• Cake
  • Frosting
  • YouTube
  • My Favorite Tools
  • Nav Social Icons

  • Skip to primary navigation
  • Skip to main content
  • Skip to primary sidebar
  • Skip to footer
  • Recipes
    • Cake
    • Cupcakes
    • Frosting
    • Ice Cream
    • Vegan
  • Cake Basics
  • Tutorials
  • Blog
  • About
  • Mobile Menu Widgets

    Connect

    Search

Sugar & Sparrow logo in script font

Sugar & Sparrow

Lifestyle and Cake from Portland Oregon

  • Cake Basics
  • Recipes
    • Cake
    • Cupcakes
    • Cookies & Bars
    • Filling
    • Frosting
    • Ice Cream
    • No-Bake
    • Small Batch
    • Vegan
  • Tutorials
  • Book
  • Blog
  • About

DIY Sprinkle Letter Cake Toppers

May 13, 2022 · In: Decorations & Garnishes, Featured, Recipes, Tutorials

There are times when a store bought cake topper gets the job done, but for all the times you want something super custom, it’s so helpful to know how to make your own. These sprinkle letter toppers are my go-to for creating celebratory cake toppers that spell out anything. Not only are they extra cute, they are so quick to whip up with a handful of things you probably already have on-hand (especially if you’re a sprinkle hoarder like me). 

diy sprinkle letter toppers

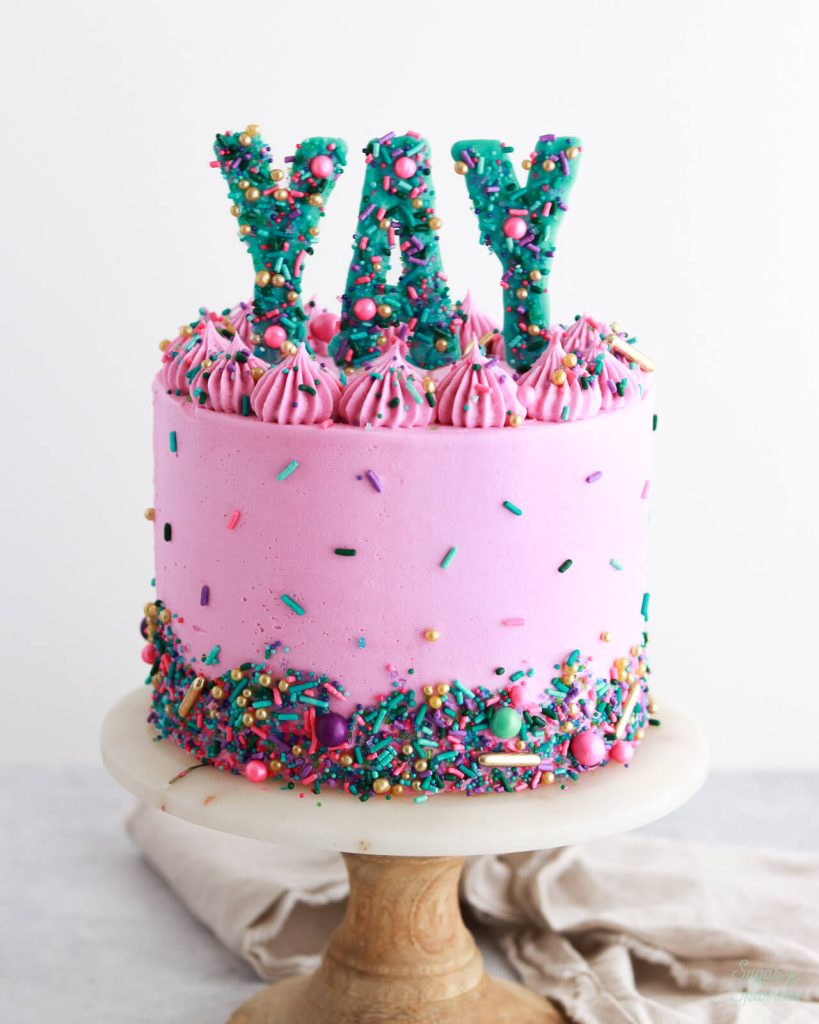
This technique you’ll be using for these sprinkle letters also works for shapes and number cake toppers, so feel free to let your imagination run wild! The main things you’ll need are Candy Melts (tempered chocolate works just as well), some pretty sprinkles, and toothpicks to turn the letters into cake toppers. I used a template that I printed out to make sure each letter was the same size and font. You could print out a template with any font you want or wing it when you pipe out your letters – the sprinkles tend to cover up any imperfections, making this technique pretty fail proof regardless. 

diy cake toppers sprinkle letters

Here’s a quick video to show you how to make these sprinkle letters before I walk you through the steps below. 

If you love creative cake tutorials like this one, be sure to check out my YouTube channel! I’ve got a growing collection of recipes, decorating tutorials, and Cake Basics over there. Hit the subscribe button on my page so you never miss a new video.
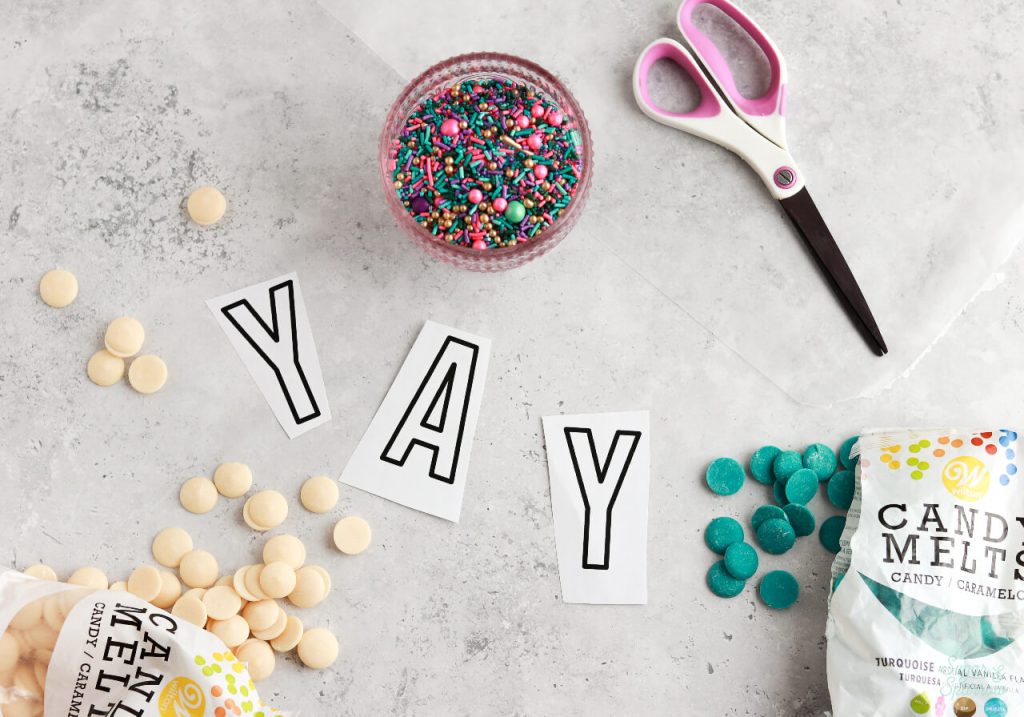
You Will Need:

  • Printed letter template (I used )
  • Wax paper
  • Scissors
  • ½ Cup Wilton Candy Melts or tempered white chocolate
  • 2 piping bags
  • Wilton Tip 3
  • Sprinkles of your choice (I used Sprinkle Pop “Treasure Hunt”)
  • Toothpicks

Step 1: Print the Letter Template

To create my template, I simply typed out the word “YAY” in a word document and experimented with fonts until I found one I loved (it’s called Bebas Neue). It took a few prints to figure out what size I wanted the letters to be, and that will vary depending on how long your word is or how tall you want the letters to end up. Once you get them the size and font you want, print the template and cut out the individual. 

how to make your own sprinkle letter toppers

If you want to replicate these exact YAY sprinkle letter toppers, here’s the template I created.

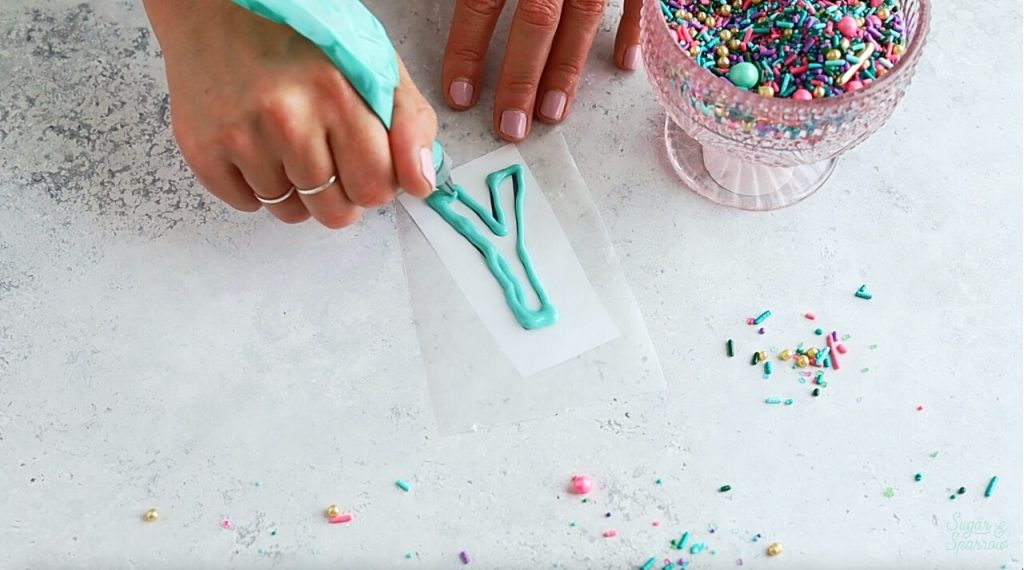
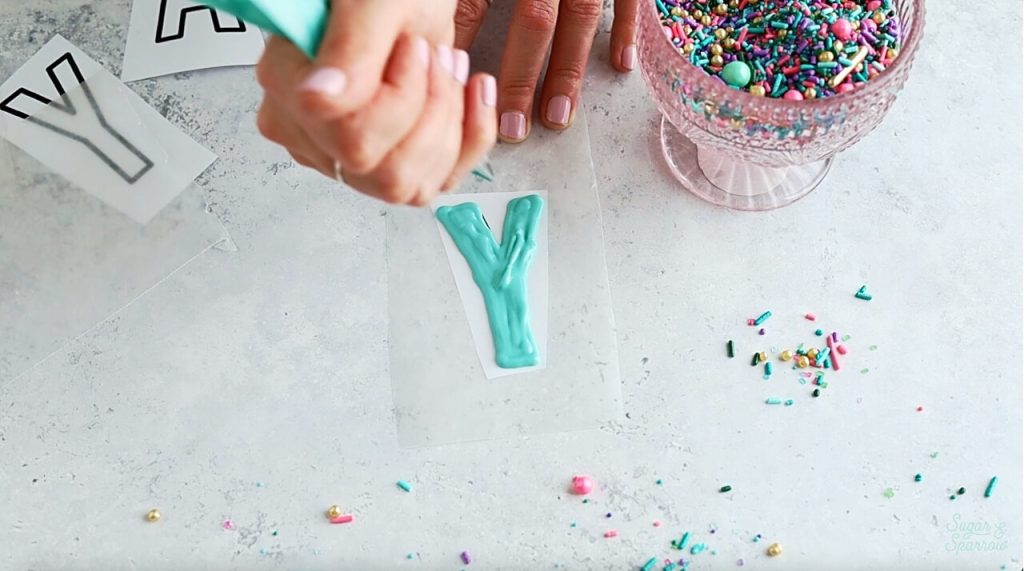
Step 2: Pipe the Letters 

Melt the Candy Melts according to the package instructions. Alternatively, you can use tempered white chocolate or Ghirardelli Melting Wafers that don’t require tempering (but taste amazing!). 

Wilton Candy Melts

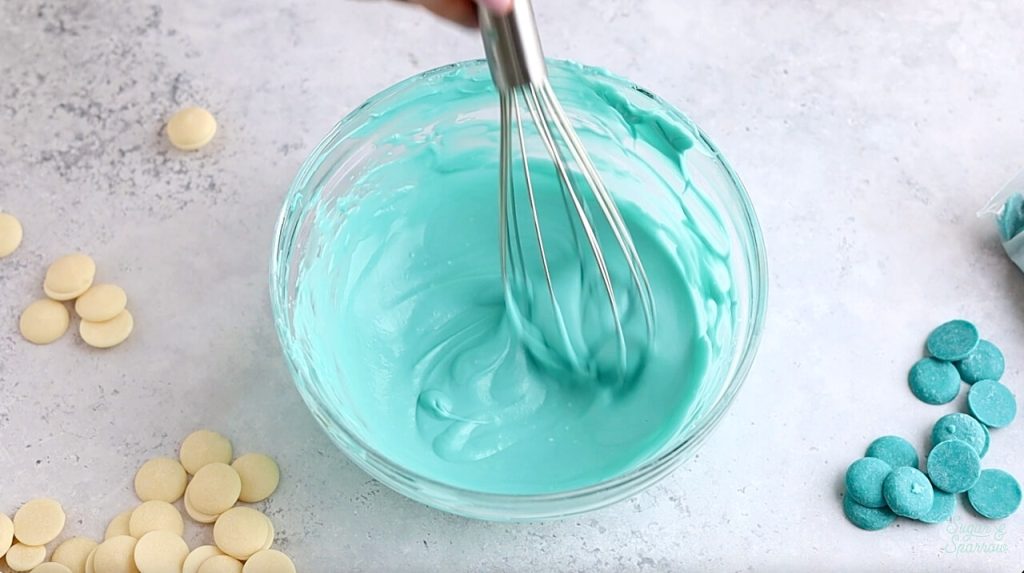
Once melted, place the Candy Melts into a piping bag fitted with Wilton Tip 3. Cut out some pieces of wax paper and place them over each individual letter, then pipe each letter onto the wax paper pieces using the template beneath as your guide. 

how to make chocolate letters
how to make letter cake toppers with chocolate

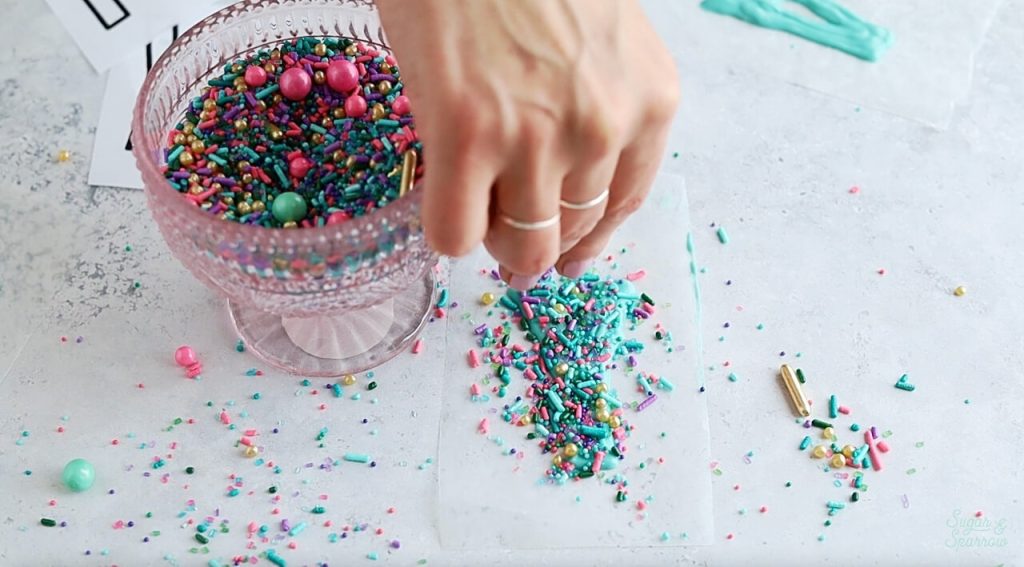
Step 3: Sprinkle the Letters

Working quickly so that the Candy Melts don’t set before this step, drop pinches of sprinkles onto the letters, then press them in gently so that the entire surface of each letter is covered with sprinkles. It’s important to use a light touch with this part because you don’t want the Candy Melts to spread and warp your letters. 

sprinkle letters cake toppers

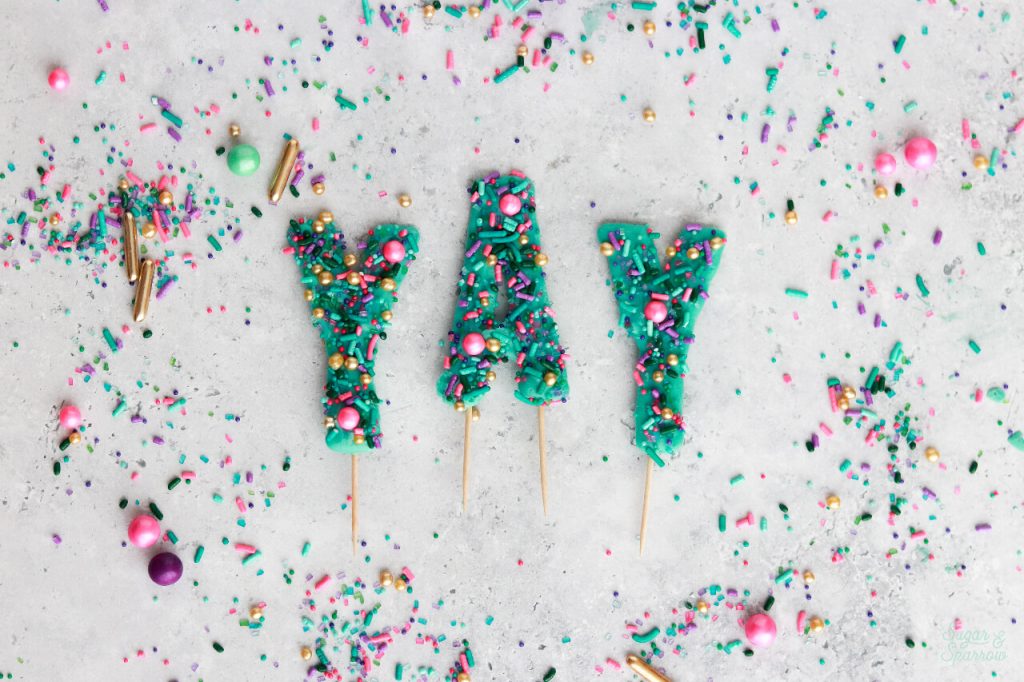
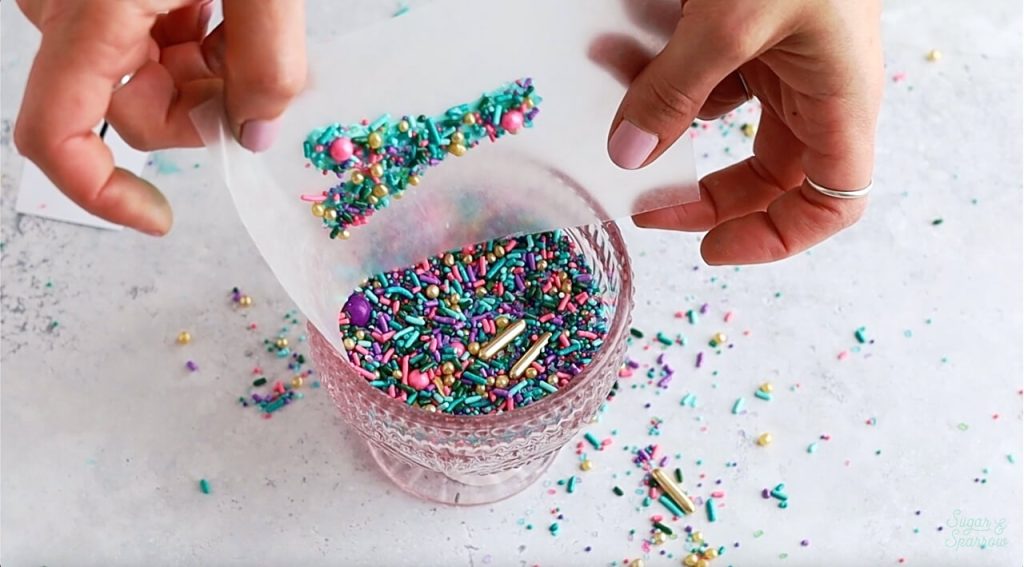
Let the sprinkled letters set up for about 20 minutes at room temperature or 10 minutes in the refrigerator. Afterwards, shake the excess sprinkles off of the letters to reveal the pretty toppers beneath. 

diy sprinkle letters tutorial

Step 4: Add the Toothpicks

Place the remaining Candy Melts (you may need to re-melt them by now) into a piping bag and snip off about ⅛ to ¼ inch opening on the end. Turn the sprinkle letters face down so that the backs are facing upward, then pipe a line of Candy Melts onto the back of each one. Add a toothpick onto the line and cover it with more melted Candy Melts. 

how to make a cake topper

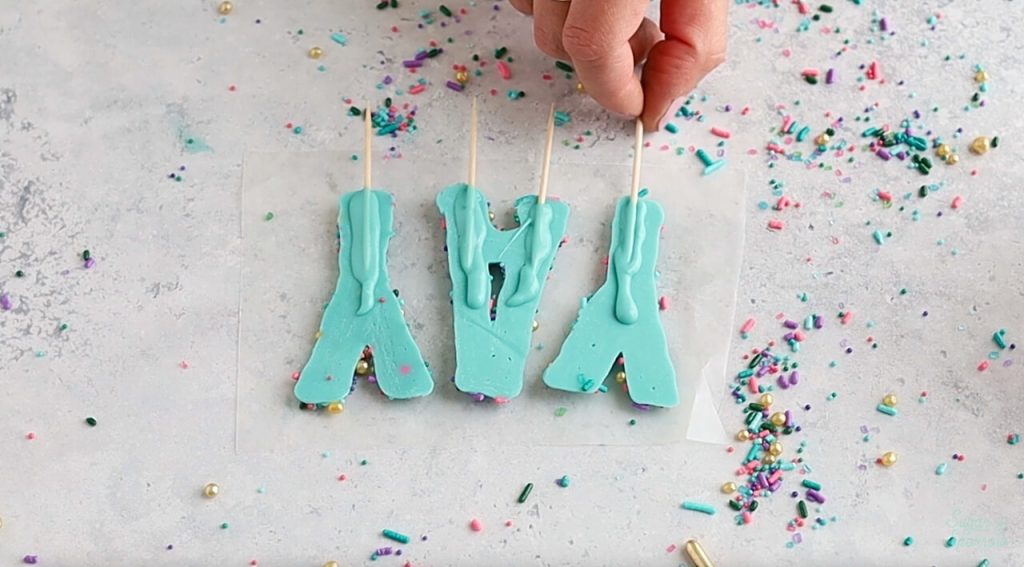
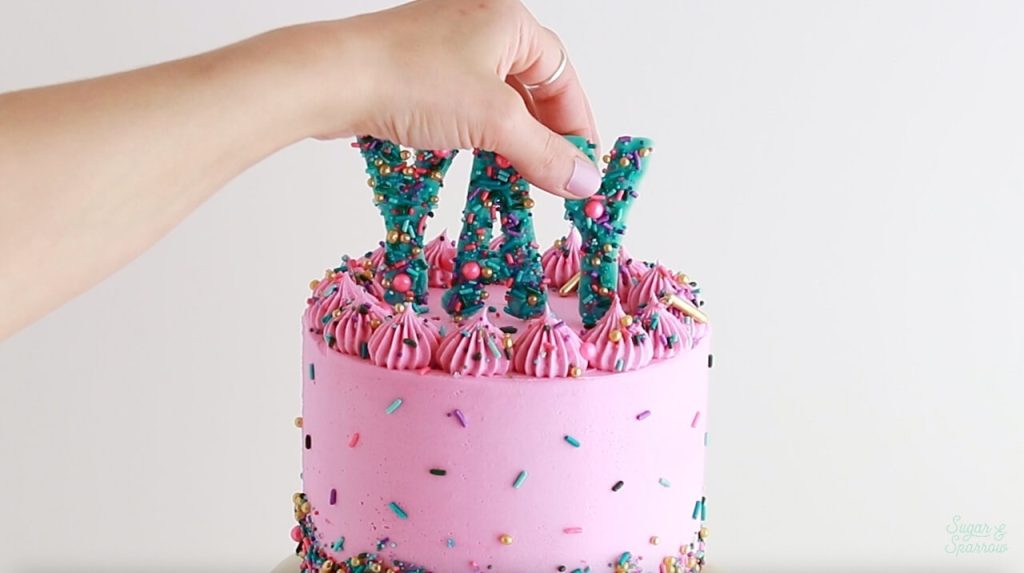
Let the toothpicks set firm for another 20 minutes at room temperature or 10 minutes in the refrigerator. Once your sprinkle letters are beautifully set and functional, you can place them on top of the cake.  

DIY cake topper ideas
how to make your own cake toppers with candy melts

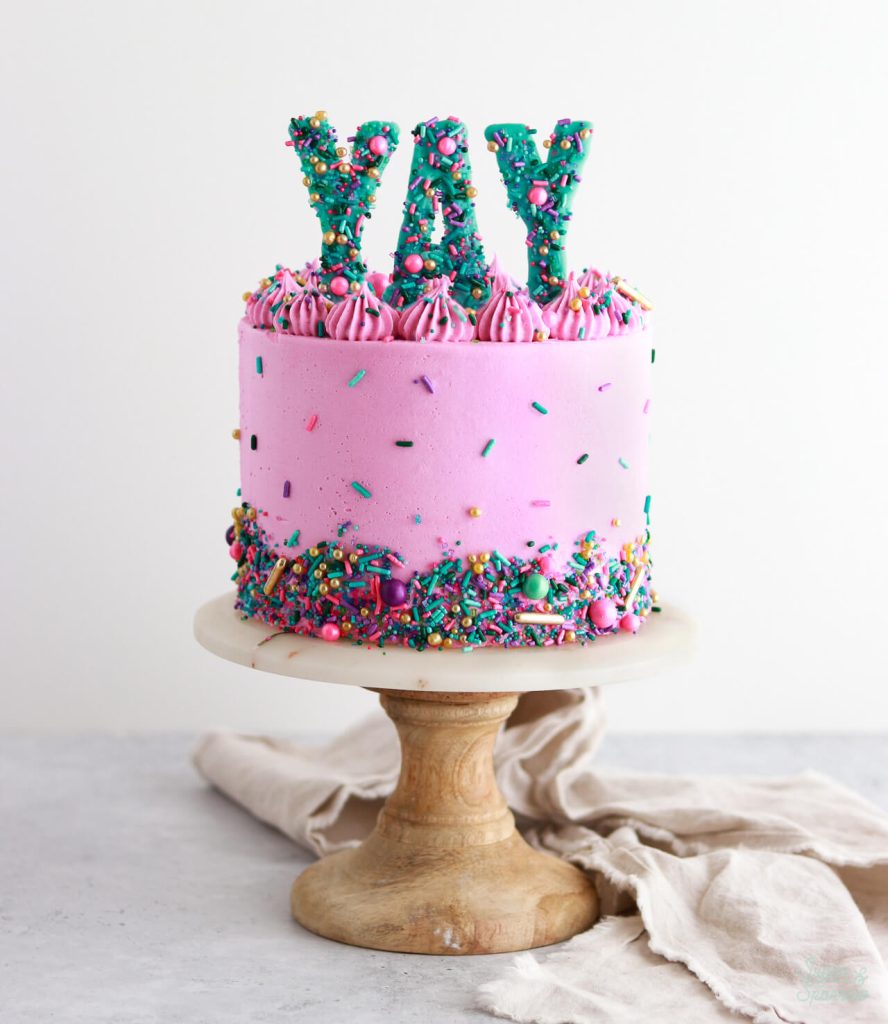
Just imagine what you can create now that you know this quick and easy cake topper technique! I’d love to know if you give it a go. Be sure to comment below to tell me about your sprinkle letter toppers or tag @sugarandsparrowco on Instagram to show me. I love to see what you make with my tutorials! 

By: Whitney · In: Decorations & Garnishes, Featured, Recipes, Tutorials · Tagged: cake decorating, cake toppers, candy melts, diy cake toppers, sprinkles, yay cake topper

you’ll also love

the best vanilla cupcakes recipeThe Perfect Vanilla Cupcake Recipe
pumpkin layer cake recipe by sugar and sparrowPerfect Pumpkin Layer Cake Recipe
oreo cookies and cream cakeOreo Layer Cake Recipe

Join the List

Stay up to date & receive the latest posts in your inbox.

Reader Interactions

Comments

  1. Abri says

    March 12, 2025 at 9:42 am

    So neat!! And if someone didn’t want to add the sprinkles on top, it’s be a great idea to print the image mirrored, that way the letters can be smooth (sort of how the backside was of the letters above). Thanks for sharing!!!

    Reply
  2. Jo says

    January 29, 2024 at 3:20 pm

    Wow, this worked great! I was trying to figure out how to make a letter and a number – royal icing, fondant, cardboard, etc. and I came upon your site and tutorial! Worked like a charm and is so much easier to handle than royal icing! Many thanks for sharing your expertise!

    Reply
  3. Sarah carrigan says

    May 27, 2022 at 7:05 pm

    Thank you for this wonderful tutorial- it saved a graduation cake I made. I make cakes for Cakes4kids, an organization that delivers cakes to kids who otherwise might not get a celebratory cake for birthdays, graduation, adoptions, etc. I am a good baker but my decorating skills are novice. I was going to make something with fondant and it did not work out. I instead made 2022 with silver and gold sprinkles (and frosted the cake using your watercolor tutorial- piping and smoothing skills still a work in progress)- and it looked so celebratory and fun! Thank you- your site and IG have been invaluable to me as I try to become a better decorator. Your recipes have been great too- I made 2 strawberry cakes and the scraps I snuck a bite of were delicious.

    Reply
    • Whitney says

      May 27, 2022 at 8:12 pm

      Yay, Sarah! I’m so glad these sprinkle toppers came to the rescue! What an amazing gift you’re giving by making cakes for those who might not otherwise get one. I love that so much. Thanks for spreading joy in the world with your cake making!!

      Reply

Leave a Reply Cancel reply

Your email address will not be published. Required fields are marked *

Recipe Rating


Next Post >

Cream Cheese Buttercream Recipe

Primary Sidebar

Welcome to Sugar & Sparrow

Welcome to Sugar & Sparrow

Helping you whip up pretty desserts with confidence and creativity. And hopefully sharing a few laughs with you along the way!

Learn More

Connect

let’s bake!

Get my very best recipes, baking tips, and decorating tutorials sent to your inbox

Featured Posts

pumpkin chocolate marble cake

Pumpkin Chocolate Marble Cake with Brown Butter Frosting

sugar and sparrow car wash cake

Theo’s Car Wash Birthday Cake

how to crumb coat a cake

How to Crumb Coat Cakes (and Why it’s Important)

Search

Archives

Follow Along

@sugarandsparrowco

BLACK FOREST CAKE 🍒 this is my favorite thing to m BLACK FOREST CAKE 🍒 this is my favorite thing to make during cherry season! My version is decadent chocolate cake soaked with homemade cherry syrup, fresh cherry filling, and whipped cream frosting. Top it with a chocolate ganache drip if you want to go the extra mile! 

Full recipe + decorating tutorial is linked in my bio + at https://sugarandsparrow.com/black-forest-cake-recipe/

PS I’m working on a sheet cake version of this recipe that’s even easier! Stay tuned.

#blackforestcake #cherrycake #chocolatecake #cherries #cakedecorating
LAVENDER BUTTERCREAM (recipe below) 💜 steeping dri LAVENDER BUTTERCREAM (recipe below) 💜 steeping dried culinary lavender in simmered milk is the KEY to the most amazing, natural, perfectly balanced lavender flavor in this frosting! It’s the ideal consistency for cake decorating + tastes incredible with my blackberry lavender cake, lemon lavender cake, and london fog cake (all of those recipes are on my blog) 🙌🏽 

Full recipe and cake pairing suggestions at https://sugarandsparrow.com/lavender-buttercream/ 💜✨⁣⁣

Lavender Buttercream ⁣
Yield: 2.5 Cups⁣⁣
⁣⁣
Ingredients:⁣⁣
1/4 Cup whole milk⁣⁣
1 Tbsp dried culinary lavender⁣⁣
1 Cup (227g) unsalted butter, room temperature⁣⁣
3 1/2 Cups (420g) powdered sugar⁣⁣
1 tsp pure vanilla extract⁣⁣
1/4 tsp salt, or to taste⁣⁣
2-4 drops purple food coloring* optional⁣⁣
⁣⁣
Instructions:⁣⁣
1. Bring the milk to a simmer + stir in the dried culinary lavender. Remove from heat and steep the lavender milk for 15 minutes, then strain the out buds over a small bowl. Allow the lavender milk to cool completely.⁣⁣
2. Beat the butter until it’s creamy and light in color, about 5 minutes. With the mixer on low speed, add the powdered sugar a few cups at a time, scraping down after each addition. Add the lavender milk, vanilla, salt, and food coloring (if using) and continue mixing on low speed until fully combined and smooth.⁣⁣
⁣⁣
#lavendar #lavendercake #buttercream #frosting #purplecake
CHOCOLATE CHIP COOKIE CAKE 🍪 for those whofor your CHOCOLATE CHIP COOKIE CAKE 🍪 for those whofor your loved ones who prefer a thick, bakery-style chocolate chip cookie over cake, this recipe is my FAVE! You can serve it warm and gooey or let it settle into a thick and fudgy cookie cake that you can decorate as a party cake 🥳

Get the full recipe link (with buttercream border + decorating tips) in my bio or at https://sugarandsparrow.com/chocolate-chip-cookie-cake/ 

CHOCOLATE CHIP COOKIE CAKE 
Serves: 12 

1/2 Cup (113g) unsalted butter, melted
1/2 Cup (100g) packed brown sugar
1/3 Cup (67g) granulated sugar
1 large egg
1 large egg yolk
2 Tsp pure vanilla extract
1/2 tsp cornstarch
1/2 tsp baking soda
1/4 tsp baking powder
1/4 tsp salt
1 1/2 Cups (199g) all purpose flour
1 Cup (175g) semi-sweet chocolate chips

1. Preheat the oven to 350ºF (177ºC). Grease and line an 8-inch or 9-inch round baking pan.
2. Melt the butter and set aside to cool slightly for 5-10 minutes. 
3. In a large bowl, add the brown sugar, granulated sugar, and melted butter. Whisk until uniform. Add the egg, egg yolk, and vanilla, then continue whisking until uniform. Whisk in the cornstarch, baking soda, baking powder, and salt.
4. Add the flour and use a silicone spatula to fold it in until smooth cookie dough forms. Reserve about 1/4 Cup of the chocolate chips and set them aside, then pour the remaining chocolate chips into the cookie dough and fold until evenly dispersed.
5. Press the dough into the prepared pan in an even layer. Sprinkle the reserved chocolate chips on top and press them in, then bake for 17-22 minutes, until evenly puffed and the edges are lightly golden. It might seem soft in the middle but don’t be tempted to over-bake! It will continue to bake in the pan as it cools.
6. Cool the cookie cake in the pan for about 30 minutes before transferring to a wire rack to cool completely to room temperature (if you’re planning on decorating with frosting). If you decide not to add the buttercream feel free to enjoy it warm.

#cookiecake #chocolatechipcookies #birthdaycake #partycake #cookie
BLACKBERRY LAVENDER CAKE 💜 Layers of soft vanilla BLACKBERRY LAVENDER CAKE 💜 Layers of soft vanilla cake with swirls of blackberry puree baked in, homemade blackberry filling, and perfectly flavored lavender buttercream. This flavor combination is STUNNING and makes the perfect whimsical cake for a garden party or any Summer gathering!

Full recipe link is in my bio or find it at https://sugarandsparrow.com/blackberry-lavender-cake/ 

#blackberrylavender #partycake #blackberry #lavendercake #lavender
POV: you ask for a construction truck birthday cak POV: you ask for a construction truck birthday cake (and I’m your mom) 🚜🥳 I took inspiration from @beyondfrosting for this design to celebrate my littlest turning three! Details: 

👩🏽‍🍳 Cake Recipe: my easy chocolate sheet cake (you’ll find it on my blog!) 
🤎 Dirt: Oreo cookie crumbs
🚜 Construction trucks + cones: @amazon 
🥳 Sprinkles: @fancysprinkles 
✨ Piping tip for the border: @wiltoncakes 4B 

#birthdaycake #partycake #constructiontruckcake #cakeideas #constructioncake

Footer

On the Blog

  • Cake Basics
  • Recipes
  • Tutorials

Info

  • About
  • Privacy Policy & Disclosure

stay in the know

Copyright © 2026 · Theme by Sugar & Sparrow