• Cake
  • Frosting
  • YouTube
  • My Favorite Tools
  • Nav Social Icons

  • Skip to primary navigation
  • Skip to main content
  • Skip to primary sidebar
  • Skip to footer
  • Recipes
    • Cake
    • Cupcakes
    • Frosting
    • Ice Cream
    • Vegan
  • Cake Basics
  • Tutorials
  • Blog
  • About
  • Mobile Menu Widgets

    Connect

    Search

Sugar & Sparrow logo in script font

Sugar & Sparrow

Lifestyle and Cake from Portland Oregon

  • Cake Basics
  • Recipes
    • Cake
    • Cupcakes
    • Cookies & Bars
    • Filling
    • Frosting
    • Ice Cream
    • No-Bake
    • Small Batch
    • Vegan
  • Tutorials
  • Book
  • Blog
  • About

No-Churn Samoa Ice Cream

July 13, 2023 · In: Featured, Ice Cream, Recipes, Seasonal, Summer

Jump to Recipe

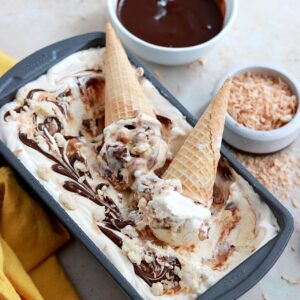
Whenever Girl Scout cookie season rolls around, I have to have the Samoas (aka Caramel deLites). The toasted coconut covered in chewy caramel, the chocolate drizzle, the shortbread cookie crust – these little cookies are everything wonderful. So when Amoretti sent me their Toasted Coconut Extract and told me to get creative with recipe writing, Samoas were quick to come to mind. And instead of trying to make a copycat Samoa recipe, I decided to transform everything I love about them into a no-churn ice cream recipe that’s perfect for Summer. Spoiler alert: it was all that I hoped it would be and I couldn’t stop eating it. 

no churn samoa ice cream recipe by sugar and sparrow

This no-churn Samoa ice cream starts with the most delicious toasted coconut ice cream base. It’s so easy to make – just whip up some heavy whipping cream, sweetened condensed milk, Amoretti Toasted Coconut Extract, and a little vanilla extract for good measure. I’m pretty blown away at how the extract adds the toastiness of toasted coconut and keeps the coconut flavor super authentic. After making the toasted coconut ice cream base, I gently folded in some caramel sauce ribbons and took things a step beyond. This made the perfect ice cream base for all the Samoa toppings I added in next. 

samoa girl scout cookie ice cream recipe

To capture the essence of Samoa cookies without actually adding them into the ice cream, I started by mixing together equal parts caramel sauce and toasted coconut. This made gooey toasted coconut caramel clusters that taste just like the Samoa cookie topping. I swirled those into the ice cream along with hot fudge sauce and baked shortbread crumbles. After freezing it all together for 6 hours, this ice cream is the perfect creamy consistency, packed with toppings in every bite, and tastes JUST like Samoa cookies in ice cream form. I am so pleased with this recipe! 

no churn coconut caramel chocolate shortbread ice cream
samoa cookie ice cream recipe

The best part about this ice cream recipe is you can make it any time you’re craving Samoas during the Girl Scout Cookie off-season (like now!). I will warn you though: this ice cream is completely addicting. I found myself thinking about it so much that I had to have a bowl of it every night until it was gone. The perfect toasted coconut ice cream base swirled with caramel, those gooey toasted coconut caramel clusters, the decadent hot fudge ribbons, the crunchy shortbread crumbles – it’s all so perfect and I hope you love this recipe as much as I do! 

toasted coconut caramel chocolate ice cream recipe

The Amoretti Toasted Coconut Extract really gives this ice cream base the perfect flavor. Be sure to use my discount code: SPARROWCOFREESHIP for free shipping when you shop!

no churn Samoa cookie ice cream recipe

No-Churn Samoa Ice Cream

No-churn toasted coconut ice cream base swirled with caramel ribbons, gooey toasted coconut-caramel clusters, decadent hot fudge, and crunchy shortbread crumbles. This tastes just like Samoa cookies in ice cream form!
Print Recipe Pin Recipe
Prep Time:45 minutes mins
Cook Time:1 hour hr
Freeze Time:6 hours hrs
Servings: 6 Cups (12 servings)

Ingredients

Baked Shortbread Crumbles

  • 3/4 Cups (90g) cake flour
  • 2 1/2 Tbsp (32g) granulated sugar
  • 1/8 tsp baking powder
  • 1/4 tsp salt
  • 3 Tbsp (42g) unsalted butter, melted
  • 1/2 tsp pure vanilla extract

Caramel Sauce

  • 1 Cup (200g) granulated sugar
  • 6 Tbsp (85g) unsalted butter, room temperature, cut into cubes
  • 1/2 Cup (120ml) heavy whipping cream, room temperature
  • 1/2 tsp salt

Toasted Coconut Ice Cream

  • 2 Cups (240ml) heavy whipping cream, cold
  • 14 Oz sweetened condensed milk
  • 1 tsp Amoretti toasted coconut extract or coconut extract
  • 1 tsp pure vanilla extract

Additional Add-Ins

  • 1/2 Cup sweetened shredded coconut, toasted*
  • 1/2 Cup hot fudge sauce**

Instructions

Bake the Shortbread Crumbles

  • Preheat the oven to 250°F/121ºC and line a baking sheet with parchment paper. In a medium bowl, whisk together the cake flour, sugar, baking powder, and salt.
  • Add the melted butter and vanilla extract. Mix with a rubber spatula until the mixture begins to form small clusters, then press the ingredients together with your hands to form even more clusters. Spread the clusters onto the prepared baking sheet and bake for 30 minutes. Cool the crumbs completely before using in the ice cream assembly.

Make the Caramel Sauce

  • Have everything pre-measured and ready to go (you’ll be constantly stirring). Place the sugar in a medium saucepan over medium-high heat and stir constantly with a wooden spoon, until it melts into an amber-colored liquid and no sugar clumps remain, 5-6 minutes. 
  • Reduce the heat to medium. Carefully add the butter (it will bubble up when you do) and use a whisk to combine it with the sugar mixture until the butter is fully melted and incorporated, 2-3 minutes. 
  • Add the heavy whipping cream in a steady stream while whisking. As soon as the cream is incorporated, let the caramel boil for a full minute before removing it from the heat and stirring in the salt. 
  • Let the caramel cool to room temperature before using it in the ice cream assembly.

Prep the Additional Add-Ins

  • In a small bowl, mix 1/2 Cup of the caramel sauce with the toasted coconut and set aside. Place the hot fudge sauce into a piping bag and snip off the end.

Make the Toasted Coconut Ice Cream

  • Place a large metal bowl into the refrigerator and a loaf pan into the freezer to chill for at least 15-20 minutes before you begin.
  • Remove the large chilled metal bowl from the refrigerator and add the heavy whipping cream, sweetened condensed milk, Amoretti toasted coconut extract, and vanilla extract. Beat with a hand mixer (or using the whisk attachment on your stand mixer) on high speed until thick and creamy, about 7 minutes.
  • Using a rubber spatula, gently fold in the remaining caramel sauce to create ribbons in the toasted coconut ice cream mixture.
  • Remove the chilled loaf pan from the freezer and add 1/3 of the ice cream mixture into it. Smooth it down with a rubber spatula and add 1/3 of the caramel-toasted coconut mixture by the spoonful on top. Pipe on 1/3 of the hot fudge sauce and sprinkle a few handfuls of shortbread crumbles on top. Use a skewer to marble the toppings into the ice cream. Repeat twice more.
  • Cover the loaf pan with a piece of aluminum foil and freeze for at least 6 hours, after which the ice cream should be semi-firm and ready to enjoy!

Notes

*To toast the coconut: preheat the oven to 325F. Spread sweetened shredded coconut onto a parchment lined cookie sheet and bake for 5-10 minutes, shaking the pan halfway through. 
**You can use store bought hot fudge sauce (I use Hersheys brand) or use a homemade recipe of your choice. 
Make Ahead Tips:
  1. You can bake the shortbread crumbles ahead and store them in an airtight container in the refrigerator for up to one week. 
  2. You can make the caramel sauce ahead and store in an airtight container in the refrigerator for up to two weeks. When you’re ready to use it, reheat it in the microwave in 15 second intervals until it reaches room temperature. 
Storage Tips: This ice cream is best stored in an airtight container in the freezer. It will last for several months (if you can make it last that long). 

Disclaimer: I was compensated by Amoretti for my work of creating this recipe, styling, filming, photographing, and writing about their products. As always, all opinions are honest and my own. Thank you for supporting brands that support Sugar & Sparrow.

By: Whitney · In: Featured, Ice Cream, Recipes, Seasonal, Summer · Tagged: amoretti, girl scout cookies, no churn samoa ice cream, samoa, samoa ice cream, samoas, toasted coconut, toasted coconut extract

you’ll also love

Dunkaroos layer cake with sprinkle buttercream recipeDunkaroos Layer Cake Recipe (feat. Amoretti)
birthday ice cream cake recipe with cake batter ice cream, brownies, and hot fudgeThe Ultimate Birthday Ice Cream Cake
cotton candy layer cake recipeWhimsical Cotton Candy Cake Recipe

Join the List

Stay up to date & receive the latest posts in your inbox.

Reader Interactions

Leave a Reply Cancel reply

Your email address will not be published. Required fields are marked *

Recipe Rating


Next Post >

Toasted Coconut Cupcakes Recipe

Primary Sidebar

Welcome to Sugar & Sparrow

Welcome to Sugar & Sparrow

Helping you whip up pretty desserts with confidence and creativity. And hopefully sharing a few laughs with you along the way!

Learn More

Connect

let’s bake!

Get my very best recipes, baking tips, and decorating tutorials sent to your inbox

Featured Posts

oreo cookies and cream cake

Oreo Layer Cake Recipe

baymax birthday cake tutorial

Baymax Birthday Cake

sugar and sparrow small batch strawberry cake

Small Batch Strawberry Cake

Search

Archives

Follow Along

@sugarandsparrowco

STRAWBERRY CUPCAKES 🍓based on my beloved strawb STRAWBERRY CUPCAKES 🍓based on my beloved strawberry layer cake recipe, this cupcake version is just as moist yet fluffy and bursting with natural strawberry flavor! Between the mix of fresh strawberries in the cupcakes + freeze-dried strawberries in the frosting, the flavor is out of this world 🚀

Full recipe link in my bio (with strawberry buttercream) + at https://sugarandsparrow.com/strawberry-cupcakes/

STRAWBERRY CUPCAKES
Yield: 14 cupcakes

INGREDIENTS:
5 oz (143g) fresh or frozen strawberries
1/3 Cup (80ml) whole milk, room temp
1 1/2 Cups (158g) sifted cake flour
1 tsp baking powder
1/4 tsp baking soda
1/2 tsp salt
6 Tbsp (85g) unsalted butter, room temp
1 Cup (200g) granulated sugar
2 large eggs, room temp
3 Tbsp (45g) sour cream, room temp
1 tsp vanilla extract
1 drop pink food coloring (optional)

INSTRUCTIONS: 
1. Puree the strawberries using a food processor (you’ll have about 1/2 cup of puree), then place into a saucepan over medium-low heat. Bring to a simmer, then cook for 10-15 min, stirring occasionally, until you have 1/4 cup. Refrigerate until room temp.
2. Preheat oven to 350ºF (177ºC) and line a standard cupcake pan with liners.
3. Whisk together the sifted cake flour, baking powder, baking soda, and salt and set aside.
4. In a stand mixer w/ paddle attachment (or hand mixer + large bowl), whip the butter on high for 2 min. Add sugar and beat for 2 min, until light and fluffy. Turn the mixer to low and add the eggs one at a time, then add the vanilla and sour cream, turn the mixer to high and beat for 1 min. Meanwhile, whisk together the strawberry puree, whole milk, and food coloring (if using).
5. Turn the mixer off and add all of the dry ingredients at once. Mix on low until just combined, then add the strawberry milk mixture until just combined, about 30 seconds.
6. Fill the cupcake liners 2/3 full and bake for 14-18 minutes. Cool completely before topping with strawberry buttercream (full recipe linked above). 

#strawberrycupcakes #strawberrycake #pinkcupcakes #strawberry #cupcakes
COFFEE BUTTERCREAM (recipe below)☕️ this frost COFFEE BUTTERCREAM (recipe below)☕️ this frosting has AMAZING coffee flavor, is so easy to decorate cakes with, and pairs beautifully with so many flavors (chocolate, vanilla, or any cake flavor you’d want to turn into a latte). 

All my cake pairing suggestions are linked in my bio or at https://sugarandsparrow.com/coffee-buttercream-recipe/ 

COFFEE BUTTERCREAM⁣
Yield: 2.5 Cups⁣

INGREDIENTS⁣
1 1/2 tsp instant coffee or espresso powder⁣
1 1/2 Tbsp whole milk, room temperature⁣
1 Cup (226g) unsalted butter, room temperature⁣
3 1/2 Cups (420g) powdered sugar⁣
2 tsp pure vanilla extract⁣
Pinch of salt⁣

INSTRUCTIONS⁣
1. Combine the instant espresso/coffee with the whole milk and set aside. In the bowl of a stand mixer, beat the butter on high until creamy and smooth (about 5 minutes), scraping down the bowl and paddle a few times in between.⁣
2. Turn the mixer to low and add the powdered sugar a few cups at a time, scraping down the bowl and paddle between intervals. Add the vanilla, the coffee/espresso milk mixture, and salt. Mix on low until fully incorporated, about one minute.⁣

#coffeebuttercream #buttercream #frosting #coffeecake
HUMMINGBIRD CAKE 🤎 after weeks of testing this HUMMINGBIRD CAKE 🤎 after weeks of testing this recipe I found that the KEY to taking this already delicious cake to the next level is: roasting the bananas!! It’s an optional step in this recipe BUT it adds unparalleled caramel notes and noticeable richness to the flavor 🙌🏼 Along with the crushed pineapple, toasted pecans, and tangy cream cheese buttercream, this cake is NEXT LEVEL delicious, ultra-moist, melts in your mouth, and will have everyone asking for the recipe. 

Full recipe (with cream cheese frosting) linked in my bio + at https://sugarandsparrow.com/hummingbird-cake-recipe/ 

#hummingbirdcake #creamcheesefrosting #bananacake #cakedecorating #cakerecipe
OREO CUPCAKES 🖤 (recipe below) I made these for OREO CUPCAKES 🖤 (recipe below) I made these for a fundraiser at @vancity.youth last weekend and was reminded of how delicious this recipe is! There’s black cocoa powder in the cupcake batter to give them the PERFECT Oreo cookie flavor profile + the most delicious cookies and cream buttercream I’d eat all on its own. 
 
Full recipe at https://sugarandsparrow.com/oreo-cupcakes-recipe/ 
 
OREO CUPCAKES 
1 Cup (132g) all purpose flour 
3/4 Cup (150g) granulated sugar 
1/3 Cup (38g) black cocoa powder 
1 tsp baking soda 
1/2 tsp baking powder 
1/4 tsp salt 
1/4 Cup (60ml) vegetable oil 
1 large egg, room temp 
1/2 tsp pure vanilla extract 
1/2 Cup (120ml) buttermilk, room temp 
1/2 Cup (120ml) hot coffee or hot water 
 
1. Preheat the oven to 350ºF/177ºC and line a cupcake pan with 12-15 liners. 
2. In a large bowl, whisk all of the dry ingredients together. Add the vegetable oil, eggs, vanilla, and buttermilk and whisk to combine. Whisk in the hot coffee (or hot water). 
3. Pour the batter into the prepared cupcake liners and bake for 14-18 minutes. 
 
OREO BUTTERCREAM 
1 Cup (226g) unsalted butter, room temperature 
3 Cups (360g) powdered sugar 
2 tsp pure vanilla extract 
2 Tbsp whole milk, room temperature 
pinch of salt, or to taste 
9 Oreo cookies (96g), finely ground 
 
1. Using a hand mixer or stand mixer, cream the butter on medium-high speed until it’s creamy and pale, 5 min. 
2. Add the powdered sugar a few cups at a time, mixing on low speed and scraping down bowl and paddle in between intervals. Keep the mixer on low and add the vanilla, milk, and salt. Mix until fully incorporated and uniform, 1-2 min. 
4. Mix in the Oreo cookie crumbs on low speed. 
 
#oreo #oreocupcakes #cookiesandcream #chocolatecupcakes #cupcakes
RASPBERRY CAKE FILLING (recipe below) ♥️ this RASPBERRY CAKE FILLING (recipe below) ♥️ this perfectly sweet/tart raspberry cake filling is beautifully thick, seedless, and so rewarding to make from scratch! It takes just a handful of ingredients and can be made with fresh OR frozen raspberries 🙌🏼 

Get the full recipe + cake pairing suggestions at the link in my bio or at https://sugarandsparrow.com/seedless-raspberry-cake-filling/

INGREDIENTS:
2 1/2 Cups (10oz, 315g) fresh or frozen raspberries
1/2 Cup (100g) granulated sugar
1 Tbsp lemon juice
1 tsp lemon zest
1 1/2 Tbsp (12g) cornstarch
1 1/2 Tbsp (22ml) water

INSTRUCTIONS: 
1. In a saucepan set over medium heat, add the raspberries, granulated sugar, lemon juice, and lemon zest. Cook until the mixture begins to boil, stirring occasionally. 
2. Once boiling, lower the heat and simmer for 10-15 minutes while you continue stirring occasionally. Then, remove from heat and use a fine mesh sieve to strain out the seeds over a medium bowl. After straining, you’ll be left with about 1/4 Cup of seedy pulp.
3. In a small separate bowl, combine the cornstarch and water until uniform. Return the strained raspberry filling to the saucepan (wipe it free of any remaining seeds if needed) and add the cornstarch/water mixture. Cook over medium heat until boiling, stirring constantly, then reduce to a simmer and cook for 1-3 minutes, until the filling has thickened slightly, is no longer cloudy, and coats the back of the spatula.
4. Pour into an airtight container and refrigerate for at least 4 hours and up to 1 week. It will be jello-like once set but after stirring it will become a thick, jammy consistency that’s perfect to use as a cake or cupcake filling!

#raspberrycake #cakefilling #cakedecorating #raspberries #baking

Footer

On the Blog

  • Cake Basics
  • Recipes
  • Tutorials

Info

  • About
  • Privacy Policy & Disclosure

stay in the know

Copyright © 2026 · Theme by Sugar & Sparrow