• Cake
  • Frosting
  • YouTube
  • My Favorite Tools
  • Nav Social Icons

  • Skip to primary navigation
  • Skip to main content
  • Skip to primary sidebar
  • Skip to footer
  • Recipes
    • Cake
    • Cupcakes
    • Frosting
    • Ice Cream
    • Vegan
  • Cake Basics
  • Tutorials
  • Blog
  • About
  • Mobile Menu Widgets

    Connect

    Search

Sugar & Sparrow logo in script font

Sugar & Sparrow

Lifestyle and Cake from Portland Oregon

  • Cake Basics
  • Recipes
    • Cake
    • Cupcakes
    • Cookies & Bars
    • Filling
    • Frosting
    • Ice Cream
    • No-Bake
    • Small Batch
    • Vegan
  • Tutorials
  • Book
  • Blog
  • About

No-Churn Samoa Ice Cream

July 13, 2023 · In: Featured, Ice Cream, Recipes, Seasonal, Summer

Jump to Recipe

Whenever Girl Scout cookie season rolls around, I have to have the Samoas (aka Caramel deLites). The toasted coconut covered in chewy caramel, the chocolate drizzle, the shortbread cookie crust – these little cookies are everything wonderful. So when Amoretti sent me their Toasted Coconut Extract and told me to get creative with recipe writing, Samoas were quick to come to mind. And instead of trying to make a copycat Samoa recipe, I decided to transform everything I love about them into a no-churn ice cream recipe that’s perfect for Summer. Spoiler alert: it was all that I hoped it would be and I couldn’t stop eating it. 

no churn samoa ice cream recipe by sugar and sparrow

This no-churn Samoa ice cream starts with the most delicious toasted coconut ice cream base. It’s so easy to make – just whip up some heavy whipping cream, sweetened condensed milk, Amoretti Toasted Coconut Extract, and a little vanilla extract for good measure. I’m pretty blown away at how the extract adds the toastiness of toasted coconut and keeps the coconut flavor super authentic. After making the toasted coconut ice cream base, I gently folded in some caramel sauce ribbons and took things a step beyond. This made the perfect ice cream base for all the Samoa toppings I added in next. 

samoa girl scout cookie ice cream recipe

To capture the essence of Samoa cookies without actually adding them into the ice cream, I started by mixing together equal parts caramel sauce and toasted coconut. This made gooey toasted coconut caramel clusters that taste just like the Samoa cookie topping. I swirled those into the ice cream along with hot fudge sauce and baked shortbread crumbles. After freezing it all together for 6 hours, this ice cream is the perfect creamy consistency, packed with toppings in every bite, and tastes JUST like Samoa cookies in ice cream form. I am so pleased with this recipe! 

no churn coconut caramel chocolate shortbread ice cream
samoa cookie ice cream recipe

The best part about this ice cream recipe is you can make it any time you’re craving Samoas during the Girl Scout Cookie off-season (like now!). I will warn you though: this ice cream is completely addicting. I found myself thinking about it so much that I had to have a bowl of it every night until it was gone. The perfect toasted coconut ice cream base swirled with caramel, those gooey toasted coconut caramel clusters, the decadent hot fudge ribbons, the crunchy shortbread crumbles – it’s all so perfect and I hope you love this recipe as much as I do! 

toasted coconut caramel chocolate ice cream recipe

The Amoretti Toasted Coconut Extract really gives this ice cream base the perfect flavor. Be sure to use my discount code: SPARROWCOFREESHIP for free shipping when you shop!
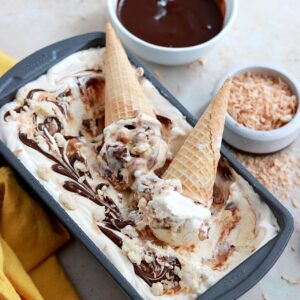
no churn Samoa cookie ice cream recipe

No-Churn Samoa Ice Cream

No-churn toasted coconut ice cream base swirled with caramel ribbons, gooey toasted coconut-caramel clusters, decadent hot fudge, and crunchy shortbread crumbles. This tastes just like Samoa cookies in ice cream form!
Print Recipe Pin Recipe
Prep Time:45 minutes mins
Cook Time:1 hour hr
Freeze Time:6 hours hrs
Servings: 6 Cups (12 servings)

Ingredients

Baked Shortbread Crumbles

  • 3/4 Cups (90g) cake flour
  • 2 1/2 Tbsp (32g) granulated sugar
  • 1/8 tsp baking powder
  • 1/4 tsp salt
  • 3 Tbsp (42g) unsalted butter, melted
  • 1/2 tsp pure vanilla extract

Caramel Sauce

  • 1 Cup (200g) granulated sugar
  • 6 Tbsp (85g) unsalted butter, room temperature, cut into cubes
  • 1/2 Cup (120ml) heavy whipping cream, room temperature
  • 1/2 tsp salt

Toasted Coconut Ice Cream

  • 2 Cups (240ml) heavy whipping cream, cold
  • 14 Oz sweetened condensed milk
  • 1 tsp Amoretti toasted coconut extract or coconut extract
  • 1 tsp pure vanilla extract

Additional Add-Ins

  • 1/2 Cup sweetened shredded coconut, toasted*
  • 1/2 Cup hot fudge sauce**

Instructions

Bake the Shortbread Crumbles

  • Preheat the oven to 250°F/121ºC and line a baking sheet with parchment paper. In a medium bowl, whisk together the cake flour, sugar, baking powder, and salt.
  • Add the melted butter and vanilla extract. Mix with a rubber spatula until the mixture begins to form small clusters, then press the ingredients together with your hands to form even more clusters. Spread the clusters onto the prepared baking sheet and bake for 30 minutes. Cool the crumbs completely before using in the ice cream assembly.

Make the Caramel Sauce

  • Have everything pre-measured and ready to go (you’ll be constantly stirring). Place the sugar in a medium saucepan over medium-high heat and stir constantly with a wooden spoon, until it melts into an amber-colored liquid and no sugar clumps remain, 5-6 minutes. 
  • Reduce the heat to medium. Carefully add the butter (it will bubble up when you do) and use a whisk to combine it with the sugar mixture until the butter is fully melted and incorporated, 2-3 minutes. 
  • Add the heavy whipping cream in a steady stream while whisking. As soon as the cream is incorporated, let the caramel boil for a full minute before removing it from the heat and stirring in the salt. 
  • Let the caramel cool to room temperature before using it in the ice cream assembly.

Prep the Additional Add-Ins

  • In a small bowl, mix 1/2 Cup of the caramel sauce with the toasted coconut and set aside. Place the hot fudge sauce into a piping bag and snip off the end.

Make the Toasted Coconut Ice Cream

  • Place a large metal bowl into the refrigerator and a loaf pan into the freezer to chill for at least 15-20 minutes before you begin.
  • Remove the large chilled metal bowl from the refrigerator and add the heavy whipping cream, sweetened condensed milk, Amoretti toasted coconut extract, and vanilla extract. Beat with a hand mixer (or using the whisk attachment on your stand mixer) on high speed until thick and creamy, about 7 minutes.
  • Using a rubber spatula, gently fold in the remaining caramel sauce to create ribbons in the toasted coconut ice cream mixture.
  • Remove the chilled loaf pan from the freezer and add 1/3 of the ice cream mixture into it. Smooth it down with a rubber spatula and add 1/3 of the caramel-toasted coconut mixture by the spoonful on top. Pipe on 1/3 of the hot fudge sauce and sprinkle a few handfuls of shortbread crumbles on top. Use a skewer to marble the toppings into the ice cream. Repeat twice more.
  • Cover the loaf pan with a piece of aluminum foil and freeze for at least 6 hours, after which the ice cream should be semi-firm and ready to enjoy!

Notes

*To toast the coconut: preheat the oven to 325F. Spread sweetened shredded coconut onto a parchment lined cookie sheet and bake for 5-10 minutes, shaking the pan halfway through. 
**You can use store bought hot fudge sauce (I use Hersheys brand) or use a homemade recipe of your choice. 
Make Ahead Tips:
  1. You can bake the shortbread crumbles ahead and store them in an airtight container in the refrigerator for up to one week. 
  2. You can make the caramel sauce ahead and store in an airtight container in the refrigerator for up to two weeks. When you’re ready to use it, reheat it in the microwave in 15 second intervals until it reaches room temperature. 
Storage Tips: This ice cream is best stored in an airtight container in the freezer. It will last for several months (if you can make it last that long). 

Disclaimer: I was compensated by Amoretti for my work of creating this recipe, styling, filming, photographing, and writing about their products. As always, all opinions are honest and my own. Thank you for supporting brands that support Sugar & Sparrow.
By: Whitney · In: Featured, Ice Cream, Recipes, Seasonal, Summer · Tagged: amoretti, girl scout cookies, no churn samoa ice cream, samoa, samoa ice cream, samoas, toasted coconut, toasted coconut extract

you’ll also love

Dunkaroos layer cake with sprinkle buttercream recipeDunkaroos Layer Cake Recipe (feat. Amoretti)
birthday ice cream cake recipe with cake batter ice cream, brownies, and hot fudgeThe Ultimate Birthday Ice Cream Cake
cotton candy layer cake recipeWhimsical Cotton Candy Cake Recipe

Join the List

Stay up to date & receive the latest posts in your inbox.

Reader Interactions

Leave a Reply Cancel reply

Your email address will not be published. Required fields are marked *

Recipe Rating


Next Post >

Toasted Coconut Cupcakes Recipe

Primary Sidebar

Welcome to Sugar & Sparrow

Welcome to Sugar & Sparrow

Helping you whip up pretty desserts with confidence and creativity. And hopefully sharing a few laughs with you along the way!

Learn More

Connect

let’s bake!

Get my very best recipes, baking tips, and decorating tutorials sent to your inbox

Featured Posts

milky way cake by sugar and sparrow

Milky Way Layer Cake

marshmallow meringue recipe for cakes

Homemade Marshmallow Meringue

pumpkin chocolate chip cake by sugar and sparrow

Pumpkin Chocolate Chip Cake with Spiced Cream Cheese Frosting

Search

Archives

Follow Along

@sugarandsparrowco

DYE-FREE BLACK BUTTERCREAM 🖤 (recipe below) there DYE-FREE BLACK BUTTERCREAM 🖤 (recipe below) there is ZERO food coloring in this black buttercream recipe which means it won’t turn your mouth black (or anything else 💩) + it tastes like Oreo cookie butter so it’s a win all around!! The key is to use EXTRA dark black cocoa powder, which also comes in handy in my black velvet cake recipe 🙌🏼 ideal secret ingredient for your Halloween cakes! 
⁣
Full recipe (and the black cocoa powder I use!) is linked in my bio and at https://sugarandsparrow.com/dye-free-black-buttercream/
⁣
DYE-FREE BLACK BUTTERCREAM⁣⁣
Yield: 2.5 Cups⁣⁣
⁣⁣
INGREDIENTS:⁣⁣
1 Cup (226g) unsalted butter, room temp
2 1/2 Cups (300g) powdered sugar⁣⁣
1/2 Cup (56g) EXTRA DARK black cocoa powder⁣⁣*
1 tsp pure vanilla extract⁣⁣
2 Tbsp whole milk, room temp
pinch of salt⁣⁣
⁣⁣
INSTRUCTIONS:⁣⁣
1. In a stand mixer fitted with the paddle attachment, whip the butter on medium speed until creamy and light in color, 4 min. Add half of the powdered sugar and mix on low until just combined, then add the rest of the powdered sugar. With the mixer still in the off position, sift in the black cocoa powder and add the vanilla, milk, and salt. Mix on low until all ingredients are thoroughly combined, 2-3 minutes, scraping down the bowl and paddle as needed.⁣⁣
2. Place the buttercream in an airtight container and allow the color to deepen for 24 hours or more. ⁣⁣

*I use a brand called The Cocoa Trader that I get on Amazon. It’s the darkest black cocoa powder I’ve seen so far!!
⁣⁣
#blackbuttercream #naturalfoodcoloring #blackcake #buttercream #blackcocoapowder
SMALL BATCH pumpkin cake with cream cheese frostin SMALL BATCH pumpkin cake with cream cheese frosting 🧡 This mini cake is a scaled down version of my favorite pumpkin cake recipe + makes the perfect amount for 2-4 people! Bake it as a 4-inch mini layer cake or a single layer 6-inch cake, either way is absolutely delicious and the perfect for date night, a small gathering, or any time you’re craving pumpkin cake without having to make a huge dessert 🙌🏽

Comment RECIPE and I’ll send you the full recipe (with thick and stable cream cheese frosting!) or find it linked in my bio + at https://sugarandsparrow.com/small-batch-pumpkin-cake/ 

INGREDIENTS 
2/3 Cup (88g) all-purpose flour
1 tsp baking powder
1/4 tsp baking soda
1/4 tsp salt
1 tsp ground cinnamon
1/2 tsp allspice
1/4 tsp nutmeg
1/8 tsp ground ginger
1/3 Cup (67g) packed brown sugar
2 Tbsp (25g) granulated sugar
1/3 Cup (80ml) vegetable oil or melted butter
1 large egg, room temp
1/2 Cup (125g) canned pumpkin puree
1/2 tsp pure vanilla extract

INSTRUCTIONS
1. Preheat the oven to 350ºF (177ºC). Grease and line three 4-inch cake pans or one 6-inch cake pan.
2. In a medium bowl, whisk together the all-purpose flour, baking powder, baking soda, salt, cinnamon, allspice, nutmeg, and ground ginger. Set aside.
3. In a separate medium bowl, add the brown sugar, granulated sugar, vegetable oil (if using melted butter in place of the oil, cool it for 5-10 minutes prior to adding here), egg, pumpkin puree, and vanilla extract. Whisk together until uniform, then add the flour mixture and whisk until smooth.
4. Pour the batter evenly between the prepared cake pan(s). If using 4-inch cake pans, bake for 22-26 minutes. If using a 6-inch cake pan, bake for 25-30 minutes. Cool completely before frosting (full recipe with cream cheese buttercream is linked in my bio!)

#pumpkincake #smallbatchcake #minicake #creamcheesefrosting #fallbaking
TOP 10 FALL CAKES 🍂 These are not only MY favorite TOP 10 FALL CAKES 🍂 These are not only MY favorite Fall cake recipes, they’re yours too! 🥰

Comment “FALL” and I’ll send you all of the cake recipes shown here and all 36+ of my favorite Fall baking ideas – classic cakes like pumpkin cake with cream cheese frosting, spice cake, and cranberry orange cake, more complex flavor combinations like chocolate pecan pie cake with salted caramel and apple crisp cake, and cozy recipes like no-bake pumpkin cheesecake, homemade salted caramel, and my favorite brown butter chocolate chip cookie bars. 

https://sugarandsparrow.com/fall-baking-recipes/

#pumpkincake #applecake #fallcake #cakeinspiration #cakeideas
The BEST pumpkin cake with cream cheese frosting 🧡 The BEST pumpkin cake with cream cheese frosting 🧡 this pumpkin layer cake is easy to make, perfectly spiced, so moist, irresistible with cream cheese frosting, and uses the ENTIRE 15oz can of pumpkin (no awkward leftovers!). Top it with pretty piped pumpkins to make it extra cute 🥰

Comment RECIPE to get the full recipe (with frosting + cake decorating tutorial) or find it linked in my bio and at https://sugarandsparrow.com/pumpkin-layer-cake-recipe/

INGREDIENTS
2 Cups (265g) all-purpose flour
2 tsp baking powder
1 tsp baking soda
1 tsp salt
2 tsp ground cinnamon
1 tsp allspice
1 tsp nutmeg
1/2 tsp ground ginger
1 Cup (200g) packed brown sugar
1/2 Cup (100g) granulated sugar
1 Cup (240ml) vegetable oil or melted butter
4 large eggs, room temp
15 Oz (425g) canned pumpkin puree
2 tsp pure vanilla extract

INSTRUCTIONS
1. Preheat the oven to 350ºF (177ºC). Grease and line three 6-inch or two 8-inch cake pans.
2. In a medium bowl, whisk together the all-purpose flour, baking powder, baking soda, salt, cinnamon, allspice, nutmeg, and ground ginger. Set aside.
3. In a separate large bowl, add the brown sugar, granulated sugar, oil (if using melted butter in place of the oil, cool it for 5-10 minutes prior to adding here), eggs, pumpkin puree, and vanilla extract. Whisk together until uniform, then add the flour mixture and whisk until smooth.
4. Pour the batter evenly between the prepared cake pans and bake for 32-36 minutes, until a toothpick inserted comes out clean or with just a few moist crumbs. Cool the cakes completely to room temp before frosting!

#pumpkincake #creamcheesefrosting #layercake #cake #fallbaking
EASY HOMEMADE SALTED CARAMEL✨(recipe below) even i EASY HOMEMADE SALTED CARAMEL✨(recipe below) even if you’ve never made salted caramel from scratch before, this recipe is VERY beginner friendly + nearly fail proof! There are only 4 ingredients involved, no candy thermometer required, and takes just 10 minutes to make 👏🏽 this is my go-to caramel for drip cakes, drizzling desserts, flavoring coffee, adding it to buttercream, and so much more! 🍯  
 
Full recipe (with video + detailed instructions) linked in my bio or at https://sugarandsparrow.com/salted-caramel-recipe/
⁣ 
SALTED CARAMEL 
Yield: 1.25 Cup⁣s
⁣⁣ 
Ingredients:⁣⁣ 
1 Cup (200g) white granulated sugar⁣⁣ 
6 Tbsp (85g) unsalted butter, room temperature, cut into cubes⁣⁣ 
1/2 Cup (120ml) heavy whipping cream, room temperature⁣⁣ 
1 1/4 tsp kosher salt⁣⁣ 
⁣⁣ 
Instructions:⁣⁣ 
1. Place the sugar in a medium saucepan over medium-high heat and stir constantly until it melts into an amber-colored liquid and no sugar clumps remain, 5-6 minutes. ⁣⁣ 
2. Reduce the heat to medium. Carefully add the butter (it will bubble up when you do) and use a whisk to combine it with the sugar mixture until the butter is fully melted and incorporated, 2-3 minutes. ⁣⁣ 
3. Add the heavy whipping cream in a steady stream while whisking. As soon as the cream is incorporated, let the caramel boil for a full minute before removing it from the heat and stirring in the salt. ⁣⁣ 
4. Let the caramel cool to room temperature before using it in a cake recipe or as a drip. If you’re using it to drizzle over ice cream or warm baked goods, you only need to cool it slightly (20 minutes or so). It will thicken as it cools. ⁣⁣ 
⁣⁣ 
#caramel #saltedcaramel #bakedfromscratch #caramelcake #caramelsauce

Footer

On the Blog

  • Cake Basics
  • Recipes
  • Tutorials

Info

  • About
  • Privacy Policy & Disclosure

stay in the know

Copyright © 2026 · Theme by Sugar & Sparrow