• Cake
  • Frosting
  • YouTube
  • My Favorite Tools
  • Nav Social Icons

  • Skip to primary navigation
  • Skip to main content
  • Skip to primary sidebar
  • Skip to footer
  • Recipes
    • Cake
    • Cupcakes
    • Frosting
    • Ice Cream
    • Vegan
  • Cake Basics
  • Tutorials
  • Blog
  • About
  • Mobile Menu Widgets

    Connect

    Search

Sugar & Sparrow logo in script font

Sugar & Sparrow

Lifestyle and Cake from Portland Oregon

  • Cake Basics
  • Recipes
    • Cake
    • Cupcakes
    • Cookies & Bars
    • Filling
    • Frosting
    • Ice Cream
    • No-Bake
    • Small Batch
    • Vegan
  • Tutorials
  • Book
  • Blog
  • About

Chocolate Peanut Butter Cake Recipe

November 5, 2020 · In: Cake, Recipes

Jump to Recipe

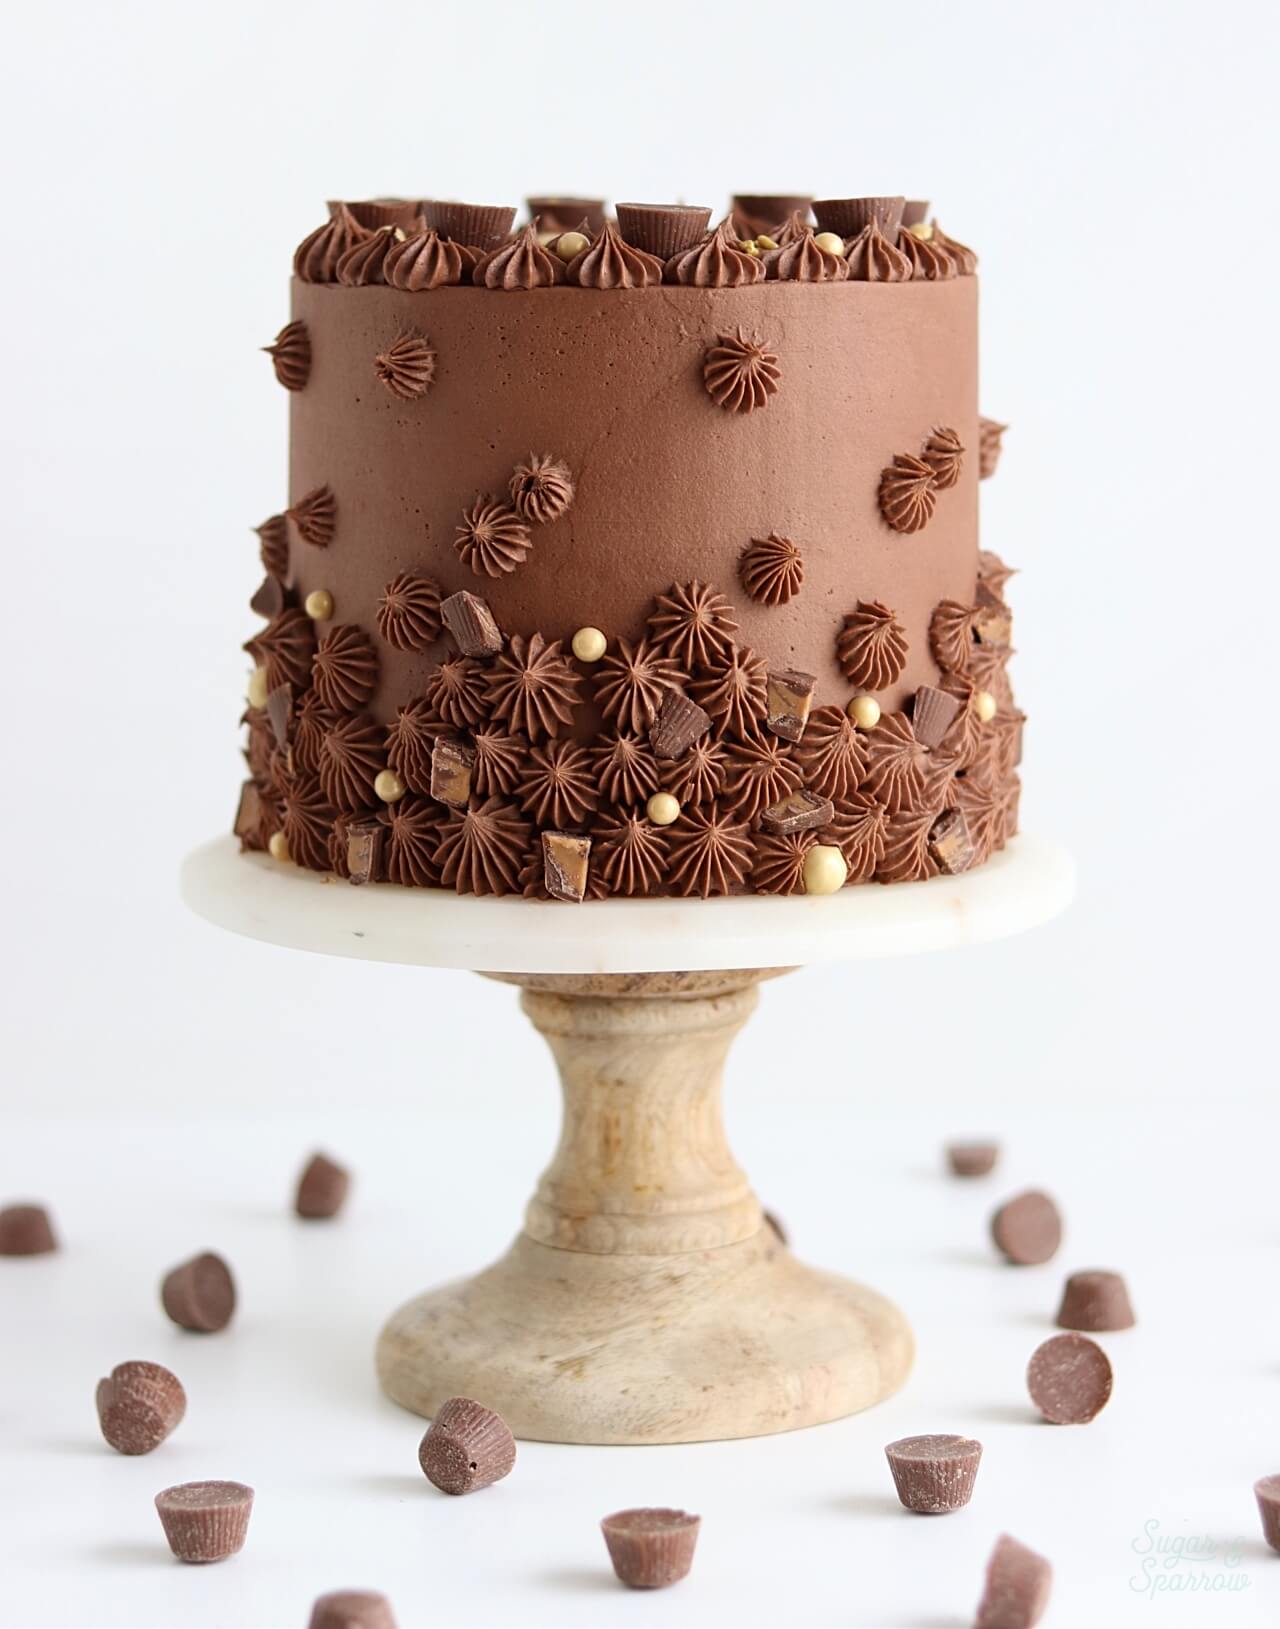
Some say that peanut butter and jelly are the perfect match for each other, but I say peanut butter and chocolate are even better. It’s the best blend of salty and sweet ever, and the sole flavor inspiration behind this Chocolate Peanut Butter Cake. If you’re a chocolate peanut butter fan, this is the cake of your dreams! Behold:

chocolate peanut butter cake recipe

It all starts with a peanut butter cake that’s just as moist and flavorful as it is light and fluffy. It’s flavored with creamy peanut butter and a little brown sugar to send your tastebuds to heaven. You can use any brand of creamy peanut butter in this recipe, but I opt for Simply Jif because it has less sugar than regular Jif. It makes the peanut butter flavor come through beautifully without being too sweet.

peanut butter cake recipe

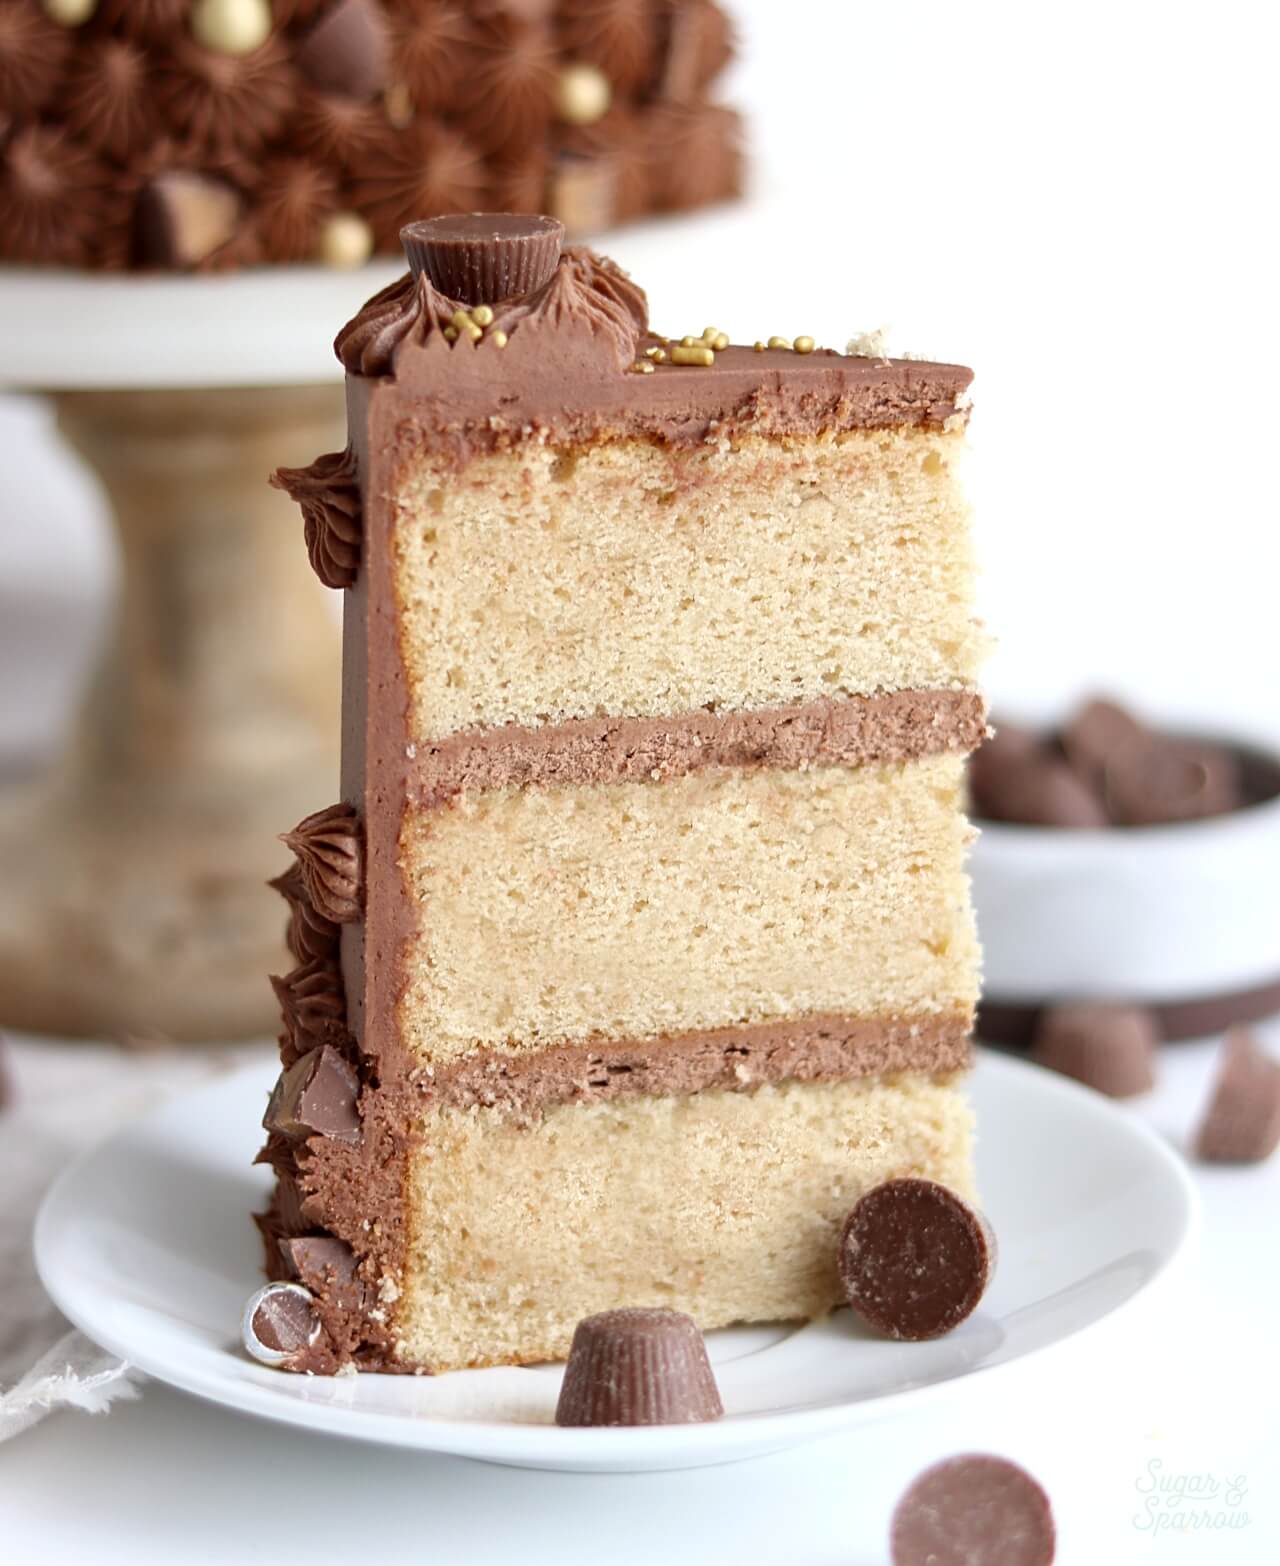
To top this delicious peanut butter cake, I originally thought to use my favorite Chocolate Buttercream recipe, but had an epiphany at the last second: why not add a little peanut butter to the chocolate buttercream? The result was AMAZING and really helps the peanut butter flavor take center stage! Simply whip some creamy peanut butter along with the butter and use it as a base for the chocolate buttercream, and voila.

peanut butter cake with chocolate peanut butter buttercream

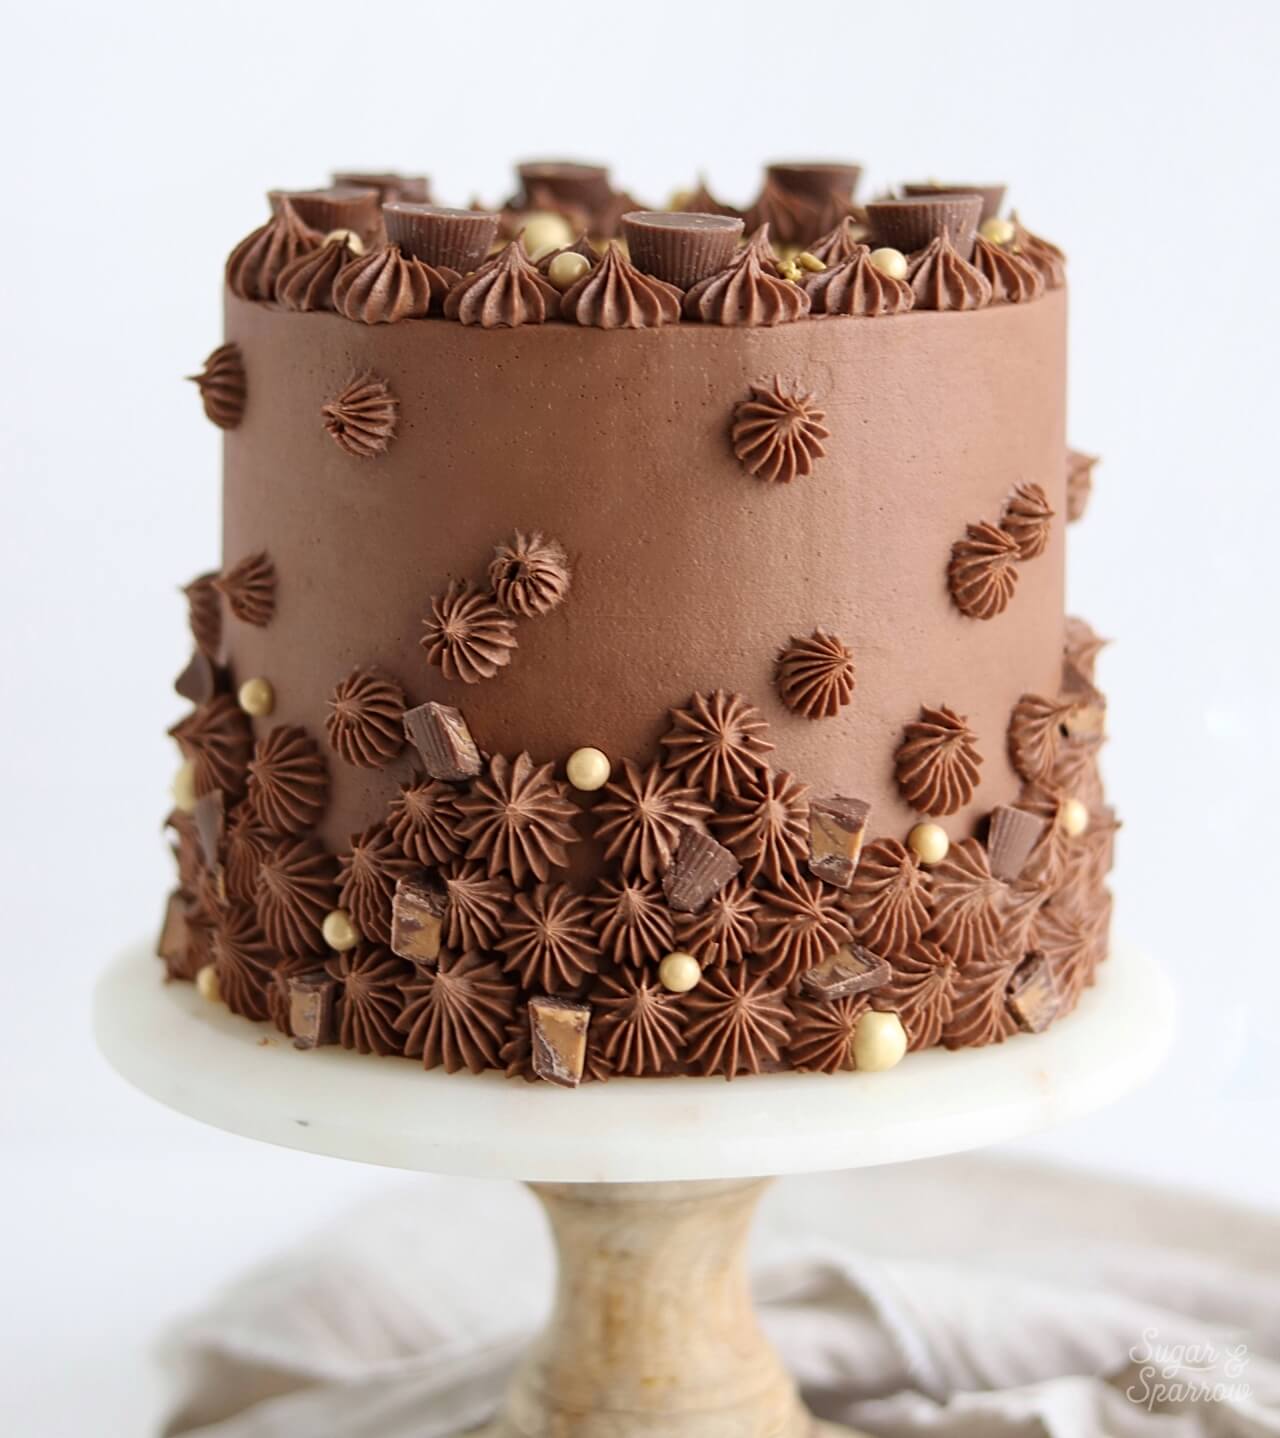
After frosting the peanut butter cakes with a smooth finish of the chocolate peanut butter buttercream (say that five times fast!), I used Wilton Tip 4B to pipe some open stars around the cake in an ombrè style, then used the same piping tip to create two rows of open stars around the top edge. I finished decorating with some mini peanut butter cups and a few SprinklePop sprinkles in the Gold Sprinkle Mix.

chocolate peanut butter buttercream
chocolate peanut butter cake

You can choose to decorate this cake however you want, because at the end of the day, the flavors are what takes this Chocolate Peanut Butter Cake beyond. It’s perfect for any fan of this flavor combo (who isn’t a fan though!), and so easy to whip up. A total crowd pleaser in my book!

peanut butter chocolate cake

Chocolate Peanut Butter Cake

5 from 5 votes
Layers of moist, fluffy Peanut Butter Cake topped with Chocolate Peanut Butter Buttercream. The dreamiest of all decadent flavor combo. 
Print Recipe Pin Recipe

Ingredients

Peanut Butter Layer Cake

  • 3 1/2 Cups (370g) cake flour, sifted before measuring
  • 1 Tbsp baking powder
  • 3/4 tsp baking soda
  • 1 1/2 tsp kosher salt
  • 1 1/8 Cup (254g) unsalted butter, room temperature
  • 1 Cup (205g) granulated white sugar
  • 1/2 Cup (94g) packed brown sugar
  • 1 Cup (250g) creamy peanut butter
  • 4 eggs, room temperature
  • 1/3 Cup (75g) sour cream, room temperature
  • 1 1/2 Tbsp vanilla extract
  • 1 1/2 Cups (360ml) whole milk, room temperature

Chocolate Peanut Butter Buttercream

  • 1 1/2 Cups (339g) unsalted butter, room temperature
  • 1/3 Cup (83g) creamy peanut butter
  • 4 1/2 Cups (540g) powdered sugar
  • 3/4 Cup (63g) natural unsweetened cocoa powder
  • 6 Tbsp (89ml) whole milk, room temperature
  • 1 Tbsp vanilla extract
  • 1/2 tsp kosher salt

Instructions

Make The Peanut Butter Layer Cake

  • Preheat the oven to 350°F. Prepare three 8-inch or four 6-inch cake pans by spraying the sides with a cooking spray (Baker's Joy is my favorite) and a wax paper circle fitted to the bottom of the pan. Alternatively, you can grease and lightly flour the pans.
  • Sift the cake flour and then measure by spooning and leveling it in your measuring cup. Add the cake flour, baking powder, baking soda, and salt into a bowl and whisk to combine. Set aside. 
  • In the bowl of your stand mixer (a handheld mixer works fine too!), cream the butter for on high for two minutes until it’s light and fluffy. Add in white sugar, brown sugar, and peanut butter and continue to mix on medium-high for another three minutes, scraping down the bowl and paddle as needed. Add the eggs one at a time, mixing thoroughly after each addition. Add vanilla and sour cream and mix for one minute on medium-high, scraping down the bowl and paddle once more.
  • With the mixer on low speed, add in the dry ingredients and mix until just combined. Add the whole milk and mix until just incorporated. Scrape down the sides and bottom of the bowl and give it a few stirs to make sure there are no lumps. Batter will be thick.
  • Pour batter evenly into prepared cake pans (no more than 2/3 of the way full), smooth the tops, and bake for 35-40 minutes. They’re done when they spring back to the touch and a toothpick inserted into the middle comes out clean. Let the cakes cool in the pan for five minutes before turning them out onto a wire rack for an additional few hours of cooling. Make sure they’re entirely room temperature before applying any frosting.

Make The Chocolate Peanut Butter Buttercream

  • In a stand mixer fitted with a paddle attachment, whip the butter and peanut butter on medium speed until very creamy and well combined, about three minutes. Scrape down the bowl and paddle and turn the mixer to low, then add powdered sugar, cocoa powder, milk, vanilla extract, and salt. Increase the speed to medium and beat for two full minutes.

Assembly

  • Fill and frost the Peanut Butter Cake layers with the Chocolate Peanut Butter Buttercream. If you want to recreate the look that’s pictured, frost a smooth finish with the buttercream, then refrigerate the cake for 30 minutes. Prepare a piping bag with Wilton Tip 4B, fill it with more Chocolate Peanut Butter Buttercream, then pipe open stars in an ombre pattern on the sides of the cake. Use the same piping tip to create a buttercream border on top, then top the cake with mini peanut butter cups and gold sprinkles. 

Notes

Make Ahead Tips: this cake can be made ahead and stored at room temperature, covered tightly in plastic wrap, for up to two days. Alternatively, you can cover with plastic wrap and store in the freezer for up to two months before thawing to room temperature. 
The buttercream can be made ahead and stored in an airtight container at room temperature for up to 1 day. Alternatively, you can store it in an airtight container in the refrigerator for up to two weeks. When you’re ready to use it, bring it back to room temperature and rewhip with your stand mixer to bring back to frosting consistency. 

Did you make this recipe? I want to know what you think! Let me know in the comments below or tag me on Instagram. I love to see what you’re caking!

By: Whitney · In: Cake, Recipes · Tagged: buttercream recipe, cake decorating, cake recipe, chocolate peanut butter buttercream, chocolate peanut butter cake, peanut butter buttercream, peanut butter cake, peanut butter cake recipe, peanut butter chocolate cake, peanut butter cup cake, sprinklepop, sugar and sparrow, wilton 4b

you’ll also love

the best vanilla cupcakes recipeThe Perfect Vanilla Cupcake Recipe
pumpkin layer cake recipe by sugar and sparrowPerfect Pumpkin Layer Cake Recipe
oreo cookies and cream cakeOreo Layer Cake Recipe

Join the List

Stay up to date & receive the latest posts in your inbox.

Reader Interactions

Comments

  1. Julie says

    February 17, 2024 at 1:32 pm

    About how many cupcakes would this recipe make?

    Reply
    • Whitney says

      February 27, 2024 at 2:39 pm

      Hi Julie! This recipe will make quite a few cupcakes, about 30-35. Hope that helps!

      Reply
  2. marjan nini says

    February 2, 2024 at 6:28 am

    hello, I would like to make this cake, may I ask how many grams is 1 cup of flour?
    Then I remove 2 tablespoons of flour and add Cornstarch to 15 grams
    but I first want to know how much 1 cup of flour weighs, thanks

    Reply
    • Whitney says

      February 4, 2024 at 9:51 pm

      Hi there! 1 cup of all purpose flour weighs about 133g. Hope that helps!

      Reply
  3. Dereth Salchak says

    February 21, 2023 at 7:34 am

    5 stars
    The brown sugar makes this cake. Its like a peanut butter cookie! I make this cake, and had leftover batter so I made cupcakes. Filled them with marionberry jam, topped with peanut butter buttercream. So good!

    Reply
    • Whitney says

      February 21, 2023 at 7:35 pm

      Yuuuum, Dereth! That sounds so delicious!

      Reply
  4. Marissa says

    January 15, 2023 at 10:19 am

    Hi! I can’t wait to make this cake for a coworker’s birthday! If I wanted to incorporate alcohol (per birthday girl’s request) what would be the right choice and amount to not mess up the batter? Thank you! (Ps pre-ordered your book, I’m trying to teach myself cakes as a hobby homebaker… cupcakes are doing ok but cakes are scary!!)

    Reply
    • Whitney says

      January 20, 2023 at 1:54 pm

      Thanks so much for preordering my book, Marissa! I can’t wait for you to see it and I’m cheering you on with your cake making! As far as adding alcohol to my cake recipes, I’m not sure what the right amount would be since I’ve never tried it before! I did find this blog post by The Cake Blog that might be able to help though: https://thecakeblog.com/2015/12/how-to-bake-with-alcohol.html

      Reply
  5. Maria Cecilia says

    June 15, 2021 at 6:37 pm

    Hi! I’m about to try your recipe! But I only have a 5 or 7 inches (14×10 or 18×10 cm) pans if I was to use only one pan what size should it be?

    Thank you so much ❤️!

    Reply
    • Whitney says

      June 17, 2021 at 10:18 am

      Hi Maria! For just one pan, I would go with the 7 inch for this recipe and if you’re only making one layer I would half the recipe as this makes quite a lot of batter. Hope that helps!

      Reply
  6. Pamela says

    June 3, 2021 at 10:25 am

    I want to make this cake with white chocolate peanut butter butter cream instead of milk chocolate and a glaze drip. Do you think I could achieve this with the glaze over buttercream? Any tips?

    Reply
    • Whitney says

      June 4, 2021 at 1:20 pm

      That sounds delicious, Pamela! I’ve never done a glaze before so I’m not entirely sure, but if the base for a glaze drip is chilled buttercream it should work so long as you refrigerate the cake for at least 30 minutes beforehand.

      Reply
  7. Callie says

    February 20, 2021 at 4:47 am

    This may be my favorite cake of yours yet in terms of flavor, just delicious. I did have a problem with dry moisture, I think it was because I had to cook mine longer than your suggested time to get a clean toothpick. I used regular creamy jif (could not find simply jif). My only thought was to do a larger pan and thinner layers next time to hopefully get middle done quicker but do you have any suggestions?
    Also separately, a request, since I only trust your cake recipes from here on out (they are just better than any I have tried!) I would love to see a carrot and red velvet recipe of yours, let me know if I am missing those in your archives!

    Reply
    • Whitney says

      February 21, 2021 at 8:53 pm

      Yay, Callie! So happy to hear that you love this recipe and I do wonder why it took longer to cook the layers. It’s hard to say without knowing what kind of pans you’re using, etc. I would start by checking your oven temp with an oven thermometer just to make sure the internal temp is where it should be. If it’s correct, then you could try using bake even strips around your cake pans to get them to cook more evenly, or like you suggested, bake thinner layers. Hope that helps and thank you for the requests – they’re on my list for sure!

      Reply
  8. Sarah says

    February 7, 2021 at 2:59 pm

    Could I adjust this recipe to make cupcakes?

    Reply
    • Whitney says

      February 8, 2021 at 8:46 am

      Absolutely, Sarah! Just be sure to fill the tins no more than 2/3 full and bake at 350ºF for 15-18 minutes, or until a toothpick inserted comes out clean. Enjoy!

      Reply
  9. Ella says

    January 27, 2021 at 2:38 pm

    I’m so excited to try this recipe!!

    Reply
    • Whitney says

      January 29, 2021 at 2:16 pm

      Yay Ella! Excited for you to try and let me know how it goes!

      Reply
  10. Christina says

    January 2, 2021 at 8:00 am

    Hi! This looks delicious! ….I was wondering, to make the frosting lighter in colour, would it be okay to omit the cocoa powder from the buttercream? Or would that affect the consistency of the frosting?

    Reply
    • Whitney says

      January 3, 2021 at 4:02 pm

      Hi Christina! If you omit the cocoa powder from the buttercream, you’ll end up with a peanut butter buttercream instead of a chocolate peanut butter buttercream. If you’re ok with that, you can omit the cocoa powder from the recipe but may need to add a little more powdered sugar (1/2 cup or so) to make the consistency thick enough to fill and frost the cake with.

      Reply
  11. Georgie says

    June 17, 2020 at 7:25 am

    Hi, huge peanut butter fan but never been brave enough to try and make a cake with it. Could I use natural peanut butter instead of creamy? Also will probably make cupcakes instead of one large cake, any specific conversion tips? An incredible looking cake though, such an inspiration!

    Reply
    • Whitney says

      June 17, 2020 at 10:06 am

      Hi Georgie! Natural peanut butter should work just fine, I chose creamy because I don’t like bits of peanut in the cake so just be aware that if the consistency of the natural peanut butter is chunky, you’ll end up with some crunchy pieces in the cake. And you can certainly make cupcakes instead! This recipe will make a lot of them (40ish?) so if you want a smaller amount I recommend halving the recipe. Fill the tins no more than 2/3 full and bake at 350 for 15-17 min and you’ll be good to go 🙂

      Reply
  12. Paula says

    June 11, 2020 at 4:00 pm

    5 stars
    Hi Whitney!
    I made this beautiful cake (I used choc cake instead) and sprinkled gold stars. Received so many compliments!!! I posted on my Instagram and tagged you. Hope you saw. I find exceptional inspiration from your posts. Even my daughter, who is a trained artist, was looking at your site today with me and was impressed. Looking to make a version of your gradient rainbow cake soon. Love that technique! Thank you very much!!

    Reply
    • Whitney says

      June 12, 2020 at 9:04 am

      Hi Paula! I’m so glad the cake was a hit and I did just see your photo on Instagram – it turned out sooo pretty! Thank you for tagging me and taking the time to let me know how much you love the recipe. I’m so excited for you to try the gradient rainbow cake! Can’t wait to see!

      Reply
  13. jeannine frenzel says

    January 17, 2020 at 8:30 am

    5 stars
    This cake was DELICIOUS! The star piping made it easy to decorate and beautiful! That’s something I love about your cakes. You make simple decorations look very special.
    Where did you get the cake pedestal?

    Reply
    • Whitney says

      January 17, 2020 at 11:00 am

      So happy it was a hit, Jeannine! This is one of my absolute fave recipes. The cake stand was actually a gift from my sis in law and it was so long ago that it’s not available online anymore! I did find a similar one on Amazon though: https://amzn.to/2Ry1dQ6

      Reply
  14. Kayla says

    December 20, 2019 at 11:31 pm

    Hi Whitney! Made this cake tonight and can’t wait to gift it to my father in law tomorrow. Question, is this frosting typically thicker? Mine ended up being a little thicker than I normally would use and I wasn’t sure wether or not to add milk so I just went with it haha.

    Reply
    • Whitney says

      December 26, 2019 at 10:34 am

      Hi Kayla! If the frosting ends up being too thick, just add a little more milk to thin it out as desired.

      Reply
  15. Ro says

    November 13, 2019 at 11:35 pm

    Hi! Is the metric measurement for the white granulated sugar correct? In your other recipes it shows that one cup of granulated sugar is around 200g.
    Thanks!

    Reply
    • Whitney says

      November 14, 2019 at 10:57 am

      Good catch, Ro! It should be 205g for the white granulated sugar. I will fix that typo!

      Reply
  16. Carol L. says

    August 13, 2019 at 6:55 am

    5 stars
    I made this yesterday for my brother’s birthday. This really is a cake for pb lovers as both the crumb and the frosting are loaded with pb flavor. The crumb was light and moist, and not at all eggy even though the recipe calls for 4 eggs. As recommended in the notes, I used Simply Jiff rather than regular Jiff (which I had in the cupboard) and the frosting was deliciously chocolatey peanut buttery, and had just the right amount of sweetness – not sickly sweet like many frostings tend to be.
    I will say that this recipe made A LOT of batter. I used two 6×3 pans and one 6×2 pan. I filled all the pans 2/3 full, including the 6x3s so they baked quite a bit longer, I think 15 minutes longer. I was afraid they’d be dry but they weren’t. They were tall, so I cut them in thirds, and by the time I frosted those six layers, the 6×2 layer could not be piled on because the cake would have been way too tall.
    I’m personally not a pb dessert fan but this cake was very good, and the pb dessert lovers in my family loved it!
    This is the second one of your cake recipes I’ve tried, Whitney, and I will keep coming back because you know cakes!

    Reply
    • Whitney says

      August 13, 2019 at 1:48 pm

      That’s so wonderful to hear, Carol! I’m so happy the cake was such a hit 🙂 it’s one of my fave recipes and I love to hear other people enjoying it!

      Reply
    • Vivian Brown says

      March 9, 2020 at 6:06 pm

      I filled 3 of the 6×2 pans. The batter is too much for 3 of the 6 inch pans. Would be better for 3 of the 8 inch pans.

      Reply
      • Whitney says

        March 10, 2020 at 7:49 pm

        Thanks for the feedback, Vivian!

        Reply
  17. Rachel says

    May 16, 2019 at 7:17 am

    The recipe is for 1 cup plus an 1/8 of butter? Just making sure!

    Reply
    • Whitney says

      May 16, 2019 at 2:28 pm

      Hi Rachel! Yes, that’s correct. 1 1/8 Cups of butter, also measured as 2 1/4 sticks of butter.

      Reply
  18. Eileen says

    May 15, 2019 at 9:18 pm

    5 stars
    This looks stunning and probably tastes even better! I can’t wait to try it for my son’s birthday party this weekend.

    Reply
    • Whitney says

      May 16, 2019 at 2:31 pm

      So excited for you to try this cake recipe, Eileen! It’s one of my very favorites!

      Reply
  19. Mark Mathai says

    April 26, 2019 at 12:42 am

    Hey I don’t have 3 six inch pans, will 2 eight inch pans do fir a two layered cake for the same quantity of ingredients?

    Reply
    • Whitney says

      April 27, 2019 at 1:48 pm

      Hi Mark! Two 8-inch pans will totally work with this ratio of ingredients. Just make sure not to fill the pans more than 2/3 of the way full and you should be good to go!

      Reply
  20. Rose says

    April 25, 2019 at 6:29 pm

    Hi! I’d love to try this but I don’t keep cake flour handy. Can I use all purpose?

    Reply
    • Whitney says

      April 27, 2019 at 1:51 pm

      Hi Rose! The reason I love cake flour for this recipe is it makes the cake extra light and fluffy. You can substitute all-purpose flour, but the crumb will be a little more dense. I do have a DIY cake flour recipe that you can create using all-purpose flour, it’s perfect in a pinch:

      To make your own cake flour, spoon and level one cup of all-purpose flour and remove 2 Tbsp. Add 2 Tbsp of cornstarch. Repeat per the amount of cake flour you need, then sift the flour and cornstarch mixture 4 times (don’t skip that step!). After sifting, spoon and level to re-measure the amount of cake flour you need.

      Reply
  21. Linda says

    April 20, 2019 at 2:47 am

    Looks absolutely scrumptious 🙂

    Reply
    • Whitney says

      April 20, 2019 at 1:41 pm

      Hi Linda! It’s my favorite flavor combo of the moment 🙂 I hope you try it!

      Reply

Leave a Reply Cancel reply

Your email address will not be published. Required fields are marked *

Recipe Rating


Next Post >

Almond Joy Cake Recipe

Primary Sidebar

Welcome to Sugar & Sparrow

Welcome to Sugar & Sparrow

Helping you whip up pretty desserts with confidence and creativity. And hopefully sharing a few laughs with you along the way!

Learn More

Connect

let’s bake!

Get my very best recipes, baking tips, and decorating tutorials sent to your inbox

Featured Posts

berry chantilly cake recipe sheet cake

Berry Chantilly Sheet Cake

cream cheese buttercream recipe thats pipeable

Cream Cheese Buttercream Recipe

pips chai cake

Pip’s “Heart of Gold” Coconut Chai Cake Recipe

Search

Archives

Follow Along

@sugarandsparrowco

TOP 10 BIRTHDAY CAKES 🥳 These are just a few of my TOP 10 BIRTHDAY CAKES 🥳 These are just a few of my favorite birthday cake recipes that will make anyone feel special! 

Comment “BIRTHDAY” and I’ll send you all 24+ of my favorite birthday cake ideas –  classics like funfetti cake and yellow cake with chocolate frosting, plus ice cream cakes, sheet cakes, and more complex flavor combos like Snickers cake and Millionaire cake. 

https://sugarandsparrow.com/best-birthday-cake-recipes/

#birthdaycake #partycake #birthdaycakeideas #cakeinspiration #cakeideas
BERRIES & CREAM SHEET CAKE 🍓🫐 deliciously light, n BERRIES & CREAM SHEET CAKE 🍓🫐 deliciously light, naturally stunning, and the easiest cake you’ll want to make all Summer long!! It’s my favorite bakery-style vanilla sheet cake that’s so soft and moist, topped with silky whipped cream cheese frosting and fresh berries. I love how quickly this cake comes together with simple ingredients + doesn’t require any fancy cake decorating techniques to make it a showstopper✨

Grab the recipe link in my bio or find it at https://sugarandsparrow.com/berries-and-cream-sheet-cake/

#berrycake #berriesandcream #sheetcake #whippedcreamfrosting #cakedecorating
FUNFETTI SHEET CAKE 🥳 the most celebratory flavor FUNFETTI SHEET CAKE 🥳 the most celebratory flavor of all and so perfect for a crowd. It’s extra soft and moist vanilla cake speckled with rainbow sprinkles + captures that box mix texture but it’s 100% homemade and EASY! Top it with vanilla buttercream and rainbow sprinkles for the perfect party cake 🎉
 
Full recipe (w/ frosting) at the link in my bio or at https://sugarandsparrow.com/funfetti-sheet-cake/ 

INGREDIENTS 
2 1/2 Cups (265g) sifted cake flour 
2 tsp baking powder 
1/2 tsp baking soda 
1 tsp salt 
3/4 Cup (170g) unsalted butter, room temp 
1 3/4 Cup (340g) granulated white sugar 
3 large eggs, room temp 
1/2 Cup (120g) sour cream, room temp 
1 Tbsp pure vanilla extract 
1 Cup (240ml) whole milk, room temp 
1/3 Cup (60g) rainbow sprinkles, coated in 1 tsp flour 
 
INSTRUCTIONS 
1. Preheat the oven to 325°F (163ºC). Grease and line a 9×13 baking pan. 
2. In a medium bowl, whisk together the sifted cake flour, baking powder, baking soda, and salt. Set aside.  
3. In the bowl of your stand mixer fitted with the paddle attachment (or with a large bowl and hand mixer), beat the butter and sugar on medium-high speed until light and fluffy, 4 min. Add the eggs one at a time, then add the vanilla and sour cream and mix for one minute on high speed. 
4. Turn the mixer off and add the dry ingredients all at once. Mix on low speed until just combined, then add the milk and mix until just incorporated.  
5. Coat the rainbow sprinkles in 1 teaspoon of flour, then gently fold them into the cake batter. Pour the batter into the prepared baking pan and bake for 30-35 minutes, or until the cake springs back to the touch and a toothpick inserted into the middle comes out clean. Let the cake cool in the baking dish until room temperature, then decorate with vanilla buttercream + rainbow sprinkles (full recipe link in bio!) 
 
#funfetti #funfetticake #sheetcake #cake #birthdaycake
COOKIE DOUGH ICE CREAM CAKE 🍪🍦this is the birthday COOKIE DOUGH ICE CREAM CAKE 🍪🍦this is the birthday cake of my DREAMS and I’m so excited to share the recipe with you!! It’s chocolate and vanilla no-churn ice creams with homemade cookie dough chunks in every bite, swirled together and set on a delicious Oreo cookie crust 😍 easy, perfectly sliceable, and ideal for making ahead! I’m already dreaming about when I can make it again ✨

Get the recipe link in my bio + at https://sugarandsparrow.com/chocolate-chip-cookie-dough-ice-cream-cake/

#birthdaycake #icecreamcake #cakedecorating #nochurnicecream #icecreamlover
My kitchen in May 💛 some of these recipes had me f My kitchen in May 💛 some of these recipes had me feeling CRAZY with how many tests they took 🤪 but in the end I am so happy with these ones I got to hit the publish button on + I made my DREAM birthday cake that I can’t wait to share ASAP!!

Comment “MAY” to get all the recipes that are available now:

-Strawberry Shortcake Sheet Cake
-Lemon Cupcakes
-Lemon Cream Cheese Buttercream
-Orange Poppyseed Cake
-Whipped Mascarpone Frosting
-No-Bake Marbled Strawberry Cheesecake
-Chocolate Chip Cookie Cake

https://sugarandsparrow.com/everything-i-baked-in-may
 
#dessert #bakersofinstagram #baking #bakinglove #dessertlovers

Footer

On the Blog

  • Cake Basics
  • Recipes
  • Tutorials

Info

  • About
  • Privacy Policy & Disclosure

stay in the know

Copyright © 2026 · Theme by Sugar & Sparrow