For years, I’ve been seeing my Instagram caker friends post photos of metallic gold buttercream cakes. Like, really shiny ones. After doing a bit of research into how to get the look, I decided to order the Rolkem Super Gold luster dust and try my hand at it. I’ve seen a lot of cake makers use that mixed with a little vodka to paint their buttercream cakes for a flawless metallic look. Here’s the thing though, while I was absolutely blown away by the shiny gold finish, I realized that there has been a recall on Rolkem Super Gold because (the batch I ordered at least) contains high levels of copper, which is not the healthiest for consumption. It’s FDA approved in some countries, but not the USA, so I wondered if after swooning over this amazing gold finish I could actually find a comparable option that is FDA approved worldwide.
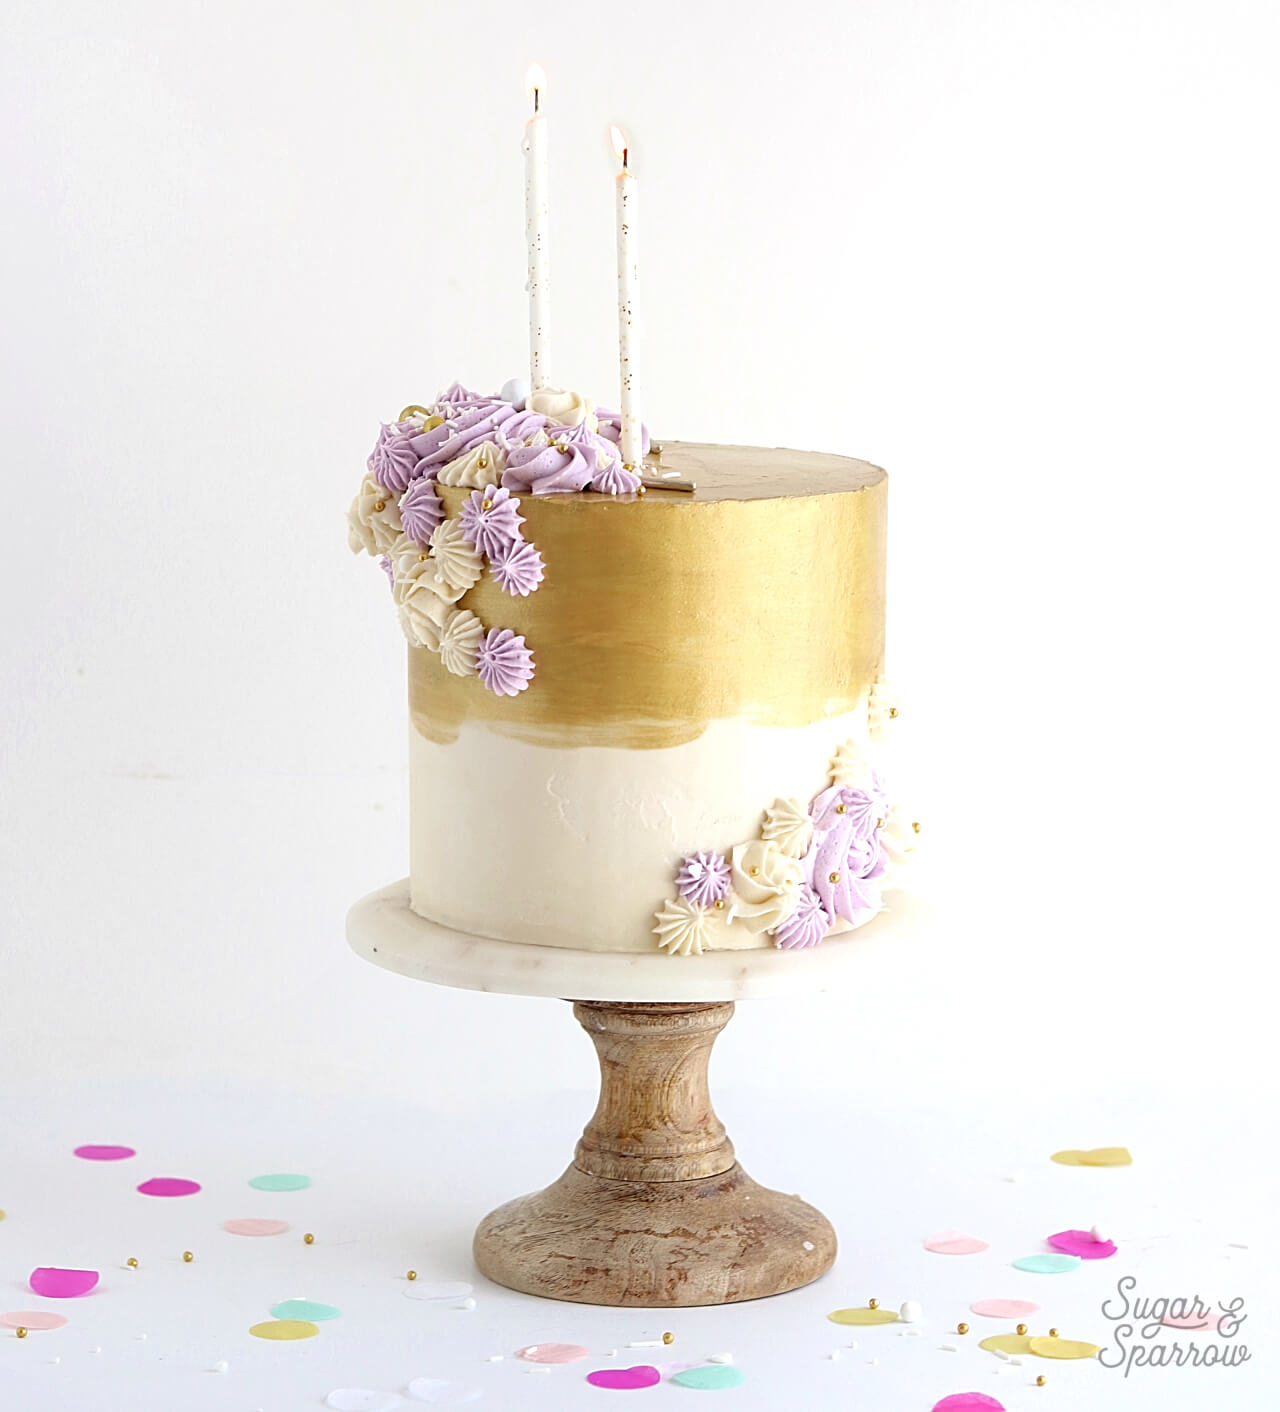
This wonderment sent me on a quest to find the best product for a perfect metallic buttercream finish: one that’s as shiny as Super Gold, as easy to paint with (aka I wouldn’t have to paint a million coats), and of course, one that is universally FDA approved for eating. After scouring the internet and reading countless reviews, I ordered three to try: King’s Gold by CK Products, Gold Pearl Dust by Wilton, and Glamorous Gold by Edible Art Paint. I made a little video to show you how they look in action:
Disclaimer: this post does contain some affiliate links, meaning I may receive a small commission if you click them and purchase items I’ve recommended. Using these links won’t cost you any extra money, but they do help to keep Sugar & Sparrow up and running. Thank you for your support!
Important Tips For Painting On Buttercream
Whether you’re painting a metallic finish or a non-metallic finish, it’s important to start with the right consistency of whatever you’re painting with, the right brush for the job, and a solid cake finish. All three of these things can make or break the final outcome. Here are my best tips for success:
First, to avoid messing up your final coat of buttercream, you must start with a well-chilled cake. After applying my final coat of buttercream, I place the cake in the refrigerator for a good 30 minutes or more, until the finish is hard to the touch.

Second, you need a good brush that won’t leave a ton of bristles in your paint job. This brush by Innovative Sugarworks is a great one, made specifically for cake decorating so you can rest assured that the bristles are made from high quality synthetic fibers and are safe for use with food. Your local craft store might have good brushes, but make sure they’re made with the right bristle fiber because a lot of paint brushes are made with animal hair. After all, the last thing you want is horse hair ending up on your cake!

And finally, you’ll need the right consistency of edible paint to get the look you’re going for and the best mixing solution to help the finish dry quickly. When working with luster dusts, you’ll need an alcohol solution to mix with so the liquid evaporates after you paint with it. Some cakers prefer vodka, but I always use grain alcohol to mix luster dusts with.
Grain alcohol can be found at your local liquor store (it’s also known as Everclear), and at 180 proof it has the highest alcohol content of any alcohol. The higher the alcohol content, the faster it will evaporate from your cake and leave you with that shiny gold finish you’re pining for. If you only have vodka or lemon extract on hand, those will work as well, they’ll just take longer to dry.
The Best FDA Approved Products For A Metallic Buttercream Finish
To my amazement, I ended up really liking all three of the products I tried for metallic finishes. There was one that stood out above the rest (read all about it below!) for color and ease of use, but all three will work depending on the color you need. Be sure to watch this video to see them all in action.

Glamorous Gold By Edible Art Paint
Rating: 10/10
Spoiler alert: this one was my absolute favorite of the three products I used. It comes in a bottle pre-mixed with the right amount of alcohol solution, so you don’t even have to worry about making that extra trip to the liquor store. Edible Art Paints come in all sorts of colors, metallic and non-metallic, and the Glamorous Gold was the perfect shimmery gold color I was after.
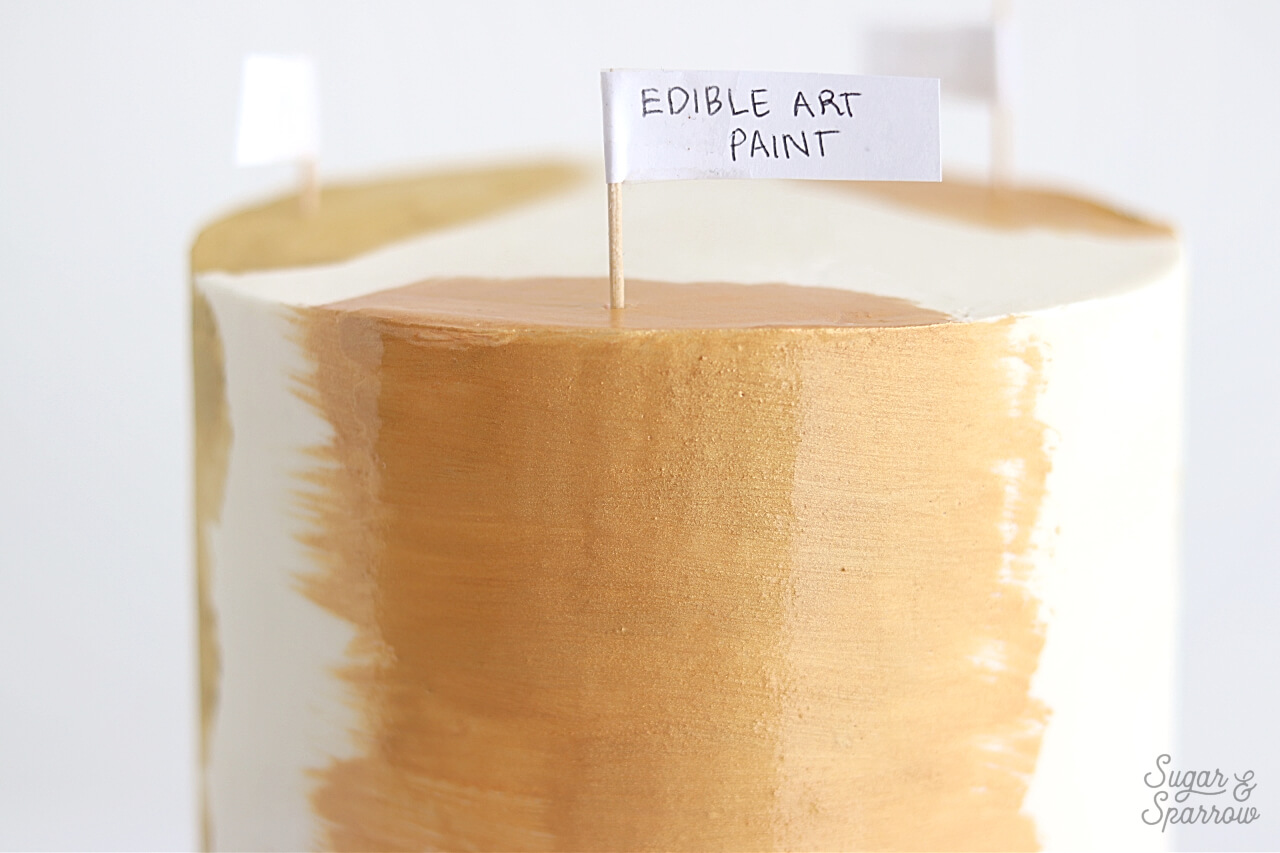
The finish dried in about ten minutes and I found that one coat was sufficient for applying to the cake. I was worried about it looking streaky, but after the first coat dried, it ended up looking really uniform.
King’s Gold by CK Products
Rating: 9/10
The King’s Gold by CK Products is a luster dust, so you will need to mix it with a solution like everclear (or vodka!) to make it paintable. After mixing it with everclear, the luster dust dissolved really well and ended up being a breeze to paint with. Here’s how it looked after one coat:
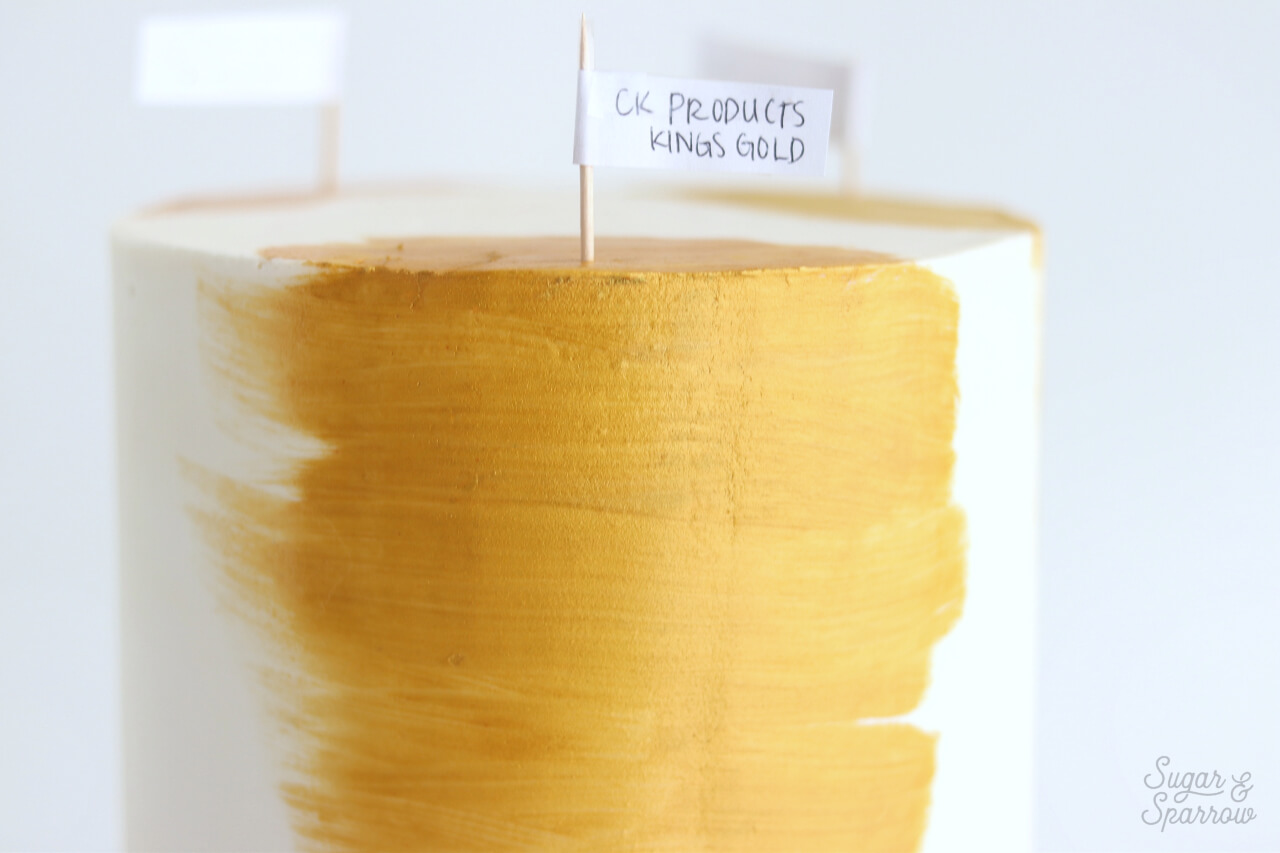
My reasoning for the lower rating is mainly because of the color and the semi-streakiness. King’s Gold was a bit vibrant for my liking, but they do make some other metallics that I would be interested in trying (there’s a Shiny Gold that looks a bit more like the color I was after). After painting a second coat, the streaks are diminished.
Gold Pearl Dust by Wilton
Rating: 7/10
The best thing about Gold Pearl Dust by Wilton is that it’s more commonly found at your local craft store. It’s a luster dust that you’ll need to mix with an alcohol solution to make it paintable, but I found that the dust didn’t dissolve as well as other luster dusts I’ve used, making it a little more grainy of a finish.

The color was also more of a champagne gold, and to my knowledge it’s the only gold metallic color option available from Wilton. If that’s the color you’re going for though, I’d totally recommend trying it. The finish ended up being shiny after two coats, although still a little streaky.
If you’re looking for the best metallic buttercream finish that’s FDA approved and edible, I would definitely recommend any of these three, my favorite being Edible Art Paint. Remember that any time you paint on buttercream, make sure you start with a well-chilled cake that’s firm to the touch. Let me know if you end up trying any of these recommendations in the comments below, or if you know of other FDA approved solutions that work well!


Thanks for this posts, it’s very helpful. Do you have any tips on how much of the alcohol to use?
Hi Megan! I never measure it! Just add a few drops at a time until the consistency is thick, velvety, and liquid enough to paint.
Hi ! thank you for the great work…. The vanilla buttercream you are using is considered crusted buttercream . Because on the site of edible art says that metallic edible art colors cannot be on Italian or Swiss buttercream but only in crusted buttercream. Thank you in advance
Hi Eleni! Thanks for the heads up about the other buttercreams not being compatible with Edible Art Paint. I have a friend who was able to paint it on to Swiss Meringue buttercream when the cake was cold because the buttercream was so firm, but since I haven’t attempted it with any other buttercream besides American, I can’t say how well it worked.
do you have any worries of the final product sweating after pulling it from cooler?
Hi Heather! I’ve never had a problem with buttercream sweating after removing it from the refrigerator. You might get a little bit of condensation if your environment is extremely hot, but nothing that will ruin the look.
Great post, what kind of buttercream will work for this? Does a Swiss buttercream have too much butter that will repel the alcohol in the paint?
Hi, Dillyn! Any type of buttercream works for this, but I use an American buttercream recipe: https://sugarandsparrow.com/vanilla-buttercream-recipe/
I‘m way late with my reply to this question, however, it might help someone else. Indeed, you cannot use the Edible Art paint on Swiss buttercream. The manufacturer recommends only American buttercream and some stockists even spell it out NOT to use it on Swiss.
Hi! I’m planning to make a 10” 3 layer cake probably 4 or so inches tall. Is one bottle enough to cover the entire cake?
Hi Takwa, 1 bottle of Edible Art Paint will totally be enough to cover a cake that size. You’ll probably only use about 1/4 of the bottle 🙂
I am planning to paint the semi naked cake with little gold … my question is do I have to put the cake in the fridge after applying the buttercream or leave at room temperature to form a crust and then paint.
Also once I paint the cake do I have to put it back into the fridge? As the cake will be travelling for an hour .. won’t it condense ( in and out of the fridge)? Or will the painted buttercream stay intact? Thanks in advance
Hi Sam! Before you paint the gold, refrigerate the cake for 20-30 minutes until the buttercream is firm to the touch. It makes a much better canvas for painting when the buttercream is cold and set. After you paint it, you can keep it out at room temp, but if it’s going for an hour drive I would refrigerate it until you’re ready to transport it, as cold cakes are easier to manage. I’ve never had a problem with condensation with this method. You may get a little bit of condensation but it won’t ruin your cake finish.
Thanks
I read some comments on another website about how the Edible Art gold paint tastes horrible, what is your opinion on the taste? Does the flavour of it affect the product you’re putting it on?
Hi, Rox! In my experience, when Edible Art Paint is completely dry, it doesn’t have any taste. When it’s wet, it definitely tastes like alcohol. Their website says this: “If the paint is painted on and properly air dried, leaving the paint rub free then there should not be an after taste. If the product is still wet and in paint form, yes there will be an unpleasant taste as the liquid has not been dried and evaporated.”
Thank you so much for posting this! My question is can I use a makeup sponge instead of a brush to apply the color? My daughter wants a more watercolor look, and I’m not sure if I can achieve that look with a brush.
Hi Debbie! I’m sure a sponge would make a really cool effect! You can totally use it to apply the color.
Can you comment at all on the taste of the edible art paint? I recently used the rose gold on a buttercream cake, where I also painted some white chocolate decorations and meringues and everything that was painted tasted awful! Pretty much inedible in fact. I’m not sure if I got a bad batch or if they all taste this bad. It really ruined the cake.
Thanks!
Hi Carey! Every time I’ve used Edible Art Paint there hasn’t been a taste to it. I just went and tasted a drop from a bottle I have (haha) and it does taste like alcohol, so I googled to see if other people are experiencing a bad taste and from Edible Art Paint’s website, they say “If the paint is painted on and properly air dried, leaving the paint rub free than there should not be an after taste. If the product is still wet and in paint form, yes there will be an unpleasant taste as the liquid has not been dried and evaporated.” Were the paints completely dry before eating the cake? If so, it sounds like you did get a bad batch unfortunately :/ I’d reach out to them and see if they’ll send you a new one!
Thanks for taking this on! What would you suggest for a cupcake, since the surface is piped and cant be painted with a brush? Have you tried the spray method and would you recommend it?
Hi Luciana! I’ve never tried the spray method before, but it’s definitely worth a try. For a cupcake, I would refrigerate the finished cupcake for about 20 minutes so the buttercream firms up, then paint on the Edible Art Paint. That would be my go-to method for a gold-finished cupcake, but like I said, the spray method may be a good way to go.
Loved your post and the video! I was wondering if you have tried this experiment with silver? Do you have a favorite silver that’s FDA approved and great for painting on American Buttercream?
Thanks so much, Summer! Although I have not tried this experiment with silver, I am so confident in Edible Art Paint’s metallic collection that I’m sure they have options for great FDA approved silver paint. Here’s a link to their silver: https://amzn.to/2tVdcM1 and they also have a “Light Silver” if you’re looking for a lighter option and “Gun Metal Grey” if you’re looking for a darker option.
This was so very helpful. I purchased the Rose Gold and it is my first time using cake paint. I am doing a 2 layer 6″ cake. Is one 0.5 oz bottle enough to do the top half?
Hi Kimberley! I love the Rose Gold color so much – that will look amazing on a cake! And yes, that should be more than enough. You’ll probably only need a third of the bottle or less.
Do you put cake back in fridge after painting? Thank you so much for your tips big help as I’m doing one tonight! X
Hi Clare! I usually put the cake back in the fridge after painting for about 15 minutes (so the paint can dry) before continuing with the decorating process.
Thank u very much
Hi! This was extremely helpful and thank you. I found the Edible Art paint at a local cake decorating store. One question I have is, do you place it in the one of those clear dishes first? What’s the best way so not to waste any? With the luster dust you can always put back in the jar. Thoughts?
Hi Teisha! That’s so awesome you found Edible Art Paint locally – I’m jealous! Whenever I use Edible Art Paint, I just eyeball it to see how much I think I’m going to need and put squirt it into a bowl to dip my paintbrush in. If there’s any left over, you can always unscrew the cap and pour it back into the container.
This post is super helpful! I do have a question though. Did you paint on ABC or SMBC? I tried edible art for the first time last week on SMBC and found it To be streaky. I ended up using two coats and never got a uniform code I was looking for.
Hi Chassidy! I haven’t ever tried painting SMBC, I always use American buttercream and loved the way the Edible Art Paint turned out after painting with it. Did you chill your buttercream before painting? I am not sure if a luster dust mixed with alcohol would be a better choice for SMBC or not since I’ve never tried the technique on that kind of buttercream.
Very helpful information, thank you.