• Cake
  • Frosting
  • YouTube
  • My Favorite Tools
  • Nav Social Icons

  • Skip to primary navigation
  • Skip to main content
  • Skip to primary sidebar
  • Skip to footer
  • Recipes
    • Cake
    • Cupcakes
    • Frosting
    • Ice Cream
    • Vegan
  • Cake Basics
  • Tutorials
  • Blog
  • About
  • Mobile Menu Widgets

    Connect

    Search

Sugar & Sparrow logo in script font

Sugar & Sparrow

Lifestyle and Cake from Portland Oregon

  • Cake Basics
  • Recipes
    • Cake
    • Cupcakes
    • Cookies & Bars
    • Filling
    • Frosting
    • Ice Cream
    • No-Bake
    • Small Batch
    • Vegan
  • Tutorials
  • Book
  • Blog
  • About

Easy S’mores Icebox Cake (No-Bake!)

June 22, 2025 · In: Cake, Featured, No-Bake, Recipes, Seasonal, Summer

Jump to Recipe

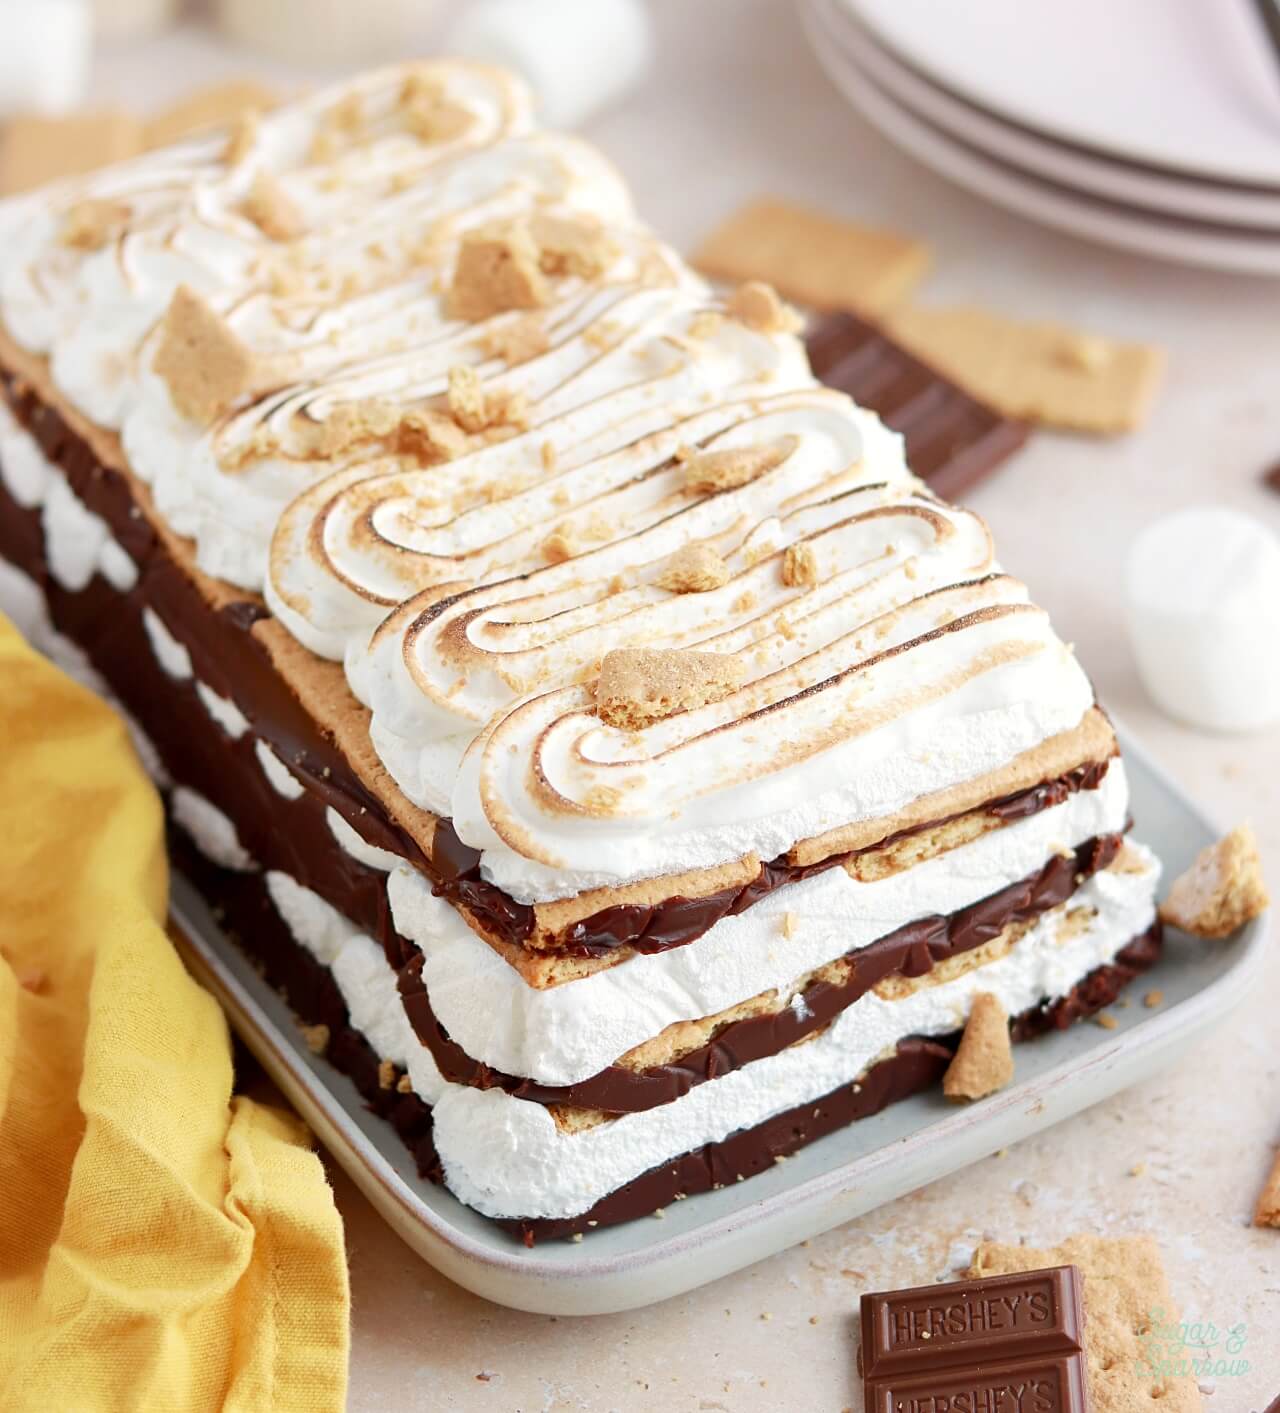
This s’mores icebox cake is so simple to make (no baking necessary) and absolutely delicious! It’s layers of graham crackers, easy chocolate ganache, and pillowy soft homemade marshmallow meringue. After layering these elements together in a loaf pan, the cake sets perfectly in the refrigerator while softening the graham crackers slightly to create a cake-like consistency. Topped with toasted marshmallow meringue, the result looks and tastes like a gourmet s’more and is sure to impress! 

smores icebox cake recipe by sugar and sparrow
 no bake smores cake recipe

What is an Icebox Cake?

Icebox cakes are no-bake desserts that are typically layers of cookies and whipped cream (or in this case, graham crackers, chocolate ganache, and marshmallow meringue). The layered desserts are refrigerated until the cookie element softens, which takes about 8 hours at the minimum. These no-bake desserts originated in the early 20th century, when refrigeration was a luxury. Refrigerators then were called iceboxes (literally chests with big ice blocks inside), hence the name icebox cake. 

smores cake with homemade marshmallow creme, chocolate ganache, and graham crackers

S’mores Icebox Cake Layers

Now that we know the concept of the icebox cake, let’s dive into each of the layers in this s’mores icebox cake:

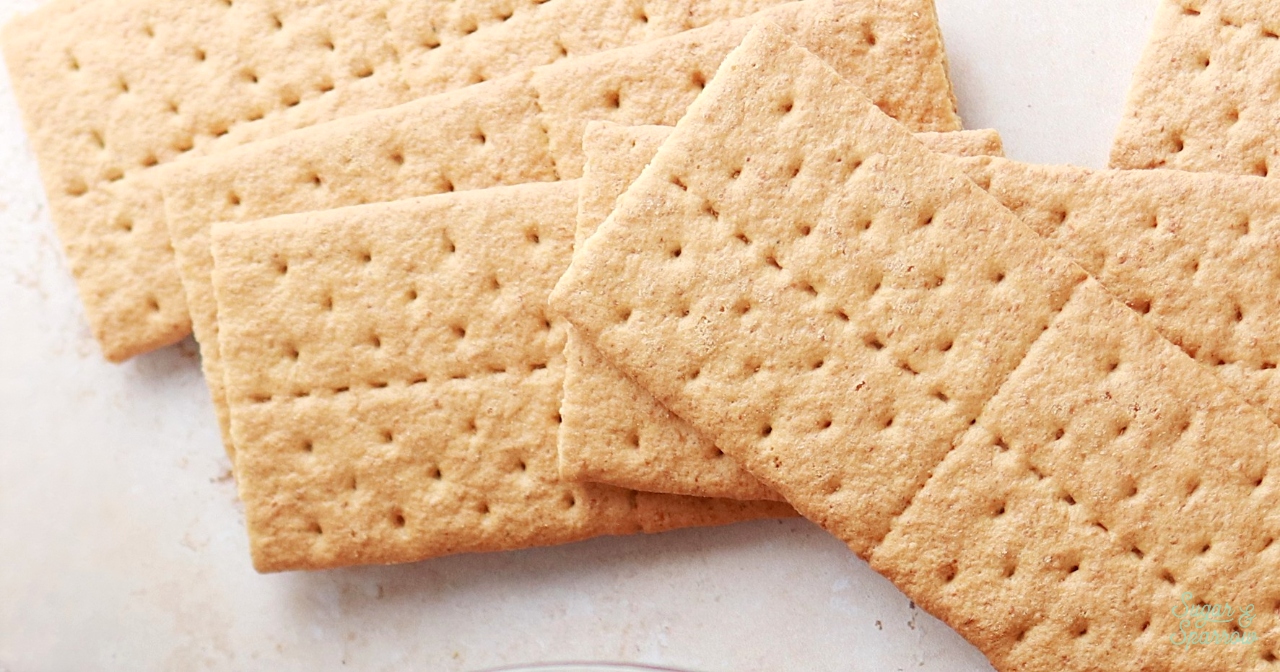
Graham Crackers. There are five layers of graham crackers in this s’mores icebox cake. I like to use honey graham crackers, but any graham cracker flavor you prefer with your s’mores will do. 

smores icebox cake with graham crackers

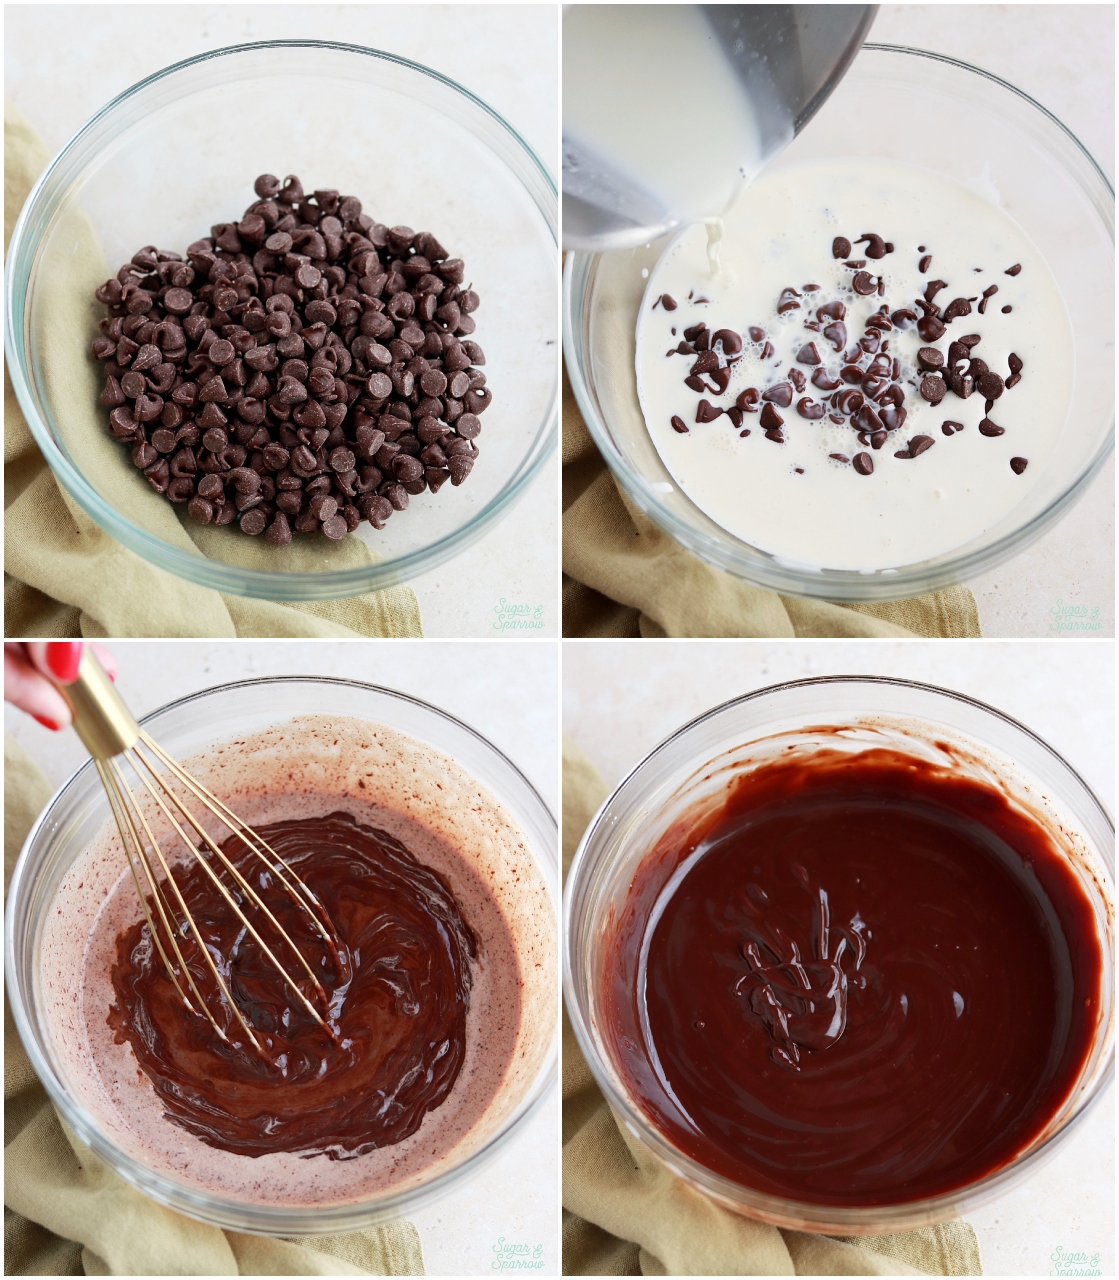
Chocolate Ganache. This two-ingredient chocolate ganache is really easy to make, even if you’ve never made ganache before. You’ll want to use a few quality chocolate bars or semi-sweet chocolate chips. I prefer using Nestlè Toll House Chocolate Chips because I almost always have them on-hand and the chocolate flavor in the final ganache is divine. 

chocolate ganache consistency for drip cakes

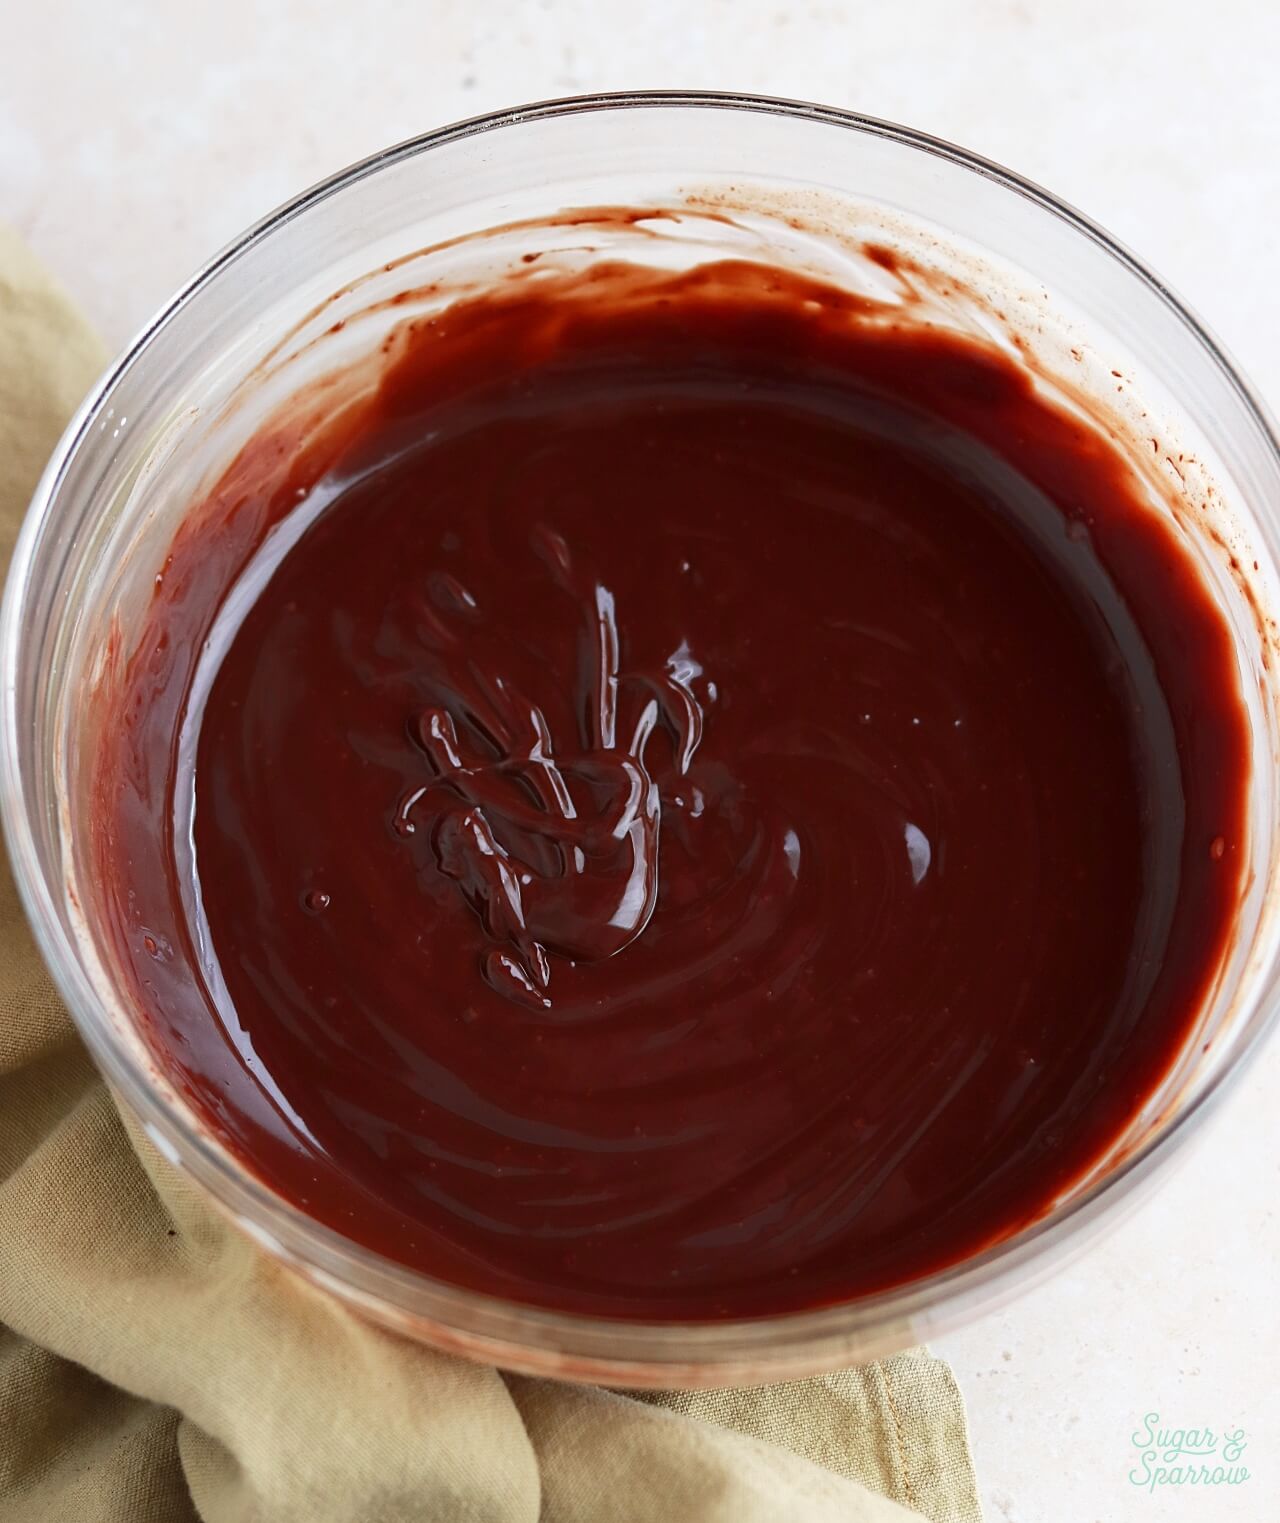
The second ingredient in the ganache is heavy whipping cream (aka double cream). You’ll bring this to a soft simmer in a saucepan, then pour it over the chocolate and whisk until you create a uniform ganache. It will look really soupy at first, but it will thicken as it cools. 

how to make chocolate ganache

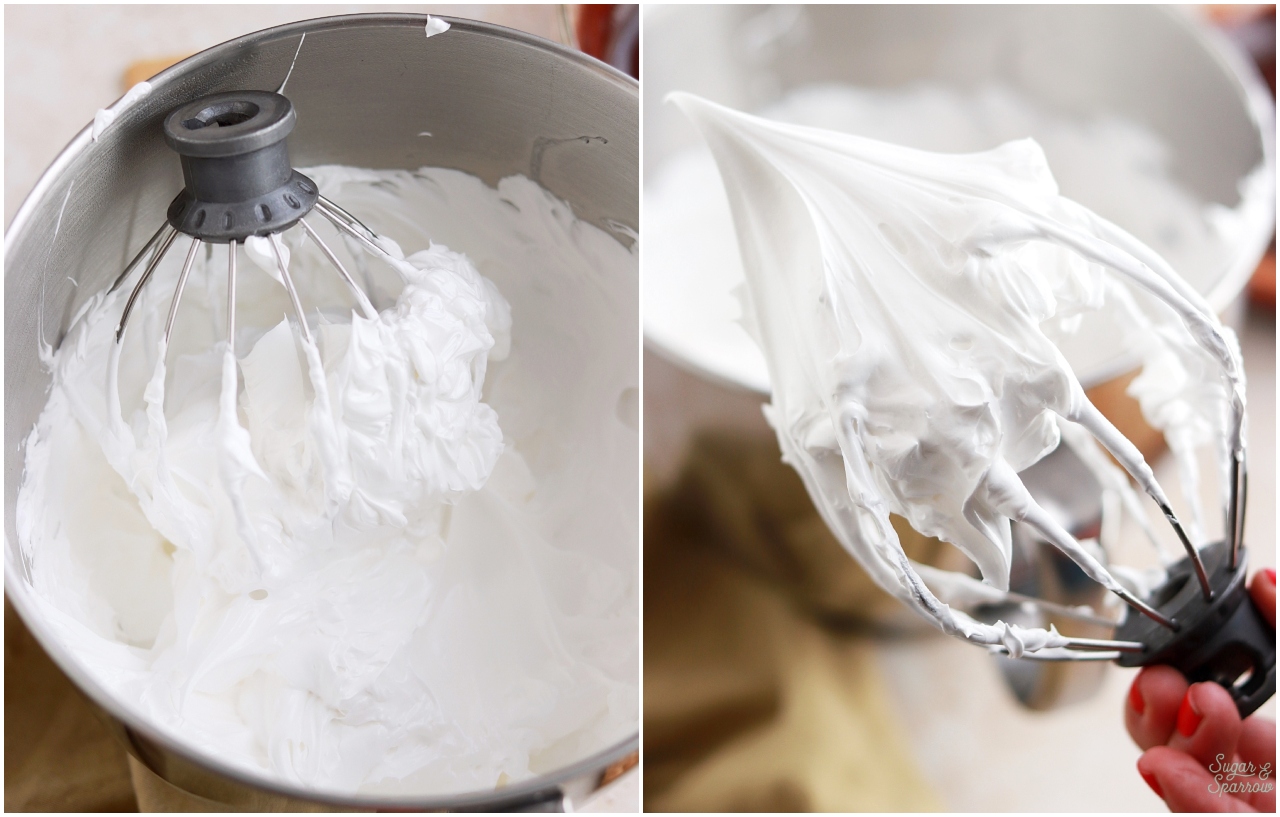
Marshmallow Meringue. This is essentially a homemade marshmallow creme made by whisking together egg whites, granulated sugar, and a little cream of tartar, then cooking the mixture over a double boiler until the sugar dissolves. Once this happens, pour the mixture into the bowl of your stand mixer fitted with the whisk attachment, add a little vanilla extract, and the mixer does all the rest of the work for you! It transforms the mixture into marshmallow meringue with stiff, glossy peaks. 

homemade marshmallow creme recipe

How to Make a S’mores Icebox Cake

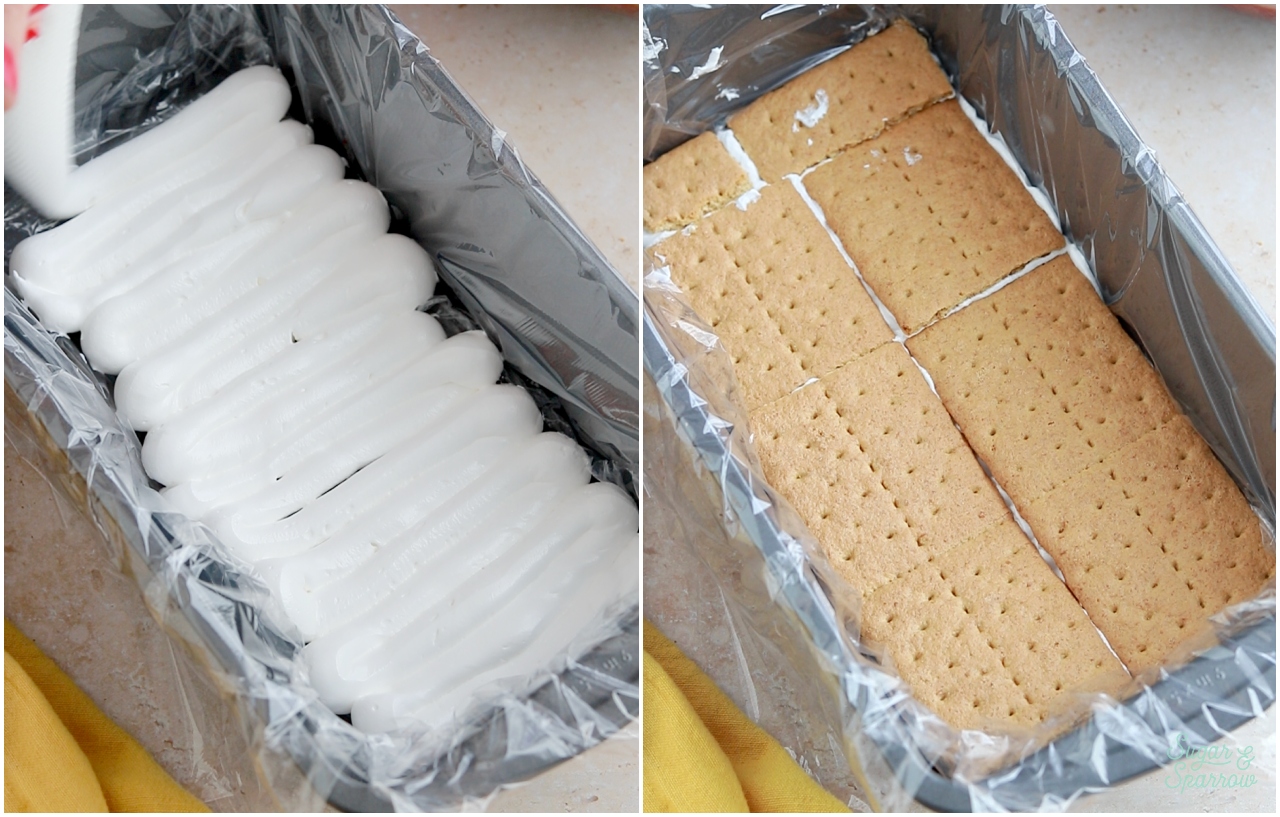
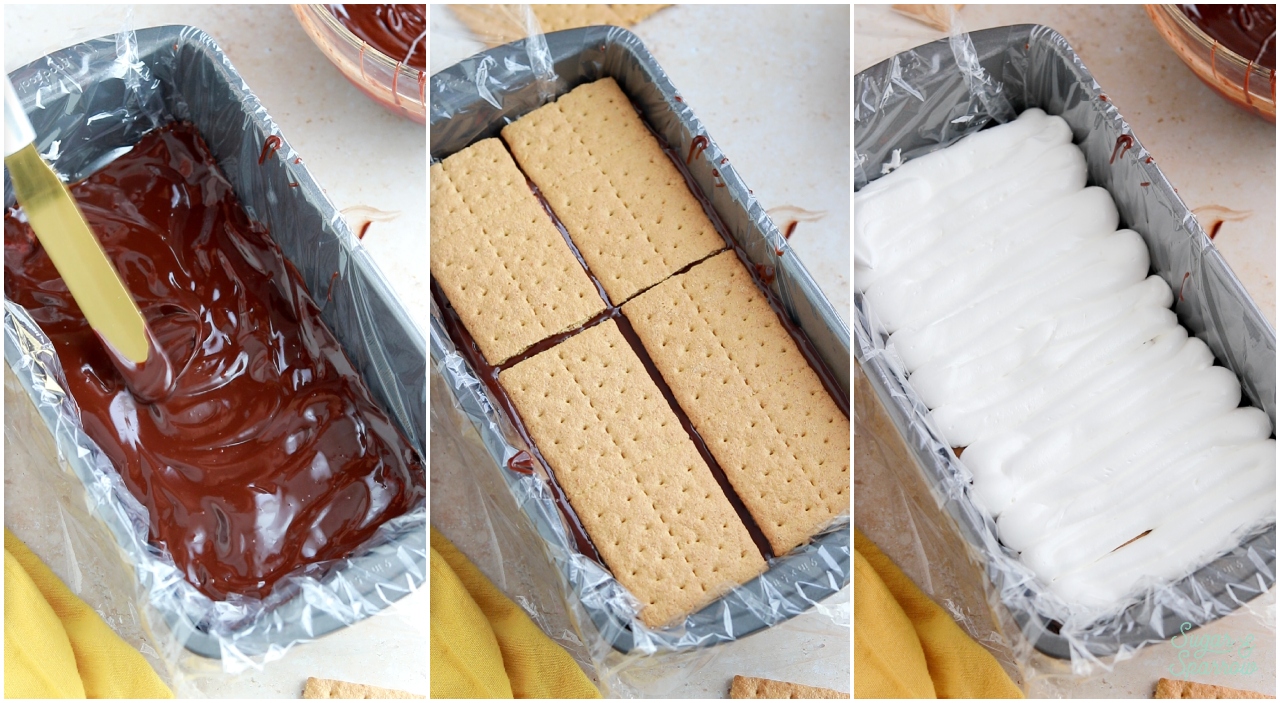
Once you have your s’mores icebox cake elements made, it’s time to assemble. I like to make this recipe in a 9.5 x 5 inch loaf pan, which I line with plastic wrap. Leave a little bit of overhang on all four sides. 

I added the marshmallow meringue into a piping bag and piped a layer of marshmallow meringue on the bottom of the pan, which will end up being the top of the cake. If you don’t have a piping bag, you can spread a thin layer of marshmallow meringue into the bottom of the pan. Stick the first layer of graham crackers on top of the meringue layer, trimming some of the graham crackers down so that you can fit them in.

how to make a smores icebox cake

Next, add about ⅓ of the chocolate ganache onto the graham crackers and spread it evenly before topping with another layer of graham crackers. Pipe (or spread) another layer of marshmallow meringue on top

how to make a smores icebox cake

Pipe (or spread) the next layer of marshmallow meringue on top, then repeat the layers of graham crackers, ⅓ of the chocolate ganache, graham crackers, marshmallow meringue, graham crackers, and the final ⅓ of chocolate ganache. 

assembling a smores icebox cake

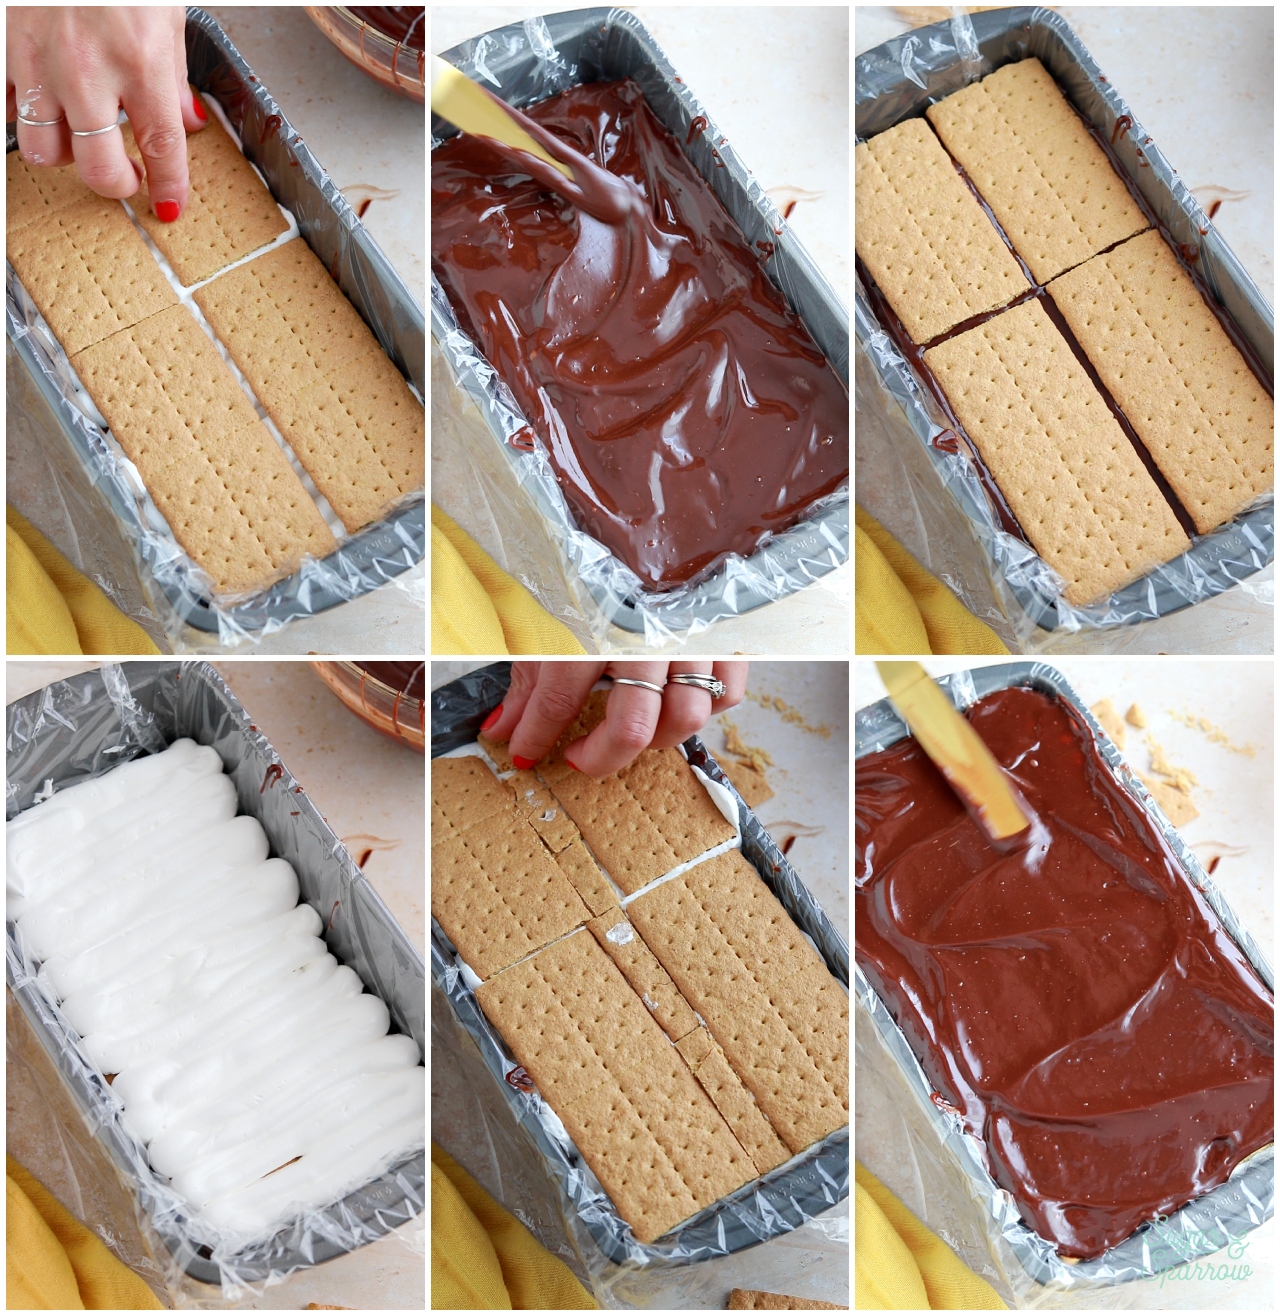
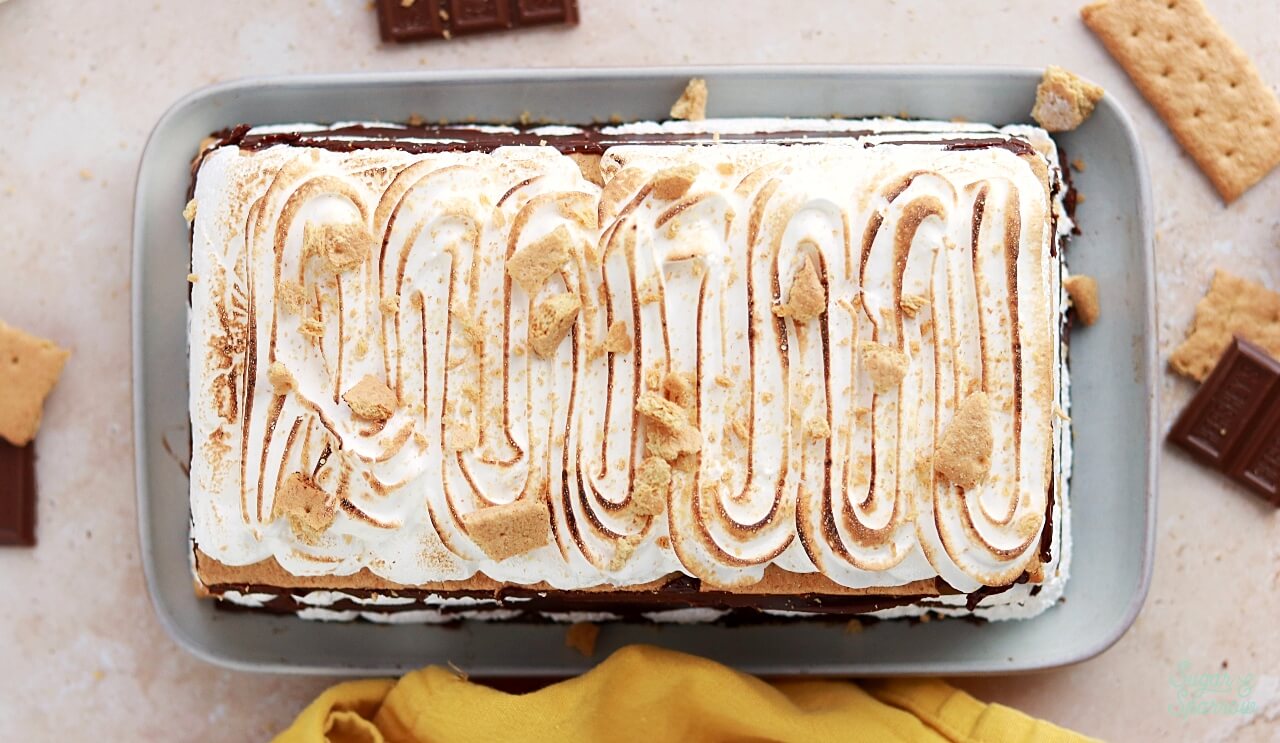
You’ll have a little marshmallow meringue leftover to pipe on top of the s’mores icebox cake once it’s set. This is what gets toasted with a kitchen torch. Place the leftover marshmallow meringue into an airtight container and store it in the refrigerator until the icebox cake has set and you’re ready to decorate.

smores icebox cake assembly

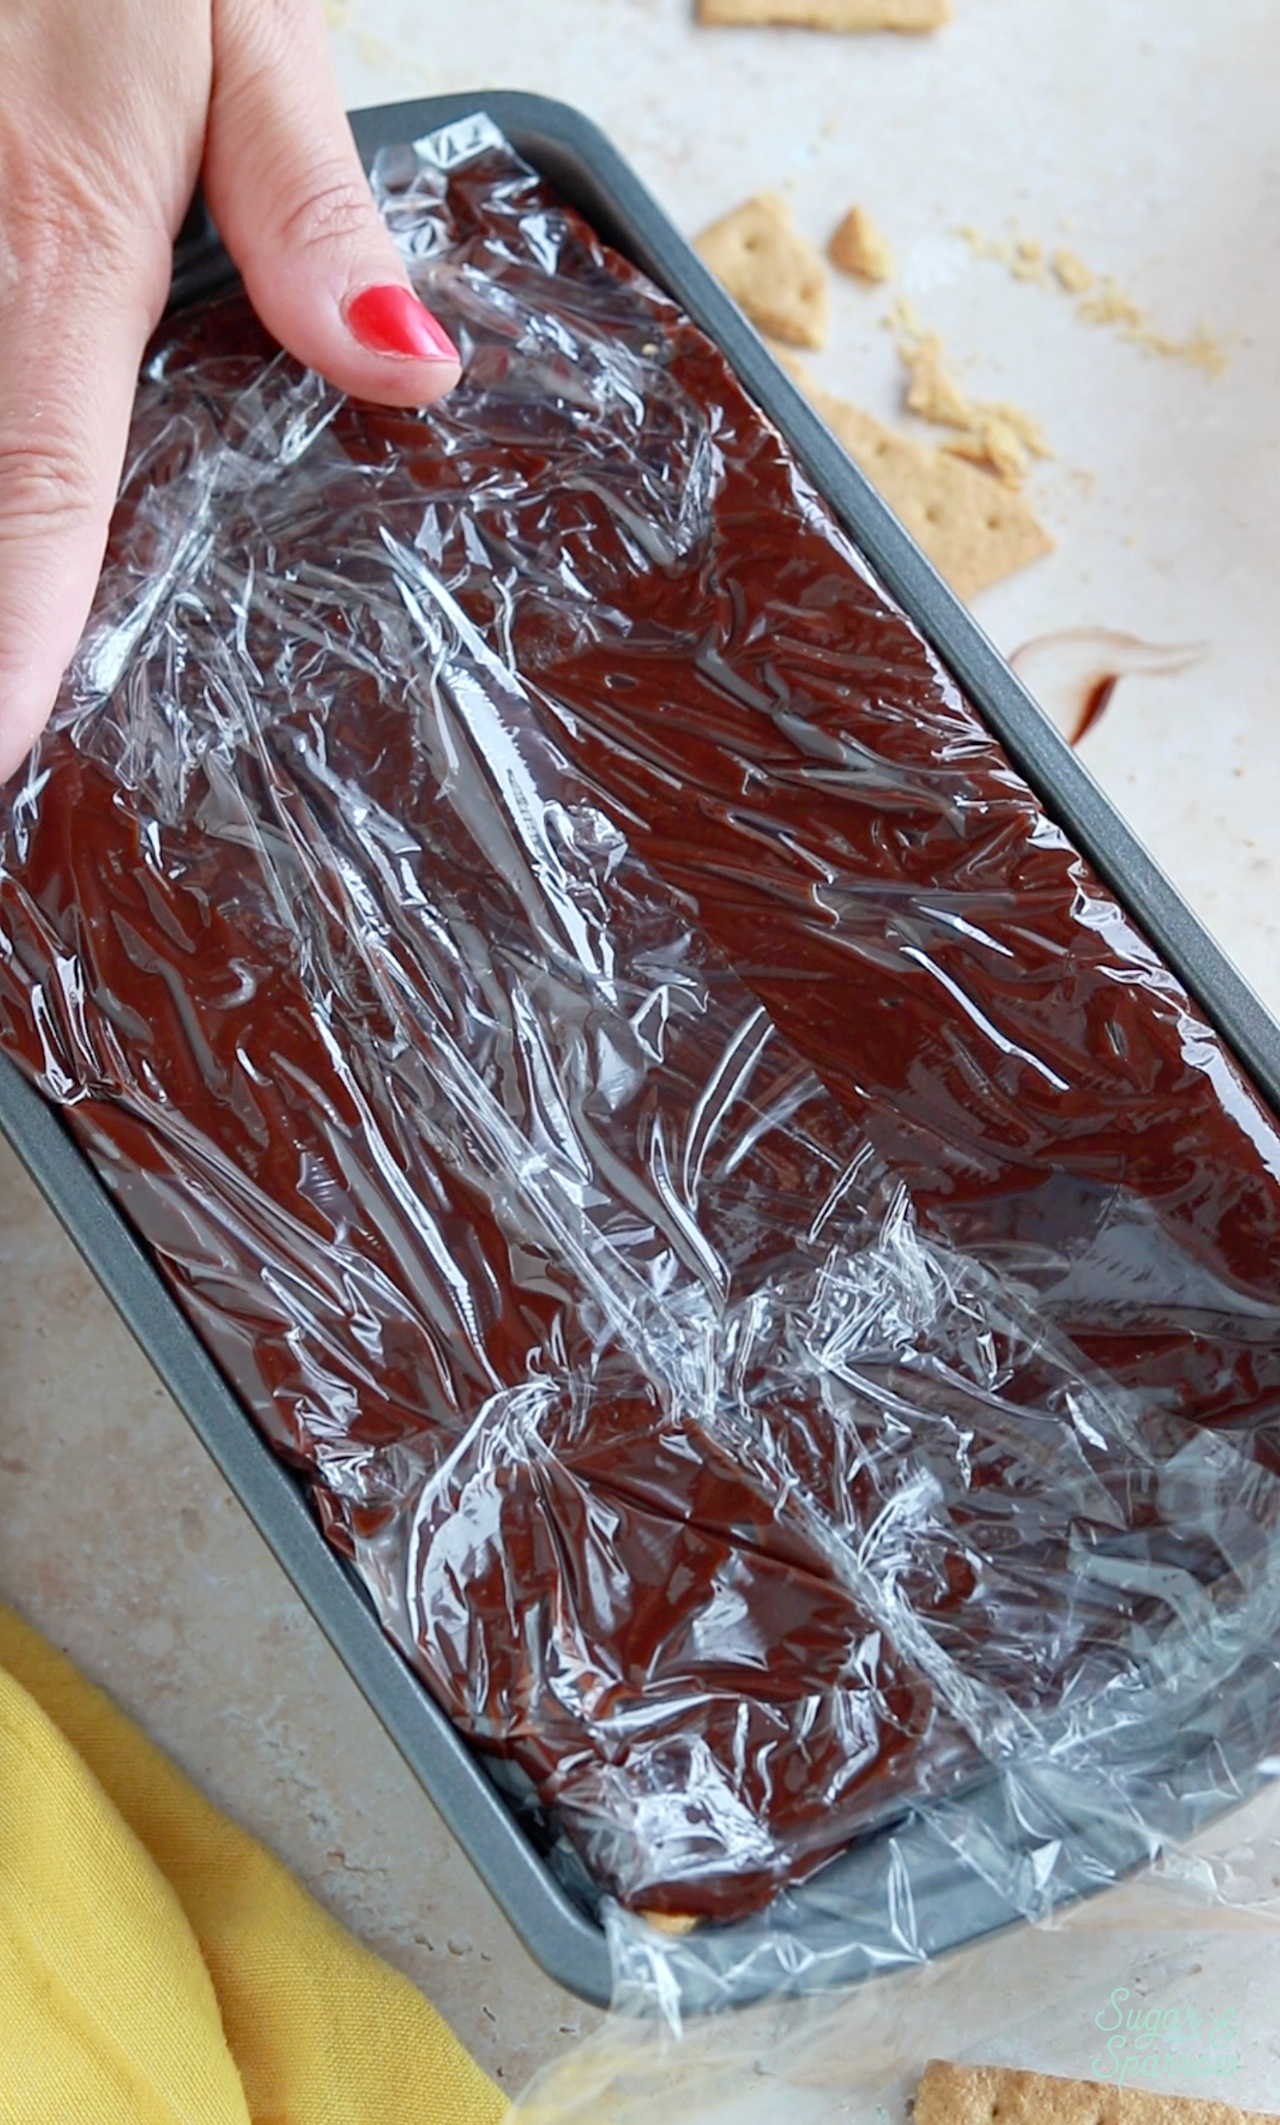
With all your layers assembled and the leftover meringue packed away, fold the overhang of plastic wrap over the top of the final chocolate ganache layer to cover it up. Place the icebox cake in the refrigerator for at least 8 hours and up to two days.

Serving the S’mores Icebox Cake

Once the s’mores icebox cake has set, unwrap the plastic wrap from the top of the cake (which is about to become the bottom of the cake). Grab a large plate or serving tray and place it on top of the loaf pan, then flip the pan with the plate so that the plate is on the bottom and you can lift the loaf pan off the icebox cake. Then, unwrap the rest of the plastic wrap.

Next, grab the marshmallow meringue you have stored in the refrigerator and give it a few stirs. You can either place it into a piping bag and pipe it onto the top of the cake like I did (I used Wilton Tip 1M for the look pictured), or spread it on with a knife or spatula for a more rustic look. Then, toast the meringue with a kitchen torch.

no bake smores cake recipe
toasted marshmallow meringue on top of smores cake

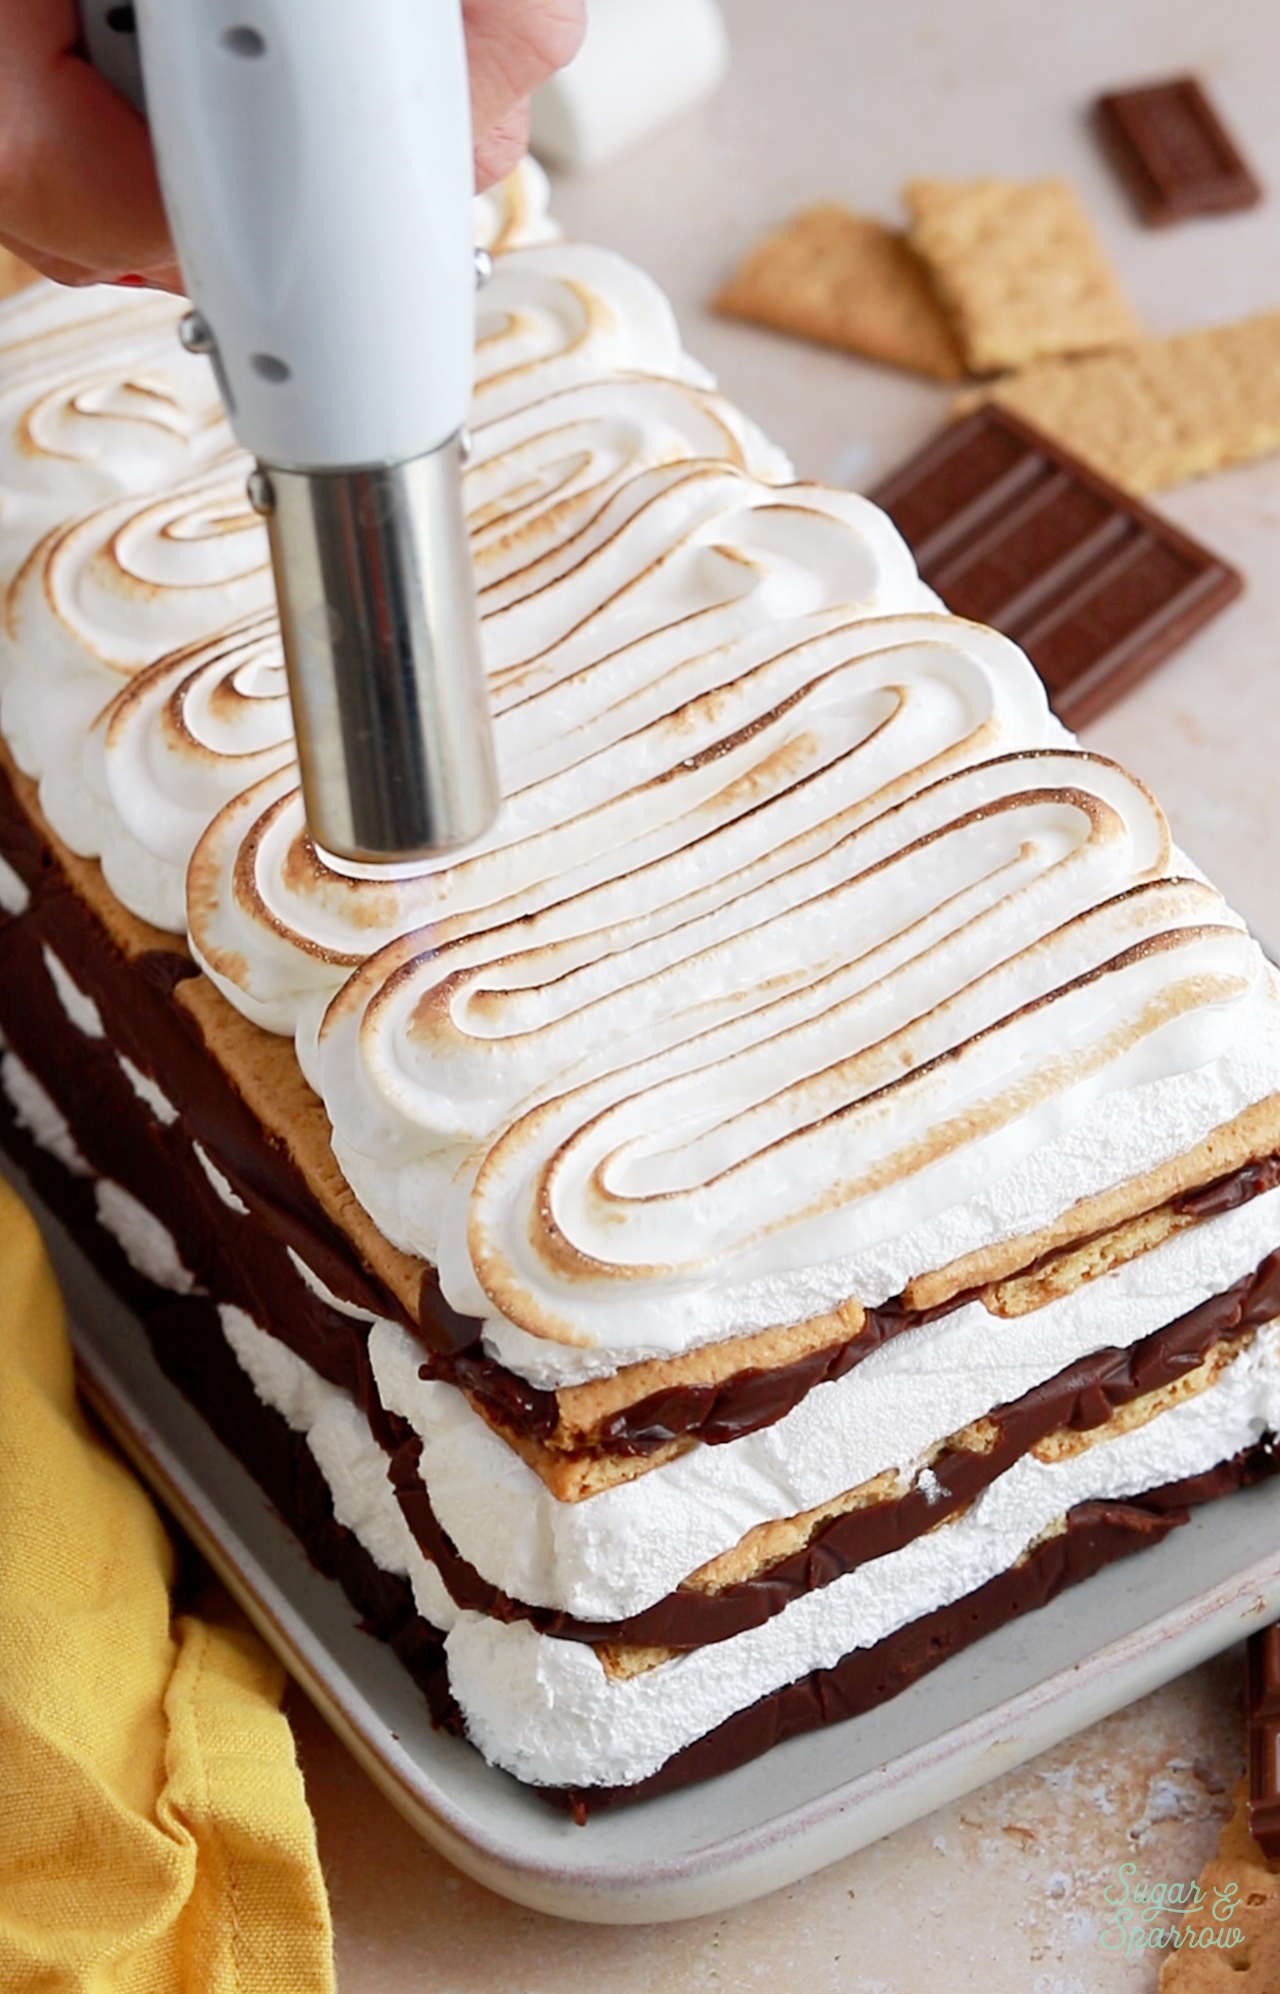
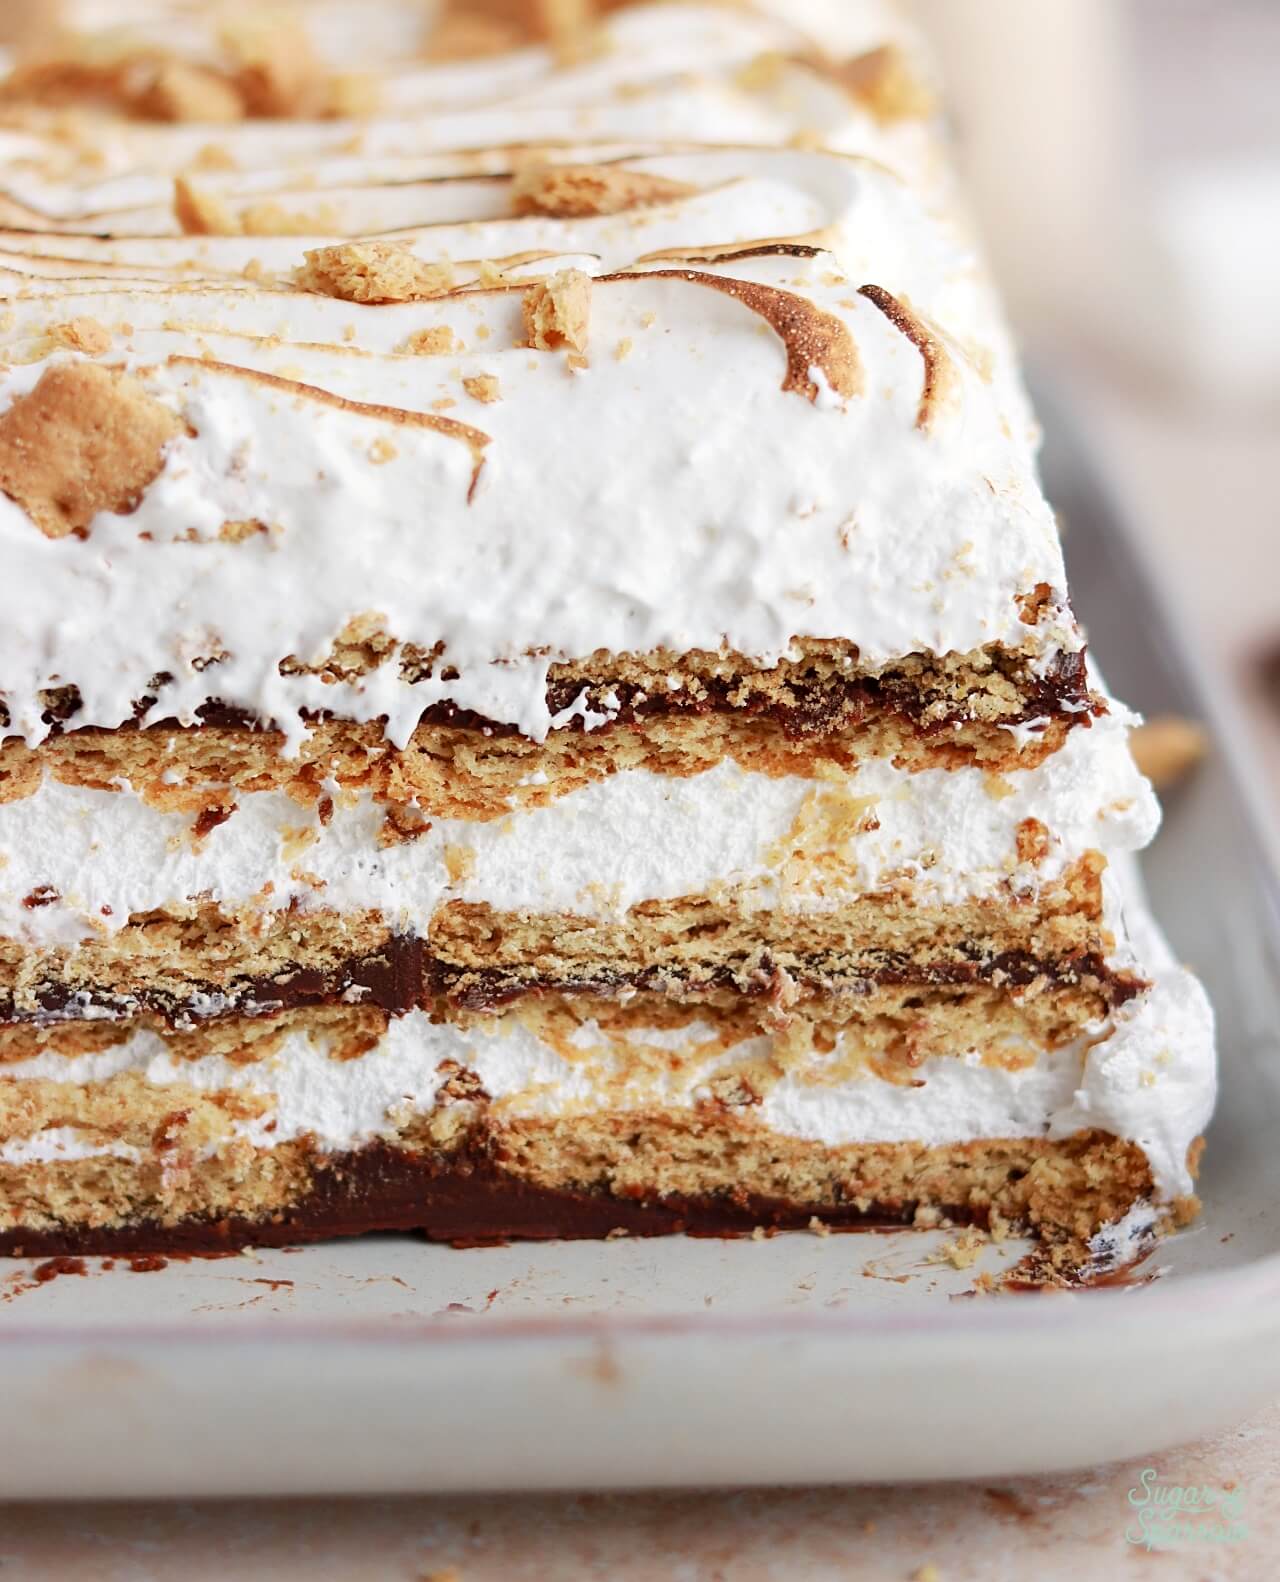
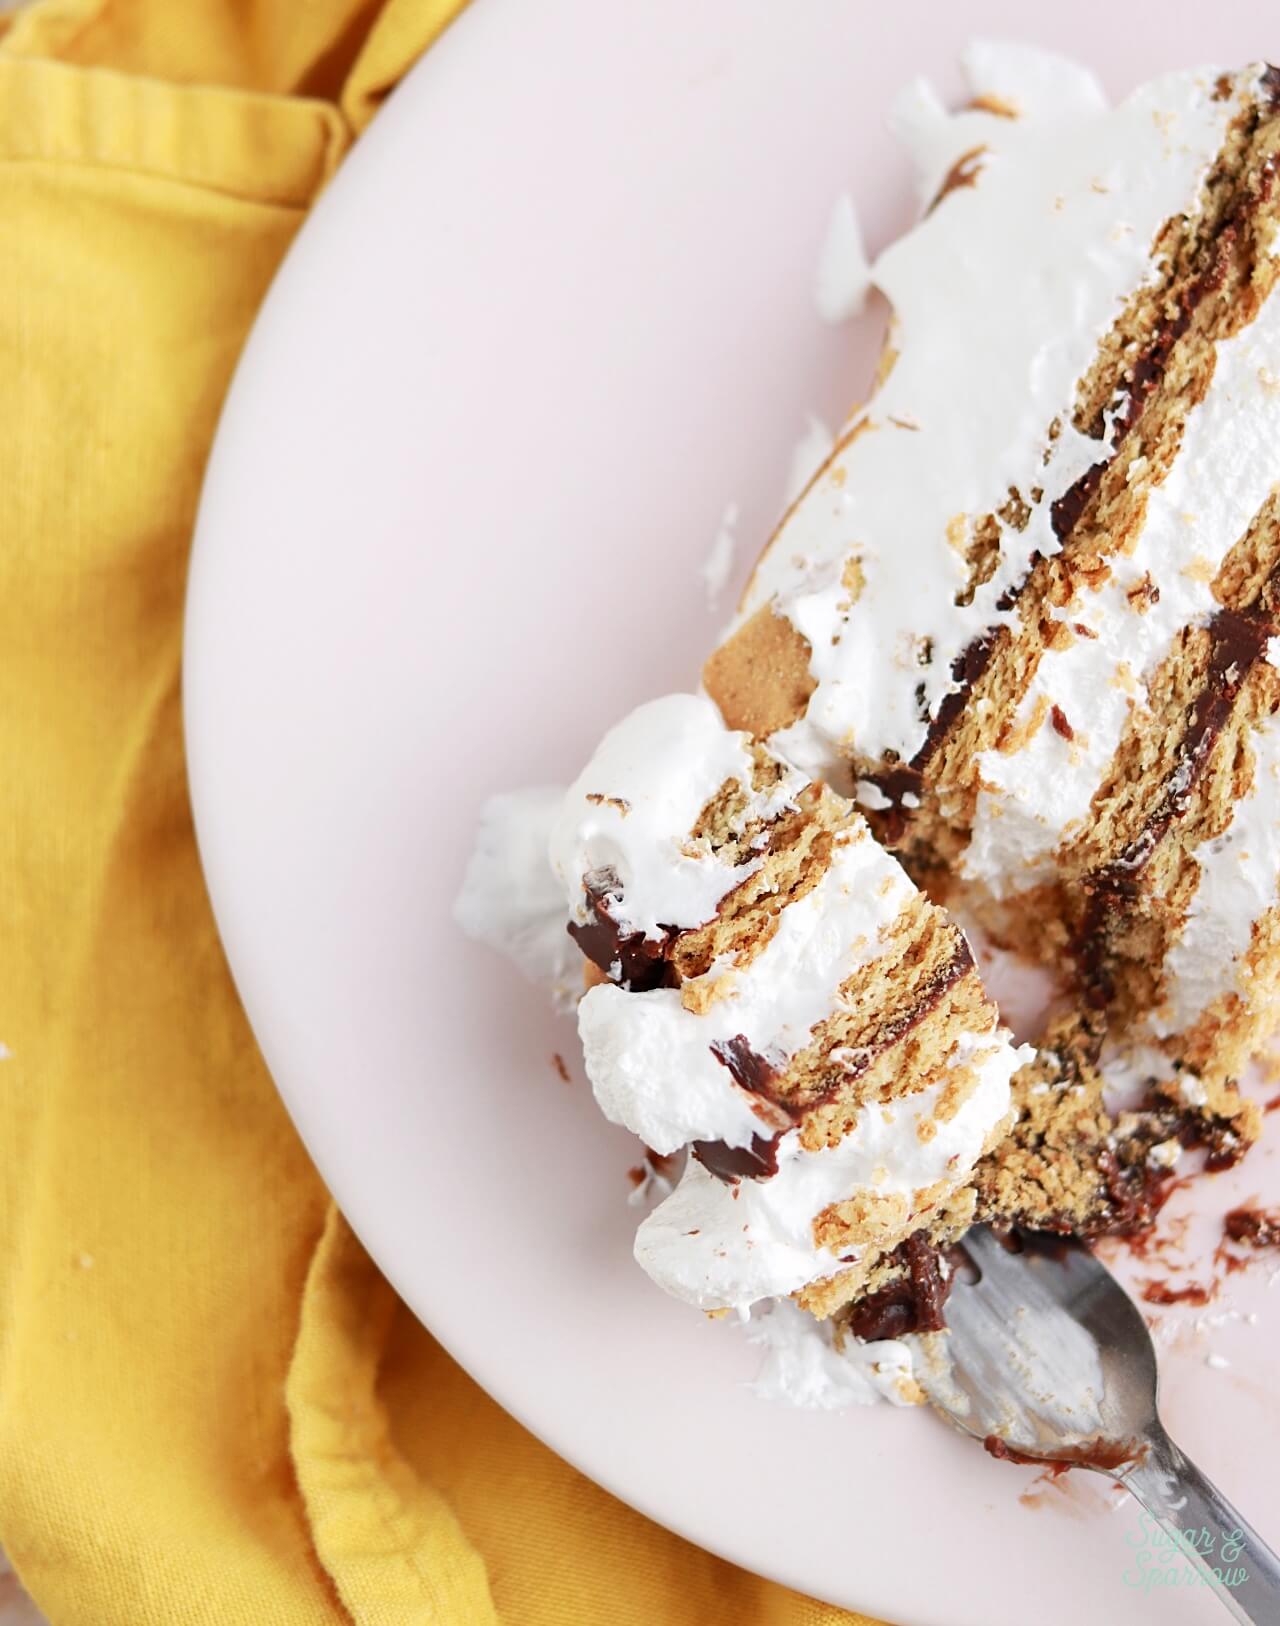
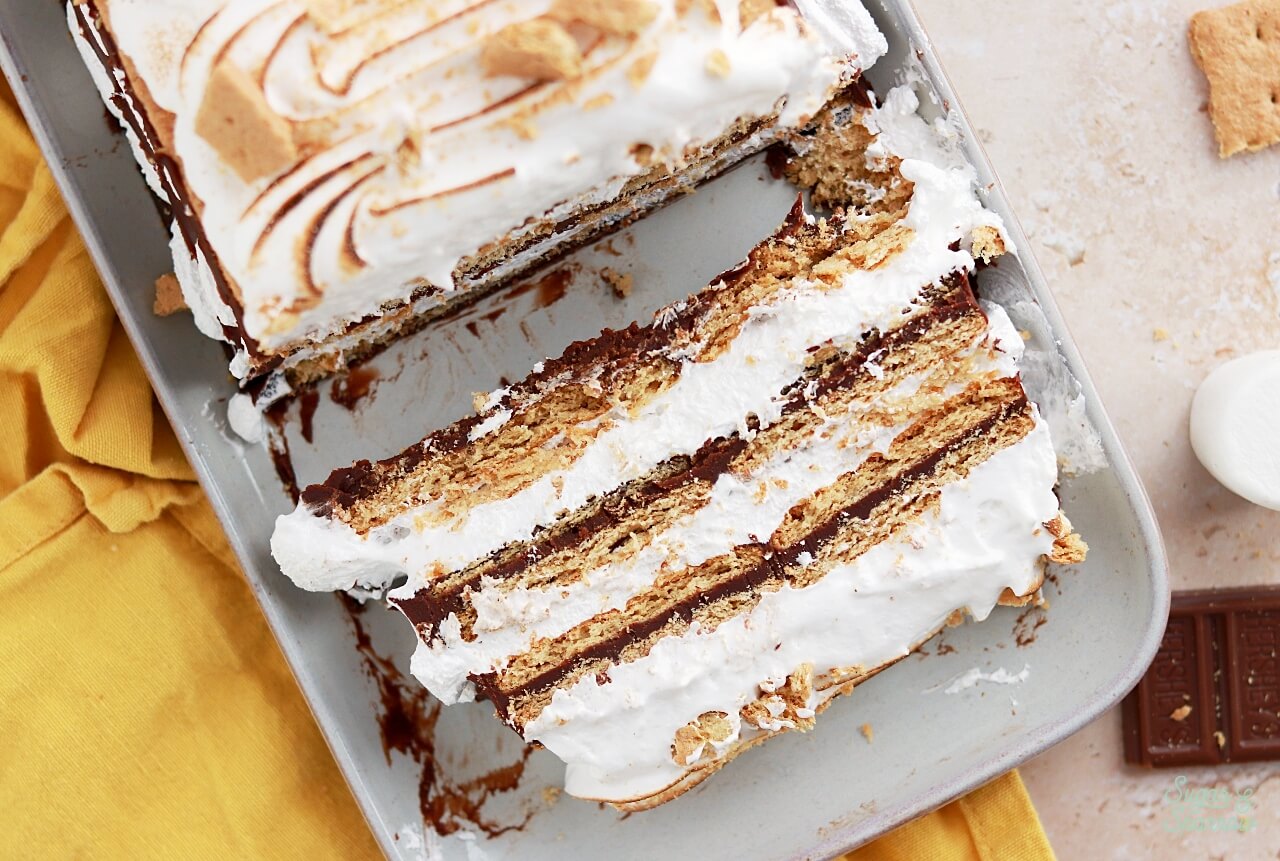
From here you can slice the icebox cake into slabs using a chef’s knife. Look at all these beautiful layers!

smores icebox cake with graham crackers chocolate ganache marshmallow
easy smores cake recipe

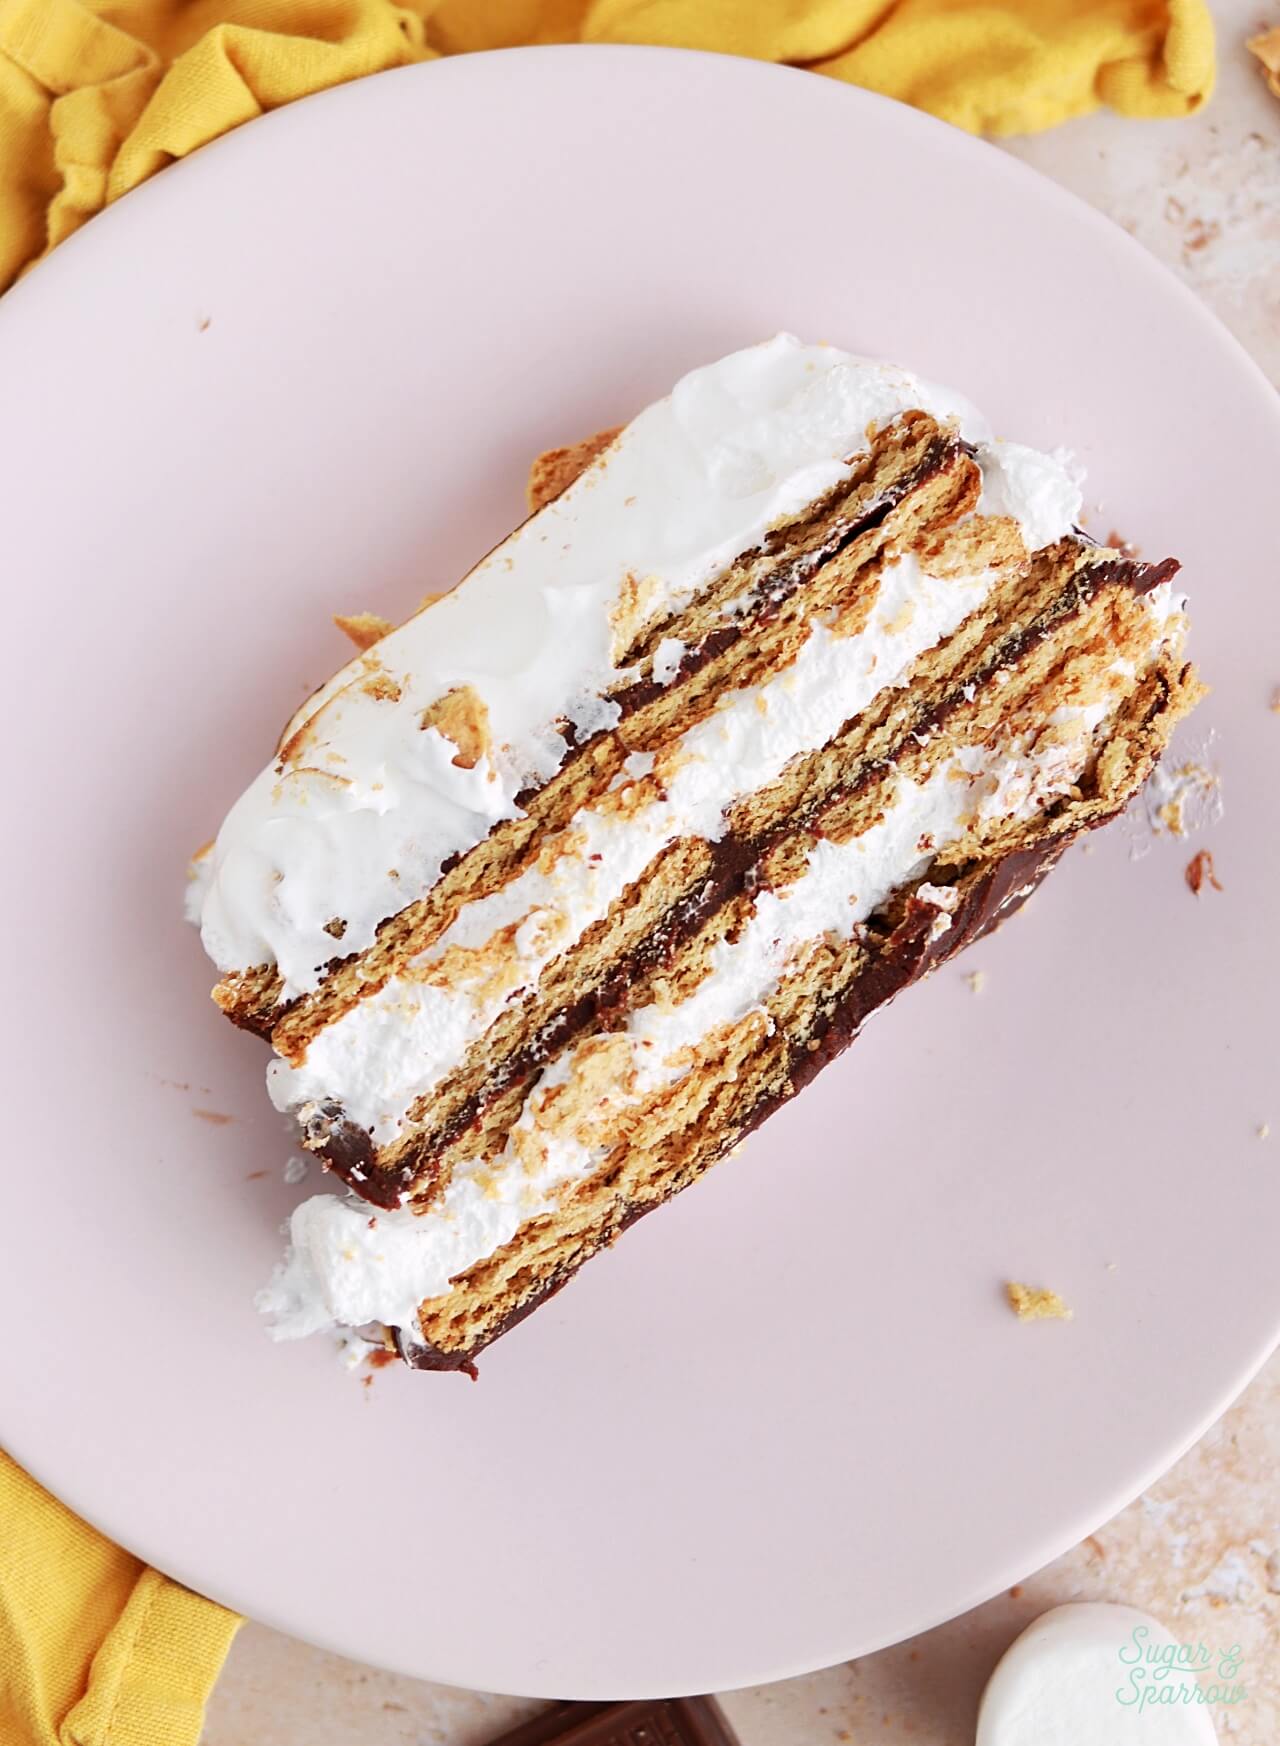
This s’mores icebox cake is the perfect no-bake dessert for those warm summer days where you don’t want to turn on the oven. It’s visually stunning and the layers are absolutely delicious together. With the cake-like graham crackers, decadent chocolate ganache, and soft marshmallow meringue, it’s completely irresistible and tastes so much more complex than it is. You’ll have everyone begging for this recipe!

easy smores icebox cake recipe

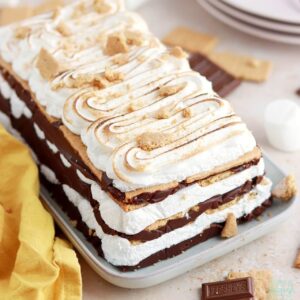
No-Bake S’mores Icebox Cake

Layers of graham crackers, decadent chocolate ganache, and soft homemade marshmallow meringue that are piled high in a loaf pan! After chilling in the refrigerator overnight, this s'mores icebox cake is topped with more marshmallow meringue that you'll toast to perfection.
Print Recipe Pin Recipe
Prep Time:45 minutes mins
Cook Time:10 minutes mins
Refrigeration:8 hours hrs
Total Time:8 hours hrs 55 minutes mins
Course: Dessert
Cuisine: American
Servings: 12 servings

Equipment

  • 9.5×5-Inch Loaf Pan
  • Butane Kitchen Torch

Ingredients

  • 1 1/2 Cups (270g) semi-sweet chocolate chips
  • 1 Cup (240ml) heavy whipping cream
  • 4 large egg whites (about 120g)
  • 1 Cup (200g) granulated sugar
  • 1/2 tsp cream of tartar
  • 1 tsp pure vanilla extract
  • 20 full-sheet graham crackers About 2/3 of one standard box

Instructions

Make the Chocolate Ganache

  • Place the chocolate chips into a heat proof bowl (glass or metal) and set aside.
  • In a saucepan over medium-high heat, warm the heavy whipping cream until it just starts to simmer. I always look for small bubbles forming around the edge and a soft simmer starting in the middle. When it's reached this point, pour the cream into your bowl of chocolate and let sit for about 30 seconds. 
  • Whisk the ingredients together until the ganache is uniform in consistency and there are no bits of chocolate left on your whisk. It will look soupy at first, but will come together into a smooth ganache.

Make the Marshmallow Meringue

  • Fill a medium saucepan with an inch or two of water and bring it to a simmer over medium heat. Whisk together the egg whites, granulated sugar, and cream of tartar in a heat proof bowl (glass or metal), then place it on top of the simmering saucepan. Make sure that the bottom of the bowl does not touch the water. Alternatively, you can use a double boiler for this part.
  • Whisk the egg white mixture continuously until the sugar and cream of tartar are dissolved, about 4 minutes. It will thin out and be very frothy on top.
  • Remove the mixture from the heat and add it to a stand mixer fitted with the whisk attachment (you can use a hand mixer for this part as well). Add the vanilla, then beat on high speed for about 5 minutes. You’ll know it’s ready when it looks glossy with stiff peaks. To test it, dip your whisk attachment into the meringue and make sure the peak stays perfectly upright when you flip the whisk upright.

Assembly

  • Line a 9.5×5 inch loaf pan with plastic wrap, leaving an overhang on all four sides of the pan.
  • Reserve about 1/2 Cup of marshmallow meringue and place it into an airtight container in the refrigerator. You'll use this to decorate the cake once it's set. Add the rest of the marshmallow meringue into a piping bag and pipe about 1/3 of it into the bottom of the lined loaf pan. Alternatively you can spread the marshmallow meringue into the pan with a spatula, just note that it will be sticky.
  • Add a layer of graham crackers on top of the meringue, breaking some of the graham crackers into smaller pieces to fill up the entire space. Add about 1/3 of the chocolate ganache on top of the graham crackers and spread it in an even layer all the way to the edges of the pan.
  • Add another layer of graham crackers, followed by 1/3 of the the marshmallow meringue, a layer of graham crackers, 1/3 of the chocolate ganache, a layer of graham crackers, the rest of the marshmallow meringue, a layer of graham crackers, and the rest of the chocolate ganache.
  • Wrap the excess plastic wrap overhang over the surface of the chocolate ganache to cover it completely, then place the s'mores icebox cake into the refrigerator for at least 8 hours and up to two days. Overnight is best.
  • Once the s'mores icebox cake is set and you're ready to serve, turn it out onto a serving plate and remove the plastic wrap. Top with the reserved marshmallow meringue (I piped mine on with Wilton Tip 1M but you could also spread it on with a spatula). Toast the meringue with a kitchen torch and top with crushed graham crackers, if desired.

Notes

Make Ahead Tips: 
  1. The chocolate ganache can be made ahead and stored in the refrigerator in an airtight container for up to two weeks. When you’re ready to use it, bring it back to room temperature by microwaving in 5-10 second intervals until it’s spreadable. 
  2. The assembled dessert can be stored in the refrigerator for up to two days, or in the freezer for up to one month. If freezing, thaw overnight in the refrigerator before serving and be prepared to make fresh marshmallow meringue for the top of the cake since that cannot be made that far in advance. 1/2 batch of the marshmallow meringue will be more than enough for the topping.
What to Do with Leftover Egg Yolks: here’s a great list of ideas for leftover egg yolks.
What to Do with Leftover Graham Crackers: here are some recipes of mine that use graham crackers to inspire you!

Did you make this s’mores icebox cake? I want to know how it went! Let me know in the comments and feel free to tag @sugarandsparrowco on Instagram to show me a photo. I love to see what you create with my recipes!

By: Whitney · In: Cake, Featured, No-Bake, Recipes, Seasonal, Summer · Tagged: graham crackers, icebox cakes, marshmallow meringue, no bake cake, smores

you’ll also love

oreo icebox cake recipeEasy Oreo Icebox Cake
smores ice cream cake recipe by sugar and sparrowThe Ultimate S’mores Ice Cream Cake
No-Churn S’mores Ice Cream

Join the List

Stay up to date & receive the latest posts in your inbox.

Reader Interactions

Leave a Reply Cancel reply

Your email address will not be published. Required fields are marked *

Recipe Rating


Next Post >

The Perfect No-Bake Cheesecake Recipe

Primary Sidebar

Welcome to Sugar & Sparrow

Welcome to Sugar & Sparrow

Helping you whip up pretty desserts with confidence and creativity. And hopefully sharing a few laughs with you along the way!

Learn More

Connect

let’s bake!

Get my very best recipes, baking tips, and decorating tutorials sent to your inbox

Featured Posts

pink ombre layer cake recipe with pink ombre buttercream tutorial

Pink Ombre Cake Recipe & Decorating Tutorial

hostess cupcake layer cake recipe

Hostess Cupcake Layer Cake

conversation heart cakes by sugar and sparrow

Mini Conversation Heart Cakes Tutorial

Search

Archives

Follow Along

@sugarandsparrowco

STRAWBERRY CUPCAKES 🍓based on my beloved strawb STRAWBERRY CUPCAKES 🍓based on my beloved strawberry layer cake recipe, this cupcake version is just as moist yet fluffy and bursting with natural strawberry flavor! Between the mix of fresh strawberries in the cupcakes + freeze-dried strawberries in the frosting, the flavor is out of this world 🚀

Full recipe link in my bio (with strawberry buttercream) + at https://sugarandsparrow.com/strawberry-cupcakes/

STRAWBERRY CUPCAKES
Yield: 14 cupcakes

INGREDIENTS:
5 oz (143g) fresh or frozen strawberries
1/3 Cup (80ml) whole milk, room temp
1 1/2 Cups (158g) sifted cake flour
1 tsp baking powder
1/4 tsp baking soda
1/2 tsp salt
6 Tbsp (85g) unsalted butter, room temp
1 Cup (200g) granulated sugar
2 large eggs, room temp
3 Tbsp (45g) sour cream, room temp
1 tsp vanilla extract
1 drop pink food coloring (optional)

INSTRUCTIONS: 
1. Puree the strawberries using a food processor (you’ll have about 1/2 cup of puree), then place into a saucepan over medium-low heat. Bring to a simmer, then cook for 10-15 min, stirring occasionally, until you have 1/4 cup. Refrigerate until room temp.
2. Preheat oven to 350ºF (177ºC) and line a standard cupcake pan with liners.
3. Whisk together the sifted cake flour, baking powder, baking soda, and salt and set aside.
4. In a stand mixer w/ paddle attachment (or hand mixer + large bowl), whip the butter on high for 2 min. Add sugar and beat for 2 min, until light and fluffy. Turn the mixer to low and add the eggs one at a time, then add the vanilla and sour cream, turn the mixer to high and beat for 1 min. Meanwhile, whisk together the strawberry puree, whole milk, and food coloring (if using).
5. Turn the mixer off and add all of the dry ingredients at once. Mix on low until just combined, then add the strawberry milk mixture until just combined, about 30 seconds.
6. Fill the cupcake liners 2/3 full and bake for 14-18 minutes. Cool completely before topping with strawberry buttercream (full recipe linked above). 

#strawberrycupcakes #strawberrycake #pinkcupcakes #strawberry #cupcakes
COFFEE BUTTERCREAM (recipe below)☕️ this frost COFFEE BUTTERCREAM (recipe below)☕️ this frosting has AMAZING coffee flavor, is so easy to decorate cakes with, and pairs beautifully with so many flavors (chocolate, vanilla, or any cake flavor you’d want to turn into a latte). 

All my cake pairing suggestions are linked in my bio or at https://sugarandsparrow.com/coffee-buttercream-recipe/ 

COFFEE BUTTERCREAM⁣
Yield: 2.5 Cups⁣

INGREDIENTS⁣
1 1/2 tsp instant coffee or espresso powder⁣
1 1/2 Tbsp whole milk, room temperature⁣
1 Cup (226g) unsalted butter, room temperature⁣
3 1/2 Cups (420g) powdered sugar⁣
2 tsp pure vanilla extract⁣
Pinch of salt⁣

INSTRUCTIONS⁣
1. Combine the instant espresso/coffee with the whole milk and set aside. In the bowl of a stand mixer, beat the butter on high until creamy and smooth (about 5 minutes), scraping down the bowl and paddle a few times in between.⁣
2. Turn the mixer to low and add the powdered sugar a few cups at a time, scraping down the bowl and paddle between intervals. Add the vanilla, the coffee/espresso milk mixture, and salt. Mix on low until fully incorporated, about one minute.⁣

#coffeebuttercream #buttercream #frosting #coffeecake
HUMMINGBIRD CAKE 🤎 after weeks of testing this HUMMINGBIRD CAKE 🤎 after weeks of testing this recipe I found that the KEY to taking this already delicious cake to the next level is: roasting the bananas!! It’s an optional step in this recipe BUT it adds unparalleled caramel notes and noticeable richness to the flavor 🙌🏼 Along with the crushed pineapple, toasted pecans, and tangy cream cheese buttercream, this cake is NEXT LEVEL delicious, ultra-moist, melts in your mouth, and will have everyone asking for the recipe. 

Full recipe (with cream cheese frosting) linked in my bio + at https://sugarandsparrow.com/hummingbird-cake-recipe/ 

#hummingbirdcake #creamcheesefrosting #bananacake #cakedecorating #cakerecipe
OREO CUPCAKES 🖤 (recipe below) I made these for OREO CUPCAKES 🖤 (recipe below) I made these for a fundraiser at @vancity.youth last weekend and was reminded of how delicious this recipe is! There’s black cocoa powder in the cupcake batter to give them the PERFECT Oreo cookie flavor profile + the most delicious cookies and cream buttercream I’d eat all on its own. 
 
Full recipe at https://sugarandsparrow.com/oreo-cupcakes-recipe/ 
 
OREO CUPCAKES 
1 Cup (132g) all purpose flour 
3/4 Cup (150g) granulated sugar 
1/3 Cup (38g) black cocoa powder 
1 tsp baking soda 
1/2 tsp baking powder 
1/4 tsp salt 
1/4 Cup (60ml) vegetable oil 
1 large egg, room temp 
1/2 tsp pure vanilla extract 
1/2 Cup (120ml) buttermilk, room temp 
1/2 Cup (120ml) hot coffee or hot water 
 
1. Preheat the oven to 350ºF/177ºC and line a cupcake pan with 12-15 liners. 
2. In a large bowl, whisk all of the dry ingredients together. Add the vegetable oil, eggs, vanilla, and buttermilk and whisk to combine. Whisk in the hot coffee (or hot water). 
3. Pour the batter into the prepared cupcake liners and bake for 14-18 minutes. 
 
OREO BUTTERCREAM 
1 Cup (226g) unsalted butter, room temperature 
3 Cups (360g) powdered sugar 
2 tsp pure vanilla extract 
2 Tbsp whole milk, room temperature 
pinch of salt, or to taste 
9 Oreo cookies (96g), finely ground 
 
1. Using a hand mixer or stand mixer, cream the butter on medium-high speed until it’s creamy and pale, 5 min. 
2. Add the powdered sugar a few cups at a time, mixing on low speed and scraping down bowl and paddle in between intervals. Keep the mixer on low and add the vanilla, milk, and salt. Mix until fully incorporated and uniform, 1-2 min. 
4. Mix in the Oreo cookie crumbs on low speed. 
 
#oreo #oreocupcakes #cookiesandcream #chocolatecupcakes #cupcakes
RASPBERRY CAKE FILLING (recipe below) ♥️ this RASPBERRY CAKE FILLING (recipe below) ♥️ this perfectly sweet/tart raspberry cake filling is beautifully thick, seedless, and so rewarding to make from scratch! It takes just a handful of ingredients and can be made with fresh OR frozen raspberries 🙌🏼 

Get the full recipe + cake pairing suggestions at the link in my bio or at https://sugarandsparrow.com/seedless-raspberry-cake-filling/

INGREDIENTS:
2 1/2 Cups (10oz, 315g) fresh or frozen raspberries
1/2 Cup (100g) granulated sugar
1 Tbsp lemon juice
1 tsp lemon zest
1 1/2 Tbsp (12g) cornstarch
1 1/2 Tbsp (22ml) water

INSTRUCTIONS: 
1. In a saucepan set over medium heat, add the raspberries, granulated sugar, lemon juice, and lemon zest. Cook until the mixture begins to boil, stirring occasionally. 
2. Once boiling, lower the heat and simmer for 10-15 minutes while you continue stirring occasionally. Then, remove from heat and use a fine mesh sieve to strain out the seeds over a medium bowl. After straining, you’ll be left with about 1/4 Cup of seedy pulp.
3. In a small separate bowl, combine the cornstarch and water until uniform. Return the strained raspberry filling to the saucepan (wipe it free of any remaining seeds if needed) and add the cornstarch/water mixture. Cook over medium heat until boiling, stirring constantly, then reduce to a simmer and cook for 1-3 minutes, until the filling has thickened slightly, is no longer cloudy, and coats the back of the spatula.
4. Pour into an airtight container and refrigerate for at least 4 hours and up to 1 week. It will be jello-like once set but after stirring it will become a thick, jammy consistency that’s perfect to use as a cake or cupcake filling!

#raspberrycake #cakefilling #cakedecorating #raspberries #baking

Footer

On the Blog

  • Cake Basics
  • Recipes
  • Tutorials

Info

  • About
  • Privacy Policy & Disclosure

stay in the know

Copyright © 2026 · Theme by Sugar & Sparrow