• Cake
  • Frosting
  • YouTube
  • My Favorite Tools
  • Nav Social Icons

  • Skip to primary navigation
  • Skip to main content
  • Skip to primary sidebar
  • Skip to footer
  • Recipes
    • Cake
    • Cupcakes
    • Frosting
    • Ice Cream
    • Vegan
  • Cake Basics
  • Tutorials
  • Blog
  • About
  • Mobile Menu Widgets

    Connect

    Search

Sugar & Sparrow logo in script font

Sugar & Sparrow

Lifestyle and Cake from Portland Oregon

  • Cake Basics
  • Recipes
    • Cake
    • Cupcakes
    • Cookies & Bars
    • Filling
    • Frosting
    • Ice Cream
    • No-Bake
    • Small Batch
    • Vegan
  • Tutorials
  • Book
  • Blog
  • About

No-Churn Strawberry Shortcake Ice Cream

May 30, 2023 · In: Featured, Ice Cream, Recipes, Seasonal, Summer

Jump to Recipe

Between the weather getting hotter and my pregnancy cravings, I am on a full-blown ice cream kick. And since discovering how easy the no-churn ice cream method is, I can’t stop experimenting with different flavors! When you open my freezer these days, you’ll always see at least one loaf pan full of my latest ice cream concoction. My most recent flavor success is probably my favorite of all my ice cream recipes thus far: strawberry shortcake! 

no churn strawberry shortcake ice cream recipe

One Reader, Ashley, says: “I’ve been putting off trying an ice cream recipe just because it’s unfamiliar to me but this recipe was easy and delicious! My whole family loved it, to include my dad that doesn’t even particularly like strawberries, and one guest even said ‘I’m not trying to blow smoke, but this is the best ice cream I’ve ever had’” ★★★★★

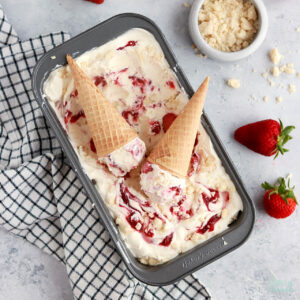
This easy strawberry shortcake ice cream features delicious fresh strawberries that have been sweetened and reduced to amplify flavor, plus baked shortcake crumbs to give it extra texture and beautiful bursts of shortcake flavor. These toppings get incorporated into the base ice cream recipe, which is vanilla ice cream spiked with a little cream cheese to give it a rich and creamy cheesecake-like flavor. So, so good. Like, irresistibly good!

strawberry shortcake ice cream recipe easy
strawberry shortcake ice cream recipe

Like most great recipes, this one will require a little more involvement than the average no-churn ice cream recipe. It’s still easier than a churned ice cream recipe, there are just a couple elements that require cooking (the strawberries) and baking (the shortcake crumbles). 

You’ll start by chopping up some fresh strawberries and adding them into a saucepan along with some granulated sugar and a pinch of salt. These strawberries will cook for about 20-25 minutes, until most of the liquid has evaporated and you’re left with more of a jam-like consistency with big strawberry chunks in it. Eliminating the majority of the liquid not only amplifies the strawberry flavor, it will make the overall consistency of the ice cream perfect. Too much liquid will result in chunks of strawberry flavored ice in your ice cream, which isn’t the most pleasant. So be sure not to skip the reduction! And when it’s finished, just pop it into the refrigerator to cool completely. 

no churn strawberry shortcake ice cream recipe
no churn strawberry ice cream recipe

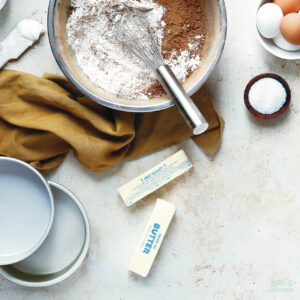
The next element is the shortcake crumbles, which involve mixing up a few dry ingredients and binding them together with melted butter and vanilla extract until the mixture is crumbly. Then you’ll throw them on a lined cookie sheet and bake them. You could even toss this part of the recipe together and bake the crumbles while you’re reducing the strawberries to make things even more efficient. 

Once your toppings are both completely cool, you’re ready to make the ice cream base and mix it with the toppings in a chilled loaf pan. To make sure there are strawberries and shortcake crumbles throughout, I like to do the assembly process in layers: add one layer of ice cream, top it with strawberries and shortcake crumbles, swirl everything together with a skewer, repeat twice more. After a 6 hour stay in the freezer, your strawberry shortcake ice cream is ready to enjoy! 

no churn strawberry shortcake ice cream layered with strawberries and shortcake crumbles
strawberry shortcake ice cream recipe

I could not stop eating this ice cream during the photo session. It’s so delicious in a cone or simply by the spoonful, so saturated with strawberries and shortcake crumbles that you get the best bite every time. If you love strawberry shortcake and ice cream, this is a dessert made in heaven just for you – a true must try!

Now all I want to do it turn this flavor combo into an ice cream cake. Stay tuned for that!

no churn strawberry shortcake ice cream recipe with shortcake crumbles

No-Churn Strawberry Shortcake Ice Cream

5 from 2 votes
No-churn vanilla ice cream with sweetened strawberries and baked shortcake crumbles in every bite. So dreamy and easy to whip up (no ice cream maker needed!)
Print Recipe Pin Recipe
Prep Time:40 minutes mins
Cook Time:1 hour hr
Freeze Time:6 hours hrs
Servings: 6 Cups (12 servings)

Ingredients

Strawberry Reduction

  • 2 Cups (300g) fresh strawberries*, halved
  • 1/3 Cup (70g) granulated sugar
  • pinch of salt

Baked Shortcake Crumbles

  • 3/4 Cups (90g) cake flour
  • 2 1/2 Tbsp (32g) granulated sugar
  • 1/8 tsp baking powder
  • 1/4 tsp salt
  • 3 Tbsp (42g) unsalted butter, melted
  • 1/2 tsp pure vanilla extract

Ice Cream

  • 4 Oz (120g) cream cheese, room temperature
  • 1 1/2 Cups (12 Oz) sweetened condensed milk
  • 2 Cups (480ml) heavy whipping cream
  • 2 tsp pure vanilla extract

Instructions

Make the Strawberry Reduction

  • In a medium saucepan over medium heat, combine the strawberries, sugar, and salt. The strawberries will begin to release their juices. Bring the mixture to a simmer and mash up the strawberries as you cook them down. 
  • Simmer over medium-low heat until most of the liquid has evaporated, about 25-30 minutes, stirring occasionally. The mixture should become somewhat of a jam-like consistency after the reduction. Place into an airtight container and refrigerate until cold.

Bake the Shortcake Crumbles

  • Preheat the oven to 250°F/121ºC and line a baking sheet with parchment paper. In a medium bowl, whisk together the cake flour, sugar, baking powder, and salt.
  • Add the melted butter and vanilla extract. Mix with a rubber spatula until the mixture begins to form small clusters, then press the ingredients together with your hands to form even more clusters. Spread the clusters onto the prepared baking sheet and bake for 30 minutes. Cool the crumbs completely before using in the cake assembly.

Make the Ice Cream

  • Place a large metal bowl into the refrigerator and a loaf pan into the freezer to chill for at least 15-20 minutes. Meanwhile, add the sweetened condensed milk and vanilla into a small bowl and whisk to combine. Set aside.
  • Remove the large chilled metal bowl from the refrigerator and add the cream cheese into it. Beat with a hand mixer (or using the whisk attachment on your stand mixer) until creamy, about 2 minutes. Add the heavy whipping cream and beat the two ingredients together on high speed until stiff peaks form, about 3 minutes.
  • Using a rubber spatula, fold one half of the sweetened condensed milk mixture into the heavy whipping cream mixture. When combined, gently fold in the rest of the sweetened condensed milk mixture in.
  • Remove the chilled loaf pan from the freezer and add 1/3 of the ice cream mixture into it. Smooth it down with a rubber spatula and add 1/3 of the strawberries and a few Tablespoons of the shortcake crumbles on top. Use a skewer to marble the toppings into the ice cream. Repeat twice more.
  • Cover the loaf pan with a piece of aluminum foil and freeze for at least 6 hours, after which the ice cream should be semi-firm and ready to enjoy!

Notes

*You can use frozen strawberries, but since there is added liquid content from the ice, you may need to cook them for longer than this recipe indicates to reach a jam-like consistency. 
Time saving tip: Mix up and bake the shortcake crumbles while the strawberries are reducing! You’ll have plenty of time since the strawberries only need to be stirred occasionally. 
Make ahead tips: the strawberry reduction and shortcake crumbles can be made up to one week ahead of time. Store both in separate airtight containers in the refrigerator until ready to use. 
Storage tips: This ice cream is best stored in an airtight container in the freezer. It will last for several months (if you can make it last that long). 

Did you make this no-churn strawberry shortcake ice cream? I want to know how it went! Let me know in the comments below and feel free to tag @sugarandsparrowco on Instagram to show me. I love to see what you create with my recipes!

By: Whitney · In: Featured, Ice Cream, Recipes, Seasonal, Summer · Tagged: no bake, no churn ice cream, shortcake crumbles, strawberry ice cream, strawberry reduction, strawberry shortcake, strawberry shortcake ice cream

you’ll also love

no churn vanilla ice cream berry crisp toppingsNo-Churn Berry Crisp Ice Cream
blackberry lavender no churn ice creamNo-Churn Blackberry Lavender Ice Cream
no bake mango cheesecake by sugar and sparrowNo-Bake Mango Cheesecake

Join the List

Stay up to date & receive the latest posts in your inbox.

Reader Interactions

Comments

  1. Jean says

    October 28, 2023 at 9:25 pm

    Hi Whitney
    Thank you for your recipe, it looks so yummy. I would like to use it as an 8 inch birthday cake layer between strawberry and vanilla cakes. Does this ice cream have an ‘icy’ texture to it and can you suggest how to avoid that happening? Thanks for reply.

    Reply
    • Whitney says

      November 1, 2023 at 7:53 pm

      Hi Jean! This would make an amazing ice cream layer in a cake! It doesn’t have an icy texture (trust me, I ate a LOT of it haha).

      Reply
  2. Ashley says

    June 26, 2023 at 3:12 pm

    5 stars
    I have been making your cakes and cupcakes for years and have loved it all! I’ve been putting off trying an ice cream recipe just because it’s unfamiliar to me but this recipe was easy and delicious! My whole family loved it, to include my dad that doesn’t even particularly like strawberries, and one guest even said “I’m not trying to blow smoke, but this is the best ice cream I’ve ever had”. Thank you for sharing and can’t wait to try more flavors!

    Reply
    • Whitney says

      June 26, 2023 at 10:10 pm

      Oh my gosh! That’s amazing, Ashley! I’m so happy it was such a hit 🙂

      Reply
    • Tracy says

      July 3, 2023 at 2:45 pm

      I feel like I shouldn’t rate this yet but I can’t help myself. I tasted it just before it went into the freezer and it’s AMAZING! It is the best ice cream I’ve ever tasted. It’s so creamy and the strawberry is so bright tasting and the crumbles…. I made the jam a day in advance and had a really hard time staying out of it. I even put a spoonful on a piece of chocolate and ate it! Excellent recipe. Thank you for sharing.

      Reply
      • Whitney says

        July 3, 2023 at 9:01 pm

        Yay, Tracy! I’m so happy you loved this recipe!!

        Reply
  3. Giggi says

    June 14, 2023 at 7:39 am

    I was reading the instructions and noticed you don’t mention which size pan to bake the shortcake in. 8×8? Also, in reading you don’t mention when to fold in I assume crumbles of the cake. You only mention adding a few tablespoons of the shortcake crumbles on top.

    Can you please clarify as I plan on having this for a father’s day dessert. It’s my husband’s favorite flavor ice cream.

    Thank you so much.

    Reply
    • Raven says

      June 17, 2023 at 12:54 pm

      Hi Gigi,
      I made this recipe and used a basic cookie sheet, since the crumbles are indeterminate size, it doesn’t matter what size pan you use as long as it is enough to hold the shortcake crumbles (you could even use more if you have small cookie sheets or pans. You fold in the crumbles at each layering stage (3X), with the last layer having the strawberry reduction and crumbles on top. I hope this helps!

      Reply
    • Whitney says

      June 20, 2023 at 8:52 am

      Hi Giggi! You’ll bake the shortcake crumbles on a cookie sheet. And you won’t be folding them into the cake batter – they’re just for adding between layers. I’m so sorry I didn’t get to this message in time for Father’s Day!

      Reply
      • Giggi says

        June 21, 2023 at 4:53 am

        5 stars
        Got it! My family and my picky small grandkids absolutely loved this and the next day came over to my side of the house for seconds. Now that is saying how great this flavor ice cream is. As we are scooping the last of it, my husband looked at me, and said, um, was it hard to make? That is his way of saying, can you make it again? Thank you for this incredible recipe, served with an angel food cake and my strawberry sauce. ❤️

        Reply
        • Whitney says

          June 25, 2023 at 2:48 pm

          That is the best, Giggi! I’m so happy this recipe was such a hit with the whole family! It’s my favorite ice cream recipe to date 🙂

          Reply

Leave a Reply Cancel reply

Your email address will not be published. Required fields are marked *

Recipe Rating


Next Post >

How to Scale a Cake Recipe Up or Down

Primary Sidebar

Welcome to Sugar & Sparrow

Welcome to Sugar & Sparrow

Helping you whip up pretty desserts with confidence and creativity. And hopefully sharing a few laughs with you along the way!

Learn More

Connect

let’s bake!

Get my very best recipes, baking tips, and decorating tutorials sent to your inbox

Featured Posts

hot cocoa cake recipe with homemade marshmallow filling

Hot Cocoa Cake with Homemade Marshmallow Filling

milk and cookies cake

Milk & Cookies Cake Recipe

fault line cake tutorial

Sprinkle Fault Line Cake Tutorial

Search

Archives

Follow Along

@sugarandsparrowco

STRAWBERRY CUPCAKES 🍓based on my beloved strawb STRAWBERRY CUPCAKES 🍓based on my beloved strawberry layer cake recipe, this cupcake version is just as moist yet fluffy and bursting with natural strawberry flavor! Between the mix of fresh strawberries in the cupcakes + freeze-dried strawberries in the frosting, the flavor is out of this world 🚀

Full recipe link in my bio (with strawberry buttercream) + at https://sugarandsparrow.com/strawberry-cupcakes/

STRAWBERRY CUPCAKES
Yield: 14 cupcakes

INGREDIENTS:
5 oz (143g) fresh or frozen strawberries
1/3 Cup (80ml) whole milk, room temp
1 1/2 Cups (158g) sifted cake flour
1 tsp baking powder
1/4 tsp baking soda
1/2 tsp salt
6 Tbsp (85g) unsalted butter, room temp
1 Cup (200g) granulated sugar
2 large eggs, room temp
3 Tbsp (45g) sour cream, room temp
1 tsp vanilla extract
1 drop pink food coloring (optional)

INSTRUCTIONS: 
1. Puree the strawberries using a food processor (you’ll have about 1/2 cup of puree), then place into a saucepan over medium-low heat. Bring to a simmer, then cook for 10-15 min, stirring occasionally, until you have 1/4 cup. Refrigerate until room temp.
2. Preheat oven to 350ºF (177ºC) and line a standard cupcake pan with liners.
3. Whisk together the sifted cake flour, baking powder, baking soda, and salt and set aside.
4. In a stand mixer w/ paddle attachment (or hand mixer + large bowl), whip the butter on high for 2 min. Add sugar and beat for 2 min, until light and fluffy. Turn the mixer to low and add the eggs one at a time, then add the vanilla and sour cream, turn the mixer to high and beat for 1 min. Meanwhile, whisk together the strawberry puree, whole milk, and food coloring (if using).
5. Turn the mixer off and add all of the dry ingredients at once. Mix on low until just combined, then add the strawberry milk mixture until just combined, about 30 seconds.
6. Fill the cupcake liners 2/3 full and bake for 14-18 minutes. Cool completely before topping with strawberry buttercream (full recipe linked above). 

#strawberrycupcakes #strawberrycake #pinkcupcakes #strawberry #cupcakes
COFFEE BUTTERCREAM (recipe below)☕️ this frost COFFEE BUTTERCREAM (recipe below)☕️ this frosting has AMAZING coffee flavor, is so easy to decorate cakes with, and pairs beautifully with so many flavors (chocolate, vanilla, or any cake flavor you’d want to turn into a latte). 

All my cake pairing suggestions are linked in my bio or at https://sugarandsparrow.com/coffee-buttercream-recipe/ 

COFFEE BUTTERCREAM⁣
Yield: 2.5 Cups⁣

INGREDIENTS⁣
1 1/2 tsp instant coffee or espresso powder⁣
1 1/2 Tbsp whole milk, room temperature⁣
1 Cup (226g) unsalted butter, room temperature⁣
3 1/2 Cups (420g) powdered sugar⁣
2 tsp pure vanilla extract⁣
Pinch of salt⁣

INSTRUCTIONS⁣
1. Combine the instant espresso/coffee with the whole milk and set aside. In the bowl of a stand mixer, beat the butter on high until creamy and smooth (about 5 minutes), scraping down the bowl and paddle a few times in between.⁣
2. Turn the mixer to low and add the powdered sugar a few cups at a time, scraping down the bowl and paddle between intervals. Add the vanilla, the coffee/espresso milk mixture, and salt. Mix on low until fully incorporated, about one minute.⁣

#coffeebuttercream #buttercream #frosting #coffeecake
HUMMINGBIRD CAKE 🤎 after weeks of testing this HUMMINGBIRD CAKE 🤎 after weeks of testing this recipe I found that the KEY to taking this already delicious cake to the next level is: roasting the bananas!! It’s an optional step in this recipe BUT it adds unparalleled caramel notes and noticeable richness to the flavor 🙌🏼 Along with the crushed pineapple, toasted pecans, and tangy cream cheese buttercream, this cake is NEXT LEVEL delicious, ultra-moist, melts in your mouth, and will have everyone asking for the recipe. 

Full recipe (with cream cheese frosting) linked in my bio + at https://sugarandsparrow.com/hummingbird-cake-recipe/ 

#hummingbirdcake #creamcheesefrosting #bananacake #cakedecorating #cakerecipe
OREO CUPCAKES 🖤 (recipe below) I made these for OREO CUPCAKES 🖤 (recipe below) I made these for a fundraiser at @vancity.youth last weekend and was reminded of how delicious this recipe is! There’s black cocoa powder in the cupcake batter to give them the PERFECT Oreo cookie flavor profile + the most delicious cookies and cream buttercream I’d eat all on its own. 
 
Full recipe at https://sugarandsparrow.com/oreo-cupcakes-recipe/ 
 
OREO CUPCAKES 
1 Cup (132g) all purpose flour 
3/4 Cup (150g) granulated sugar 
1/3 Cup (38g) black cocoa powder 
1 tsp baking soda 
1/2 tsp baking powder 
1/4 tsp salt 
1/4 Cup (60ml) vegetable oil 
1 large egg, room temp 
1/2 tsp pure vanilla extract 
1/2 Cup (120ml) buttermilk, room temp 
1/2 Cup (120ml) hot coffee or hot water 
 
1. Preheat the oven to 350ºF/177ºC and line a cupcake pan with 12-15 liners. 
2. In a large bowl, whisk all of the dry ingredients together. Add the vegetable oil, eggs, vanilla, and buttermilk and whisk to combine. Whisk in the hot coffee (or hot water). 
3. Pour the batter into the prepared cupcake liners and bake for 14-18 minutes. 
 
OREO BUTTERCREAM 
1 Cup (226g) unsalted butter, room temperature 
3 Cups (360g) powdered sugar 
2 tsp pure vanilla extract 
2 Tbsp whole milk, room temperature 
pinch of salt, or to taste 
9 Oreo cookies (96g), finely ground 
 
1. Using a hand mixer or stand mixer, cream the butter on medium-high speed until it’s creamy and pale, 5 min. 
2. Add the powdered sugar a few cups at a time, mixing on low speed and scraping down bowl and paddle in between intervals. Keep the mixer on low and add the vanilla, milk, and salt. Mix until fully incorporated and uniform, 1-2 min. 
4. Mix in the Oreo cookie crumbs on low speed. 
 
#oreo #oreocupcakes #cookiesandcream #chocolatecupcakes #cupcakes
RASPBERRY CAKE FILLING (recipe below) ♥️ this RASPBERRY CAKE FILLING (recipe below) ♥️ this perfectly sweet/tart raspberry cake filling is beautifully thick, seedless, and so rewarding to make from scratch! It takes just a handful of ingredients and can be made with fresh OR frozen raspberries 🙌🏼 

Get the full recipe + cake pairing suggestions at the link in my bio or at https://sugarandsparrow.com/seedless-raspberry-cake-filling/

INGREDIENTS:
2 1/2 Cups (10oz, 315g) fresh or frozen raspberries
1/2 Cup (100g) granulated sugar
1 Tbsp lemon juice
1 tsp lemon zest
1 1/2 Tbsp (12g) cornstarch
1 1/2 Tbsp (22ml) water

INSTRUCTIONS: 
1. In a saucepan set over medium heat, add the raspberries, granulated sugar, lemon juice, and lemon zest. Cook until the mixture begins to boil, stirring occasionally. 
2. Once boiling, lower the heat and simmer for 10-15 minutes while you continue stirring occasionally. Then, remove from heat and use a fine mesh sieve to strain out the seeds over a medium bowl. After straining, you’ll be left with about 1/4 Cup of seedy pulp.
3. In a small separate bowl, combine the cornstarch and water until uniform. Return the strained raspberry filling to the saucepan (wipe it free of any remaining seeds if needed) and add the cornstarch/water mixture. Cook over medium heat until boiling, stirring constantly, then reduce to a simmer and cook for 1-3 minutes, until the filling has thickened slightly, is no longer cloudy, and coats the back of the spatula.
4. Pour into an airtight container and refrigerate for at least 4 hours and up to 1 week. It will be jello-like once set but after stirring it will become a thick, jammy consistency that’s perfect to use as a cake or cupcake filling!

#raspberrycake #cakefilling #cakedecorating #raspberries #baking

Footer

On the Blog

  • Cake Basics
  • Recipes
  • Tutorials

Info

  • About
  • Privacy Policy & Disclosure

stay in the know

Copyright © 2026 · Theme by Sugar & Sparrow