• Cake
  • Frosting
  • YouTube
  • My Favorite Tools
  • Nav Social Icons

  • Skip to primary navigation
  • Skip to main content
  • Skip to primary sidebar
  • Skip to footer
  • Recipes
    • Cake
    • Cupcakes
    • Frosting
    • Ice Cream
    • Vegan
  • Cake Basics
  • Tutorials
  • Blog
  • About
  • Mobile Menu Widgets

    Connect

    Search

Sugar & Sparrow logo in script font

Sugar & Sparrow

Lifestyle and Cake from Portland Oregon

  • Cake Basics
  • Recipes
    • Cake
    • Cupcakes
    • Cookies & Bars
    • Filling
    • Frosting
    • Ice Cream
    • No-Bake
    • Small Batch
    • Vegan
  • Tutorials
  • Book
  • Blog
  • About

Sprinkle Fault Line Cake Tutorial

May 30, 2019 · In: Uncategorized

There’s a serious sprinkle trend happening on Instagram, and I’m not even sure who came up with it! I’ve been marveling over sprinkle fault line cakes for weeks now, and I finally got the chance to try it for myself. I was so excited to use the technique with the Vintage Rose Gold sprinkle mix by SprinklePop because the sprinkles alone are stunning, but the fault line style really makes them pop! I just love the way they look peeking through that buttercream:

sprinkle fault line cake tutorial
sprinkle fault line cake with sprinklepop sprinkles

Pretty, right? Before I act like an expert and show you how to create this sprinkle fault line cake, allow me to admit that this was my second attempt. The first go at this technique did not end well at all. The sprinkles got in the way of my smooth buttercream, my fault line was too tiny, and I basically ended up with a ripply, sprinkled mess. Thankfully, I learned some valuable lessons in my first attempt and I can tell you how to avoid cake tragedies like that!

vintage rose gold sprinkles by sprinklepop
fault line cake decorating tutorial

Now, I can confidently say I’ve got all the details of how to make a failproof sprinkle fault line cake below. Here’s a quick video of the process before you read all about it:

You Will Need

  • A 6-inch cake that’s been crumb coated and chilled
  • 1.5 batches of vanilla buttercream
  • Food color gel of your choice (optional)
  • 4 oz bottle of Vintage Rose Gold sprinkles (or any fave SprinklePop mix)
  • Icing smoother
  • Angled spatula
  • Gold Edible Art Paint (gold luster dust mixed with a little vodka works too)
  • Small food-grade paintbrush

Step 1: Separate The Sprinkles

To prepare for your beautiful sprinkle fault line cake, first divide the sprinkles into two separate bowls: one for the jimmies and smaller sprinkles, and one for the large spheres and dragees.

rose gold sprinkle mix by sprinklepop

If you’re planning on coloring your buttercream, now is a good time for that too! For this rustic rose color, I used a combination of Americolor Dusty Rose, Peach, and Maroon.

Americolor Dusty Rose buttercream

Step 2: Frost Only The Middle Of The Cake

Place your crumb coated cake on a turntable and frost a thin layer of buttercream around only the middle of the cake. Then, smooth it with your icing smoother.

frosting a fault line cake

This will become the middle of the fault line, where the sprinkles go.

Step 3: Apply The Small Sprinkles

Place a baking sheet underneath your cake turntable to catch any sprinkles that fall (this part can get messy!). Then, add only the jimmies and smaller sprinkles to the newly frosted portion of your cake.

creating a sprinkle fault line cake

By leaving the larger sprinkles out of this part, you will prevent them from getting in the way once you frost the buttercream fault line. That was the biggest takeaway from my first time trying this technique. Smaller sprinkles make it easier to achieve a smooth, flawless fault line. Don’t worry though, we’ll add the larger sprinkles in toward the end!

Step 4: Frost The Fault Line

Frost and smooth the top of the cake, then add buttercream to the top third and bottom third of the cake, making sure you stop wherever the sprinkles begin. Feel free to overlap the sprinkles in some areas, but try to keep most of the sprinkles exposed. Also, make sure that the layer of buttercream you add is thicker than the layer of sprinkles. This way when you go to smooth it, your icing smoother will glide over the buttercream without dragging the sprinkles along with it.

buttercream fault line cake

Next, smooth the buttercream with your icing scraper to create even sides without touching the sprinkles.

smooth buttercream cake with sprinkles

When your sides are looking smooth, use your angled spatula to create sharp edges around the top of the cake by swiping any buttercream from the outer edge toward the top center of the cake.
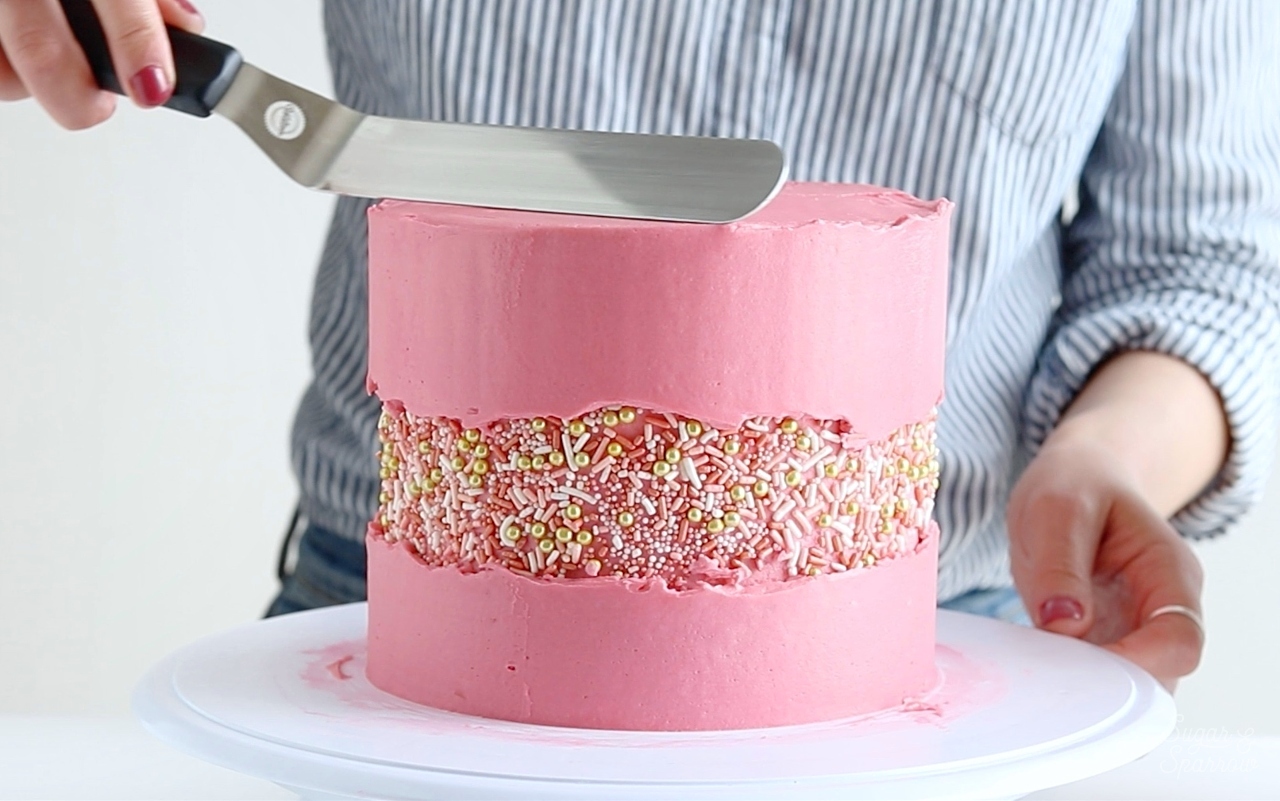
sharp edges buttercream cake

Once your fault line is looking perfect, chill the cake in the refrigerator for about 20 minutes to let the buttercream firm up before moving on to the next step.

Step 5: Add In The Large Sprinkles

Now that the buttercream is nice and set, it’s time to add in the rest of this beautiful sprinkle mix! Add all of the large sprinkles you separated out in Step 1 to the sprinkled portion of the cake.

Adding sprinkles to fault line cake

Continue adding sprinkles until the fault line looks dazzling.

Step 6: Paint The Edges (Optional)

To complete the look, use a small food-grade paintbrush to paint some Gold Edible Art Paint onto the edges of the fault line. As an alternative to Edible Art Paint, you could use gold foil, gold luster dust mixed with a little vodka, or whatever your jam is when it comes to an edible gold look!

Gold edible art paint

And voila! This sprinkle fault line cake is so eye-catching. I love this technique now that I know a few tips and tricks to getting it just right!

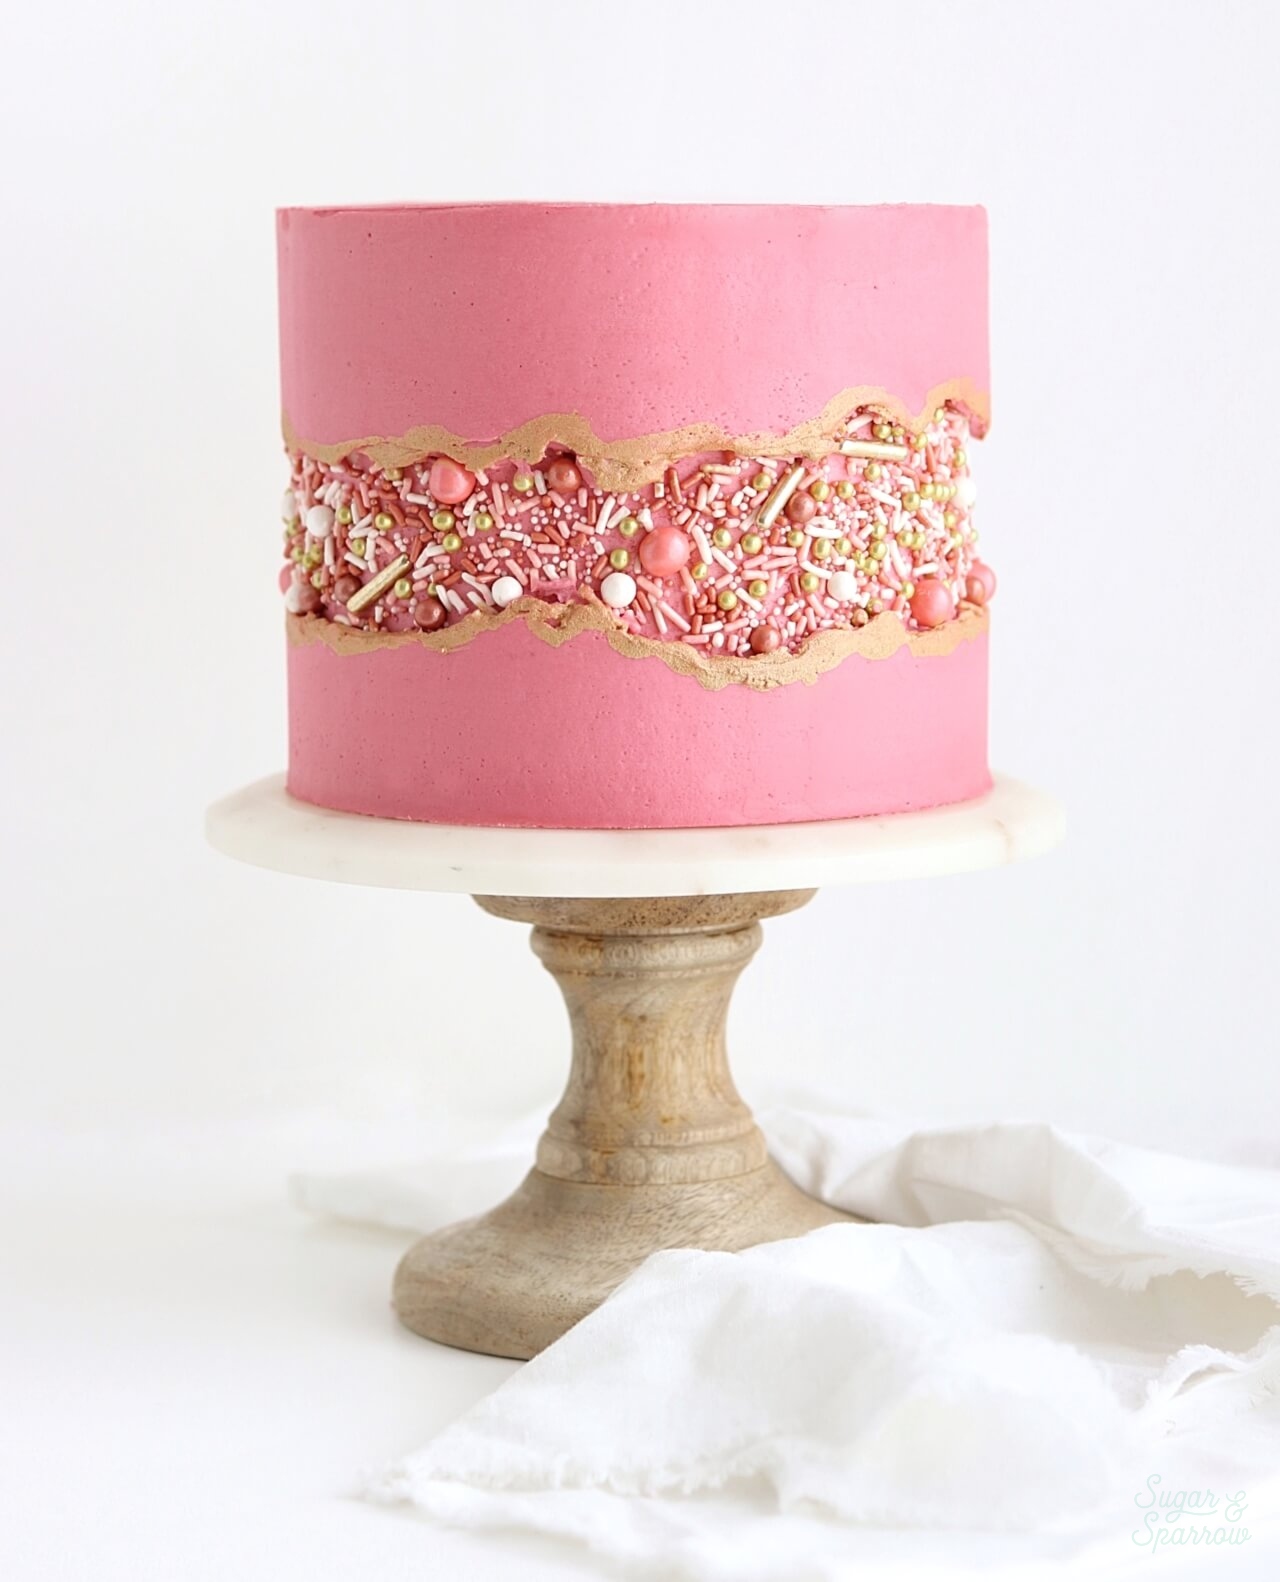
fault line cake with sprinkles
Rose gold cake by Sugar and Sparrow

I hope you feel a little more confident with your sprinkle fault line cakes now that you know a thing or two. Be sure to try it with your fave SprinklePop mix! And if you found this tutorial helpful for your cake decorating session let me know by tagging me on Instagram. I love to see what you’re caking 🙂

Disclaimer: I was compensated by SprinklePop for my work of creating this project, styling, filming, photographing, and writing about their products. As always, all opinions are honest and my own. Thank you for supporting brands that support Sugar & Sparrow.


By: Whitney · In: Uncategorized · Tagged: americolor, cake decorating, cake tutorial, edible art paint, fault line cake, pink buttercream, rose colored buttercream, rose gold sprinkles, smooth buttercream, sprinkle cake, sprinkle fault line cake, sprinkle gap cake, sprinklepop, vintage rose gold sprinkles

you’ll also love

the best vanilla cupcakes recipeThe Perfect Vanilla Cupcake Recipe
pumpkin layer cake recipe by sugar and sparrowPerfect Pumpkin Layer Cake Recipe
oreo cookies and cream cakeOreo Layer Cake Recipe

Join the List

Stay up to date & receive the latest posts in your inbox.

Reader Interactions

Comments

  1. Kim Dunlop says

    April 24, 2021 at 7:39 pm

    Hi Whitney, If I’m decorating this cake the day before would the sprinkles bleed into the icing? Should I store it in the fridge overnight? Thank you for your tutorial, so many helpful tips!!

    Reply
    • Whitney says

      April 27, 2021 at 10:11 am

      Hi Kim! As long as you use sprinkles like the ones I use in this tutorial (ones that don’t naturally bleed), the sprinkles shouldn’t bleed into the icing. Any of the Sprinkle Pop sprinkle mixes will be perfect for this look. And yes, I usually store my decorated cakes in the refrigerator overnight to preserve all the decorating, but then bring them back to room temp before serving them.

      Reply
  2. Faye says

    November 16, 2020 at 2:34 am

    First time doing a fault line cake and I followed your tutorial! .
    It was easier and harder than I thought : D Overall I was happy with the final result as was the recipient but I certainly felt the pressure whilst smoothing the icing !

    So glad I found your website as I have looked through the other tutorials and keen to give them a go as well! Thank You x

    Reply
    • Whitney says

      November 19, 2020 at 2:47 pm

      Yay, Faye! I’m so happy to hear that this tutorial was helpful 🙂 thank you for your kind words and I’m excited for you to try more tutorials!

      Reply
  3. Frankeska santiago says

    November 9, 2020 at 7:52 pm

    What consistency was your buttercream ? Thin? Medium ? Or stuff?

    Reply
    • Whitney says

      November 9, 2020 at 9:49 pm

      This is thin (frosting) consistency – this vanilla buttercream recipe as-is: https://sugarandsparrow.com/vanilla-buttercream-recipe/

      Reply
  4. Mary Beth Christie says

    September 26, 2020 at 11:40 am

    Thank you so much for posting your process. This was my first time doing this and with your help, it turned out great!!!! Thank you for sharing!!!!!

    Reply
    • Whitney says

      September 27, 2020 at 4:34 pm

      Yay, Mary Beth! So happy to hear that!

      Reply
  5. CH says

    September 10, 2020 at 5:12 pm

    Great tutorial! Just made a blue one with silver paint, thanks for the tips!

    Reply
    • Whitney says

      September 10, 2020 at 6:06 pm

      Yay! So happy the tutorial was helpful!

      Reply
  6. cindie says

    August 21, 2020 at 2:51 pm

    how much gold paint do you need for this size cake? on average?

    Reply
    • Whitney says

      August 22, 2020 at 1:54 pm

      Hi Cindie! Not much, I probably used about a Tbsp? I didn’t measure it out, as I had this 15ml bottle of Edible Art Paint to work with: https://amzn.to/31iHtG0

      Reply
  7. Sharon Coelho says

    July 2, 2020 at 7:36 am

    Hi Whitney, This is a stunning cake. Thanks for sharing the tutorial. You mentioned you use all three gel colours together to frost the cake. How many drops of each did you use.
    Thanks

    Reply
    • Whitney says

      July 3, 2020 at 12:22 pm

      Thank you, Sharon! I did use a combination of those three color gels to get the frosting color. It’s mostly Americolor Dusty Rose plus a little bit of Peach + Maroon to tone it just right. I don’t ever count how many drops I use because it’s really relative to the amount of frosting you’re coloring. Instead, I would just add a few drops at a time (starting with Dusty Rose, then toning with Peach/Maroon) until the desired shade is achieved.

      Reply
  8. Amanda says

    May 10, 2020 at 11:21 am

    Did you use the entire 4oz jar of sprinkles?

    Reply
    • Whitney says

      May 10, 2020 at 3:34 pm

      Hi Amanda! I used about half of the jar for this cake (which was a 6 inch round)

      Reply
  9. Adegefon Oluwakemi says

    April 7, 2020 at 10:58 am

    Thanks for the knowledge.so pretty.

    Reply
  10. Mona says

    March 8, 2020 at 3:45 pm

    This is beautiful! Thank you for the tutorial — it was very helpful. Once question — how do you get your buttercream so smooth? Mine had a bunch of air bubbles in it.

    Reply
    • Whitney says

      March 10, 2020 at 7:53 pm

      Hi Mona! To get rid of airbubbles, I mix my buttercream on low for about 30 seconds to push out as much air as possible, then follow the steps in this tutorial: https://sugarandsparrow.com/how-to-frost-a-cake/ basically, I frost the cake as smooth as possible, put it in the fridge to firm up for about 20 min, then frost another thin layer to fill in any air bubbles or imperfections.

      Reply
  11. Anthony says

    February 25, 2020 at 7:17 am

    Loved the way it looks, very helpful managed to get it right the first go round thanx.

    Reply
    • Whitney says

      February 25, 2020 at 8:44 pm

      Yay, Anthony! So happy these tips helped!!

      Reply
« Older Comments

Leave a Reply Cancel reply

Your email address will not be published. Required fields are marked *

Recipe Rating


Next Post >

Bee Themed Cake with Thistle & Lace Cake Toppers

Primary Sidebar

Welcome to Sugar & Sparrow

Welcome to Sugar & Sparrow

Helping you whip up pretty desserts with confidence and creativity. And hopefully sharing a few laughs with you along the way!

Learn More

Connect

let’s bake!

Get my very best recipes, baking tips, and decorating tutorials sent to your inbox

Featured Posts

biscoff no bake cheesecake recipe

No-Bake Biscoff Cheesecake

small batch raspberry chocolate cake recipe by sugar and sparrow

Small Batch Raspberry Chocolate Cake

easy dulce de leche recipe by sugar and sparrow

Easy Homemade Dulce de Leche Recipe

Search

Archives

Follow Along

@sugarandsparrowco

Everything I baked in June☀️I was so motivated to Everything I baked in June☀️I was so motivated to bake this month (summer flavors had me INSPIRED!) and could barely keep up with myself but I ended up publishing 7 new recipes on my website + finalized 5 more that will be up ASAP! 

Comment “JUNE” to get all the recipes that are available now:

-Cookie Dough Ice Cream Cake
-Rocky Road Cupcakes (w/ homemade marshmallow creme filling!)
-Blackberry Lavender Cake
-Homemade Blackberry Filling
-Whipped Cream Cheese Frosting
-Strawberry Shortcake Cookie Bars
-Berries & Cream Sheet Cake

https://sugarandsparrow.com/everything-i-baked-in-june
 
#cake #bakersofinstagram #baking #bakinglove #cakedecorating
WHIPPED CREAM CHEESE FROSTING ☁️ this easy 4-ingre WHIPPED CREAM CHEESE FROSTING ☁️ this easy 4-ingredient whipped cream frosting is deliciously light, comes together SO easily, and is stabilized with cream cheese to make it the perfect thick consistency for filling and frosting cakes and cupcakes!! It’s so good with my strawberry shortcake sheet cake and berries & cream cake and I have a feeling I’m going to be whipping it up for many more summer cakes😍

Full recipe with cake pairing suggestions at https://sugarandsparrow.com/whipped-cream-cheese-frosting/ 

INGREDIENTS 
1 Cup (8oz, 226g) full-fat brick-style cream cheese, cold
1 Cup (120g) powdered sugar
1 tsp pure vanilla extract
2 1/2 Cups (600ml) heavy whipping cream, cold

INSTRUCTIONS
1. Chill the bowl of your stand mixer (or the large bowl you’ll be using with your hand mixer) into the refrigerator for 20 minutes.
2. Into the cold mixing bowl, add the cream cheese and beat on medium speed with the whisk attachment until creamy, 2 min. Add the powdered sugar and mix on low speed until mostly incorporated, then turn the mixer to medium-high speed and mix for 1 min.
3. Add the vanilla extract, then turn the mixer to medium-high speed and slowly pour in the heavy whipping cream (down the side of the bowl so it doesn’t fly everywhere). Once all the cream is added, continue mixing on medium-high for just about 30 seconds longer, keeping a close eye on the mixing bowl to watch it thicken. It should come together into a thick, silky frosting consistency at this point, where you can dip the whisk into the frosting and it holds a slight peak when you hold it upright.
4. Use the frosting immediately to decorate cakes and/or cupcakes for best results!

#whippedcreamfrosting #creamcheesefrosting #cakedecorating #whippedcream #frosting
TOP 10 4TH OF JULY DESSERTS 🎆 These are just a few TOP 10 4TH OF JULY DESSERTS 🎆 These are just a few of my favorite summer dessert recipes that will disappear at any Fourth of July celebration.

Comment “JULY” and I’ll send you all 20+ of my favorite 4th of July dessert ideas – naturally red white and blue desserts like my berries and cream cake, easy no-bake desserts, no-churn ice cream, strawberry shortcake inspired recipes, and all the treats that will go FAST at any barbecue.

https://sugarandsparrow.com/4th-of-july-desserts/

#fourthofjuly #4thofjuly #summerdessert #partycake #dessertideas
STRAWBERRY SHORTCAKE COOKIE BARS 🍓my hot take: str STRAWBERRY SHORTCAKE COOKIE BARS 🍓my hot take: strawberry shortcake toppings on a buttery, soft sugar cookie base is WAY BETTER than traditional strawberry shortcake. I topped my favorite sugar cookie bar recipe with silky whipped cream cheese frosting + homemade strawberry sauce and now I’m ruined 😵

Full recipe is linked in my bio + at https://sugarandsparrow.com/strawberry-shortcake-cookie-bars/ 

SOFT SUGAR COOKIE BARS
2 Cups + 2 Tbsp (283g) all purpose flour
1 tsp baking powder
1/2 tsp baking soda
1/2 tsp salt
3/4 Cup (170g) unsalted butter, room temp
1 Cup (200g) granulated sugar
1 large egg
1 large egg yolk
1 1/2 tsp pure vanilla extract

1. Preheat the oven to 350ºF (177ºC). Grease and line an 8-inch square baking pan with parchment paper, leaving a slight overhang for easy release.
2. Whisk together the flour, baking powder, baking soda, and salt. Set aside.
3. Using a stand mixer with the paddle attachment (or hand mixer) cream together the butter and sugar on high speed until pale and fluffy, 2-3 min.
4. Turn the mixer to medium and add the egg, egg yolk, and vanilla. Mix until combined, then add the flour mixture and mix on low speed until a uniform cookie dough forms.
5. Press the cookie dough into the prepared pan in an even layer, all the way to the edges. Bake for 18-20 minutes, until the edges are just starting to brown. 
6. Cool the sugar cookie bars in the pan for 30 minutes, then transfer to a wire rack to cool completely. Top with whipped cream cheese frosting and strawberry sauce (full recipe linked in my bio!)

#strawberryshortcake #strawberries #whippedcreamfrosting #cookiebars #sugarcookies
BLACK FOREST CAKE 🍒 this is my favorite thing to m BLACK FOREST CAKE 🍒 this is my favorite thing to make during cherry season! My version is decadent chocolate cake soaked with homemade cherry syrup, fresh cherry filling, and whipped cream frosting. Top it with a chocolate ganache drip if you want to go the extra mile! 

Full recipe + decorating tutorial is linked in my bio + at https://sugarandsparrow.com/black-forest-cake-recipe/

PS I’m working on a sheet cake version of this recipe that’s even easier! Stay tuned.

#blackforestcake #cherrycake #chocolatecake #cherries #cakedecorating

Footer

On the Blog

  • Cake Basics
  • Recipes
  • Tutorials

Info

  • About
  • Privacy Policy & Disclosure

stay in the know

Copyright © 2026 · Theme by Sugar & Sparrow
