• Cake
  • Frosting
  • YouTube
  • My Favorite Tools
  • Nav Social Icons

  • Skip to primary navigation
  • Skip to main content
  • Skip to primary sidebar
  • Skip to footer
  • Recipes
    • Cake
    • Cupcakes
    • Frosting
    • Ice Cream
    • Vegan
  • Cake Basics
  • Tutorials
  • Blog
  • About
  • Mobile Menu Widgets

    Connect

    Search

Sugar & Sparrow logo in script font

Sugar & Sparrow

Lifestyle and Cake from Portland Oregon

  • Cake Basics
  • Recipes
    • Cake
    • Cupcakes
    • Cookies & Bars
    • Filling
    • Frosting
    • Ice Cream
    • No-Bake
    • Small Batch
    • Vegan
  • Tutorials
  • Book
  • Blog
  • About

Green Velvet Cake with Rainbow Frosting

February 20, 2025 · In: Cake, Featured, Recipes

Jump to Recipe

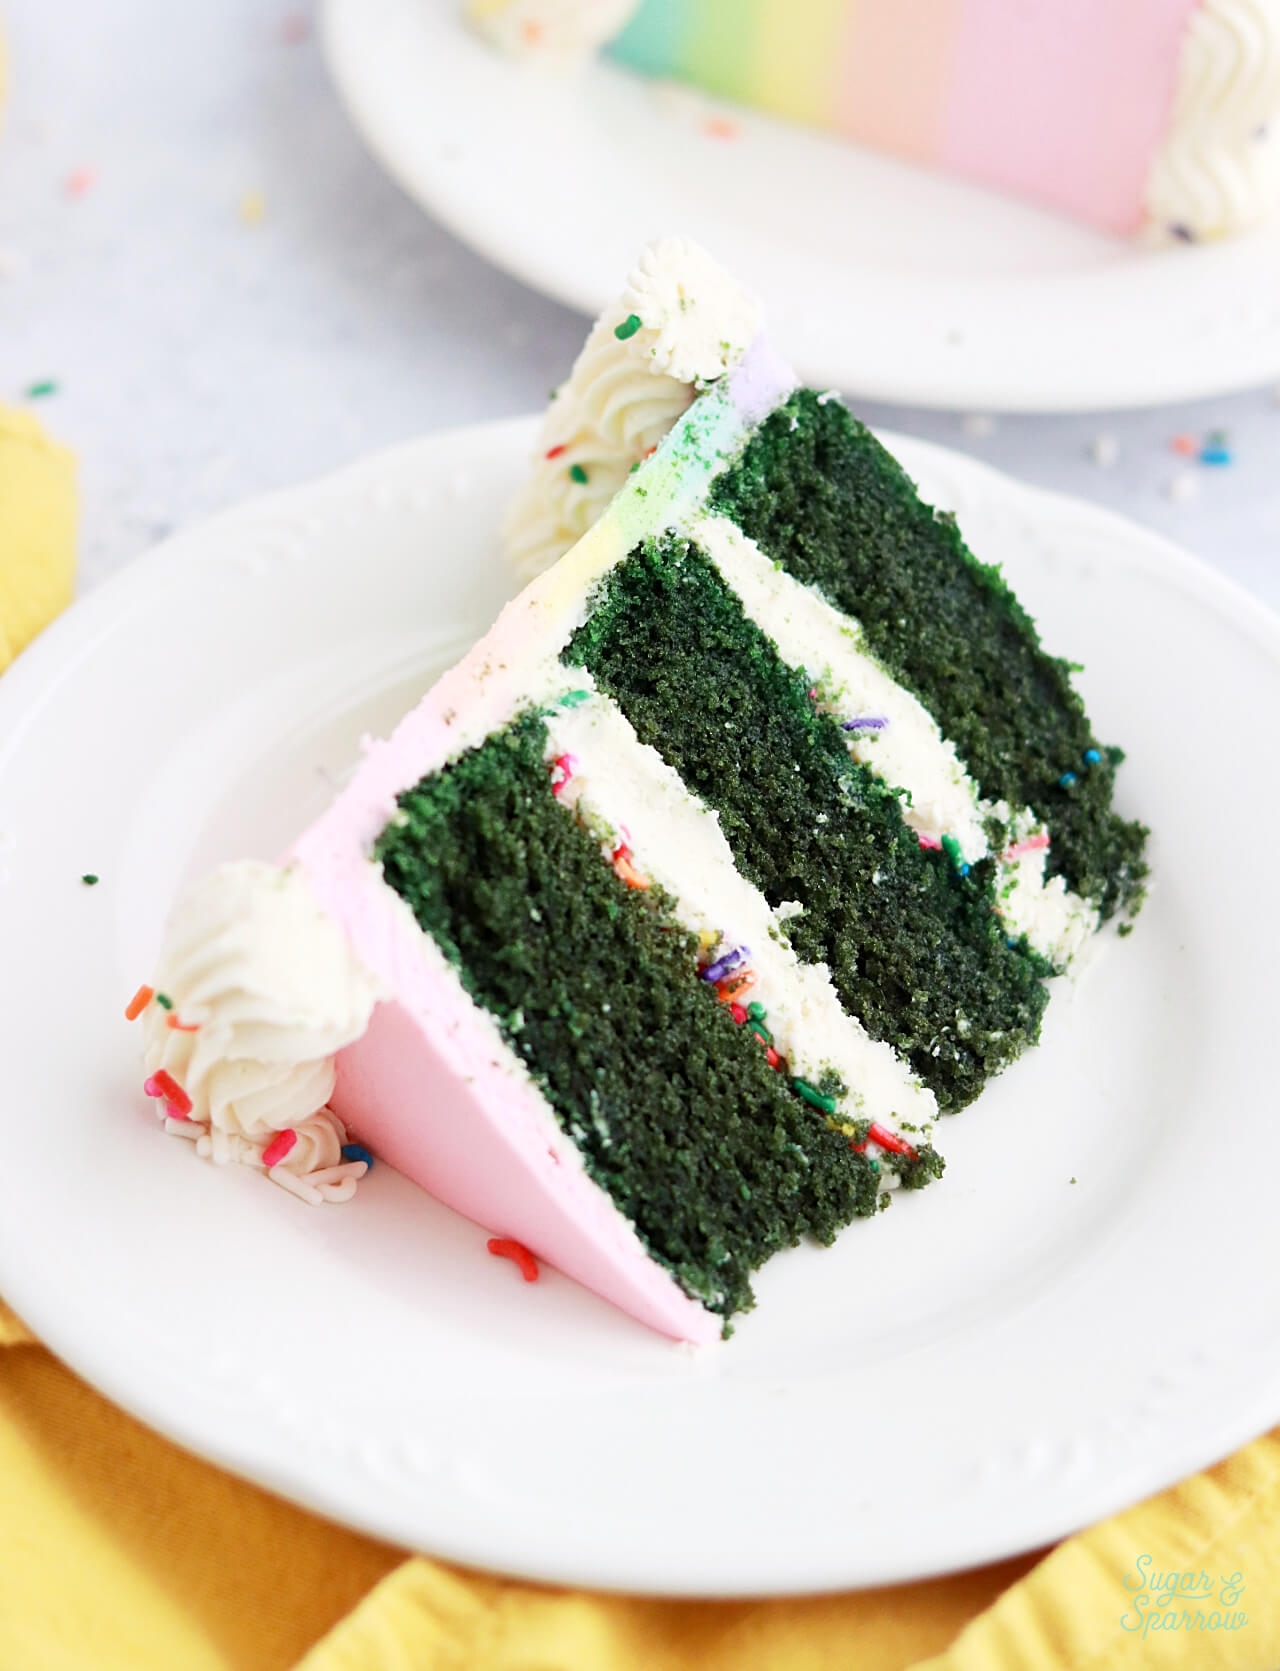
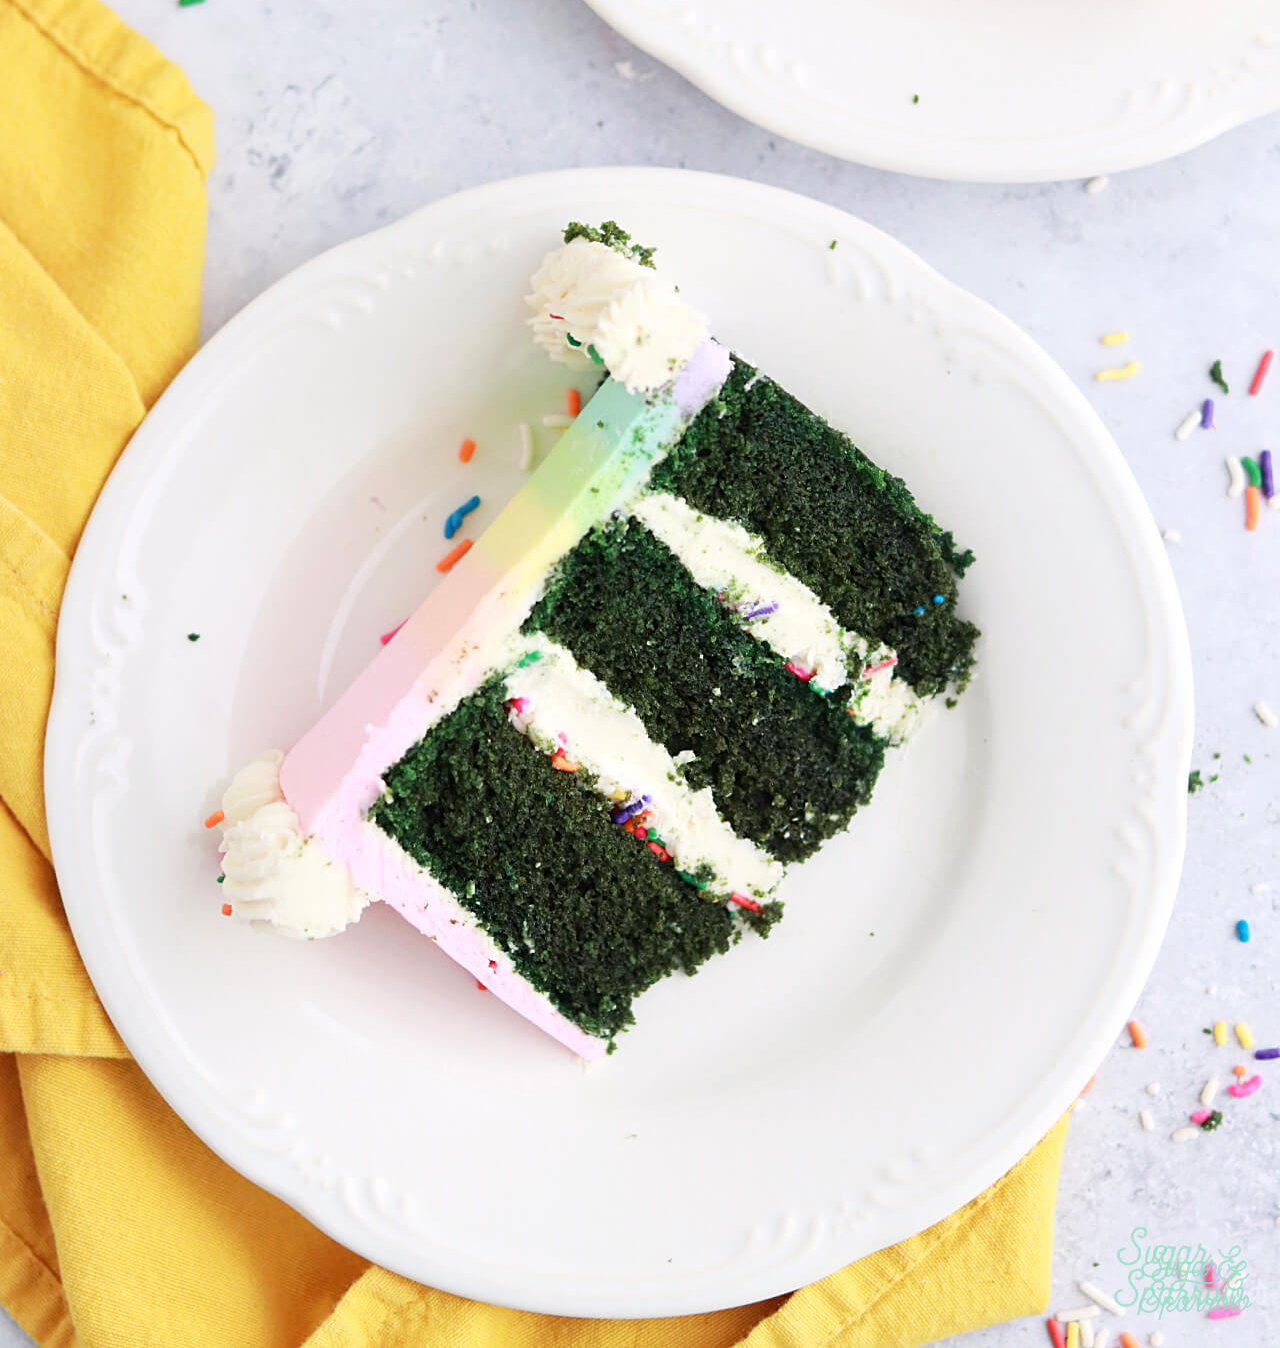
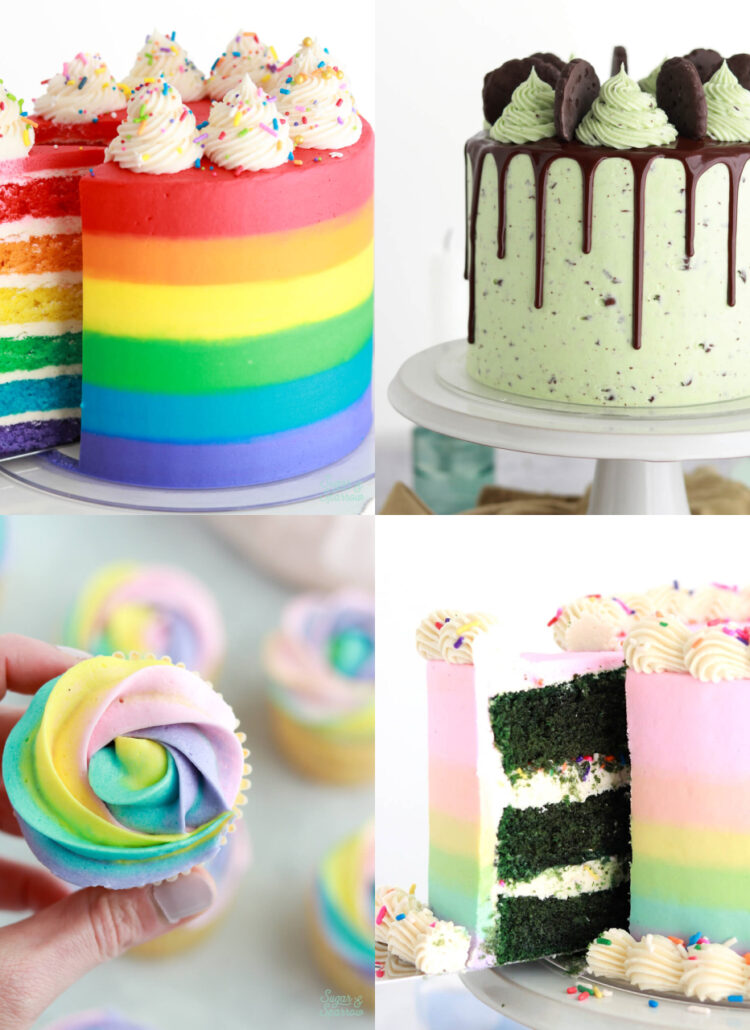
Whether you need a St. Patrick’s Day dessert or simply want to make something fun, this green velvet cake with rainbow frosting is a true showstopper! It has a light chocolate flavor profile just like a red velvet cake, only tinted green. The rainbow frosting effect is made with vanilla buttercream and is super easy to recreate with the tutorial below. You can also make green velvet cupcakes with this recipe! See the notes section of the recipe card for instructions. 

rainbow cake tutorial
green velvet cake recipe with rainbow frosting

I’ve been making this red velvet cake recipe for years and love everything about it. I can’t believe how long it’s taken me to realize that you can swap out the red food color gel with different colors to create so many velvet cake hues! Since the cake does involve a little bit of cocoa powder, not every color is possible, but I found that green works perfectly. And with St. Patrick’s Day right around the corner, it was perfect timing. 

What Does a Green Velvet Cake Taste Like?

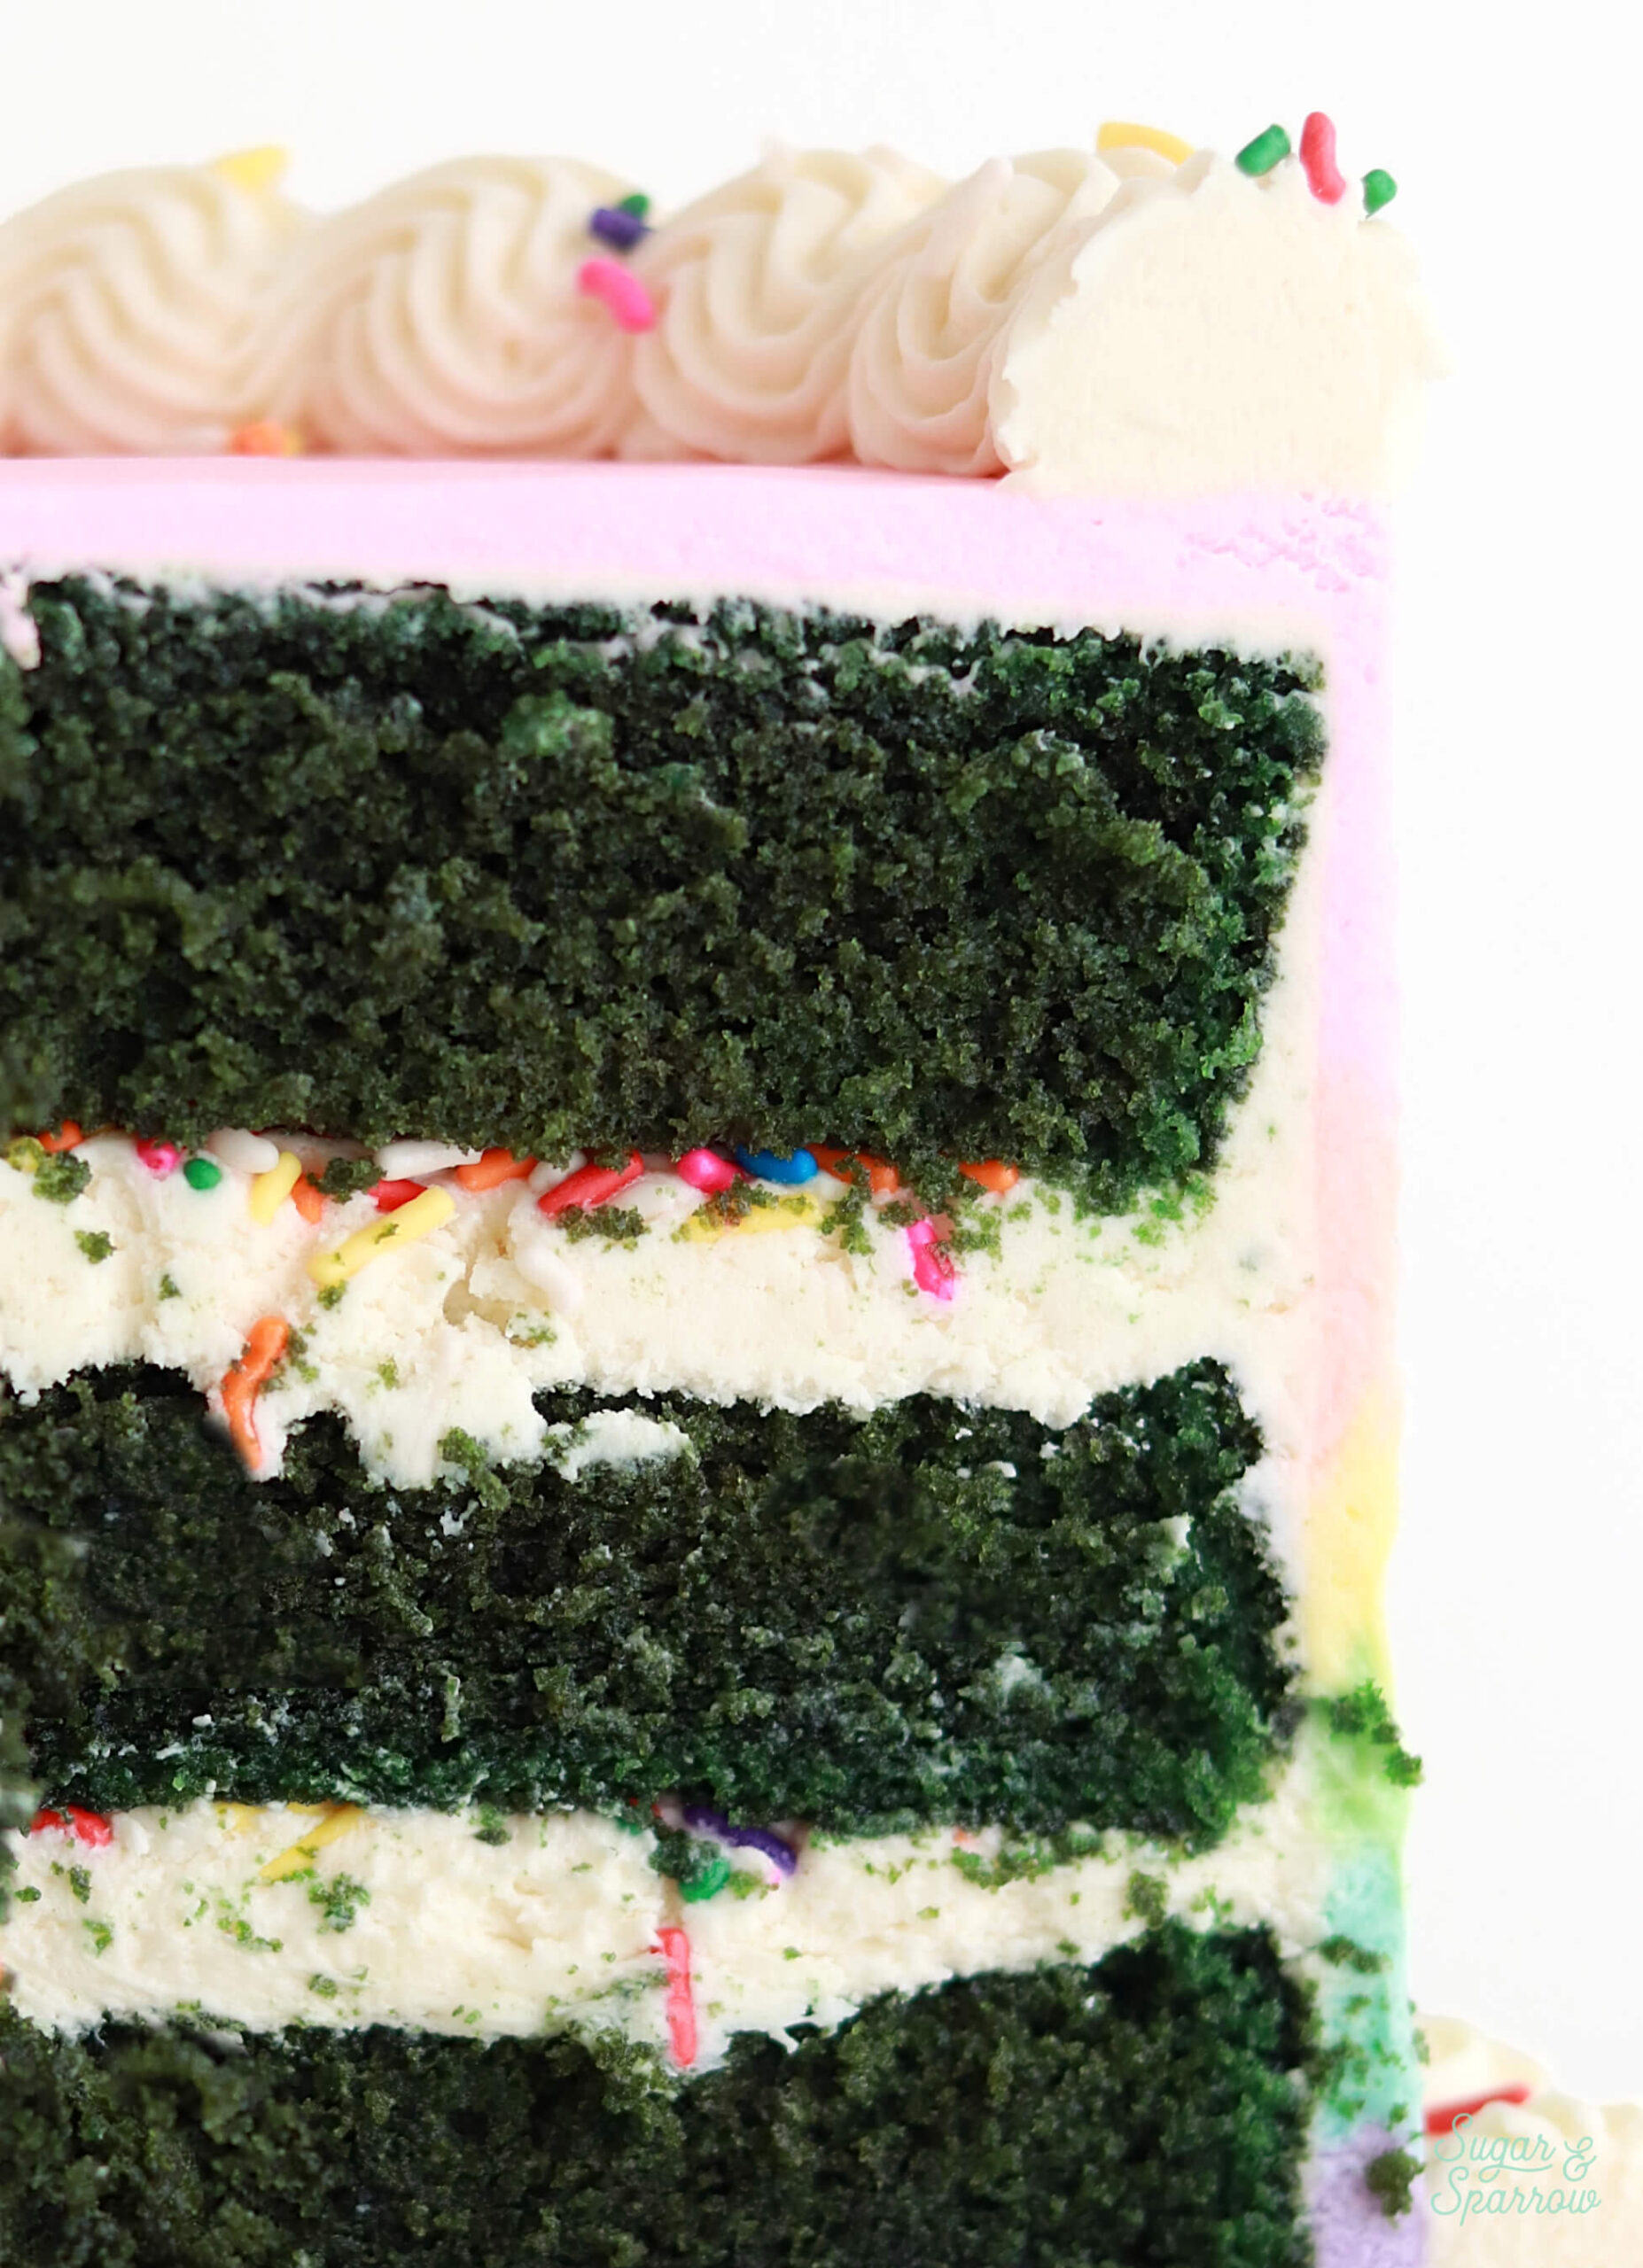
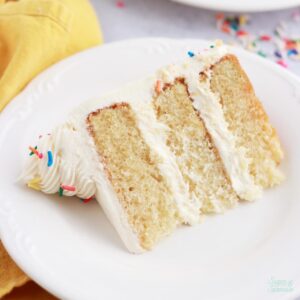
Since this recipe uses my red velvet cake as a base, it has the exact same flavor profile. In other words the cake is super soft and moist with a hint of chocolate flavor. I filled these green velvet cake layers with vanilla buttercream and rainbow sprinkles to keep it simple and St. Patrick’s Day inspired. It would also taste amazing with cream cheese buttercream, which is what I usually pair with red velvet. 

green velvet cake recipe

Green Velvet Cake Ingredients & Substitutions

There are a few key ingredients that give this green velvet cake the perfect texture and flavor. I’ve included some substitutions in case you need to make any. 

  • Cake flour. Since it has the lowest protein content of any flour, cake flour gives this cake an extra fine and soft texture. You should be able to find it in the baking aisle of your local grocery store or here online, but if you can’t easily find it you can make a homemade version using all-purpose (or plain) flour with a little cornstarch. I have instructions in the notes section of the recipe card. 
  • Cocoa powder. A hint of cocoa powder gives this cake a subtle chocolate flavor that is oh so delicious. I recommend using natural unsweetened cocoa powder instead of Dutch-processed in this recipe. This is because Dutch-processed cocoa powder yields a much darker brown cake in the baking process, and to get the green color just right you’ll want to start with a lighter brown colored batter.
  • Vegetable oil. A little bit of vegetable oil adds a beautiful amount of moisture to the cake crumb. I love using plain vegetable oil because it doesn’t add any flavor, but you can substitute this for any kind of cooking oil you prefer. Just keep the flavor of the oil in mind.
  • Distilled white vinegar. This ingredient is key to creating a super soft (velvety) texture. It reacts with the baking soda in the recipe to create carbon dioxide bubbles that expand in the baking process, which ultimately creates a soft and airy crumb. If you can’t find white vinegar you can use apple cider vinegar as a substitute. 
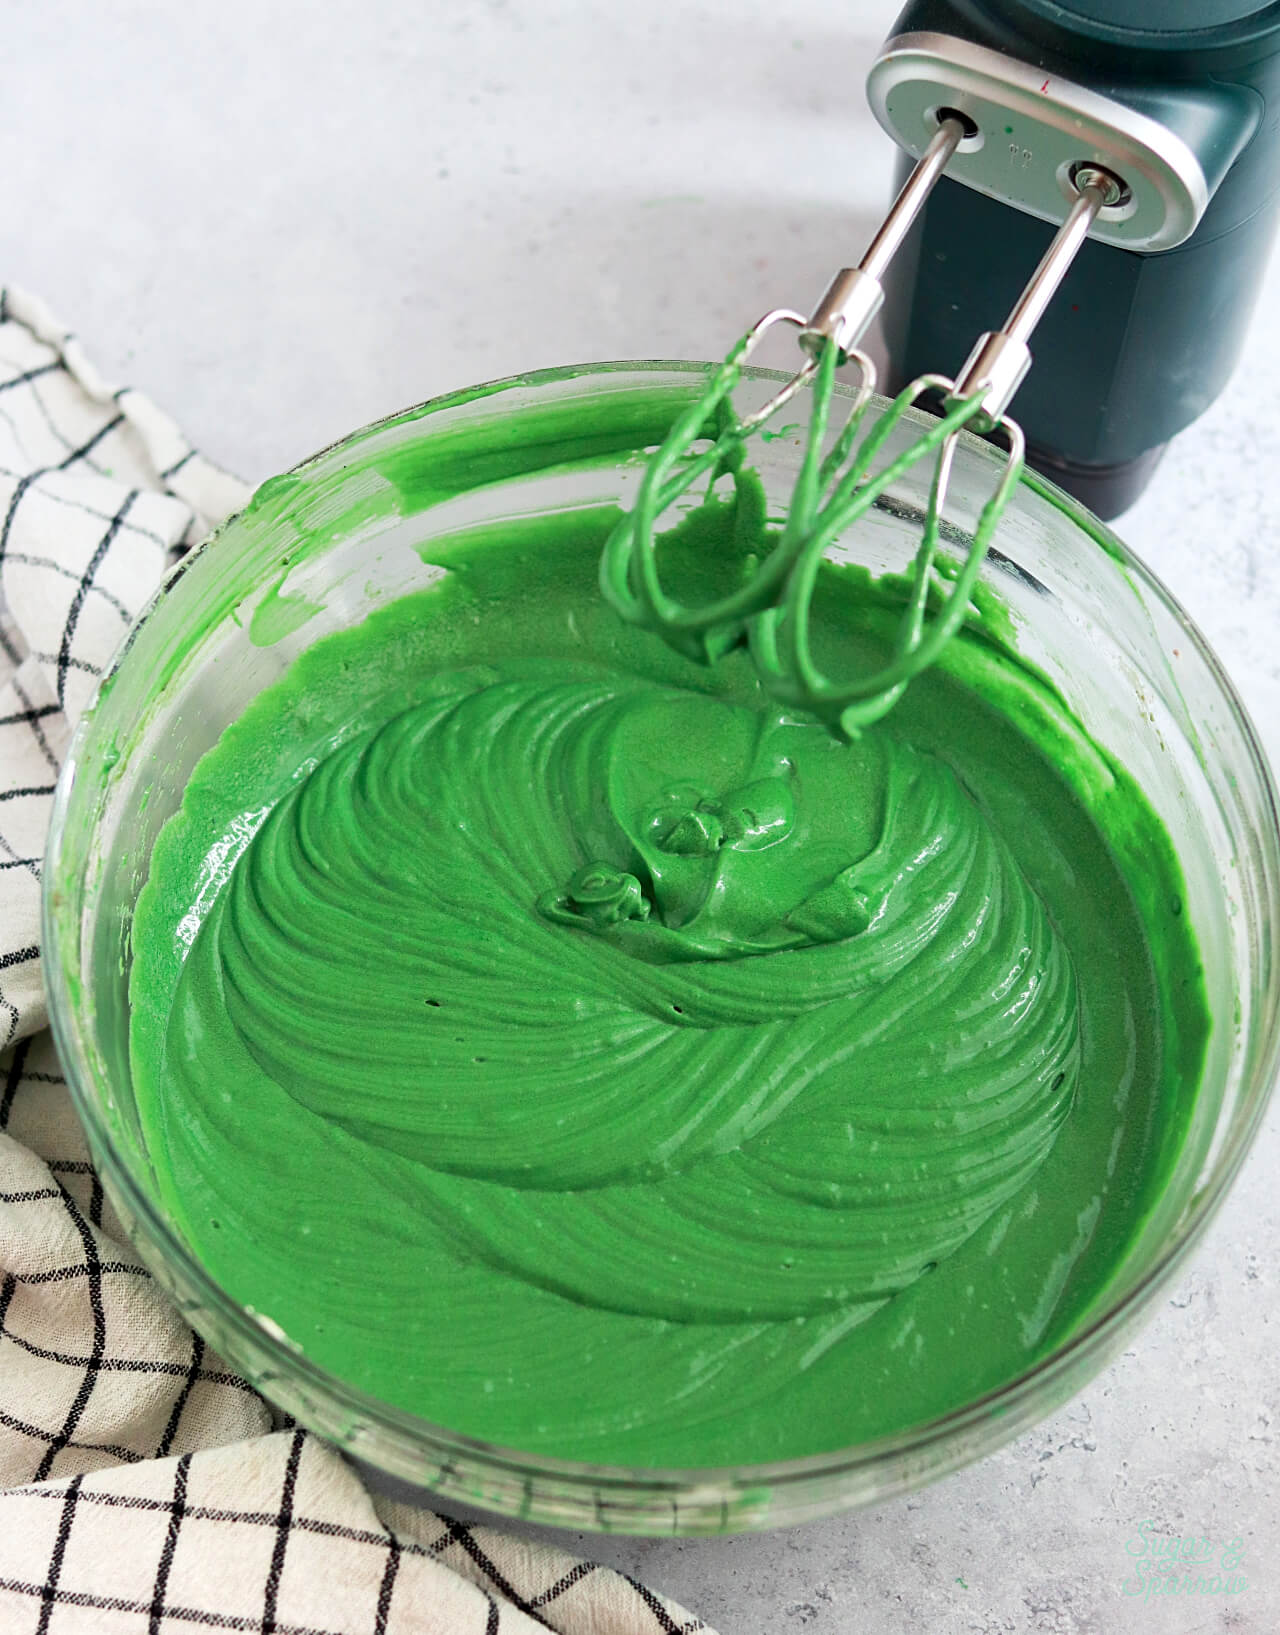
  • Green food coloring. I used AmeriColor Leaf Green to tint the batter green, but you can use any green food color gel of your choice.
  • Buttermilk. Adds even more moisture to this green velvet cake. You can create a homemade version of buttermilk if you can’t find it at your local grocery store – the instructions are in the notes section of the recipe card below! 
green velvet cake batter
green velvet cake st patricks day dessert ideas

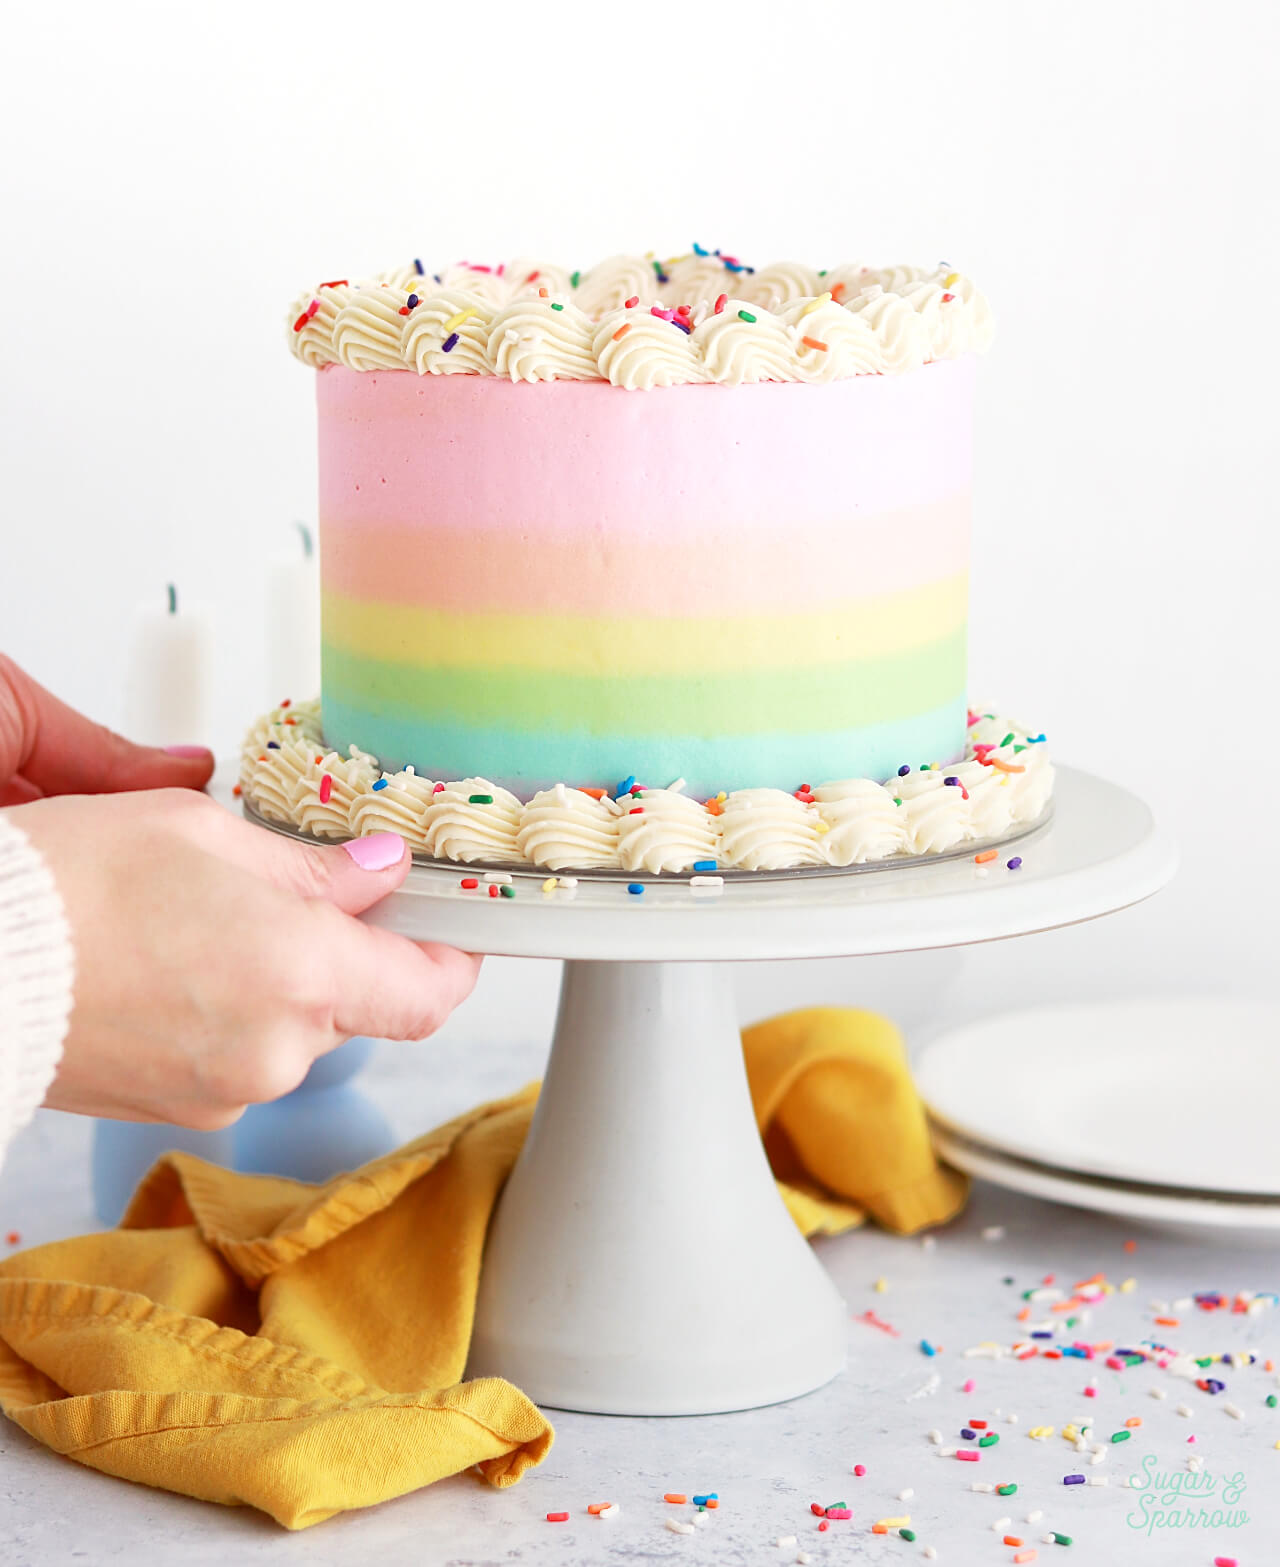
Rainbow Frosting Tutorial 

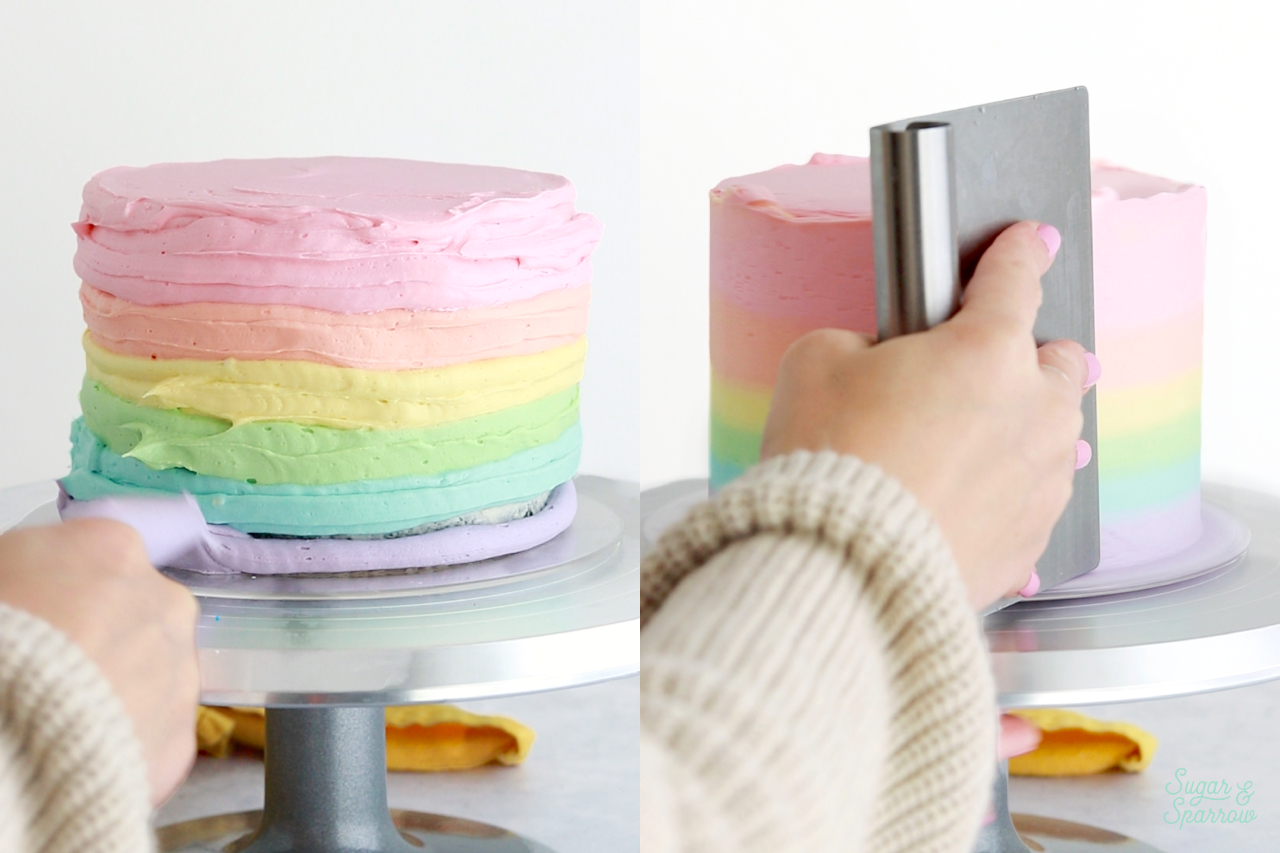
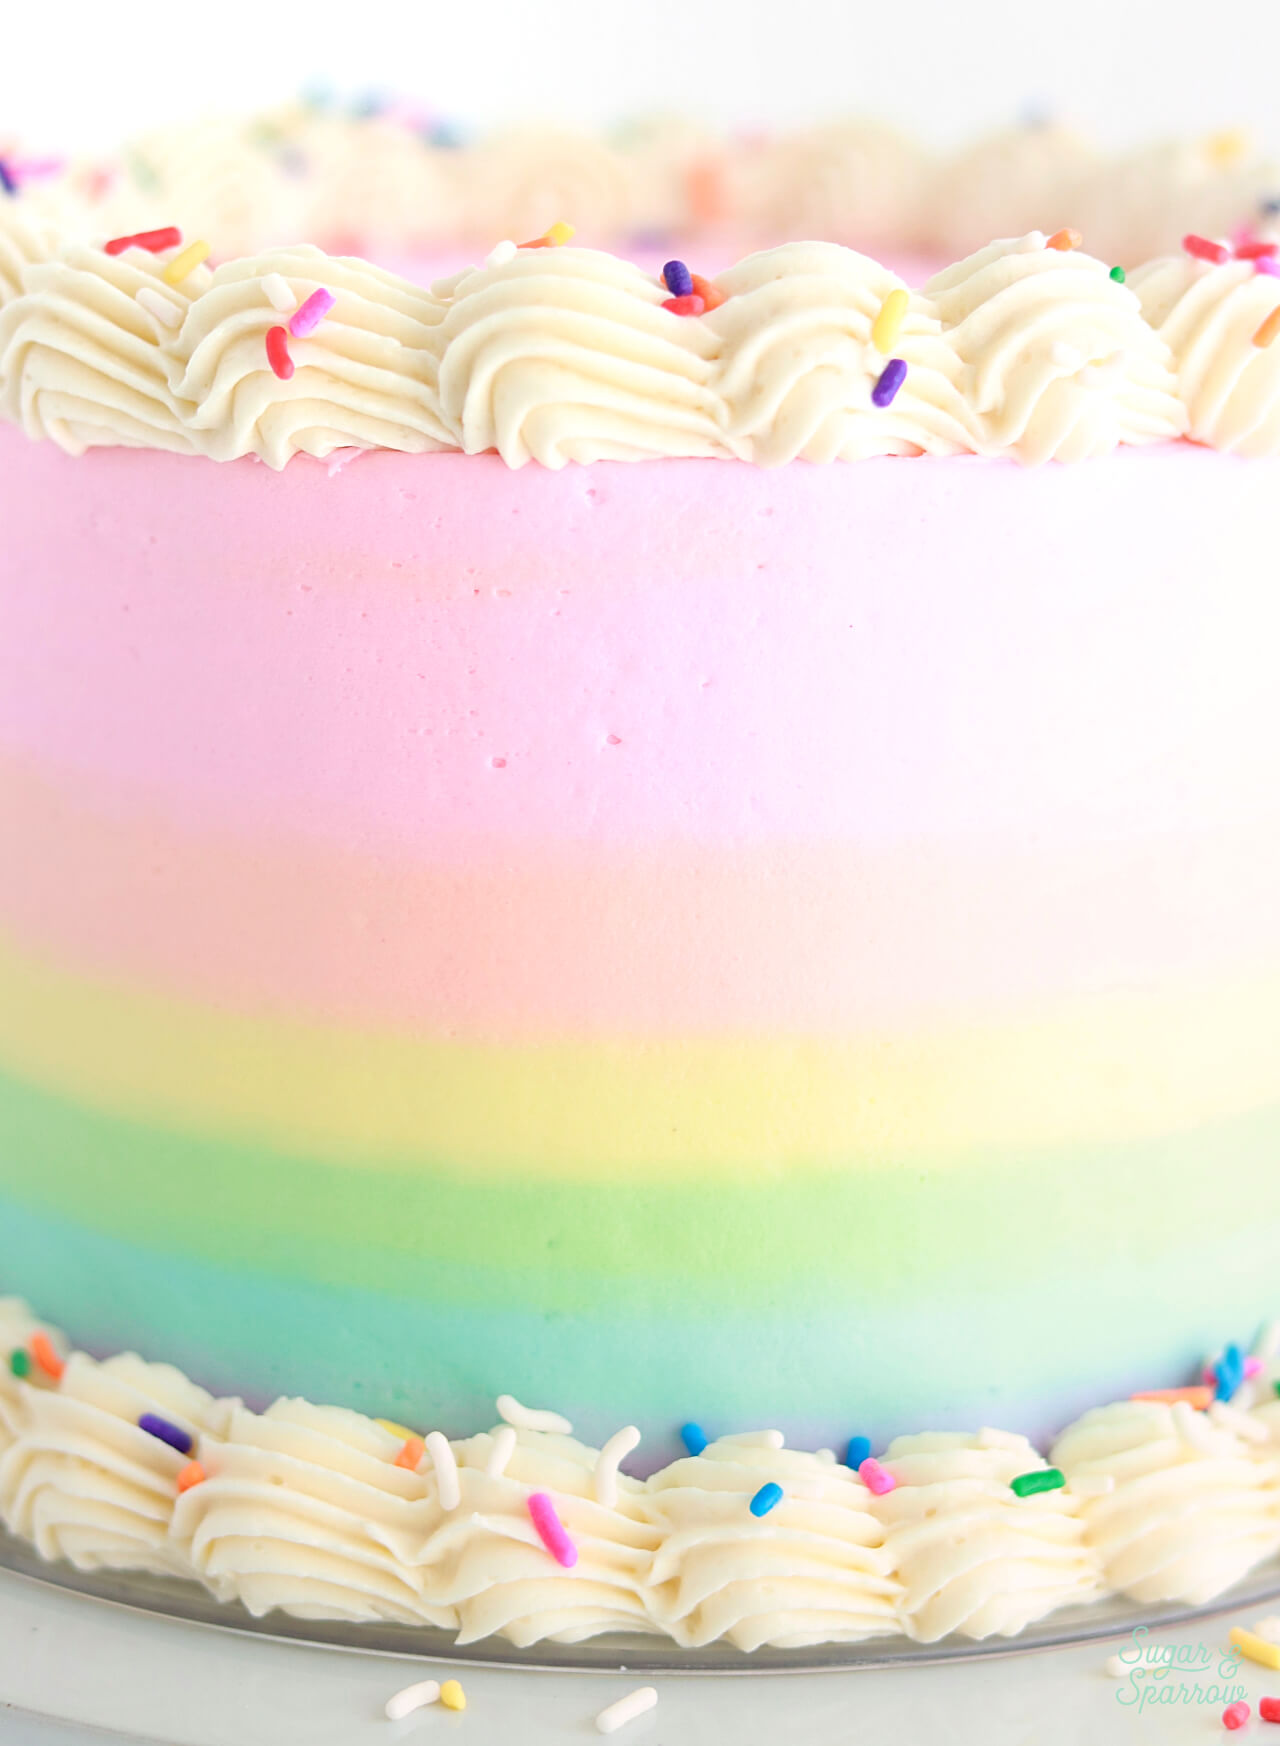
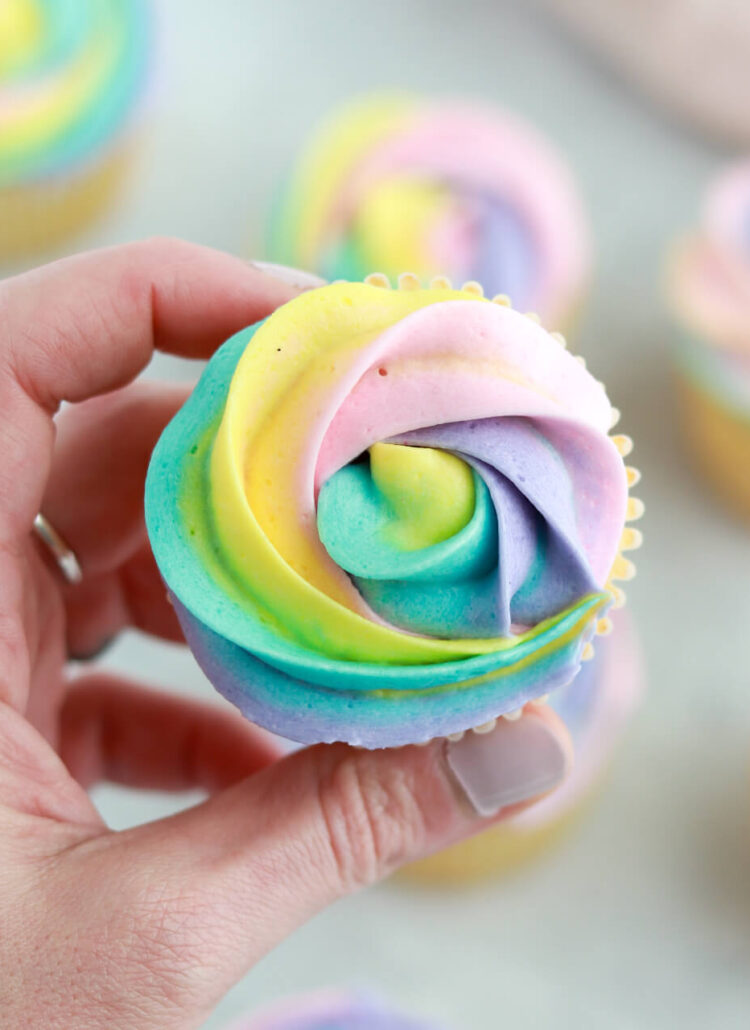
Before I created the rainbow frosting on the exterior of the cake, I filled the cake layers with vanilla buttercream topped with rainbow sprinkles. Then, I crumb coated the cake with more vanilla buttercream. While the crumb coated cake was chilling in the refrigerator, I reserved about 1 1/2 Cups of vanilla buttercream for the shell borders, then divided the rest of the buttercream evenly between 6 different bowls. I tinted each bowl a different color of the rainbow: pink, orange, yellow, green, blue, and purple. 

rainbow buttercream color tutorial

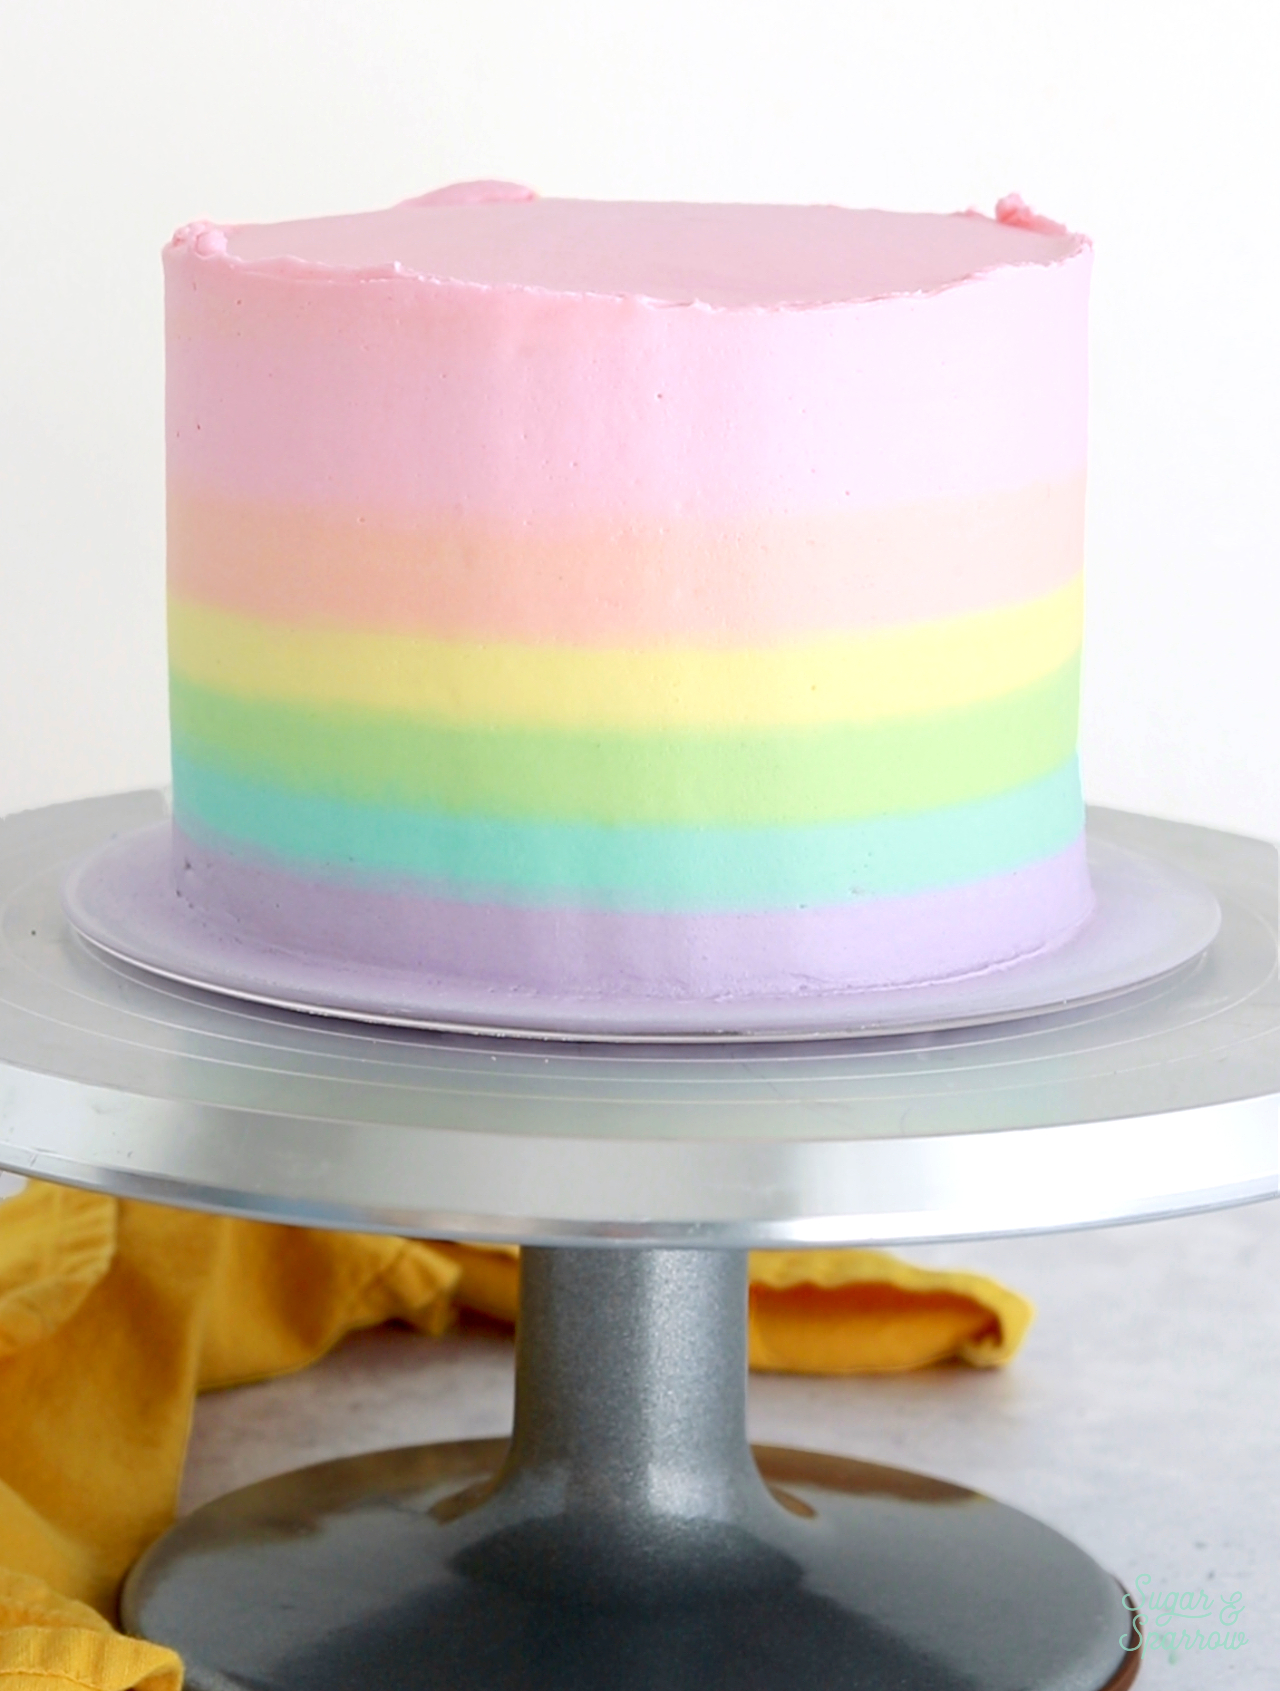
Once the crumb coated cake was nice and chilled, I marked out 6 equally-sized sections on the cake (one for each rainbow color), then piped each color onto the cake in rainbow order before creating a smooth buttercream finish. 

how to make a rainbow cake with buttercream
rainbow cake tutorial

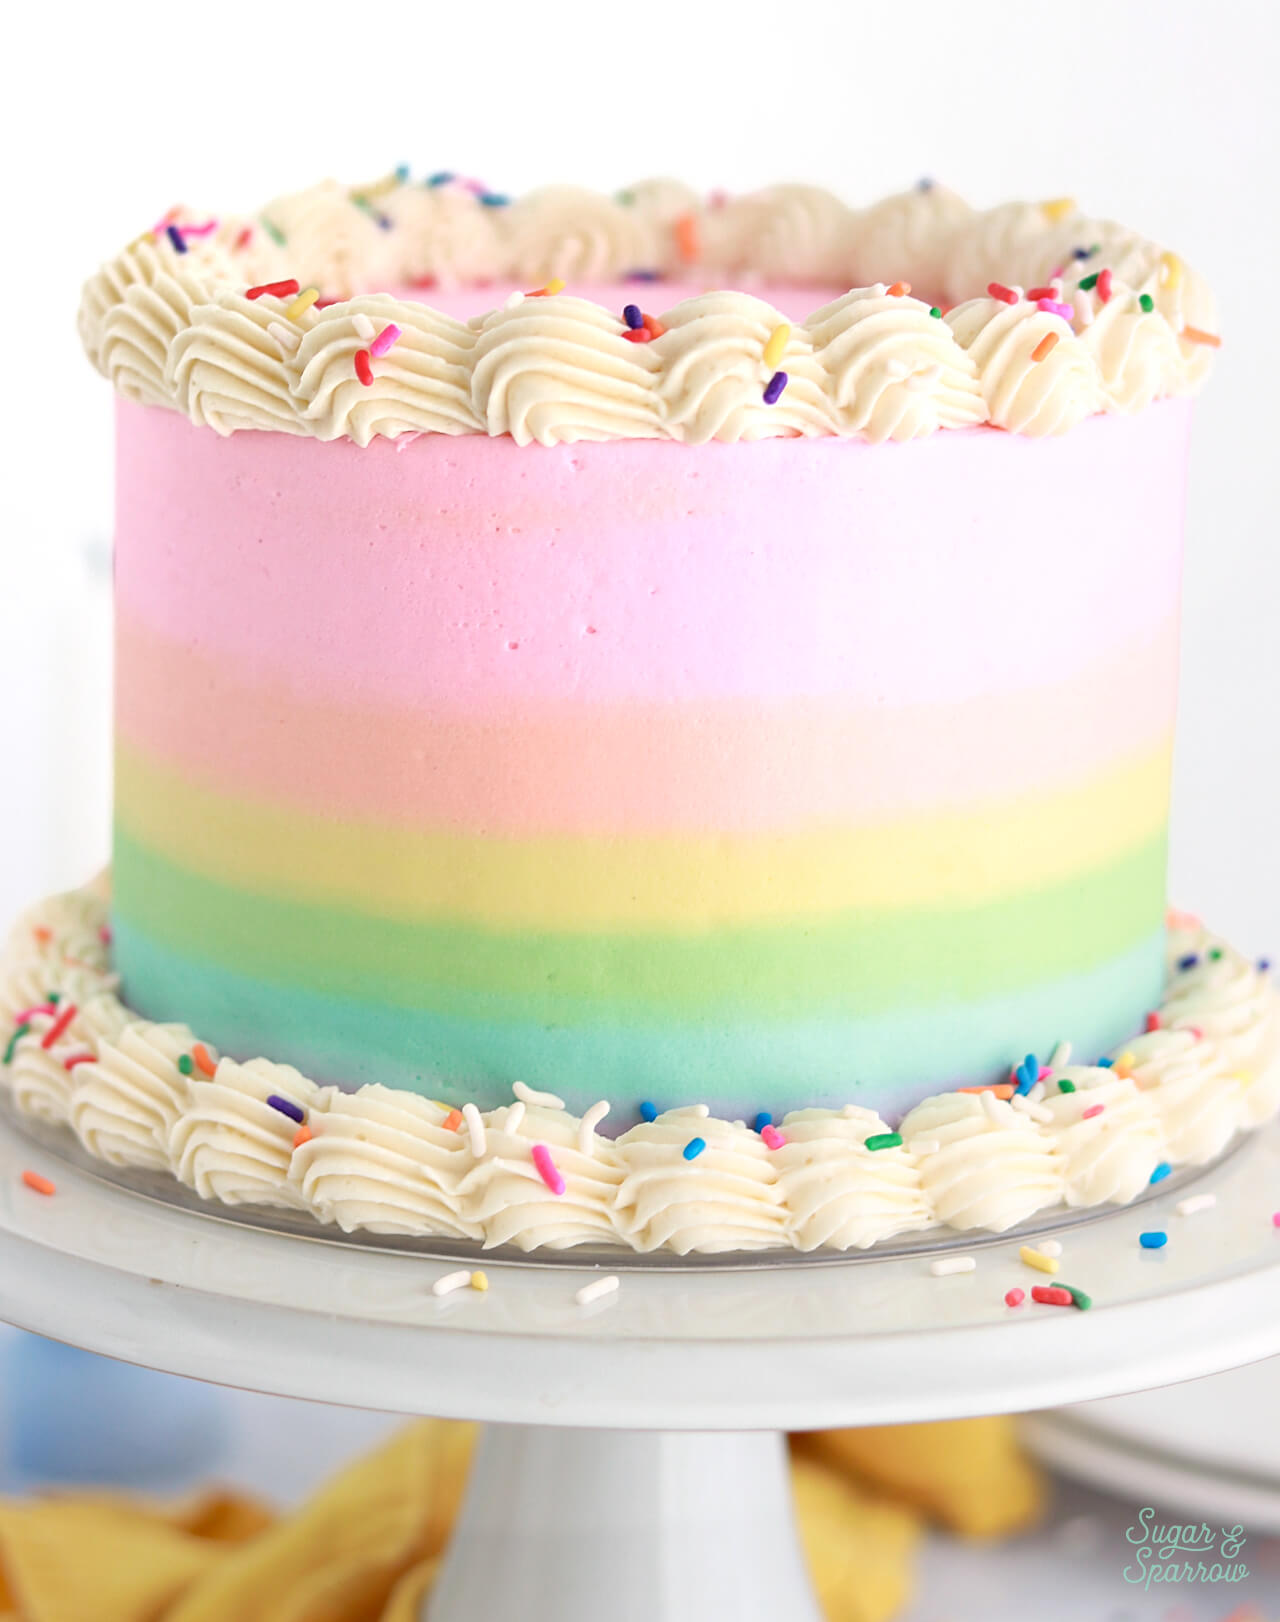
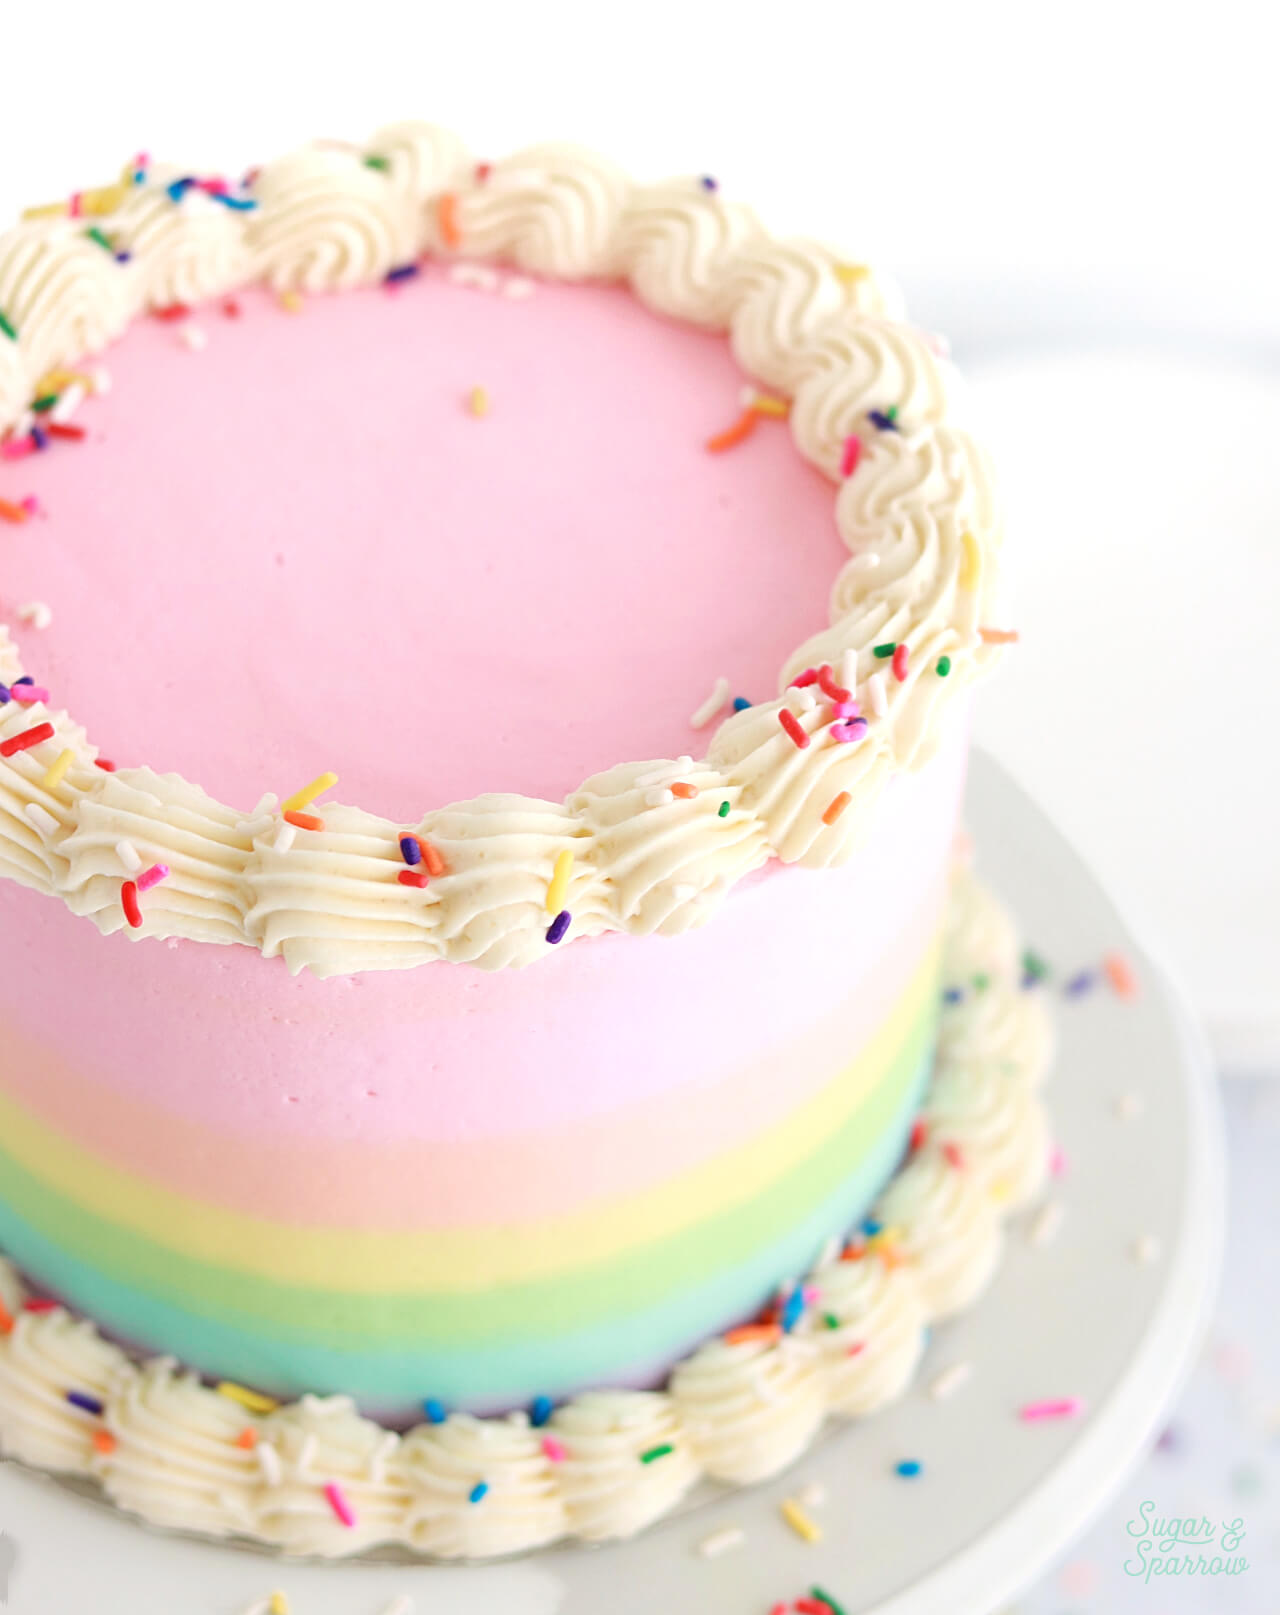
To finish the look, I added the uncolored buttercream into a piping bag fitted with Wilton Tip 4B and piped shell borders around the bottom and top of the cake. Then I added rainbow sprinkles onto both shell borders. I went back and forth about adding those sprinkles but I am so glad I did!  

st patricks day cake ideas
rainbow buttercream tutorial

How to Make Green Velvet Cupcakes

If you’d rather make cupcakes, this recipe is easy to adapt and will yield 24-30 cupcakes! All you have to do is replace the cake flour with 2 cups (265g) of all-purpose flour. Note that the gram measurement is different from the recipe card – this is because all-purpose flour weighs more than cake flour, so even though the volume is the same, the weight will be different. 

Follow the instructions for making the green velvet cake exactly, only use the batter to fill your cupcake tins no more than ⅔ full and bake at 350ºF for 14-18 minutes, or until a toothpick inserted comes out clean or with just a few moist crumbs.

rainbow buttercream cake
green velvet cake with rainbow buttercream frosting

Regardless of whether you make this a layer cake or cupcakes, rainbow frosting or not, this cake is absolutely delicious and will delight all who get to enjoy it! I can’t wait for you to try it.

green velvet cake recipe for st patricks day dessert

Green Velvet Cake with Rainbow Frosting

Layers of soft and moist green velvet cake with the perfect hint of chocolate flavor, layered with vanilla buttercream and rainbow sprinkles, then decorated with rainbow frosting for a St. Patrick's Day theme.
Print Recipe Pin Recipe
Prep Time:45 minutes mins
Cook Time:30 minutes mins
Cooling Time:3 hours hrs
Total Time:4 hours hrs 15 minutes mins
Course: Dessert
Cuisine: American
Servings: 15 slices

Ingredients

Red Velvet Cake

  • 2 Cups (212g) sifted cake flour
  • 3 Tbsp natural unsweetened cocoa powder NOT Dutch-processed
  • 1 tsp baking soda
  • 1/2 tsp salt
  • 1/2 Cup (113g) unsalted butter, room temperature
  • 1 1/2 Cups (300g) white granulated sugar
  • 1/2 Cup (120ml) vegetable oil
  • 2 large eggs, room temperature
  • 2 tsp pure vanilla extract
  • 2 tsp distilled white vinegar
  • 1/2 tsp green food color gel*
  • 1 Cup (240ml) buttermilk, room temperature** DIY recipe in notes

Vanilla Buttercream

  • 2 Cups (452g) unsalted butter, room temperature
  • 7 Cups (840g) powdered sugar
  • 4 tsp pure vanilla extract
  • 4 Tbsp whole milk, room temperature
  • 1/4 tsp salt, or to taste
  • Pink, Orange, Yellow, Green, Blue, and Purple food color gel (optional)

Additional Filling & Garnish

  • 1/2 Cup Rainbow sprinkles

Instructions

Make the Green Velvet Cake

  • Preheat the oven to 350ºF and prepare three 6-inch or two 8-inch cake pans by spraying the sides with cooking spray and placing a wax or parchment paper circle into the bottom of each one. Measure the sifted cake flour by spooning into your measuring cup and leveling it, or simply sift the cake flour into a bowl on your kitchen scale to measure it. Place the cake flour into a medium sized bowl and add the cocoa powder, baking soda, and salt. Whisk together and set aside.
  • Cream the butter on high for two minutes, then add the vegetable oil and sugar. Cream together on medium-high until light and fluffy, about 2 minutes. Scrape down the bowl and paddle. Turn the mixer to low and add the eggs one at a time. Once the eggs are incorporated, add the vanilla and white vinegar and mix on low for another 30 seconds. Scrape down the bowl and paddle once more.
  • Mix the green food color gel into the buttermilk. With the mixer on low speed, alternate adding the flour mixture and buttermilk in three additions, beginning and ending with the flour mixture. Mix only until the ingredients start to come together, then whisk the batter by hand a few times to make sure there are no large lumps.
  • Pour the batter into prepared cake pans (no more than 2/3 full) and bake for 30-35 minutes, until a toothpick inserted comes out clean. Let the cakes cool in the pan for five minutes before carefully removing them and placing the cakes on a wire rack or cookie sheet. Allow the cakes to cool completely before assembling and frosting.

Make the Vanilla Buttercream

  • With a hand mixer or paddle attachment on your stand mixer, cream the butter on medium-high until it’s creamy and light (almost white) in color. About 7 minutes. 
  • With the mixer on low, add the sifted powdered sugar one cup at a time, scraping down after each addition and making sure each cup is fully incorporated before adding the next one. 
  • Add vanilla, milk, and salt and mix on low for another minute until fully incorporated. Reserve the food coloring for step 2 of the assembly process.

Assembly

  • Once the Green Velvet Cakes are cooled throughout, level and torte the layers to your desired height. Fill and stack the cake with vanilla buttercream topped with rainbow sprinkles. Crumb coat the cake and place it into the refrigerator for at least 30 minutes to let the crumb coat firm up.
  • To create the look pictured, reserve about 1 1/2 Cups of vanilla buttercream for the shell borders, then divide the rest of the buttercream evenly between 6 different bowls. Tint each bowl a different color of the rainbow: pink, orange, yellow, green, blue, and purple. Add each color into a piping bag and snip off 1/2 inch opening.
  • Mark out 6 equally sized sections on the side of the chilled crumb coated cake, then pipe the rainbow colors in order onto the side of the cake, one color per section. Use an icing smoother to create a smooth buttercream finish.
  • Add the uncolored buttercream into a piping bag fitted with Wilton Tip 4B, then pipe shell borders on the top and bottom of the cake before sprinkling with rainbow sprinkles.

Notes

Make Ahead Tips: 
  1. The cake layers can be made ahead and stored, wrapped in plastic wrap, at room temperature for up to two days. Alternatively, you can store the wrapped cake layers in the freezer for up to 2 months before thawing and frosting.
  2. The vanilla buttercream can be made ahead and stored in an airtight container in the refrigerator for up to two weeks. When you’re ready to use it, bring it back to room temperature and re-whip in your stand mixer to bring back to smooth buttercream consistency. 
*Green Food Color Gel: I used AmeriColor Leaf Green, but recommend using any brand of green food color gel that is concentrated and flavorless.
**DIY Buttermilk Recipe: Add 1 Tbsp white vinegar into a mason jar or measuring cup. Add one cup (240ml) whole milk and let sit for at least 15 minutes before using in a recipe. 
To Make as Cupcakes: Swap the cake flour for an equal amount of all-purpose flour (if weighing, this will measure 265g instead of 212g since all-purpose flour weighs more than cake flour). Fill the cupcake tins no more than 2/3 full and bake at 350F (177C) for 14-18 minutes. 

By: Whitney · In: Cake, Featured, Recipes · Tagged: green velvet cake, rainbow cake, rainbow frosting

you’ll also love

Rainbow layer cake with rainbow frostingThe Ultimate Rainbow Cake (Inside and Out!)
st patricks day cake ideas by sugar and sparrowSt. Patrick’s Day Dessert Ideas
rainbow swirl cupcakes tutorialHow to Make Rainbow Swirl Cupcakes

Join the List

Stay up to date & receive the latest posts in your inbox.

Reader Interactions

Comments

  1. Luella says

    March 15, 2026 at 11:44 pm

    What brand of cocoa powered did you use? I used the exact same gel coloring and my cakes turned out way too dark. I used the rodelle cocoa powder. I would really like to try again and get the color right.
    Thanks

    Reply
    • Whitney says

      March 16, 2026 at 12:39 pm

      Hi Luella! I’m so sorry the color turned out too dark! I used Hershey brand cocoa powder, which is not Dutch-processed. Rodelle is Dutch-processed, which yields a darker brown (sometimes almost black!) cake. Next time I would try it with natural unsweetened cocoa powder instead of Dutch-processed. I’ll make note of that in the blog post.

      Reply
      • Luella says

        March 16, 2026 at 1:45 pm

        Thank you!
        I will definitely get some and give it another try!

        Reply
        • Luella says

          March 17, 2026 at 8:57 pm

          I gave it another try with the correct cocoa powder and it turned out great. I used your cream cheese buttercream frosting. Also everyone enjoyed the cake.

          Reply
  2. Dorothy says

    March 14, 2026 at 12:06 pm

    Unfortunately, after carefully following the recipe, my cake is not green and the chocolate flavour isn’t very rich for chocolate cake. Given it’s for St Paddy’s Day, I’ll have to try something else.

    Reply
    • Whitney says

      March 15, 2026 at 7:58 pm

      Hi Dorothy, I’m so sorry this cake didn’t work out for you. What kind of food coloring did you use? It sounds like there wasn’t enough added if the cake didn’t turn out green. And like a red velvet cake, this cake is meant to have only a light chocolate flavor.

      Reply
      • Dorothy says

        March 16, 2026 at 8:34 pm

        After reading other comments, it may have been my cocoa. It still tasted wonderful!

        Reply
  3. Tiffany says

    November 8, 2025 at 12:23 pm

    Do you have white velvet recipe or could I just leave out the Coca for this one to be white?

    Reply
    • Whitney says

      November 11, 2025 at 2:45 pm

      Hi Tiffany! For a white cake I recommend this recipe: https://sugarandsparrow.com/white-cake-recipe/

      Reply

Leave a Reply Cancel reply

Your email address will not be published. Required fields are marked *

Recipe Rating


Next Post >

Eggless Vanilla Cake Recipe (Can Be Made Vegan!)

Primary Sidebar

Welcome to Sugar & Sparrow

Welcome to Sugar & Sparrow

Helping you whip up pretty desserts with confidence and creativity. And hopefully sharing a few laughs with you along the way!

Learn More

Connect

let’s bake!

Get my very best recipes, baking tips, and decorating tutorials sent to your inbox

Featured Posts

a few of my favorite things for summer by sugar and sparrow

A Few of My Favorite Things (Summer 2025)

gender reveal cupcakes

Sprinkle Filled Gender Reveal Cupcakes

pumpkin cream cheese cupcakes

Pumpkin Cream Cheese Halloween Cupcakes

Search

Archives

Follow Along

@sugarandsparrowco

LEMON CUPCAKES 🍋 after about a dozen recipe tes LEMON CUPCAKES 🍋 after about a dozen recipe tests, this one is everything I could want in a lemon cupcake! Fluffy-yet-moist, bursting with natural lemon flavor, and absolutely irresistible topped with lemon cream cheese buttercream. 

Full recipe (with frosting) linked in my bio + at https://sugarandsparrow.com/homemade-lemon-cupcakes/

INGREDIENTS:
1 Cup (132g) all-purpose flour
1 tsp baking powder
1/4 tsp salt
1/4 Cup (60ml) whole milk, room temperature
3 Tbsp (45ml) lemon juice from 1 medium lemon
3/4 Cup (150g) granulated sugar
3 Tbsp (42g) unsalted butter, room temperature
2 Tbsp (30ml) vegetable oil
2 large eggs, room temperature
1 tsp pure vanilla extract

INSTRUCTIONS:
1. Preheat the oven to 350ºF (177ºF) and line a standard cupcake pan with 12 paper liners.
2. In a large bowl, whisk together the flour, baking powder, and salt. Set aside. 
3. In the bowl of a stand mixer fitted with the paddle attachment (or with a hand mixer and large bowl), add the lemon zest to the sugar and mix on low speed until fragrant and well combined, about 1 minute. Meanwhile, combine the lemon juice with the milk and set aside. 
4. Add the butter to the lemon-sugar mixture and cream on medium speed until and combined, about 2 minutes. Add the vegetable oil and beat until light and creamy, about 3 minutes. Scrape down the bowl and paddle as needed.
5. Mix in the eggs one at a time on low speed, then add the vanilla and turn the mixer to medium speed for one minute.
6. Turn the mixer off and add the flour mixture all at once. Mix on low speed until just combined, then slowly pour in the lemon-milk mixture. Mix until just combined, about 30 seconds.
7. Divide the batter equally between the liners and bake for 14-18 min. Cool, then top with frosting of your choice (link in bio for lemon cream cheese frosting)�
#lemoncupcakes #creamcheesefrosting #lemon #cupcakes #cupcakedecorating
April in my kitchen 🌸 I published 5 NEW recipes April in my kitchen 🌸 I published 5 NEW recipes on my site, baked my Oreo cupcake recipe for a fundraiser and found it was just as delicious as I remember, and filmed/photographed 3 recipes that will be on my blog in May (Lemon Cupcakes, Lemon Cream Cheese Buttercream, and No-Bake Marbled Strawberry Cheesecake) 🥰 

Comment “APRIL” to get all the available recipes and stay tuned for more! 

#bakersofinstagram #springbaking #cakedecorating #cupcakes #bakinglove
SHEET PAN COOKIE CAKE 🍪 slice it warm for a fud SHEET PAN COOKIE CAKE 🍪 slice it warm for a fudgy chocolate chip cookie OR let it settle into a moist and chewy cookie cake that’s perfect for decorating! My fave vanilla buttercream + sprinkles turn this giant chocolate chip cookie into the perfect birthday cake alternative at the end 🥳
⁣
Full recipe + decorating ideas at https://sugarandsparrow.com/sheet-pan-chocolate-chip-cookie-cake/
⁣
INGREDIENTS⁣
1 Cup (226g) unsalted butter, melted⁣
1 1/3 Cups (267g) packed light or dark brown sugar⁣
1/2 Cup (100g) granulated sugar⁣
3 large eggs⁣
1 Tbsp pure vanilla extract⁣
1 tsp baking soda⁣
1 tsp cornstarch⁣
1/2 tsp salt⁣
3 Cups (398g) all purpose flour⁣
2 Cups (350g) semi-sweet chocolate chips⁣
⁣
INSTRUCTIONS⁣
1. Preheat the oven to 350ºF (177ºC). Grease and line a 13×18 inch sheet pan.⁣
2. In a large bowl, add the brown sugar and granulated sugar. Melt the butter in the microwave and pour it over the top of the sugars. Whisk together until uniform. Add the eggs and vanilla, then continue whisking until uniform. Whisk in the baking soda, cornstarch, and salt.⁣
3. Add the flour and use a silicone spatula to fold it in until smooth cookie dough forms. Reserve 1/2 Cup of the chocolate chips and set them aside, then fold the remaining 1 1/2 Cups of chocolate chips into the cookie dough.⁣
4. Place the chocolate chip cookie dough onto the prepared sheet pan and use an offset spatula to spread it all the way to the edges in an even layer.⁣
5. Bake the cookie cake for 14-16 minutes, until it looks golden brown on the edges and set. 
6. Enjoy warm or let it cool and decorate with vanilla buttercream and sprinkles! ⁣
⁣
#cookiecake #chocolatechipcookies #sheetcake #birthdaycake #cakedecorating
STRAWBERRY CUPCAKES 🍓based on my beloved strawb STRAWBERRY CUPCAKES 🍓based on my beloved strawberry layer cake recipe, this cupcake version is just as moist yet fluffy and bursting with natural strawberry flavor! Between the mix of fresh strawberries in the cupcakes + freeze-dried strawberries in the frosting, the flavor is out of this world 🚀

Full recipe link in my bio (with strawberry buttercream) + at https://sugarandsparrow.com/strawberry-cupcakes/

STRAWBERRY CUPCAKES
Yield: 14 cupcakes

INGREDIENTS:
5 oz (143g) fresh or frozen strawberries
1/3 Cup (80ml) whole milk, room temp
1 1/2 Cups (158g) sifted cake flour
1 tsp baking powder
1/4 tsp baking soda
1/2 tsp salt
6 Tbsp (85g) unsalted butter, room temp
1 Cup (200g) granulated sugar
2 large eggs, room temp
3 Tbsp (45g) sour cream, room temp
1 tsp vanilla extract
1 drop pink food coloring (optional)

INSTRUCTIONS: 
1. Puree the strawberries using a food processor (you’ll have about 1/2 cup of puree), then place into a saucepan over medium-low heat. Bring to a simmer, then cook for 10-15 min, stirring occasionally, until you have 1/4 cup. Refrigerate until room temp.
2. Preheat oven to 350ºF (177ºC) and line a standard cupcake pan with liners.
3. Whisk together the sifted cake flour, baking powder, baking soda, and salt and set aside.
4. In a stand mixer w/ paddle attachment (or hand mixer + large bowl), whip the butter on high for 2 min. Add sugar and beat for 2 min, until light and fluffy. Turn the mixer to low and add the eggs one at a time, then add the vanilla and sour cream, turn the mixer to high and beat for 1 min. Meanwhile, whisk together the strawberry puree, whole milk, and food coloring (if using).
5. Turn the mixer off and add all of the dry ingredients at once. Mix on low until just combined, then add the strawberry milk mixture until just combined, about 30 seconds.
6. Fill the cupcake liners 2/3 full and bake for 14-18 minutes. Cool completely before topping with strawberry buttercream (full recipe linked above). 

#strawberrycupcakes #strawberrycake #pinkcupcakes #strawberry #cupcakes
COFFEE BUTTERCREAM (recipe below)☕️ this frost COFFEE BUTTERCREAM (recipe below)☕️ this frosting has AMAZING coffee flavor, is so easy to decorate cakes with, and pairs beautifully with so many flavors (chocolate, vanilla, or any cake flavor you’d want to turn into a latte). 

All my cake pairing suggestions are linked in my bio or at https://sugarandsparrow.com/coffee-buttercream-recipe/ 

COFFEE BUTTERCREAM⁣
Yield: 2.5 Cups⁣

INGREDIENTS⁣
1 1/2 tsp instant coffee or espresso powder⁣
1 1/2 Tbsp whole milk, room temperature⁣
1 Cup (226g) unsalted butter, room temperature⁣
3 1/2 Cups (420g) powdered sugar⁣
2 tsp pure vanilla extract⁣
Pinch of salt⁣

INSTRUCTIONS⁣
1. Combine the instant espresso/coffee with the whole milk and set aside. In the bowl of a stand mixer, beat the butter on high until creamy and smooth (about 5 minutes), scraping down the bowl and paddle a few times in between.⁣
2. Turn the mixer to low and add the powdered sugar a few cups at a time, scraping down the bowl and paddle between intervals. Add the vanilla, the coffee/espresso milk mixture, and salt. Mix on low until fully incorporated, about one minute.⁣

#coffeebuttercream #buttercream #frosting #coffeecake

Footer

On the Blog

  • Cake Basics
  • Recipes
  • Tutorials

Info

  • About
  • Privacy Policy & Disclosure

stay in the know

Copyright © 2026 · Theme by Sugar & Sparrow