• Cake
  • Frosting
  • YouTube
  • My Favorite Tools
  • Nav Social Icons

  • Skip to primary navigation
  • Skip to main content
  • Skip to primary sidebar
  • Skip to footer
  • Recipes
    • Cake
    • Cupcakes
    • Frosting
    • Ice Cream
    • Vegan
  • Cake Basics
  • Tutorials
  • Blog
  • About
  • Mobile Menu Widgets

    Connect

    Search

Sugar & Sparrow logo in script font

Sugar & Sparrow

Lifestyle and Cake from Portland Oregon

  • Cake Basics
  • Recipes
    • Cake
    • Cupcakes
    • Cookies & Bars
    • Filling
    • Frosting
    • Ice Cream
    • No-Bake
    • Small Batch
    • Vegan
  • Tutorials
  • Book
  • Blog
  • About

Marble Buttercream Cake Tutorial Feat. the JOANN Stir Collection

November 4, 2022 · In: Featured, Tutorials

I am a big fan of baking and cake decorating tools that are pretty and functional, so when I saw the new line of Stir products at JOANN I just about squealed. They are honestly the most beautiful tools I’ve seen in my baking career thus far – gold stainless steel with elegant marble accents. They’re pretty enough to keep on display in your kitchen or use as food photography props, and they’ll get you extra excited to bake all the things! Plus, they’re dishwasher safe which is a huge win in my book. Pretty, functional, and practical.

UPDATE 2025: JOANN has (sadly!!) gone out of business, so I have slightly changed these product links.

gold marble cake decorating tools by JOANN's Stir collection

JOANN asked me to create a cake project with these baking and decorating tools and I was immediately inspired to make a marble buttercream cake with gold accents. I wanted to make a cake that captured the beauty of these tools in cake form, plus show you how fun and simple it is to make marble buttercream! These Stir products are top-notch when it comes to functionality, which made them a true joy to decorate this marble cake with.

marble buttercream cake tutorial
marble buttercream tutorial

I whipped up a quick video for this marble buttercream tutorial so you can visualize it before you read all about it below.

If you’re into cake decorating videos like this one, be sure to check out my YouTube Channel! You’ll find tons of videos to inspire you there, and make sure you never miss a new one by clicking the Subscribe button.

You Will Need

  • A 6-inch cake that’s been crumb coated and chilled
  • Cake turntable
  • 1.5 batches of vanilla buttercream
  • Black food color gel
  • Bowls and spoons for color mixing
  • Baker’s twine
  • Parchment paper
  • Scissors
  • Scotch tape
  • Angled icing spatula
  • Icing smoother
  • Fondant smoother
  • Small food-grade paint brush
  • Gold luster dust
  • Clear extract (lemon or vanilla) or vodka

Step 1: Frost the Cake

With your chilled and crumb coated cake on a turntable, use the largest bowl of buttercream to frost a smooth finish onto the cake. Start by frosting a smooth layer on the very top of the cake with your angled icing spatula.

how to frost a cake

Next, add buttercream to the sides of the cake and glide your icing smoother over them while turning the turntable to create smooth sides.

frosting a buttercream cake
smooth buttercream cake tutorial

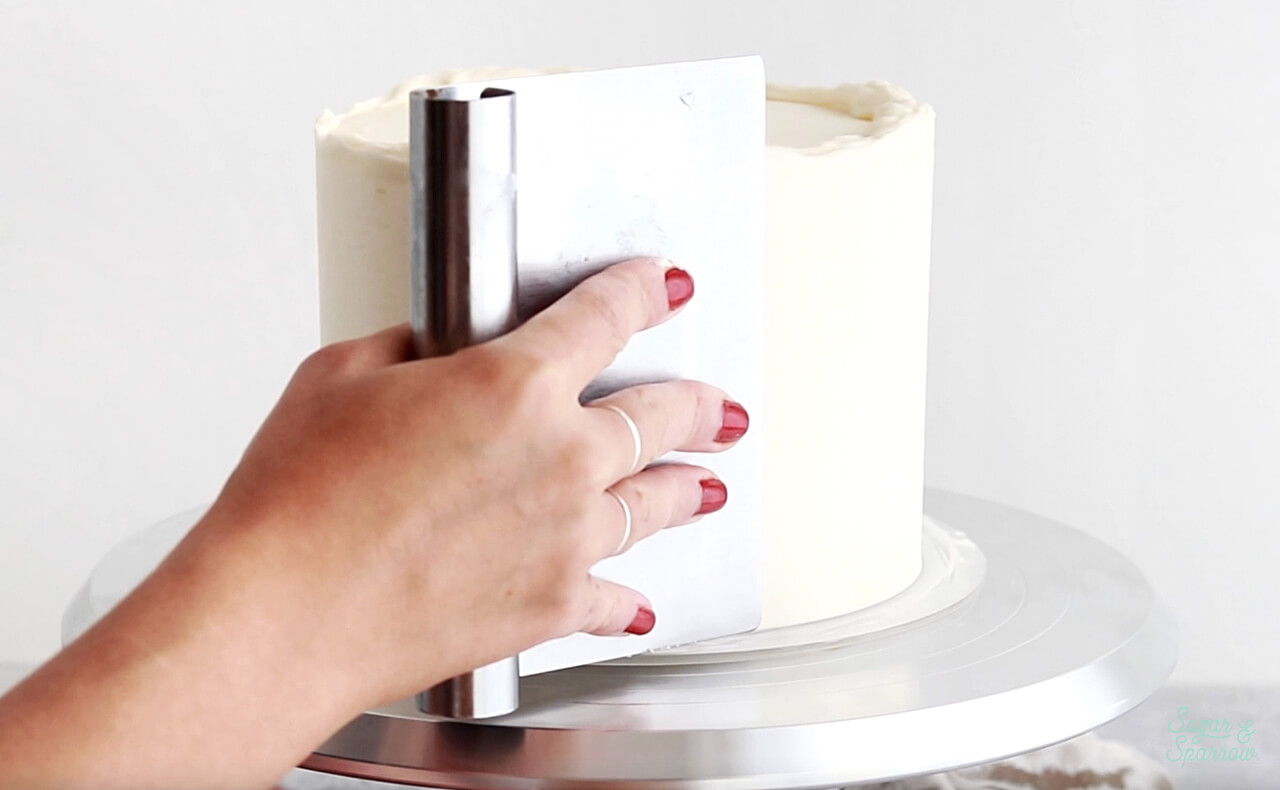
You’ll notice a crown of buttercream forming on the top edges of the cake, which is essential to getting sharp edges on the top. Use your angled icing spatula to swipe the crown inwards (toward the top center of the cake). Repeat until you’ve got nice sharp edges.

how to get sharp edges buttercream

When your cake is looking ultra smooth, pop it into the refrigerator to firm up for at least 30 minutes. If you want more tips on creating a perfectly smooth cake finish, I’ve got a great tutorial for you here. 

Step 2: Mix the Marble Buttercream

Divide the remaining buttercream into three small bowls. Add 2 drops of black food color gel into the first bowl and gently mix it with your spatula until it’s about half mixed. You’ll want a dark grey color with some streaks of white/lighter grey in there.

how to make marble buttercream

Scoop out about 1 teaspoon of this dark grey marble color and mix it into the second bowl. Repeat the process of mixing until you have a light grey color with streaks of white mixed in. Keep the last bowl uncolored.

Step 3: Make the Marble Buttercream Wrap

Once your frosted cake is nice and chilled, wrap a piece of baker’s twine around it to measure the circumference. Cut the baker’s twine to mark the circumference and lay it out on your work surface. Spread a piece of parchment paper out as long as the baker’s twine and mark about one inch past the twine, then cut the parchment paper.

how to measure cake circumference
measuring parchment paper for buttercream wrap

After trimming the parchment paper lengthwise, I marked the height at 4 ½ inches tall (almost the height of the frosted cake) and trimmed the excess. When you’re finished trimming the parchment, tape it down onto your work surface. 

Using the small angled spatula, scoop the dark grey and light grey marbled buttercream and gently apply it to the parchment paper. You’ll want to be sure not to spread or mix it up too much as you place it onto the parchment. Next, scoop the uncolored buttercream either with the same spatula (for an even more marbley look) or a clean spatula (for a cleaner look) and apply it to the parchment next to the marbled grey buttercreams.

how to make a marble buttercream cake
marble buttercream cake tutorial

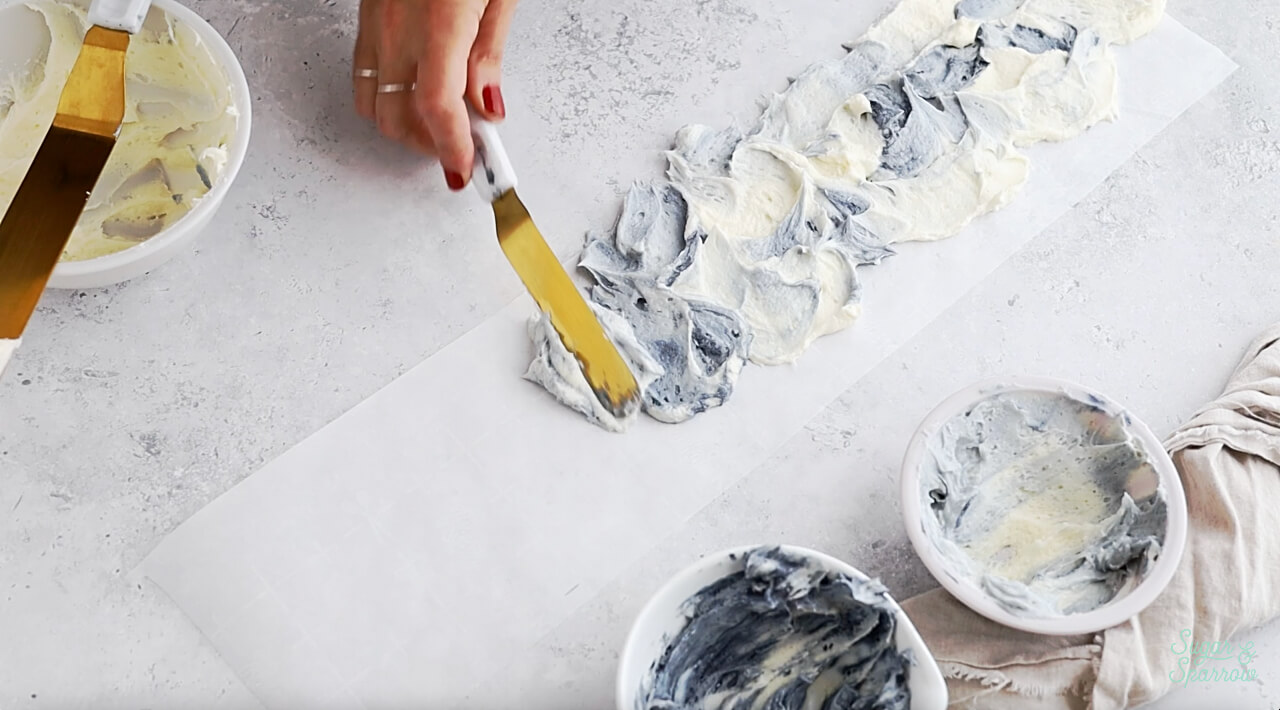
Repeat the process of scooping and applying the buttercream until you’ve covered the length of the parchment, creating varying heights along the way. Make sure to place the highest buttercream splotches at least ½ inch down from the top of the parchment.

marble buttercream wrap cake tutorial

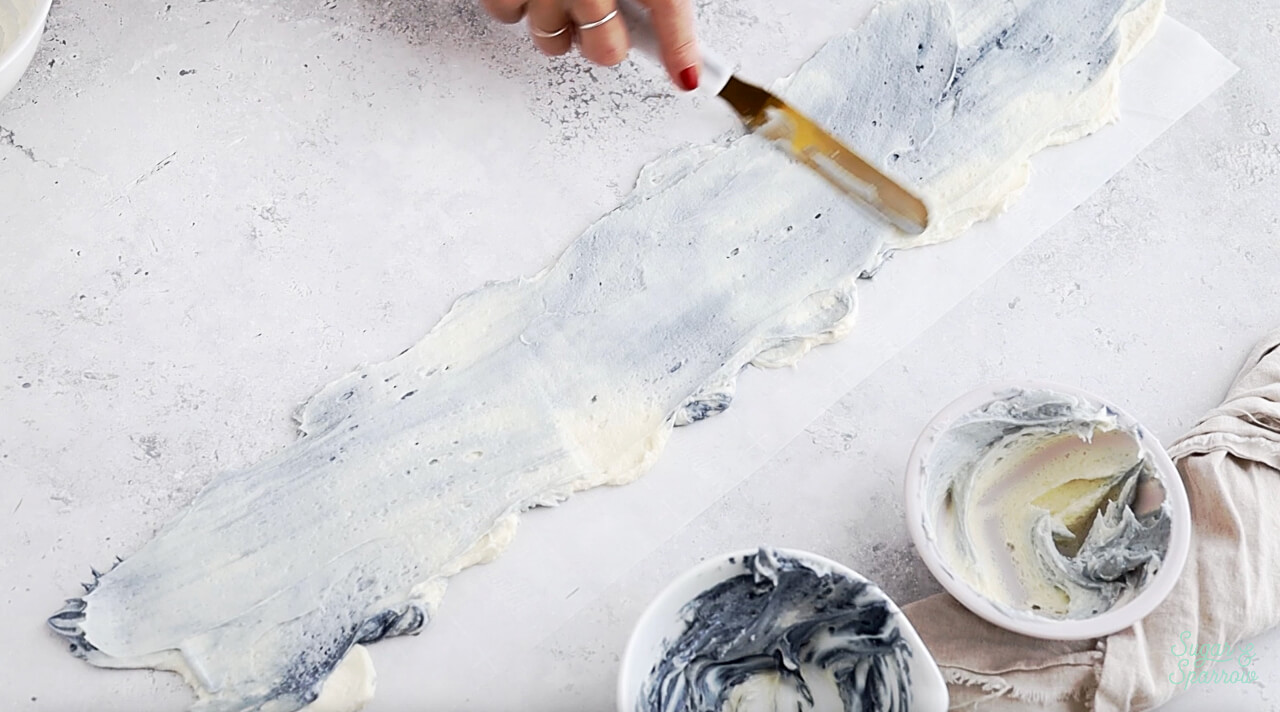
When you’ve finished applying the buttercream to the parchment paper, use an angled spatula to gently smooth the buttercream down until it’s about ¼ inch thick. Using gentle pressure here will prevent the marble from mixing too much underneath.

smoothing buttercream on parchment

Step 4: Apply the Marble Buttercream Wrap

Place your chilled, frosted cake on the turntable. Un-tape the marble buttercream wrap from your work surface and wrap it around the cake as tightly as possible. It should stick to the cake really easily since the frosting is still very wet at this point. 

marble buttercream wrap tutorial for cake
marble buttercream wrap cake tutorial

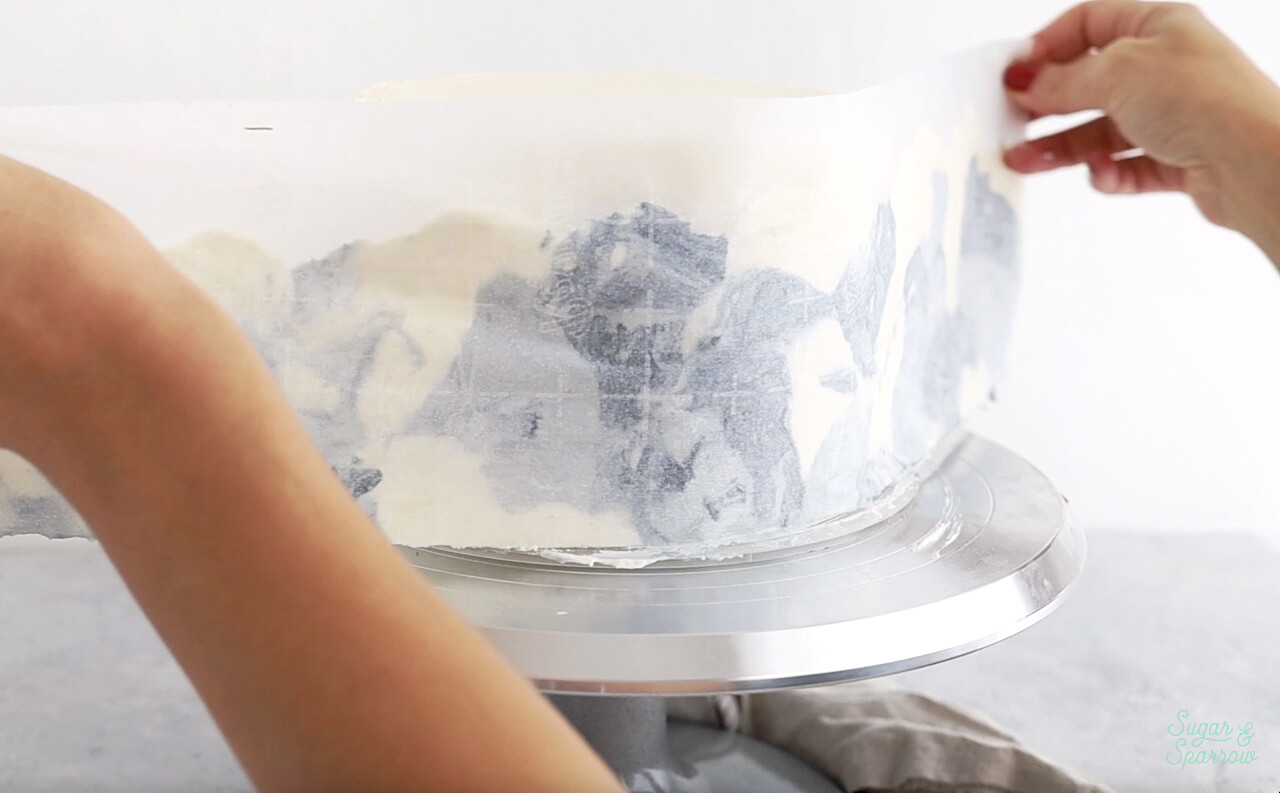
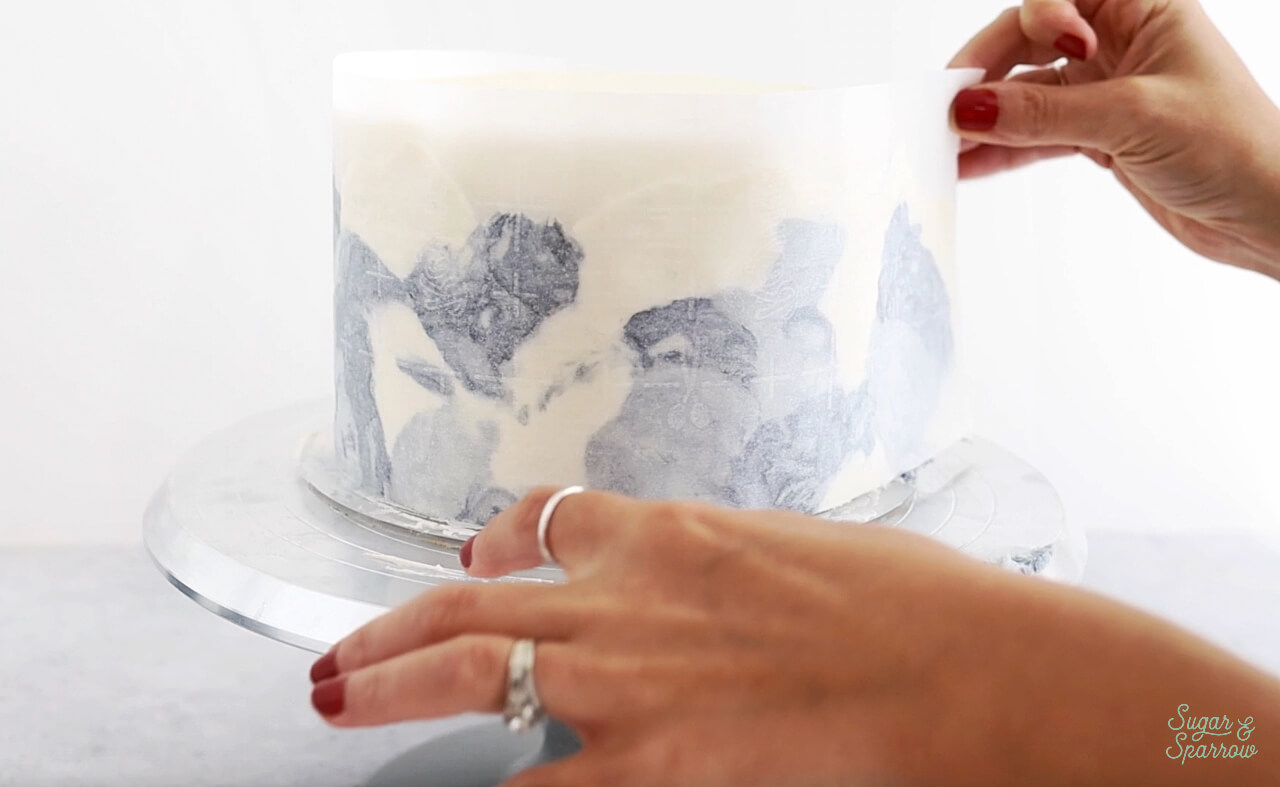
Use your fondant smoother to smooth the buttercream wrap down and adhere it to the cake, then place the wrapped cake back into the refrigerator for at least 30 minutes to let the marble buttercream firm up.

marble cake tutorial with buttercream

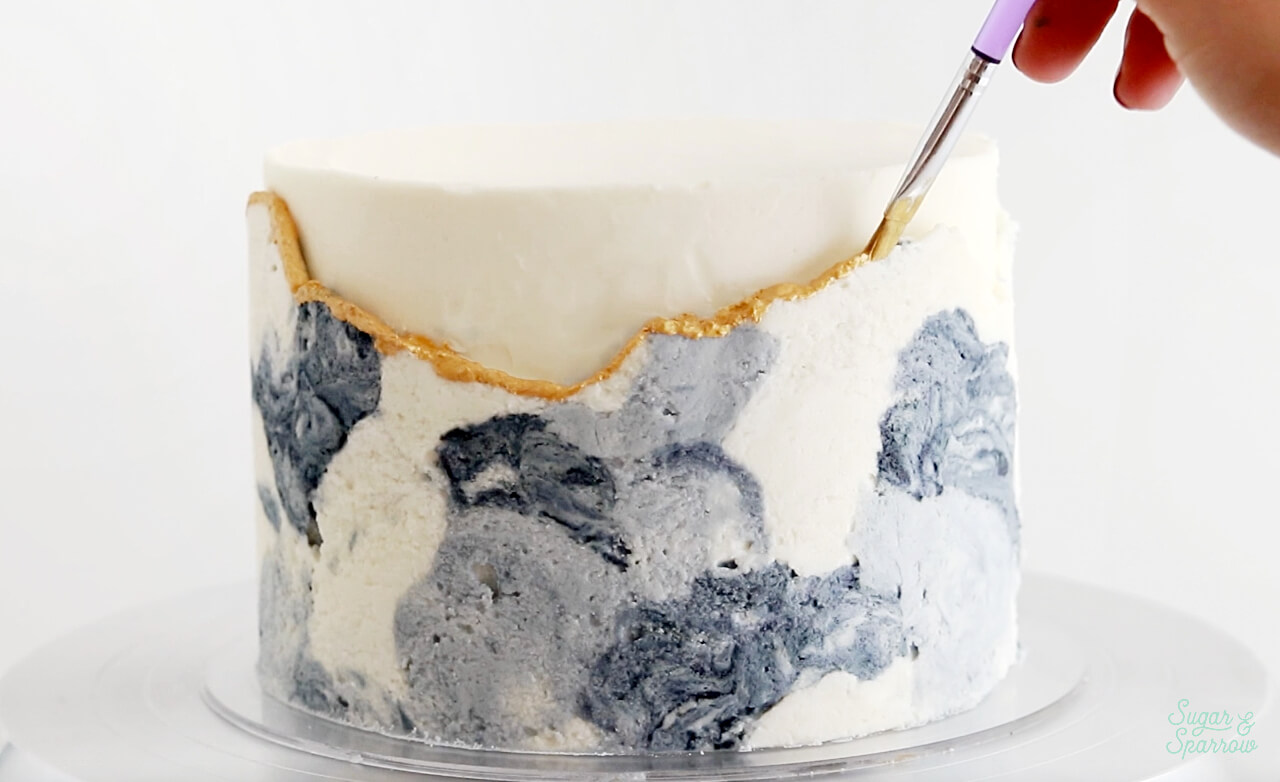
Step 5: Reveal the Marble 

Once the buttercream beneath the parchment paper is firm to the touch, gently peel the parchment away to reveal the stunning marble buttercream beneath.

marble cake tutorial with buttercream

I chose to keep the texture that the parchment paper created instead of smoothing it down because a) it looks amazing and b) last time I smoothed out the marble it all blended together and didn’t look as cool. 

Step 6: Paint the Gold Accents

Mix a few drops of clear extract or vodka into about 1 teaspoon of gold luster dust. Add more liquid if necessary to thin it into a paint-able consistency. When the gold paint is just right, use a small food-grade paintbrush to paint the top edge of the marble buttercream wrap.

how to make gold cake paint
gold marble buttercream cake tutorial

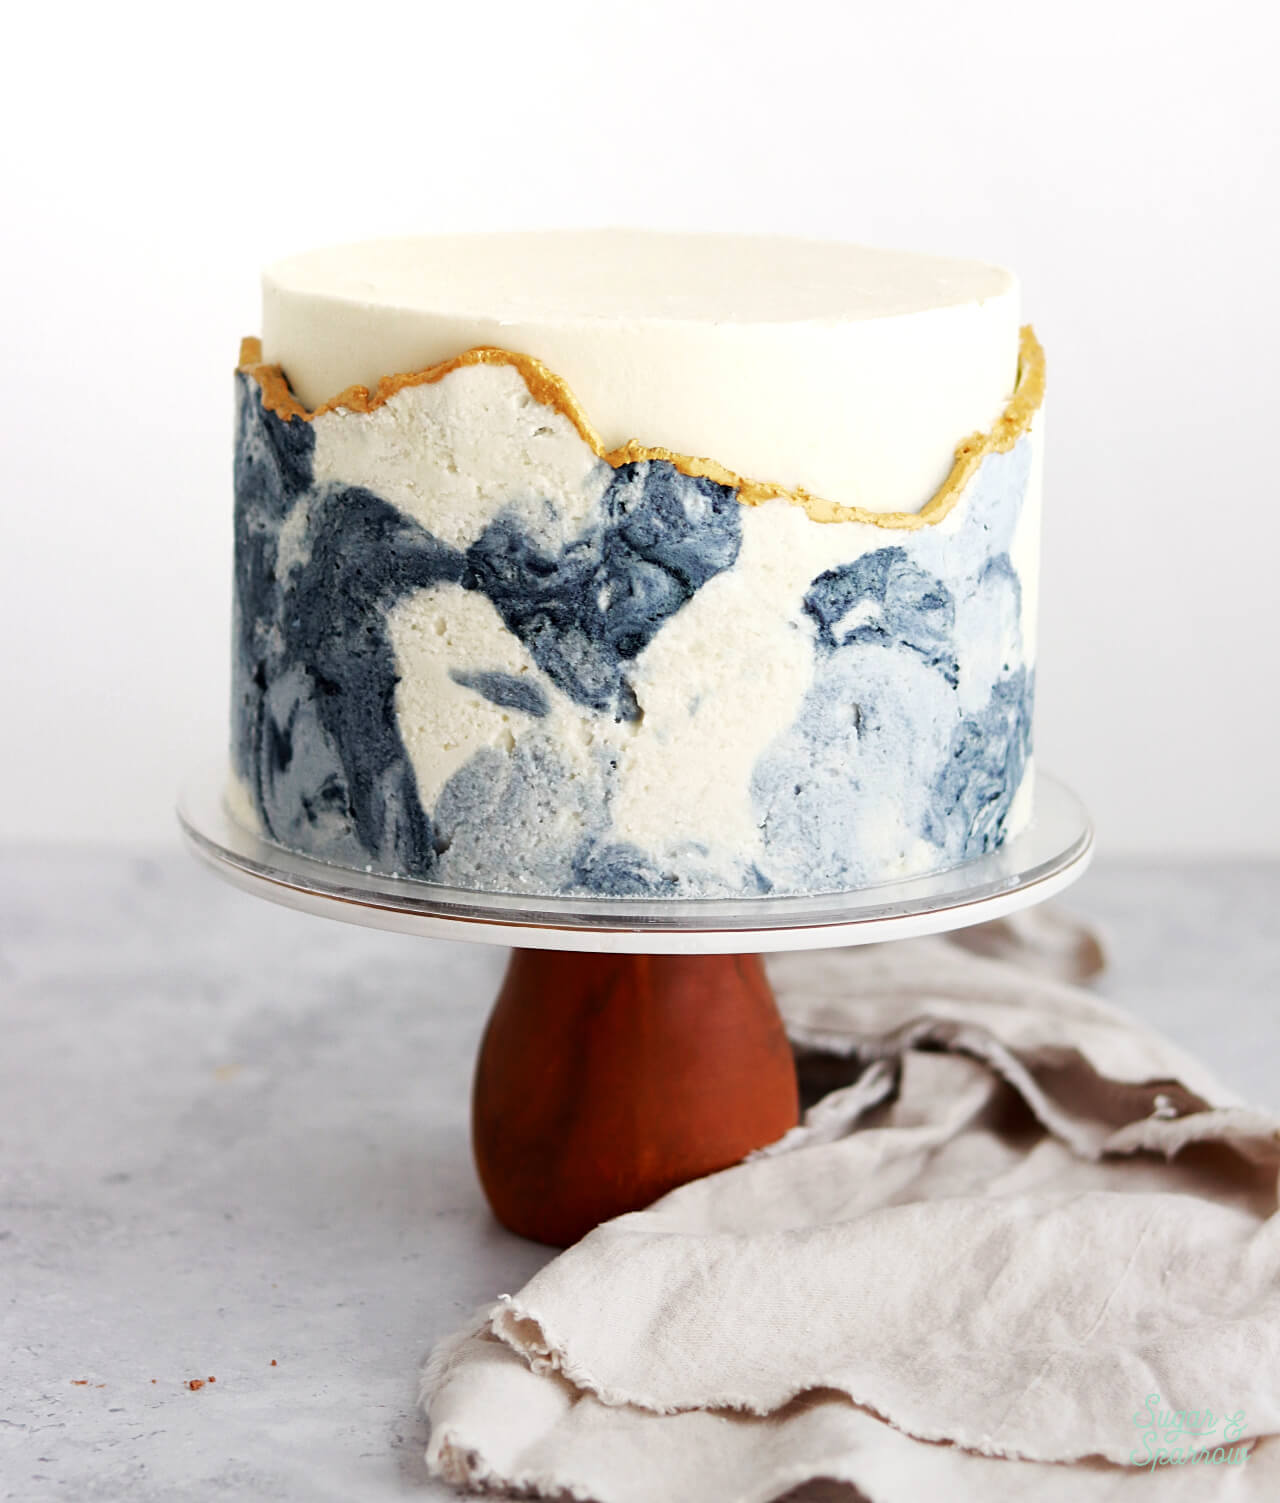
Isn’t this marble buttercream cake so elegant? It’s so perfect for a wedding, fancy birthday party, anniversary, or any event that could use some elevating. Let me know what you think in the comments below and feel free to tag @sugarandsparrowco if you post a pic!

marble buttercream cake with gold accents
gold and marble buttercream cake tutorial

Disclaimer: I was compensated by JOANN for my work of creating this project, styling, filming, photographing, and writing about their products. As always, all opinions are honest and my own. Thank you for supporting brands that support Sugar & Sparrow.

By: Whitney · In: Featured, Tutorials · Tagged: baking tools, cake decorating tools, JOANN, marble buttercream, marble buttercream cake, marble buttercream tutorial, marble cake, marble cake tutorial

you’ll also love

amazon prime day deals for bakers 2024The Best Baking Deals for Prime Day 2024
marble cake recipe with chocolate buttercreamMarble Cake Recipe
vintage halloween lambeth cakeVintage Halloween Lambeth Cake Tutorial

Join the List

Stay up to date & receive the latest posts in your inbox.

Reader Interactions

Comments

  1. Ange says

    February 9, 2024 at 9:28 pm

    Hi – total amateur here. Thank you so much for this tutorial – I love this look and have just used your method to decorate a cake for my daughter. I used ermine frosting because she doesn’t like buttercream, but found that when I removed the paper I had quite a few air bubbles. Do you think this was caused by not smoothing the frosting enough before fridging it or is it because I used a different type of frosting?

    Reply
    • Whitney says

      February 12, 2024 at 8:22 am

      Hi Ange! Ermine frosting should work just fine with this method. If you had air bubbles appear as the cake came to room temperature, this would mean that the marbled part wasn’t smoothed down enough and air got trapped underneath, then as the temperature got warmer the air expanded. If you had air bubbles like little holes in your marble finish it means you just need to press a little harder when you’re creating the marble transfer so that air doesn’t get trapped between the acetate (or parchment) and the frosting. Hope that helps!

      Reply

Leave a Reply Cancel reply

Your email address will not be published. Required fields are marked *

Recipe Rating


Next Post >

Spiced Pumpkin Biscoff Cake

Primary Sidebar

Welcome to Sugar & Sparrow

Welcome to Sugar & Sparrow

Helping you whip up pretty desserts with confidence and creativity. And hopefully sharing a few laughs with you along the way!

Learn More

Connect

let’s bake!

Get my very best recipes, baking tips, and decorating tutorials sent to your inbox

Featured Posts

sprinkle cake tutorial by sugar and sparrow

How to Decorate a Cake with Sprinkles

top 10 cakes of 2022

The Best of 2022

birthday ice cream cake recipe with cake batter ice cream, brownies, and hot fudge

The Ultimate Birthday Ice Cream Cake

Search

Archives

Follow Along

@sugarandsparrowco

RASPBERRY CAKE FILLING (recipe below) ♥️ this RASPBERRY CAKE FILLING (recipe below) ♥️ this perfectly sweet/tart raspberry cake filling is beautifully thick, seedless, and so rewarding to make from scratch! It takes just a handful of ingredients and can be made with fresh OR frozen raspberries 🙌🏼 

Get the full recipe + cake pairing suggestions at the link in my bio or at https://sugarandsparrow.com/seedless-raspberry-cake-filling/

INGREDIENTS:
2 1/2 Cups (10oz, 315g) fresh or frozen raspberries
1/2 Cup (100g) granulated sugar
1 Tbsp lemon juice
1 tsp lemon zest
1 1/2 Tbsp (12g) cornstarch
1 1/2 Tbsp (22ml) water

INSTRUCTIONS: 
1. In a saucepan set over medium heat, add the raspberries, granulated sugar, lemon juice, and lemon zest. Cook until the mixture begins to boil, stirring occasionally. 
2. Once boiling, lower the heat and simmer for 10-15 minutes while you continue stirring occasionally. Then, remove from heat and use a fine mesh sieve to strain out the seeds over a medium bowl. After straining, you’ll be left with about 1/4 Cup of seedy pulp.
3. In a small separate bowl, combine the cornstarch and water until uniform. Return the strained raspberry filling to the saucepan (wipe it free of any remaining seeds if needed) and add the cornstarch/water mixture. Cook over medium heat until boiling, stirring constantly, then reduce to a simmer and cook for 1-3 minutes, until the filling has thickened slightly, is no longer cloudy, and coats the back of the spatula.
4. Pour into an airtight container and refrigerate for at least 4 hours and up to 1 week. It will be jello-like once set but after stirring it will become a thick, jammy consistency that’s perfect to use as a cake or cupcake filling!

#raspberrycake #cakefilling #cakedecorating #raspberries #baking
STRAWBERRY LEMON CAKE 🍓🍋 this cake is so lig STRAWBERRY LEMON CAKE 🍓🍋 this cake is so light and refreshing and bursting with all-natural flavors! It’s layers of my favorite extra fluffy lemon cake + the most delicious freeze-dried strawberry buttercream that ends up the prettiest natural pink color. I’ll never get over those little flecks of strawberry in the buttercream or the tiny chamomile flowers adding so much cheer! 

Grab the recipe at the link in my bio or at https://sugarandsparrow.com/strawberry-lemon-cake/

#strawberrylemon #lemoncake #strawberrycake #cakedecorating #strawberrybuttercream
CHOCOLATE SHEET CAKE (recipe below) 🍫 🥳 this CHOCOLATE SHEET CAKE (recipe below) 🍫 🥳 this is everything I want in a chocolate cake: rich and decadent, stick-to-your-fork fudgy, ultra-chocolatey, shareable, and EASY! Like box mix easy but from-scratch and a MUST try if you’re in need of a good chocolate cake recipe to feed a crowd👩🏽‍🍳⁣ 
 
Get the full recipe (with chocolate frosting) at the link in my bio or at https://sugarandsparrow.com/chocolate-sheet-cake/ ✨⁣ 
⁣ 
CHOCOLATE SHEET CAKE
2 Cups (265g) all purpose flour⁣ 
1 2/3 Cups (340g) white granulated sugar⁣ 
2/3 Cup (60g) unsweetened natural cocoa powder⁣ 
2 tsp baking soda⁣ 
1 tsp baking powder⁣ 
1/2 tsp kosher salt⁣ 
1/2 Cup (120ml) vegetable oil⁣ 
2 eggs, room temperature⁣ 
1 1/2 tsp pure vanilla extract⁣ 
1 Cup (240ml) full-fat buttermilk⁣ 
1 Cup (240ml) hot coffee OR hot water⁣ 
⁣ 
INSTRUCTIONS⁣ 
1. Preheat the oven to 325ºF. Grease and line a 9x13 inch cake pan. ⁣ 
2. Place all of the dry ingredients into the bowl of a stand mixer (or use a large bowl with a hand mixer) and mix on low to combine. Add the vegetable oil, eggs, vanilla, and buttermilk and mix on low until combined. With the mixer still on low, add the hot coffee or hot water in a slow stream, then turn the mixer to medium and beat until smooth, about 2 minutes. The batter will be very thin. ⁣ 
3. Pour the batter into the prepared pan and bake for 35-40 minutes, until a toothpick inserted comes out clean.⁣ Full recipe (with frosting) link in my bio.
⁣ 
#chocolatecake #chocolate #sheetcake #chocolatelover #birthdaycake
VANILLA RASPBERRY LAYER CAKE ♥️ between the na VANILLA RASPBERRY LAYER CAKE ♥️ between the naturally pink raspberry buttercream, jammy homemade raspberry filling, and soft vanilla cake layers, this is the perfect cake for Spring!! It’s has amazing, authentic raspberry flavor in every bite from fresh (or frozen) raspberries in the filling + freeze-dried raspberries in the frosting 😋

Get the full recipe link in my bio or find it at https://sugarandsparrow.com/vanilla-raspberry-layer-cake/ 

#raspberrycake #raspberries #vanillacake #cakedecorating #pinkcake
SMALL BATCH VANILLA CAKE 🎂🥳 this mini vanill SMALL BATCH VANILLA CAKE 🎂🥳 this mini vanilla cake recipe makes the PERFECT amount for 2-4 people and can be baked as a tiny 4-inch layer cake or a single layer 6-inch cake. It goes with any frosting flavor but vanilla buttercream keeps it classic for date night, a small gathering, a smash cake, or satisfying a cake craving. 
⁣
✨Full recipe (with frosting) linked in my bio + at https://sugarandsparrow.com/small-batch-vanilla-cake/ 
⁣⁣⁣⁣
SMALL BATCH VANILLA CAKE⁣⁣⁣⁣
⁣⁣⁣⁣
INGREDIENTS⁣⁣⁣⁣
3/4 Cups (79g) sifted cake flour⁣⁣⁣
1 tsp baking powder⁣⁣⁣
1/4 tsp salt⁣⁣⁣
1/4 Cup (57g) unsalted butter, room temperature⁣⁣⁣
1/2 Cup (100g) granulated sugar⁣⁣⁣
1 large egg, room temperature⁣⁣⁣
2 Tbsp (30g) sour cream, room temperature⁣⁣⁣
1 tsp pure vanilla extract⁣⁣⁣
1/3 Cup (80ml) whole milk, room temperature⁣⁣⁣
⁣⁣⁣⁣
INSTRUCTIONS ⁣⁣⁣⁣
1. Preheat the oven to 350ºF. Grease and line three 4-inch or one 6-inch cake pan.⁣⁣⁣
2. In the bowl of your stand mixer (a handheld mixer works fine too!), cream together the butter and sugar on medium-high until light and fluffy, 3 min. Turn the mixer to low and add the egg, mixing until just combined. Add the vanilla and sour cream, turn the mixer to high, and beat for 1 min. ⁣⁣⁣
3. Turn the mixer to low speed and add the dry ingredients all at once. Mix until just combined, then slowly pour in the milk. Continue to mix on low speed until just combined, about 30 seconds. ⁣⁣⁣
4. Pour the batter evenly between the prepared cake 4-inch pans (or all into one 6-inch cake pan). If using 4-inch cake pans, bake for 18-22 minutes. If using a 6-inch cake pan bake for 24-28 minutes. The cake is done when it springs back to the touch and a toothpick inserted comes out with a few moist crumbs. ⁣⁣⁣
⁣⁣⁣⁣
#vanillacake #cakes #vanilla #minicake #cakedecorating

Footer

On the Blog

  • Cake Basics
  • Recipes
  • Tutorials

Info

  • About
  • Privacy Policy & Disclosure

stay in the know

Copyright © 2026 · Theme by Sugar & Sparrow