• Cake
  • Frosting
  • YouTube
  • My Favorite Tools
  • Nav Social Icons

  • Skip to primary navigation
  • Skip to main content
  • Skip to primary sidebar
  • Skip to footer
  • Recipes
    • Cake
    • Cupcakes
    • Frosting
    • Ice Cream
    • Vegan
  • Cake Basics
  • Tutorials
  • Blog
  • About
  • Mobile Menu Widgets

    Connect

    Search

Sugar & Sparrow logo in script font

Sugar & Sparrow

Lifestyle and Cake from Portland Oregon

  • Cake Basics
  • Recipes
    • Cake
    • Cupcakes
    • Cookies & Bars
    • Filling
    • Frosting
    • Ice Cream
    • No-Bake
    • Small Batch
    • Vegan
  • Tutorials
  • Book
  • Blog
  • About

Vintage Halloween Lambeth Cake Tutorial

September 5, 2023 · In: Featured, Halloween, Seasonal, Tutorials

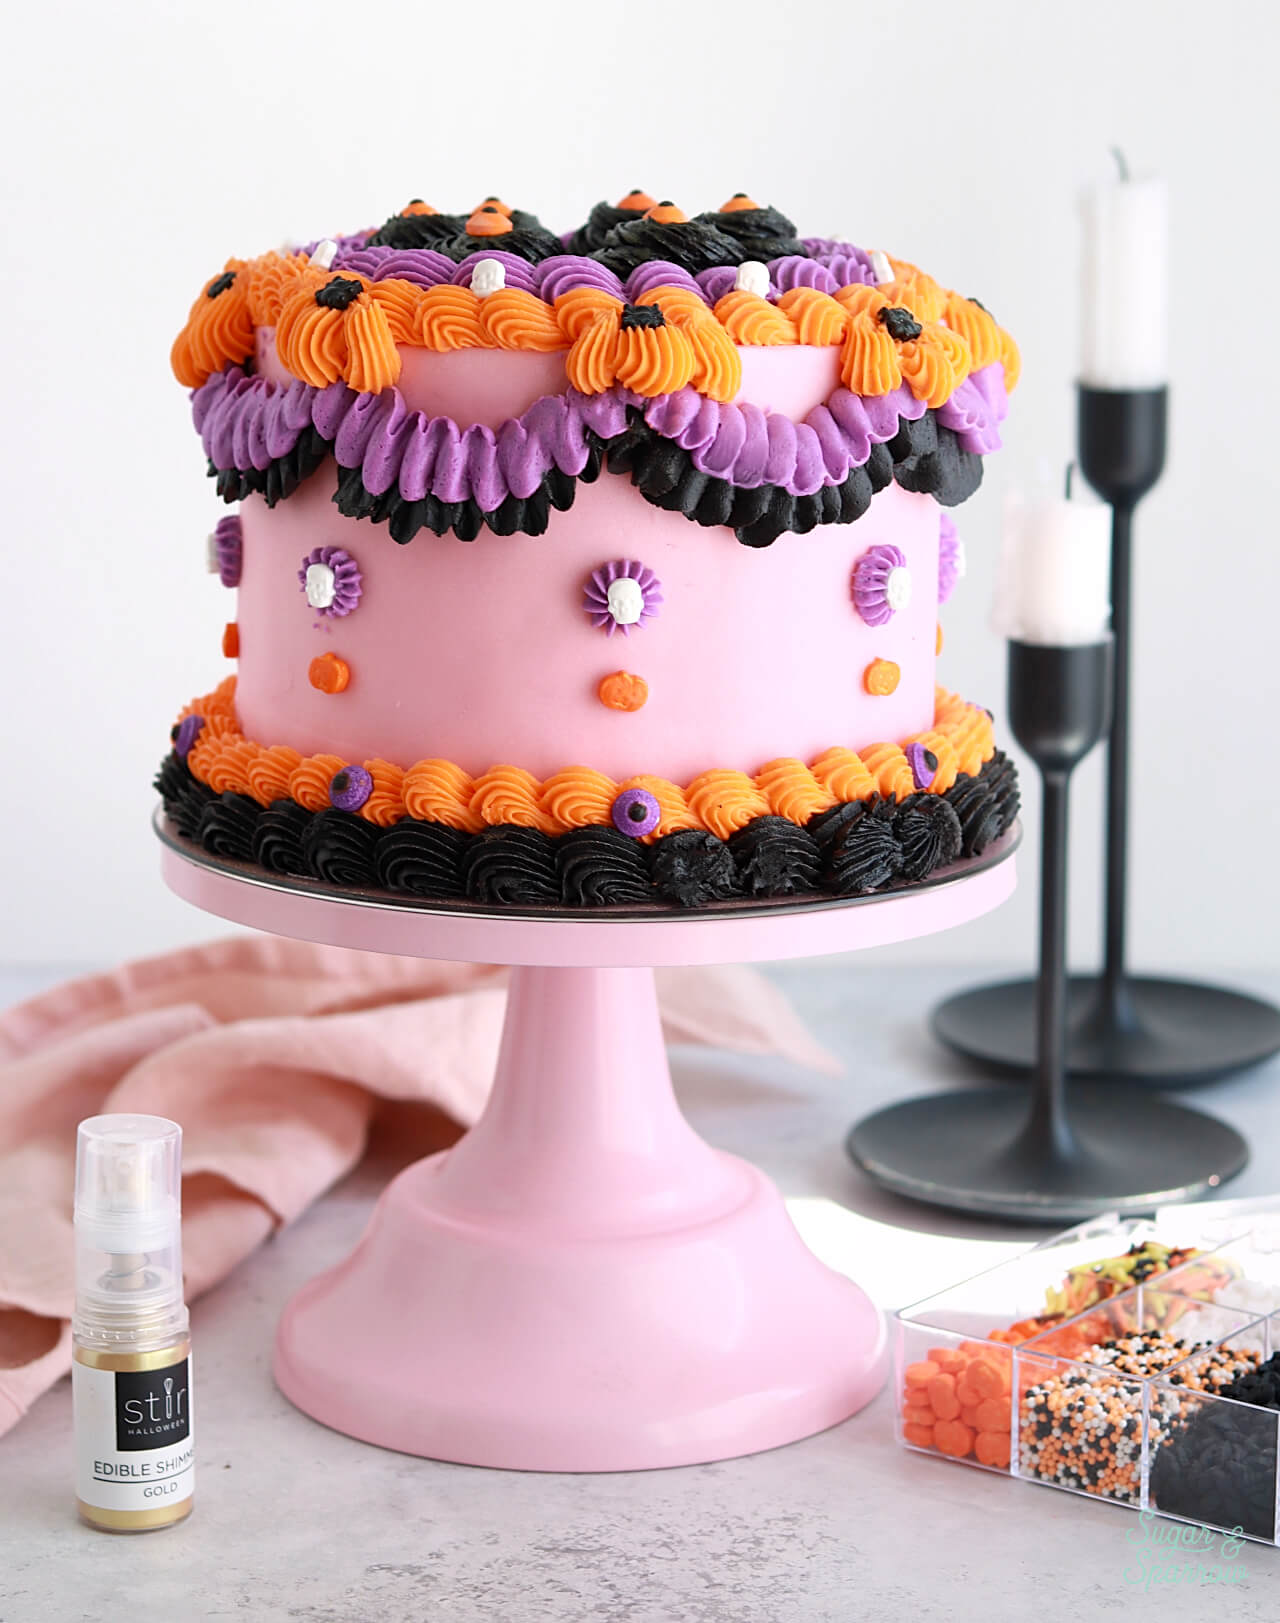
Halloween is such a fun time of year to get creative with cake decorating! While I love taking inspiration from the spookiness of the season, this year I couldn’t stop thinking about combining my love for vintage Lambeth cakes with a bold Halloween color palette. Basically, a colorful Halloween party showstopper that could be equal parts elegant and festive. So with that in mind, I headed to my local JOANN to check out their seasonal food crafting items and see what could make my vision come alive. As usual, they had everything I needed (and then some). Just look at how this beauty turned out!

UPDATE 2025: JOANN has (sadly!!) gone out of business, so I have slightly changed these product links.

halloween lambeth cake tutorial

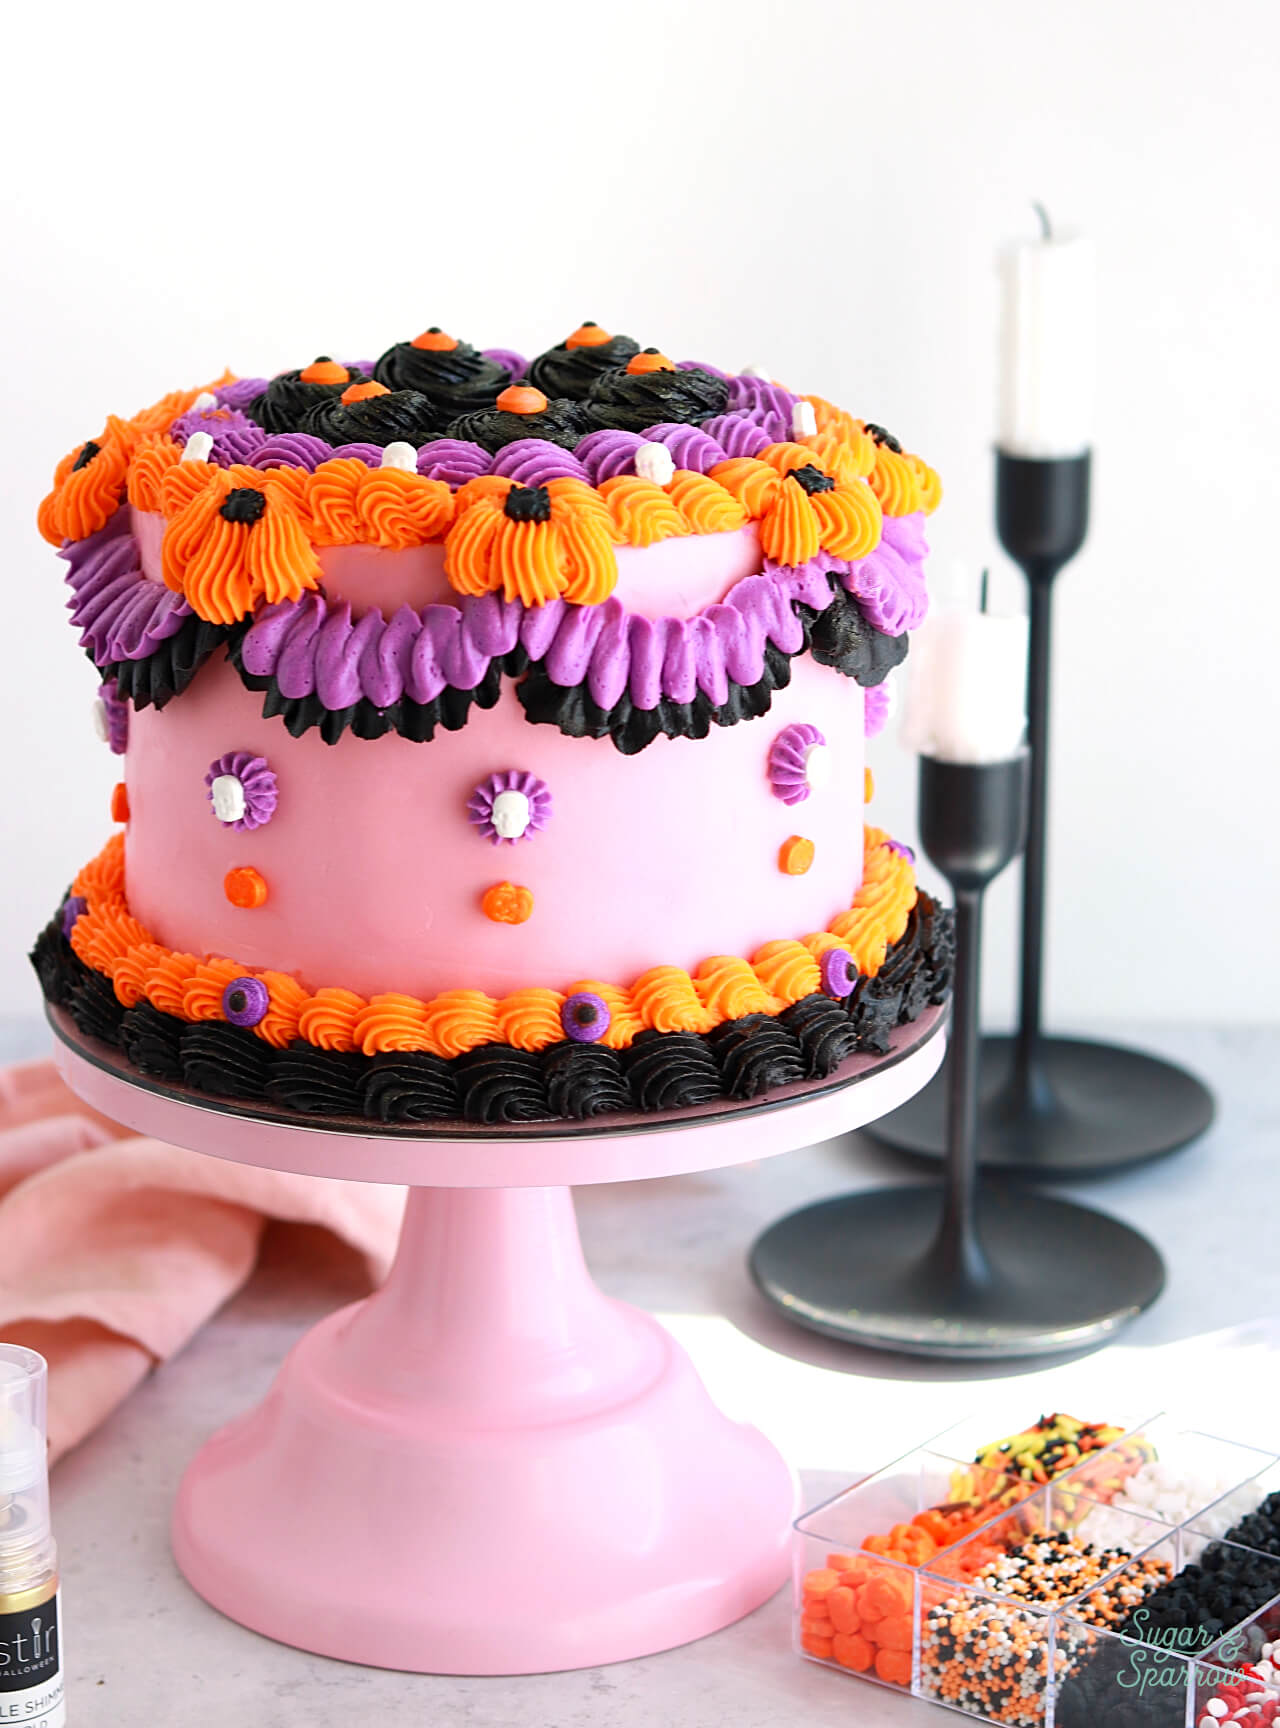
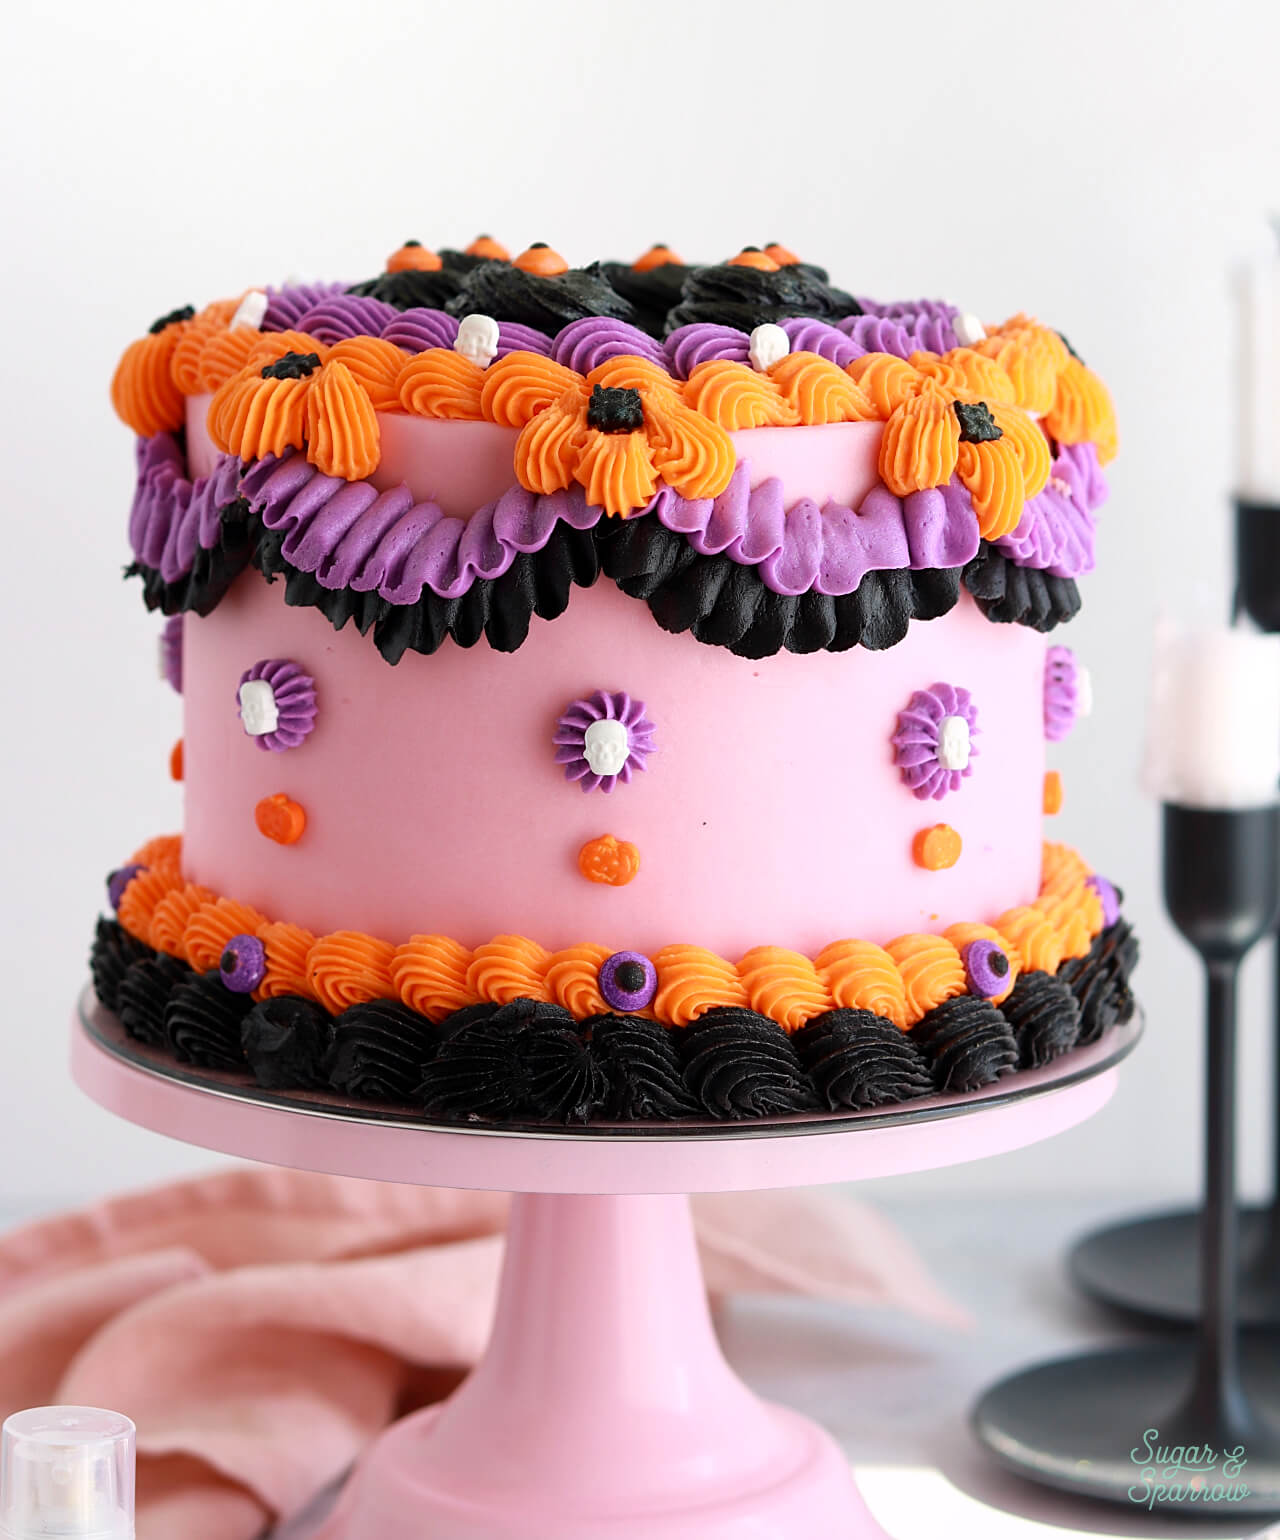
I absolutely love the details on this cake, from the pretty piping to the spooky sprinkles and a touch of sparkle created with gold shimmer dust. It would be so stunning on any Halloween party table! And it’s delicious too – underneath all that pretty piping is my favorite black velvet cake recipe.

vintage halloween cake tutorial by sugar and sparrow
black velvet halloween cake

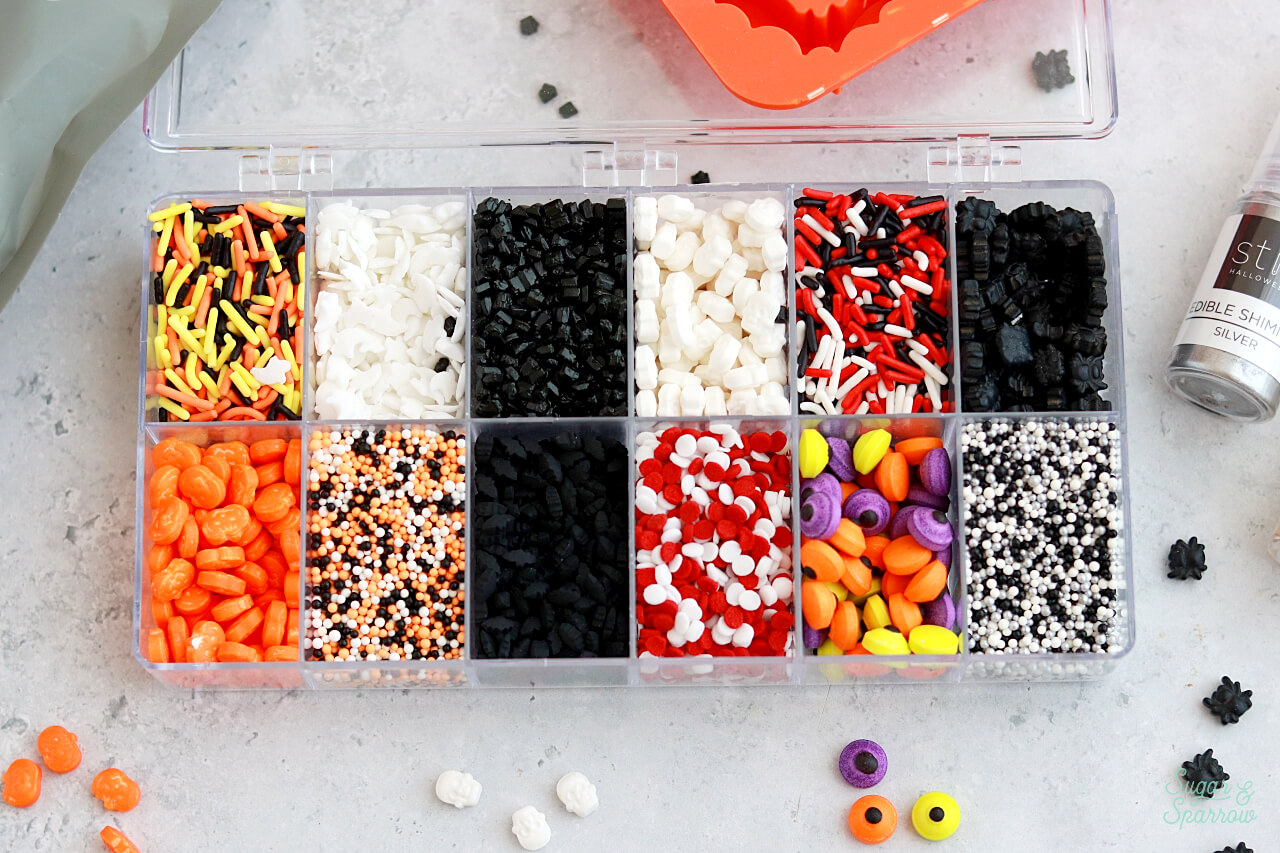
The set of sprinkles I used below is no longer available, but I found some similar sprinkles online that would work as a substitute:

  • These ones by Wilton
  • These colorful eyeball sprinkles
Halloween sprinkle mixes by JOANN

Lambeth Cake Tips for Success

If you’ve never made one before, a Lambeth cake may look a little intimidating. Since the style involves over-piping (aka you can never pipe too many details), it ends up being a really forgiving design. Here are some of my best tips to set you up for success: 

Start with a chilled cake. Before you pipe any details, make sure that your smooth buttercream finish is nice and chilled (firm to the touch). This helps keep the buttercream finish intact while you pipe on top and will help any piping set quickly because of the cold surface. 

Place a larger cake circle underneath. Since you’ll be piping details onto the bottom border of the cake, it will save you a lot of stress to make sure the cake is sitting on a cake circle that’s larger than the cake and any piping. This way you can just lift the whole cake off of the turntable while keeping all the piping perfect. For example, since my cake layers are 6-inches in diameter, I decorated my cake on an 8-inch cake circle for easy transfer. 

Plan out your piping. It’s not enough to know what kinds of designs you want to pipe on a Lambeth cake. You have to know where to pipe them. This is where a template comes in handy, and I’ll show you how to make the most simple template ever in this tutorial below. 

Create the ideal buttercream consistency. Piping looks its best when you’re using buttercream that is the right consistency. Not so thick that there are crinkly edges, but not so thin that you can’t see detail and the designs are drooping. You want a stiff consistency buttercream, and this post will show you how to create it with my American buttercream recipe. 

vintage piping halloween cake

Here’s a video tutorial that will walk you through how to create this Halloween Lambeth Cake from start to finish. Give it a watch before you read through the detailed steps below!

If you love cake decorating tutorial videos like this one, be sure to check out my YouTube channel! I’ve got a growing collection of recipes, decorating tutorials, and Cake Basics over there. Hit the subscribe button on my page so you never miss a new video.

You Will Need

  • 6-inch cake that’s been frosted smooth and chilled
  • 8-inch cake circle to decorate on
  • 6-inch cake pan (for tracing)
  • Wax or parchment paper
  • Pencil
  • Scissors
  • Toothpick
  • 2 ¼ inch round cookie cutter 
  • Scotch tape
  • 1 batch (3 Cups) of vanilla buttercream 
  • Bowls and spoons for color mixing
  • Food color gels of your choice
  • 2 Tablespoons black cocoa powder or regular cocoa powder
  • Cake turntable
  • Wilton tips 104, 4B, and 32
  • Piping bags
  • Halloween sprinkles
  • Colorful eyeball sprinkles
  • Edible shimmer dust in gold

Step 1: Make the Lambeth Template + Mark the Cake

The Lambeth technique is all about symmetry. The best way to keep your piping symmetrical is to make a template to mark out equal sized sections on your cake. To make the template, flip a cake pan (the same size as your cake layers) upside down onto a piece of parchment paper. Trace around it with a pencil and cut out the circle. Flipping the pan upside down and tracing around the lip helps account for the frosting on the sides of the cake when measuring the true diameter.

how to make a template for buttercream piping

After cutting out your parchment paper circle, fold it in half three times to create 8 equal-sized sections.

buttercream piping template
lambeth piping template

Place the template on top of the chilled cake and mark each crease with a toothpick (a). Find a round glass or cookie cutter that’s the same diameter as the sections in your template and place a piece of scotch tape across the middle to create a half circle (b). This will help you line it up with the top of your cake as you press it into the sides (c) to indicate where each garland will go.

how to mark buttercream cake for piping

Step 2: Mix the Color Palette

Divide the 3 Cups of buttercream equally amongst three separate bowls and mix in the color gels of your choosing. I used the Wilton Color Right Performance Food Coloring set to custom mix these colors. In the first bowl, I mixed in 5 drops of Orange. In the second bowl, 5 drops of Pink and 2 drops of Blue to create a warm purple tone.

halloween buttercream color palette

To create the black color in the last bowl, I first mixed in 2 Tablespoons of black cocoa powder to create a dark brown color, then mixed in 3 drops of Black. This way, I didn’t have to use nearly as much food coloring. If you don’t have access to black cocoa powder, you can use regular cocoa powder instead but note that you’ll need to use a few more drops of Black. 

Step 3: Prepare the Piping Bags

Fit two piping bags with Wilton Tip 104 and add half of the black buttercream into one and half of the purple buttercream into another. Fit two piping bags with Wilton Tip 4B and add the rest of the black buttercream and the rest of the purple buttercream. Fit one piping bag with Wilton Tip 32 and add the orange buttercream. 

Step 4: Create the Bottom Border

Starting at the bottom edge of the cake, pipe a shell border with Wilton Tip 4B using the black buttercream. To pipe a shell border, hold the bag at a 45 degree angle and squeeze the piping bag until the buttercream fans out and forces the tip upward (a). Gradually relax pressure as you lower the tip and pull the bag toward you to create a tail (b). Pipe the next shell directly onto the tail of the first (c).

how to pipe a shell border with buttercream

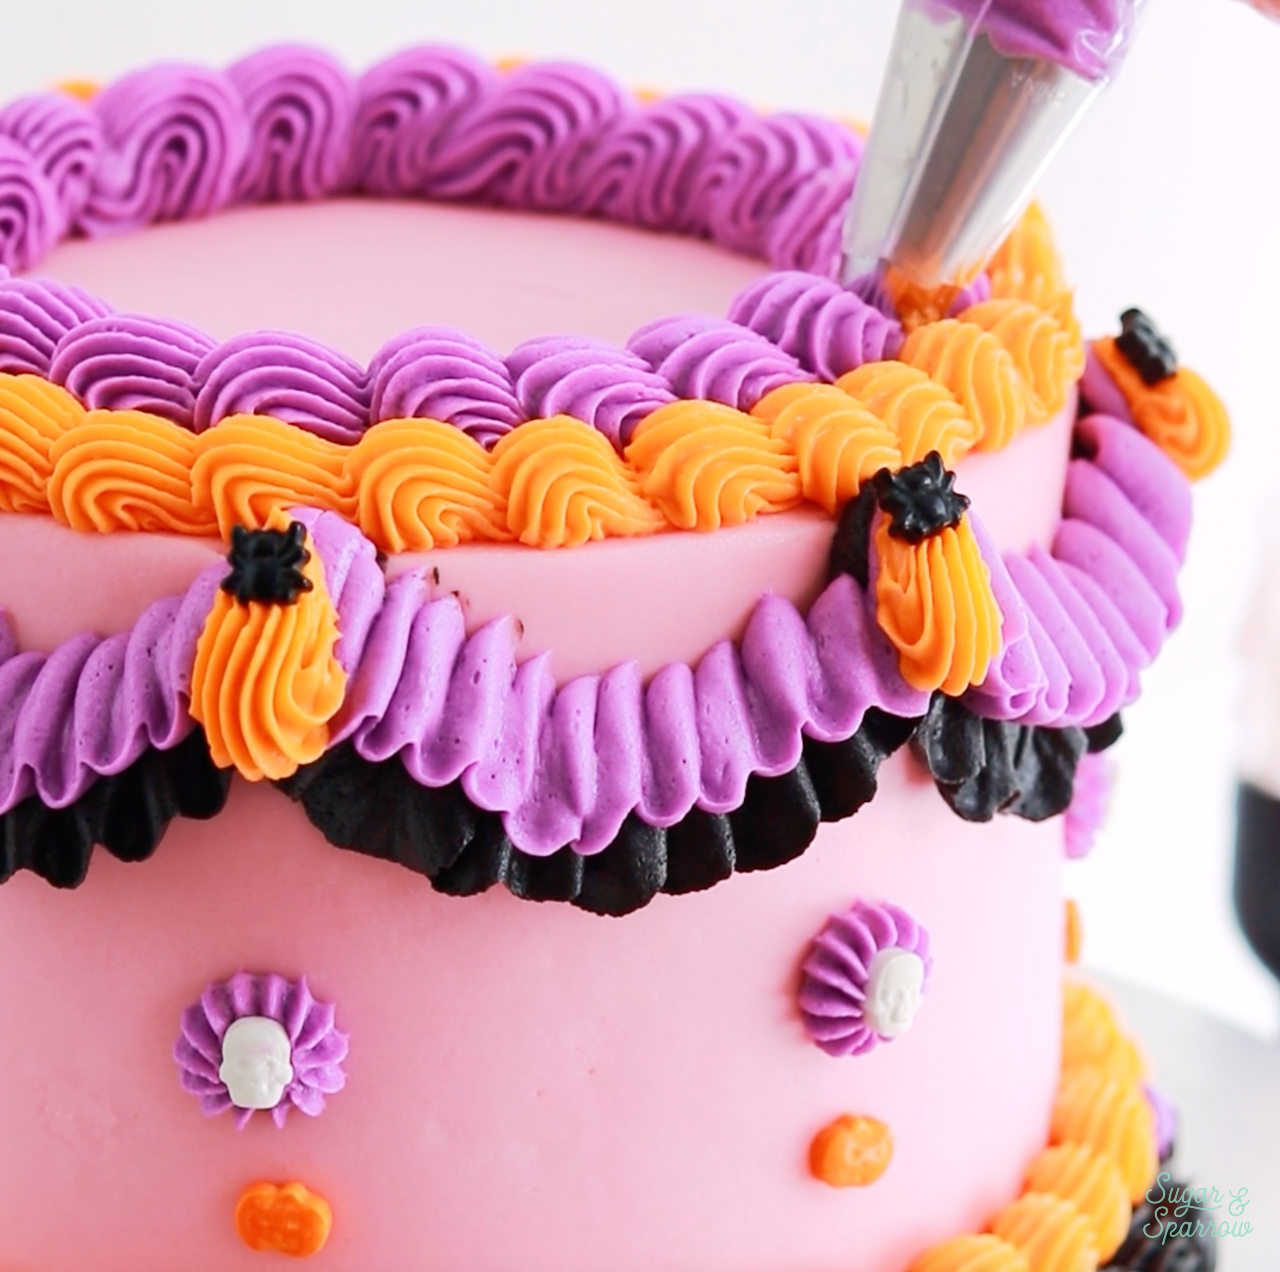
Continue piping shells all the way around the bottom edge of the cake, until you reach the very first shell you piped.Using the same technique, pipe a smaller shell border on top of the first using Wilton Tip 32 and the orange buttercream.

how to pipe a shell border with wilton tip 32

Place purple eyeball sprinkles onto the shell border as accents. I placed mine directly below where each of the indented semi-circles from the template connected.

purple eyeball sprinkles lambeth cake

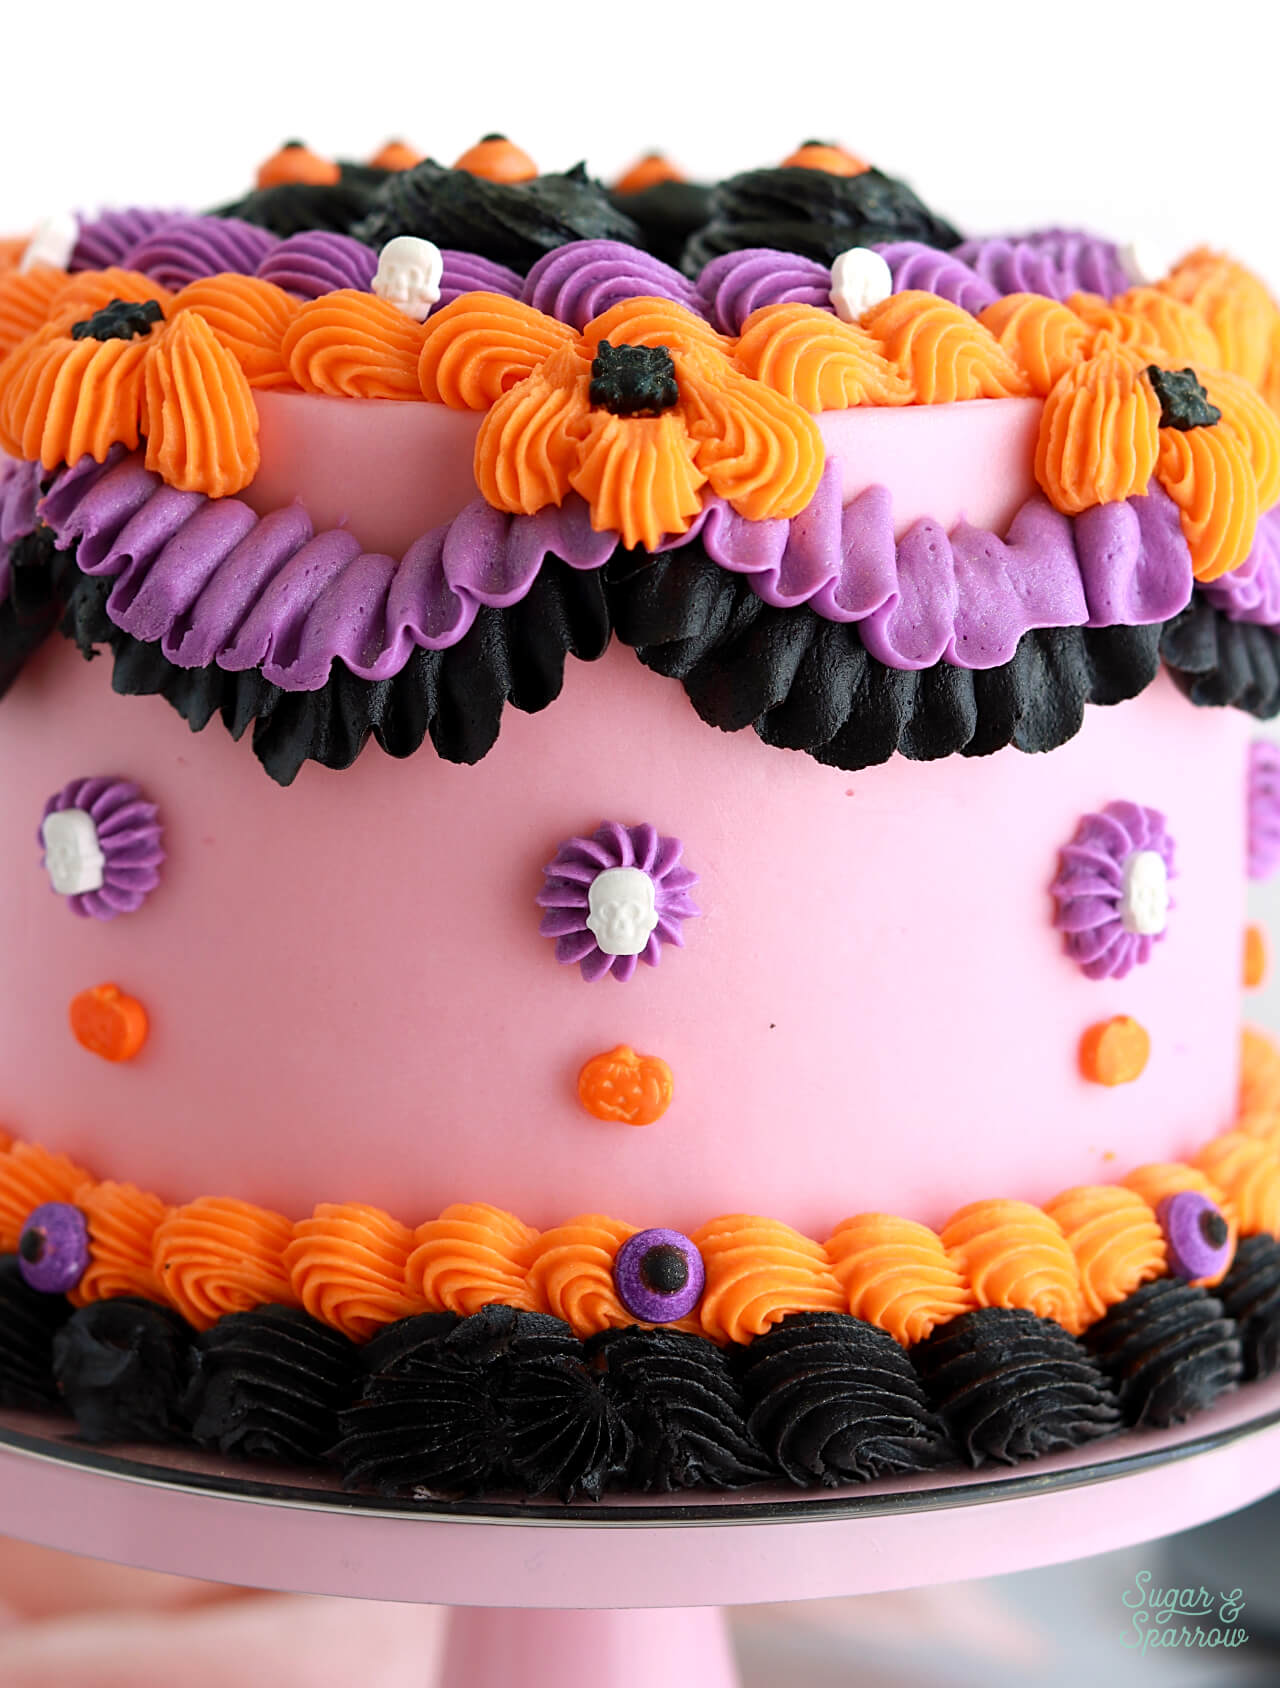
Step 5: Create the Ruffle Garlands + Accents 

Onto each of the semi-circle indents you created in Step 1, use the black buttercream-filled piping bag fitted with Wilton Tip 104 to create the ruffle garland. To create a ruffle, hold the piping bag at a 45 degree angle to the surface of the cake with the skinny end of the tip facing away from the cake (a). Squeeze the bag as you move your hand slightly up and down to create the ruffle texture as you pipe (b). Release pressure on the bag once you’ve ended the ruffle where you desire (c).

how to pipe ruffles with buttercream

Continue piping black ruffles along the semi-circle indents until you reach the first one you piped.

Using the piping bag filled with purple buttercream and fitted with Wilton Tip 104, pipe a second set of purple ruffles directly onto each black ruffle.

how to pipe buttercream ruffles

Use the orange piping bag fitted with Wilton Tip 32 to pipe a small shell with the tail pointed upwards where each of the ruffle sets connect. Place a black Halloween sprinkle onto the top of the middle shell.

halloween sprinkle lambeth cake

Pipe a purple star about an inch beneath each space where the ruffles connect using Wilton tip 4B. Place a skull sprinkle on top of each star. Gently press a pumpkin sprinkle about ½ inch beneath each skull-topped purple star.

halloween sprinkles on vintage piped cake

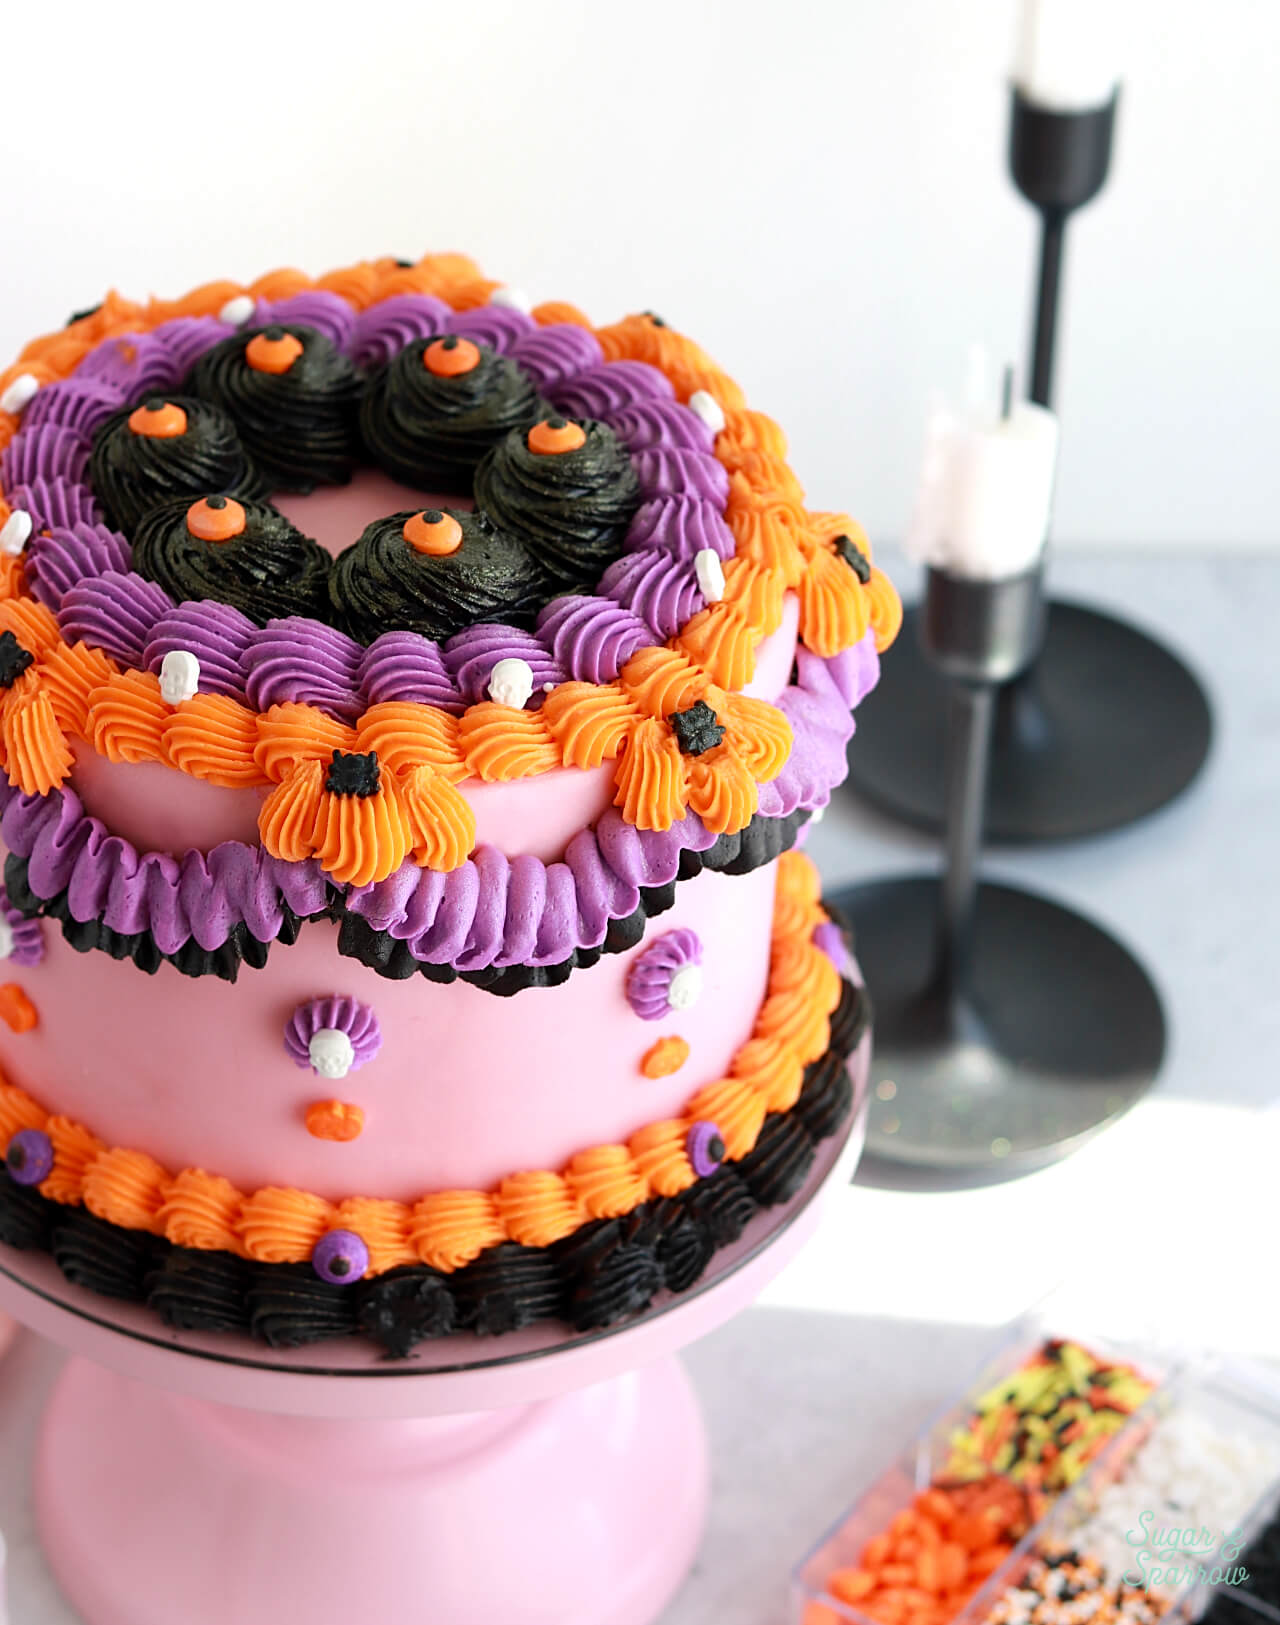
Step 6: Decorate the Top of the Cake 

On the top edge of the cake, pipe a shell border with Wilton Tip 32 and the orange buttercream. Pipe another shell border directly next to it using Wilton Tip 4B and the purple buttercream.

how to pipe buttercream shell border

Place skull sprinkles in between the two shell borders.

skull sprinkles on lambeth cake

Use the black piping bag fitted with Wilton Tip 4B to pipe swirls next to the purple shell border and place an orange eyeball sprinkle on top of each swirl.

eyeball sprinkles on halloween lambeth cake

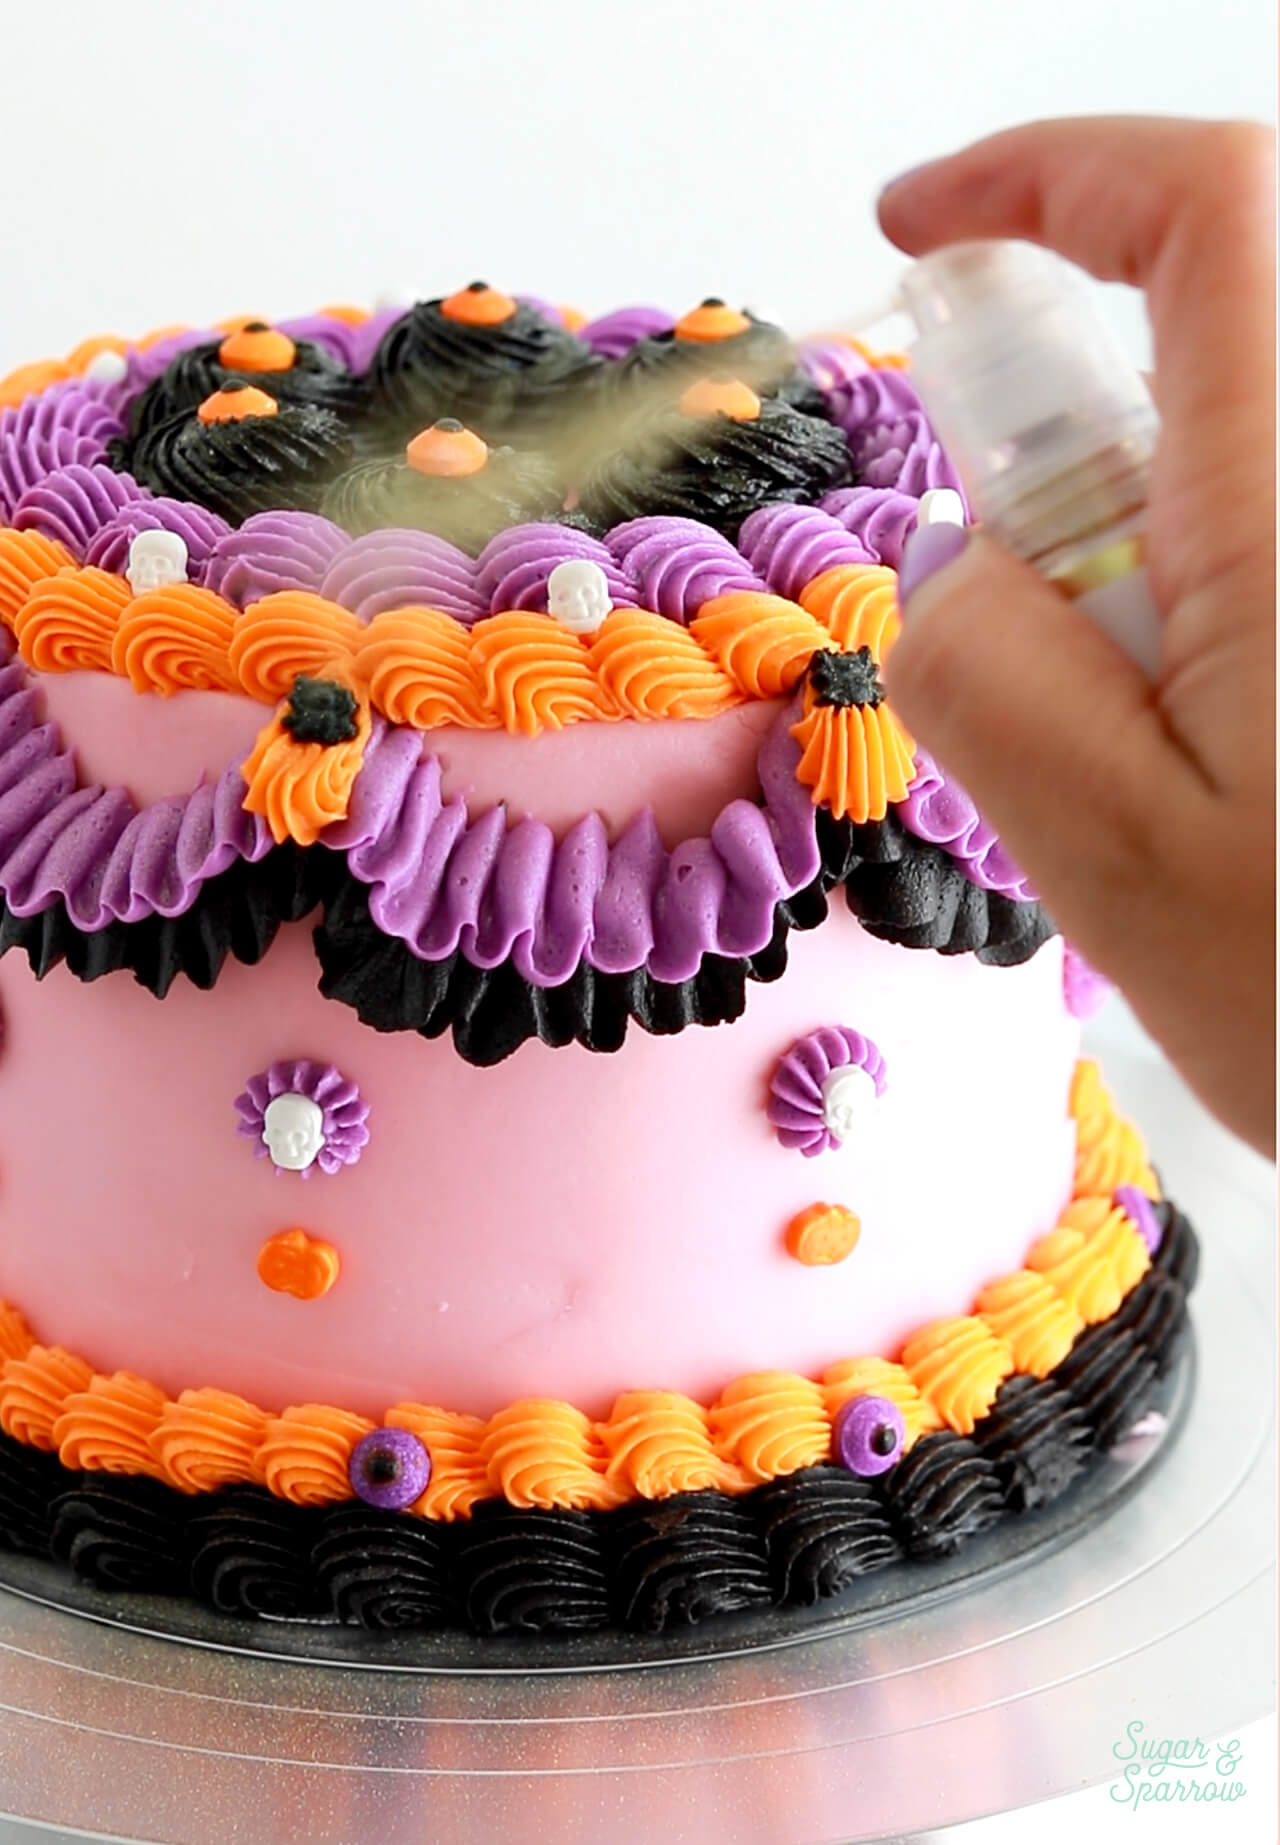
Step 7: Spray with Shimmer Dust 

For a little extra shine on all this pretty piping, I spritzed this Gold Edible Shimmer Dust all over the cake. It gives a really subtle finish of gold luster and was really fun to use! I want to top every cake with this stuff now.

edible gold luster dust spray for cake

And there you have it! The perfect Halloween showstopper cake for your party table, regardless of the average age on your guest list. Even if you’re not throwing a Halloween party this year, it’s a really fun cake design to whip up this spooky season!

pink halloween cake
vintage pink halloween cake by sugar and sparrow

I hope you love making this colorful, vintage-inspired Halloween lambeth cake as much as I did! If you do end up making one, let me know how it went in the comments below + be sure to tag @sugarandsparrowco on Instagram to show me. I’d love to see what you create!   

Disclaimer: I was compensated by JOANN for my work of creating this project, styling, filming, photographing, and writing about their products. As always, all opinions are honest and my own. Thank you for supporting brands that support Sugar & Sparrow.

By: Whitney · In: Featured, Halloween, Seasonal, Tutorials · Tagged: buttercream piping, buttercream ruffles, cake decorating, halloween cake, halloween sprinkles, JOANN, lambeth cake, shell border, vintage cake

you’ll also love

the best vanilla cupcakes recipeThe Perfect Vanilla Cupcake Recipe
halloween jack o lantern candy bucket cake tutorialJack O Lantern Candy Bucket Cake Tutorial
pumpkin layer cake recipe by sugar and sparrowPerfect Pumpkin Layer Cake Recipe

Join the List

Stay up to date & receive the latest posts in your inbox.

Reader Interactions

Leave a Reply Cancel reply

Your email address will not be published. Required fields are marked *

Recipe Rating


Next Post >

Baymax Birthday Cake

Primary Sidebar

Welcome to Sugar & Sparrow

Welcome to Sugar & Sparrow

Helping you whip up pretty desserts with confidence and creativity. And hopefully sharing a few laughs with you along the way!

Learn More

Connect

let’s bake!

Get my very best recipes, baking tips, and decorating tutorials sent to your inbox

Featured Posts

how to freeze cake layers

How to Make + Decorate Cakes Ahead of Time

how to crumb coat a cake

How to Crumb Coat Cakes (and Why it’s Important)

4th of july dessert recipes

The Best 4th of July Desserts for Your BBQ

Search

Archives

Follow Along

@sugarandsparrowco

LEMON CUPCAKES 🍋 after about a dozen recipe tes LEMON CUPCAKES 🍋 after about a dozen recipe tests, this one is everything I could want in a lemon cupcake! Fluffy-yet-moist, bursting with natural lemon flavor, and absolutely irresistible topped with lemon cream cheese buttercream. 

Full recipe (with frosting) linked in my bio + at https://sugarandsparrow.com/homemade-lemon-cupcakes/

INGREDIENTS:
1 Cup (132g) all-purpose flour
1 tsp baking powder
1/4 tsp salt
1/4 Cup (60ml) whole milk, room temperature
3 Tbsp (45ml) lemon juice from 1 medium lemon
3/4 Cup (150g) granulated sugar
3 Tbsp (42g) unsalted butter, room temperature
2 Tbsp (30ml) vegetable oil
2 large eggs, room temperature
1 tsp pure vanilla extract

INSTRUCTIONS:
1. Preheat the oven to 350ºF (177ºF) and line a standard cupcake pan with 12 paper liners.
2. In a large bowl, whisk together the flour, baking powder, and salt. Set aside. 
3. In the bowl of a stand mixer fitted with the paddle attachment (or with a hand mixer and large bowl), add the lemon zest to the sugar and mix on low speed until fragrant and well combined, about 1 minute. Meanwhile, combine the lemon juice with the milk and set aside. 
4. Add the butter to the lemon-sugar mixture and cream on medium speed until and combined, about 2 minutes. Add the vegetable oil and beat until light and creamy, about 3 minutes. Scrape down the bowl and paddle as needed.
5. Mix in the eggs one at a time on low speed, then add the vanilla and turn the mixer to medium speed for one minute.
6. Turn the mixer off and add the flour mixture all at once. Mix on low speed until just combined, then slowly pour in the lemon-milk mixture. Mix until just combined, about 30 seconds.
7. Divide the batter equally between the liners and bake for 14-18 min. Cool, then top with frosting of your choice (link in bio for lemon cream cheese frosting)�
#lemoncupcakes #creamcheesefrosting #lemon #cupcakes #cupcakedecorating
April in my kitchen 🌸 I published 5 NEW recipes April in my kitchen 🌸 I published 5 NEW recipes on my site, baked my Oreo cupcake recipe for a fundraiser and found it was just as delicious as I remember, and filmed/photographed 3 recipes that will be on my blog in May (Lemon Cupcakes, Lemon Cream Cheese Buttercream, and No-Bake Marbled Strawberry Cheesecake) 🥰 

Comment “APRIL” to get all the available recipes and stay tuned for more! 

#bakersofinstagram #springbaking #cakedecorating #cupcakes #bakinglove
SHEET PAN COOKIE CAKE 🍪 slice it warm for a fud SHEET PAN COOKIE CAKE 🍪 slice it warm for a fudgy chocolate chip cookie OR let it settle into a moist and chewy cookie cake that’s perfect for decorating! My fave vanilla buttercream + sprinkles turn this giant chocolate chip cookie into the perfect birthday cake alternative at the end 🥳
⁣
Full recipe + decorating ideas at https://sugarandsparrow.com/sheet-pan-chocolate-chip-cookie-cake/
⁣
INGREDIENTS⁣
1 Cup (226g) unsalted butter, melted⁣
1 1/3 Cups (267g) packed light or dark brown sugar⁣
1/2 Cup (100g) granulated sugar⁣
3 large eggs⁣
1 Tbsp pure vanilla extract⁣
1 tsp baking soda⁣
1 tsp cornstarch⁣
1/2 tsp salt⁣
3 Cups (398g) all purpose flour⁣
2 Cups (350g) semi-sweet chocolate chips⁣
⁣
INSTRUCTIONS⁣
1. Preheat the oven to 350ºF (177ºC). Grease and line a 13×18 inch sheet pan.⁣
2. In a large bowl, add the brown sugar and granulated sugar. Melt the butter in the microwave and pour it over the top of the sugars. Whisk together until uniform. Add the eggs and vanilla, then continue whisking until uniform. Whisk in the baking soda, cornstarch, and salt.⁣
3. Add the flour and use a silicone spatula to fold it in until smooth cookie dough forms. Reserve 1/2 Cup of the chocolate chips and set them aside, then fold the remaining 1 1/2 Cups of chocolate chips into the cookie dough.⁣
4. Place the chocolate chip cookie dough onto the prepared sheet pan and use an offset spatula to spread it all the way to the edges in an even layer.⁣
5. Bake the cookie cake for 14-16 minutes, until it looks golden brown on the edges and set. 
6. Enjoy warm or let it cool and decorate with vanilla buttercream and sprinkles! ⁣
⁣
#cookiecake #chocolatechipcookies #sheetcake #birthdaycake #cakedecorating
STRAWBERRY CUPCAKES 🍓based on my beloved strawb STRAWBERRY CUPCAKES 🍓based on my beloved strawberry layer cake recipe, this cupcake version is just as moist yet fluffy and bursting with natural strawberry flavor! Between the mix of fresh strawberries in the cupcakes + freeze-dried strawberries in the frosting, the flavor is out of this world 🚀

Full recipe link in my bio (with strawberry buttercream) + at https://sugarandsparrow.com/strawberry-cupcakes/

STRAWBERRY CUPCAKES
Yield: 14 cupcakes

INGREDIENTS:
5 oz (143g) fresh or frozen strawberries
1/3 Cup (80ml) whole milk, room temp
1 1/2 Cups (158g) sifted cake flour
1 tsp baking powder
1/4 tsp baking soda
1/2 tsp salt
6 Tbsp (85g) unsalted butter, room temp
1 Cup (200g) granulated sugar
2 large eggs, room temp
3 Tbsp (45g) sour cream, room temp
1 tsp vanilla extract
1 drop pink food coloring (optional)

INSTRUCTIONS: 
1. Puree the strawberries using a food processor (you’ll have about 1/2 cup of puree), then place into a saucepan over medium-low heat. Bring to a simmer, then cook for 10-15 min, stirring occasionally, until you have 1/4 cup. Refrigerate until room temp.
2. Preheat oven to 350ºF (177ºC) and line a standard cupcake pan with liners.
3. Whisk together the sifted cake flour, baking powder, baking soda, and salt and set aside.
4. In a stand mixer w/ paddle attachment (or hand mixer + large bowl), whip the butter on high for 2 min. Add sugar and beat for 2 min, until light and fluffy. Turn the mixer to low and add the eggs one at a time, then add the vanilla and sour cream, turn the mixer to high and beat for 1 min. Meanwhile, whisk together the strawberry puree, whole milk, and food coloring (if using).
5. Turn the mixer off and add all of the dry ingredients at once. Mix on low until just combined, then add the strawberry milk mixture until just combined, about 30 seconds.
6. Fill the cupcake liners 2/3 full and bake for 14-18 minutes. Cool completely before topping with strawberry buttercream (full recipe linked above). 

#strawberrycupcakes #strawberrycake #pinkcupcakes #strawberry #cupcakes
COFFEE BUTTERCREAM (recipe below)☕️ this frost COFFEE BUTTERCREAM (recipe below)☕️ this frosting has AMAZING coffee flavor, is so easy to decorate cakes with, and pairs beautifully with so many flavors (chocolate, vanilla, or any cake flavor you’d want to turn into a latte). 

All my cake pairing suggestions are linked in my bio or at https://sugarandsparrow.com/coffee-buttercream-recipe/ 

COFFEE BUTTERCREAM⁣
Yield: 2.5 Cups⁣

INGREDIENTS⁣
1 1/2 tsp instant coffee or espresso powder⁣
1 1/2 Tbsp whole milk, room temperature⁣
1 Cup (226g) unsalted butter, room temperature⁣
3 1/2 Cups (420g) powdered sugar⁣
2 tsp pure vanilla extract⁣
Pinch of salt⁣

INSTRUCTIONS⁣
1. Combine the instant espresso/coffee with the whole milk and set aside. In the bowl of a stand mixer, beat the butter on high until creamy and smooth (about 5 minutes), scraping down the bowl and paddle a few times in between.⁣
2. Turn the mixer to low and add the powdered sugar a few cups at a time, scraping down the bowl and paddle between intervals. Add the vanilla, the coffee/espresso milk mixture, and salt. Mix on low until fully incorporated, about one minute.⁣

#coffeebuttercream #buttercream #frosting #coffeecake

Footer

On the Blog

  • Cake Basics
  • Recipes
  • Tutorials

Info

  • About
  • Privacy Policy & Disclosure

stay in the know

Copyright © 2026 · Theme by Sugar & Sparrow