• Cake
  • Frosting
  • YouTube
  • My Favorite Tools
  • Nav Social Icons

  • Skip to primary navigation
  • Skip to main content
  • Skip to primary sidebar
  • Skip to footer
  • Recipes
    • Cake
    • Cupcakes
    • Frosting
    • Ice Cream
    • Vegan
  • Cake Basics
  • Tutorials
  • Blog
  • About
  • Mobile Menu Widgets

    Connect

    Search

Sugar & Sparrow logo in script font

Sugar & Sparrow

Lifestyle and Cake from Portland Oregon

  • Cake Basics
  • Recipes
    • Cake
    • Cupcakes
    • Cookies & Bars
    • Filling
    • Frosting
    • Ice Cream
    • No-Bake
    • Small Batch
    • Vegan
  • Tutorials
  • Book
  • Blog
  • About

Marble Cake Recipe

October 27, 2023 · In: Cake, Featured, Recipes

Jump to Recipe

For years now, one of the recipes I get asked about over and over again is a classic marble cake with chocolate and vanilla flavors. I never had a recipe to offer because I hadn’t gotten around to testing. But guess what? I finally put it at the top of my list and I can’t believe it took me this long!

This post may contain affiliate links. For more information, see our disclosure policy.

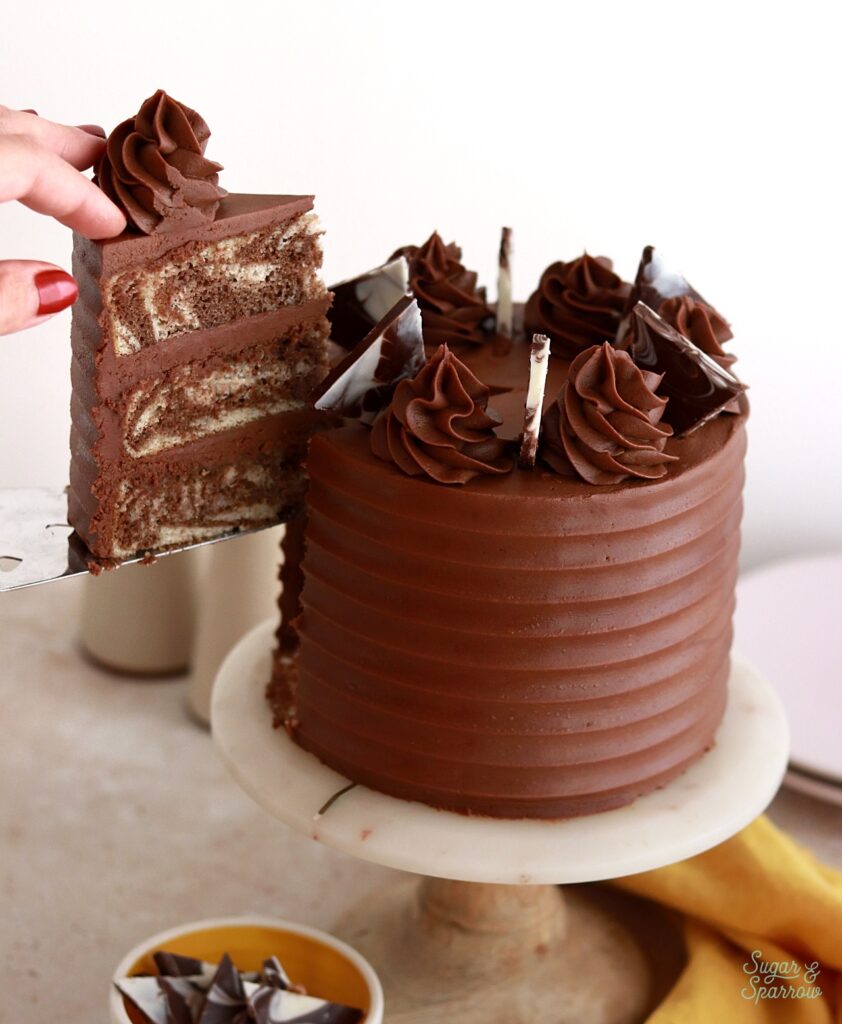
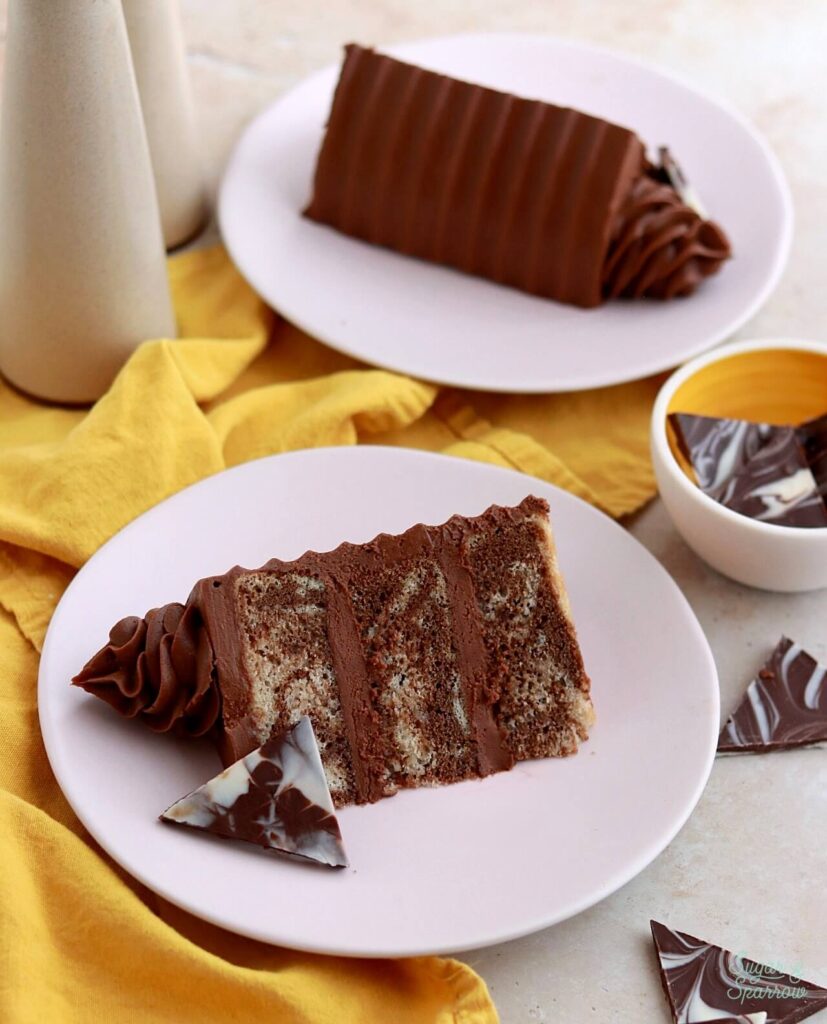
This marble cake is SO fun to make and could not be more exciting to slice into. Plus, it tastes amazing – perfectly moist and soft and both flavors come through quite stunningly. Just look at this marble effect: 

marble cake recipe by sugar and sparrow
chocolate vanilla marble cake by sugar and sparrow

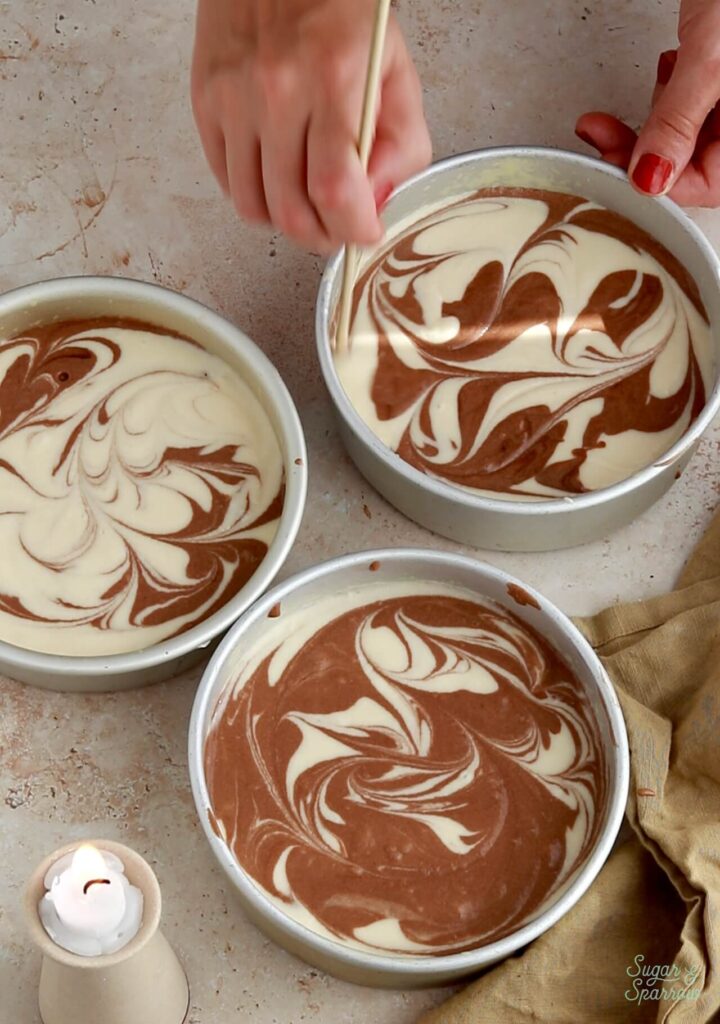
This chocolate vanilla marble cake starts with my Perfect Vanilla Cake recipe and it’s my favorite for a few reasons: it’s made with cake flour to keep the crumb nice and soft, sour cream to add maximum moisture without weighing the cake down, and a whole Tablespoon of vanilla for amplified flavor. It’s also super easy to make, and once you whip up the batter, all you have to do to create the chocolate flavor is divide the batter between two bowls and whisk in some extra ingredients to turn it into chocolate cake batter. Then, you’ll swirl both batters together in the same cake pans. 

marble cake layers with chocolate and vanilla
marble cake with chocolate frosting recipe

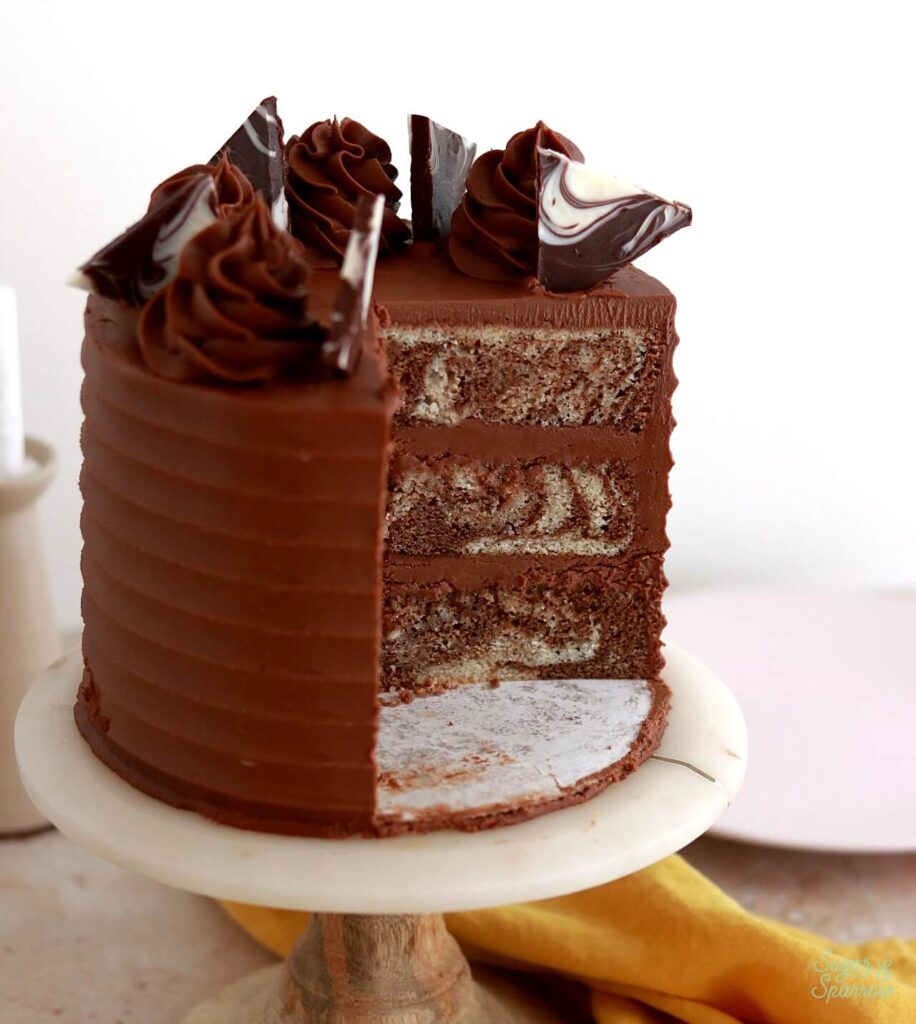
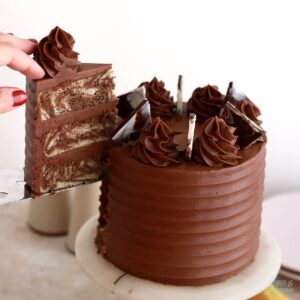
Since I’d never actually made a marble cake before I started testing this one, I was a little anxious to see how things went in the oven. But then I leveled the tops of these cakes and the marble effect was so striking that I couldn’t wait to decorate the cake and slice into the layers. The slices look AMAZING. Perfectly defined swirls that paired so beautifully with this decadent chocolate buttercream (both flavor-wise and looks-wise). 

In keeping with the marble theme, I decided to whip up some easy marbled chocolate decorations with these Ghirardelli melting wafers. I love these melting wafers because they’re basically fail proof tempered chocolate. I simply melted them according to the package instructions and swirled the two flavors together on a piece of parchment paper, then used a sharp knife to cut them into triangles. It couldn’t have been easier and they taste incredible! 

diy marbled chocolate cake toppers by sugar and sparrow
chocolate and vanilla marbled cake toppers

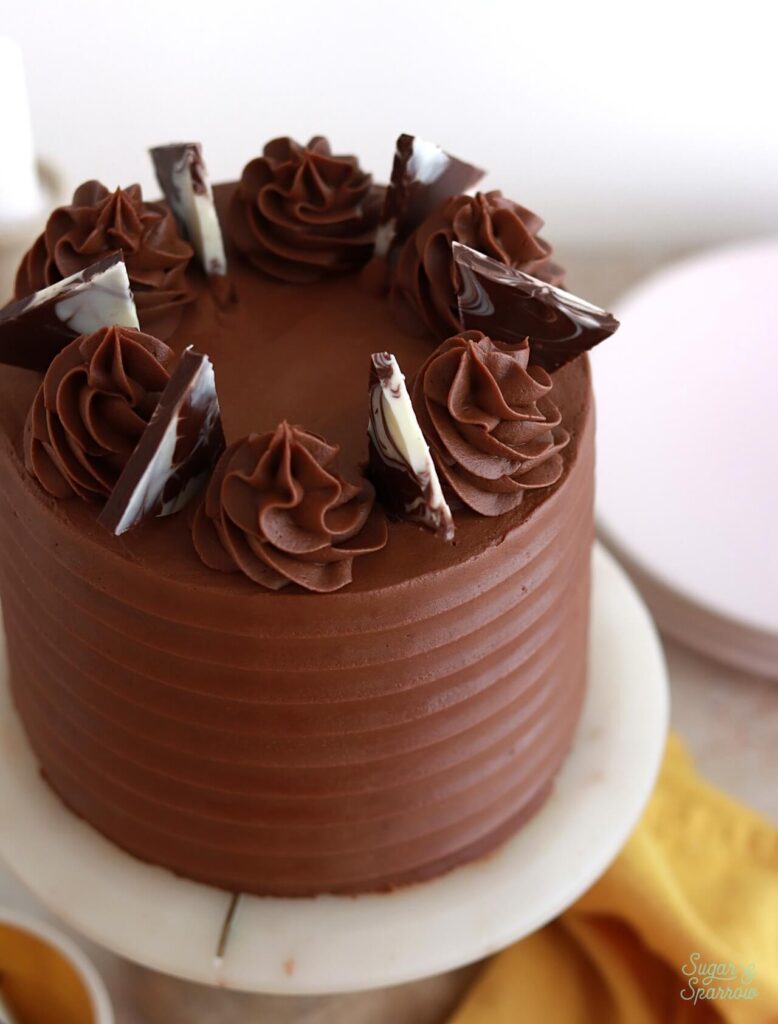
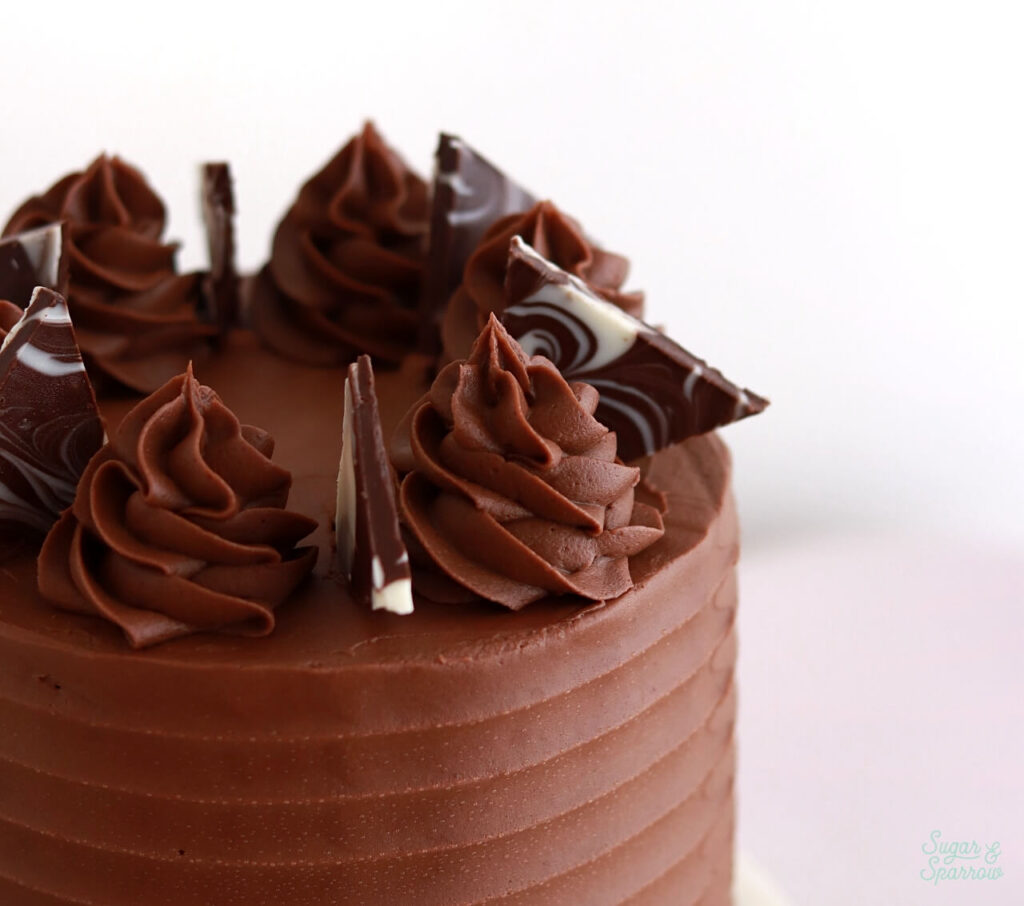
To decorate this chocolate vanilla marble cake, I used a scalloped cake comb to create the textured finish and topped it with some simple swirls using Wilton Tip 1M spaced about ½ inch apart. Then, I placed my handmade marbled chocolate decorations in between each swirl. I love how elegant the design turned out, but you could also keep things simple by decorating with this easy rustic texture. Either way, you’re going to end up with a showstopper cake inside and out!

scalloped cake comb with chocolate buttercream
marble layer cake recipe
marble cake recipe with chocolate buttercream

Marble Cake

5 from 1 vote
A true showstopper, this marble cake has stunning swirls of chocolate and vanilla cake throughout each layer. Soft and moist, packed with flavor, and so much fun to make and slice into!
Print Recipe Pin Recipe
Prep Time:50 minutes mins
Cook Time:32 minutes mins
Servings: 15 slices

Ingredients

Vanilla Batter

  • 2 3/4 Cups (290g) sifted cake flour DIY recipe in notes
  • 2 tsp baking powder
  • 1/2 tsp baking soda
  • 1 tsp salt
  • 3/4 Cup (170g) unsalted butter, room temperature
  • 1 1/2 Cups (300g) granulated sugar
  • 2 large eggs + 2 large egg whites, room temperature
  • 1 Tbsp pure vanilla extract
  • 1/2 Cup (120g) sour cream, room temperature
  • 1 Cup (240ml) whole milk, room temperature

Chocolate Batter

  • 1/4 Cup (22g) sifted unsweetened natural cocoa powder
  • 1 1/2 Tbsp (19g) granulated sugar
  • 1 1/2 Tbsp whole milk, room temperature
  • 3/4 tsp instant coffee or espresso powder (optional)

Chocolate Buttercream

  • 2 Cups (452g) unsalted butter, room temperature
  • 6 Cups (720g) powdered sugar
  • 1 Cup (90g) natural unsweetened cocoa powder
  • 6 Tbsp whole milk, room temperature
  • 4 tsp pure vanilla extract
  • 1/4 tsp salt

Instructions

Make the Vanilla Batter

  • Preheat the oven to 350°F/177ºC. Prepare three 6-inch or two 8-inch cake pans by spraying the sides with a cooking spray (Baker's Joy is my favorite) and fitting a parchment paper circle to the bottom of the pan.
  • Add the sifted cake flour, baking powder, baking soda, and salt into a bowl and whisk to combine. Set aside. 
  • In the bowl of your stand mixer (a handheld mixer works fine too!), beat the butter on high for two minutes until it's light and creamy. Add in the sugar and continue to mix on medium-high for another two minutes. Turn the mixer to low and add the eggs and egg whites, one at a time, mixing until just combined and scraping down the bowl and paddle as needed. Add the vanilla and sour cream, turn the mixer to high, and beat for one full minute. It will look curdled at this point, but don’t worry – it will become smooth cake batter at the end.
  • Add in the dry ingredients all at once and turn the mixer to low speed. Mix until just combined, then slowly pour in the milk. Continue to mix on low speed until just combined, about 30 seconds. Scrape down the sides and bottom of the bowl and give it a few stirs with a whisk to make sure there are no lumps. The batter will be slightly thick.

Make the Chocolate Batter

  • There will be around 6 cups (1300g) of vanilla batter total. Transfer half of the batter (650g) into a medium bowl and whisk in the 4 chocolate batter ingredients until smooth.
  • Drop large spoonfuls of the vanilla and chocolate batters amongst each prepared cake pan. Repeat until all the batter is used, then use a wooden skewer to swirl the batters into a marble effect.
  • Bake for 30-35 minutes. The cakes are done when a toothpick inserted in the center comes out clean. Let the cakes cool in the pan for five minutes before turning them out onto a wire rack for an additional few hours of cooling.

Make the Chocolate Buttercream

  • In a stand mixer fitted with a paddle attachment, whip the butter on medium-high speed until creamy and light in color, about 5 minutes.
  • Scrape down the bowl and paddle, then add powdered sugar, cocoa powder, milk, salt, and vanilla extract. Cover the mixer with a clean kitchen towel (to prevent ingredients flying out of the bowl), then turn the mixer to low and mix until all ingredients start to come together.
  • Remove the kitchen towel, scrape down the bowl and paddle, then continue mixing on low speed until uniform and smooth, 2-3 minutes.

Assembly

  • Once the marble cakes are completely cooled, level them to your desired height. Add a swipe of chocolate buttercream onto a cardboard cake circle and place the first cake layer on top. Fill and stack the cake with chocolate buttercream, then crumb coat the cake with chocolate buttercream. Place the crumb coated cake in the refrigerator for at least 30 minutes to let the buttercream set firm.
  • To create the design pictured, reserve about 1/2 Cup of the remaining chocolate buttercream for the piping on top of the cake, then use the rest of the buttercream to frost the cake. Use a cake comb to create the scalloped texture, then place the cake in the refrigerator for another 30+ minutes to let the frosting firm up.
  • Place all of the remaining chocolate buttercream into a piping bag fitted with Wilton tip 1M and pipe swirls around the top of the cake. Place marbled chocolate decorations in between each swirl (see blog post above for instructions on how to make the marbled chocolate decorations).

Notes

DIY Cake Flour Recipe: To make your own cake flour, spoon and level one cup of all-purpose flour and remove 2 Tbsp. Add 2 Tbsp of cornstarch. Repeat per the amount of cake flour you need, then sift the flour and cornstarch mixture 4 times (don’t skip that step!). After sifting, spoon and level to re-measure the amount of cake flour you need. 
Make Ahead Tips: 
  1. The marble cake layers can be baked ahead and stored at room temperature, wrapped in plastic wrap, for up to two days. Alternatively you can store the cakes in the freezer for up to two months.  
  2. The chocolate buttercream can be made ahead and stored in an airtight container in the refrigerator for up to two weeks. When you’re ready to use it, bring it back to room temperature and re-mix in your stand mixer to bring it back to smooth buttercream consistency. 
To Make as Cupcakes: spoon the batters into lined cupcake tins (no more than 2/3 full), marble together with a toothpick, and bake at 350ºF for 15-18 minutes, or until a toothpick inserted comes out clean. 

This chocolate vanilla marble cake is sure to be a hit at your next gathering! I hope you love it as much as I do. Let me know what you think in the comments below and feel free to tag @sugarandsparrowco on Instagram if you post a pic! I love to see what you create.

By: Whitney · In: Cake, Featured, Recipes · Tagged: chocolate vanilla cake, marble cake, marbled chocolate, scalloped cake comb

you’ll also love

marble buttercream cake tutorialMarble Buttercream Cake Tutorial Feat. the JOANN Stir Collection
pumpkin chocolate marble cakePumpkin Chocolate Marble Cake with Brown Butter Frosting
thin mint chocolate cakeThin Mint Chocolate Cake Recipe

Join the List

Stay up to date & receive the latest posts in your inbox.

Reader Interactions

Comments

  1. McKenzie says

    September 29, 2025 at 6:06 pm

    Hi! I’m trying to make my own wedding cake and i can’t find a recipe for an 11” round pan! Any tips to double the recipe or what you would do to the recipe? my vision is a vintage heart cake for about 41 people

    Reply
    • Whitney says

      September 30, 2025 at 9:29 am

      Hi McKenzie! I’m cheering you on and congratulations on your upcoming wedding! I made a cake serving guide here with a chart that shows how much cake batter you need for different pan sizes: https://sugarandsparrow.com/cake-serving-guide/ to feed 41 people with a heart shaped cake, I’d recommend doing two 11″ round layers. You’ll want to make 2.5x any of my recipes for the full amount of batter you’d need, but unless you have a large enough mixer I would bake the layers separately. So, make one batch of 1.25x the recipe to fill one cake pan, bake it, and then make another 1.25x to fill the next pan. I hope that makes sense!

      Reply
  2. Polly says

    July 14, 2025 at 2:19 pm

    5 stars
    So excited to make this! Can I make it with all whole eggs? I know the texture might change slightly but I would prefer to use whole eggs! What would the quantities be instead? Just 3 whole eggs?

    Reply
    • Whitney says

      July 14, 2025 at 2:26 pm

      Hi Polly! Yes, you can use 3 whole eggs.

      Reply
  3. Mikal says

    March 24, 2025 at 9:38 am

    Hi there! Curious how you’d adjust the recipe to make this as a small batch (two or three 4” cakes)?

    Reply
    • Whitney says

      March 25, 2025 at 10:01 pm

      Hi Mikal! To make this a small batch cake you’d make 1/3 of the recipe, or divide each ingredient by 3. Hope that helps! I’m going to add a small batch marble cake to my list because that sounds so fun.

      Reply
      • Mikal says

        March 27, 2025 at 7:33 pm

        That’s what I thought! How would you split up the eggs?
        I’m excited to try it!!

        Reply
  4. Lynne says

    October 11, 2024 at 6:27 pm

    Delicious cake tastes even better the next day
    I made in Bundt pan 35 minutes and iced with a chocolate Grenache

    Reply
  5. Emily says

    October 3, 2024 at 1:33 pm

    Could you make this as a 3-layer 8” cake if you doubled the recipe?

    Reply
    • Whitney says

      October 5, 2024 at 11:34 pm

      Hi Emily! You can make 1.5x the recipe to get the perfect amount for three 8-inch layers. Enjoy!

      Reply
  6. Jordan says

    April 2, 2024 at 10:36 am

    Can this be made as a 9×13?

    Reply
    • Whitney says

      April 8, 2024 at 1:53 pm

      Hi Jordan! I haven’t made this as a 9×13 but my hunch is that it would work! I’d bake at 350F for 35-40 min and go from there.

      Reply
  7. Darlene Low says

    March 5, 2024 at 8:02 pm

    Was wondering if I could bake the marble cake in a Bundt pan.

    Reply
    • Whitney says

      March 8, 2024 at 8:52 pm

      Hi Darlene! Yes, you can. This recipe will fit in a 9.5 Cup bundt pan and can be baked at 350F for 30-15 min. Enjoy!

      Reply

Leave a Reply Cancel reply

Your email address will not be published. Required fields are marked *

Recipe Rating


Next Post >

Black Velvet Cupcakes

Primary Sidebar

Welcome to Sugar & Sparrow

Welcome to Sugar & Sparrow

Helping you whip up pretty desserts with confidence and creativity. And hopefully sharing a few laughs with you along the way!

Learn More

Connect

let’s bake!

Get my very best recipes, baking tips, and decorating tutorials sent to your inbox

Featured Posts

hot cocoa bar setup

My Ideal Hot Cocoa Bar Setup

chocolate strawberry cake recipe by sugar and sparrow

Chocolate Covered Strawberry Cake

woven tapestry inspired cake tutorial by sugar and sparrow

Woven Tapestry Cake Tutorial

Search

Archives

Follow Along

@sugarandsparrowco

LEMON CUPCAKES 🍋 after about a dozen recipe tes LEMON CUPCAKES 🍋 after about a dozen recipe tests, this one is everything I could want in a lemon cupcake! Fluffy-yet-moist, bursting with natural lemon flavor, and absolutely irresistible topped with lemon cream cheese buttercream. 

Full recipe (with frosting) linked in my bio + at https://sugarandsparrow.com/homemade-lemon-cupcakes/

INGREDIENTS:
1 Cup (132g) all-purpose flour
1 tsp baking powder
1/4 tsp salt
1/4 Cup (60ml) whole milk, room temperature
3 Tbsp (45ml) lemon juice from 1 medium lemon
3/4 Cup (150g) granulated sugar
3 Tbsp (42g) unsalted butter, room temperature
2 Tbsp (30ml) vegetable oil
2 large eggs, room temperature
1 tsp pure vanilla extract

INSTRUCTIONS:
1. Preheat the oven to 350ºF (177ºF) and line a standard cupcake pan with 12 paper liners.
2. In a large bowl, whisk together the flour, baking powder, and salt. Set aside. 
3. In the bowl of a stand mixer fitted with the paddle attachment (or with a hand mixer and large bowl), add the lemon zest to the sugar and mix on low speed until fragrant and well combined, about 1 minute. Meanwhile, combine the lemon juice with the milk and set aside. 
4. Add the butter to the lemon-sugar mixture and cream on medium speed until and combined, about 2 minutes. Add the vegetable oil and beat until light and creamy, about 3 minutes. Scrape down the bowl and paddle as needed.
5. Mix in the eggs one at a time on low speed, then add the vanilla and turn the mixer to medium speed for one minute.
6. Turn the mixer off and add the flour mixture all at once. Mix on low speed until just combined, then slowly pour in the lemon-milk mixture. Mix until just combined, about 30 seconds.
7. Divide the batter equally between the liners and bake for 14-18 min. Cool, then top with frosting of your choice (link in bio for lemon cream cheese frosting)�
#lemoncupcakes #creamcheesefrosting #lemon #cupcakes #cupcakedecorating
April in my kitchen 🌸 I published 5 NEW recipes April in my kitchen 🌸 I published 5 NEW recipes on my site, baked my Oreo cupcake recipe for a fundraiser and found it was just as delicious as I remember, and filmed/photographed 3 recipes that will be on my blog in May (Lemon Cupcakes, Lemon Cream Cheese Buttercream, and No-Bake Marbled Strawberry Cheesecake) 🥰 

Comment “APRIL” to get all the available recipes and stay tuned for more! 

#bakersofinstagram #springbaking #cakedecorating #cupcakes #bakinglove
SHEET PAN COOKIE CAKE 🍪 slice it warm for a fud SHEET PAN COOKIE CAKE 🍪 slice it warm for a fudgy chocolate chip cookie OR let it settle into a moist and chewy cookie cake that’s perfect for decorating! My fave vanilla buttercream + sprinkles turn this giant chocolate chip cookie into the perfect birthday cake alternative at the end 🥳
⁣
Full recipe + decorating ideas at https://sugarandsparrow.com/sheet-pan-chocolate-chip-cookie-cake/
⁣
INGREDIENTS⁣
1 Cup (226g) unsalted butter, melted⁣
1 1/3 Cups (267g) packed light or dark brown sugar⁣
1/2 Cup (100g) granulated sugar⁣
3 large eggs⁣
1 Tbsp pure vanilla extract⁣
1 tsp baking soda⁣
1 tsp cornstarch⁣
1/2 tsp salt⁣
3 Cups (398g) all purpose flour⁣
2 Cups (350g) semi-sweet chocolate chips⁣
⁣
INSTRUCTIONS⁣
1. Preheat the oven to 350ºF (177ºC). Grease and line a 13×18 inch sheet pan.⁣
2. In a large bowl, add the brown sugar and granulated sugar. Melt the butter in the microwave and pour it over the top of the sugars. Whisk together until uniform. Add the eggs and vanilla, then continue whisking until uniform. Whisk in the baking soda, cornstarch, and salt.⁣
3. Add the flour and use a silicone spatula to fold it in until smooth cookie dough forms. Reserve 1/2 Cup of the chocolate chips and set them aside, then fold the remaining 1 1/2 Cups of chocolate chips into the cookie dough.⁣
4. Place the chocolate chip cookie dough onto the prepared sheet pan and use an offset spatula to spread it all the way to the edges in an even layer.⁣
5. Bake the cookie cake for 14-16 minutes, until it looks golden brown on the edges and set. 
6. Enjoy warm or let it cool and decorate with vanilla buttercream and sprinkles! ⁣
⁣
#cookiecake #chocolatechipcookies #sheetcake #birthdaycake #cakedecorating
STRAWBERRY CUPCAKES 🍓based on my beloved strawb STRAWBERRY CUPCAKES 🍓based on my beloved strawberry layer cake recipe, this cupcake version is just as moist yet fluffy and bursting with natural strawberry flavor! Between the mix of fresh strawberries in the cupcakes + freeze-dried strawberries in the frosting, the flavor is out of this world 🚀

Full recipe link in my bio (with strawberry buttercream) + at https://sugarandsparrow.com/strawberry-cupcakes/

STRAWBERRY CUPCAKES
Yield: 14 cupcakes

INGREDIENTS:
5 oz (143g) fresh or frozen strawberries
1/3 Cup (80ml) whole milk, room temp
1 1/2 Cups (158g) sifted cake flour
1 tsp baking powder
1/4 tsp baking soda
1/2 tsp salt
6 Tbsp (85g) unsalted butter, room temp
1 Cup (200g) granulated sugar
2 large eggs, room temp
3 Tbsp (45g) sour cream, room temp
1 tsp vanilla extract
1 drop pink food coloring (optional)

INSTRUCTIONS: 
1. Puree the strawberries using a food processor (you’ll have about 1/2 cup of puree), then place into a saucepan over medium-low heat. Bring to a simmer, then cook for 10-15 min, stirring occasionally, until you have 1/4 cup. Refrigerate until room temp.
2. Preheat oven to 350ºF (177ºC) and line a standard cupcake pan with liners.
3. Whisk together the sifted cake flour, baking powder, baking soda, and salt and set aside.
4. In a stand mixer w/ paddle attachment (or hand mixer + large bowl), whip the butter on high for 2 min. Add sugar and beat for 2 min, until light and fluffy. Turn the mixer to low and add the eggs one at a time, then add the vanilla and sour cream, turn the mixer to high and beat for 1 min. Meanwhile, whisk together the strawberry puree, whole milk, and food coloring (if using).
5. Turn the mixer off and add all of the dry ingredients at once. Mix on low until just combined, then add the strawberry milk mixture until just combined, about 30 seconds.
6. Fill the cupcake liners 2/3 full and bake for 14-18 minutes. Cool completely before topping with strawberry buttercream (full recipe linked above). 

#strawberrycupcakes #strawberrycake #pinkcupcakes #strawberry #cupcakes
COFFEE BUTTERCREAM (recipe below)☕️ this frost COFFEE BUTTERCREAM (recipe below)☕️ this frosting has AMAZING coffee flavor, is so easy to decorate cakes with, and pairs beautifully with so many flavors (chocolate, vanilla, or any cake flavor you’d want to turn into a latte). 

All my cake pairing suggestions are linked in my bio or at https://sugarandsparrow.com/coffee-buttercream-recipe/ 

COFFEE BUTTERCREAM⁣
Yield: 2.5 Cups⁣

INGREDIENTS⁣
1 1/2 tsp instant coffee or espresso powder⁣
1 1/2 Tbsp whole milk, room temperature⁣
1 Cup (226g) unsalted butter, room temperature⁣
3 1/2 Cups (420g) powdered sugar⁣
2 tsp pure vanilla extract⁣
Pinch of salt⁣

INSTRUCTIONS⁣
1. Combine the instant espresso/coffee with the whole milk and set aside. In the bowl of a stand mixer, beat the butter on high until creamy and smooth (about 5 minutes), scraping down the bowl and paddle a few times in between.⁣
2. Turn the mixer to low and add the powdered sugar a few cups at a time, scraping down the bowl and paddle between intervals. Add the vanilla, the coffee/espresso milk mixture, and salt. Mix on low until fully incorporated, about one minute.⁣

#coffeebuttercream #buttercream #frosting #coffeecake

Footer

On the Blog

  • Cake Basics
  • Recipes
  • Tutorials

Info

  • About
  • Privacy Policy & Disclosure

stay in the know

Copyright © 2026 · Theme by Sugar & Sparrow