• Cake
  • Frosting
  • YouTube
  • My Favorite Tools
  • Nav Social Icons

  • Skip to primary navigation
  • Skip to main content
  • Skip to primary sidebar
  • Skip to footer
  • Recipes
    • Cake
    • Cupcakes
    • Frosting
    • Ice Cream
    • Vegan
  • Cake Basics
  • Tutorials
  • Blog
  • About
  • Mobile Menu Widgets

    Connect

    Search

Sugar & Sparrow logo in script font

Sugar & Sparrow

Lifestyle and Cake from Portland Oregon

  • Cake Basics
  • Recipes
    • Cake
    • Cupcakes
    • Sheet Cakes
    • Cookies & Bars
    • Filling
    • Frosting
    • Ice Cream
    • No-Bake
    • Small Batch
    • Vegan
  • Tutorials
  • Book
  • Blog
  • About

Chocolate Peanut Butter Cake Recipe

November 5, 2020 · In: Cake, Recipes

Jump to Recipe

Some say that peanut butter and jelly are the perfect match for each other, but I say peanut butter and chocolate are even better. It’s the best blend of salty and sweet ever, and the sole flavor inspiration behind this Chocolate Peanut Butter Cake. If you’re a chocolate peanut butter fan, this is the cake of your dreams! Behold:
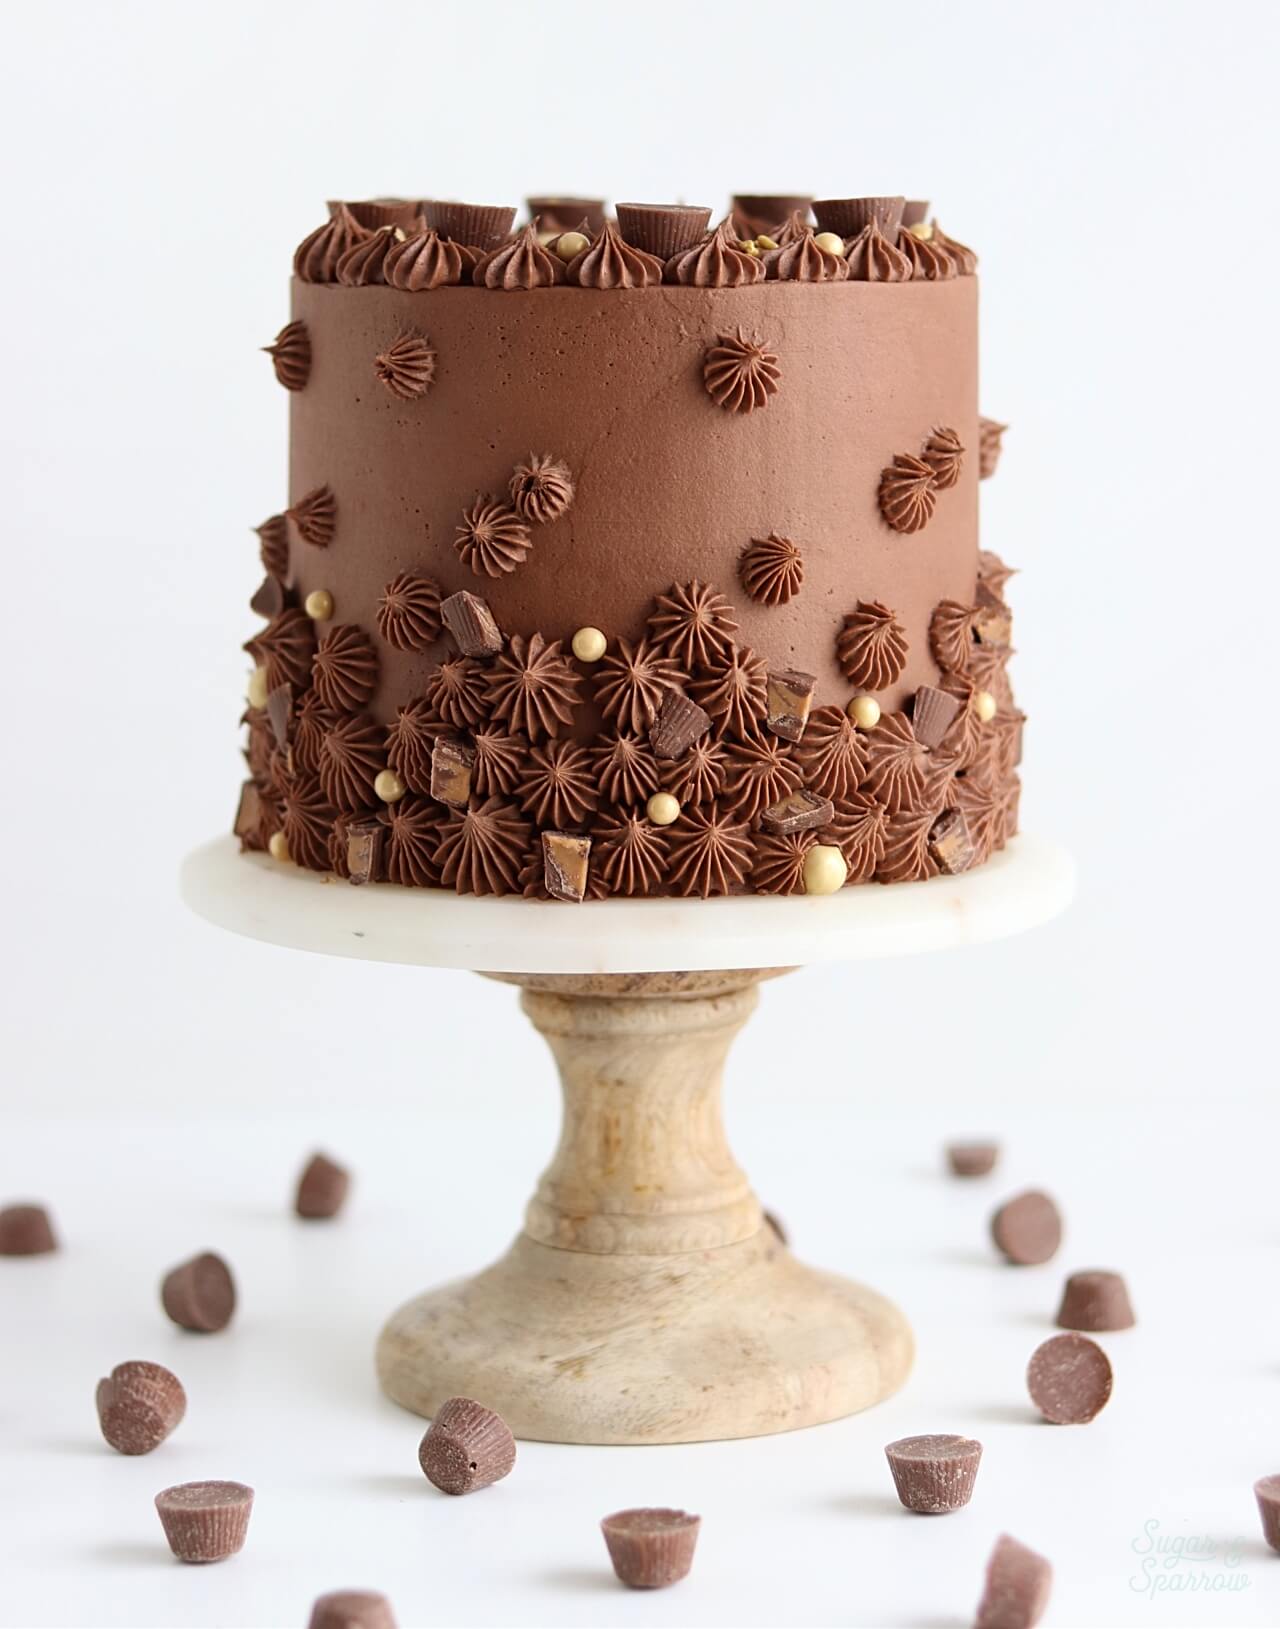
chocolate peanut butter cake recipe

It all starts with a peanut butter cake that’s just as moist and flavorful as it is light and fluffy. It’s flavored with creamy peanut butter and a little brown sugar to send your tastebuds to heaven. You can use any brand of creamy peanut butter in this recipe, but I opt for Simply Jif because it has less sugar than regular Jif. It makes the peanut butter flavor come through beautifully without being too sweet.
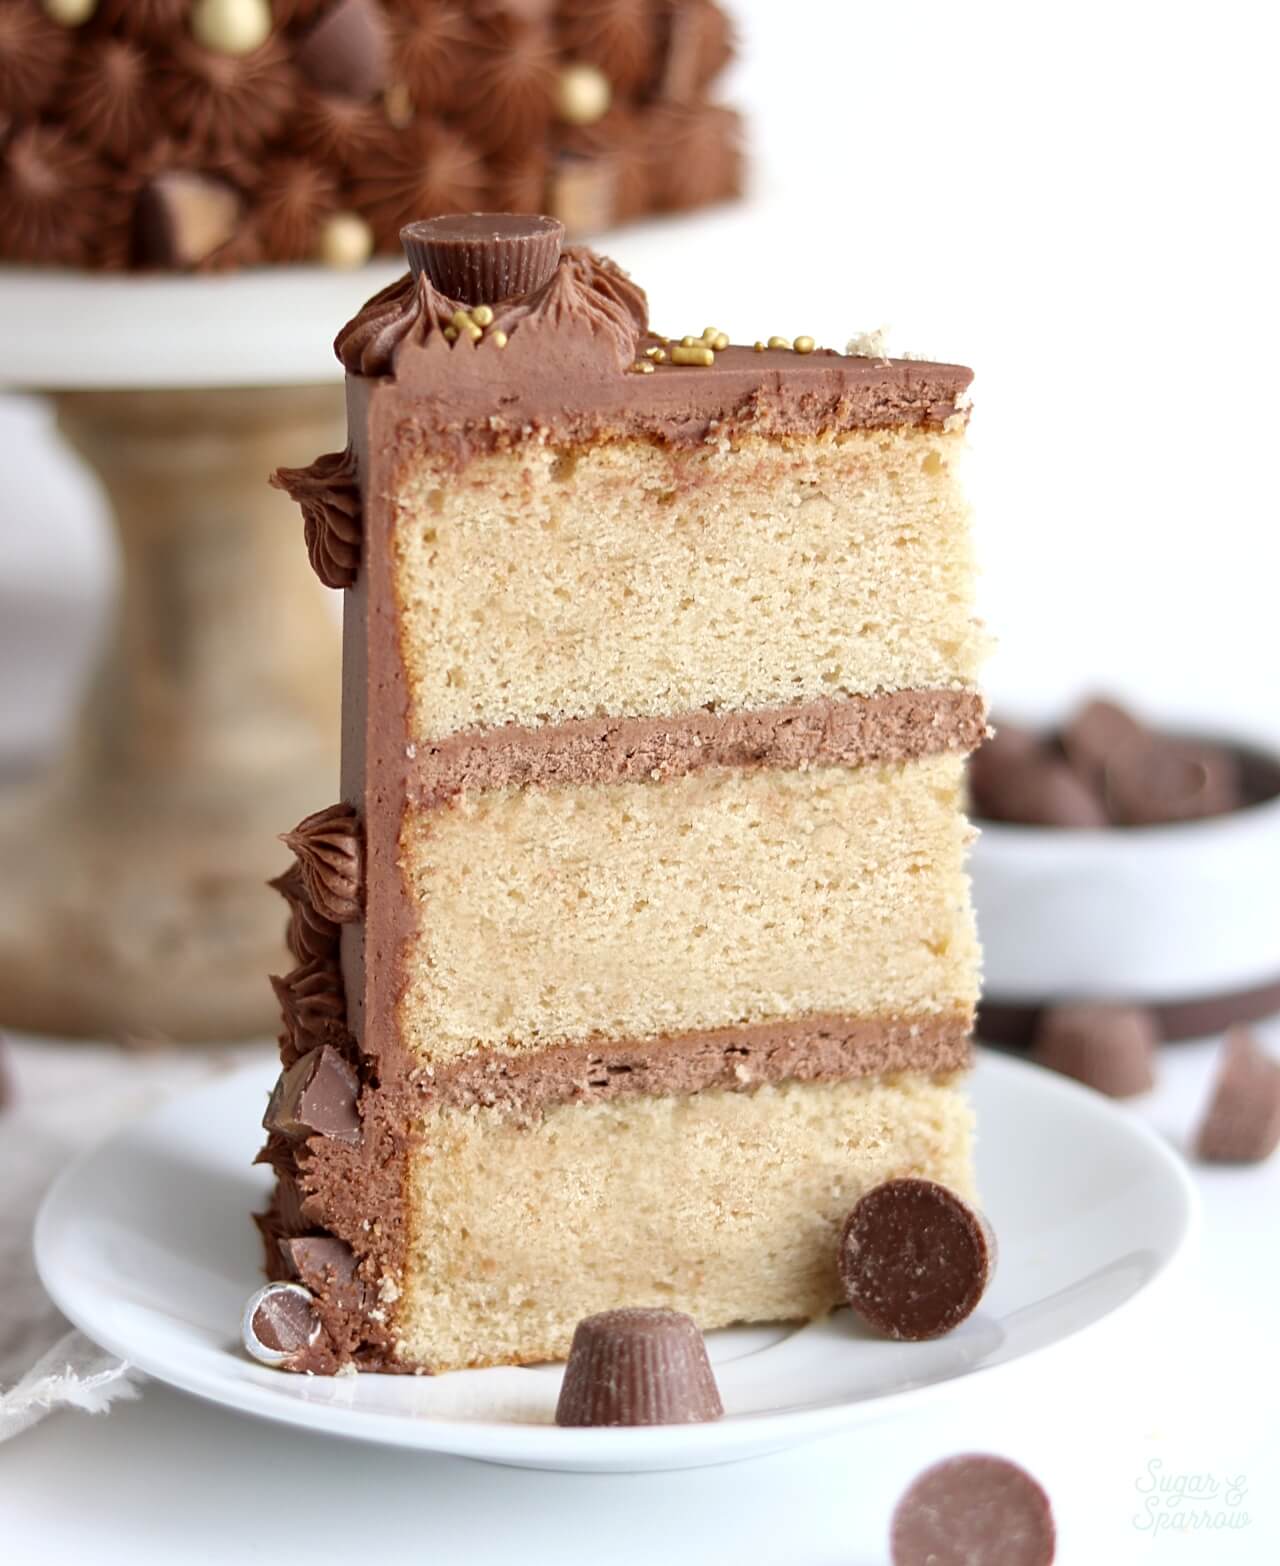
peanut butter cake recipe

To top this delicious peanut butter cake, I originally thought to use my favorite Chocolate Buttercream recipe, but had an epiphany at the last second: why not add a little peanut butter to the chocolate buttercream? The result was AMAZING and really helps the peanut butter flavor take center stage! Simply whip some creamy peanut butter along with the butter and use it as a base for the chocolate buttercream, and voila.

peanut butter cake with chocolate peanut butter buttercream

After frosting the peanut butter cakes with a smooth finish of the chocolate peanut butter buttercream (say that five times fast!), I used Wilton Tip 4B to pipe some open stars around the cake in an ombrè style, then used the same piping tip to create two rows of open stars around the top edge. I finished decorating with some mini peanut butter cups and a few SprinklePop sprinkles in the Gold Sprinkle Mix.

chocolate peanut butter buttercream
chocolate peanut butter cake

You can choose to decorate this cake however you want, because at the end of the day, the flavors are what takes this Chocolate Peanut Butter Cake beyond. It’s perfect for any fan of this flavor combo (who isn’t a fan though!), and so easy to whip up. A total crowd pleaser in my book!
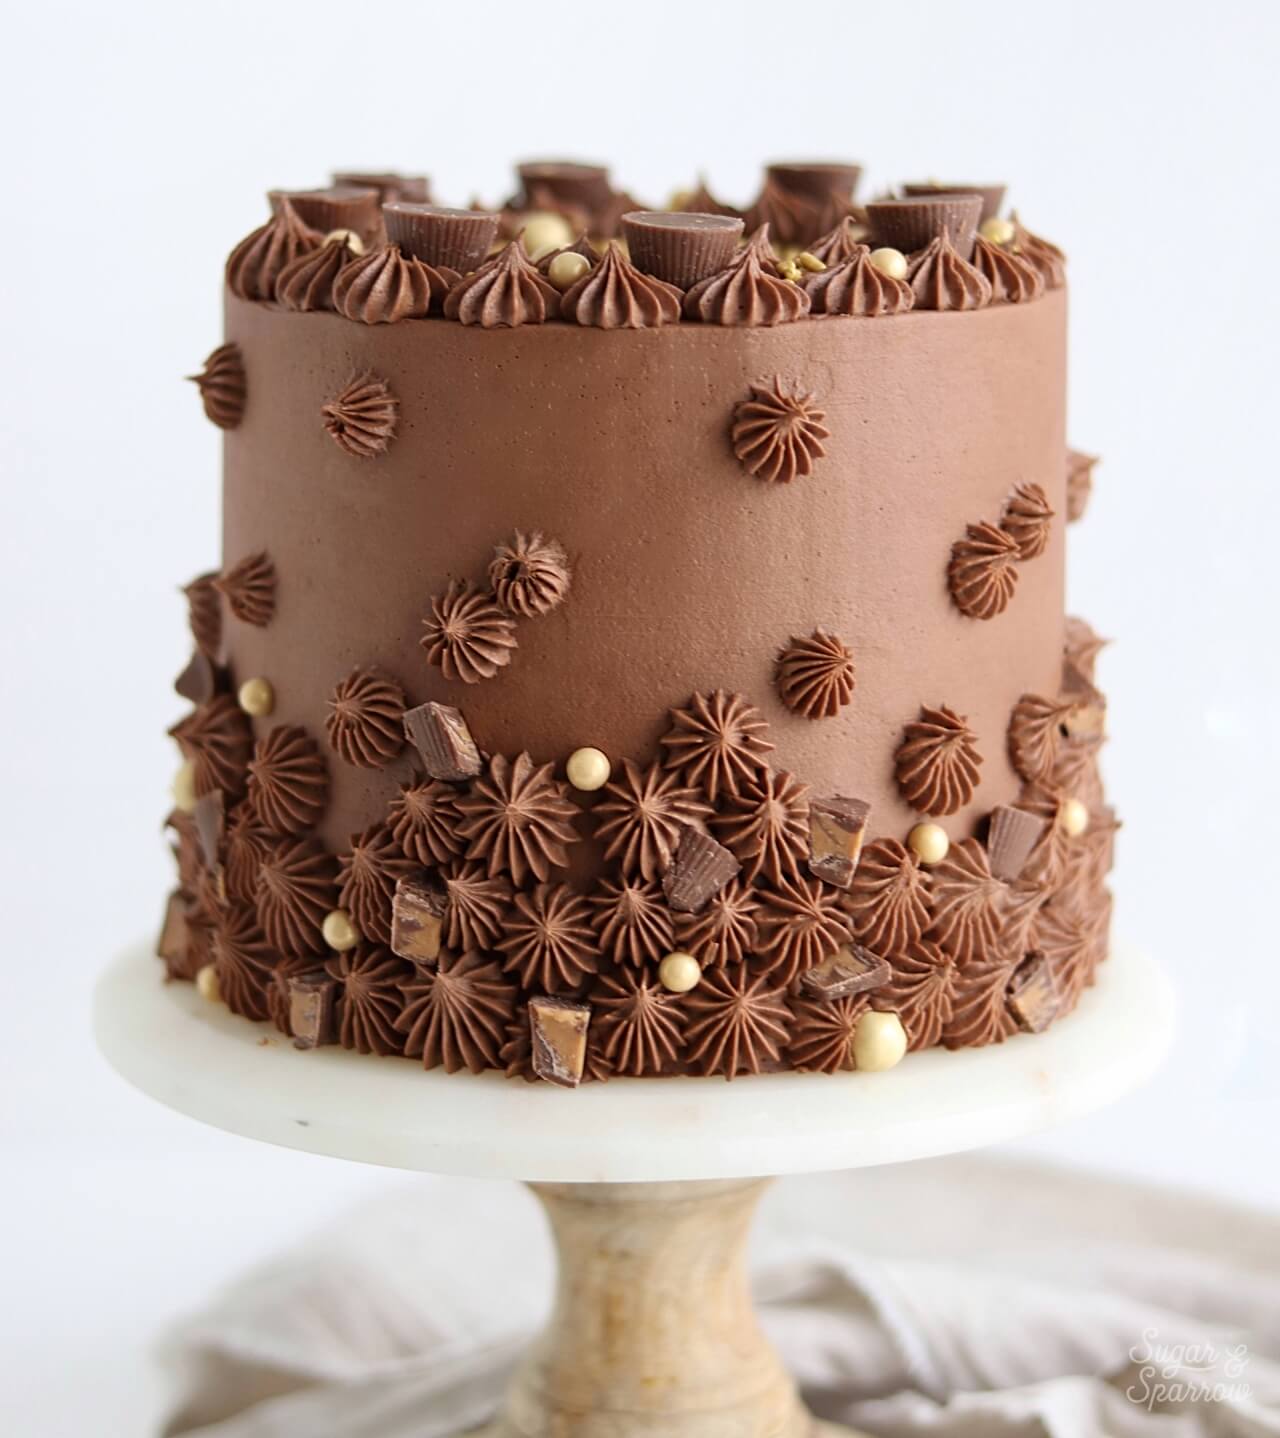
peanut butter chocolate cake

Chocolate Peanut Butter Cake

5 from 5 votes
Layers of moist, fluffy Peanut Butter Cake topped with Chocolate Peanut Butter Buttercream. The dreamiest of all decadent flavor combo. 
Print Recipe Pin Recipe

Ingredients

Peanut Butter Layer Cake

  • 3 1/2 Cups (370g) cake flour, sifted before measuring
  • 1 Tbsp baking powder
  • 3/4 tsp baking soda
  • 1 1/2 tsp kosher salt
  • 1 1/8 Cup (254g) unsalted butter, room temperature
  • 1 Cup (205g) granulated white sugar
  • 1/2 Cup (94g) packed brown sugar
  • 1 Cup (250g) creamy peanut butter
  • 4 eggs, room temperature
  • 1/3 Cup (75g) sour cream, room temperature
  • 1 1/2 Tbsp vanilla extract
  • 1 1/2 Cups (360ml) whole milk, room temperature

Chocolate Peanut Butter Buttercream

  • 1 1/2 Cups (339g) unsalted butter, room temperature
  • 1/3 Cup (83g) creamy peanut butter
  • 4 1/2 Cups (540g) powdered sugar
  • 3/4 Cup (63g) natural unsweetened cocoa powder
  • 6 Tbsp (89ml) whole milk, room temperature
  • 1 Tbsp vanilla extract
  • 1/2 tsp kosher salt

Instructions

Make The Peanut Butter Layer Cake

  • Preheat the oven to 350°F. Prepare three 8-inch or four 6-inch cake pans by spraying the sides with a cooking spray (Baker's Joy is my favorite) and a wax paper circle fitted to the bottom of the pan. Alternatively, you can grease and lightly flour the pans.
  • Sift the cake flour and then measure by spooning and leveling it in your measuring cup. Add the cake flour, baking powder, baking soda, and salt into a bowl and whisk to combine. Set aside. 
  • In the bowl of your stand mixer (a handheld mixer works fine too!), cream the butter for on high for two minutes until it’s light and fluffy. Add in white sugar, brown sugar, and peanut butter and continue to mix on medium-high for another three minutes, scraping down the bowl and paddle as needed. Add the eggs one at a time, mixing thoroughly after each addition. Add vanilla and sour cream and mix for one minute on medium-high, scraping down the bowl and paddle once more.
  • With the mixer on low speed, add in the dry ingredients and mix until just combined. Add the whole milk and mix until just incorporated. Scrape down the sides and bottom of the bowl and give it a few stirs to make sure there are no lumps. Batter will be thick.
  • Pour batter evenly into prepared cake pans (no more than 2/3 of the way full), smooth the tops, and bake for 35-40 minutes. They’re done when they spring back to the touch and a toothpick inserted into the middle comes out clean. Let the cakes cool in the pan for five minutes before turning them out onto a wire rack for an additional few hours of cooling. Make sure they’re entirely room temperature before applying any frosting.

Make The Chocolate Peanut Butter Buttercream

  • In a stand mixer fitted with a paddle attachment, whip the butter and peanut butter on medium speed until very creamy and well combined, about three minutes. Scrape down the bowl and paddle and turn the mixer to low, then add powdered sugar, cocoa powder, milk, vanilla extract, and salt. Increase the speed to medium and beat for two full minutes.

Assembly

  • Fill and frost the Peanut Butter Cake layers with the Chocolate Peanut Butter Buttercream. If you want to recreate the look that’s pictured, frost a smooth finish with the buttercream, then refrigerate the cake for 30 minutes. Prepare a piping bag with Wilton Tip 4B, fill it with more Chocolate Peanut Butter Buttercream, then pipe open stars in an ombre pattern on the sides of the cake. Use the same piping tip to create a buttercream border on top, then top the cake with mini peanut butter cups and gold sprinkles. 

Notes

Make Ahead Tips: this cake can be made ahead and stored at room temperature, covered tightly in plastic wrap, for up to two days. Alternatively, you can cover with plastic wrap and store in the freezer for up to two months before thawing to room temperature. 
The buttercream can be made ahead and stored in an airtight container at room temperature for up to 1 day. Alternatively, you can store it in an airtight container in the refrigerator for up to two weeks. When you’re ready to use it, bring it back to room temperature and rewhip with your stand mixer to bring back to frosting consistency. 

Did you make this recipe? I want to know what you think! Let me know in the comments below or tag me on Instagram. I love to see what you’re caking!
By: Whitney · In: Cake, Recipes · Tagged: buttercream recipe, cake decorating, cake recipe, chocolate peanut butter buttercream, chocolate peanut butter cake, peanut butter buttercream, peanut butter cake, peanut butter cake recipe, peanut butter chocolate cake, peanut butter cup cake, sprinklepop, sugar and sparrow, wilton 4b

you’ll also love

Almond Joy Cake
the best vanilla cupcakes recipeThe Perfect Vanilla Cupcake Recipe
pumpkin layer cake recipe by sugar and sparrowPerfect Pumpkin Layer Cake Recipe

Join the List

Stay up to date & receive the latest posts in your inbox.

Reader Interactions

Comments

  1. Julie says

    February 17, 2024 at 1:32 pm

    About how many cupcakes would this recipe make?

    Reply
    • Whitney says

      February 27, 2024 at 2:39 pm

      Hi Julie! This recipe will make quite a few cupcakes, about 30-35. Hope that helps!

      Reply
  2. marjan nini says

    February 2, 2024 at 6:28 am

    hello, I would like to make this cake, may I ask how many grams is 1 cup of flour?
    Then I remove 2 tablespoons of flour and add Cornstarch to 15 grams
    but I first want to know how much 1 cup of flour weighs, thanks

    Reply
    • Whitney says

      February 4, 2024 at 9:51 pm

      Hi there! 1 cup of all purpose flour weighs about 133g. Hope that helps!

      Reply
  3. Dereth Salchak says

    February 21, 2023 at 7:34 am

    5 stars
    The brown sugar makes this cake. Its like a peanut butter cookie! I make this cake, and had leftover batter so I made cupcakes. Filled them with marionberry jam, topped with peanut butter buttercream. So good!

    Reply
    • Whitney says

      February 21, 2023 at 7:35 pm

      Yuuuum, Dereth! That sounds so delicious!

      Reply
  4. Marissa says

    January 15, 2023 at 10:19 am

    Hi! I can’t wait to make this cake for a coworker’s birthday! If I wanted to incorporate alcohol (per birthday girl’s request) what would be the right choice and amount to not mess up the batter? Thank you! (Ps pre-ordered your book, I’m trying to teach myself cakes as a hobby homebaker… cupcakes are doing ok but cakes are scary!!)

    Reply
    • Whitney says

      January 20, 2023 at 1:54 pm

      Thanks so much for preordering my book, Marissa! I can’t wait for you to see it and I’m cheering you on with your cake making! As far as adding alcohol to my cake recipes, I’m not sure what the right amount would be since I’ve never tried it before! I did find this blog post by The Cake Blog that might be able to help though: https://thecakeblog.com/2015/12/how-to-bake-with-alcohol.html

      Reply
  5. Maria Cecilia says

    June 15, 2021 at 6:37 pm

    Hi! I’m about to try your recipe! But I only have a 5 or 7 inches (14×10 or 18×10 cm) pans if I was to use only one pan what size should it be?

    Thank you so much ❤️!

    Reply
    • Whitney says

      June 17, 2021 at 10:18 am

      Hi Maria! For just one pan, I would go with the 7 inch for this recipe and if you’re only making one layer I would half the recipe as this makes quite a lot of batter. Hope that helps!

      Reply
  6. Pamela says

    June 3, 2021 at 10:25 am

    I want to make this cake with white chocolate peanut butter butter cream instead of milk chocolate and a glaze drip. Do you think I could achieve this with the glaze over buttercream? Any tips?

    Reply
    • Whitney says

      June 4, 2021 at 1:20 pm

      That sounds delicious, Pamela! I’ve never done a glaze before so I’m not entirely sure, but if the base for a glaze drip is chilled buttercream it should work so long as you refrigerate the cake for at least 30 minutes beforehand.

      Reply
« Older Comments

Leave a Reply Cancel reply

Your email address will not be published. Required fields are marked *

Recipe Rating


Next Post >

Golden Milk Latte Cake Recipe

Primary Sidebar

Welcome to Sugar & Sparrow

Welcome to Sugar & Sparrow

Helping you whip up pretty desserts with confidence and creativity. And hopefully sharing a few laughs with you along the way!

Learn More

Connect

let’s bake!

Get my very best recipes, baking tips, and decorating tutorials sent to your inbox

Featured Posts

funfetti birthday cake recipe

Double Funfetti Birthday Cake

buttercream consistency

How to Make the Perfect Buttercream Consistency + Troubleshooting Tips

monster cake by sugar and sparrow

Spooky Black Buttercream Halloween Cake

Search

Archives

Follow Along

@sugarandsparrowco

You butter believe I made myself the Halloween cos You butter believe I made myself the Halloween costume of my dreams!! 🧈 

#diyhalloweencostume
#foodcostume #halloweencostume #handmadecostume #bakerlife
MELTED CANDLE CUPCAKES 🖤🕯give me a few cupcakes, s MELTED CANDLE CUPCAKES 🖤🕯give me a few cupcakes, some dye-free black buttercream, and black chocolate ganache and watch me transform them into the spookiest edible centerpiece! 

Full tutorial is linked in my bio + at https://sugarandsparrow.com/melting-candle-cupcakes/ but I have a condensed version below: 
 
SUPPLIES: ⁣ 
-9 cupcakes⁣  (made these with my small batch black velvet cake recipe!) 
-1 batch of dye-free black buttercream 
-boba straws or skewers (for stabilizing the taller candles) ⁣ 
-icing smoother + turntable ⁣ 
-black ganache for dripping⁣ 
-3 birthday cake candles⁣ 
-matches ⁣ to light them
⁣ 
INSTRUCTIONS: ⁣ 
1. Fill and stack the cupcakes: one stack of 2 cupcakes, one stack of 3 cupcakes, and one stack of 4 cupcakes. For the two taller cupcakes I inserted a boba straw through the middle to stabilize the stack for frosting. ⁣ 
2. Frost the stacked cupcakes with smooth buttercream and keep the top edge raw. Refrigerate for 20 minutes to let the frosting firm up. ⁣ 
3. Transfer the frosted cupcake candles  onto a small plate and pipe ganache around the edges and tops to look like melted wax. ⁣ 
4. Insert a birthday cake candle into each cake candle (keep the wick about 1/4 inch from the cake surface) and light! ⁣ 
⁣ 
#candlecake #halloweencake #cupcakes #blackvelvetcake #blackbuttercream
BISCOFF COOKIE BUTTERCREAM 🤎 this delicious frosti BISCOFF COOKIE BUTTERCREAM 🤎 this delicious frosting is flavored with Biscoff cookie butter and goes with literally ANY Fall cake recipe 🙌🏼 So far my favorite cake flavors to pair it with are pumpkin cake, banana cake, chocolate cake, coffee cake, and spice cake, but I am also testing a full-on Biscoff cake this week!! 

Full recipe + my favorite cake pairing suggestions are at https://sugarandsparrow.com/biscoff-buttercream/ 
⁣⁣ 
INGREDIENTS⁣⁣ 
1 Cups (226g) unsalted butter, room temperature⁣⁣ 
1/2 Cup (94g) Biscoff cookie butter⁣⁣ or spread
3 Cups (360g) powdered sugar⁣⁣ 
1 tsp pure vanilla extract⁣⁣ 
2 Tbsp whole milk, room temperature⁣⁣ 
1/4 tsp salt, or to taste⁣⁣ 
⁣⁣ 
INSTRUCTIONS⁣⁣ 
1. Cream the butter and Biscoff cookie butter together in the bowl of a stand mixer fitted with the paddle attachment (or you can use a hand mixer and large bowl). Mix on medium-high until creamy and well combined, about 5 minutes, scraping down the bowl and paddle as needed.⁣⁣ 
2. Turn the mixer to low speed and add the powdered sugar a few cups at a time, scraping down the bowl and paddle after mixing in each addition. Add the vanilla, milk, and salt and continue mixing on low speed until smooth and combined, 1-2 minutes.⁣ 
⁣⁣ 
#biscoffcake #biscoff #buttercream #frosting #cakedecorating
DYE-FREE BLACK VELVET CUPCAKES 🖤 These all black c DYE-FREE BLACK VELVET CUPCAKES 🖤 These all black cupcakes use black cocoa powder (and NO food coloring!) to achieve that rich black color for the cupcakes + black buttercream. That means they won’t turn anyone’s mouth black AND they taste like Oreo cookies in deliciously moist cupcake form 👻

✨Full recipe (with dye-free black buttercream) is linked in my bio + at https://sugarandsparrow.com/black-velvet-cupcakes/ 

BLACK VELVET CUPCAKES
Yield: 14 cupcakes

1 Cup (132g) all purpose flour
3/4 Cup (150g) granulated sugar
1/3 Cup (38g) black cocoa powder
1 tsp baking soda
1/2 tsp baking powder
1/4 tsp salt
1/4 Cup (60ml) vegetable oil
1 large egg, room temperature
1/2 tsp pure vanilla extract
1/2 Cup (120ml) full-fat buttermilk*
1/2 Cup (120ml) hot coffee or hot water

INSTRUCTIONS:
1. Preheat the oven to 350°F (177°C). Line a muffin pan with cupcake liners and set aside.
2. Place all of the dry ingredients into a large bowl and whisk together to combine. Add the vegetable oil, eggs, vanilla, and buttermilk and whisk until combined. With the mixer still on low, add the hot coffee (or hot water) and whisk until smooth, about 2 minutes. The batter will be very thin. 
3. Pour the batter into the prepared cupcake liners (no more than ⅔ full) and bake for 15-18 minutes, until a toothpick inserted comes out with just a few moist crumbs on it. Cool completely before frosting with dye-free black buttercream (full recipe linked in my bio).

*If you don’t have buttermilk on hand (I rarely do!), use 1/2 Cup whole milk mixed with 1 1/2 tsp vinegar or lemon juice. 

#blackcupcakes #blackbuttercream #blackcocoapowder #halloweencupcakes #halloweenbaking
EASY MUMMY CUPCAKES 👀 this classic Halloween cupca EASY MUMMY CUPCAKES 👀 this classic Halloween cupcake design is so easy to make with chocolate cupcakes, googly eye sprinkles, vanilla buttercream, and one piping tip! Here’s how:

Full tutorial (with recipes for the cupcakes and buttercream!) is linked in my bio + at https://sugarandsparrow.com/mummy-cupcakes/

MUMMY CUPCAKES SUPPLIES: 
-Baked chocolate cupcakes
-Vanilla buttercream
-Googly eye sprinkles
-Piping bag
-Small flat piping tip or basket weave tip

INSTRUCTIONS: 
1. Press two googly eye sprinkles on top of the chocolate cupcake.
2. Starting on the edge of the cupcake, pipe a straight line to the opposite edge, avoiding the googly eye sprinkles. If you’re using a basket weave tip, make sure the grooved edge is face down.
3. Continue piping lines that connect the edges, overlapping the lines until the surface of the cupcake is covered (aside from the googly eyes) and the piping looks like mummy cloths.

#halloweencupcakes #halloweenbaking #chocolatecupcakes #cupcakedecorating #cupcakes

Footer

On the Blog

  • Cake Basics
  • Recipes
  • Tutorials

Info

  • About
  • Privacy Policy & Disclosure

stay in the know

Copyright © 2026 · Theme by Sugar & Sparrow