• Cake
  • Frosting
  • YouTube
  • My Favorite Tools
  • Nav Social Icons

  • Skip to primary navigation
  • Skip to main content
  • Skip to primary sidebar
  • Skip to footer
  • Recipes
    • Cake
    • Cupcakes
    • Frosting
    • Ice Cream
    • Vegan
  • Cake Basics
  • Tutorials
  • Blog
  • About
  • Mobile Menu Widgets

    Connect

    Search

Sugar & Sparrow logo in script font

Sugar & Sparrow

Lifestyle and Cake from Portland Oregon

  • Cake Basics
  • Recipes
    • Cake
    • Cupcakes
    • Cookies & Bars
    • Filling
    • Frosting
    • Ice Cream
    • No-Bake
    • Small Batch
    • Vegan
  • Tutorials
  • Book
  • Blog
  • About

Funfetti Layer Cake Recipe

July 30, 2018 · In: Cake, Featured, Recipes

Jump to Recipe

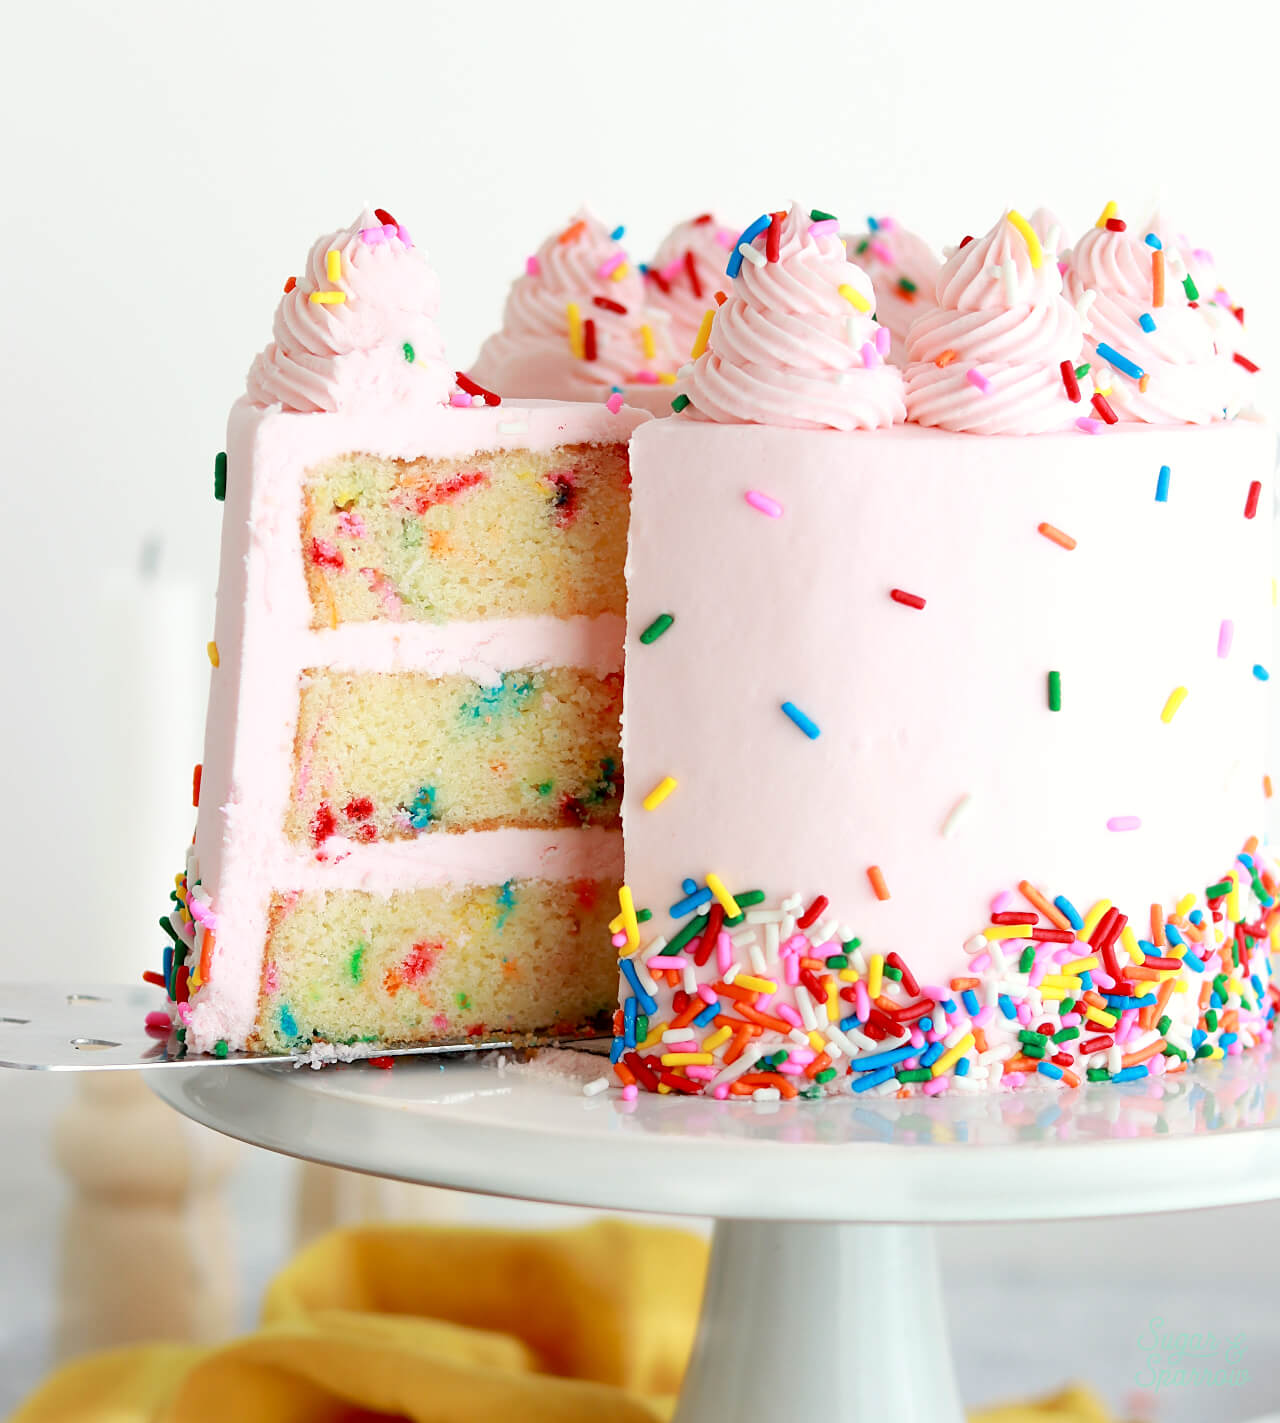
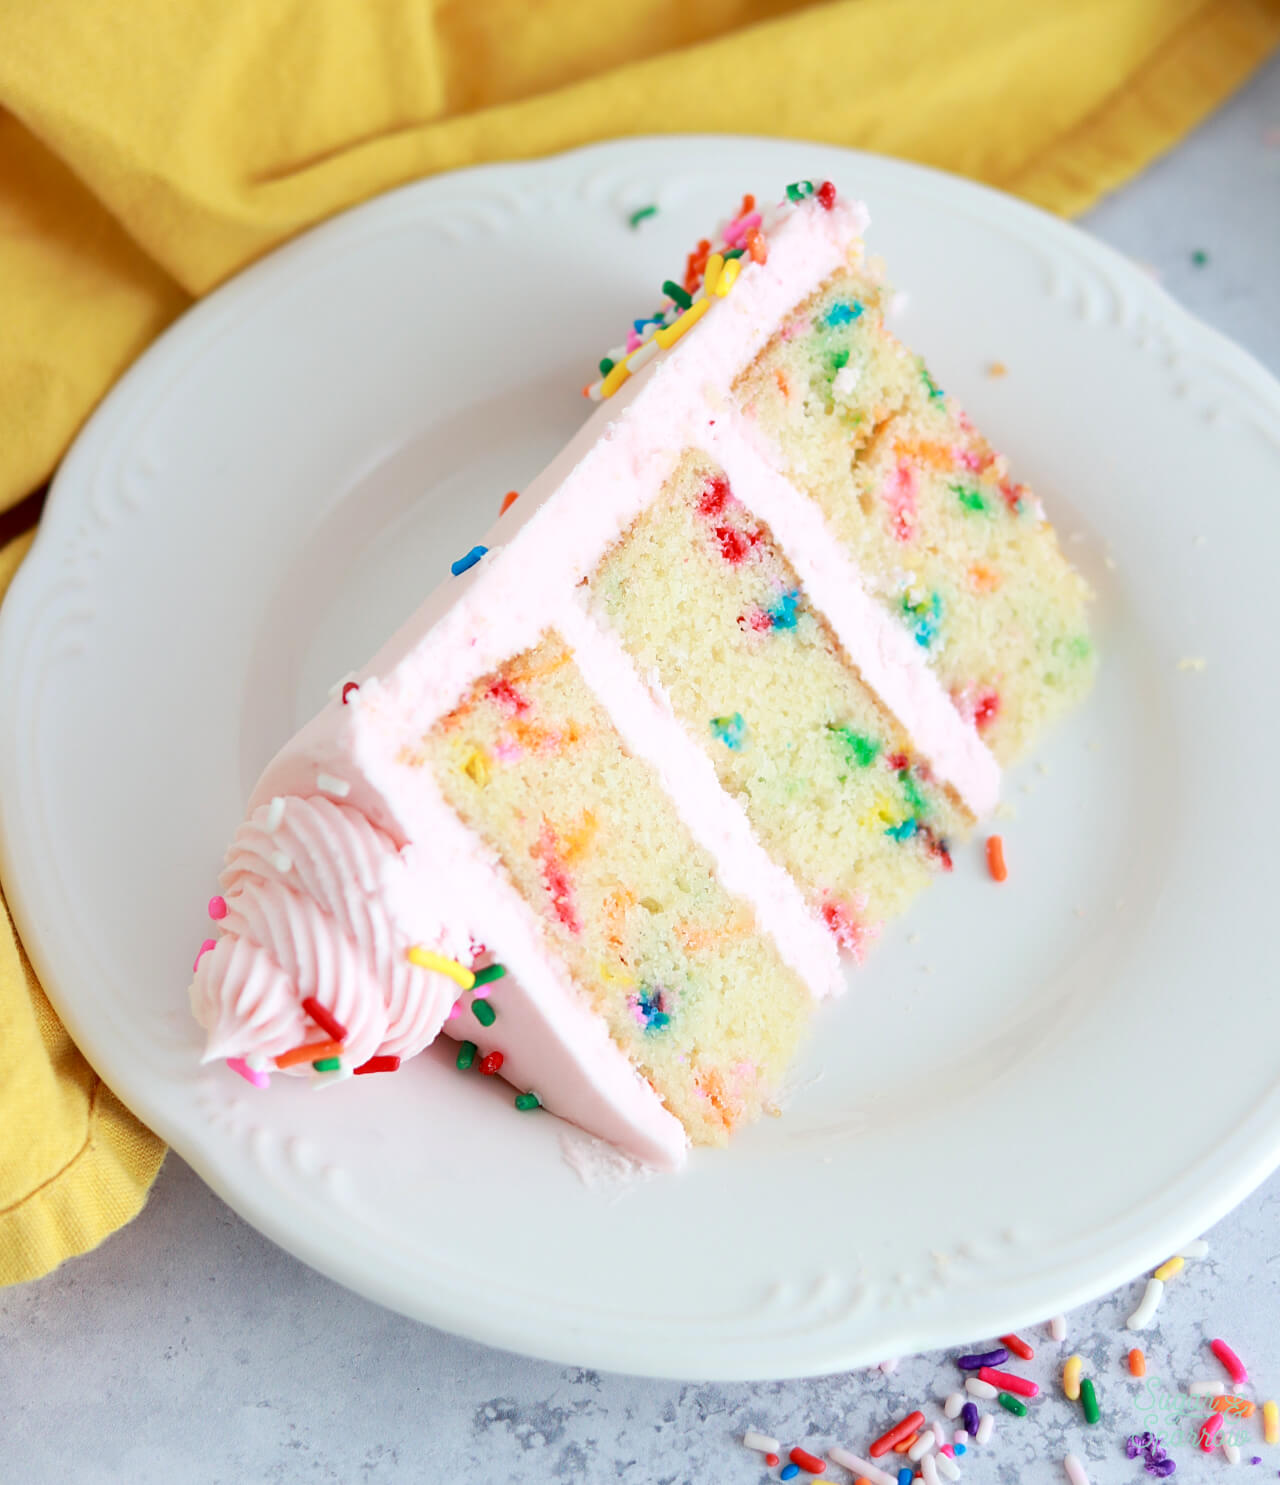
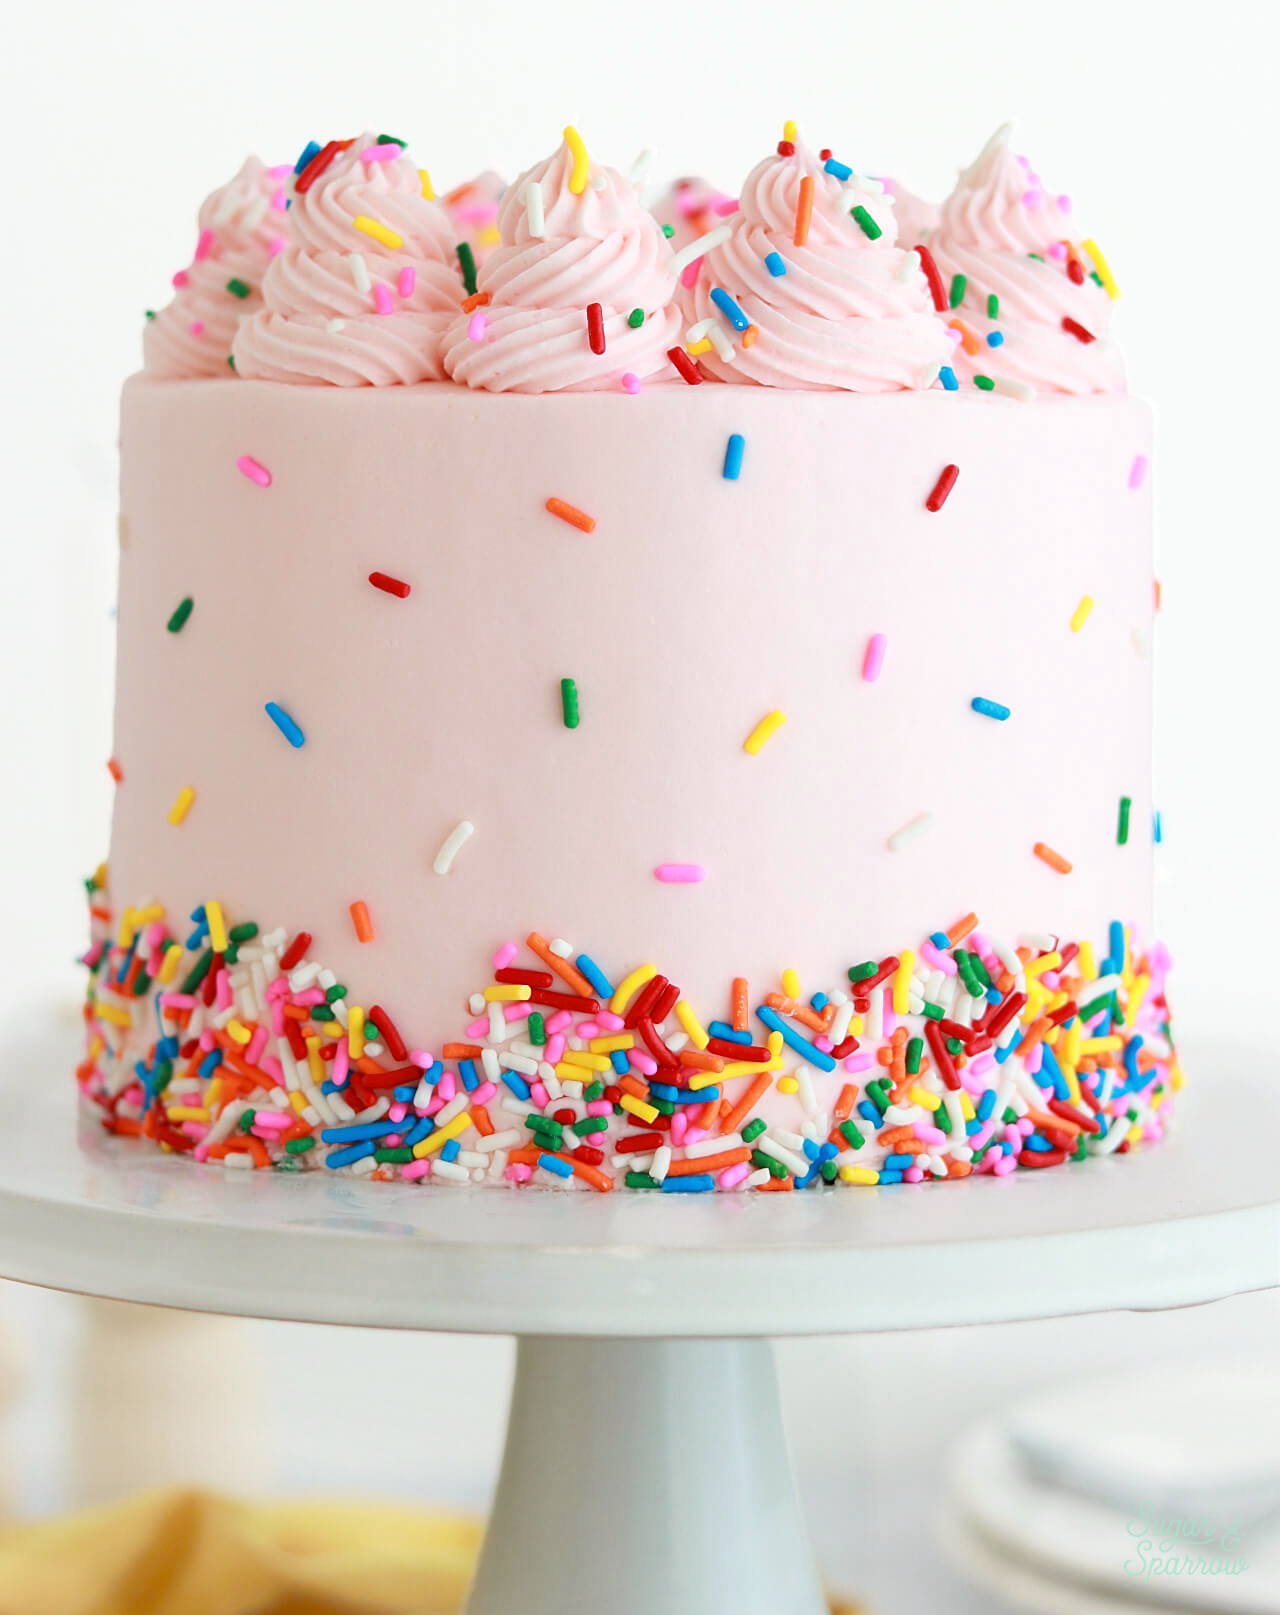
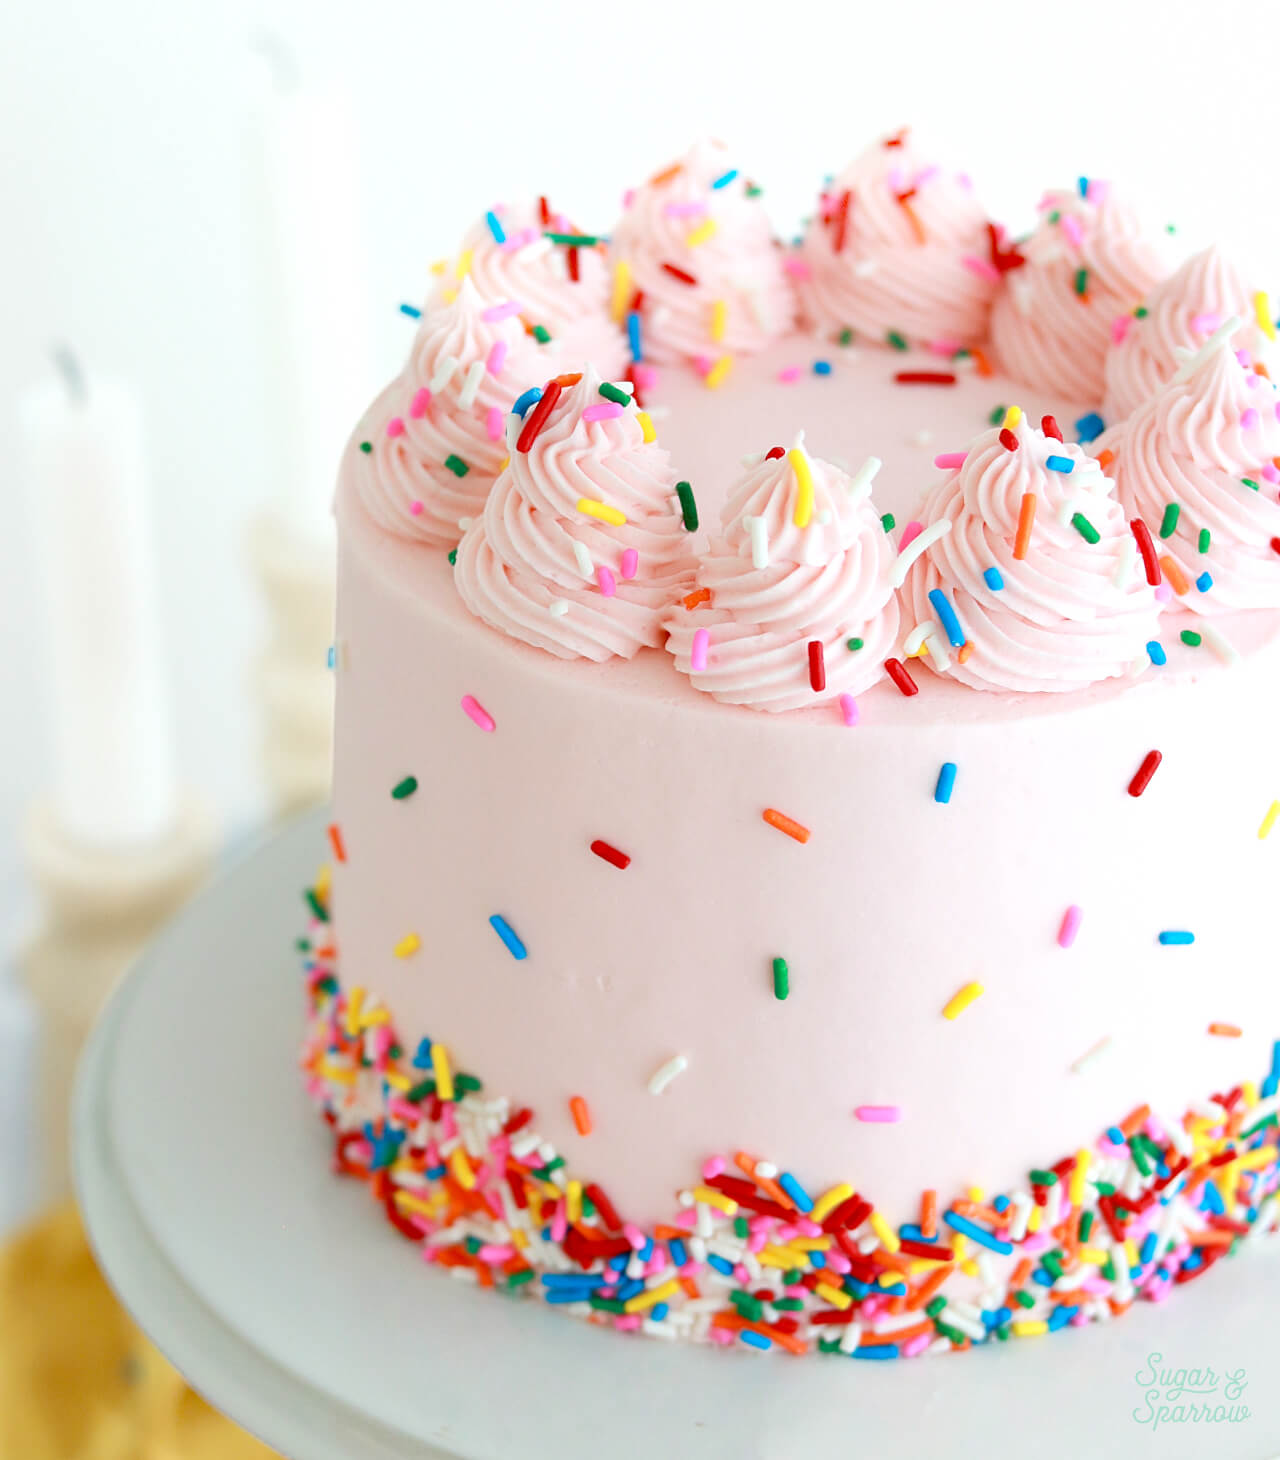
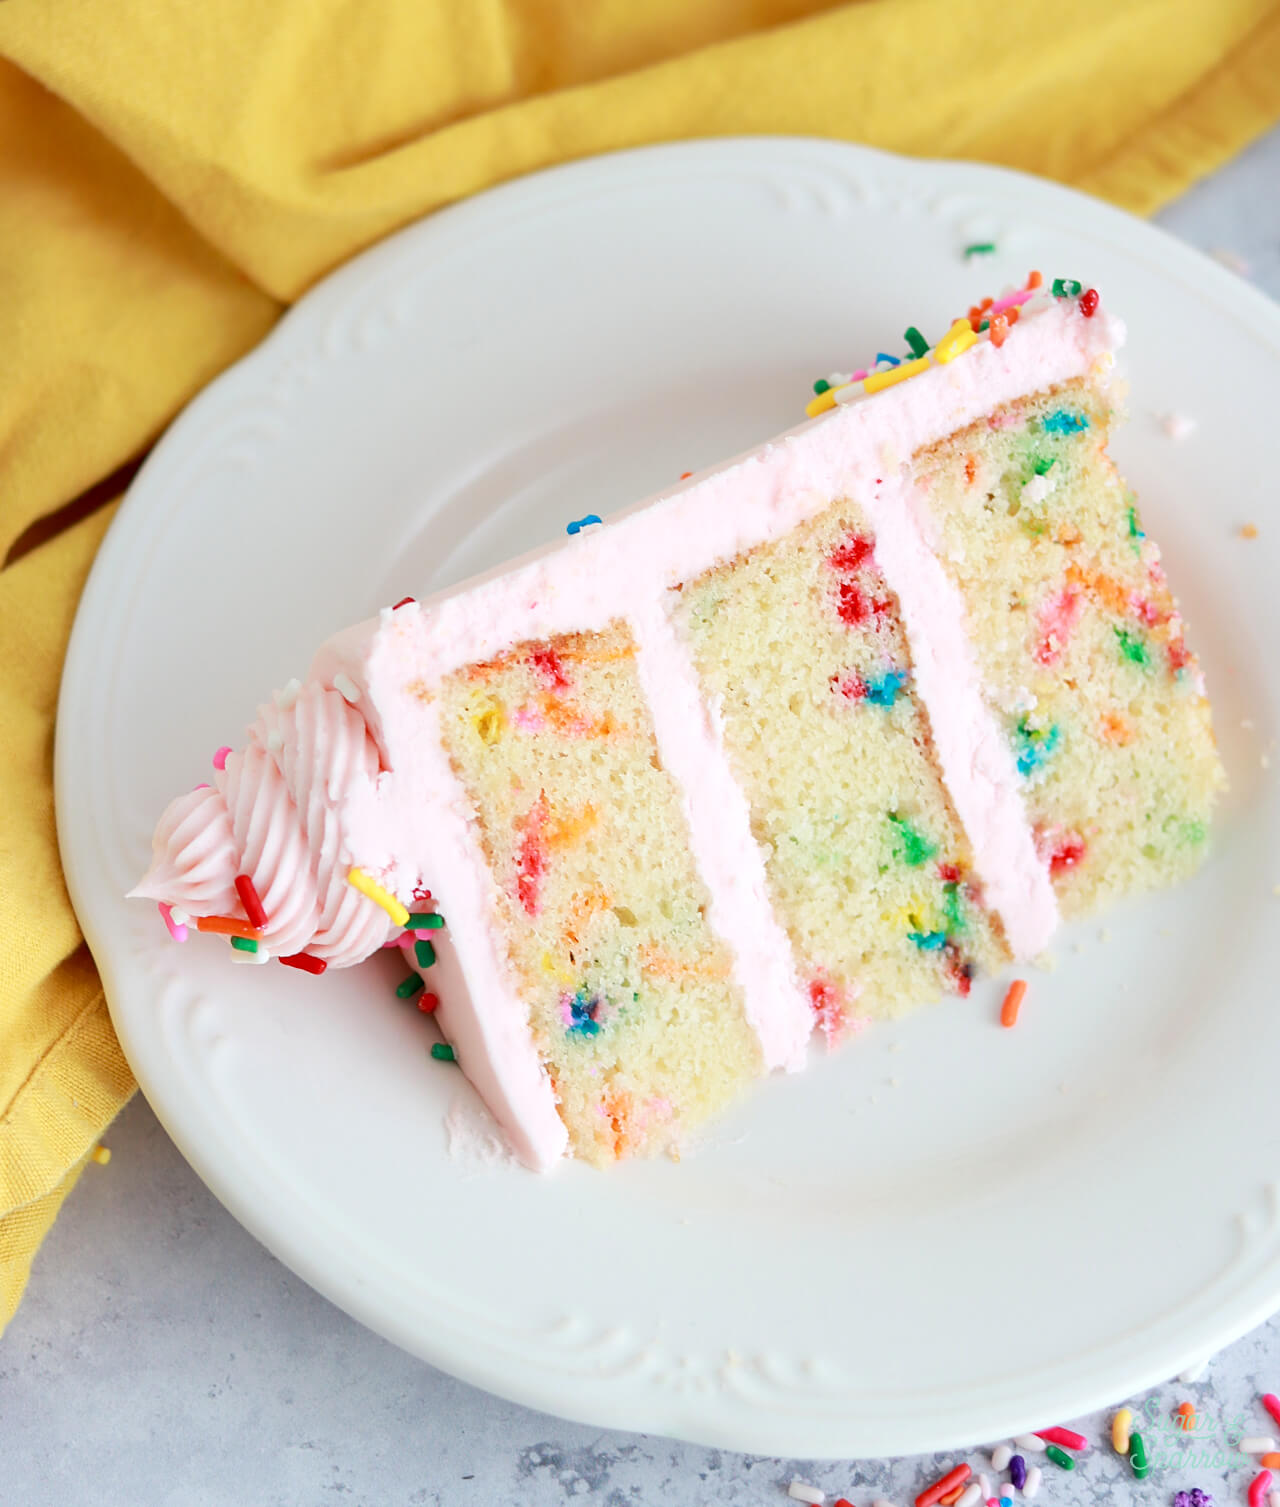
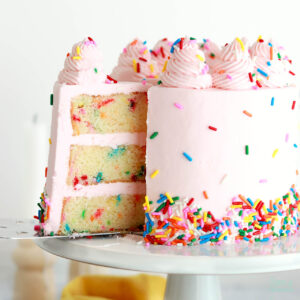
Funfetti is undoubtedly the most celebratory cake flavor of all, and this funfetti layer cake is the ultimate party cake! Originally published in 2018 (then ultra re-tested and updated in 2025), this recipe features layers of soft and moist vanilla cake with the ideal amount of rainbow sprinkles baked inside. Filled and frosted with a double batch of my favorite vanilla buttercream and decorated with plenty of colorful sprinkles, it’s perfect for celebrating anything and always a crowd favorite.

funfetti layer cake recipe by sugar and sparrow
slice of homemade funfetti cake on a plate

Why You’ll Love This Funfetti Cake 

There’s so much to love about this funfetti cake recipe, but here are the first few things that come to mind: 

  • Extra moist and fluffy. This recipe uses cake flour for a super soft crumb (it’s ultra-fine and has the lowest protein content of all the flours) and if you’ve never heard of it or can’t find it locally I have this homemade version you can use to obtain similar results. The perfect amount of moisture comes from the fat content in this recipe. Mostly the use of butter for richness, plus the addition of sour cream and whole milk. 
  • Amazing vanilla flavor. I use an entire Tablespoon of vanilla extract in this recipe for a powerful vanilla flavor, but I also love this recipe with a little almond extract. If that’s you too, you can sub one teaspoon of the vanilla for almond extract and get that little hit of almond to make the flavor more complex.  
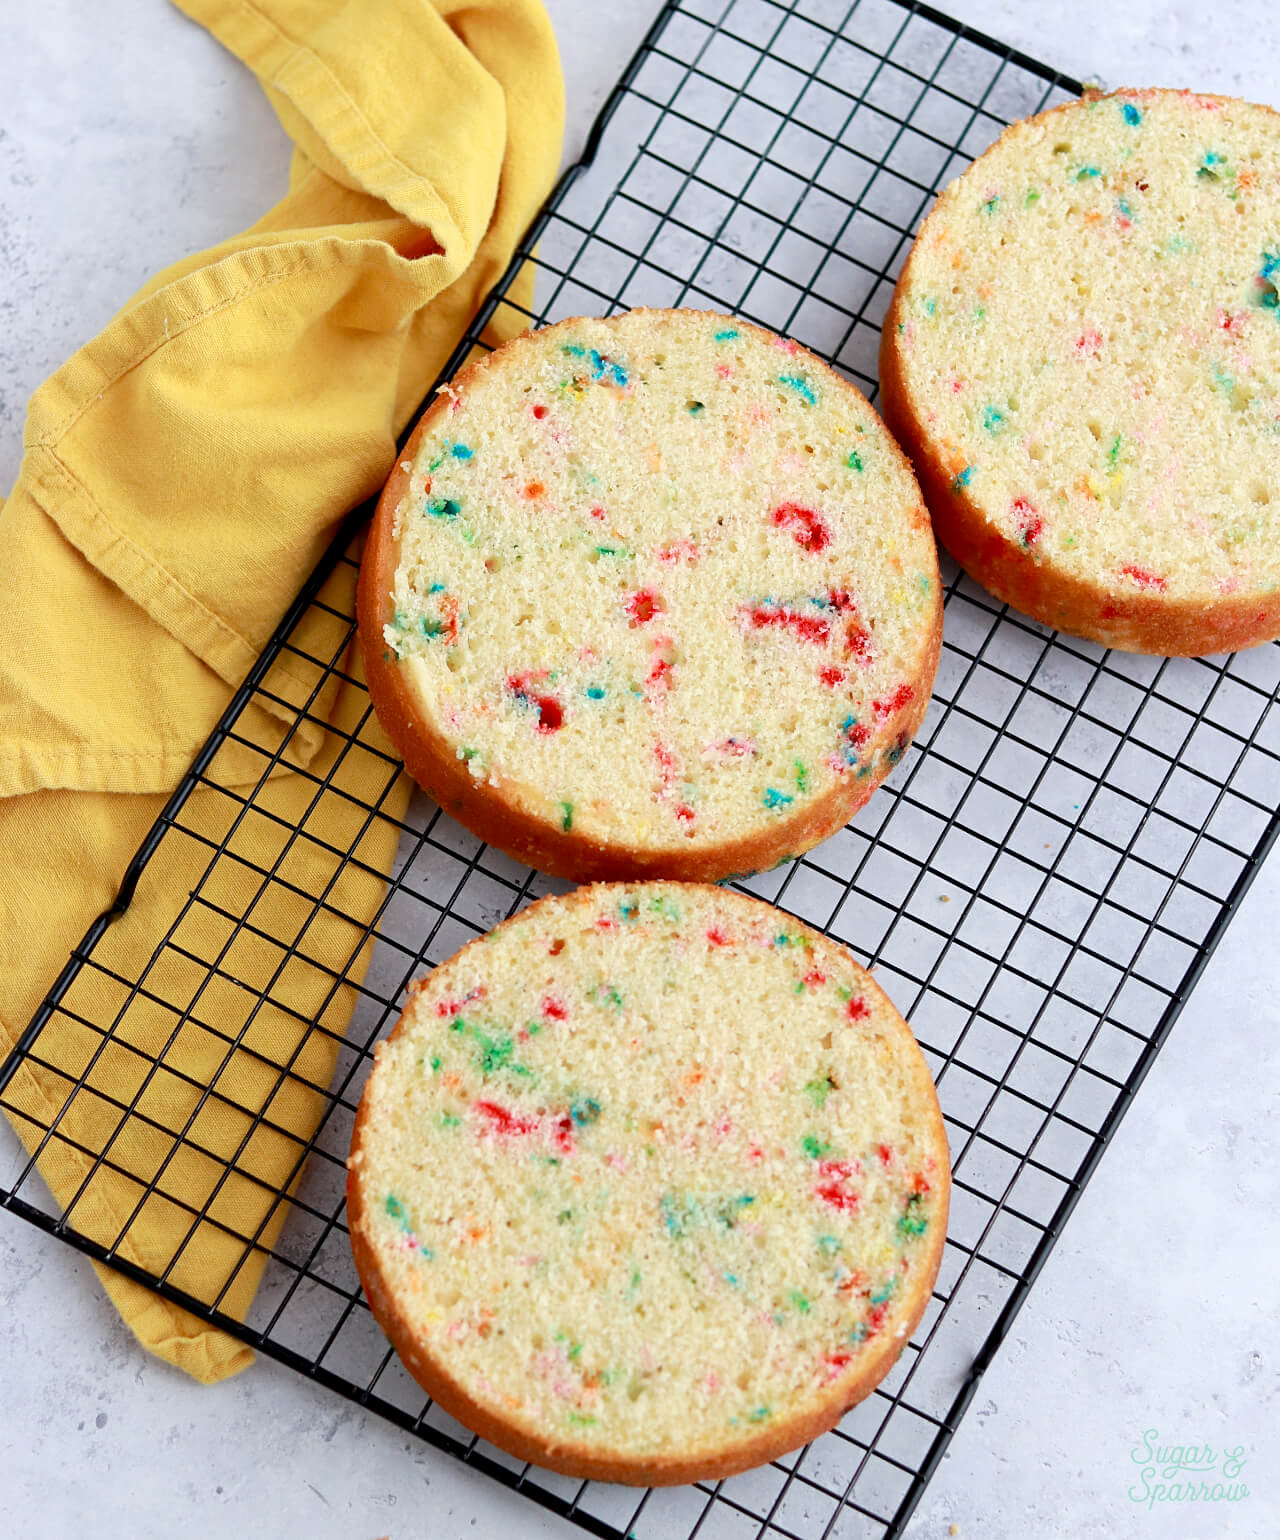
  • Perfectly Suspended Rainbow Sprinkles. No sinking sprinkles in this recipe! They stay perfectly suspended all throughout the baking process so you get the prettiest slices. 
  • Everyone’s Favorite Flavor. Okay maybe not everyone, but almost everyone loves a funfetti cake. It’s nostalgic and childlike, but so fun to eat at any age. I truly think it’s the most celebratory cake flavor of all!
funfetti cake with pink vanilla buttercream and rainbow sprinkles

The Best Kind of Sprinkles for Funfetti Cake

To get the prettiest funfetti cake slices, you have to use the right kind of sprinkles. Otherwise, your sprinkles might bleed color into the batter or disintegrate in the baking process. In my experience, the best kind of sprinkles have been the elongated rainbow sprinkles (aka jimmies) that have carnauba wax and confectioner’s glaze in the ingredients list. Those two coatings help prevent the sprinkles from streaking your batter with color. 

funfetti cake batter in a bowl
the best sprinkles for funfetti cake

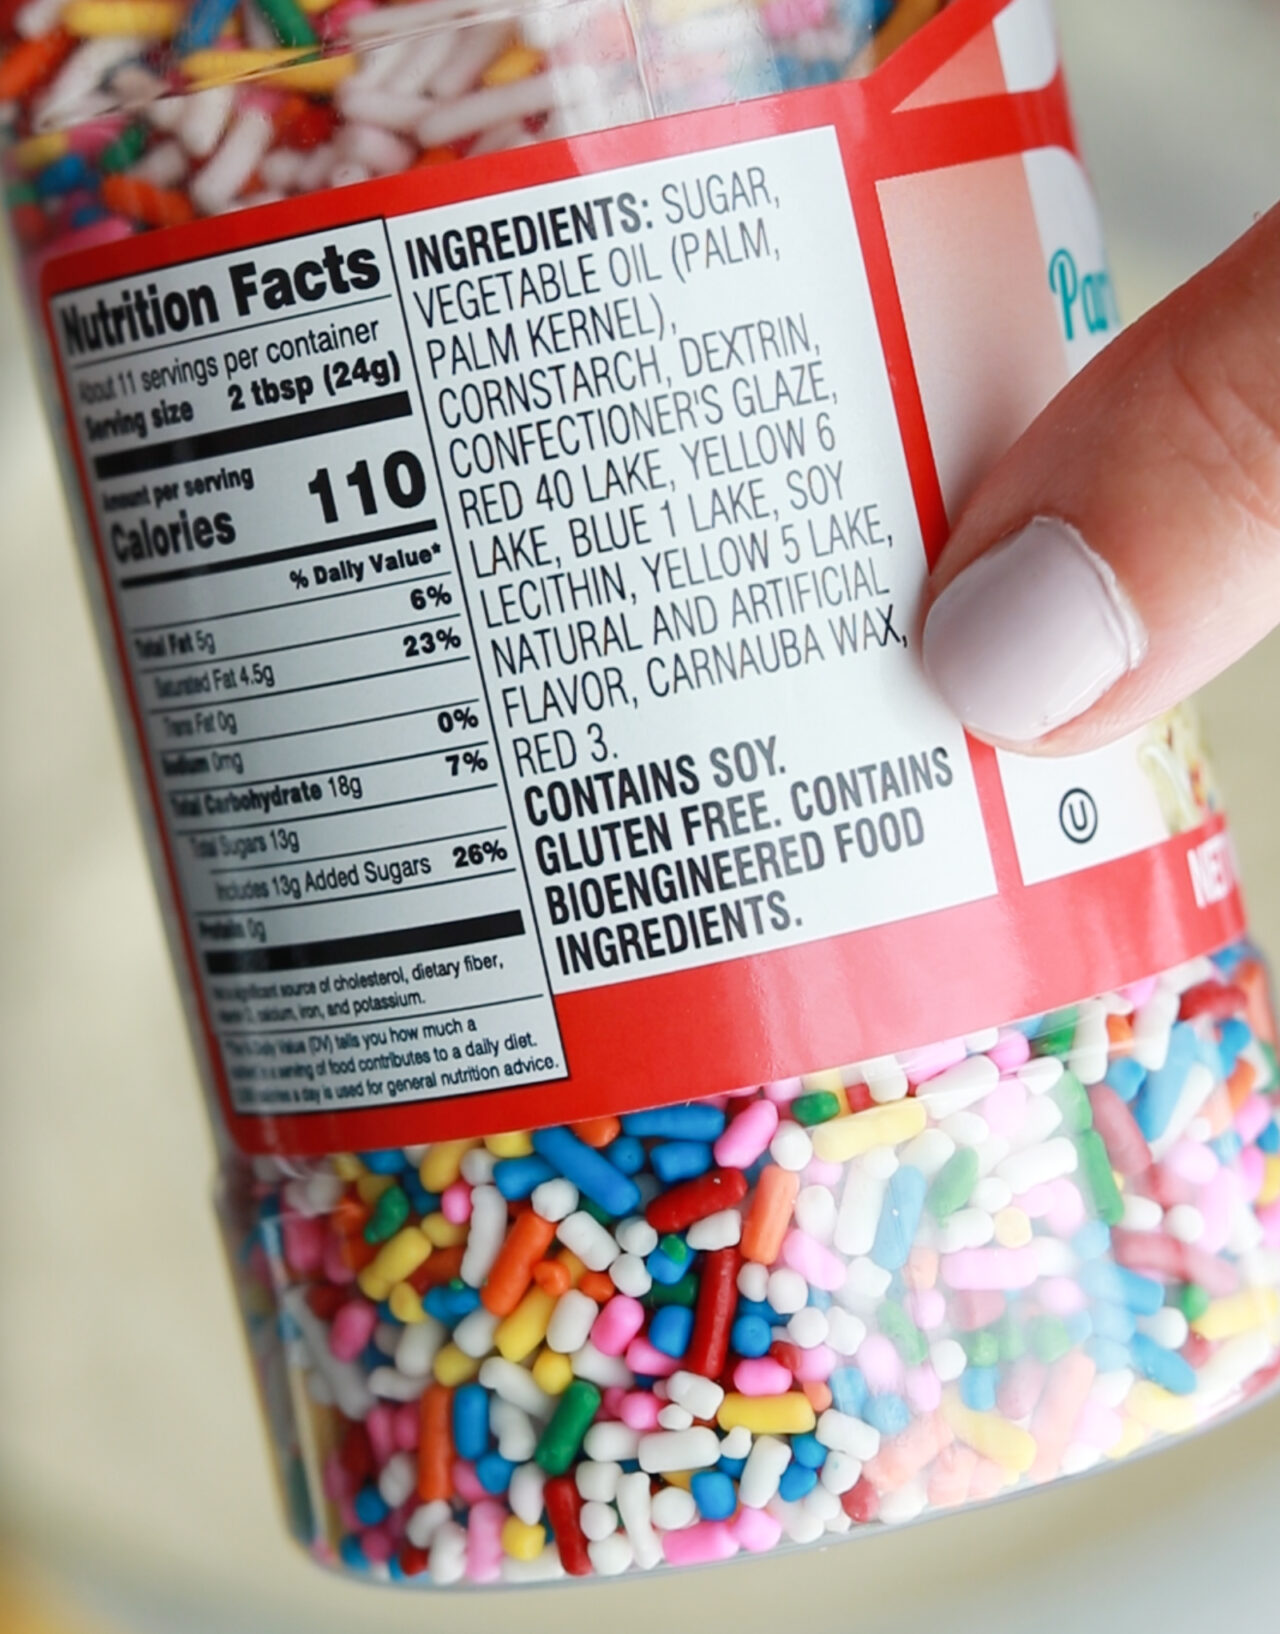
Some of my favorite brands to use are: 

  • Unpretentious Baker Rainbow Sprinkles
  • SprinklePop Ultimate Unicorn Rainbow Jimmies
  • Chef’s Select Rainbow Sprinkles
  • Betty Crocker “Parlor Perfect” rainbow sprinkles (I find these at my local grocery store)

How to Make a Funfetti Cake

Here’s how to make and decorate this funfetti layer cake from start to finish:

Step 1. Preheat the oven to 350ºF, then grease and line three 6-inch round cake pans or two 8-inch round cake pans. 

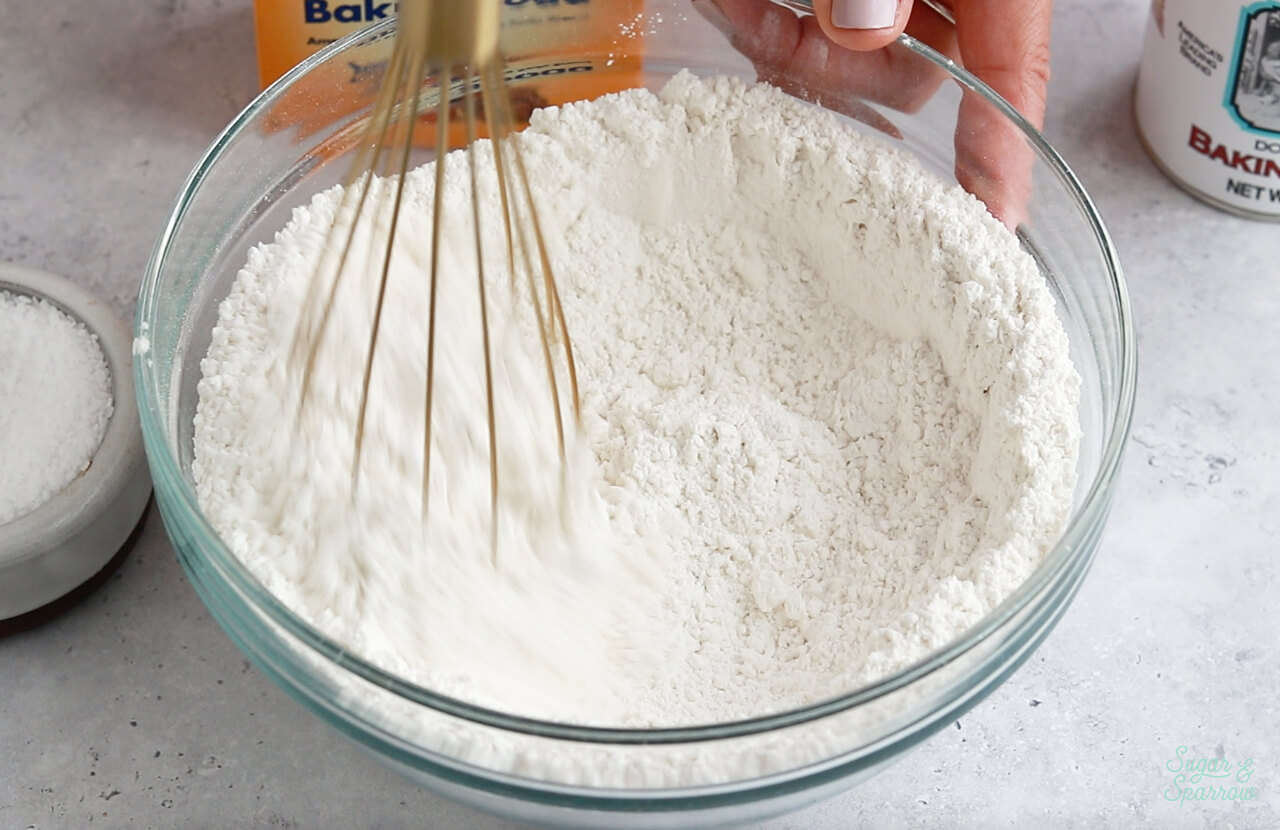
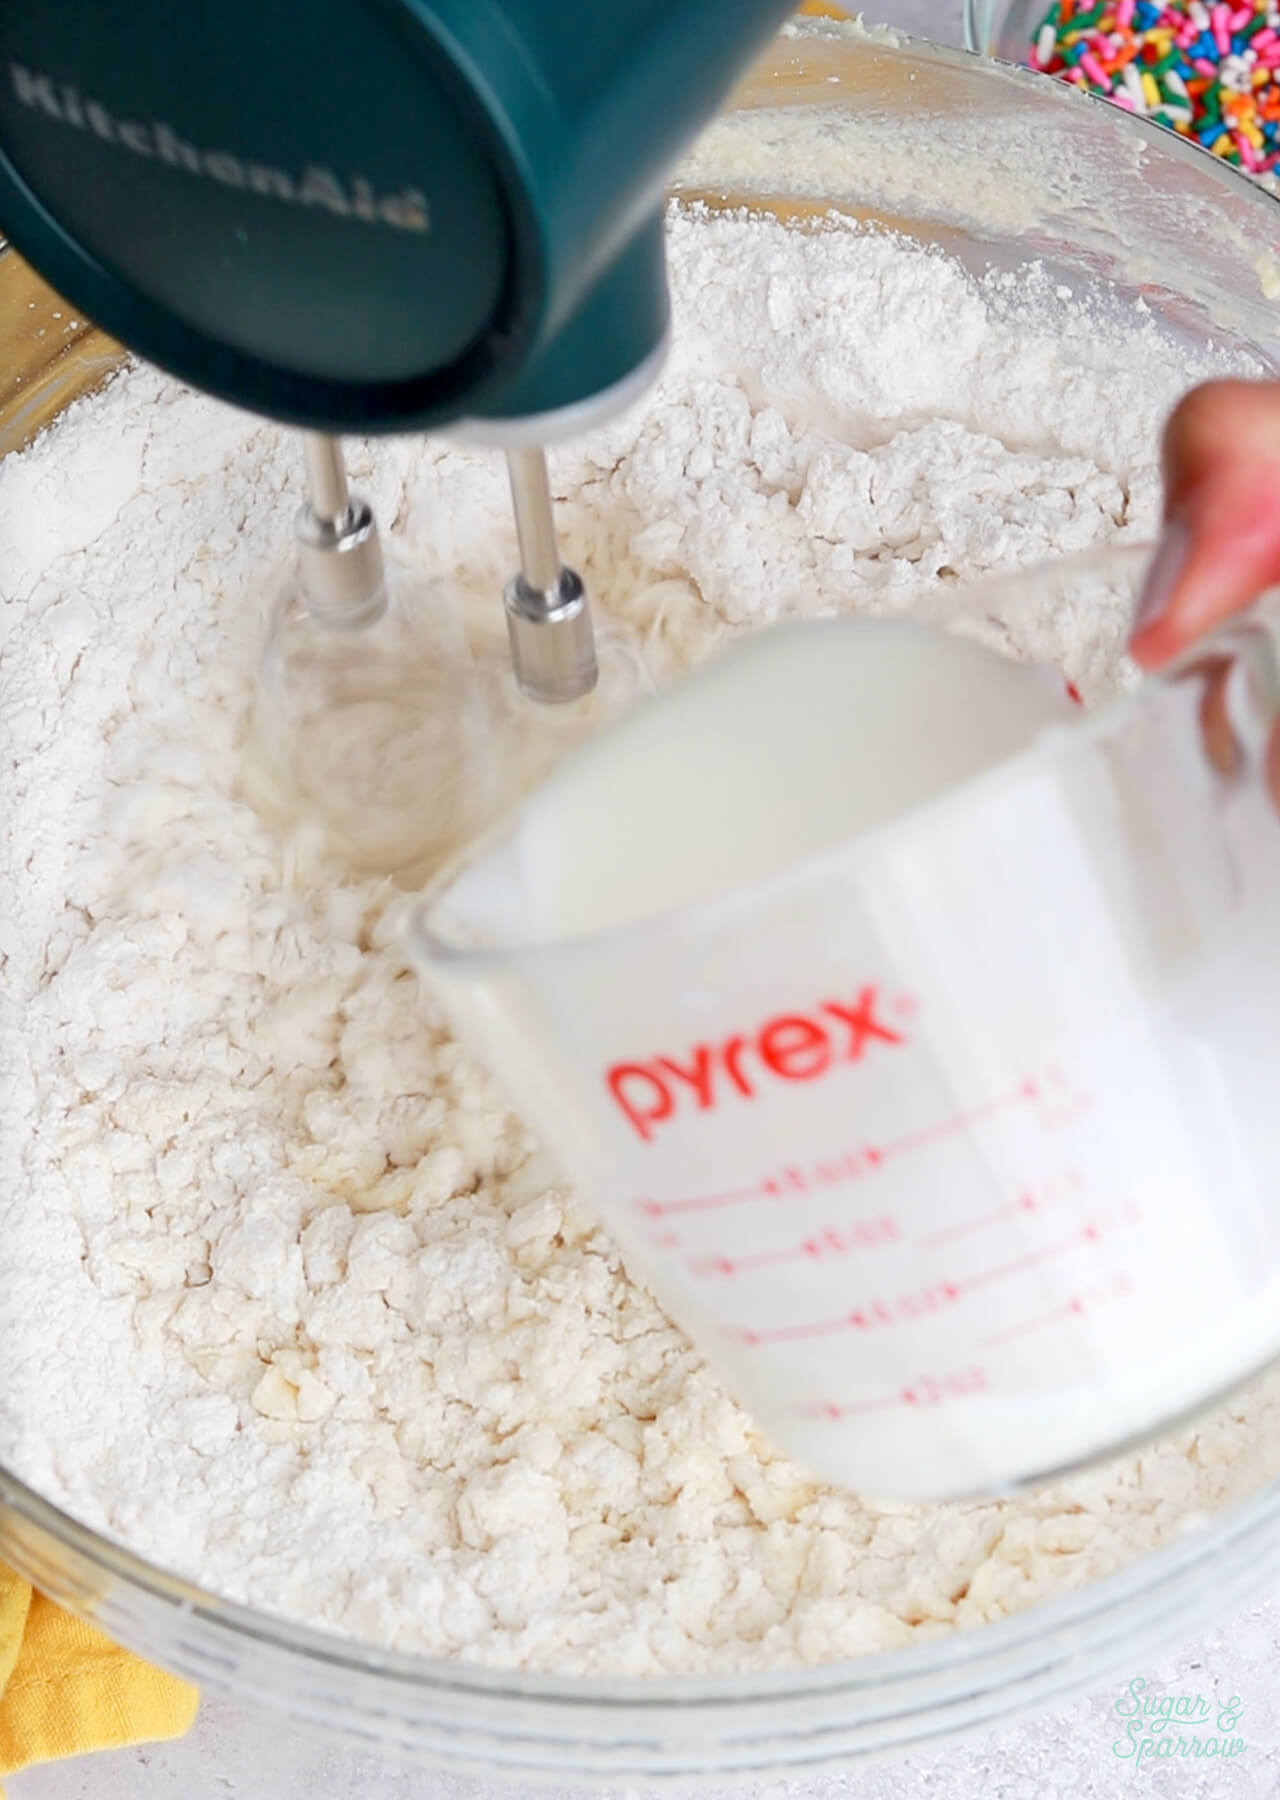
Step 2. Whisk together the flour, baking powder, baking soda, and salt. Set aside.

whisk the dry ingredients together

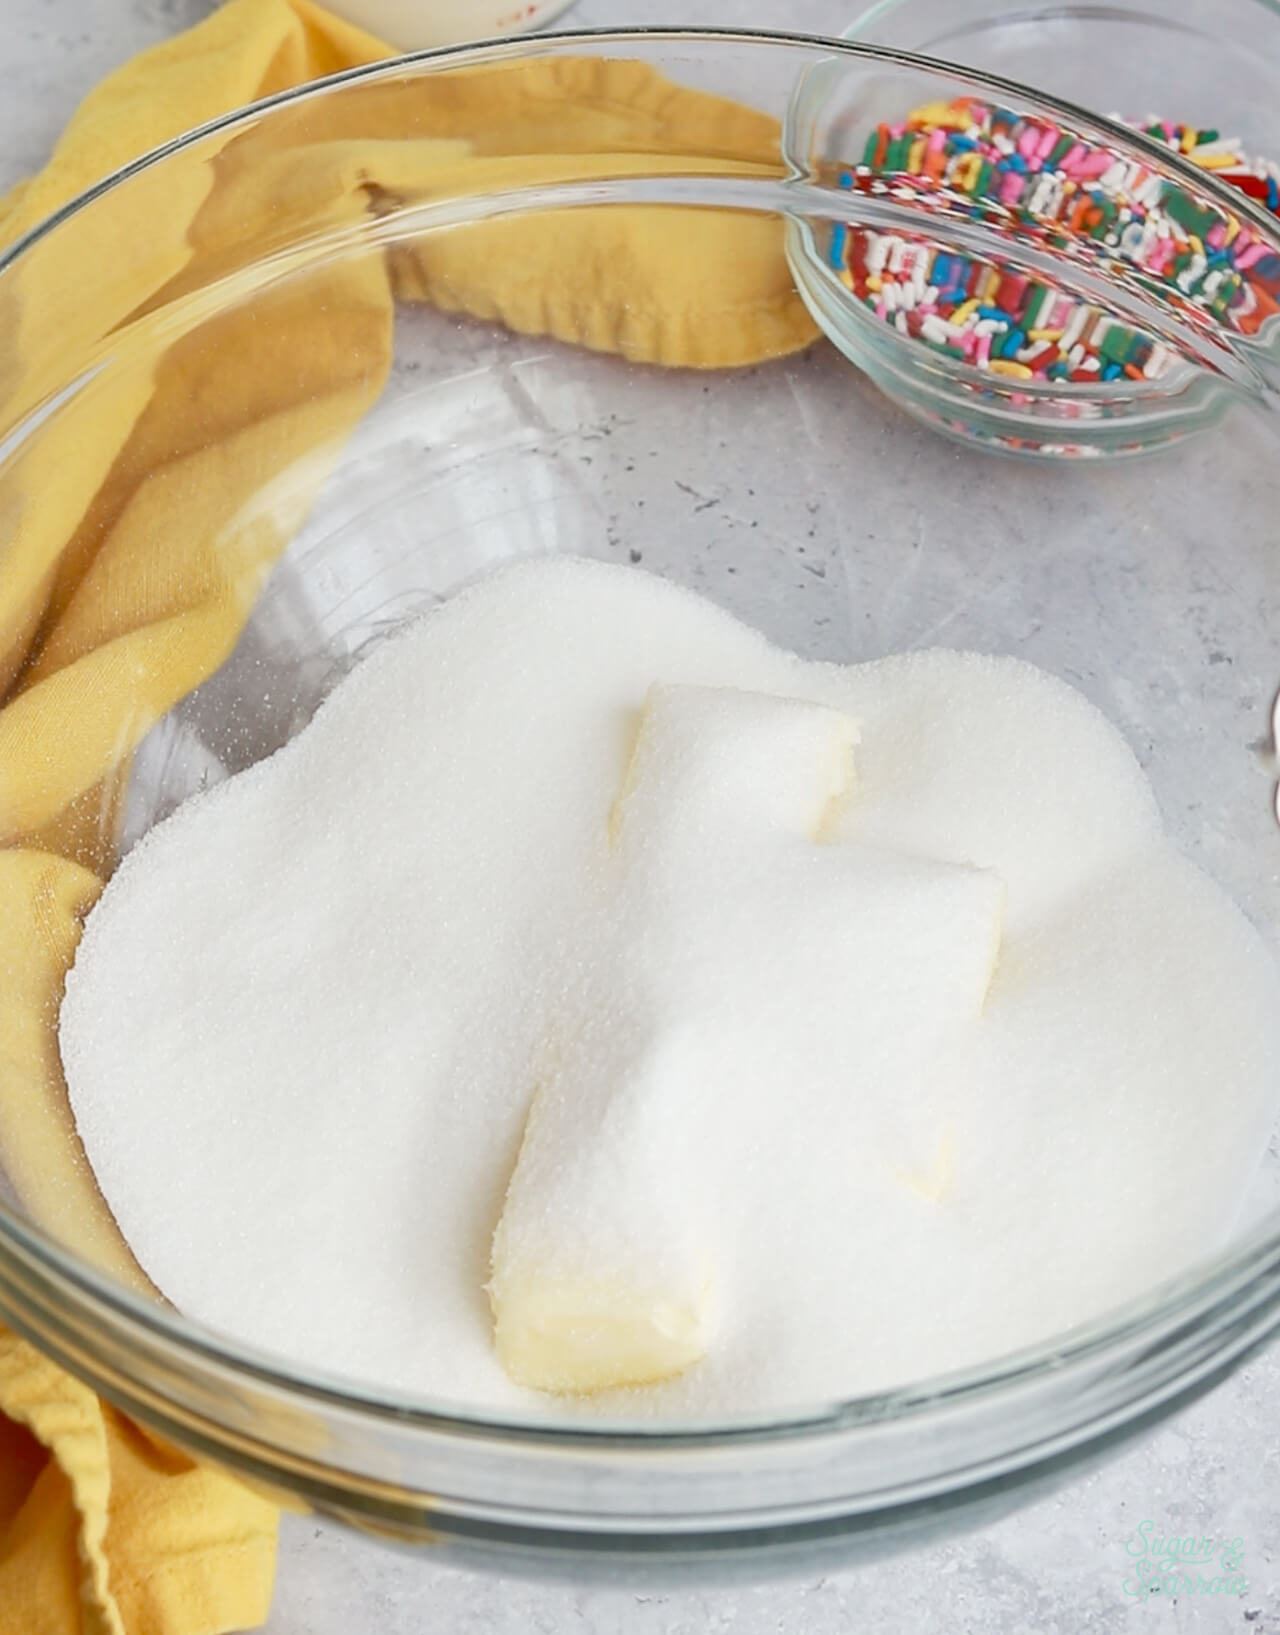
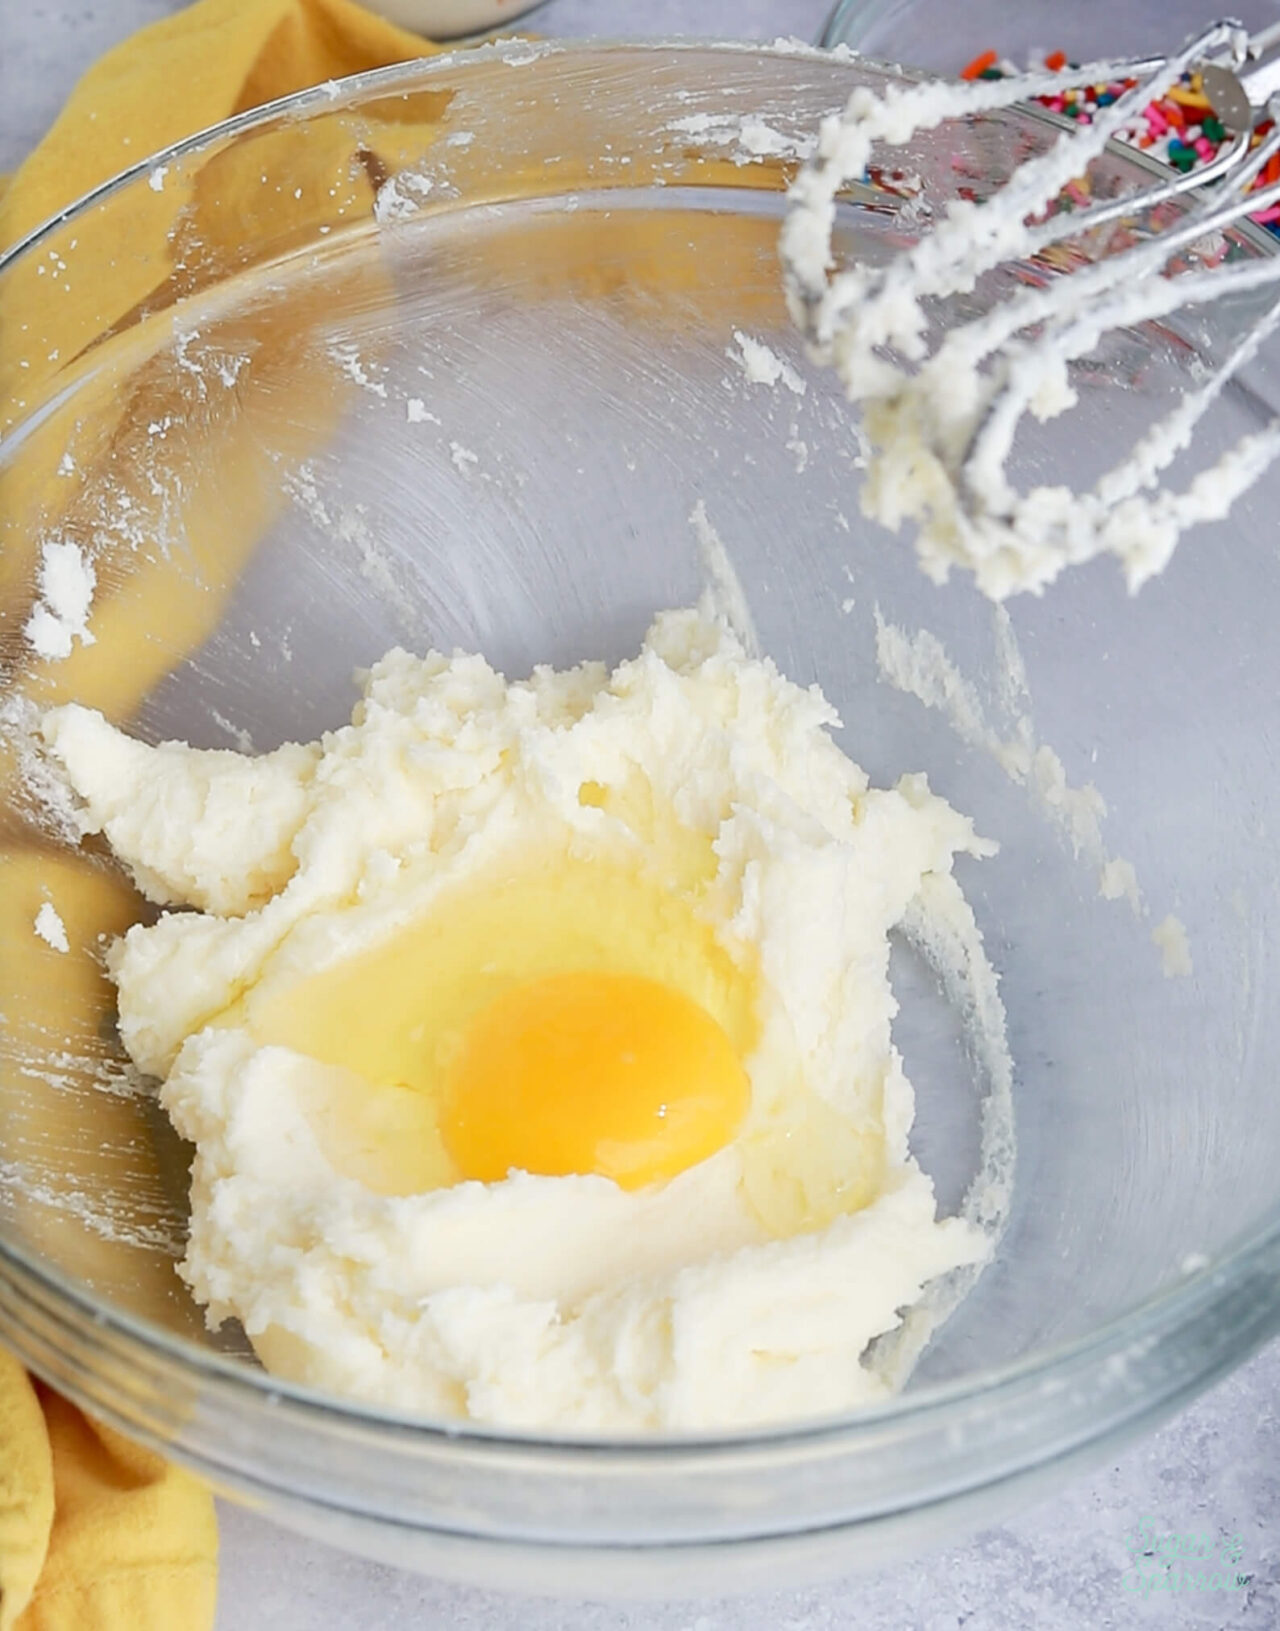
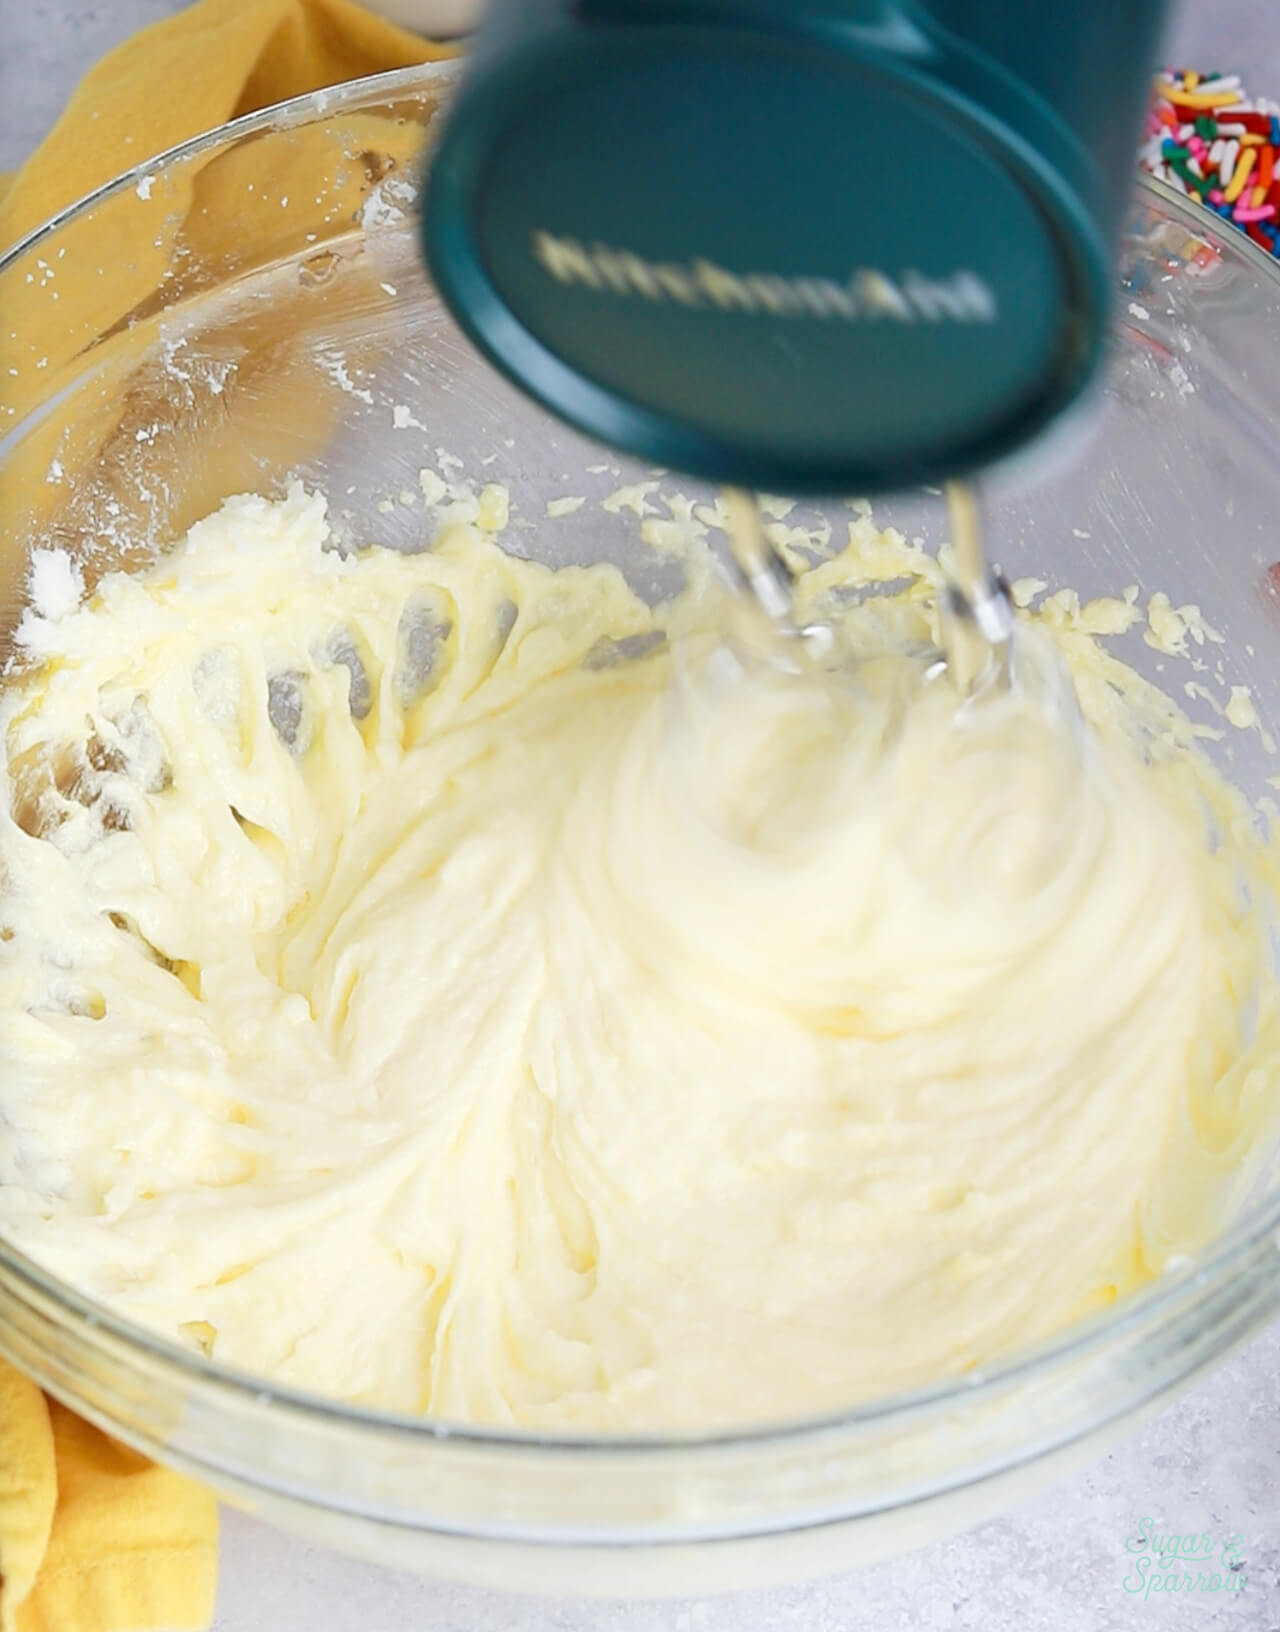
Step 3. Beat the butter and sugar until light and fluffy.

butter and sugar in a mixing bowl

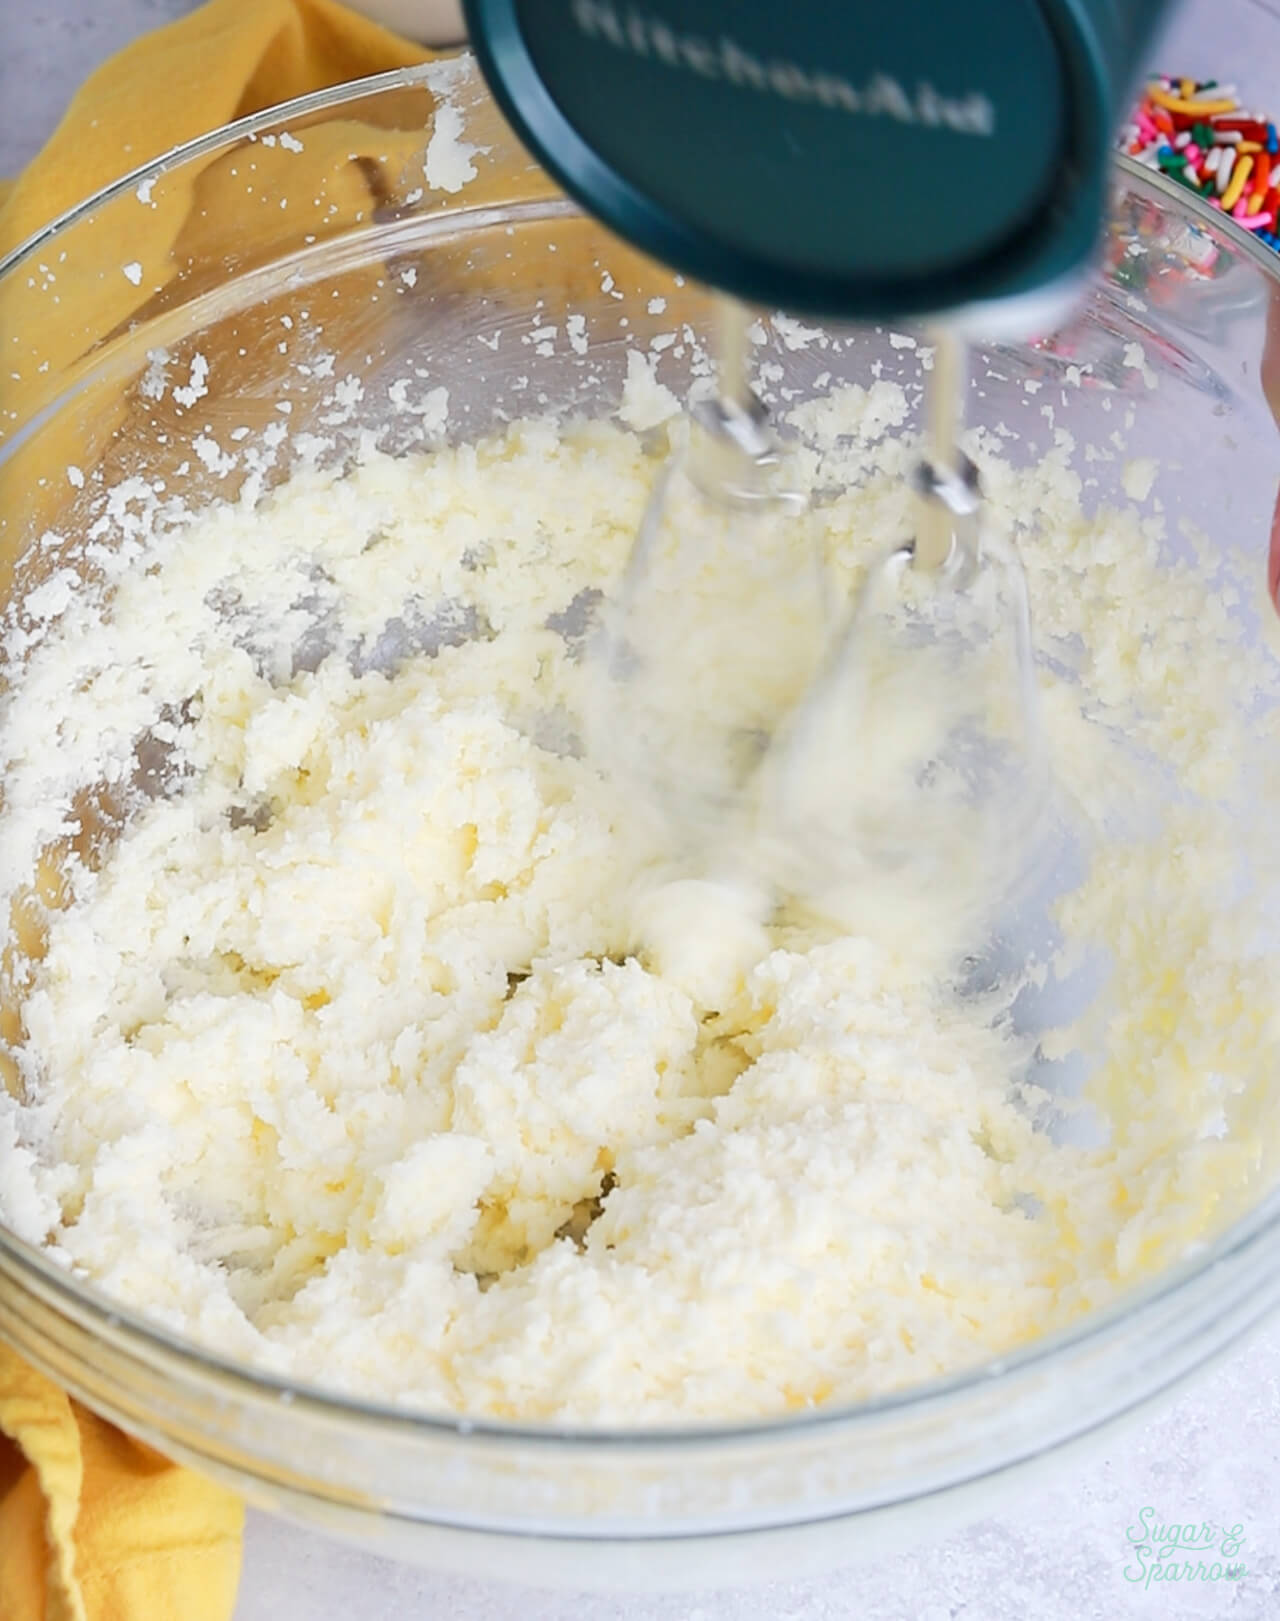
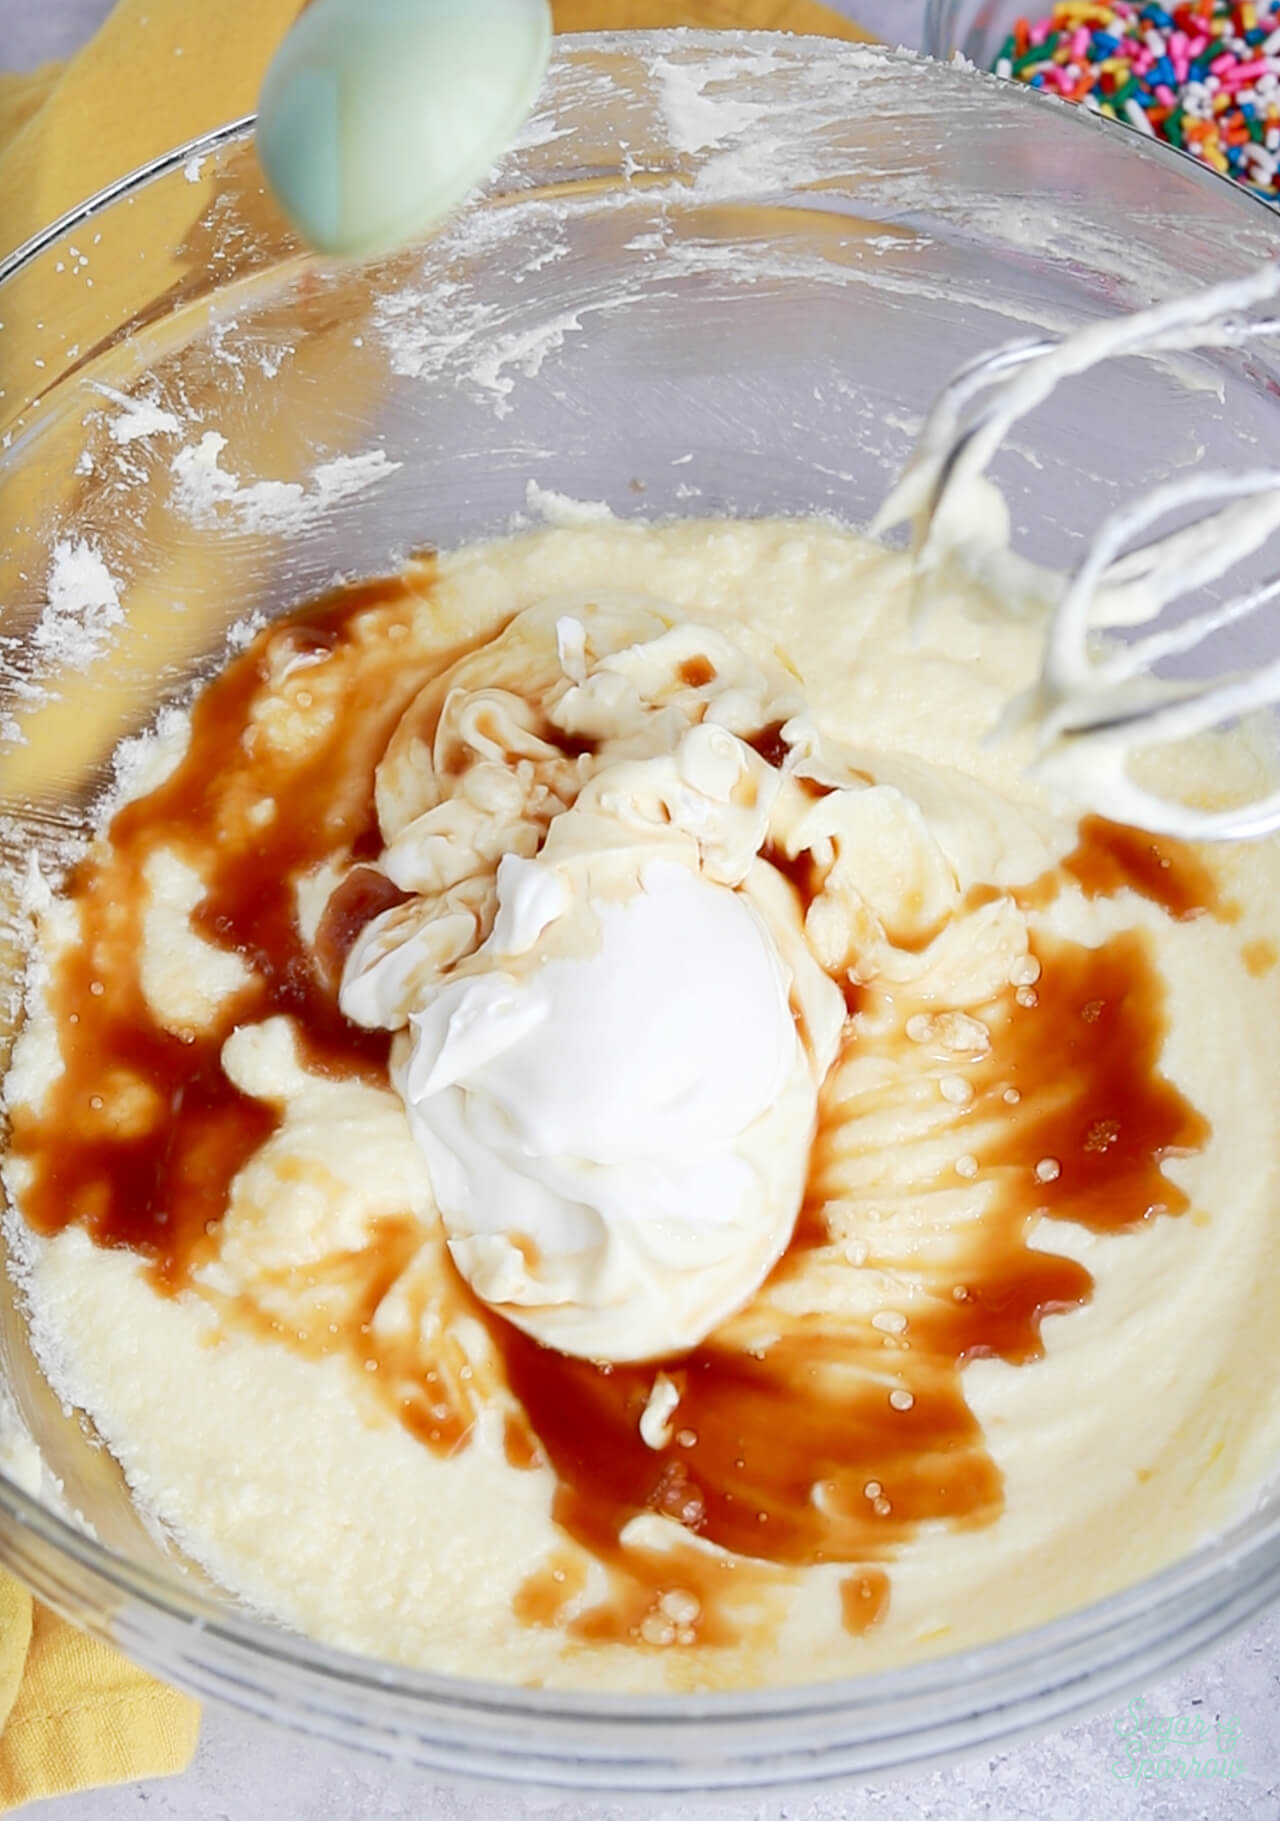
Step 4. Mix in the eggs one at a time, then add the sour cream and vanilla before whipping everything on high speed for one minute.

add the eggs to cake batter one at a time
mixing eggs into cake batter one at a time
adding sour cream to cake batter

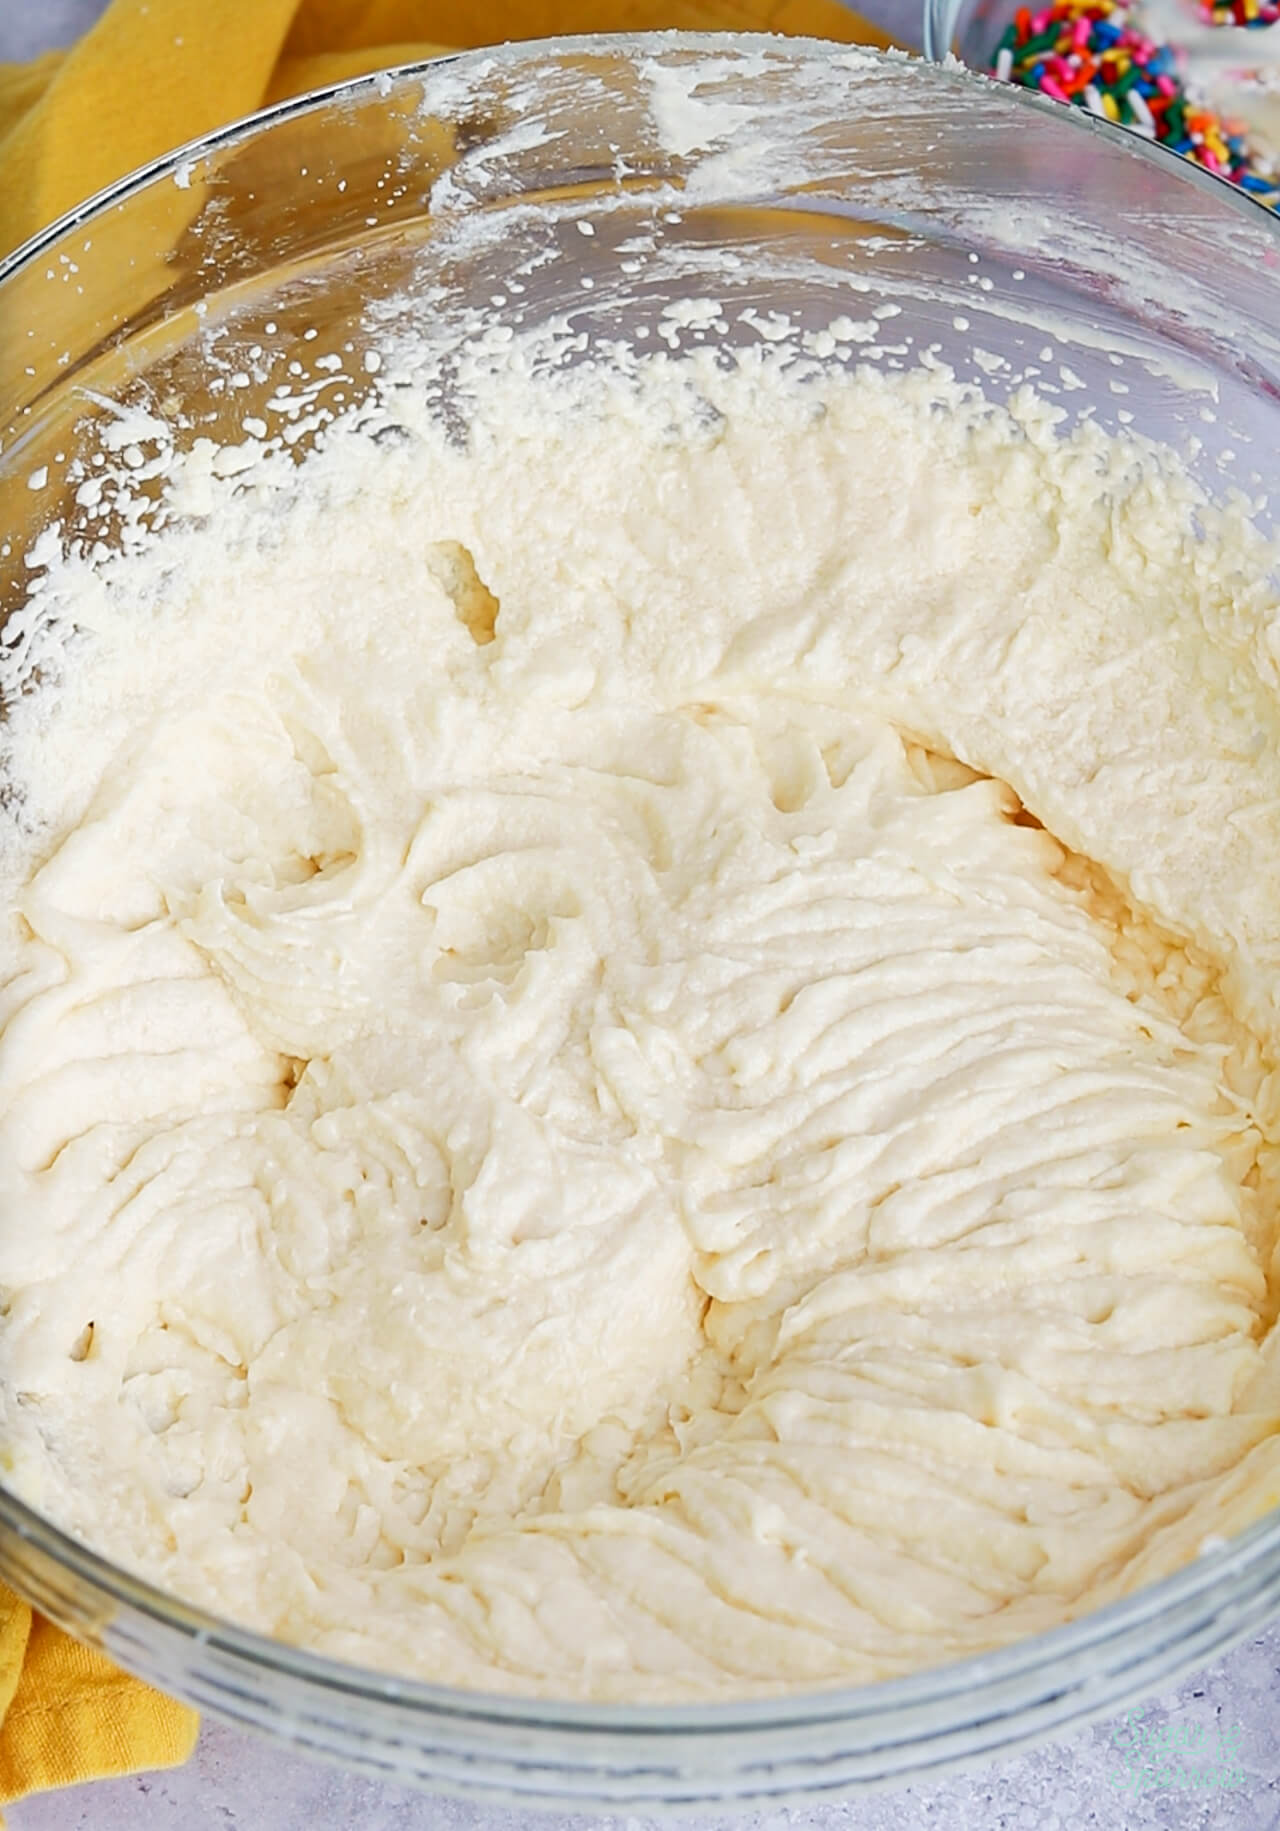
Step 5. Add the dry ingredients all at once, mix on low speed until they begin to incorporate, then add in the whole milk in a steady stream while continuing to mix on low speed. Mix until the ingredients are well incorporated, about 15-30 seconds. 

add the dry ingredients all at once

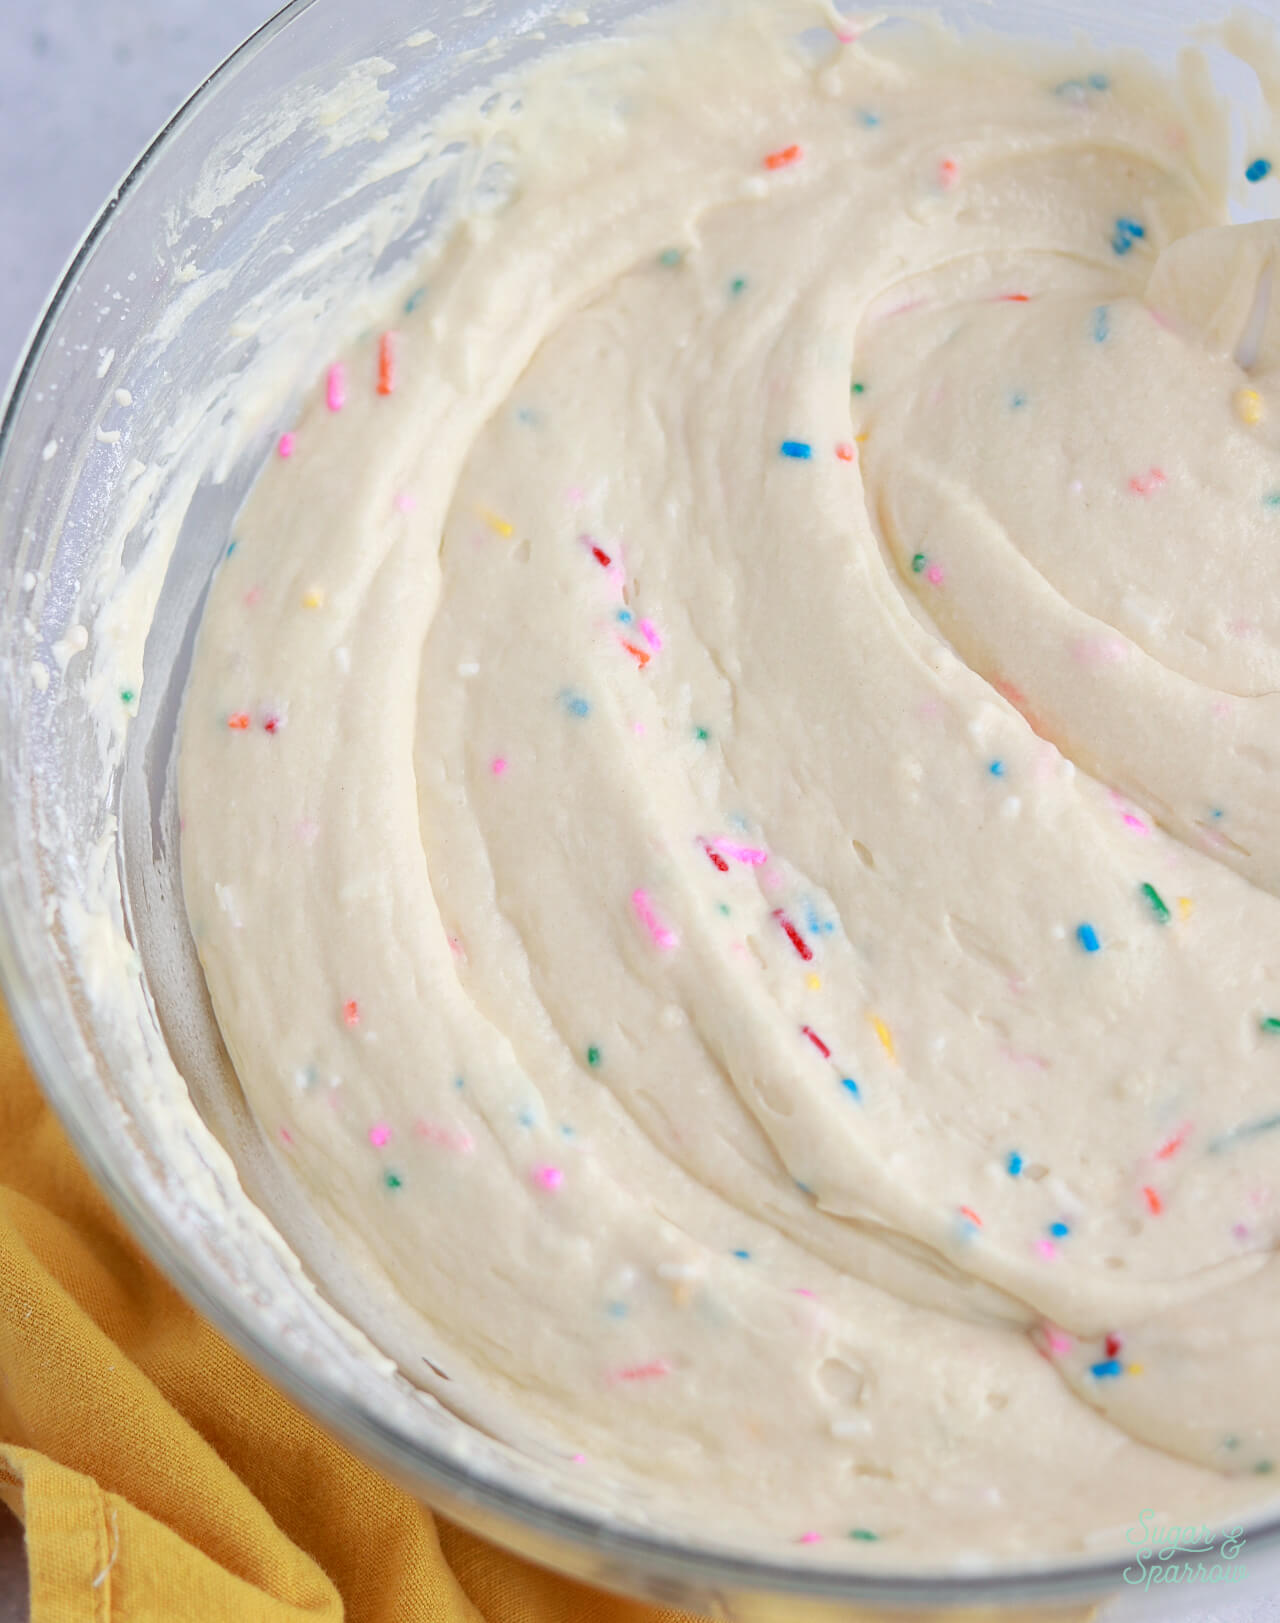
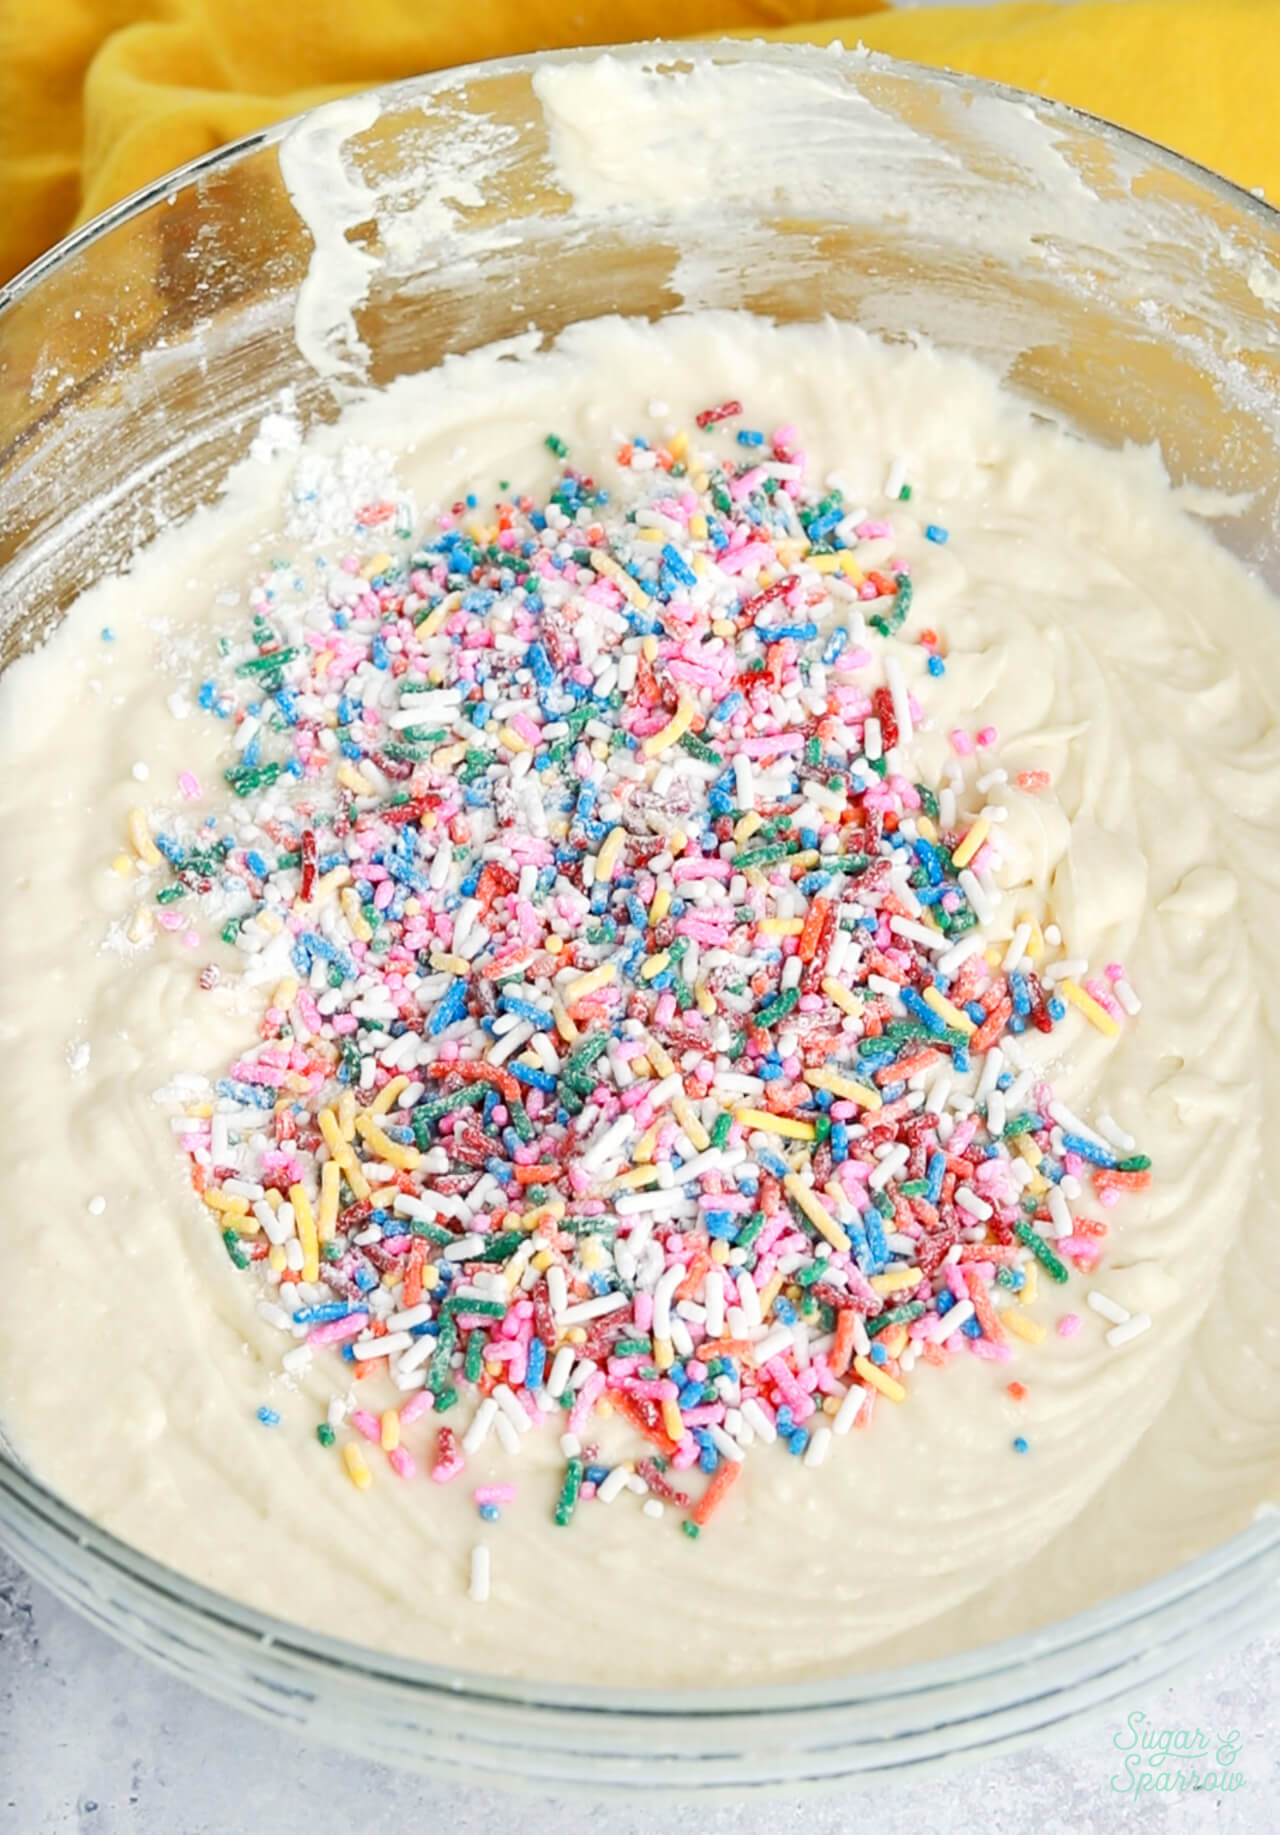
Step 6. Coat the rainbow sprinkles with a little flour (cake flour or all purpose flour), then gently fold them into your cake batter.

coating rainbow sprinkles in flour before adding them to cake batter

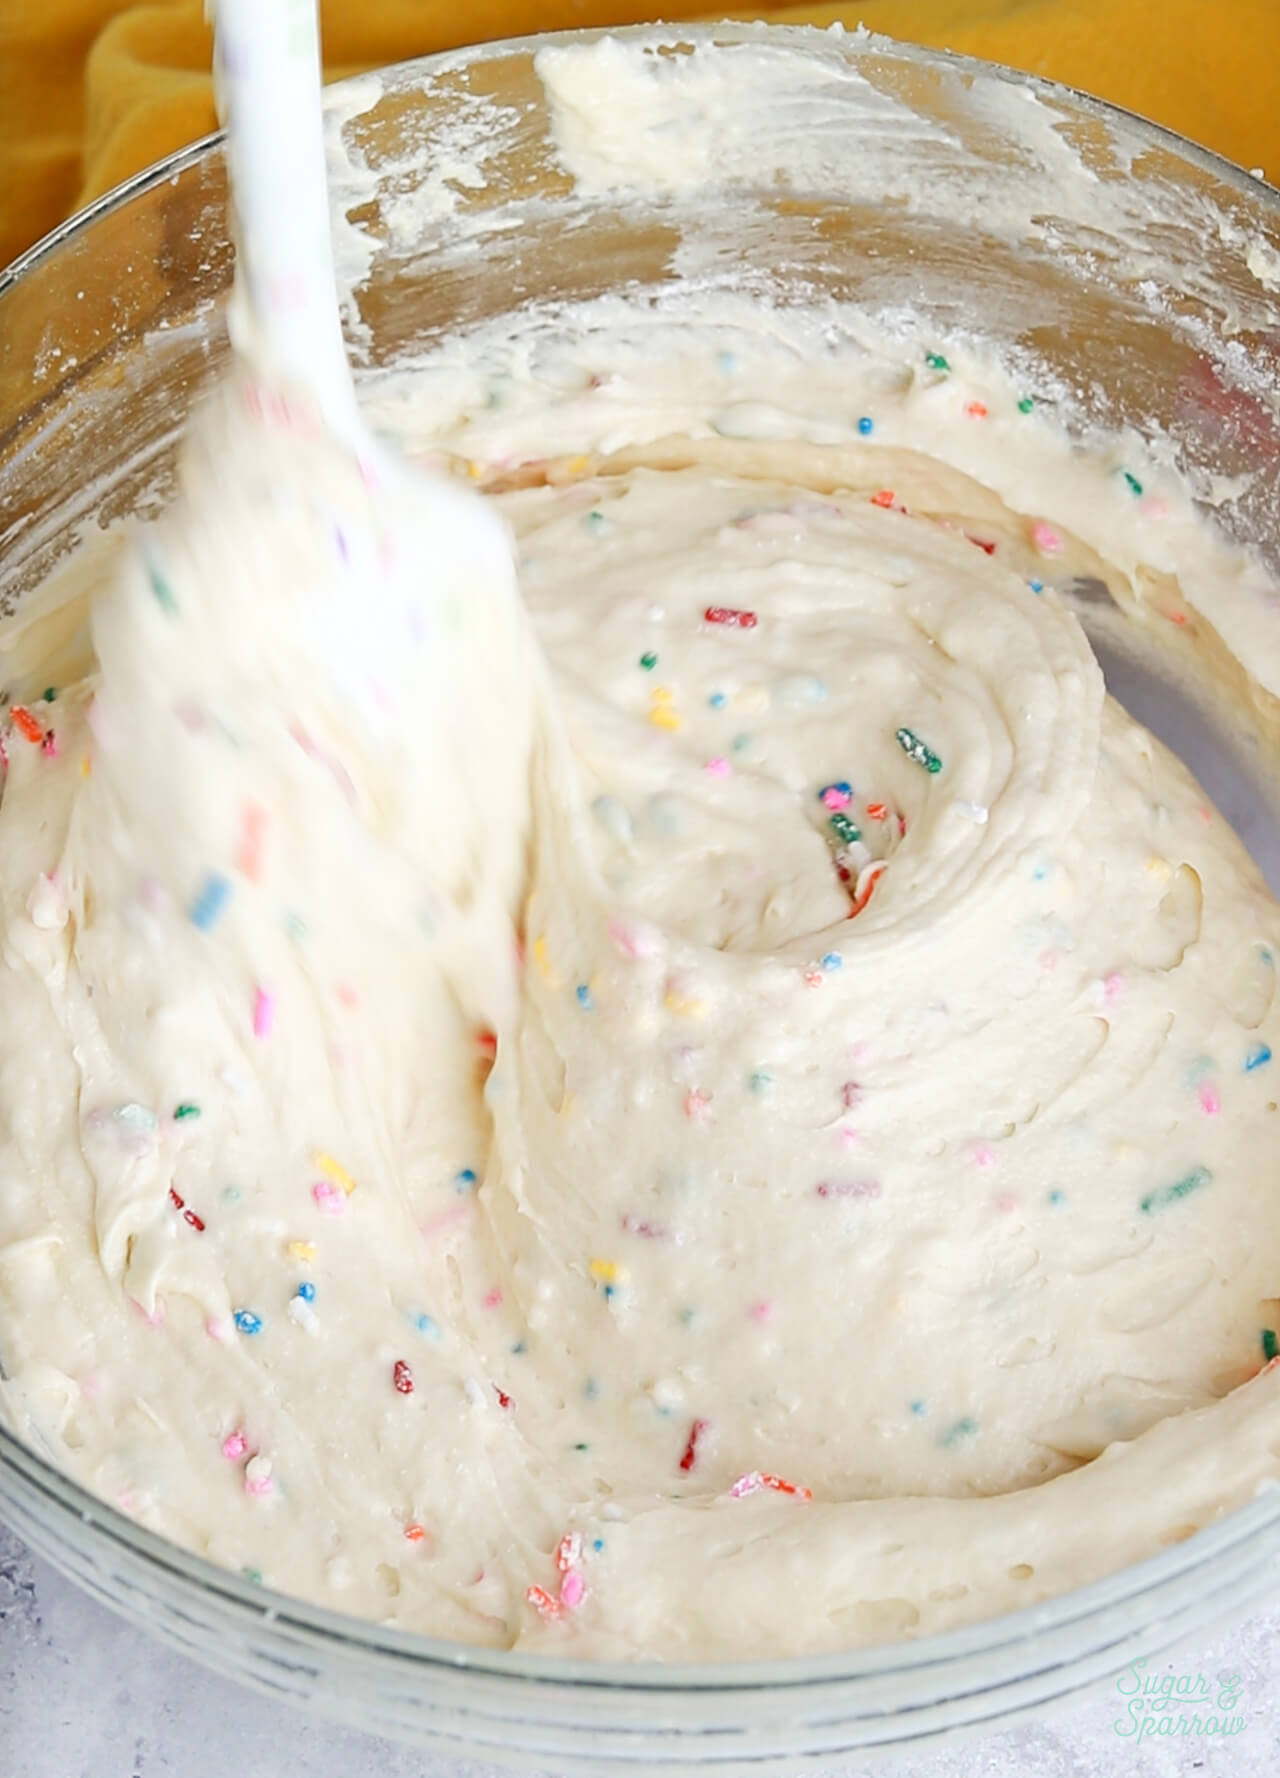
Step 7. Pour the batter into your prepared cake pans and bake for 30-35 minutes.

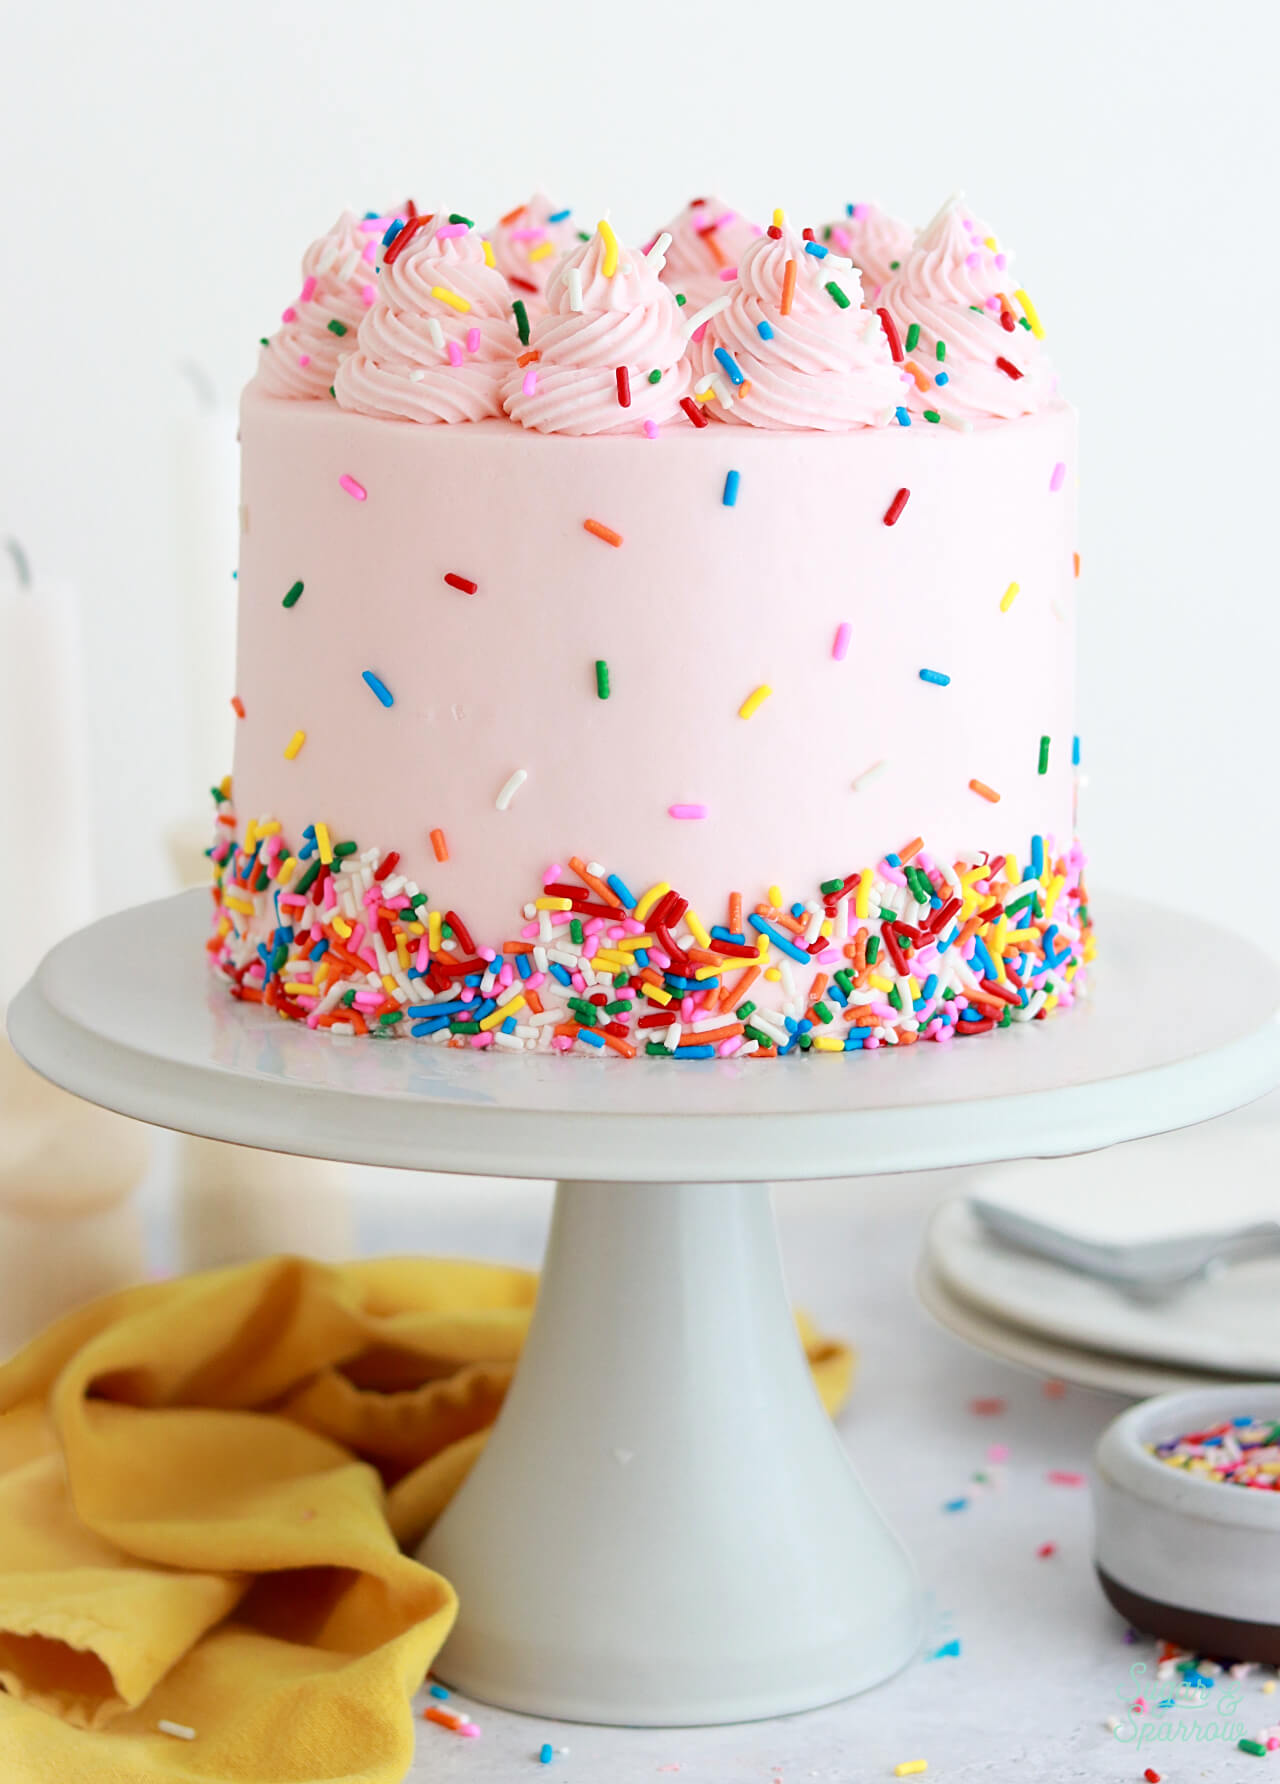
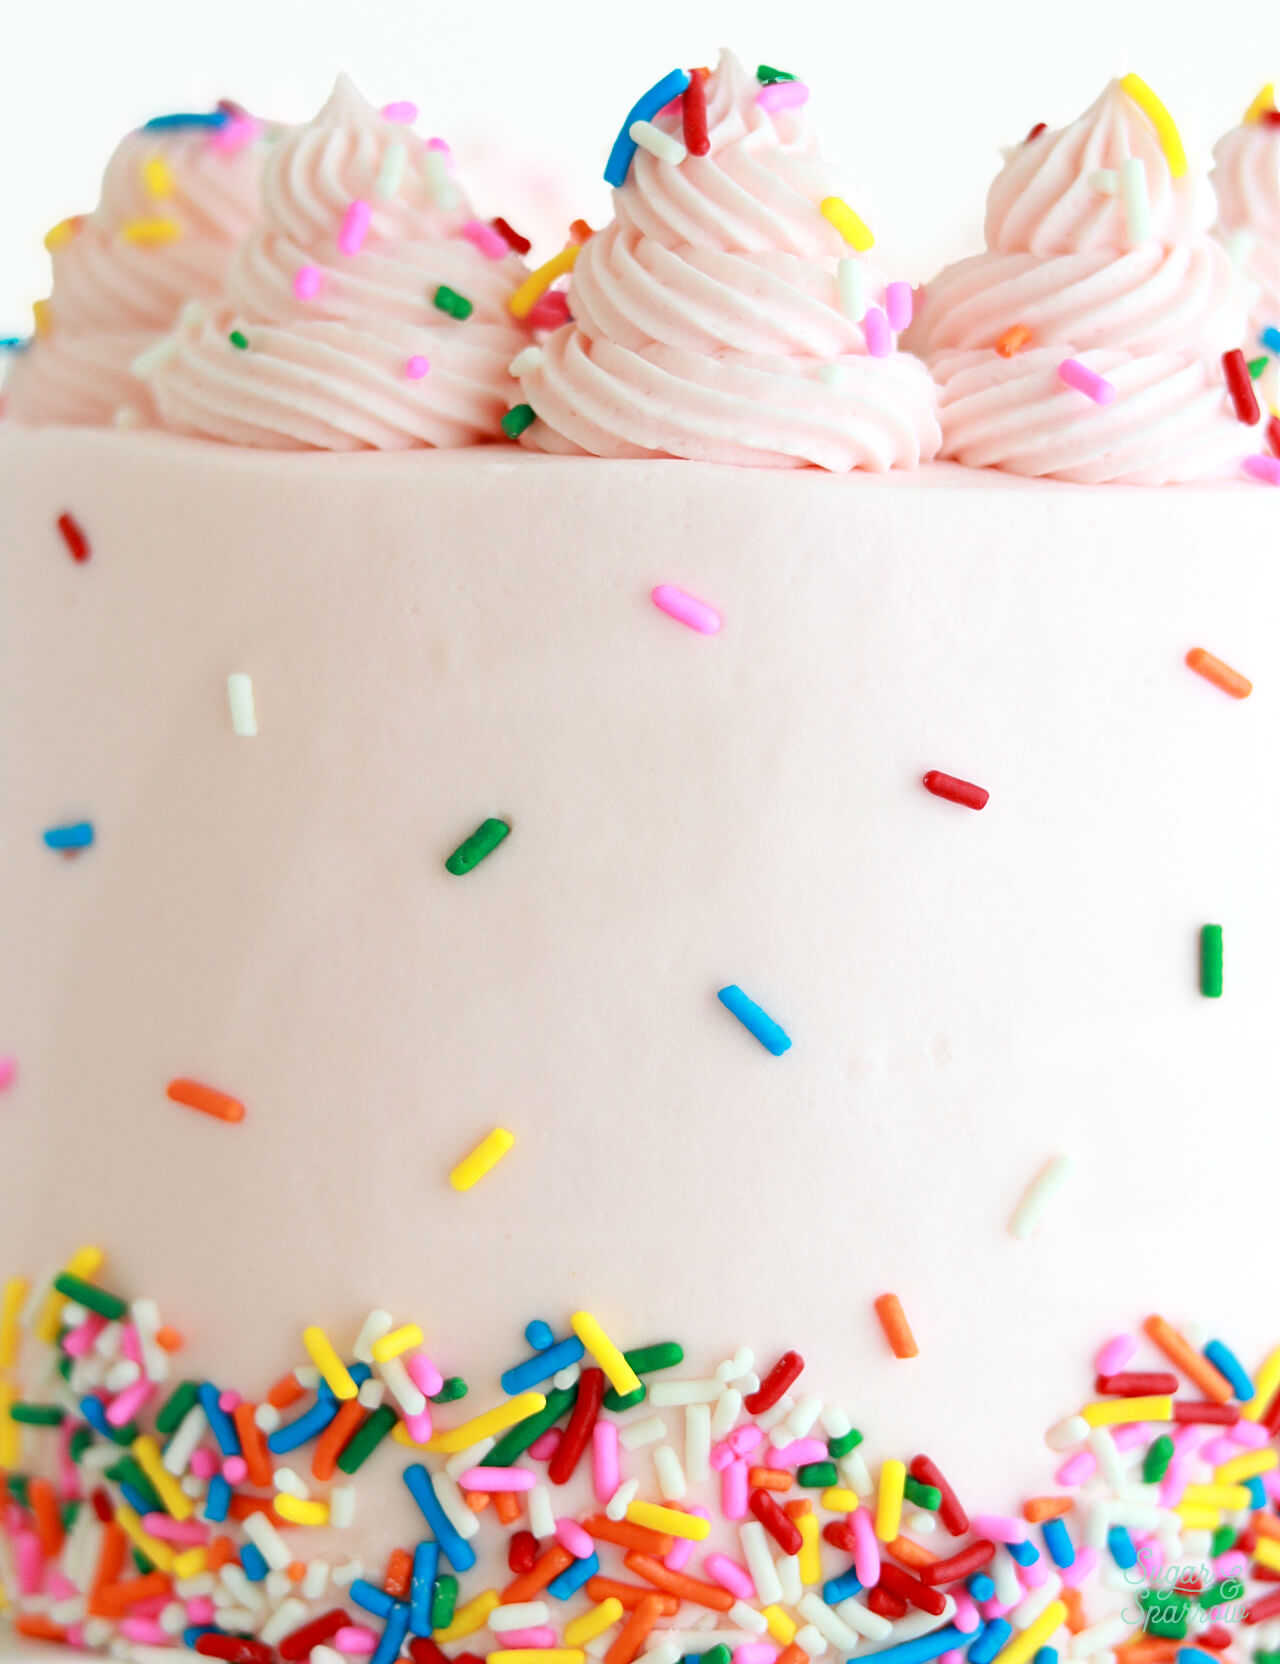
Step 8. Let the cake cool to room temperature, then make the buttercream frosting. I tinted my favorite vanilla buttercream recipe with a few drops of pink food color gel.

funfetti cake layers on a cooling rack

Step 9. Decorate the cake. I kept the design here simple by filling and frosting the cake with the vanilla buttercream, creating a smooth buttercream finish, and hand placing some rainbow sprinkles all around the sides of the cake. To finish the look, I used Wilton Tip 4B to pipe swirls of vanilla buttercream on top of the cake and added more rainbow sprinkles.

pink birthday cake with funfetti cake layers
funfetti birthday cake with pink buttercream and rainbow sprinkles

More Classic Party Cake Recipes You’ll Love

If you’re looking for more celebratory cake recipes, here are a handful of my go-to’s: 

  • Funfetti Sheet Cake 
  • Chocolate Sheet Cake
  • Vanilla Sheet Cake 
  • Yellow Cake with Chocolate Frosting
  • One-Bowl Chocolate Cake 
pink buttercream with rainbow sprinkles
slice of funfetti cake on a white plate

Did you make this funfetti layer cake recipe? I want to know how it went! Feel free to rate it and post a comment below, or tag @sugarandsparrowco on Instagram to show me a photo. I love to see what you create with my recipes!

funfetti cake recipe with vanilla buttercream

Funfetti Layer Cake

5 from 11 votes
Soft and moist vanilla cake with the ideal amount of rainbow sprinkles baked into each layer. Top it with vanilla buttercream for a classic party cake that's perfect for celebrating anything!
Print Recipe Pin Recipe
Prep Time:20 minutes mins
Cook Time:30 minutes mins
Cooling Time:3 hours hrs
Total Time:3 hours hrs 50 minutes mins
Course: Dessert
Cuisine: American
Servings: 15 slices

Ingredients

Funfetti Cake

  • 2 1/2 Cups (265g) sifted cake flour* DIY recipe in notes
  • 2 tsp baking powder
  • 1/2 tsp baking soda
  • 1 tsp salt
  • 3/4 Cup (170g) unsalted butter, room temperature
  • 1 3/4 Cups (340g) granulated white sugar
  • 3 large eggs, room temperature
  • 1/2 Cup (120g) sour cream, room temperature
  • 1 Tbsp pure vanilla extract
  • 1 Cup (240ml) whole milk, room temperature
  • 1/3 Cup (60g) rainbow sprinkles**, coated in 1 tsp flour

Vanilla Buttercream

  • 2 batches vanilla buttercream

Instructions

  • Preheat the oven to 350°F. Prepare three 6-inch or two 8-inch cake pans by spraying the sides with baking spray (Baker's Joy is my favorite) and lining the bottom with parchment paper. Alternatively, you can grease and lightly flour the pans. 
  • In a medium bowl, add the sifted cake flour, baking powder, baking soda, and salt. Whisk to combine and set aside.
  • In the bowl of your stand mixer fitted with the paddle attachment (or with a large bowl and handheld mixer), cream the butter and sugar until light and fluffy, about 4 minutes, scraping down the bowl and paddle once in between. Turn the mixer to low speed and add the eggs one at a time, mixing for about 10-15 seconds after each addition. Add the vanilla and sour cream, then mix for one minute on high speed. Scrape down the bowl and paddle.
  • Turn the mixer off and add the dry ingredients all at once, then mix on low speed. When the ingredients just begin to incorporate, add the milk slowly and mix until just incorporated, about 30 seconds. Scrape down the sides and bottom of the bowl and give it a few stirs by hand to make sure there are no large lumps. 
  • In a small bowl, coat the rainbow sprinkles with 1 teaspoon of flour (cake flour or all purpose flour). Then, gently fold the flour-coated rainbow sprinkles into the cake batter with a silicone spatula. The batter will be slightly thick.
  • Pour batter into prepared cake pans and bake for 30-35 minutes. They're done when they spring back to the touch and a toothpick inserted into the middle comes out clean. Let the cakes cool in the pan for five minutes before turning them out onto a wire rack for an additional few hours of cooling. Make sure they're entirely room temperature before filling and frosting with vanilla buttercream (or frosting of your choice).

Notes

*DIY Cake Flour Recipe: To make your own cake flour, spoon and level one cup of all-purpose flour and remove 2 Tbsp. Add 2 Tbsp of cornstarch. Repeat per the amount of cake flour you need, then sift the flour and cornstarch mixture 4 times (don’t skip that step!). After sifting, spoon and level to re-measure the amount of cake flour you need. 
**Rainbow Sprinkles: Be sure to use elongated rainbow sprinkles (jimmies) and look for carnauba wax and confectioner’s glaze in the ingredients list. These two ingredients help coat the sprinkles and help prevent them from bleeding color into the batter. This is one of my go-to brands for funfetti recipes. 
To Make Ahead: These cakes can be baked, cooled, wrapped in plastic wrap, and left out at room temperature up to two days ahead of decorating. Unfrosted cake layers can be wrapped tightly in plastic wrap and stored in the freezer for up to two months before thawing and frosting. 
To Make As Cupcakes: Use this funfetti cupcakes recipe.
To Make As a Sheet Cake: Use this funfetti sheet cake recipe.
Previous Measurements: I originally posted this recipe in 2018 and it yielded four 6-inch cake layers or three 8-inch cake layers. Here are those measurements you can use along with the instructions above: 3 3/4 Cups (394g) sifted cake flour, 1 Tbsp baking powder, 1/2 tsp baking soda, 1 1/2 tsp salt, 1 1/8 Cups (254g) unsalted butter at room temperature, 2 1/2 Cups (500g) granulated white sugar, 5 large eggs at room temperature, 3/4 Cup (180g) sour cream at room temperature, 1 1/2 Tbsp pure vanilla extract, 1 1/2 Cups (360ml) whole milk at room temperature, 1/2 Cup (90g) rainbow sprinkles

By: Whitney · In: Cake, Featured, Recipes · Tagged: cake, cake decorating, cake recipe, fancy sprinkles, funfetti cake, funfetti cake from scratch, funfetti cake recipe, sprinkles

you’ll also love

pumpkin layer cake recipe by sugar and sparrowPerfect Pumpkin Layer Cake Recipe
oreo cookies and cream cakeOreo Layer Cake Recipe
yellow cake recipe with chocolate frosting and rainbow sprinklesYellow Cake with Chocolate Frosting (Classic Birthday Cake)

Join the List

Stay up to date & receive the latest posts in your inbox.

Reader Interactions

Comments

  1. Liz says

    October 16, 2025 at 7:46 pm

    Hi! I keep running into the same issue so I’m wondering if I am doing something wrong. I made your sprinkle ombré funfetti cake recipe from you book. I made the buttercream frosting exactly as laid out in the book, and I used a scale to measure my filling and crumb coat per the instructions in your book so I know I didn’t use too much on that part. When I went to measure out the 3 different bowls, I only had about 540 g of frosting total left, so I was short by about half of what I was supposed to have. What am I doing wrong? Am I supposed to be doubling the buttercream even on the full recipes in your book? Meaning donate recipes in your book only account for the final frosting, and then I should plan to do something additional for the frosting and crumb coat? Thank you!

    Reply
    • Whitney says

      October 17, 2025 at 8:42 am

      Hi Liz! If you made the frosting recipe that was part of the sprinkle ombre funfetti layer cake, it should make more than enough frosting for filling, crumb coating, and frosting/decorating the cake. Did you run out of buttercream? Or just not have as much by weight as the book specified? If the buttercream recipe is part of the entire cake recipe, it should always make enough for creating the cake pictured.

      Reply
      • Liz says

        October 17, 2025 at 4:37 pm

        Thank you for your reply! I still had some, but just enough to fill the largest bowl with the dark buttercream (called for 538g in that bowl.) I probably had about 545g total leftover after doing the crumb coat and filling, so only about 7g left after the big bowl. The recipe said I should’ve had enough to make a second bowl with 161g and a third bowl with 323g, so I feel like I did something wrong to be missing basically 484g of buttercream but I’m not sure what I would have done wrong.

        Reply
  2. Rue says

    September 4, 2025 at 3:22 am

    I’m looking at making this cake later today. I have self raising cake flour could I use this and not add the baking powder or soda? Thank yoo

    Reply
    • Whitney says

      September 4, 2025 at 10:38 am

      Hi Rue! I’ve never tried this recipe with self-raising flour, so it will be an experiment. If you try it, I would omit the baking powder and salt from the recipe, since self-rising flour contains both of those. Keep the baking soda in. Hope that helps and hope it turns out well!

      Reply
  3. Elizabeth says

    June 12, 2025 at 9:21 am

    Excuse me if this has already been asked – I want to do a 2-layer 9-inch cake. Could I use this recipe or am I better off using your vanilla recipe for 2-layer 8”? Thanks!

    Reply
  4. Kristy says

    November 6, 2024 at 8:02 am

    I love this recipe! Definitely my go to for vanilla cake. I have scrolled through the comments now several times to see if it has been asked but couldn’t find it, but can I add lemon juice or emulsion to make this a lemon cake?

    Reply
    • Whitney says

      November 6, 2024 at 9:35 pm

      Hi Kristy! I haven’t tried that with this recipe before, but I do have a lemon cake recipe that I love. It’s super light and fluffy with beautiful lemon flavor: https://sugarandsparrow.com/favorite-lemon-layer-cake/

      Reply
  5. Zelda says

    December 31, 2023 at 7:22 pm

    Hello, do you have the frosting recipe and instructions please. I don’t see it. My cakes never look this good when I put the icing on so I’m keen to know how you made the frosting look so flawless.

    Thanks!

    Reply
    • Whitney says

      January 3, 2024 at 9:12 pm

      Hi Zelda! I used a double batch of my vanilla buttercream recipe for this cake: https://sugarandsparrow.com/vanilla-buttercream-recipe/ and I have a tutorial on how to get smooth buttercream here: https://sugarandsparrow.com/smooth-buttercream-cake-tutorial/

      Reply
  6. Kathy says

    August 17, 2023 at 9:01 am

    Hi Whitney, what are your thoughts on using vanilla extract instead of almond? Afraid some may not like the almond flavor.

    Reply
    • Whitney says

      August 18, 2023 at 12:58 pm

      Hi Kathy! You can absolutely use all vanilla extract instead of adding almond. I’d add about 1.5 Tablespoons to this recipe. Enjoy!

      Reply
  7. Judy says

    July 17, 2023 at 12:59 pm

    5 stars
    I made this cake for my daughter’s 5th Birthday and it was so good! I followed all the instruction to the T! even the vanilla buttercream came out really good not runny at all. My first time making it too. Thank you for sharing!

    Reply
    • Whitney says

      July 23, 2023 at 10:31 pm

      That’s amazing, Judy! I’m so happy to hear that!

      Reply
  8. Kelisha Latoya Corridon says

    April 24, 2023 at 7:28 pm

    Thinking of making this into a 4 layer 7 inch cake. Should I double the batter?

    Reply
    • Whitney says

      April 25, 2023 at 8:56 pm

      Hi Kelisha! You could make 1.5x the recipe and have enough for four 7 inch layers. Doubling the recipe will give you more than enough! Whatever you decide, just be sure to fill the pans no more than 2/3 full so they don’t overflow in the baking process.

      Reply
  9. Lexi says

    October 26, 2022 at 11:05 pm

    I tried both your vanilla cake and this funfetti cake and both batters split. I had my ingredients room temp and set a timer for the creaming of the butter and sugar. It kept happening when I added the milk at the end and the milk was definitely not cold. Looked to see if I could save the batter and ended up put in some tablespoons of flour but nothing worked. Not sure what went wrong here… I feel like vanilla cakes are my enemy haha
    Thank you for the help!

    Reply
    • Whitney says

      October 27, 2022 at 9:46 am

      Hi Lexi, I’m sorry to hear that happened. I know that the batter will end up looking curdled after adding the sour cream/vanilla and beating for a minute, but it should come together into a smooth cake batter after adding the flour and milk. Did you make any substitutions? And did you try baking the cakes?

      Reply
  10. Belle says

    September 21, 2022 at 12:56 pm

    Hi there I noticed in the directions you have to sift the flour before measuring it how exactly do you do that?

    Reply
    • Whitney says

      September 21, 2022 at 9:02 pm

      Hi Belle! I usually place a bowl on my kitchen scale, then sift the flour into the bowl to measure by weight. You can alternatively sift the flour into a bowl and then spoon and level the sifted flour into dry measuring cups. Hope that helps!

      Reply
  11. Bethany says

    August 26, 2022 at 4:39 am

    Hello from England

    I’m baking this cake for my daughters 5th birthday. I was wondering does it matter if the 8 inch tins are deep or shallow? I have 2 shallow and 1 deep so I’ll see how they turn out

    Reply
    • Whitney says

      August 30, 2022 at 2:49 pm

      Hi Bethany! My 8-inch tins are 2 inches tall, so that’s the size I wrote this recipe for. If you’re using a deeper tin I would recommend increasing the baking time.

      Reply
  12. Shell says

    April 20, 2022 at 8:54 pm

    Hi, I am wondering whether I can make this with 7″ tins. Would I be able to split the mixture to make it a four level cake? Or would I need to make a larger mixture. Roughly how long do you think the cooking. time would be. Thanks in advance.

    Reply
    • Whitney says

      April 24, 2022 at 9:36 pm

      Hi Shell! You can divide the batter between four 7 inch tins and the layers will be slightly shorter (closer to 1.25 inch tall each instead of 2 inches tall each). I’m not sure about the exact baking time since I’ve never baked the layers in a 7 inch tin before but since they would be shorter, I would check them at 25 minutes for doneness, then add more time from there if needed. If you want taller layers, you can make 1.5x the recipe but note that you will have more than enough batter, so be sure to only fill the tins 2/3 full. Hope that helps!

      Reply
  13. Melanie says

    February 21, 2022 at 6:55 pm

    5 stars
    Wow! This is going to be my new go to recipe for birthday cakes (with or without the sprinkles) and I only wish I’d found it years ago. I made a trial cake on the weekend before I have to make the real deal for my daughters birthday party in a few weeks and my family can’t stop raving about it. Even my husband who grew up on cake (MIL is an incredible cake maker) said it’s the best cake he’s ever had. I put it together with your basic vanilla buttercream – I only wish I could get this as smooth as yours! Thank you so much – cannot wait to recreate it in a few weeks with a Harry Potter theme for the party!

    Reply
    • Whitney says

      February 21, 2022 at 10:04 pm

      Yay, Melanie! That’s so amazing! I’m happy it was a hit and excited for you to make it again. A Harry Potter themed party sounds like the best ever!

      Reply
  14. Sarah says

    January 29, 2022 at 3:13 pm

    Hi- how many servings would this cake make? With 3 8-inch layers as you described? Having a birthday party with about 20 people and want to make sure I’ll have enough. Thanks!

    Reply
    • Whitney says

      January 30, 2022 at 8:05 pm

      Hi Sarah! A triple layer 8 inch cake will serve 20-24 depending on how large you cut the slices. Enjoy!

      Reply
  15. Suzana says

    September 20, 2021 at 5:16 pm

    Hi there! Planning to make this for my sons upcoming birthday, it looks divine! If I do 3x 8” layers, how many people will this serve? Thank you!

    Reply
    • Whitney says

      September 25, 2021 at 9:23 pm

      Hi Suzana! So excited for you to make this cake for your son’s birthday! A cake that size should serve 20-24 people. Enjoy!

      Reply
  16. Amber says

    September 6, 2021 at 4:45 pm

    Hi there! I love the flavor of this cake, but I’ve made it twice now and it turns out very dense. Any idea what I might be doing wrong? It is the best tasting vanilla cake I’ve ever made so hoping I can get the texture right next time!

    Reply
    • Whitney says

      September 7, 2021 at 7:24 am

      Hi Amber! Some common reasons why a cake would turn out more dense: 1) making substitutions like using all purpose flour instead of cake flour 2) ingredients are not room temp (mainly too cold), 3) overmixing the batter at the end or overcreaming the butter/sugar in the beginning. If you are following the recipe to a t, I would just be careful not to overmix at the end. It’s easy to do. Just make sure you stop mixing when everything just starts to come together, then give the mixture just a few stirs with a rubber spatula. Hope that helps!

      Reply
  17. Pita says

    August 20, 2021 at 6:42 am

    Hi Whitney! I love your cake-baking video series and I’m gearing up to make two “Smash Cakes” and 12 cupcakes for our 1 year olds using this Funfetti recipe. Thanks for arming me with the confidence to give this a try at home!

    I purchased tins for 4″ cake layers (they are about 2″ tall). If I am doing 2 cakes, 4″ diameter, both 3 layers tall, and a batch of 12 cupcakes, do you have any suggestions for sizing this recipe? Would double be enough?

    Kind regards!

    Reply
    • Whitney says

      August 20, 2021 at 2:50 pm

      Yay, Pita! That’s so fun! This recipe should make enough for two triple layer 4 inch cakes + 12 cupcakes as is. You’ll want to bake the 4 inch cakes for about 25 minutes and the cupcakes for about 17 minutes. Enjoy!

      Reply
  18. Ashley M says

    July 30, 2021 at 11:01 am

    Does elevation or humidity change the weight of flour? I measured several times and re-sifted several times too and would get 398g with only 3 cups of flour.

    Reply
    • Whitney says

      August 1, 2021 at 9:52 am

      Hi Ashley! I’m not sure about the elevation changing weight. Are you using cake flour or all purpose flour? Cake flour does weight much less than all purpose, so if you’re using the latter the weight will be much more. Hope that helps!

      Reply
  19. Natalie says

    July 17, 2021 at 2:07 am

    5 stars
    Cake is absolutely divine! Just wondering if anyone in Australia can recommend a brand of jimmys? Mine seem to have bled a little.

    Reply
  20. Alydia says

    June 2, 2021 at 10:21 am

    Any tips if I want to use this for cupcakes???

    Reply
    • Whitney says

      June 2, 2021 at 10:47 am

      Yes! This recipe works great as cupcakes. Just fill the tins no more than 2/3 full and bake at 350 for 15-18 min.

      Reply
  21. Tiziana says

    May 26, 2021 at 2:34 pm

    Hi Whitney,
    How much does the recipe serve? I am planning to use the 6 inch tins. How high will the cake be? My pans are 4 inch tall. I am having a double celebration at the same party so I will also be making cupcakes apart from the cake so I do not want too much waste
    Thanks!

    Reply
    • Whitney says

      May 31, 2021 at 9:12 pm

      Hi Tiziana! The cake pictured is a three layer 6 inch cake that stands at about 6 inches tall, but the recipe makes four 6 inch layers. If you bake that additional layer, the cake will be about 8 inches tall. My cake pans are only 2 inches tall, and since I’ve never baked my recipes in a taller pan like the one you have, I’m not sure how the baking time/oven temp should be altered to accommodate the taller sides. I’ve heard that you should drop the oven temp by 25 degrees and bake for longer when using taller pans, but I’m not sure exactly how long they’ll need if you’re wanting to bake taller layers. Other than that, if you’re planning on using some of the batter for cupcakes, I have tested that before and they bake perfectly at 350 for 15-17 minutes! Hope that helps and let me know if you have any more questions!

      Reply
  22. Alyssa says

    March 27, 2021 at 12:32 pm

    This is a great recipe! I made cupcakes and they needed exactly 17 minutes at 350*. It made about 48 cupcakes, so I’m very glad I didn’t double the recipe, but I will be saving this for the next time I need to make a cake or cupcakes. Very happy with it!

    Reply
    • Whitney says

      March 28, 2021 at 11:18 am

      Yay, Alyssa! I’m so happy to hear that this recipe worked well as cupcakes! Thanks for reporting back how many cupcakes it yielded as well 🙂

      Reply
  23. Sara Horgen says

    January 5, 2021 at 11:37 am

    Hi again – you can disregard and delete my above comment if you’d like, I just found some on Walmart! Thanks though!

    Reply
    • Whitney says

      January 12, 2021 at 5:40 pm

      So good to know! I’ll keep the comment on here just in case anyone else is wondering where to look.

      Reply
  24. Sara Horgen says

    January 5, 2021 at 10:32 am

    Hi Whitney! Congrats on your little one! (I follow you on IG). Any idea where I can get these dang specific sprinkles from for not an arm and a leg? The rainbow jimmies for the inside meaning. The only ones I’m seeing from Wilton just have white/red/pink/yellow/green/orange. I’d really like to find the ones like the above with the blue and purple too. I’m making a unicorn cake and her dress has good chunk of purple. TIA!

    Reply
    • Whitney says

      January 12, 2021 at 5:40 pm

      Hi Sara! Thank you so much 🙂 I actually buy the rainbow jimmies from the bulk section of my local grocery store (Winco)! Not sure where you’re located, but check the bulk section of your local grocery store. The baking goods aisle might have sprinkles too, just make sure they’re coated with a waxy film so that they don’t bleed their colors.

      Reply
  25. Sheryll says

    November 27, 2020 at 11:59 am

    5 stars
    I want to bake a 2 layer 6 inch cake as well as 24 cupcakes. Would 2 batches of this recipe be enough batter? Also how many batches of your vanilla frosting should I make?

    Reply
    • Whitney says

      November 30, 2020 at 7:27 am

      Hi Sheryll! I actually think that this recipe might be enough as-is, but it might be cutting it a little close. I would make the recipe as-is and if you need more batter, use this recipe but add 1/4 cup sprinkles (same recipe but reduced amount of batter and no sprinkles) to make more cupcakes. You’ll need about 2.5 batches of my vanilla buttercream recipe to frost all of that. Hope that helps!

      Reply
  26. Stephanie Hamilton says

    November 13, 2020 at 11:18 am

    Your notes are awesome for a novice baker. But I have 2 more questions: can I make a 4 layer cake using 6 inch square pans with this recipe, or would that alter the cooking time? also, if I replace the milk with buttermilk in order to omit the sour cream, is the measurement still 1 1/2 cups of the buttermilk?
    Thank You!

    Reply
    • Whitney says

      November 13, 2020 at 7:53 pm

      Hi Stephanie! I think you totally could, but the shape of a square pan requires more cake batter than a round pan, meaning your layers may be shorter when dividing the batter equally between them. Since I’ve never tried this recipe in square pans, I can’t say for sure what the baking time will be, but I would check at 30 minutes and go from there. And yes – if omitting the sour cream use 1.5 Cups of buttermilk. Hope that helps and enjoy!

      Reply
  27. Caroline Grace McClung says

    November 2, 2020 at 12:05 pm

    Hey! So, I made this cake and the sprinkles all fell to the bottom or to the top, is there a way to prevent this?

    Reply
    • Whitney says

      November 4, 2020 at 11:28 am

      Hi Caroline! Did you coat the sprinkles in flour as specified in the recipe? That’s the only way I know of to prevent the sprinkles from sinking.

      Reply
  28. Jessica says

    October 26, 2020 at 11:15 am

    Hello Whitney Congratulations on your new little bundle, being a mom is the best but tough.
    I’ve tried many different recipes and my vanilla and yellow cakes always turn out heavy and dense. They aren’t dry just heavy. Any tips that might help me make it fluffy and light? Thanks so much!

    Reply
    • Whitney says

      October 26, 2020 at 4:58 pm

      Hi Jessica! Thanks so much for your kind words. When you say you’ve tried vanilla and yellow cake recipes, are you referring to my recipes or just those cake flavors in general? That will help me determine how to best help!

      Reply
      • Jessica says

        October 27, 2020 at 8:35 am

        Good morning. I haven’t tried yours yet, but they are next in hopes they will produce a light cake. Maybe I should try them first and then let you know how they turned out. I’m using your funfetti recipe in the next few days!

        Reply
        • Whitney says

          October 28, 2020 at 9:56 am

          Yes – the fluffiness of the cake mostly depends on the recipe you follow. I won’t be able to instruct you on how to make someone else’s recipe more fluffy, but I do hope that you find this funfetti cake to be fluffy when you try it. I did a lot of testing to make sure it ends up nice and soft!

          Reply
          • Jessica says

            November 3, 2020 at 12:58 pm

            Hi Whitney,
            So I tried your funfetti cake! The cake batter was so light and fluffy, my husband tested it and loved it! A few mini later he goes, you know I’ll want to clean the bowl when your done! Ha! But I tried making it twice and both times my cakes fell in the middle. I live in Denver so maybe the altitude has something to do with it, i followed the recipe to a T and even let my over preheat for a long time to make sure it was warmed evenly. Please help because this cake is delicious! Thank you for sharing with us!

          • Whitney says

            November 4, 2020 at 11:25 am

            Hi Jessica! Yes, baking at higher altitudes requires some different oven temps/techniques that I’m unsure of since I’ve never baked at a high altitude before. I would do a little research to see what you need to alter to make a cake recipe work for high altitude baking and adjust this recipe accordingly. That is my best guess as to why the cake fell in the middle, but here is a blog post I wrote up with the most common reasons why cakes sink: https://sugarandsparrow.com/why-cakes-sink/ double check that list as well to make sure it isn’t one of those things in addition! Hope that helps!

  29. Joanne Fournier says

    October 25, 2020 at 4:55 am

    5 stars
    I made this cake for my granddaughter’s birthday, and it was a big hit. The cake was moist and flavorful, and the floured jimmies baked really well throughout the cake. I used three 8″ pans, and wow, those layers were nice and tall! I also used the AmeriColor Lilac for the frosting, but I ended up with a different shade of purple than your beautiful cake. It may have been because I used a Swiss meringue buttercream frosting, but I’m wondering if you have any tips for making that color pop. Your cake is so awesome! I will definitely be making this cake again as it was both moist and very flavorful. Thanks for a great recipe!

    Reply
    • Whitney says

      October 26, 2020 at 4:54 pm

      I’m so happy to hear that this recipe was a hit, Joanne! Happy birthday to your granddaughter! And yes, you are totally right about the swiss meringue buttercream not being easy to color with standard color gels. I’ve never worked with it before, but I hear that you have to use a different coloring technique to achieve vibrant colors like that. It’s one of the reasons why I always use American Buttercream for everything I do. It’s on my list to learn more about swiss meringue buttercream someday and share what I know as I go! In the meantime thanks so much for taking the time to let me know how much you loved this cake recipe!!

      Reply
  30. Yvonne Kane says

    September 1, 2020 at 3:46 pm

    5 stars
    I just made this cake for my daughter and it was absolutely delicious. Worked perfect!
    Thank you!

    Reply
  31. Yvonne Kane says

    August 29, 2020 at 11:48 pm

    I just made this cake and it turned out delicious! Thank you so much for sharing!

    Reply
    • Whitney says

      September 2, 2020 at 12:09 pm

      Yay, Yvonne! So happy to hear this recipe was a hit!!

      Reply
  32. Julie says

    August 8, 2020 at 10:12 pm

    5 stars
    I have made this recipe twice and it’s delicious! I had the same issue both times. The sides, after being cooked, are super crunchy. The first time I simply overcooked the cakes because my oven (convection gas) must run hotter than expected even though I baked it 30 min. The second time I watched it carefully starting around 20 minutes and ended up only baking a few minutes longer than that. The middle was perfect, but all three pans had crunchy and dark top, sides, and bottoms that I ended up removing because another blogger recommended it when using light icing colors. Either way I think it would have to be done because they tasted burnt. Anyway, I assumed the first time was because I overcooked the cakes, but I can’t figure out how to avoid this disparity between the interior and exterior of the cake next time. Any ideas or thoughts? Also, how many batches of your vanilla buttercream do you need for the 3 layer 8”? I doubled it and that was enough to ice the whole cake but nothing left to pipe. I had to run out and buy buttercream from the grocery store bakery (life saver in a pinch) to pipe and design. I still ran out of icing mainly because I am new to piping and had to practice some.

    Reply
    • Whitney says

      August 10, 2020 at 9:01 am

      Hi Julie! Since you have a gas convection oven, the temperature needs to be altered to accommodate it. This recipe is written for a conventional oven. Next time, try lowering the oven temp by 25ºF (so bake at 325ºF). This is most definitely why your edges burned. You’ll also need to keep an eye on the baking time, since convection ovens tend to cook food faster even at the lower temp. Here’s everything you need to know about convection ovens vs. conventional: https://www.cnet.com/how-to/what-is-a-convection-oven/

      As for the buttercream, next time make 2.5x the recipe so you’ll have enough for piping after filling and frosting. Simply multiply each recipe by 2.5 and you’ll be good to go!

      Reply
  33. Rebekah says

    August 6, 2020 at 8:10 am

    What size cake pans do you use?

    Reply
    • Whitney says

      August 6, 2020 at 11:08 am

      Hi Rebekah! This recipe is written for either 6-inch or 8-inch cake pans. The cake pictured has three 6-inch layers.

      Reply
      • Rebekah says

        August 6, 2020 at 11:54 am

        Thank you!

        Reply
  34. Joi says

    July 12, 2020 at 8:49 am

    Hi Whitney,

    I have tried this recipe about 10 times now and I absolutely love it. Here’s my question, do you recommend using cake baking strips with this cake and if so would I need to increase the baking time? I have used them before but my cake always comes out sticky. Thanks

    Reply
    • Whitney says

      July 12, 2020 at 4:03 pm

      Hi Joi! I’ve actually never used baking strips before. I would do a little research to see if the ones you have require altering the oven temp/baking time and go from there!

      Reply
  35. Jasmin says

    June 7, 2020 at 12:49 am

    Hi!
    Could you please tell me the minimum depth the 8” pans will need to be?
    I have some but they are only about 1 and 1/2” deep, will they work?
    Thanks so much can’t wait to bake this cake

    Reply
    • Whitney says

      June 7, 2020 at 10:17 am

      Hi Jasmin! My 8-inch pans are 2 inches deep. Your shallower 8-inch pans will work fine as long as you fill them no more than 1/2 full (instead of 2/3 full as the recipe instructs).

      Reply
      • Jasmin says

        June 7, 2020 at 4:05 pm

        Thanks so much for your quick response!

        Reply
  36. Ashley says

    May 1, 2020 at 10:59 am

    Hi Whitney,

    We love using our bundt cake pans for making cakes. My little one loves all of the curves that our pan creates. Can this recipe be adapted for a bundt cake pan?

    Reply
    • Whitney says

      May 1, 2020 at 5:21 pm

      Hi Ashley! I’ve never tried baking a layer cake recipe in a bundt pan before, so I can’t say for sure how it will turn out. After some Googling it seems like a layer cake recipe like this one will work in a bundt pan if you bake at 350 for 45-50 minutes. Be sure to fill the pan no more than 1/2 to 2/3 full. Let me know how it goes if you try it!

      Reply
  37. Meleia says

    April 14, 2020 at 8:58 pm

    Hi Whitney!

    I have three 9″ pans, will this recipe work ok for this size or do I need to 8″ pans? BTW I am making a cake for boy/girl twins birthday cake.

    Thank you!

    Reply
    • Whitney says

      April 14, 2020 at 10:39 pm

      Hi Meleia, it should work fine to divide this recipe equally between three 9 inch pans. I usually fill my 8-inch pans about 2/3 full, which yields baked cake layers that are about 2 inches tall. So with 9 inch pans, your cakes will be somewhere around 1.5 inches tall once baked, but it will totally work. Let me know how it goes!

      Reply
  38. Desiree Justice says

    March 7, 2020 at 4:46 am

    I am so confused, even after reading the recipe and comments multiple times. Does this recipe, minus the jimmies, make enough batter for 3/ 8″ round pans?

    Reply
    • Whitney says

      March 10, 2020 at 7:58 pm

      Hi Desiree! Yes, this recipe makes enough for three 8-inch rounds as specified in the recipe directions. I originally wrote it for three 6-inch rounds, but it truly makes enough batter for three 8-inch rounds, which is why I added that size to the directions.

      Reply
  39. Nili says

    March 4, 2020 at 8:33 am

    Hi Whitney

    I had made the vanilla cake smash recipe from your blog and it worked perfectly. I doubled the recipe as i needed to fill two 6-inch x 3 inch springform pans.

    I now wanted to make a tiered cake. I was thinking of using double the vanilla cake smash recipe for the top tier with sprinkles and then this recipe for the bottom tier. My pan for the bottom tier is 8 inch x 3 inch springform pan. Do i double this recipe to make 2, 8 inch pans?

    Thanks!

    Reply
    • Whitney says

      March 5, 2020 at 10:09 am

      So happy you love the vanilla smash cake recipe, Nili! This funfetti cake recipe is essentially the same as the vanilla smash cake recipe, and will make enough for two 8-inch pans as-is. If you double it, you’ll have enough for all the layers you need (top tier included)!

      Reply
      • Nili says

        March 6, 2020 at 11:33 am

        Thanks Whitney! I’m making it tonight. Fingers crossed! 🙂

        Reply
  40. Courtney says

    January 21, 2020 at 9:10 am

    5 stars
    Hi Whitney!

    Love this recipe! I made it a few times now! Wondering if you could provide a link for the great cake stand? It’s so hard to find in smaller diameter and height. Thx!

    Courtney

    Reply
    • Whitney says

      January 21, 2020 at 3:37 pm

      Hi Courtney! So happy you love this recipe as much as I do! The cake stand was a gift from my sis in law years ago and I can’t find the exact one online anymore, but this one on Amazon is super similar and the same size: https://amzn.to/2Ry1dQ6

      Reply
  41. Araceli says

    January 19, 2020 at 9:16 am

    How can I made a raspberry and chocolate buttercream for this cake?

    Reply
    • Whitney says

      January 20, 2020 at 1:19 pm

      Hi there! I have recipes for both of those buttercream flavors. Here is the raspberry buttercream recipe: https://sugarandsparrow.com/raspberry-buttercream-recipe/ and here is the chocolate buttercream recipe: https://sugarandsparrow.com/chocolate-buttercream-recipe/

      Reply
  42. Jess says

    November 28, 2019 at 12:36 pm

    Hi Whitney,
    Thanks so much for your blog! I’m wondering how long your cakes keep in the fridge once frosted? Wondering how far I can make ahead of my daughter’s birthday party!!
    Also do you have any tutorials on cutting a cake of this size?
    Many thanks!!
    Jess

    Reply
    • Whitney says

      December 2, 2019 at 10:52 am

      Hi Jess! So happy to hear you’re loving the blog 🙂 Once a cake is frosted, you can store it in the refrigerator for a day or two and it’ll be fresh for the birthday party! I usually frost and decorate my cakes the night before a party, but you could definitely do two nights before and still have a fresh cake. Just make sure you bring it to room temp by taking it out at least an hour before serving. I don’t have tutorials on cutting a cake (that’s a great idea for the future!), but this video is super helpful: https://www.youtube.com/watch?v=F_6MbvKpBuc

      Reply
  43. Shanti says

    November 23, 2019 at 5:01 am

    Hi. Can this recipe be used to make cakes that will be decorated with fondant.?

    Reply
    • Whitney says

      November 25, 2019 at 8:55 am

      Hi Shanti! All of my cake recipes are great for using under fondant, this one included!

      Reply
  44. Sally says

    September 22, 2019 at 3:10 pm

    Hi!
    With the cake flour, I’m purchasing it and there is the option for plain flour or self raising flour type, which one should I purchase?
    Thank you

    Reply
    • Whitney says

      September 23, 2019 at 9:04 am

      Hi Sally! For cake flour, use the plain flour version (not the self rising). The self rising has baking powder added to it, so it will end up adding too much rising agent to cake recipes. The brands I love are Swans Down, Pillsbury Softasilk, and Bob’s Red Mill.

      Reply
      • Sally says

        September 24, 2019 at 9:21 pm

        Thank you so much. Can’t wait to make this. Im following the vanilla cake recipe and adding the cup of sprinkles to make a three layer 9inch cake. So excited for my nearly 2 year old little girl to blow out her candles on this cake. I’m

        Reply
        • Vicky says

          April 19, 2021 at 2:45 pm

          Hi,

          I am wanting to make 3 x layers (1.5inch thick) using 7inch tins. Is this recipe okay for this or do I need to increase the re pie?

          Reply
          • Whitney says

            April 20, 2021 at 2:51 pm

            Hi Vicky! This recipe will make a little more than enough for pans of that size as-is. Just be sure to fill them no more than 2/3 of the way full. Enjoy!

  45. Ashley N says

    July 12, 2019 at 12:47 pm

    5 stars
    Seriously delish! I was doubtful of the 5 eggs – but it was amazing! It’s a lot of cake batter though, much more than the normal cake box amount.
    I’ve got a bag of it and the vanilla buttercream frosting sitting in my fridge. Wondering how long it’ll keep and/or if I can put it in the freezer. Do you know?

    Reply
    • Whitney says

      July 12, 2019 at 2:51 pm

      Thanks Ashley! What size cake pan and how many layers did you make? I usually make this recipe in three 6-inch pans and only have a little bit of batter left over – enough for a few cupcakes. The sad news is that cake batter won’t keep. The fridge/freezer alters the chemistry of the cake so it’s no good after you first make it.

      Reply
    • Ruth says

      August 16, 2022 at 11:15 am

      Hi from the UK, Whitney! My stepdaughter has asked me to make a cake for her baby shower and I’d like to use this recipe to make three 8” cakes. In the instructions, you say to prepare three 8” tins but in the comments you mention you usually use it to make three 6” cakes. As I want the layers to be reasonably deep, will the quantities here be enough for 8” cakes? Thank you.

      Reply
      • Whitney says

        August 16, 2022 at 8:46 pm

        Hi Ruth! This recipe makes enough for three 8-inch layers that end up being about 2 inches deep. That comment about the 6-inch layers might have been an old one, cause this makes enough for 4 6-inch layers but when I initially wrote the recipe it was written for 3 6-inch layers. Hope that makes sense! Enjoy!

        Reply
        • Ruth says

          August 17, 2022 at 11:52 am

          Thank you so much for replying so quickly.

          Reply
        • Ruth says

          August 27, 2022 at 4:02 am

          Hi again Whitney. I’ve made this cake today ( minus sprinkles) and although it tastes really moist and buttery, the texture is very fragile. It’s not dry and crumbly but is breaking easily. I wondered whether the size of eggs could be to blame? I’ve used Uk large which weigh around 70g each in their shell. Do you have any advice, please? This is a trial run for the baby shower cake! Thank you.

          Reply
          • Whitney says

            August 30, 2022 at 2:48 pm

            Hi Ruth! Is the texture fragile while the cake is still warm? Or is it too light and fluffy at room temperature? If it’s breaking apart while warm I would recommend cooling to room temp before handling the cake layers. Also, I didn’t realize that UK eggs weigh more than US eggs, and after a quick google search it looks like one US large egg = one UK medium egg. It might be worth another go with medium eggs!

        • Ruth says

          September 7, 2022 at 12:40 am

          5 stars
          Hello Whitney. Just an update on my previous comment to let you know that using the medium eggs (UK) worked a treat. Following your YouTube series also gave me the confidence to decorate the baby shower cake with an ombré buttercream icing (your recipe again) , add a border of sprinkles and add swirls to the top. Unfortunately, I didn’t get to taste this one but my stepdaughter was over the moon with it and said it was absolutely delicious! Thank you.

          Reply
          • Whitney says

            September 14, 2022 at 7:43 pm

            Yay, Ruth! All of that makes me so happy! I’m so glad the recipe was a hit, worked well with the UK medium eggs, and you felt confident in your decorating after watching some tutorials 🙂 amazing job! And thank you for following up, it’s so helpful for me to know that egg sizes vary by location!

  46. Sara Young says

    July 5, 2019 at 12:37 pm

    Hi Whitney, your cakes are beautiful! Can I ask, in this photo the cake looks taller then most cakes. In the photo is it a 5 layer cake?

    Reply
    • Whitney says

      July 5, 2019 at 4:28 pm

      Hi Sara! Thanks for the kind words! It’s a three layer 6-inch cake. Ends up being about 5.5 inches tall with the frosting.

      Reply
  47. Bea says

    June 25, 2019 at 8:40 pm

    Hi can I use this recipe for cupcakes? How would that work?

    Reply
    • Whitney says

      June 26, 2019 at 9:33 am

      Hi Bea! This recipe works wonderfully as cupcakes! Just fill the cupcake tins about 2/3 full and bake for 17 minutes at 350.

      Reply
      • Alexa says

        April 18, 2024 at 6:25 pm

        Hi Whitney, I’m wanting to make this as cupcakes as well – do you know approx how many this would make? Thank you!

        Reply
        • Whitney says

          May 2, 2024 at 8:36 pm

          Hi Alexa! This recipe makes about 35-40 cupcakes. Enjoy!

          Reply
  48. Tori says

    June 25, 2019 at 1:13 pm

    Hi Whitney!

    I am making a 3 layer 9 inch cake for my son’s birthday and I’m trying to figure out how to increase this recipe. (It looks AMAZING!) You say this is the same as your vanilla cake, just with jimmies, but your vanilla cake, with 2 1/2 cups of flour, is for 2 8-inch rounds. This has 3 3/4 cups of flour and is for 3 6-inch rounds. My confusion stems from the fact that 3 6-inch rounds should require 12 cups in volume, the exact same as 2 8-inch rounds. Where is the discrepancy in the recipe? Or in my calculations? What am I missing?!

    Thanks for your help!

    Reply
    • Whitney says

      June 25, 2019 at 1:59 pm

      Hi Tori! I always like to bake tall layers (at least 2 inches tall), so that’s why this recipe creates a little more batter than the vanilla cake recipe for the double layer 8 inch. To make a 3 layer 9 inch cake, I would double the vanilla cake recipe and add 1 Cup of rainbow sprinkles. You’ll probably have some extra batter, but in my opinion it’s better to have a little more batter and have taller layers that you can trim down instead of having three shorter layers.

      Reply
  49. Whitney says

    June 21, 2019 at 9:34 am

    Hi Amy! You’re right – this recipe is almost identical to the matcha cake. I added more sour cream to this recipe to make it a little more moist, but you can totally go with the 112g instead of 168g of sour cream.

    Reply
  50. Amy says

    June 21, 2019 at 5:40 am

    Hi Whitney,
    I have made your matcha cake and it was really lovely. I notice this recipe is exactly the same (without the sprinkles and the added matcha powder for the matcha flavour of course), but the sour cream is alot more in this recipe, is this correct? Will there be any difference if i used 112g sour cream instead of the 168g listed?

    Reply
  51. Jenny says

    May 28, 2019 at 5:36 pm

    Any chance I can just use all purpose flour instead of cake flour? Having toddlers, I tend to like shortcuts! Lol. Really want to try this recipe!

    Reply
    • Whitney says

      May 28, 2019 at 7:53 pm

      Hi Jenny! So the reason I use cake flour in the recipe is that it produces a much fluffier cake than all-purpose flour. Fortunately, you can easily make your own cake flour to use in a pinch. To make your own cake flour, spoon and level one cup of all-purpose flour and remove 2 Tbsp. Add 2 Tbsp of cornstarch. Repeat per the amount of cake flour you need, then sift the flour and cornstarch mixture 4 times (don’t skip that step!). After sifting, spoon and level to re-measure the amount of cake flour you need.

      Hope that helps!

      Reply
  52. Ali says

    May 21, 2019 at 7:13 pm

    Hey! I want to use this recipe to make an ombre cake with a dark, milk and white chocolate layer! Do you think it will work if I divide the batter in three and add a 1/2 cup of melted milk, dark, or white chocolate to each to obtain three different layers? or would that ruin the baking?

    Reply
    • Whitney says

      May 22, 2019 at 9:03 am

      Hi Ali! I’ve never tried adding melted chocolate to the cake batter, so I can’t say whether or not it will work. You can certainly try it and let me know! Otherwise I’d recommend finding and following a recipe for a flavor ombre cake. Let me know what you end up doing!

      Reply
  53. Mackenzie says

    April 20, 2019 at 2:16 pm

    I made this cake in two 8in round pans and at the end I found that all my jimmies went to the bottom of my cake! How can I prevent that?

    Reply
    • Whitney says

      April 20, 2019 at 3:17 pm

      Hi Mackenzie! Sorry to hear your jimmies sunk to the bottom of the cake. That doesn’t usually happen with the jimmies I use, but I did read a tip recently about preventing the sprinkles from sinking in a funfetti cake: add the sprinkles to a bowl and coat them with 1.5 tbsp of flour before gently folding them into the batter. You can use cake flour or all purpose flour for that part. Apparently it keeps them from sinking!

      Reply
  54. Adriane Potilechio says

    April 19, 2019 at 6:38 am

    Do you have a go to butter cream recipe? I usually make either a whipped cream frosting, or a cream cheese frosting. But I think these would be too soft and the sprinkles would just get absorbed into them…..thoughts?

    Reply
    • Whitney says

      April 19, 2019 at 11:32 am

      Hi Adriane! I do have a go-to buttercream recipe: https://www.sugarandsparrow.com/vanilla-buttercream-recipe

      Reply
  55. Donna says

    April 15, 2019 at 7:40 am

    How did you get the sprinkles to attach to the sides of the cake in such a perfect pattern? Especially the upper part where they are sparse…did you toss them onto the frosting one at a time? And the bottom part where they are thicker…?

    Reply
    • Whitney says

      April 15, 2019 at 10:39 am

      Hi Donna! To add sprinkles to the cake finish, I make sure the buttercream is still slightly wet for the sprinkles to adhere. I place them by the handful around the base of the cake, then place them one by one on the upper part of the cake by pressing the sprinkle onto my finger and touching it to the cake finish. Here’s a video of the process with a different cake, but the same technique: https://www.youtube.com/watch?v=1hWwaFvcYHY

      Reply
  56. Kirsten says

    April 8, 2019 at 3:24 am

    Hi Whitney

    So glad I stumbled across your blog, it’s amazing! I’m planning to make a 3 layer 6 inch cake using this recipe (minus the jimmies) and I’m wondering since I only have 2 tins if the third lot of batter can sit while the first 2 cakes are baking? If so, do I leave it at room temp or refrigerate it?

    Thank you!

    Reply
    • Whitney says

      April 8, 2019 at 8:52 am

      Hi Kirsten! Thanks so much for the kind words! The batter can definitely sit at room temperature while the first two layers are baking. Just cover the top of the mixing bowl with saran wrap and then when you’re ready to bake the third layer, give the batter a stir before pouring it into the tin.

      Reply
  57. Cindy says

    March 24, 2019 at 4:20 pm

    What’s the best grocery store cake flour to buy? I have found unbleached cake flour..so many options.

    Reply
    • Whitney says

      March 25, 2019 at 9:43 am

      Hi Cindy! I have only ever used Softasilk and Swans Down, which are both enriched bleached cake flours, but I am sure that unbleached is great! Sounds healthier 🙂

      Reply
  58. Kayla says

    March 20, 2019 at 10:01 pm

    I’m making a three layer 10 inch cake for a birthday. Should I just double the recipe or do you have another suggestion?

    Reply
    • Whitney says

      March 21, 2019 at 8:47 am

      Hi Kayla! Yes – I would double the recipe for a three layer 10-inch cake 🙂

      Reply
  59. Roxanne says

    February 27, 2019 at 7:48 pm

    Hi, what kind of food coloring did you use for this buttercream?

    Reply
    • Whitney says

      February 28, 2019 at 7:46 pm

      Hi Roxanne! I used Americolor food color gel in Lilac for this soft purple buttercream.

      Reply
  60. Veronica says

    February 26, 2019 at 9:53 am

    5 stars
    Thanks for the DIY tip on making your own cake flour!

    Reply
    • Whitney says

      February 26, 2019 at 11:42 am

      No problem, Veronica! Hope you love the recipe!

      Reply
  61. Julianna Macari says

    January 17, 2019 at 1:52 pm

    I tried to make this cake twice and had the same problem each time…it is hard to describe. The cake has a good rise, is completely cooked on the outside, but from the middle bubbles out cake batter that is raw and seeps onto the top of the cake without cooking. I’m sure I’ve done something wrong, but I have no idea what it is. I thought I followed the directions exactly!

    Reply
    • Whitney says

      January 17, 2019 at 3:03 pm

      Hi Julianna! I’m so sorry that’s happening! Usually when the cake is raw or gummy on the inside, it can mean two things: you need to bake it a few minutes longer (until a toothpick inserted comes out completely clean), or something went wrong while creaming the butter and sugar together. Make sure your butter is room temp and soft before starting the creaming process, and try creaming the butter and sugar on medium-high (instead of full blast) for only two minutes. I hear that creaming for too long can lead to too much air incorporation, leading to gummy streaks inside the cake even though its baked.

      Reply
    • Jenna says

      February 24, 2025 at 6:47 am

      This is an old thread but I had the same problem. I think elevation might be playing a part here. Also consider your cake pans. I’m at sea level and used pretty dark cake pans and had the same problem. I ended up with a burnt, caramelized exterior with a raw center. Cut your temp down 25 to 50°F and that should help.

      Reply
  62. Diana says

    October 2, 2018 at 1:48 pm

    Hi
    Just wondering if you can tell me what 1 cup is equalavent to in grams?
    Would appreciate this very much
    Thanks

    Reply
    • Whitney says

      October 2, 2018 at 8:54 pm

      Hi Diana! Knowing the weight of 1 cup in grams depends on the ingredient (1 cup of cake flour will weigh less in grams than sugar, for instance). I just bought my first kitchen scale and am currently working on converting all of my recipes to grams this week! I’ll make an announcement as soon as they’ve all been converted. Sorry for any inconvenience and make sure you’re signed up for my email list to catch the announcement first thing!

      Reply
  63. Jasmine says

    October 2, 2018 at 3:28 am

    Hi Whitney! I am making a 4 layer 8″ cake for halloween and I wanted to ask if this recipe is ok for 2 8″ pans? Or should I stick with the basic recipe that you have for your vanilla cake? Thank you!

    Reply
    • Whitney says

      October 2, 2018 at 8:51 pm

      Hi Jasmine! This funfetti recipe will make enough for two 8″ layers (plus a little left over). If you want to be more exact, you could double the basic vanilla cake recipe to make four 8 inch layers and fold in 1 cup of rainbow sprinkles total at the end. The funfetti cake is my basic vanilla cake recipe with added sprinkles 🙂 I hope your Halloween cake turns out amazing!

      Reply
      • Emily says

        November 2, 2021 at 8:07 pm

        Had prepared the vanilla cake recipe already and my daughter just asked for fun funfetti. I love this blog!

        Reply
        • Whitney says

          November 7, 2021 at 11:18 am

          Yay, Emily! Hope your daughter loves this cake!

          Reply
  64. aya says

    September 20, 2018 at 12:52 pm

    sour cream? can i use diy buttermilk?

    Reply
    • Whitney says

      September 21, 2018 at 9:52 am

      Hi Aya! I have never substituted anything for the sour cream before. My hunch is that buttercream will be too much liquid since sour cream is more the consistency of yogurt. If you don’t have access to sour cream, I’d recommend substituting it for a full fat yogurt or omitting the sour cream and using buttermilk in place of the whole milk instead. Let me know if that helps!

      Reply

Leave a Reply Cancel reply

Your email address will not be published. Required fields are marked *

Recipe Rating


Next Post >

Reflecting On My Cake Journey + Lessons Learned

Primary Sidebar

Welcome to Sugar & Sparrow

Welcome to Sugar & Sparrow

Helping you whip up pretty desserts with confidence and creativity. And hopefully sharing a few laughs with you along the way!

Learn More

Connect

let’s bake!

Get my very best recipes, baking tips, and decorating tutorials sent to your inbox

Featured Posts

semi naked cake tutorial

How To Frost A Flawless Semi-Naked Cake

black forest cake recipe with homemade cherry filling and whipped cream frosting

Black Forest Cake Recipe

salted caramel buttercream recipe for cakes and cupcakes

Salted Caramel Buttercream Recipe

Search

Archives

Follow Along

@sugarandsparrowco

Y’all have been asking for gluten-free cake reci Y’all have been asking for gluten-free cake recipes for awhile now, which makes me EXTRA excited to finally share this gluten-free chocolate cake!! After tonnns of recipe testing, this cake is so rich and fudgy (yet somehow not too dense!), has an amazing chocolate flavor, is irresistible with chocolate buttercream, and truly doesn’t taste gluten-free. It low key might be my favorite chocolate cake recipe of all (and I’ve had a LOT of them) 🤎 
 
Get the recipe link in my bio + at https://sugarandsparrow.com/gluten-free-chocolate-cake/ 
 
#chocolatecake #glutenfreecake #glutenfree #cakesofig #birthdaycake
VANILLA CUPCAKES 🧁these from-scratch vanilla cu VANILLA CUPCAKES 🧁these from-scratch vanilla cupcakes are super soft and moist, have the perfect vanilla flavor, and are perfect for any celebration with a swirl of vanilla buttercream + pretty rainbow sprinkles! I originally published this recipe in 2018 and it’s become a reader fave ever since 🙌🏼 
�Full recipe (with frosting) is linked in my bio + at https://sugarandsparrow.com/vanilla-cupcake-recipe/ 
 
VANILLA CUPCAKES 
Yield: 32 cupcakes 
 
INGREDIENTS 
2 1/2 cups (265g) sifted cake flour 
2 tsp baking powder 
1/2 tsp baking soda 
1 tsp salt 
3/4 cup (170g) unsalted butter, room temp 
1 3/4 cup (350g) granulated sugar 
3 large eggs, room temp 
1/2 cup (120g) sour cream, room temp 
1 Tbsp pure vanilla extract 
1 cup (240ml) whole milk, room temp 
 
INSTRUCTIONS 
1. Preheat the oven to 350°F (177ºC) and line standard cupcake pan(s) with up to 32 liners. 
2. Add the sifted cake flour, baking powder, baking soda, and salt into a bowl and whisk to combine. Set aside. 
3. In the bowl of your stand mixer with the paddle attachment (or w/ hand mixer and large bowl), beat the butter on high for 2 minutes, then add the sugar and continue to beat on high until light and fluffy, about 2 min. Turn the mixer to low and add the eggs one at a time, mixing thoroughly after each addition. Add the vanilla and sour cream, then turn the mixer to high speed and mix for 1 min. Scrape down the bowl and paddle as needed. 
4. With the mixer on low speed, add the dry ingredients all at once and mix until just combined, then add the milk in a steady stream. Continue mixing for another 20-30 seconds, until just combined. Scrape the sides and bottom of the bowl and gently mix by hand until uniform. 
5. Spoon or pour the batter into the cupcake liners until they’re about ⅔ full, then bake for 14-18 minutes, until they spring back to the touch and a toothpick inserted comes out clean. 
6. Top with your fave frosting (my vanilla buttercream recipe is linked in my bio)! 
 
#vanilla #cupcakes #cupcakesofinstagram #cakedecorating #fromscratch
FUDGY CHOCOLATE NUTELLA CAKE 🍫🌰 this is my a FUDGY CHOCOLATE NUTELLA CAKE 🍫🌰 this is my absolute DREAM cake + if you love chocolate and hazelnut it will be yours toothis cake is pure decadence and perfect for any chocolate hazelnut lover: layers of fudgy chocolate cake with the+ creamiest Nutella ganache and Nutella flavored buttercream. 
⁣ 
Comment NUTELLA CAKE to get the recipe sent to you 💌 it’s also linked in my bio + at https://sugarandsparrow.com/chocolate-nutella-cake/ 
⁣ 
#nutellacake #nutella #chocolatecake #cakelover #cakes
FREEZE-DRIED CHERRY BUTTERCREAM 🍒I was so excit FREEZE-DRIED CHERRY BUTTERCREAM 🍒I was so excited to find freeze-dried tart cherries for the very first time at @traderjoes and had to try them in a buttercream recipe! Turns out they are an AMAZING way to flavor a cherry buttercream – you get incredible cherry flavor without adding any liquid, so the consistency of the frosting ends up perfect every time. I found that the KEY to amplifying the cherry flavor here is add a little almond extract ✨ trust! 
 
Full recipe with cake pairing suggestions linked in my bio + at https://sugarandsparrow.com/freeze-dried-cherry-buttercream/ (spoiler alert: it’s incredible on chocolate cupcakes!) 
 
CHERRY BUTTERCREAM 
Yield: 2.5 Cups 
 
INGREDIENTS 
1 Cup (226g) unsalted butter, room temp 
3/4 Cup (34g) freeze-dried cherries 
3 Tbsp (45ml) whole milk, room temp 
1 tsp pure vanilla extract 
1/2 tsp almond extract 
3 Cups (360g) powdered sugar 
pinch of salt, or to taste 
 
INSTRUCTIONS 
1. With a food processor, grind the freeze-dried cherries into a fine powder. You can alternatively place the cherries in a Ziploc bag and crush them into powder with a rolling pin. 
2. Whip the butter using a stand mixer with a paddle attachment on medium-high speed until it’s creamy and light in color, about 5 minutes, scraping down the bowl and paddle as needed. Add the cherry powder, milk, vanilla, and almond extract and continue to mix on medium until fully combined. 
3. Add the powdered sugar one cup at a time and mix on low speed, scraping down the bowl and paddle after each addition. Add a pinch of salt and mix on low speed until fully combined and smooth, 1-2 minutes. 
 
#cherrybuttercream #cherries #cakedecorating #frosting #buttercream
CONVERSATION HEART CAKES 💕 these mini heart cak CONVERSATION HEART CAKES 💕 these mini heart cakes turned out so cute + I love that you can write any message you want on top!! Perfect Valentine’s Day party activity and/or dessert. Details (full recipe + tutorial link is in my bio): 
 
👩🏽‍🍳Recipes: my favorite one-bowl chocolate cake + vanilla buttercream. Both are included in the link below, but you can use any cake recipe with the tutorial. 
💗Heart cake pans: I found these 4-inch heart pans on @amazon but also include instructions on how to make heart-shaped cakes starting with round cake layers in case you don’t want to add any more cake pans to your collection 
🎨Buttercream colors: @americolor electric purple, mint green, and deep pink (and super red for the writing on top) 
🥰Piping tip: @wiltoncakes tip 5 
 
Full tutorial (w/ recipes!) is linked in my bio + at https://sugarandsparrow.com/mini-conversation-heart-cakes/ 
⁣⁣ 
#minicake #heartcake #cakedecorating #chocolatecake #vintagecake

Footer

On the Blog

  • Cake Basics
  • Recipes
  • Tutorials

Info

  • About
  • Privacy Policy & Disclosure

stay in the know

Copyright © 2026 · Theme by Sugar & Sparrow