• Cake
  • Frosting
  • YouTube
  • My Favorite Tools
  • Nav Social Icons

  • Skip to primary navigation
  • Skip to main content
  • Skip to primary sidebar
  • Skip to footer
  • Recipes
    • Cake
    • Cupcakes
    • Frosting
    • Ice Cream
    • Vegan
  • Cake Basics
  • Tutorials
  • Blog
  • About
  • Mobile Menu Widgets

    Connect

    Search

Sugar & Sparrow logo in script font

Sugar & Sparrow

Lifestyle and Cake from Portland Oregon

  • Cake Basics
  • Recipes
    • Cake
    • Cupcakes
    • Cookies & Bars
    • Filling
    • Frosting
    • Ice Cream
    • No-Bake
    • Small Batch
    • Vegan
  • Tutorials
  • Book
  • Blog
  • About

Layered Ombrè Buttercream Cake Tutorial

June 10, 2021 · In: Featured, Tutorials

I tend to use color ombrès a lot in my buttercream cakes. There’s something about the gradient color change that is so eye-catching and works a little better than a solid finish in some cases (like my Cactus Cake, Under the Sea Cake, and Strawberry Lemonade Cake Recipe to name just a few). Today though, instead of creating a subtle gradient with my buttercream colors, I decided to make them a bit more edgy with this Layered Ombrè Cake. The design allows each color to really stand out and I just love the beautiful texture you can create with the layers! 

layered ombre cake by sugar and sparrow

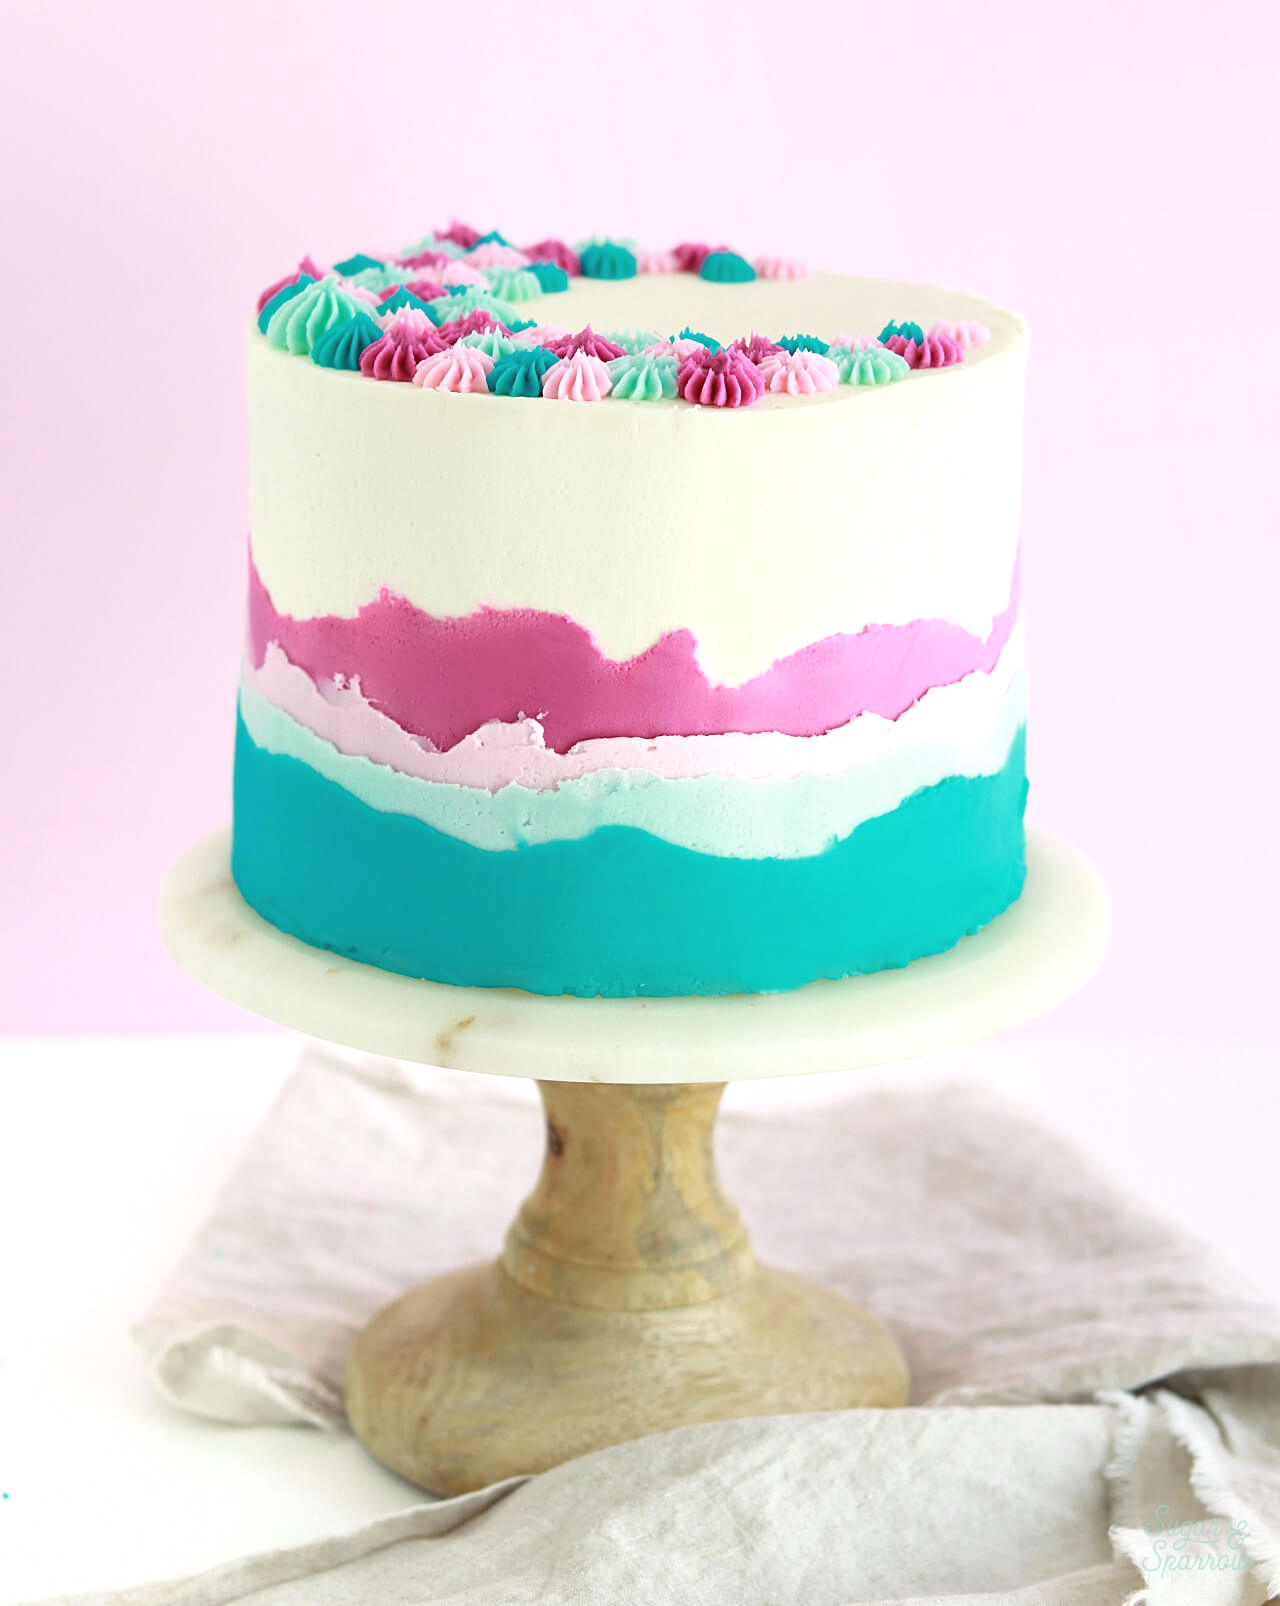
The best part about this Layered Ombrè Cake is that the design is super forgiving. You start with a smooth buttercream cake, but you don’t need to be meticulous about the finish since half of the cake will be covered up with layers of color. No need to stress about this one! 

buttercream layer cake tutorial
ombre buttercream cake tutorial

Before we get to the written tutorial, be sure to check out this video I whipped up of the process: 

Are you into cake decorating videos like this one? If so, head to my YouTube page to see even more! From decorating tutorials to recipe videos and Cake Basics, you’ll find everything you need there to grow in your cake skills. Be sure to hit the Subscribe button so you never miss a new video. 

You Will Need:

  • A cake that’s been crumb coated and chilled (this one is a 3 layer 6 inch, but any size will do)
  • Cake turntable
  • Icing smoother
  • Angled spatula 
  • 1.5 batches of vanilla buttercream
  • Color gels (I used AmeriColor Fuchsia and Teal for mine)
  • Bowls and spoons for color mixing
  • Wilton Tip 4B (x4) – optional
  • 4 piping bags – optional

Step 1: Frost a Smooth Buttercream Finish

With your chilled, crumb coated cake on the turntable, add buttercream to the top of the cake and smooth it down with your angled spatula until it’s level and reaches over the edges.

frosting a cake with buttercream

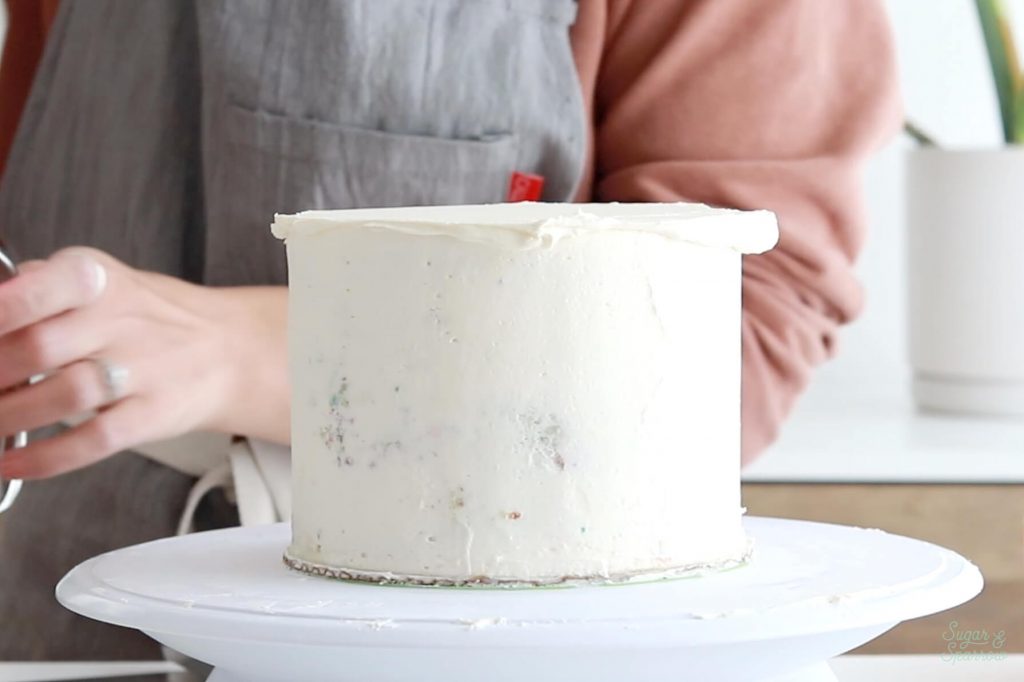
Add a layer of buttercream all around the sides of the cake, then use your icing smoother to smooth the sides. If you need tips on how to get a nice smooth finish, be sure to check out this Cake Basics post on how to frost a smooth buttercream cake. 

how to frost a cake with buttercream
how to frost a cake with smooth buttercream

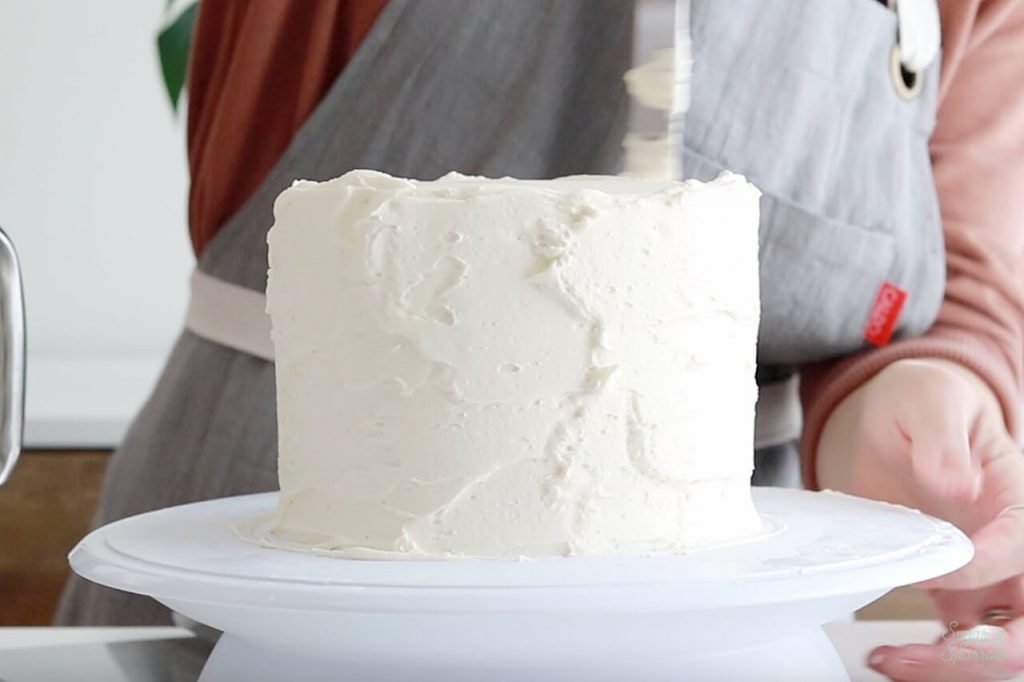
You’ll notice that a little crown of buttercream has formed around the top edge of the cake (a great sign!). Use your angled spatula to swipe the edges inward (toward the top center of the cake) so you create nice sharp edges. 

how to create sharp edges on buttercream cake

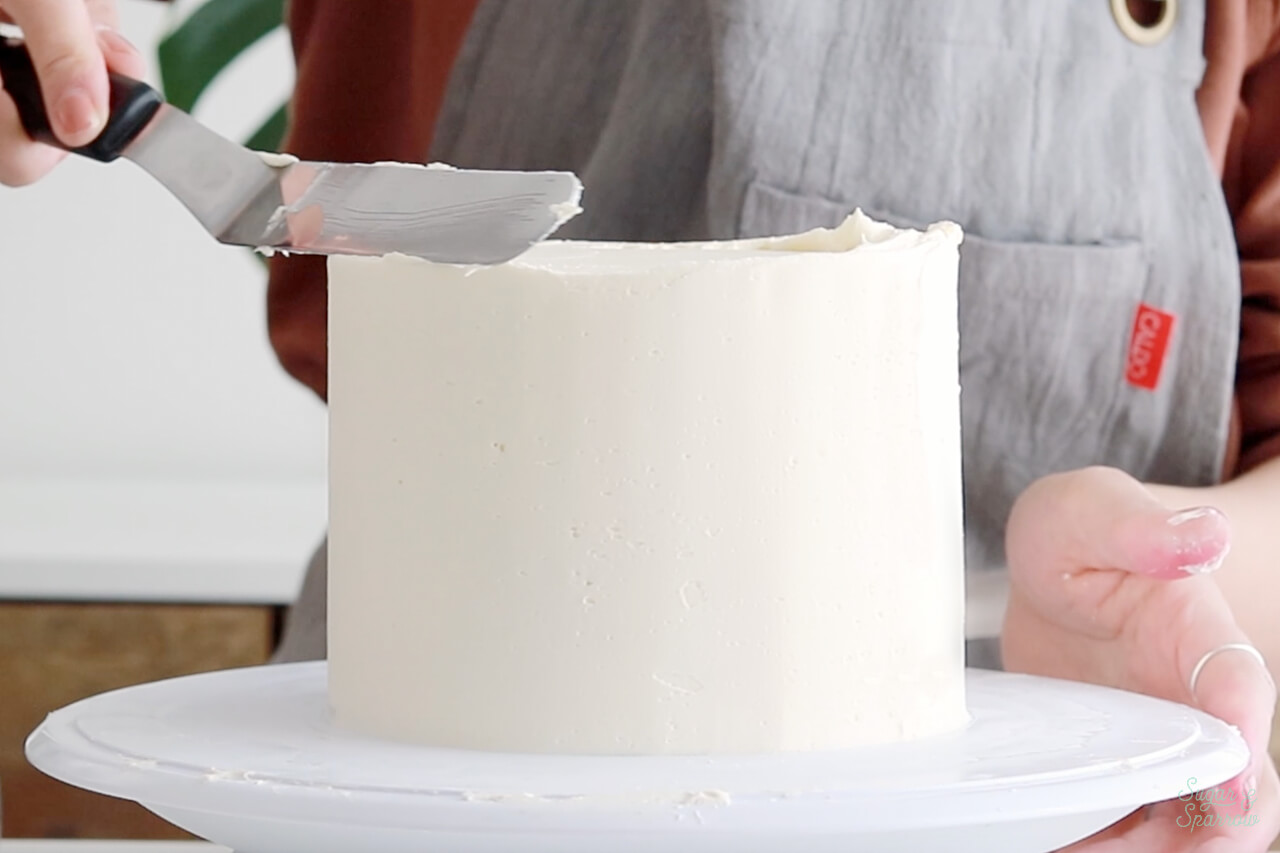
When you’re happy with your buttercream finish, pop it into the refrigerator for about 30 minutes while you move on to the next step. 

Step 2: Mix Your Buttercream Colors

Divide the remaining buttercream equally amongst four different bowls (or however many colors you want for the layers). Add your food color gel to each one and mix until you like what you see. 

how to make buttercream colors

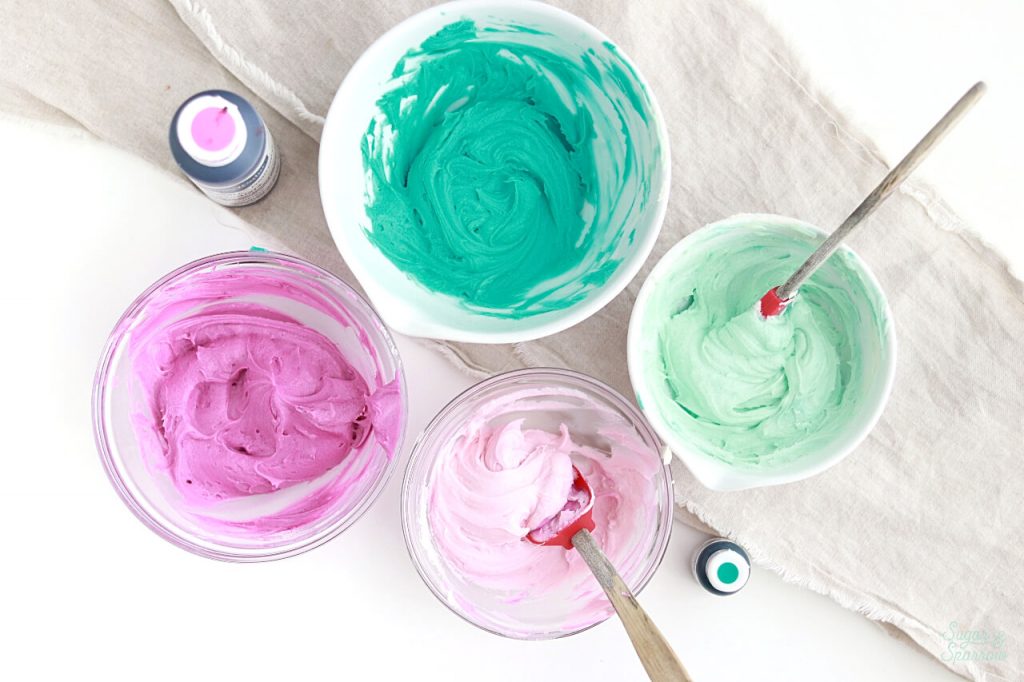
For my color palette, I used AmeriColor Fuchsia in different increments for the light and dark pinks and AmeriColor Teal for the light and dark teal colors (also in different increments). If you want to learn more about color mixing, I created a Cake Basics guide here. 

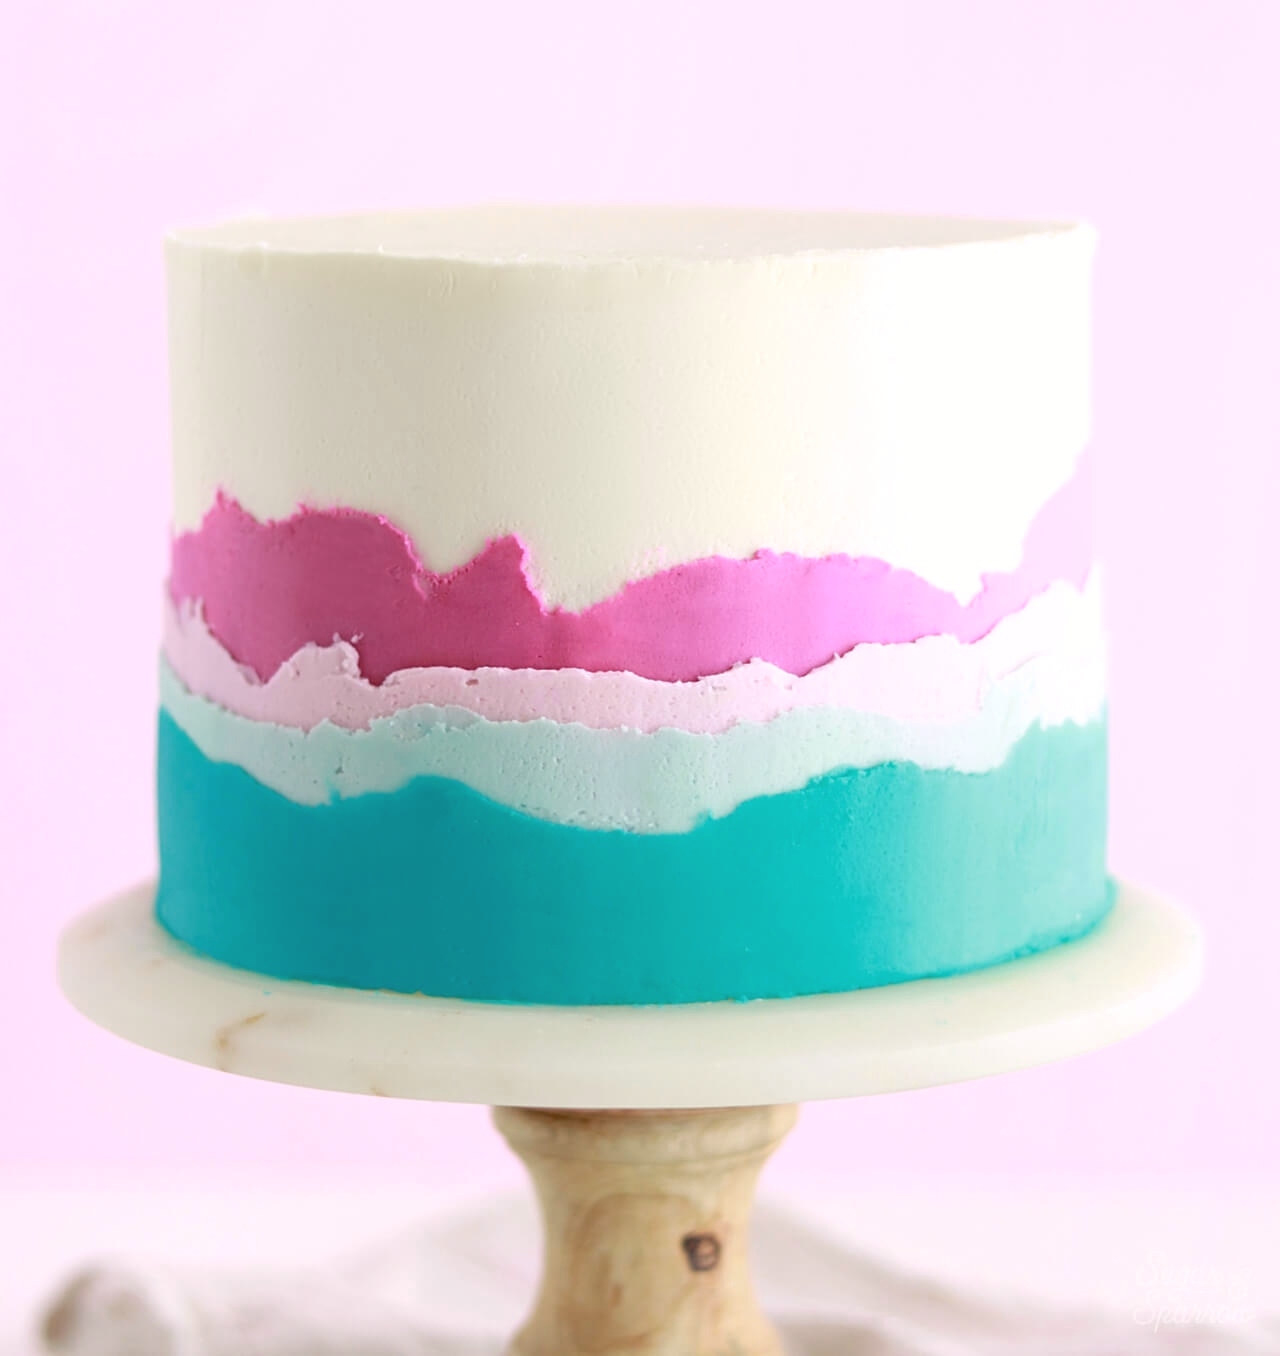
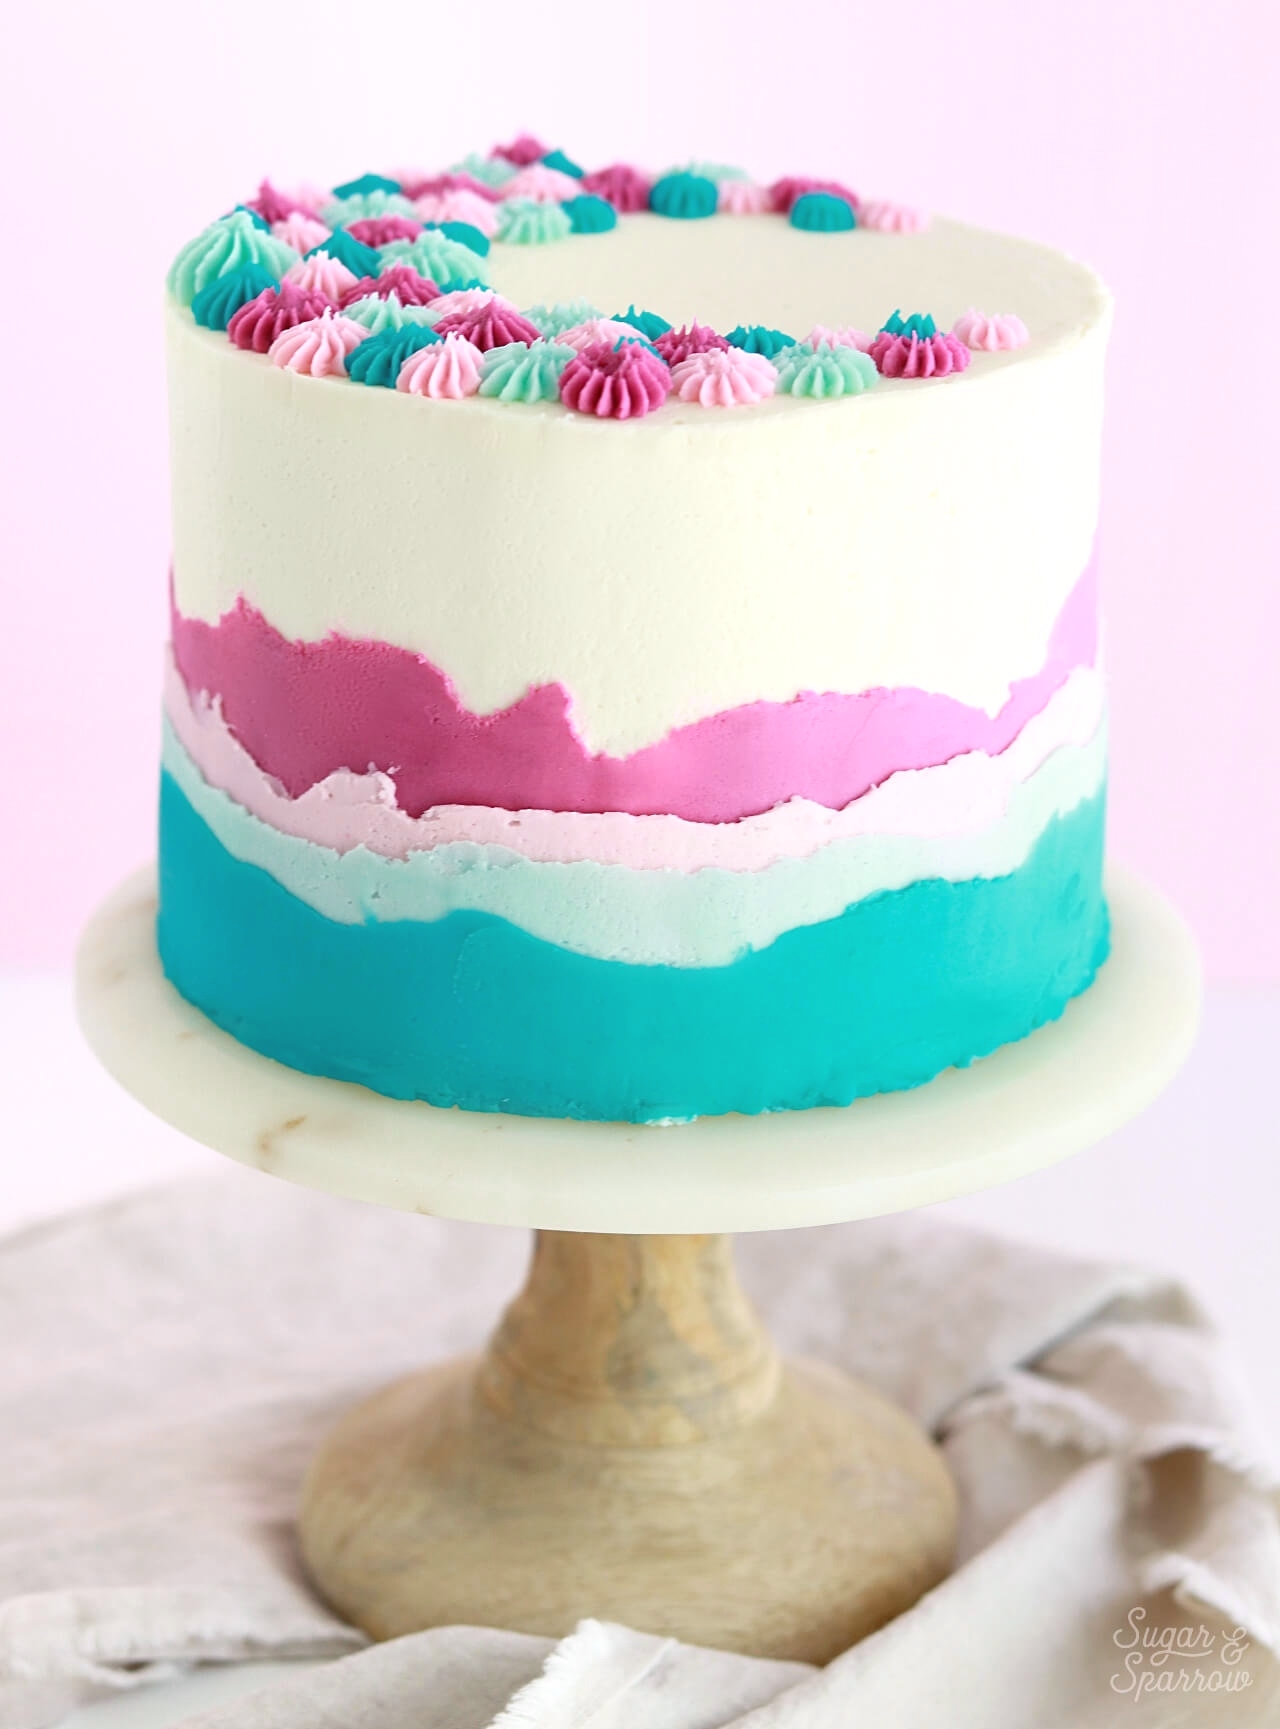
Step 3: Add the First Layer

Starting at the middle of the cake, add your first color. It should have highs and lows and look perfectly imperfect. No need to add it all the way down the cake, just stick to the middle area. 

how to make a layered ombre buttercream cake

Once your color is on, use your icing smoother to gently (and slowly!) smooth it down.

how to make buttercream layers on a cake

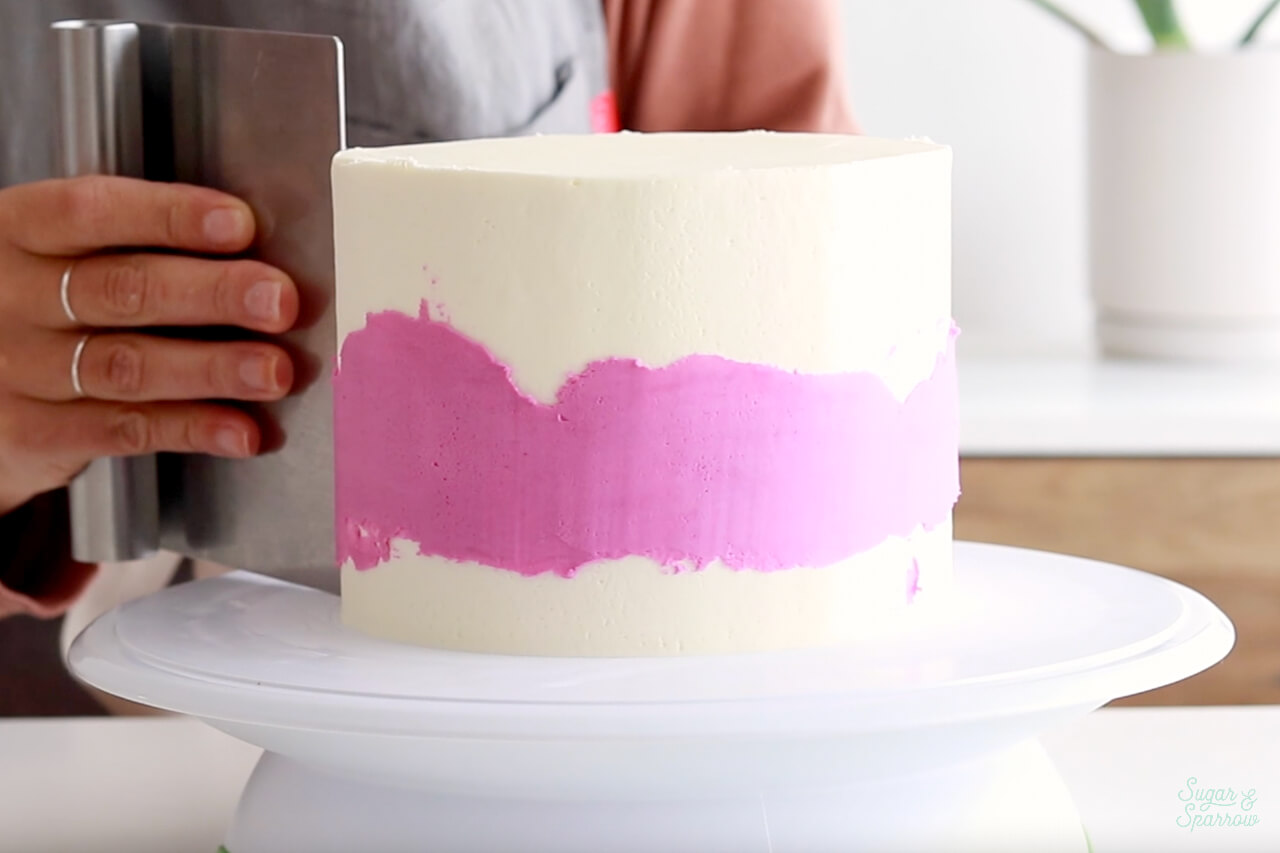
Don’t worry about stopping and starting again in the smoothing process – it’s essential that you go slow for this part to maintain those highs and lows. 

Step 4: Add the Additional Layers

When the first color is smoothed down, add the next color slightly below it so that the color above is still very visible. Repeat the process of smoothing it down.

buttercream layer ombre cake tutorial
layered ombre cake tutorial

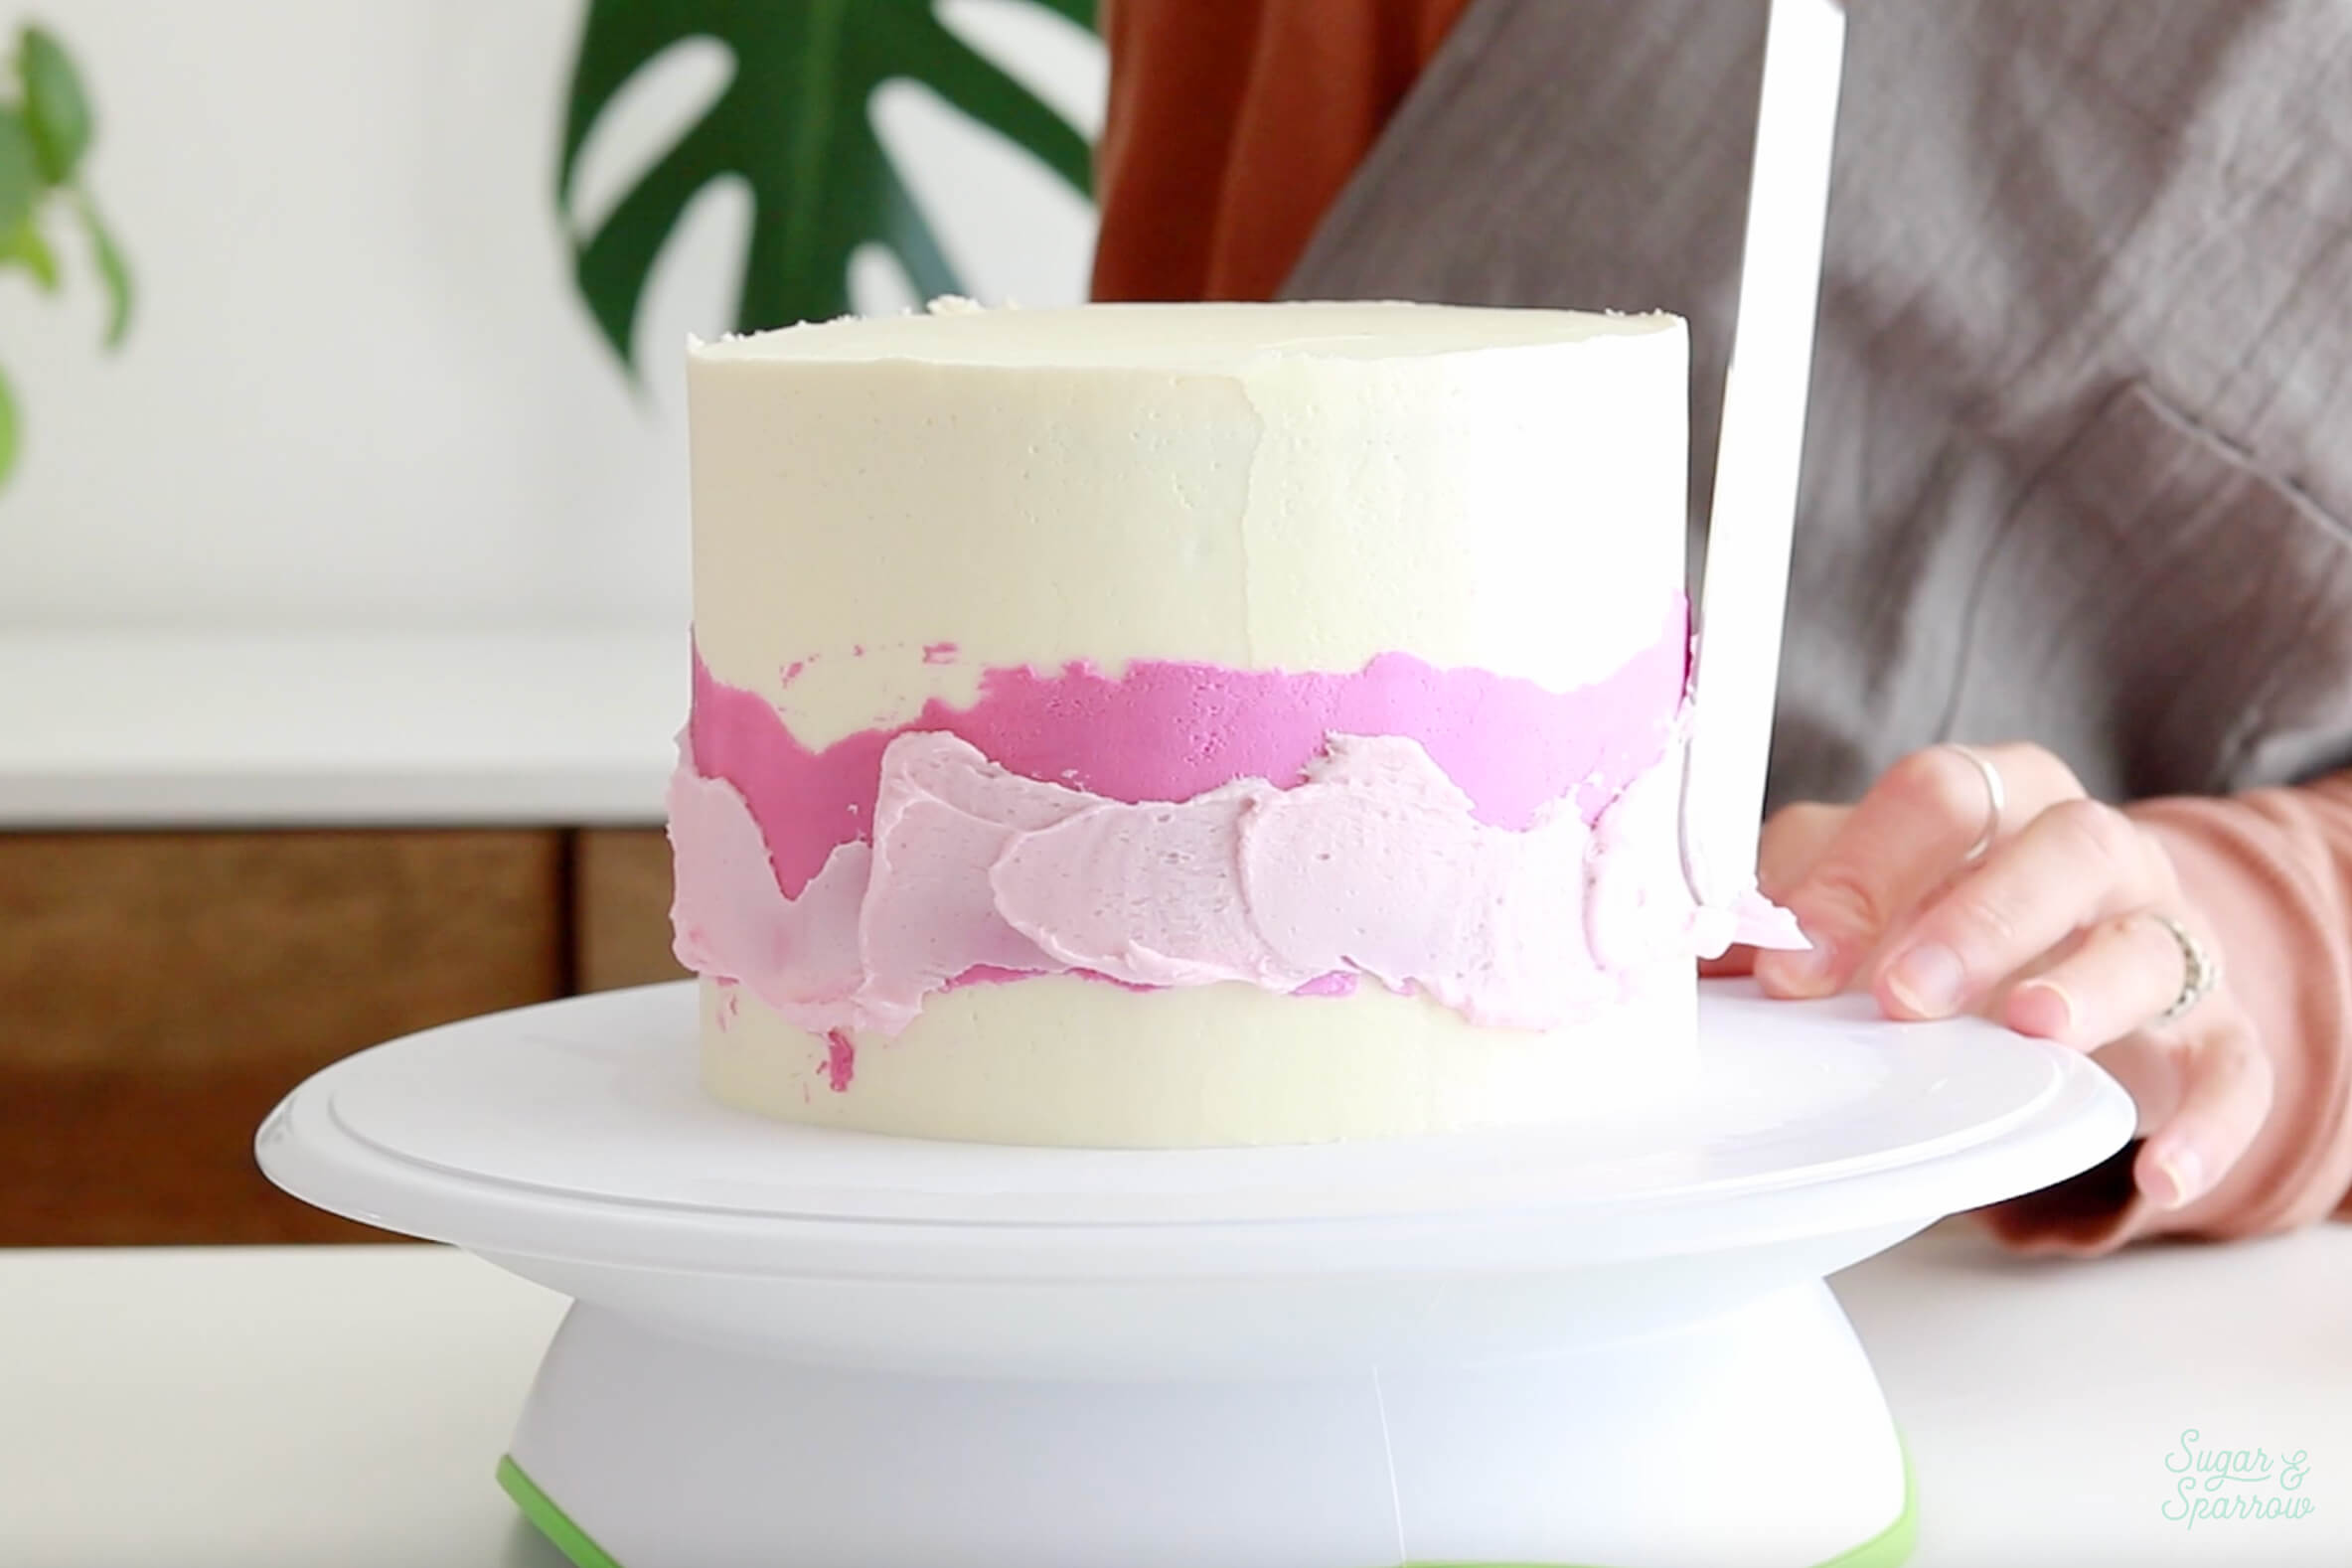
Continue to add and smooth your colors until you reach the bottom of the cake. 

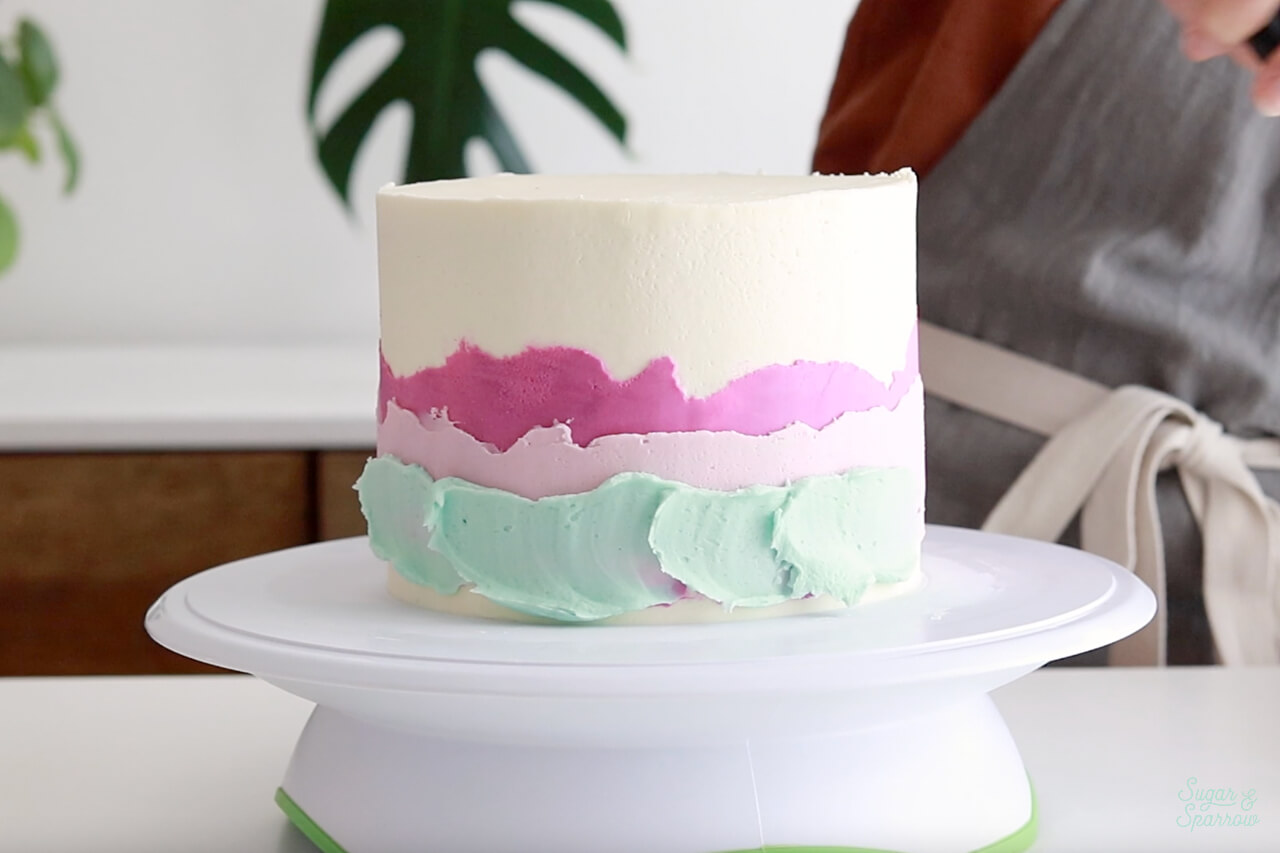
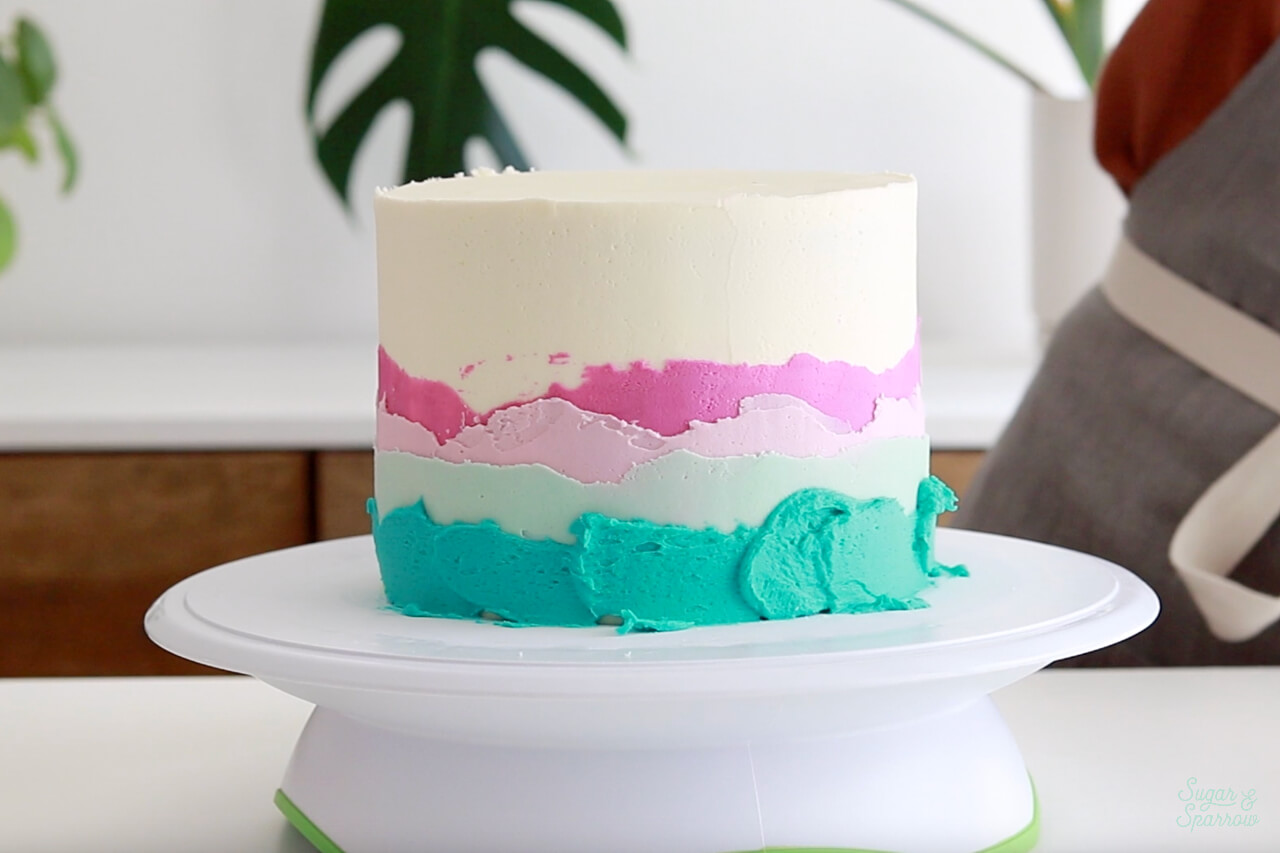
Look at that pretty texture you can create with buttercream layers!

layered ombre with buttercream

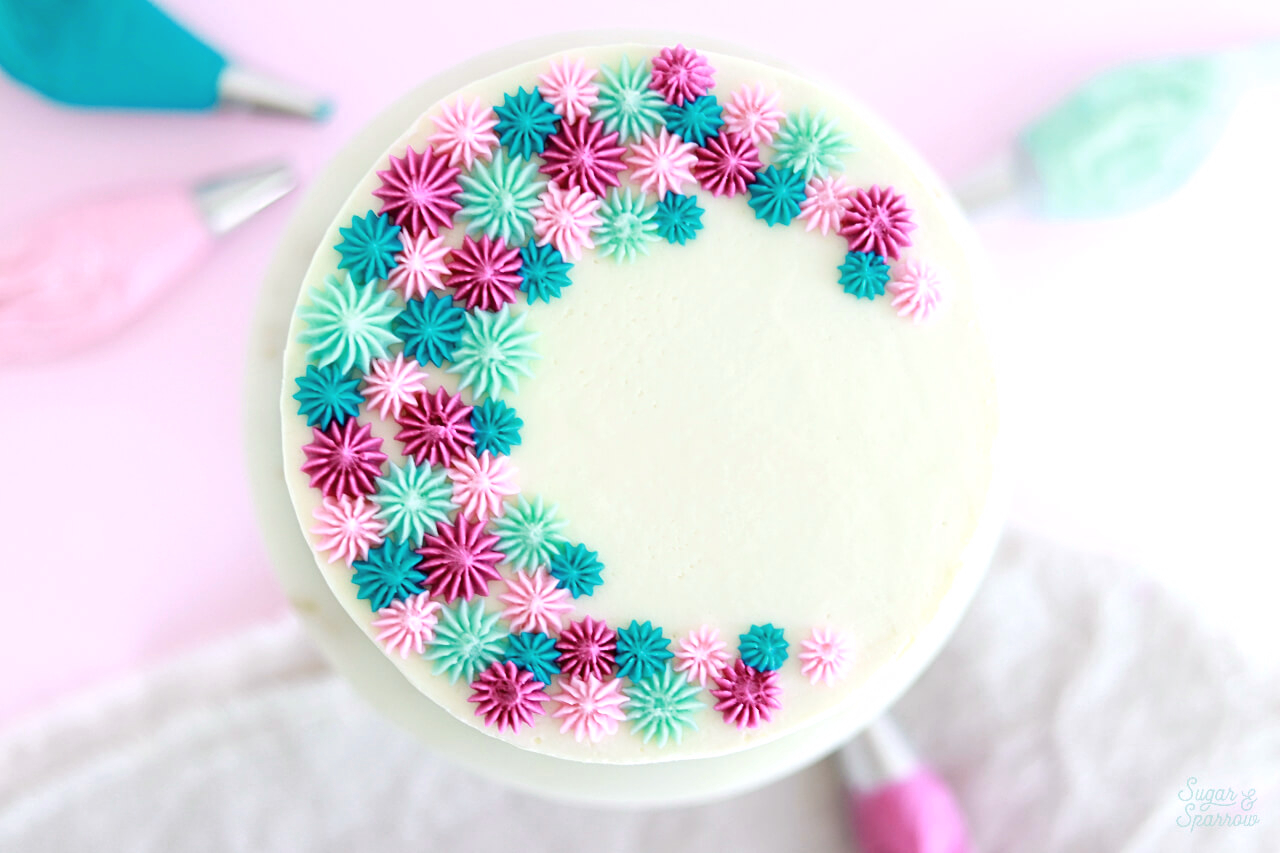
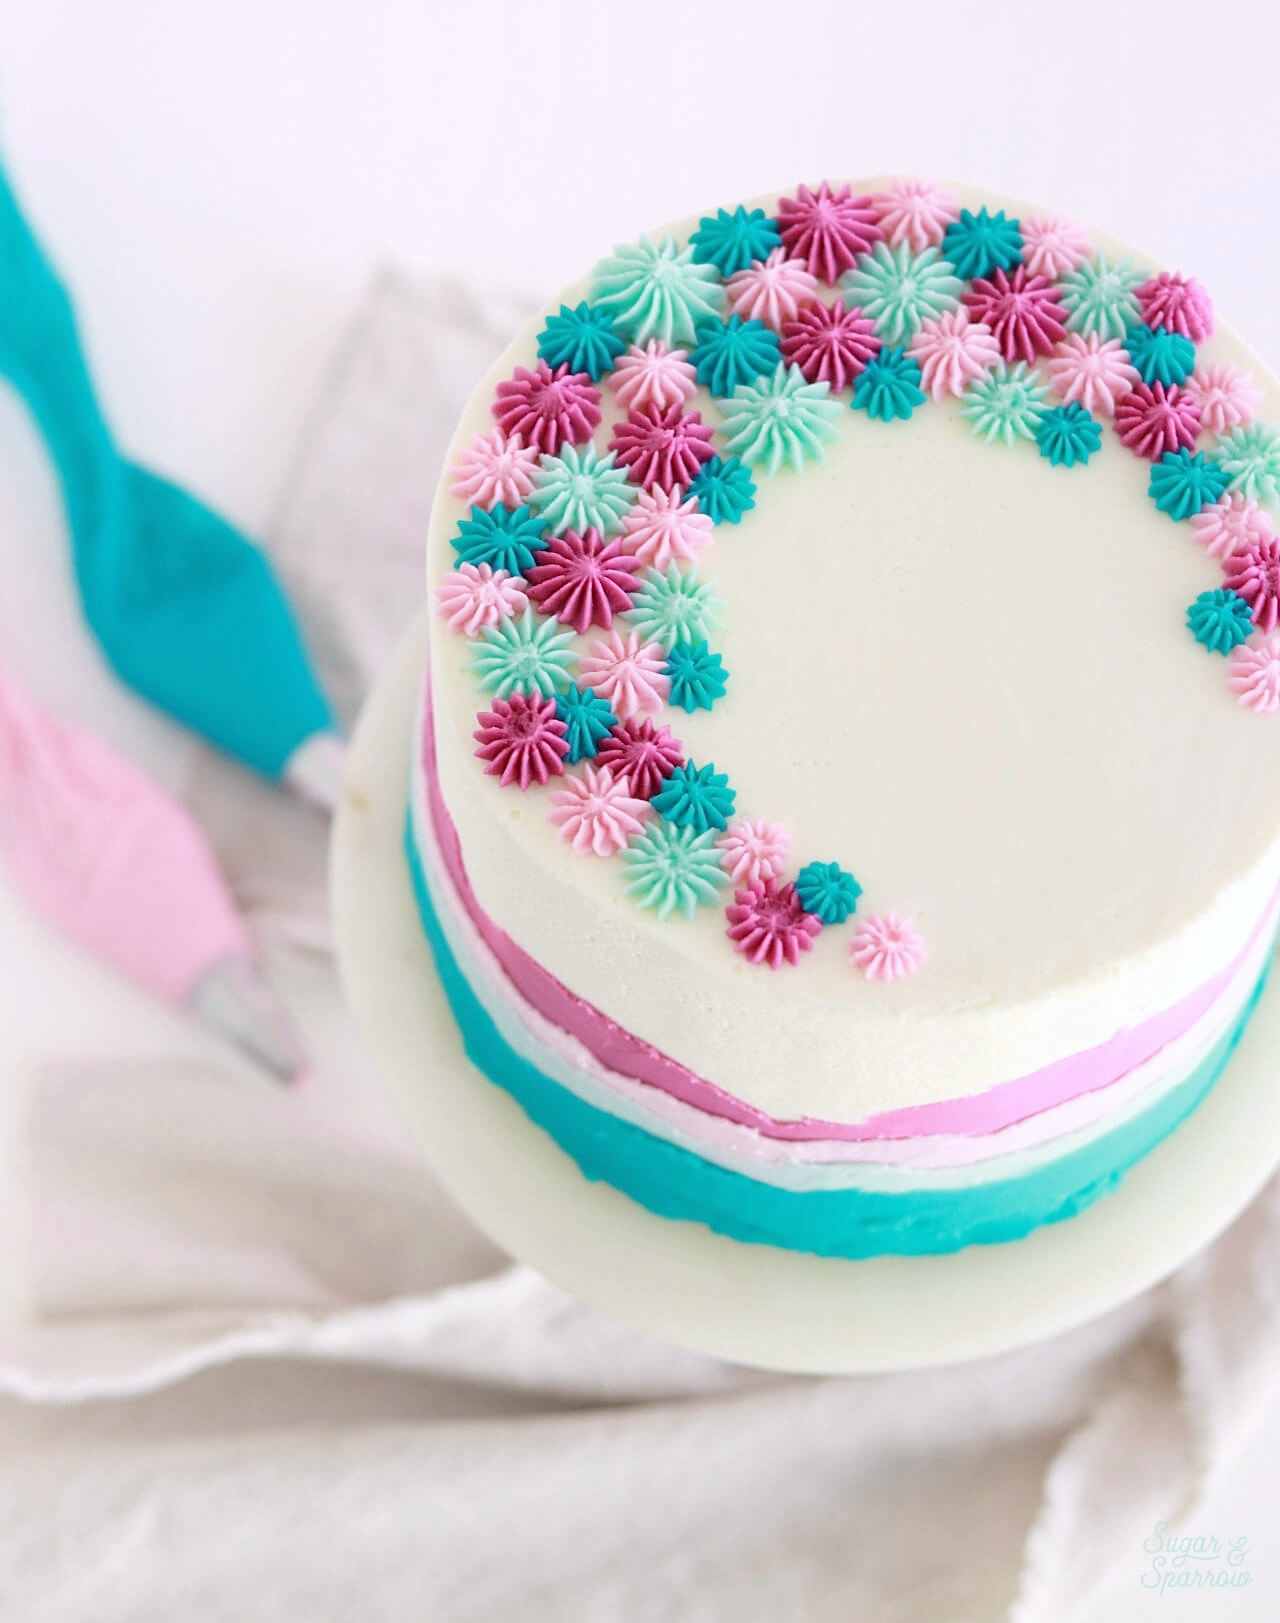
Step 5: Finish with Some Piping (Optional)

You can feel free to stop the design process with the previous step, but I thought this cake needed a little something extra on the top. I prepared four piping bags with Wilton Tip 4B and filled each one with a different color. Then, I added buttercream stars along the top in a crescent shape. 

piping with wilton tip 4b
buttercream piping with wilton tip 4b

And there you have it – a totally eye-catching alternative to the gradient ombrè! This Layered Ombrè look is so much fun to create and an easy look for anyone to achieve. 

layered ombre buttercream cake with piping
ombre cake by sugar and sparrow

If you found this tutorial helpful for your Layered Ombrè Cake, I want to see the results! Be sure to leave a comment below and tag @sugarandsparrowco in any Instagram photos of your cake. I love to see what you create!

By: Whitney · In: Featured, Tutorials · Tagged: americolor fuchsia, americolor teal, buttercream cake, buttercream layers, cake decorating, cake tutorial, layered ombre cake, ombre buttercream, ombre cake, party cake

you’ll also love

the best vanilla cupcakes recipeThe Perfect Vanilla Cupcake Recipe
pumpkin layer cake recipe by sugar and sparrowPerfect Pumpkin Layer Cake Recipe
oreo cookies and cream cakeOreo Layer Cake Recipe

Join the List

Stay up to date & receive the latest posts in your inbox.

Reader Interactions

Comments

  1. Celena says

    August 13, 2021 at 2:28 pm

    Hi! This is one of the only tutorials I could find like this after I botched a buttercream overlay today. My main question is can you pipe on the different colors and freeze between layers? I’m wondering if I don’t freeze between colors if they would blend together.

    Reply
    • Whitney says

      August 15, 2021 at 9:25 am

      Hi Celena! I don’t freeze or refrigerate between layers in this tutorial. I didn’t have any problem with the colors blending together and I think its because I start with a frosted cake that has been refrigerated, so when I spread each color on it’s going on top of a cooled cake and has a chance to set up faster. If you’re concerned about the colors blending though, you could certainly try freezing or refrigerating between layers.

      Reply
  2. Carole says

    July 7, 2021 at 8:34 pm

    I am trying to make an ombré watermelon cake for my daughter’s birthday and I can’t get a smooth finish on my buttercream. It looks like little holes all over it. Any ideas on what may be the issue?

    Reply
    • Whitney says

      July 11, 2021 at 9:32 pm

      Hi Carole! It sounds like there are air bubbles in your buttercream finish. The way to fix that is pop the cake in the refrigerator for about 30 minutes to let it firm up and then do another thin layer of buttercream over the top of that to fill in all the air bubble holes and smoothe it all out. You can also use this guide I wrote on how to create a smooth buttercream cake: https://sugarandsparrow.com/smooth-buttercream-cake-tutorial/

      Reply

Leave a Reply Cancel reply

Your email address will not be published. Required fields are marked *

Recipe Rating


Next Post >

How to Make + Decorate Cakes Ahead of Time

Primary Sidebar

Welcome to Sugar & Sparrow

Welcome to Sugar & Sparrow

Helping you whip up pretty desserts with confidence and creativity. And hopefully sharing a few laughs with you along the way!

Learn More

Connect

let’s bake!

Get my very best recipes, baking tips, and decorating tutorials sent to your inbox

Featured Posts

diy animals in party hats cake toppers

DIY Party Animal Cake Toppers

lemon cream cheese buttercream for cakes and cupcakes

Lemon Cream Cheese Buttercream

black velvet cake plant based

Vegan Black Velvet Cake (Dye-Free!)

Search

Archives

Follow Along

@sugarandsparrowco

TOP 10 BIRTHDAY CAKES 🥳 These are just a few of my TOP 10 BIRTHDAY CAKES 🥳 These are just a few of my favorite birthday cake recipes that will make anyone feel special! 

Comment “BIRTHDAY” and I’ll send you all 24+ of my favorite birthday cake ideas –  classics like funfetti cake and yellow cake with chocolate frosting, plus ice cream cakes, sheet cakes, and more complex flavor combos like Snickers cake and Millionaire cake. 

https://sugarandsparrow.com/best-birthday-cake-recipes/

#birthdaycake #partycake #birthdaycakeideas #cakeinspiration #cakeideas
BERRIES & CREAM SHEET CAKE 🍓🫐 deliciously light, n BERRIES & CREAM SHEET CAKE 🍓🫐 deliciously light, naturally stunning, and the easiest cake you’ll want to make all Summer long!! It’s my favorite bakery-style vanilla sheet cake that’s so soft and moist, topped with silky whipped cream cheese frosting and fresh berries. I love how quickly this cake comes together with simple ingredients + doesn’t require any fancy cake decorating techniques to make it a showstopper✨

Grab the recipe link in my bio or find it at https://sugarandsparrow.com/berries-and-cream-sheet-cake/

#berrycake #berriesandcream #sheetcake #whippedcreamfrosting #cakedecorating
FUNFETTI SHEET CAKE 🥳 the most celebratory flavor FUNFETTI SHEET CAKE 🥳 the most celebratory flavor of all and so perfect for a crowd. It’s extra soft and moist vanilla cake speckled with rainbow sprinkles + captures that box mix texture but it’s 100% homemade and EASY! Top it with vanilla buttercream and rainbow sprinkles for the perfect party cake 🎉
 
Full recipe (w/ frosting) at the link in my bio or at https://sugarandsparrow.com/funfetti-sheet-cake/ 

INGREDIENTS 
2 1/2 Cups (265g) sifted cake flour 
2 tsp baking powder 
1/2 tsp baking soda 
1 tsp salt 
3/4 Cup (170g) unsalted butter, room temp 
1 3/4 Cup (340g) granulated white sugar 
3 large eggs, room temp 
1/2 Cup (120g) sour cream, room temp 
1 Tbsp pure vanilla extract 
1 Cup (240ml) whole milk, room temp 
1/3 Cup (60g) rainbow sprinkles, coated in 1 tsp flour 
 
INSTRUCTIONS 
1. Preheat the oven to 325°F (163ºC). Grease and line a 9×13 baking pan. 
2. In a medium bowl, whisk together the sifted cake flour, baking powder, baking soda, and salt. Set aside.  
3. In the bowl of your stand mixer fitted with the paddle attachment (or with a large bowl and hand mixer), beat the butter and sugar on medium-high speed until light and fluffy, 4 min. Add the eggs one at a time, then add the vanilla and sour cream and mix for one minute on high speed. 
4. Turn the mixer off and add the dry ingredients all at once. Mix on low speed until just combined, then add the milk and mix until just incorporated.  
5. Coat the rainbow sprinkles in 1 teaspoon of flour, then gently fold them into the cake batter. Pour the batter into the prepared baking pan and bake for 30-35 minutes, or until the cake springs back to the touch and a toothpick inserted into the middle comes out clean. Let the cake cool in the baking dish until room temperature, then decorate with vanilla buttercream + rainbow sprinkles (full recipe link in bio!) 
 
#funfetti #funfetticake #sheetcake #cake #birthdaycake
COOKIE DOUGH ICE CREAM CAKE 🍪🍦this is the birthday COOKIE DOUGH ICE CREAM CAKE 🍪🍦this is the birthday cake of my DREAMS and I’m so excited to share the recipe with you!! It’s chocolate and vanilla no-churn ice creams with homemade cookie dough chunks in every bite, swirled together and set on a delicious Oreo cookie crust 😍 easy, perfectly sliceable, and ideal for making ahead! I’m already dreaming about when I can make it again ✨

Get the recipe link in my bio + at https://sugarandsparrow.com/chocolate-chip-cookie-dough-ice-cream-cake/

#birthdaycake #icecreamcake #cakedecorating #nochurnicecream #icecreamlover
My kitchen in May 💛 some of these recipes had me f My kitchen in May 💛 some of these recipes had me feeling CRAZY with how many tests they took 🤪 but in the end I am so happy with these ones I got to hit the publish button on + I made my DREAM birthday cake that I can’t wait to share ASAP!!

Comment “MAY” to get all the recipes that are available now:

-Strawberry Shortcake Sheet Cake
-Lemon Cupcakes
-Lemon Cream Cheese Buttercream
-Orange Poppyseed Cake
-Whipped Mascarpone Frosting
-No-Bake Marbled Strawberry Cheesecake
-Chocolate Chip Cookie Cake

https://sugarandsparrow.com/everything-i-baked-in-may
 
#dessert #bakersofinstagram #baking #bakinglove #dessertlovers

Footer

On the Blog

  • Cake Basics
  • Recipes
  • Tutorials

Info

  • About
  • Privacy Policy & Disclosure

stay in the know

Copyright © 2026 · Theme by Sugar & Sparrow