• Cake
  • Frosting
  • YouTube
  • My Favorite Tools
  • Nav Social Icons

  • Skip to primary navigation
  • Skip to main content
  • Skip to primary sidebar
  • Skip to footer
  • Recipes
    • Cake
    • Cupcakes
    • Frosting
    • Ice Cream
    • Vegan
  • Cake Basics
  • Tutorials
  • Blog
  • About
  • Mobile Menu Widgets

    Connect

    Search

Sugar & Sparrow logo in script font

Sugar & Sparrow

Lifestyle and Cake from Portland Oregon

  • Cake Basics
  • Recipes
    • Cake
    • Cupcakes
    • Cookies & Bars
    • Filling
    • Frosting
    • Ice Cream
    • No-Bake
    • Small Batch
    • Vegan
  • Tutorials
  • Book
  • Blog
  • About

No-Bake Cadbury Mini Egg Cheesecake

April 2, 2025 · In: Featured, No-Bake, Recipes, Seasonal, Spring

Jump to Recipe

One thing you need to know about me is how much I love Cadbury Mini Eggs. It’s kind of a problem when they show up on the shelves this time of year because I can’t help myself! As an ode to my love for them I made this Cadbury Mini Egg Cake recipe last year (which features a ganache filling made from Cadbury Mini Eggs!) and this year I decided to incorporate them into this no-bake cheesecake which is so light and creamy, easy to make, and loaded with crushed Cadbury Mini Eggs. It’s the perfect make-ahead dessert for your next Spring gathering! 

Cadbury mini egg cheesecake recipe by sugar and sparrow
no-bake cadbury mini egg cheesecake

Delicious & Easy No-Bake Cheesecake

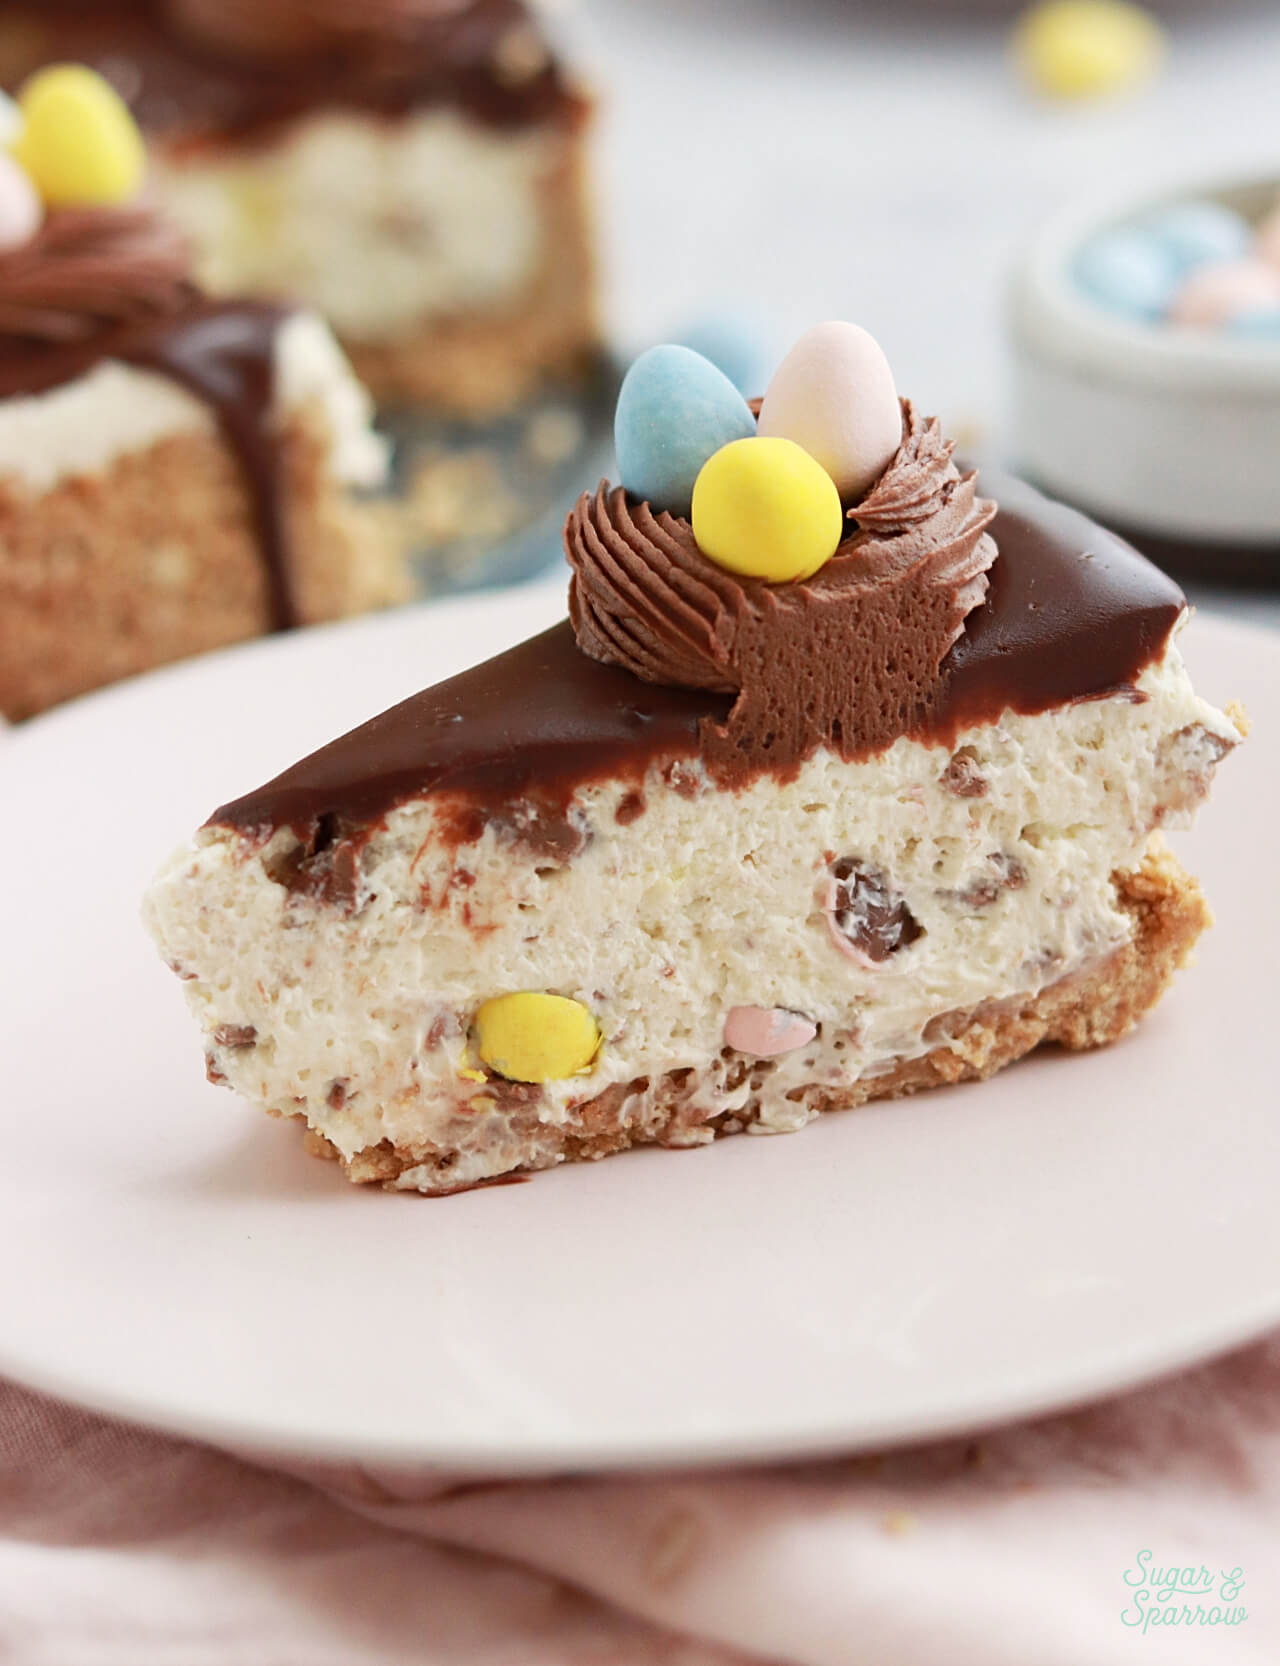
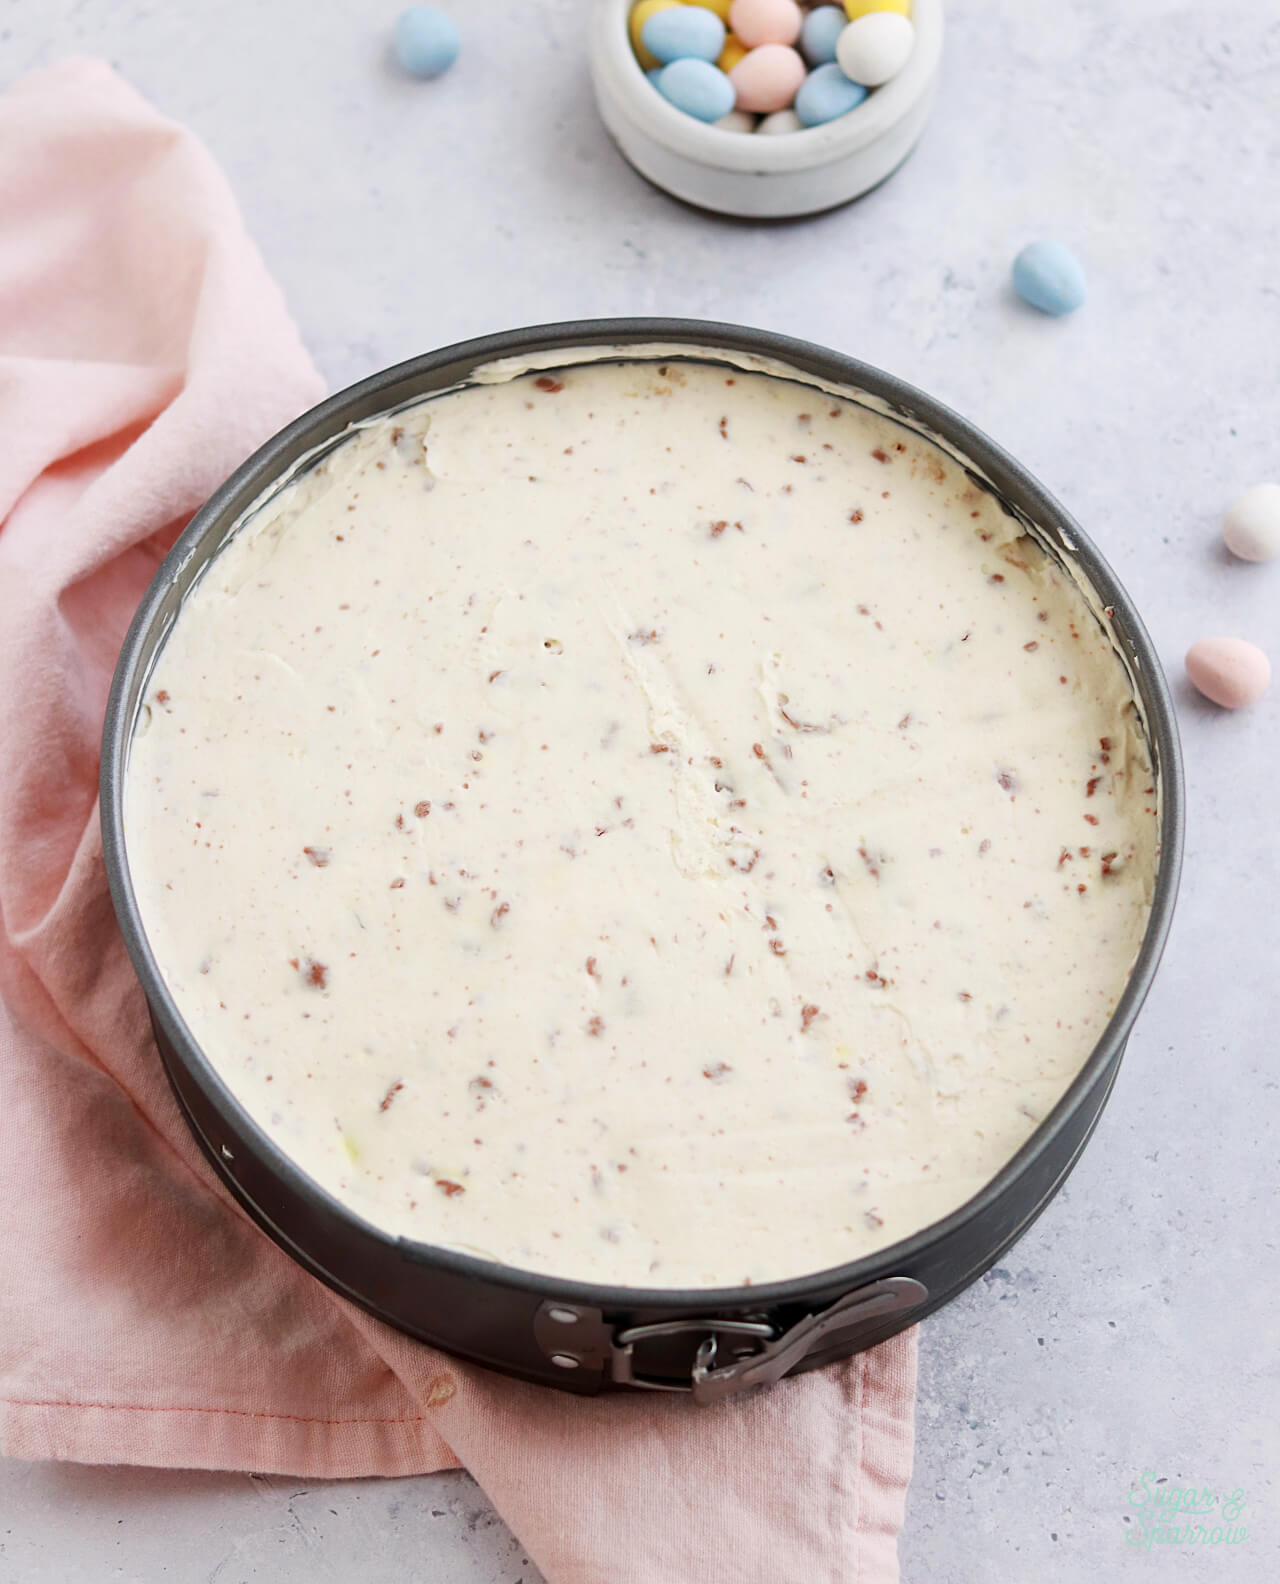
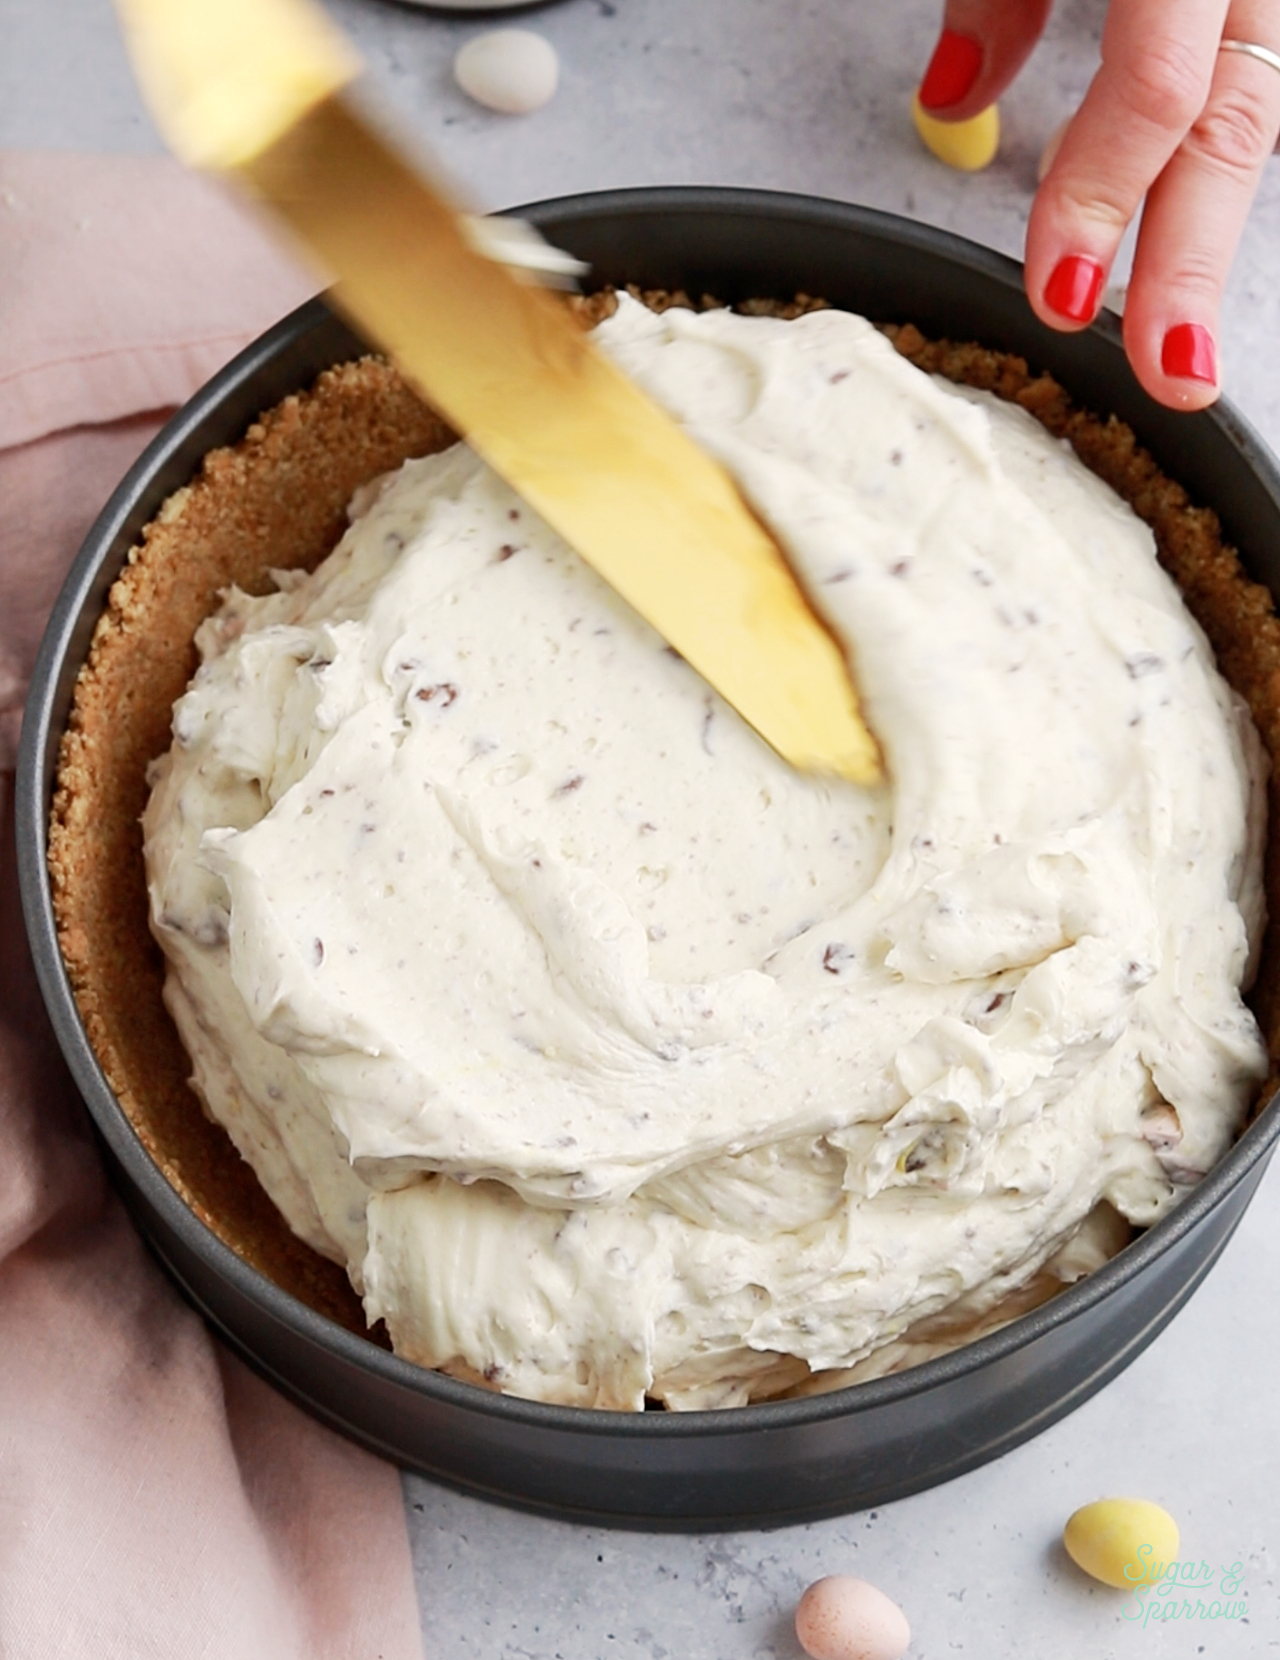
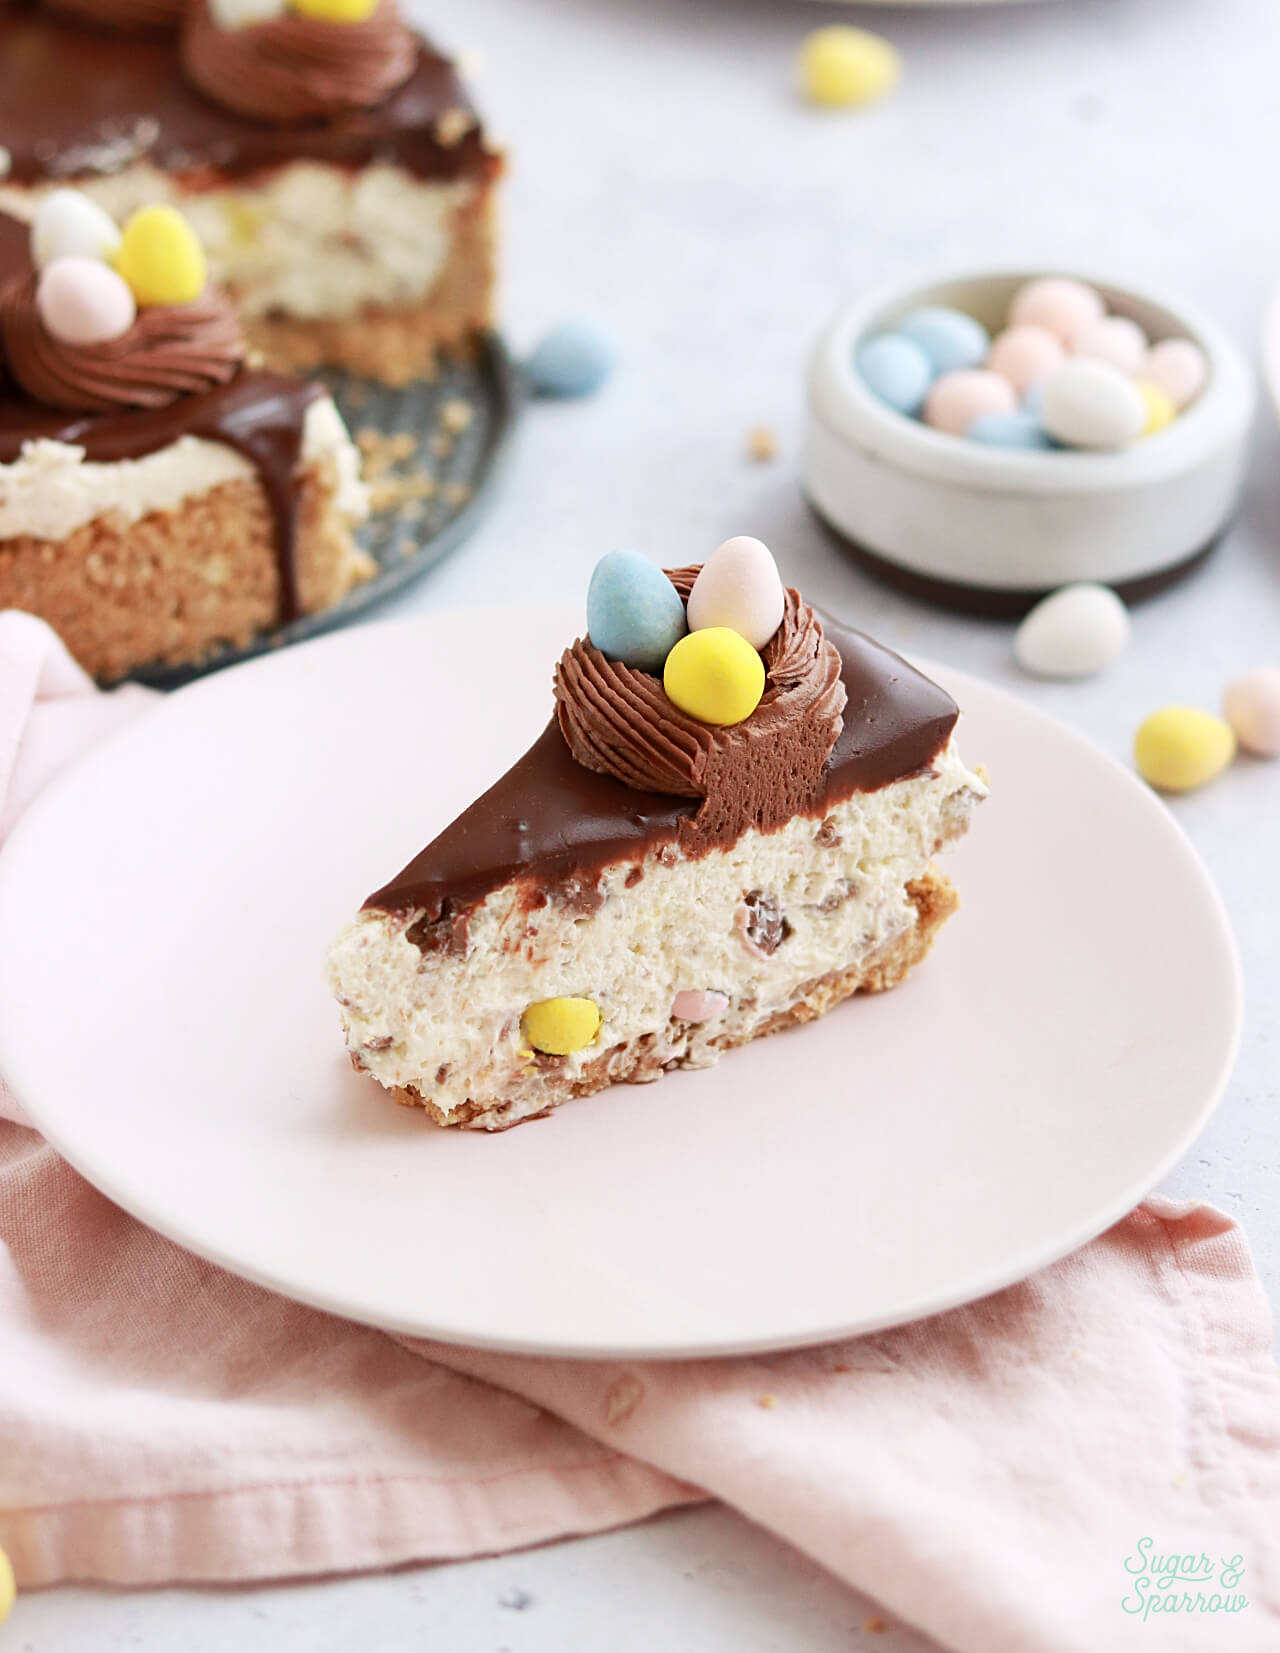
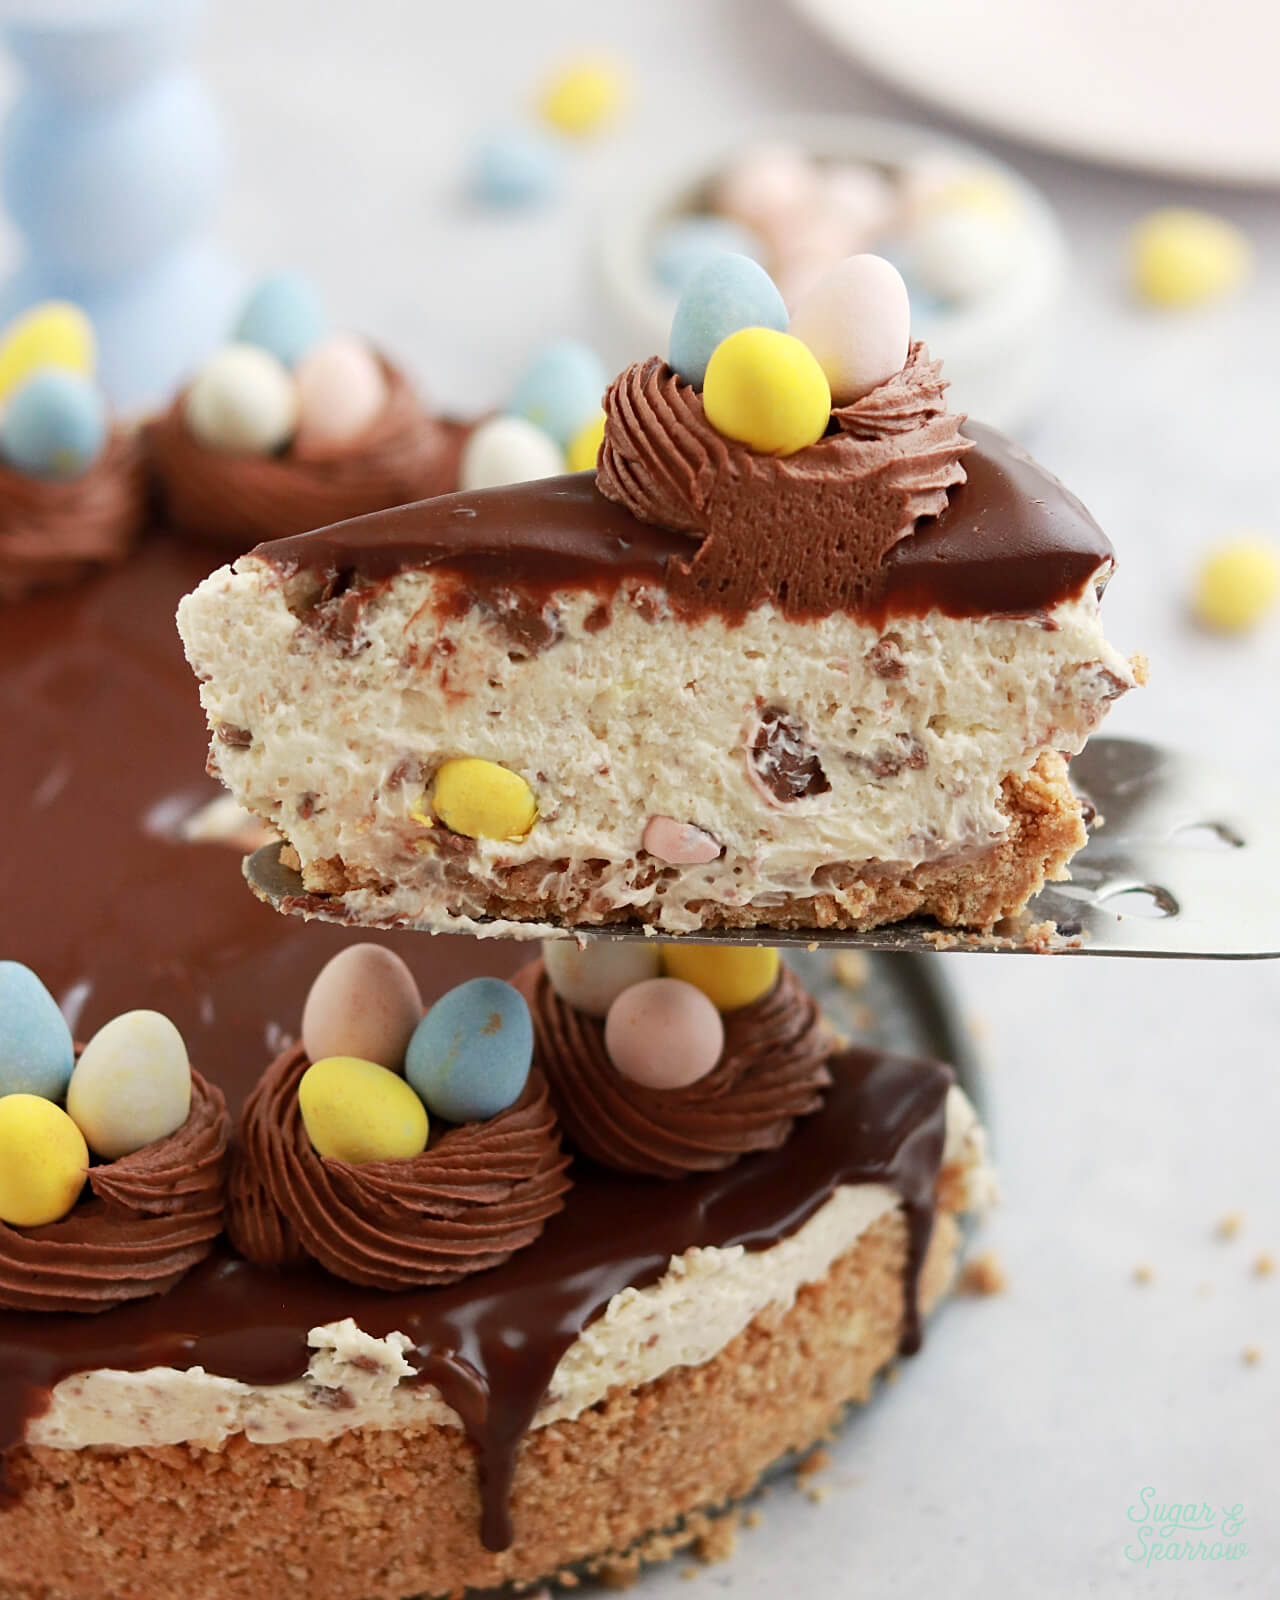
This Cadbury Mini Egg cheesecake doesn’t require an oven. Instead, you’ll create a cheesecake base with cream cheese and flavoring, then fold it together with whipped cream until you have a beautifully creamy filling. After folding crushed Cadbury Mini Eggs into that filling, you’ll pile it into a springform pan lined with graham cracker crust, smooth it down, and place it in the refrigerator overnight. Once set, the filling becomes mousse-like and perfectly stable with a delicious cheesecake flavor and speckles of Cadbury Mini Eggs in every bite. It’s magical! 

no-bake cheesecake recipe with cadbury mini eggs

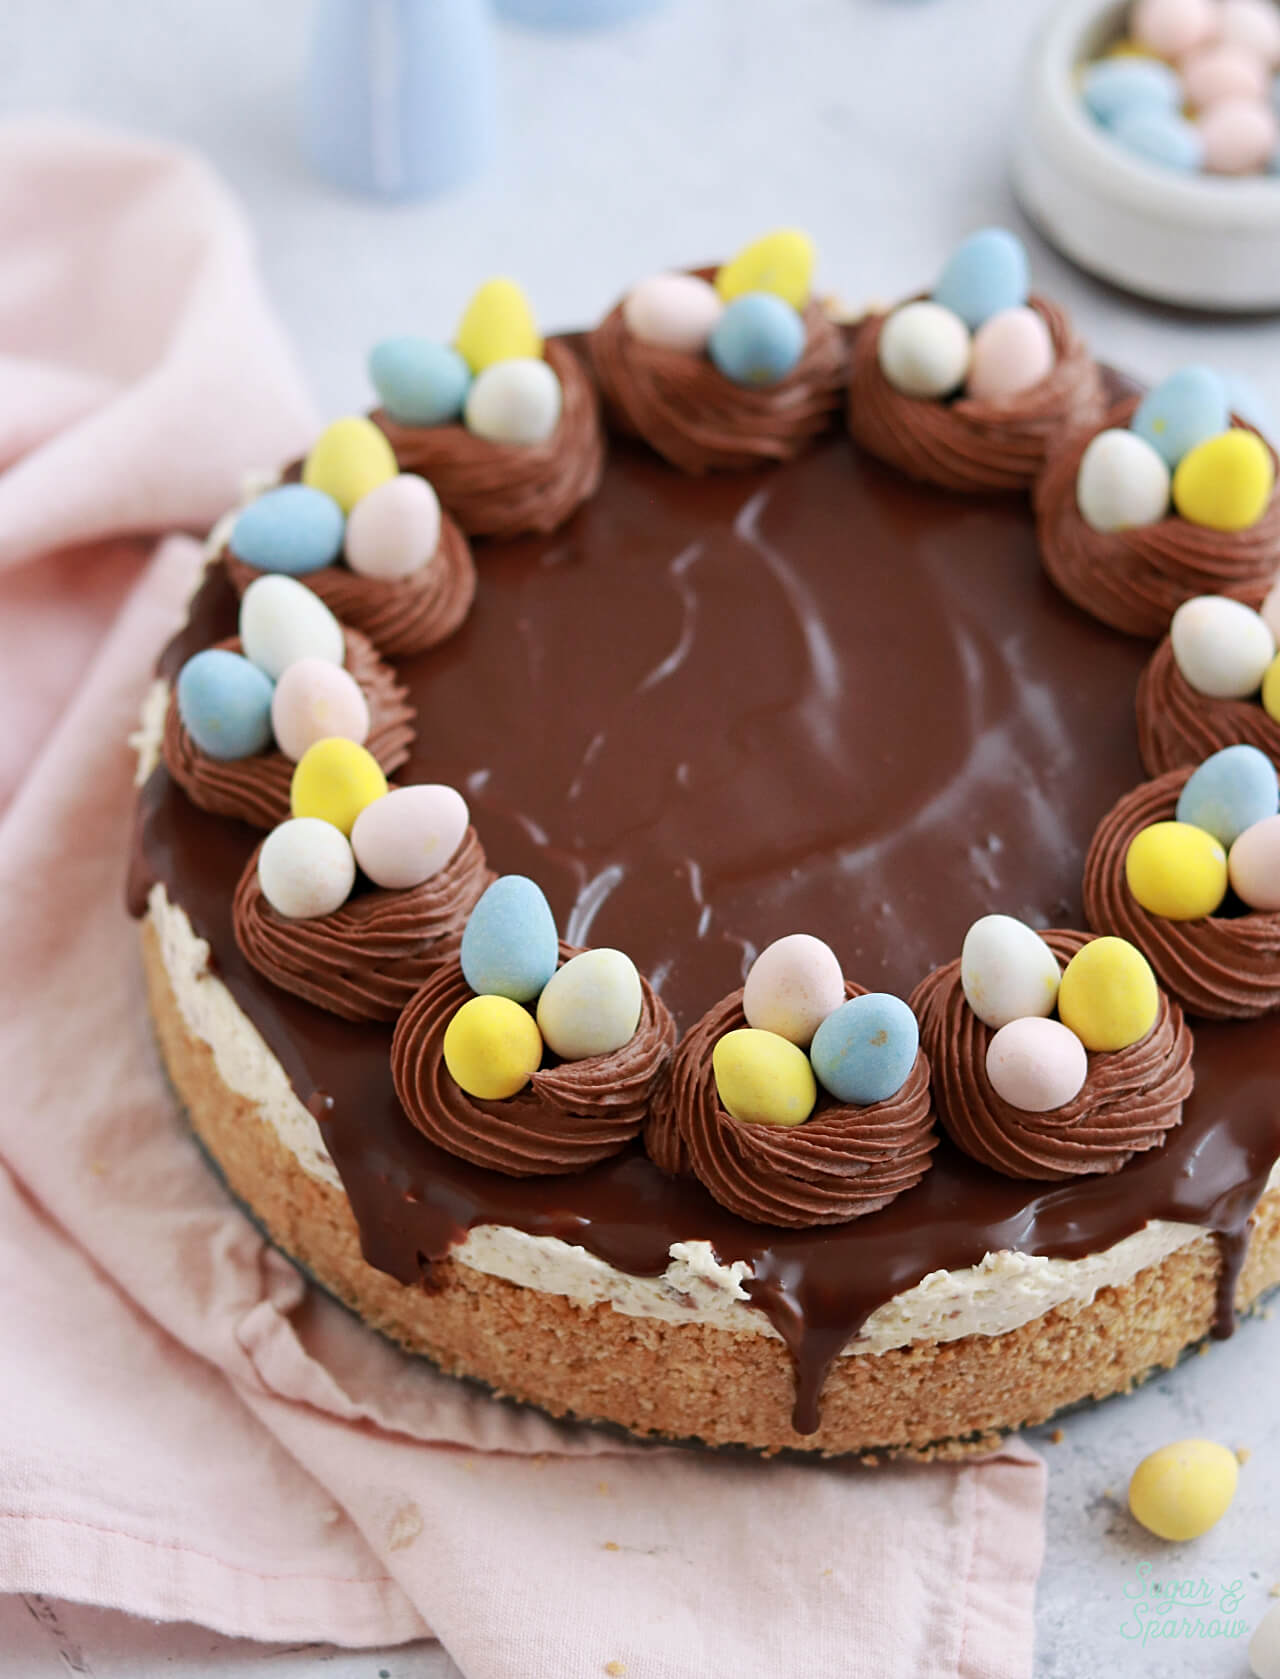
The cheesecake filling is delicious on its own, but together with the graham cracker crust, chocolate ganache topping, and chocolate whipped cream nests filled with Mini Eggs, it’s totally next level. All of these elements are simple to make with less than a handful of ingredients each. And you can make most of them individually (or even the whole assembled cheesecake) ahead of time!

easter cheesecake recipe by sugar and sparrow

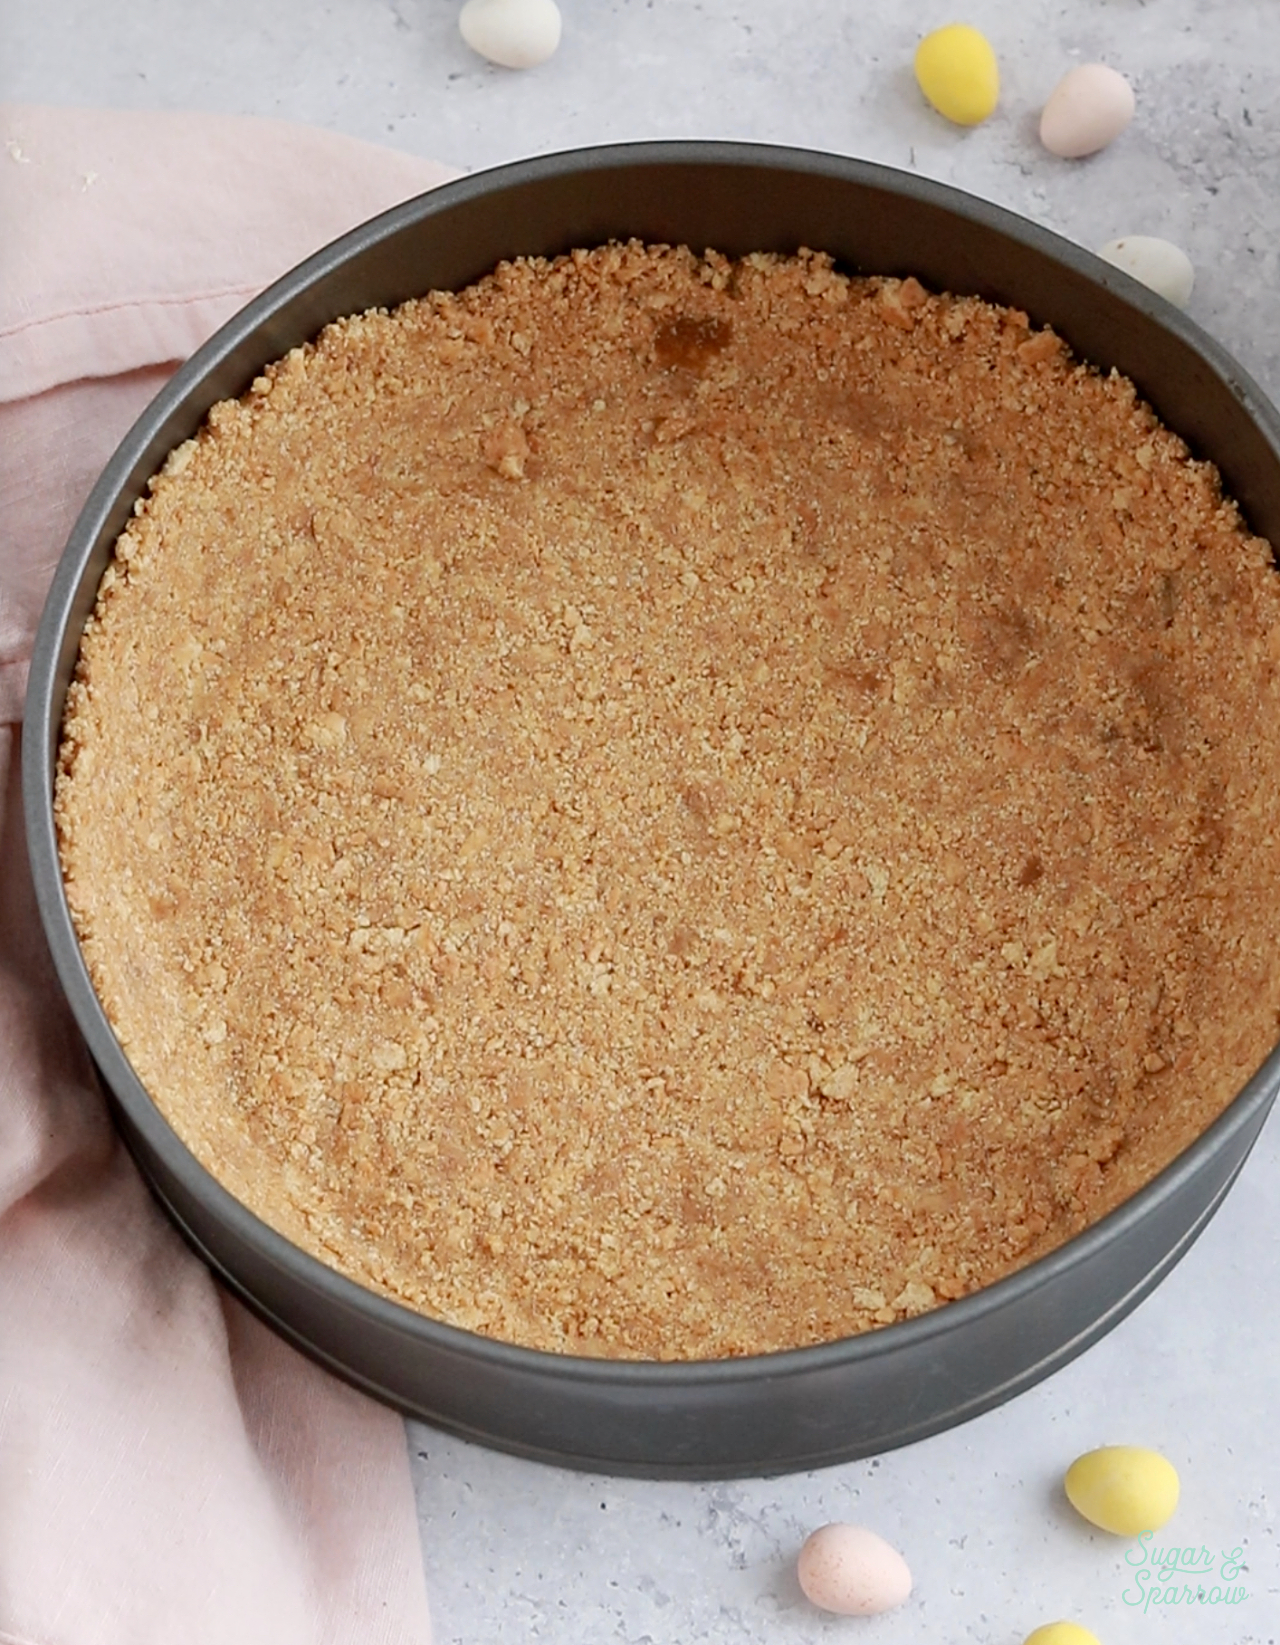
Perfect Graham Cracker Crust

The graham cracker crust is the base of this cheesecake recipe and only requires three ingredients: crushed graham crackers, brown sugar, and melted butter. There are a couple keys to making sure the graham cracker crust is sturdy and holds together when you cut these cheesecake slices:

  1. Finely crush the graham crackers. This step ensures that the crust elements properly stick together. I usually add the graham crackers into a large Ziploc bag and use a rolling pin to grind them down into fine crumbs. 
  2. Mix until it looks like wet sand. After adding the melted butter to the crushed graham crackers and brown sugar, you’ll want to mix it all together until it looks like wet sand. The butter is the glue in this mixture, and the wet sand appearance tells us that it’s properly mixed in. 
  3. Press it into the pan with a glass or jar. After adding the graham cracker crust into your springform pan, press it into the bottom and up the sides of the pan with your hands first, then grab a glass or a mason jar and press on it even more. The tighter you pack it, the better it will hold together when sliced. 
graham cracker crust recipe
easy no-bake cheesecake recipe

Cadbury Mini Egg Cheesecake Ingredients 

There are a few ingredients that make this no-bake cheesecake magic happen. I usually include substitutions in sections like this, but it’s important to stick to these key ingredients for success: 

  • Heavy Whipping Cream. This is the stabilizer in this cheesecake recipe, and it’s important to beat the heavy whipping cream (also known as double cream) into stiff peaks. This will yield the most set cheesecake. 
  • Full-Fat Brick-Style Cream Cheese. You’ll need full-fat brick-style cream cheese to give this recipe the perfect cheesecake flavor and texture. The cheesecake will not set properly if you use the spreadable cream cheese or low-fat versions. Both of those options contain extra water content that will turn your cheesecake filling into cheesecake soup. 
  • Granulated Sugar. To sweeten the filling.
  • Sour Cream. This adds a velvety texture and mimics the signature cheesecake tang. 
  • Vanilla Extract. A little bit of vanilla extract flavors this cheesecake beautifully. 
  • Crushed Cadbury Mini Eggs. You’ll fold crushed Cadbury Mini Eggs into the cheesecake filling as the last step before adding it into the graham cracker crust. I pulsed mine in a food processor a few times to get some good sized chunks but you can also carefully chop them by hand. 
no-bake cadbury mini egg cheesecake for easter dessert

Make No-Bake Cheesecake Ahead of Time 

In addition to being one of the easiest cheesecakes you’ll ever make, it’s so simple to make this cheesecake ahead of time! You can pace yourself by making the graham cracker crust and chocolate ganache ahead, making the cheesecake filling a day or two later, then decorating the following day once set. Or, you can make the cheesecake and let it set up in the refrigerator for up to two days before decorating and serving it. And if you want to make it really far in advance, you can even freeze this cheesecake for up to three months before thawing and serving it. But who could wait that long?

easter dessert ideas no bake cadbury mini egg cheesecake

How to Decorate a Cadbury Mini Egg Cheesecake  

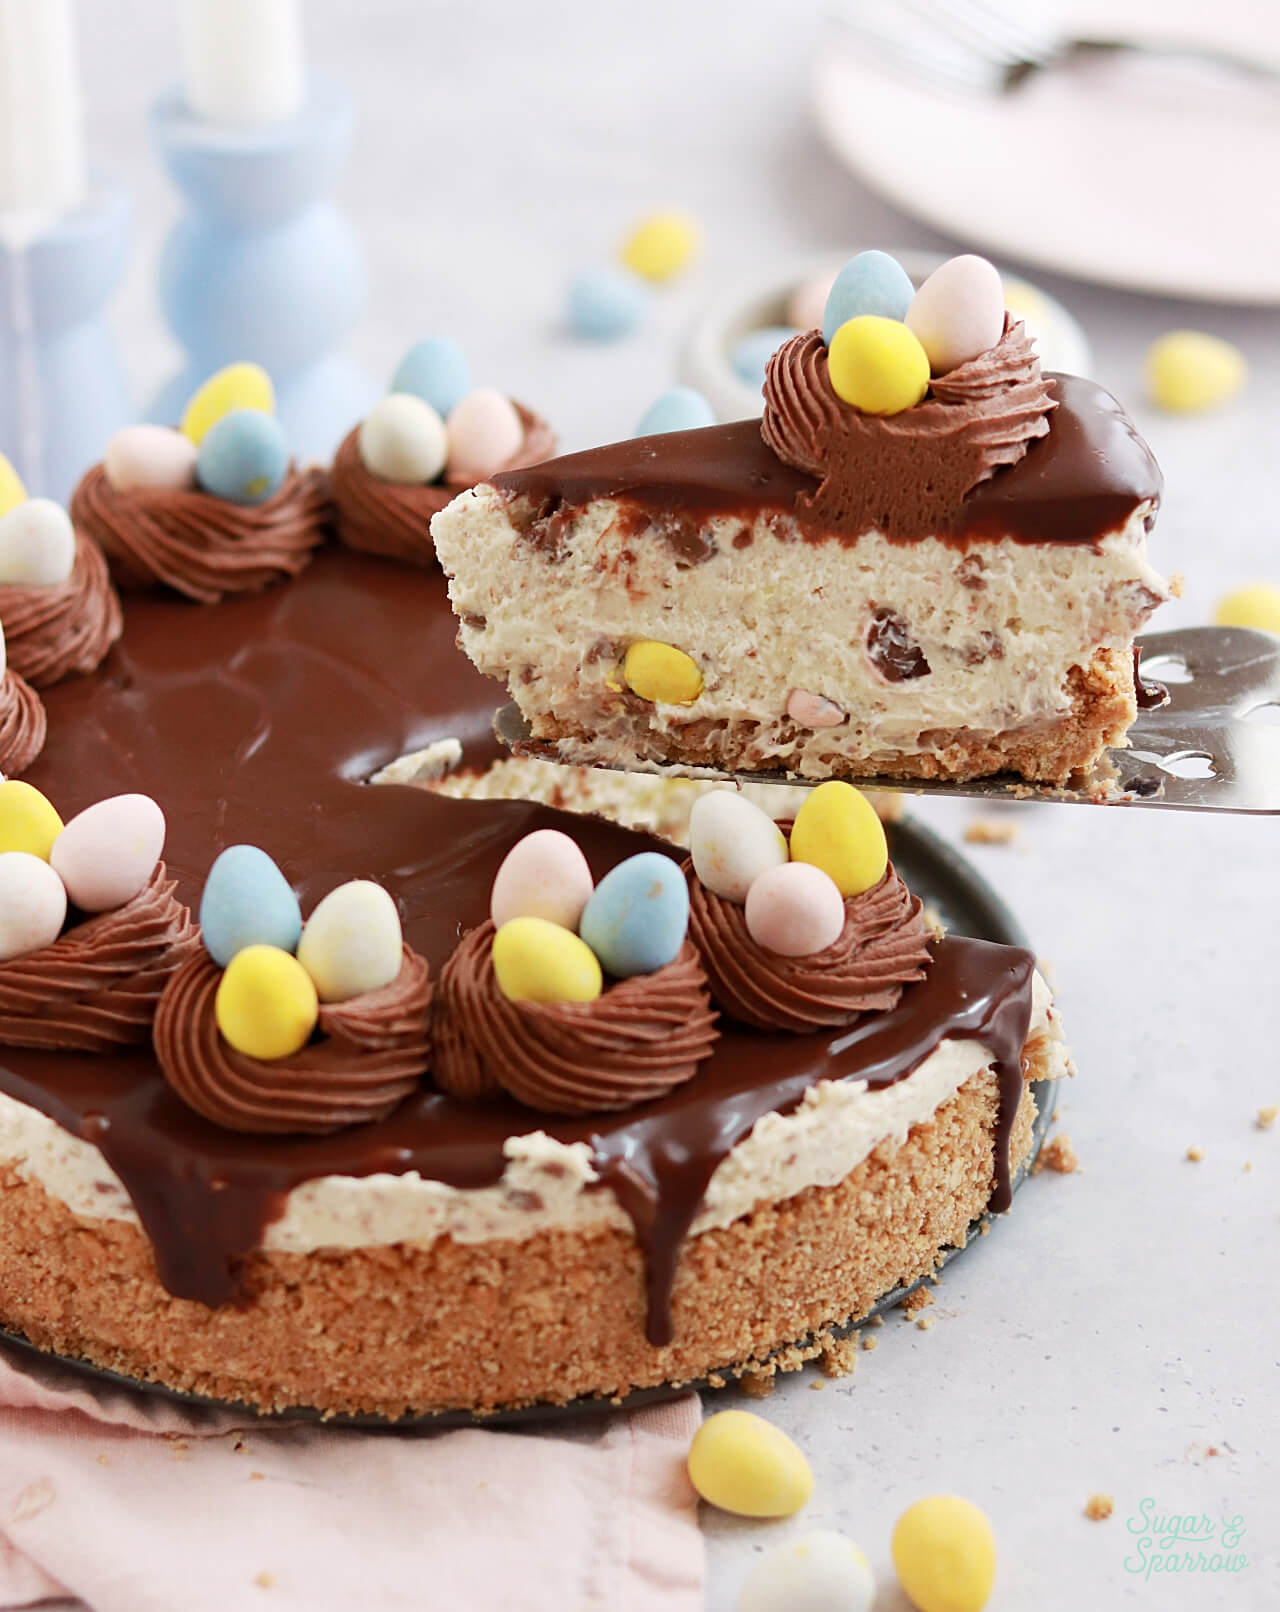
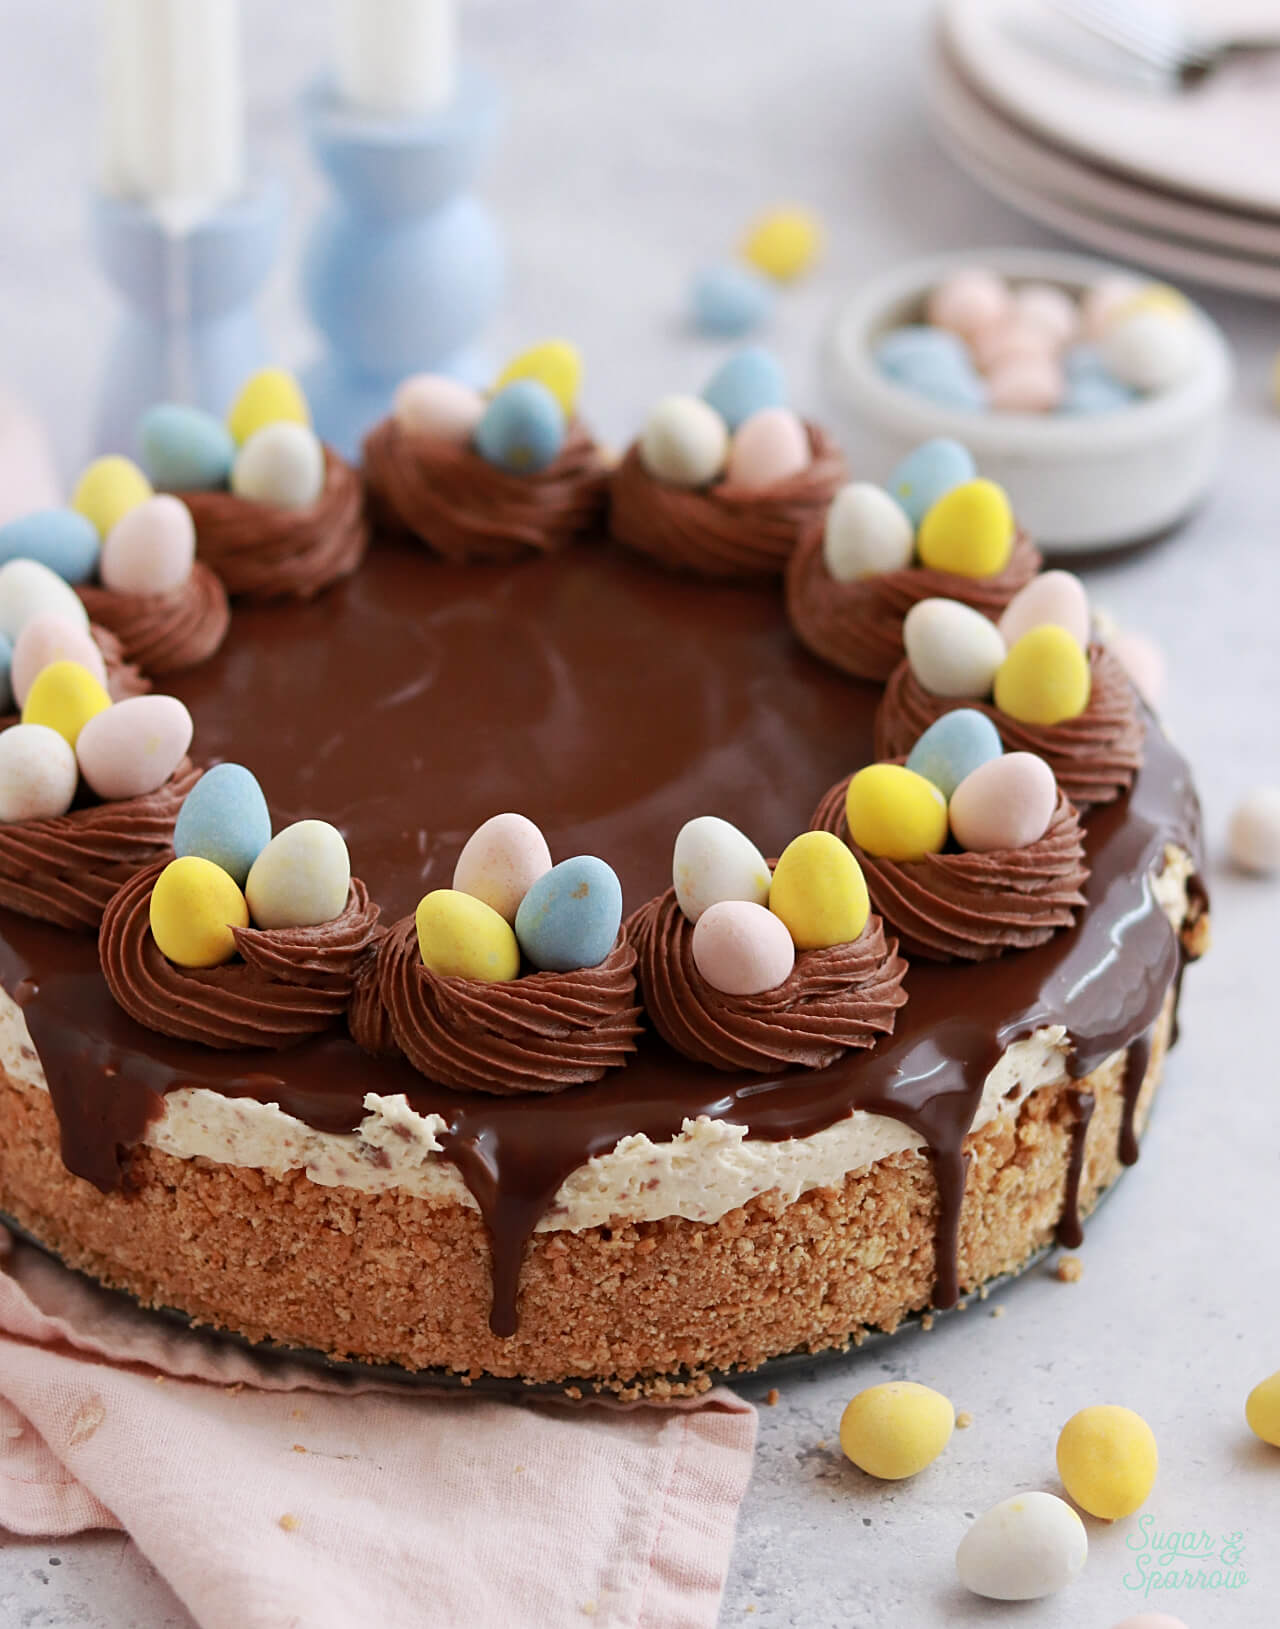
I knew I wanted to incorporate Cadbury Mini Eggs in little nests around the edge of this cheesecake, and this design would have looked cool with the cheesecake filling as the backdrop, but I decided a chocolate ganache topping would make the nests stand out (plus it tastes amazing). So, after the cheesecake filling set, I added chocolate ganache to the top and let it drip down around the edges. Then, I got to work on my nests. Since I had heavy whipping cream left over, I decided to whip it together with some cocoa powder to create chocolate whipped cream, which ended up being the perfect color for the nests. I piped the chocolate whipped cream nests around the edges of the cheesecake with Wilton Tip 4B and then placed three Cadbury Mini Eggs into each one. 

cadbury mini egg cheesecake with chocolate ganache topping
cadbury egg cheesecake recipe by sugar and sparrow

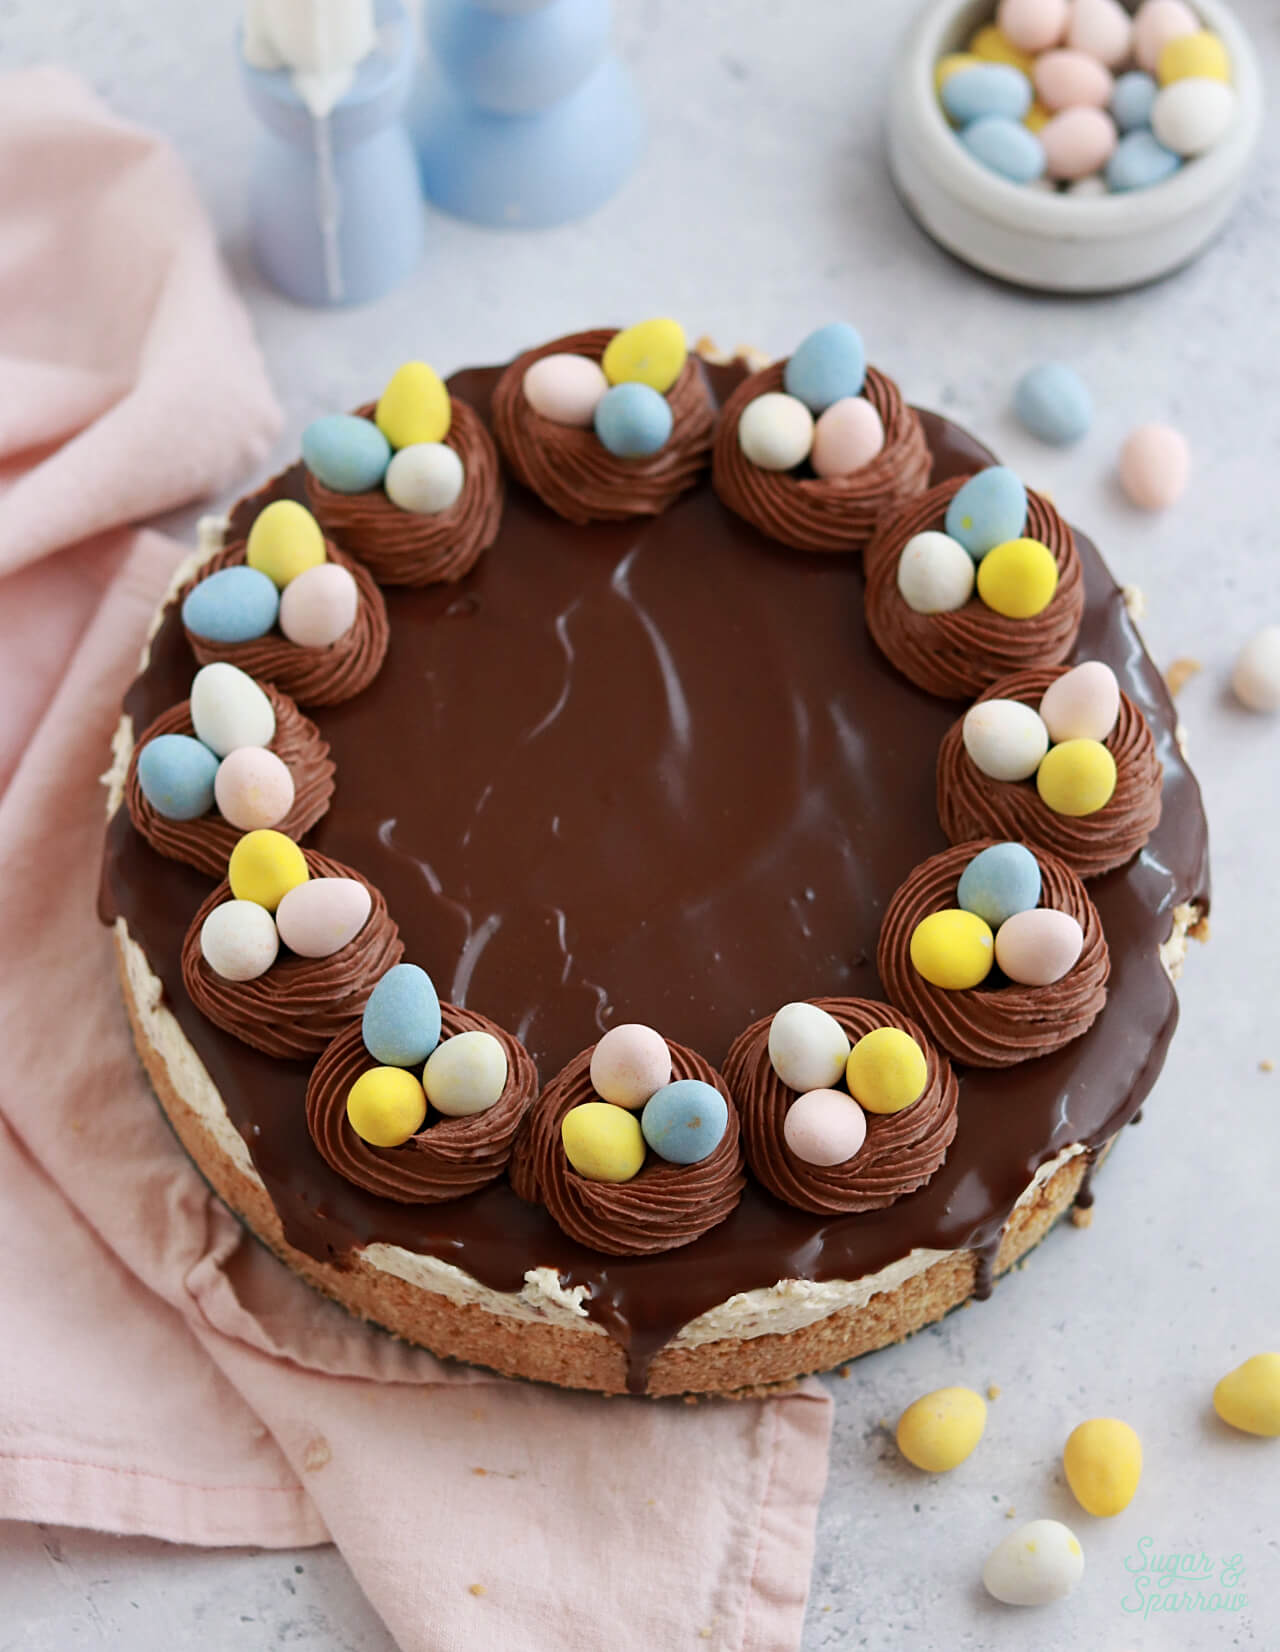
You can feel free to get as creative with the design of this Cadbury Mini Egg Cheesecake as you want! Pile the Cadbury Mini Eggs in the middle of the cheesecake. Drizzle the chocolate ganache on top. Or leave the chocolate ganache off entirely to let the speckled cheesecake filling shine through. However you decorate, it will be heavenly to eat and is sure to be a hit at your next Easter or Spring gathering! 

easy Cadbury Mini Egg Cheesecake recipe

No-Bake Cadbury Mini Egg Cheesecake

5 from 1 vote
The perfect easy Easter dessert! Rich and velvety no-bake cheesecake speckled with crushed Cadbury Mini Eggs on a delicious graham cracker crust. Top it with chocolate ganache and chocolate whipped cream "nests" to make it extra festive.
Print Recipe Pin Recipe
Prep Time:45 minutes mins
Refrigeration:8 hours hrs
Total Time:8 hours hrs 45 minutes mins
Course: Dessert
Cuisine: American
Servings: 12 slices

Equipment

  • 9-inch springform pan

Ingredients

Graham Cracker Crust

  • 2 Cups (240g) graham cracker crumbs about 15 full sheets
  • 1/3 Cup (67g) packed light brown sugar
  • 1/2 Cup (113g) unsalted butter, melted

Cadbury Mini Egg Cheesecake Filling

  • 1 Cup (8oz, 215g) Cadbury Mini Eggs
  • 1 1/4 Cups (300ml) heavy whipping cream, cold
  • 24 Oz (678g) full-fat brick-style cream cheese, room temperature not the spread
  • 1/2 Cup (100g) granulated sugar
  • 2 Tbsp powdered sugar
  • 1/4 Cup (60g) sour cream, room temperature
  • 1 tsp pure vanilla extract

Chocolate Ganache Topping

  • 1/2 Cup (93g) semi-sweet chocolate chips
  • 1/2 Cup (120ml) heavy whipping cream

Chocolate Whipped Cream (For the Nest Decorations)

  • 1/2 Cup (120ml) heavy whipping cream
  • 2 Tbsp granulated sugar
  • 2 Tbsp unsweetened cocoa powder regular or Dutch processed
  • 1/4 tsp pure vanilla extract

Garnish

  • 36 Cadbury Mini Eggs about 4.5 Oz

Instructions

Make the Graham Cracker Crust

  • In a medium bowl, mix together the graham cracker crumbs, brown sugar, and melted butter. Pour the mixture into a 9-inch springform pan or 10-inch springform pan. Pack it down tightly to the bottom and up the sides of the pan using a glass jar or measuring cup. You’ll want to pack it as tightly as possible to prevent it from crumbling apart when you cut the cheesecake. Freeze the graham cracker crust in the pan for 10-20 minutes while you prepare the cheesecake filling.

Make the Cadbury Mini Egg Cheesecake Filling

  • Place the Cadbury Mini Eggs into a food processor and pulse a few times to roughly chop them, then set aside. Alternatively you can chop the Mini Eggs by hand.
  • Using a hand mixer with a medium bowl or a stand mixer fitted with a whisk attachment, whip the cold heavy cream on medium-high speed until stiff peaks form, about 4–5 minutes. Set aside.
  • In another large bowl (either with a hand mixer or stand mixer), beat the cream cheese and granulated sugar together on medium until creamy. Scrape down the bowl and paddle as needed. Add the powdered sugar, sour cream, and vanilla extract. Beat on medium-high speed until smooth and combined (no lumps), about 2–3 minutes.
  • Use a rubber spatula to gently fold the whipped cream into the cheesecake filling until combined. Then, fold in the chopped Cadbury Mini Eggs.
  • Remove the graham cracker crust from the freezer and add the Cadbury Mini Egg cheesecake filling into it. Spread the filling to the edges of the crust and smooth the top using an angled spatula, then cover it tightly with plastic wrap or aluminum foil. Refrigerate for at least 8 hours and up to 2 days. For best results, chill the cheesecake overnight. This will yield the most set filling.
  • Wait to move on in the recipe until the cheesecake is completely set unless you want to make the chocolate ganache ahead of time (see notes for make ahead tips).

Make the Chocolate Ganache

  • Place chocolate chips into a heat resistant bowl (glass or metal) and set aside.
  • In a saucepan over medium-high heat, warm the heavy whipping cream until it just starts to simmer. I always look for small bubbles forming around the edge and a soft simmer starting in the middle. When it's reached this point, pour the cream into your bowl of chocolate and let sit for about 30 seconds. 
  • Whisk it together until it’s uniform in consistency and there are no bits of chocolate left on your whisk. Cool ganache at room temperature for 10-20 minutes, or until the ganache itself is room temperature or slightly above.

Make the Homemade Whipped Cream

  • Make sure the no-bake Cadbury Mini Egg cheesecake filling is set before making the chocolate whipped cream. Put the metal bowl of a stand mixer or a large metal mixing bowl into the refrigerator to chill for at least 15-30 minutes.
  • Add the heavy whipping cream, granulated sugar, cocoa powder, and vanilla extract into the chilled bowl. Using a whisk attachment on your stand mixer or a hand mixer, combine the ingredients on low speed, then beat together on high speed until stiff peaks form, 1-2 minutes.

Assembly

  • When you’re ready to decorate the no-bake Cadbury Mini Egg cheesecake, remove the rim from the springform pan. Top with the (room temperature) chocolate ganache and smooth it down with an angled spatula until it reaches over the edges in some places. Place the cheesecake back into the refrigerator for about 5 minutes to let the ganache set up while you prepare a piping bag with the chocolate whipped cream, if using.
  • Add the chocolate whipped cream into a piping bag fitted with Wilton Tip 4B and pipe nests (two overlapping circles) around the edges of the cheesecake. Fill each nest with Cadbury Mini Eggs. Store in the refrigerator until you're ready to serve!

Notes

Make Ahead Tips:
  1. After making and freezing the graham cracker crust, it can be covered and stored in the refrigerator until you add the filling (1-2 days ahead is best for the freshest flavor).
  2. You can make and assemble the no-bake Cadbury Mini Egg cheesecake up to 2 days in advance, stored in the refrigerator and covered in aluminum foil or plastic wrap. You can alternatively freeze the cheesecake for up to 3 months after it’s set in the refrigerator. Be sure to cover well if freezing. I recommend one layer of plastic wrap and one layer of aluminum foil. 
  3. The chocolate ganache can be made ahead and stored in the refrigerator in an airtight container for up to two weeks. When you’re ready to use it as a topping, microwave it in 10 second increments, stirring after every interval until your ganache is room temperature and uniform in consistency.
  4. The chocolate whipped cream cannot be made ahead, so be sure to make it right before you plan on piping the nests. 
Leftovers: Store leftovers (covered well) in the refrigerator for up to 5 days or in the freezer for up to 3 months. 

By: Whitney · In: Featured, No-Bake, Recipes, Seasonal, Spring · Tagged: cadbury, cadbury mini eggs, Easter, easter desserts, no bake cheesecake

you’ll also love

The best easter dessert recipes24+ Best Easter Dessert Recipes
no bake cheesecake recipe by sugar and sparrowThe Perfect No-Bake Cheesecake Recipe
Cadbury Mini Egg chocolate ganache filling for cakesCadbury Mini Egg Ganache

Join the List

Stay up to date & receive the latest posts in your inbox.

Reader Interactions

Comments

  1. Renae says

    April 20, 2025 at 2:48 pm

    5 stars
    Rave reviews from my family. I chose to drizzle chocolate over the top rather than cover with the ganache which made the chocolate nests really pop. Thanks for sharing this delicious recipe!

    Reply
    • Whitney says

      April 20, 2025 at 9:23 pm

      Yay, Renae! That makes me so happy!

      Reply

Leave a Reply Cancel reply

Your email address will not be published. Required fields are marked *

Recipe Rating


Next Post >

Carrot Cake with Cream Cheese Frosting

Primary Sidebar

Welcome to Sugar & Sparrow

Welcome to Sugar & Sparrow

Helping you whip up pretty desserts with confidence and creativity. And hopefully sharing a few laughs with you along the way!

Learn More

Connect

let’s bake!

Get my very best recipes, baking tips, and decorating tutorials sent to your inbox

Featured Posts

christmas sugar cookie dough cake recipe

Christmas Sugar Cookie Dough Cake

how to scale a cake recipe

How to Scale a Cake Recipe Up or Down

how to transfer cakes to a cake stand

How to Transfer Cakes From a Turntable to a Stand

Search

Archives

Follow Along

@sugarandsparrowco

STRAWBERRY SHORTCAKE ICE CREAM CAKE 🍓if Strawbe STRAWBERRY SHORTCAKE ICE CREAM CAKE 🍓if Strawberry Shortcake Ice Cream Bars make you nostalgic for your childhood ice cream truck days, you’re going to LOVE this easy ice cream cake version - no ice cream maker needed 🙌🏼 

Full recipe on my blog at https://sugarandsparrow.com/strawberry-shortcake-ice-cream-cake/

STRAWBERRY CRUNCH 
24 whole (280g) Golden Oreos, finely ground
3 Oz box strawberry jello
4 Tbsp unsalted butter, melted

ICE CREAM LAYERS
1/2 Cup (15g) freeze-dried strawberries
2 Cups heavy whipping cream, cold
1 Tbsp pure vanilla extract, divided
14 Oz sweetened condensed milk
1 1/2 tsp strawberry jam or preserves

1. Combine the strawberry crunch ingredients and bake on a lined cookie sheet at 350ºF for 4 min.
2. For the crust, combine 1 Cup of the strawberry crunch with 2 Tbsp melted butter. Press into the bottom of a 6-inch springform pan and line with an acetate collar. Place in the freezer while you move on.
3. Using a food processor, grind the freeze-dried strawberries into a fine powder. Set aside.
4. Add the heavy whipping cream and 2 tsp of vanilla extract into a chilled bowl, then whip it with a hand mixer to stiff peaks. Place in the refrigerator.
5. Divide the condensed milk between two medium bowls. To one bowl, add 1 teaspoon of vanilla. To the second bowl, add the finely strawberry powder and the jam/preserves. Whisk the ingredients together within each individual bowl.
6. Divide the whipping cream evenly between each of the two bowls you created in the previous step. Fold each sweetened condensed milk mixture together with the divided whipped cream to create the vanilla ice cream and strawberry ice cream.
7. Layer half of each of the ice creams on top of the strawberry crunch crust, sprinkle a layer of strawberry crunch on top, then repeat. Freeze for 6 hours and serve. 
#icecreamcake #strawberryshortcake #nochurnicecream #icecreamlover #strawberry
LEMON CUPCAKES 🍋 after about a dozen recipe tes LEMON CUPCAKES 🍋 after about a dozen recipe tests, this one is everything I could want in a lemon cupcake! Fluffy-yet-moist, bursting with natural lemon flavor, and absolutely irresistible topped with lemon cream cheese buttercream. 

Full recipe (with frosting) linked in my bio + at https://sugarandsparrow.com/homemade-lemon-cupcakes/

INGREDIENTS:
1 Cup (132g) all-purpose flour
1 tsp baking powder
1/4 tsp salt
1/4 Cup (60ml) whole milk, room temperature
3 Tbsp (45ml) lemon juice from 1 medium lemon
3/4 Cup (150g) granulated sugar
3 Tbsp (42g) unsalted butter, room temperature
2 Tbsp (30ml) vegetable oil
2 large eggs, room temperature
1 tsp pure vanilla extract

INSTRUCTIONS:
1. Preheat the oven to 350ºF (177ºF) and line a standard cupcake pan with 12 paper liners.
2. In a large bowl, whisk together the flour, baking powder, and salt. Set aside. 
3. In the bowl of a stand mixer fitted with the paddle attachment (or with a hand mixer and large bowl), add the lemon zest to the sugar and mix on low speed until fragrant and well combined, about 1 minute. Meanwhile, combine the lemon juice with the milk and set aside. 
4. Add the butter to the lemon-sugar mixture and cream on medium speed until and combined, about 2 minutes. Add the vegetable oil and beat until light and creamy, about 3 minutes. Scrape down the bowl and paddle as needed.
5. Mix in the eggs one at a time on low speed, then add the vanilla and turn the mixer to medium speed for one minute.
6. Turn the mixer off and add the flour mixture all at once. Mix on low speed until just combined, then slowly pour in the lemon-milk mixture. Mix until just combined, about 30 seconds.
7. Divide the batter equally between the liners and bake for 14-18 min. Cool, then top with frosting of your choice (link in bio for lemon cream cheese frosting)�
#lemoncupcakes #creamcheesefrosting #lemon #cupcakes #cupcakedecorating
April in my kitchen 🌸 I published 5 NEW recipes April in my kitchen 🌸 I published 5 NEW recipes on my site, baked my Oreo cupcake recipe for a fundraiser and found it was just as delicious as I remember, and filmed/photographed 3 recipes that will be on my blog in May (Lemon Cupcakes, Lemon Cream Cheese Buttercream, and No-Bake Marbled Strawberry Cheesecake) 🥰 

Comment “APRIL” to get all the available recipes and stay tuned for more! 

#bakersofinstagram #springbaking #cakedecorating #cupcakes #bakinglove
SHEET PAN COOKIE CAKE 🍪 slice it warm for a fud SHEET PAN COOKIE CAKE 🍪 slice it warm for a fudgy chocolate chip cookie OR let it settle into a moist and chewy cookie cake that’s perfect for decorating! My fave vanilla buttercream + sprinkles turn this giant chocolate chip cookie into the perfect birthday cake alternative at the end 🥳
⁣
Full recipe + decorating ideas at https://sugarandsparrow.com/sheet-pan-chocolate-chip-cookie-cake/
⁣
INGREDIENTS⁣
1 Cup (226g) unsalted butter, melted⁣
1 1/3 Cups (267g) packed light or dark brown sugar⁣
1/2 Cup (100g) granulated sugar⁣
3 large eggs⁣
1 Tbsp pure vanilla extract⁣
1 tsp baking soda⁣
1 tsp cornstarch⁣
1/2 tsp salt⁣
3 Cups (398g) all purpose flour⁣
2 Cups (350g) semi-sweet chocolate chips⁣
⁣
INSTRUCTIONS⁣
1. Preheat the oven to 350ºF (177ºC). Grease and line a 13×18 inch sheet pan.⁣
2. In a large bowl, add the brown sugar and granulated sugar. Melt the butter in the microwave and pour it over the top of the sugars. Whisk together until uniform. Add the eggs and vanilla, then continue whisking until uniform. Whisk in the baking soda, cornstarch, and salt.⁣
3. Add the flour and use a silicone spatula to fold it in until smooth cookie dough forms. Reserve 1/2 Cup of the chocolate chips and set them aside, then fold the remaining 1 1/2 Cups of chocolate chips into the cookie dough.⁣
4. Place the chocolate chip cookie dough onto the prepared sheet pan and use an offset spatula to spread it all the way to the edges in an even layer.⁣
5. Bake the cookie cake for 14-16 minutes, until it looks golden brown on the edges and set. 
6. Enjoy warm or let it cool and decorate with vanilla buttercream and sprinkles! ⁣
⁣
#cookiecake #chocolatechipcookies #sheetcake #birthdaycake #cakedecorating
STRAWBERRY CUPCAKES 🍓based on my beloved strawb STRAWBERRY CUPCAKES 🍓based on my beloved strawberry layer cake recipe, this cupcake version is just as moist yet fluffy and bursting with natural strawberry flavor! Between the mix of fresh strawberries in the cupcakes + freeze-dried strawberries in the frosting, the flavor is out of this world 🚀

Full recipe link in my bio (with strawberry buttercream) + at https://sugarandsparrow.com/strawberry-cupcakes/

STRAWBERRY CUPCAKES
Yield: 14 cupcakes

INGREDIENTS:
5 oz (143g) fresh or frozen strawberries
1/3 Cup (80ml) whole milk, room temp
1 1/2 Cups (158g) sifted cake flour
1 tsp baking powder
1/4 tsp baking soda
1/2 tsp salt
6 Tbsp (85g) unsalted butter, room temp
1 Cup (200g) granulated sugar
2 large eggs, room temp
3 Tbsp (45g) sour cream, room temp
1 tsp vanilla extract
1 drop pink food coloring (optional)

INSTRUCTIONS: 
1. Puree the strawberries using a food processor (you’ll have about 1/2 cup of puree), then place into a saucepan over medium-low heat. Bring to a simmer, then cook for 10-15 min, stirring occasionally, until you have 1/4 cup. Refrigerate until room temp.
2. Preheat oven to 350ºF (177ºC) and line a standard cupcake pan with liners.
3. Whisk together the sifted cake flour, baking powder, baking soda, and salt and set aside.
4. In a stand mixer w/ paddle attachment (or hand mixer + large bowl), whip the butter on high for 2 min. Add sugar and beat for 2 min, until light and fluffy. Turn the mixer to low and add the eggs one at a time, then add the vanilla and sour cream, turn the mixer to high and beat for 1 min. Meanwhile, whisk together the strawberry puree, whole milk, and food coloring (if using).
5. Turn the mixer off and add all of the dry ingredients at once. Mix on low until just combined, then add the strawberry milk mixture until just combined, about 30 seconds.
6. Fill the cupcake liners 2/3 full and bake for 14-18 minutes. Cool completely before topping with strawberry buttercream (full recipe linked above). 

#strawberrycupcakes #strawberrycake #pinkcupcakes #strawberry #cupcakes

Footer

On the Blog

  • Cake Basics
  • Recipes
  • Tutorials

Info

  • About
  • Privacy Policy & Disclosure

stay in the know

Copyright © 2026 · Theme by Sugar & Sparrow