• Cake
  • Frosting
  • YouTube
  • My Favorite Tools
  • Nav Social Icons

  • Skip to primary navigation
  • Skip to main content
  • Skip to primary sidebar
  • Skip to footer
  • Recipes
    • Cake
    • Cupcakes
    • Frosting
    • Ice Cream
    • Vegan
  • Cake Basics
  • Tutorials
  • Blog
  • About
  • Mobile Menu Widgets

    Connect

    Search

Sugar & Sparrow logo in script font

Sugar & Sparrow

Lifestyle and Cake from Portland Oregon

  • Cake Basics
  • Recipes
    • Cake
    • Cupcakes
    • Cookies & Bars
    • Filling
    • Frosting
    • Ice Cream
    • No-Bake
    • Small Batch
    • Vegan
  • Tutorials
  • Book
  • Blog
  • About

The Perfect No-Bake Cheesecake Recipe

June 17, 2025 · In: Featured, No-Bake, Recipes, Seasonal, Spring, Summer

Jump to Recipe

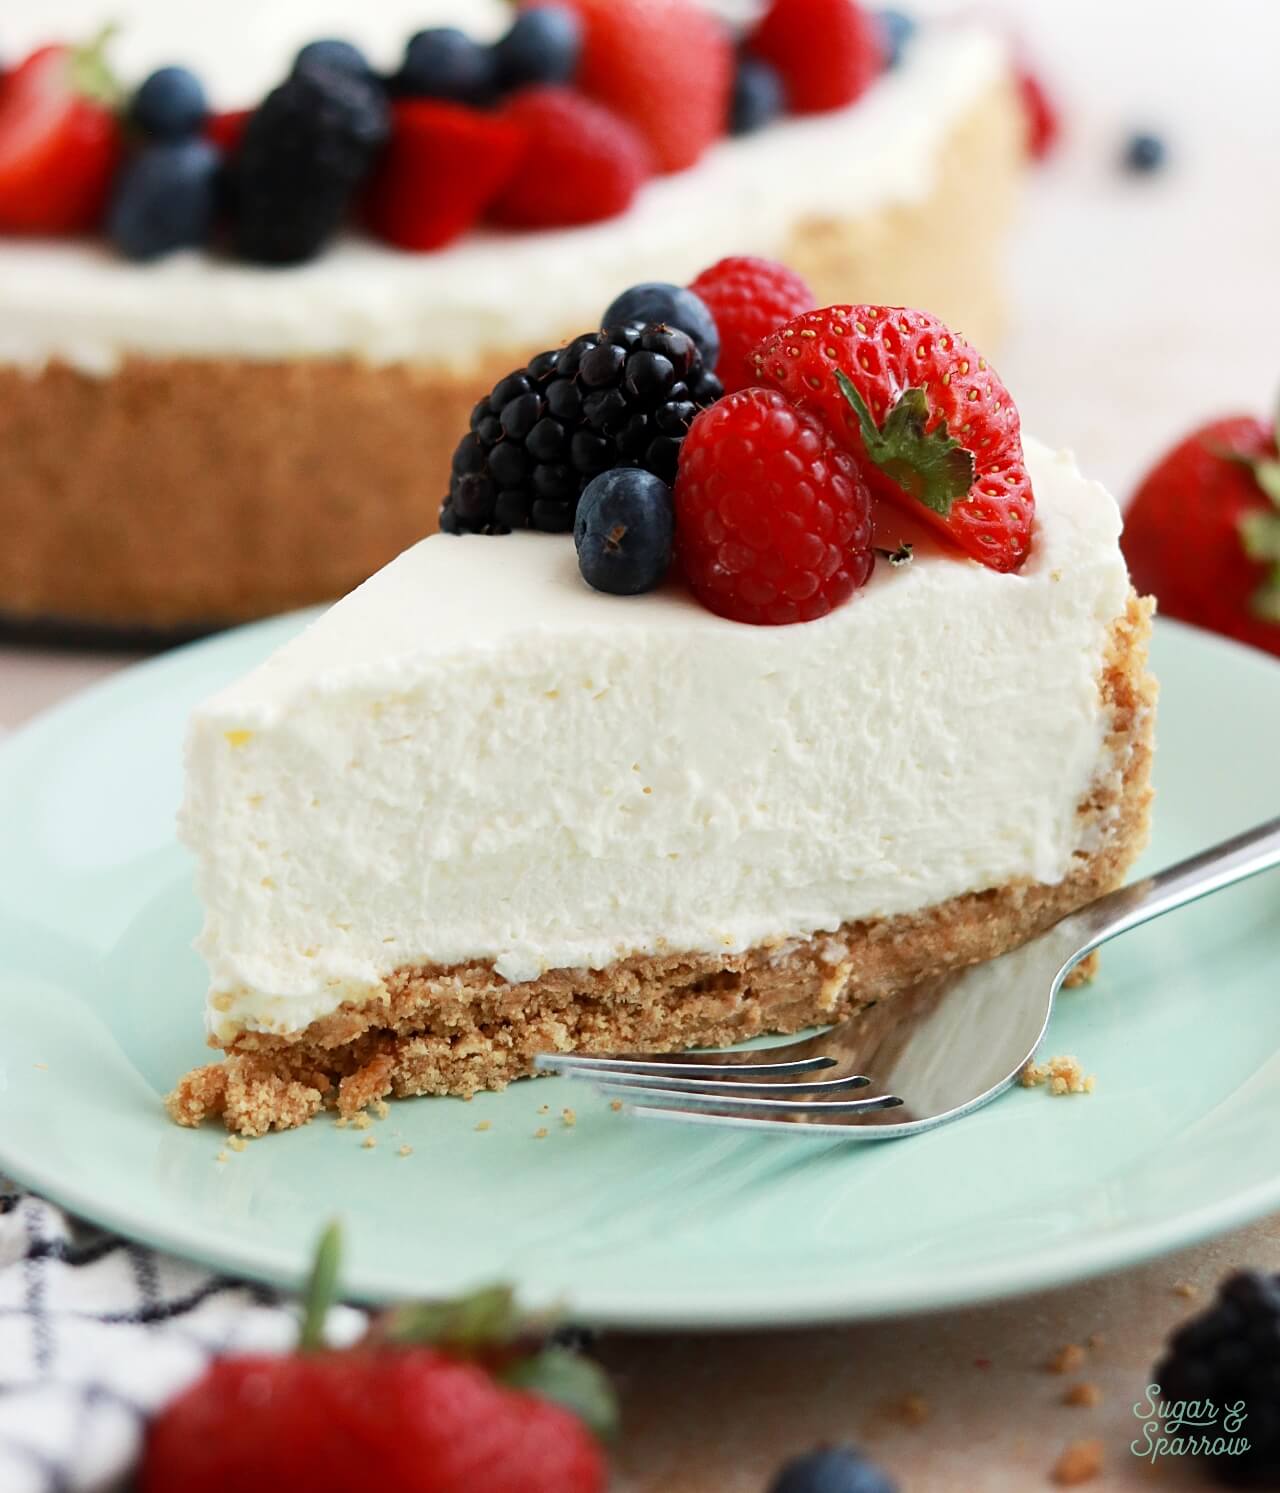
If you’re looking for an easy and delicious dessert that doesn’t require turning on the oven, this no-bake cheesecake is the perfect recipe! It’s a buttery graham cracker crust topped with a velvety smooth, creamy filling that has all the traditional flavor of cheesecake. In other words, it’s a cheesecake without the commitment of a cheesecake. This no-bake cheesecake recipe is so easy to make ahead of time, a great base for other cheesecake flavors or toppings, and perfect for serving at any gathering, any time of year. 

no bake cheesecake recipe with berries
easy cheesecake recipe by sugar and sparrow

How to Make a No-Bake Cheesecake

While traditional cheesecake requires baking the filling and the graham cracker crust, this recipe doesn’t involve turning on the oven at all. It starts with an easy graham cracker crust recipe that you press into a springform pan, then whipping up a cheesecake filling that sets up beautifully in the refrigerator. Here’s how it works:

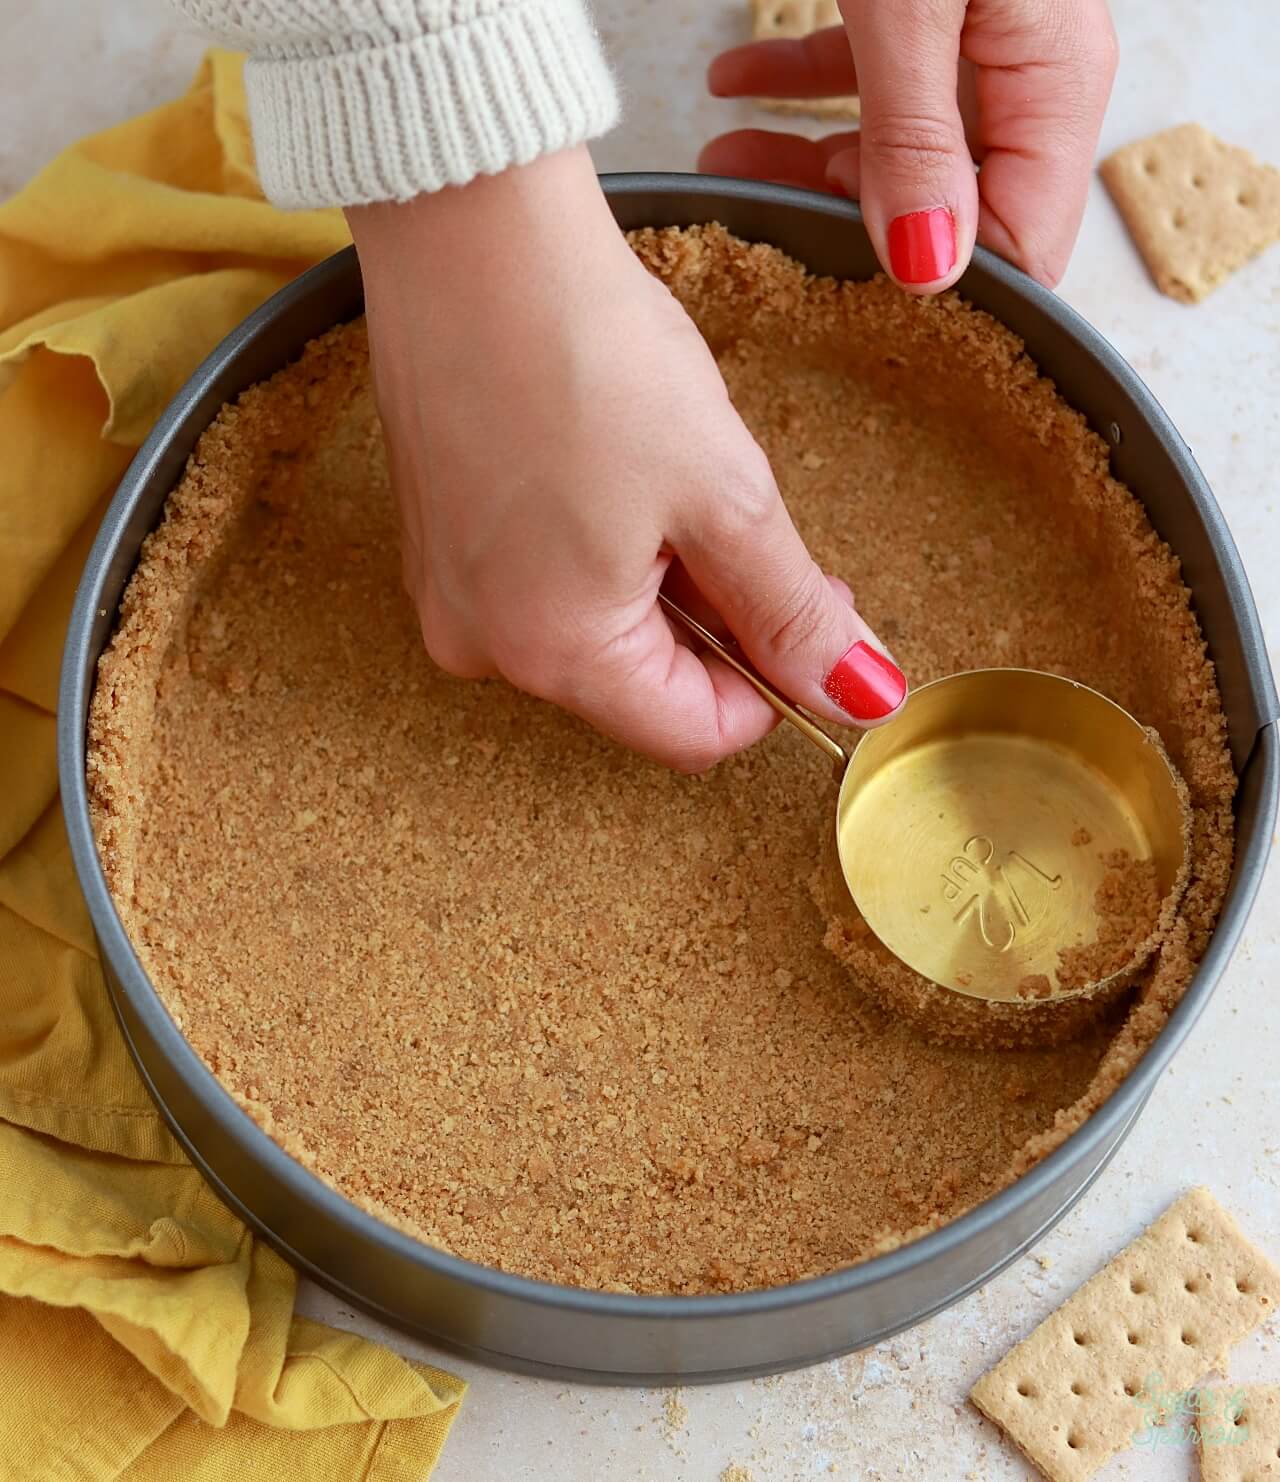
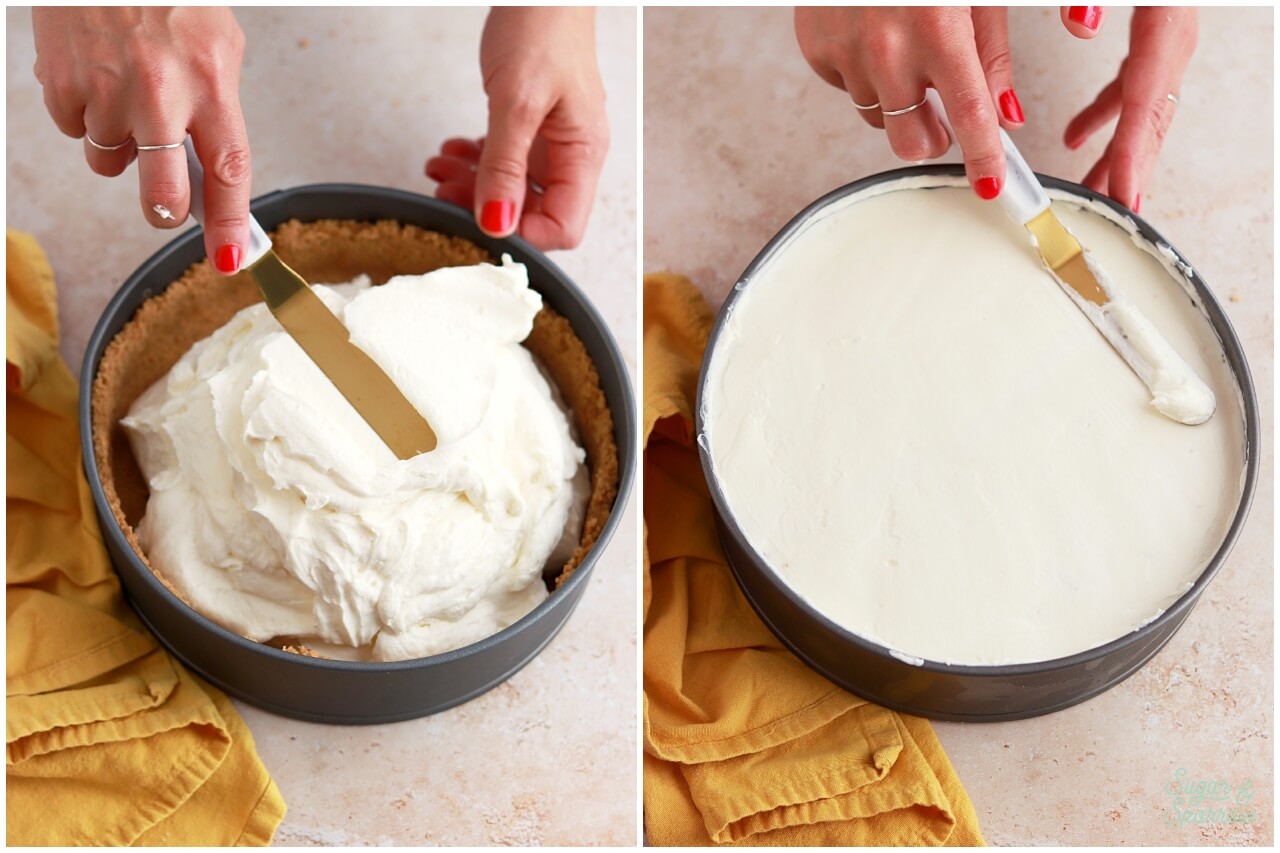
First, you’ll make a graham cracker crust with a few simple ingredients and press it into a 9-inch springform pan or a 10-inch springform pan. You’ll want to really pack it down and up the sides of the pan so that it sticks together really well when you slice the cheesecake. Then, place the graham cracker crust lined pan into the freezer while you make the cheesecake filling.

how to make a graham cracker crust for cheesecake

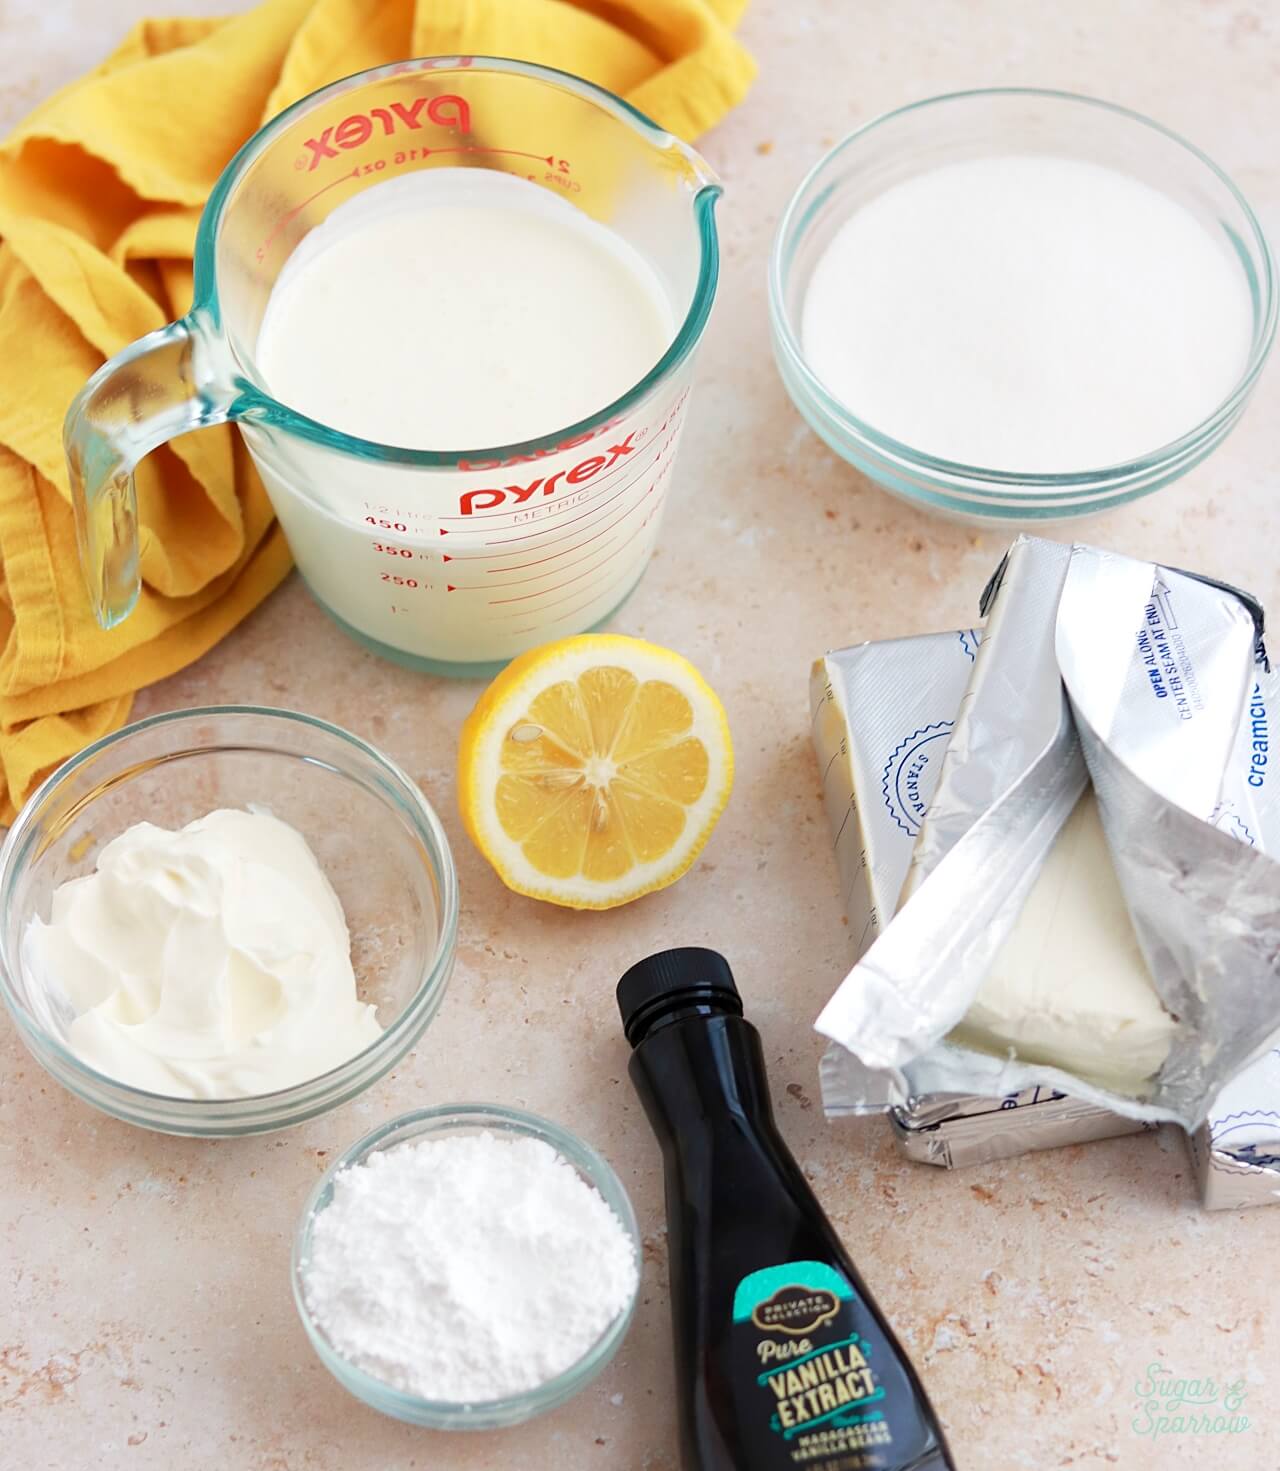
For the filling, you’ll mix together some simple ingredients that will make this cheesecake taste like a cheesecake. I’ll list all of the ingredients below, but the most notable here are full-fat brick-style cream cheese, sour cream, lemon juice, and vanilla extract. Together, these create the ideal cheesecake flavor. 

no bake cheesecake filling recipe

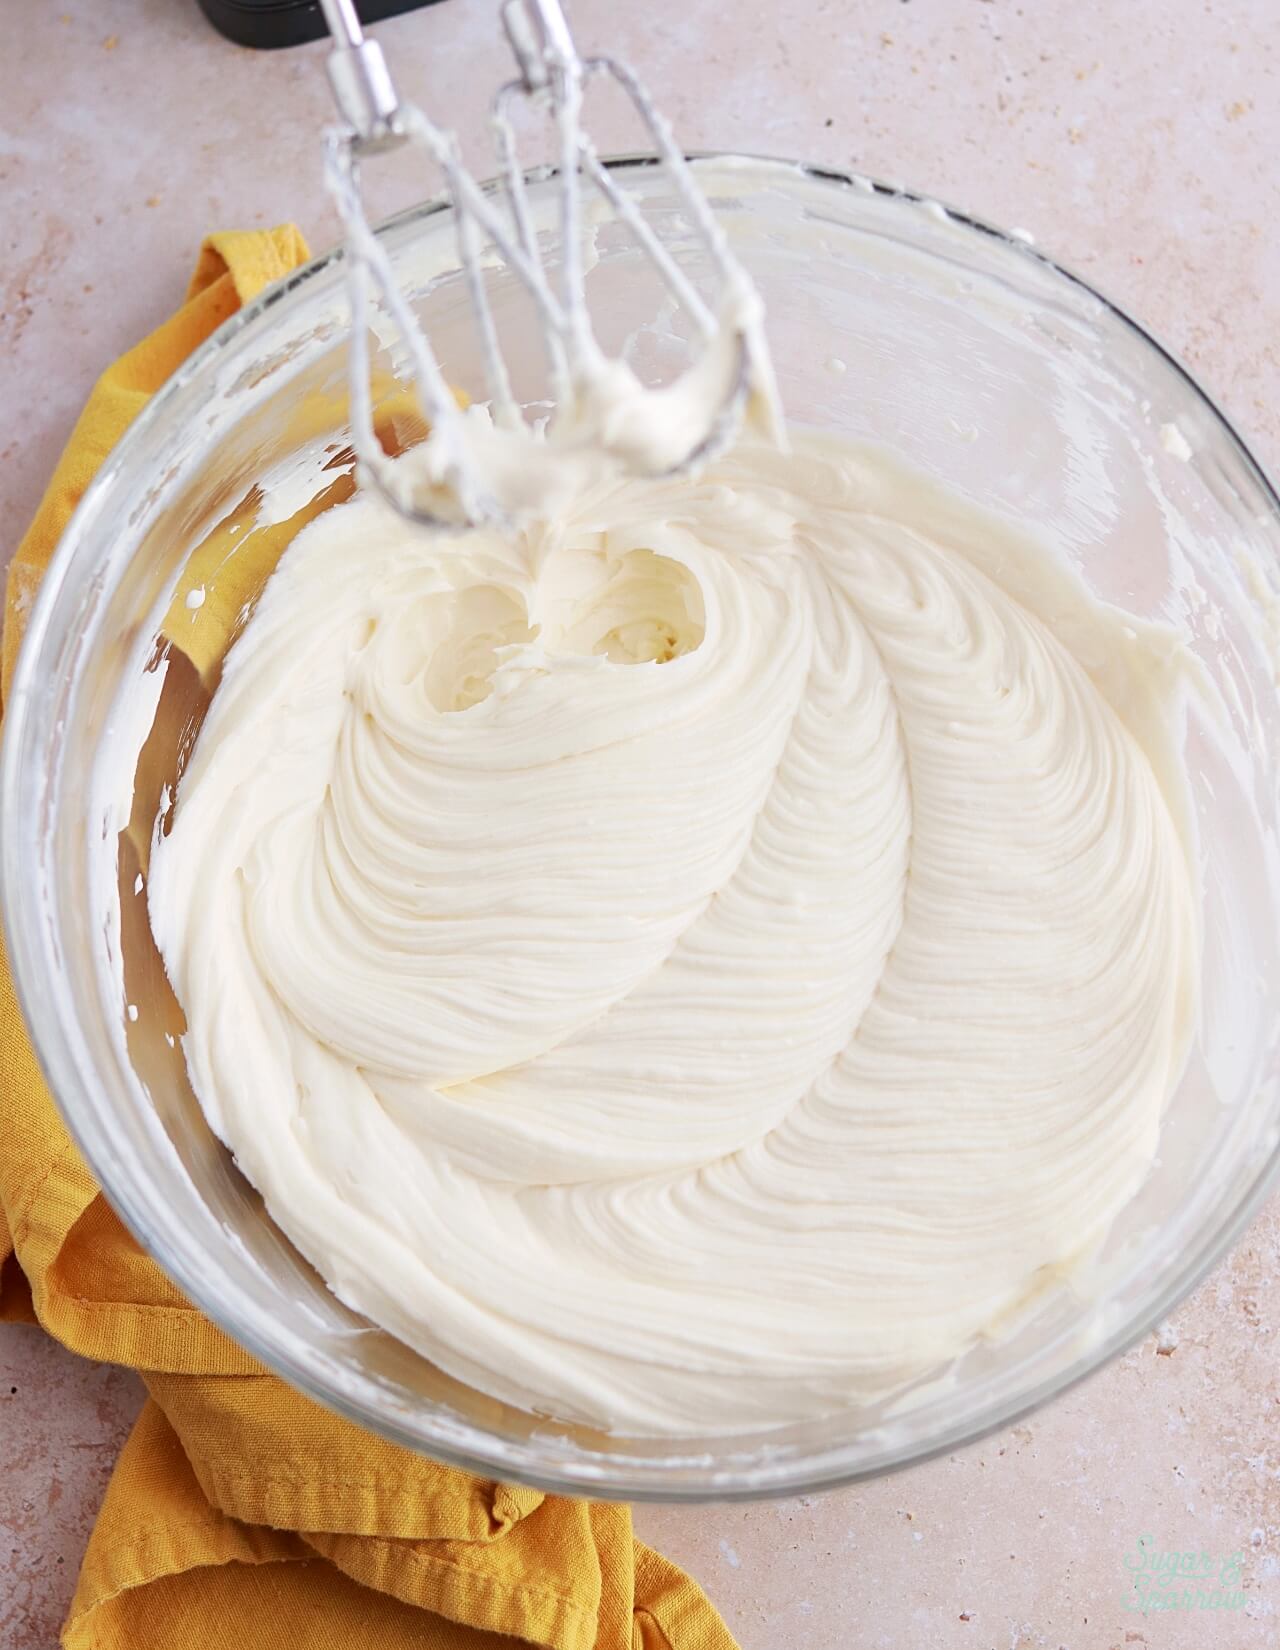
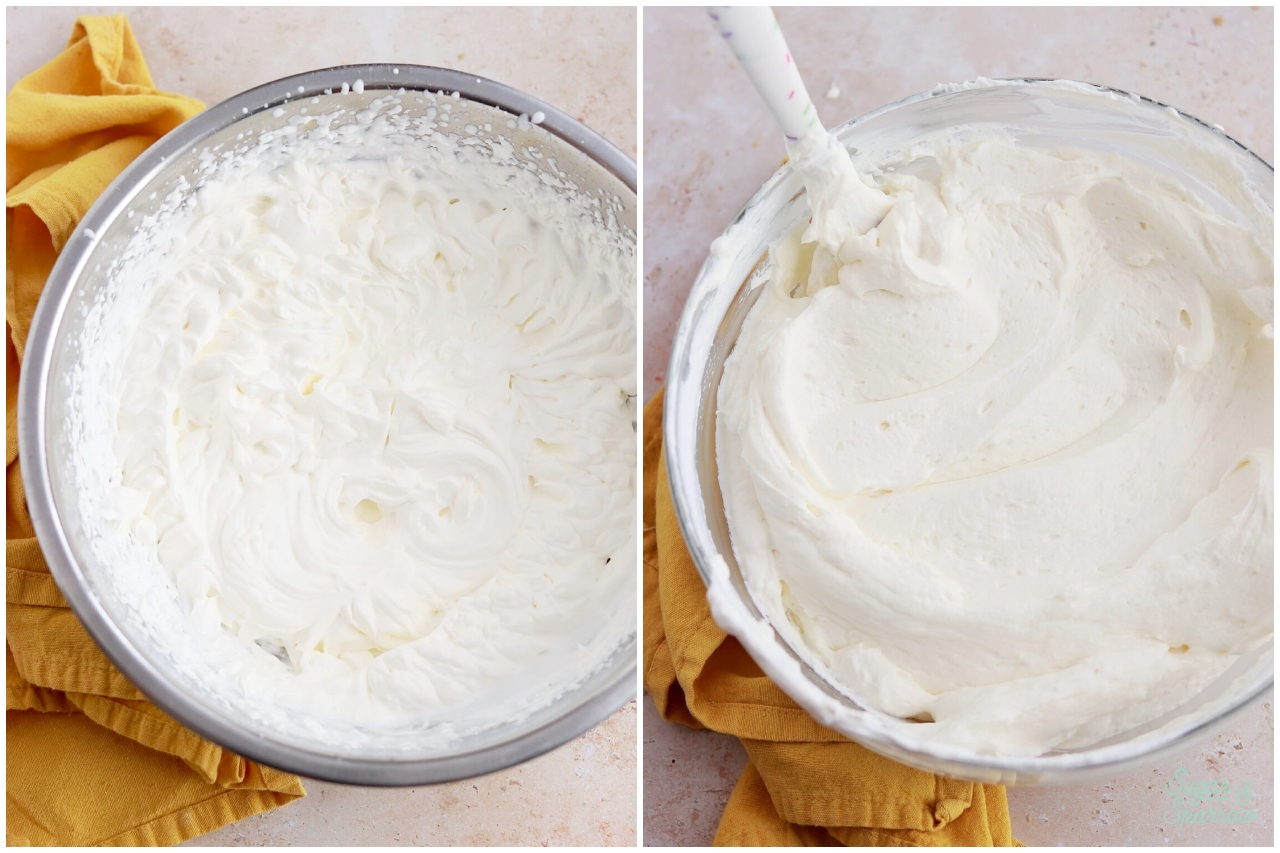
The second part of the filling is heavy whipping cream. You will whip it into stiff peaks, then fold it into the cream cheese mixture. 

how to make a no bake cheesecake

Now that the filling is ready, add it on top of the graham cracker crust, smooth it down with an angled spatula, then refrigerate for at least 8 hours (overnight is best).

how to make a no bake cheesecake with graham cracker crust

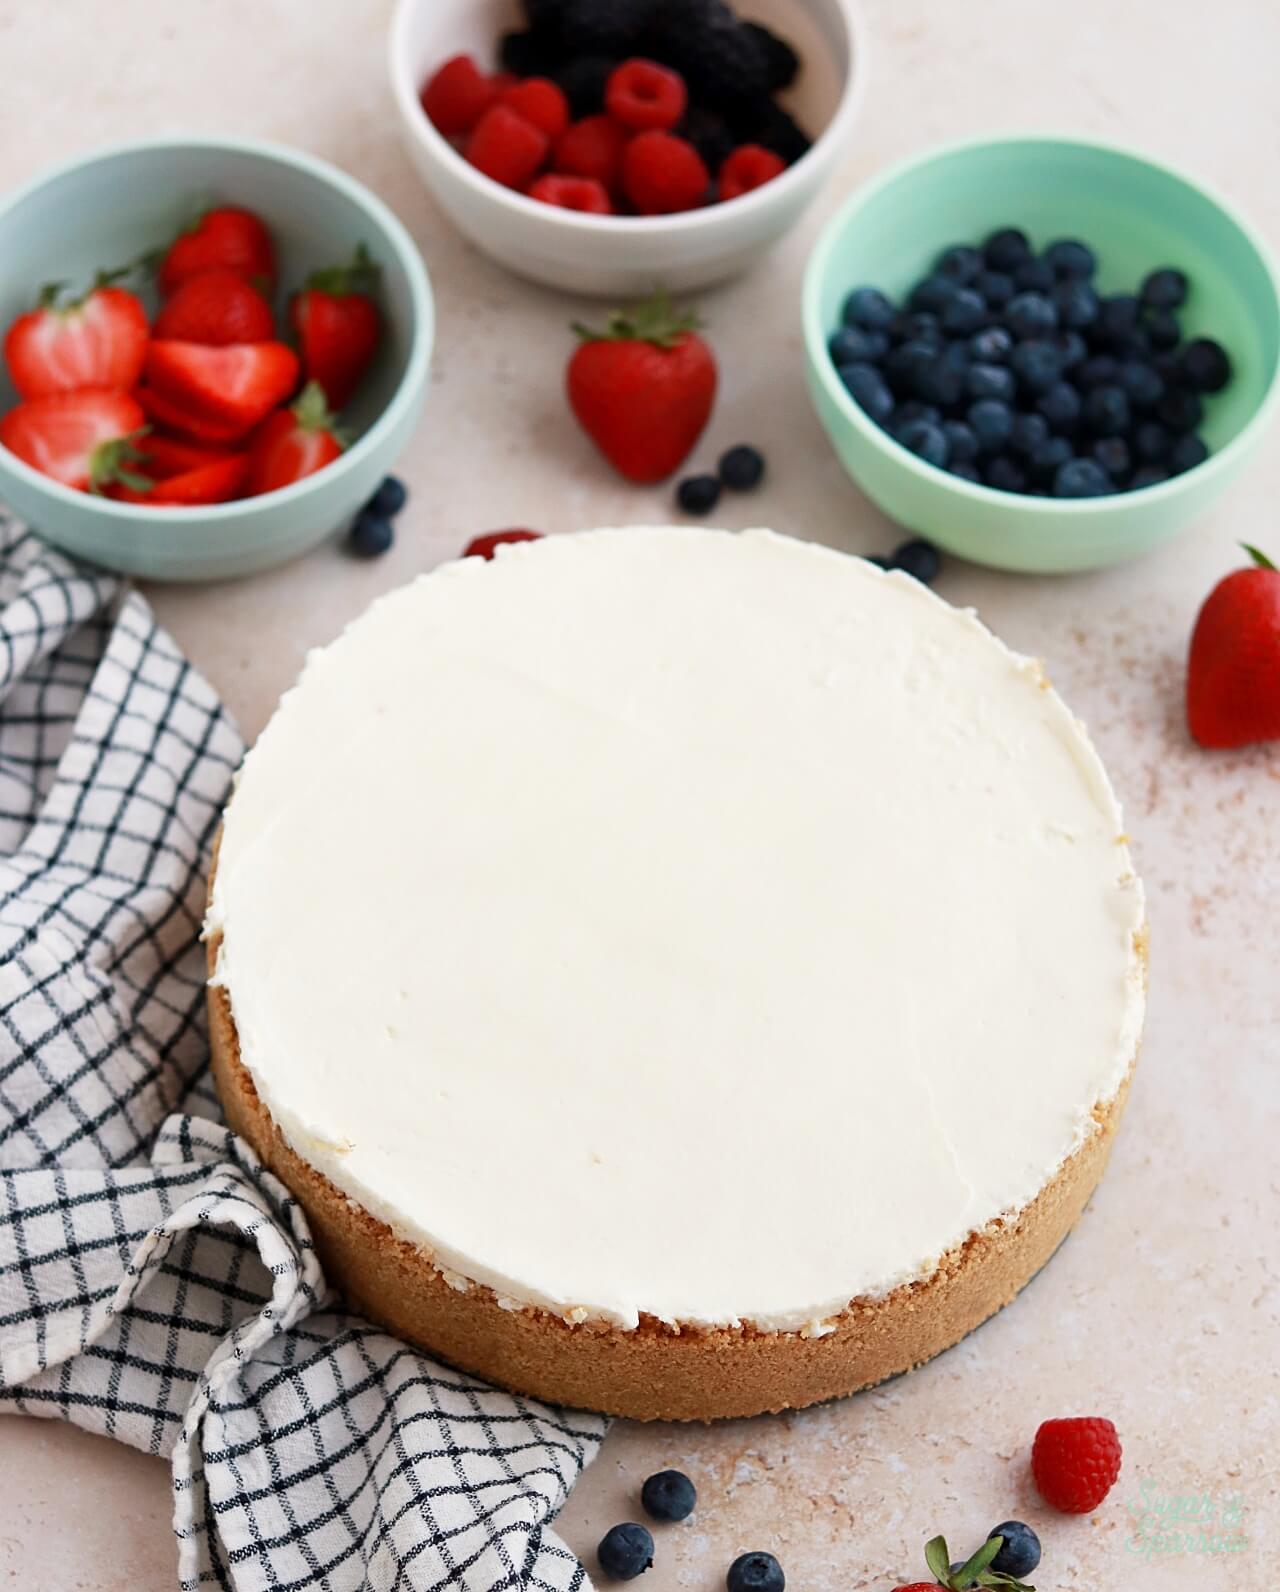
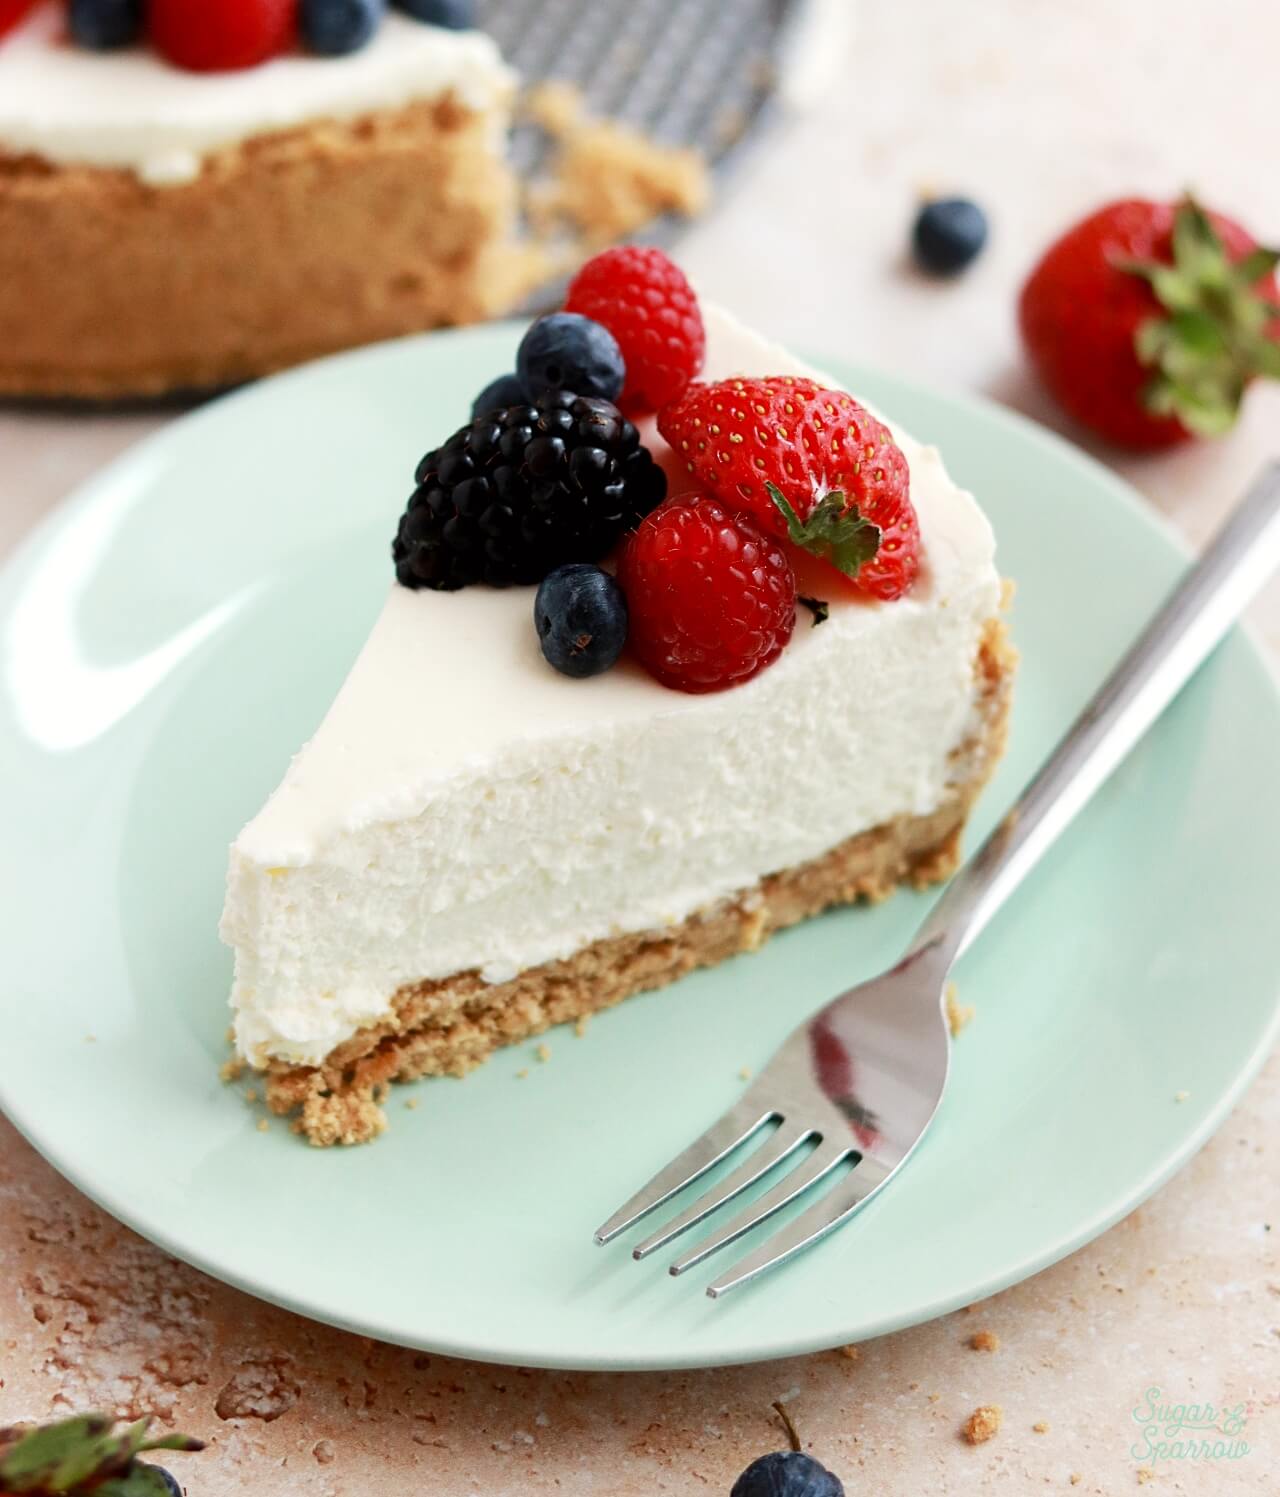
Once the cheesecake filling is set, remove the springform collar from your pan and you’ll have the most beautiful no-bake cheesecake to decorate and serve. 

how to make no bake cheesecake

No-Bake Cheesecake Ingredients 

In order for this no-bake cheesecake to set up properly, there are some key ingredients to make the magic happen:

  • Full-Fat Brick-Style Cream Cheese. This is where most of the cheesecake flavor comes from, along with the base structure for the filling. It’s really important to use full-fat brick-style cream cheese here. The spreadable kind in tubs and the low-fat versions contain too much liquid content and preservatives to set up properly. In other words, you’ll end up with cheesecake soup unless you use the full-fat brick-style kind. 
  • Granulated Sugar. For sweetening the filling. 
  • Powdered Sugar. A little bit of powdered sugar helps thicken the filling just the right amount while keeping the sweetness level just right. 
  • Sour Cream. Just like in a New York style cheesecake, sour cream adds velvety texture and creaminess to the cheesecake filling. It is also partially responsible for the signature cheesecake tanginess. 
  • Lemon Juice. A hint of lemon juice rounds out the tanginess for the flavor of this cheesecake. The final filling won’t taste like lemon, but the fresh lemon juice certainly adds something special. 
  • Pure Vanilla Extract. For rounding out the overall flavor of this cheesecake.
  • Heavy Whipping Cream. For adding the majority of the structure to this cheesecake filling, heavy whipping cream is whipped to stiff peaks and then folded into the cheesecake mixture. 
no bake cheesecake ingredients

No-Bake Cheesecake Tips for Success

This no-bake cheesecake recipe is special. It’s one of those recipes you can make days ahead of an event and still wow all of your guests when it comes to serving time. In order to really knock this recipe out of the park, here are a few things to keep in mind:

  • Firmly pack the graham cracker crust. Use a measuring cup or jar to really press that graham cracker crust down on the bottom and up the sides of the pan. The more firmly you pack it, the easier it will stay together when you slice the cheesecake. 
  • Use full-fat brick-style cream cheese. This is crucial for the filling to set properly. I know I sound like a broken record but the spreadable cream cheese and low-fat versions contain too much water content for the filling to properly set. I don’t want you to end up with soupy cheesecake, y’all. 
  • Whip the cream to stiff peaks. This is another critical step for the filling to set into that velvety smooth-yet-structured texture. You’ll want to whip the heavy whipping cream with the whisk attachment on your stand mixer or with a large bowl and hand mixer until you can dip a spatula in and the peaks stand straight up without drooping. It takes about 4 minutes for me. 
  • Don’t overmix the filling. Be sure to fold the whipped cream into the cheesecake mixture with a rubber spatula. You’ll do this gently until there are no more streaks. If you spend too long on this step you may risk the whipped cream deflating. 
  • Refrigerate for at least 8 hours. Any shorter and your filling won’t be properly set. If you want perfect slices with just the right amount of structure, refrigerate this no-bake cheesecake for at least 8 hours and up to two days. I like to make mine one day ahead for ultimate stress reduction. 
no bake cheesecake recipe with graham cracker crust and berries

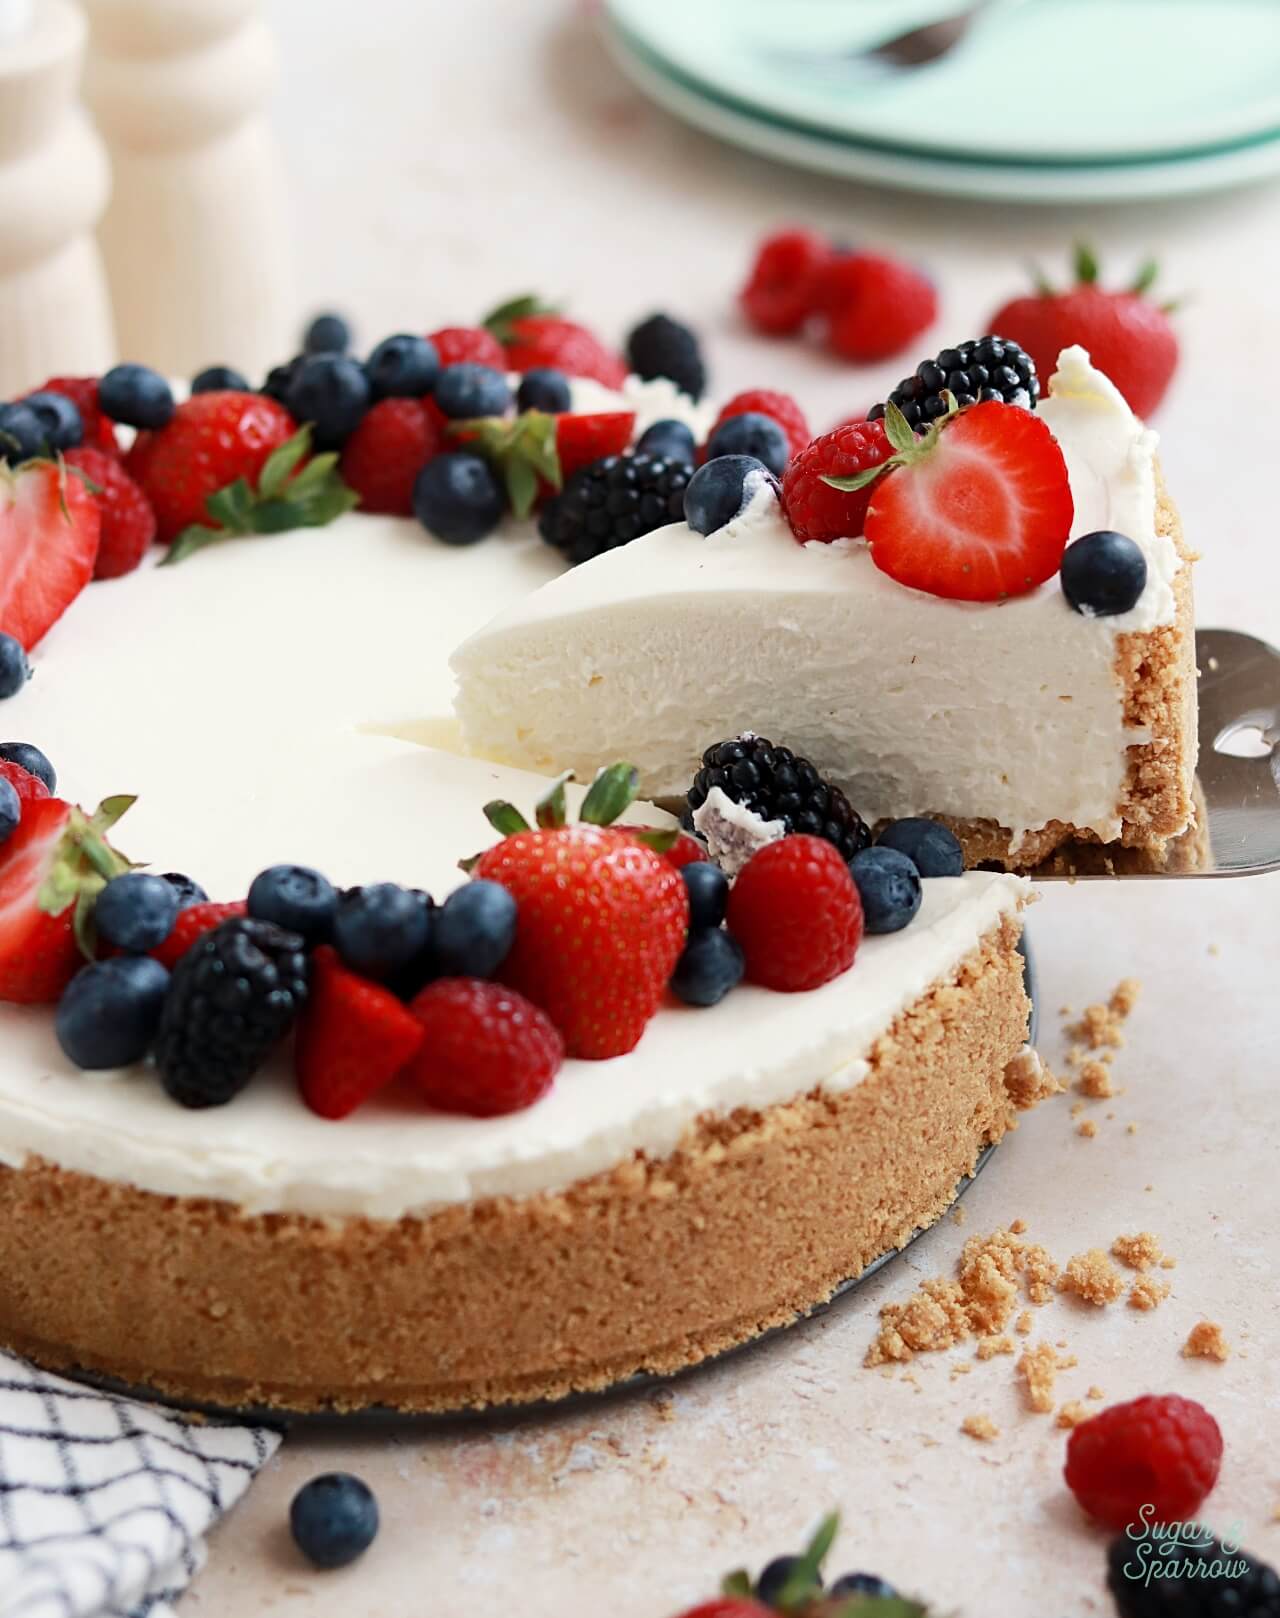
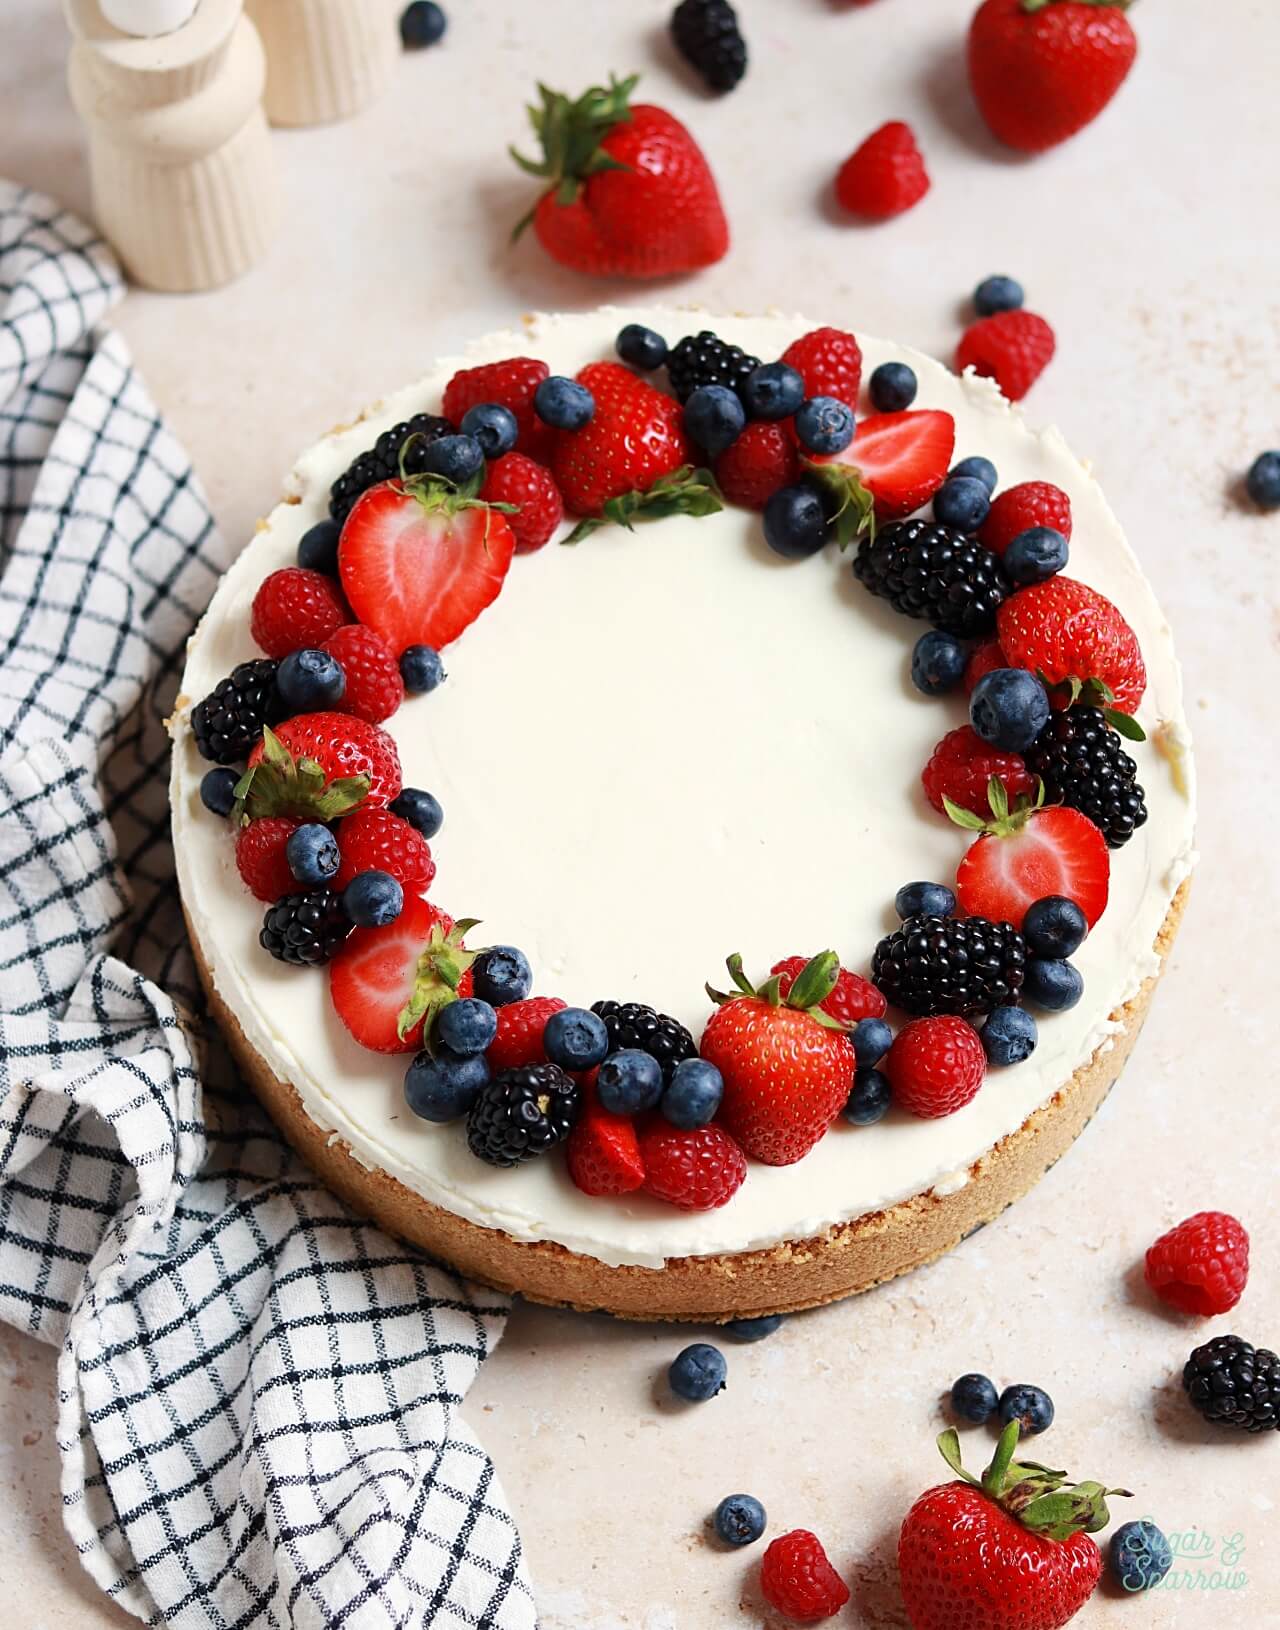
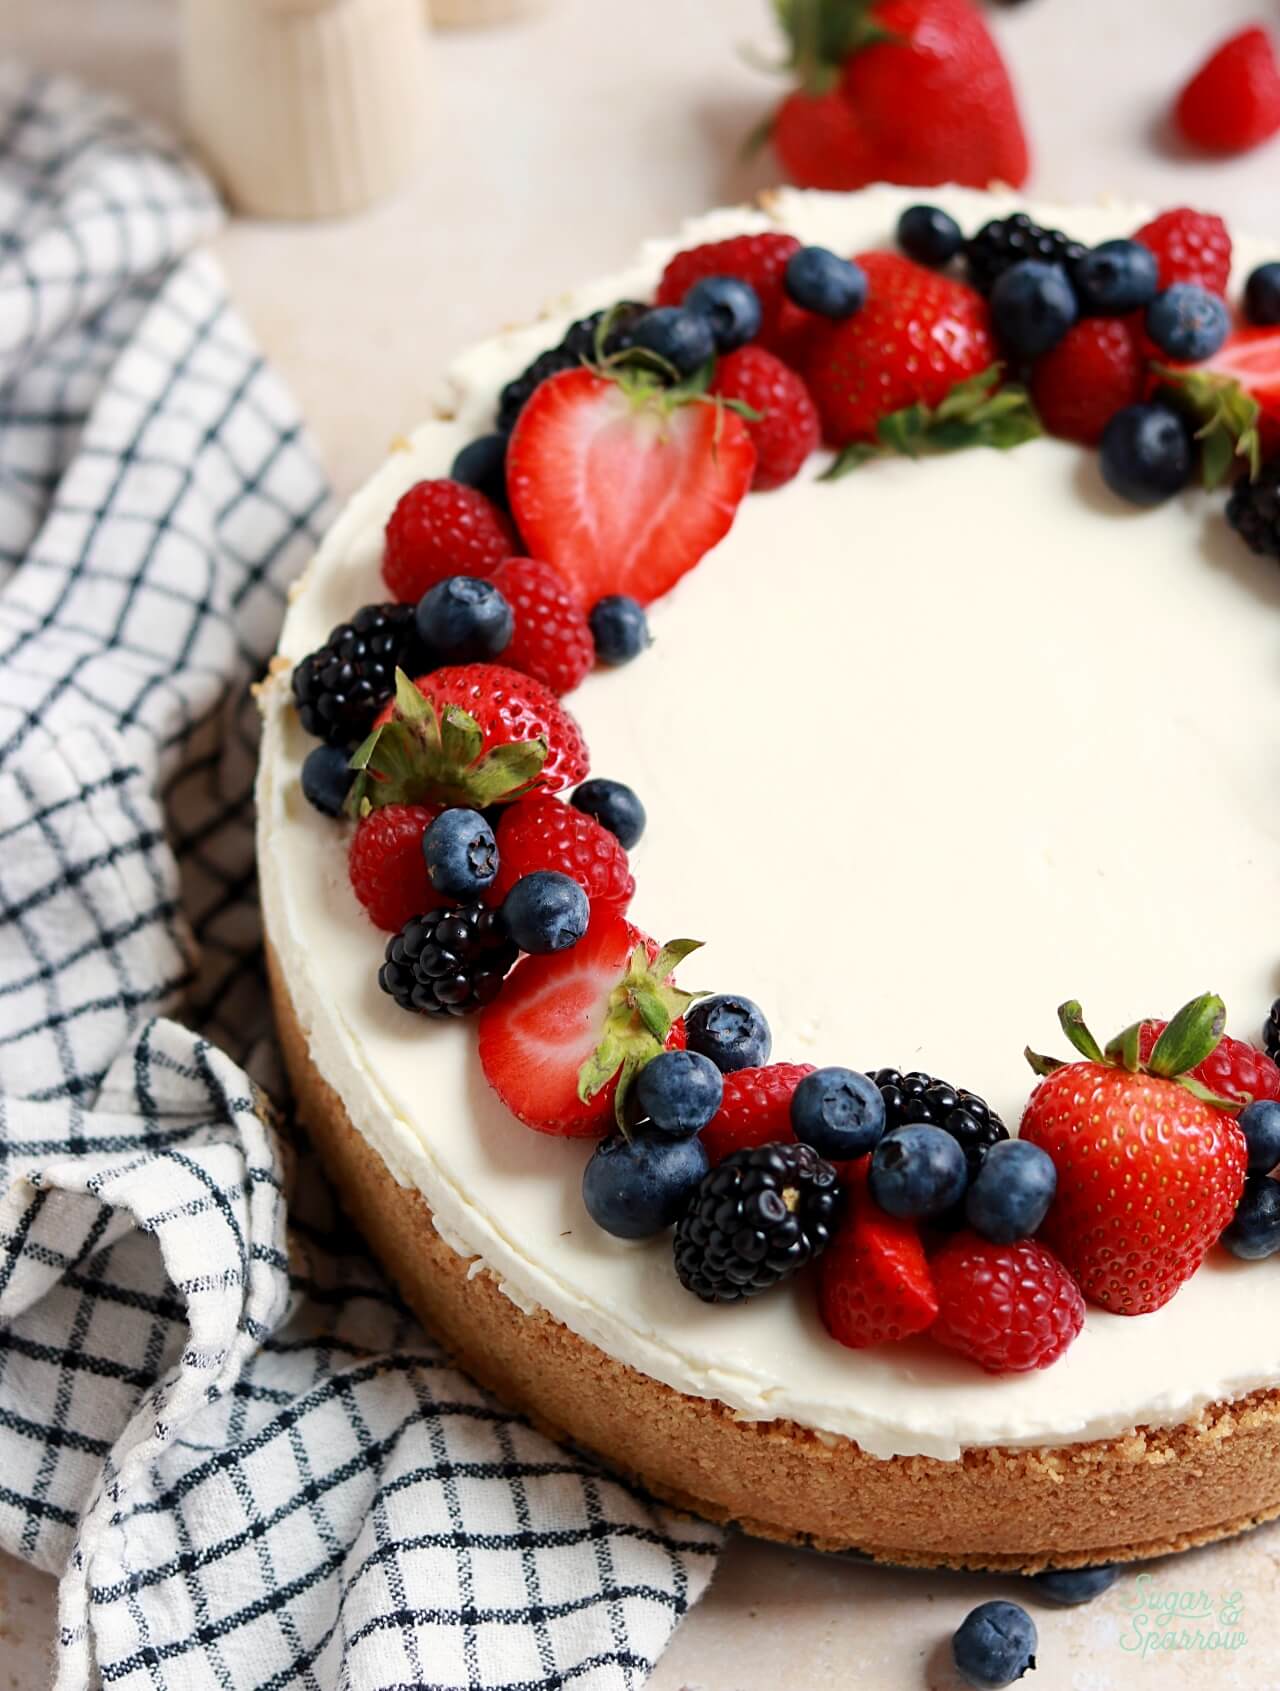
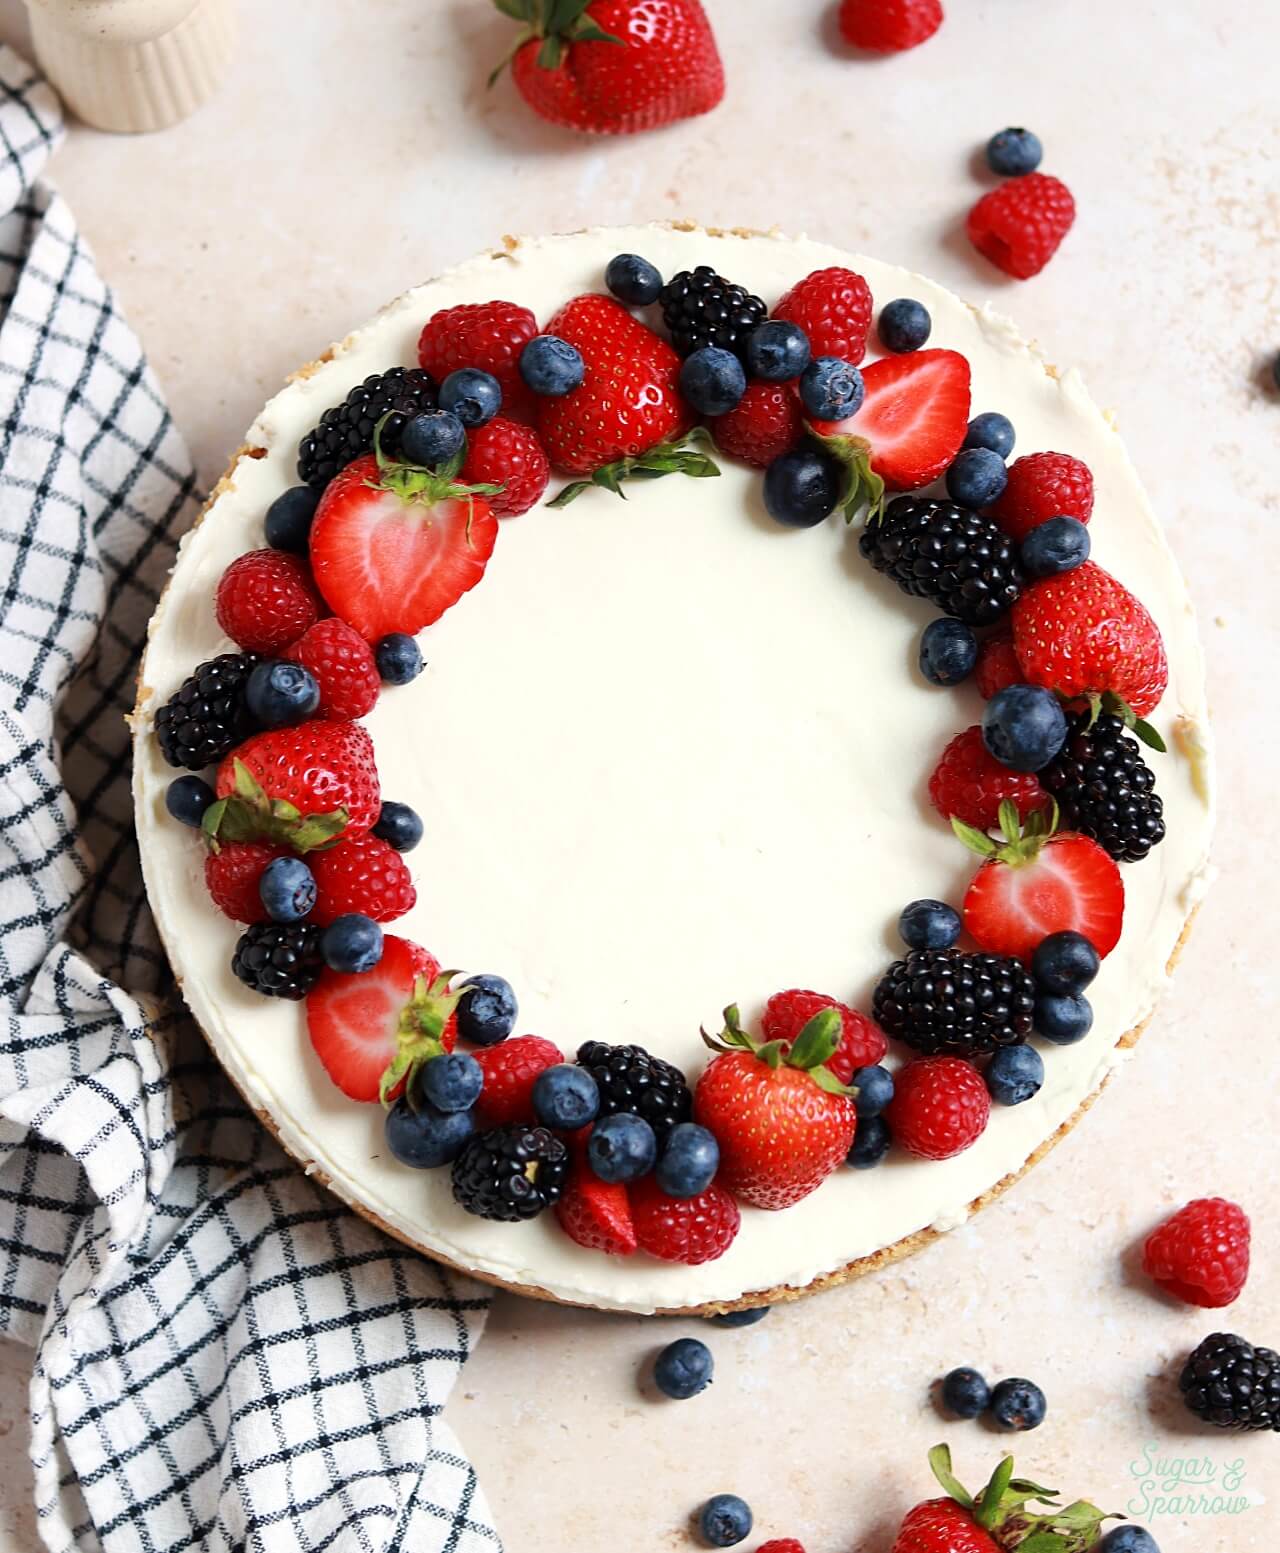
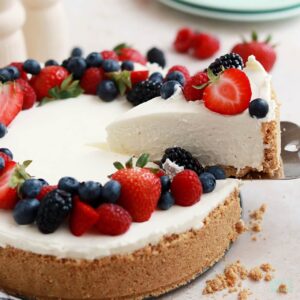
How to Decorate a No-Bake Cheesecake with Fresh Berries

I topped this cheesecake with a wreath of fresh Summer berries, which was so easy and very eye-catching. I halved some strawberries and placed them along the edge of the cheesecake along with blueberries, blackberries, and raspberries. This looks best if you decorate the same day you serve the cheesecake and truly only takes about 5 minutes. 

how to decorate a cheesecake with fresh berries
decorating a no bake cheesecake with fresh berries

There are so many ways you could decorate this no-bake cheesecake if you’d rather use another kind of topping. Add crushed cookies, pipe some whipped cream on top, drizzle it with chocolate ganache or caramel, the possibilities are endless! 

no bake cheesecake recipe 4th of july

More No-Bake Cheesecake Flavors

I’ve used this no-bake cheesecake recipe as a base for other flavors! It’s so easy to customize. Here are some other flavors I’ve made:

  • No-Bake Oreo Cheesecake
  • No-Bake Mango Cheesecake
  • No-Bake Eggnog Cheesecake
  • No-Bake Pumpkin Cheesecake with Biscoff Cookie Crust
  • No-Bake Cadbury Mini Egg Cheesecake
no bake cheesecake recipe by sugar and sparrow

No-Bake Cheesecake

The easiest cheesecake you'll ever make! This no-bake cheesecake has a rich, velvety texture the perfect tangy flavor, and sets up beautifully in the refrigerator. It's set on a buttery graham cracker crust and is the ideal make-ahead dessert for any gathering!
Print Recipe Pin Recipe
Prep Time:30 minutes mins
Refrigeration:8 hours hrs
Total Time:8 hours hrs 45 minutes mins
Course: Dessert
Cuisine: American
Servings: 12 slices

Equipment

  • 9-inch springform pan

Ingredients

Graham Cracker Crust

  • 2 Cups (240g) graham cracker crumbs about 15 full sheets
  • 1/3 Cup (67g) packed light brown sugar
  • 1/2 Cup (113g) unsalted butter, melted

Cheesecake Filling

  • 1 1/2 Cups (360ml) heavy whipping cream, cold
  • 24 Oz (678g) full-fat brick-style cream cheese, room temperature NOT the spread
  • 1/2 Cup (100g) granulated sugar
  • 1/4 Cup powdered sugar
  • 1/3 Cup (80g) sour cream, room temperature
  • 2 tsp lemon juice
  • 2 tsp pure vanilla extract

Garnish (optional)

  • 1 Cup fresh summer berries

Instructions

Make the Graham Cracker Crust

  • In a medium bowl, mix together the graham cracker crumbs, brown sugar, and melted butter. Pour the mixture into a 9-inch springform pan or 10-inch springform pan. Pack it down tightly to the bottom and up the sides of the pan using a glass jar or measuring cup. You’ll want to pack it as tightly as possible to prevent it from crumbling apart when you cut the cheesecake. Freeze the graham cracker crust in the pan for 10-20 minutes while you prepare the cheesecake filling.

Cheesecake Filling

  • Using a hand mixer with a medium bowl or a stand mixer fitted with a whisk attachment, whip the cold heavy cream on medium-high speed until stiff peaks form, about 4–5 minutes. Set aside.
  • In another large bowl (either with a hand mixer or stand mixer), beat the cream cheese and granulated sugar together on medium until creamy. Scrape down the bowl and paddle as needed. Add the powdered sugar, sour cream, lemon juice, and vanilla extract. Beat on medium-high speed until smooth and combined (no lumps), about 2–3 minutes.
  • Use a rubber spatula to gently fold the whipped cream into the cheesecake filling until combined.
  • Remove the graham cracker crust from the freezer and add the cheesecake filling into it. Spread the filling to the edges of the crust and smooth the top using an angled spatula, then cover it tightly with plastic wrap or aluminum foil. Refrigerate for at least 8 hours and up to 2 days. For best results, chill the cheesecake overnight. This will yield the most set filling.

Assembly

  • When you’re ready to decorate the no-bake cheesecake, remove the rim from the springform pan. To create the look pictured, top with the fresh Summer berries in a wreath arrangement around the edges of the cheesecake. I used halved strawberries, blueberries, raspberries, and blackberries and placed them all by hand. The filling is slightly sticky, so this worked quite well.

Notes

Make Ahead Tips:
  1. After making and freezing the graham cracker crust, it can be covered and stored in the refrigerator until you add the filling (1-2 days ahead is best for the freshest flavor).
  2. You can make and assemble the no-bake cheesecake up to 2 days in advance, stored in the refrigerator and covered in aluminum foil or plastic wrap. You can alternatively freeze the cheesecake for up to 3 months after it’s set in the refrigerator. Be sure to cover well if freezing. I recommend one layer of plastic wrap and one layer of aluminum foil. 
Leftovers: Store leftovers (covered well) in the refrigerator for up to 5 days or in the freezer for up to 3 months. 

Did you make this no-bake cheesecake? I want to know how it went! Let me know in the comments and feel free to tag @sugarandsparrowco on Instagram to show me a photo. I love to see what you create with my recipes!

By: Whitney · In: Featured, No-Bake, Recipes, Seasonal, Spring, Summer · Tagged: 4th of july desserts, berries, cheesecake, graham cracker crust, no bake cheesecake, no bake desserts, summer desserts

you’ll also love

no churn vanilla ice cream berry crisp toppingsNo-Churn Berry Crisp Ice Cream
berry crisp recipe with vanilla ice creamMixed Berry Crisp Recipe
4th of july dessert recipesThe Best 4th of July Desserts for Your BBQ

Join the List

Stay up to date & receive the latest posts in your inbox.

Reader Interactions

Leave a Reply Cancel reply

Your email address will not be published. Required fields are marked *

Recipe Rating


Next Post >

The Best 4th of July Desserts for Your BBQ

Primary Sidebar

Welcome to Sugar & Sparrow

Welcome to Sugar & Sparrow

Helping you whip up pretty desserts with confidence and creativity. And hopefully sharing a few laughs with you along the way!

Learn More

Connect

let’s bake!

Get my very best recipes, baking tips, and decorating tutorials sent to your inbox

Featured Posts

marble buttercream cake tutorial

Marble Buttercream Cake Tutorial Feat. the JOANN Stir Collection

toasted smores cupcakes by sugar and sparrow

Toasted S’mores Cupcakes

smores ice cream cake recipe by sugar and sparrow

The Ultimate S’mores Ice Cream Cake

Search

Archives

Follow Along

@sugarandsparrowco

RASPBERRY CAKE FILLING (recipe below) ♥️ this RASPBERRY CAKE FILLING (recipe below) ♥️ this perfectly sweet/tart raspberry cake filling is beautifully thick, seedless, and so rewarding to make from scratch! It takes just a handful of ingredients and can be made with fresh OR frozen raspberries 🙌🏼 

Get the full recipe + cake pairing suggestions at the link in my bio or at https://sugarandsparrow.com/seedless-raspberry-cake-filling/

INGREDIENTS:
2 1/2 Cups (10oz, 315g) fresh or frozen raspberries
1/2 Cup (100g) granulated sugar
1 Tbsp lemon juice
1 tsp lemon zest
1 1/2 Tbsp (12g) cornstarch
1 1/2 Tbsp (22ml) water

INSTRUCTIONS: 
1. In a saucepan set over medium heat, add the raspberries, granulated sugar, lemon juice, and lemon zest. Cook until the mixture begins to boil, stirring occasionally. 
2. Once boiling, lower the heat and simmer for 10-15 minutes while you continue stirring occasionally. Then, remove from heat and use a fine mesh sieve to strain out the seeds over a medium bowl. After straining, you’ll be left with about 1/4 Cup of seedy pulp.
3. In a small separate bowl, combine the cornstarch and water until uniform. Return the strained raspberry filling to the saucepan (wipe it free of any remaining seeds if needed) and add the cornstarch/water mixture. Cook over medium heat until boiling, stirring constantly, then reduce to a simmer and cook for 1-3 minutes, until the filling has thickened slightly, is no longer cloudy, and coats the back of the spatula.
4. Pour into an airtight container and refrigerate for at least 4 hours and up to 1 week. It will be jello-like once set but after stirring it will become a thick, jammy consistency that’s perfect to use as a cake or cupcake filling!

#raspberrycake #cakefilling #cakedecorating #raspberries #baking
STRAWBERRY LEMON CAKE 🍓🍋 this cake is so lig STRAWBERRY LEMON CAKE 🍓🍋 this cake is so light and refreshing and bursting with all-natural flavors! It’s layers of my favorite extra fluffy lemon cake + the most delicious freeze-dried strawberry buttercream that ends up the prettiest natural pink color. I’ll never get over those little flecks of strawberry in the buttercream or the tiny chamomile flowers adding so much cheer! 

Grab the recipe at the link in my bio or at https://sugarandsparrow.com/strawberry-lemon-cake/

#strawberrylemon #lemoncake #strawberrycake #cakedecorating #strawberrybuttercream
CHOCOLATE SHEET CAKE (recipe below) 🍫 🥳 this CHOCOLATE SHEET CAKE (recipe below) 🍫 🥳 this is everything I want in a chocolate cake: rich and decadent, stick-to-your-fork fudgy, ultra-chocolatey, shareable, and EASY! Like box mix easy but from-scratch and a MUST try if you’re in need of a good chocolate cake recipe to feed a crowd👩🏽‍🍳⁣ 
 
Get the full recipe (with chocolate frosting) at the link in my bio or at https://sugarandsparrow.com/chocolate-sheet-cake/ ✨⁣ 
⁣ 
CHOCOLATE SHEET CAKE
2 Cups (265g) all purpose flour⁣ 
1 2/3 Cups (340g) white granulated sugar⁣ 
2/3 Cup (60g) unsweetened natural cocoa powder⁣ 
2 tsp baking soda⁣ 
1 tsp baking powder⁣ 
1/2 tsp kosher salt⁣ 
1/2 Cup (120ml) vegetable oil⁣ 
2 eggs, room temperature⁣ 
1 1/2 tsp pure vanilla extract⁣ 
1 Cup (240ml) full-fat buttermilk⁣ 
1 Cup (240ml) hot coffee OR hot water⁣ 
⁣ 
INSTRUCTIONS⁣ 
1. Preheat the oven to 325ºF. Grease and line a 9x13 inch cake pan. ⁣ 
2. Place all of the dry ingredients into the bowl of a stand mixer (or use a large bowl with a hand mixer) and mix on low to combine. Add the vegetable oil, eggs, vanilla, and buttermilk and mix on low until combined. With the mixer still on low, add the hot coffee or hot water in a slow stream, then turn the mixer to medium and beat until smooth, about 2 minutes. The batter will be very thin. ⁣ 
3. Pour the batter into the prepared pan and bake for 35-40 minutes, until a toothpick inserted comes out clean.⁣ Full recipe (with frosting) link in my bio.
⁣ 
#chocolatecake #chocolate #sheetcake #chocolatelover #birthdaycake
VANILLA RASPBERRY LAYER CAKE ♥️ between the na VANILLA RASPBERRY LAYER CAKE ♥️ between the naturally pink raspberry buttercream, jammy homemade raspberry filling, and soft vanilla cake layers, this is the perfect cake for Spring!! It’s has amazing, authentic raspberry flavor in every bite from fresh (or frozen) raspberries in the filling + freeze-dried raspberries in the frosting 😋

Get the full recipe link in my bio or find it at https://sugarandsparrow.com/vanilla-raspberry-layer-cake/ 

#raspberrycake #raspberries #vanillacake #cakedecorating #pinkcake
SMALL BATCH VANILLA CAKE 🎂🥳 this mini vanill SMALL BATCH VANILLA CAKE 🎂🥳 this mini vanilla cake recipe makes the PERFECT amount for 2-4 people and can be baked as a tiny 4-inch layer cake or a single layer 6-inch cake. It goes with any frosting flavor but vanilla buttercream keeps it classic for date night, a small gathering, a smash cake, or satisfying a cake craving. 
⁣
✨Full recipe (with frosting) linked in my bio + at https://sugarandsparrow.com/small-batch-vanilla-cake/ 
⁣⁣⁣⁣
SMALL BATCH VANILLA CAKE⁣⁣⁣⁣
⁣⁣⁣⁣
INGREDIENTS⁣⁣⁣⁣
3/4 Cups (79g) sifted cake flour⁣⁣⁣
1 tsp baking powder⁣⁣⁣
1/4 tsp salt⁣⁣⁣
1/4 Cup (57g) unsalted butter, room temperature⁣⁣⁣
1/2 Cup (100g) granulated sugar⁣⁣⁣
1 large egg, room temperature⁣⁣⁣
2 Tbsp (30g) sour cream, room temperature⁣⁣⁣
1 tsp pure vanilla extract⁣⁣⁣
1/3 Cup (80ml) whole milk, room temperature⁣⁣⁣
⁣⁣⁣⁣
INSTRUCTIONS ⁣⁣⁣⁣
1. Preheat the oven to 350ºF. Grease and line three 4-inch or one 6-inch cake pan.⁣⁣⁣
2. In the bowl of your stand mixer (a handheld mixer works fine too!), cream together the butter and sugar on medium-high until light and fluffy, 3 min. Turn the mixer to low and add the egg, mixing until just combined. Add the vanilla and sour cream, turn the mixer to high, and beat for 1 min. ⁣⁣⁣
3. Turn the mixer to low speed and add the dry ingredients all at once. Mix until just combined, then slowly pour in the milk. Continue to mix on low speed until just combined, about 30 seconds. ⁣⁣⁣
4. Pour the batter evenly between the prepared cake 4-inch pans (or all into one 6-inch cake pan). If using 4-inch cake pans, bake for 18-22 minutes. If using a 6-inch cake pan bake for 24-28 minutes. The cake is done when it springs back to the touch and a toothpick inserted comes out with a few moist crumbs. ⁣⁣⁣
⁣⁣⁣⁣
#vanillacake #cakes #vanilla #minicake #cakedecorating

Footer

On the Blog

  • Cake Basics
  • Recipes
  • Tutorials

Info

  • About
  • Privacy Policy & Disclosure

stay in the know

Copyright © 2026 · Theme by Sugar & Sparrow