• Cake
  • Frosting
  • YouTube
  • My Favorite Tools
  • Nav Social Icons

  • Skip to primary navigation
  • Skip to main content
  • Skip to primary sidebar
  • Skip to footer
  • Recipes
    • Cake
    • Cupcakes
    • Frosting
    • Ice Cream
    • Vegan
  • Cake Basics
  • Tutorials
  • Blog
  • About
  • Mobile Menu Widgets

    Connect

    Search

Sugar & Sparrow logo in script font

Sugar & Sparrow

Lifestyle and Cake from Portland Oregon

  • Cake Basics
  • Recipes
    • Cake
    • Cupcakes
    • Cookies & Bars
    • Filling
    • Frosting
    • Ice Cream
    • No-Bake
    • Small Batch
    • Vegan
  • Tutorials
  • Book
  • Blog
  • About

Cadbury Mini Egg Cake

March 18, 2024 · In: Cake, Featured, Recipes, Seasonal, Spring

Jump to Recipe

There is no candy that I love more than Cadbury Mini Eggs, so when the grocery stores start putting out their Easter candy I always have a steady stash of them in my cupboard. They do not last long in this house. Even Theo is obsessed with what he calls “bwoo eggs” (blue eggs). For Easters’ past I have been known to decorate cakes with these classic little pastel eggs but this year I decided I needed the flavor to be a showstopper as well. So I found a really fun and INCREDIBLY TASTY way to add the distinct flavor of Cadbury Mini Eggs throughout the cake and I can’t wait for you to try it! 

This post may contain affiliate links. For more information, see our disclosure policy.

cadbury mini egg cake recipe by sugar and sparrow
cadbury mini egg ganache filling for cake

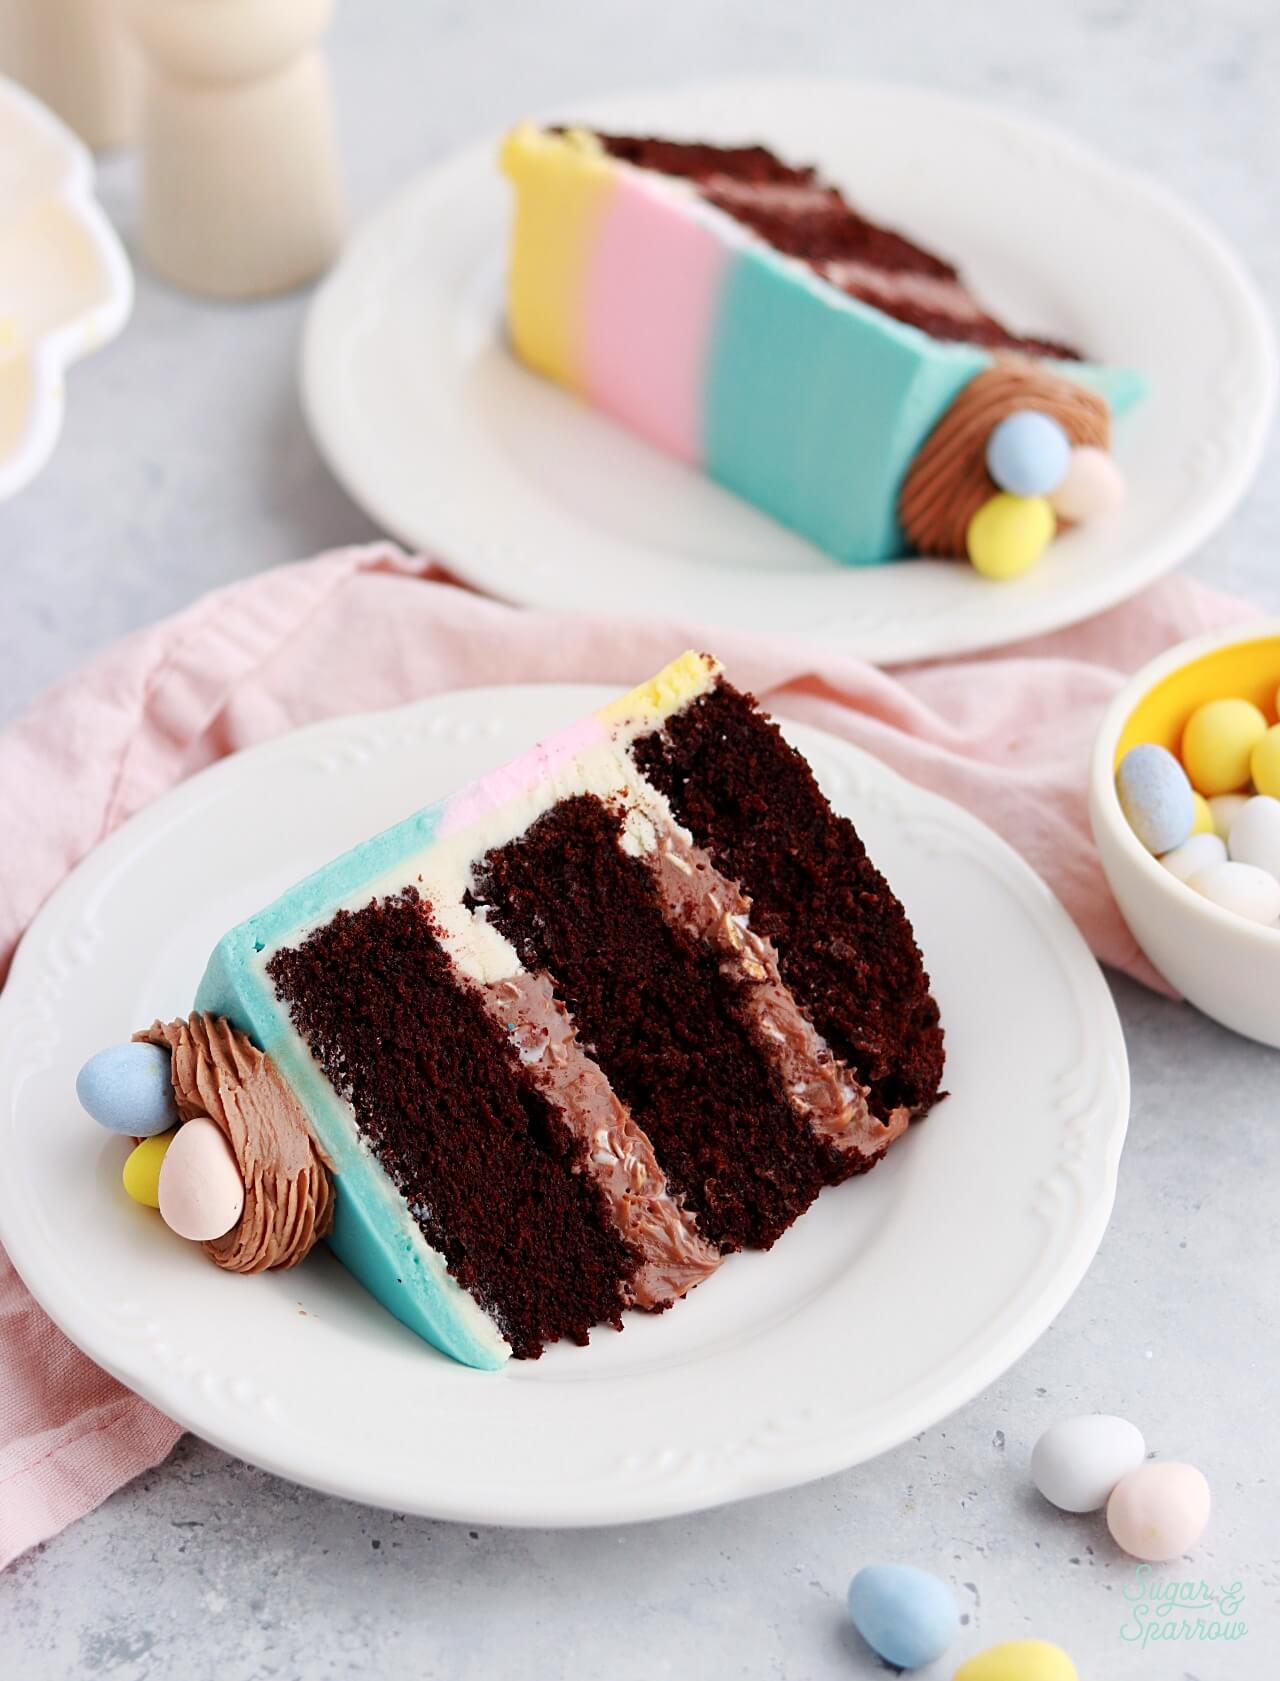
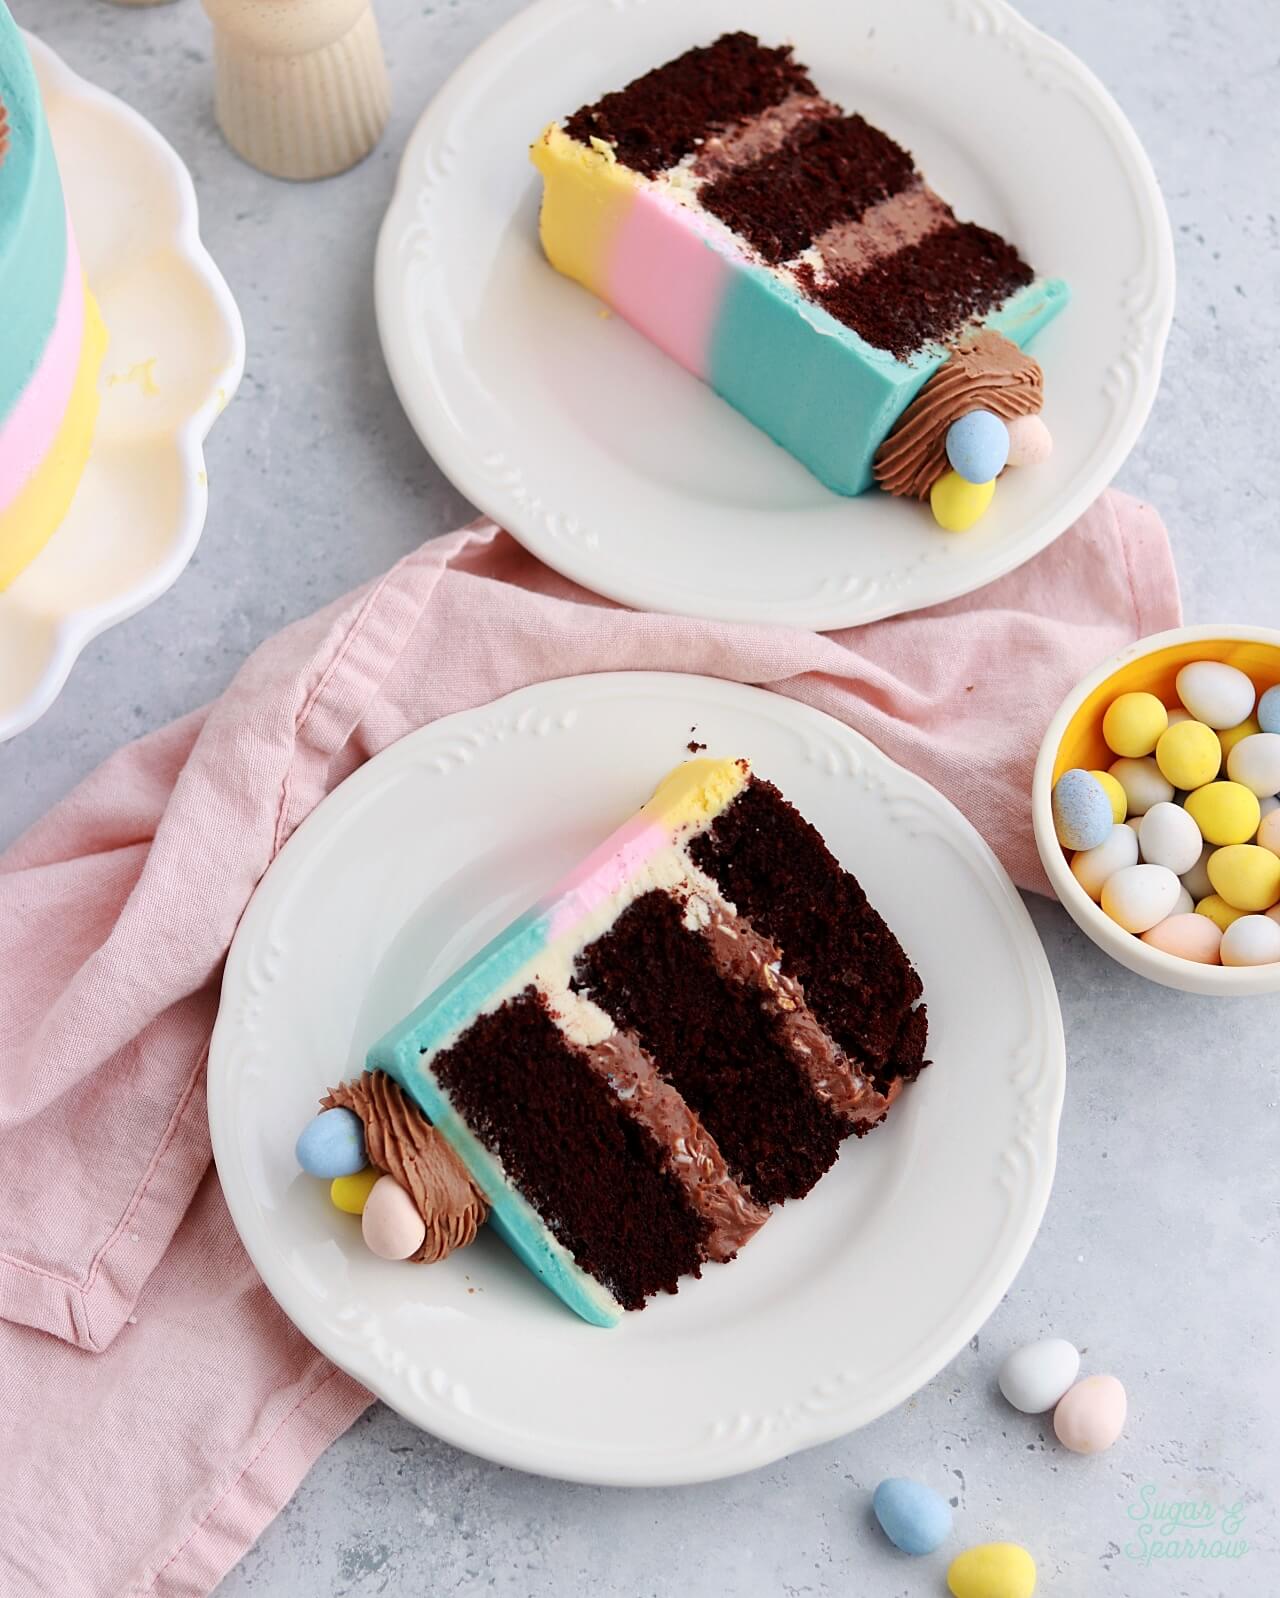
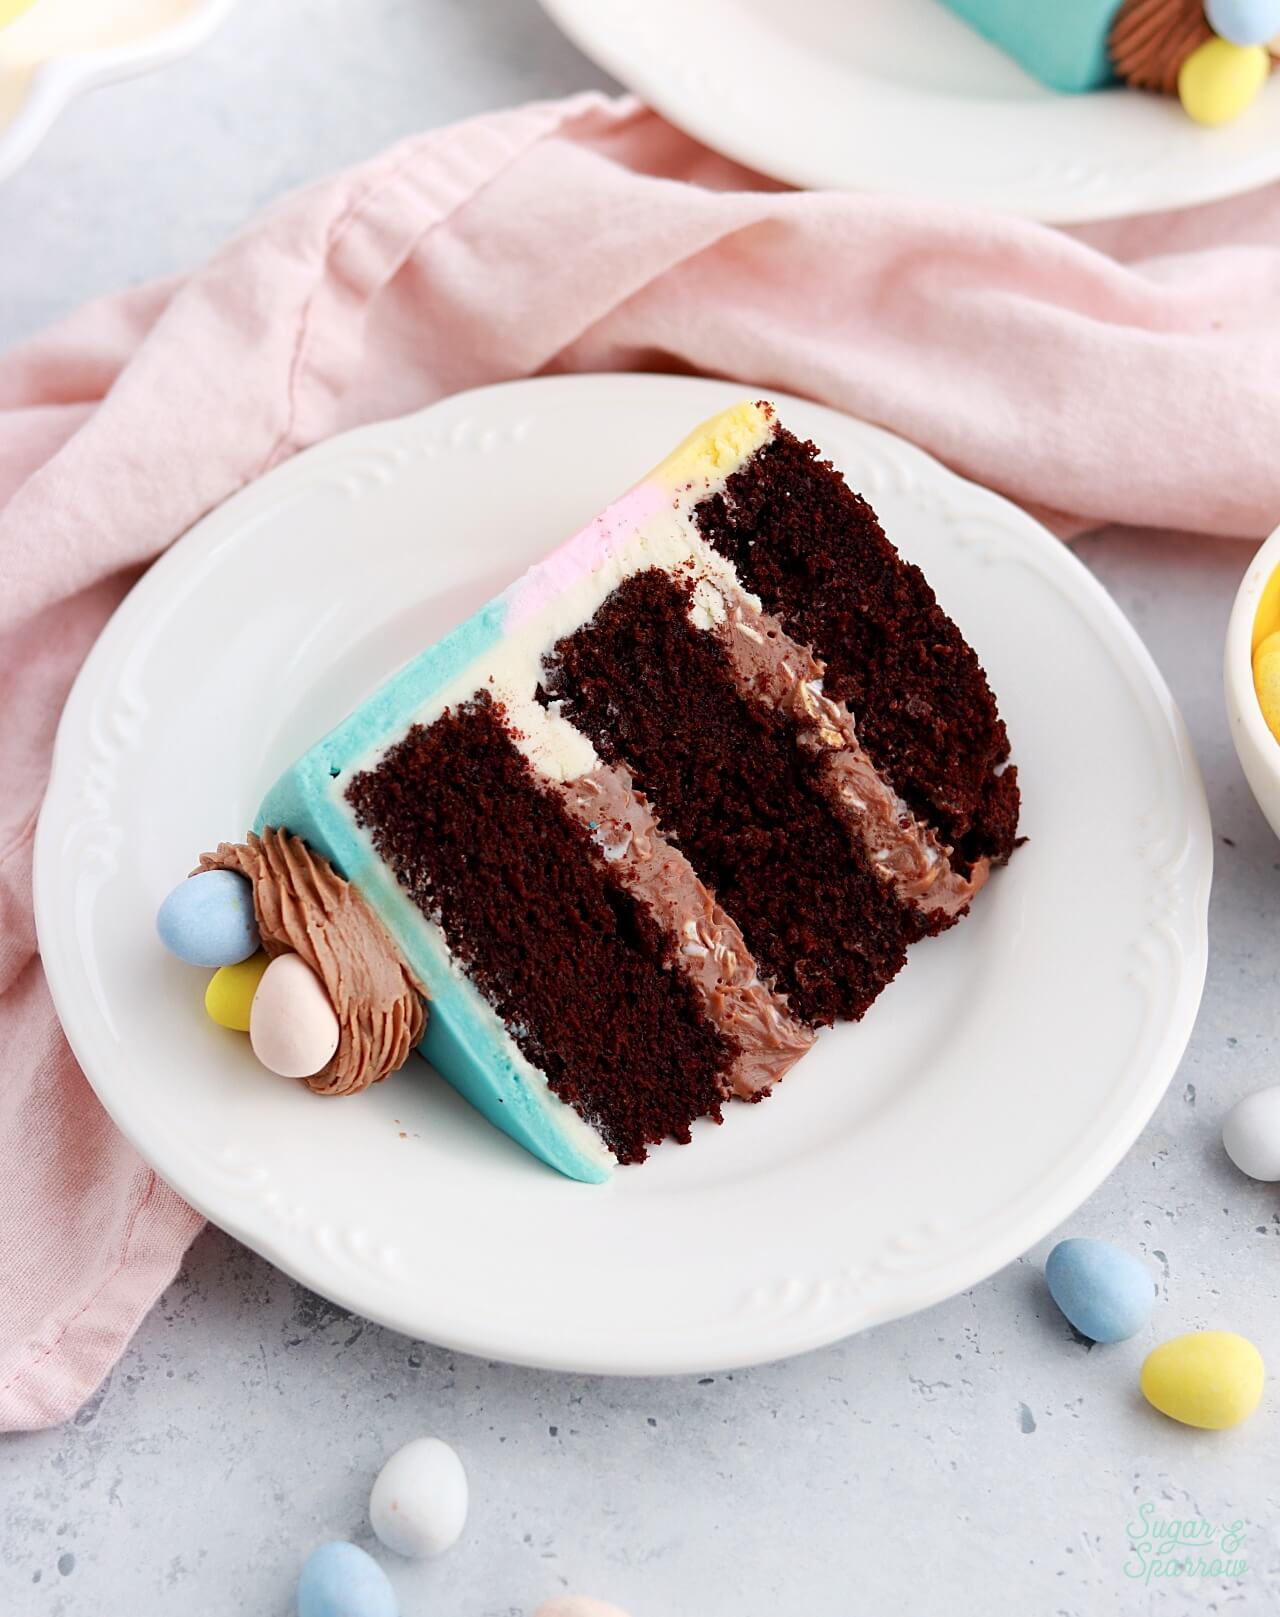
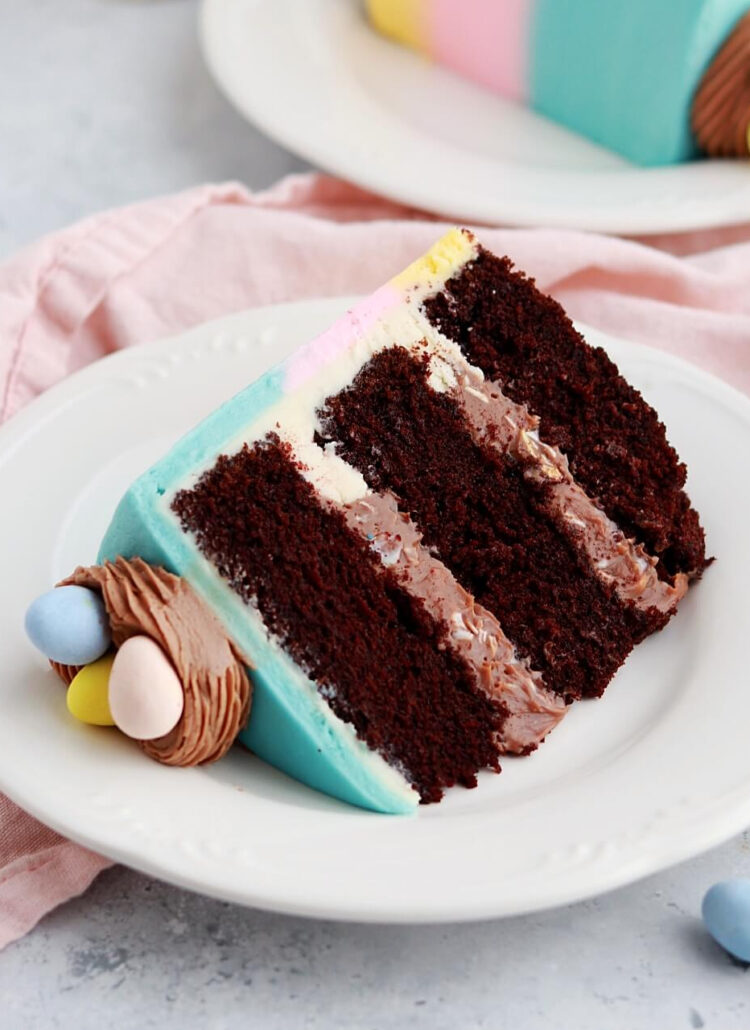
This Cadbury Mini Egg cake recipe starts with my favorite one bowl chocolate cake, which is delicious all on its own, but what takes it to legendary status is the Cadbury Mini Egg ganache filling. It’s a super creamy chocolate filling made by melting the Mini Eggs with simmered heavy whipping cream until it’s silky smooth with little bits of candy shell throughout. It sets into a silky smooth, decadent ganache filling that will absolutely blow your mind! And even though the idea of ganache filling might sound extravagant if you’ve never made it before, I promise you it’s super easy to whip up in minutes.

cadbury mini egg ganache filling with chocolate cake

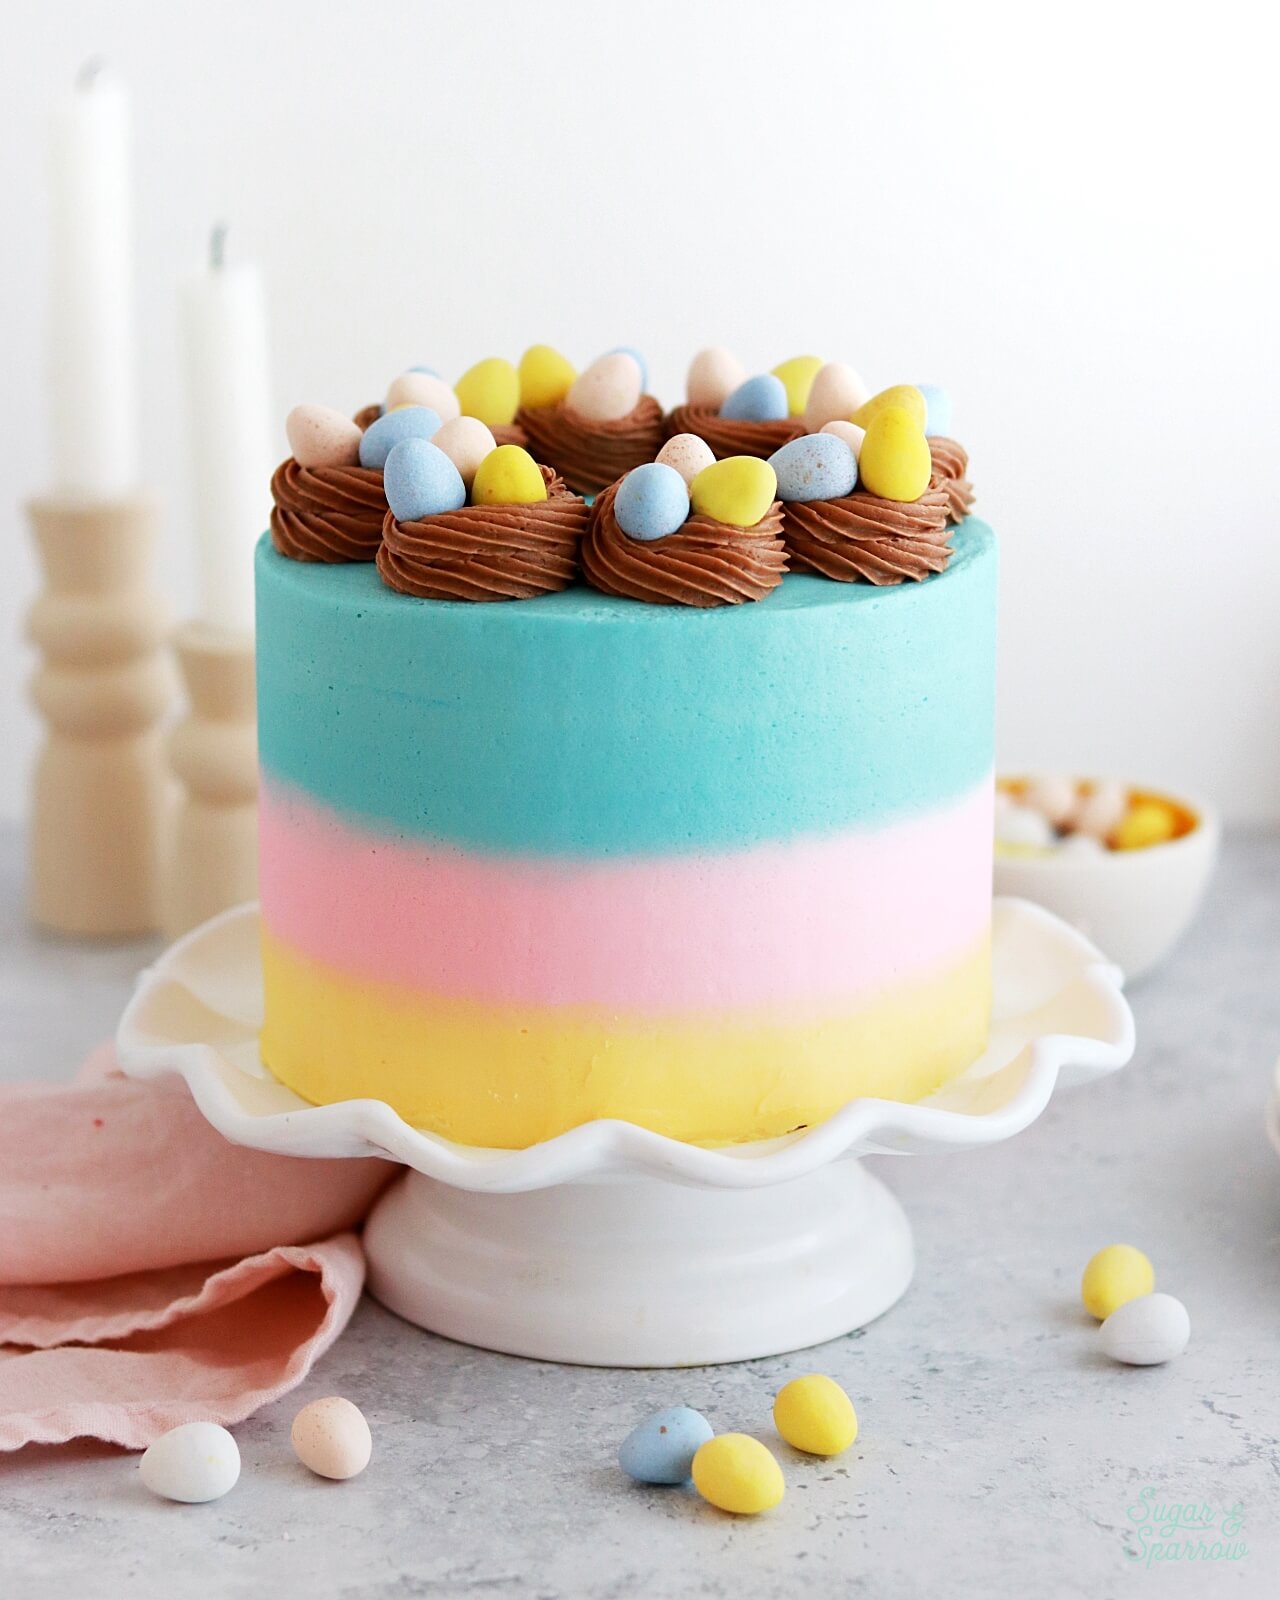
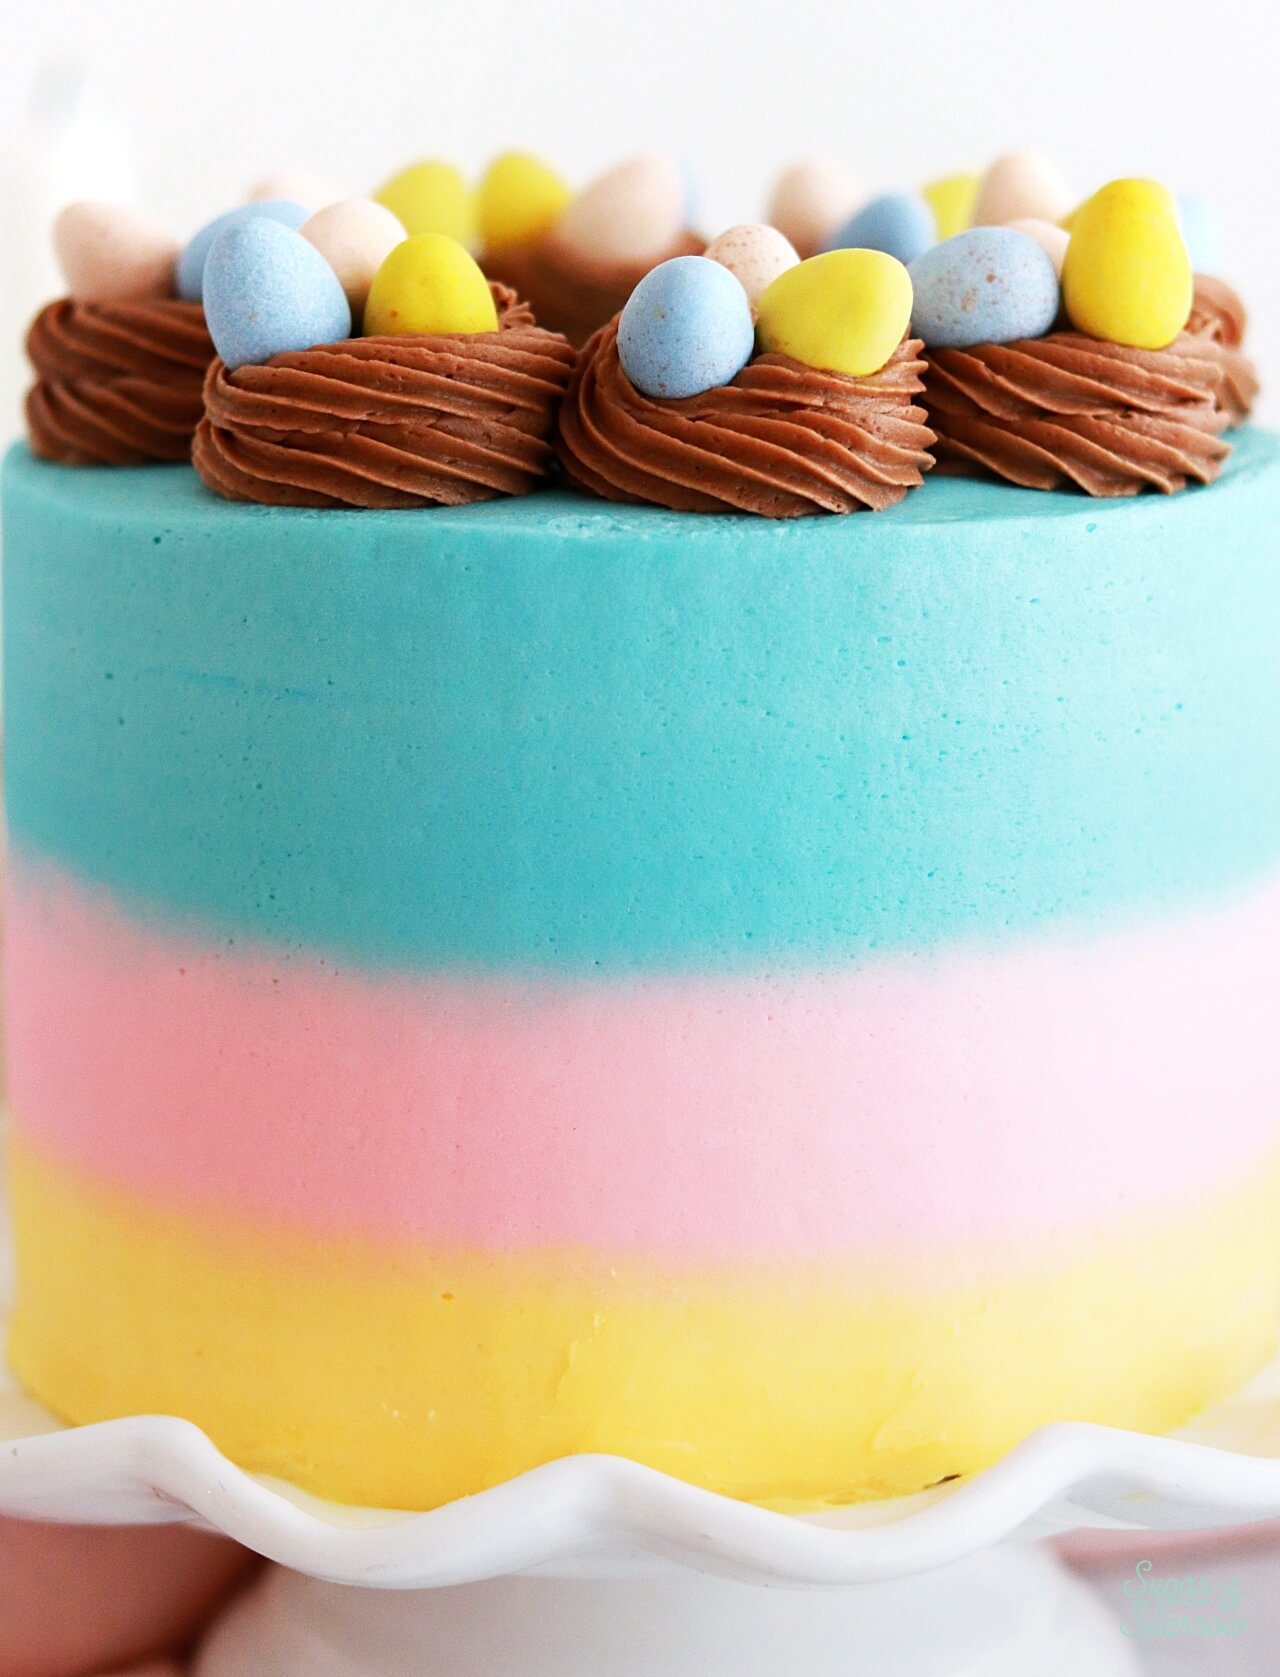
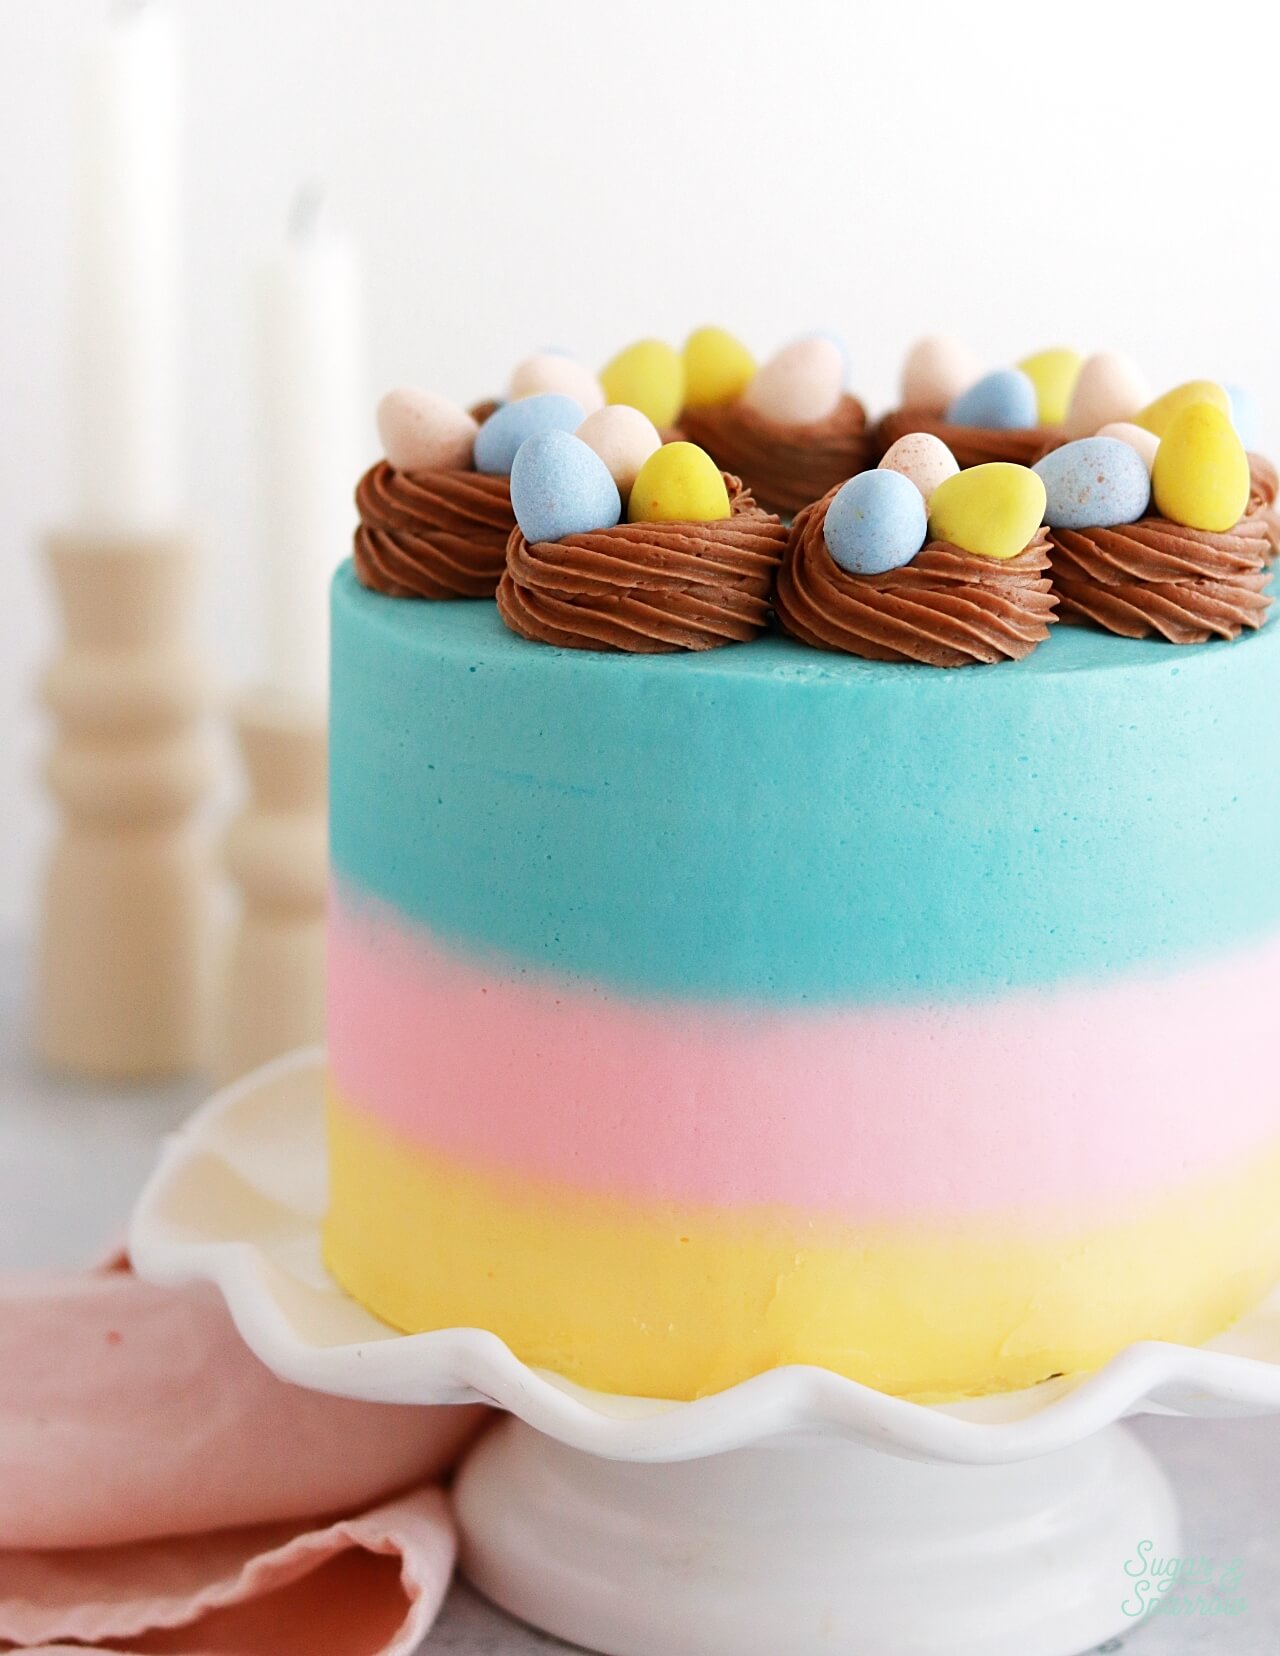
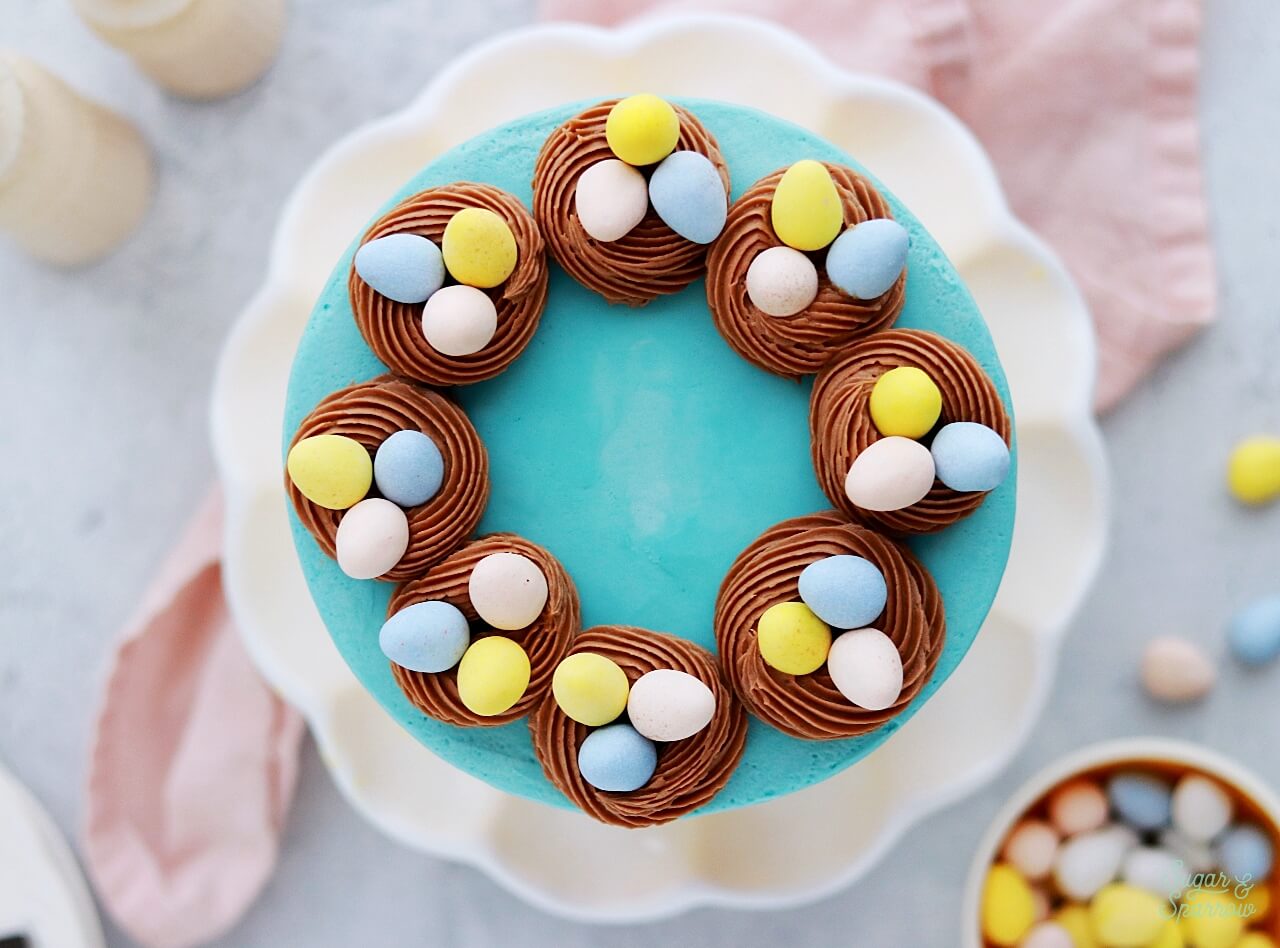
For the topping, I used my favorite vanilla buttercream recipe, dyed those signature pastel colors to match the Mini Eggs. I created an ombrè finish with pastel blue, yellow, and pink buttercream before finishing the look with some piped buttercream “nests” filled with more Mini Eggs.

cadbury egg cake recipe
easter cake recipe ideas

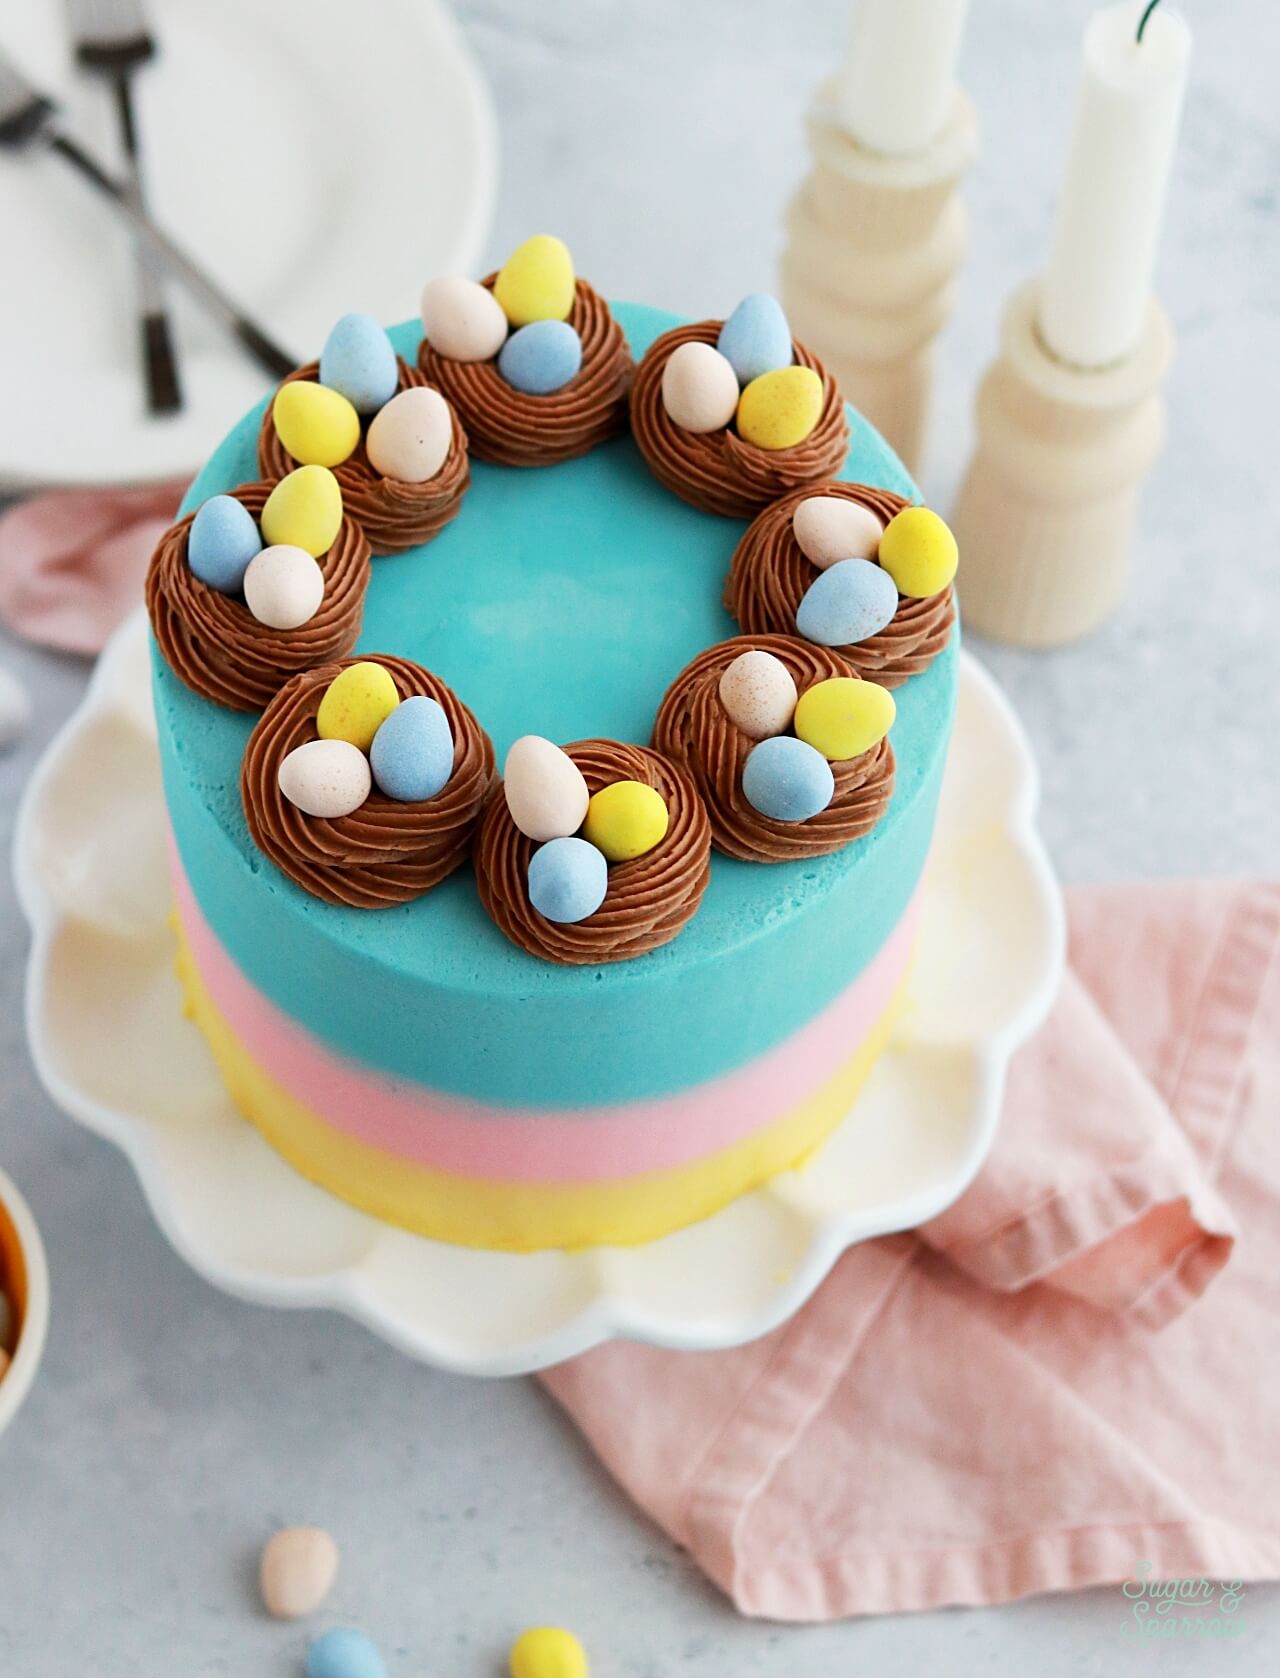
Fun fact: I actually turned the leftover buttercream from the ombrè into chocolate buttercream for those nests! After frosting the cake, I simply added the remaining buttercream into a bowl and mixed it all together with 2 teaspoons of cocoa powder and boom. Delicious chocolate buttercream with zero waste.

cadbury egg cake recipe by sugar and sparrow
chocolate cadbury mini egg cake recipe

Whether you’re celebrating Easter and need a centerpiece dessert or you simply want to welcome Spring with a fun cake, this recipe is the perfect baking project. Feel free to get creative with the decorating or replicate this look using the Assembly instructions below! However you dress it up, this cake tastes just like Cadbury Mini Eggs in cake form and will make every Cadbury fan swoon.

cadbury mini egg cake filling
cadbury mini egg cake by sugar and sparrow

Cadbury Mini Egg Cake

5 from 1 vote
Moist and decadent chocolate cake with Cadbury Mini Egg ganache filling, topped with pastel vanilla buttercream to make it a showstopper inside and out.
Print Recipe Pin Recipe
Servings: 15 slices

Ingredients

Chocolate Cake

  • 2 Cups (265g) all purpose flour
  • 1 2/3 Cups (340g) granulated sugar
  • 2/3 Cup (60g) unsweetened natural cocoa powder
  • 2 tsp baking soda
  • 1 tsp baking powder
  • 1/2 tsp kosher salt
  • 1/2 Cup (120ml) vegetable oil
  • 2 large eggs, room temperature
  • 1 1/2 tsp pure vanilla extract
  • 1 Cup (240ml) full fat buttermilk, room temperature* DIY recipe in notes
  • 1 Cup (240ml) hot coffee or hot water

Cadbury Mini Egg Ganache

  • 1 Cup (212g) Cadbury Mini Eggs
  • 1/2 Cup (120ml) heavy whipping cream

Vanilla Buttercream

  • 2 Cups (452g) unsalted butter, room temperature
  • 7 Cups (840g) powdered sugar
  • 4 tsp pure vanilla extract
  • 3 Tbsp whole milk, room temperature
  • pinch of salt
  • Pink, yellow, and blue food color gels

Nests

  • 2 tsp cocoa powder
  • 18 Cadbury Mini Eggs

Instructions

Make the Chocolate Cake

  • Preheat the oven to 350ºF and prepare three 6-inch or two 8-inch cake pans by spraying the sides with cooking spray and fitting the bottoms with a wax paper or parchment cake circle. 
  • Place all of the dry ingredients into the bowl of a stand mixer and stir on low for 30 seconds to fully combine them. Add the vegetable oil, eggs, vanilla, and buttermilk and mix on low until just combined. With the mixer still on low, add the hot water in a slow stream, then turn the mixer to medium and beat until smooth, about 2 minutes. The batter will be very thin. 
  • Pour into prepared cake pans no more than 2/3 full and bake for 32-36 minutes, until a toothpick inserted comes out clean. Cool completely before filling and frosting.

Make the Cadbury Mini Egg Ganache

  • Pour the heavy whipping cream into a small saucepan set over medium heat and bring to a simmer, whisking frequently. Meanwhile, place the Cadbury Mini Eggs in a glass bowl and microwave them in 30 second increments, until the shells crack under slight pressure and the chocolate inside looks melty. In my experience it took 2.5 intervals (so, 1 minute 15 seconds).
  • When the heavy whipping cream starts to simmer, pour it over the Cadbury Mini Eggs and cover the bowl with a plate for 2 minutes. Afterwards, whisk the mixture into a uniform consistency, breaking down the shells as you go. It will look pretty rough at first, but I promise it will come together in 1-2 minutes of whisking. When it's fully combined it will look like smooth milk chocolate ganache with tiny bits of candy shell throughout.
  • Place a piece of plastic wrap over the surface of the ganache and place in the refrigerator for 1-2 hours, until completely cooled and the consistency is much thicker, almost like Nutella.

Make the Vanilla Buttercream

  • With a hand mixer or paddle attachment on your stand mixer, cream the butter on medium-high until it’s creamy and light (almost white) in color. About 7 minutes. 
  • With the mixer on low, add the powdered sugar a few cups at a time, scraping down after each addition and making sure each is fully incorporated before adding the next one. 
  • Add vanilla, milk, and salt and mix on low for another minute until fully incorporated. 

Assembly

  • Once the chocolate cake layers have cooled completely, level and torte each layer to your desired height. Place the first layer on a turntable and pipe a circle of vanilla buttercream around the edge. Fill in the center with half of the (room temperature) Cadbury Mini Egg ganache. Here's a detailed tutorial on this filling method in case this is your first time working with a soft filling.
  • Place the next cake layer on top and repeat the process of piping the buttercream circle and filling in the center with the rest of the Cadbury Mini Egg ganache. Place the final layer on top, upside down so that the bottom of the cake layer is the top of the cake. Crumb coat the cake with vanilla buttercream and place it in the refrigerator for at least 20 minutes to let everything set up.
  • Color the Buttercream: Divide the rest of the vanilla buttercream between three bowls and make sure one of the bowls has about 1/2 Cup more buttercream than the other two. Use food color gels to tint one bowl pastel pink, one bowl pastel yellow, and the bowl with the most buttercream periwinkle blue.
  • Create the Ombrè Finish: Add each buttercream color into a piping bag and snip off the end. Starting at the bottom of the cake and working your way up, pipe the yellow buttercream while you turn the turntable until it reaches about 1/3 of the way up the cake. Continue on with the pink buttercream until you reach 2/3 of the way up the cake. Finish with the blue buttercream for the top third of the cake and the very top. Use an icing smoother to create a smooth buttercream finish with the ombrè colors, then place the cake into the refrigerator for 20 minutes to let the buttercream set.
  • Make the Nests: Place the remaining colored buttercream into a bowl and add 2 tsp of cocoa powder on top. Mix until you have a uniform chocolate buttercream and add it into a piping bag fitted with Wilton Tip 4B. Pipe 6 nests on top of the cake. I basically piped a circle with another circle on top. Add 3 Cadbury Mini Eggs into each nest.

Notes

*DIY Buttermilk recipe: add 1 Tbsp of white vinegar to a jar and top it with 1 Cup of whole milk. Stir and let sit for 15 minutes before using in the recipe. 
Make ahead tips: 
  1. The chocolate cake can be made ahead and stored at room temperature, covered tightly in plastic wrap, for up to two days. Alternatively, you can cover with plastic wrap and store in the freezer for up to two months before thawing to room temperature. 
  2. The Cadbury Mini Egg Ganache can be made up to a week in advance and stored in an airtight container in the refrigerator. Bring it back to room temperature before using as a filling. You may need to microwave it for 5-10 seconds to get it nice and creamy. 
  3. The vanilla buttercream can be made ahead and stored in an airtight container in the refrigerator for up to two weeks. When you’re ready to use it, bring it back to room temperature and re-whip in your stand mixer to bring back to smooth buttercream consistency. 

I hope you’re as obsessed with this Cadbury Mini Egg Cake recipe as I am! Let me know what you think in the comments below + be sure to tag @sugarandsparrowco on Instagram to show me. I love to see what you create!

By: Whitney · In: Cake, Featured, Recipes, Seasonal, Spring · Tagged: cadbury mini egg cake, cadbury mini eggs, easter cake, pastel cake

you’ll also love

Cadbury Mini Egg chocolate ganache filling for cakesCadbury Mini Egg Ganache
easy Cadbury Mini Egg Cheesecake recipeNo-Bake Cadbury Mini Egg Cheesecake
carrot cake recipe by sugar and sparrowCarrot Cake with Cream Cheese Frosting

Join the List

Stay up to date & receive the latest posts in your inbox.

Reader Interactions

Comments

  1. Shannon S. says

    April 25, 2025 at 5:08 am

    5 stars
    I made this recipe at Easter and it was a hit with everyone. I usually use a chocolate cake recipe that I’ve used tons of times but decided to give this one a try. I loved it, it will have to be in rotation with my other one. The ganache was really good. The shells of the Cadbury eggs don’t stay crispy after a day but they still add something to the ganache. Will definitely make again!

    Reply
  2. Nicole says

    April 14, 2025 at 7:23 am

    Hi,
    If you use two 8inch cake pans would you make it into 4 layers or leave as two???
    Thank you

    Reply
    • Whitney says

      April 14, 2025 at 9:33 am

      Hi Nicole! I usually just leave it as two 8-inch layers, but you could torte them into four if you want.

      Reply
  3. Kim says

    March 28, 2024 at 5:19 pm

    Question! Is this ganache firm enough to be used as a macaron filling? Or is it a bit too soft?

    Reply
    • Whitney says

      March 29, 2024 at 5:40 pm

      Hi Kim! You could totally use it as a macaron filling. I’d break the shells down as small as possible so you can pipe it into the centers easily.

      Reply
  4. Addie says

    March 19, 2024 at 6:05 pm

    Oh my goodness!!!! this cake is SOOO adorable…. Might be my next make! I love the Easter theme. Thanks for amazing recipes and tips Whitney!

    Reply
    • Whitney says

      March 20, 2024 at 8:18 pm

      Yay, Addie! I hope you get a chance to make this one, it turned out so tasty!

      Reply

Leave a Reply Cancel reply

Your email address will not be published. Required fields are marked *

Recipe Rating


Next Post >

Small Batch Funfetti Cake

Primary Sidebar

Welcome to Sugar & Sparrow

Welcome to Sugar & Sparrow

Helping you whip up pretty desserts with confidence and creativity. And hopefully sharing a few laughs with you along the way!

Learn More

Connect

let’s bake!

Get my very best recipes, baking tips, and decorating tutorials sent to your inbox

Featured Posts

fresh flowers on cake

How To Make Fresh Flowers Safe For Cakes

eggless chocolate birthday cake recipe by sugar and sparrow

Eggless Chocolate Cake Recipe (Can Be Made Vegan!)

sugarbear sleep vitamins

SugarBear Sleep Vitamins Cake Collab

Search

Archives

Follow Along

@sugarandsparrowco

Finally cracked the code on this marbled strawberr Finally cracked the code on this marbled strawberry no-bake cheesecake!! 🍓it’s a classic tangy no-bake cheesecake marbled with strawberry reduction on top of a buttery graham cracker crust. The key is mixing some of the cheesecake filling with the jammy strawberry reduction before swirling the two flavors together, then refrigerate overnight and the filling is velvety and mousse-like with the perfect pops of strawberry flavor.

Recipe is linked in my bio + at https://sugarandsparrow.com/no-bake-marbled-strawberry-cheesecake/

#nobakecheesecake #strawberrycheesecake #strawberry #cakedecorating #nobakedessert
STRAWBERRY SHORTCAKE ICE CREAM CAKE 🍓if Strawbe STRAWBERRY SHORTCAKE ICE CREAM CAKE 🍓if Strawberry Shortcake Ice Cream Bars make you nostalgic for your childhood ice cream truck days, you’re going to LOVE this easy ice cream cake version - no ice cream maker needed 🙌🏼 

Full recipe on my blog at https://sugarandsparrow.com/strawberry-shortcake-ice-cream-cake/

STRAWBERRY CRUNCH 
24 whole (280g) Golden Oreos, finely ground
3 Oz box strawberry jello
4 Tbsp unsalted butter, melted

ICE CREAM LAYERS
1/2 Cup (15g) freeze-dried strawberries
2 Cups heavy whipping cream, cold
1 Tbsp pure vanilla extract, divided
14 Oz sweetened condensed milk
1 1/2 tsp strawberry jam or preserves

1. Combine the strawberry crunch ingredients and bake on a lined cookie sheet at 350ºF for 4 min.
2. For the crust, combine 1 Cup of the strawberry crunch with 2 Tbsp melted butter. Press into the bottom of a 6-inch springform pan and line with an acetate collar. Place in the freezer while you move on.
3. Using a food processor, grind the freeze-dried strawberries into a fine powder. Set aside.
4. Add the heavy whipping cream and 2 tsp of vanilla extract into a chilled bowl, then whip it with a hand mixer to stiff peaks. Place in the refrigerator.
5. Divide the condensed milk between two medium bowls. To one bowl, add 1 teaspoon of vanilla. To the second bowl, add the finely strawberry powder and the jam/preserves. Whisk the ingredients together within each individual bowl.
6. Divide the whipping cream evenly between each of the two bowls you created in the previous step. Fold each sweetened condensed milk mixture together with the divided whipped cream to create the vanilla ice cream and strawberry ice cream.
7. Layer half of each of the ice creams on top of the strawberry crunch crust, sprinkle a layer of strawberry crunch on top, then repeat. Freeze for 6 hours and serve. 
#icecreamcake #strawberryshortcake #nochurnicecream #icecreamlover #strawberry
LEMON CUPCAKES 🍋 after about a dozen recipe tes LEMON CUPCAKES 🍋 after about a dozen recipe tests, this one is everything I could want in a lemon cupcake! Fluffy-yet-moist, bursting with natural lemon flavor, and absolutely irresistible topped with lemon cream cheese buttercream. 

Full recipe (with frosting) linked in my bio + at https://sugarandsparrow.com/homemade-lemon-cupcakes/

INGREDIENTS:
1 Cup (132g) all-purpose flour
1 tsp baking powder
1/4 tsp salt
1/4 Cup (60ml) whole milk, room temperature
3 Tbsp (45ml) lemon juice from 1 medium lemon
3/4 Cup (150g) granulated sugar
3 Tbsp (42g) unsalted butter, room temperature
2 Tbsp (30ml) vegetable oil
2 large eggs, room temperature
1 tsp pure vanilla extract

INSTRUCTIONS:
1. Preheat the oven to 350ºF (177ºF) and line a standard cupcake pan with 12 paper liners.
2. In a large bowl, whisk together the flour, baking powder, and salt. Set aside. 
3. In the bowl of a stand mixer fitted with the paddle attachment (or with a hand mixer and large bowl), add the lemon zest to the sugar and mix on low speed until fragrant and well combined, about 1 minute. Meanwhile, combine the lemon juice with the milk and set aside. 
4. Add the butter to the lemon-sugar mixture and cream on medium speed until and combined, about 2 minutes. Add the vegetable oil and beat until light and creamy, about 3 minutes. Scrape down the bowl and paddle as needed.
5. Mix in the eggs one at a time on low speed, then add the vanilla and turn the mixer to medium speed for one minute.
6. Turn the mixer off and add the flour mixture all at once. Mix on low speed until just combined, then slowly pour in the lemon-milk mixture. Mix until just combined, about 30 seconds.
7. Divide the batter equally between the liners and bake for 14-18 min. Cool, then top with frosting of your choice (link in bio for lemon cream cheese frosting)�
#lemoncupcakes #creamcheesefrosting #lemon #cupcakes #cupcakedecorating
April in my kitchen 🌸 I published 5 NEW recipes April in my kitchen 🌸 I published 5 NEW recipes on my site, baked my Oreo cupcake recipe for a fundraiser and found it was just as delicious as I remember, and filmed/photographed 3 recipes that will be on my blog in May (Lemon Cupcakes, Lemon Cream Cheese Buttercream, and No-Bake Marbled Strawberry Cheesecake) 🥰 

Comment “APRIL” to get all the available recipes and stay tuned for more! 

#bakersofinstagram #springbaking #cakedecorating #cupcakes #bakinglove
SHEET PAN COOKIE CAKE 🍪 slice it warm for a fud SHEET PAN COOKIE CAKE 🍪 slice it warm for a fudgy chocolate chip cookie OR let it settle into a moist and chewy cookie cake that’s perfect for decorating! My fave vanilla buttercream + sprinkles turn this giant chocolate chip cookie into the perfect birthday cake alternative at the end 🥳
⁣
Full recipe + decorating ideas at https://sugarandsparrow.com/sheet-pan-chocolate-chip-cookie-cake/
⁣
INGREDIENTS⁣
1 Cup (226g) unsalted butter, melted⁣
1 1/3 Cups (267g) packed light or dark brown sugar⁣
1/2 Cup (100g) granulated sugar⁣
3 large eggs⁣
1 Tbsp pure vanilla extract⁣
1 tsp baking soda⁣
1 tsp cornstarch⁣
1/2 tsp salt⁣
3 Cups (398g) all purpose flour⁣
2 Cups (350g) semi-sweet chocolate chips⁣
⁣
INSTRUCTIONS⁣
1. Preheat the oven to 350ºF (177ºC). Grease and line a 13×18 inch sheet pan.⁣
2. In a large bowl, add the brown sugar and granulated sugar. Melt the butter in the microwave and pour it over the top of the sugars. Whisk together until uniform. Add the eggs and vanilla, then continue whisking until uniform. Whisk in the baking soda, cornstarch, and salt.⁣
3. Add the flour and use a silicone spatula to fold it in until smooth cookie dough forms. Reserve 1/2 Cup of the chocolate chips and set them aside, then fold the remaining 1 1/2 Cups of chocolate chips into the cookie dough.⁣
4. Place the chocolate chip cookie dough onto the prepared sheet pan and use an offset spatula to spread it all the way to the edges in an even layer.⁣
5. Bake the cookie cake for 14-16 minutes, until it looks golden brown on the edges and set. 
6. Enjoy warm or let it cool and decorate with vanilla buttercream and sprinkles! ⁣
⁣
#cookiecake #chocolatechipcookies #sheetcake #birthdaycake #cakedecorating

Footer

On the Blog

  • Cake Basics
  • Recipes
  • Tutorials

Info

  • About
  • Privacy Policy & Disclosure

stay in the know

Copyright © 2026 · Theme by Sugar & Sparrow