• Cake
  • Frosting
  • YouTube
  • My Favorite Tools
  • Nav Social Icons

  • Skip to primary navigation
  • Skip to main content
  • Skip to primary sidebar
  • Skip to footer
  • Recipes
    • Cake
    • Cupcakes
    • Frosting
    • Ice Cream
    • Vegan
  • Cake Basics
  • Tutorials
  • Blog
  • About
  • Mobile Menu Widgets

    Connect

    Search

Sugar & Sparrow logo in script font

Sugar & Sparrow

Lifestyle and Cake from Portland Oregon

  • Cake Basics
  • Recipes
    • Cake
    • Cupcakes
    • Cookies & Bars
    • Filling
    • Frosting
    • Ice Cream
    • No-Bake
    • Small Batch
    • Vegan
  • Tutorials
  • Book
  • Blog
  • About

Sprinkle Gingerbread House Kits + Decorating Tutorial

December 5, 2019 · In: Holiday, Seasonal, Tutorials

Way back in July, I got this amazing opportunity to design a sprinkley gingerbread house for SprinklePop using their Sprinkle Gingerbread House Kit. It was so much fun to create (truly felt like Christmas in July!) and also, my festive little gingerbread creation ended up on the package itself! I was so starry-eyed over all of it then and now that the Holidays are in full swing, I’m swooning all over again. If you’re looking for the perfect gingerbread house kit to decorate with family and friends, this one is my pick!  

Gingerbread House Kit by SprinklePop

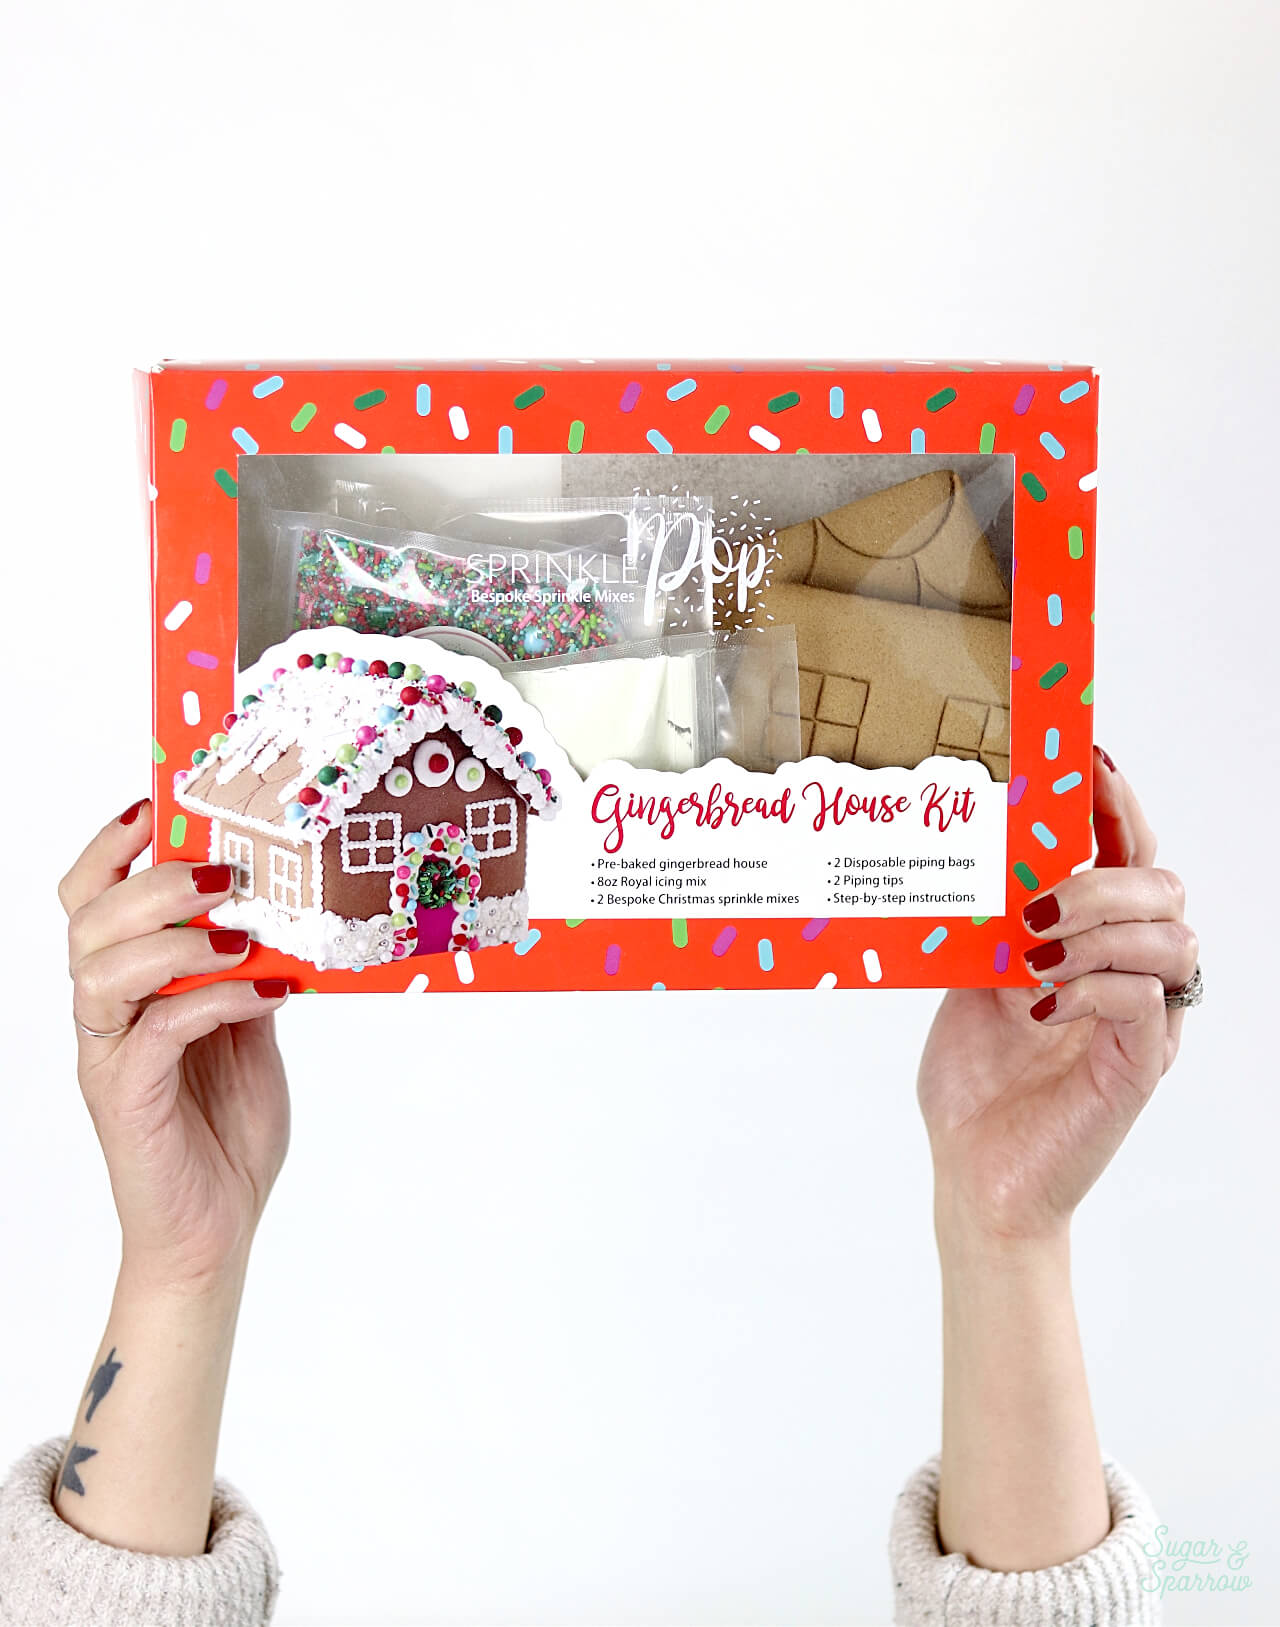
Decorating gingerbread houses is such a fun Holiday tradition and these kits come with everything you need: gingerbread house pieces that are perfectly baked, royal icing mix that you can whip up with just a few tablespoons of water, the ideal holiday sprinkle mixes, and they even include piping bags and tips for flawless decorating. The sprinkles that come inside the kit are the ultra-colorful Fahoo Fores and the super-pretty Winter Wonderland sprinkles. You can use both on your gingerbread house to create the design pictured, mix it up by adding some extra holiday candy, or just be creative and do your own thing. The (Winter) sky’s the limit with these Sprinkle Gingerbread House Kits.

gingerbread house decorating tutorial
gingerbread house with sprinkles

The best part about these kits is that they make gingerbread house assembly incredibly easy. The pieces are held together with the royal icing mix that comes with the kit, and it’s super pipeable and sturdy – aka the perfect glue! You end up with a strong gingerbread house that won’t collapse on you, and the decorating process is a whole lot more fun when you’re not worried about the house falling apart.

gingerbread house assembly

Whether you want to replicate this exact sprinkle gingerbread house design or do your own thing decorating-wise, here’s a quick video to show you how to build and dress up a gingerbread house using the SprinklePop Sprinkle Gingerbread House Kits:

You Will Need

  • A SprinklePop Sprinkle Gingerbread House Kit
  • A hand mixer or stand mixer 
  • 2 Tbsp water 
  • Color gels of your choice
  • Wilton Tips 4B, 199, and 2 (all tips are optional)

Step 1: Mix Up The Royal Icing

Place the royal icing mix into the bowl of your stand mixer fitted with the whisk attachment (alternatively you can use a hand mixer). Add 2 Tbsp of water, then turn the mixer on high and let it whip up for about 7 minutes, until peaks form.

royal icing recipe for gingerbread house

From here, you can divide the royal icing up into separate bowls for color mixing. I chose to color about 3 Tbsp of the royal icing with Americolor Electric Pink to create the colorful front door for my gingerbread house. Then, I colored a few more Tbsp with Americolor Mint Green to pipe a wreath on top of the front door. For the pink royal icing, I also mixed in a few more drops of water to thin it out just a little bit.

how to color royal icing

Place your royal icing into the piping bags. The Sprinkle Gingerbread House Kit comes with piping bags and tips, but I used Wilton Tip 2 for my pink icing and some of the white icing, Wilton Tip 199 for my green icing, and Wilton Tip 4B for some more of my white icing. For the rest of the white icing, I placed it into a piping bag with a tiny opening snipped off, just for the assembly process.

Step 2: Decorate The Gingerbread House Pieces

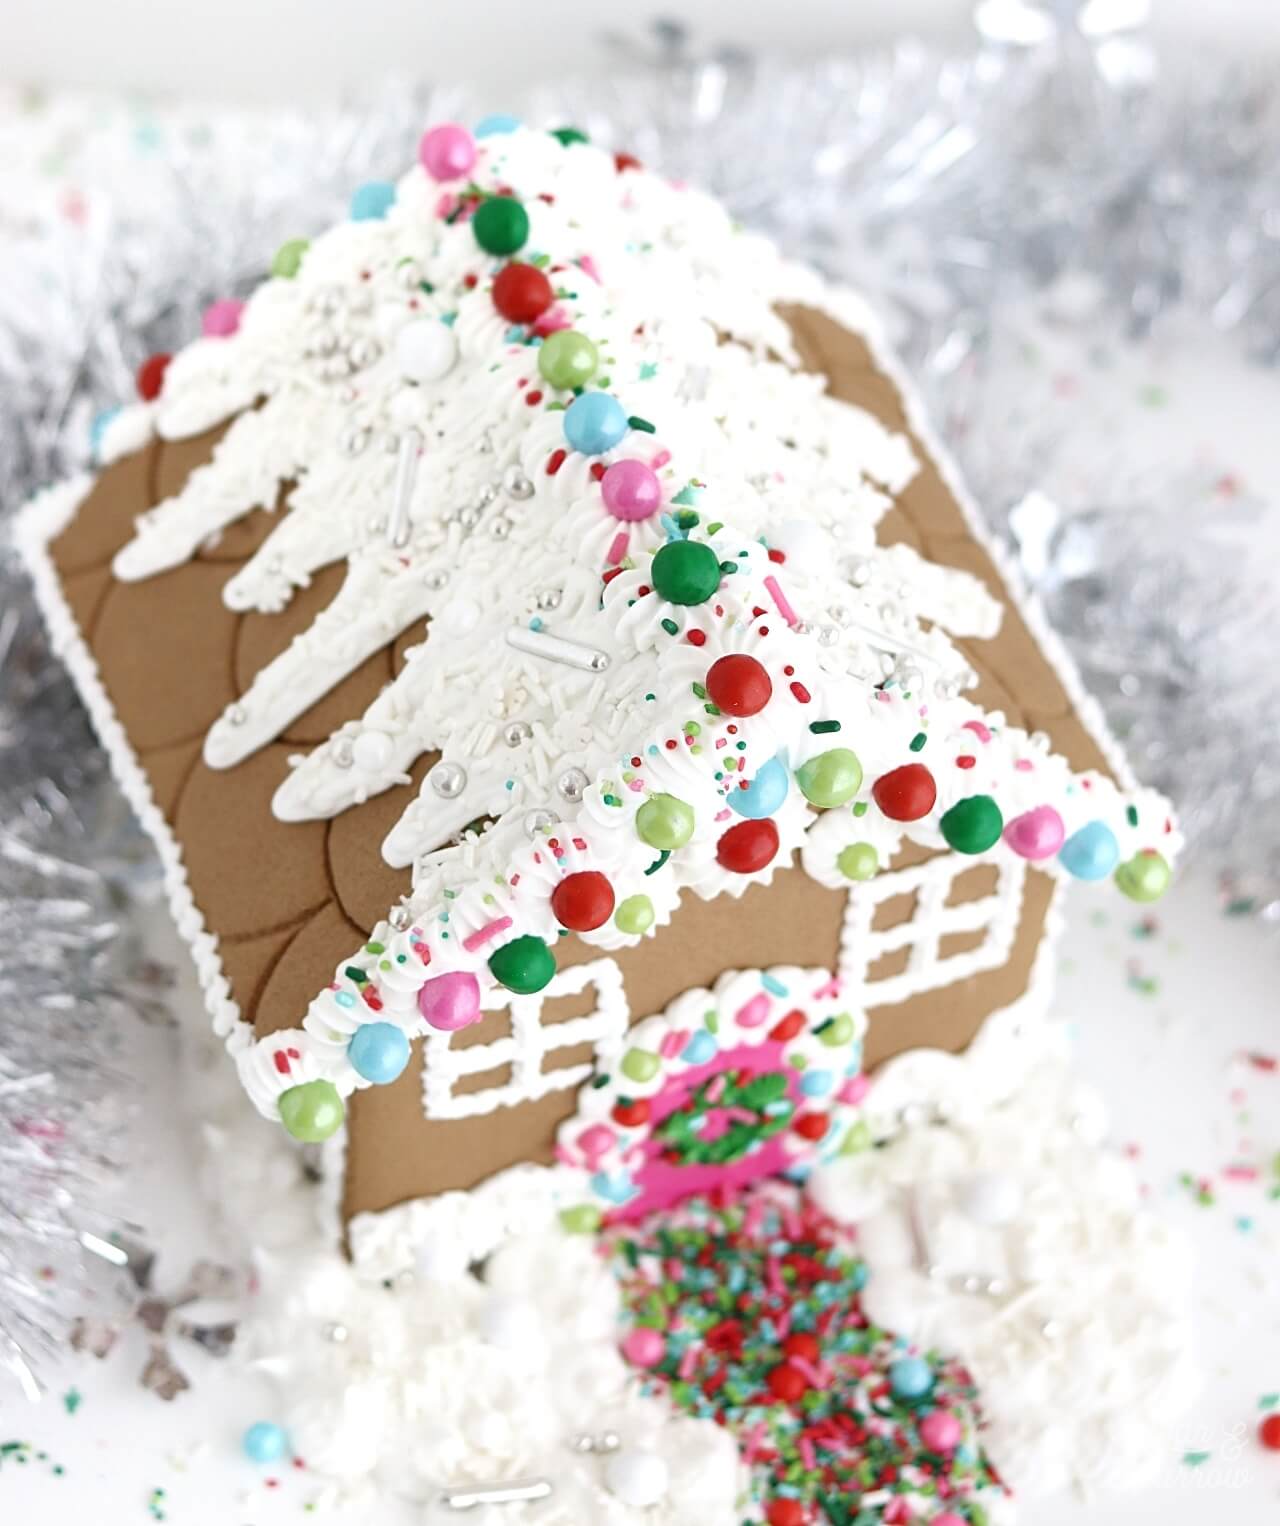
One by one, decorate the gingerbread house pieces with your piping bags and sprinkles. For the front of the house, I created a pink front door, then piped some white dots around it before placing some of the smaller sprinkles from the Fahoo Fores mix. Then, I piped a green wreath with Wilton Tip 199 onto the front door and continued piping and decorating with more of the sprinkles. I used the Winter Wonderland sprinkles toward the bottom of the house to make it look like sparkly snow drifts.

decorating gingerbread house pieces
gingerbread house decorating ideas

For the roof pieces, I piped some white royal icing in a drip pattern and then filled it all in with Winter Wonderland sprinkles.

how to decorate gingerbread house
snow on gingerbread house

And for the side pieces, I continued with the Winter Wonderland snow drifts along the bottom edges, then filled in the windows with piped dots using Wilton Tip 2.

decorated gingerbread house pieces

When you’re finished decorating, allow the pieces to dry for a few hours until they’re firm enough to the touch for assembly.

how to decorate gingerbread house with sprinkles

Be sure to store the remaining royal icing in an airtight container so it doesn’t dry up on you. In the meantime, you can pop on a Holiday movie and snuggle up with some cocoa! 

Step 3: Assemble The Base of the Gingerbread House

Once your gingerbread house pieces are dry, it’s time for assembly. Add some royal icing into a piping bag with about ⅛ inch opening snipped off the end, then add a line of royal icing along the edge of the side piece that connects with the front of the house. Add another line of royal icing along the side of the front piece of the house that will connect with the side, then press them together at a 90 degree angle. 

royal icing for gingerbread house recipe
assembling gingerbread house

Pipe royal icing along the edges of the other side pieces that connect, then press them all together to form the base of your house.

how to make a sturdy gingerbread house
how to glue gingerbread together
base of gingerbread house

Let the pieces dry together for about 12 hours before moving on to the next step. In the meantime, be sure to store your extra royal icing in an airtight container.

Step 4: Attach The Roof

Now that the base of your house is nice and sturdy, it’s time to add the roof and make it a home. Pipe royal icing along the top edges of your house, then along the places of your roof that the house will connect with.

how to attach roof to gingerbread house

Press each piece of the roof onto the house gently. The royal icing should hold it in place perfectly.

how to add roof to gingerbread house

Step 5: Decorate Even More

With your gingerbread house assembly complete, all that’s left to do is keep adding those festive touches. I piped some white royal icing with Wilton Tip 4B all along the roof lines, then added the larger sprinkle balls from the Fahoo Fores mix to make it look like Christmas lights.

how to make a strong gingerbread house for decorating

Next, I decided to create an entire Wintery scene by piping a walkway up to the house and covering it with more Fahoo Fores sprinkles. Then, I used Wilton Tip 4B to pipe little mounds of snow all around the front yard and sprinkled Winter Wonderland all over it. This part is totally optional, but I just couldn’t help myself.

sprinklepop gingerbread house tutorial

And just like that, you’ve got the best gingerbread house on the block! Be sure to pick up a Sprinkle Gingerbread House this Holiday season for some festive (and sprinkley!) fun. Happy Holidays! 

Disclaimer: I was compensated by SprinklePop for my work of creating this project, styling, filming, photographing, and writing about their products. As always, all opinions are honest and my own. Thank you for supporting brands that support Sugar & Sparrow.

By: Whitney · In: Holiday, Seasonal, Tutorials · Tagged: christmas, decorating, gingerbread, gingerbread house, gingerbread house decorating, holiday, royal icing, sprinklepop, sprinklepop gingerbread house kit, sprinkles, tutorial

you’ll also love

the best vanilla cupcakes recipeThe Perfect Vanilla Cupcake Recipe
no bake eggnog cheesecake recipe by sugar and sparrowNo-Bake Eggnog Cheesecake with Biscoff Cookie Crust
sprinkle cake balls topper tutorial by sugar and sparrowSprinkle Cake Truffles

Join the List

Stay up to date & receive the latest posts in your inbox.

Reader Interactions

Leave a Reply Cancel reply

Your email address will not be published. Required fields are marked *

Recipe Rating


Next Post >

My Ideal Hot Cocoa Bar Setup

Primary Sidebar

Welcome to Sugar & Sparrow

Welcome to Sugar & Sparrow

Helping you whip up pretty desserts with confidence and creativity. And hopefully sharing a few laughs with you along the way!

Learn More

Connect

let’s bake!

Get my very best recipes, baking tips, and decorating tutorials sent to your inbox

Featured Posts

gingerbread latte cake recipe

Gingerbread Latte Cake Recipe

sugarbear sleep vitamins

SugarBear Sleep Vitamins Cake Collab

sprinkle cake tutorial by sugar and sparrow

How to Decorate a Cake with Sprinkles

Search

Archives

Follow Along

@sugarandsparrowco

TOP 10 BIRTHDAY CAKES 🥳 These are just a few of my TOP 10 BIRTHDAY CAKES 🥳 These are just a few of my favorite birthday cake recipes that will make anyone feel special! 

Comment “BIRTHDAY” and I’ll send you all 24+ of my favorite birthday cake ideas –  classics like funfetti cake and yellow cake with chocolate frosting, plus ice cream cakes, sheet cakes, and more complex flavor combos like Snickers cake and Millionaire cake. 

https://sugarandsparrow.com/best-birthday-cake-recipes/

#birthdaycake #partycake #birthdaycakeideas #cakeinspiration #cakeideas
BERRIES & CREAM SHEET CAKE 🍓🫐 deliciously light, n BERRIES & CREAM SHEET CAKE 🍓🫐 deliciously light, naturally stunning, and the easiest cake you’ll want to make all Summer long!! It’s my favorite bakery-style vanilla sheet cake that’s so soft and moist, topped with silky whipped cream cheese frosting and fresh berries. I love how quickly this cake comes together with simple ingredients + doesn’t require any fancy cake decorating techniques to make it a showstopper✨

Grab the recipe link in my bio or find it at https://sugarandsparrow.com/berries-and-cream-sheet-cake/

#berrycake #berriesandcream #sheetcake #whippedcreamfrosting #cakedecorating
FUNFETTI SHEET CAKE 🥳 the most celebratory flavor FUNFETTI SHEET CAKE 🥳 the most celebratory flavor of all and so perfect for a crowd. It’s extra soft and moist vanilla cake speckled with rainbow sprinkles + captures that box mix texture but it’s 100% homemade and EASY! Top it with vanilla buttercream and rainbow sprinkles for the perfect party cake 🎉
 
Full recipe (w/ frosting) at the link in my bio or at https://sugarandsparrow.com/funfetti-sheet-cake/ 

INGREDIENTS 
2 1/2 Cups (265g) sifted cake flour 
2 tsp baking powder 
1/2 tsp baking soda 
1 tsp salt 
3/4 Cup (170g) unsalted butter, room temp 
1 3/4 Cup (340g) granulated white sugar 
3 large eggs, room temp 
1/2 Cup (120g) sour cream, room temp 
1 Tbsp pure vanilla extract 
1 Cup (240ml) whole milk, room temp 
1/3 Cup (60g) rainbow sprinkles, coated in 1 tsp flour 
 
INSTRUCTIONS 
1. Preheat the oven to 325°F (163ºC). Grease and line a 9×13 baking pan. 
2. In a medium bowl, whisk together the sifted cake flour, baking powder, baking soda, and salt. Set aside.  
3. In the bowl of your stand mixer fitted with the paddle attachment (or with a large bowl and hand mixer), beat the butter and sugar on medium-high speed until light and fluffy, 4 min. Add the eggs one at a time, then add the vanilla and sour cream and mix for one minute on high speed. 
4. Turn the mixer off and add the dry ingredients all at once. Mix on low speed until just combined, then add the milk and mix until just incorporated.  
5. Coat the rainbow sprinkles in 1 teaspoon of flour, then gently fold them into the cake batter. Pour the batter into the prepared baking pan and bake for 30-35 minutes, or until the cake springs back to the touch and a toothpick inserted into the middle comes out clean. Let the cake cool in the baking dish until room temperature, then decorate with vanilla buttercream + rainbow sprinkles (full recipe link in bio!) 
 
#funfetti #funfetticake #sheetcake #cake #birthdaycake
COOKIE DOUGH ICE CREAM CAKE 🍪🍦this is the birthday COOKIE DOUGH ICE CREAM CAKE 🍪🍦this is the birthday cake of my DREAMS and I’m so excited to share the recipe with you!! It’s chocolate and vanilla no-churn ice creams with homemade cookie dough chunks in every bite, swirled together and set on a delicious Oreo cookie crust 😍 easy, perfectly sliceable, and ideal for making ahead! I’m already dreaming about when I can make it again ✨

Get the recipe link in my bio + at https://sugarandsparrow.com/chocolate-chip-cookie-dough-ice-cream-cake/

#birthdaycake #icecreamcake #cakedecorating #nochurnicecream #icecreamlover
My kitchen in May 💛 some of these recipes had me f My kitchen in May 💛 some of these recipes had me feeling CRAZY with how many tests they took 🤪 but in the end I am so happy with these ones I got to hit the publish button on + I made my DREAM birthday cake that I can’t wait to share ASAP!!

Comment “MAY” to get all the recipes that are available now:

-Strawberry Shortcake Sheet Cake
-Lemon Cupcakes
-Lemon Cream Cheese Buttercream
-Orange Poppyseed Cake
-Whipped Mascarpone Frosting
-No-Bake Marbled Strawberry Cheesecake
-Chocolate Chip Cookie Cake

https://sugarandsparrow.com/everything-i-baked-in-may
 
#dessert #bakersofinstagram #baking #bakinglove #dessertlovers

Footer

On the Blog

  • Cake Basics
  • Recipes
  • Tutorials

Info

  • About
  • Privacy Policy & Disclosure

stay in the know

Copyright © 2026 · Theme by Sugar & Sparrow