
This cake recipe originally appeared as a guest post on SprinklePop’s blog. It’s too good not to re-share here, especially because several cake tasters described it by saying it “tastes just like summer.” Enjoy!
Jump to RecipeWhat’s more refreshing than lemonade on a warm summer day? Strawberry lemonade, of course! There’s something about blending the two flavors together that creates summertime magic, and when you incorporate them into cake, it’s just downright delicious! I think this Strawberry Lemonade cake is the perfect summertime treat, whether you’re celebrating with a shindig or just want to whip up something tasty and pretty to look at. I owe all of the inspiration behind creating this recipe to the Pink Lemonade sprinkle mix by SpinklePop, because just one look at them sparked the idea to incorporate refreshing flavor of pink (aka strawberry) lemonade into a cake. And just look at how beautiful the sprinkles make it!

Let’s talk about the strawberry cake underneath all that lemony buttercream. It’s made with real strawberries that have been pureed and then reduced to keep the addition packed with flavor, but not too watered down with juice. I’ll admit, the process of pureeing and reducing strawberries does add an extra step, but it’s so worth it. The texture is moist and fluffy, and the pastel pink color makes it so pretty to look at.


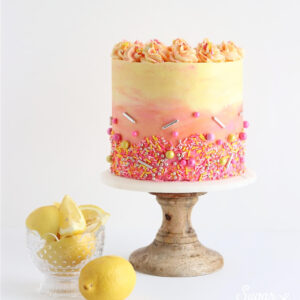
The cake is filled with strawberry buttercream to really enhance the strawberry flavor, then frosted with a lemon buttercream for a perfect tangy compliment. Made with real lemon juice and zest, the lemon buttercream has a tasty zing that can’t be matched with the artificial stuff. To top it all off, I’ve used a little yellow and pink food color gel to create an ombrè buttercream finish, making it resemble a glass of real strawberry lemonade. And it’s a real head turner with SprinklePop’s Pink Lemonade sprinkles as a garnish. Just look at how pretty these colors are!


The best part is, the cake and buttercream recipes are super easy to whip up, and everything can be made ahead of time if that’s your jam. And however you decide to decorate, using SprinklePop sprinkles will take it to the next level. They’re the perfect finishing touch!
Update 2020: I’ve changed the measurements in the recipe below to make exactly enough batter for three 6-inch cake pans or two 9-inch cake pans. I always do triple 6-inch layers when making cakes (I like ‘em tall!), and since I get so many questions on how to convert the original recipe into three 6-inch layers I thought I’d just do the math for you. So same great recipe, with the most requested amount of batter!
Strawberry Lemonade Cake Recipe
Ingredients
Strawberry Cake
- 3/4 lb (12oz) fresh strawberries, pureed and reduced to 1/2 cup
- 3/4 cup (180ml) whole milk, room temperature
- 2 1/2 cups (255g) cake flour, sifted before measuring
- 2 tsp baking powder
- 1/4 tsp baking soda
- 1 tsp kosher salt
- 3/4 cups (170g) unsalted butter, room temperature
- 1 2/3 cups (350g) granulated sugar
- 3 large eggs, room temperature
- 1/3 cup (75g) sour cream, room temperature
- 2 tsp vanilla extract
- 1-2 drops pink food coloring, optional
Strawberry Buttercream Filling
- 1/2 cup (11g) freeze dried strawberries
- 1/2 cup (113g) unsalted butter, room temperature
- 1 1/2 Tbsp (22ml) whole milk, room temperature
- 1/2 tsp vanilla extract
- 2 cups (240g) powdered sugar
- 1/4 tsp kosher salt
Lemon Buttercream Frosting
- 1 1/2 cups (339g) unsalted butter, room temperature
- 5 1/4 cups (630g) powdered sugar
- 2 medium lemons, zested and juiced
- 3 Tbsp whole milk, room temperature
- 1/4 tsp kosher salt
Instructions
Make The Strawberry Cake
- Start by pureeing 3/4 lbs of fresh strawberries with a food processor. Afterwards, you should be left with about 1 cup of puree. Place the strawberry puree into a saucepan over medium-low heat and simmer for 20-25 minutes, stirring occasionally. When you’re done with the reduction, you should have about 1/2 cup (if you have more, keep cooking!). Place the reduced puree into an airtight container and refrigerate it for at least 30 minutes, or until it reaches room temperature. Then, whisk it together with the whole milk and set aside.
- Preheat the oven to 350ºF and prepare three 6-inch or two 9-inch cake pans by spraying the sides with cooking spray and fitting the bottoms with wax or parchment paper circles. In a medium sized bowl, place the sifted cake flour, baking powder, baking soda, and salt and whisk to combine.
- In the bowl of your stand mixer with the paddle attachment, whip the butter on high for one minute. Scrape down the paddle and bowl, add the granulated sugar, and beat on high for another 2 minutes. Turn the mixer to low and add the eggs one at a time, making sure each one is incorporated before adding the next, then turn the mixer to high and beat for 1 minute.
- Turn the mixer to low and add the vanilla and sour cream until incorporated. Keeping the mixer on low, add all of the dry ingredients at once until just combined, then add the strawberry milk mixture and pink food coloring (if using) until just combined, about 30 seconds. Give the batter a few stirs by hand to make sure everything is incorporated without over-mixing. Pour the batter into the prepared cake pans, about 2/3 full.
- Bake the cakes for 30-35 minutes, until a toothpick inserted comes out clean. Cool the cakes in the pan for five minutes, after which you can turn them out and continue to cool them on a wire rack or sheet pan for several hours.
Make The Strawberry Buttercream Filling
- With a food processor, grind freeze dried strawberries into a fine powder and set aside. In the bowl of a stand mixer fitted with the paddle attachment, whip the butter on high until light in color and creamy, about 5 minutes. Add the freeze dried strawberry powder, whole milk, and vanilla, and continue to beat on medium for 1 minute.
- Add the powdered sugar a cup at a time, scraping down the bowl and paddle after each addition. Add the salt and continue to mix on low for another 30 seconds.
Make The Lemon Buttercream Frosting
- In a stand mixer fitted with the paddle attachment, whip the butter on high until creamy and light in color, about 5 minutes. Add the powdered sugar in two additions, mixing thoroughly for a minute and scraping down the bowl and paddle after each addition. Zest the lemons right into the bowl, then add the lemon juice, whole milk and salt and mix on high for 2 minutes.
Assembly
- Torte the strawberry cake layers to desired height. Using a piping bag with about ½ inch opening, pipe a circle with lemon buttercream on the outer edge of the first cake layer and fill the middle with strawberry buttercream. Place the next layer of strawberry cake on top of the first, then repeat the process of piping a lemon buttercream dam and filling the center with strawberry buttercream. Place the third layer of strawberry cake on top, upside down so that the bottom of the cake layer serves as the top of the cake. Crumb coat the cake with lemon buttercream and place in the refrigerator for at least 20 minutes.
- If you wish to replicate the design I’ve created, you’ll need to color the lemon buttercream three different shades (yellow, pink, and orange). To do this, reserve about 1 ½ cups of lemon buttercream and color it with a few drops of yellow food color gel. Color the remainder of the lemon buttercream with a few drops of pink food color gel, then use a third bowl to mix about ¼ cup of the yellow buttercream with about ¼ cup of the pink buttercream to make the orange shade.
- For the final coat of lemon buttercream, use a spatula to apply the pink buttercream around the bottom of the cake, the orange buttercream around the middle, and the yellow buttercream onto the top third of the cake. Smooth with a bench scraper and angled spatula until you have a pretty buttercream ombrè. Using a piping bag with your favorite piping tip attached (I’ve used Wilton tip 1M), create swirls around the top edge of the cake. Sprinkle generously with SprinklePop Pink Lemonade sprinkles.




I made this as a six-inch cake yesterday. The cake was delicious and just as I had hoped! I wanted to report that I had great success using frozen strawberries since fresh are completely unavailable where I am right now. I also used French type 45 flour instead of cake flour because I am in Switzerland and there is no cake flour here. It worked beautifully. Thank you!
So happy to hear that, Julie! Thanks so much for taking the time to let me know that the recipe was a hit!
Hi! My daughter is begging for a strawberry lemon cake for her birthday next week, but strawberries are out of season. Do you think this cake would work with frozen strawberries? Thank you!
Hi Julie! Since you’ll be making a puree with the strawberries and reducing it, frozen strawberries should be totally fine. Just thaw them according to the package instructions and follow the recipe from there!
this cake looks so delicious! it is my birthday in a few days and I am going to make this. YUMMMMMM!
Yay, Brecklin! So excited for you to make this cake and happy early birthday!
Absolutely delicious cake! The strawberry cake is a stand alone outstanding cake but making the different icings and adding sprinkles is genius. Your instructions are very clear and I am so happy with this fun, enticing and unusual cake. I have already printed out several of your recipes, starting with the Vanilla Chai, and will practice perfecting your icings. Thank you and continue with the brilliant cake ideas!
Yay, Trish! So happy to hear that you love this recipe as much as I do. Thanks for taking the time to let me know and I’m so excited for you to try the Vanilla Chai cake next!
Hi Whitney, this looks GORGEOUS. I’m living in a remote part of Northern Canada and it’s hard to get my hands on certain ingredients – i.e. the freeze dried strawberries. Any tips for a DYI hack for a workaround? Many thanks.
Hi Emily! I’ve never tried freeze-drying my own strawberries, but it looks like there may be some tutorials out there. The process involves removing all of the liquid from the berries (so not really freezing them per se), so if you want to try it yourself there are a few methods out there via Google/YouTube. If you’re able to receive Amazon packages where you live, this is the brand I use: https://amzn.to/3g862Ks and there are other brands available on Amazon as well. Good luck!
Whitney, hi! Thank you so much for this cake inspiration – I’m so excited to try out this recipe next weekend for my birthday. (I’ve never baked my own birthday cake since family+friends usually make / buy me one so this will be a first and I’m excited!)
Since we’re still in quarantine in MA, I definitely don’t want to be stuck with a ton of leftovers and was thinking of doing two, 6-inch cakes (will split the layers for 4 layers too). Do you have any recommendations on how to cut the ingredients for this height / size cake?
THANK YOU! 🙂
Hi Vanessa! If you half this cake recipe it will be enough for two 6-inch cake layers that you can then divide in half to make four shorter layers. For the eggs, use 2 whole eggs + 1 egg yolk. Let me know how it goes and happy birthday!!
Whitney, this turned out spectacular! It was everything I had hoped for and more – thank you so much! I ended up sticking to your original recipe (not halving it) and it did not disappoint. I added a layer of strawberries to cut down on the buttercream between each layer and it was a fruity little treat in each slice. Thank you again!
Yay, Vanessa!! So happy to hear this recipe turned out even better than you expected 🙂 And the strawberries in between layers sounds like a brilliant idea – I’m gonna have to try that some time!
Can I use the strawberry buttercream filling as the frosting as well (understand that I would need to up the recipe a bit)? But just want to make sure it’s the right consistency for that purpose.
You totally can, Michelle! It works beautifully as a frosting 🙂
Im going to bake my daughters 2nd birthday cake using your recipe using 3 8 inch tins. First time baking a cake from scratch and would like it tall. Would the recipe be enough or should u double it?
Been reading this recipe for months for my daughters bday and next week is finally the week.
Hi Joelle! To make three 8-inch layers that are on the taller side (my 8 inch pans are two inches tall) I would make 1.5x the recipe. Simply multiply each ingredient by 1.5 and you’ll have the perfect amount, maybe even a little more than you need. Be sure to fill the pans no more than 2/3 full and you should be good to go! Let me know how it goes!
Hi there!
I want to do 4 – 9 inch cakes. How can I adjust the recipe for 2 inch layers? Also, since it would be in a bigger pan, how long would I need to bake them for?
Hi Bree! This recipe actually makes quite a lot of batter as-is, enough for three 8-inch cake pans. I would 1.5 the recipe to have enough for 4 9-inch pans, bake them at the same oven temp, and check the cakes at about 40 minutes to check for doneness.
Hi there, my lemon buttercream was very runny!! I followed the recipe perfectly. Any idea why? I would love to try again sometime but need to fix this problem. I added more powered sugar and it came out ok but wasn’t able to pipe the top. It looked sad.
Thanks for your help.
It was a great cake otherwise. I’m in love with the strawberry sponge.
Hi Rosani! How hot is your kitchen? If it’s a warm environment, or if you warmed the butter up for too long in the microwave, the butter can soften too much and make the frosting runny. In those cases, you can either add more powdered sugar (and salt to even out the flavor), or place the bowl of frosting in the refrigerator for about 15-20 minutes before re-whipping it to cool it down/firm it up.
Thank you so much for sharing! I can’t wait to try this cake, looks like pure summer! My question is I bought these Sprinkle Pop sprinkles and it says “contains items for decorative use only”. I’m assuming the metallic pieces. Do you just tell people not to eat the sprinkles? Thanks!
Hi Jessica! So the metallic sprinkles are coated in non-toxic gold and silver food color. Apparently it’s FDA approved in the UK and Canada, but is still awaiting the FDA approval from the US. Since they’re non-toxic and made for consumption, they’re perfectly fine to eat. I think she just has to label them that way because of the pending FDA approval in the US.
Great, thank you so much!
Hello! I made this cake in the 3 6-inch and loved it. I’d like to make it slightly larger this time around, and make it in 3 8-inch. Would you recommend 1.5 the ingredients, or should the original be enough?
Hi Jessica! So happy you love the recipe! You can keep the measurements the same for a 3 layer 8-inch cake but the layers won’t be as tall (about 1 inch instead of 2). If you like the layers to be at least 2 inches tall, I would recommend 1.5x the recipe.
Hello. I tried this recipe yesterday for a treat for my son’s job. HOLY MOLY !!!! Simply deliciousness all around. I used (3) 8 inch cake pans to get a shorter and wider cake. It came out beautiful and the texture of the Strawberry cake is amazing. Thank you so much for this amazing recipe. I wish I could post a picture of mine.
That’s so wonderful to hear, Olga!! So happy you loved the recipe!!
Hi. Maybe I read it wrong but your cake assembly has three layers of cake but you say to use two 6 inch cake pans. Also is there a way to make it bigger to use three 9 inch pans and if so by how much should I multiply the recipes by? Thanks!
Hi Stephanie! The recipe says to prepare three 6-inch cake pans, and this recipe will make just enough for those three 6-inch layers. To use three 9-inch cake pans I would double the recipe!
What kind of lemons do you recommend? Can you five bake times for cupcakes?
Hi Tiffiny! I just used regular lemons (I think they’re called Lisbon Lemons?) and this recipe would totally work as cupcakes. The bake time for cupcakes is 15-17 minutes.
hi !!
i have tried to make a gradient/ombre cake before but i wasnt able to get that ombre effect, instead the colors were just different coloured strips.
any tips?
Hi Dana! Yeah I totally have tips for the ombre look: Instead of making each color a straight line around the cake, use an icing spatula to add each color so that it’s a bit more imperfect and slightly overlap your colors so they end up mixing with one another when you use the scraper. I wish I had a video of this! Gives me an idea for a future tutorial 🙂