• Cake
  • Frosting
  • YouTube
  • My Favorite Tools
  • Nav Social Icons

  • Skip to primary navigation
  • Skip to main content
  • Skip to primary sidebar
  • Skip to footer
  • Recipes
    • Cake
    • Cupcakes
    • Frosting
    • Ice Cream
    • Vegan
  • Cake Basics
  • Tutorials
  • Blog
  • About
  • Mobile Menu Widgets

    Connect

    Search

Sugar & Sparrow logo in script font

Sugar & Sparrow

Lifestyle and Cake from Portland Oregon

  • Cake Basics
  • Recipes
    • Cake
    • Cupcakes
    • Cookies & Bars
    • Filling
    • Frosting
    • Ice Cream
    • No-Bake
    • Small Batch
    • Vegan
  • Tutorials
  • Book
  • Blog
  • About

Gradient Rainbow Buttercream Cake Tutorial

September 17, 2018 · In: Featured, Seasonal, Spring, Summer, Tutorials

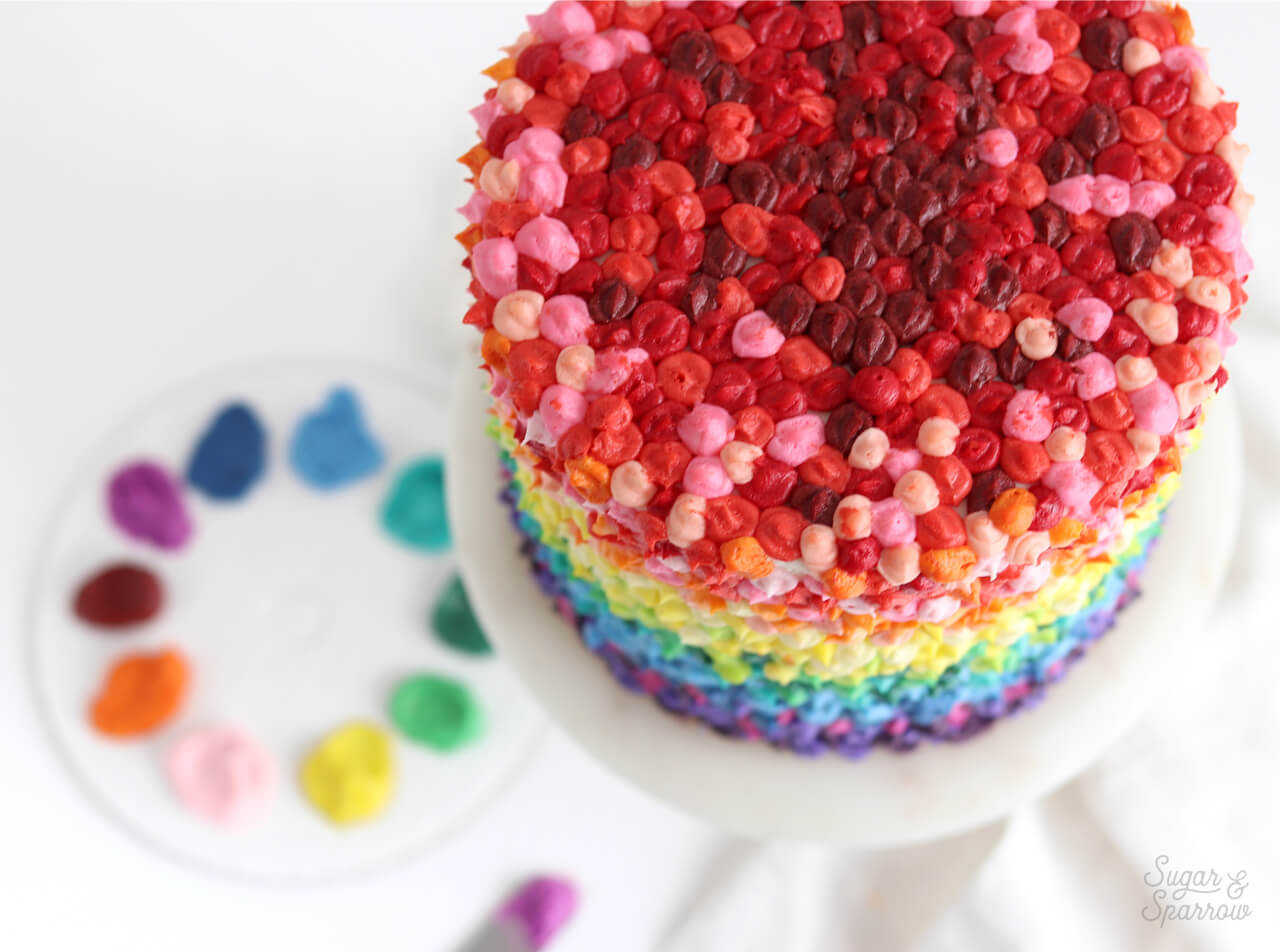
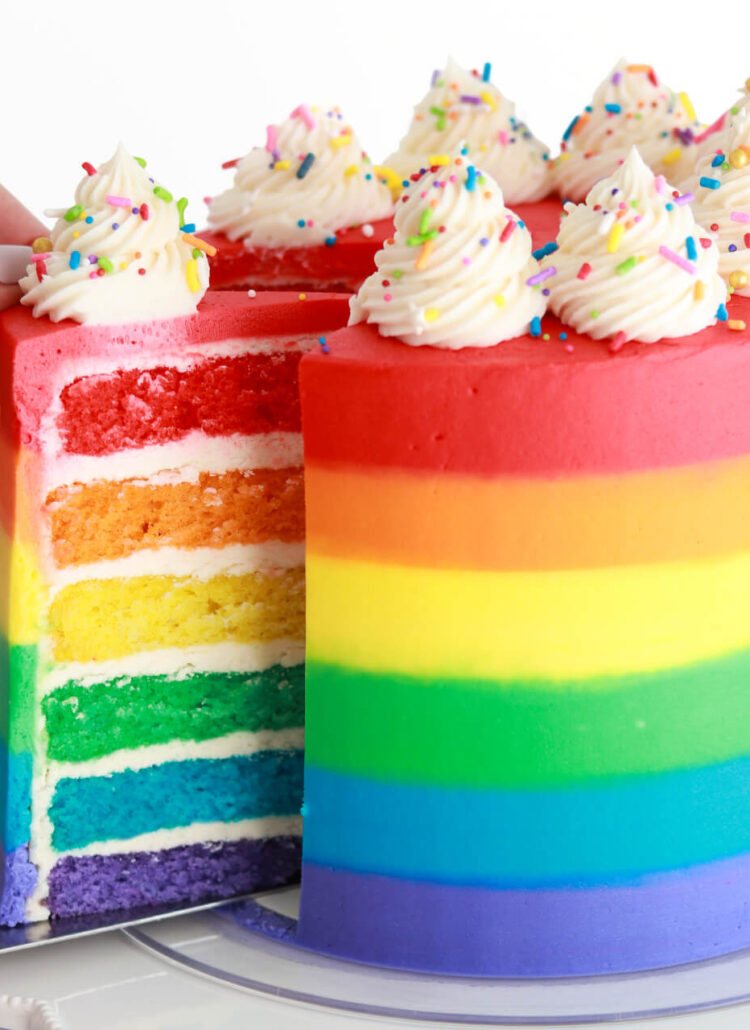
If you’ve been following along on my Instagram, you know that I’ve been completely nerding out on my Americolor Nifty Fifty Kit. Having 50 beautiful food color gels in my collection has been a complete game changer when it comes to coloring buttercream (and all the edible things!) and I’ve gotten to create some really cool, colorful cakes since getting the kit. You can see a few of the cakes I’ve created, real life color swatches, and read more about the kit in this post, but today I want to talk about this gradient rainbow cake. Can you believe it features 20 different colors from the Nifty Fifty Kit? I am in love.

I’ll walk you through the step by step below. First, here’s a quick video tutorial of how I created this gradient rainbow cake, from mixing the colors to applying them:

Disclaimer: this post does contain some affiliate links, meaning I may receive a small commission if you click them and purchase items I’ve recommended. Using these links won’t cost you any extra money, but they do help to keep Sugar & Sparrow up and running. Thank you for your support!

You Will Need:

  • A cake that’s been frosted and chilled
  • 1.5 batches of vanilla or other light colored buttercream
  • Food color gels in rainbow shades. I used colors from The Nifty Fifty Kit (detailed below)
  • Plates and spoons for color mixing
  • Piping bags
  • Scissors
  • Ruler

Step 1: Mix Up Your Colors

Divide equal amounts of buttercream across a few plates or in separate mixing bowls. Like I said before, I got a little crazy and mixed up 20 different shades from my Nifty Fifty Kit. The colors I used (in rainbow order) are: Watermelon, Burgundy, Super Red, Soft Pint, Deep Pink, Orange, Peach, Electric Orange, Electric Yellow, Lemon Yellow, Egg Yellow, Electric Green, Leaf Green, Forest Green, Teal, Sky Blue, Navy Blue, Electric Purple, Regal Purple, and Eggplant.

rainbow buttercream

The important thing with these colors is that you have a few different shades of each rainbow color, whether you use the same color in different intensities or more varied colors for each of the seven rainbow hues.

Step 2: Fill Your Piping Bags

Prepare several piping bags (enough for each shade you’ve created) by snipping off a ¼ inch opening off the tip with your scissors, then filling each bag with a different shade. It helps to have disposable piping bags for this step.

rainbow buttercream by sugar and sparrow

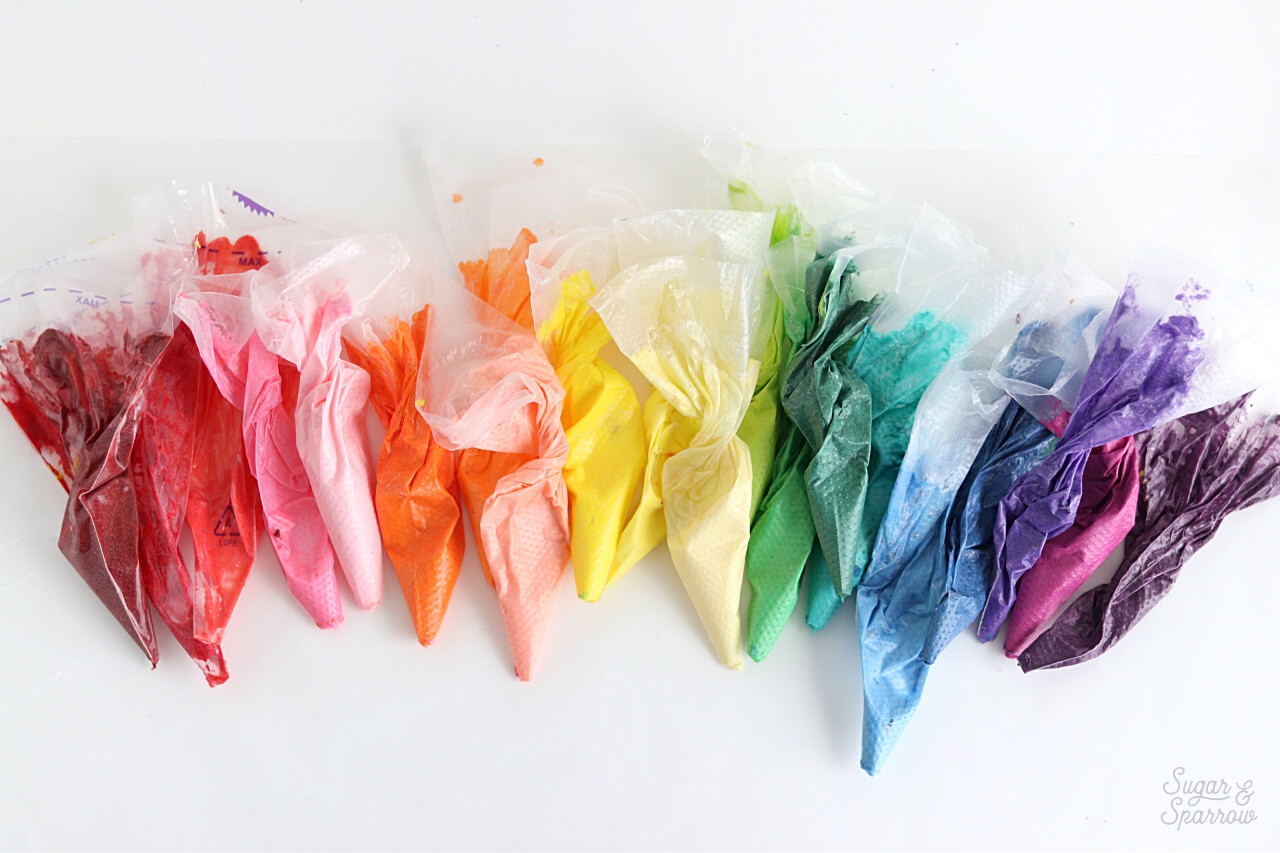
Once you’ve got your bags all filled, line them up in the order you want to pipe color-wise. Look at all those piping bags! I was swooning before I even started adding the colors to the cake.

Step 3: Measure Out Sections On The Cake

Using a ruler as your guide, mark off six equal sections with an icing spatula or other sharp object. It’s important that you start with a cake that’s been frosted and chilled so your marks are sharp and unwavering. Place marks horizontally all around the cake so you know where each color should end and a new one should begin. This way, you’ll have nice equal sections of color instead of getting towards the top of the cake and realizing you barely have room for the last few colors.

measure equal sections on a cake

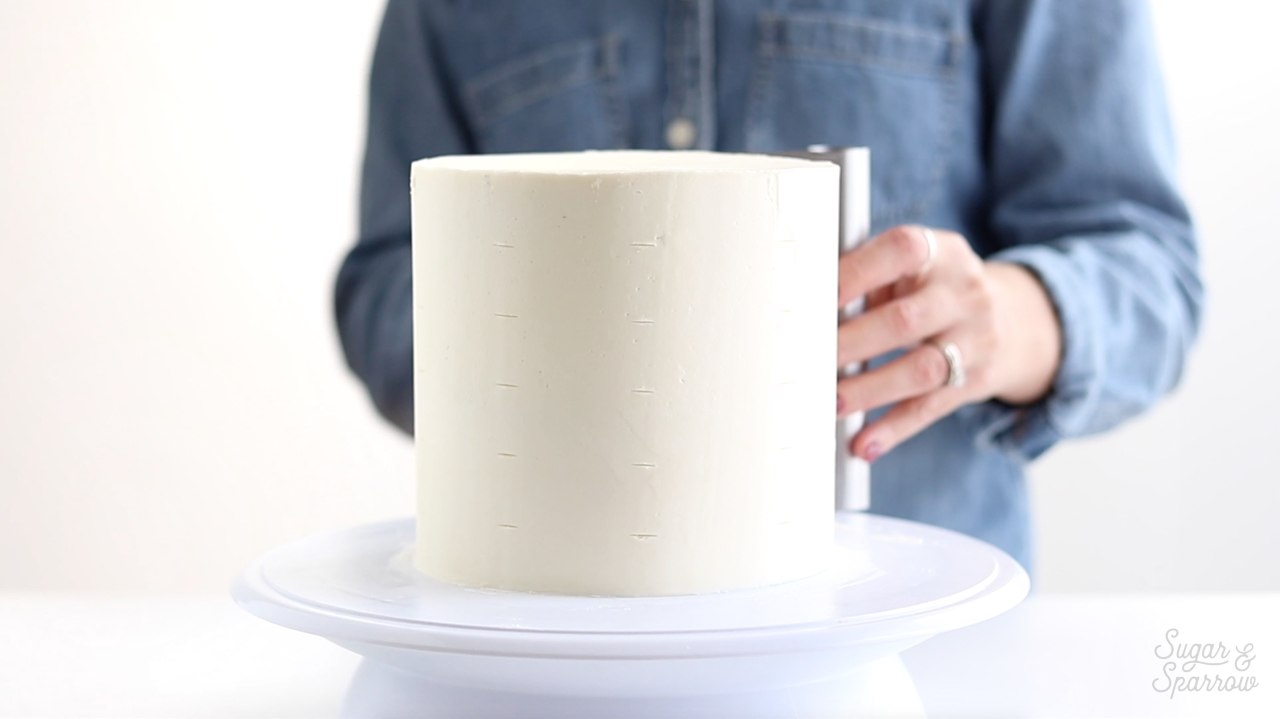
Note that you’ve marked six equal horizontal sections but have seven colors. This is because the top of the cake will act as its own (seventh) section.

Step 4: Apply The Colors

Now for the fun part! Starting at the bottom of the cake, pipe the purple hues within the bottom section you’ve marked off. I chose to start at the very bottom with the darker purples (Eggplant and Regal Purple) and saved the lighter purple (Electric Purple) for the top of the section. There’s no real pattern here other than that. The cake ends up looking really cool with the dots in a more random order rather than piping lines of the same color. In other words, it’s ok to have some of the darker purples toward the top of the section and put different colored dots next to each other.

how to pipe dots onto cake

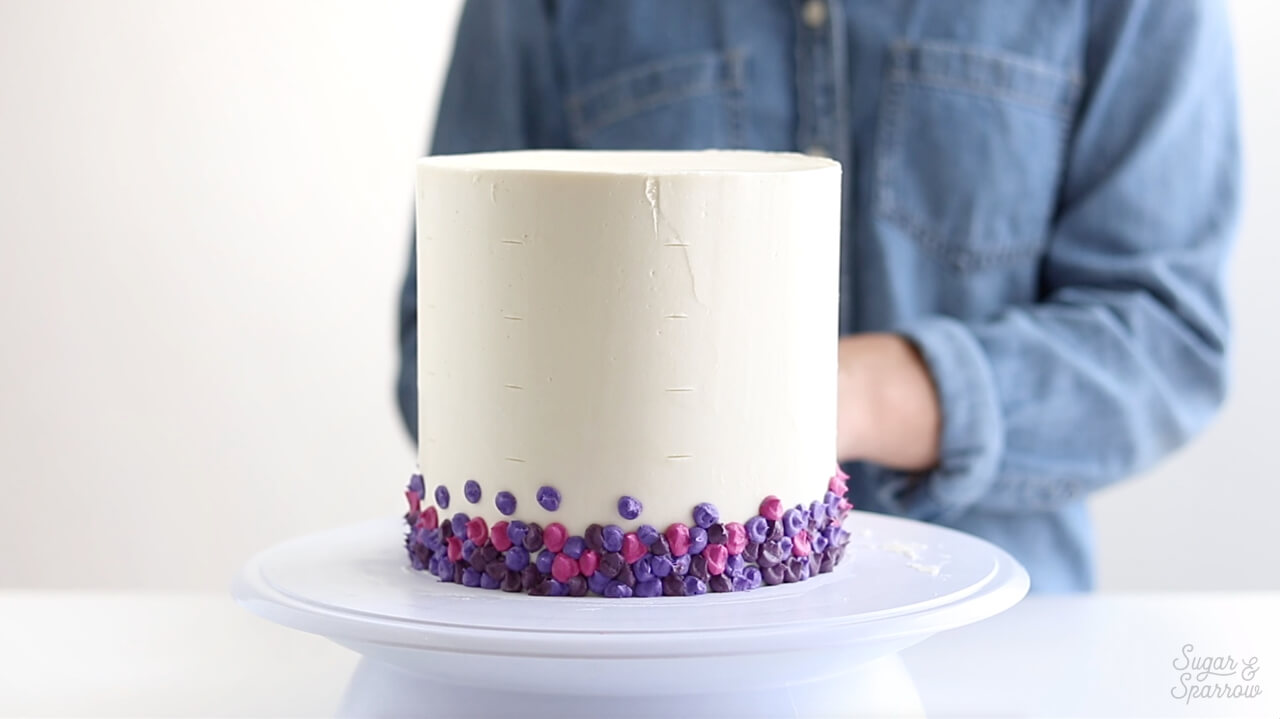
Pipe a few stray purple dots into the section that should be blue to help with the gradient effect, then fill the rest of the next section in with the blue hues. Again, I’ve chosen to pipe the darker blue (Navy Blue) toward the bottom of the blue section and the lighter blues (Sky Blue and Teal) toward the top.

piping dots onto cake

Repeat this process in reverse rainbow color order with the rest of your shades. When you get to the top of the cake, pipe all of the red shades. Remember to pipe a few stray red and pink dots down into the orange section to help with the gradient effect.

colorful cake by sugar and sparrow

how to make a rainbow cake

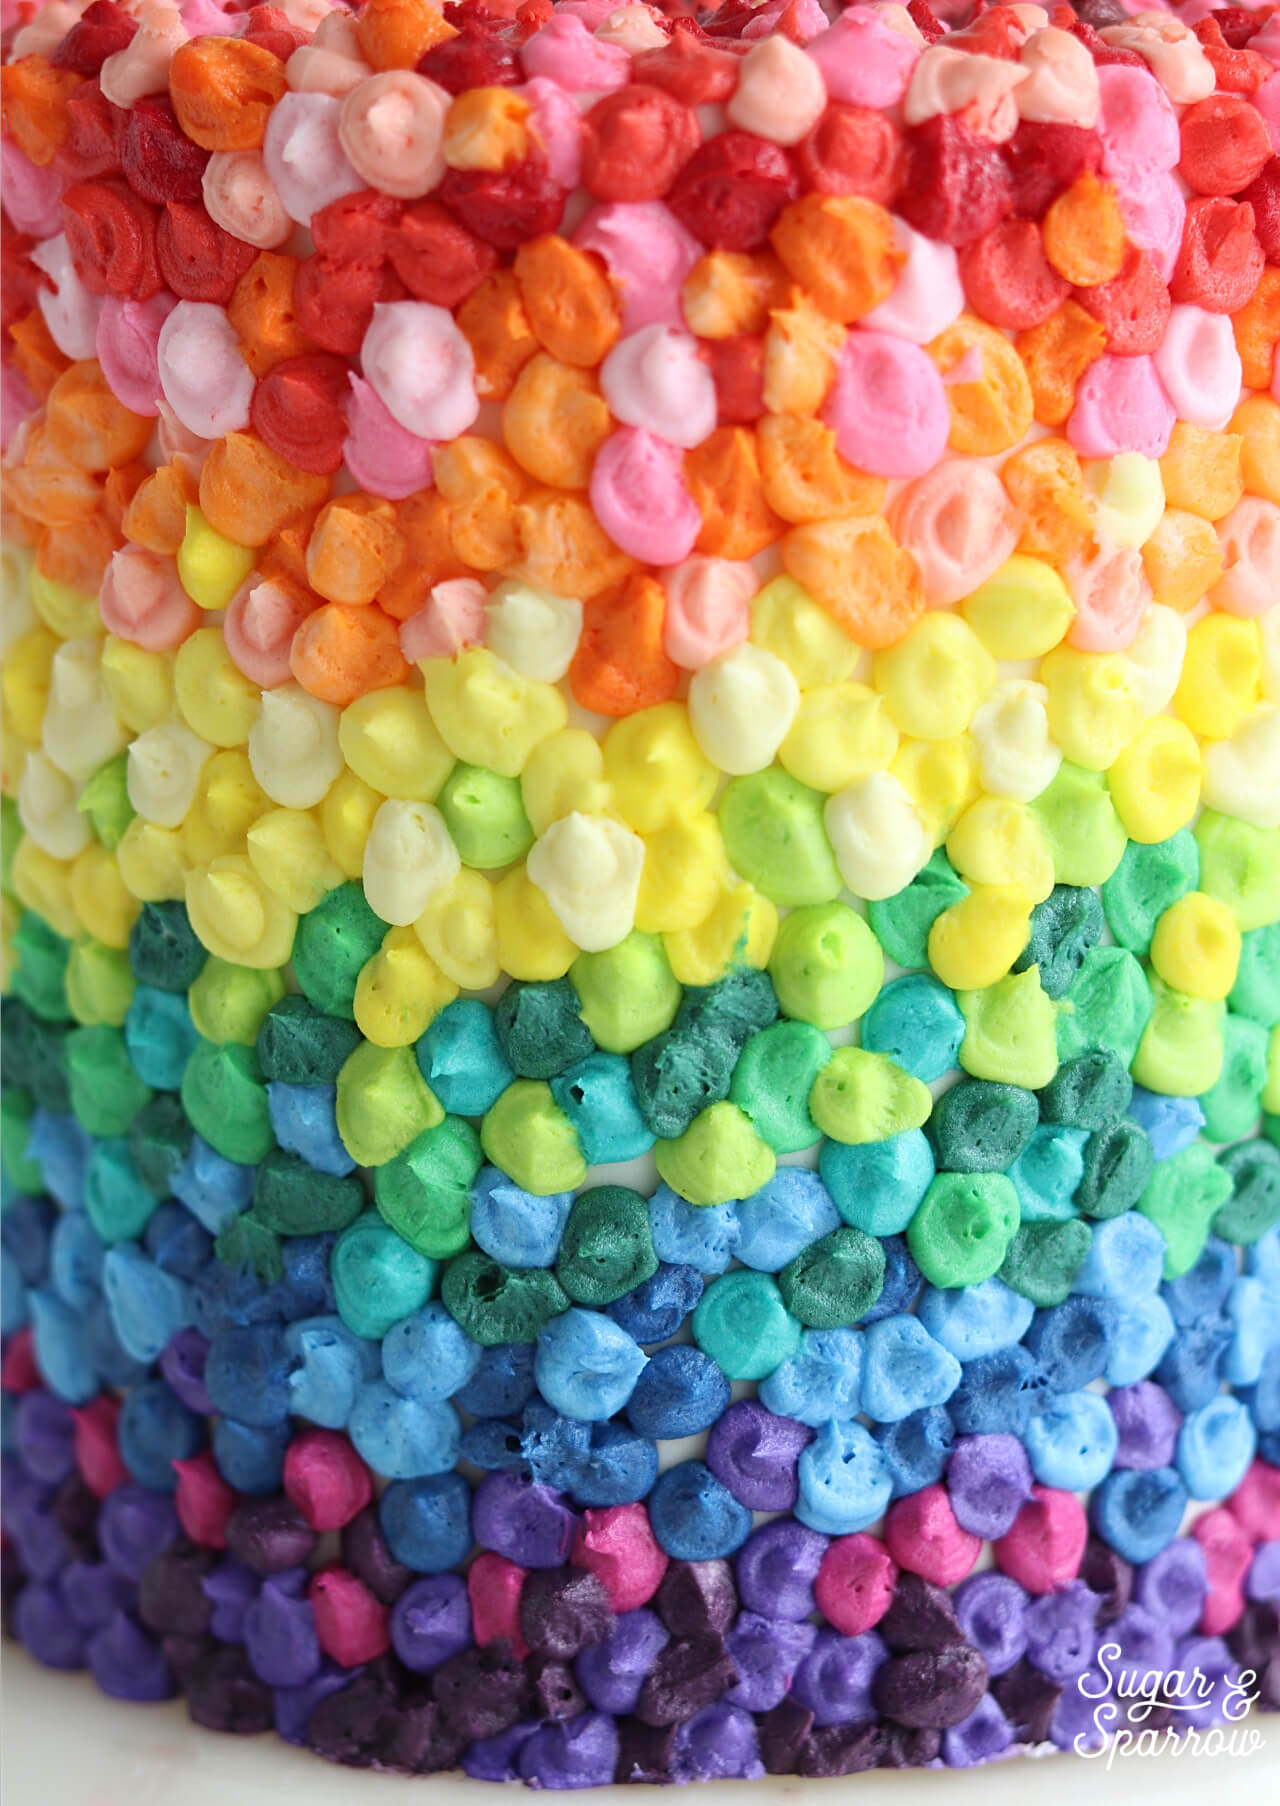
How cool is this gradient rainbow buttercream cake? I absolutely love color and having my Nifty Fifty Kit made all of my colorful cake dreams come true with this one! It’s well worth having the entire kit in your cake decorating collection. These gels last for ages and save tons of time you would have otherwise spent custom mixing different color gels to get just the right shade. Let me know if you end up making this cake and/or getting the Nifty Fifty Kit! I would love to nerd out on color with you.

By: Whitney · In: Featured, Seasonal, Spring, Summer, Tutorials · Tagged: americolor, americolor nifty fifty kit, buttercream, buttercream cake, buttercream piping, cake decorating, colorful cake, piping bags, rainbow buttercream cake, rainbow cake

you’ll also love

Rainbow layer cake with rainbow frostingThe Ultimate Rainbow Cake (Inside and Out!)
st patricks day cake ideas by sugar and sparrowSt. Patrick’s Day Dessert Ideas
rainbow swirl cupcakes tutorialHow to Make Rainbow Swirl Cupcakes

Join the List

Stay up to date & receive the latest posts in your inbox.

Reader Interactions

Comments

  1. Paula says

    June 17, 2020 at 9:04 pm

    Wow! I just made this gorgeous design today! Took a loooong time, but I think it looks pretty, but not as pretty as yours, Whitney! Thank you, as always, for such amazing inspiration. I will take a couple of pics and tag you so you can see! 🙂

    Reply
    • Whitney says

      June 18, 2020 at 9:06 am

      Yay, Paula! Haha yes, this design definitely takes patience but so worth it. I can’t wait to see how yours turned out!!

      Reply
      • Paula says

        June 18, 2020 at 2:39 pm

        Just posted 3 photos today! Can’t wait for you to see!!!

        Reply
  2. Nina Fattahi says

    October 21, 2018 at 4:45 am

    How many layers is this cake? In other words, how high do I have to make it? I’m making this for my daughter’s first birthday smash cake!

    Reply
    • Whitney says

      October 22, 2018 at 10:54 am

      Hi Nina! This cake was three 6 inch layers and ended up being a little over five inches tall. The design will work for any size cake though! Whatever height you end up with, just divide it into five equal sections and follow the tutorial. Good luck and happy birthday to your girl!

      Reply

Leave a Reply Cancel reply

Your email address will not be published. Required fields are marked *

Recipe Rating


Next Post >

The Americolor Nifty Fifty Kit Giveaway!

Primary Sidebar

Welcome to Sugar & Sparrow

Welcome to Sugar & Sparrow

Helping you whip up pretty desserts with confidence and creativity. And hopefully sharing a few laughs with you along the way!

Learn More

Connect

let’s bake!

Get my very best recipes, baking tips, and decorating tutorials sent to your inbox

Featured Posts

coffee buttercream recipe by sugar and sparrow

Coffee Buttercream Frosting Recipe

the best christmas dessert recipes

32+ Festive Christmas Dessert Recipes

vintage christmas red velvet cake by sugar and sparrow

Vintage Christmas Red Velvet Cake

Search

Archives

Follow Along

@sugarandsparrowco

LEMON CUPCAKES 🍋 after about a dozen recipe tes LEMON CUPCAKES 🍋 after about a dozen recipe tests, this one is everything I could want in a lemon cupcake! Fluffy-yet-moist, bursting with natural lemon flavor, and absolutely irresistible topped with lemon cream cheese buttercream. 

Full recipe (with frosting) linked in my bio + at https://sugarandsparrow.com/homemade-lemon-cupcakes/

INGREDIENTS:
1 Cup (132g) all-purpose flour
1 tsp baking powder
1/4 tsp salt
1/4 Cup (60ml) whole milk, room temperature
3 Tbsp (45ml) lemon juice from 1 medium lemon
3/4 Cup (150g) granulated sugar
3 Tbsp (42g) unsalted butter, room temperature
2 Tbsp (30ml) vegetable oil
2 large eggs, room temperature
1 tsp pure vanilla extract

INSTRUCTIONS:
1. Preheat the oven to 350ºF (177ºF) and line a standard cupcake pan with 12 paper liners.
2. In a large bowl, whisk together the flour, baking powder, and salt. Set aside. 
3. In the bowl of a stand mixer fitted with the paddle attachment (or with a hand mixer and large bowl), add the lemon zest to the sugar and mix on low speed until fragrant and well combined, about 1 minute. Meanwhile, combine the lemon juice with the milk and set aside. 
4. Add the butter to the lemon-sugar mixture and cream on medium speed until and combined, about 2 minutes. Add the vegetable oil and beat until light and creamy, about 3 minutes. Scrape down the bowl and paddle as needed.
5. Mix in the eggs one at a time on low speed, then add the vanilla and turn the mixer to medium speed for one minute.
6. Turn the mixer off and add the flour mixture all at once. Mix on low speed until just combined, then slowly pour in the lemon-milk mixture. Mix until just combined, about 30 seconds.
7. Divide the batter equally between the liners and bake for 14-18 min. Cool, then top with frosting of your choice (link in bio for lemon cream cheese frosting)�
#lemoncupcakes #creamcheesefrosting #lemon #cupcakes #cupcakedecorating
April in my kitchen 🌸 I published 5 NEW recipes April in my kitchen 🌸 I published 5 NEW recipes on my site, baked my Oreo cupcake recipe for a fundraiser and found it was just as delicious as I remember, and filmed/photographed 3 recipes that will be on my blog in May (Lemon Cupcakes, Lemon Cream Cheese Buttercream, and No-Bake Marbled Strawberry Cheesecake) 🥰 

Comment “APRIL” to get all the available recipes and stay tuned for more! 

#bakersofinstagram #springbaking #cakedecorating #cupcakes #bakinglove
SHEET PAN COOKIE CAKE 🍪 slice it warm for a fud SHEET PAN COOKIE CAKE 🍪 slice it warm for a fudgy chocolate chip cookie OR let it settle into a moist and chewy cookie cake that’s perfect for decorating! My fave vanilla buttercream + sprinkles turn this giant chocolate chip cookie into the perfect birthday cake alternative at the end 🥳
⁣
Full recipe + decorating ideas at https://sugarandsparrow.com/sheet-pan-chocolate-chip-cookie-cake/
⁣
INGREDIENTS⁣
1 Cup (226g) unsalted butter, melted⁣
1 1/3 Cups (267g) packed light or dark brown sugar⁣
1/2 Cup (100g) granulated sugar⁣
3 large eggs⁣
1 Tbsp pure vanilla extract⁣
1 tsp baking soda⁣
1 tsp cornstarch⁣
1/2 tsp salt⁣
3 Cups (398g) all purpose flour⁣
2 Cups (350g) semi-sweet chocolate chips⁣
⁣
INSTRUCTIONS⁣
1. Preheat the oven to 350ºF (177ºC). Grease and line a 13×18 inch sheet pan.⁣
2. In a large bowl, add the brown sugar and granulated sugar. Melt the butter in the microwave and pour it over the top of the sugars. Whisk together until uniform. Add the eggs and vanilla, then continue whisking until uniform. Whisk in the baking soda, cornstarch, and salt.⁣
3. Add the flour and use a silicone spatula to fold it in until smooth cookie dough forms. Reserve 1/2 Cup of the chocolate chips and set them aside, then fold the remaining 1 1/2 Cups of chocolate chips into the cookie dough.⁣
4. Place the chocolate chip cookie dough onto the prepared sheet pan and use an offset spatula to spread it all the way to the edges in an even layer.⁣
5. Bake the cookie cake for 14-16 minutes, until it looks golden brown on the edges and set. 
6. Enjoy warm or let it cool and decorate with vanilla buttercream and sprinkles! ⁣
⁣
#cookiecake #chocolatechipcookies #sheetcake #birthdaycake #cakedecorating
STRAWBERRY CUPCAKES 🍓based on my beloved strawb STRAWBERRY CUPCAKES 🍓based on my beloved strawberry layer cake recipe, this cupcake version is just as moist yet fluffy and bursting with natural strawberry flavor! Between the mix of fresh strawberries in the cupcakes + freeze-dried strawberries in the frosting, the flavor is out of this world 🚀

Full recipe link in my bio (with strawberry buttercream) + at https://sugarandsparrow.com/strawberry-cupcakes/

STRAWBERRY CUPCAKES
Yield: 14 cupcakes

INGREDIENTS:
5 oz (143g) fresh or frozen strawberries
1/3 Cup (80ml) whole milk, room temp
1 1/2 Cups (158g) sifted cake flour
1 tsp baking powder
1/4 tsp baking soda
1/2 tsp salt
6 Tbsp (85g) unsalted butter, room temp
1 Cup (200g) granulated sugar
2 large eggs, room temp
3 Tbsp (45g) sour cream, room temp
1 tsp vanilla extract
1 drop pink food coloring (optional)

INSTRUCTIONS: 
1. Puree the strawberries using a food processor (you’ll have about 1/2 cup of puree), then place into a saucepan over medium-low heat. Bring to a simmer, then cook for 10-15 min, stirring occasionally, until you have 1/4 cup. Refrigerate until room temp.
2. Preheat oven to 350ºF (177ºC) and line a standard cupcake pan with liners.
3. Whisk together the sifted cake flour, baking powder, baking soda, and salt and set aside.
4. In a stand mixer w/ paddle attachment (or hand mixer + large bowl), whip the butter on high for 2 min. Add sugar and beat for 2 min, until light and fluffy. Turn the mixer to low and add the eggs one at a time, then add the vanilla and sour cream, turn the mixer to high and beat for 1 min. Meanwhile, whisk together the strawberry puree, whole milk, and food coloring (if using).
5. Turn the mixer off and add all of the dry ingredients at once. Mix on low until just combined, then add the strawberry milk mixture until just combined, about 30 seconds.
6. Fill the cupcake liners 2/3 full and bake for 14-18 minutes. Cool completely before topping with strawberry buttercream (full recipe linked above). 

#strawberrycupcakes #strawberrycake #pinkcupcakes #strawberry #cupcakes
COFFEE BUTTERCREAM (recipe below)☕️ this frost COFFEE BUTTERCREAM (recipe below)☕️ this frosting has AMAZING coffee flavor, is so easy to decorate cakes with, and pairs beautifully with so many flavors (chocolate, vanilla, or any cake flavor you’d want to turn into a latte). 

All my cake pairing suggestions are linked in my bio or at https://sugarandsparrow.com/coffee-buttercream-recipe/ 

COFFEE BUTTERCREAM⁣
Yield: 2.5 Cups⁣

INGREDIENTS⁣
1 1/2 tsp instant coffee or espresso powder⁣
1 1/2 Tbsp whole milk, room temperature⁣
1 Cup (226g) unsalted butter, room temperature⁣
3 1/2 Cups (420g) powdered sugar⁣
2 tsp pure vanilla extract⁣
Pinch of salt⁣

INSTRUCTIONS⁣
1. Combine the instant espresso/coffee with the whole milk and set aside. In the bowl of a stand mixer, beat the butter on high until creamy and smooth (about 5 minutes), scraping down the bowl and paddle a few times in between.⁣
2. Turn the mixer to low and add the powdered sugar a few cups at a time, scraping down the bowl and paddle between intervals. Add the vanilla, the coffee/espresso milk mixture, and salt. Mix on low until fully incorporated, about one minute.⁣

#coffeebuttercream #buttercream #frosting #coffeecake

Footer

On the Blog

  • Cake Basics
  • Recipes
  • Tutorials

Info

  • About
  • Privacy Policy & Disclosure

stay in the know

Copyright © 2026 · Theme by Sugar & Sparrow