• Cake
  • Frosting
  • YouTube
  • My Favorite Tools
  • Nav Social Icons

  • Skip to primary navigation
  • Skip to main content
  • Skip to primary sidebar
  • Skip to footer
  • Recipes
    • Cake
    • Cupcakes
    • Frosting
    • Ice Cream
    • Vegan
  • Cake Basics
  • Tutorials
  • Blog
  • About
  • Mobile Menu Widgets

    Connect

    Search

Sugar & Sparrow logo in script font

Sugar & Sparrow

Lifestyle and Cake from Portland Oregon

  • Cake Basics
  • Recipes
    • Cake
    • Cupcakes
    • Cookies & Bars
    • Filling
    • Frosting
    • Ice Cream
    • No-Bake
    • Small Batch
    • Vegan
  • Tutorials
  • Book
  • Blog
  • About

A Cactus Cake With Major Desert Vibes

August 16, 2019 · In: Featured, Lifestyle, Seasonal, Spring, Summer, Tutorials

Of all the beautiful foliage in the world, cactus is among my very favorite. I was so excited when The Cake Blog asked me to create this cactus cake and make all my desert-loving dreams come true! The buttercream ombrè sunrise, pretty piped cactus shapes, and edible (graham cracker) sand have me all heart eyed. Just look at how pretty! 

cactus cake tutorial

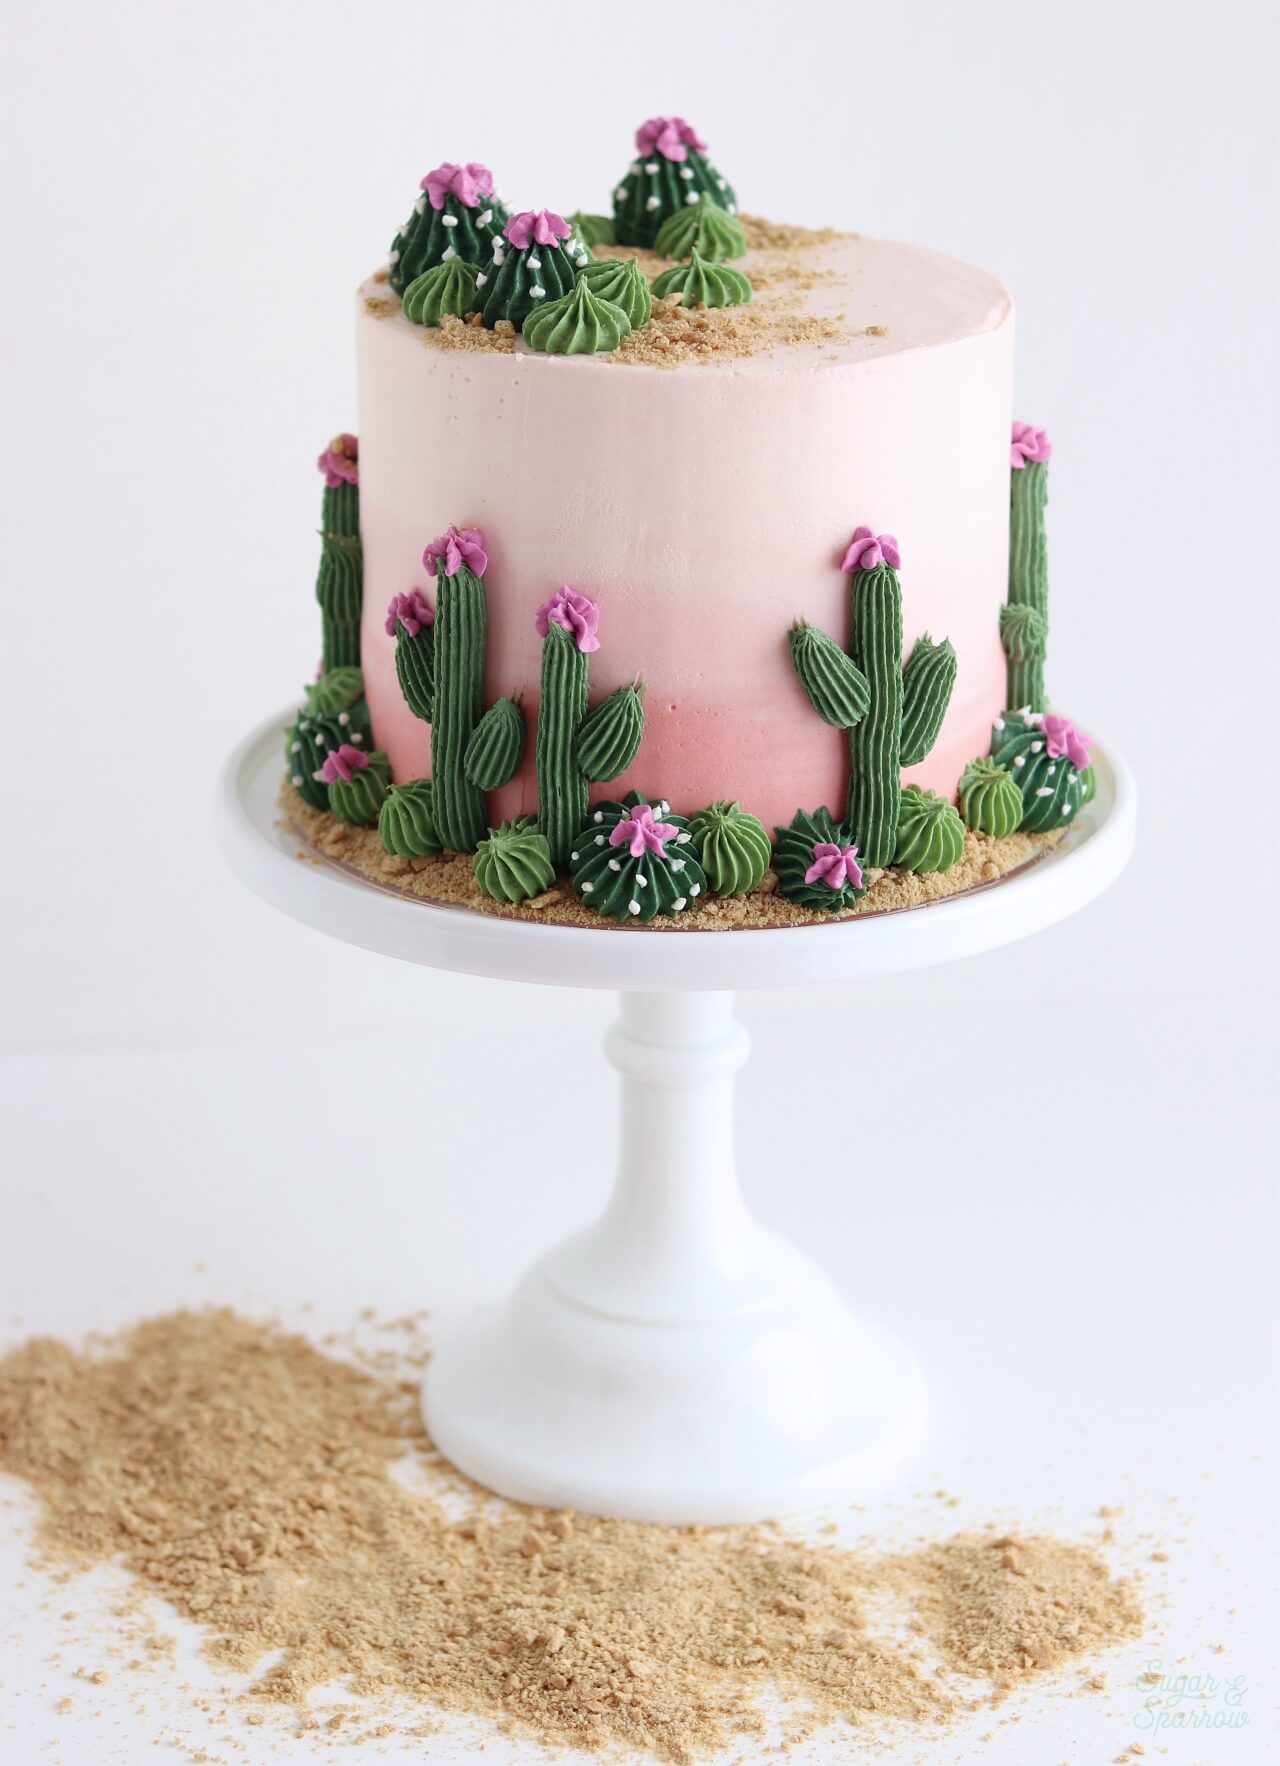
I wrote out the entire tutorial for this cactus cake over on The Cake Blog, so be sure to head over there to see how to get the look. Although it may seem like a complicated design, it’s actually a lot easier than it looks. All you need is a few piping tips, some pretty buttercream colors, and a little imagination. Here’s some photo inspiration:

how to pipe buttercream cactus
desert cake with cactus tutorial
buttercream cactus piping
how to make cactus cake
cactus cake ideas

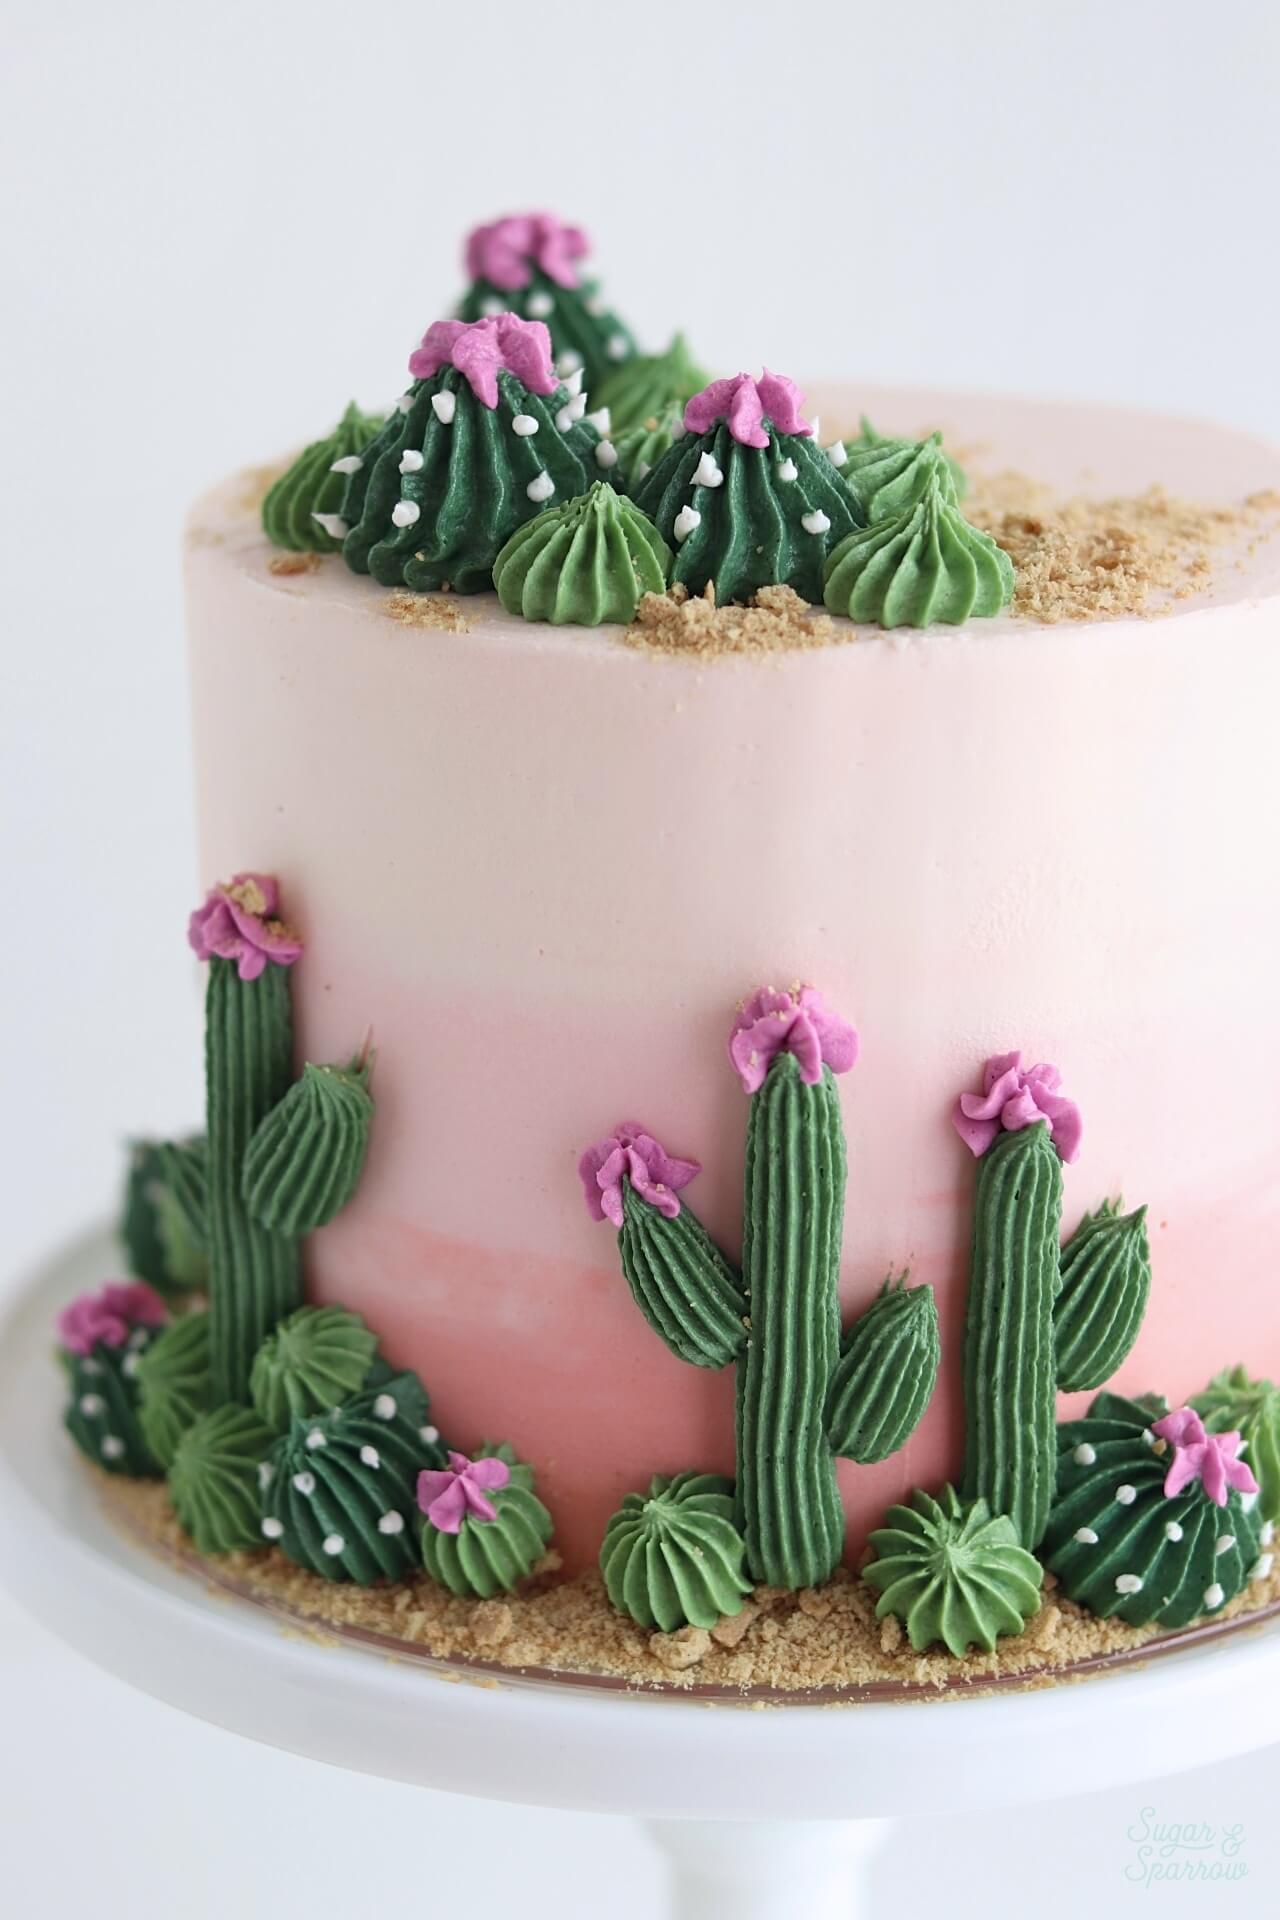
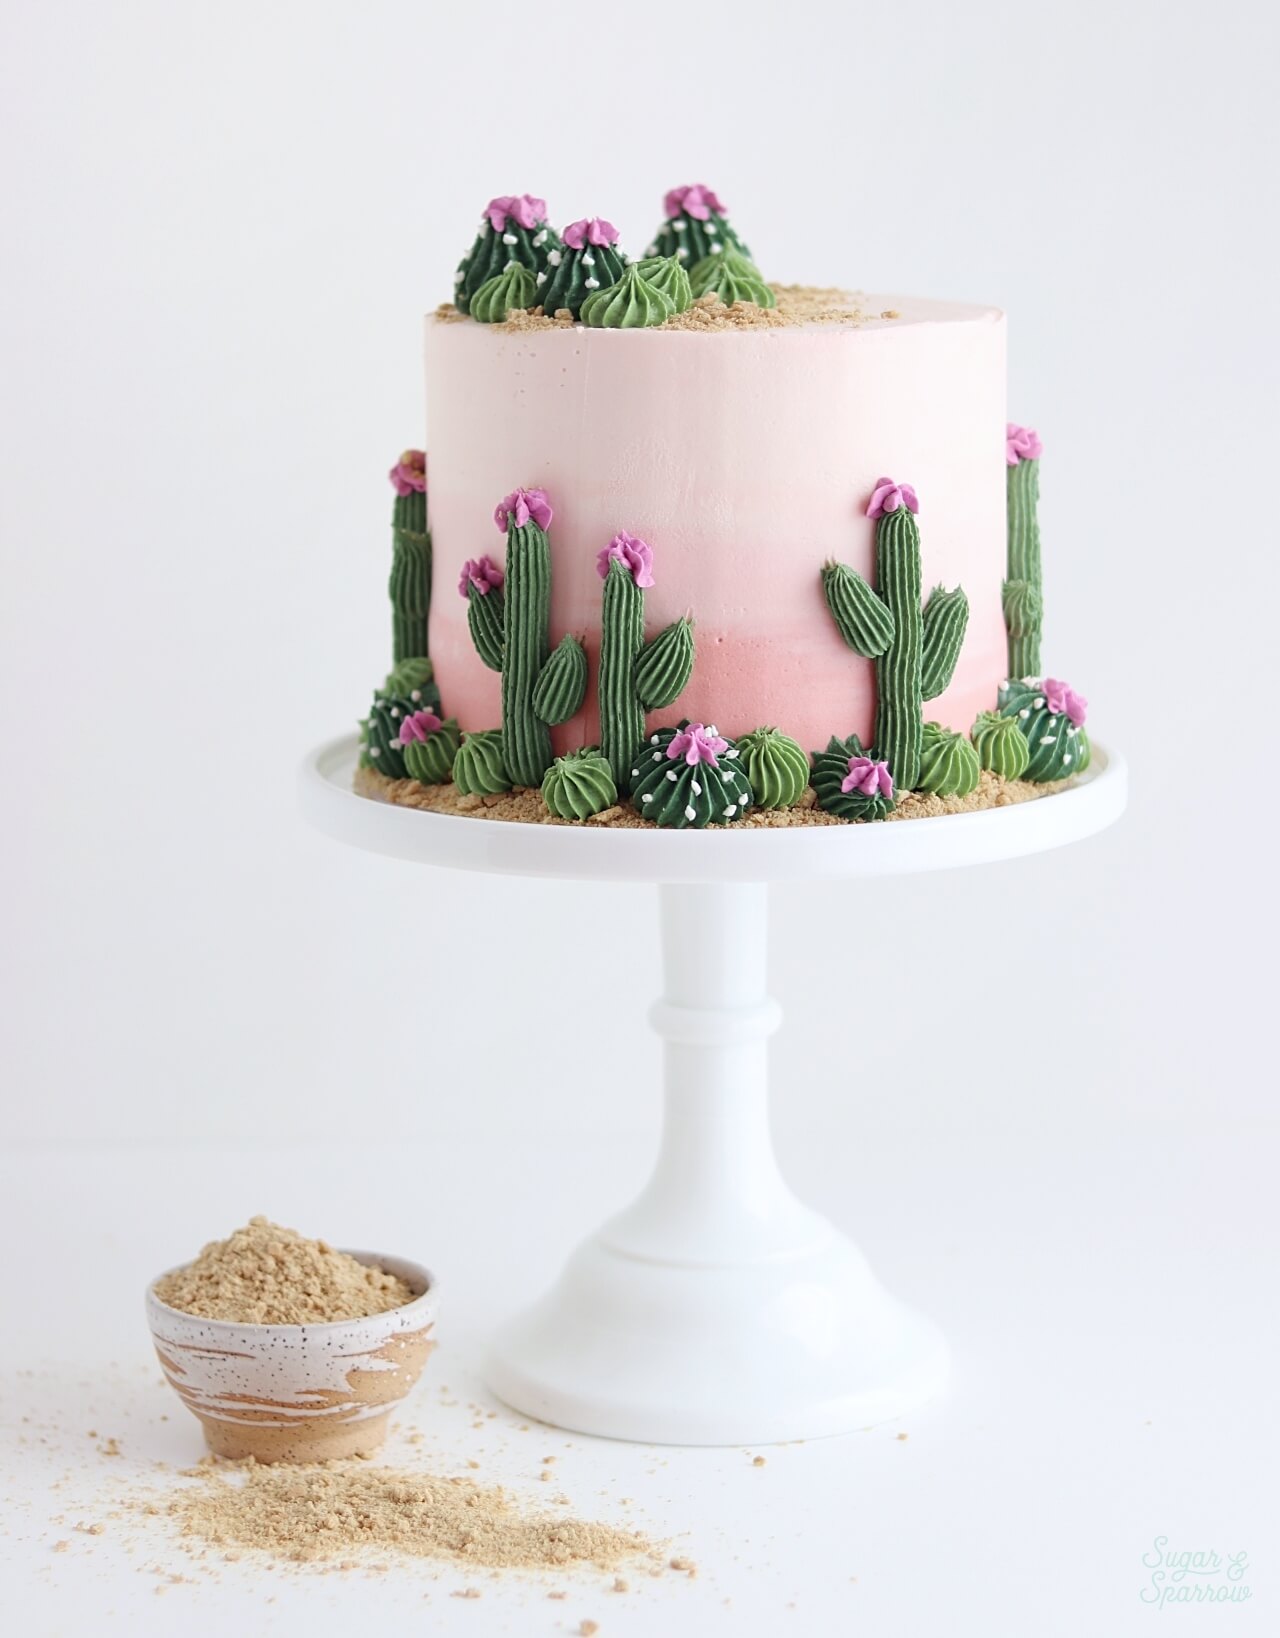
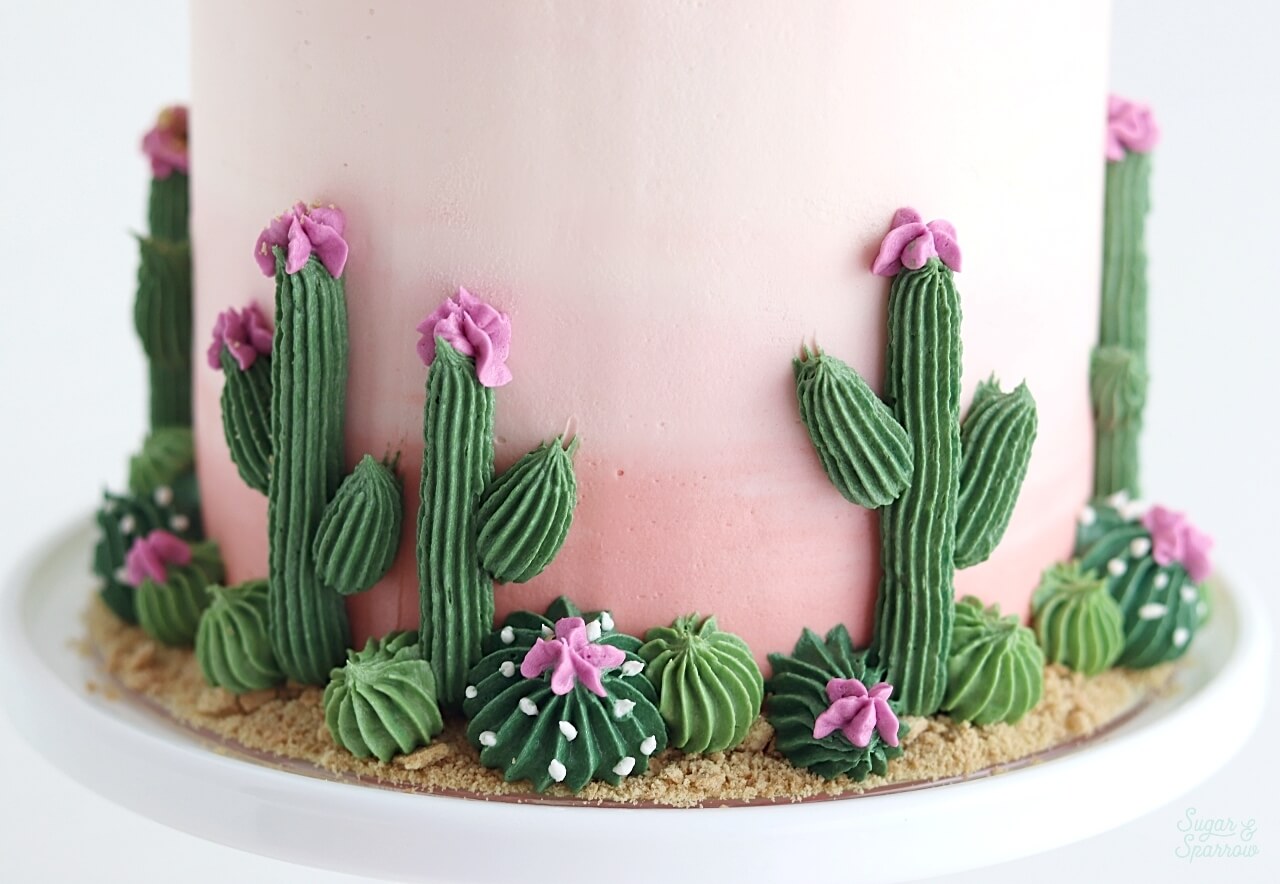
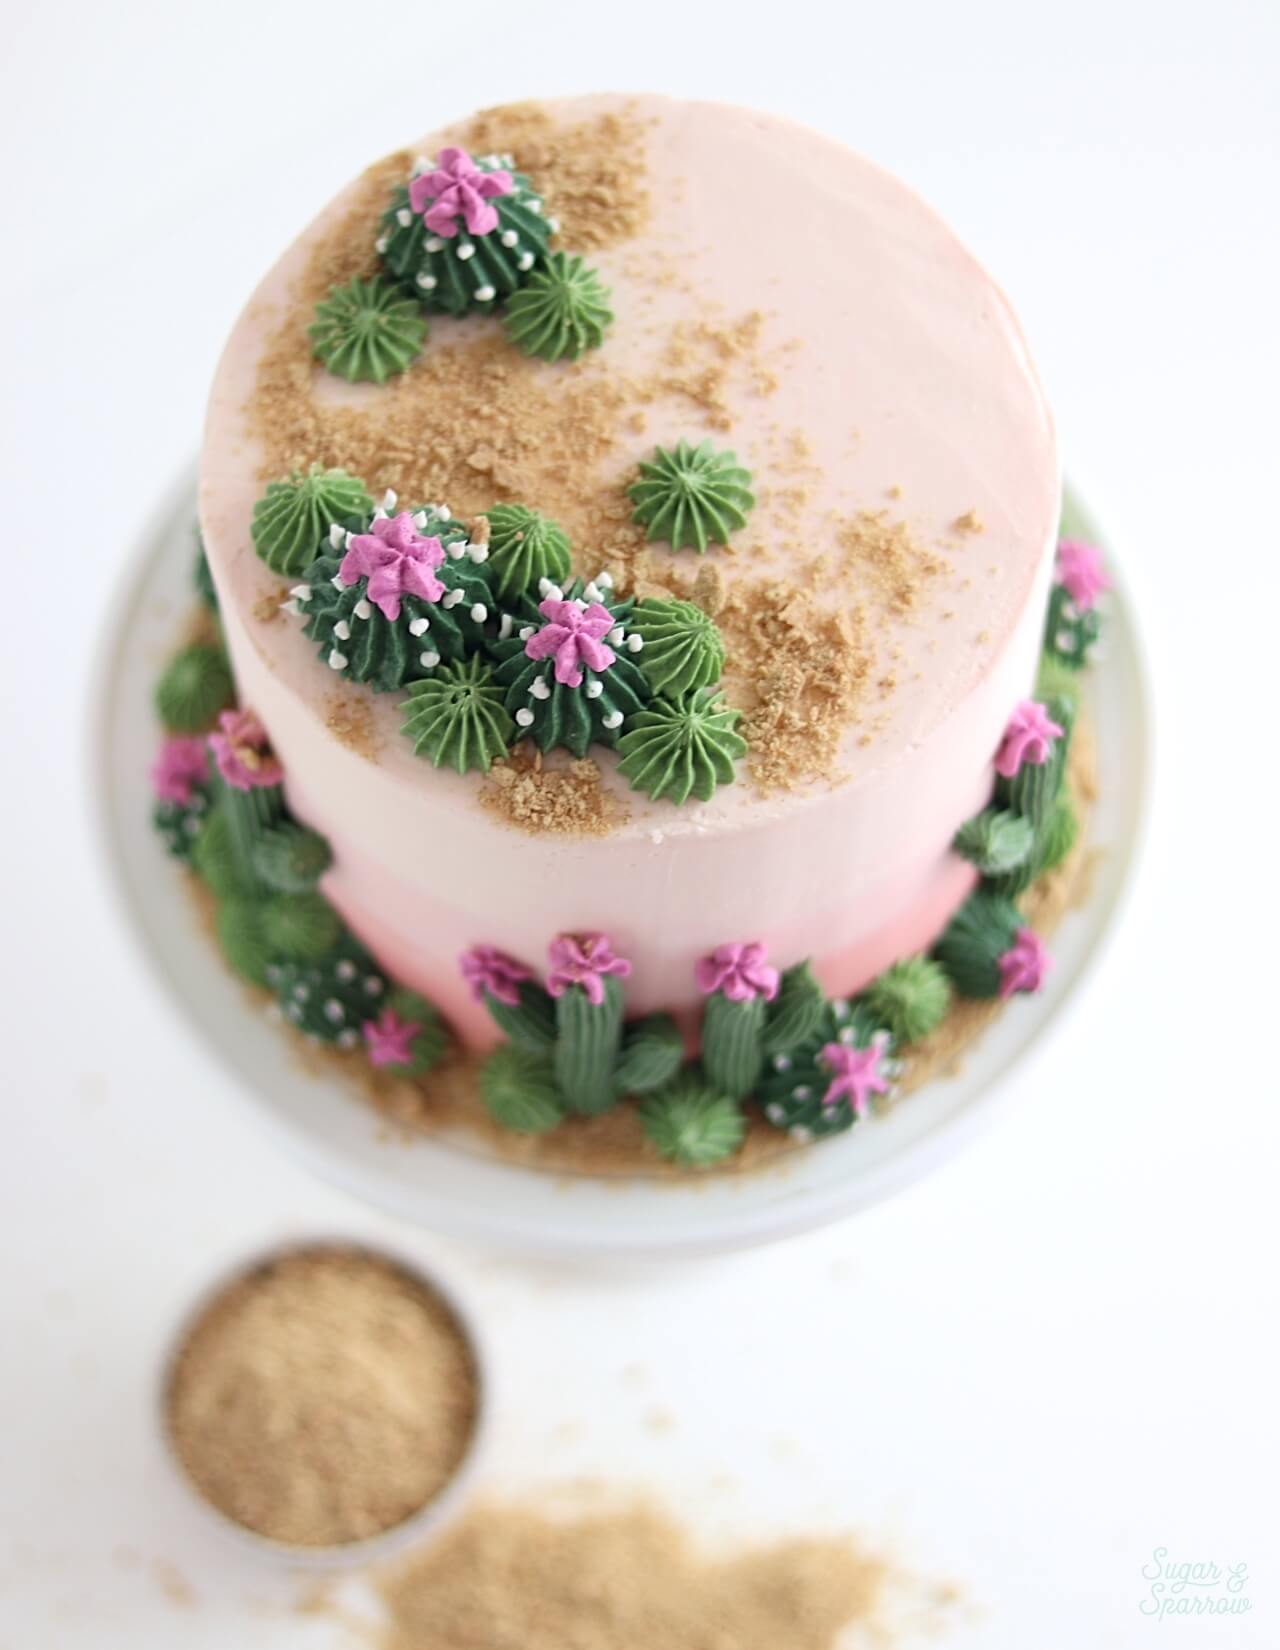
So pretty right? Makes me want to spend some time in the desert! Be sure to head to The Cake Blog for the full tutorial and let us know if you make this cake by tagging @sugarandsparrowco and @thecakeblog on Instagram! We’d love to see your take on this cactus creation. 

By: Whitney · In: Featured, Lifestyle, Seasonal, Spring, Summer, Tutorials · Tagged: buttercream cactus, buttercream cactus tutorial, buttercream ombre, cactus cake, cactus cake ideas, cactus cake tutorial, cake decorating, cake ideas, cake tutorial, ombre buttercream, party cake, sugar and sparrow, the cake blog

you’ll also love

the best vanilla cupcakes recipeThe Perfect Vanilla Cupcake Recipe
pumpkin layer cake recipe by sugar and sparrowPerfect Pumpkin Layer Cake Recipe
oreo cookies and cream cakeOreo Layer Cake Recipe

Join the List

Stay up to date & receive the latest posts in your inbox.

Reader Interactions

Comments

  1. Ann says

    August 9, 2022 at 1:15 am

    what three shades of green did you use for the cacti?

    Reply
    • Whitney says

      August 11, 2022 at 12:18 pm

      Hi Ann! I used Americolor Forest Green and Avocado, then a mix of those two for the third color. Here’s the Forest Green: https://amzn.to/3QkQc1o and here’s the Avocado: https://amzn.to/3JNSAvi

      Reply
  2. Jeff C. says

    February 23, 2022 at 6:01 am

    WOW!!! What a beautiful work of art! Cheers 😉

    Reply
    • Whitney says

      February 25, 2022 at 8:27 am

      Thanks so much, Jeff!

      Reply
  3. Stella says

    September 9, 2021 at 3:50 pm

    Love this look and recipe!! Should I keep it refrigerated if I’m serving it two days from now?

    Reply
    • Whitney says

      September 10, 2021 at 3:02 pm

      Yay, Stella! So excited for you to try this! You technically don’t have to refrigerate it, but I always refrigerate the cake until an hour or two before serving, just to keep all the details intact.

      Reply
  4. Marissa Shervin says

    March 19, 2021 at 8:23 am

    Hello! Beautiful cake! What kind of piping tip did you use to make the ball-like cactuses? Thanks in advance!

    Reply
    • Whitney says

      March 20, 2021 at 1:26 pm

      Thank you, Marissa! I used Wilton Tip 6B to make the ball-shaped cactus. You can find the full tutorial for this cake here: https://thecakeblog.com/2019/08/cactus-cake.html

      Reply
  5. Febyshe says

    October 11, 2020 at 6:43 am

    I made your Cactus cake yesterday for my niece’s birthday party today. She chose the design from Pinterest and, in my opinion, has way more faith in my cake decorating then I do. But…it turned out beautifully! Thank you so much for this beautiful and creative design. You are amazingly talented. I just wish that I could post a picture for you to see just how inspiring you are!

    Reply
    • Whitney says

      October 12, 2020 at 7:26 am

      Yay, Febyshe! So happy to hear that the tutorial was helpful and happy birthday to your niece!

      Reply
  6. Melissa says

    June 10, 2020 at 5:49 pm

    Hi Whitney! First and foremost, this cake is gorgeous!!! I’m hoping to try my hand at it this weekend. Do you recall what the three shades of AmeriColor were used for the Cactus?

    Reply
    • Whitney says

      June 11, 2020 at 11:27 am

      Thank you, Melissa! I believe I used AmeriColor Forest Green and Avocado in varying intensity to get these three shades.

      Reply
  7. Elissa says

    June 4, 2020 at 1:42 pm

    Hi Whitney – I’m going make this cake soon (well, actually I’m going to make your Toy Story version with the fondant clouds on the side) and I was wondering how you would recommend to store it once it’s fully frosted?

    I’ll be making the cake the day before the party so it will need to be stored for around 24 hours. It’s winter here in Australia but the weather is fairly mild (between 50 – 70 degrees F). My main concern would be the fondant clouds as I thought that once on the cake they shouldn’t be refrigerated.

    Any tips you have on storing this cake before serving would be greatly appreciated! x

    Reply
    • Whitney says

      June 4, 2020 at 5:15 pm

      Hi Elissa! So excited for you to make the Toy Story version of this cake design! I ended up storing the cake with fondant clouds for about 24 hours in the refrigerator and they did totally fine. I was a little worried about it because of the conflicting opinions about putting fondant in the fridge, but they stored beautifully for me. I’d say give it a try or if you’re super worried about it you could always create the clouds with buttercream – make a “stencil” of the cloud shape out of wax/parchment paper, place it on a chilled buttercream cake, then smear white buttercream over the top and remove the paper.

      Reply
      • Elissa Condon says

        June 4, 2020 at 7:53 pm

        Oh brilliant! I think I will give it a try. Do you always store buttercream cakes in the fridge?

        Also, for the fondant clouds – did you make them in advance so they set a little or did you put them straight on the cake?

        Reply
        • Whitney says

          June 5, 2020 at 5:16 pm

          I always store buttercream cakes in the fridge until about 2 hrs before serving (or up until the last minute before delivering). They store really nicely that way and the buttercream exterior keeps them nice and moist. For the fondant clouds, I started with a chilled buttercream cake and then stuck the clouds on straight away using a little water as adhesive. It worked really well!

          Reply

Leave a Reply Cancel reply

Your email address will not be published. Required fields are marked *

Recipe Rating


Next Post >

Under The Sea Cake Tutorial

Primary Sidebar

Welcome to Sugar & Sparrow

Welcome to Sugar & Sparrow

Helping you whip up pretty desserts with confidence and creativity. And hopefully sharing a few laughs with you along the way!

Learn More

Connect

let’s bake!

Get my very best recipes, baking tips, and decorating tutorials sent to your inbox

Featured Posts

earl grey buttercream recipe

Earl Grey Buttercream

neapolitan ice cream cake by sugar and sparrow

Neapolitan Ice Cream Cake

oatmeal creme pie cake recipe

Oatmeal Creme Pie Cake

Search

Archives

Follow Along

@sugarandsparrowco

STRAWBERRY SHORTCAKE ICE CREAM CAKE 🍓if Strawbe STRAWBERRY SHORTCAKE ICE CREAM CAKE 🍓if Strawberry Shortcake Ice Cream Bars make you nostalgic for your childhood ice cream truck days, you’re going to LOVE this easy ice cream cake version - no ice cream maker needed 🙌🏼 

Full recipe on my blog at https://sugarandsparrow.com/strawberry-shortcake-ice-cream-cake/

STRAWBERRY CRUNCH 
24 whole (280g) Golden Oreos, finely ground
3 Oz box strawberry jello
4 Tbsp unsalted butter, melted

ICE CREAM LAYERS
1/2 Cup (15g) freeze-dried strawberries
2 Cups heavy whipping cream, cold
1 Tbsp pure vanilla extract, divided
14 Oz sweetened condensed milk
1 1/2 tsp strawberry jam or preserves

1. Combine the strawberry crunch ingredients and bake on a lined cookie sheet at 350ºF for 4 min.
2. For the crust, combine 1 Cup of the strawberry crunch with 2 Tbsp melted butter. Press into the bottom of a 6-inch springform pan and line with an acetate collar. Place in the freezer while you move on.
3. Using a food processor, grind the freeze-dried strawberries into a fine powder. Set aside.
4. Add the heavy whipping cream and 2 tsp of vanilla extract into a chilled bowl, then whip it with a hand mixer to stiff peaks. Place in the refrigerator.
5. Divide the condensed milk between two medium bowls. To one bowl, add 1 teaspoon of vanilla. To the second bowl, add the finely strawberry powder and the jam/preserves. Whisk the ingredients together within each individual bowl.
6. Divide the whipping cream evenly between each of the two bowls you created in the previous step. Fold each sweetened condensed milk mixture together with the divided whipped cream to create the vanilla ice cream and strawberry ice cream.
7. Layer half of each of the ice creams on top of the strawberry crunch crust, sprinkle a layer of strawberry crunch on top, then repeat. Freeze for 6 hours and serve. 
#icecreamcake #strawberryshortcake #nochurnicecream #icecreamlover #strawberry
LEMON CUPCAKES 🍋 after about a dozen recipe tes LEMON CUPCAKES 🍋 after about a dozen recipe tests, this one is everything I could want in a lemon cupcake! Fluffy-yet-moist, bursting with natural lemon flavor, and absolutely irresistible topped with lemon cream cheese buttercream. 

Full recipe (with frosting) linked in my bio + at https://sugarandsparrow.com/homemade-lemon-cupcakes/

INGREDIENTS:
1 Cup (132g) all-purpose flour
1 tsp baking powder
1/4 tsp salt
1/4 Cup (60ml) whole milk, room temperature
3 Tbsp (45ml) lemon juice from 1 medium lemon
3/4 Cup (150g) granulated sugar
3 Tbsp (42g) unsalted butter, room temperature
2 Tbsp (30ml) vegetable oil
2 large eggs, room temperature
1 tsp pure vanilla extract

INSTRUCTIONS:
1. Preheat the oven to 350ºF (177ºF) and line a standard cupcake pan with 12 paper liners.
2. In a large bowl, whisk together the flour, baking powder, and salt. Set aside. 
3. In the bowl of a stand mixer fitted with the paddle attachment (or with a hand mixer and large bowl), add the lemon zest to the sugar and mix on low speed until fragrant and well combined, about 1 minute. Meanwhile, combine the lemon juice with the milk and set aside. 
4. Add the butter to the lemon-sugar mixture and cream on medium speed until and combined, about 2 minutes. Add the vegetable oil and beat until light and creamy, about 3 minutes. Scrape down the bowl and paddle as needed.
5. Mix in the eggs one at a time on low speed, then add the vanilla and turn the mixer to medium speed for one minute.
6. Turn the mixer off and add the flour mixture all at once. Mix on low speed until just combined, then slowly pour in the lemon-milk mixture. Mix until just combined, about 30 seconds.
7. Divide the batter equally between the liners and bake for 14-18 min. Cool, then top with frosting of your choice (link in bio for lemon cream cheese frosting)�
#lemoncupcakes #creamcheesefrosting #lemon #cupcakes #cupcakedecorating
April in my kitchen 🌸 I published 5 NEW recipes April in my kitchen 🌸 I published 5 NEW recipes on my site, baked my Oreo cupcake recipe for a fundraiser and found it was just as delicious as I remember, and filmed/photographed 3 recipes that will be on my blog in May (Lemon Cupcakes, Lemon Cream Cheese Buttercream, and No-Bake Marbled Strawberry Cheesecake) 🥰 

Comment “APRIL” to get all the available recipes and stay tuned for more! 

#bakersofinstagram #springbaking #cakedecorating #cupcakes #bakinglove
SHEET PAN COOKIE CAKE 🍪 slice it warm for a fud SHEET PAN COOKIE CAKE 🍪 slice it warm for a fudgy chocolate chip cookie OR let it settle into a moist and chewy cookie cake that’s perfect for decorating! My fave vanilla buttercream + sprinkles turn this giant chocolate chip cookie into the perfect birthday cake alternative at the end 🥳
⁣
Full recipe + decorating ideas at https://sugarandsparrow.com/sheet-pan-chocolate-chip-cookie-cake/
⁣
INGREDIENTS⁣
1 Cup (226g) unsalted butter, melted⁣
1 1/3 Cups (267g) packed light or dark brown sugar⁣
1/2 Cup (100g) granulated sugar⁣
3 large eggs⁣
1 Tbsp pure vanilla extract⁣
1 tsp baking soda⁣
1 tsp cornstarch⁣
1/2 tsp salt⁣
3 Cups (398g) all purpose flour⁣
2 Cups (350g) semi-sweet chocolate chips⁣
⁣
INSTRUCTIONS⁣
1. Preheat the oven to 350ºF (177ºC). Grease and line a 13×18 inch sheet pan.⁣
2. In a large bowl, add the brown sugar and granulated sugar. Melt the butter in the microwave and pour it over the top of the sugars. Whisk together until uniform. Add the eggs and vanilla, then continue whisking until uniform. Whisk in the baking soda, cornstarch, and salt.⁣
3. Add the flour and use a silicone spatula to fold it in until smooth cookie dough forms. Reserve 1/2 Cup of the chocolate chips and set them aside, then fold the remaining 1 1/2 Cups of chocolate chips into the cookie dough.⁣
4. Place the chocolate chip cookie dough onto the prepared sheet pan and use an offset spatula to spread it all the way to the edges in an even layer.⁣
5. Bake the cookie cake for 14-16 minutes, until it looks golden brown on the edges and set. 
6. Enjoy warm or let it cool and decorate with vanilla buttercream and sprinkles! ⁣
⁣
#cookiecake #chocolatechipcookies #sheetcake #birthdaycake #cakedecorating
STRAWBERRY CUPCAKES 🍓based on my beloved strawb STRAWBERRY CUPCAKES 🍓based on my beloved strawberry layer cake recipe, this cupcake version is just as moist yet fluffy and bursting with natural strawberry flavor! Between the mix of fresh strawberries in the cupcakes + freeze-dried strawberries in the frosting, the flavor is out of this world 🚀

Full recipe link in my bio (with strawberry buttercream) + at https://sugarandsparrow.com/strawberry-cupcakes/

STRAWBERRY CUPCAKES
Yield: 14 cupcakes

INGREDIENTS:
5 oz (143g) fresh or frozen strawberries
1/3 Cup (80ml) whole milk, room temp
1 1/2 Cups (158g) sifted cake flour
1 tsp baking powder
1/4 tsp baking soda
1/2 tsp salt
6 Tbsp (85g) unsalted butter, room temp
1 Cup (200g) granulated sugar
2 large eggs, room temp
3 Tbsp (45g) sour cream, room temp
1 tsp vanilla extract
1 drop pink food coloring (optional)

INSTRUCTIONS: 
1. Puree the strawberries using a food processor (you’ll have about 1/2 cup of puree), then place into a saucepan over medium-low heat. Bring to a simmer, then cook for 10-15 min, stirring occasionally, until you have 1/4 cup. Refrigerate until room temp.
2. Preheat oven to 350ºF (177ºC) and line a standard cupcake pan with liners.
3. Whisk together the sifted cake flour, baking powder, baking soda, and salt and set aside.
4. In a stand mixer w/ paddle attachment (or hand mixer + large bowl), whip the butter on high for 2 min. Add sugar and beat for 2 min, until light and fluffy. Turn the mixer to low and add the eggs one at a time, then add the vanilla and sour cream, turn the mixer to high and beat for 1 min. Meanwhile, whisk together the strawberry puree, whole milk, and food coloring (if using).
5. Turn the mixer off and add all of the dry ingredients at once. Mix on low until just combined, then add the strawberry milk mixture until just combined, about 30 seconds.
6. Fill the cupcake liners 2/3 full and bake for 14-18 minutes. Cool completely before topping with strawberry buttercream (full recipe linked above). 

#strawberrycupcakes #strawberrycake #pinkcupcakes #strawberry #cupcakes

Footer

On the Blog

  • Cake Basics
  • Recipes
  • Tutorials

Info

  • About
  • Privacy Policy & Disclosure

stay in the know

Copyright © 2026 · Theme by Sugar & Sparrow