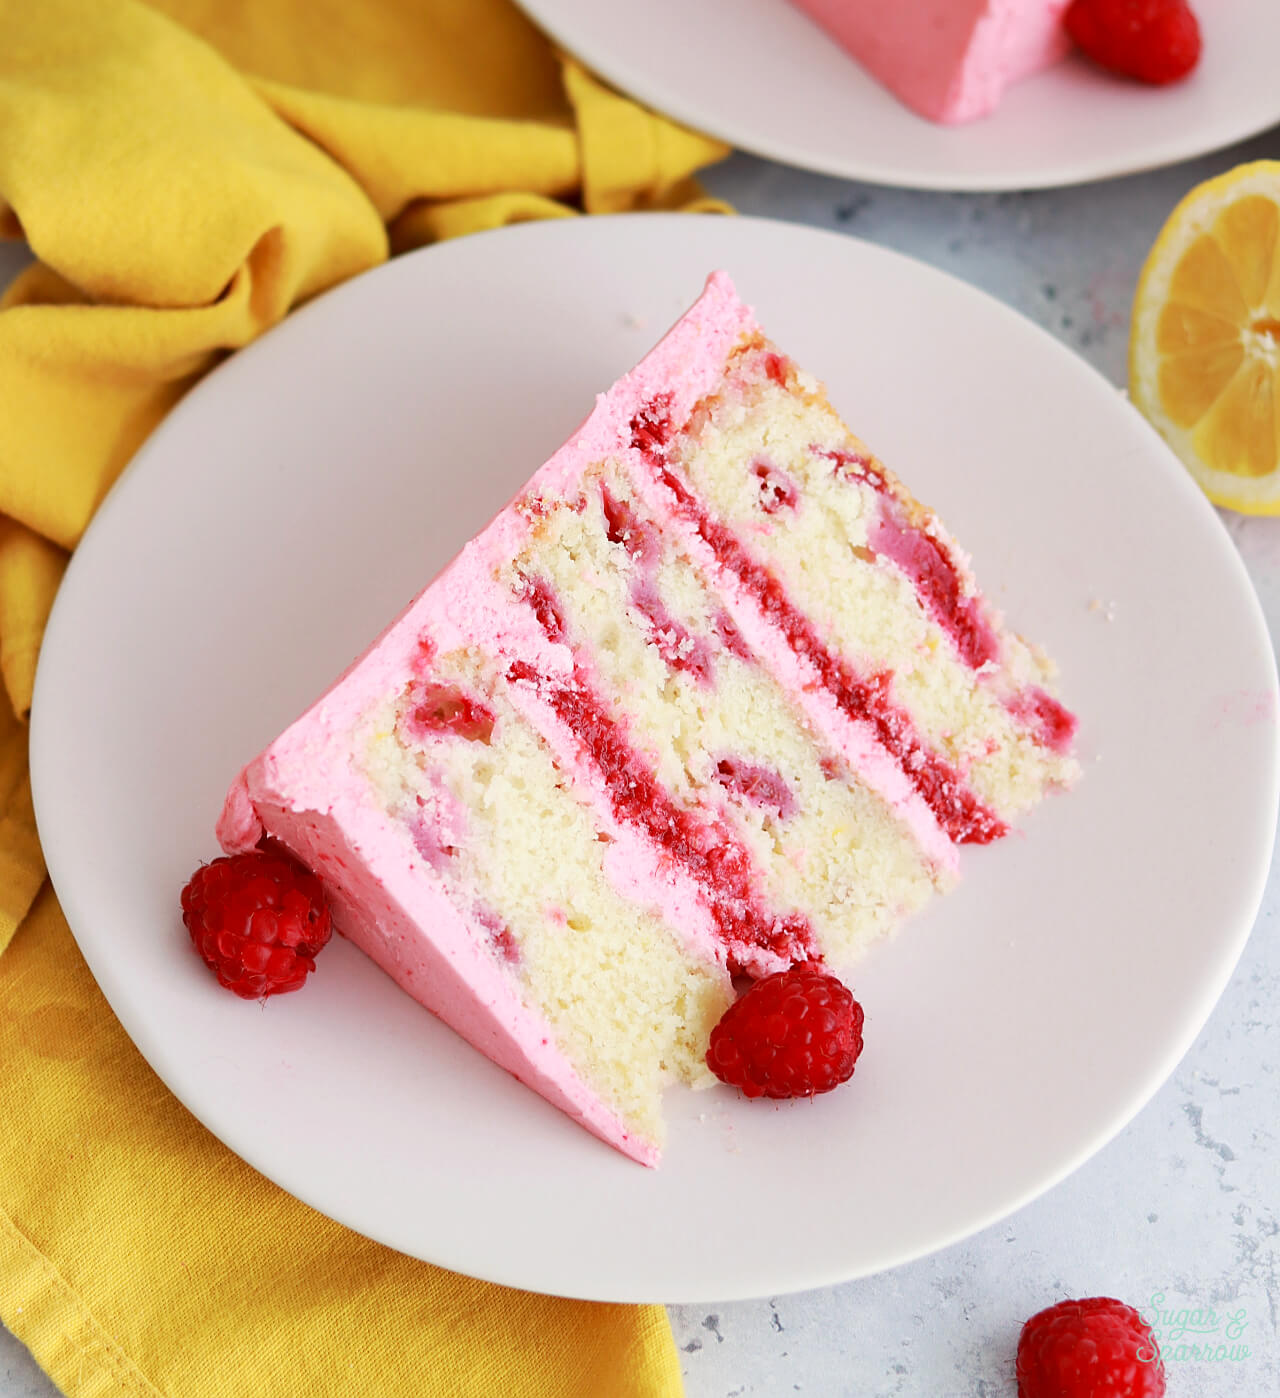
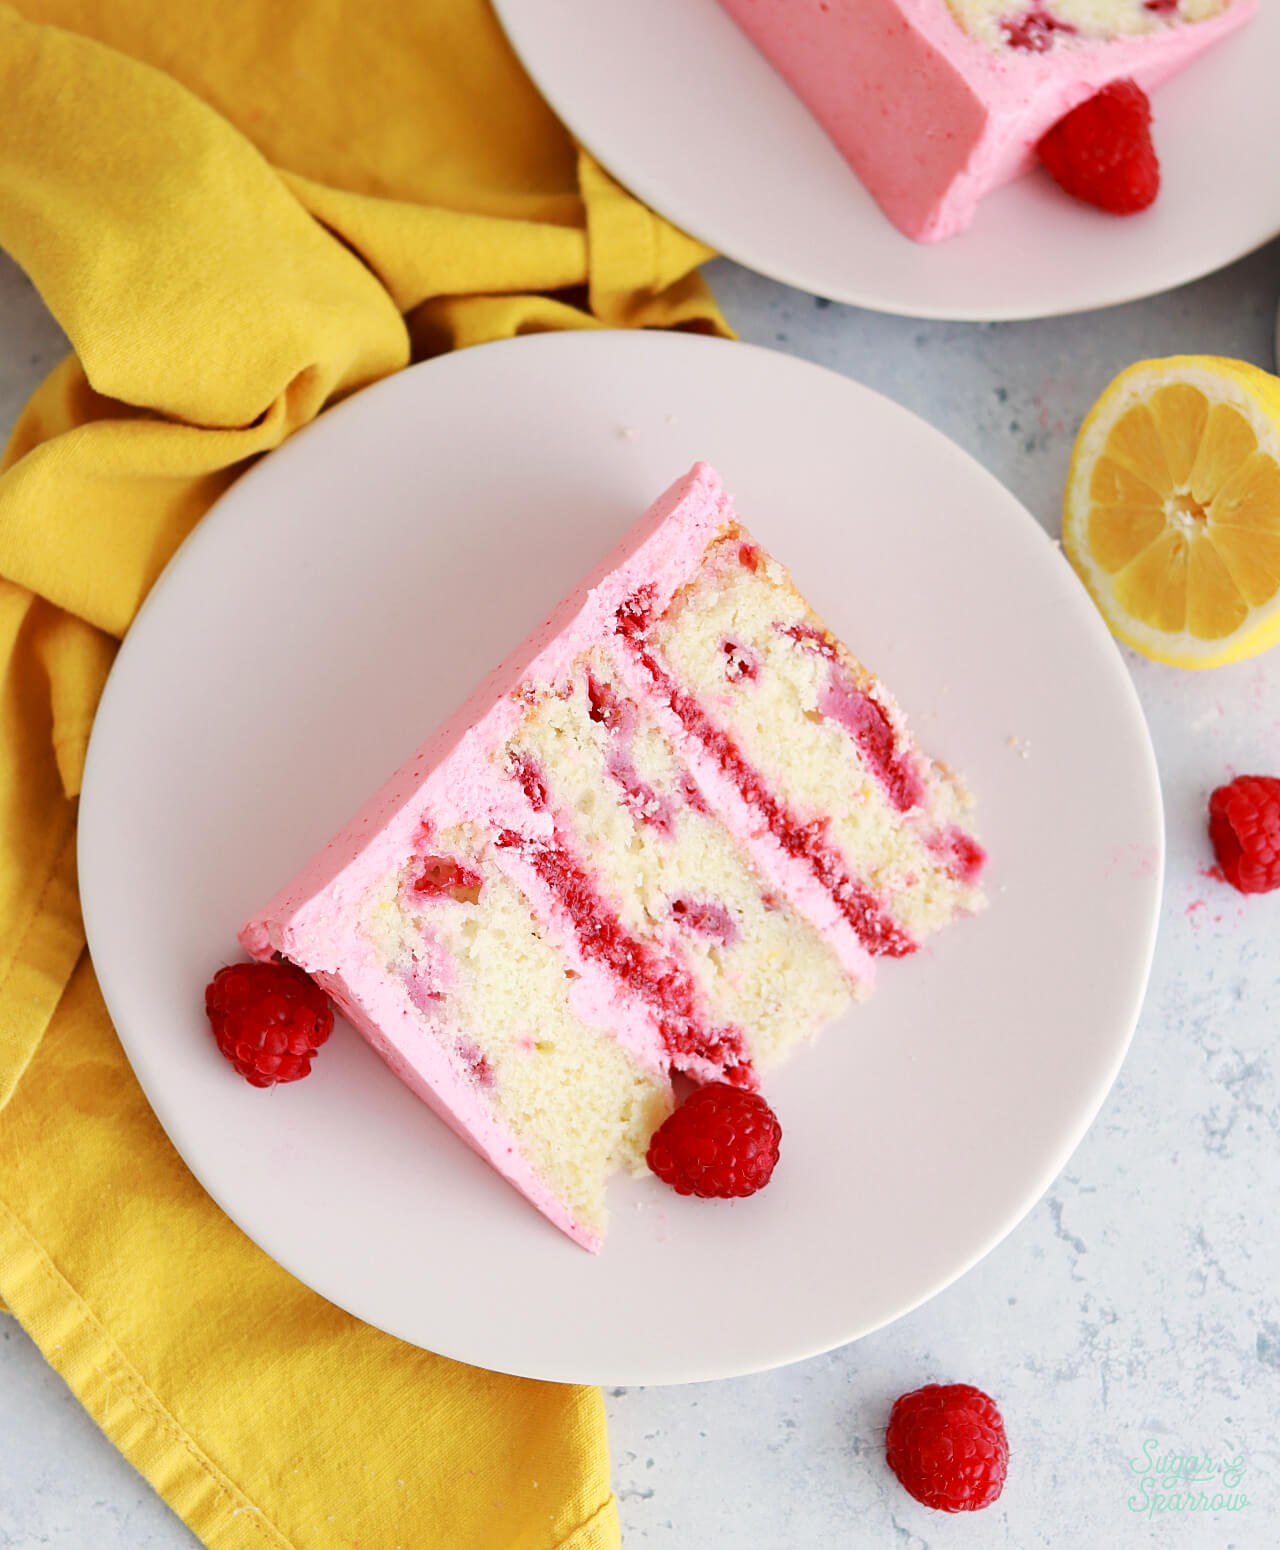
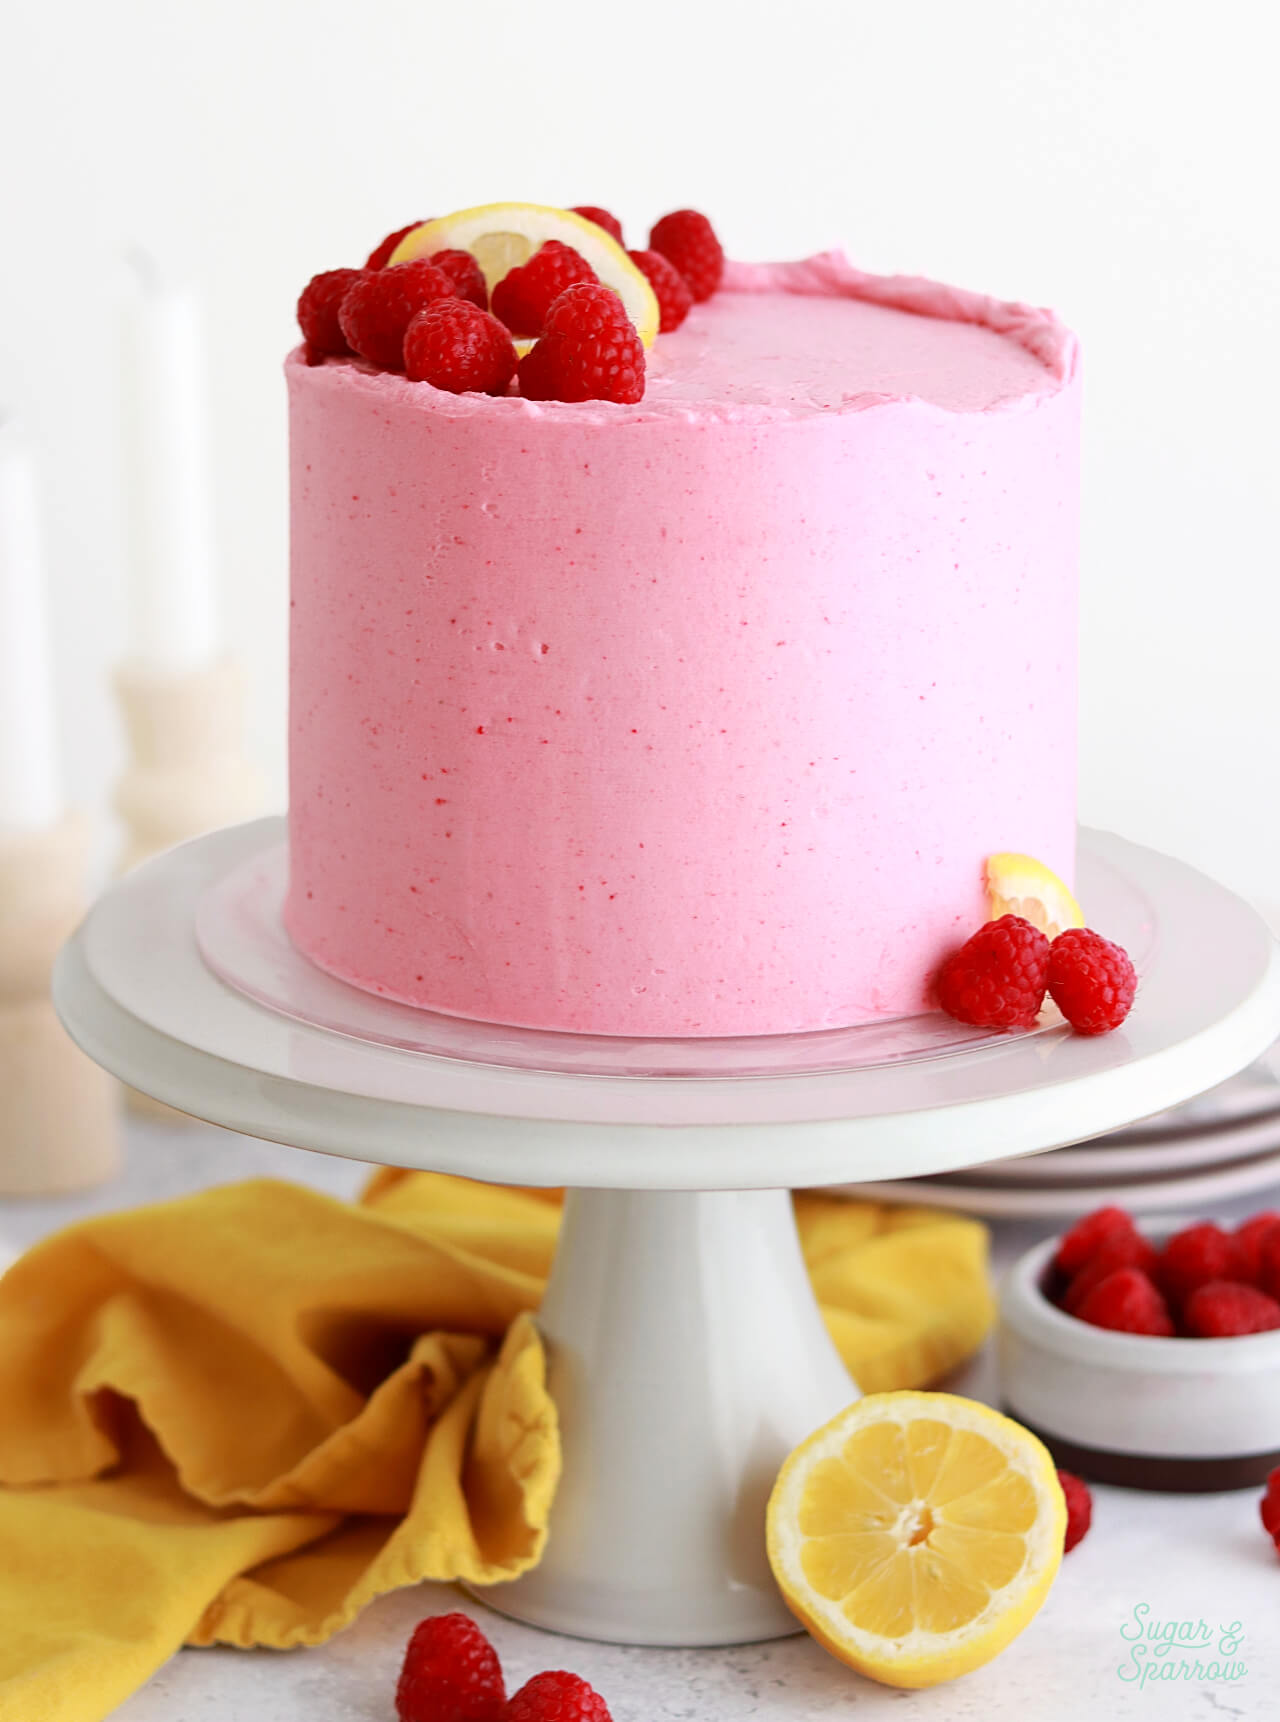
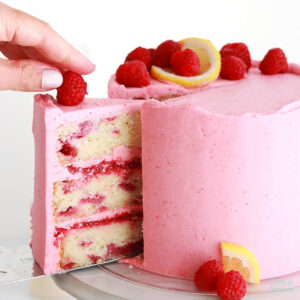
After nailing down my lemon blueberry layer cake recipe, I decided it was time to try making a lemon raspberry version and this beautiful cake is the result! It features layers of soft lemon cake with raspberries baked into each layer (and perfectly suspended!), fresh raspberry cake filling, and lemon raspberry buttercream. These flavors are so heavenly together and I’m obsessed with how visually stunning the cake layers turned out!

One Reader, Shannon, says: “I love to bake, and I have an enthusiastic audience in my family. This cake however is the best cake I have ever made. It left us speechless!” ★★★★★
Adding Raspberries to a Lemon Cake Recipe
I thought it would be so simple to swap the blueberries in my lemon blueberry cake recipe with raspberries and it turns out that whole raspberries weigh even more than blueberries. In my first attempt, all of the raspberries sunk to the bottom of the cake in the baking process, even the ones I added to the top of each unbaked cake layer. So I did some research and found that if you divide the raspberries into smaller pieces and coat them in flour, the weight of the berries is reduced and they remain suspended in the cake layer as they bake. The only problem is that raspberries can get messy when you cut them up and will leak their juices into your cake batter, streaking it pink. Not the worst thing in the world, but not the look I was going for.
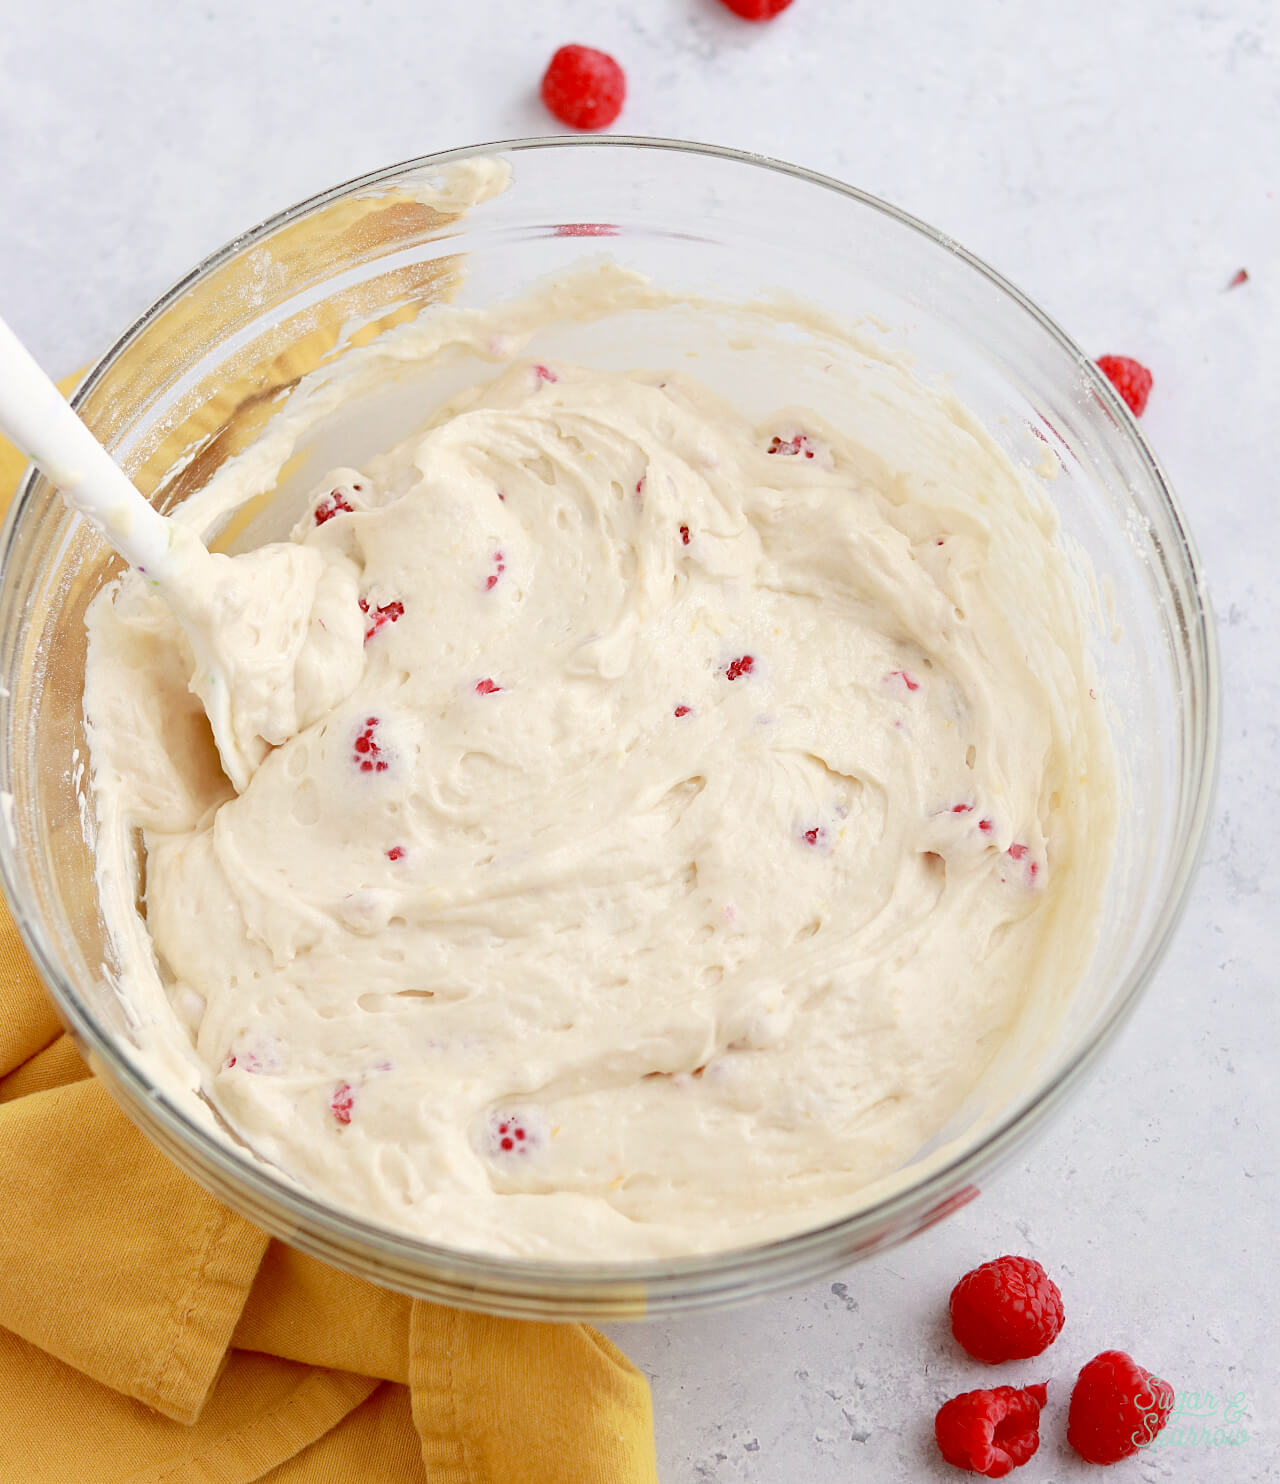
Instead of using fresh raspberries, I tried using frozen raspberries which were so easy to break into smaller pieces by hand. I tossed the raspberry pieces in a little flour, folded them into the cake batter, and they baked beautifully! You can absolutely use fresh raspberries if you want, but they’ll just be a little messier to break into smaller pieces. I do recommend tearing the raspberries vs. cutting them up with a knife.
Lemon Raspberry Cake Ingredients & Substitutions
This lemon cake recipe uses every part of a lemon to get the perfect citrus flavor. The zest is mixed together with the sugar to release essential oils + the juice is added to the milk to create buttermilk, which adds both moisture and flavor. Even though this cake uses all-purpose flour, which is heavier than cake flour and typically yields a denser cake, the other ingredients are tweaked to maintain a moist and tender crumb while perfectly supporting those raspberries!
Here’s what you need to know about some of the key ingredients:
- Lemon zest + fresh squeezed lemon juice. As mentioned previously, this recipe uses every part of the lemon for flavoring this cake. The lemon zest is mixed with the sugar in the beginning of the recipe to release lemon essential oils from the beginning. Then, you’ll juice a few lemons into the milk to create a diy buttermilk that adds lots of moisture and flavor at the end of the recipe. In total, you’ll need 3-4 medium lemons.
- All-purpose flour. After lots of testing, I realized that the batter for this cake needs to be thick enough to support the raspberries and keep them from sinking to the bottom of the cake pans during the baking process. All-purpose flour (or plain flour) is the best choice here. While I am normally a fan of cake flour for most of my recipes, don’t be tempted to substitute it in.
- Whole Milk. In the beginning of the recipe, you’ll add lemon juice to the whole milk to create homemade buttermilk. This creates moisture and adds flavor to the cake. Since whole milk has a high amount of fat and protein, it’s the best choice for adding moisture while binding the ingredients together. The best substitutes here would be soy milk or full-fat buttermilk, but whole milk is my recommendation.
- Granulated Sugar. This not only sweetens the cake but also tenderizes the crumb, creating a softer cake.
- Butter + Vegetable Oil. These are the two base fats I use in this recipe, a little bit of butter for a rich texture and a little bit of vegetable oil for added moisture.
- Large Eggs. These add structure to the cake and help bind the ingredients together.
- Frozen or Fresh Raspberries. The raspberries will need to be broken into smaller pieces so that they will weigh less and remain suspended in the cake layers during the baking process. I used frozen raspberries because they are easy to break apart into smaller pieces without them leaking juice, but you can absolutely use fresh raspberries. Just be sure to tear them into smaller pieces (as opposed to chopping them) to minimize the amount of juice that they’ll leak.
Perfectly Thick Raspberry Filling
I have been wanting to make a thick, jam-like raspberry cake filling for years and I saw this cake as the perfect opportunity! The raspberry filling only uses five ingredients and comes together so easily. You can use fresh or frozen raspberries, which get cooked together with some granulated sugar, lemon juice, and a cornstarch/water mixture that will thicken the raspberry filling into the perfect consistency. It will keep thickening as it cools and is just perfect for using as cake or cupcake filling!

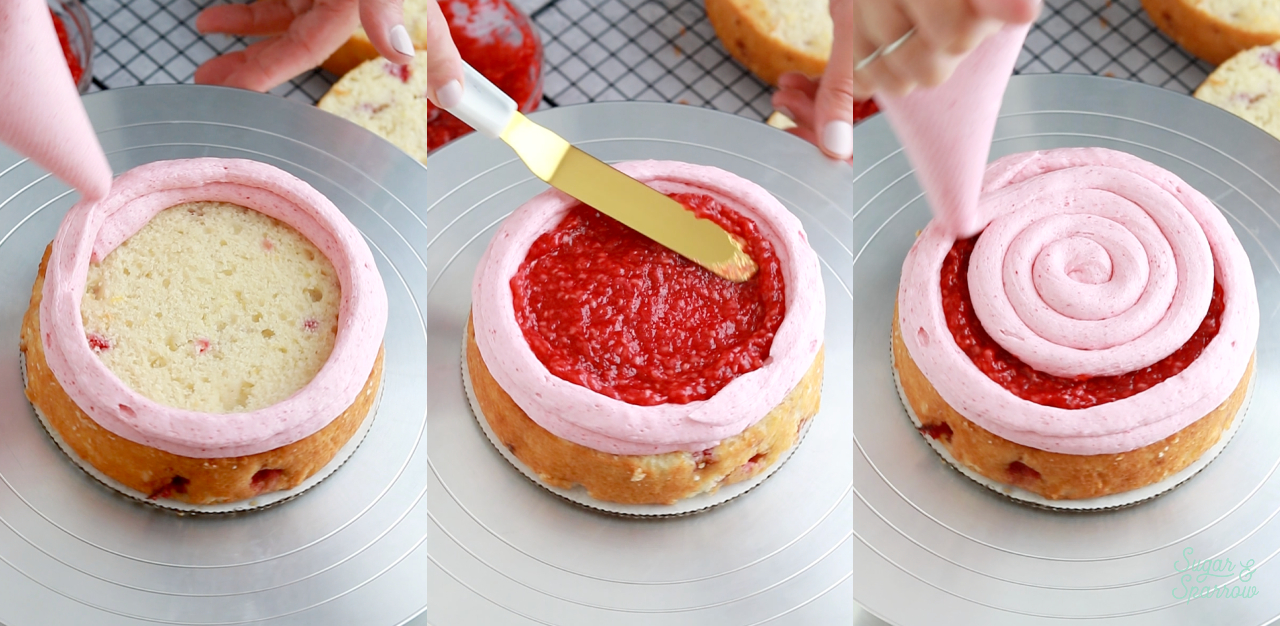
Since this raspberry filling is quite soft, you’ll need to construct a buttercream dam around the edges of each cake layer. In other words, you’ll pipe a ring of buttercream around the edges of the cake layers before filling in the center with raspberry filling. This helps uphold the weight of the layer(s) above and helps prevent the filling from oozing out.
Lemon Raspberry Buttercream Frosting
I couldn’t stop imagining this cake with pink frosting, so I was set on making my favorite raspberry buttercream for the topping. Then it dawned on me that I could add a little lemon juice to make it lemon raspberry flavored! It turned out so delicious and perfectly compliments the lemon and raspberry flavors throughout.

The flavor for this buttercream comes from freeze-dried raspberries and fresh squeezed lemon juice. By grinding the freeze-dried berries into a fine powder, I’m able to add powerful raspberry flavor without adding any extra liquid. That means the consistency of the frosting is perfection! And adding a little lemon juice at the end gives it just the right amount of zing.
You should be able to find freeze dried raspberries at your local grocery store (check the snack section!) but if you can’t, you can get them on Amazon. If you’d rather use fresh raspberries, see the notes section of the recipe below for how to make that substitution.
How to Assemble this Lemon Raspberry Cake
Once you have all of the lemon raspberry elements, here’s how to build them into the perfect lemon raspberry cake. You’ll place the first cake layer on your turntable and pipe a ring of lemon raspberry buttercream (aka buttercream dam) around the edge. Then, fill in the center with raspberry filling about halfway to the top of the dam, topped with a layer of lemon raspberry buttercream.
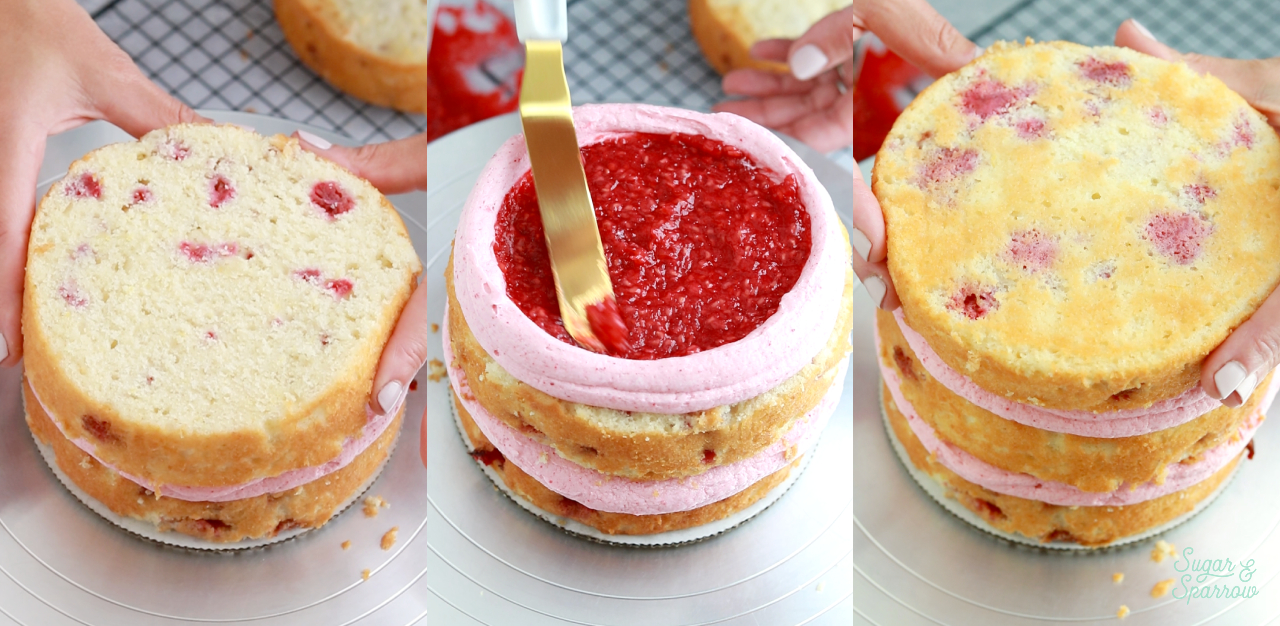
Place the next cake layer on top and repeat the filling and stacking process. When you get to the final cake layer, place it upside down on top.
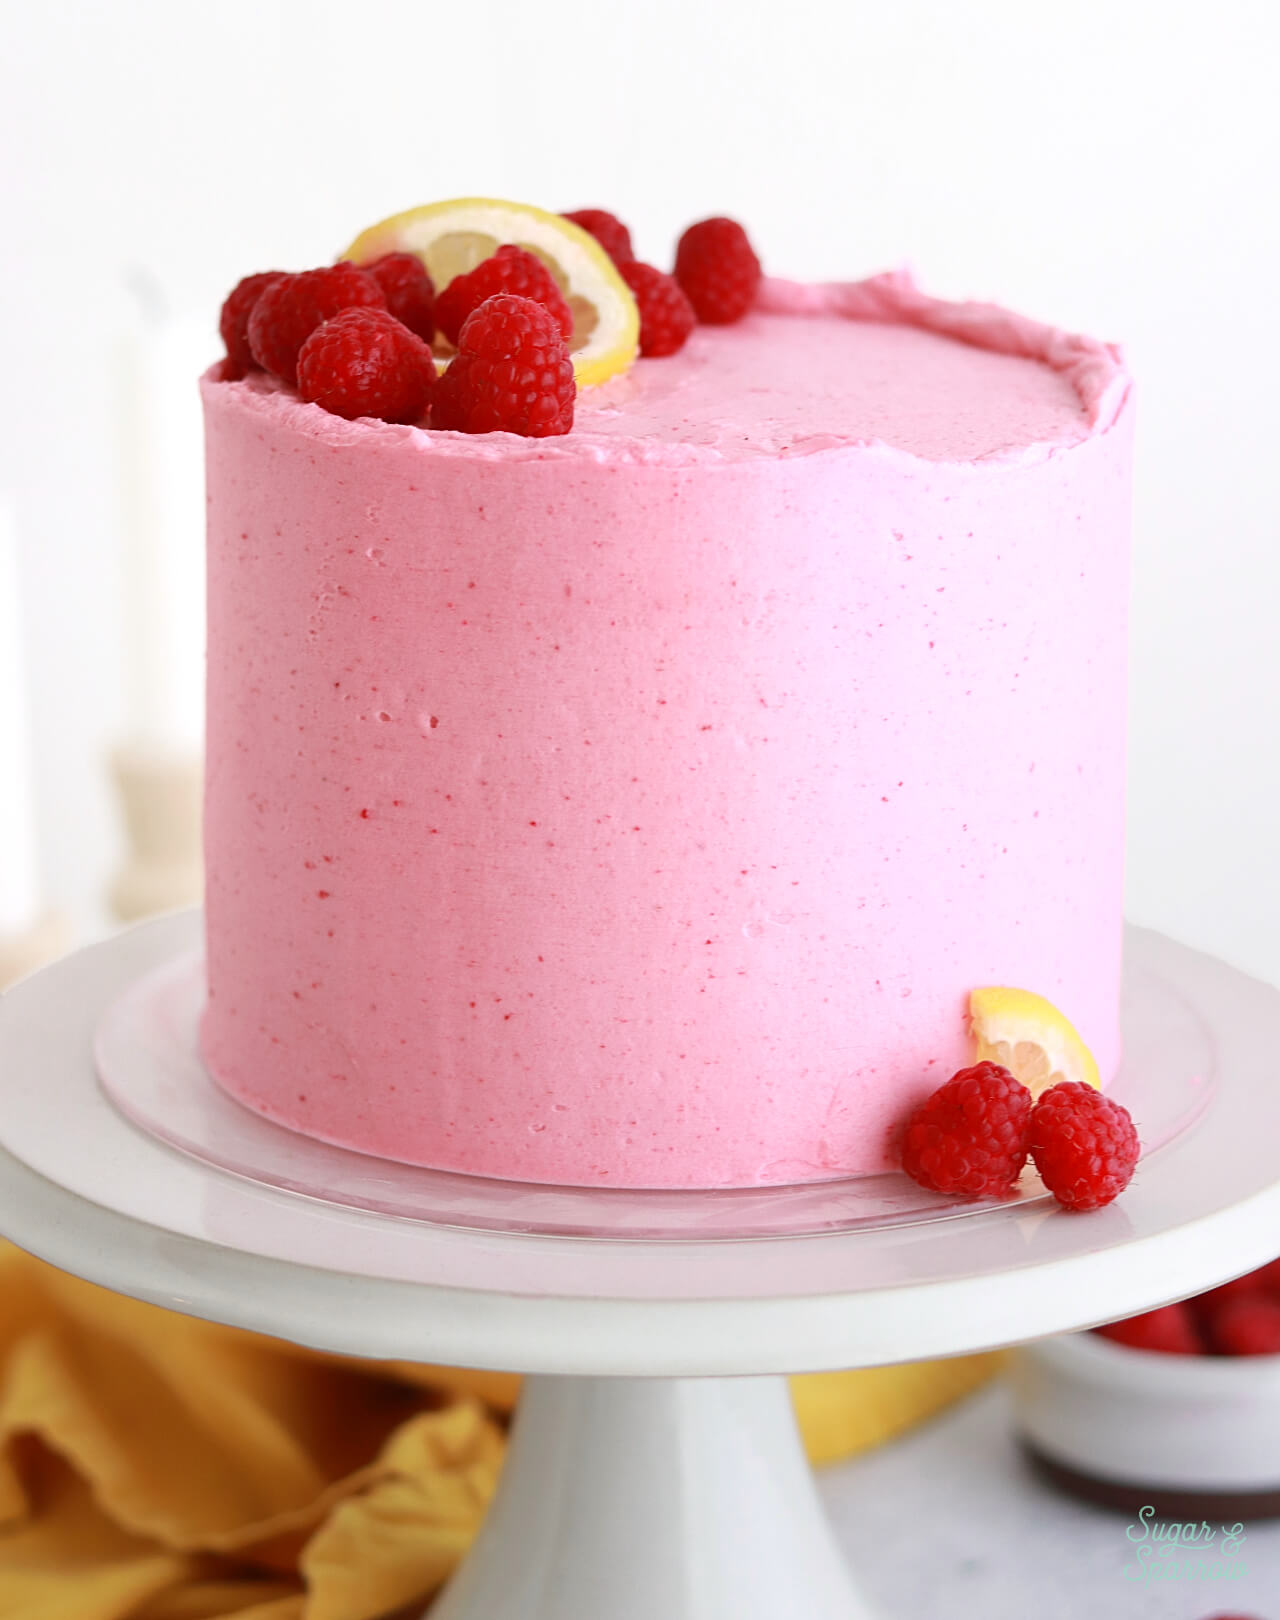
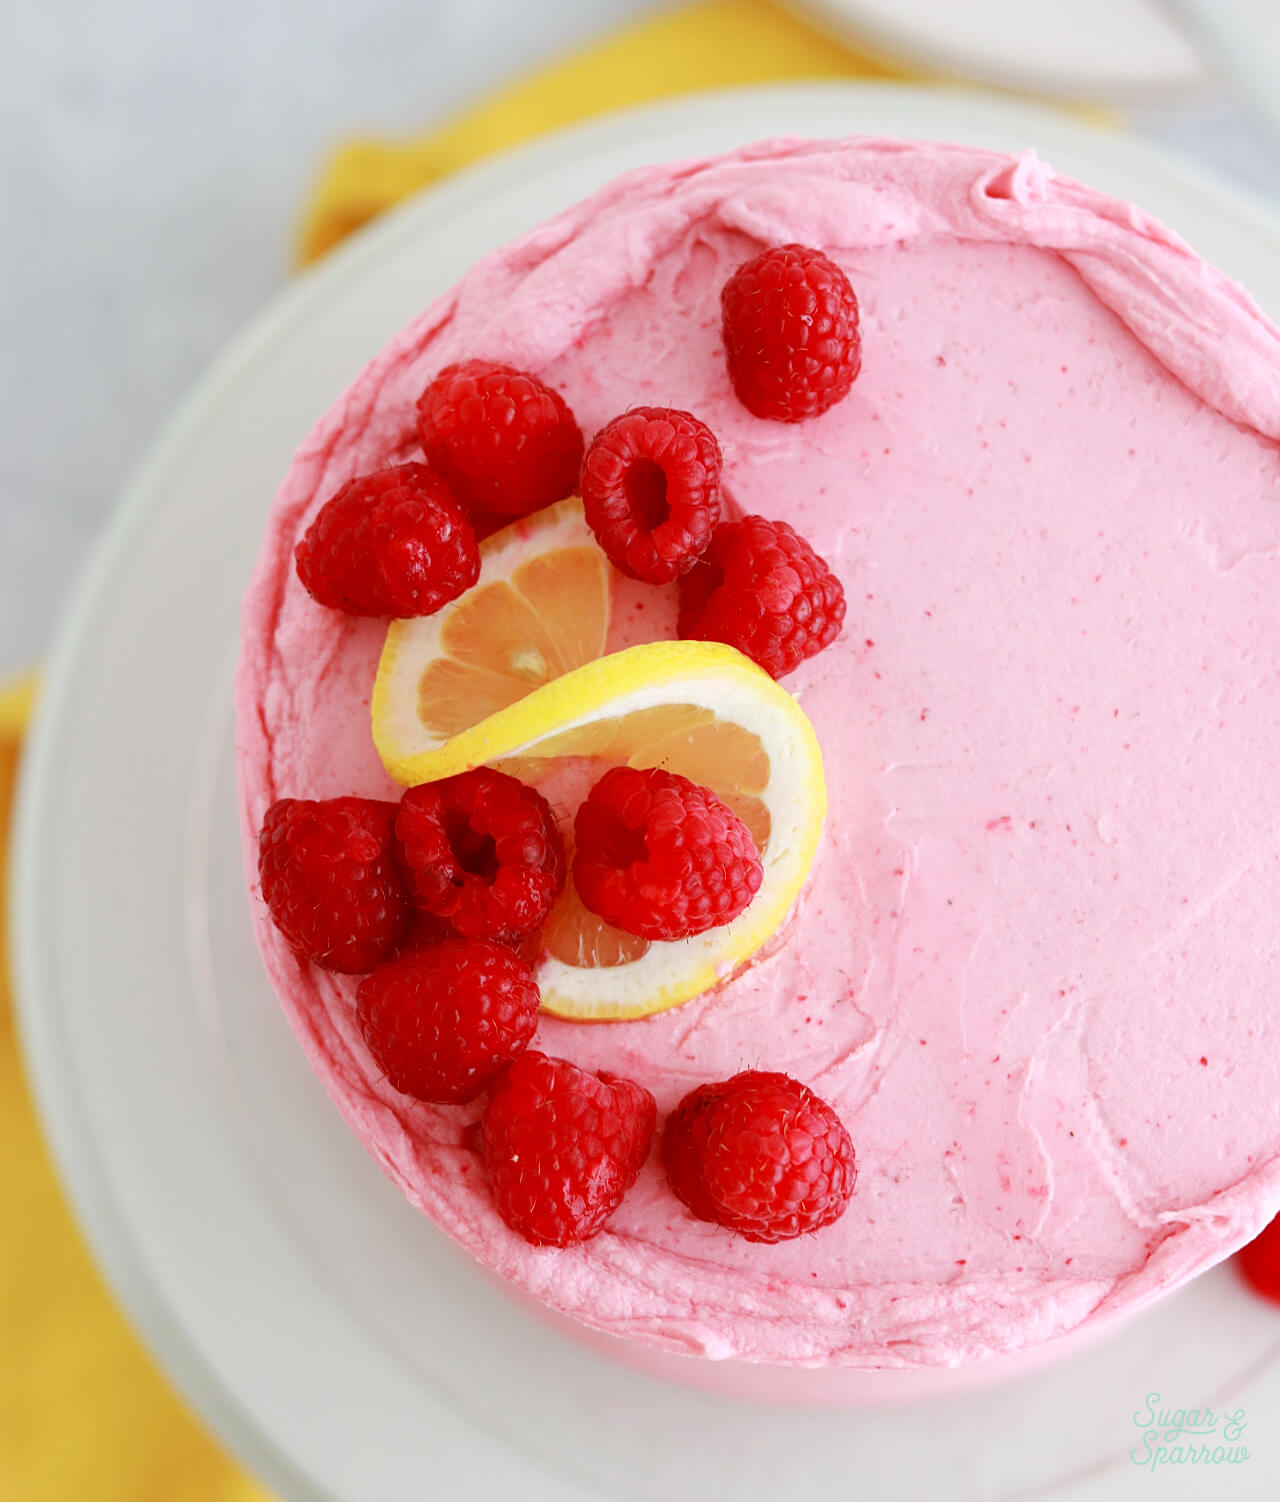
At this point I crumb coat the cake with lemon raspberry buttercream and refrigerate it for about 30 minutes to let everything firm up before moving on. Then, I frosted a smooth buttercream finish with the lemon raspberry buttercream, keeping the top edge raw and jagged, and garnished with a twisted lemon slice and fresh raspberries.

I think it turned out so beautiful! Regardless of how you decorate, you will love this cake if lemon raspberry is your jam.
Lemon Raspberry Layer Cake
Ingredients
Lemon Raspberry Cake
- 2 Cups (265g) all-purpose flour
- 1 1/2 tsp baking powder
- 1/4 tsp baking soda
- 1/2 tsp salt
- 1/2 Cup (120ml) whole milk, room temperature
- 1/3 Cup (80ml) lemon juice from 3-4 medium lemons
- 1 Tbsp lemon zest from 1 medium lemon
- 1 1/2 Cups (300g) granulated sugar
- 1/3 Cup (75g) unsalted butter, room temperature
- 1/4 Cup (60ml) vegetable oil
- 3 large eggs, room temperature
- 2 tsp pure vanilla extract
- 1 1/4 Cups (5 oz, 137g) frozen or fresh raspberries*
- 1 tsp all-purpose flour (for coating the raspberries)
Raspberry Filling
- 1 1/2 Tbsp (12g) cornstarch
- 1 1/2 Tbsp (22ml) water
- 2 Cups (8oz, 228g) fresh or frozen raspberries
- 1/3 Cup (67g) granulated sugar
- 1 Tbsp lemon juice
Lemon Raspberry Buttercream
- 1 Cup (24g) freeze-dried raspberries**
- 1 1/2 Cups (339g) unsalted butter, room temperature
- 1 1/2 Tbsp (22ml) fresh squeezed lemon juice
- 3 Tbsp (45ml) whole milk, room temperature
- 5 Cups (600g) powdered sugar
- pinch of salt, or to taste
Garnish
- 1 twisted lemon slice
- 1/4 Cup (30g) fresh raspberries
Instructions
Make the Lemon Raspberry Cake
- Preheat the oven to 350ºF/177ºF and prepare three 6-inch or two 8-inch cake pans by spraying the sides with cooking spray and fitting a parchment paper circle to the bottoms.
- In a large bowl, whisk together the flour, baking powder, baking soda, and salt. Set aside. In a liquid measuring cup, whisk together the milk and lemon juice and set aside.
- Using a stand mixer fitted with the paddle attachment, mix together the sugar and lemon zest until fragrant and well combined, about 1 minute. Add the butter and cream it together with the lemon-sugar mixture on medium speed until light and fluffy, about 2 minutes. Add the vegetable oil and beat until combined, light and creamy, about 3 minutes. Scrape down the bowl and paddle as needed.
- With the mixer on low speed, add the eggs one at a time and mix until combined. Add the vanilla, then turn the mixer to medium speed and beat for one minute.
- Turn the mixer off and add the flour mixture all at once. Mix on low speed until just combined, then slowly pour in the lemon milk mixture. Mix until just combined, about 30 seconds.
- In a small bowl, break up the frozen raspberries* into smaller pieces and coat them in 1 tsp of flour. Then, fold them into the cake batter with a rubber spatula.
- Divide the cake batter evenly between the prepared cake pans and bake for 30-35 minutes, until a toothpick inserted into the centers comes out clean or with a few moist crumbs. Cool for 5 minutes before removing the cakes from the pans. Transfer the cake layers to a wire rack to cool completely to room temperature.
Make the Raspberry Filling
- In a small bowl, whisk together the cornstarch and water until combined. Add it into a medium saucepan along with the raspberries, granulated sugar, and lemon juice. Set the saucepan over medium heat and stir with a rubber spatula to combine. Cook until the mixture begins to boil, mashing down the raspberries as they soften.
- Once the mixture starts to boil, set the timer for 5 minutes while you continue stirring occasionally. Then, remove from heat and transfer to a heat proof container. It won’t seem super thick at this point, but don’t worry – it will thicken significantly as it cools. Let the raspberry filling sit at room temperature for about 20 minutes, then cover and refrigerate for at least 4 hours and up to 1 week. The longer you refrigerate, the thicker and more flavorful it will be.
Make the Lemon Raspberry Buttercream
- With a food processor, grind the raspberries into a fine powder. Sift out the seeds (if a few seeds end up in the powder that is totally ok) and set the powder aside.
- Whip the butter using a stand mixer with a paddle attachment on medium-high speed until it’s creamy and light in color (5 minutes). Add the lemon juice, milk, and raspberry powder and continue to mix on medium until fully combined.
- Turn the mixer to low speed and add the powdered sugar a few cups at a time, scraping down the bowl and paddle after each addition. Add a pinch of salt and continue mixing on low speed until fully combined and smooth, 1-2 minutes.
Assembly
- Once the cake layers have cooled completely, level them to your desired height. Add a swipe of buttercream onto a cardboard cake circle and place the first cake layer on top. Pipe a circle of lemon raspberry buttercream around the edge of the layer, then fill in the center with the cooled raspberry filling until it reaches almost to the top of the dam, then cover the top with more of the lemon raspberry buttercream. Add the next cake layer on top and continue filling and stacking the cake layers with the raspberry filling and lemon raspberry frosting, placing the final cake layer upside down on top. Crumb coat the cake with more lemon raspberry buttercream, then refrigerate the crumb coated cake for at least 30 minutes to let everything firm up.
- To create the design pictured, frost a smooth buttercream finish with the lemon raspberry buttercream and keep the top edge raw. Garnish with a twisted lemon slice and fresh raspberries.
Notes
- The lemon raspberry cake layers can be made ahead and stored, wrapped in plastic wrap, at room temperature for up to two days. Alternatively, you can store the wrapped cake layers in the freezer for up to 2 months before thawing and frosting.
- The raspberry filling can be made ahead and stored in an airtight container in the refrigerator for up to one week.
- The lemon raspberry buttercream can be made ahead and stored in an airtight container in the refrigerator for up to one week. When you’re ready to use it, bring it back to room temperature and re-mix in your stand mixer on low speed to bring back to smooth buttercream consistency.
- The decorated cake can be stored in the refrigerator for up to 5 days. Take it out of the refrigerator an hour or two before serving – it stores best cold but tastes best at room temperature.
Did you make this lemon raspberry layer cake? I want to know what you think! Let me know in the comments below and feel free to tag @sugarandsparrowco on Instagram to show me. I love to see what you create!


I made it last week. This was my first full from scratch cake, and filling and butter cream. I am very happy with how it turned out. I am making this weekend for Mother’s Day for my mom.
Yay, Jim! I’m so honored that your first from-scratch cake recipe was mine! I’m so happy you loved the recipe and can’t wait for your mom to try it 🙂
Is there a way of leaving the raspberries out of the sponge? Or would I need to change the whole sponge recipe and ingredients?
Hi Krystie! If you don’t want the raspberries in the cake, I would make this lemon cake recipe for the layers instead: https://sugarandsparrow.com/favorite-lemon-layer-cake/
Is there a way to turn this recipe into cupcakes? Could I do all of the same things and just make the raspberry filling to put inside the cupcakes?
Hi Katie! Yes, absolutely. Bake the cupcakes at 350F for 14-18 minutes, until a toothpick inserted comes out clean or with just a few moist crumbs. I’d fill them with the raspberry filling and top them with the lemon-raspberry buttercream. Enjoy!
Lovely cake! I wonder if you think I could double the recipe and make it 4 layers instead of 2. Do you think it would be too heavy?
Hi Sally! I’m so happy you love this recipe! You could totally double it for four 8-inch cake layers. It won’t be too heavy. Enjoy!
This cake is delicious! For my next project, I need a white buttercream. Would this cake pair well with vanilla buttercream instead ? 🙂
Hi Pamela! I’m so happy you loved this recipe and yes, it will pair wonderfully with vanilla buttercream!
Thank you!
Great Cake Recipe, I made this cake for both of my granddaughters 1st birthdays, one cake I did the pink icing and the 2nd time I made it I left it beige to match the color of my granddaughters dress. In March my grandson will turn 1 I will make the blueberry one for him. Not sure how to add the photos of cakes on this page. Thank you.
This cake looks delicious; however, there appears to be a problem with the scaling of the ingredients in the recipe. While the cup measurements change when you change the serving size at the top, the weight doesn’t, e.g. flour stays at 265g and butter 75g.
Hi Eloise! Yeah, unfortunately with this plugin there isn’t a way to scale the weight measurements. You’ll have to manually divide or multiply the individual metric measurements. Sorry for the inconvenience!
I love to bake, and I have an enthusiastic audience in my family. This cake however is the best cake I have ever made. It left us speechless! The buttercream is so complex and so much better than just an every day buttercream. Because it seems like so much thought had gone into the recipe, I followed it to a t. The cake is dense and tender-Ohmygosh! We all LOVED it. Friends and family have all had unreserved praise!
Yay, Shannon! I’m so happy this recipe was such a hit!! Thanks for letting me know 🙂
Absolutely delicious! The cake was denser than I expected and that made it very sturdy! The raspberry filling is now my favorite jam. It tasted so fresh and yummy and really set off the balance of the cake taste. I’ve never used freeze dried fruit in frosting before. I am so excited to try more! It was the best flavored buttercream I’ve ever made and I’m not even a big fan of buttercreams even though I make it often. I didn’t have enough fresh raspberries to top with so I dusted the freeze dried raspberry dust on top. It gave it such a fun finish and added to the layer look when cut.
I used fresh raspberries and I’m glad I did. I don’t know how frozen raspberries turn out but my fresh ones tasted amazing in this!
I want to double to jam filling just to make as a jam for other baking. Would you recommend just doubling all the ingredients or altering somehow?
Thank you! I had so much curiosity baking this!
Hi Amy! I’m so glad that you loved this recipe, it made my day to read your review of all the elements! For the raspberry jam, you can just double all of the ingredients to make a double batch. Enjoy!
Eggless version of this recipe
How to alter the recipe to eggless
Hi Priyanga! I haven’t tested an eggless version of this recipe so it would be an experiment. And after all the testing it took to keep those raspberries suspended I would hate for it to go sideways. Your best bet is to look for a lemon raspberry cake recipe that’s already eggless. Another option is to use my eggless vanilla cake recipe as a base, but sub some of the liquid for lemon juice and add 1 Tbsp of lemon zest. Here’s my eggless vanilla cake recipe: https://sugarandsparrow.com/eggless-vanilla-cake-recipe/ Hope that helps!
Hi Whitney! I am so excited to try the lemon raspberry cake for my granddaughter’s birthday. I would like to make a 3 layer, 8 inch cake. How should I alter the recipe? Thank you, Elisa
I’m hoping to do the same, Elisa. How did yours turn out? Any tips?