I have always been a candy bar girlie, and although my favorite changes over the months and years, my top three has remained pretty steady. Currently in the number one spot is the Milky Way (followed by Twix and Almond Joy), and since I love making cake versions of my favorite things, it was only a matter of time before I made a Milky Way cake. You guys. I can hardly put into words how perfect it turned out. It’s everything I want in a cake!
This post may contain affiliate links. For more information, see our disclosure policy.

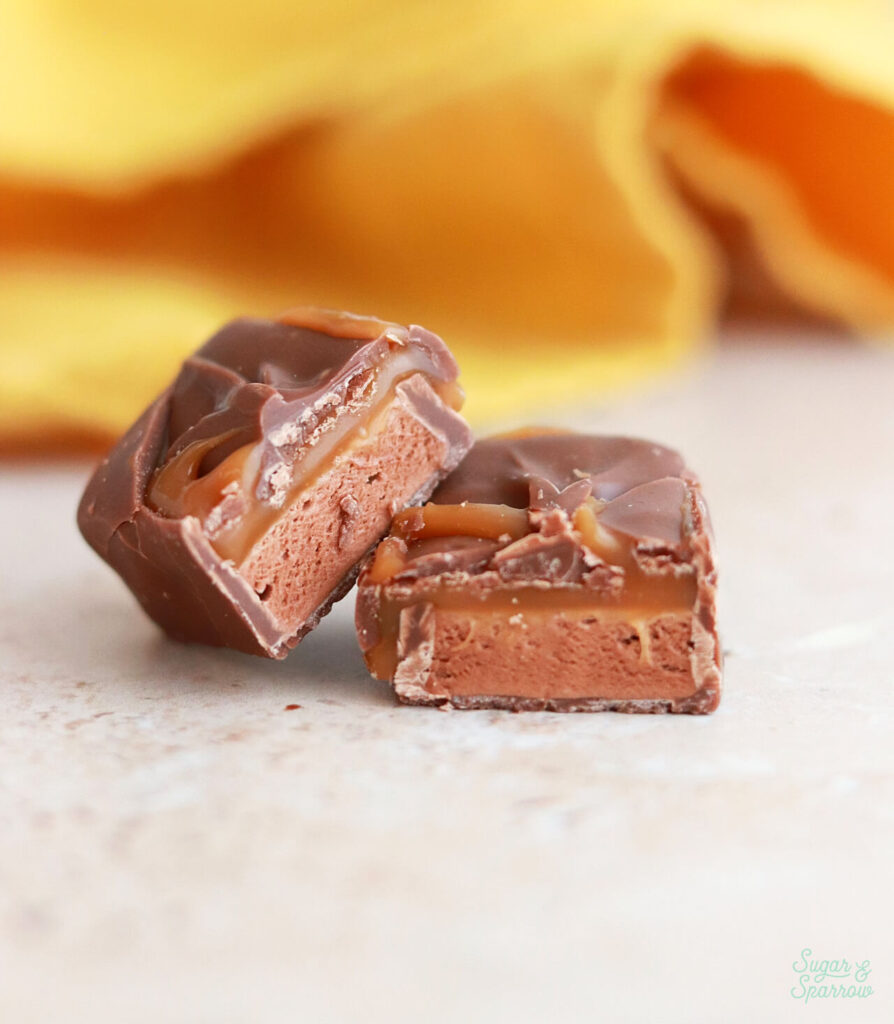
What’s in a Milky Way Candy Bar?
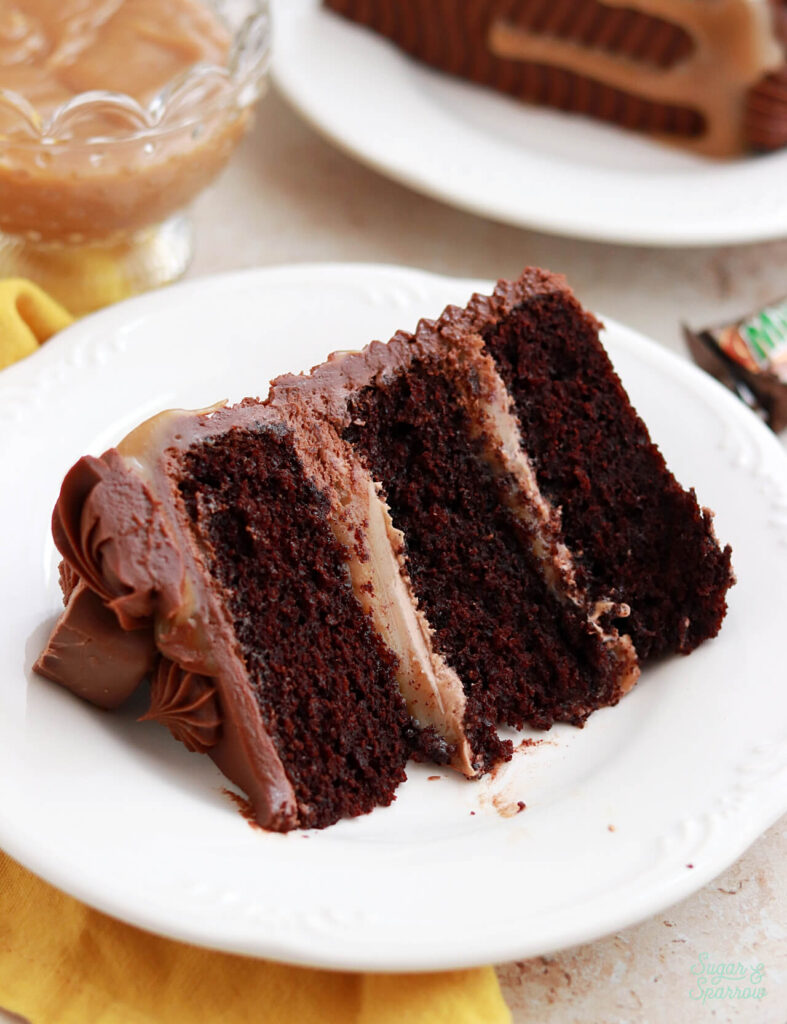
Milky Way candy bars have a layer of chocolate nougat topped with a layer of thick, gooey caramel, covered in an outer layer of milk chocolate. The chocolate nougat is a fluffy, aerated chocolate marshmallow filling. The caramel layer is beautifully soft and thick enough that when you break the chocolate bar in two, the caramel will stretch. All together with the milk chocolate, these elements make the most delicious candy bar (in my humble opinion).
Elements of a Milky Way Cake
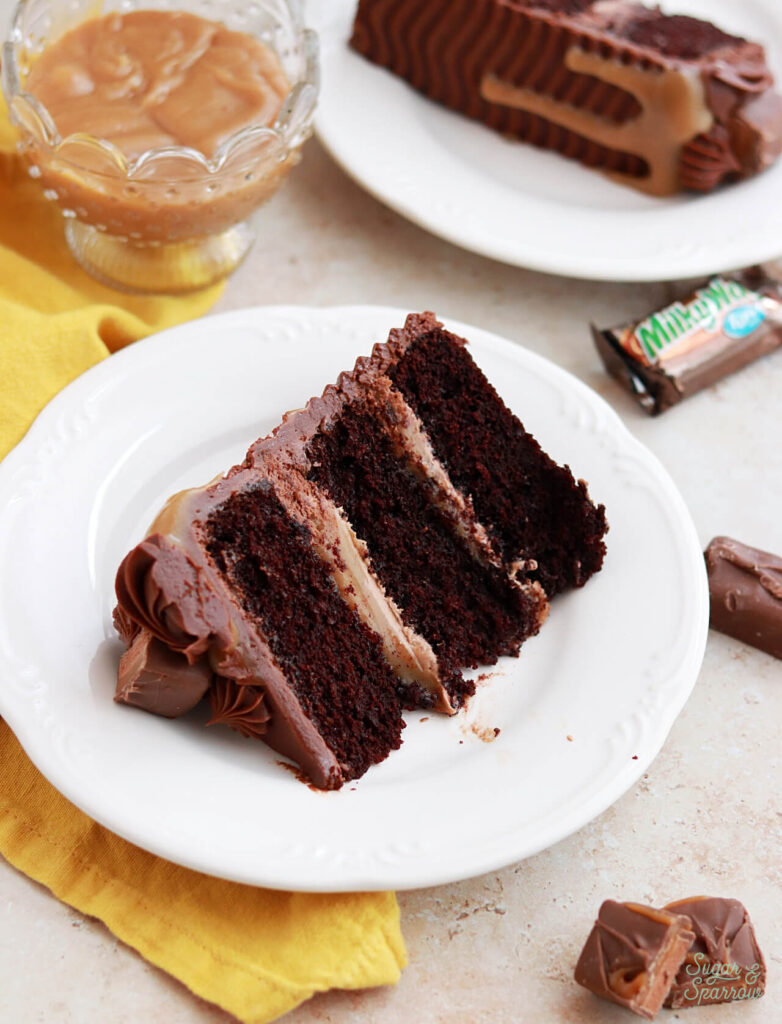
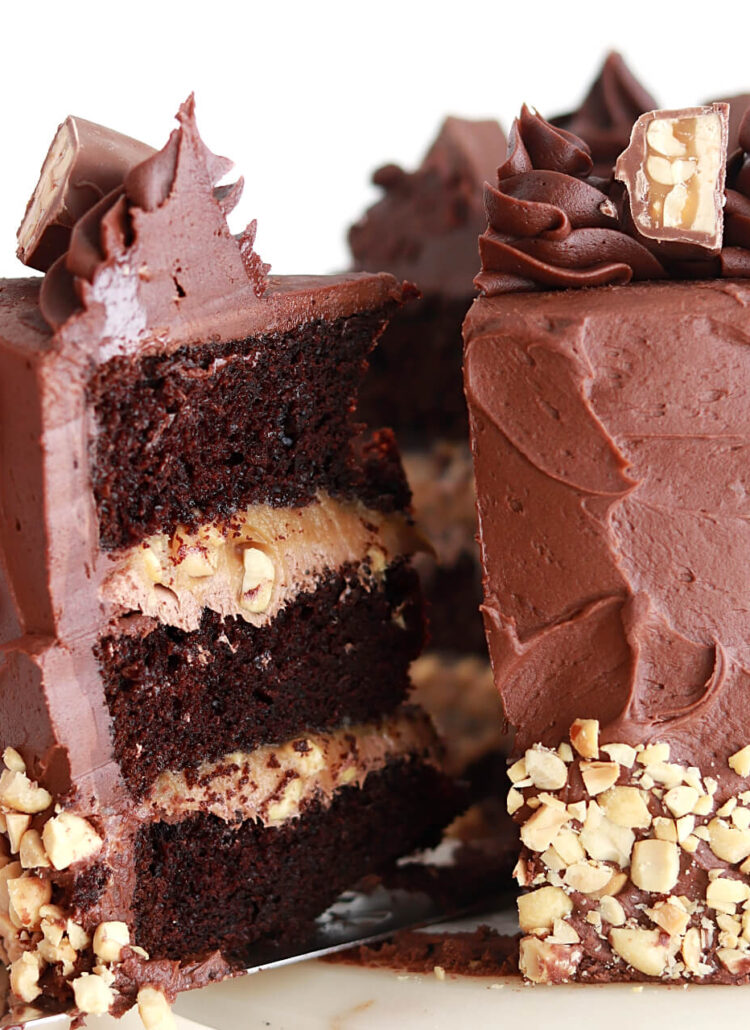
To mimic the flavor and textures of a Milky Way candy bar, here’s a breakdown of what’s in this cake version:
- Moist Chocolate Cake Layers. This cake starts with baking my favorite one-bowl chocolate cake, which is beautifully moist, full of decadent chocolate flavor, and so easy to whip up.
- Fluffy Chocolate Marshmallow (Nougat) Filling. I wanted the nougat layer to be soft and aerated, with a slight chocolate flavor. What ended up tasting just like the Milky Way nougat was adding a little bit of cocoa powder to my marshmallow creme filling recipe. The resemblance is uncanny!
- Thick, Gooey Caramel. Just like a traditional Milky Way, I added a layer of this thick caramel filling on top of the nougat layer. This makes up the filling in between each cake layer and I used it to add a drip to the outside of the cake.
- Chocolate Buttercream. Since the fillings are both so soft, I needed a thicker frosting to hold everything inside and give the cake structure. This chocolate buttercream ended up being perfect for using as a filling dam and for frosting/decorating the cake.
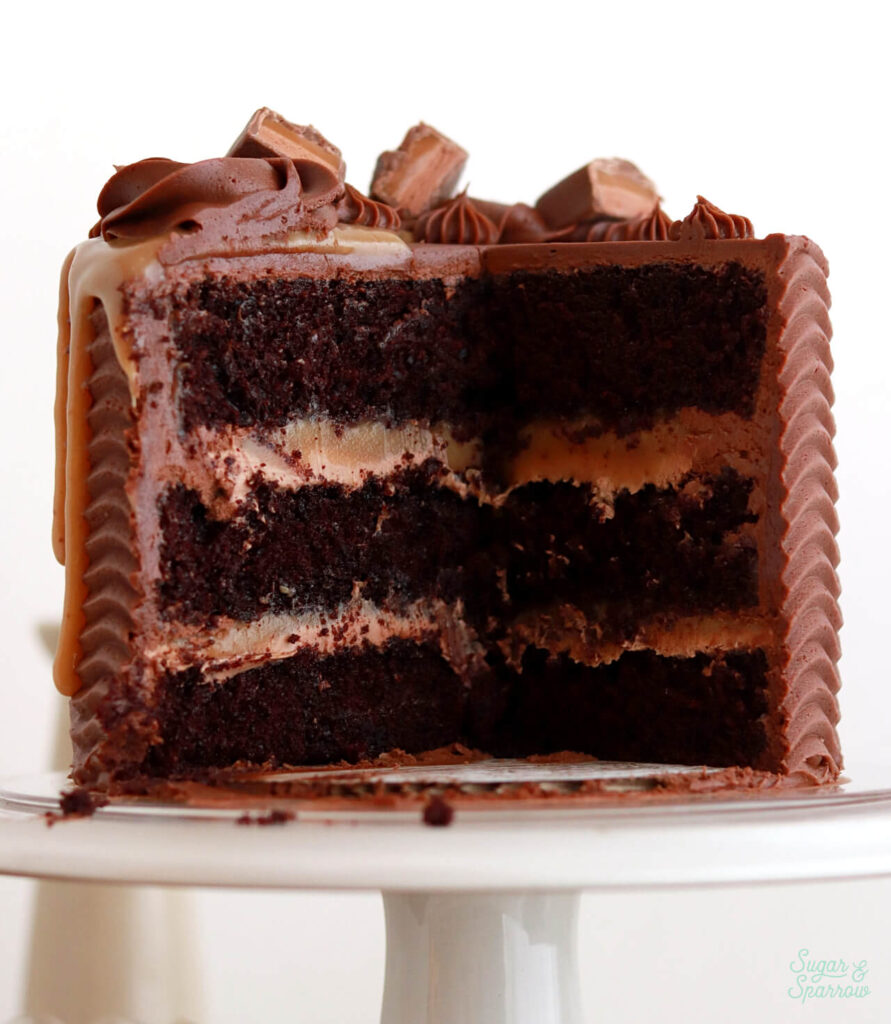
- Fun-Sized Milky Way Candy Bars. I cut a few of these little candy bars in half so that the fillings were revealed, then used them to decorate the top of the cake.
How to Decorate a Milky Way Cake
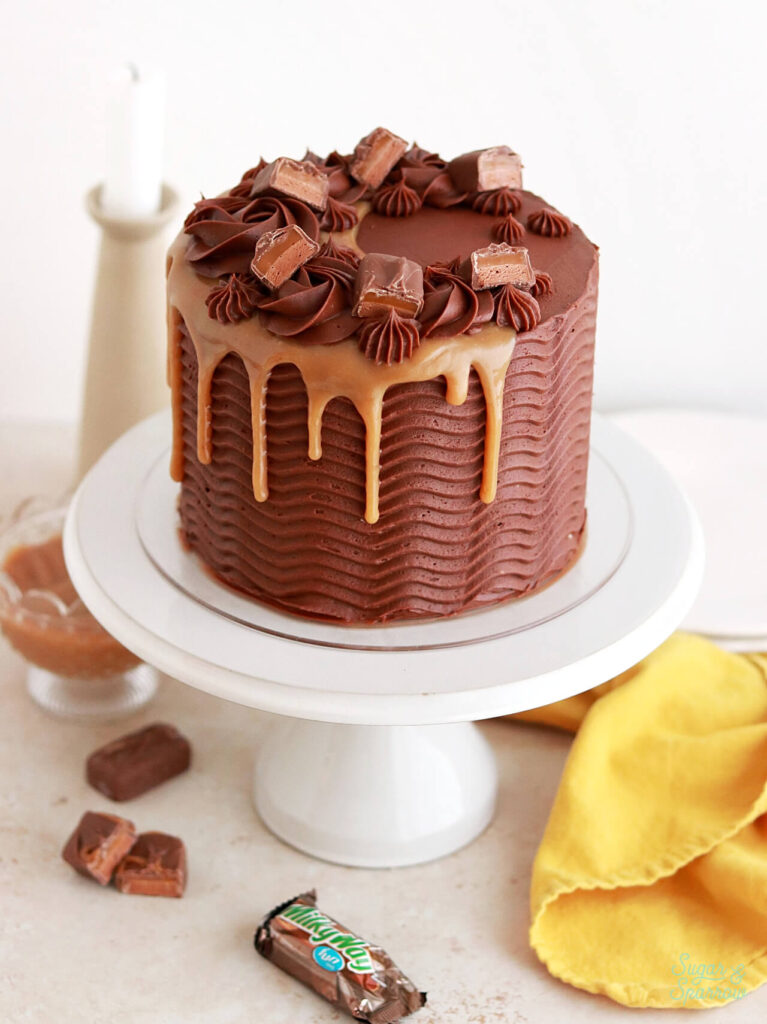
You always have free range to decorate any of my cake recipes as you please, but if you want to make it look like the one pictured here, this is what I did:
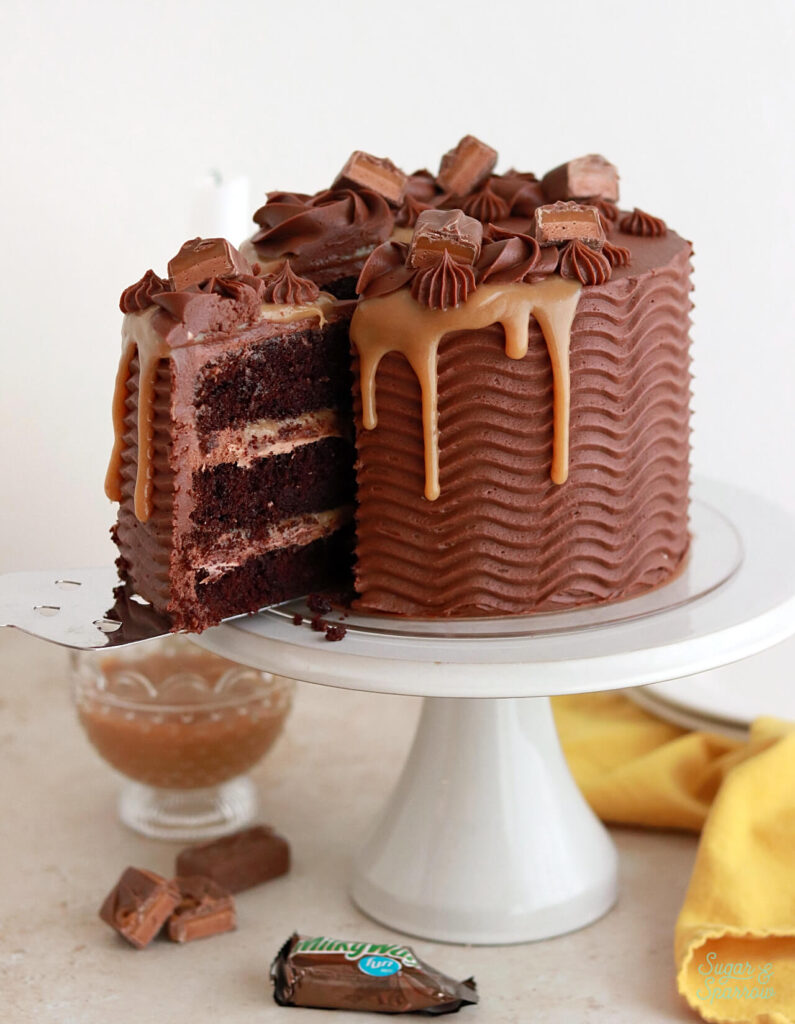
I frosted the cake with chocolate buttercream and used an icing smoother to create a semi-smooth (not super perfect) finish on the cake, then used a cake comb (the saw-toothed one from this set) to create the texture. I basically held it against the sides of the cake, moving my hand up and down to create the wave texture while I rotated the turntable with my other hand. It was my first time doing a freeform texture like this with a cake comb and I am completely obsessed! It was so much easier and forgiving than I thought it would be.
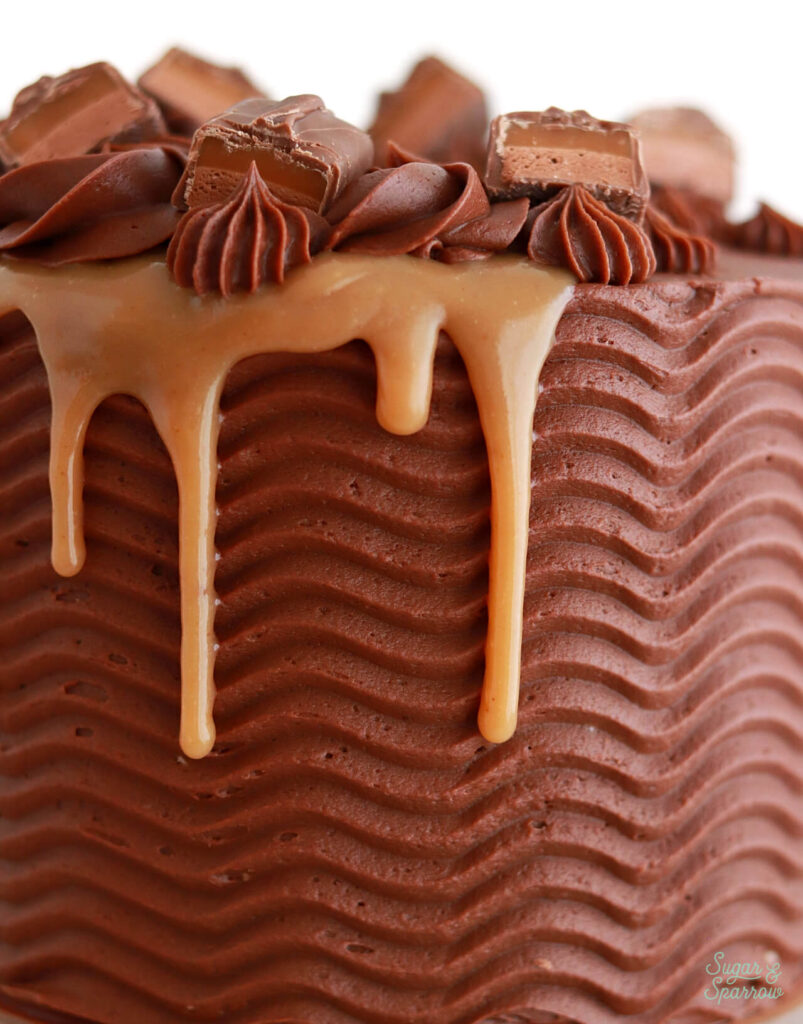
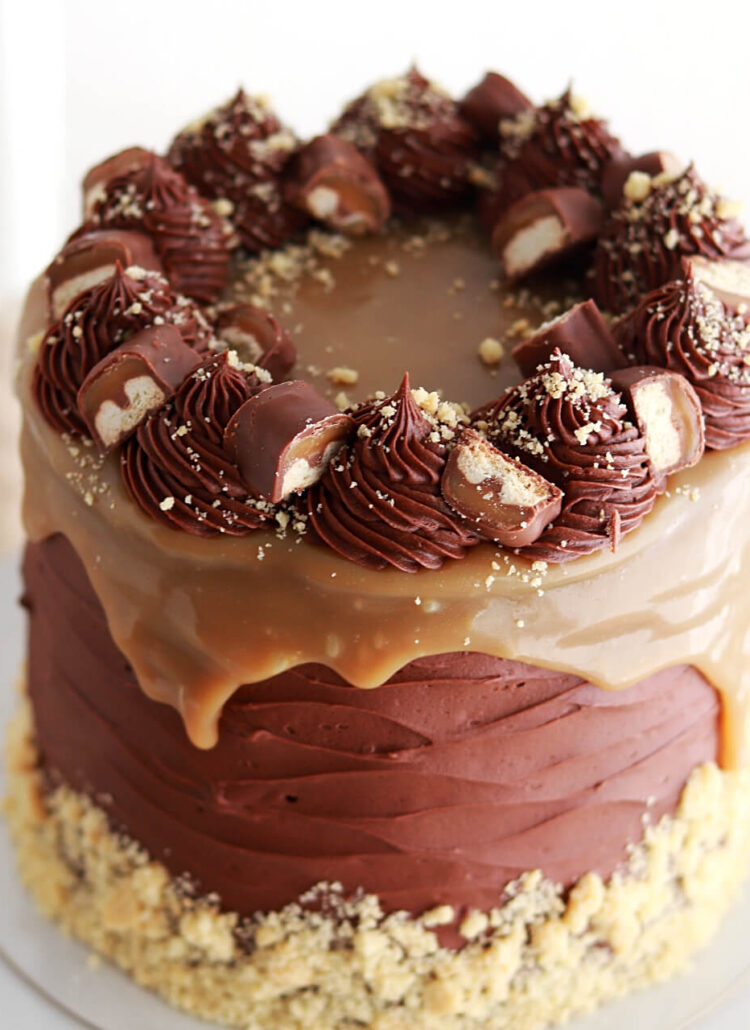
After frosting the cake, I put it back in the refrigerator to let the buttercream firm up before heating up the leftover caramel to ever-so-slightly above room temperature. This made it thin enough to use as a cake drip. I added it into a piping bag and piped the heated caramel onto the chilled cake to create a drip halfway around the cake. It turned out so pretty!
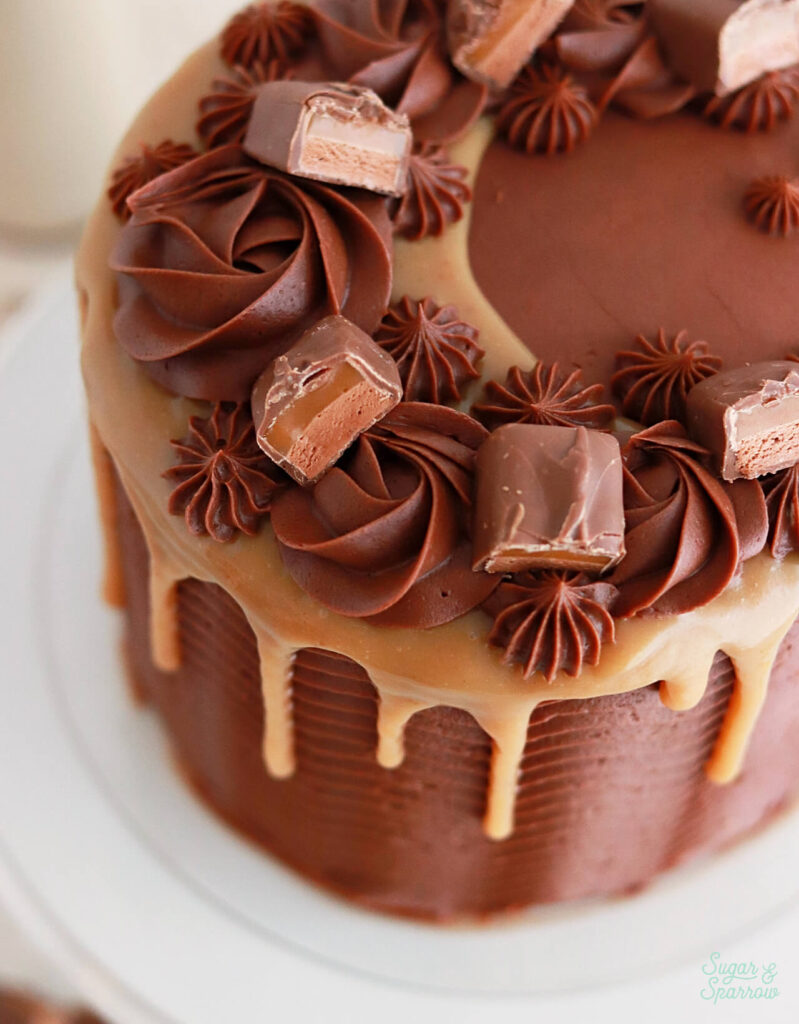
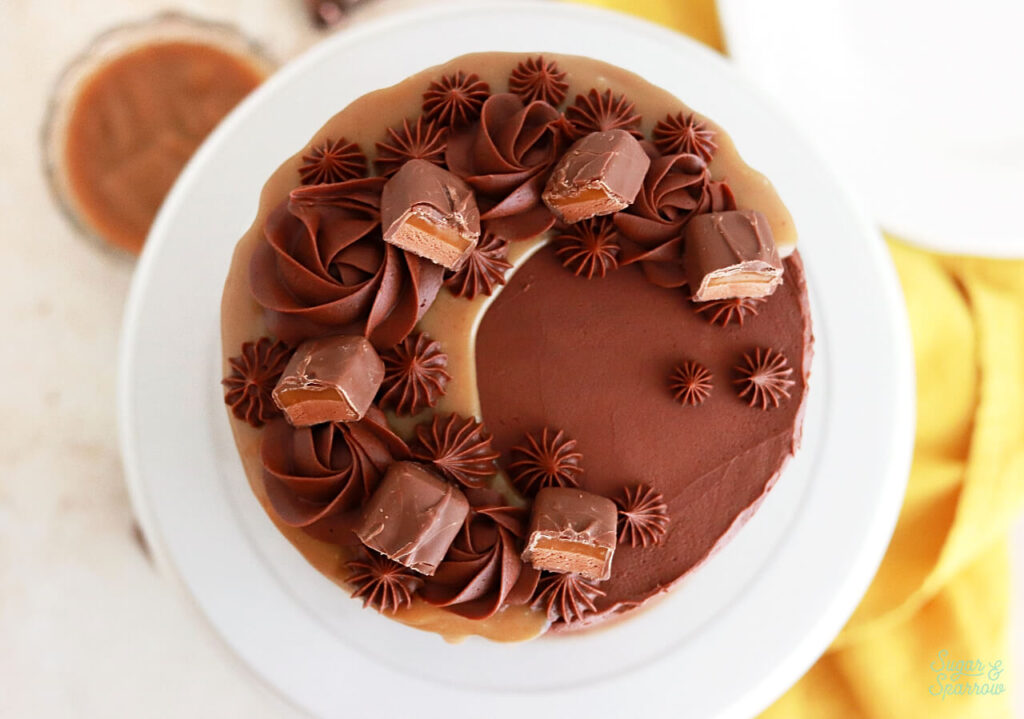
I let the caramel set for a few minutes in the refrigerator while I added the remaining chocolate buttercream into two piping bags, one fitted with Wilton Tip 4B and the other fitted with Wilton Tip 1M. Then I piped rosettes with tip 1M and stars with Tip 4B onto the top of the cake in a crescent pattern, following the caramel drip as my guide for placement. And finally, I topped the cake with the halved fun-size Milky Ways.
However you decorate, this is going to be your favorite cake recipe if you love Milky Way candy bars, or a chocolate caramel flavor combination in general. Everything from the texture of the filling to the flavor of all the elements together is just stunning. I hope you love it as much as I do!
Milky Way Layer Cake
Ingredients
Chocolate Cake
- 2 Cups (265g) all-purpose flour
- 1 2/3 Cups (340g) granulated sugar
- 2/3 Cup (60g) unsweetened natural cocoa powder
- 2 tsp baking soda
- 1 tsp baking powder
- 1/2 tsp salt
- 1/2 Cup (120ml) vegetable oil
- 2 large eggs, room temperature
- 1 1/2 tsp pure vanilla extract
- 1 Cup (240ml) full-fat buttermilk* DIY recipe in notes
- 1 Cup (240ml) hot coffee or hot water
Thick Caramel Filling
- 1/4 Cup (57g) unsalted butter
- 1/2 Cup (100g) packed light brown sugar
- 1/3 Cup (105g, 80ml) sweetened condensed milk
- 2 Tbsp (30ml) light corn syrup or golden syrup
- 3 Tbsp (45ml) heavy whipping cream
- 1/2 tsp pure vanilla extract
- 1/2 tsp salt
Chocolate Nougat Filling
- 4 Tbsp (56g) unsalted butter, room temperature
- 2/3 Cup (70g) powdered sugar
- 2 Tbsp (10g) unsweetened natural cocoa powder
- 1/2 Cup (65g) Jet-Puffed Marshmallow Creme
- 1/2 tsp pure vanilla extract
Chocolate Buttercream Frosting
- 1 1/2 Cups (339g) unsalted butter, room temperature
- 4 1/2 Cups (540g) powdered sugar
- 3/4 Cup (68g) natural unsweetened cocoa powder
- 1/4 Cup (60ml) whole milk, room temperature
- 1/4 tsp salt
- 1 Tbsp pure vanilla extract
Additional Garnish
- 3 fun-size Milky Way candy bars, halved
Instructions
Make the Chocolate Cake
- Preheat the oven to 350ºF and prepare three 6-inch or two 8-inch cake pans by spraying the sides with cooking spray and fitting the bottoms with a wax paper or parchment cake circle.
- Place all of the dry ingredients into the bowl of a stand mixer and stir on low for 30 seconds to fully combine them. Add the vegetable oil, eggs, vanilla, and buttermilk and mix on low until just combined. With the mixer still on low, add the hot water in a slow stream, then turn the mixer to medium and beat until smooth, about 2 minutes. The batter will be very thin.
- Pour into prepared cake pans no more than 2/3 full and bake for 32-36 minutes, until a toothpick inserted comes out clean. Cool completely before moving on in the recipe.
Make the Thick Caramel Filling
- In a large saucepan over medium heat, add the sweetened condensed milk, butter, brown sugar, corn syrup, heavy whipping cream, and salt. Stir with a rubber spatula constantly until the mixture is fully combined and begins to bubble, about 5 minutes.
- Continue stirring until the caramel begins to thicken, 5-7 minutes. If you have a candy thermometer, you’ll want to cook this until it reaches 225F/107C. That is the temperature that will thicken the caramel while keeping it nice and soft at room temperature.
- Remove the caramel from the heat and mix in the vanilla extract. Pour into a separate container and let the caramel cool completely to room temperature before using it to fill the cake. You can either leave the container on the counter for about 2 hours or speed the cooling process slightly by placing the container in the refrigerator. It will thicken significantly as it cools.
Make the Chocolate Nougat Filling
- In the bowl of a stand mixer with the paddle attachment or using a hand mixer, whip the butter on high speed until smooth and creamy, about 3 minutes. Add the powdered sugar, cocoa powder, marshmallow creme and vanilla. Mix on low speed until fully combined, about 2-3 minutes, scraping down the bowl and paddle as needed.
Make the Chocolate Buttercream
- In a stand mixer fitted with a paddle attachment, whip the butter on medium-high speed until creamy and light in color, 4-5 minutes.
- Scrape down the bowl and paddle, then add powdered sugar, cocoa powder, milk, salt, and vanilla extract. Cover the mixer with a clean kitchen towel (to prevent ingredients flying out of the bowl), then turn the mixer to low and mix until all ingredients start to come together.
- Remove the kitchen towel, scrape down the bowl and paddle, then continue mixing on low speed until uniform and smooth, 2-3 minutes.
Assembly
- Once the chocolate cake layers have cooled completely, level and torte each layer to your desired height. Add about 1.5 Cups of chocolate buttercream into a piping bag and snip off about 1/2 inch opening.
- Place the first layer on a turntable and pipe a circle of chocolate buttercream around the edge of the cake layer, then pipe another circle of buttercream on top of the first to make it slightly taller. Fill in the center halfway with chocolate nougat filling and smooth it down. Then, fill nearly to the top of the chocolate buttercream circle dam with thick caramel filling. Here's a detailed tutorial on this filling method in case this is your first time working with a soft filling.
- Place the next cake layer on top and repeat the process of piping the chocolate buttercream circle and filling in the center with the chocolate nougat and thick caramel fillings. Place the final layer on top, upside down so that the bottom of the cake layer is the top of the cake. Crumb coat the cake with chocolate buttercream and place it in the refrigerator for at least 20 minutes to let everything set up.
- To create the look pictured, frost the cake with chocolate buttercream and use an icing smoother create a semi-smooth (doesn't have to be perfect) finish. Then, hold a saw-toothed cake comb against the sides of the cake and move it slightly up and down while rotating the turntable to create the wavy buttercream texture. Place the cake into the refrigerator for 10-20 minutes to let the frosting chill while you prepare the caramel drip.
- To Create the Caramel Drip: Add about 1/2 Cup of thick caramel filling into a microwave safe bowl and microwave in 5-10 second increments until it's slightly above room temperature and ideal drip consistency. Pour into a piping bag and snip off a small opening, then use it to pipe the caramel over the top edge of the cake, creating drips about halfway around the cake. Pipe caramel over the top of the cake in a crescent moon shape that begins and ends where the drips do, then place the cake back into the refrigerator for 5-10 minutes to let the drip set.
- To finish to look, divide the remaining chocolate buttercream between two piping bags, one fitted with Wilton Tip 1M and one fitted with Wilton Tip 4B. Pipe rosettes with Tip 1M and stars with Tip 4B in a crescent formation around the top of the cake, following the caramel drip as your guide on where to begin and end. Garnish with the halved fun-size Milky Ways.
Notes
- The chocolate cake layers can be made ahead and stored at room temperature, covered tightly in plastic wrap, for up to two days. Alternatively, you can cover with plastic wrap and store in the freezer for up to two months before thawing to room temperature.
- The thick caramel filling can be made ahead and stored in an airtight container in the refrigerator for up to two weeks. When you’re ready to use it, bring the caramel back to room temperature by setting it out on the counter for an hour or so, or heating it in the microwave in 10-second increments until it’s spreadable.
- The chocolate nougat filling can be made ahead and stored in an airtight container in the refrigerator for up to two weeks. When you’re ready to use it, bring back to room temperature and re-mix until smooth.
- The chocolate buttercream can be made ahead and stored in an airtight container at room temperature for up to 1 day. Alternatively, you can store it in an airtight container in the refrigerator for up to two weeks. When you’re ready to use it, bring it back to room temperature and rewhip with your stand mixer to bring back to frosting consistency.
I hope you love this Milky Way cake as much as I do! Let me know what you think in the comments below and feel free to tag @sugarandsparrowco on Instagram if you post a pic. I love to see what you create!
Hi Whitney I’m attempting to make this cake is it okay to use cake flour instead or all purpose or is it best to stick with the all purpose ?
Hi Arianna! It’s best to stick with all purpose flour here, chocolate cakes need that extra structure. Enjoy!
When I heat up the caramel, even on half power and stirring every 10 seconds, the grease separates from it and is impossible to stir in again. What am I doing wrong
Hi Annika! I have never had that happen with this caramel recipe before – did you make any ingredient substitutes? From a quick Google search it seems like the only way to fix it is to put it in a saucepan over low heat and whisk in 1 Tbsp of warm heavy whipping cream. Whisk vigorously until it re-emulsifies and then remove from heat and bring back to room temperature. I hope that helps!
I made this recipe for my 9YO’s birthday this year, using your vegan chocolate cake and vegan chocolate buttercream recipes. It was absolutely divine. Everyone loved it!
I’m thinking of doing the cupcake version. Can you give me tips on how to fill the cupcakes? I’ve done a single filling before but not two.
Hi Julianne! I would probably fill them with the nougat, top them with chocolate buttercream and drizzle the caramel and on top. This way you’ll get the best ratio of all the elements. If you really want the caramel and nougat inside the cupcake an alternative would be to fill up to halfway with the nougat, fill the rest of the way with the caramel, then top with chocolate buttercream. Hope that helps!
Hi Whitney,
When I weigh 1/2 cup of marshmallow crème it amounts to about 65 grams. Should the recipe call for a full cup or is the weight stated wrong?
Can’t wait to try this cake!!
Thanks,
Cheryl
Hi Cheryl! Thanks for catching that! It should be 65g (1/2 Cup).
Hi Whitney, I’m in Australia and don’t have easy access to Jet-Puffed Marshmallow Creme. Is Marshmallow Fluff ok to use instead?
Thanks!
Bec
Absolutely, Bec! That’s the perfect substitute. Enjoy!
Hi! I’m getting ready to make this cake. Can I use butter instead of oil for the batter?
Hi Jasmyn! I’ve never tried melted butter in place of the oil in this recipe, so it would be an experiment. Let me know if you try it!
Hi I love your chocolate cake! Recently I found out my nephew is allergic to eggs. How do you recommend I sub the eggs in this recipe? I looked at the vegan chocolate cake and notice there was more oil than this recipe. Is that how you accommodated for it? I don’t wanna go totally nondairy if possible because I love dairy haha
Hi Charlie! I have never tried my one bowl chocolate cake with an egg replacement, so I’m not sure what to recommend other than trying my vegan chocolate cake recipe. It honestly rivals the one bowl chocolate cake in every way and doesn’t taste like it lacks dairy.
Hi! So did sub one cup of the water with buttermilk and it worked great! I tried with all water and the cake kind of stuck to the pan but that was probably more user error than anything else. Thank you for your help 🙂
Wow. I don’t know how you come up with recipes like this, Whitney!! This looks absolutely incredible. I LOVE Milky Ways and will definitely have to give this a go. Thank you for your wonderful recipes and inspiration!!!