• Cake
  • Frosting
  • YouTube
  • My Favorite Tools
  • Nav Social Icons

  • Skip to primary navigation
  • Skip to main content
  • Skip to primary sidebar
  • Skip to footer
  • Recipes
    • Cake
    • Cupcakes
    • Frosting
    • Ice Cream
    • Vegan
  • Cake Basics
  • Tutorials
  • Blog
  • About
  • Mobile Menu Widgets

    Connect

    Search

Sugar & Sparrow logo in script font

Sugar & Sparrow

Lifestyle and Cake from Portland Oregon

  • Cake Basics
  • Recipes
    • Cake
    • Cupcakes
    • Cookies & Bars
    • Filling
    • Frosting
    • Ice Cream
    • No-Bake
    • Small Batch
    • Vegan
  • Tutorials
  • Book
  • Blog
  • About

Red Velvet Cupcakes with Cream Cheese Frosting

January 11, 2025 · In: Cupcakes, Featured, Holiday, Recipes, Seasonal, Valentines

Jump to Recipe

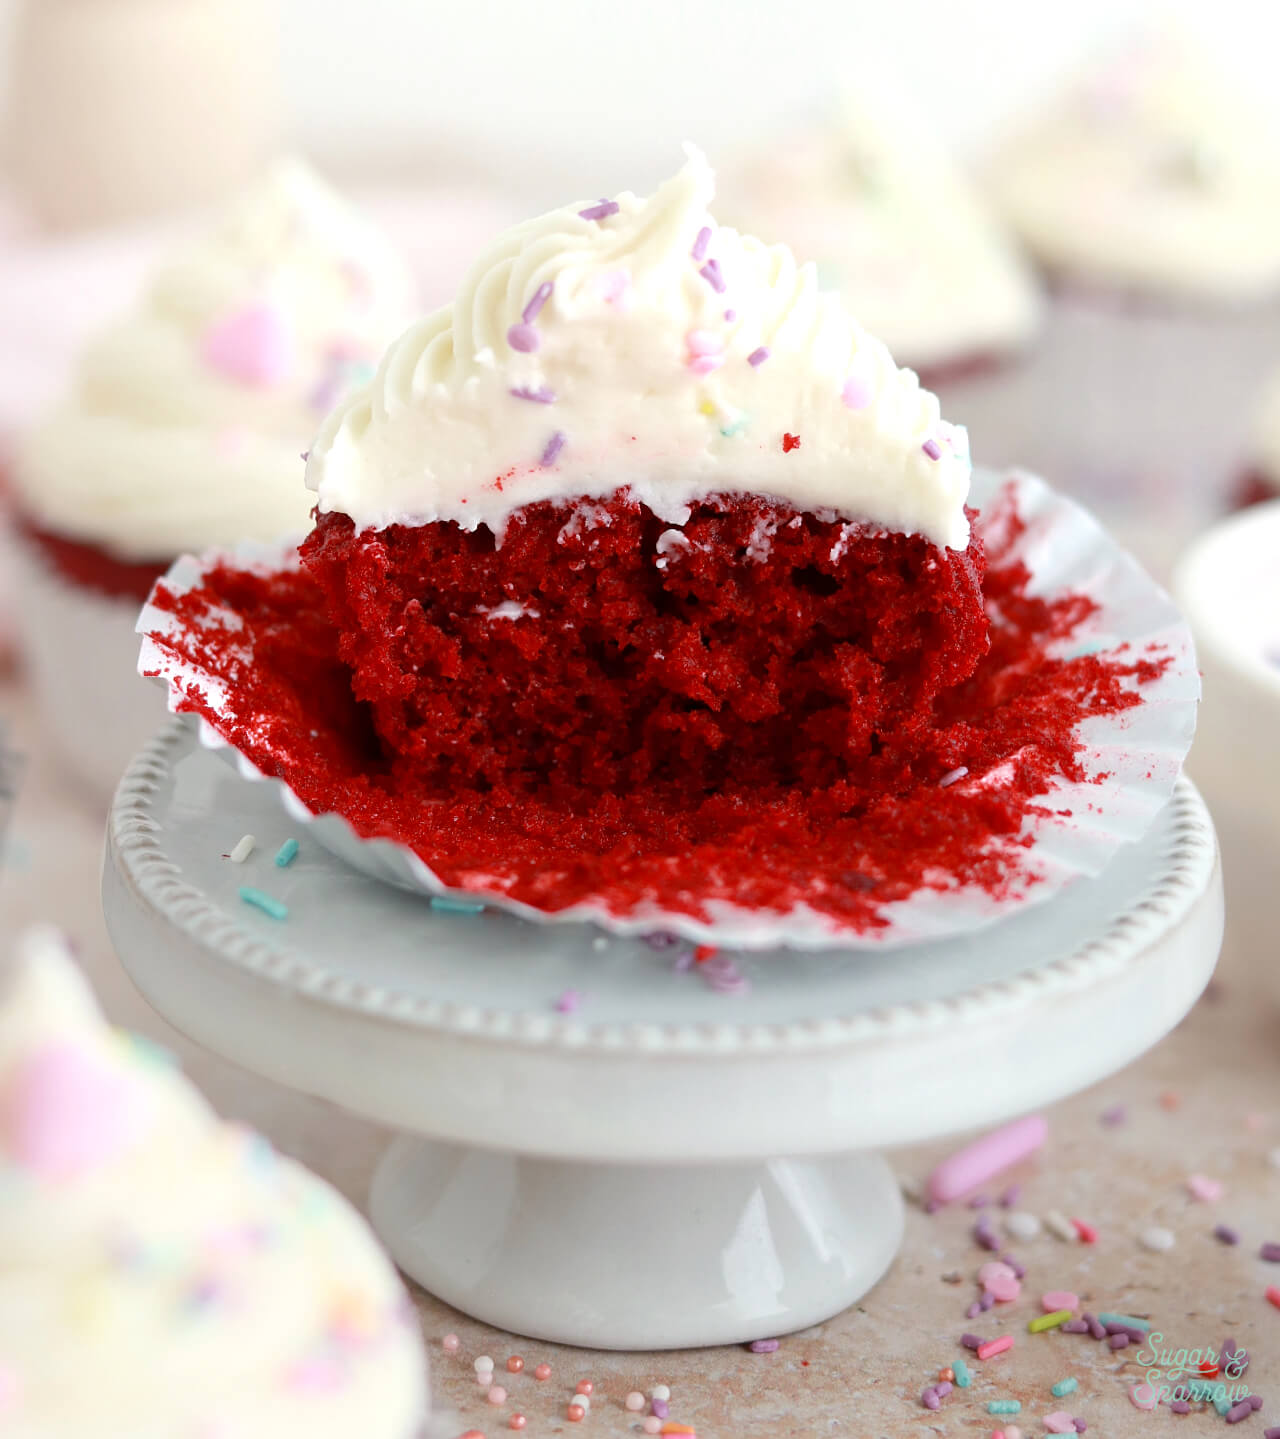
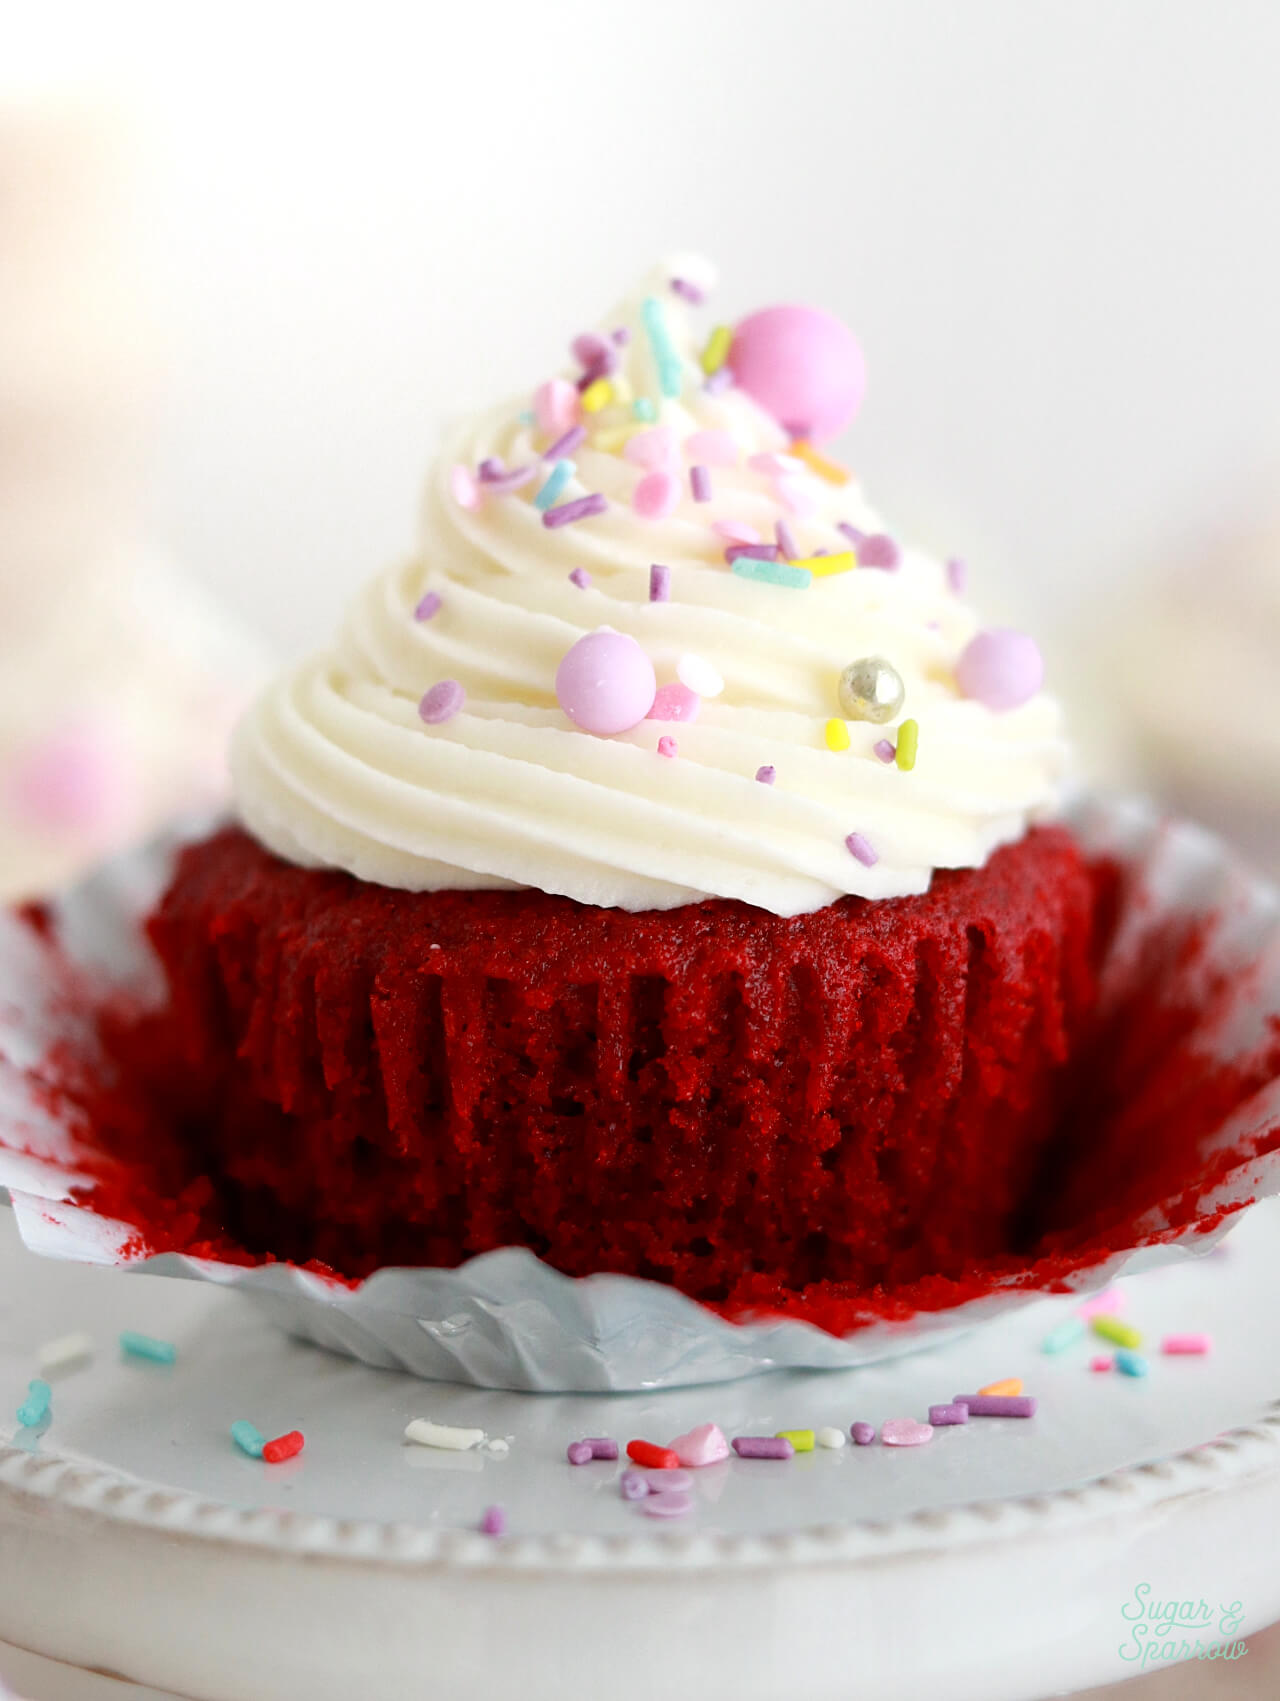
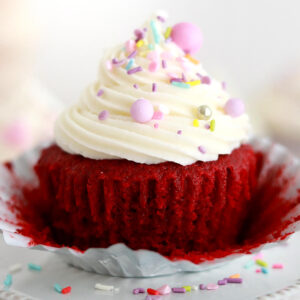
My red velvet cake recipe has been a blog reader favorite (and a personal fave) for years now. And while lots of you have made my red velvet cake recipe into cupcakes, I thought it would be a little more convenient to make an official red velvet cupcake recipe post! So without further ado, here are my beloved red velvet cupcakes with cream cheese buttercream in all their glory! 

how to decorate red velvet cupcakes
red velvet cupcakes with cream cheese frosting

Red Velvet Cupcake Ingredients

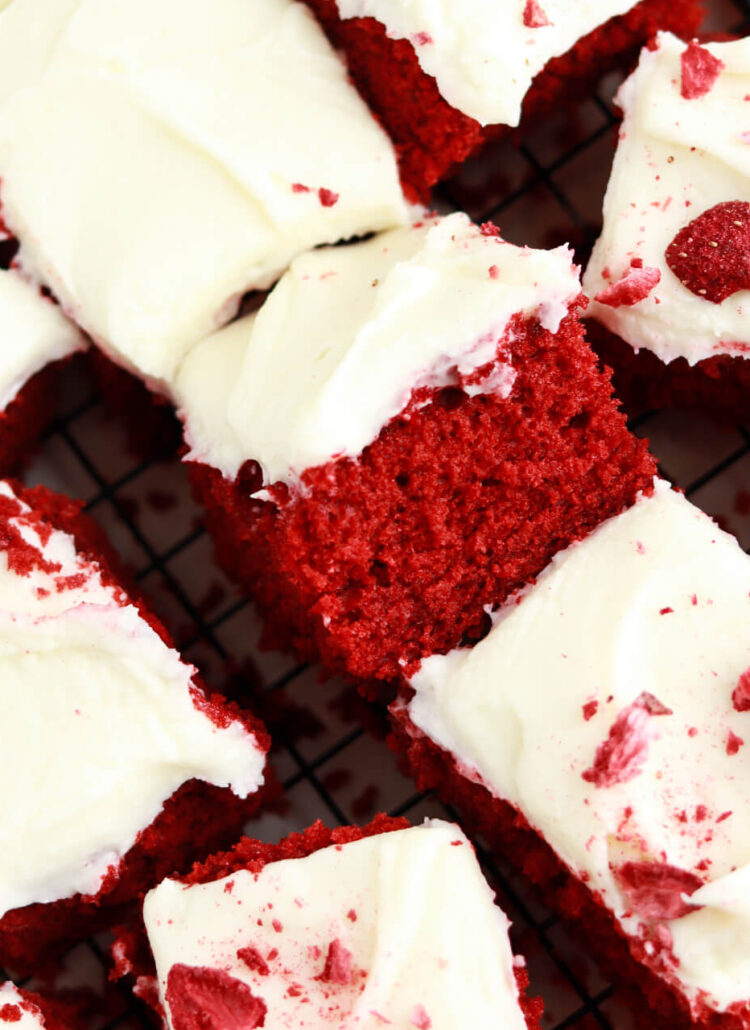
These red velvet cupcakes are wonderfully soft and moist with the perfect hint of chocolate flavor. Here are some of the key ingredients that make these red velvet cupcakes so special:

  • All-purpose flour. If you’ve made the layer cake version, you might notice one difference between that recipe and this one: all-purpose flour instead of cake flour. While I prefer cake flour in the layer cake for an extra fine crumb, all-purpose flour gives these cupcakes more stability while maintaining that beautiful softness.
  • Cocoa powder. A hint of cocoa powder gives these cupcakes a subtle chocolate flavor that is oh so delicious. 
  • Vegetable oil. A few tablespoons of vegetable oil adds a beautiful amount of moisture to the cupcake crumb. I love using plain vegetable oil because it doesn’t add any flavor, but you can substitute this for any kind of cooking oil you prefer. Just keep the flavor of the oil in mind.
  • Distilled white vinegar. This ingredient is key to creating a super soft (velvety) texture. It reacts with the baking soda in the recipe to create carbon dioxide bubbles that expand in the baking process, which ultimately creates a soft and airy crumb. If you can’t find white vinegar you can use apple cider vinegar as a substitute. 
  • Red food color gel. For that iconic red color.   
  • Buttermilk. Adds even more moisture to these red velvet cupcakes. You can create a homemade version of buttermilk if you can’t find it at your local grocery store – the instructions are in the notes section of the recipe below! 
red velvet cupcake recipe

What Gives Red Velvet Cupcakes Their Color? 

Red velvet cake batter most commonly gets its color from red food coloring. While you can use  a more natural method like beet purèe, using gel food color is the easiest way to achieve a beautiful red color while maintaining the ideal soft cake crumb and perfect flavor. I find that using a highly concentrated food color gel like AmeriColor Super Red allows me to get away with adding less than the average red velvet cake recipe – about 1 teaspoon per batch will yield a brilliant red color. Since the food color gel doesn’t add any flavor to the cake, you could add even less (or none at all) and still have a great tasting cake. But what’s the fun in that? You know you’re going to want to dye this cake batter deep red! 

red velvet cupcakes with cream cheese frosting

Red Velvet Cupcakes + Cream Cheese Buttercream

My go-to frosting for these red velvet cupcakes is delicious cream cheese buttercream. It’s a classic combination in my eyes and always a crowd pleaser. I love this particular cream cheese frosting recipe because it’s so soft and creamy yet stable, making it perfect for piping and decorating the cupcakes. 

The most important ingredient for the stability of this frosting is full-fat brick-style cream cheese. If you’re using either low fat cream cheese or the spreadable kind in the tub, your buttercream will not be the right consistency (aka it will look like soup). Both of those cream cheese options contain more liquid than the full-fat brick-style kind and will thus add too much liquid content to your frosting. If you don’t have access to the right kind of cream cheese, I recommend making a different kind of buttercream to top these cupcakes. My top recommendations: 

  • Vanilla Buttercream
  • White Chocolate Buttercream 
  • Freeze-Dried Strawberry Buttercream
  • Fresh Strawberry Buttercream 
  • Ruby Chocolate Buttercream
valentines day red velvet cupcakes recipe
the best red velvet cupcakes recipe

How to Decorate Red Velvet Cupcakes

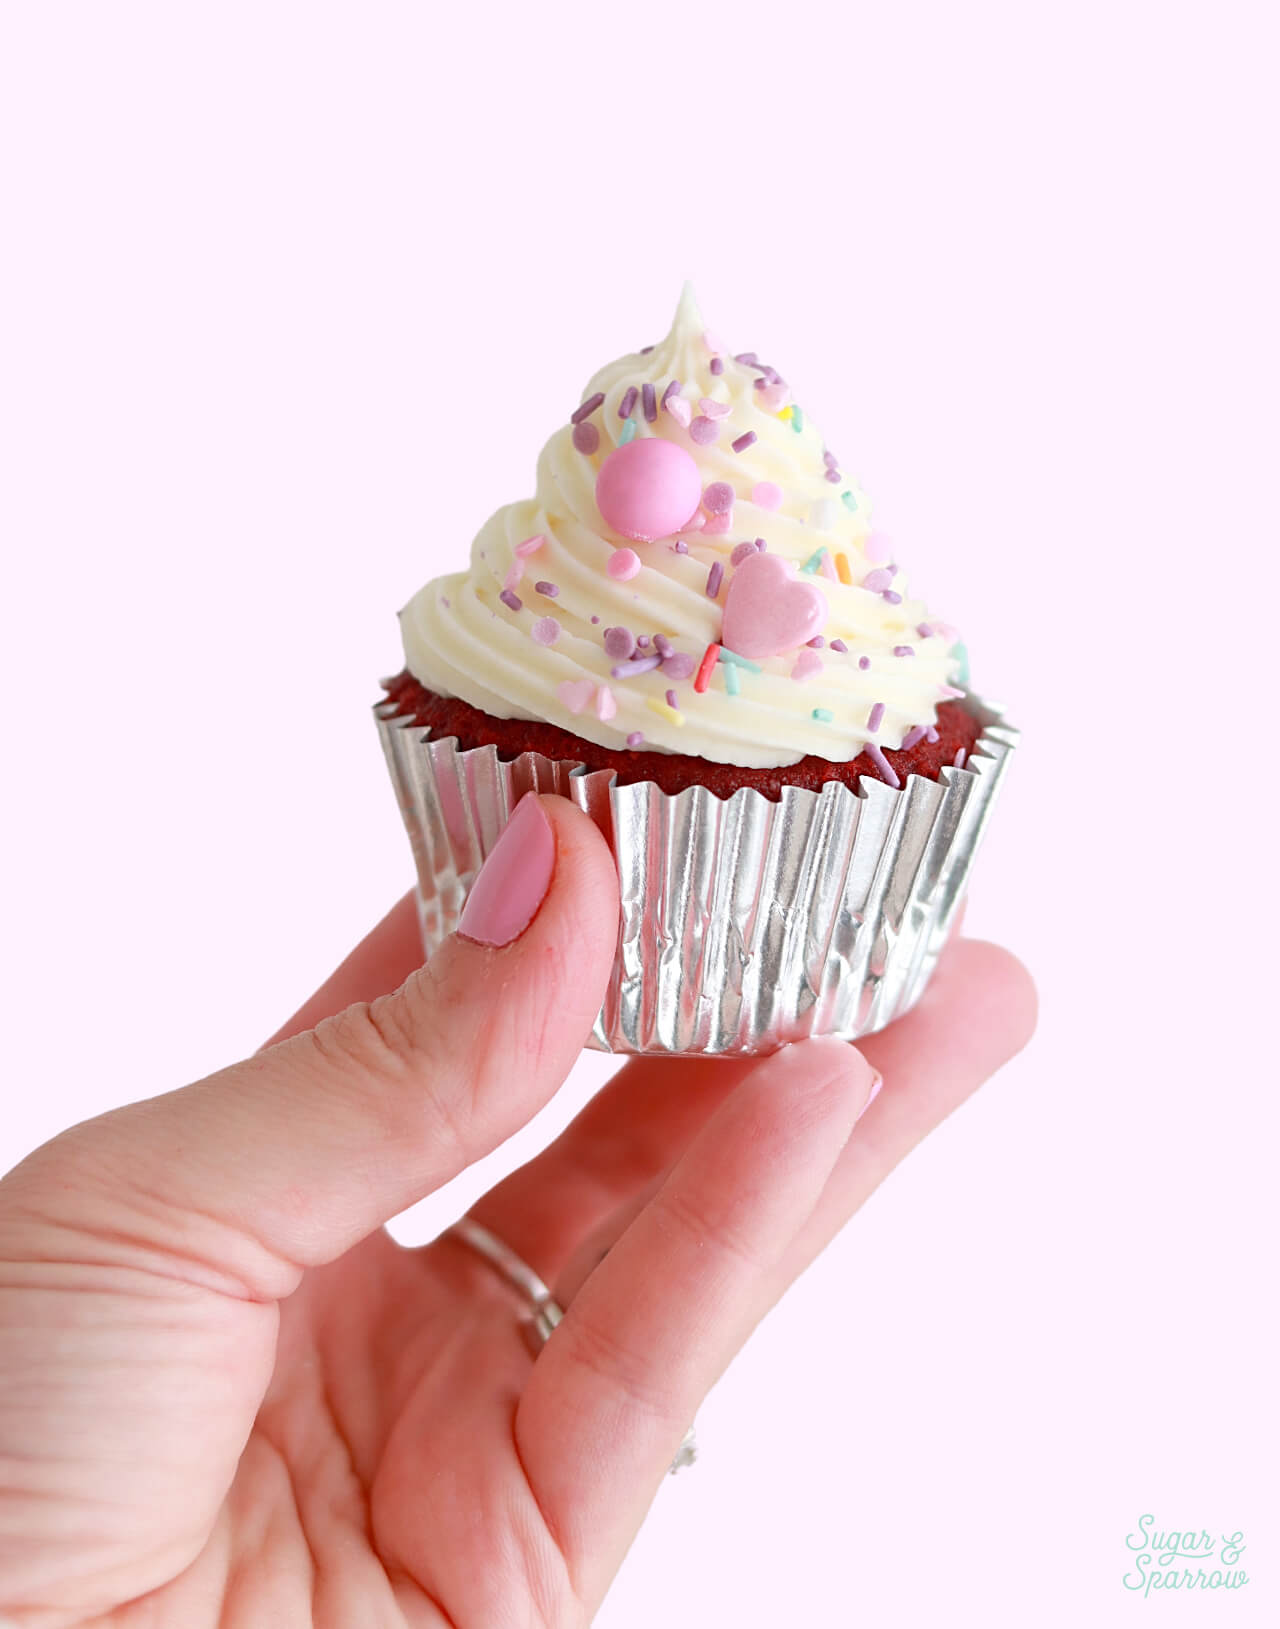
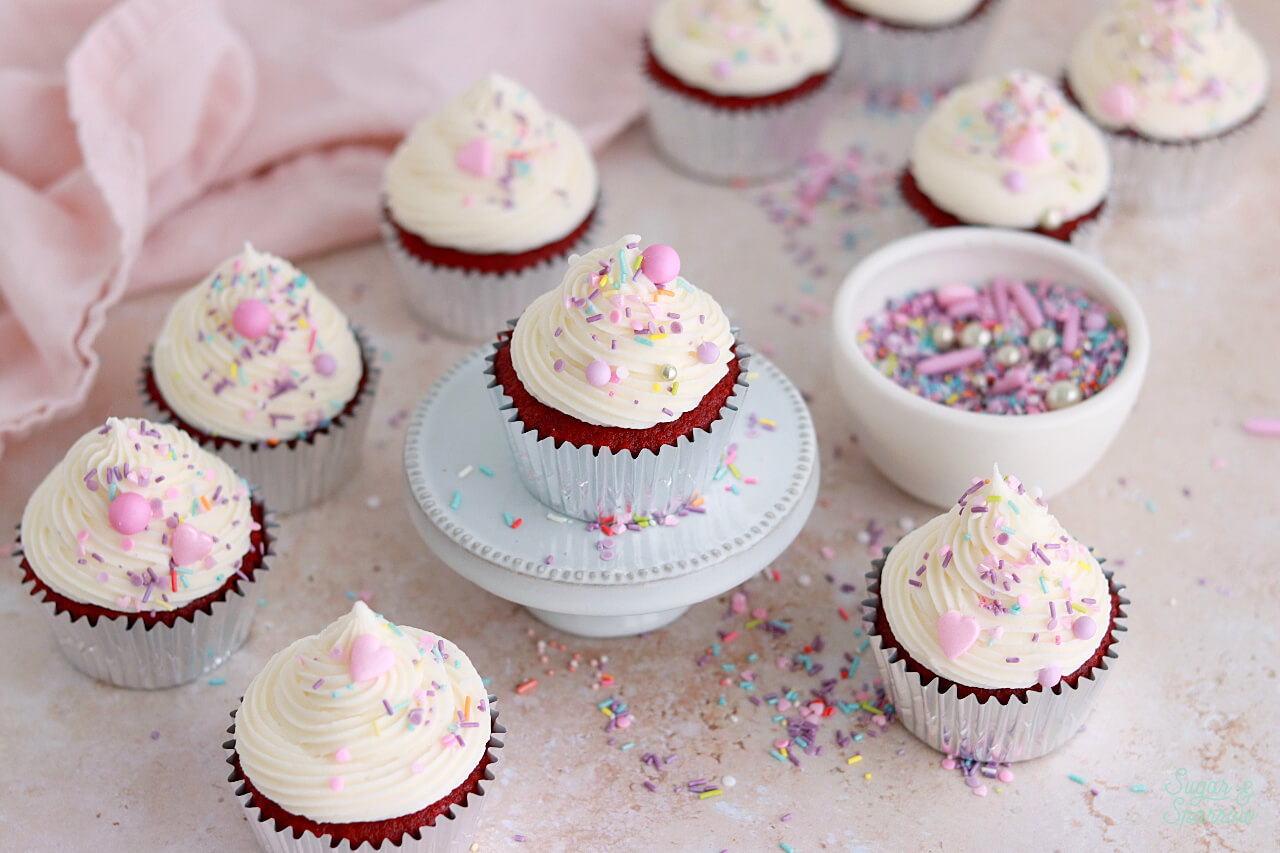
There are so many different ways you can decorate these red velvet cupcakes. You can spread the cream cheese buttercream on with a spatula for a rustic look, pipe a swirl or rosette with a star tip, create a floral design, add some pretty sprinkles – the possibilities are endless. 

red velvet cupcakes valentines day recipe

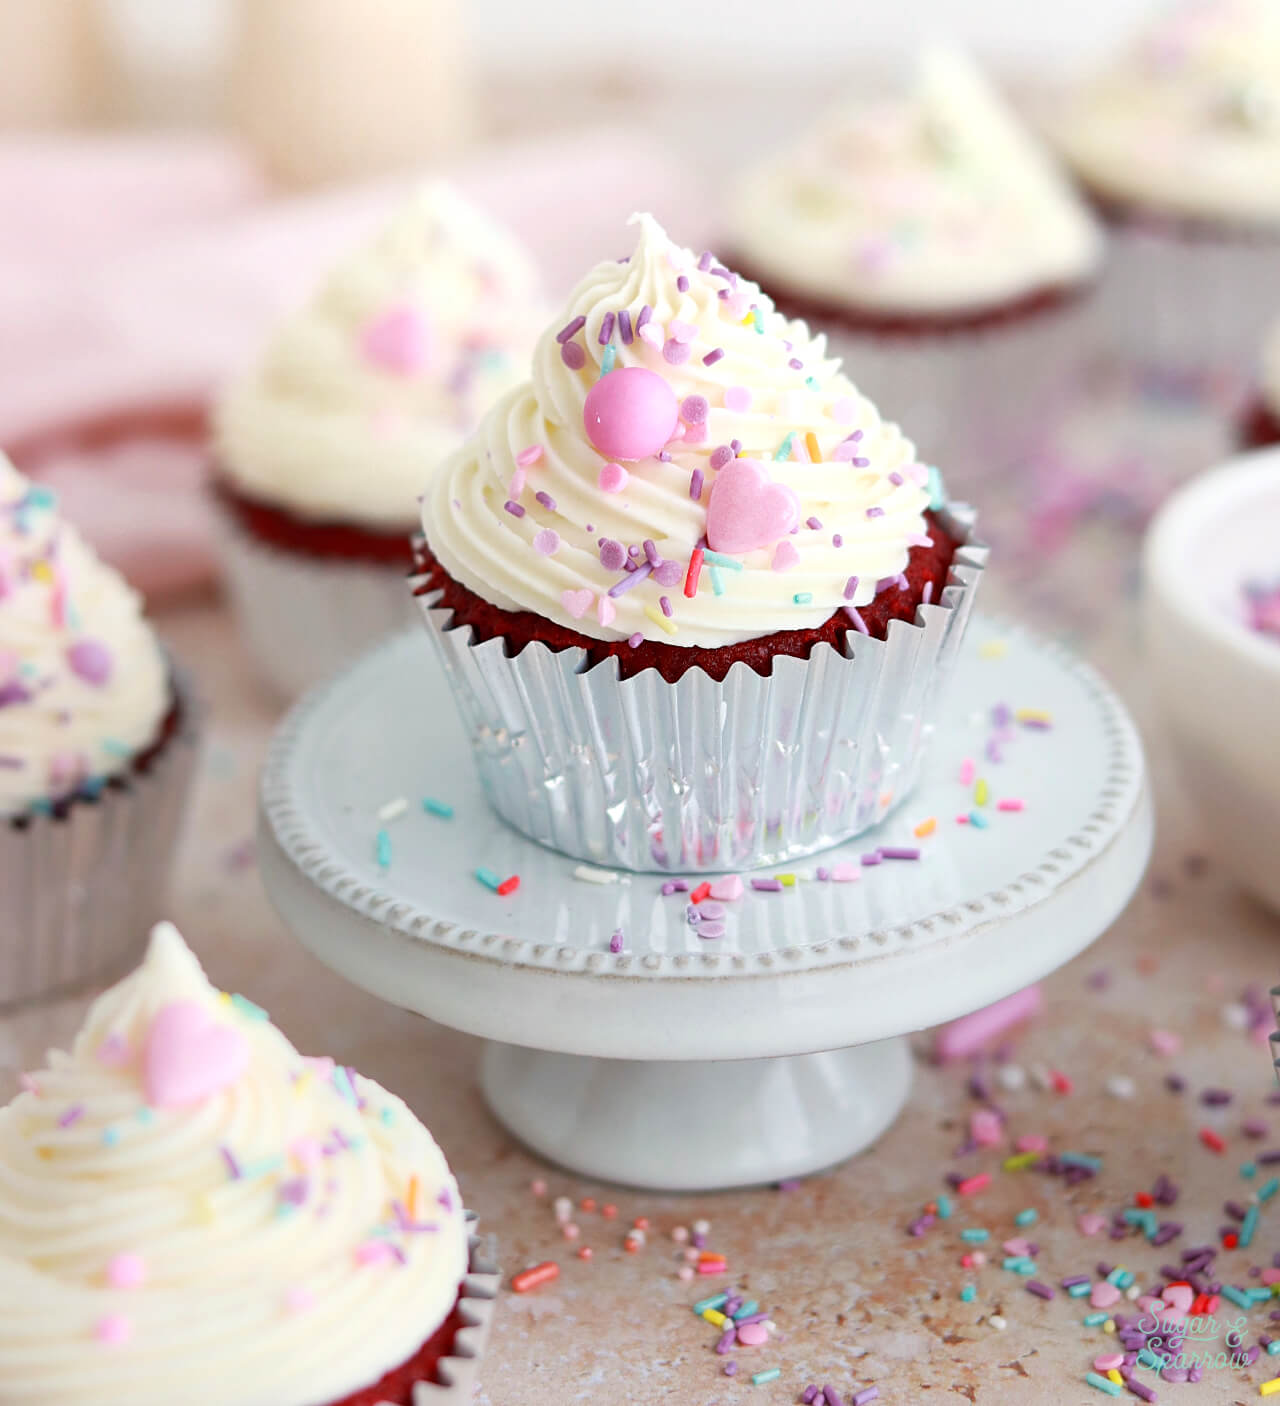
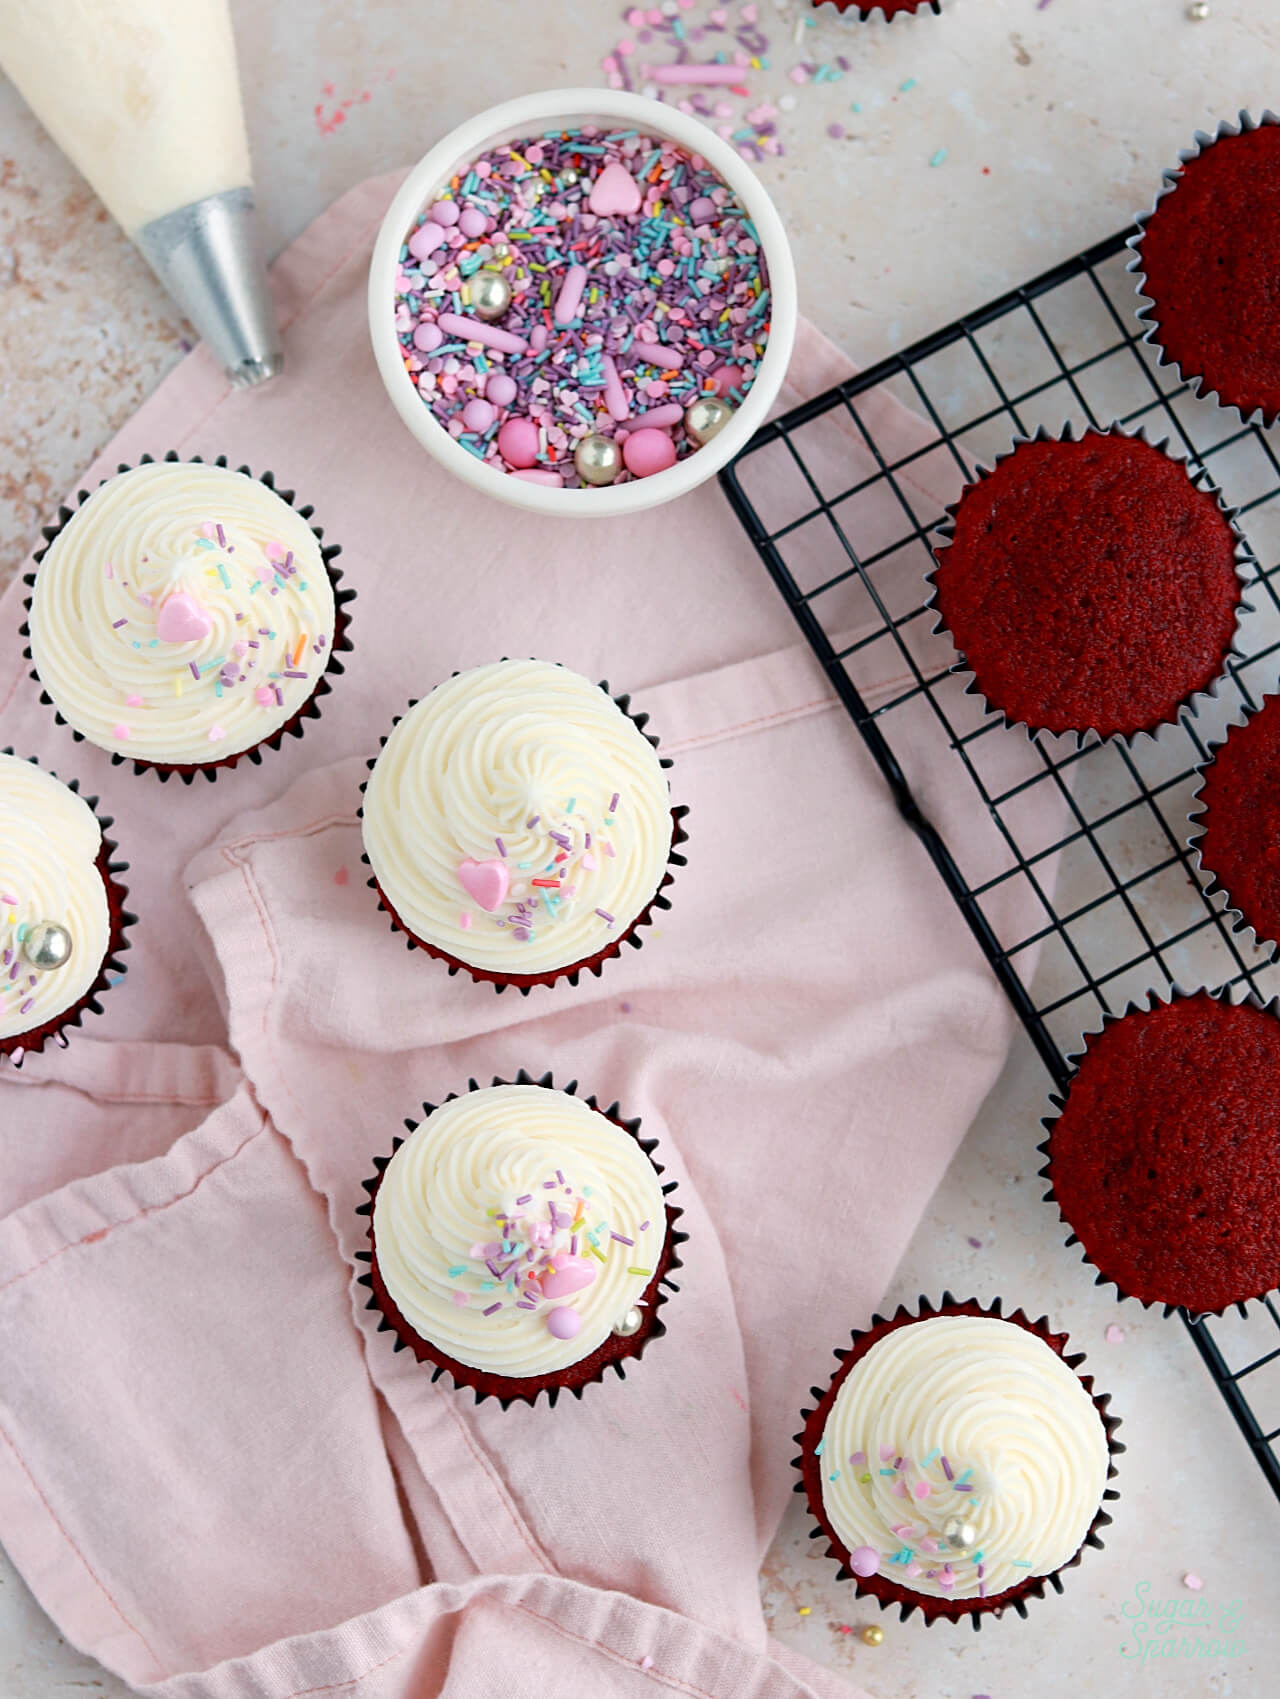
I chose to keep things simple by piping a swirl onto each cupcake with Wilton Tip 4B and then adding a pop of color with some pretty Valentine sprinkles. I couldn’t find the same sprinkles available for purchase anywhere but if you’re looking for pretty sprinkles any time of year, Sprinkle Pop always has a great assortment. 

However you decorate these red velvet cupcakes, they are sure to be a hit at your next event! They’re an iconic flavor that so many people love. I can’t wait for you to give this recipe a go!

the best red velvet cupcakes recipe

Red Velvet Cupcakes with Cream Cheese Frosting

Perfectly moist and fluffy red velvet cupcakes with irresistible cream cheese buttercream. A crowd pleaser every time!
Print Recipe Pin Recipe
Prep Time:30 minutes mins
Cook Time:14 minutes mins
Total Time:44 minutes mins
Course: Dessert
Cuisine: American
Servings: 14 cupcakes

Ingredients

Red Velvet Cake

  • 1 Cup (133g) all purpose flour
  • 1 1/2 Tbsp natural unsweetened cocoa powder
  • 1/2 tsp baking soda
  • 1/4 tsp salt
  • 1/4 Cup (57g) unsalted butter, room temperature
  • 3/4 Cup (150g) white granulated sugar
  • 1/4 Cup (60ml) vegetable oil
  • 1 large egg, room temperature
  • 1 tsp pure vanilla extract
  • 1 tsp distilled white vinegar
  • 1 tsp red food color gel*
  • 1/2 Cup (120ml) buttermilk, room temperature** DIY recipe in notes

Cream Cheese Buttercream

  • 1/2 Cup (113g) unsalted butter, room temperature
  • 8 Oz cream cheese, room temperature brick-style, not the spreadable kind
  • 4 Cups (480g) powdered sugar
  • 1 1/2 tsp pure vanilla extract
  • 1/4 tsp salt, or to taste

Garnish

  • 2 Tbsp sprinkles (optional)

Instructions

Make the Red Velvet Cupcakes

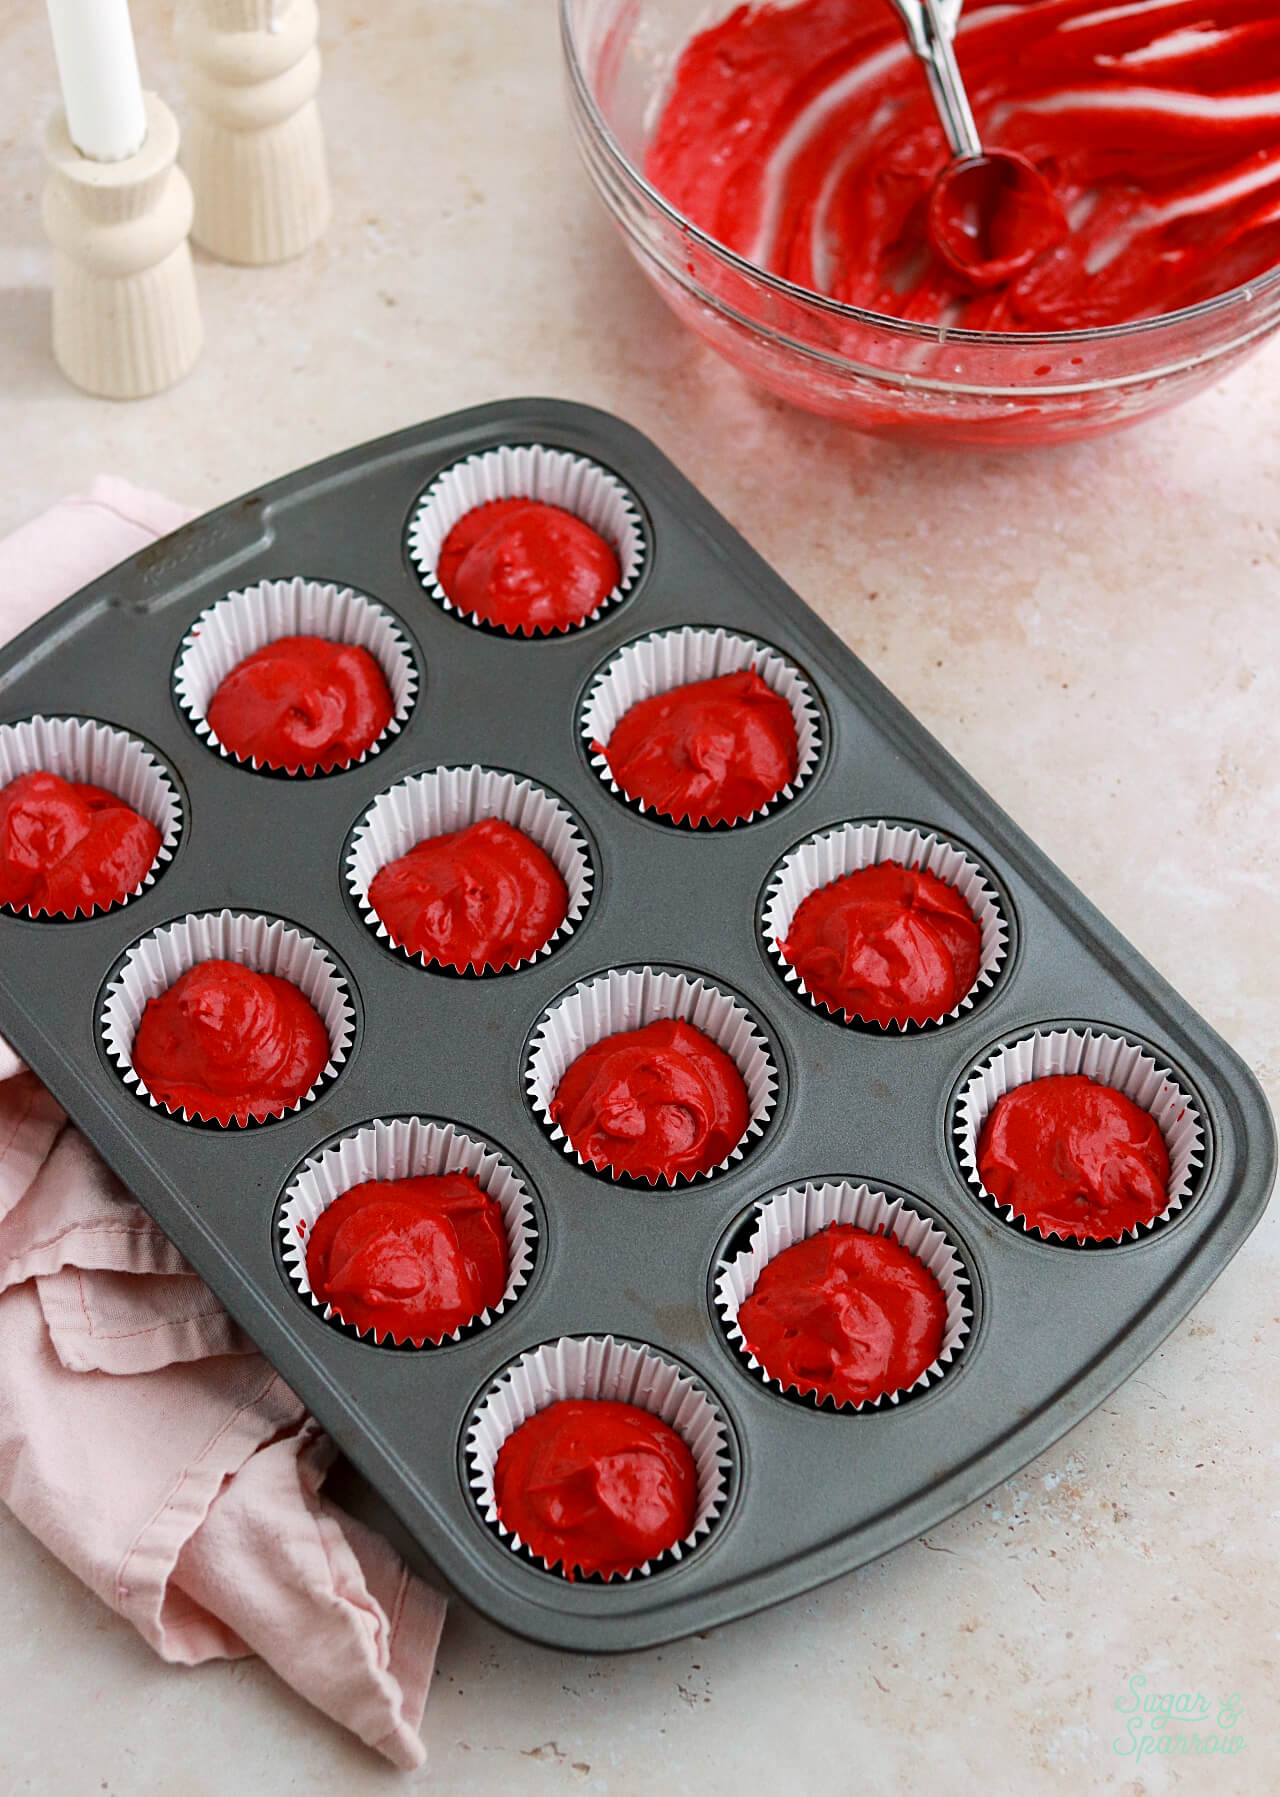
  • Preheat the oven to 350ºF and prepare a cupcake tin by placing liners into the cavities. This recipe will make 14 cupcakes.
  • In a medium bowl, add the flour, cocoa powder, baking soda, and salt. Whisk together and set aside. Mix the red food color gel into the buttermilk and set aside.
  • Cream the butter on high for two minutes, then add the vegetable oil and sugar. Cream together on medium-high until light and fluffy, about 2 minutes. Scrape down the bowl and paddle. Turn the mixer to low speed and add the egg. Mix until incorporated, then add the vanilla and white vinegar and mix on low for another 30 seconds. Scrape down the bowl and paddle once more.
  • Add the flour mixture all at once and mix on low speed until just incorporated, then add the red buttermilk mixture and continue mixing on low speed until uniform.
  • Scoop the batter into prepared cupcake liners (no more than 2/3 full) and bake for 13-15 minutes, until a toothpick inserted comes out clean. Let the cupcakes cool completely before frosting.

Make the Cream Cheese Buttercream

  • In the bowl of a stand mixer fitted with the paddle attachment, cream the butter and cream cheese on high until light, fluffy, and uniform (no lumps), about five minutes. Turn the mixer to low and add the powdered sugar a few cups at a time, mixing thoroughly after each addition. Add the vanilla and salt, mixing on low for another 30 seconds.

Assembly

  • Once the red velvet cupcakes are completely cooled, frost with the cream cheese buttercream. To create the look pictured, fit a piping bag with Wilton Tip 4B and fill it with the cream cheese buttercream, then pipe a swirl onto each cupcake. Garnish with sprinkles.

Notes

*Red Food Color Gel: I recommend using any brand of red food color gel that is concentrated and flavorless. I used AmeriColor Super Red for this recipe. Feel free to use less food color gel if you don’t care for the cupcakes to be as red (or none at all, but what’s the fun in that?)
**DIY Buttermilk Recipe: Add 1/2 Tbsp white vinegar into a mason jar or measuring cup. Add 1/2 cup (120ml) whole milk and let sit for at least 15 minutes before using in the recipe. 
Make Ahead Tips: 
  1. The cupcakes can be made ahead and stored in the cupcake tin with plastic wrap covering the top (or in an airtight container) for up to one day. Alternatively, you can store the cupcakes in an airtight container in the freezer for up to 1 month. 
  2. The cream cheese buttercream can be made ahead and stored in an airtight container in the refrigerator for up to two weeks. When you’re ready to use it, bring it back to room temperature and re-whip in your stand mixer to bring back to smooth buttercream consistency. 

Did you make these cupcakes? I want to know how it went! Let me know in the comments section below or tag @sugarandsparrowco on Instagram to show me a photo. I love to see what you make!

By: Whitney · In: Cupcakes, Featured, Holiday, Recipes, Seasonal, Valentines · Tagged: cream cheese buttercream, red velvet cupcakes, valentines day cupcakes

you’ll also love

pistachio cake recipe by sugar and sparrowPistachio Cake with Cream Cheese Frosting
red velvet sheet cake recipe with natural food coloringRed Velvet Sheet Cake with Cream Cheese Frosting
pumpkin layer cake recipe by sugar and sparrowPerfect Pumpkin Layer Cake Recipe

Join the List

Stay up to date & receive the latest posts in your inbox.

Reader Interactions

Leave a Reply Cancel reply

Your email address will not be published. Required fields are marked *

Recipe Rating


Next Post >

Sheet Pan Chocolate Chip Cookie Cake

Primary Sidebar

Welcome to Sugar & Sparrow

Welcome to Sugar & Sparrow

Helping you whip up pretty desserts with confidence and creativity. And hopefully sharing a few laughs with you along the way!

Learn More

Connect

let’s bake!

Get my very best recipes, baking tips, and decorating tutorials sent to your inbox

Featured Posts

edible gold crown cake topper tutorial

Edible Gold Crown Cake Topper Tutorial

christmas tree cake by sugar and sparrow

How To Make A Christmas Tree Cake

24 fall baking recipes

38+ Fall Baking Recipes

Search

Archives

Follow Along

@sugarandsparrowco

RASPBERRY CAKE FILLING (recipe below) ♥️ this RASPBERRY CAKE FILLING (recipe below) ♥️ this perfectly sweet/tart raspberry cake filling is beautifully thick, seedless, and so rewarding to make from scratch! It takes just a handful of ingredients and can be made with fresh OR frozen raspberries 🙌🏼 

Get the full recipe + cake pairing suggestions at the link in my bio or at https://sugarandsparrow.com/seedless-raspberry-cake-filling/

INGREDIENTS:
2 1/2 Cups (10oz, 315g) fresh or frozen raspberries
1/2 Cup (100g) granulated sugar
1 Tbsp lemon juice
1 tsp lemon zest
1 1/2 Tbsp (12g) cornstarch
1 1/2 Tbsp (22ml) water

INSTRUCTIONS: 
1. In a saucepan set over medium heat, add the raspberries, granulated sugar, lemon juice, and lemon zest. Cook until the mixture begins to boil, stirring occasionally. 
2. Once boiling, lower the heat and simmer for 10-15 minutes while you continue stirring occasionally. Then, remove from heat and use a fine mesh sieve to strain out the seeds over a medium bowl. After straining, you’ll be left with about 1/4 Cup of seedy pulp.
3. In a small separate bowl, combine the cornstarch and water until uniform. Return the strained raspberry filling to the saucepan (wipe it free of any remaining seeds if needed) and add the cornstarch/water mixture. Cook over medium heat until boiling, stirring constantly, then reduce to a simmer and cook for 1-3 minutes, until the filling has thickened slightly, is no longer cloudy, and coats the back of the spatula.
4. Pour into an airtight container and refrigerate for at least 4 hours and up to 1 week. It will be jello-like once set but after stirring it will become a thick, jammy consistency that’s perfect to use as a cake or cupcake filling!

#raspberrycake #cakefilling #cakedecorating #raspberries #baking
STRAWBERRY LEMON CAKE 🍓🍋 this cake is so lig STRAWBERRY LEMON CAKE 🍓🍋 this cake is so light and refreshing and bursting with all-natural flavors! It’s layers of my favorite extra fluffy lemon cake + the most delicious freeze-dried strawberry buttercream that ends up the prettiest natural pink color. I’ll never get over those little flecks of strawberry in the buttercream or the tiny chamomile flowers adding so much cheer! 

Grab the recipe at the link in my bio or at https://sugarandsparrow.com/strawberry-lemon-cake/

#strawberrylemon #lemoncake #strawberrycake #cakedecorating #strawberrybuttercream
CHOCOLATE SHEET CAKE (recipe below) 🍫 🥳 this CHOCOLATE SHEET CAKE (recipe below) 🍫 🥳 this is everything I want in a chocolate cake: rich and decadent, stick-to-your-fork fudgy, ultra-chocolatey, shareable, and EASY! Like box mix easy but from-scratch and a MUST try if you’re in need of a good chocolate cake recipe to feed a crowd👩🏽‍🍳⁣ 
 
Get the full recipe (with chocolate frosting) at the link in my bio or at https://sugarandsparrow.com/chocolate-sheet-cake/ ✨⁣ 
⁣ 
CHOCOLATE SHEET CAKE
2 Cups (265g) all purpose flour⁣ 
1 2/3 Cups (340g) white granulated sugar⁣ 
2/3 Cup (60g) unsweetened natural cocoa powder⁣ 
2 tsp baking soda⁣ 
1 tsp baking powder⁣ 
1/2 tsp kosher salt⁣ 
1/2 Cup (120ml) vegetable oil⁣ 
2 eggs, room temperature⁣ 
1 1/2 tsp pure vanilla extract⁣ 
1 Cup (240ml) full-fat buttermilk⁣ 
1 Cup (240ml) hot coffee OR hot water⁣ 
⁣ 
INSTRUCTIONS⁣ 
1. Preheat the oven to 325ºF. Grease and line a 9x13 inch cake pan. ⁣ 
2. Place all of the dry ingredients into the bowl of a stand mixer (or use a large bowl with a hand mixer) and mix on low to combine. Add the vegetable oil, eggs, vanilla, and buttermilk and mix on low until combined. With the mixer still on low, add the hot coffee or hot water in a slow stream, then turn the mixer to medium and beat until smooth, about 2 minutes. The batter will be very thin. ⁣ 
3. Pour the batter into the prepared pan and bake for 35-40 minutes, until a toothpick inserted comes out clean.⁣ Full recipe (with frosting) link in my bio.
⁣ 
#chocolatecake #chocolate #sheetcake #chocolatelover #birthdaycake
VANILLA RASPBERRY LAYER CAKE ♥️ between the na VANILLA RASPBERRY LAYER CAKE ♥️ between the naturally pink raspberry buttercream, jammy homemade raspberry filling, and soft vanilla cake layers, this is the perfect cake for Spring!! It’s has amazing, authentic raspberry flavor in every bite from fresh (or frozen) raspberries in the filling + freeze-dried raspberries in the frosting 😋

Get the full recipe link in my bio or find it at https://sugarandsparrow.com/vanilla-raspberry-layer-cake/ 

#raspberrycake #raspberries #vanillacake #cakedecorating #pinkcake
SMALL BATCH VANILLA CAKE 🎂🥳 this mini vanill SMALL BATCH VANILLA CAKE 🎂🥳 this mini vanilla cake recipe makes the PERFECT amount for 2-4 people and can be baked as a tiny 4-inch layer cake or a single layer 6-inch cake. It goes with any frosting flavor but vanilla buttercream keeps it classic for date night, a small gathering, a smash cake, or satisfying a cake craving. 
⁣
✨Full recipe (with frosting) linked in my bio + at https://sugarandsparrow.com/small-batch-vanilla-cake/ 
⁣⁣⁣⁣
SMALL BATCH VANILLA CAKE⁣⁣⁣⁣
⁣⁣⁣⁣
INGREDIENTS⁣⁣⁣⁣
3/4 Cups (79g) sifted cake flour⁣⁣⁣
1 tsp baking powder⁣⁣⁣
1/4 tsp salt⁣⁣⁣
1/4 Cup (57g) unsalted butter, room temperature⁣⁣⁣
1/2 Cup (100g) granulated sugar⁣⁣⁣
1 large egg, room temperature⁣⁣⁣
2 Tbsp (30g) sour cream, room temperature⁣⁣⁣
1 tsp pure vanilla extract⁣⁣⁣
1/3 Cup (80ml) whole milk, room temperature⁣⁣⁣
⁣⁣⁣⁣
INSTRUCTIONS ⁣⁣⁣⁣
1. Preheat the oven to 350ºF. Grease and line three 4-inch or one 6-inch cake pan.⁣⁣⁣
2. In the bowl of your stand mixer (a handheld mixer works fine too!), cream together the butter and sugar on medium-high until light and fluffy, 3 min. Turn the mixer to low and add the egg, mixing until just combined. Add the vanilla and sour cream, turn the mixer to high, and beat for 1 min. ⁣⁣⁣
3. Turn the mixer to low speed and add the dry ingredients all at once. Mix until just combined, then slowly pour in the milk. Continue to mix on low speed until just combined, about 30 seconds. ⁣⁣⁣
4. Pour the batter evenly between the prepared cake 4-inch pans (or all into one 6-inch cake pan). If using 4-inch cake pans, bake for 18-22 minutes. If using a 6-inch cake pan bake for 24-28 minutes. The cake is done when it springs back to the touch and a toothpick inserted comes out with a few moist crumbs. ⁣⁣⁣
⁣⁣⁣⁣
#vanillacake #cakes #vanilla #minicake #cakedecorating

Footer

On the Blog

  • Cake Basics
  • Recipes
  • Tutorials

Info

  • About
  • Privacy Policy & Disclosure

stay in the know

Copyright © 2026 · Theme by Sugar & Sparrow