• Cake
  • Frosting
  • YouTube
  • My Favorite Tools
  • Nav Social Icons

  • Skip to primary navigation
  • Skip to main content
  • Skip to primary sidebar
  • Skip to footer
  • Recipes
    • Cake
    • Cupcakes
    • Frosting
    • Ice Cream
    • Vegan
  • Cake Basics
  • Tutorials
  • Blog
  • About
  • Mobile Menu Widgets

    Connect

    Search

Sugar & Sparrow logo in script font

Sugar & Sparrow

Lifestyle and Cake from Portland Oregon

  • Cake Basics
  • Recipes
    • Cake
    • Cupcakes
    • Cookies & Bars
    • Filling
    • Frosting
    • Ice Cream
    • No-Bake
    • Small Batch
    • Vegan
  • Tutorials
  • Book
  • Blog
  • About

Red Velvet Sheet Cake with Cream Cheese Frosting

February 4, 2026 · In: Cake, Featured, Holiday, Recipes, Seasonal, Valentines

Jump to Recipe

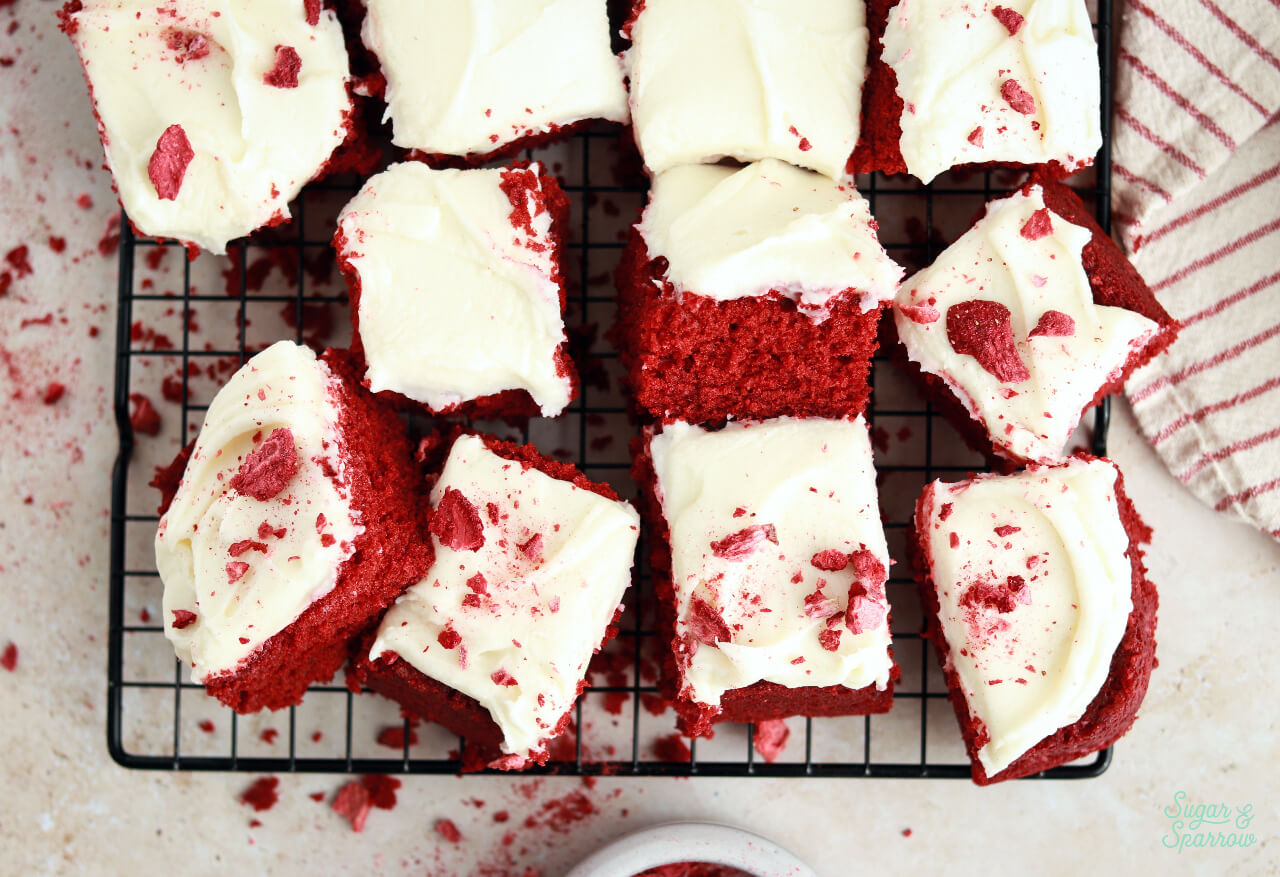
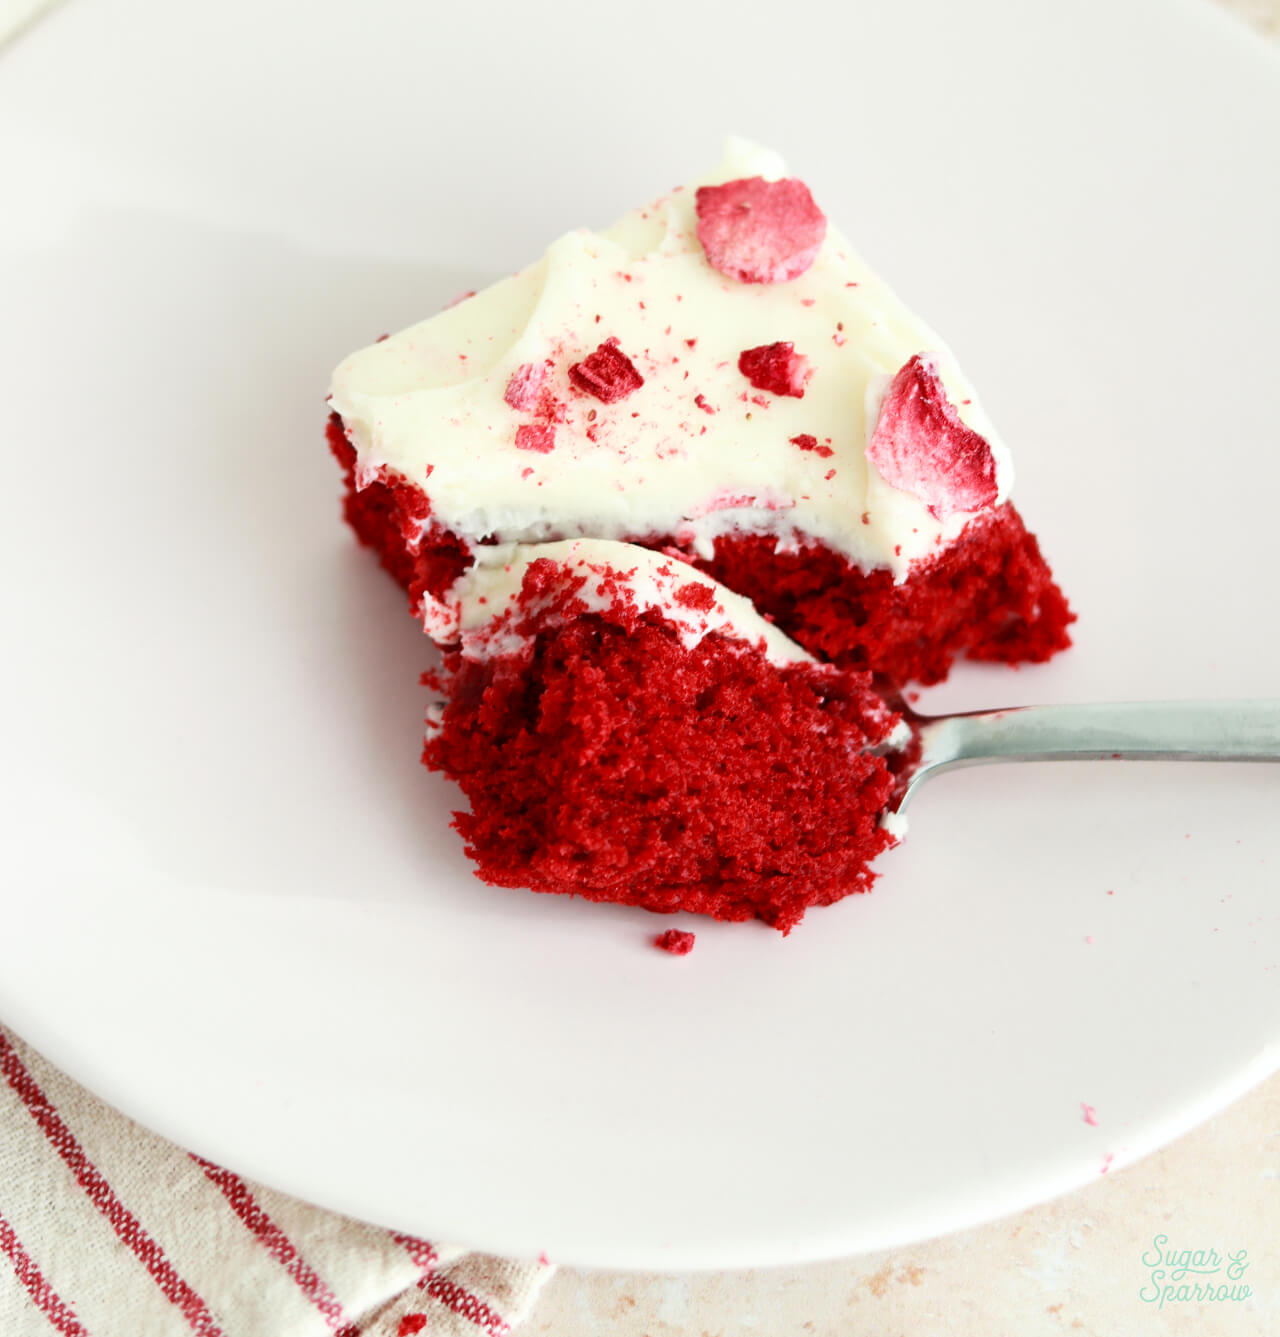
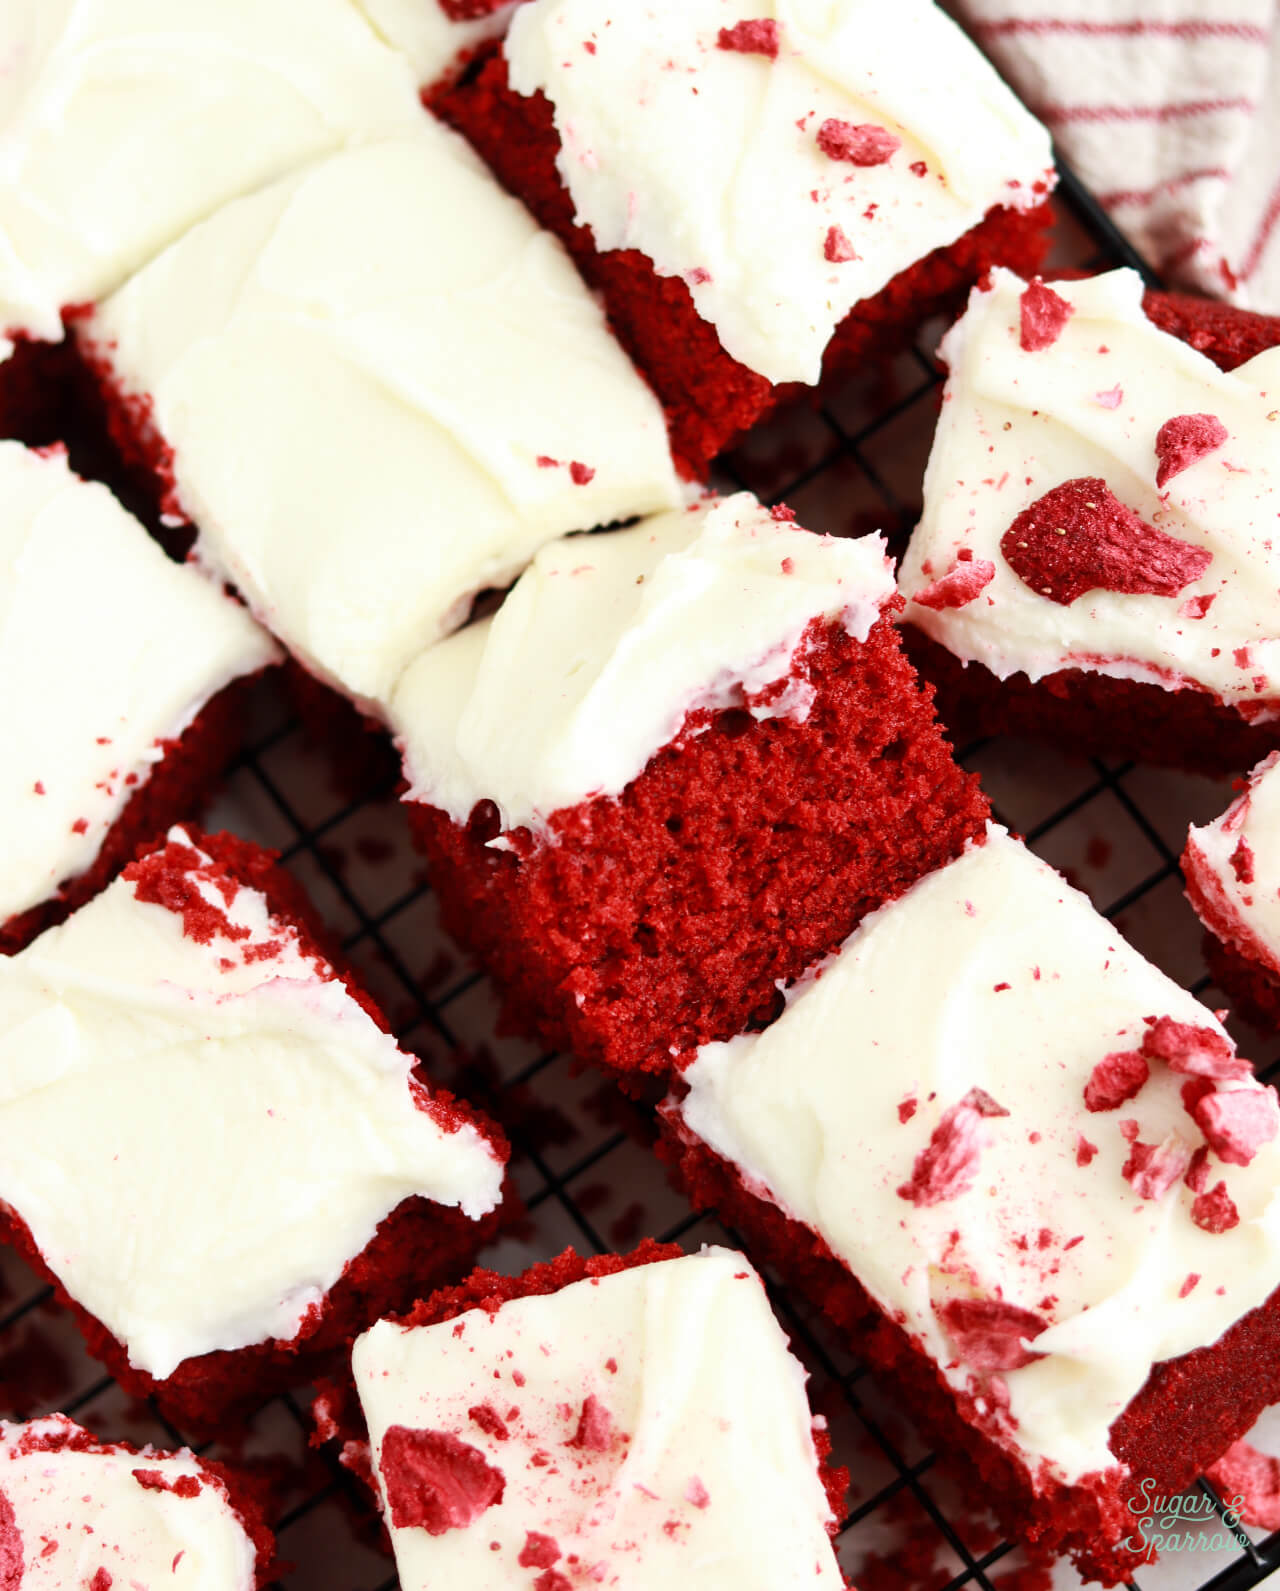
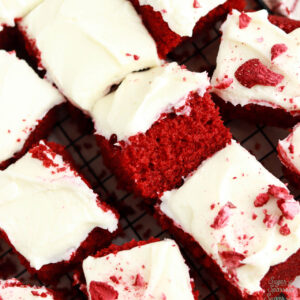
Based on my favorite red velvet layer cake recipe, this sheet cake version is just as soft and moist with the perfect light chocolate flavor and tangy cream cheese frosting. It’s one of those cakes you keep wanting one more bite of! Baked in a 9×13 pan and sliced into squares, it’s convenient for feeding a crowd, so quick and easy to decorate, and always the perfect flavor to serve. And while the iconic red color is made with food coloring, I’ve had lots of success making this recipe with all-natural red food coloring (pictured throughout this blog post!) in case you want that alternative. 

red velvet cake recipe with all natural food coloring
the best red velvet cake recipe

Red Velvet Sheet Cake Ingredients & Substitutions

Here are all the ingredients you’ll need for this red velvet sheet cake! I’ve also included substitutions if you need them: 

  • Cake flour. This has the lowest protein content of all the flours, which makes the texture super light and fluffy. You can find cake flour at most grocery stores, but if all you’ve got is all-purpose flour in your pantry, here are instructions for how to make your own cake flour. Keep in mind that if you do use the homemade version, the gram measurement will weigh more (236g instead of 212g) since all-purpose flour is heavier than cake flour.  
  • Cocoa powder. Red velvet cake has a very light cocoa flavor, which is why this recipe calls for just three tablespoons of cocoa powder. 
  • Baking soda + vinegar. The chemical reaction that happens between these two ingredients is what gives the cake its rise! When they react with one another, tiny air bubbles are created that expand in the baking process. I use white distilled vinegar in this recipe but you can also use apple cider vinegar. 
  • Unsalted butter + vegetable oil. This is a butter and oil based cake. The butter adds richness and the vegetable oil creates a more moist and tender crumb. You can use salted butter if you prefer (just omit the salt from the recipe) and use any oil you normally use for baking (canola oil, coconut oil, avocado oil, etc). I prefer plain vegetable oil. 
  • Granulated sugar. Not only does sugar sweeten the batter, it actually creates an extra soft and tender texture in the baked cake. The creaming process with the butter and oil also creates the foundation for the rise of this cake. 
  • Vanilla + salt. These enhance and add depth to the light cocoa flavor. 
  • Eggs. I use two large eggs in this recipe, which help bind the ingredients together and create structure in the baking process. 
  • Buttermilk. Provides tons of moisture while binding the ingredients together at the end of the recipe. If you don’t have buttermilk on-hand, you can easily make your own by adding 1 Tablespoon of white vinegar or lemon juice into a liquid measuring cup, then topping it with whole milk until you measure out 1 Cup. Stir it together and let it come to room temperature. Keep in mind that it will end up looking curdled, but that’s what we want! 
  • Red food coloring. For the signature red color! I recommend using any brand of red food coloring that is concentrated and flavorless. I have used AmeriColor Super Red for this recipe but with the US ban on Red 3 I have since switched to Enco Naturals which doesn’t contain Red 3 or Red 40. If you are using natural food color, you may need to add up to 1 tsp more than the recipe calls for if you want a deep red. 
red velvet cake batter
red velvet cake baked in 9x13 pan

Tangy Cream Cheese Buttercream 

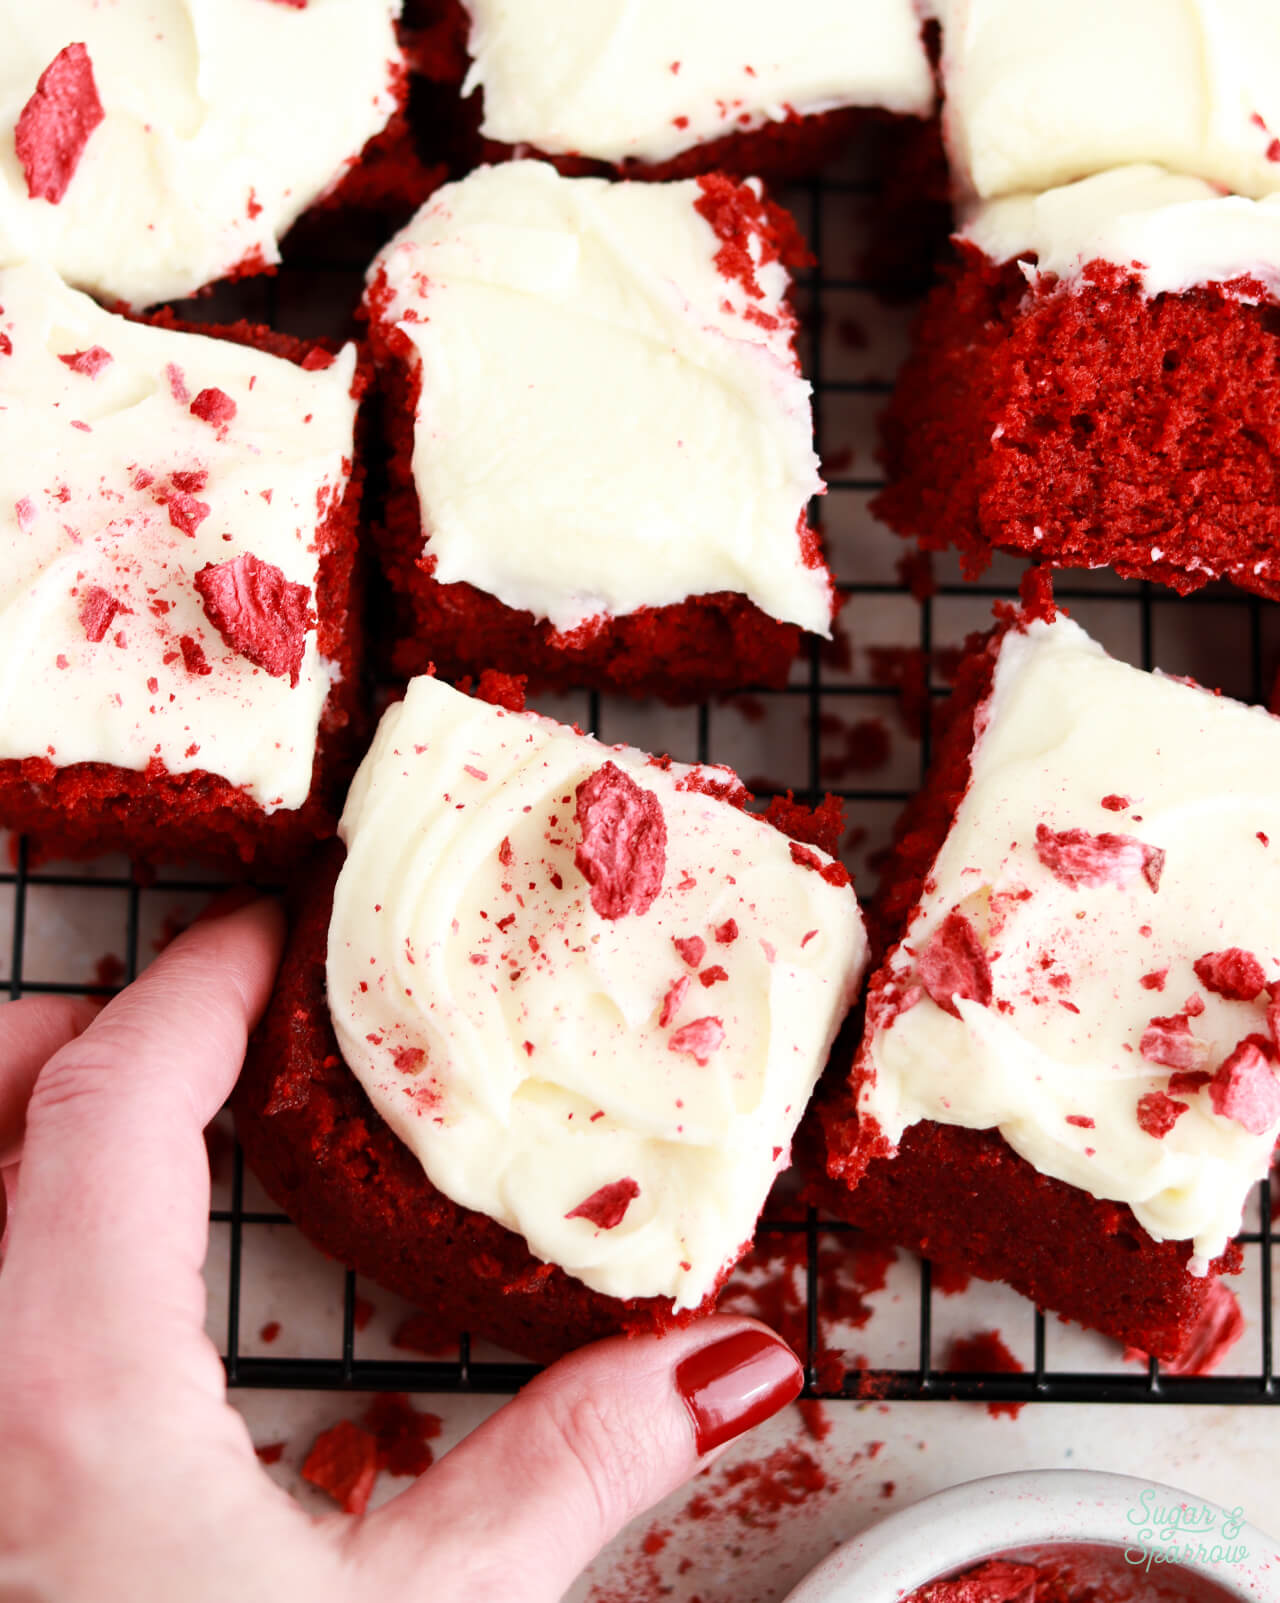
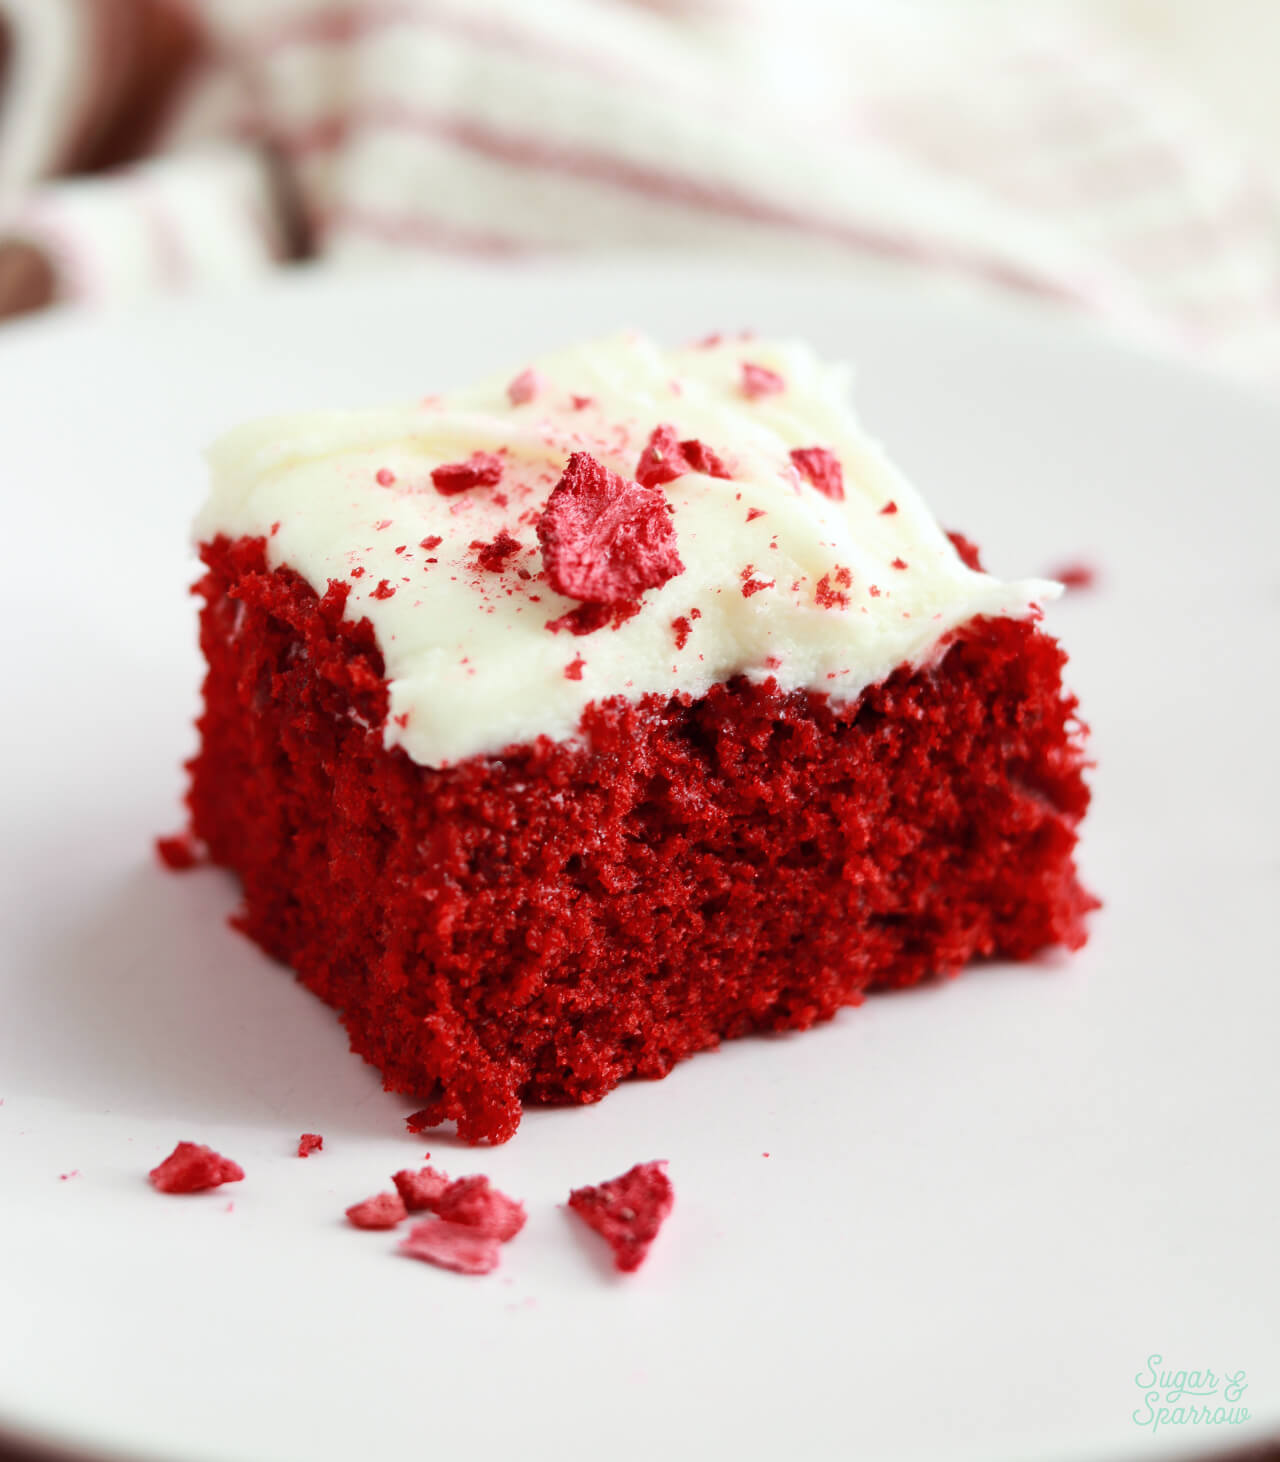
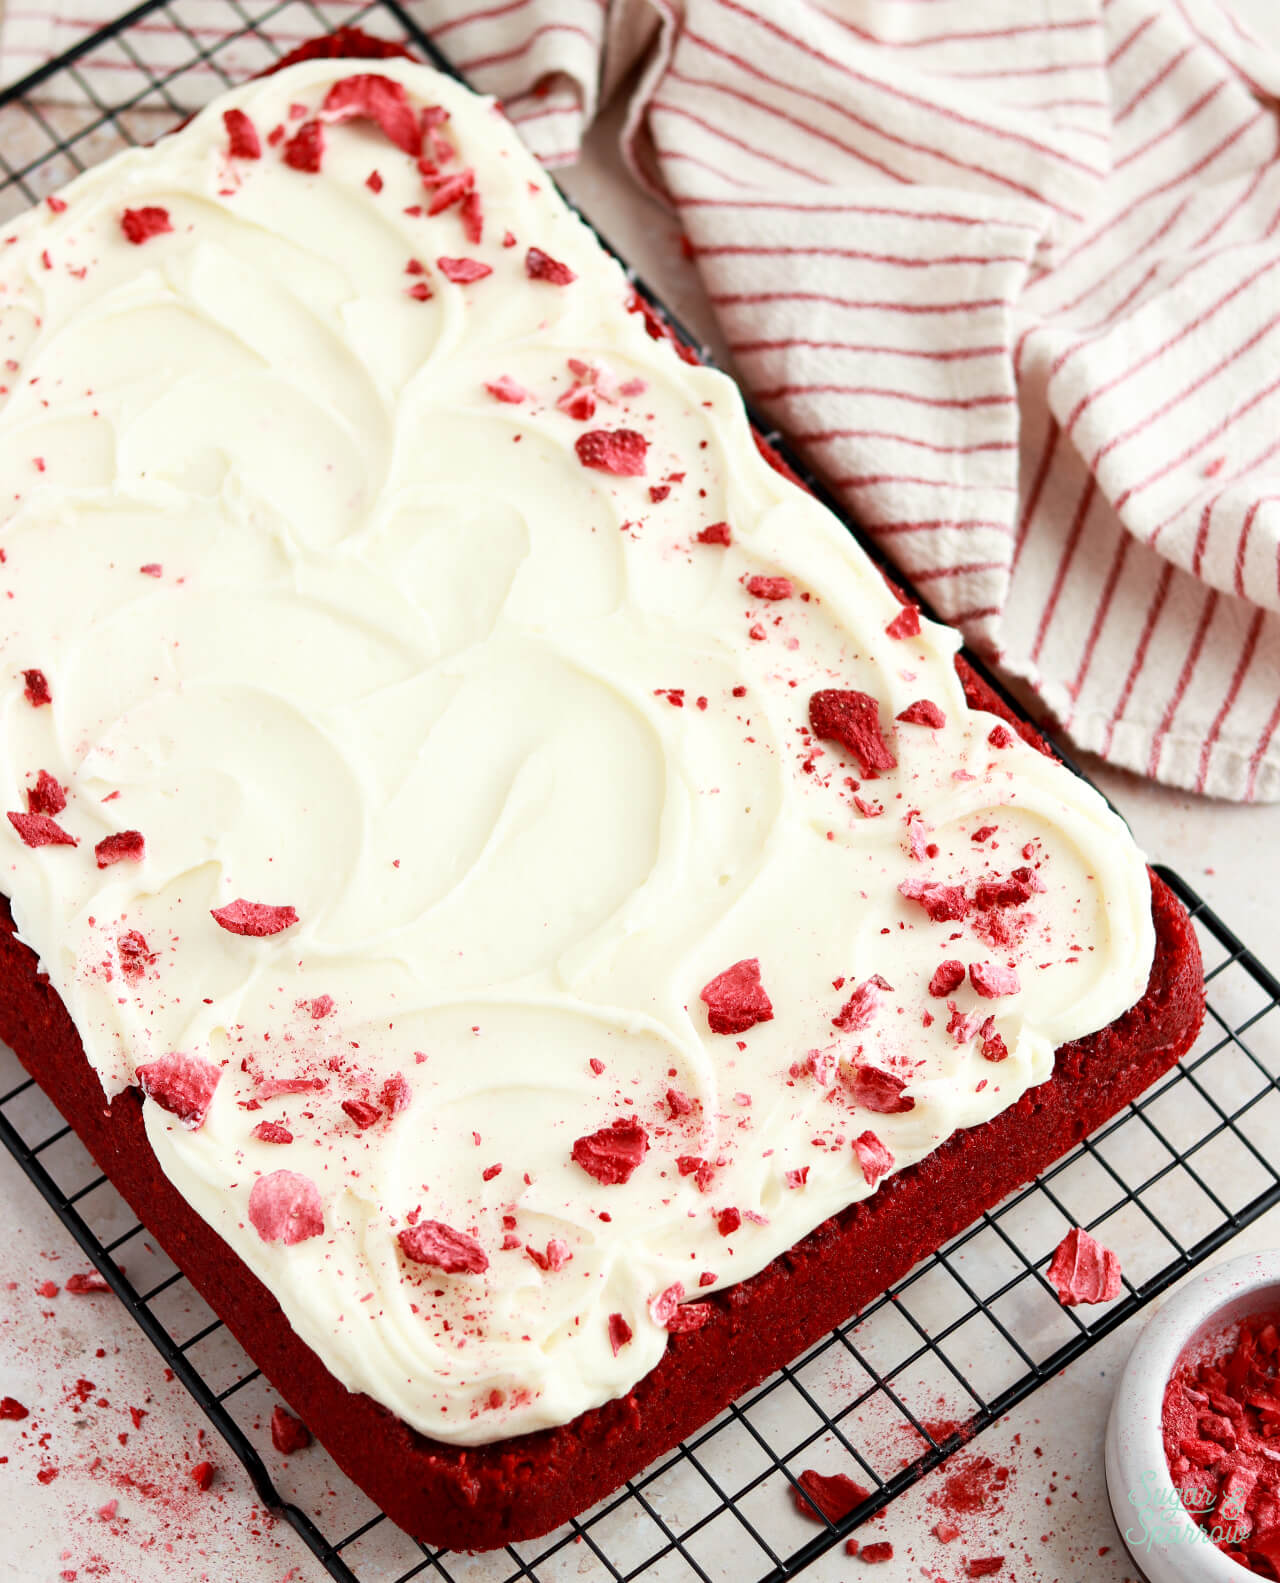
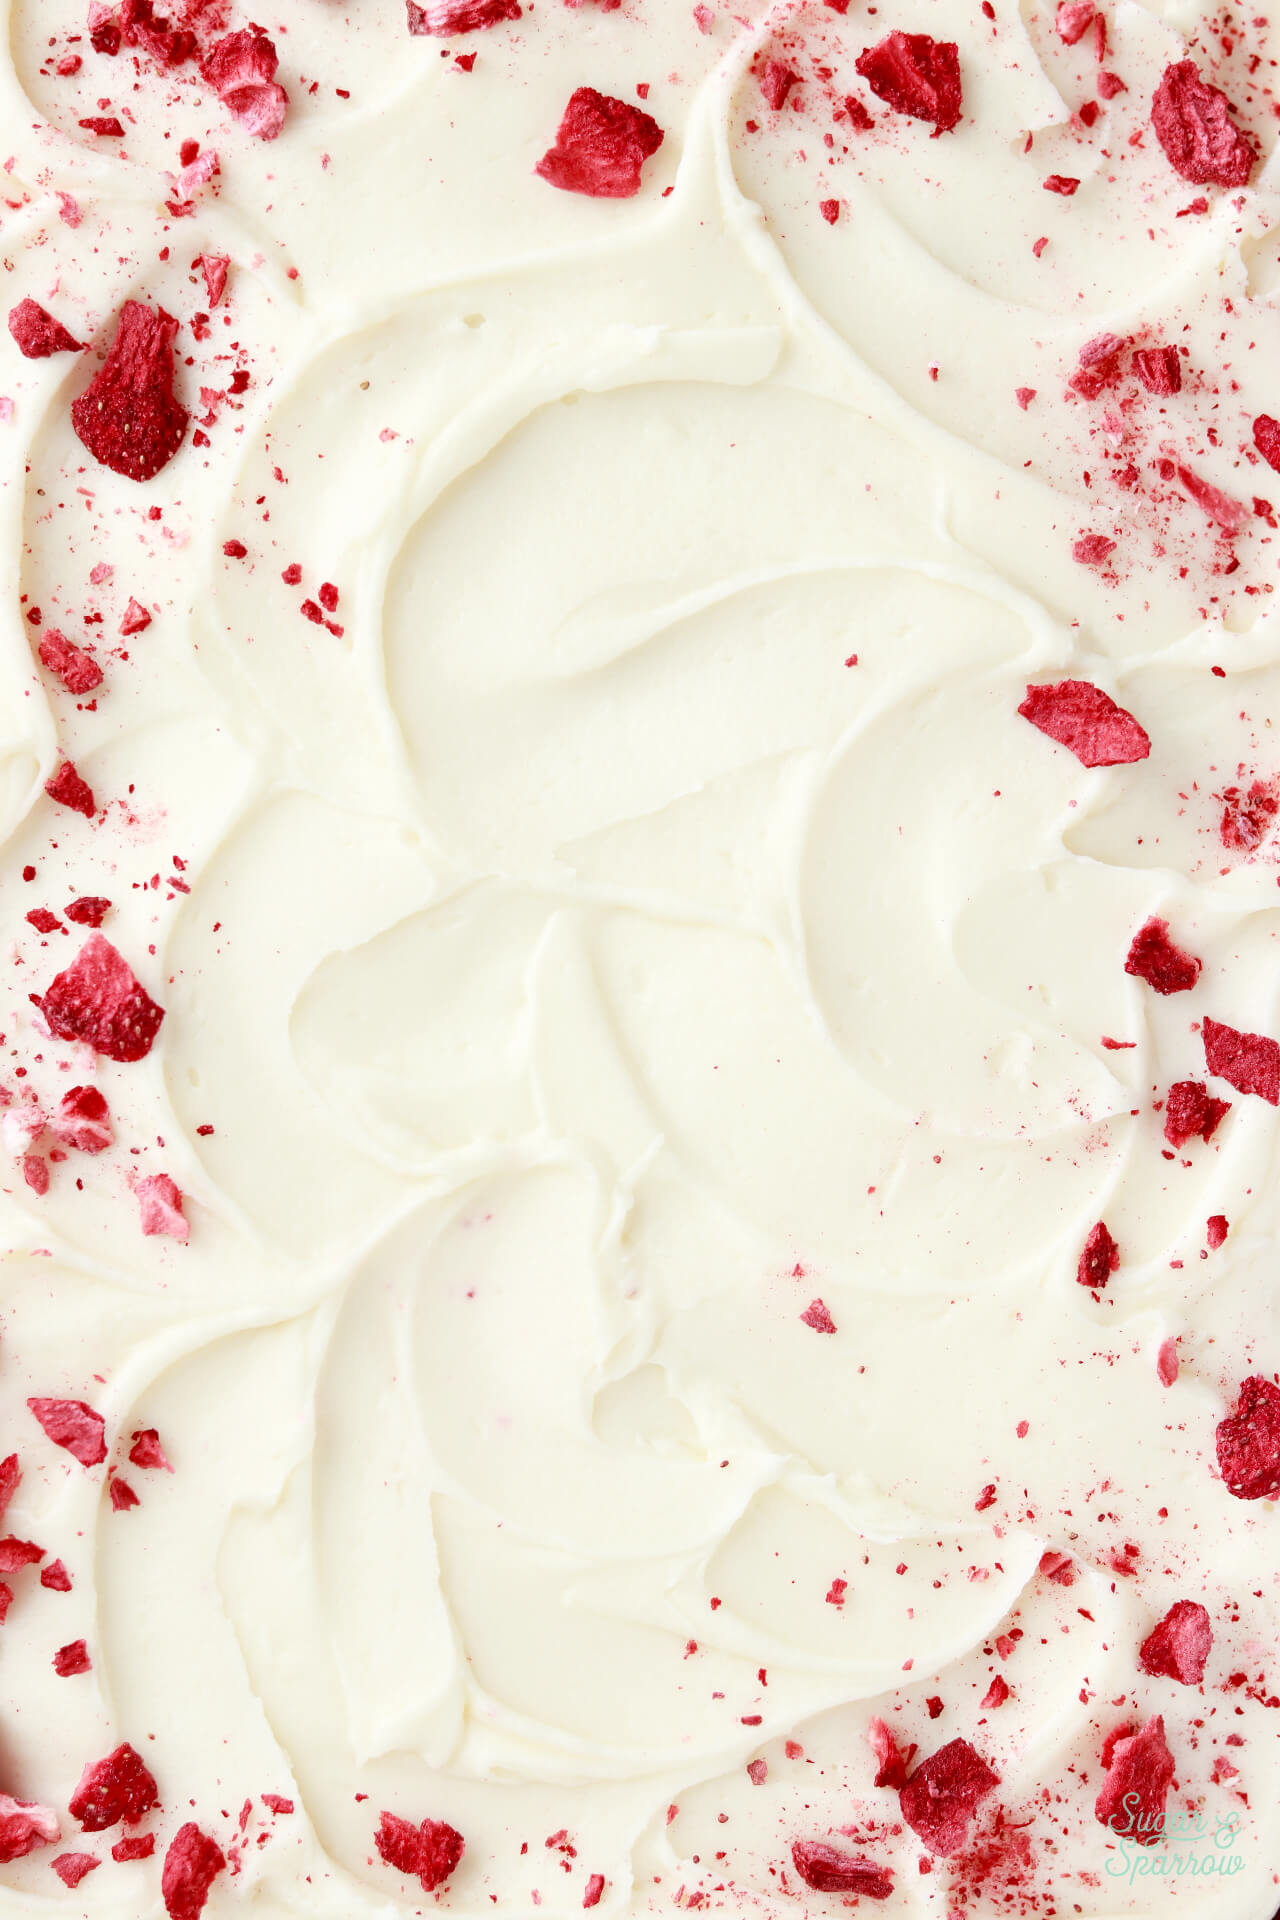
Red velvet cake and cream cheese buttercream are always a match made in heaven. I frosted this red velvet sheet cake with my favorite super silky cream cheese frosting and it lends the perfect balance of tangy and sweet. I kept it rustic and just frosted it onto the sheet cake while swooping my angled spatula through to create some swirly textures, then sprinkled some freeze-dried strawberry pieces around the edges for decoration (totally optional, but pretty!). 

red velvet sheet cake with cream cheese frosting recipe
cream cheese buttercream frosting with freeze dried strawberries

The cream cheese frosting recipe below makes just enough to frost the top of the sheet cake as pictured, but you can absolutely double the frosting portion of the recipe to frost the sides and add a piped border around the edges. It’s a soft frosting, but totally pipeable if you want to add more intricate details. 

The most important thing to note is that you need to use full-fat brick-style cream cheese – other kinds of cream cheese (reduced fat or the spreadable kind in tubs) contain too much water content and will make your frosting turn to soup. If you don’t have access to full-fat brick-style cream cheese, I recommend any of these other frostings instead:

  • Vanilla buttercream 
  • Swiss meringue buttercream 
  • Brown butter frosting 
  • White chocolate buttercream
  • Strawberry buttercream 
red velvet sheet cake recipe by sugar and sparrow
red velvet cake slice on plate

Red Velvet Cake Recipe Video

This red velvet sheet cake recipe is identical to my red velvetlayer cake recipe, the only difference is that I bake the sheet cake at 325ºF (163ºC) while the layer cake is baked at 350ºF (177ºC). This video shows how to make the batter for the layer cake version, which might be helpful since the ingredient amounts and process for making the batter is the same.

If you love recipe videos like this one, be sure to check out my YouTube channel! I’ve got a growing collection of cake recipes, decorating tutorials, and Cake Basics over there. Hit the subscribe button on my page so you never miss a new video.

More Red Velvet Recipes

Here are all my other red velvet cake recipe variations in case you’re wondering whether or not you can make this sheet cake recipe as a layer cake, cupcakes, and more: 

  • Red Velvet Layer Cake with Cream Cheese Frosting
  • Red Velvet Cupcakes
  • Small Batch Red Velvet Cake
  • Vintage Christmas Red Velvet Cake 
red velvet cake recipe squares

I hope you love this red velvet sheet cake recipe as much as I do! Let me know if you make it in the comments below and feel free to tag @sugarandsparrowco on Instagram to show me a photo. I love to see what you create!

red velvet sheet cake recipe with natural food coloring

Red Velvet Sheet Cake

Moist and tender red velvet cake with the perfect light chocolate flavor, baked in a 9×13 pan for feeding a crowd and paired with tangy cream cheese buttercream to make it extra irresistible.
Print Recipe Pin Recipe
Prep Time:30 minutes mins
Cook Time:30 minutes mins
Cooling Time:2 hours hrs
Total Time:3 hours hrs
Course: Dessert
Cuisine: American
Servings: 24 slices

Equipment

  • 9×13 baking pan

Ingredients

Red Velvet Sheet Cake

  • 2 Cups (212g) sifted cake flour
  • 3 Tbsp (18g) natural unsweetened cocoa powder
  • 1 tsp baking soda
  • 1/2 tsp salt
  • 1/2 Cup (113g) unsalted butter, room temperature
  • 1 1/2 Cups (300g) granulated sugar
  • 1/2 Cup (120ml) vegetable oil
  • 2 large eggs, room temperature
  • 2 tsp pure vanilla extract
  • 2 tsp distilled white vinegar
  • 2 tsp red food coloring* gel or liquid
  • 1 Cup (240ml) buttermilk, room temperature* DIY recipe in notes

Cream Cheese Buttercream*

  • 1/2 Cup (113g) unsalted butter, room temperature
  • 8 Oz cream cheese, room temperature brick-style, not the spreadable kind
  • 4 Cups (480g) powdered sugar
  • 1 1/2 tsp pure vanilla extract
  • 1/4 tsp salt, or to taste

Garnish (Optional)

  • 1/4 Cup freeze-dried strawberries

Instructions

Make the Red Velvet Cake

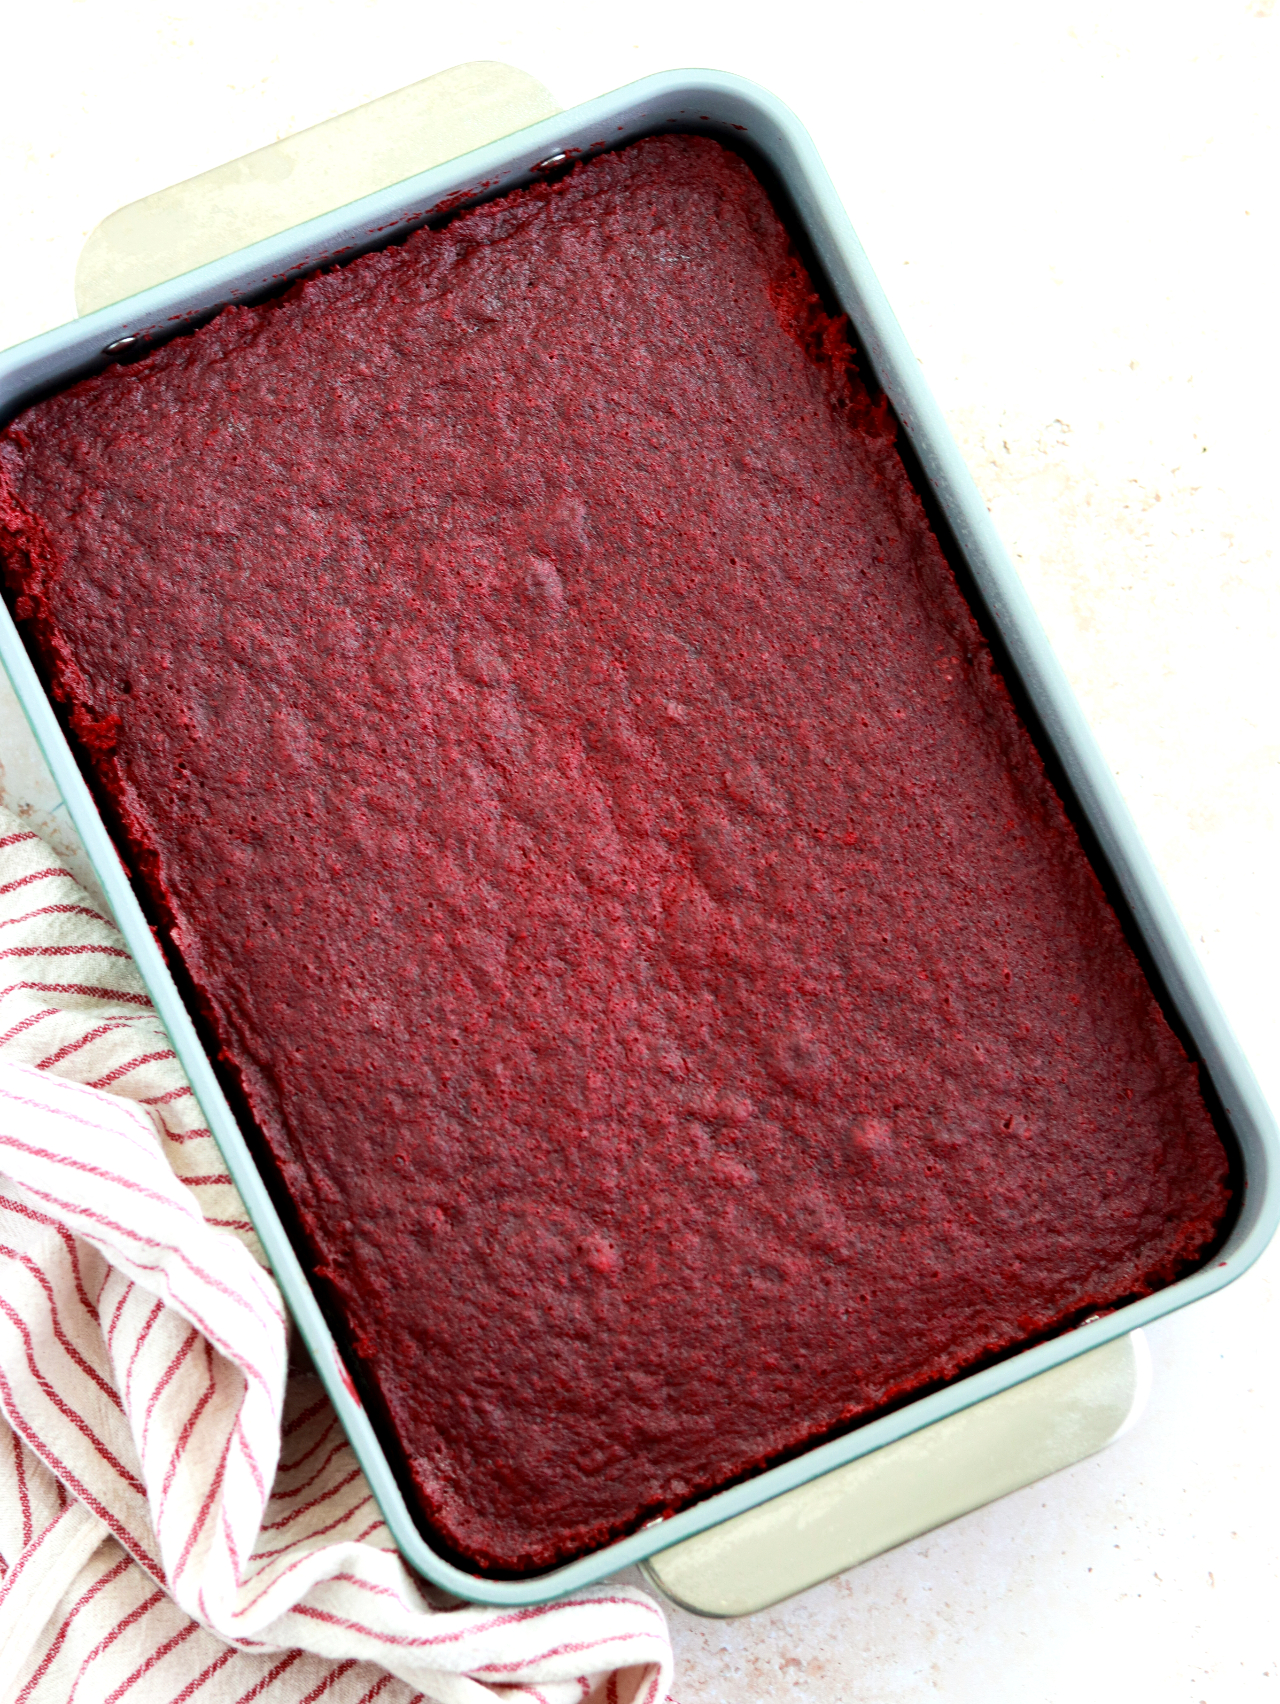
  • Preheat the oven to 325°F (163ºC). Prepare a 9×13 metal baking pan by spraying the sides with baking spray and lining the bottom with parchment paper.
  • In a medium bowl, whisk together the sifted cake flour, cocoa powder, baking soda, and salt. Set aside.
  • In the bowl of a stand mixer fitted with the paddle attachment (or with a hand mixer and large bowl), cream the butter on high for two minutes, then add the vegetable oil and sugar. Cream together on medium-high until pale and fluffy, about 2 minutes. Scrape down the bowl and paddle. Turn the mixer to low and add the eggs one at a time. Once the eggs are incorporated, add the vanilla and white vinegar and mix on low for another 30 seconds. Scrape down the bowl and paddle once more.
  • Mix the red food coloring into the buttermilk. With the mixer on low speed, alternate adding the flour mixture and buttermilk in three additions, beginning and ending with the flour mixture. Mix only until the ingredients start to come together, then whisk the batter by hand a few times to make sure there are no large lumps.
  • Pour the batter into the prepared pan and bake for 30-35 minutes, until a toothpick inserted comes out clean. Allow the cake to cool completely before frosting, either in the pan or gently invert it onto a cooling rack or serving plate to cool.

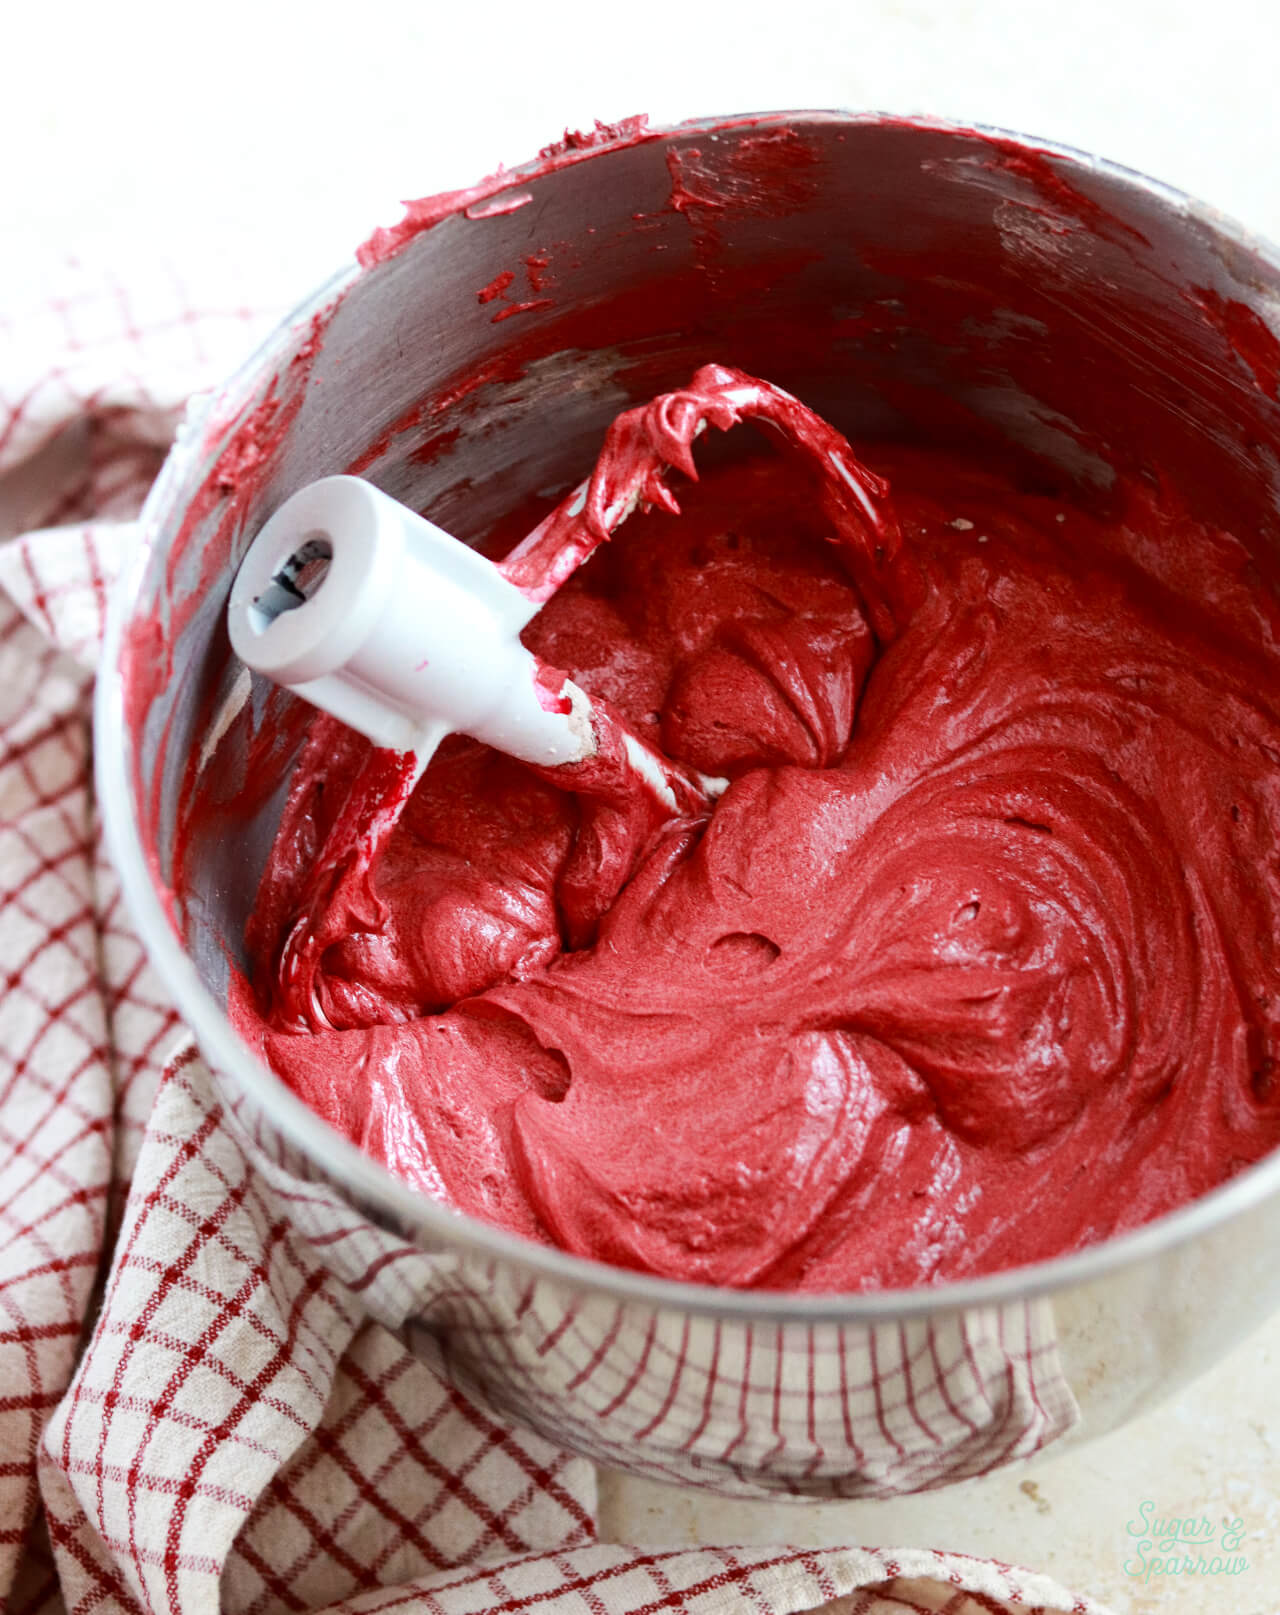
Make the Cream Cheese Buttercream

  • In the bowl of a stand mixer fitted with the paddle attachment, cream the butter and cream cheese on high until light, fluffy, and uniform (no lumps), about 5 minutes. Turn the mixer to low and add the powdered sugar a few cups at a time, mixing thoroughly after each addition. Add the vanilla and salt, mixing on low for another 30 seconds.

Assembly

  • Once the red velvet sheet cake has cooled completely, frost with the cream cheese buttercream. To create the look pictured, add all of the buttercream to the cake surface and use an angled spatula to create rustic texture, then sprinkle the edges with freeze-dried strawberry pieces.

Notes

*DIY Cake Flour Recipe: To make your own cake flour, spoon and level one cup of all-purpose flour and remove 2 Tbsp. Add 2 Tbsp of cornstarch. Repeat per the amount of cake flour you need, then sift the flour and cornstarch mixture 4 times (don’t skip that step!). After sifting, spoon and level to re-measure the amount of cake flour you need. Keep in mind that since store bought cake flour weighs less than homemade cake flour, 2 cups of homemade cake flour will weigh closer to 236g instead of 212g.
*DIY Buttermilk Recipe: Add 1 Tbsp white vinegar into a mason jar or measuring cup. Add one cup (240ml) whole milk and let sit for at least 15 minutes before using in a recipe. 
*Red Food Coloring: I recommend using any brand of red food coloring that is concentrated and flavorless. In the past I have used AmeriColor Super Red for this recipe but with the US ban on Red 3 I have since switched to Enco Naturals which doesn’t contain Red 3 or Red 40. If you are using natural food color, you may need to add up to 1 tsp more than the recipe calls for if you want a deep red. 
*Cream Cheese Buttercream: this recipe makes just enough to frost the top of the sheet cake as pictured. For additional decoration and/or to have enough to frost the sides, I recommend doubling the frosting portion of the recipe. 
9×13 Baking Dish: I used a metal pan for this sheet cake, but a ceramic or glass baking dish will work just fine if you add 10-15 minutes to the baking time. 
Make Ahead Tips: 
  1. The red velvet sheet cake can be made ahead and stored at room temperature in the pan covered with plastic wrap, for up to two days. Alternatively, you can cover tightly with plastic wrap and store in the freezer for up to two months before thawing to room temperature.
  2. The Cream Cheese Buttercream can be made ahead and stored in an airtight container in the refrigerator for up to two weeks. When you’re ready to use it, bring it back to room temperature and re-whip in your stand mixer to bring back to smooth buttercream consistency. 
  3. The frosted sheet cake can be stored at room temperature, covered with plastic wrap or aluminum foil, for up to five days. 
To Make as Cupcakes: Use this red velvet cupcakes recipe
To Make as a Layer Cake: Use this layer cake recipe

By: Whitney · In: Cake, Featured, Holiday, Recipes, Seasonal, Valentines · Tagged: cream cheese buttercream, cream cheese frosting, red velvet cake, valentines day cake

you’ll also love

hummingbird cake recipe by sugar and sparrowHummingbird Cake
pistachio cake recipe by sugar and sparrowPistachio Cake with Cream Cheese Frosting
flourless chocolate cake recipe by sugar and sparrowRich & Fudgy Flourless Chocolate Cake

Join the List

Stay up to date & receive the latest posts in your inbox.

Reader Interactions

Leave a Reply Cancel reply

Your email address will not be published. Required fields are marked *

Recipe Rating


Next Post >

Chocolate Covered Strawberry Cake

Primary Sidebar

Welcome to Sugar & Sparrow

Welcome to Sugar & Sparrow

Helping you whip up pretty desserts with confidence and creativity. And hopefully sharing a few laughs with you along the way!

Learn More

Connect

let’s bake!

Get my very best recipes, baking tips, and decorating tutorials sent to your inbox

Featured Posts

shag cake by sugar and sparrow

Autumn-Inspired Shag Cake

red velvet sheet cake recipe with natural food coloring

Red Velvet Sheet Cake with Cream Cheese Frosting

top 10 cakes of 2022

The Best of 2022

Search

Archives

Follow Along

@sugarandsparrowco

STRAWBERRY SHORTCAKE ICE CREAM CAKE 🍓if Strawbe STRAWBERRY SHORTCAKE ICE CREAM CAKE 🍓if Strawberry Shortcake Ice Cream Bars make you nostalgic for your childhood ice cream truck days, you’re going to LOVE this easy ice cream cake version - no ice cream maker needed 🙌🏼 

Full recipe on my blog at https://sugarandsparrow.com/strawberry-shortcake-ice-cream-cake/

STRAWBERRY CRUNCH 
24 whole (280g) Golden Oreos, finely ground
3 Oz box strawberry jello
4 Tbsp unsalted butter, melted

ICE CREAM LAYERS
1/2 Cup (15g) freeze-dried strawberries
2 Cups heavy whipping cream, cold
1 Tbsp pure vanilla extract, divided
14 Oz sweetened condensed milk
1 1/2 tsp strawberry jam or preserves

1. Combine the strawberry crunch ingredients and bake on a lined cookie sheet at 350ºF for 4 min.
2. For the crust, combine 1 Cup of the strawberry crunch with 2 Tbsp melted butter. Press into the bottom of a 6-inch springform pan and line with an acetate collar. Place in the freezer while you move on.
3. Using a food processor, grind the freeze-dried strawberries into a fine powder. Set aside.
4. Add the heavy whipping cream and 2 tsp of vanilla extract into a chilled bowl, then whip it with a hand mixer to stiff peaks. Place in the refrigerator.
5. Divide the condensed milk between two medium bowls. To one bowl, add 1 teaspoon of vanilla. To the second bowl, add the finely strawberry powder and the jam/preserves. Whisk the ingredients together within each individual bowl.
6. Divide the whipping cream evenly between each of the two bowls you created in the previous step. Fold each sweetened condensed milk mixture together with the divided whipped cream to create the vanilla ice cream and strawberry ice cream.
7. Layer half of each of the ice creams on top of the strawberry crunch crust, sprinkle a layer of strawberry crunch on top, then repeat. Freeze for 6 hours and serve. 
#icecreamcake #strawberryshortcake #nochurnicecream #icecreamlover #strawberry
LEMON CUPCAKES 🍋 after about a dozen recipe tes LEMON CUPCAKES 🍋 after about a dozen recipe tests, this one is everything I could want in a lemon cupcake! Fluffy-yet-moist, bursting with natural lemon flavor, and absolutely irresistible topped with lemon cream cheese buttercream. 

Full recipe (with frosting) linked in my bio + at https://sugarandsparrow.com/homemade-lemon-cupcakes/

INGREDIENTS:
1 Cup (132g) all-purpose flour
1 tsp baking powder
1/4 tsp salt
1/4 Cup (60ml) whole milk, room temperature
3 Tbsp (45ml) lemon juice from 1 medium lemon
3/4 Cup (150g) granulated sugar
3 Tbsp (42g) unsalted butter, room temperature
2 Tbsp (30ml) vegetable oil
2 large eggs, room temperature
1 tsp pure vanilla extract

INSTRUCTIONS:
1. Preheat the oven to 350ºF (177ºF) and line a standard cupcake pan with 12 paper liners.
2. In a large bowl, whisk together the flour, baking powder, and salt. Set aside. 
3. In the bowl of a stand mixer fitted with the paddle attachment (or with a hand mixer and large bowl), add the lemon zest to the sugar and mix on low speed until fragrant and well combined, about 1 minute. Meanwhile, combine the lemon juice with the milk and set aside. 
4. Add the butter to the lemon-sugar mixture and cream on medium speed until and combined, about 2 minutes. Add the vegetable oil and beat until light and creamy, about 3 minutes. Scrape down the bowl and paddle as needed.
5. Mix in the eggs one at a time on low speed, then add the vanilla and turn the mixer to medium speed for one minute.
6. Turn the mixer off and add the flour mixture all at once. Mix on low speed until just combined, then slowly pour in the lemon-milk mixture. Mix until just combined, about 30 seconds.
7. Divide the batter equally between the liners and bake for 14-18 min. Cool, then top with frosting of your choice (link in bio for lemon cream cheese frosting)�
#lemoncupcakes #creamcheesefrosting #lemon #cupcakes #cupcakedecorating
April in my kitchen 🌸 I published 5 NEW recipes April in my kitchen 🌸 I published 5 NEW recipes on my site, baked my Oreo cupcake recipe for a fundraiser and found it was just as delicious as I remember, and filmed/photographed 3 recipes that will be on my blog in May (Lemon Cupcakes, Lemon Cream Cheese Buttercream, and No-Bake Marbled Strawberry Cheesecake) 🥰 

Comment “APRIL” to get all the available recipes and stay tuned for more! 

#bakersofinstagram #springbaking #cakedecorating #cupcakes #bakinglove
SHEET PAN COOKIE CAKE 🍪 slice it warm for a fud SHEET PAN COOKIE CAKE 🍪 slice it warm for a fudgy chocolate chip cookie OR let it settle into a moist and chewy cookie cake that’s perfect for decorating! My fave vanilla buttercream + sprinkles turn this giant chocolate chip cookie into the perfect birthday cake alternative at the end 🥳
⁣
Full recipe + decorating ideas at https://sugarandsparrow.com/sheet-pan-chocolate-chip-cookie-cake/
⁣
INGREDIENTS⁣
1 Cup (226g) unsalted butter, melted⁣
1 1/3 Cups (267g) packed light or dark brown sugar⁣
1/2 Cup (100g) granulated sugar⁣
3 large eggs⁣
1 Tbsp pure vanilla extract⁣
1 tsp baking soda⁣
1 tsp cornstarch⁣
1/2 tsp salt⁣
3 Cups (398g) all purpose flour⁣
2 Cups (350g) semi-sweet chocolate chips⁣
⁣
INSTRUCTIONS⁣
1. Preheat the oven to 350ºF (177ºC). Grease and line a 13×18 inch sheet pan.⁣
2. In a large bowl, add the brown sugar and granulated sugar. Melt the butter in the microwave and pour it over the top of the sugars. Whisk together until uniform. Add the eggs and vanilla, then continue whisking until uniform. Whisk in the baking soda, cornstarch, and salt.⁣
3. Add the flour and use a silicone spatula to fold it in until smooth cookie dough forms. Reserve 1/2 Cup of the chocolate chips and set them aside, then fold the remaining 1 1/2 Cups of chocolate chips into the cookie dough.⁣
4. Place the chocolate chip cookie dough onto the prepared sheet pan and use an offset spatula to spread it all the way to the edges in an even layer.⁣
5. Bake the cookie cake for 14-16 minutes, until it looks golden brown on the edges and set. 
6. Enjoy warm or let it cool and decorate with vanilla buttercream and sprinkles! ⁣
⁣
#cookiecake #chocolatechipcookies #sheetcake #birthdaycake #cakedecorating
STRAWBERRY CUPCAKES 🍓based on my beloved strawb STRAWBERRY CUPCAKES 🍓based on my beloved strawberry layer cake recipe, this cupcake version is just as moist yet fluffy and bursting with natural strawberry flavor! Between the mix of fresh strawberries in the cupcakes + freeze-dried strawberries in the frosting, the flavor is out of this world 🚀

Full recipe link in my bio (with strawberry buttercream) + at https://sugarandsparrow.com/strawberry-cupcakes/

STRAWBERRY CUPCAKES
Yield: 14 cupcakes

INGREDIENTS:
5 oz (143g) fresh or frozen strawberries
1/3 Cup (80ml) whole milk, room temp
1 1/2 Cups (158g) sifted cake flour
1 tsp baking powder
1/4 tsp baking soda
1/2 tsp salt
6 Tbsp (85g) unsalted butter, room temp
1 Cup (200g) granulated sugar
2 large eggs, room temp
3 Tbsp (45g) sour cream, room temp
1 tsp vanilla extract
1 drop pink food coloring (optional)

INSTRUCTIONS: 
1. Puree the strawberries using a food processor (you’ll have about 1/2 cup of puree), then place into a saucepan over medium-low heat. Bring to a simmer, then cook for 10-15 min, stirring occasionally, until you have 1/4 cup. Refrigerate until room temp.
2. Preheat oven to 350ºF (177ºC) and line a standard cupcake pan with liners.
3. Whisk together the sifted cake flour, baking powder, baking soda, and salt and set aside.
4. In a stand mixer w/ paddle attachment (or hand mixer + large bowl), whip the butter on high for 2 min. Add sugar and beat for 2 min, until light and fluffy. Turn the mixer to low and add the eggs one at a time, then add the vanilla and sour cream, turn the mixer to high and beat for 1 min. Meanwhile, whisk together the strawberry puree, whole milk, and food coloring (if using).
5. Turn the mixer off and add all of the dry ingredients at once. Mix on low until just combined, then add the strawberry milk mixture until just combined, about 30 seconds.
6. Fill the cupcake liners 2/3 full and bake for 14-18 minutes. Cool completely before topping with strawberry buttercream (full recipe linked above). 

#strawberrycupcakes #strawberrycake #pinkcupcakes #strawberry #cupcakes

Footer

On the Blog

  • Cake Basics
  • Recipes
  • Tutorials

Info

  • About
  • Privacy Policy & Disclosure

stay in the know

Copyright © 2026 · Theme by Sugar & Sparrow