• Cake
  • Frosting
  • YouTube
  • My Favorite Tools
  • Nav Social Icons

  • Skip to primary navigation
  • Skip to main content
  • Skip to primary sidebar
  • Skip to footer
  • Recipes
    • Cake
    • Cupcakes
    • Frosting
    • Ice Cream
    • Vegan
  • Cake Basics
  • Tutorials
  • Blog
  • About
  • Mobile Menu Widgets

    Connect

    Search

Sugar & Sparrow logo in script font

Sugar & Sparrow

Lifestyle and Cake from Portland Oregon

  • Cake Basics
  • Recipes
    • Cake
    • Cupcakes
    • Cookies & Bars
    • Filling
    • Frosting
    • Ice Cream
    • No-Bake
    • Small Batch
    • Vegan
  • Tutorials
  • Book
  • Blog
  • About

Monster Shag Cake Tutorial

September 15, 2022 · In: Featured, Halloween, Seasonal, Tutorials

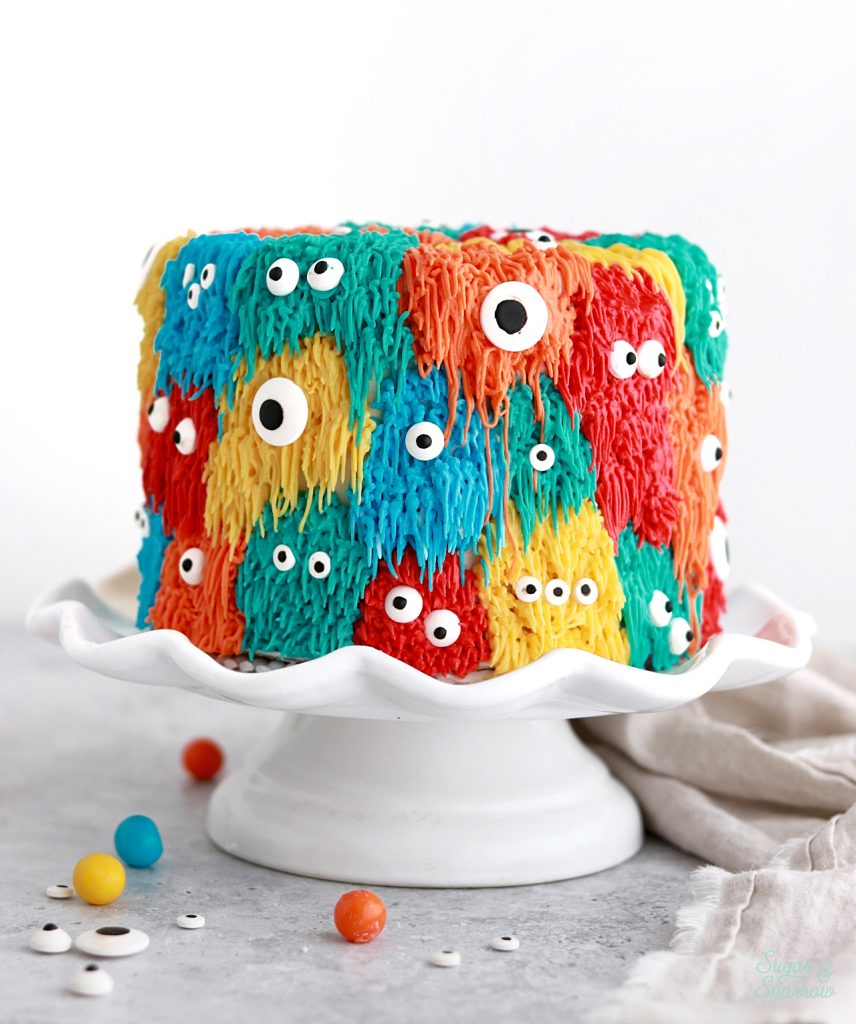
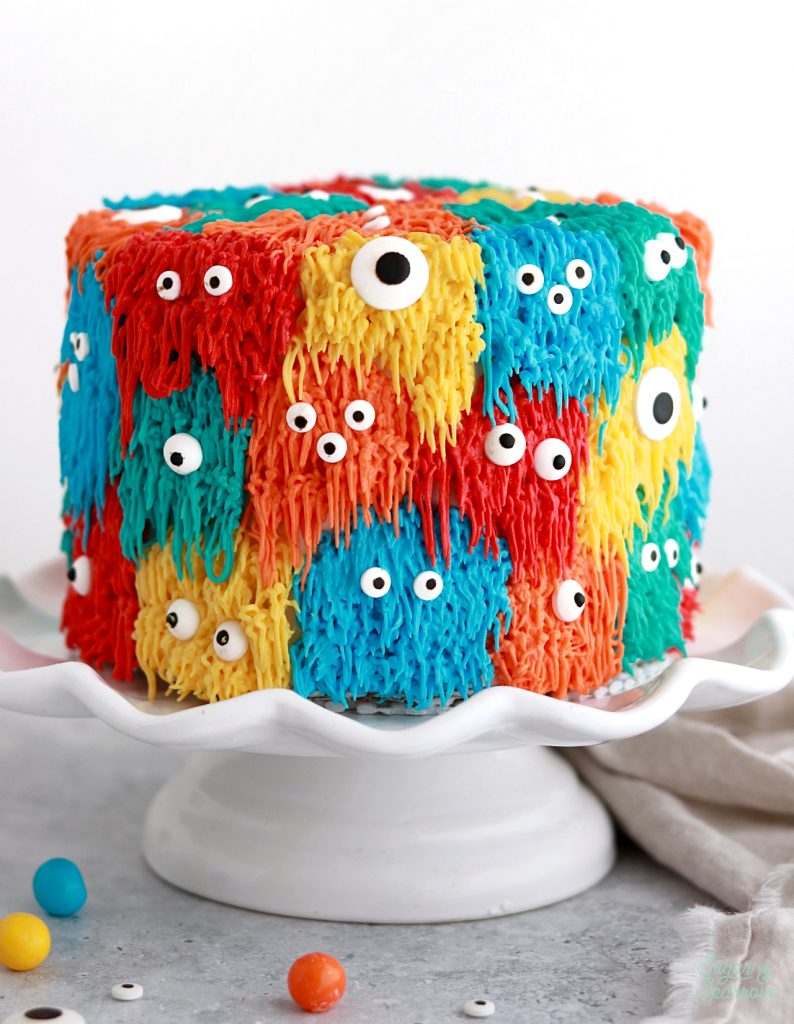
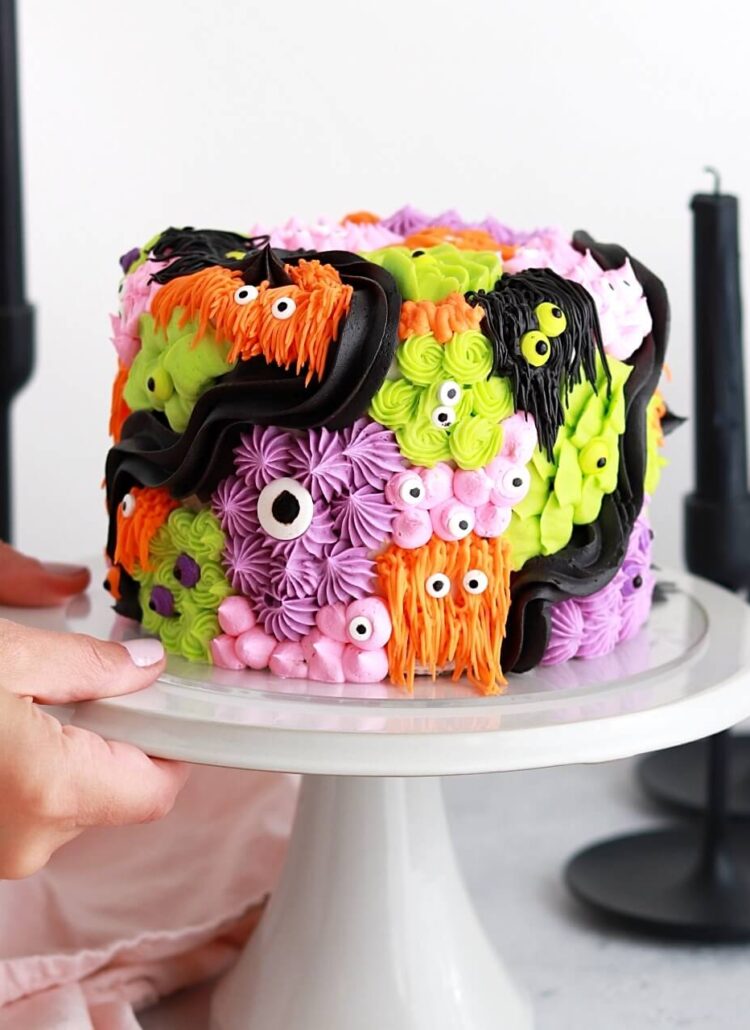
I’ve been brainstorming some new Halloween cake designs (it’s been awhile!) and the idea for this shaggy monster cake popped into my head instantly. When that kind of thing happens, I just have to roll with it right away. So I dusted off a handful of Wilton Tip 233’s, grabbed a box of candy eyeballs, and got to work. I’m so happy to say that it turned out even cuter than I imagined! I am in love with each and every one of these cute little monsters.

monster shag cake tutorial

This monster shag cake is perfect for a Halloween party table and will work in any color scheme you can think of. I used five colors here: AmeriColor Super Red, Egg Yellow, Orange, Turquoise, and Sky Blue. To make your life easier, plan on using one shag piping tip per color in your palette. Sure, you can get away with using couplers to swap piping tips between colors, but the piping process will be much more enjoyable if you have as many piping tips as colors. 

monster halloween cake tutorial

Tips for Piping a Shag Cake 

Working with Wilton Tip 233 to create shag texture is a whole lot of fun, but there are a few keys to success that I want to mention:

  1. Make sure your buttercream is medium consistency. I used my favorite Vanilla Buttercream recipe for this cake and it worked perfectly. It’s an American Buttercream but any type of buttercream will do for this piping technique as long as it’s not too thick or too thin. 
  2. Practice first. If this is your first time piping shag, don’t be afraid to practice before you start piping directly onto the cake. You can pipe onto the side of a glass or jar to get the hang of it – basically hover the tip close to the surface and squeeze the piping bag until the buttercream starts to make contact. Continue squeezing the piping bag while you pull away from the surface to create length, then quickly release pressure to end the shag. 
  3. Start with a chilled buttercream cake. After crumb coating your layer cake, chill it for 20-30 minutes (or until firm) in the refrigerator. This will create the perfect surface for piping. 
  4. Keep your hands cold. Run your hands under cold water and dry them thoroughly before piping. You’re going to be handling the piping bags quite a bit and the heat of your hands could start melting the buttercream inside. If it does start to become runny due to heat, you can place your piping bag in the refrigerator for 10-15 minutes, then gently massage the bag to mix up the buttercream and continue piping. 
monster shag cake for halloween

Here’s a quick video of the process before you read all about making this monster shag cake below: 

If you want to see more videos like this one, check out my YouTube Channel. I’ve got a growing collection of recipe videos, cake decorating tutorials, and my Cake Basics series in video format. Click subscribe while you’re there so you never miss a new video! 

You Will Need

  • A 6-inch cake that’s been crumb coated and chilled
  • 3 Cups of medium consistency buttercream (I used this Vanilla Buttercream)
  • Bowls and spoons for color mixing
  • 5 color gels of your choice 
  • 5x Wilton Tip 233 
  • 5 piping bags
  • Candy eyeballs in various sizes (I used this set) 

Step 1: Color the Buttercream

Divide the buttercream evenly between 5 bowls. Mix the color gels into each bowl to mix up the color palette of your choice. I used AmeriColor Super Red, Orange, Egg Yellow, Turquoise, and Sky Blue for this color palette (about 3 drops per color). 

colorful buttercream monster cake

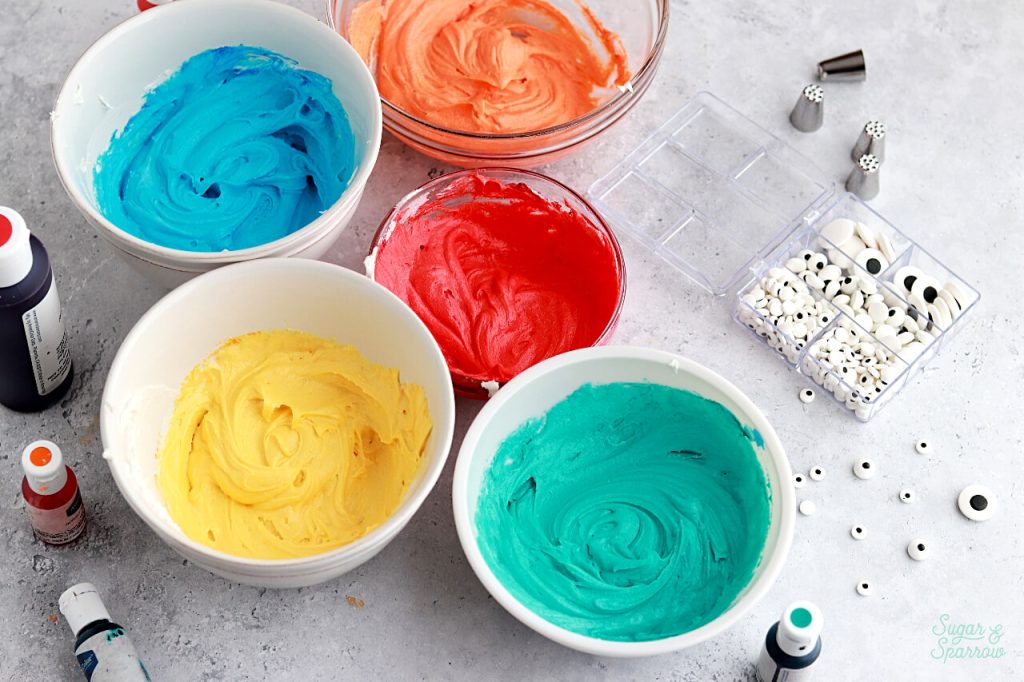
Once your buttercream colors are looking good, add each color into a separate piping bag fitted with Wilton Tip 233. 

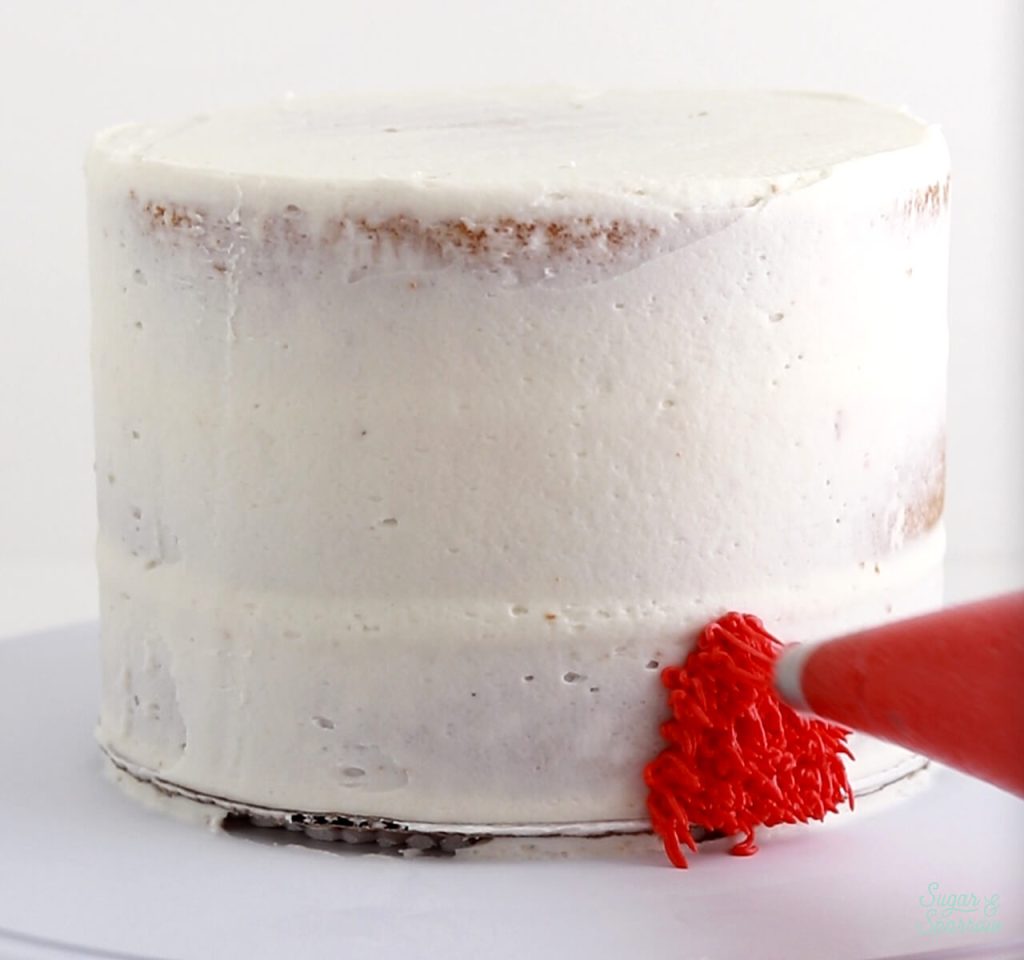
Step 2: Pipe the Shag

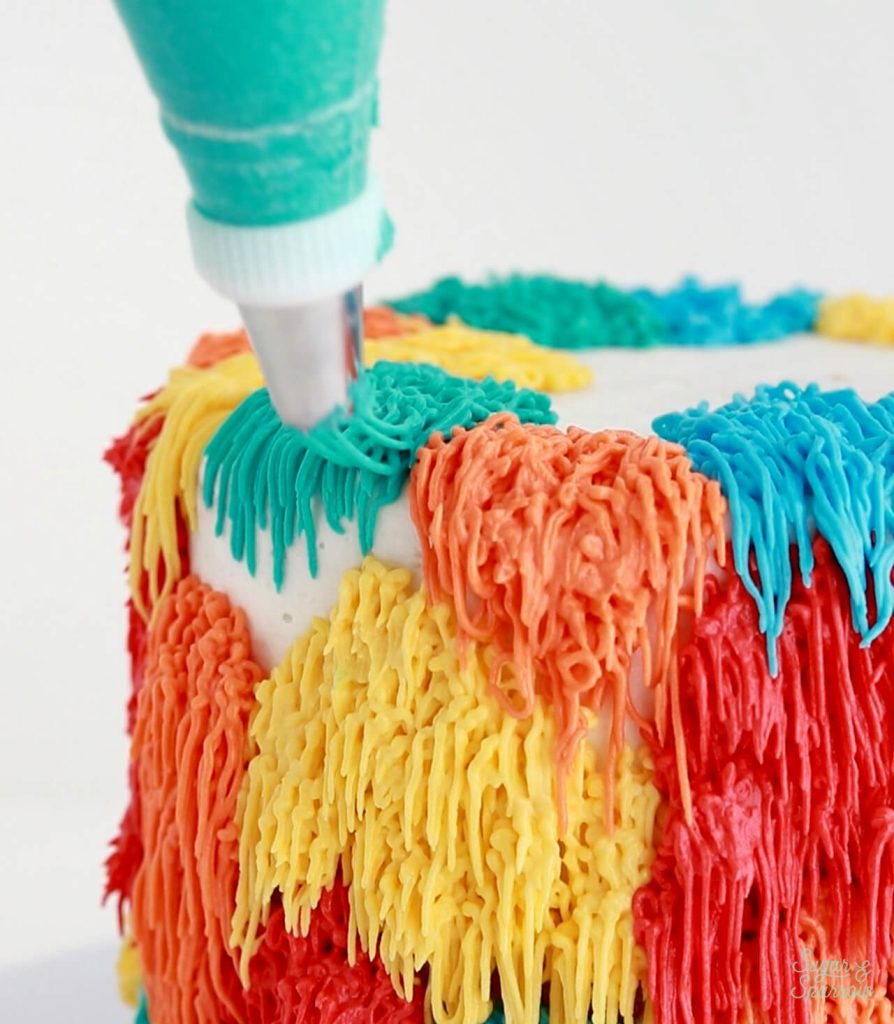
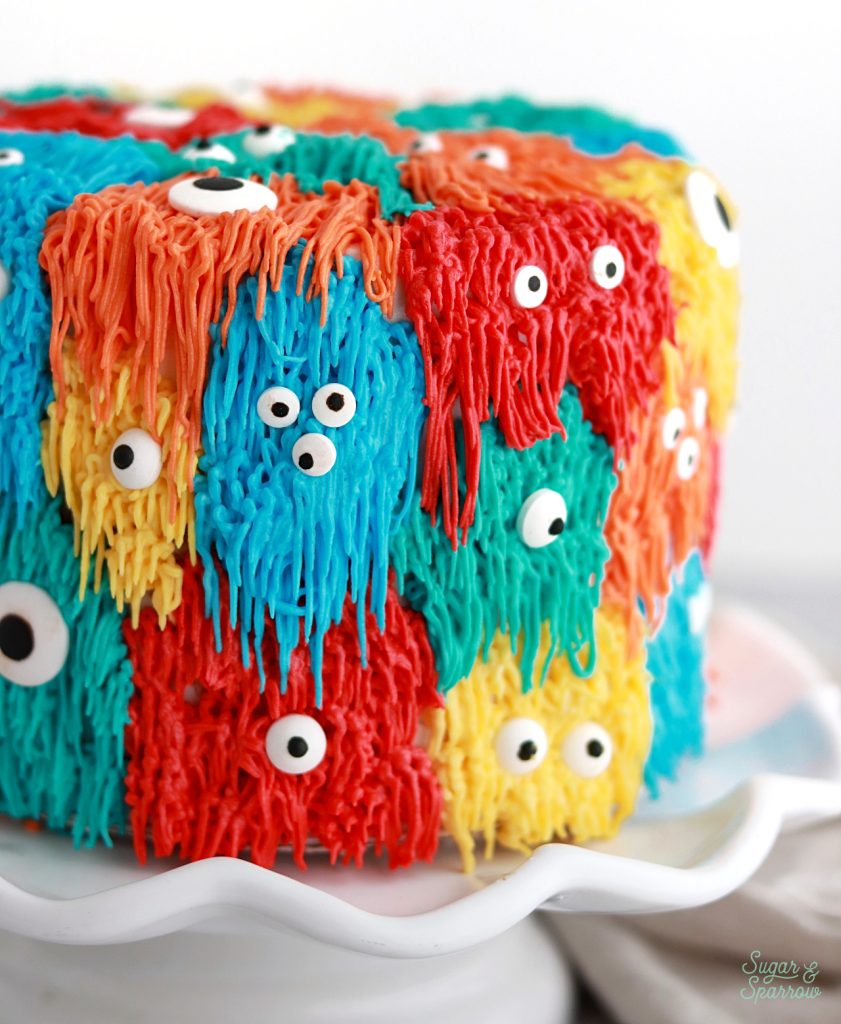
Starting on the bottom third of the cake, pipe the first shag monster. It should be an imperfect, blob-like color block. To create the shag, hover the piping tip close to the surface of the cake and squeeze the piping bag until the buttercream makes contact with the surface of the cake, then pull the tip away from the cake while you release pressure. This can take some practice, so feel free to perfect your shag piping on a glass or jar before piping directly onto the cake. 

how to pipe a shag cake with buttercream

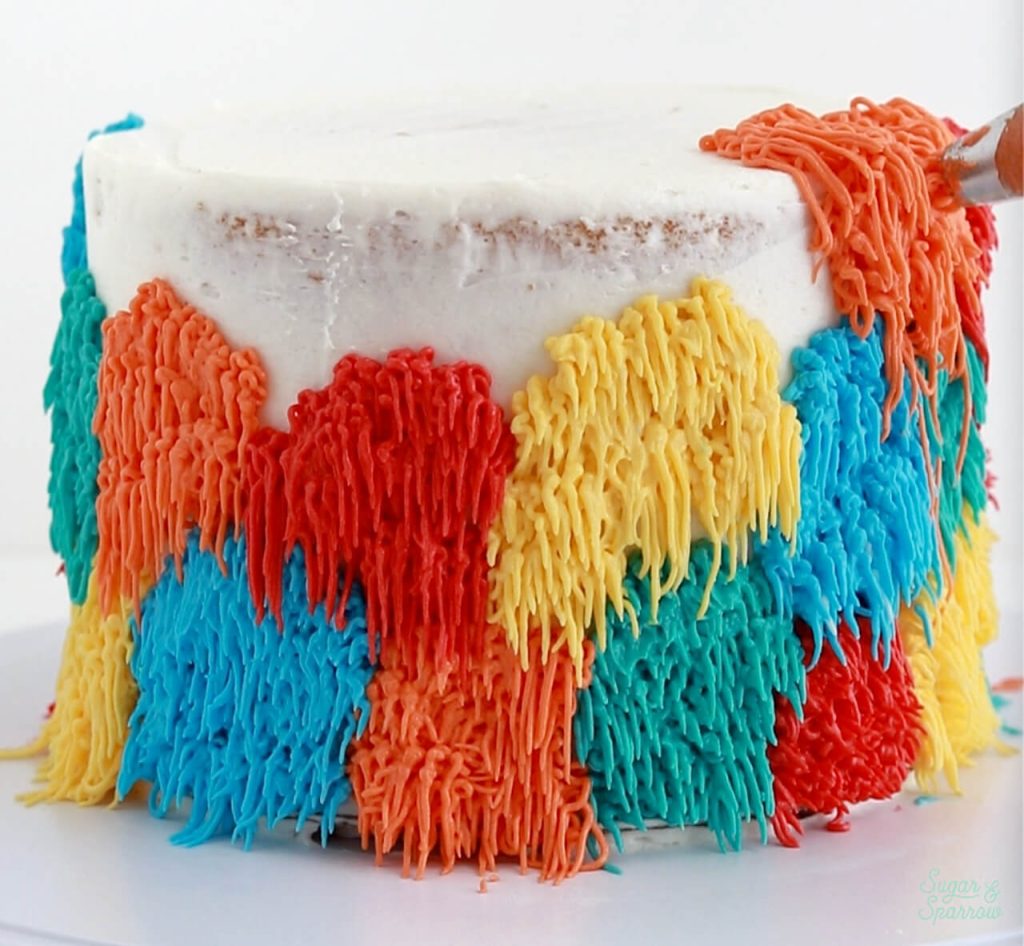
Pipe the next shag monster in a different color directly next to the first. Feel free to make this one a little taller or shorter than the first shag monster for variety. 

how to pipe a buttercream shag cake

Repeat adding the shag monster color blocks all around the bottom third of the cake.

color block shag cake with buttercream

Add a second row of shag monsters on top of the first row. Be sure to leave enough room for a third row of shag monsters. 

colorful buttercream shag cake tutorial

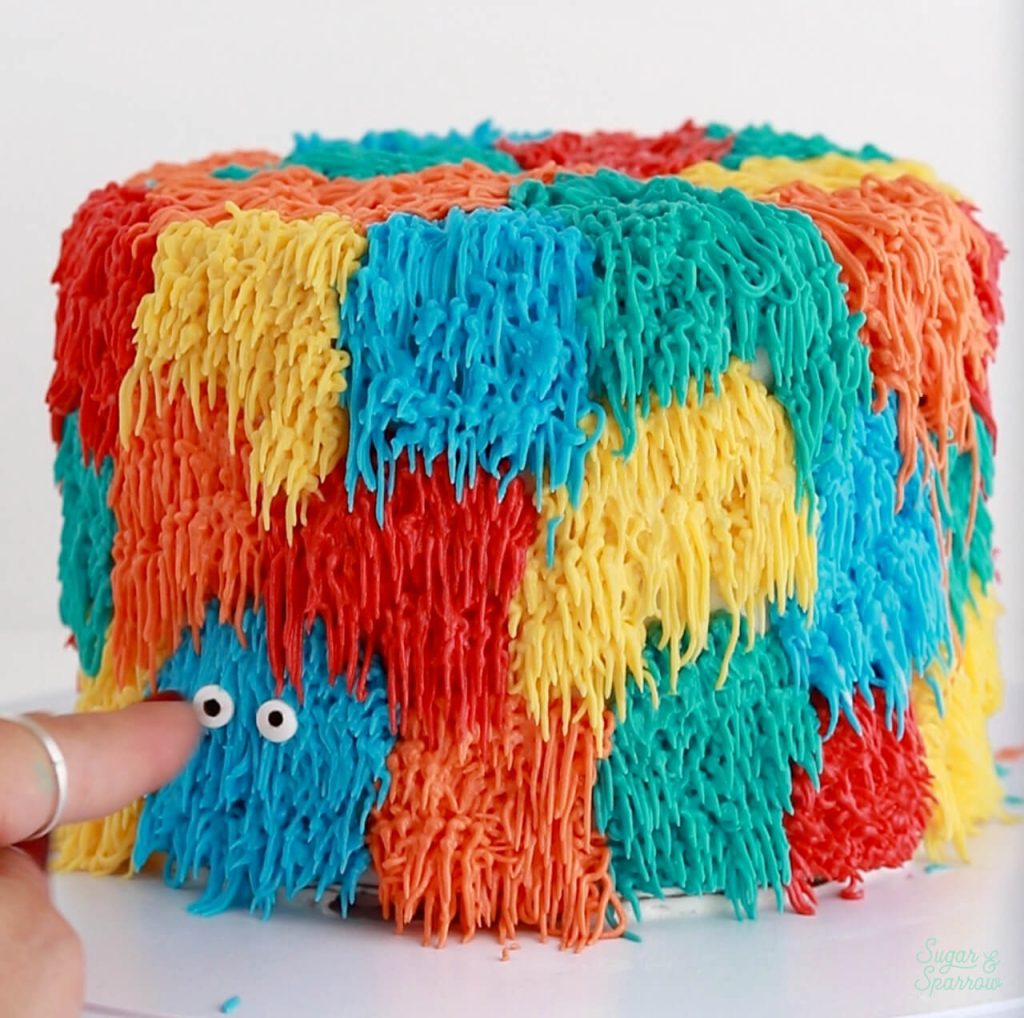
Add the final row of shag monsters on the top third of the cake and continue the shag onto the very top. Keep going until you’ve got color blocks covering every inch of the cake.

color block buttercream shag cake tutorial
shag buttercream cake tutorial by sugar and sparrow

Step 3: Add the Candy Eyeballs 

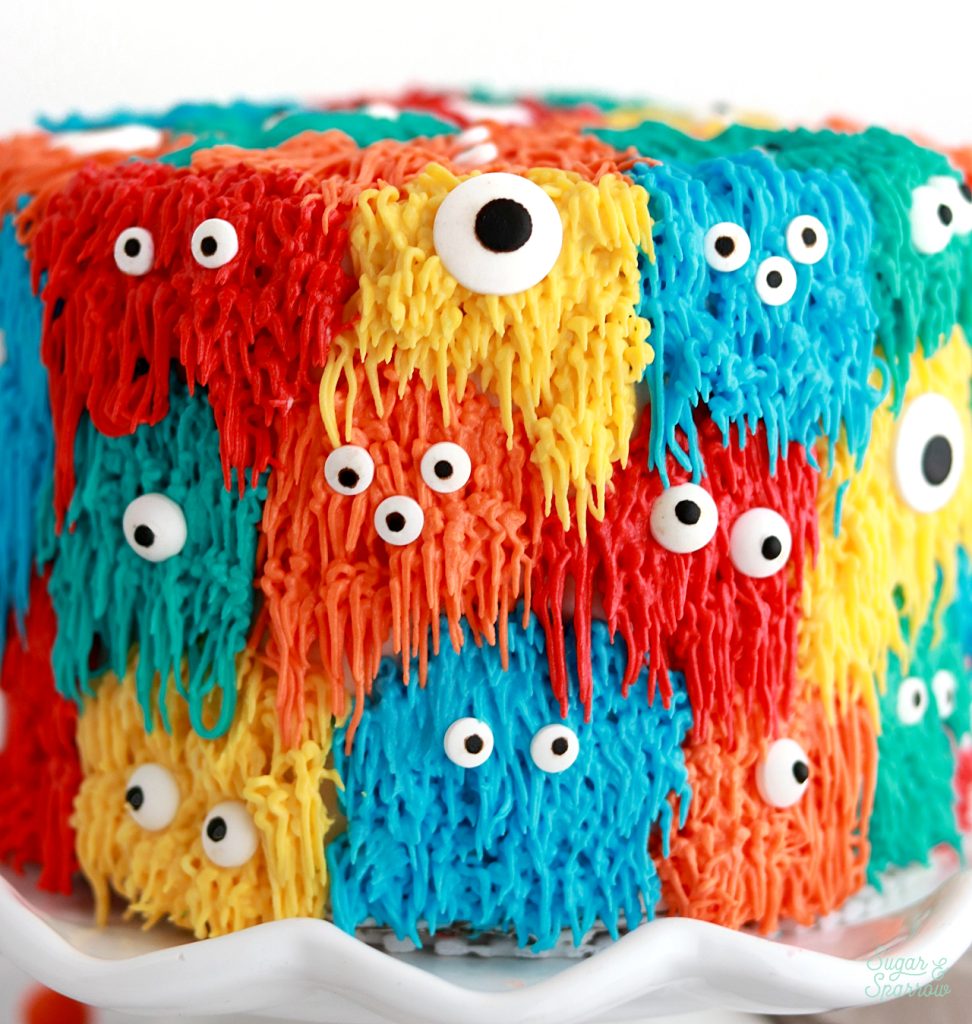
Add a set of candy eyeballs to each shag color block to bring the monsters to life. Some could have just one eyeball, others could have five eyeballs or more. Feel free to use your imagination here and create some variety! 

monster shag cake tutorial by sugar and sparrow

This set of Wilton candy eyeballs really came in handy for this cake. It comes with three different sizes of eyeballs!

buttercream monster shag cake tutorial

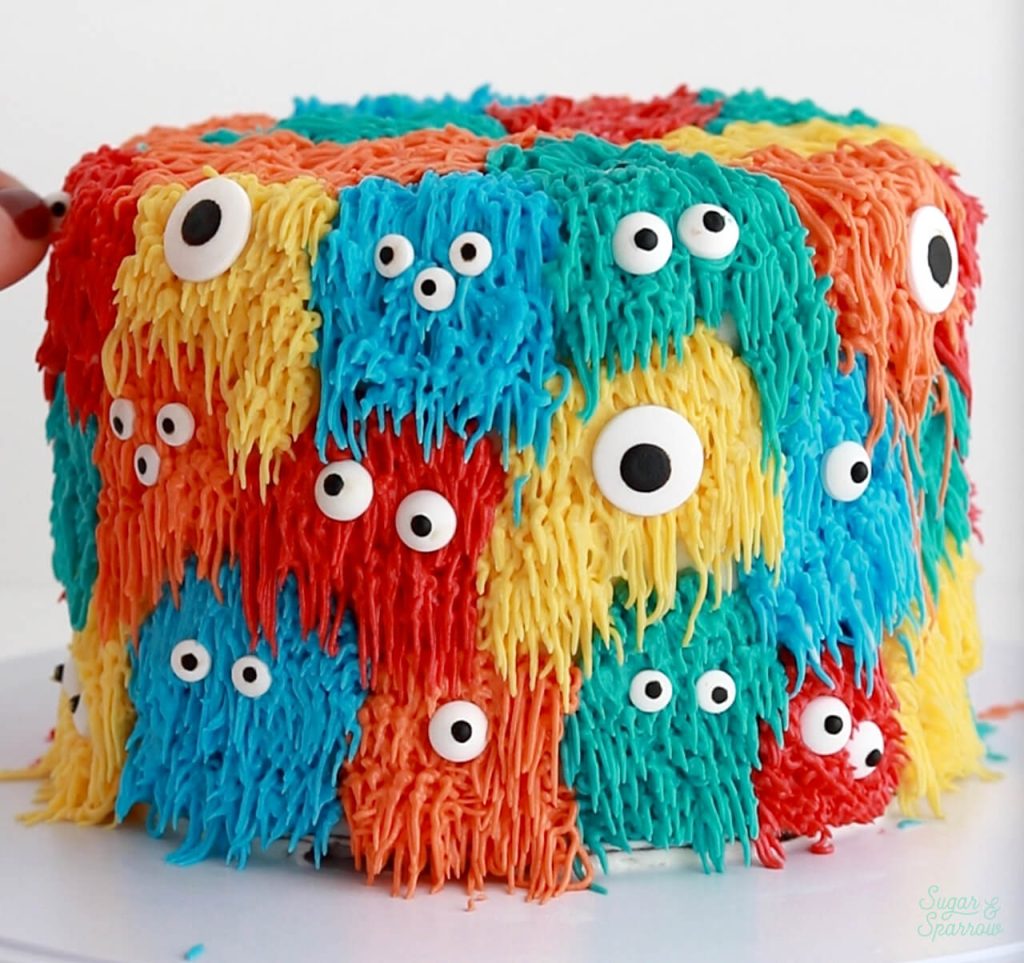
When you’re finished adding eyeballs to each and every monster, you’ll have the cutest Halloween cake ever. I love how this cake looks like the monsters are having a cozy little snuggle sesh. 

monster cake ideas for halloween
cute halloween cake ideas

Did you make this monster shag cake? I’d love to know how it turned out! Leave me a comment below and feel free to tag @sugarandsparrowco on Instagram to show me. I love to see what you create!

By: Whitney · In: Featured, Halloween, Seasonal, Tutorials · Tagged: candy eyeballs, halloween, halloween cake, monster cake, monster shag cake, shag buttercream, shag cake, wilton tip 233

you’ll also love

halloween jack o lantern candy bucket cake tutorialJack O Lantern Candy Bucket Cake Tutorial
halloween monster cake by sugar and sparrowButtercream Monster Cake Tutorial
mini black velvet layer cakeMini Black Velvet Cake Recipe

Join the List

Stay up to date & receive the latest posts in your inbox.

Reader Interactions

Comments

  1. Vee says

    May 13, 2025 at 1:29 pm

    I just want to say thank you! I’ve made four of your cake recipes so far found you on domestika first and went out and bought your book and today just made this came out so well! Thank you again!

    Reply
    • Whitney says

      May 14, 2025 at 12:09 pm

      Aw yay, Vee!! I’m so thrilled to be a little part of your cake journey + that you’ve been loving my recipes! Thanks for letting me know 🙂

      Reply
  2. Giggi says

    February 27, 2025 at 5:04 am

    My grandson picked this out for his birthday cake. I can’t wait to make it. Your cakes are incredible and I have never had a failed cake from your recipes. Thank you so much for all the work you put foward into shaaring with all of us. I will post after I make the cake 3rd week of April on FB & Instagram.

    Reply
    • Whitney says

      February 27, 2025 at 9:48 am

      So fun, Giggi! I can’t wait to see!

      Reply
  3. Hannah says

    May 31, 2024 at 8:18 pm

    Could this be made ahead the night before? Or once you ice it, does it need to be served within the hour(ish)? Thanks so much, I love the look of this!

    Reply
    • Whitney says

      June 2, 2024 at 2:27 pm

      Hi Hannah! You can totally make this cake ahead and keep it in the refrigerator until about 1-2 hours before serving. Enjoy!

      Reply
  4. Lisa says

    September 23, 2022 at 10:13 am

    OMG, Whitney! This is absolutely ADORABLE! You are so talented and I LOVE to see your creations. So inspiring! Thank you for sharing your love for cake and decorating with us!
    Have a great day!

    Reply
    • Whitney says

      September 27, 2022 at 11:05 am

      Thanks so much, Lisa! This one was so fun to make 🙂

      Reply

Leave a Reply Cancel reply

Your email address will not be published. Required fields are marked *

Recipe Rating


Next Post >

Edible Gold Crown Cake Topper Tutorial

Primary Sidebar

Welcome to Sugar & Sparrow

Welcome to Sugar & Sparrow

Helping you whip up pretty desserts with confidence and creativity. And hopefully sharing a few laughs with you along the way!

Learn More

Connect

let’s bake!

Get my very best recipes, baking tips, and decorating tutorials sent to your inbox

Featured Posts

Sugar and sparrow vanilla sheet cake

The Best Vanilla Sheet Cake Recipe

rainbow cake by sugar and sparrow

Sugar & Sparrow is TWO!

Sugar and Sparrow best cake recipes of 2023

Best of 2023

Search

Archives

Follow Along

@sugarandsparrowco

LEMON CUPCAKES 🍋 after about a dozen recipe tes LEMON CUPCAKES 🍋 after about a dozen recipe tests, this one is everything I could want in a lemon cupcake! Fluffy-yet-moist, bursting with natural lemon flavor, and absolutely irresistible topped with lemon cream cheese buttercream. 

Full recipe (with frosting) linked in my bio + at https://sugarandsparrow.com/homemade-lemon-cupcakes/

INGREDIENTS:
1 Cup (132g) all-purpose flour
1 tsp baking powder
1/4 tsp salt
1/4 Cup (60ml) whole milk, room temperature
3 Tbsp (45ml) lemon juice from 1 medium lemon
3/4 Cup (150g) granulated sugar
3 Tbsp (42g) unsalted butter, room temperature
2 Tbsp (30ml) vegetable oil
2 large eggs, room temperature
1 tsp pure vanilla extract

INSTRUCTIONS:
1. Preheat the oven to 350ºF (177ºF) and line a standard cupcake pan with 12 paper liners.
2. In a large bowl, whisk together the flour, baking powder, and salt. Set aside. 
3. In the bowl of a stand mixer fitted with the paddle attachment (or with a hand mixer and large bowl), add the lemon zest to the sugar and mix on low speed until fragrant and well combined, about 1 minute. Meanwhile, combine the lemon juice with the milk and set aside. 
4. Add the butter to the lemon-sugar mixture and cream on medium speed until and combined, about 2 minutes. Add the vegetable oil and beat until light and creamy, about 3 minutes. Scrape down the bowl and paddle as needed.
5. Mix in the eggs one at a time on low speed, then add the vanilla and turn the mixer to medium speed for one minute.
6. Turn the mixer off and add the flour mixture all at once. Mix on low speed until just combined, then slowly pour in the lemon-milk mixture. Mix until just combined, about 30 seconds.
7. Divide the batter equally between the liners and bake for 14-18 min. Cool, then top with frosting of your choice (link in bio for lemon cream cheese frosting)�
#lemoncupcakes #creamcheesefrosting #lemon #cupcakes #cupcakedecorating
April in my kitchen 🌸 I published 5 NEW recipes April in my kitchen 🌸 I published 5 NEW recipes on my site, baked my Oreo cupcake recipe for a fundraiser and found it was just as delicious as I remember, and filmed/photographed 3 recipes that will be on my blog in May (Lemon Cupcakes, Lemon Cream Cheese Buttercream, and No-Bake Marbled Strawberry Cheesecake) 🥰 

Comment “APRIL” to get all the available recipes and stay tuned for more! 

#bakersofinstagram #springbaking #cakedecorating #cupcakes #bakinglove
SHEET PAN COOKIE CAKE 🍪 slice it warm for a fud SHEET PAN COOKIE CAKE 🍪 slice it warm for a fudgy chocolate chip cookie OR let it settle into a moist and chewy cookie cake that’s perfect for decorating! My fave vanilla buttercream + sprinkles turn this giant chocolate chip cookie into the perfect birthday cake alternative at the end 🥳
⁣
Full recipe + decorating ideas at https://sugarandsparrow.com/sheet-pan-chocolate-chip-cookie-cake/
⁣
INGREDIENTS⁣
1 Cup (226g) unsalted butter, melted⁣
1 1/3 Cups (267g) packed light or dark brown sugar⁣
1/2 Cup (100g) granulated sugar⁣
3 large eggs⁣
1 Tbsp pure vanilla extract⁣
1 tsp baking soda⁣
1 tsp cornstarch⁣
1/2 tsp salt⁣
3 Cups (398g) all purpose flour⁣
2 Cups (350g) semi-sweet chocolate chips⁣
⁣
INSTRUCTIONS⁣
1. Preheat the oven to 350ºF (177ºC). Grease and line a 13×18 inch sheet pan.⁣
2. In a large bowl, add the brown sugar and granulated sugar. Melt the butter in the microwave and pour it over the top of the sugars. Whisk together until uniform. Add the eggs and vanilla, then continue whisking until uniform. Whisk in the baking soda, cornstarch, and salt.⁣
3. Add the flour and use a silicone spatula to fold it in until smooth cookie dough forms. Reserve 1/2 Cup of the chocolate chips and set them aside, then fold the remaining 1 1/2 Cups of chocolate chips into the cookie dough.⁣
4. Place the chocolate chip cookie dough onto the prepared sheet pan and use an offset spatula to spread it all the way to the edges in an even layer.⁣
5. Bake the cookie cake for 14-16 minutes, until it looks golden brown on the edges and set. 
6. Enjoy warm or let it cool and decorate with vanilla buttercream and sprinkles! ⁣
⁣
#cookiecake #chocolatechipcookies #sheetcake #birthdaycake #cakedecorating
STRAWBERRY CUPCAKES 🍓based on my beloved strawb STRAWBERRY CUPCAKES 🍓based on my beloved strawberry layer cake recipe, this cupcake version is just as moist yet fluffy and bursting with natural strawberry flavor! Between the mix of fresh strawberries in the cupcakes + freeze-dried strawberries in the frosting, the flavor is out of this world 🚀

Full recipe link in my bio (with strawberry buttercream) + at https://sugarandsparrow.com/strawberry-cupcakes/

STRAWBERRY CUPCAKES
Yield: 14 cupcakes

INGREDIENTS:
5 oz (143g) fresh or frozen strawberries
1/3 Cup (80ml) whole milk, room temp
1 1/2 Cups (158g) sifted cake flour
1 tsp baking powder
1/4 tsp baking soda
1/2 tsp salt
6 Tbsp (85g) unsalted butter, room temp
1 Cup (200g) granulated sugar
2 large eggs, room temp
3 Tbsp (45g) sour cream, room temp
1 tsp vanilla extract
1 drop pink food coloring (optional)

INSTRUCTIONS: 
1. Puree the strawberries using a food processor (you’ll have about 1/2 cup of puree), then place into a saucepan over medium-low heat. Bring to a simmer, then cook for 10-15 min, stirring occasionally, until you have 1/4 cup. Refrigerate until room temp.
2. Preheat oven to 350ºF (177ºC) and line a standard cupcake pan with liners.
3. Whisk together the sifted cake flour, baking powder, baking soda, and salt and set aside.
4. In a stand mixer w/ paddle attachment (or hand mixer + large bowl), whip the butter on high for 2 min. Add sugar and beat for 2 min, until light and fluffy. Turn the mixer to low and add the eggs one at a time, then add the vanilla and sour cream, turn the mixer to high and beat for 1 min. Meanwhile, whisk together the strawberry puree, whole milk, and food coloring (if using).
5. Turn the mixer off and add all of the dry ingredients at once. Mix on low until just combined, then add the strawberry milk mixture until just combined, about 30 seconds.
6. Fill the cupcake liners 2/3 full and bake for 14-18 minutes. Cool completely before topping with strawberry buttercream (full recipe linked above). 

#strawberrycupcakes #strawberrycake #pinkcupcakes #strawberry #cupcakes
COFFEE BUTTERCREAM (recipe below)☕️ this frost COFFEE BUTTERCREAM (recipe below)☕️ this frosting has AMAZING coffee flavor, is so easy to decorate cakes with, and pairs beautifully with so many flavors (chocolate, vanilla, or any cake flavor you’d want to turn into a latte). 

All my cake pairing suggestions are linked in my bio or at https://sugarandsparrow.com/coffee-buttercream-recipe/ 

COFFEE BUTTERCREAM⁣
Yield: 2.5 Cups⁣

INGREDIENTS⁣
1 1/2 tsp instant coffee or espresso powder⁣
1 1/2 Tbsp whole milk, room temperature⁣
1 Cup (226g) unsalted butter, room temperature⁣
3 1/2 Cups (420g) powdered sugar⁣
2 tsp pure vanilla extract⁣
Pinch of salt⁣

INSTRUCTIONS⁣
1. Combine the instant espresso/coffee with the whole milk and set aside. In the bowl of a stand mixer, beat the butter on high until creamy and smooth (about 5 minutes), scraping down the bowl and paddle a few times in between.⁣
2. Turn the mixer to low and add the powdered sugar a few cups at a time, scraping down the bowl and paddle between intervals. Add the vanilla, the coffee/espresso milk mixture, and salt. Mix on low until fully incorporated, about one minute.⁣

#coffeebuttercream #buttercream #frosting #coffeecake

Footer

On the Blog

  • Cake Basics
  • Recipes
  • Tutorials

Info

  • About
  • Privacy Policy & Disclosure

stay in the know

Copyright © 2026 · Theme by Sugar & Sparrow