• Cake
  • Frosting
  • YouTube
  • My Favorite Tools
  • Nav Social Icons

  • Skip to primary navigation
  • Skip to main content
  • Skip to primary sidebar
  • Skip to footer
  • Recipes
    • Cake
    • Cupcakes
    • Frosting
    • Ice Cream
    • Vegan
  • Cake Basics
  • Tutorials
  • Blog
  • About
  • Mobile Menu Widgets

    Connect

    Search

Sugar & Sparrow logo in script font

Sugar & Sparrow

Lifestyle and Cake from Portland Oregon

  • Cake Basics
  • Recipes
    • Cake
    • Cupcakes
    • Cookies & Bars
    • Filling
    • Frosting
    • Ice Cream
    • No-Bake
    • Small Batch
    • Vegan
  • Tutorials
  • Book
  • Blog
  • About

Pumpkin Chocolate Marble Cake with Brown Butter Frosting

September 23, 2022 · In: Cake, Fall, Featured, Recipes, Seasonal

Jump to Recipe

I’ve been dying to try a marble cake for awhile now and the thing that’s kept me from it was the thought of making two different cake batters. It sounded like too much effort just to have a pretty marble effect. BUT after some research it turns out there’s a way to make two different flavors from the same cake batter. A revolutionary idea! So in the spirit of Fall, I introduce to you my very first marble cake ever: pumpkin and chocolate swirled together in the same cozy cake layers. 

pumpkin marble cake recipe by sugar and sparrow

This pumpkin chocolate marble cake is perfectly spiced, super moist, and so ideal for autumn baking. It starts with whipping up my favorite pumpkin layer cake batter, then you’ll reserve some of the batter to mix with melted semi-sweet chocolate. Since it’s mixed with the pumpkin cake batter, the chocolate cake batter ends up with spiced undertones and is so tasty. I didn’t realize how well pumpkin and chocolate went together until I made this cake and I’m so happy to know! Those two batters get swirled together to give the resulting cake layer a beautiful marbled effect. 

marble cake recipe by sugar and sparrow
chocolate pumpkin marble cake recipe

I polled my Instagram followers about what frosting to pair with this pumpkin chocolate marble cake and the winner was brown butter frosting, which I was secretly hoping would win. Brown sugar frosting was a close second and if you’d rather go with that, this pumpkin pie layer cake includes a brown sugar frosting that you can use. But brown butter frosting, oh my. It is so tasty with these marbled cake layers! One of these days I’ll dedicate an entire blog post to it. 

pumpkin cake with brown butter frosting recipe

To make the brown butter frosting, you’ll add some of the butter into a frying pan, melt it over medium heat, and bring it to a simmer until it starts to turn foamy and light brown in color. It will start to smell nutty and you’ll see little brown bits forming. At this point you add it into a glass container and let it re-solidify before mixing it up into buttercream. It was my first time making brown butter frosting and I just can’t get over how tasty it is and those little brown bits in the buttercream finish make me swoon. 
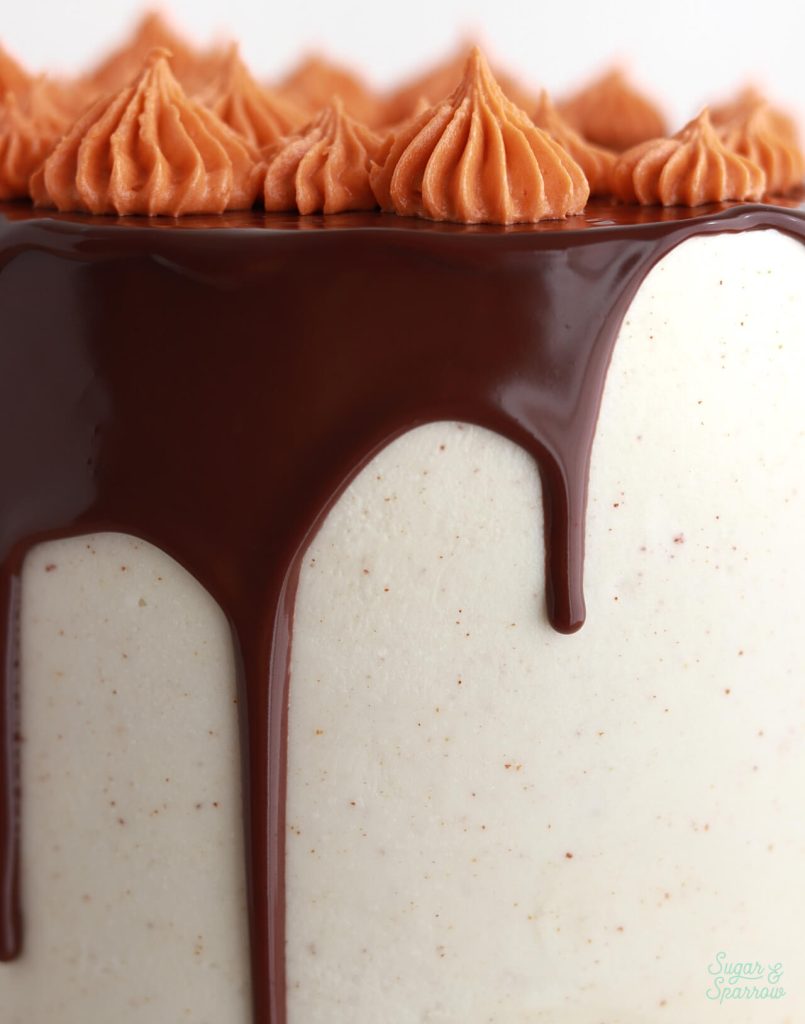
brown butter buttercream frosting recipe

After filling and topping this pumpkin marble cake with brown butter frosting, I added a chocolate ganache curtain drip. This is where you pour the ganache on top of the chilled cake and use an offset spatula to push curtains of ganache over the edges. It’s a bit more of a rustic technique than my traditional chocolate ganache technique, and I just love it on this cake. 

pumpkin chocolate cake recipe with brown butter frosting
pumpkin chocolate cake with brown butter buttercream

I tinted the remaining brown butter frosting with AmeriColor Burnt Orange and used Wilton Tips 6B and 4B to pipe a crescent of open stars. I wanted a little nod to the pumpkin flavor in this recipe without being too obvious. The real star of the show are the cake layers inside, so regardless of how you decorate, you’ll be super excited to cut into the cake and reveal all that marbling! 

pumpkin chocolate marble cake with brown butter frosting recipe
pumpkin chocolate marble cake

Pumpkin Chocolate Marble Cake with Brown Butter Frosting

5 from 1 vote
Deliciously spiced pumpkin and chocolate cake batters swirled together to create a marble effect in each layer. Paired beautifully with brown butter frosting and a chocolate ganache curtain drip.
Print Recipe Pin Recipe
Prep Time:1 hour hr
Cook Time:45 minutes mins
Servings: 15 slices

Ingredients

Pumpkin Chocolate Marble Cake

  • 4 Oz semi-sweet chocolate chips
  • 2 3/4 Cups (290g) sifted cake flour
  • 2 1/2 tsp baking powder
  • 1 tsp baking soda
  • 1 tsp salt
  • 2 tsp ground cinnamon
  • 1 tsp ground allspice
  • 1 tsp ground nutmeg
  • 1/2 tsp ground ginger
  • 1 Cup (226g) unsalted butter, room temperature
  • 3/4 Cup (140g) packed brown sugar
  • 1 Cup (200g) granulated sugar
  • 3 large eggs, room temperature
  • 2 tsp pure vanilla extract
  • 1 1/2 Cups (360g, 12oz) canned pumpkin purèe
  • 1 Cup (240g) full fat buttermilk* DIY recipe in notes

Brown Butter Buttercream Frosting

  • 2 Cups (452g) unsalted butter, room temperature, divided
  • 2 tsp pure vanilla extract
  • 7 Cups (840g) powdered sugar
  • 1/4 Cup (60ml) whole milk or heavy whipping cream, room temperature
  • 1/2 tsp salt

Chocolate Ganache Drip (optional)

  • 1/4 Cup (46g) semi-sweet chocolate chips
  • 1/4 Cup (60ml) heavy whipping cream

Instructions

Make the Pumpkin Chocolate Marble Cake

  • Preheat the oven to 350ºF and prepare three 6-inch or two 8-inch cake pans by spraying the sides with cooking spray and placing a wax or parchment paper circle into the bottom of each one.
  • Place the chocolate chips into a glass bowl and microwave in 15-20 second intervals, stirring after each one, until the chocolate is fully melted and uniform. Set aside to cool. Place the sifted cake flour into a medium sized bowl and add the baking powder, baking soda, salt, ground cinnamon, allspice, nutmeg, and ground ginger. Whisk together and set aside.
  • In the bowl of your stand mixer (a handheld mixer works fine too!), cream the butter on high for two minutes until it's light and fluffy. Add in white and brown sugars and continue to mix on high for another two minutes, scraping down the bowl and paddle as needed. Add the eggs one at a time, mixing thoroughly after each addition. Add pumpkin puree and vanilla and mix for one minute on medium-high, scraping down the bowl and paddle once more. It will look very curdled at this point, but don't worry! It will all come together after the next step.
  • With the mixer on low speed, add in the dry ingredients and mix until just combined. Add the buttermilk in a steady stream and mix until just incorporated. Scrape down the sides and bottom of the bowl and give it a few stirs to make sure there are no lumps. Batter will be slightly thick, but pourable.
  • Reserve about 2 Cups of the pumpkin cake batter (about 500g) into a separate small bowl and whisk in the cooled melted chocolate until the batter is uniform.
  • Place spoonfuls of the pumpkin cake batter and chocolate cake batter into each prepared cake pan and carefully swirl with a kitchen skewer or butter knife to create a marbled effect throughout the cake layer. Try not to over-swirl and make sure to fill each pan no more than 2/3 full. Bake for 32-36minutes, until a toothpick inserted comes out clean. Cool the cakes in the pan for ten minutes before removing and continuing to cool on a wire rack or flat surface.

Make the Brown Butter Buttercream Frosting

  • Brown the butter: Add 1 Cup of the unsalted butter into a large frying pan and cook over medium heat until the butter melts, stirring occasionally. Continue cooking for another 6-7 minutes while stirring constantly. The melted butter will start to foam on top, then will turn light brown in color and smell deliciously nutty. Remove from heat at this point and transfer to a glass container. Allow it to re-solidify for about 2 hours at room temperature or place it into the refrigerator for about 30 minutes. It should be completely room temperature and thick (about the consistency of a thick caramel) before continuing on with the buttercream recipe.
  • Once the brown butter is room temperature, cream the other 1 Cup of unsalted butter in the bowl of a stand mixer fitted with the paddle attachment. Mix on medium-high until creamy and light in color, about 5 minutes, scraping down the bowl and paddle as needed.
  • Add the cooled brown butter and vanilla and mix on medium speed until uniform. Turn the mixer to low speed and add the powdered sugar a few cups at a time, scraping down the bowl and paddle after mixing in each addition. Add the milk and salt and continue mixing on low speed until smooth.

Make the Chocolate Ganache (Optional)

  • Place chocolate chips into a heat resistant bowl (glass or metal). In a saucepan over medium-high heat, warm the heavy whipping cream until it just starts to simmer, then pour the cream over the chocolate and let sit for about 30 seconds. 
  • Whisk together until the ganache is uniform in consistency and there are no bits of chocolate left on your whisk. Cool the ganache at room temperature for 10-20 minutes, or until the ganache itself is room temperature or slightly above. 

Assembly

  • Once the cake layers have cooled completely, level them to your desired height. Fill and stack the layers with brown butter frosting, then crumb coat the cake with more brown butter frosting. Refrigerate the crumb coated cake for 20-30 minutes to let the frosting firm up.
  • To create the design pictured, use the brown butter frosting to create a smooth finish on the cake, then refrigerate it for at least 30 minutes before dripping the cake with a curtain drip of chocolate ganache (pour the cooled ganache over the top of the cake and use an offset spatula to nudge it over the edges).
  • Place the cake back into the refrigerator to let the ganache set while you tint the remaining brown butter frosting burnt orange (I used AmeriColor Burnt Orange for this part). Divide the frosting between two piping bags, one fitted with Wilton Tip 6B and one fitted with Wilton Tip 4B. Pipe open stars in a crescent formation around the top of the cake.

Notes

*DIY Buttermilk Recipe: Add 1 Tbsp white vinegar into a mason jar or measuring cup. Add one cup (240ml) whole milk and let sit for at least 15 minutes before using in a recipe. 
Make Ahead Tips: 
  1. The cake layers can be made ahead and stored, wrapped in plastic wrap, at room temperature for up to two days. Alternatively, you can store the wrapped cake layers in the freezer for up to 2 months before thawing and frosting.
  2. The brown butter can be made ahead and stored in a glass jar or airtight container in the refrigerator for up to two weeks. When you’re ready to use it, let it sit at room temperature until softened. 
  3. The brown butter buttercream frosting can be made ahead and stored in an airtight container in the refrigerator for up to two weeks. When you’re ready to use it, bring it back to room temperature and re-whip in your stand mixer to bring back to smooth buttercream consistency. 
  4. The chocolate ganache can be made ahead and stored in an airtight container in the refrigerator for up to two weeks. When you’re ready to use it, bring it back to drip consistency by gently heating it in 15-20 second intervals in the microwave, stirring after each one, until it becomes room temperature or slightly above. 

This pumpkin chocolate marble cake recipe is so perfect for any Fall gathering! I hope you love it as much as I do. Let me know what you think in the comments below and feel free to tag @sugarandsparrowco on Instagram if you post a pic! I love to see what you create.
By: Whitney · In: Cake, Fall, Featured, Recipes, Seasonal · Tagged: brown butter buttercream, brown butter frosting, curtain drip, fall cake, marble cake, pumpkin chocolate cake

you’ll also love

apple sheet cake with spiced buttercreamSpiced Apple Sheet Cake
spice cake recipe with brown butter cream cheese frostingSpice Cake with Brown Butter Cream Cheese Frosting
Peach Crisp Cake with Brown Butter Frosting

Join the List

Stay up to date & receive the latest posts in your inbox.

Reader Interactions

Comments

  1. Desiree says

    September 11, 2025 at 7:08 pm

    Can i make this into cupcakes?

    Reply
    • Whitney says

      September 11, 2025 at 9:14 pm

      Hi Desiree! Yes, this recipe will bake well as cupcakes. Be sure to fill your cupcake tins no more than 2/3 full (scoop a little of each batter in and swirl with a toothpick) and bake at 350F for 14-18 minutes. Enjoy!

      Reply
  2. Mary Pietrantuono says

    October 5, 2023 at 4:05 am

    If I don’t have cake flour will all purpose be fine?? Would i have to alter the measurement?

    Reply
    • Whitney says

      October 6, 2023 at 9:27 am

      Hi Mary! If you don’t have access to cake flour I recommend making a homemade version with all purpose flour. Here’s how: https://sugarandsparrow.com/homemade-cake-flour-recipe/

      Reply
  3. Abby says

    November 14, 2022 at 6:13 am

    Thank you Whitney. I tried the recipe using the vanilla cake cake recipe, then i added the melted chocolate chip. It tasted really good but not as moist. Apart from that, everyone loved it.

    Would you recommend i add more milk next time,since this recipe used pumpkin puree which might have made the batter thinner?

    Reply
    • Whitney says

      November 14, 2022 at 8:45 pm

      Hi Abby! The pumpkin/chocolate combo was actually my first time making a marble cake so I haven’t had the chance to try it with vanilla/chocolate yet. I assumed it would work with my vanilla cake recipe as a starting point, but since I haven’t had the chance to experiment with the recipe I can’t say what would make it better. I do plan on testing a vanilla/chocolate marble cake in the future (I’ll probably try adding cocoa powder as an alternative to the melted chocolate chips), so I’ll let you know.

      Reply
  4. Abby says

    November 9, 2022 at 12:43 pm

    Do I need to add buttermilk if I am making vanilla and chocolate marble cake?

    Reply
    • Whitney says

      November 9, 2022 at 9:18 pm

      Hi Abby! If you’re doing a vanilla and chocolate marble cake, I would start with my vanilla buttercream batter, which doesn’t use buttermilk: https://sugarandsparrow.com/vanilla-cake-recipe/

      Reply
  5. Erica Brawley says

    October 16, 2022 at 2:03 pm

    Could I substitute the pumpkin with your vanilla cake recipe to make a vanilla and chocolate marble cake?

    Reply
    • Whitney says

      October 17, 2022 at 1:20 pm

      Hi Erica! Yes, that should totally work!

      Reply
  6. Megan says

    October 2, 2022 at 1:42 pm

    5 stars
    Super moist, turned out great

    Reply
    • Whitney says

      October 6, 2022 at 9:04 pm

      Yay, Megan! I’m so happy to hear that!

      Reply

Leave a Reply Cancel reply

Your email address will not be published. Required fields are marked *

Recipe Rating


Next Post >

Easy Salted Caramel Recipe

Primary Sidebar

Welcome to Sugar & Sparrow

Welcome to Sugar & Sparrow

Helping you whip up pretty desserts with confidence and creativity. And hopefully sharing a few laughs with you along the way!

Learn More

Connect

let’s bake!

Get my very best recipes, baking tips, and decorating tutorials sent to your inbox

Featured Posts

mini black velvet layer cake

Mini Black Velvet Cake Recipe

buttercream recipe for hot weather

Stable Vanilla Buttercream Recipe for Hot Weather

chocolate buttercream recipe

Favorite Chocolate Buttercream Recipe

Search

Archives

Follow Along

@sugarandsparrowco

DYE-FREE BLACK BUTTERCREAM 🖤 (recipe below) there DYE-FREE BLACK BUTTERCREAM 🖤 (recipe below) there is ZERO food coloring in this black buttercream recipe which means it won’t turn your mouth black (or anything else 💩) + it tastes like Oreo cookie butter so it’s a win all around!! The key is to use EXTRA dark black cocoa powder, which also comes in handy in my black velvet cake recipe 🙌🏼 ideal secret ingredient for your Halloween cakes! 
⁣
Full recipe (and the black cocoa powder I use!) is linked in my bio and at https://sugarandsparrow.com/dye-free-black-buttercream/
⁣
DYE-FREE BLACK BUTTERCREAM⁣⁣
Yield: 2.5 Cups⁣⁣
⁣⁣
INGREDIENTS:⁣⁣
1 Cup (226g) unsalted butter, room temp
2 1/2 Cups (300g) powdered sugar⁣⁣
1/2 Cup (56g) EXTRA DARK black cocoa powder⁣⁣*
1 tsp pure vanilla extract⁣⁣
2 Tbsp whole milk, room temp
pinch of salt⁣⁣
⁣⁣
INSTRUCTIONS:⁣⁣
1. In a stand mixer fitted with the paddle attachment, whip the butter on medium speed until creamy and light in color, 4 min. Add half of the powdered sugar and mix on low until just combined, then add the rest of the powdered sugar. With the mixer still in the off position, sift in the black cocoa powder and add the vanilla, milk, and salt. Mix on low until all ingredients are thoroughly combined, 2-3 minutes, scraping down the bowl and paddle as needed.⁣⁣
2. Place the buttercream in an airtight container and allow the color to deepen for 24 hours or more. ⁣⁣

*I use a brand called The Cocoa Trader that I get on Amazon. It’s the darkest black cocoa powder I’ve seen so far!!
⁣⁣
#blackbuttercream #naturalfoodcoloring #blackcake #buttercream #blackcocoapowder
SMALL BATCH pumpkin cake with cream cheese frostin SMALL BATCH pumpkin cake with cream cheese frosting 🧡 This mini cake is a scaled down version of my favorite pumpkin cake recipe + makes the perfect amount for 2-4 people! Bake it as a 4-inch mini layer cake or a single layer 6-inch cake, either way is absolutely delicious and the perfect for date night, a small gathering, or any time you’re craving pumpkin cake without having to make a huge dessert 🙌🏽

Comment RECIPE and I’ll send you the full recipe (with thick and stable cream cheese frosting!) or find it linked in my bio + at https://sugarandsparrow.com/small-batch-pumpkin-cake/ 

INGREDIENTS 
2/3 Cup (88g) all-purpose flour
1 tsp baking powder
1/4 tsp baking soda
1/4 tsp salt
1 tsp ground cinnamon
1/2 tsp allspice
1/4 tsp nutmeg
1/8 tsp ground ginger
1/3 Cup (67g) packed brown sugar
2 Tbsp (25g) granulated sugar
1/3 Cup (80ml) vegetable oil or melted butter
1 large egg, room temp
1/2 Cup (125g) canned pumpkin puree
1/2 tsp pure vanilla extract

INSTRUCTIONS
1. Preheat the oven to 350ºF (177ºC). Grease and line three 4-inch cake pans or one 6-inch cake pan.
2. In a medium bowl, whisk together the all-purpose flour, baking powder, baking soda, salt, cinnamon, allspice, nutmeg, and ground ginger. Set aside.
3. In a separate medium bowl, add the brown sugar, granulated sugar, vegetable oil (if using melted butter in place of the oil, cool it for 5-10 minutes prior to adding here), egg, pumpkin puree, and vanilla extract. Whisk together until uniform, then add the flour mixture and whisk until smooth.
4. Pour the batter evenly between the prepared cake pan(s). If using 4-inch cake pans, bake for 22-26 minutes. If using a 6-inch cake pan, bake for 25-30 minutes. Cool completely before frosting (full recipe with cream cheese buttercream is linked in my bio!)

#pumpkincake #smallbatchcake #minicake #creamcheesefrosting #fallbaking
TOP 10 FALL CAKES 🍂 These are not only MY favorite TOP 10 FALL CAKES 🍂 These are not only MY favorite Fall cake recipes, they’re yours too! 🥰

Comment “FALL” and I’ll send you all of the cake recipes shown here and all 36+ of my favorite Fall baking ideas – classic cakes like pumpkin cake with cream cheese frosting, spice cake, and cranberry orange cake, more complex flavor combinations like chocolate pecan pie cake with salted caramel and apple crisp cake, and cozy recipes like no-bake pumpkin cheesecake, homemade salted caramel, and my favorite brown butter chocolate chip cookie bars. 

https://sugarandsparrow.com/fall-baking-recipes/

#pumpkincake #applecake #fallcake #cakeinspiration #cakeideas
The BEST pumpkin cake with cream cheese frosting 🧡 The BEST pumpkin cake with cream cheese frosting 🧡 this pumpkin layer cake is easy to make, perfectly spiced, so moist, irresistible with cream cheese frosting, and uses the ENTIRE 15oz can of pumpkin (no awkward leftovers!). Top it with pretty piped pumpkins to make it extra cute 🥰

Comment RECIPE to get the full recipe (with frosting + cake decorating tutorial) or find it linked in my bio and at https://sugarandsparrow.com/pumpkin-layer-cake-recipe/

INGREDIENTS
2 Cups (265g) all-purpose flour
2 tsp baking powder
1 tsp baking soda
1 tsp salt
2 tsp ground cinnamon
1 tsp allspice
1 tsp nutmeg
1/2 tsp ground ginger
1 Cup (200g) packed brown sugar
1/2 Cup (100g) granulated sugar
1 Cup (240ml) vegetable oil or melted butter
4 large eggs, room temp
15 Oz (425g) canned pumpkin puree
2 tsp pure vanilla extract

INSTRUCTIONS
1. Preheat the oven to 350ºF (177ºC). Grease and line three 6-inch or two 8-inch cake pans.
2. In a medium bowl, whisk together the all-purpose flour, baking powder, baking soda, salt, cinnamon, allspice, nutmeg, and ground ginger. Set aside.
3. In a separate large bowl, add the brown sugar, granulated sugar, oil (if using melted butter in place of the oil, cool it for 5-10 minutes prior to adding here), eggs, pumpkin puree, and vanilla extract. Whisk together until uniform, then add the flour mixture and whisk until smooth.
4. Pour the batter evenly between the prepared cake pans and bake for 32-36 minutes, until a toothpick inserted comes out clean or with just a few moist crumbs. Cool the cakes completely to room temp before frosting!

#pumpkincake #creamcheesefrosting #layercake #cake #fallbaking
EASY HOMEMADE SALTED CARAMEL✨(recipe below) even i EASY HOMEMADE SALTED CARAMEL✨(recipe below) even if you’ve never made salted caramel from scratch before, this recipe is VERY beginner friendly + nearly fail proof! There are only 4 ingredients involved, no candy thermometer required, and takes just 10 minutes to make 👏🏽 this is my go-to caramel for drip cakes, drizzling desserts, flavoring coffee, adding it to buttercream, and so much more! 🍯  
 
Full recipe (with video + detailed instructions) linked in my bio or at https://sugarandsparrow.com/salted-caramel-recipe/
⁣ 
SALTED CARAMEL 
Yield: 1.25 Cup⁣s
⁣⁣ 
Ingredients:⁣⁣ 
1 Cup (200g) white granulated sugar⁣⁣ 
6 Tbsp (85g) unsalted butter, room temperature, cut into cubes⁣⁣ 
1/2 Cup (120ml) heavy whipping cream, room temperature⁣⁣ 
1 1/4 tsp kosher salt⁣⁣ 
⁣⁣ 
Instructions:⁣⁣ 
1. Place the sugar in a medium saucepan over medium-high heat and stir constantly until it melts into an amber-colored liquid and no sugar clumps remain, 5-6 minutes. ⁣⁣ 
2. Reduce the heat to medium. Carefully add the butter (it will bubble up when you do) and use a whisk to combine it with the sugar mixture until the butter is fully melted and incorporated, 2-3 minutes. ⁣⁣ 
3. Add the heavy whipping cream in a steady stream while whisking. As soon as the cream is incorporated, let the caramel boil for a full minute before removing it from the heat and stirring in the salt. ⁣⁣ 
4. Let the caramel cool to room temperature before using it in a cake recipe or as a drip. If you’re using it to drizzle over ice cream or warm baked goods, you only need to cool it slightly (20 minutes or so). It will thicken as it cools. ⁣⁣ 
⁣⁣ 
#caramel #saltedcaramel #bakedfromscratch #caramelcake #caramelsauce

Footer

On the Blog

  • Cake Basics
  • Recipes
  • Tutorials

Info

  • About
  • Privacy Policy & Disclosure

stay in the know

Copyright © 2026 · Theme by Sugar & Sparrow