• Cake
  • Frosting
  • YouTube
  • My Favorite Tools
  • Nav Social Icons

  • Skip to primary navigation
  • Skip to main content
  • Skip to primary sidebar
  • Skip to footer
  • Recipes
    • Cake
    • Cupcakes
    • Frosting
    • Ice Cream
    • Vegan
  • Cake Basics
  • Tutorials
  • Blog
  • About
  • Mobile Menu Widgets

    Connect

    Search

Sugar & Sparrow logo in script font

Sugar & Sparrow

Lifestyle and Cake from Portland Oregon

  • Cake Basics
  • Recipes
    • Cake
    • Cupcakes
    • Cookies & Bars
    • Filling
    • Frosting
    • Ice Cream
    • No-Bake
    • Small Batch
    • Vegan
  • Tutorials
  • Book
  • Blog
  • About

Buttercream Knitted Sweater Cake Tutorial

November 13, 2019 · In: Fall, Featured, Holiday, Seasonal, Tutorials, Winter

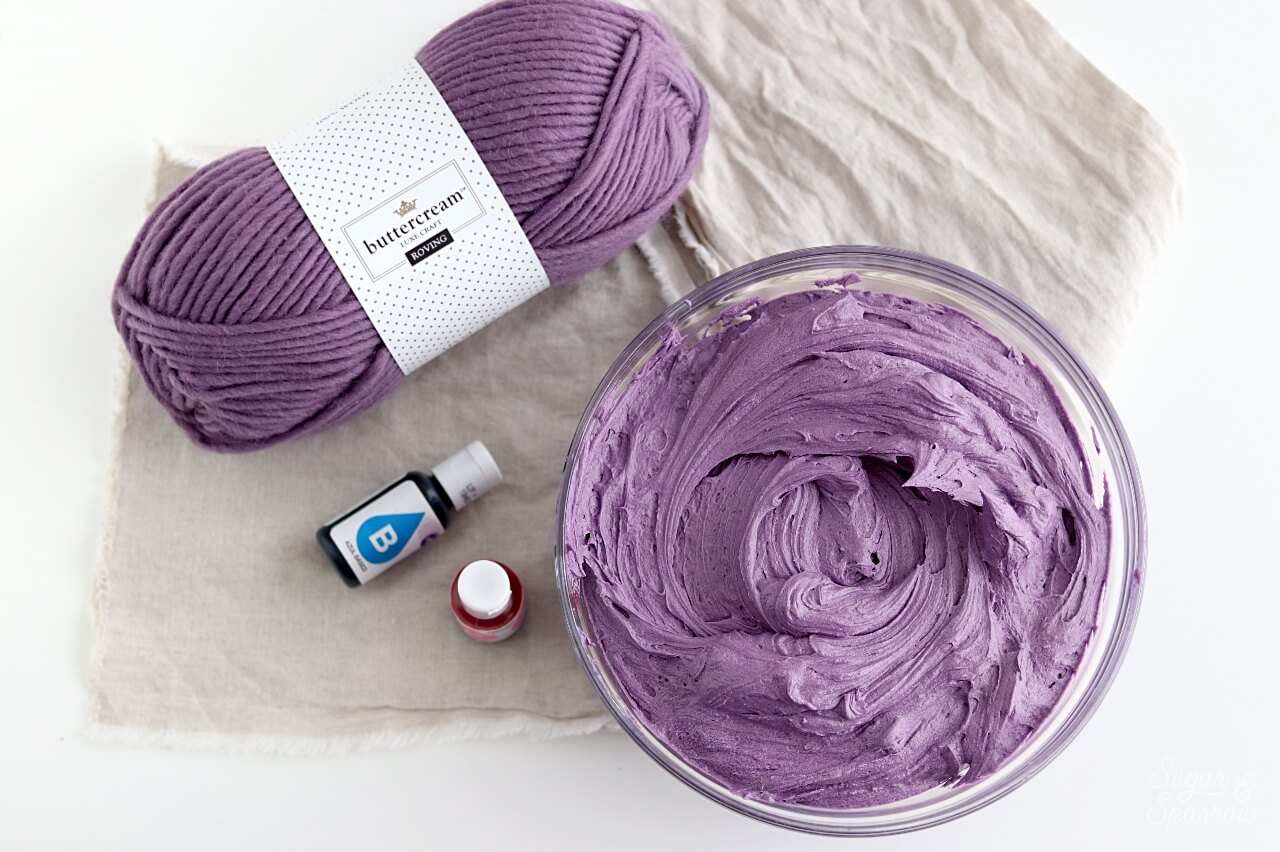
I don’t know about you, but every time I go to a JOANN store I end up wandering down all the aisles and tossing things into my cart that I did not expect (but am pleasantly surprised!) to find. Things like the perfect throw pillows for my couch, pretty pots for my plant babies, and just the other day, I wandered down the yarn aisle and stumbled upon a purple wool yarn by a brand called Buttercream (similar here). It felt like fate, because I want to learn to knit irl and was in need of some Fall cake inspiration. I may not be able to knit a cozy sweater yet, but I sure can make a buttercream cake look knitted with the right piping tips!

UPDATE 2025: JOANN has (sadly!!) gone out of business, so I have slightly changed these product links.

knitted buttercream cake tutorial

After the impulse Buttercream yarn purchase and a bit of research on knitted buttercream piping techniques, I decided to order all of the supplies on JOANN’s website and use their in-store pickup option just to see what it was like. I was so happy with how convenient it was! Did it stop me from wandering down the aisles and impulse buying some Fall home decor? Absolutely not. But it is so nice to know that the items I needed were ready and waiting for me at the checkout counter.

JOANN cake decorating supplies

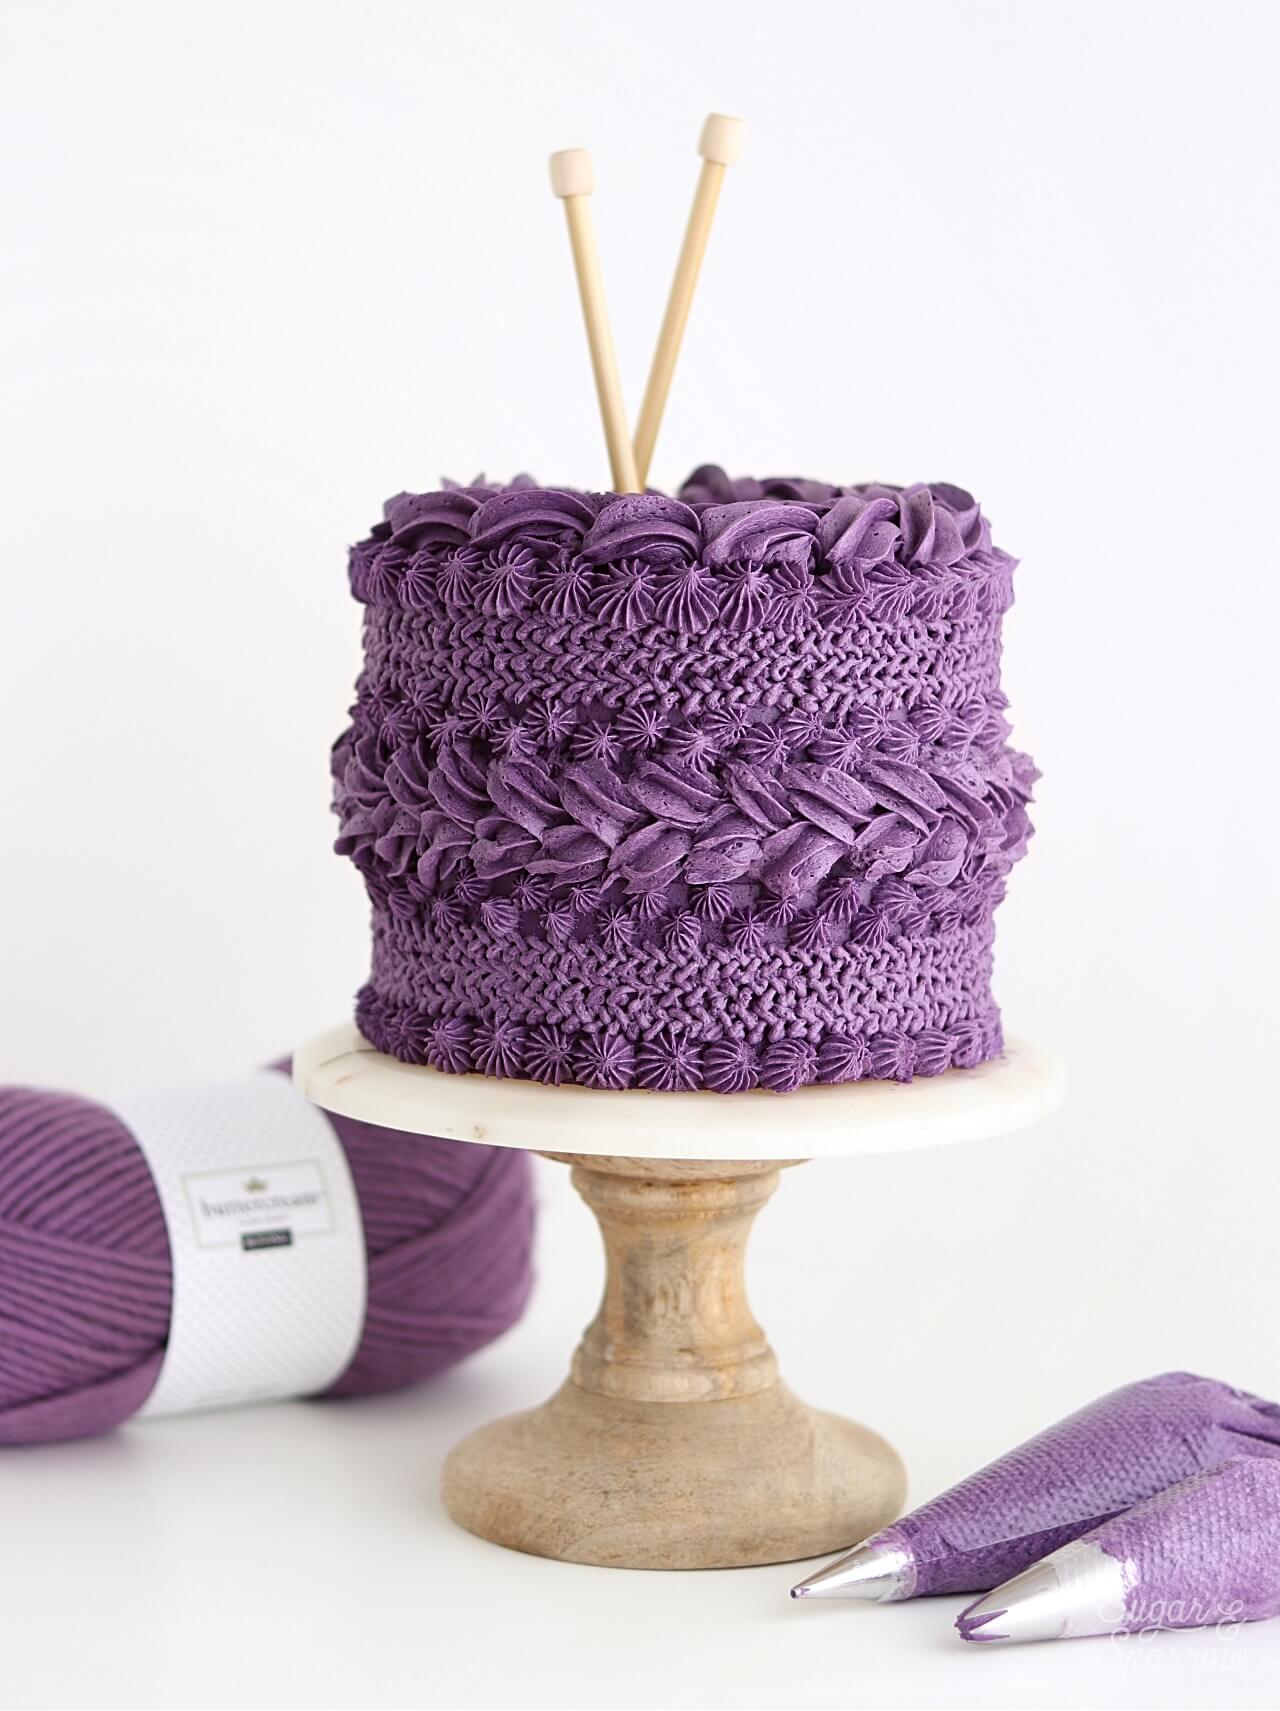
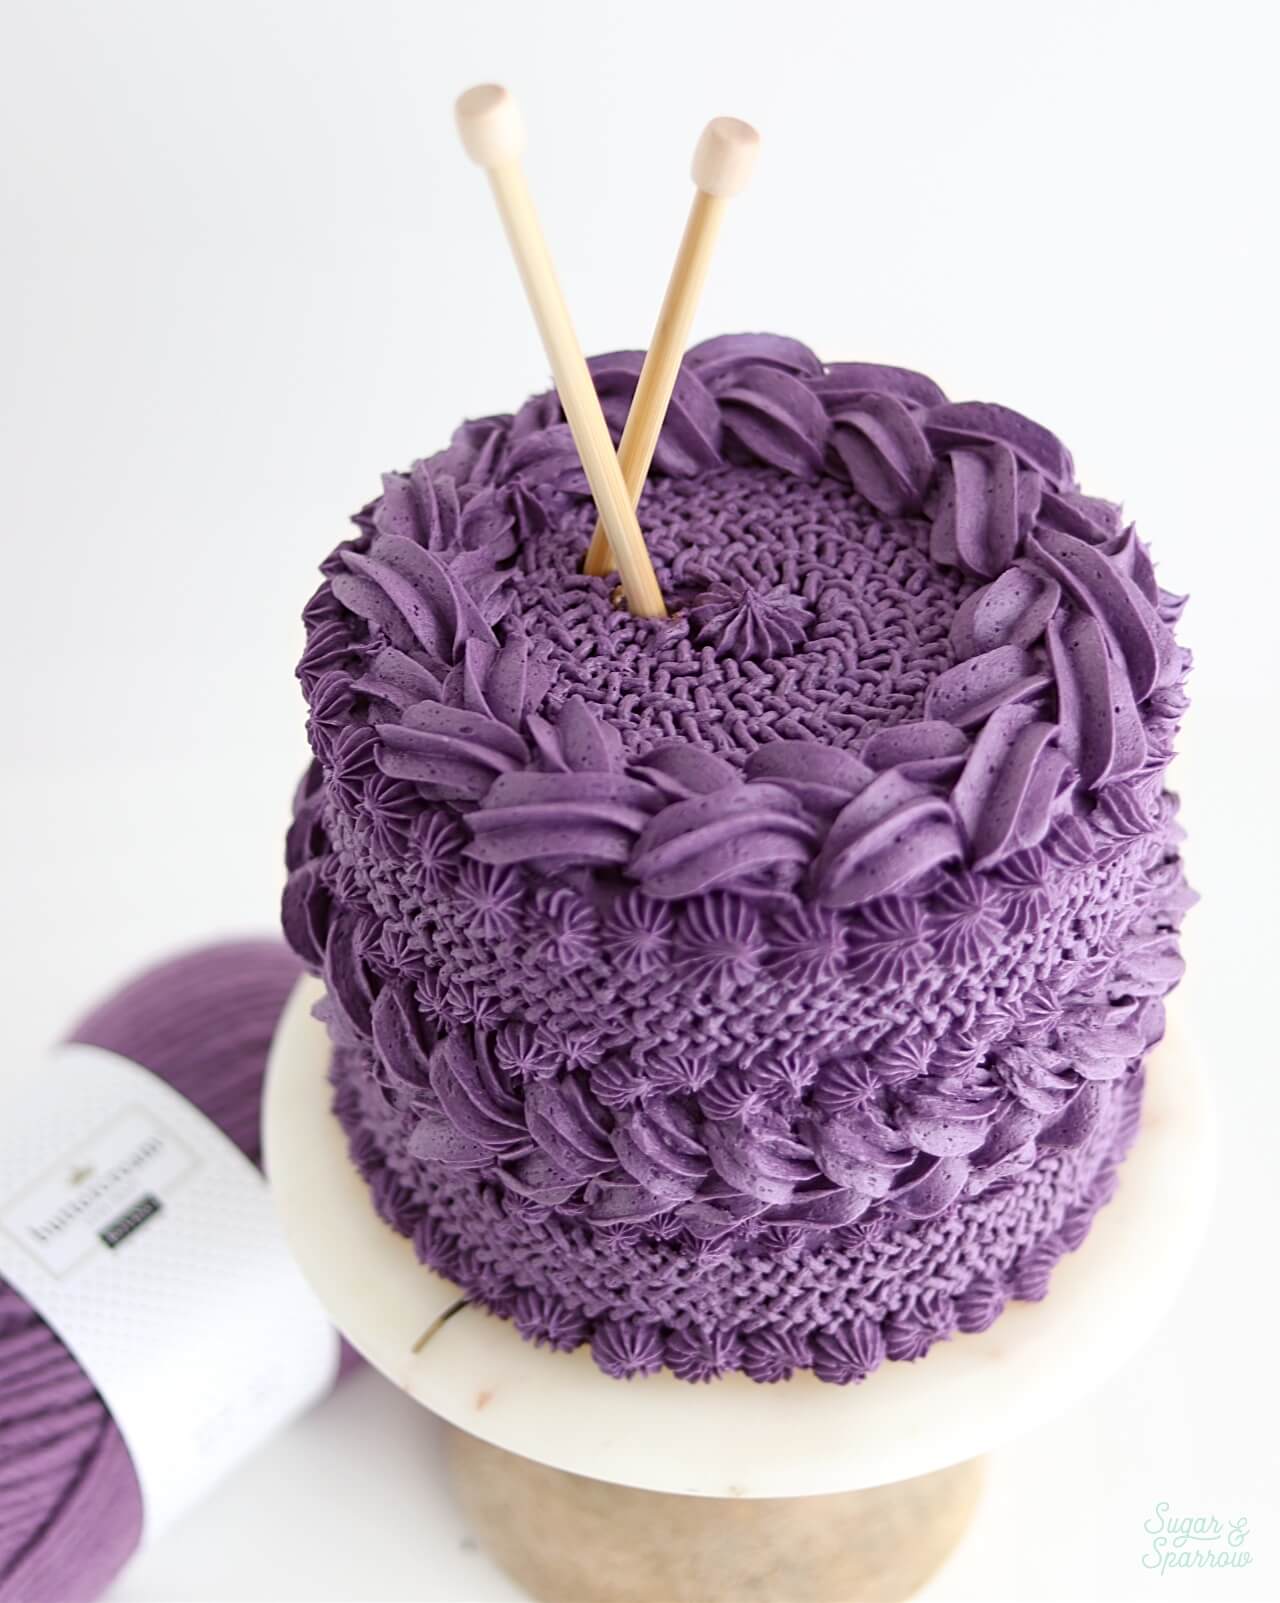
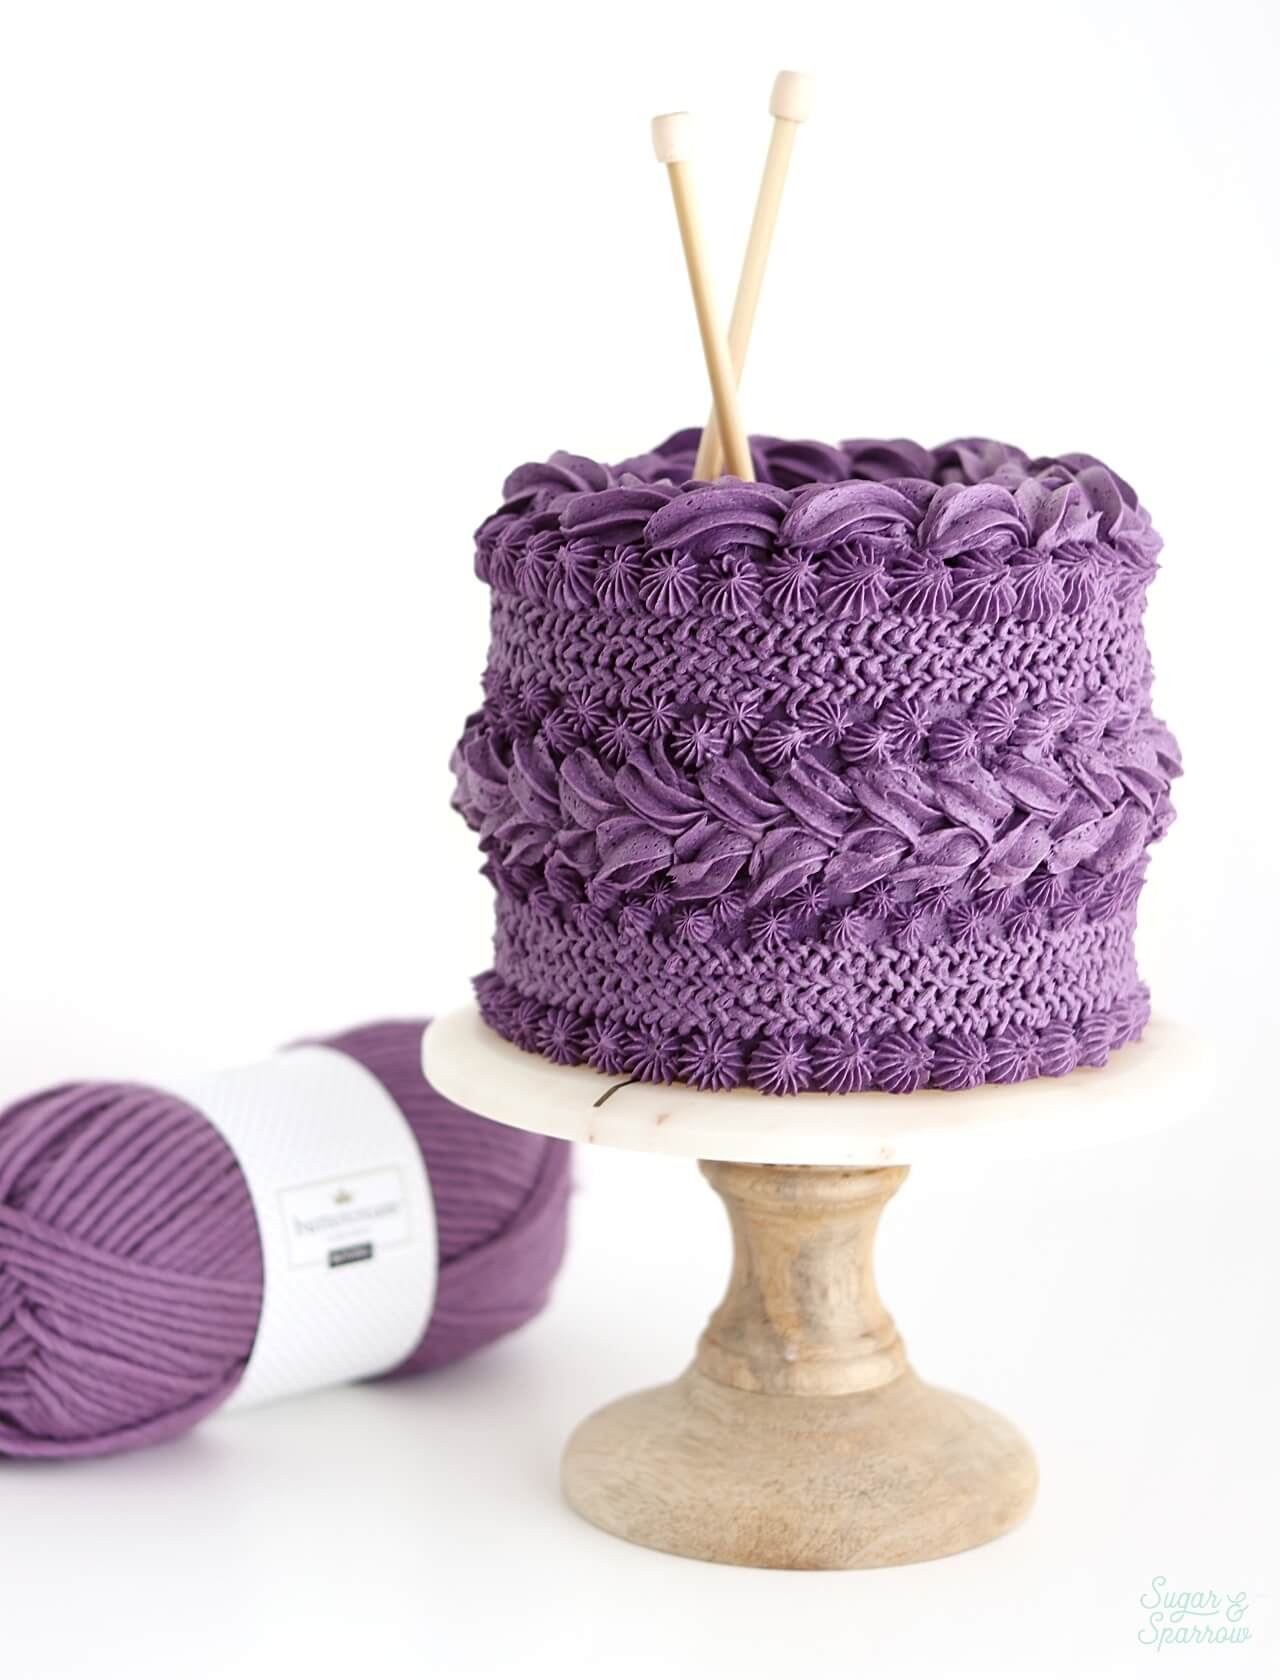
This cake requires just three piping tips (Wilton 1M, 4B, and 3) and an extra dose of patience, which is so worth it for this end result! There’s a major pro tip in the tutorial below that details how to get the knit lines so straight. I used a custom mix of pink and blue color gel to create the purple buttercream color and it matched the yarn perfectly! And as an optional cake topper, I found the perfect bamboo knitting needles to finish the look. I love everything about this cake.

How to make a knitted buttercream cake
sweater cake tutorial

Here’s a quick video to show you all the tips and techniques before you read all about them below:

If you’re into video tutorials like this, be sure to check out my YouTube channel. There are tons of videos there to inspire you and show you the ropes of cake decorating! And I’m always rolling out new ones, so be sure to subscribe so you don’t miss a thing.

You Will Need

  • 6 inch cake that’s been crumb coated and chilled
  • 1.5 batches of vanilla buttercream 
  • Food color gels of your choice (optional)
  • Cake turntable
  • Angled spatula
  • Icing Smoother
  • Square toothed cake comb
  • Wilton Tips 1M, 4B, and 3
  • Piping bags 

Step 1: Color the Buttercream (optional)

You can choose to leave the buttercream white or tint it with some food color gels of your choice. I ended up mixing together some pink and blue color gel to custom mix the perfect purple tone to match the yarn.

how to color buttercream with wilton color right system

Step 2: Frost the Cake

Before we start piping, I find it best to frost a thin layer of smooth buttercream beneath the piped finish. This way any spaces that peek through your piped patterns will match exactly, making the texture look flawless. With your chilled, crumb coated cake on the turntable, smooth a thin layer of buttercream on top of the cake using your angled spatula, then cover the sides with buttercream. 

how to frost a cake with buttercream
how to frost a cake

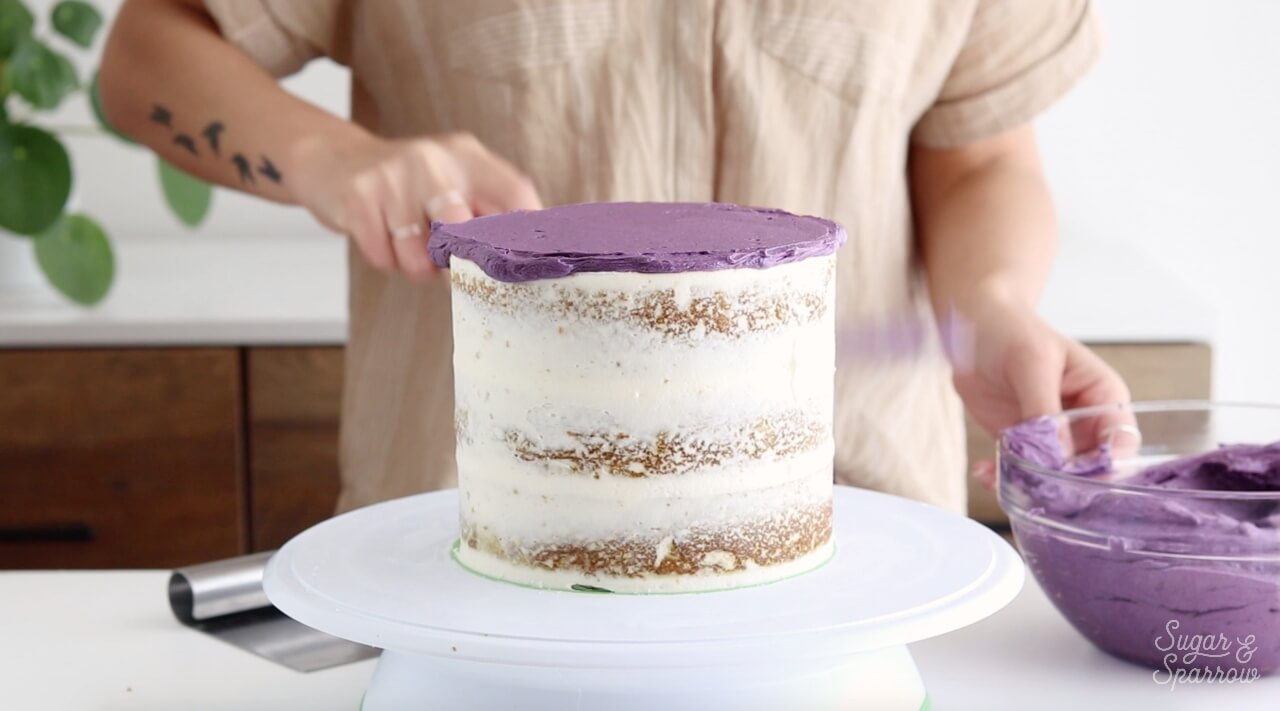
Next, use your icing smoother to create a smooth, even buttercream finish. No need to worry about small imperfections, but make sure the sides are as straight and level as possible.

how to frost a cake with smooth buttercream

You’ll notice a little crown appear around the top edge as you smooth the sides of the cake, and you can use your angled spatula to drag those edges inward to create sharp edges. 

Step 3: Create the Guidelines

If you’re wondering how to get the knitted piping perfectly straight horizontally, this is my favorite hack. I used the square tooth comb from this set to gently create evenly spaced horizontal lines around the cake. Just turn the cake while you gently comb the sides.

how to use an icing comb on buttercream cake

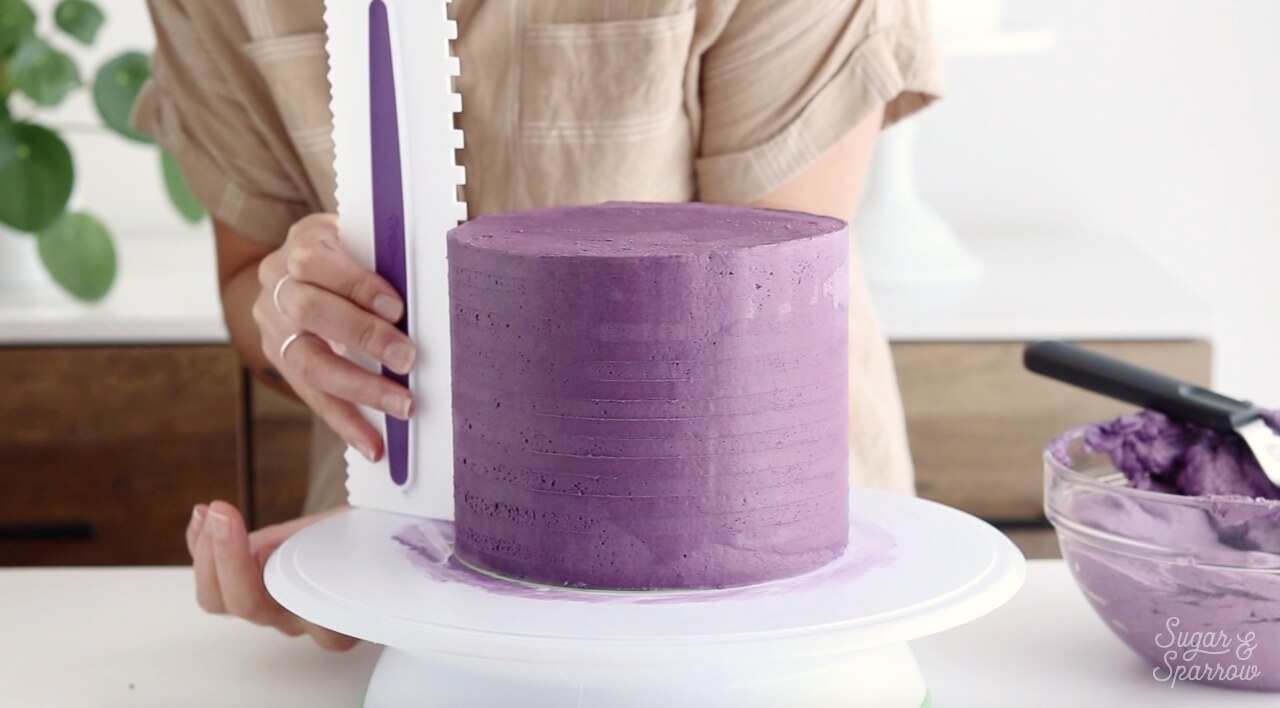
And for the top, I placed the same icing comb onto the center and swirled it around to create lines there too. These lines are the perfect piping guide! 

how to use an icing comb

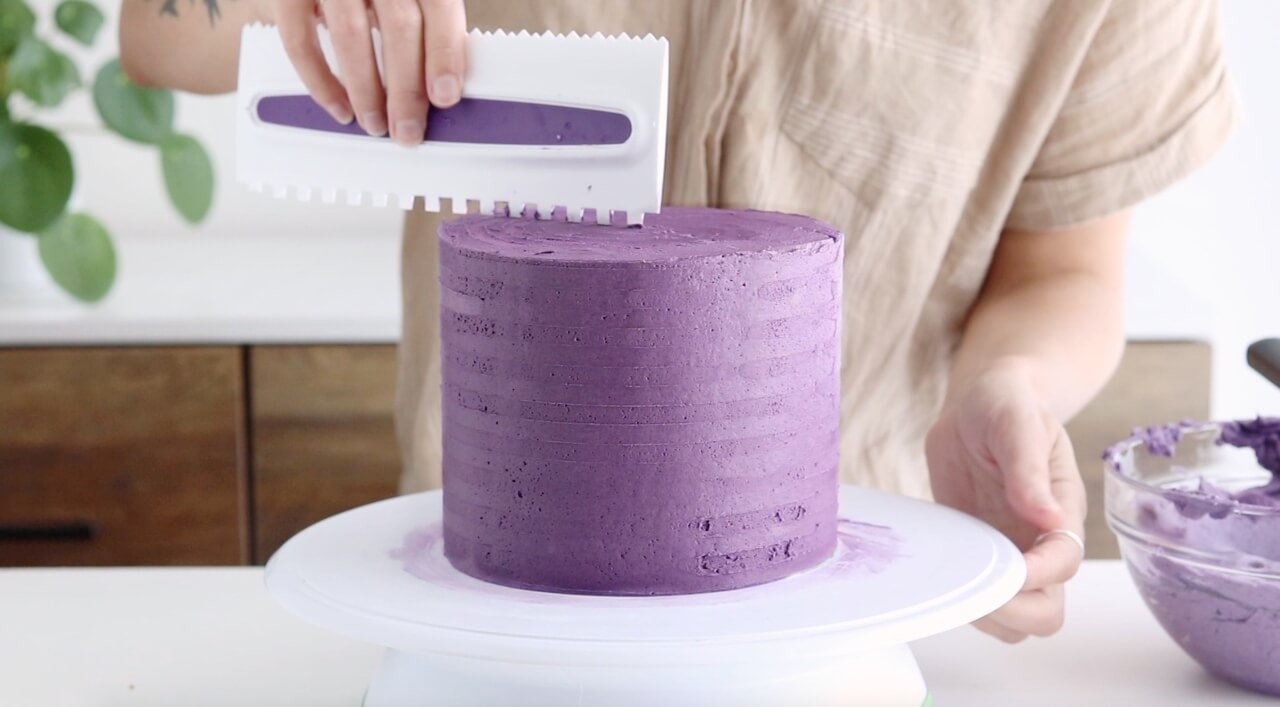
Once your cake finish is perfectly striped, pop the cake into the refrigerator to chill for about 20 minutes while you practice your piping.

Step 4: Practice Piping Techniques and Make a Plan 

While your cake is chilling, it’s best to prepare your piping bags and make a plan before you begin piping on the cake. Count how many rows (the lines from step 3) you’ve got on your cake and draw them out on a piece of paper. I had 17 rows to fill in, and knowing that helped me plan out which piping techniques I wanted to use on each section of the cake. Feel free to copy the pattern in step 5 if you have 17 rows, adjust it to fit more or less rows, or draw out your own design!  

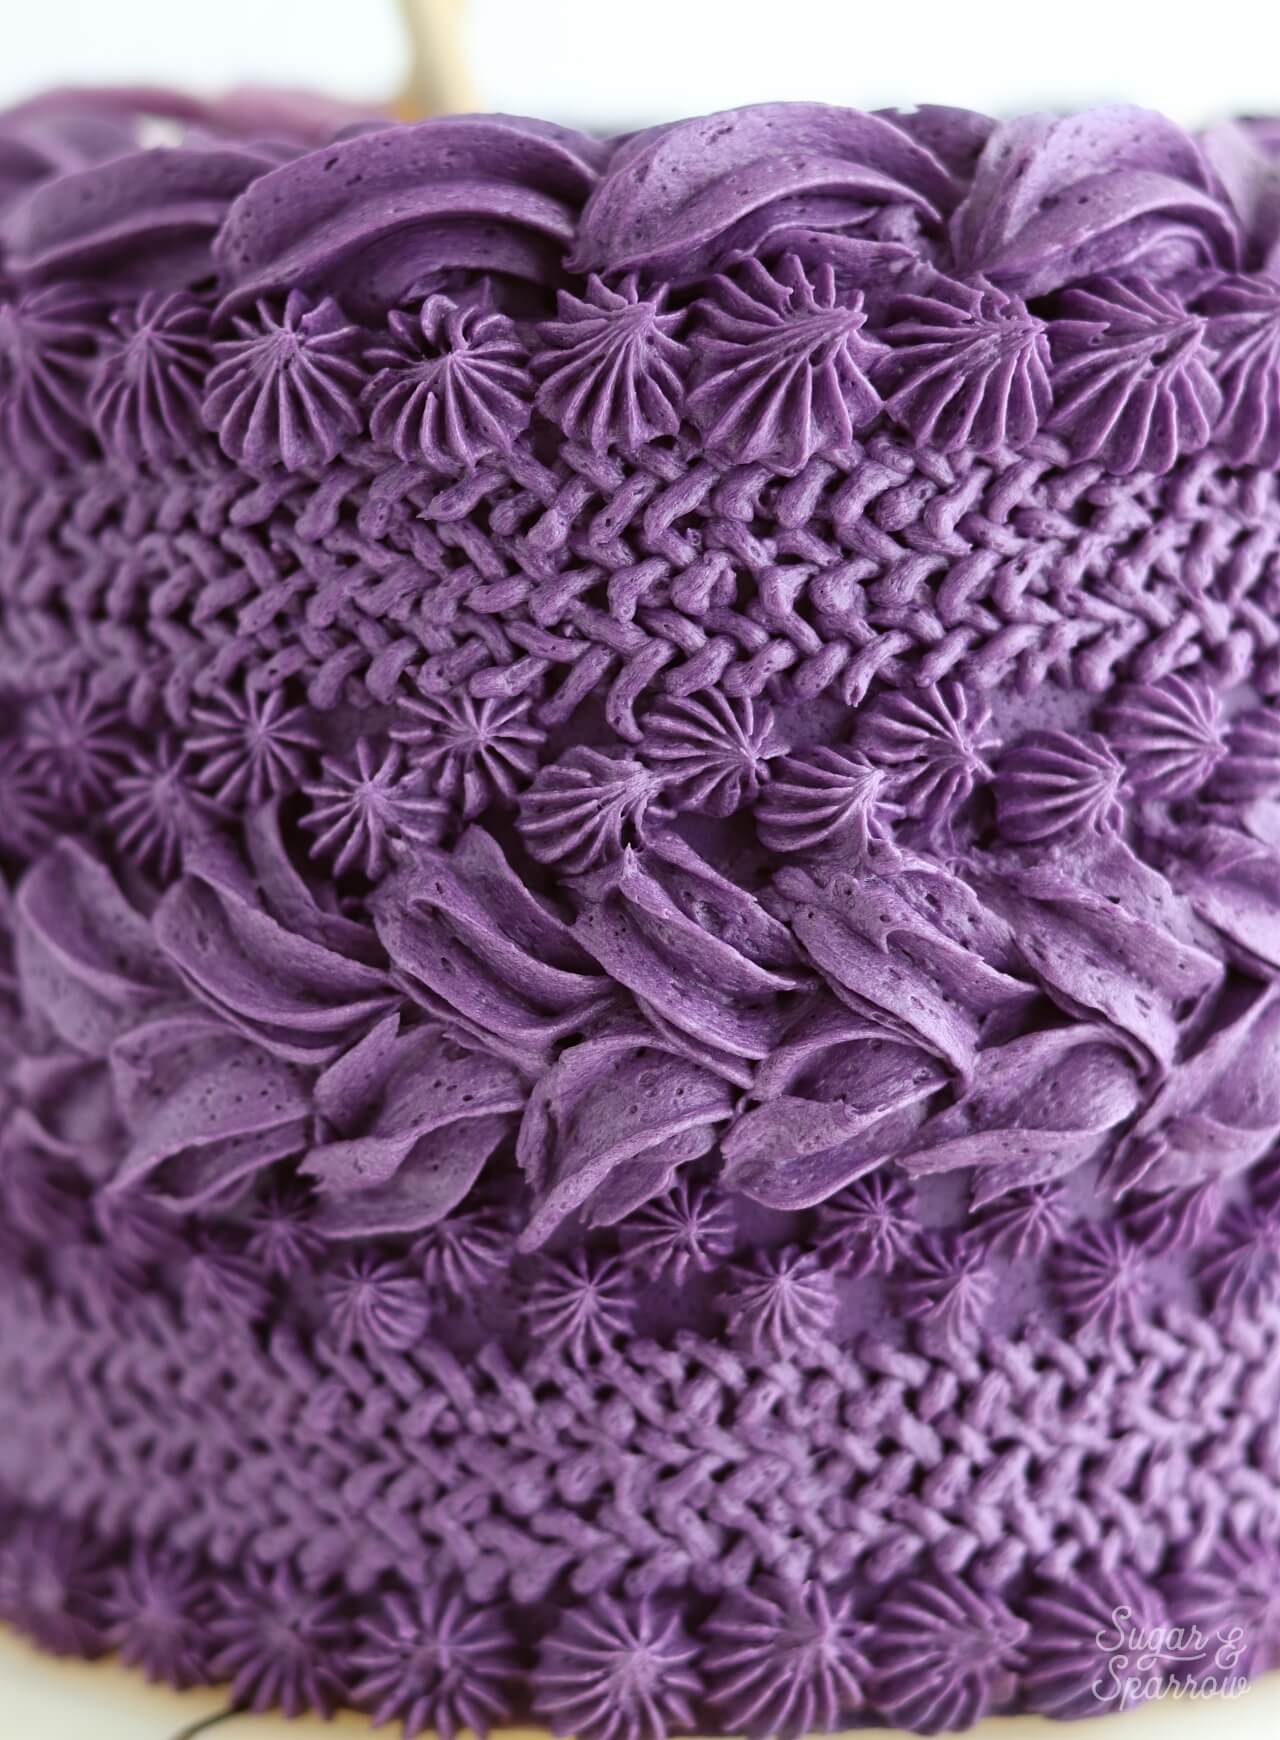
I came up with three different techniques for the knitted piping, shown in the photo below. If you want to practice them before you start on the cake, you can pipe them out on a piece of wax paper to get the hang of it. 

buttercream piping techniques

Technique 1 (the top row above) is made with Wilton Tip 4B and simply involves piping stars. 

Technique 2 (the middle row above) is a cable knit texture created with Wilton Tip 1M. You can get the look by piping a braided pattern, or piping a series of v shapes that overlap. 

Technique 3 (the bottom row above) is your basic small knit texture, created with Wilton Tip 3. It’s similar to the technique above it, but instead of piping v shapes, you’ll be piping x shapes that overlap. This way, the top of each x looks like a v. Continue until you have a series of knits that look like the bottom row in the photo.

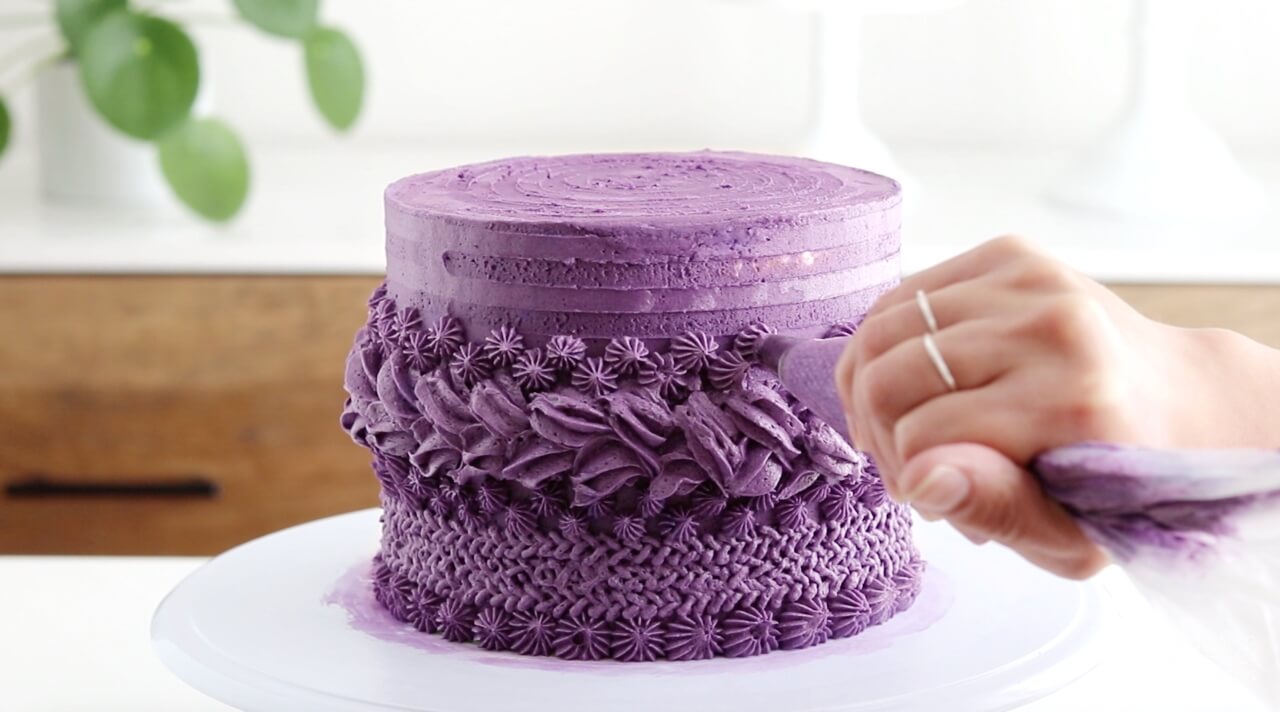
Step 5: Pipe the Sides of the Cake

Using the techniques shown above, I started at the bottom of the cake and piped a row of stars with Wilton Tip 4B, then filled in the subsequent three rows with Technique 3 (tiny knits):

knitted sweater cake tutorial

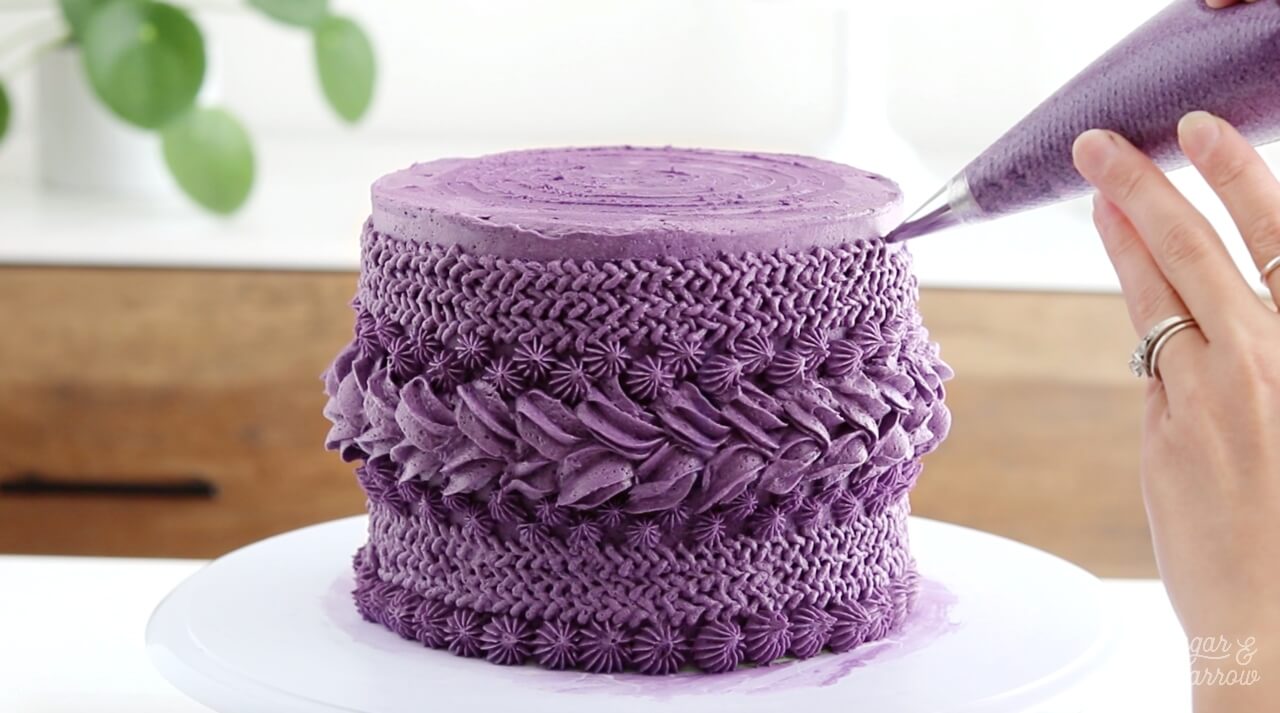
I piped Technique 1 to fill in the next two rows, then Technique 2 to fill in the subsequent four rows:

knitted buttercream cake tutorial
cable knit buttercream cake tutorial

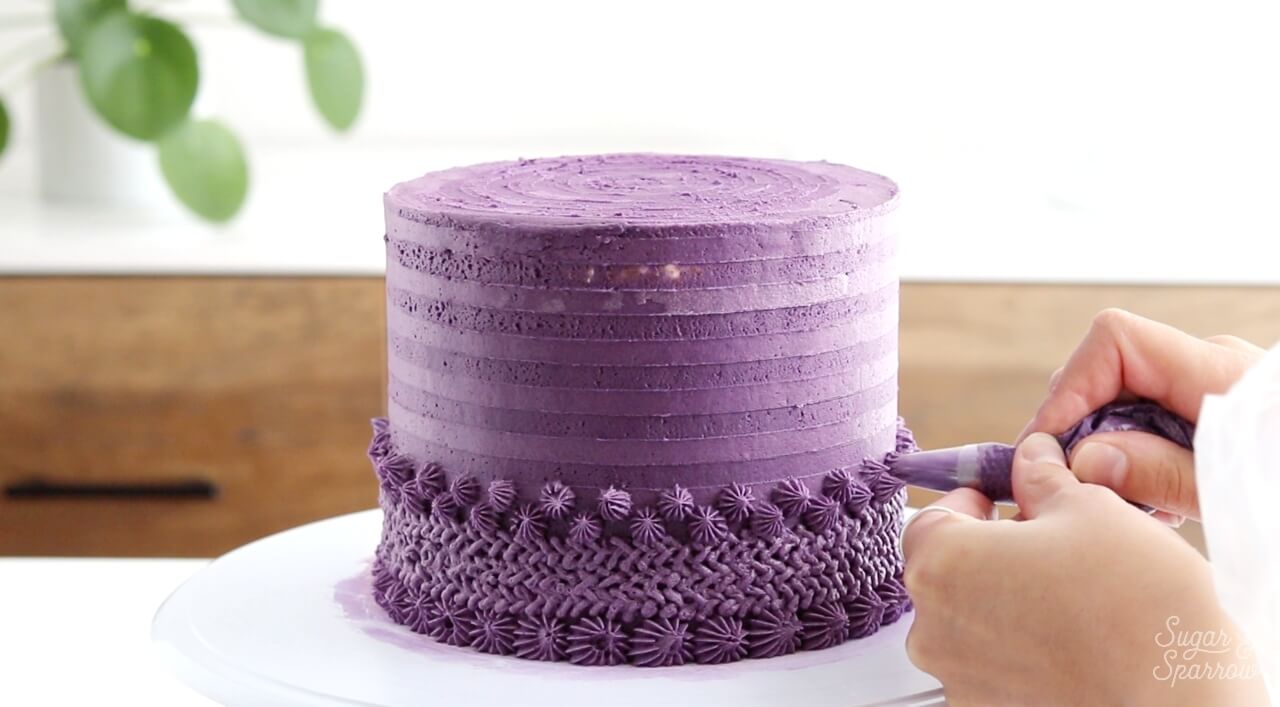
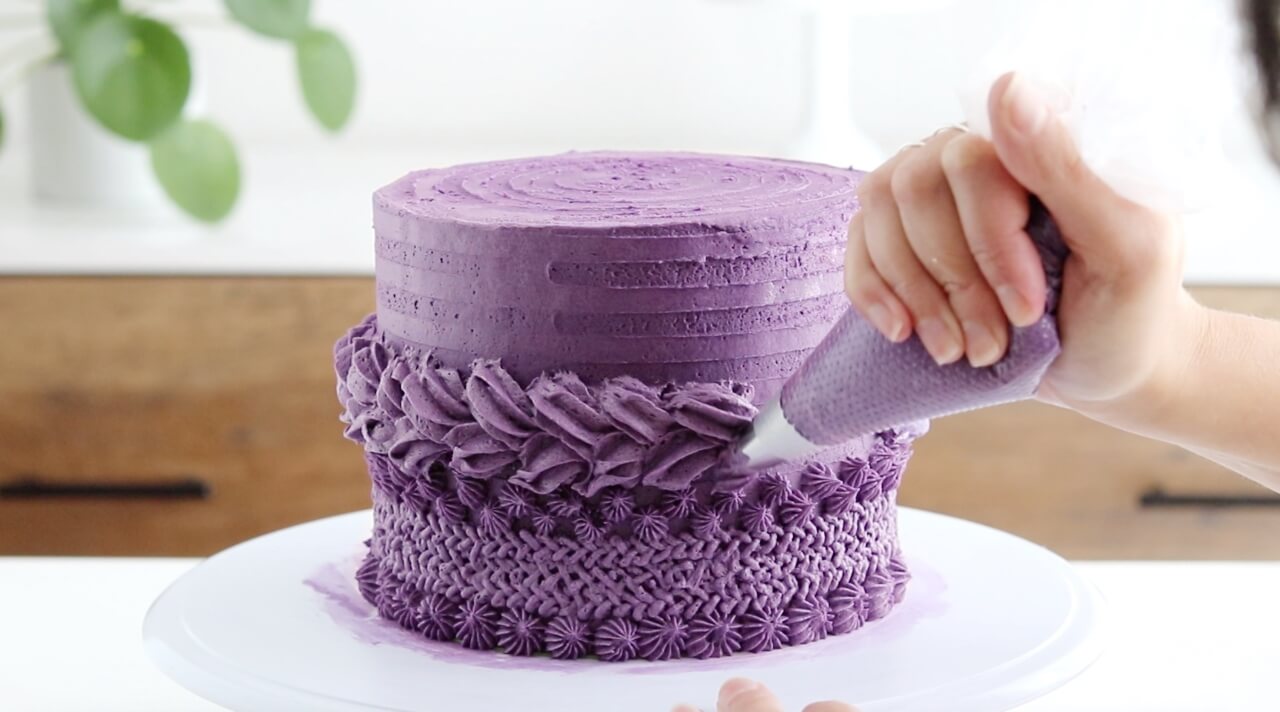
The cable knit piping is basically the middle of the cake, so I repeated those techniques in reverse order to reach the top:

how to make a knitted buttercream cake
how to make a sweater cake with buttercream
knitted buttercream piping techniques

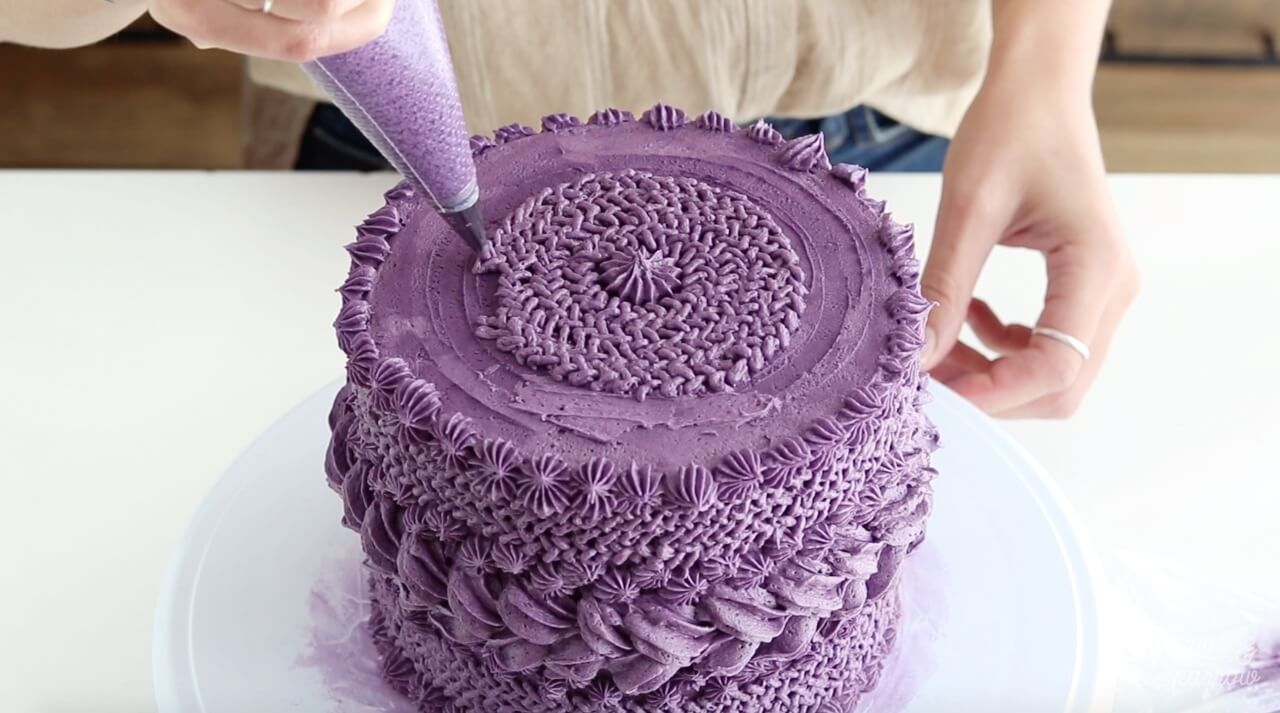
Step 6: Pipe the Top of the Cake

Similar to the planning session for the sides of the cake, count how many rows you’ve got on the top of your cake and decide how you want to fill them in. I started my design with one open star in the middle of the cake, then filled in the next four rows with Technique 3.

how to make buttercream look like yarn

Then, I finished the top with another round of cable knit piping using Technique 2.

how to make a cable knit buttercream cake

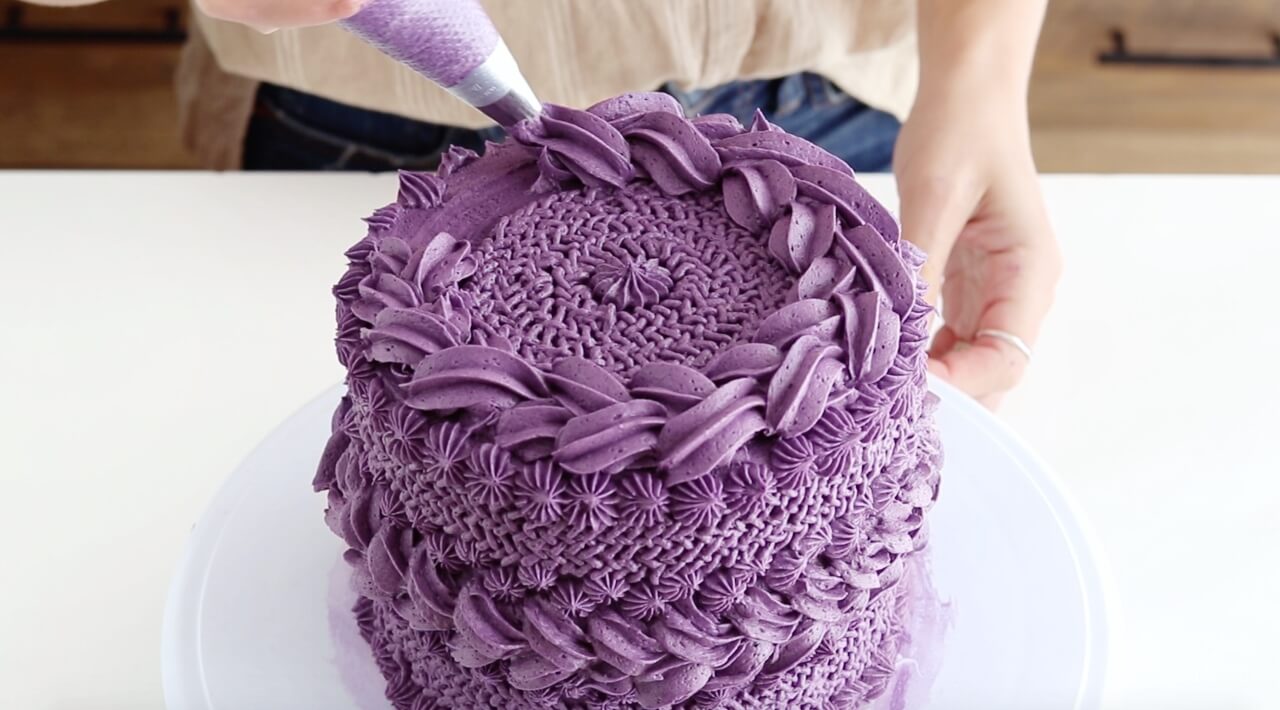
This part is totally optional, but I thought it would be so fitting to top the cake with these bamboo knitting needles once I was done with all that piping:

buttercream cake inspired by knitted sweater

You might need a hand massage after this one, but this knitted buttercream texture is unreal and totally worth it!

Knitted sweater buttercream cake by Sugar and Sparrow
buttercream sweater cake by Sugar and Sparrow

Disclaimer: I was compensated by JOANN for my work of creating this project, styling, filming, photographing, and writing about their products. As always, all opinions are honest and my own. Thank you for supporting brands that support Sugar & Sparrow.

By: Whitney · In: Fall, Featured, Holiday, Seasonal, Tutorials, Winter · Tagged: buttercream cake, buttercream knitted cake, buttercream knitted sweater cake, buttercream piping techniques, cake decorating, cake ideas, cake tutorial, fall cake, JOANN, knitted cake, knitted sweater cake, piped buttercream cake, sweater cake, wilton tip 1m, wilton tip 3, wilton tip 4b, yarn cake

you’ll also love

the best vanilla cupcakes recipeThe Perfect Vanilla Cupcake Recipe
apple sheet cake with spiced buttercreamSpiced Apple Sheet Cake
pumpkin layer cake recipe by sugar and sparrowPerfect Pumpkin Layer Cake Recipe

Join the List

Stay up to date & receive the latest posts in your inbox.

Reader Interactions

Comments

  1. Maria says

    April 1, 2024 at 4:30 am

    Hallo :).
    Fantastische Kunstwerke. Welche Art von Buttercreme ist für die Stricktorte am besten?
    Herzliche Grüße,
    Maria

    Reply
    • Whitney says

      April 8, 2024 at 1:54 pm

      Thank you, Maria! I used American buttercream but any type of pipeable buttercream will work.

      Reply
  2. Kelsey says

    January 26, 2021 at 7:40 pm

    Hi! If you made this for someone, what would be your favorite way to transport? Do you have a box you can link? Thanks!

    Reply
    • Whitney says

      January 29, 2021 at 2:24 pm

      Hi Kelsey! I use these Wilton boxes: https://amzn.to/3tb1fPC. Sometimes if the cake is taller than the box I will tape boba straws or skewers to the inside to extend the length so the top doesn’t touch the top of the cake. Hope that helps!

      Reply
  3. Nkemjika Uwaezuoke says

    January 25, 2021 at 11:55 pm

    Thank you so much, this was detailed. I enjoyed following the process through. I’m definitely making this design by Mother’s day weekend this year.

    Reply
    • Whitney says

      January 29, 2021 at 2:24 pm

      Yay! So excited for you to make this for Mother’s Day!

      Reply

Leave a Reply Cancel reply

Your email address will not be published. Required fields are marked *

Recipe Rating


Next Post >

Goodie Girl Cookie Cupcakes + Giveaway!

Primary Sidebar

Welcome to Sugar & Sparrow

Welcome to Sugar & Sparrow

Helping you whip up pretty desserts with confidence and creativity. And hopefully sharing a few laughs with you along the way!

Learn More

Connect

let’s bake!

Get my very best recipes, baking tips, and decorating tutorials sent to your inbox

Featured Posts

pink ombre layer cake recipe with pink ombre buttercream tutorial

Pink Ombre Cake Recipe & Decorating Tutorial

sugar and sparrow

Nutella Banana Cake with Toasted Meringue

sugar and sparrow best of 2021

Sugar & Sparrow’s Best of 2021

Search

Archives

Follow Along

@sugarandsparrowco

ORANGE POPPYSEED CAKE 🍊this cake is unbelievabl ORANGE POPPYSEED CAKE 🍊this cake is unbelievably delicious with whipped mascarpone frosting!! The cake layers are soft and moist, packed with fresh citrus flavor, and has the satisfying crunch of poppy seeds in every bite. The mascarpone frosting keeps it light and refreshing and I love that it comes together in just about 5 minutes with minimal effort. A fancy cake that’s secretly simple!

Grab the recipe link in my bio or find it at https://sugarandsparrow.com/orange-poppyseed-cake-with-mascarpone-frosting/

#poppyseedcake #layercake #mascarpone #whippedcreamfrosting #cakedecorating
VANILLA SHEET CAKE (recipe below) 🥳 this cake i VANILLA SHEET CAKE (recipe below) 🥳 this cake is packed with vanilla flavor, SO soft and fluffy, fun to decorate, and ideal for feeding a crowd. It makes me so nostalgic for my childhood birthday cakes!! 
 
Full recipe (w/ frosting!) at https://sugarandsparrow.com/vanilla-sheet-cake-recipe/
 
INGREDIENTS: 
2 1/2 Cups (265g) sifted cake flour
2 tsp baking powder 
1/2 tsp baking soda 
1 tsp salt 
3/4 Cup (170g) unsalted butter, room temp 
1 3/4 Cup (340g) granulated sugar 
3 large eggs, room temp 
1/2 Cup (120g) sour cream, room temp
1 Tbsp pure vanilla extract 
1 Cup (240ml) whole milk, room temp
 
INSTRUCTIONS: 
1. Preheat the oven to 325°F. Grease and line a 9×13 baking dish. 
2. Add the sifted cake flour, baking powder, baking soda, and salt into a medium bowl and whisk to combine. Set aside. 
3. In the bowl of your stand mixer fitted with the paddle attachment (or with a hand mixer and large bowl), beat the butter on high speed for two minutes until creamy. Add the sugar and continue to beat on high speed until light and fluffy, about 2 minutes. Scrape down the bowl and paddle as needed. Add the eggs one at a time, mixing for about 10-15 seconds after each addition. Add the vanilla and sour cream and mix for one minute on high speed. 
4. Turn the mixer off and add the dry ingredients all at once. Mix on low speed until just combined, then add the milk in a steady stream and mix until just incorporated. 
5. Pour the batter into the prepared baking dish and bake for 30-35 minutes, or until the cake springs back to the touch and a toothpick inserted into the middle comes out clean. Let the cake cool in the baking dish until room temperature, then frost with vanilla buttercream. 
 
#vanillacake #sheetcake #birthdaycake #vanilla #cakedecorating
LEMON CREAM CHEESE BUTTERCREAM 🍋 if you love th LEMON CREAM CHEESE BUTTERCREAM 🍋 if you love the tang of cream cheese frosting, you’re going to be obsessed with this lemon variation!! It’s light and refreshing, tangy and complex, and perfect consistency for cake decorating. I particularly love it on my lemon blueberry cake and lemon cupcakes 💛 

INGREDIENTS:
1/2 Cup (113g) unsalted butter, room temp
8 Oz (226g) full-fat brick-style cream cheese, room temp
4 Cups (480g) powdered sugar
1 1/2 tsp lemon juice
Pinch of salt, or to taste

INSTRUCTIONS:
1. In the bowl of a stand mixer fitted with the paddle attachment, beat the butter and cream cheese together on medium-high speed until light and creamy (no lumps), about 5 minutes, scraping down the bowl and paddle as needed.
2. Add the powdered sugar a few cups at a time and mix on low speed until combined, scraping down the bowl and paddle between additions. Add the lemon juice and salt and continue mixing on low speed until fully combined and smooth.
⁣
Full recipe + cake pairing suggestions linked in my bio and at https://sugarandsparrow.com/lemon-cream-cheese-buttercream/
⁣
#lemoncake #creamcheesefrosting #cakedecorating #buttercream #lemon
LEMON BLUEBERRY CAKE 🍋🫐 so soft and fluffy, LEMON BLUEBERRY CAKE 🍋🫐 so soft and fluffy, packed with zesty lemon flavor, blueberries in every bite, and absolutely scrumptious with lemon cream cheese buttercream. It’s Spring in cake form and I saw someone pair these cake layers with actual cheesecake filling last week and now I NEED TO TRY IT 💛 
⁣
Full recipe linked in my bio or at https://sugarandsparrow.com/lemon-blueberry-layer-cake/ 
⁣
#lemonblueberrycake #lemoncake #lemonblueberry #creamcheesefrosting #cakedecorating
Finally cracked the code on this marbled strawberr Finally cracked the code on this marbled strawberry no-bake cheesecake!! 🍓it’s a classic tangy no-bake cheesecake marbled with strawberry reduction on top of a buttery graham cracker crust. The key is mixing some of the cheesecake filling with the jammy strawberry reduction before swirling the two flavors together, then refrigerate overnight and the filling is velvety and mousse-like with the perfect pops of strawberry flavor.

Recipe is linked in my bio + at https://sugarandsparrow.com/no-bake-marbled-strawberry-cheesecake/

#nobakecheesecake #strawberrycheesecake #strawberry #cakedecorating #nobakedessert

Footer

On the Blog

  • Cake Basics
  • Recipes
  • Tutorials

Info

  • About
  • Privacy Policy & Disclosure

stay in the know

Copyright © 2026 · Theme by Sugar & Sparrow