• Cake
  • Frosting
  • YouTube
  • My Favorite Tools
  • Nav Social Icons

  • Skip to primary navigation
  • Skip to main content
  • Skip to primary sidebar
  • Skip to footer
  • Recipes
    • Cake
    • Cupcakes
    • Frosting
    • Ice Cream
    • Vegan
  • Cake Basics
  • Tutorials
  • Blog
  • About
  • Mobile Menu Widgets

    Connect

    Search

Sugar & Sparrow logo in script font

Sugar & Sparrow

Lifestyle and Cake from Portland Oregon

  • Cake Basics
  • Recipes
    • Cake
    • Cupcakes
    • Cookies & Bars
    • Filling
    • Frosting
    • Ice Cream
    • No-Bake
    • Small Batch
    • Vegan
  • Tutorials
  • Book
  • Blog
  • About

3 Ways to Make Fondant Decorations with a Tasty by Wilton Kit

January 13, 2020 · In: Featured, Tutorials

I’m a buttercream cake lover through and through, but when it comes to making handmade decorations and cake toppers, fondant is my jam. It’s essentially like playdoh (but edible!) that you can paint, cut into shapes, and mold into all sorts of intricate designs! So when JOANN sent me one of their new Tasty by Wilton kits, I got really excited to see what I could create with it. Spoiler alert: I had a lot of fun with this kit!

UPDATE 2025: JOANN has (sadly!!) gone out of business, so I have slightly changed these product links.

Tasty by Wilton Fondant Skills 101 Kit
Tasty by Wilton Fondant Skills 101 Kit Review

These fondant kits come with everything you need to create fondant decorations for cakes, cupcakes, brownies, and cookies. Inside, you’ll find some basic instructions on working with fondant and so many tools and supplies for getting artsy with it. There’s a paint palette, paint brush, and food color that you can mix with water for painting on fondant. A geometric-textured mat for embossing the fondant. And even a piping tip with a circular opening that you can use to create fondant sprinkles. I wanted to try it all, so I made some painted decorations, used the texture mat, and made my own sprinkles. So fun!

how to make fondant decorations for buttercream cakes
buttercream cake with watercolor fondant

I think adding fondant accents to buttercream cakes can be such a fun way to mix mediums and achieve some really artistic looks. The best thing about using fondant decorations is that they’re 100% edible, fondant dries firm in about 24-48 hours, and it’s really easy to work with. This Fondant Skills 101 Kit is perfect whether you’ve never worked with fondant before or you want to try a variety of fondant techniques in a cost effective way (only $10!).

how to make fondant geometric shapes

I’m walking you through the different types of fondant decorations I created with this kit below, but first, here’s a quick video of all three to show you in action:

If you love tutorial videos like this one, be sure to check out my YouTube channel! I’ve got a growing collection of cake recipes, decorating tutorials, and Cake Basics over there. Hit the subscribe button on my page so you never miss a new video.

You Will Need:

  • Fondant
  • Plastic paint palette
  • Liquid food colors
  • Food grade paint brushes
  • Fondant texture mats (similar)
  • Cornstarch or powdered sugar
  • Vegetable shortening 
  • Small rolling pin 
  • Sharp knife
  • Circular cookie/fondant cutters
  • Wax or parchment paper
  • Buttercream frosted cake, any size (mine is a 4” round)

How to Make Watercolor Fondant Decorations

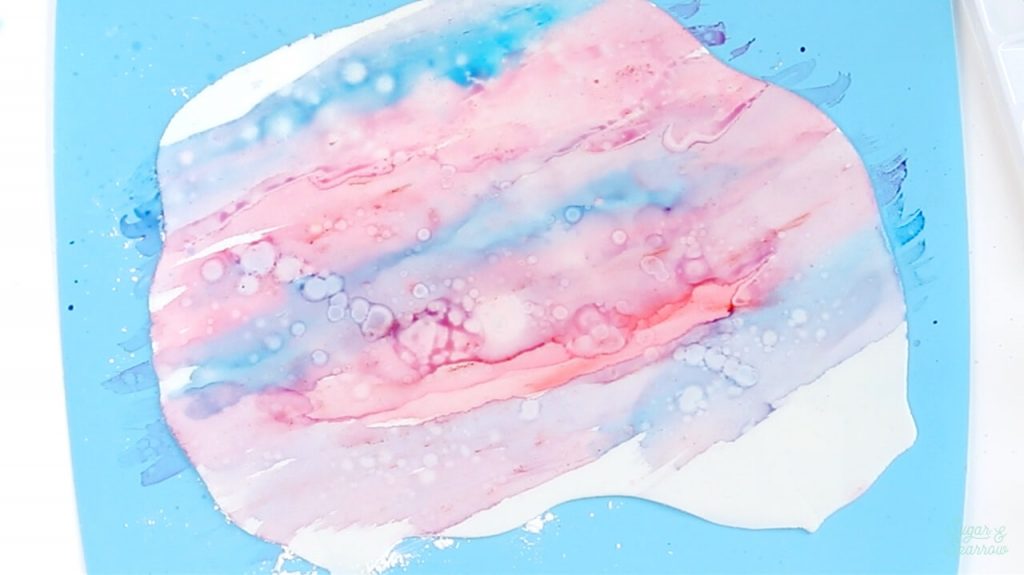
Grab about 1/4 Cup of fondant and knead it until the consistency is moldable and even, similar to Playdoh. You can add a little vegetable shortening to your hands if you find they are sticking to the fondant.

how to mold fondant for cake decorating

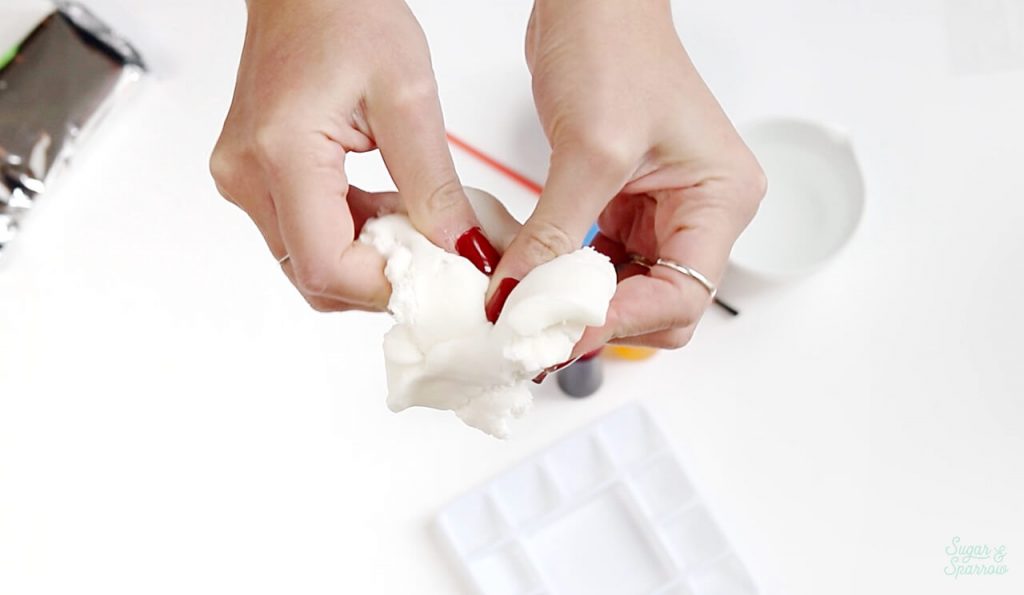
Place a little cornstarch or powdered sugar on a flat surface to prevent the fondant from sticking, then use a small rolling pin to roll the fondant into about an ⅛ inch sheet.

how thick to roll fondant for cake decorating

Let the fondant sit while you mix up your paint colors. On the paint palette, add a few drops of whatever blend of colors you’d like, then mix a few drops of water into each color. The kit came with primary colors (red, blue, yellow), so I created some pinkish reds, purples, and blues. Mix it with just a little bit of water for a stronger color, or a lot of water for a softer hue. When your colors are ready, use the paintbrush to paint them onto your fondant canvas.

how to paint on fondant
how to create watercolor fondant cake decorations

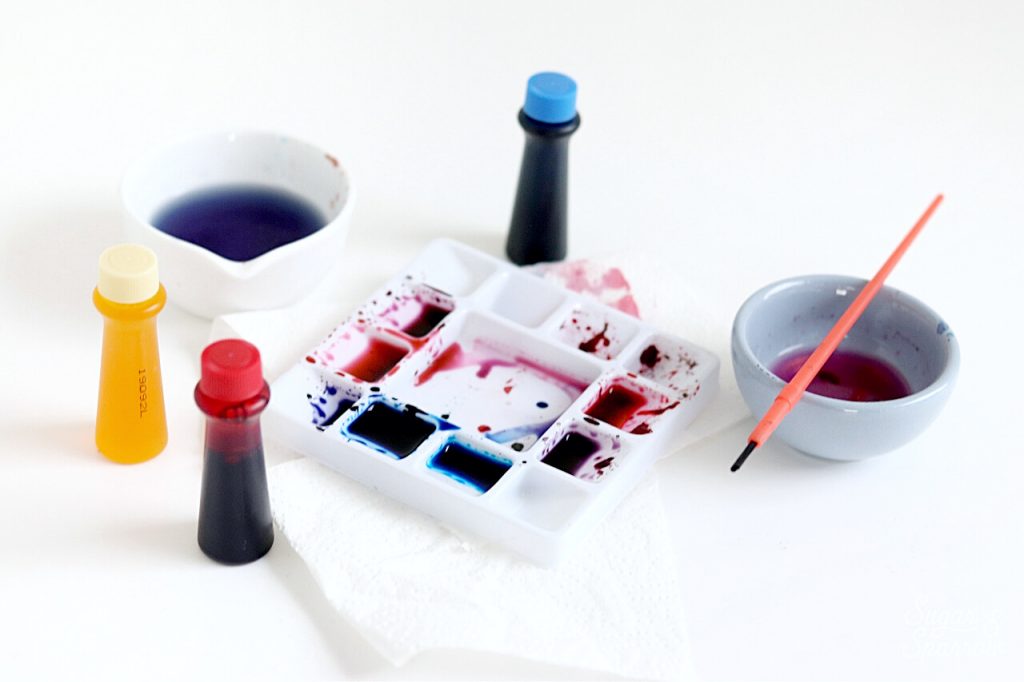
I added broad strokes of each color and splattered a little extra water over the top of the canvas to let the colors bleed a bit.

watercolor painting on fondant

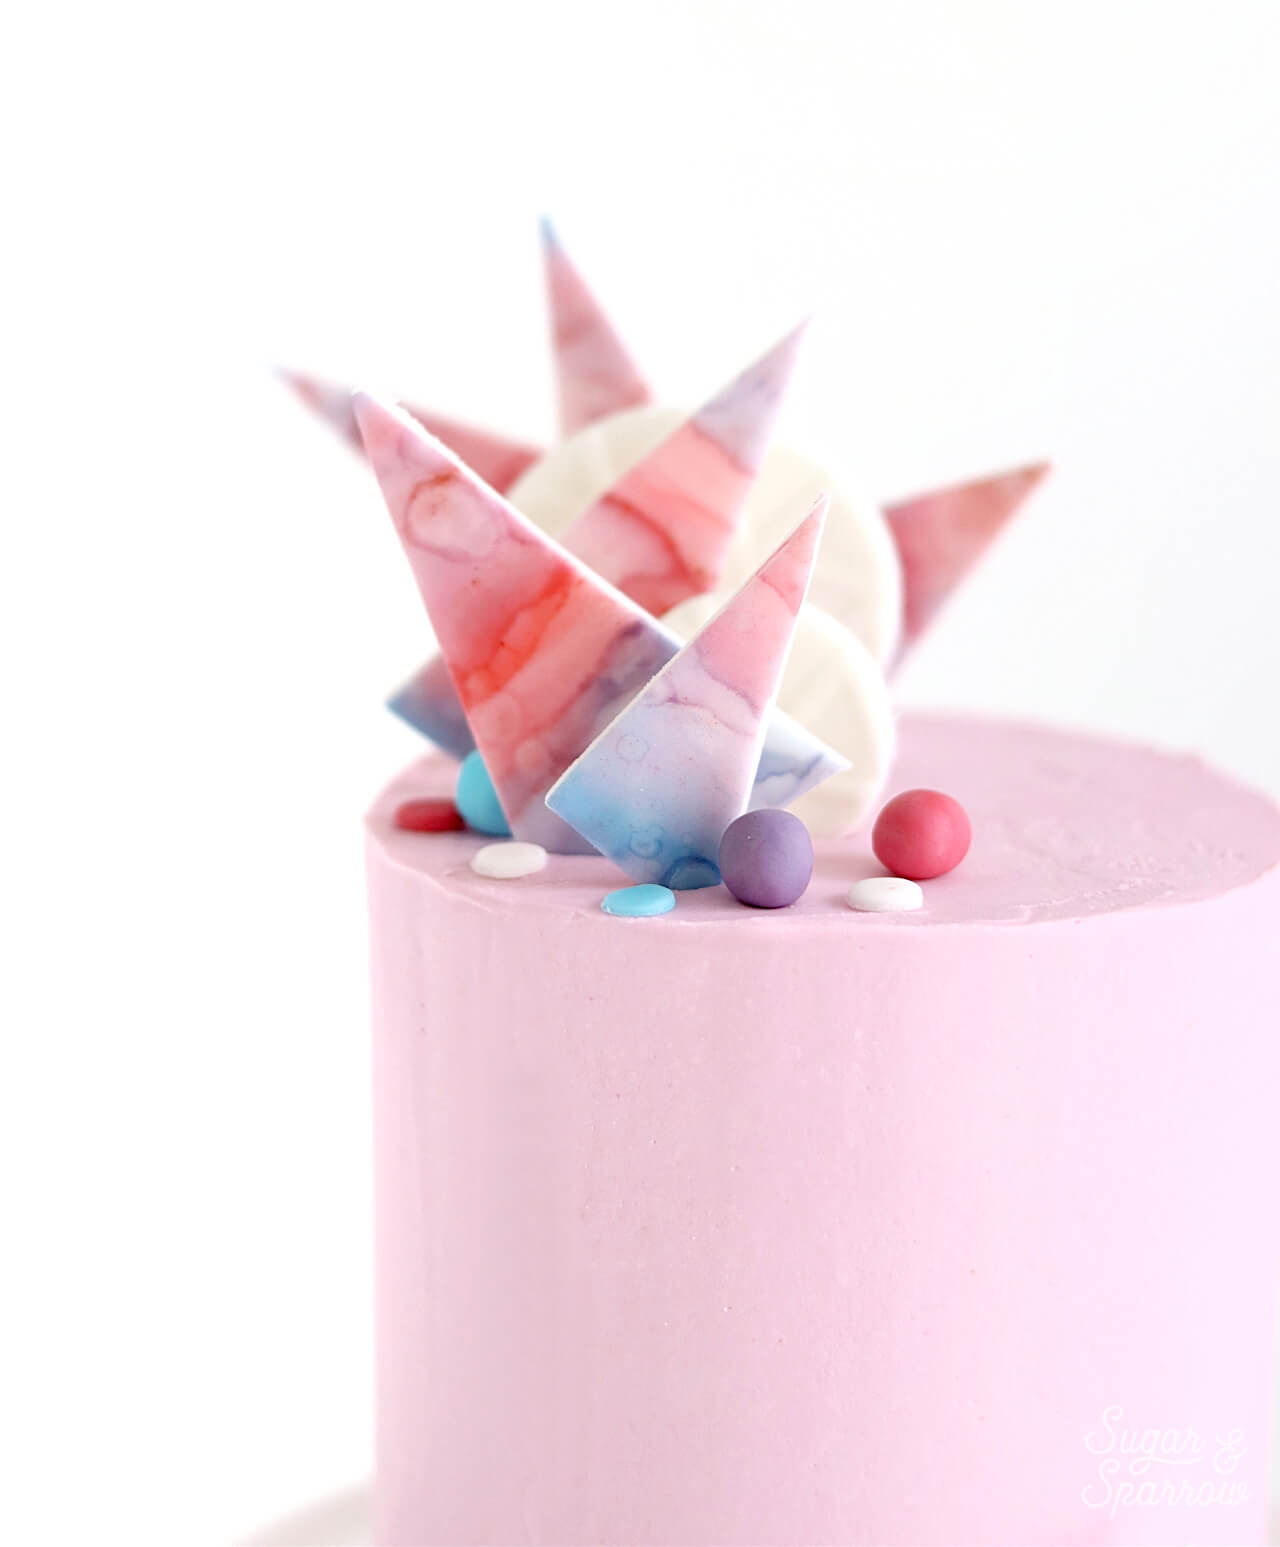
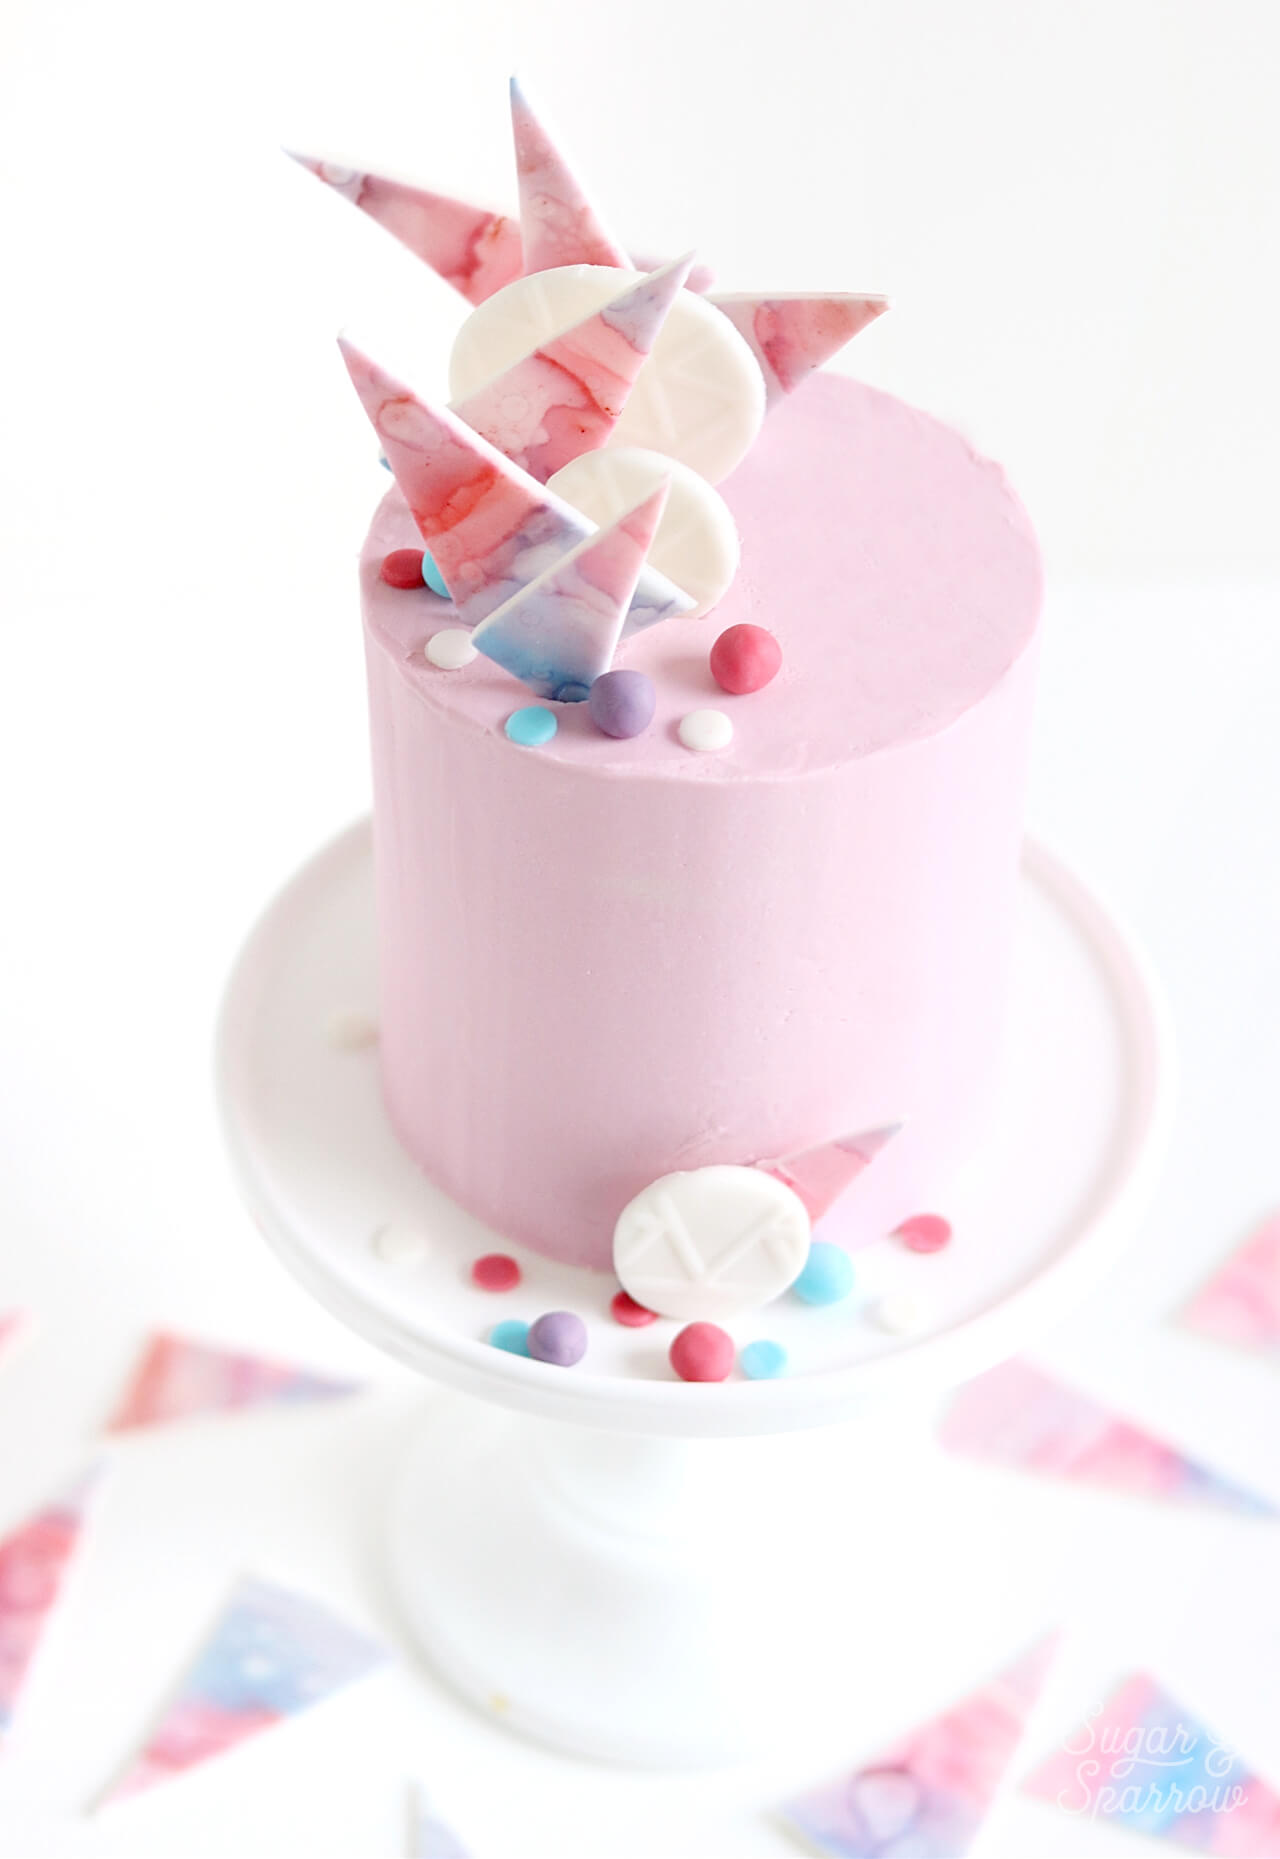
When you’re satisfied with how your painting looks, cut the fondant into shapes. I used a sharp knife to cut the painted fondant into isosceles triangles, but you can create any shape you want with a knife or cookie cutters!

watercolor fondant triangles for cake decorating

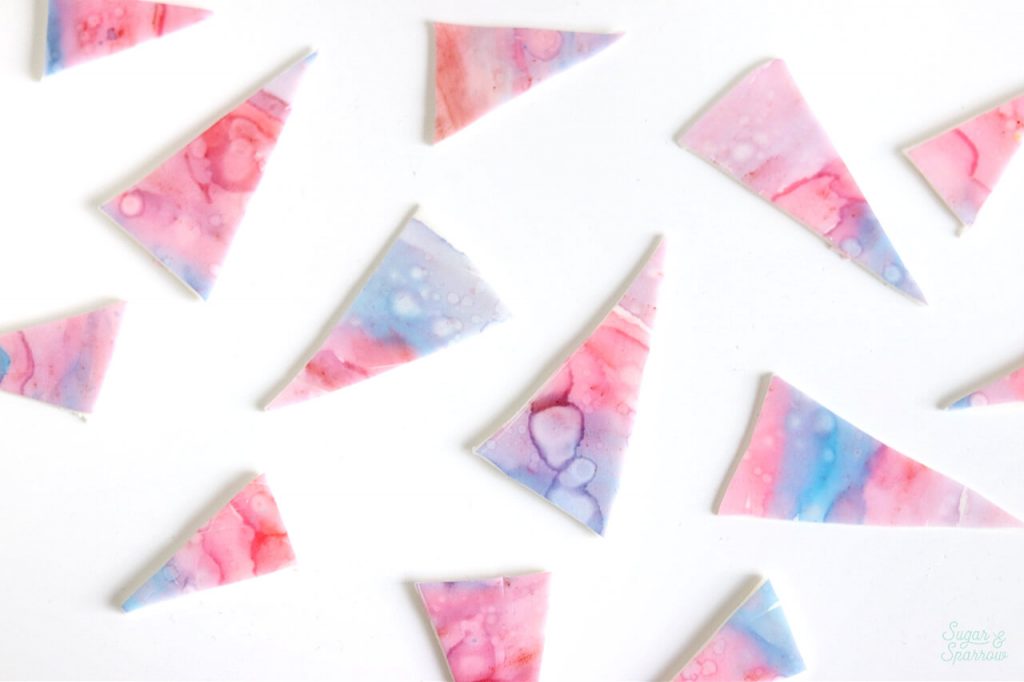
Once your shapes are cut out, place each one onto a sheet of wax or parchment paper to dry. I recommend allowing them to dry for 24 hours, then flipping them over and allowing the other side to dry for at least 12 more hours. 

How to Make Geometric Print Decorations

To make the geometric printed circles, open the second package of fondant and follow the steps in the previous section to knead the fondant and roll it into an ⅛ inch sheet. Then, take the geometric texture mat, place it on top of the fondant sheet, and roll over it with the rolling pin a few times.

how to use texture mat on fondant

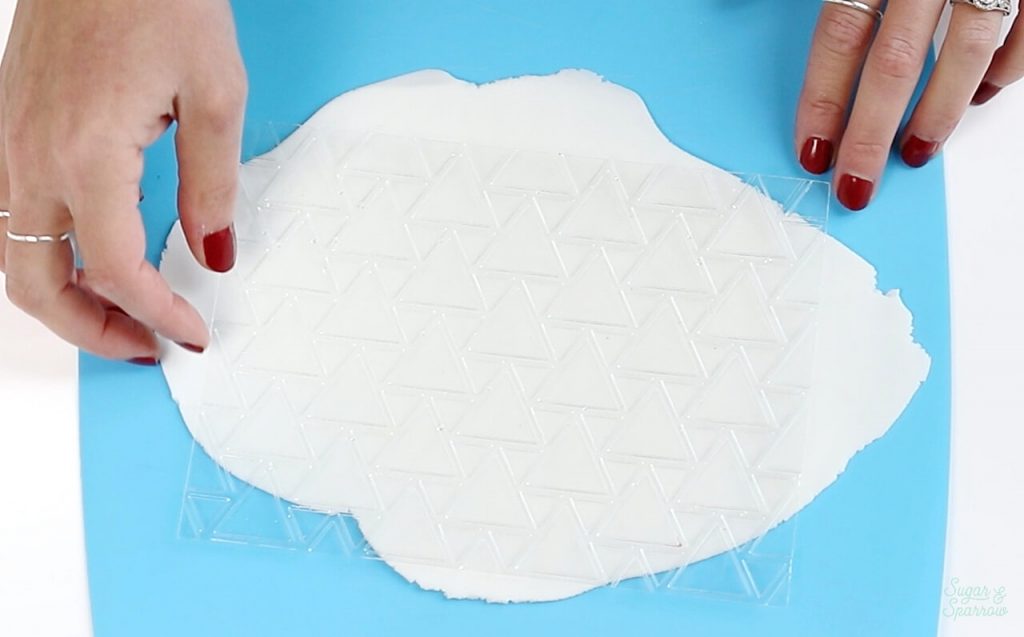
Peel off the texture mat to reveal a glorious geometric pattern.

how to imprint fondant

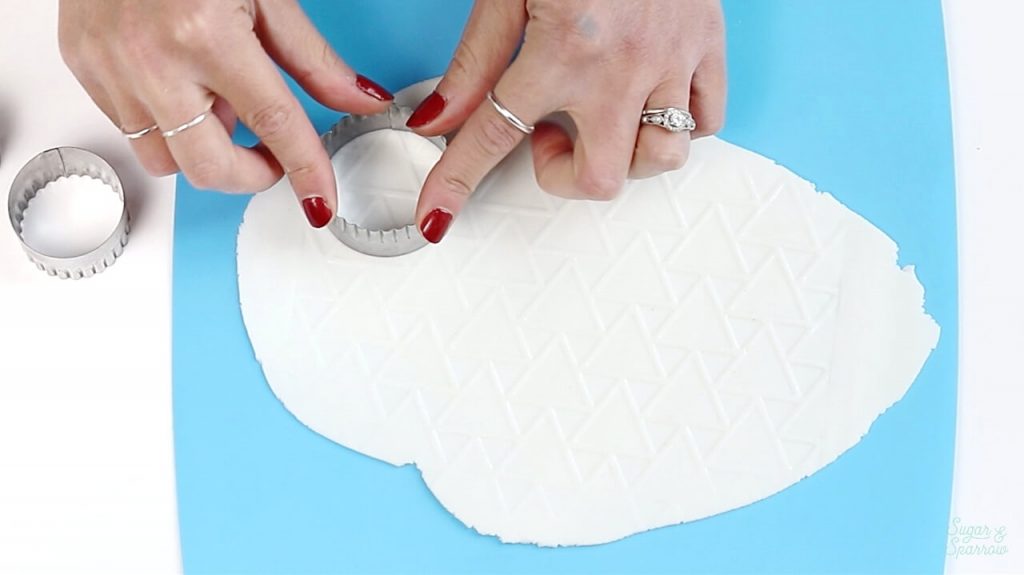
You can cut this fondant into any shape you want, or even paint over it at this point using the steps in the previous section. I chose to keep these decorations white and used these cookie cutters to cut out circular shapes.

how to make fondant circles with cookie cutters
geometric fondant cake decorations tutorial

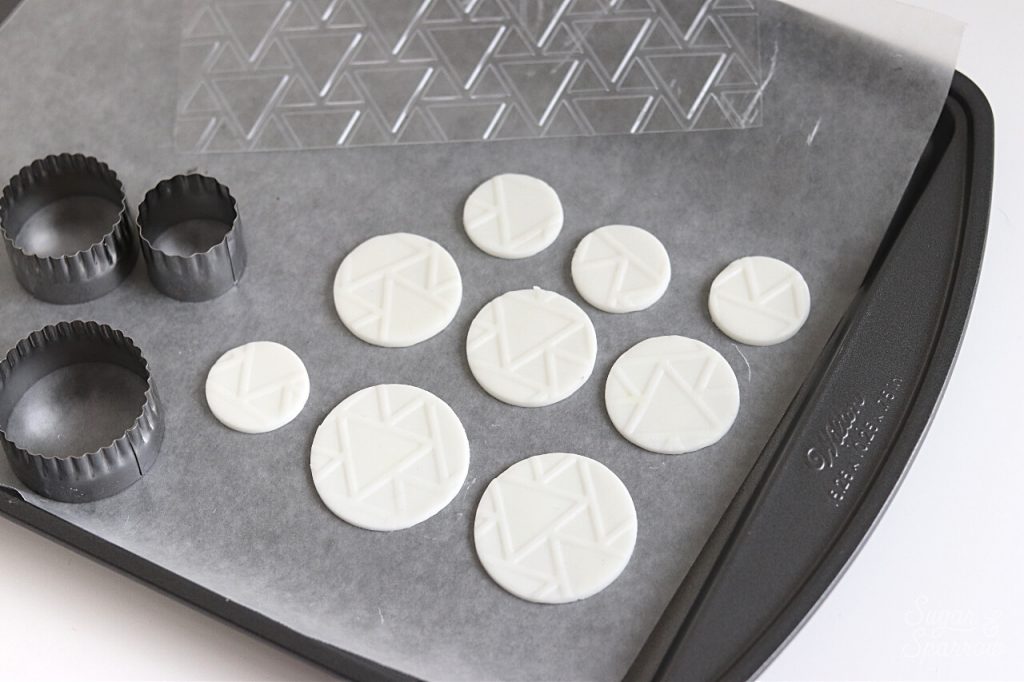
Place your geometric print decorations on a sheet of wax or parchment paper, then allow them to dry for 24 hours on one side before flipping them over and drying for another 12 hours.

How to Make Fondant Sprinkles 

For this technique, I colored the remaining fondant with the food colors from the kit, then rolled all of them out into an ⅛ inch sheet. Using the small end of the green piping tip, press into the fondant sheet to cut out small circular sprinkles of each color.

how to make fondant sprinkles

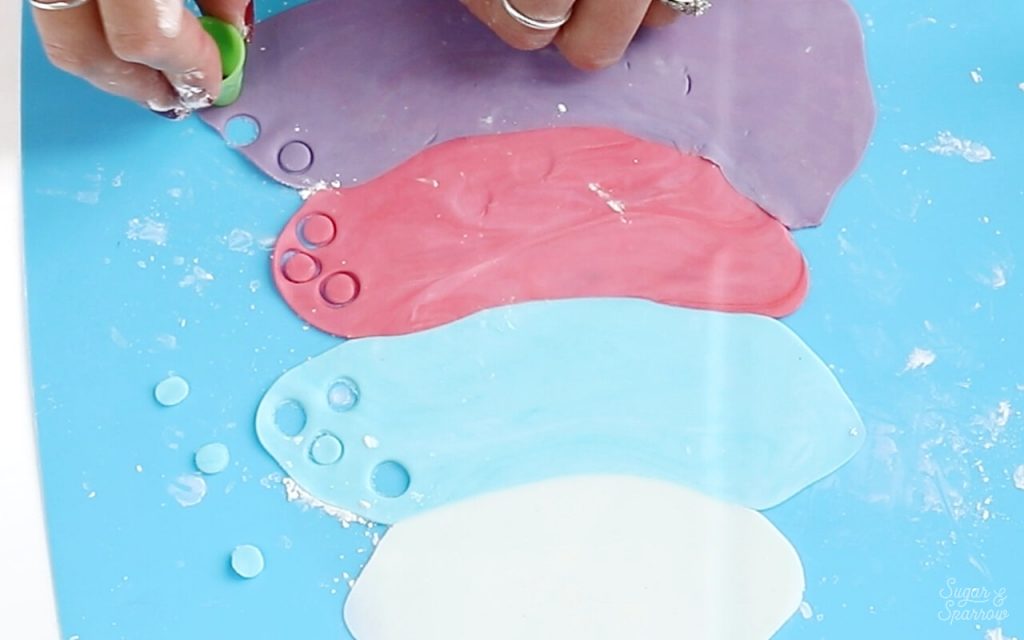
Using the wide end of a piping tip, cut out larger circles from each color. Then, roll each large circle into a ball.

DIY sprinkles tutorial by Sugar and Sparrow

Fondant sprinkles are so easy and I love how customizable they are! Imagine all the color palettes you could create.

DIY fondant sprinkles tutorial

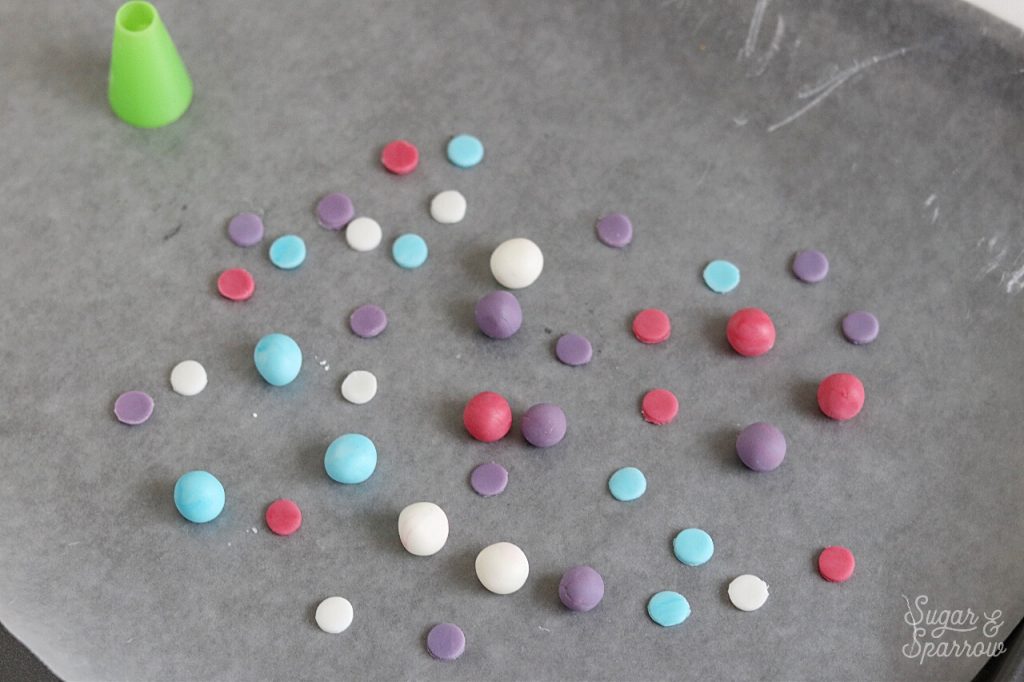
Allow the fondant sprinkles to dry for about 24 hours, or until they’re firm. 

Decorating The Cake

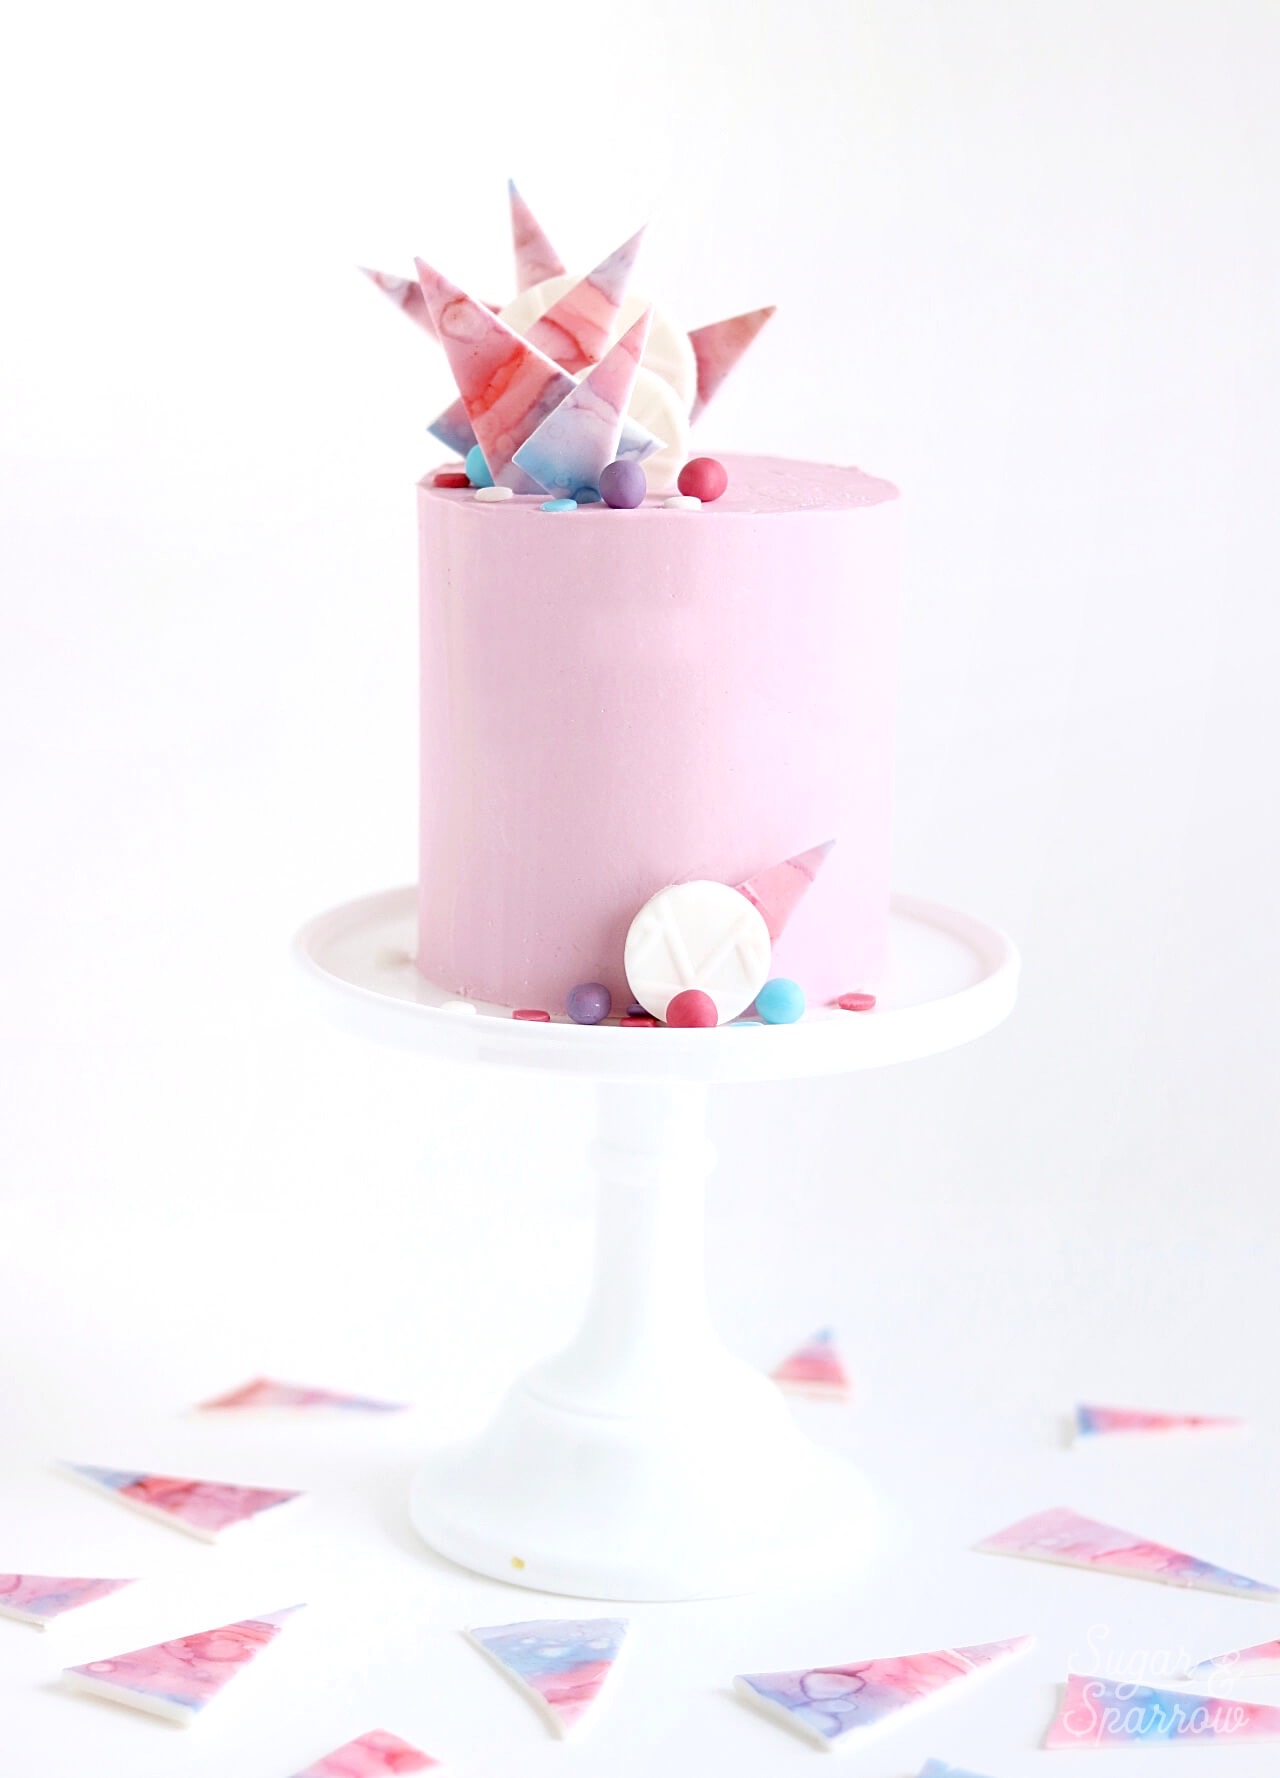
All that’s left to do is add your fondant decorations to your buttercream cake and make a mixed medium masterpiece! To add my decorations, I simply stuck the watercolor triangles and geometric print circle decorations into the top of the cake. It’s easy to stick them straight into the buttercream and they’ll stand on their own (they weigh barely anything). Then, I added some fondant sprinkles around the toppers.

how to make watercolor fondant cake decorations

I also placed some of the fondant decorations to the side of the cake with a few dots of buttercream and added even more fondant sprinkles.

how to make fondant decorations for cake decorating

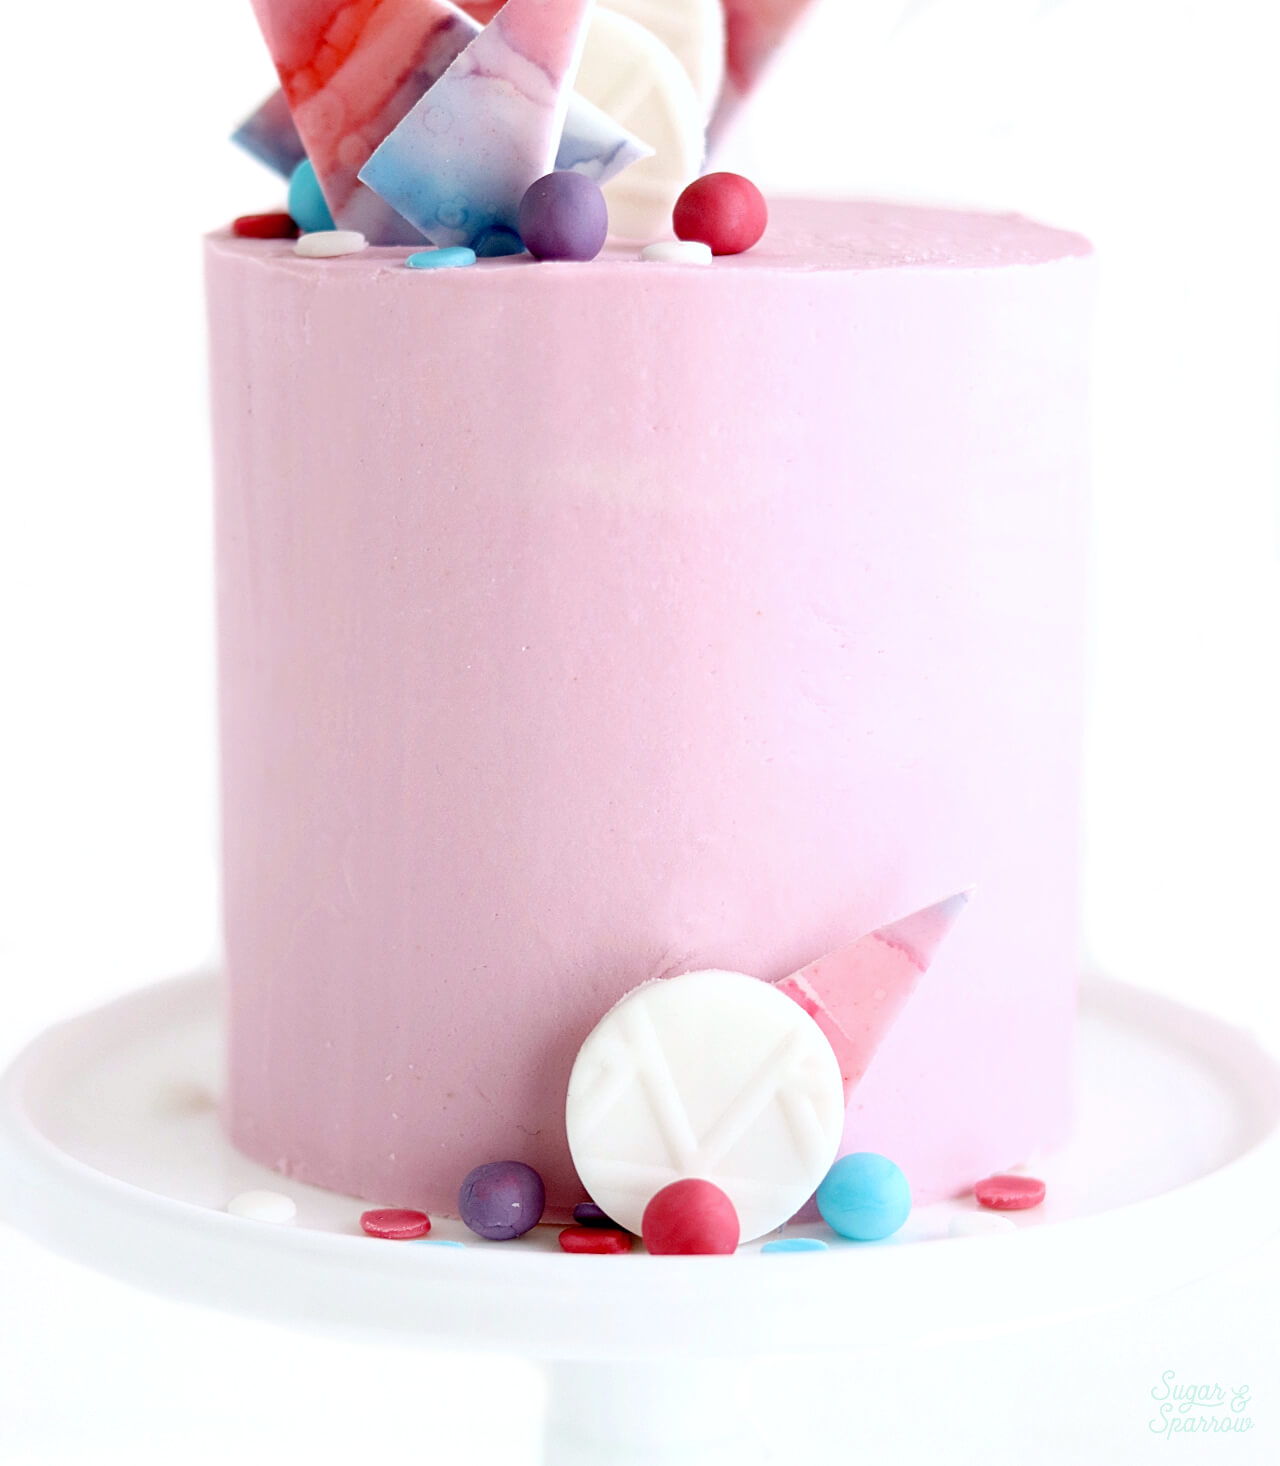
These fondant accents ended up making this cake look super abstract and I am so into it!

abstract buttercream and fondant cake by sugar and sparrow

Disclaimer: I was compensated by JOANN for my work of creating this project, styling, filming, photographing, and writing about their products. As always, all opinions are honest and my own. Thank you for supporting brands that support Sugar & Sparrow.

By: Whitney · In: Featured, Tutorials · Tagged: abstract cake, buttercream cake, cake art, cake decorating, cake tutorial, diy sprinkles, fondant, fondant cake decorations, fondant skills 101 kit, fondant sprinkles, geometric cake decorations, JOANN, painting on fondant, tasty by wilton, watercolor fondant, wilton

you’ll also love

the best vanilla cupcakes recipeThe Perfect Vanilla Cupcake Recipe
pumpkin layer cake recipe by sugar and sparrowPerfect Pumpkin Layer Cake Recipe
oreo cookies and cream cakeOreo Layer Cake Recipe

Join the List

Stay up to date & receive the latest posts in your inbox.

Reader Interactions

Comments

  1. SallyBR says

    February 25, 2020 at 5:15 am

    I bought that yesterday after reading your blog, was lucky that our JoAnn store carried it…

    I must confess I don’t like the taste of fondant, but in small decorations I think it looks perfect.

    Reply
    • Whitney says

      February 25, 2020 at 8:45 pm

      I feel the same way about fondant! I’m a buttercream cake fan through and through but fondant works so well for decorations like this. So happy that your local JoAnn store had the kit!

      Reply

Leave a Reply Cancel reply

Your email address will not be published. Required fields are marked *

Recipe Rating


Next Post >

DIY Sprinkled Number Cake Toppers Tutorial

Primary Sidebar

Welcome to Sugar & Sparrow

Welcome to Sugar & Sparrow

Helping you whip up pretty desserts with confidence and creativity. And hopefully sharing a few laughs with you along the way!

Learn More

Connect

let’s bake!

Get my very best recipes, baking tips, and decorating tutorials sent to your inbox

Featured Posts

oreo buttercream recipe for cakes and cupcakes

Oreo Buttercream

no bake eggnog cheesecake recipe by sugar and sparrow

No-Bake Eggnog Cheesecake with Biscoff Cookie Crust

rainbow cake topper by sugar and sparrow

Rainbow Arch Cake Topper Tutorial

Search

Archives

Follow Along

@sugarandsparrowco

LEMON CUPCAKES 🍋 after about a dozen recipe tes LEMON CUPCAKES 🍋 after about a dozen recipe tests, this one is everything I could want in a lemon cupcake! Fluffy-yet-moist, bursting with natural lemon flavor, and absolutely irresistible topped with lemon cream cheese buttercream. 

Full recipe (with frosting) linked in my bio + at https://sugarandsparrow.com/homemade-lemon-cupcakes/

INGREDIENTS:
1 Cup (132g) all-purpose flour
1 tsp baking powder
1/4 tsp salt
1/4 Cup (60ml) whole milk, room temperature
3 Tbsp (45ml) lemon juice from 1 medium lemon
3/4 Cup (150g) granulated sugar
3 Tbsp (42g) unsalted butter, room temperature
2 Tbsp (30ml) vegetable oil
2 large eggs, room temperature
1 tsp pure vanilla extract

INSTRUCTIONS:
1. Preheat the oven to 350ºF (177ºF) and line a standard cupcake pan with 12 paper liners.
2. In a large bowl, whisk together the flour, baking powder, and salt. Set aside. 
3. In the bowl of a stand mixer fitted with the paddle attachment (or with a hand mixer and large bowl), add the lemon zest to the sugar and mix on low speed until fragrant and well combined, about 1 minute. Meanwhile, combine the lemon juice with the milk and set aside. 
4. Add the butter to the lemon-sugar mixture and cream on medium speed until and combined, about 2 minutes. Add the vegetable oil and beat until light and creamy, about 3 minutes. Scrape down the bowl and paddle as needed.
5. Mix in the eggs one at a time on low speed, then add the vanilla and turn the mixer to medium speed for one minute.
6. Turn the mixer off and add the flour mixture all at once. Mix on low speed until just combined, then slowly pour in the lemon-milk mixture. Mix until just combined, about 30 seconds.
7. Divide the batter equally between the liners and bake for 14-18 min. Cool, then top with frosting of your choice (link in bio for lemon cream cheese frosting)�
#lemoncupcakes #creamcheesefrosting #lemon #cupcakes #cupcakedecorating
April in my kitchen 🌸 I published 5 NEW recipes April in my kitchen 🌸 I published 5 NEW recipes on my site, baked my Oreo cupcake recipe for a fundraiser and found it was just as delicious as I remember, and filmed/photographed 3 recipes that will be on my blog in May (Lemon Cupcakes, Lemon Cream Cheese Buttercream, and No-Bake Marbled Strawberry Cheesecake) 🥰 

Comment “APRIL” to get all the available recipes and stay tuned for more! 

#bakersofinstagram #springbaking #cakedecorating #cupcakes #bakinglove
SHEET PAN COOKIE CAKE 🍪 slice it warm for a fud SHEET PAN COOKIE CAKE 🍪 slice it warm for a fudgy chocolate chip cookie OR let it settle into a moist and chewy cookie cake that’s perfect for decorating! My fave vanilla buttercream + sprinkles turn this giant chocolate chip cookie into the perfect birthday cake alternative at the end 🥳
⁣
Full recipe + decorating ideas at https://sugarandsparrow.com/sheet-pan-chocolate-chip-cookie-cake/
⁣
INGREDIENTS⁣
1 Cup (226g) unsalted butter, melted⁣
1 1/3 Cups (267g) packed light or dark brown sugar⁣
1/2 Cup (100g) granulated sugar⁣
3 large eggs⁣
1 Tbsp pure vanilla extract⁣
1 tsp baking soda⁣
1 tsp cornstarch⁣
1/2 tsp salt⁣
3 Cups (398g) all purpose flour⁣
2 Cups (350g) semi-sweet chocolate chips⁣
⁣
INSTRUCTIONS⁣
1. Preheat the oven to 350ºF (177ºC). Grease and line a 13×18 inch sheet pan.⁣
2. In a large bowl, add the brown sugar and granulated sugar. Melt the butter in the microwave and pour it over the top of the sugars. Whisk together until uniform. Add the eggs and vanilla, then continue whisking until uniform. Whisk in the baking soda, cornstarch, and salt.⁣
3. Add the flour and use a silicone spatula to fold it in until smooth cookie dough forms. Reserve 1/2 Cup of the chocolate chips and set them aside, then fold the remaining 1 1/2 Cups of chocolate chips into the cookie dough.⁣
4. Place the chocolate chip cookie dough onto the prepared sheet pan and use an offset spatula to spread it all the way to the edges in an even layer.⁣
5. Bake the cookie cake for 14-16 minutes, until it looks golden brown on the edges and set. 
6. Enjoy warm or let it cool and decorate with vanilla buttercream and sprinkles! ⁣
⁣
#cookiecake #chocolatechipcookies #sheetcake #birthdaycake #cakedecorating
STRAWBERRY CUPCAKES 🍓based on my beloved strawb STRAWBERRY CUPCAKES 🍓based on my beloved strawberry layer cake recipe, this cupcake version is just as moist yet fluffy and bursting with natural strawberry flavor! Between the mix of fresh strawberries in the cupcakes + freeze-dried strawberries in the frosting, the flavor is out of this world 🚀

Full recipe link in my bio (with strawberry buttercream) + at https://sugarandsparrow.com/strawberry-cupcakes/

STRAWBERRY CUPCAKES
Yield: 14 cupcakes

INGREDIENTS:
5 oz (143g) fresh or frozen strawberries
1/3 Cup (80ml) whole milk, room temp
1 1/2 Cups (158g) sifted cake flour
1 tsp baking powder
1/4 tsp baking soda
1/2 tsp salt
6 Tbsp (85g) unsalted butter, room temp
1 Cup (200g) granulated sugar
2 large eggs, room temp
3 Tbsp (45g) sour cream, room temp
1 tsp vanilla extract
1 drop pink food coloring (optional)

INSTRUCTIONS: 
1. Puree the strawberries using a food processor (you’ll have about 1/2 cup of puree), then place into a saucepan over medium-low heat. Bring to a simmer, then cook for 10-15 min, stirring occasionally, until you have 1/4 cup. Refrigerate until room temp.
2. Preheat oven to 350ºF (177ºC) and line a standard cupcake pan with liners.
3. Whisk together the sifted cake flour, baking powder, baking soda, and salt and set aside.
4. In a stand mixer w/ paddle attachment (or hand mixer + large bowl), whip the butter on high for 2 min. Add sugar and beat for 2 min, until light and fluffy. Turn the mixer to low and add the eggs one at a time, then add the vanilla and sour cream, turn the mixer to high and beat for 1 min. Meanwhile, whisk together the strawberry puree, whole milk, and food coloring (if using).
5. Turn the mixer off and add all of the dry ingredients at once. Mix on low until just combined, then add the strawberry milk mixture until just combined, about 30 seconds.
6. Fill the cupcake liners 2/3 full and bake for 14-18 minutes. Cool completely before topping with strawberry buttercream (full recipe linked above). 

#strawberrycupcakes #strawberrycake #pinkcupcakes #strawberry #cupcakes
COFFEE BUTTERCREAM (recipe below)☕️ this frost COFFEE BUTTERCREAM (recipe below)☕️ this frosting has AMAZING coffee flavor, is so easy to decorate cakes with, and pairs beautifully with so many flavors (chocolate, vanilla, or any cake flavor you’d want to turn into a latte). 

All my cake pairing suggestions are linked in my bio or at https://sugarandsparrow.com/coffee-buttercream-recipe/ 

COFFEE BUTTERCREAM⁣
Yield: 2.5 Cups⁣

INGREDIENTS⁣
1 1/2 tsp instant coffee or espresso powder⁣
1 1/2 Tbsp whole milk, room temperature⁣
1 Cup (226g) unsalted butter, room temperature⁣
3 1/2 Cups (420g) powdered sugar⁣
2 tsp pure vanilla extract⁣
Pinch of salt⁣

INSTRUCTIONS⁣
1. Combine the instant espresso/coffee with the whole milk and set aside. In the bowl of a stand mixer, beat the butter on high until creamy and smooth (about 5 minutes), scraping down the bowl and paddle a few times in between.⁣
2. Turn the mixer to low and add the powdered sugar a few cups at a time, scraping down the bowl and paddle between intervals. Add the vanilla, the coffee/espresso milk mixture, and salt. Mix on low until fully incorporated, about one minute.⁣

#coffeebuttercream #buttercream #frosting #coffeecake

Footer

On the Blog

  • Cake Basics
  • Recipes
  • Tutorials

Info

  • About
  • Privacy Policy & Disclosure

stay in the know

Copyright © 2026 · Theme by Sugar & Sparrow