• Cake
  • Frosting
  • YouTube
  • My Favorite Tools
  • Nav Social Icons

  • Skip to primary navigation
  • Skip to main content
  • Skip to primary sidebar
  • Skip to footer
  • Recipes
    • Cake
    • Cupcakes
    • Frosting
    • Ice Cream
    • Vegan
  • Cake Basics
  • Tutorials
  • Blog
  • About
  • Mobile Menu Widgets

    Connect

    Search

Sugar & Sparrow logo in script font

Sugar & Sparrow

Lifestyle and Cake from Portland Oregon

  • Cake Basics
  • Recipes
    • Cake
    • Frosting
    • Cupcakes
    • Ice Cream
    • Vegan
  • Tutorials
  • Book
  • Blog
  • About

Watercolor Ombrè Buttercream Tutorial

June 4, 2018 · In: Featured, Tutorials

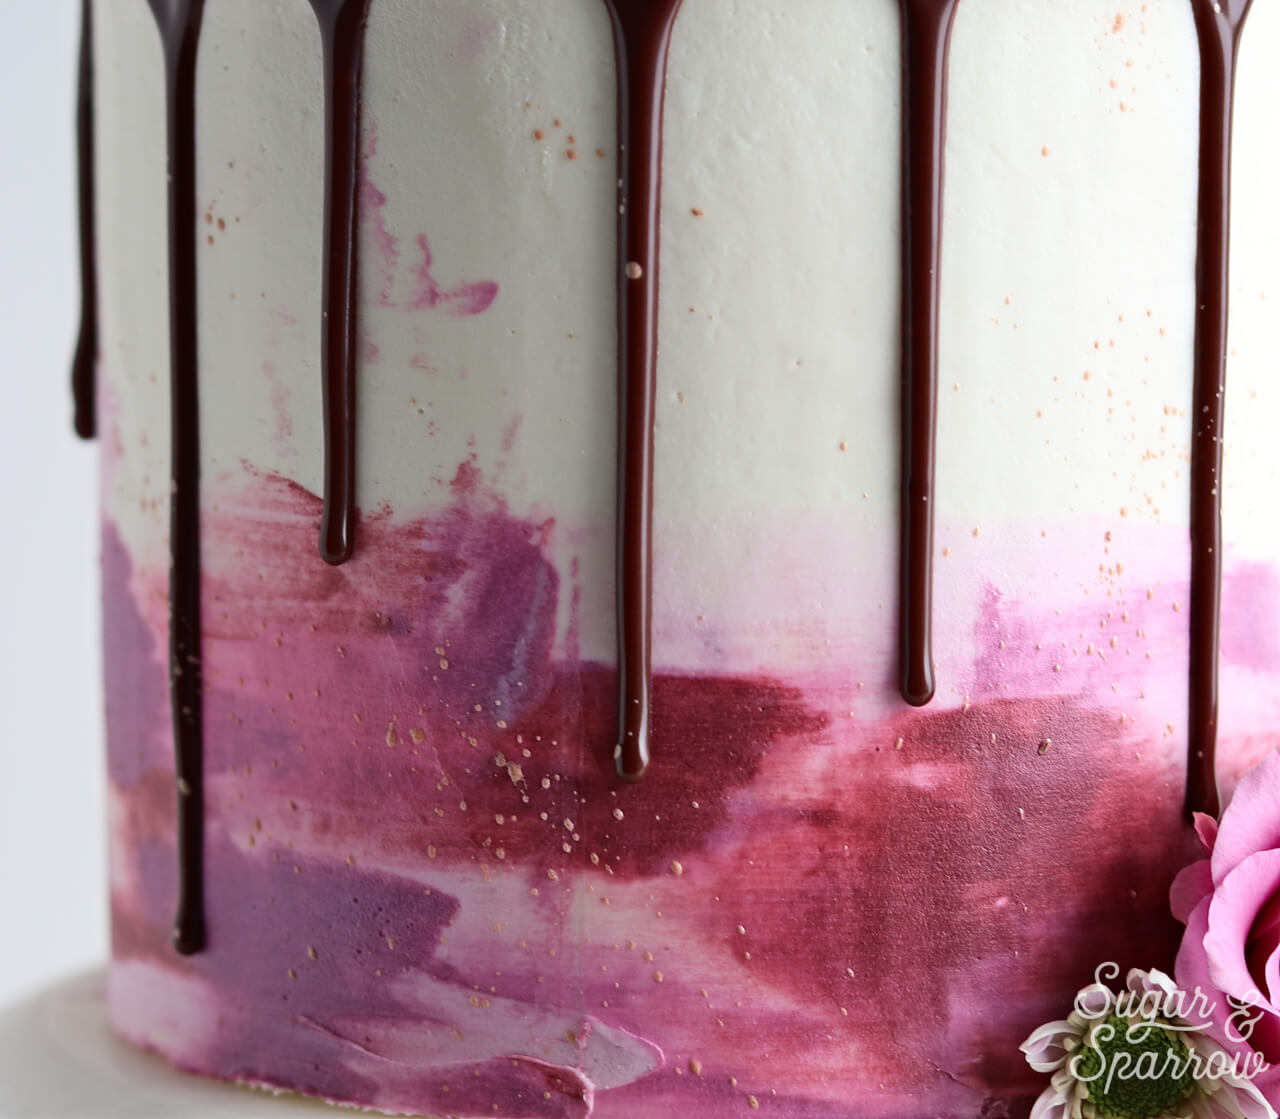
Of all the things you can paint with, buttercream remains one my favorite artistic mediums. Yes, it’s only temporary art because it’s the edible kind, but there are so many ways you can get creative with colors and techniques! One of the simplest edible art projects you can do is create a watercolor buttercream masterpiece as a cake finish, and although this tutorial focuses on how to get the look with a watercolor ombre, you can easily use this same technique on your entire cake.

When creating a watercolor finish, the first thing I do is think about a color palette. Sometimes I flip through Pantone swatches for inspiration and sometimes I just fly by the seat of my pants (usually the latter approach), but it’s always a good idea to have a plan before you start mixing up colors.

watercolor buttercream technique by sugar and sparrow

After having taken a few painting classes in my adolescent years, I know my way around the color wheel and which food color gels to blend to get the look I’m going for. If you haven’t a clue on how to mix colors, Wilton makes a pretty awesome set of food color gels called Color Right that includes all the gels you need to achieve any color of the rainbow (and then some). It’s even got a handy chart to help you mix up whatever hue you’re into.

Here’s a quick video of the watercolor technique before you read about how to get the look:

You Will Need

  • Color Gels (here’s the Wilton Color Right set)
  • A fresh batch of vanilla buttercream or other white-colored frosting
  • A cake that’s been filled, frosted, and ready for it’s final coat
  • Mixing bowls and spoons
  • Toothpicks
  • Cake turntable
  • An offset spatula
  • Bench scraper

Step 1: Fill And Frost Your Cake

Before you start creating a watercolor masterpiece, you’ll need a good blank canvas to paint on. Fill and frost your cake with a white or solid-colored buttercream so you’ve got a smooth finish that’s just waiting for a final coat.

how to frost a smooth buttercream cake

It’s best to chill the frosted cake in the refrigerator for a good half hour or more so it’s easier to work with.

Step 2: Mix Up Your Colors

While the cake is chilling in the refrigerator, mix up the colors you want to use into your buttercream. I like to color a little at a time, which is where the toothpicks come in handy. Instead of squirting the gels into the buttercream, I like to apply a little of the color to a toothpick and then dip that into the buttercream before mixing and seeing if I need more. This way, you can control the hues a little bit better. Keep in mind that your colors may darken slightly as they settle in, so be sure to allow for the darkening process if you’re trying to get a really specific shade.

coloring buttercream with Wilton Color Right gels

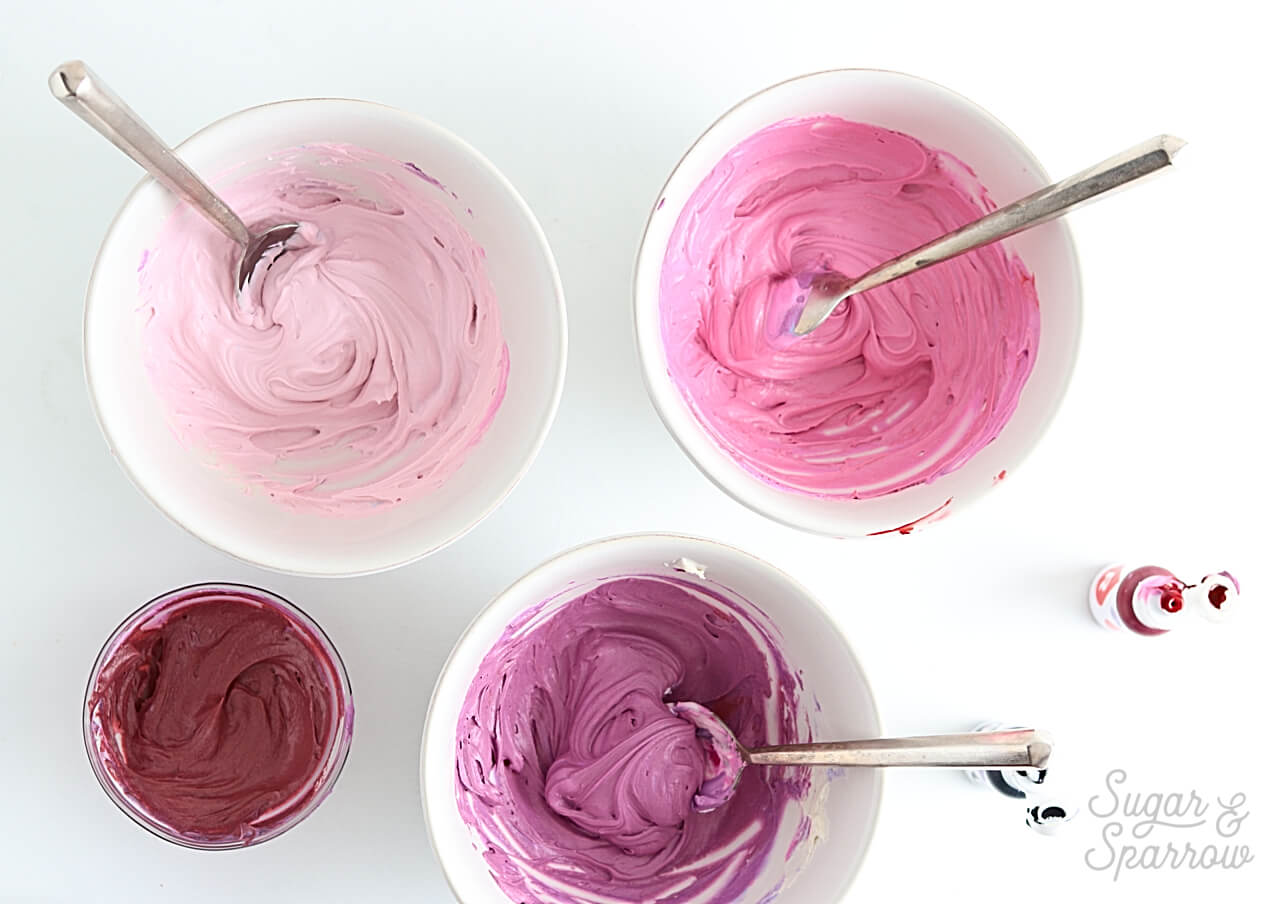
For this tutorial, I’ve created a brick red (Crimson + Rose Pink + Blue + a little Black), a purplish pink (Rose Pink + Blue), a bubblegum-toned pink (lesser amounts of Rose Pink + Blue), and a light blush tone (I mixed a tiny amount of my brick red with lots of vanilla buttercream). It’s always a good idea to keep some plain white buttercream around in case you need to tone down the color.

Step 3: Start Painting And Smoothing

After your blank canvas is chilled to the point where you can touch it and not leave a fingerprint, start applying your colors to the cake by touching them to the surface with your spatula. Try to start small by only adding a little color, smoothing the finish with your bench scraper, and then seeing where you want to add more color.

how to create a watercolor ombre buttercream finish

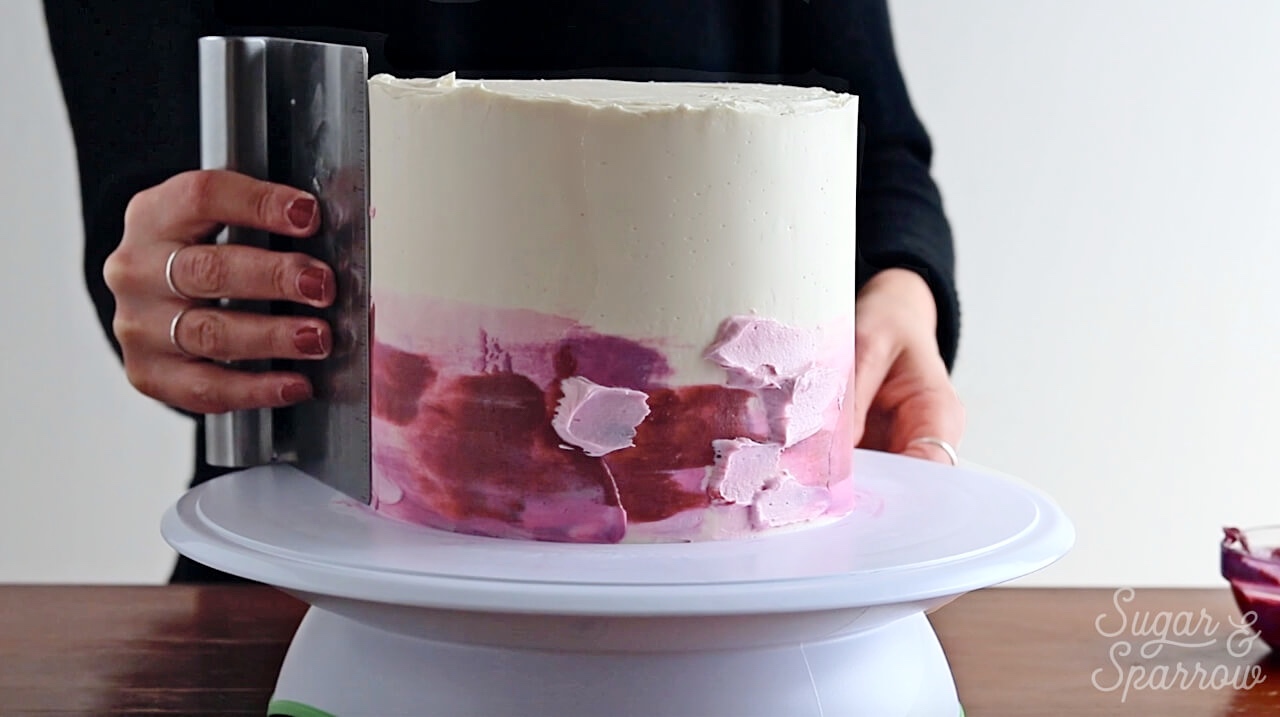
If you come on too strong with your colors, there’s an easy fix! Simply apply the white buttercream over the top of the colors and use the same smoothing technique to tone things down.

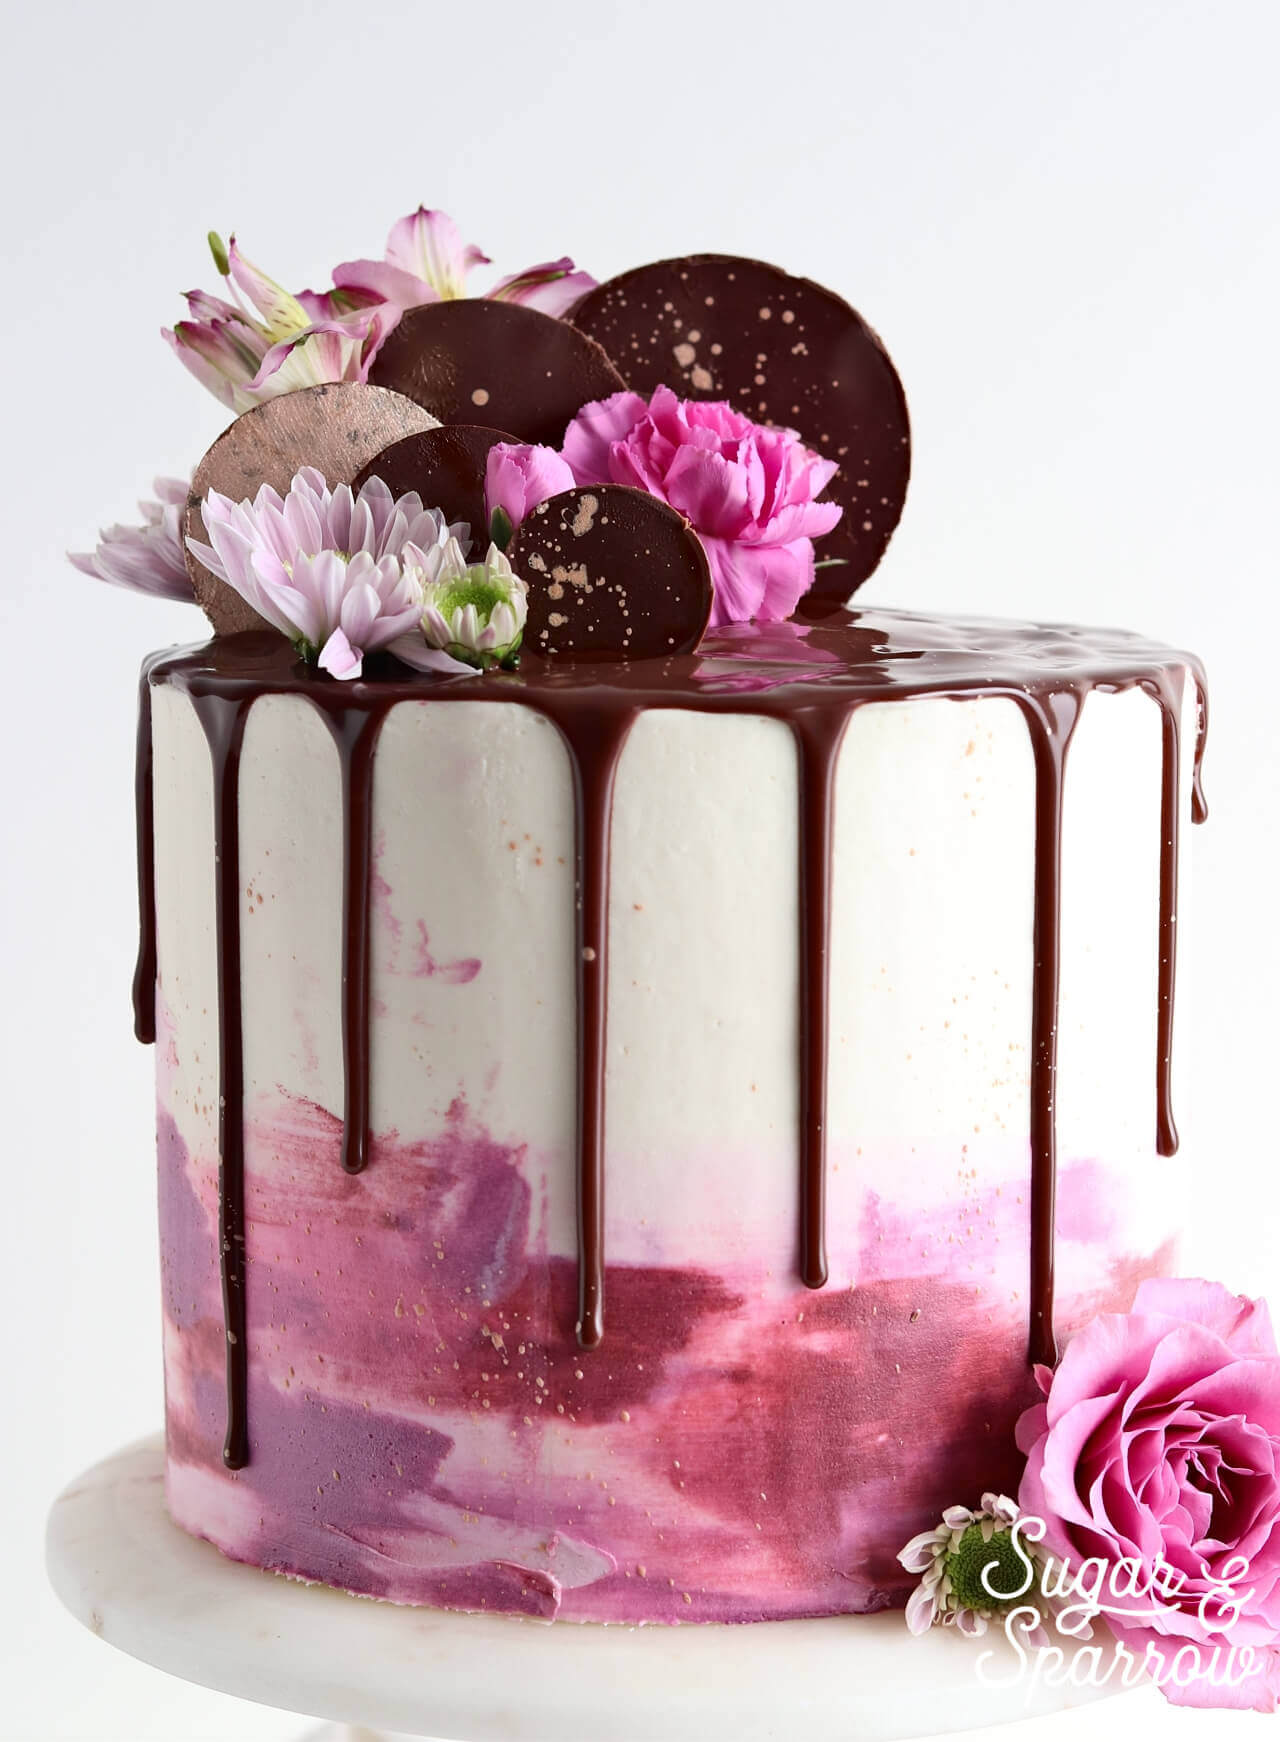
Step 4: Keep Decorating

Once your watercolor design is looking top notch, you can keep up the creativity by using some other design techniques. In this cake design, I’ve created a drip with chocolate ganache, added fresh flowers and chocolate disks to the top, and splatter painted with some Rose Gold Edible Art Paint.

watercolor buttercream drip cake by Sugar and Sparrow

Want to see some of the other looks and cake decorating techniques I’ve been loving? Head on over to my Pinterest!

By: Whitney · In: Featured, Tutorials · Tagged: buttercream, cake, cake decorating, cake tutorial, cake video, drip cake, smooth buttercream, tutorial, watercolor buttercream, watercolor ombre

you’ll also love

blueberry buttercream frosting recipeThe Best Blueberry Buttercream Recipe
raspberry buttercream frosting recipe by sugar and sparrowFreeze Dried Raspberry Buttercream Recipe
blackberry crisp layer cake recipe by sugar and sparrowBlackberry Crisp Layer Cake

Join the List

Stay up to date & receive the latest posts in your inbox.

Reader Interactions

Comments

  1. Mar-c says

    October 13, 2018 at 10:04 am

    thank you so much for posting your tips about this cake! i am making it for my birthday and i was a little worried about the decorating. do you have any classes on cake decoration, online or otherwise?? also when i make a cake and freeze it, upon thawing the dark colors seam to bleed into the lighter frosting. do you know how i could prevent that?

    Reply
    • Whitney says

      October 13, 2018 at 3:48 pm

      Hi Mar-c! Happy birthday! I don’t have official classes on cake decorating, the closest thing are these tutorials and my YouTube videos. As far as colors bleeding, I’d recommend storing finished cakes in the refrigerator instead of the freezer. If you’re eating the cake within a few days, the fridge will be totally fine and the colors shouldn’t bleed.

      Reply
  2. Christi says

    December 6, 2018 at 12:41 pm

    How many layers is this cake? Thanks!!

    Reply
    • Whitney says

      December 6, 2018 at 8:43 pm

      Hi Christi! This cake is three 6-inch layers 🙂

      Reply
  3. Nadia Hassan says

    April 25, 2019 at 8:34 am

    what kind of buttercream did you use please? Amercan or swiss meringue

    Reply
    • Whitney says

      April 27, 2019 at 1:57 pm

      Hi Nadia, this is American buttercream. The recipe can be found here: https://sugarandsparrow.com/vanilla-buttercream-recipe/

      Reply
  4. Christina says

    April 30, 2019 at 11:18 pm

    I love this artistic cake. What cake recipe and filling did you use?any suggestions?
    Greetings from Austria

    Reply
    • Whitney says

      May 1, 2019 at 10:54 am

      Hi Christina! Thank you for your kind words about my cake! For the filling and frosting on this cake, I used my vanilla buttercream recipe: https://sugarandsparrow.com/vanilla-buttercream-recipe/

      Reply
  5. Charlene says

    June 10, 2019 at 7:37 pm

    Simply Beautiful

    Reply
    • Whitney says

      June 10, 2019 at 9:51 pm

      Thank you, Charlene!

      Reply
  6. Sam says

    August 16, 2019 at 12:21 am

    Would love to know how you made the chocolate disks for this cake?

    Reply
    • Whitney says

      August 16, 2019 at 9:17 am

      Hi Sam! The tutorial (video included!) for the chocolate disks is here: https://sugarandsparrow.com/chocolate-geometric-shapes/

      Reply
      • sam says

        August 17, 2019 at 4:53 am

        Thank you soooo much!! This is super helpful! 🙂

        Reply
  7. JOAN SEVERINE says

    January 17, 2020 at 11:15 pm

    Good works

    Reply
    • Whitney says

      January 20, 2020 at 1:21 pm

      Thank you, Joan!

      Reply
  8. Maliha says

    July 23, 2020 at 5:12 pm

    I love this so pretty! I was wondering if I could do the same thing but with shades of pink and blue? Do you think it would look okay or would it all just turn purple? I was thinking that it would probably be better to do one colour (for example the pink shades) first and then do the other colour after- to prevent mixing and turning purple. Please let me know your thoughts❤️

    Reply
    • Whitney says

      July 24, 2020 at 8:05 am

      Hi Maliha! You can certainly use pink and blue with this method. You might have some color mixing happen where they overlap, but to prevent that you can do one color first, refrigerate it for a few minutes to let it set up some, and then add the next color. Hope that helps!

      Reply
  9. Sally says

    October 3, 2020 at 6:11 am

    Hey! So I placed the watercolor effect on cake however as I was trying to spread the color with the smoothing tool, the colors would spread. They kind of just stayed in place. It seemed like they were so stiff but I know my icing wasn’t stiff. It is because the cake was in the freezer for 15 min before so I couldn’t spread on the base? Any tips appreciated!

    Reply
    • Whitney says

      October 4, 2020 at 8:27 pm

      Hi Sally! The colder the cake is, the quicker it will “set” the additional buttercream colors you swipe on, so my best tips are to 1) chill in the refrigerator instead of the freezer for the specified amount of time in this tutorial and 2) work quickly with the colored buttercream. Hope that helps!

      Reply
  10. Tahmina says

    November 1, 2020 at 8:32 am

    Hi Whitney! This came looks beautiful! Do you think I could do the same on a cake with cream cheese plus whipped cream icing (Chantilly cream).. using the same Chantilly cream?
    Appreciate your advice!

    Reply
    • Whitney says

      November 2, 2020 at 6:46 am

      Hi Tahmina! I have never worked with chantilly cream before, but as long as it’s tintable and will spread like the buttercream in this tutorial it should be perfectly fine to use.

      Reply
  11. Jennifer says

    November 6, 2021 at 7:23 am

    Thank you Whitney for sharing your talents! I love how you are interactive and actually help others as well! I will definitely be using these techniques for a cake I’m making today. Actually using similar colors except gold instead of chocolate. Do you have any recipes for mirrored glaze/icing?
    Thanks again!!

    Reply
    • Whitney says

      November 7, 2021 at 11:09 am

      Thanks so much for the kind words, Jennifer! I’m so happy to hear you’re finding my blog helpful. I don’t have any recipes for mirror glaze but it’s a technique I’m hoping to try someday! I’ll be sure to let you know when I do.

      Reply

Leave a Reply Cancel reply

Your email address will not be published. Required fields are marked *

Recipe Rating


Next Post >

White Chocolate Milk Splash Tutorial

Primary Sidebar

Welcome to Sugar & Sparrow

Welcome to Sugar & Sparrow

Helping you whip up pretty desserts with confidence and creativity. And hopefully sharing a few laughs with you along the way!

Learn More

Connect

let’s bake!

Get my very best recipes, baking tips, and decorating tutorials sent to your inbox

Featured Posts

gold drip cake tutorial

Gold Ganache Drip Cake Tutorial

how to mix rainbow buttercream colors

The Easiest Way to Make Rainbow Buttercream Colors

lemon cake with cream cheese buttercream

Lemon Cake With Lemon Cream Cheese Buttercream

Search

Archives

Follow Along

@sugarandsparrowco

CARROT CAKE (recipe below) 🥕🎂 Y’all have b CARROT CAKE (recipe below) 🥕🎂 Y’all have been asking for a carrot cake recipe for YEARS and I finally whipped one up for my book, Anyone Can Cake. It’s perfectly spiced, has an extra moist crumb, and is just heavenly with cream cheese frosting. I ate an embarrassing amount during filming 😬😏⁣
⁣
CARROT CAKE⁣
YIELD: 3 6-inch layers or 2 8-inch layers⁣
⁣
INGREDIENTS⁣
2 1/2 Cups (333g) all purpose flour⁣
2 tsp (10g) baking powder⁣
1 tsp baking soda⁣
1/2 tsp salt⁣
2 tsp ground cinnamon⁣
1 tsp ground nutmeg⁣
1 tsp ground ginger⁣
1/4 tsp cloves⁣
1/2 Cup (100g) granulated sugar⁣
1 1/2 Cups (300g) packed brown sugar⁣
1 Cup (240ml) vegetable oil⁣
4 large eggs, room temperature⁣
3/4 Cup (135g) smooth unsweetened applesauce⁣
1 tsp pure vanilla extract⁣
2 Cups (260g) grated carrots (about 4 large)⁣
⁣
INSTRUCTIONS:⁣
1. Preheat the oven to 350ºF/177ºF. Grease and line three 6-inch (15cm) or two 8-inch 20cm) cake pans. ⁣
2. In a medium bowl, whisk together the flour, baking powder, baking soda, salt, cinnamon, nutmeg, ginger, and cloves. In another large bowl, whisk together the white and brown sugars, vegetable oil, eggs, applesauce, and vanilla. ⁣
3. Fold the dry ingredients into the wet ingredients using a rubber spatula until just combined, then fold in the grated carrots.⁣
4. Pour the batter evenly between the prepared cake pans and bake for 35-40 minutes, or until a toothpick inserted comes out clean.⁣
⁣
Pair with my fave cream cheese buttercream recipe at https://sugarandsparrow.com/cream-cheese-buttercream-recipe/⁣
⁣
#carrotcake #creamcheesefrosting #carrotcakerecipe #eastercake #cakeideas #anyonecancake #baking #bake #layercake #bakedfromscratch #cakelover
[CLOSED! Winner TBA] Anyone Can Cake x Wilton GIVE [CLOSED! Winner TBA] Anyone Can Cake x Wilton GIVEAWAY 🥳 @wiltoncakes has been a HUGE part of my cake journey and I’m extra excited to gift ONE lucky winner every Wilton tool they could possibly need to make ⁣perfect layer cakes!⁣
⁣
ONE lucky winner will get everything in this Reel:⁣ ⁣
✨Gold piping tip set⁣
✨Cake turntable⁣
✨Navy and gold icing spatula set ⁣
✨Color Right Performance Food Coloring Set⁣
✨Icing comb set⁣
✨Icing smoother⁣
✨Cake leveler⁣
✨Set of two 8-inch cake pans⁣
✨a SIGNED copy of my book, Anyone Can Cake⁣
⁣
TO ENTER:⁣
⁣⁣1️⃣ LIKE this post⁣ ⁣
2️⃣ FOLLOW @sugarandsparrowco and @wiltoncakes⁣
3️⃣ TAG a couple friends who would love this prize below in separate comments. One comment = one entry ⁣⁣ ⁣
4️⃣ BONUS for commenting where you’re at in your cake decorating journey!⁣
⁣
That’s it! Ends March 25th at 11:59pm PST and is open to US residents only (sorry to my worldwide friends!). I’ll reach out to the winner via DM to claim the prize and if it’s you, please respond within 24 hours to claim. 🎉 Must be 18 or older. Not sponsored by Wilton or Instagram. Best of luck to all 🎉⁣
⁣
⁣#wiltoncakes #cakedecorating #cakes #cakelover #anyonecancake #cookbook #cake #sprinkles #cake #cookbookauthor #bakersofinstagram #bake #baking
(Ad) Buttercream Embroidery Cake Tutorial🧵🌸🎂 to celebrate March being National Craft Month, I decided to try out some new buttercream piping techniques and make the embroidery cake of my dreams! It ended up being so fun + easy with the perfect cake decorating supplies from @joann_stores 🙌🏼 Here’s how to make this happy little Spring-inspired cake:⁣
⁣
1️⃣ Frost your cake with a smooth buttercream finish and chill for at least 20 minutes.⁣
2️⃣ Use floral cookie cutters to imprint the buttercream.⁣
3️⃣ Outline the shapes using Wilton tip 2 or 3, then fill in the shapes with lines of buttercream piping. For some of the flowers, start at the edge of the shape and pipe a series of lines that connect in the center. For others, experiment with ways to fill in the shape with parallel lines, dots, or other embroidery-inspired piping. ⁣
4️⃣ Freehand some tiny dotted flowers and floral accents using those same piping techniques wherever your heart desires!⁣
⁣
The full tutorial + video for this pretty floral embroidery cake is linked in my bio! It’s the perfect way to welcome Spring 🌸⁣
⁣
#handmadewithjoann #joannpartner #embroidery #embroiderycake #baking #floralcake #cakeideas #buttercreamcake #bake #cakesofinstagram #cake #buttercream #cakelover #cakeart #nationalcraftmonth
Yellow Cake + Chocolate Frosting (aka Classic Birt Yellow Cake + Chocolate Frosting (aka Classic Birthday Cake) 🙌🏼 🥳 this one is extra nostalgic for me because it’s what my mama made for all my birthdays growing up 💛 this recipe rivals the box mix: super moist and fluffy layers of classic yellow cake (naturally colored with egg yolks) + silky smooth chocolate buttercream. Top with rainbow sprinkles for extra fun! 🎉⁣
⁣
Find this recipe linked in my bio + on page 147 of my book, Anyone Can Cake ✨⁣
⁣
#birthdaycake #yellowcake #chocolatefrosting #chocolatebuttercream #sprinkles #layercake #cakelover #cakesofinstagram #cake #bake #bakingfun #bakedfromscratch #anyonecancake #cakeideas #cakedecorating
Ombré Rainbow Sheet Cake 🌈🥳 for St. Patrick Ombré Rainbow Sheet Cake 🌈🥳 for St. Patrick’s Day or any day, because rainbow cakes are year round if you ask me 🫶🏽⁣
⁣
🎨 colors: custom mixed with @wiltoncakes color right food coloring system ⁣
🌈 piping tips: @wiltoncakes 1M for the rosettes, 104 for the ruffles, 32 for the swirls and stars⁣
⁣
#ombrecake #rainbowcake #sheetcake #cakedecorating #rainbow #stpatricksday #buttercreampiping #pipingskills #bakingfun #satisfyingfood #bake #cakeideas #cakelovers

Footer

On the Blog

  • Cake Basics
  • Recipes
  • Tutorials

Info

  • About
  • Privacy Policy & Disclosure

stay in the know

Copyright © 2023 · Theme by Sugar & Sparrow