• Cake
  • Frosting
  • YouTube
  • My Favorite Tools
  • Nav Social Icons

  • Skip to primary navigation
  • Skip to main content
  • Skip to primary sidebar
  • Skip to footer
  • Recipes
    • Cake
    • Cupcakes
    • Frosting
    • Ice Cream
    • Vegan
  • Cake Basics
  • Tutorials
  • Blog
  • About
  • Mobile Menu Widgets

    Connect

    Search

Sugar & Sparrow logo in script font

Sugar & Sparrow

Lifestyle and Cake from Portland Oregon

  • Cake Basics
  • Recipes
    • Cake
    • Cupcakes
    • Cookies & Bars
    • Filling
    • Frosting
    • Ice Cream
    • No-Bake
    • Small Batch
    • Vegan
  • Tutorials
  • Book
  • Blog
  • About

Cascading Heart Cake Tutorial

February 7, 2020 · In: Featured, Seasonal, Tutorials, Valentines

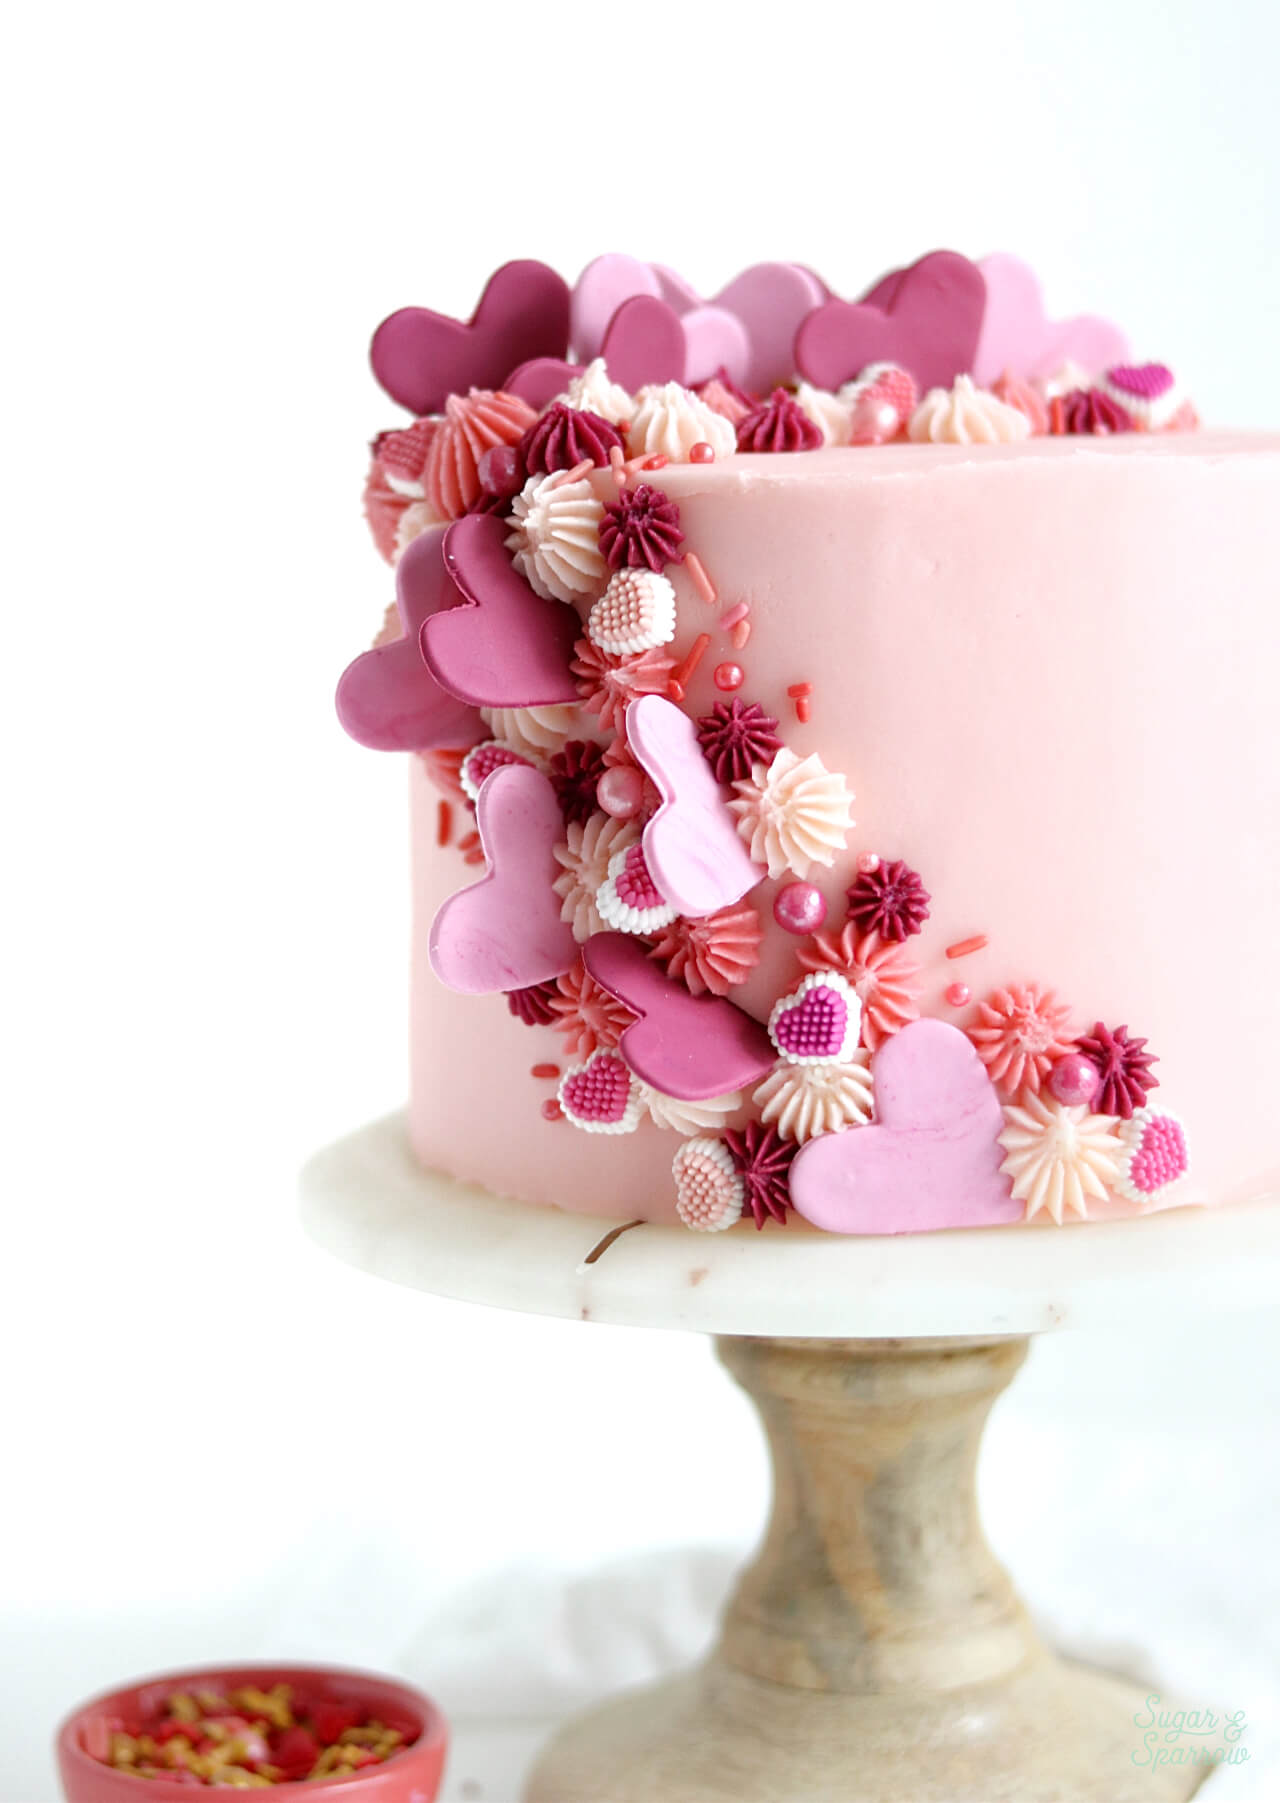
Two years ago, I got this wild idea to make some fondant hearts and cascade them down the side of a cake with pretty piping and Valentine’s Day conversation hearts. Ever since I posted that design on my Instagram back then, I’ve gotten tons of requests for a tutorial – not just for Valentine’s Day but for all sorts of occasions! Wait no more, the tutorial is finally here. 

cascading heart cake for valentines day by sugar and sparrow

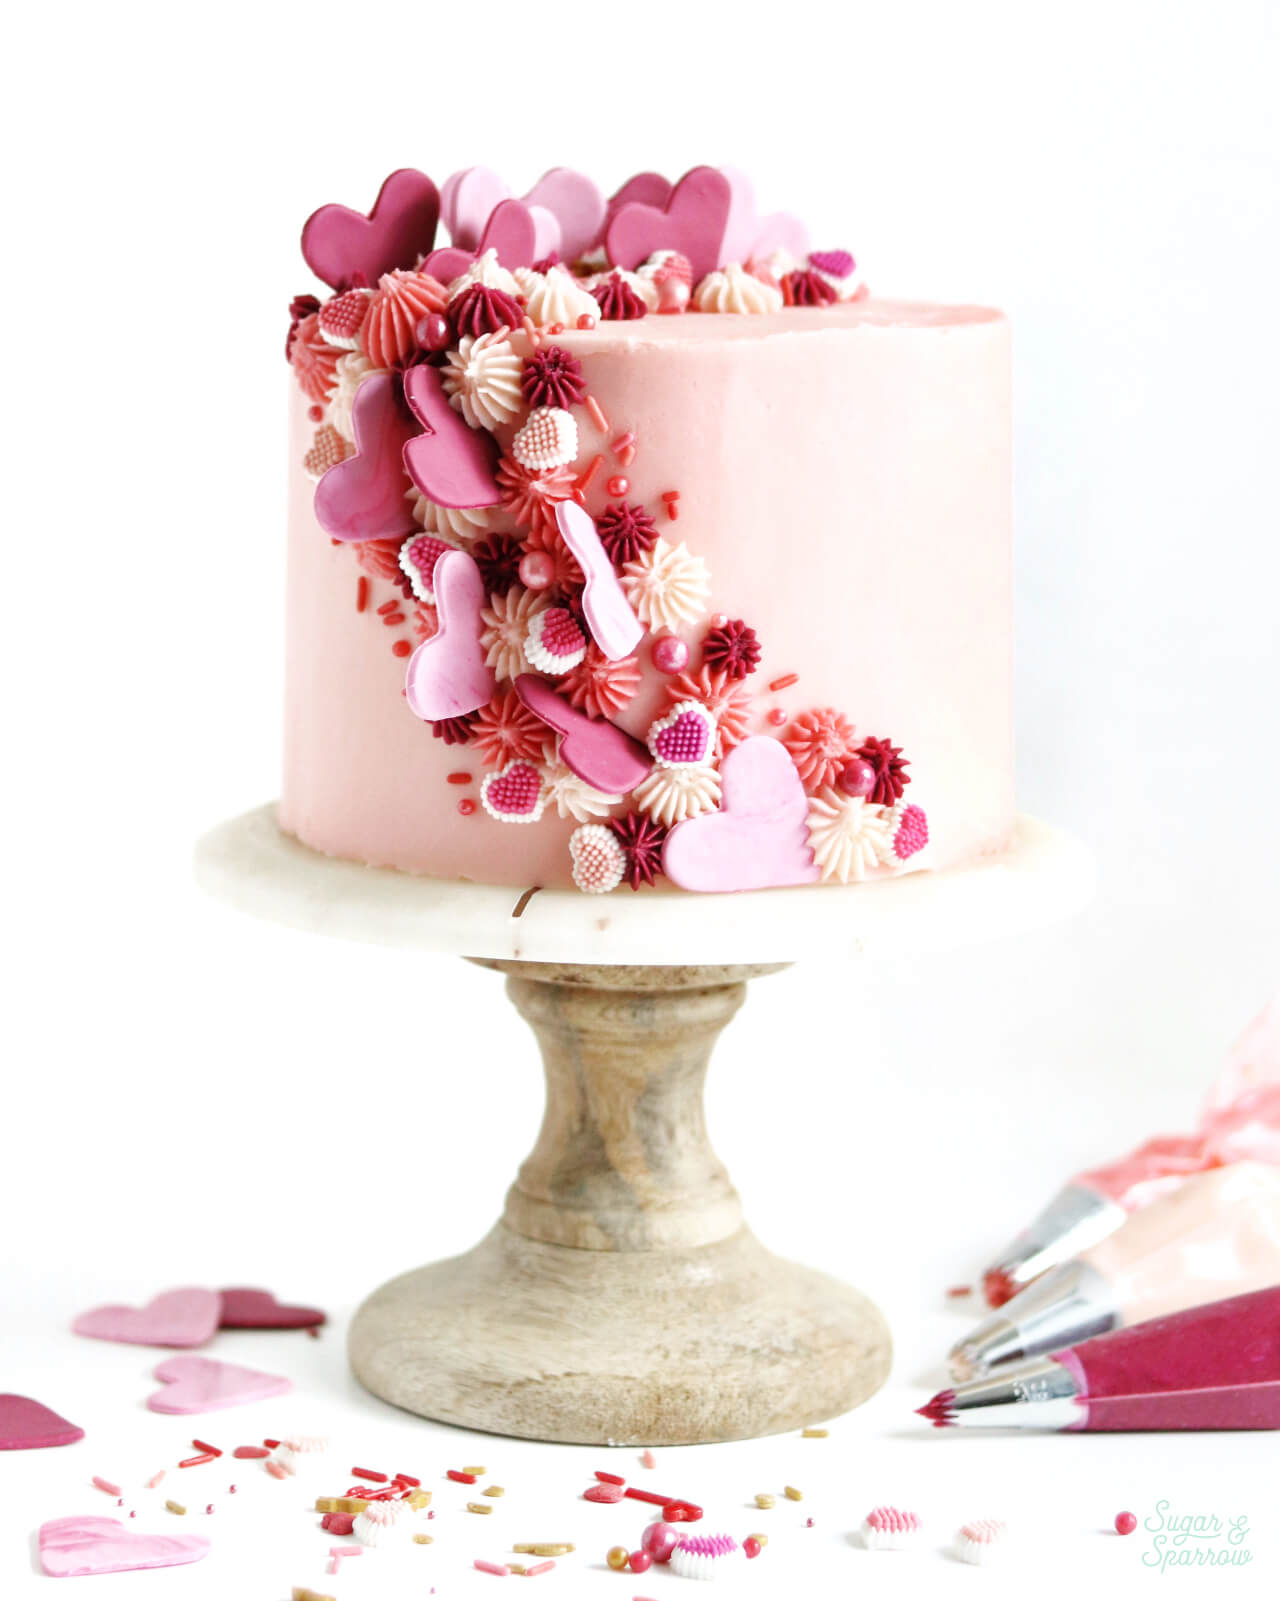
JOANN sent me a big box of Valentine’s Day goodies just for fun, and in it I found these amazing icing heart decorations and the perfect sprinkles for my color palette. I ended up ditching the conversation hearts and adding in those extras instead. And speaking of the color palette, I am super into Americolor Dusty Rose right now, so I designed the whole color scheme around it. The warm pink and red tones are giving me all the feels (don’t worry, I’ll show you how to replicate the colors below). 

valentines day cake with fondant hearts
Pink Valentines Day Cake with hearts and sprinkles

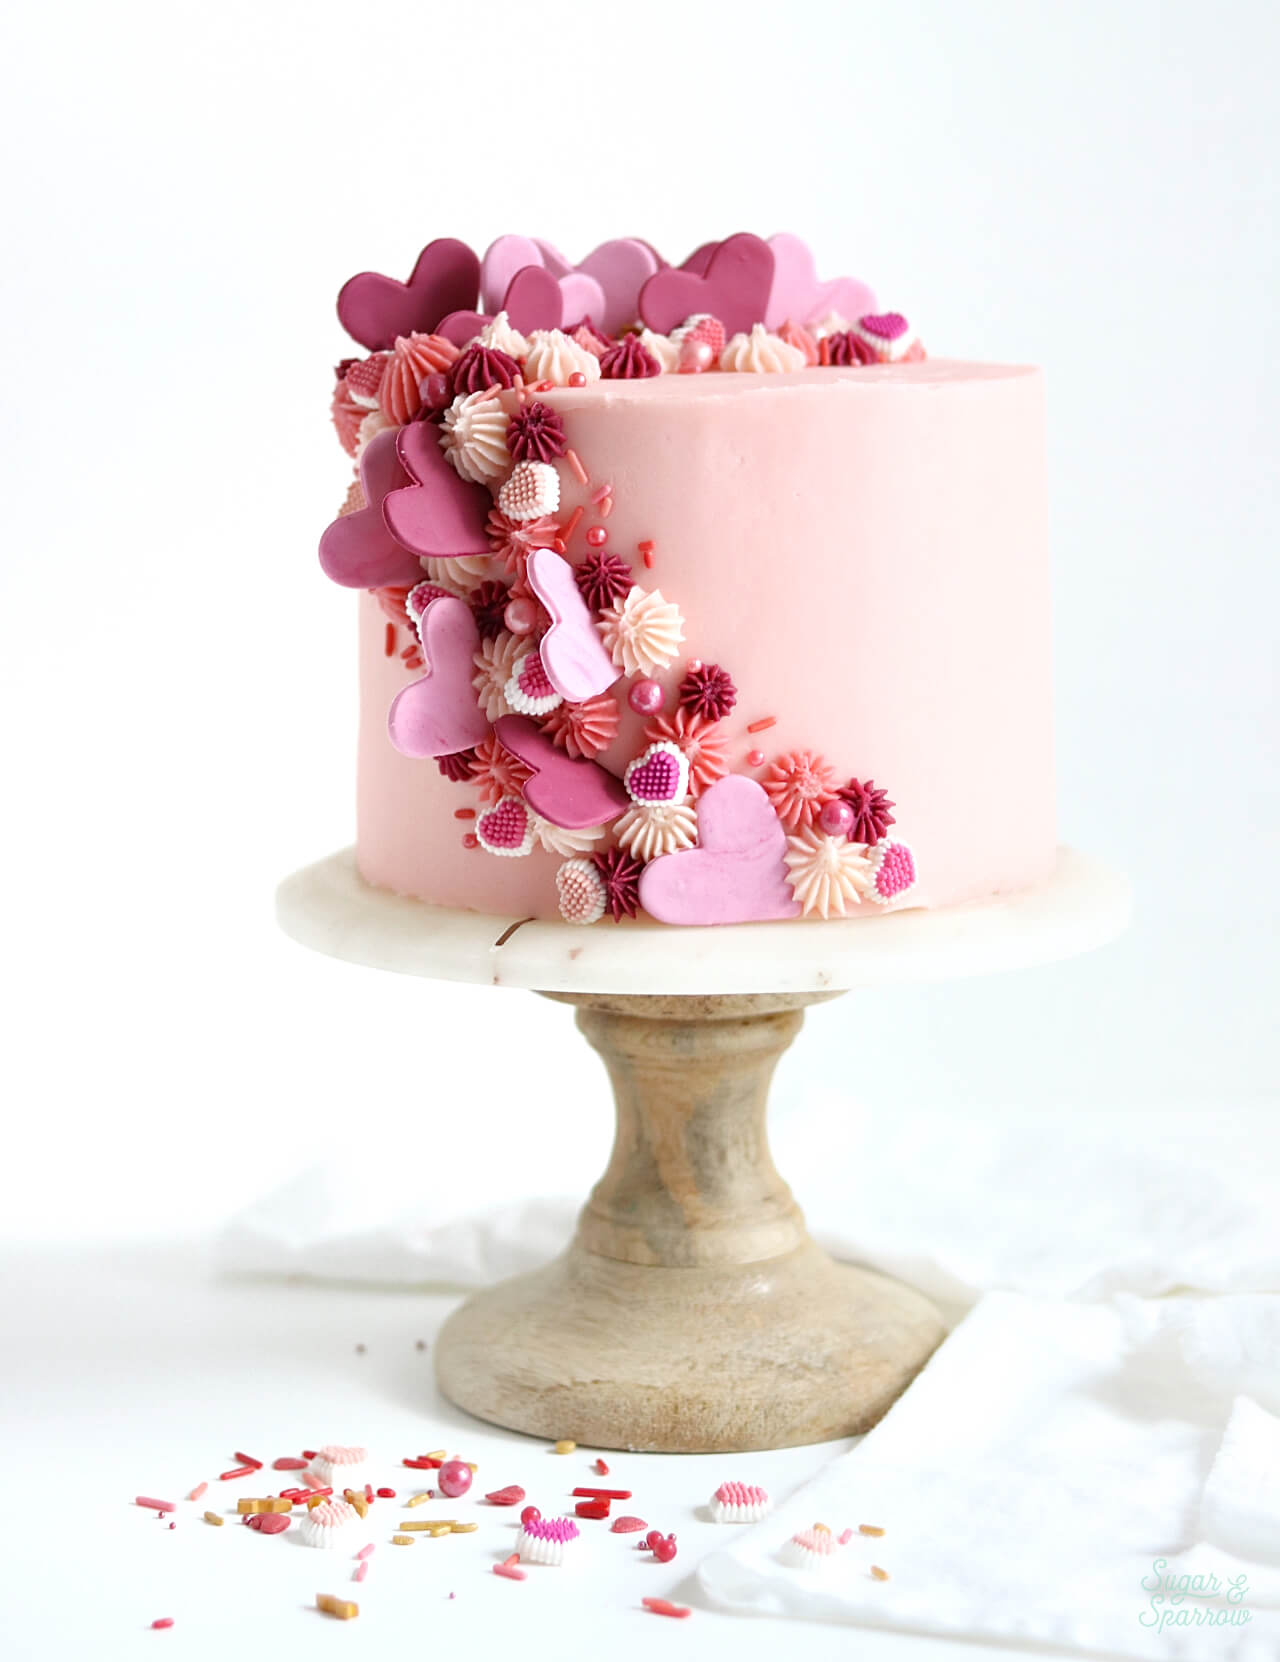
This design all begins by making your own fondant hearts. I colored some Satin Ice fondant to match my buttercream color palette and used a heart shaped cookie cutter to make the decorations. In about 24 hours (flip them halfway in between), they’re dry and ready to use. One question I get a lot is how I stick them to the side of the cake without weighing anything down. The answer is this: just make sure they’re only about ⅛ inch thick when you make them. They’ll end up weighing barely anything, so you can just stick them right into the buttercream and they’ll hold up perfectly. The buttercream piping serves as extra “glue” to keep them in place as well. 

pink valentines day cake with hearts
Pink and red heart cake for valentines day

Here’s a quick video to show you my technique for making fondant hearts and cascading them down the side of the cake with all the pretty details. I’ve written out all the steps below, but be sure to give this video a watch first for visualization: 

If you’re into cake decorating videos like this one, be sure to subscribe to my YouTube channel! I love making videos and am adding new ones there all the time, from cake decorating techniques to my go-to recipes. Head over there and click the subscribe button to make sure you don’t miss a thing!

You Will Need

  • A 6-inch cake that’s been crumb coated and chilled
  • 1.5 batches of vanilla buttercream
  • Food color gels of your choice
  • 2 ounces of fondant 
  • Small rolling pin
  • 1 tsp vegetable shortening 
  • Small heart cookie cutter (mine is about 2 inches tall) 
  • Cake turntable
  • Angled Icing Spatula 
  • Icing Smoother
  • Wilton Tip 4B (x2)
  • Wilton Tip 199 
  • Piping Bags
  • Wilton Icing Hearts Decorations
  • Valentines Day sprinkles of your choice

Step 1: Make the Fondant Hearts

With your hands coated in a little bit of vegetable shortening, knead the fondant until it’s the consistency of Play-Doh. Divide the fondant in half and color each half a different color. I used a mixture of Americolor Fuchsia + Super Red to create the dark red color, and just a tiny bit of Fuchsia to create the light pink color. 

how to color fondant

Spread a little vegetable shortening onto a fondant mat or smooth cutting board, then roll the first fondant color out to about ⅛ inch thickness. Then, use the heart cookie cutter to cut out heart shapes. 

how to make fondant hearts
Fondant Hearts tutorial

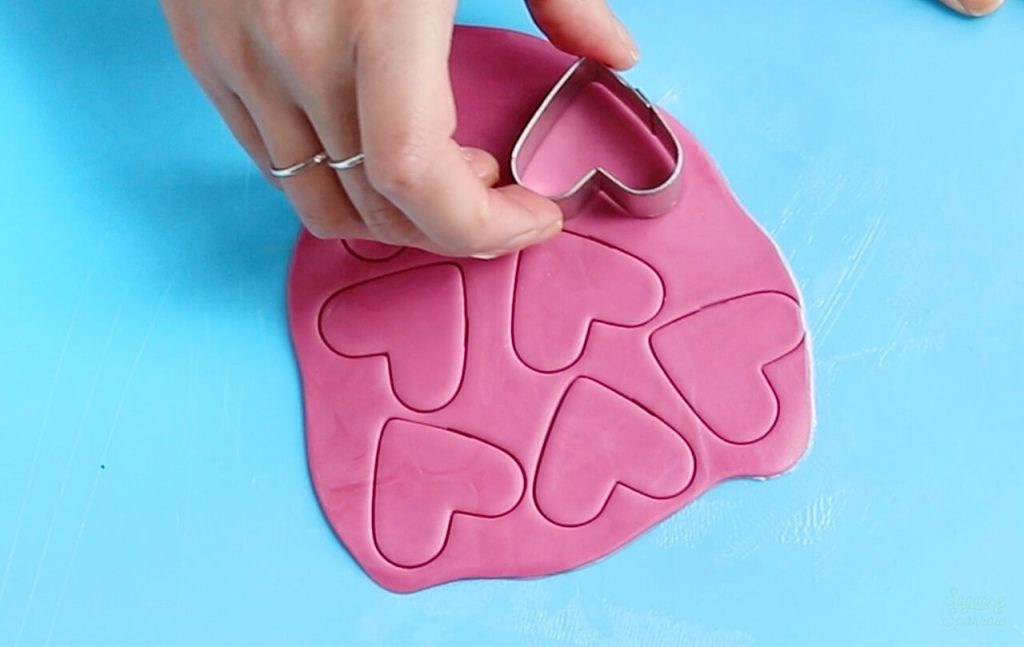
Repeat with the other fondant color and allow the heart shapes to dry for at least 24 hours, flipping them halfway through so that each side dries thoroughly. 

Step 2: Create the Buttercream Color Palette

Add about 3 cups of vanilla buttercream to a medium sized bowl, then divide the remaining buttercream evenly amongst three smaller bowls. The largest bowl is what you’ll be using to frost the cake, so color it whatever hue you’d like as your backdrop. I went with a light shade of Americolor Dusty Rose. 

Buttercream color palette for Valentine's Day

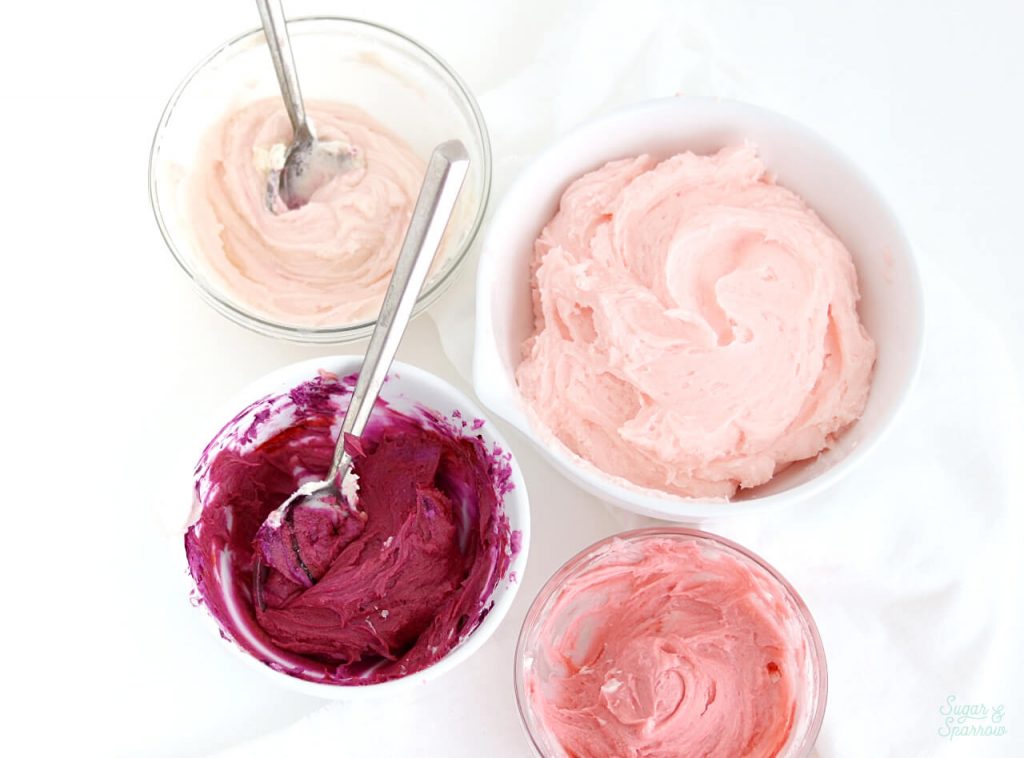
The remaining bowls will be what you use for the accent piping in the cascading decoration. I colored two of the bowls with Dusty Rose (one a little lighter than the cake background color and one a bit darker), and the last bowl with a mixture of Americolor Fuschia and a small drop of Super Red to warm up the color. 

Wilton tip 4b and 199

When you’re happy with your color palette, add the small bowls of buttercream into three separate piping bags, each fitted with either Wilton Tip 4B or 199. 

Step 3: Frost The Cake

With your chilled and crumb coated cake on a turntable, use the largest bowl of buttercream to frost a smooth finish onto the cake. Start by frosting a smooth layer on the very top of the cake with your angled icing spatula. 

how to frost a cake with buttercream

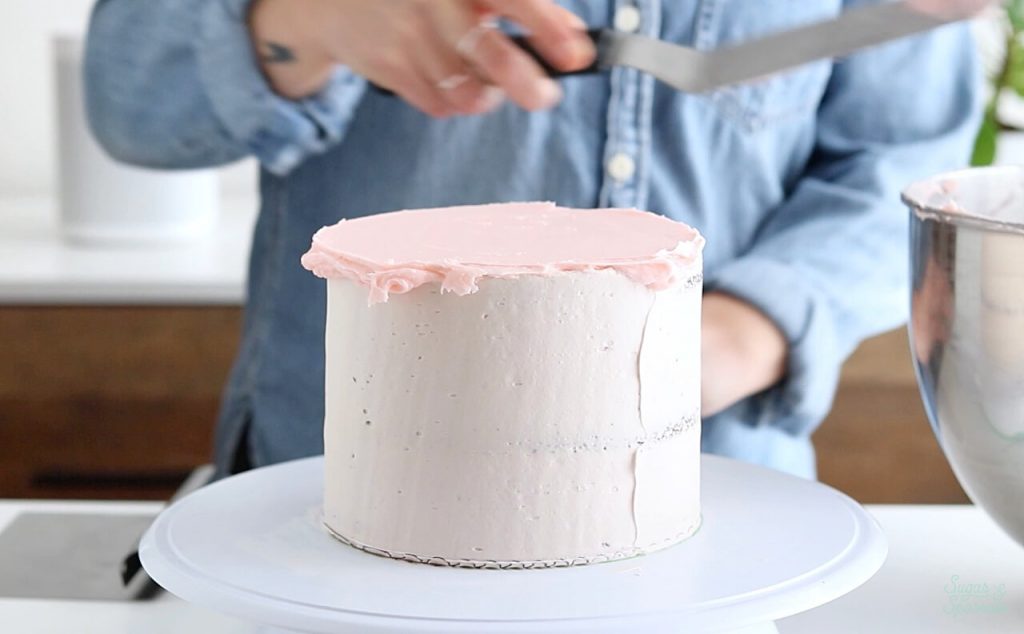
Next, add buttercream to the sides of the cake and glide your icing smoother over them while turning the turntable to create smooth sides. 

how to frost a buttercream cake
how to frost a smooth buttercream cake

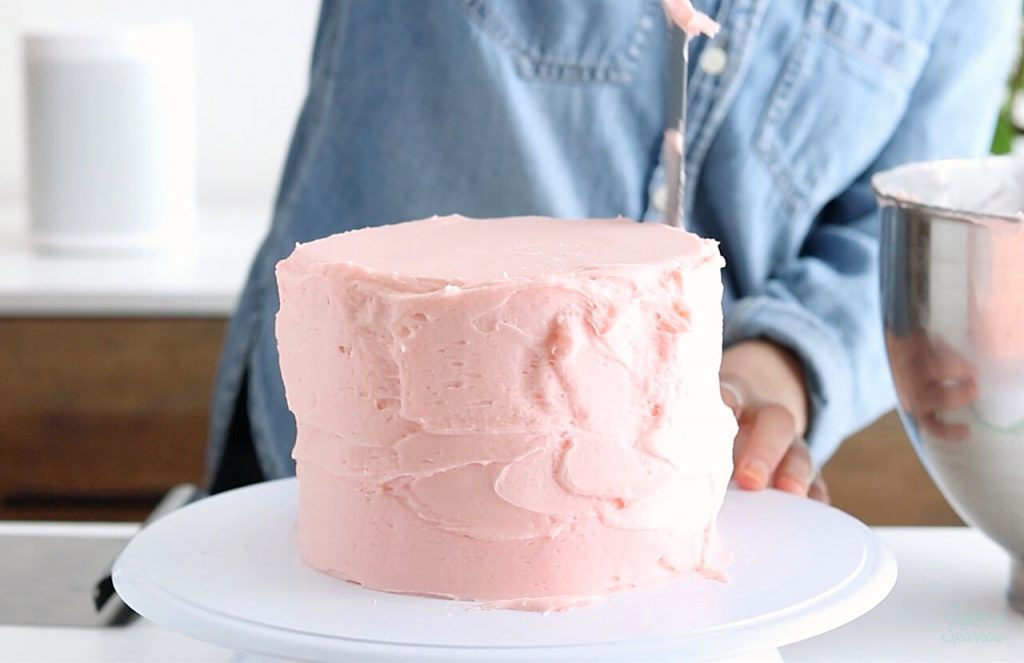
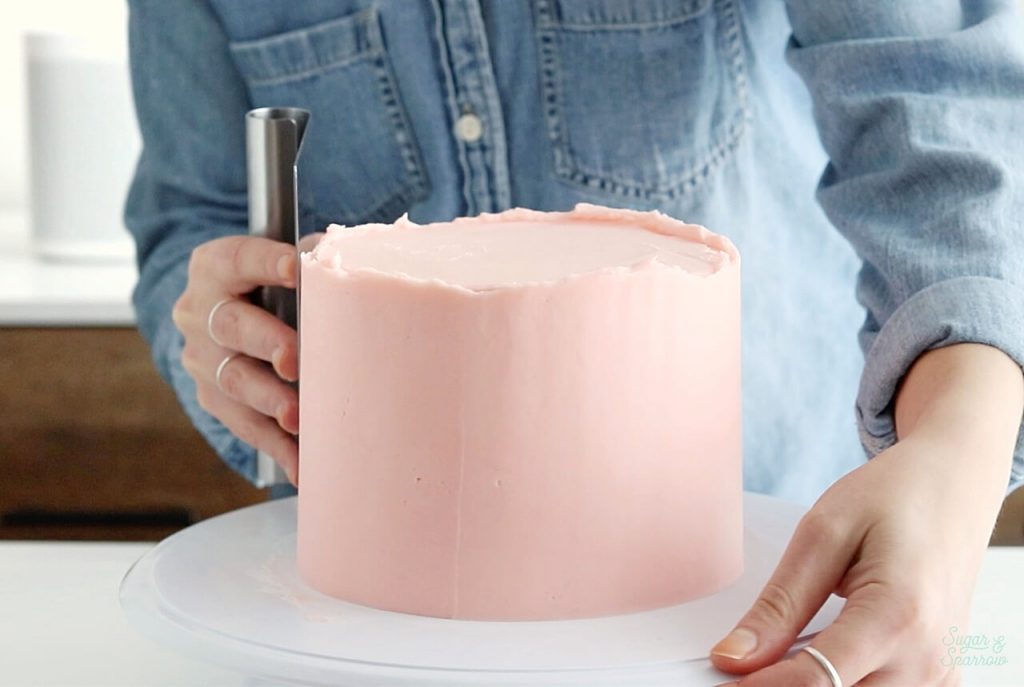
You’ll notice a crown of buttercream forming on the top edges of the cake, which is essential to getting sharp edges on the top. Use your angled icing spatula to swipe the crown inwards (toward the top center of the cake). Repeat until you’ve got nice sharp edges. 

how to frost a buttercream cake with sharp edges

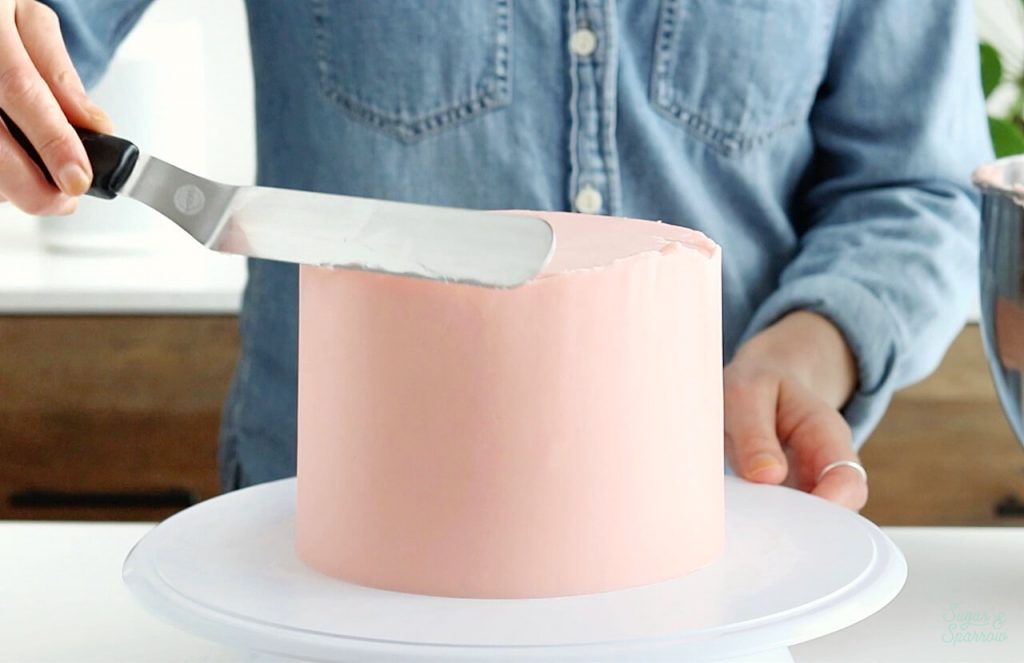
When your cake is looking ultra smooth, pop it into the refrigerator to firm up for about 20 minutes. If you want more tips on creating a perfectly smooth cake finish, I’ve got a great tutorial for you here. 

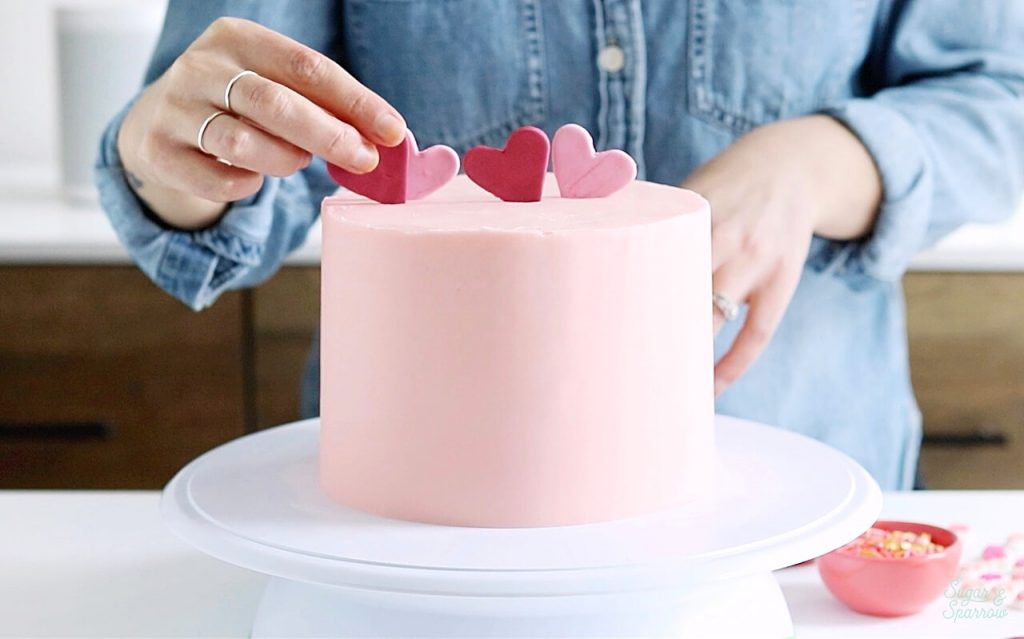
Step 4: Create The Cascading Heart Design

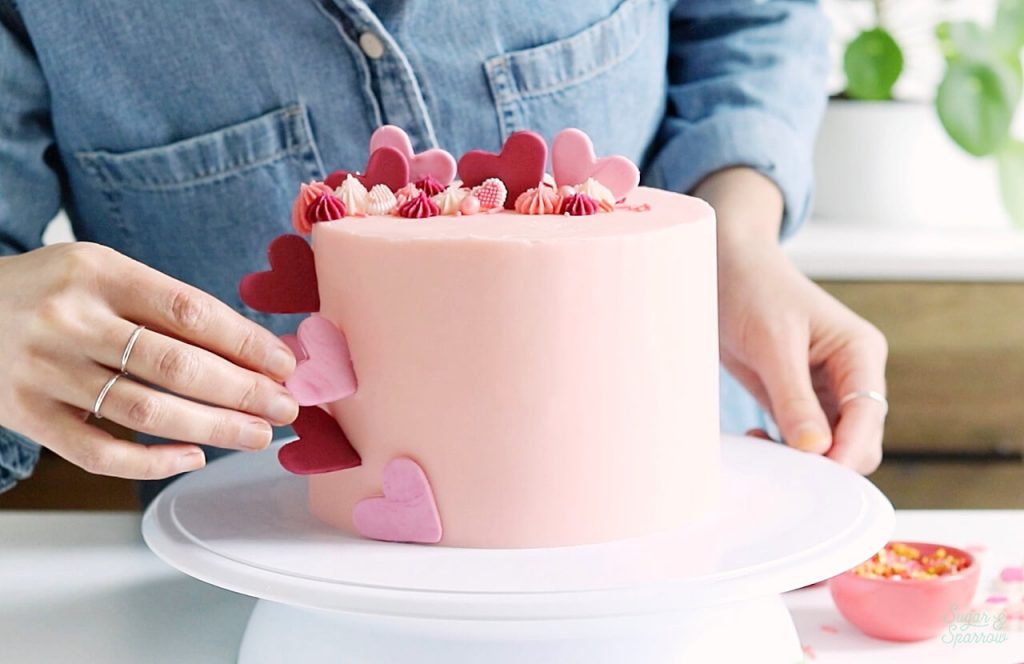
First, stick the fondant hearts onto the top of the cake in a semi-straight line from the edge to just past the center. Make sure they look perfectly imperfect by sticking them in at different heights and angles. 

how to make a fondant heart cake

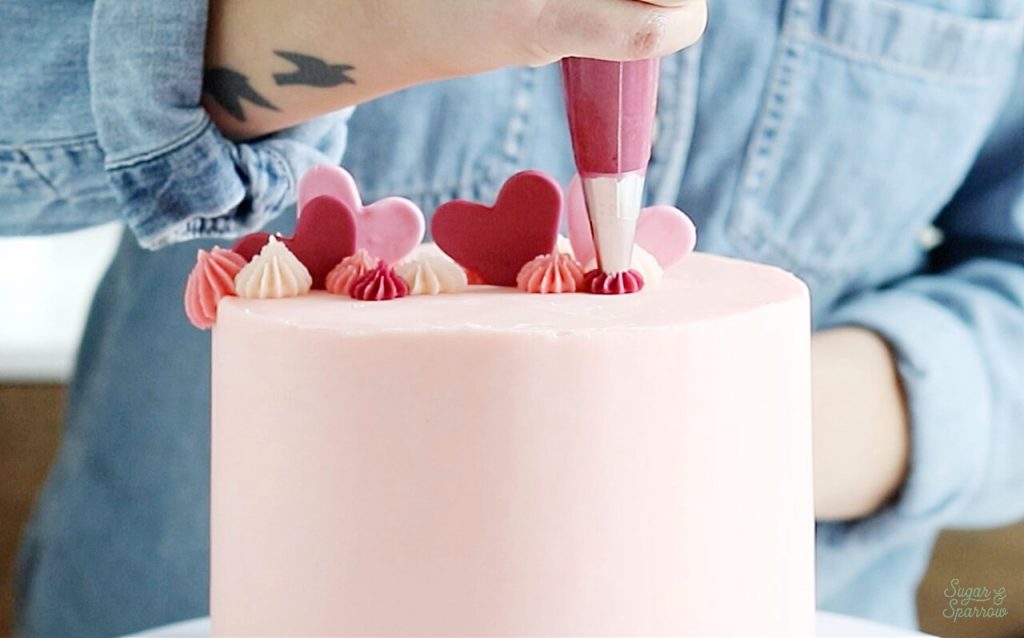
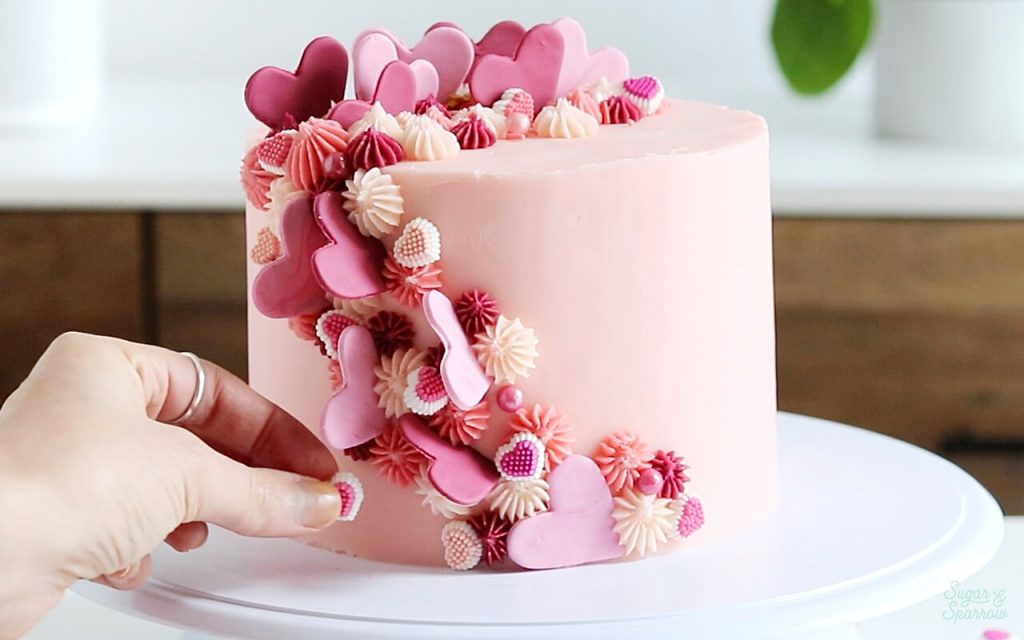
Next, use the piping bags to pipe open stars all around the hearts. Add sprinkles and icing heart decorations wherever your heart desires.

using wilton tip 4b with buttercream
how to decorate a cascading heart cake

Place more fondant hearts down the side of the cake at an angle, connecting from the hearts on top towards the bottom middle of the cake. The fondant hearts should stick right into the buttercream and stay in place without weighing anything down. 

how to make a cascading heart cake with fondant hearts

Add more buttercream piping all around the fondant hearts (this helps to truly ensure that they’ll stay in place).

buttercream piping with wilton tip 4b

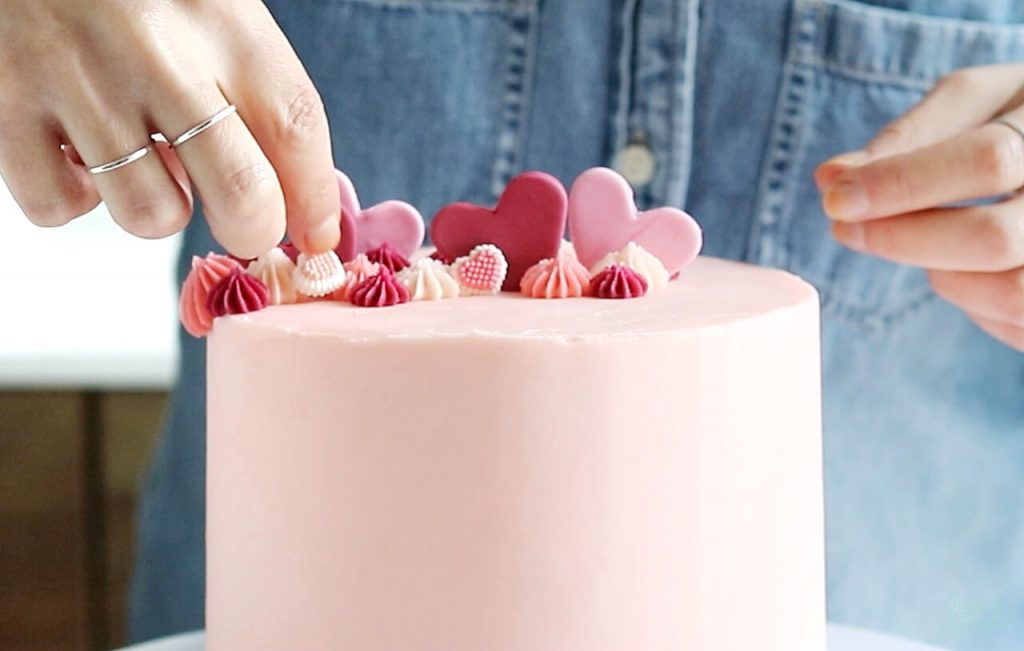
Finally, add the finishing touches with sprinkles and more icing heart decorations. The icing hearts are my favorite! 

wilton icing heart decorations for valentines day cake
how to add sprinkles to cake

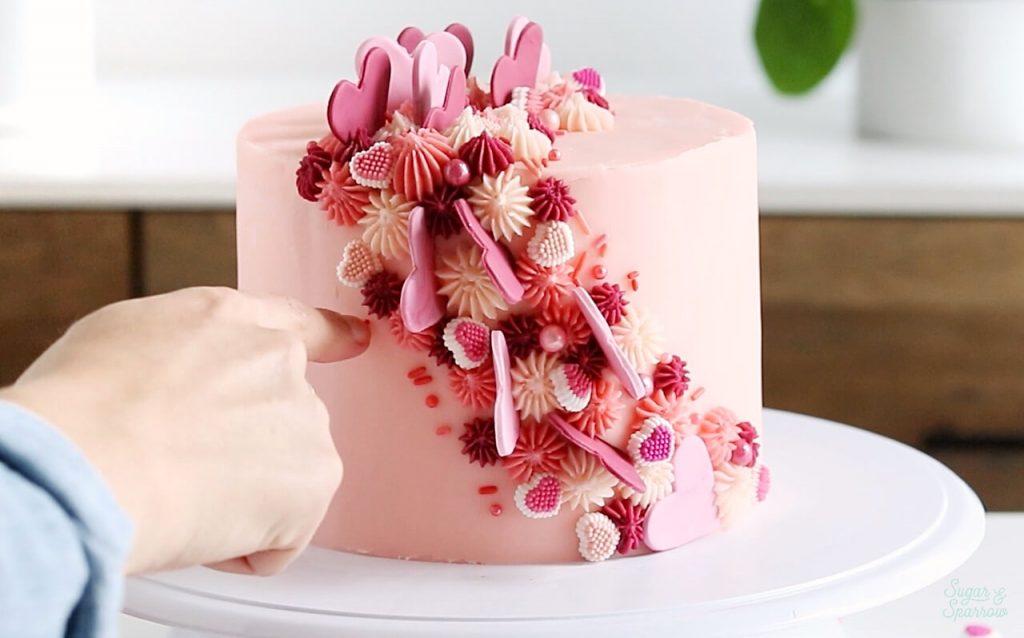
And just like that, you’ve got the most perfect cascading heart cake ever! It looks pretty complex, but can you believe how simple it is to create?

Valentines Day Heart Cake by Sugar and Sparrow

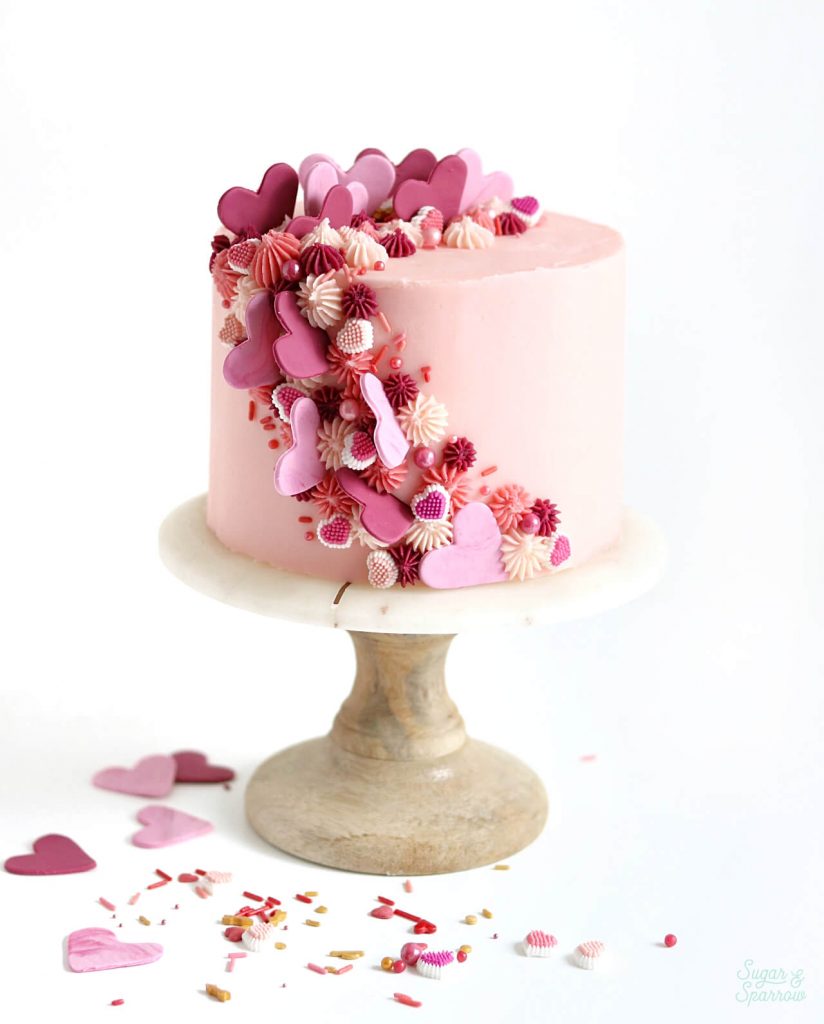
I’m in love with this one and I hope you are too! Let me know if you make this cake for Valentine’s Day (or any day!) by tagging @sugarandsparrowco on Instagram or leaving a comment on this post. I love to see your work inspired by my designs!

By: Whitney · In: Featured, Seasonal, Tutorials, Valentines · Tagged: americolor, cascading heart cake, fondant hearts, heart cake, JOANN, pink cake, valentines day, valentines day cake, valentines day sprinkles, wilton icing heart decorations, wilton tip 199, wilton tip 4b

you’ll also love

red velvet sheet cake recipe with natural food coloringRed Velvet Sheet Cake with Cream Cheese Frosting
chocolate strawberry cake recipe by sugar and sparrowChocolate Covered Strawberry Cake
flourless chocolate cake recipe by sugar and sparrowRich & Fudgy Flourless Chocolate Cake

Join the List

Stay up to date & receive the latest posts in your inbox.

Reader Interactions

Comments

  1. cakes&bakes says

    May 6, 2020 at 6:54 am

    Wounderful informative article

    Reply

Leave a Reply Cancel reply

Your email address will not be published. Required fields are marked *

Recipe Rating


Next Post >

Ruby Chocolate Buttercream Recipe

Primary Sidebar

Welcome to Sugar & Sparrow

Welcome to Sugar & Sparrow

Helping you whip up pretty desserts with confidence and creativity. And hopefully sharing a few laughs with you along the way!

Learn More

Connect

let’s bake!

Get my very best recipes, baking tips, and decorating tutorials sent to your inbox

Featured Posts

hot cocoa bar setup

My Ideal Hot Cocoa Bar Setup

the best vanilla cupcakes recipe

The Perfect Vanilla Cupcake Recipe

small batch cake recipe

Small Batch Funfetti Cake

Search

Archives

Follow Along

@sugarandsparrowco

STRAWBERRY CUPCAKES 🍓based on my beloved strawb STRAWBERRY CUPCAKES 🍓based on my beloved strawberry layer cake recipe, this cupcake version is just as moist yet fluffy and bursting with natural strawberry flavor! Between the mix of fresh strawberries in the cupcakes + freeze-dried strawberries in the frosting, the flavor is out of this world 🚀

Full recipe link in my bio (with strawberry buttercream) + at https://sugarandsparrow.com/strawberry-cupcakes/

STRAWBERRY CUPCAKES
Yield: 14 cupcakes

INGREDIENTS:
5 oz (143g) fresh or frozen strawberries
1/3 Cup (80ml) whole milk, room temp
1 1/2 Cups (158g) sifted cake flour
1 tsp baking powder
1/4 tsp baking soda
1/2 tsp salt
6 Tbsp (85g) unsalted butter, room temp
1 Cup (200g) granulated sugar
2 large eggs, room temp
3 Tbsp (45g) sour cream, room temp
1 tsp vanilla extract
1 drop pink food coloring (optional)

INSTRUCTIONS: 
1. Puree the strawberries using a food processor (you’ll have about 1/2 cup of puree), then place into a saucepan over medium-low heat. Bring to a simmer, then cook for 10-15 min, stirring occasionally, until you have 1/4 cup. Refrigerate until room temp.
2. Preheat oven to 350ºF (177ºC) and line a standard cupcake pan with liners.
3. Whisk together the sifted cake flour, baking powder, baking soda, and salt and set aside.
4. In a stand mixer w/ paddle attachment (or hand mixer + large bowl), whip the butter on high for 2 min. Add sugar and beat for 2 min, until light and fluffy. Turn the mixer to low and add the eggs one at a time, then add the vanilla and sour cream, turn the mixer to high and beat for 1 min. Meanwhile, whisk together the strawberry puree, whole milk, and food coloring (if using).
5. Turn the mixer off and add all of the dry ingredients at once. Mix on low until just combined, then add the strawberry milk mixture until just combined, about 30 seconds.
6. Fill the cupcake liners 2/3 full and bake for 14-18 minutes. Cool completely before topping with strawberry buttercream (full recipe linked above). 

#strawberrycupcakes #strawberrycake #pinkcupcakes #strawberry #cupcakes
COFFEE BUTTERCREAM (recipe below)☕️ this frost COFFEE BUTTERCREAM (recipe below)☕️ this frosting has AMAZING coffee flavor, is so easy to decorate cakes with, and pairs beautifully with so many flavors (chocolate, vanilla, or any cake flavor you’d want to turn into a latte). 

All my cake pairing suggestions are linked in my bio or at https://sugarandsparrow.com/coffee-buttercream-recipe/ 

COFFEE BUTTERCREAM⁣
Yield: 2.5 Cups⁣

INGREDIENTS⁣
1 1/2 tsp instant coffee or espresso powder⁣
1 1/2 Tbsp whole milk, room temperature⁣
1 Cup (226g) unsalted butter, room temperature⁣
3 1/2 Cups (420g) powdered sugar⁣
2 tsp pure vanilla extract⁣
Pinch of salt⁣

INSTRUCTIONS⁣
1. Combine the instant espresso/coffee with the whole milk and set aside. In the bowl of a stand mixer, beat the butter on high until creamy and smooth (about 5 minutes), scraping down the bowl and paddle a few times in between.⁣
2. Turn the mixer to low and add the powdered sugar a few cups at a time, scraping down the bowl and paddle between intervals. Add the vanilla, the coffee/espresso milk mixture, and salt. Mix on low until fully incorporated, about one minute.⁣

#coffeebuttercream #buttercream #frosting #coffeecake
HUMMINGBIRD CAKE 🤎 after weeks of testing this HUMMINGBIRD CAKE 🤎 after weeks of testing this recipe I found that the KEY to taking this already delicious cake to the next level is: roasting the bananas!! It’s an optional step in this recipe BUT it adds unparalleled caramel notes and noticeable richness to the flavor 🙌🏼 Along with the crushed pineapple, toasted pecans, and tangy cream cheese buttercream, this cake is NEXT LEVEL delicious, ultra-moist, melts in your mouth, and will have everyone asking for the recipe. 

Full recipe (with cream cheese frosting) linked in my bio + at https://sugarandsparrow.com/hummingbird-cake-recipe/ 

#hummingbirdcake #creamcheesefrosting #bananacake #cakedecorating #cakerecipe
OREO CUPCAKES 🖤 (recipe below) I made these for OREO CUPCAKES 🖤 (recipe below) I made these for a fundraiser at @vancity.youth last weekend and was reminded of how delicious this recipe is! There’s black cocoa powder in the cupcake batter to give them the PERFECT Oreo cookie flavor profile + the most delicious cookies and cream buttercream I’d eat all on its own. 
 
Full recipe at https://sugarandsparrow.com/oreo-cupcakes-recipe/ 
 
OREO CUPCAKES 
1 Cup (132g) all purpose flour 
3/4 Cup (150g) granulated sugar 
1/3 Cup (38g) black cocoa powder 
1 tsp baking soda 
1/2 tsp baking powder 
1/4 tsp salt 
1/4 Cup (60ml) vegetable oil 
1 large egg, room temp 
1/2 tsp pure vanilla extract 
1/2 Cup (120ml) buttermilk, room temp 
1/2 Cup (120ml) hot coffee or hot water 
 
1. Preheat the oven to 350ºF/177ºC and line a cupcake pan with 12-15 liners. 
2. In a large bowl, whisk all of the dry ingredients together. Add the vegetable oil, eggs, vanilla, and buttermilk and whisk to combine. Whisk in the hot coffee (or hot water). 
3. Pour the batter into the prepared cupcake liners and bake for 14-18 minutes. 
 
OREO BUTTERCREAM 
1 Cup (226g) unsalted butter, room temperature 
3 Cups (360g) powdered sugar 
2 tsp pure vanilla extract 
2 Tbsp whole milk, room temperature 
pinch of salt, or to taste 
9 Oreo cookies (96g), finely ground 
 
1. Using a hand mixer or stand mixer, cream the butter on medium-high speed until it’s creamy and pale, 5 min. 
2. Add the powdered sugar a few cups at a time, mixing on low speed and scraping down bowl and paddle in between intervals. Keep the mixer on low and add the vanilla, milk, and salt. Mix until fully incorporated and uniform, 1-2 min. 
4. Mix in the Oreo cookie crumbs on low speed. 
 
#oreo #oreocupcakes #cookiesandcream #chocolatecupcakes #cupcakes
RASPBERRY CAKE FILLING (recipe below) ♥️ this RASPBERRY CAKE FILLING (recipe below) ♥️ this perfectly sweet/tart raspberry cake filling is beautifully thick, seedless, and so rewarding to make from scratch! It takes just a handful of ingredients and can be made with fresh OR frozen raspberries 🙌🏼 

Get the full recipe + cake pairing suggestions at the link in my bio or at https://sugarandsparrow.com/seedless-raspberry-cake-filling/

INGREDIENTS:
2 1/2 Cups (10oz, 315g) fresh or frozen raspberries
1/2 Cup (100g) granulated sugar
1 Tbsp lemon juice
1 tsp lemon zest
1 1/2 Tbsp (12g) cornstarch
1 1/2 Tbsp (22ml) water

INSTRUCTIONS: 
1. In a saucepan set over medium heat, add the raspberries, granulated sugar, lemon juice, and lemon zest. Cook until the mixture begins to boil, stirring occasionally. 
2. Once boiling, lower the heat and simmer for 10-15 minutes while you continue stirring occasionally. Then, remove from heat and use a fine mesh sieve to strain out the seeds over a medium bowl. After straining, you’ll be left with about 1/4 Cup of seedy pulp.
3. In a small separate bowl, combine the cornstarch and water until uniform. Return the strained raspberry filling to the saucepan (wipe it free of any remaining seeds if needed) and add the cornstarch/water mixture. Cook over medium heat until boiling, stirring constantly, then reduce to a simmer and cook for 1-3 minutes, until the filling has thickened slightly, is no longer cloudy, and coats the back of the spatula.
4. Pour into an airtight container and refrigerate for at least 4 hours and up to 1 week. It will be jello-like once set but after stirring it will become a thick, jammy consistency that’s perfect to use as a cake or cupcake filling!

#raspberrycake #cakefilling #cakedecorating #raspberries #baking

Footer

On the Blog

  • Cake Basics
  • Recipes
  • Tutorials

Info

  • About
  • Privacy Policy & Disclosure

stay in the know

Copyright © 2026 · Theme by Sugar & Sparrow