• Cake
  • Frosting
  • YouTube
  • My Favorite Tools
  • Nav Social Icons

  • Skip to primary navigation
  • Skip to main content
  • Skip to primary sidebar
  • Skip to footer
  • Recipes
    • Cake
    • Cupcakes
    • Frosting
    • Ice Cream
    • Vegan
  • Cake Basics
  • Tutorials
  • Blog
  • About
  • Mobile Menu Widgets

    Connect

    Search

Sugar & Sparrow logo in script font

Sugar & Sparrow

Lifestyle and Cake from Portland Oregon

  • Cake Basics
  • Recipes
    • Cake
    • Cupcakes
    • Cookies & Bars
    • Filling
    • Frosting
    • Ice Cream
    • No-Bake
    • Small Batch
    • Vegan
  • Tutorials
  • Book
  • Blog
  • About

Buttercream Embroidery Cake Tutorial

March 21, 2023 · In: Featured, Tutorials

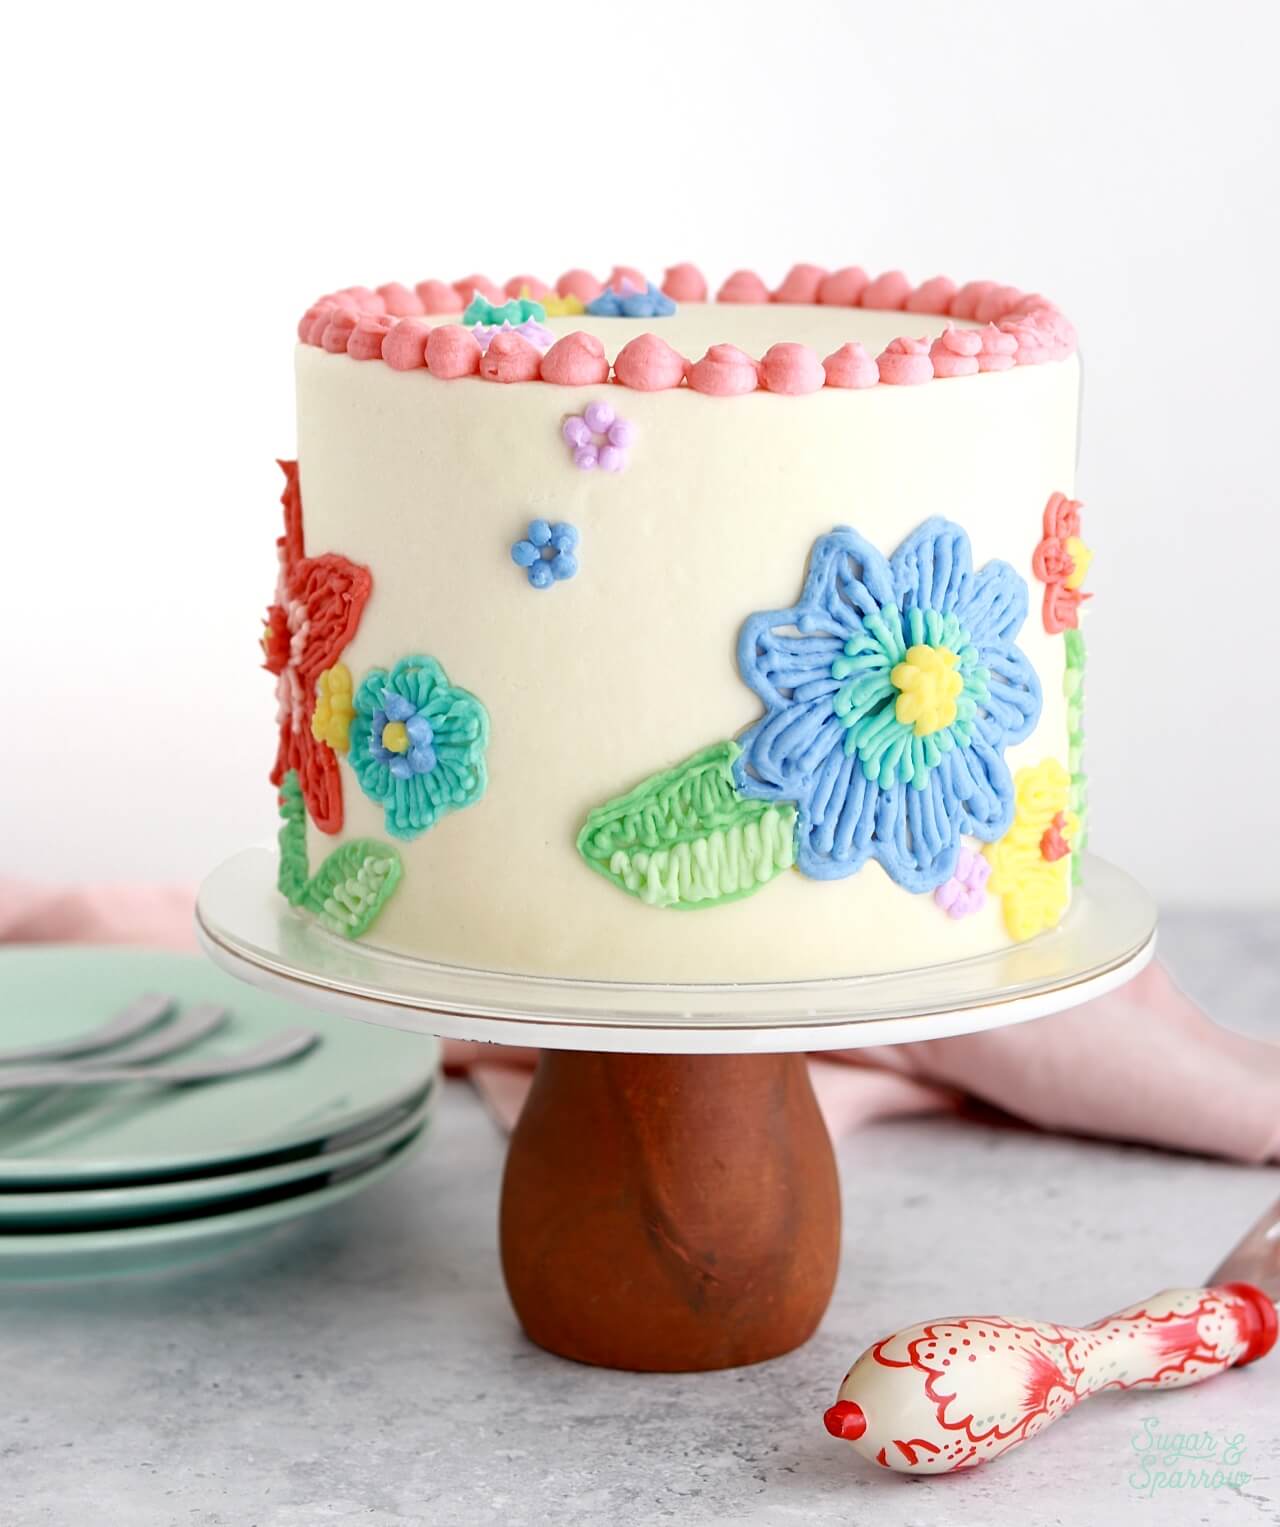
Textiles have always been a big source of inspiration for my cake making (a couple cases in point: this knitted buttercream cake and this fiber art inspired cake), and creating an embroidery cake with buttercream has been on my list of things to try for quite some time. With March being National Craft Month, I thought I’d finally check an embroidery cake off my list and luckily, JOANN had the perfect supplies to make it! Just look at this cutie.

UPDATE 2025: JOANN has (sadly!!) gone out of business, so I have slightly changed these product links.

buttercream embroidery cake tutorial by sugar and sparrow
floral embroidery cake by sugar and sparrow

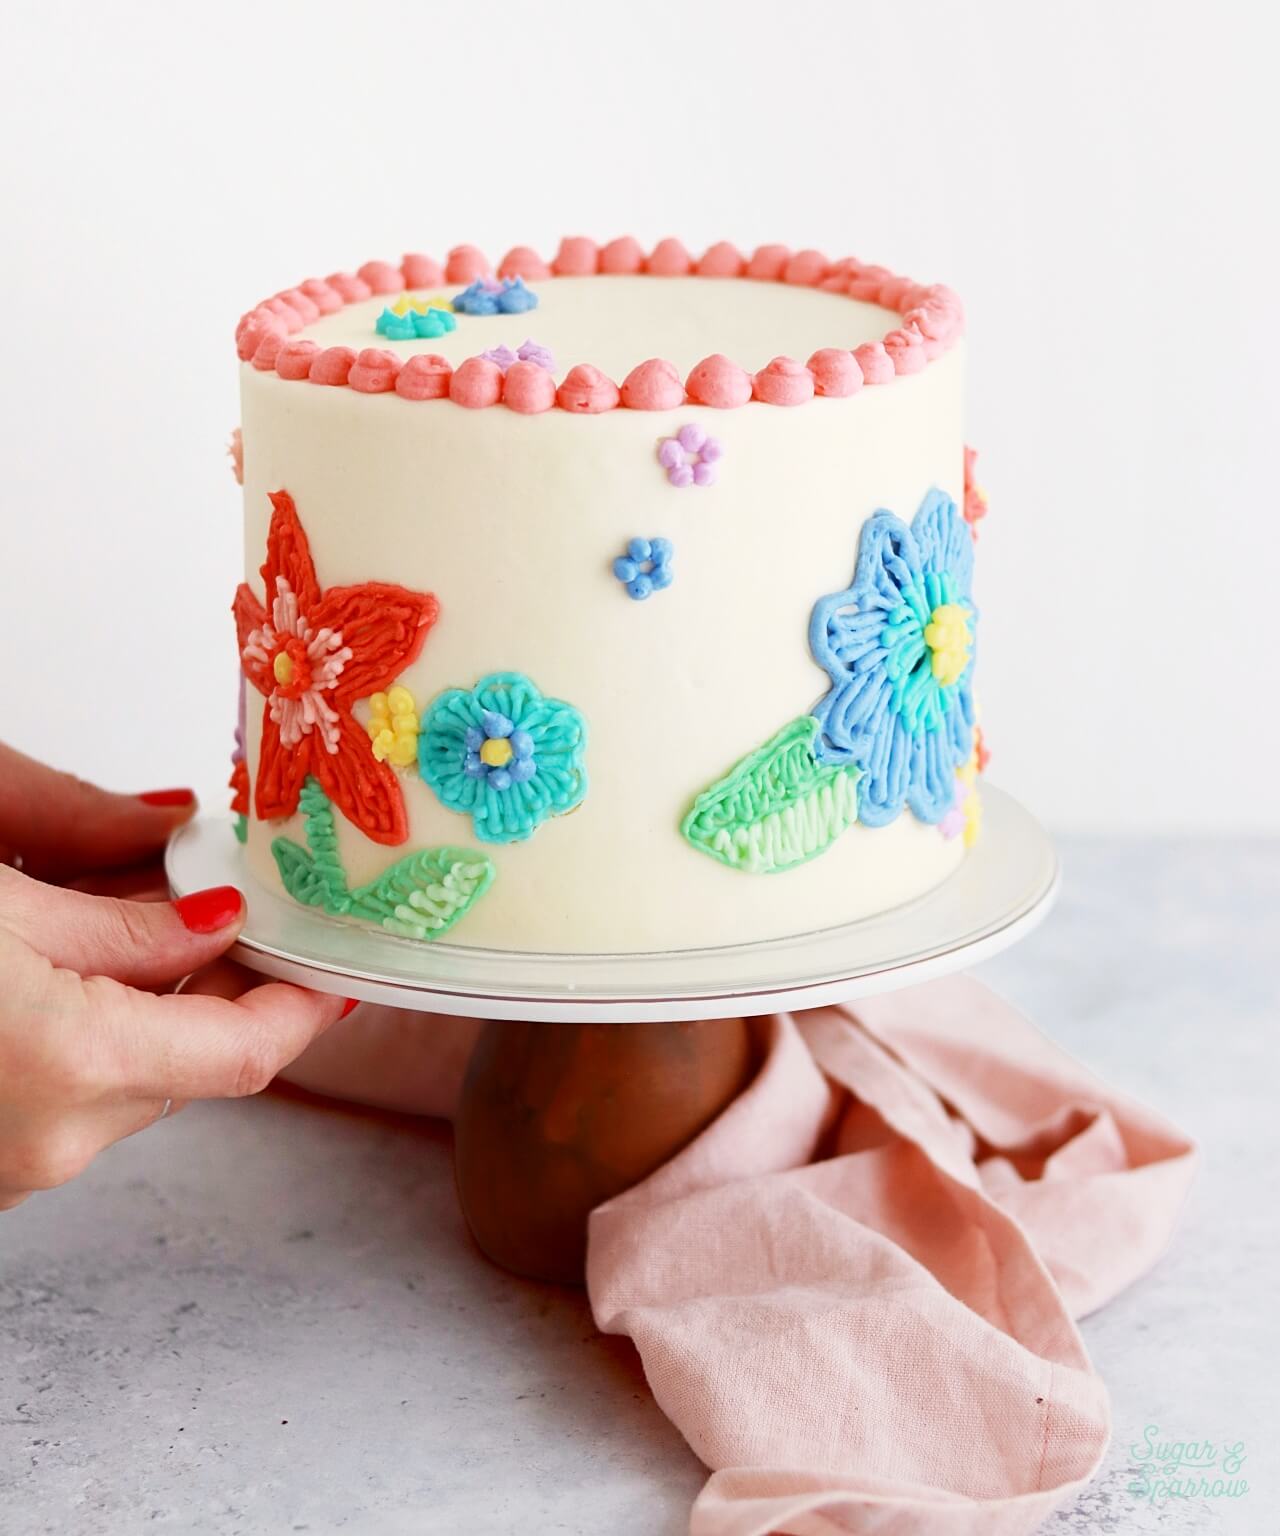
Although it looks pretty intricate, this embroidery cake ended up being so much easier than I thought it would be. This is partly because the piping techniques I used were so forgiving, and partly because I had some adorable floral cookie cutters (similar here) to imprint onto the cake and use as piping guides for the larger flowers. I went the extra mile on the buttercream color palette and mixed up nine different colors for this design. Since this cake will look great in any color scheme you can feel free to mix up a simpler palette if you want.

JOANN supplies for floral embroidery cake tutorial
buttercream floral embroidery cake

To show you the piping techniques in action, here’s a full video tutorial of this embroidery cake before I get into the written tutorial below:

If you’re into cake decorating videos like this one, be sure to check out my YouTube channel for further learning! I’m always rolling out new videos, so click the subscribe button while you’re there to ensure you never miss a new one.

You Will Need:

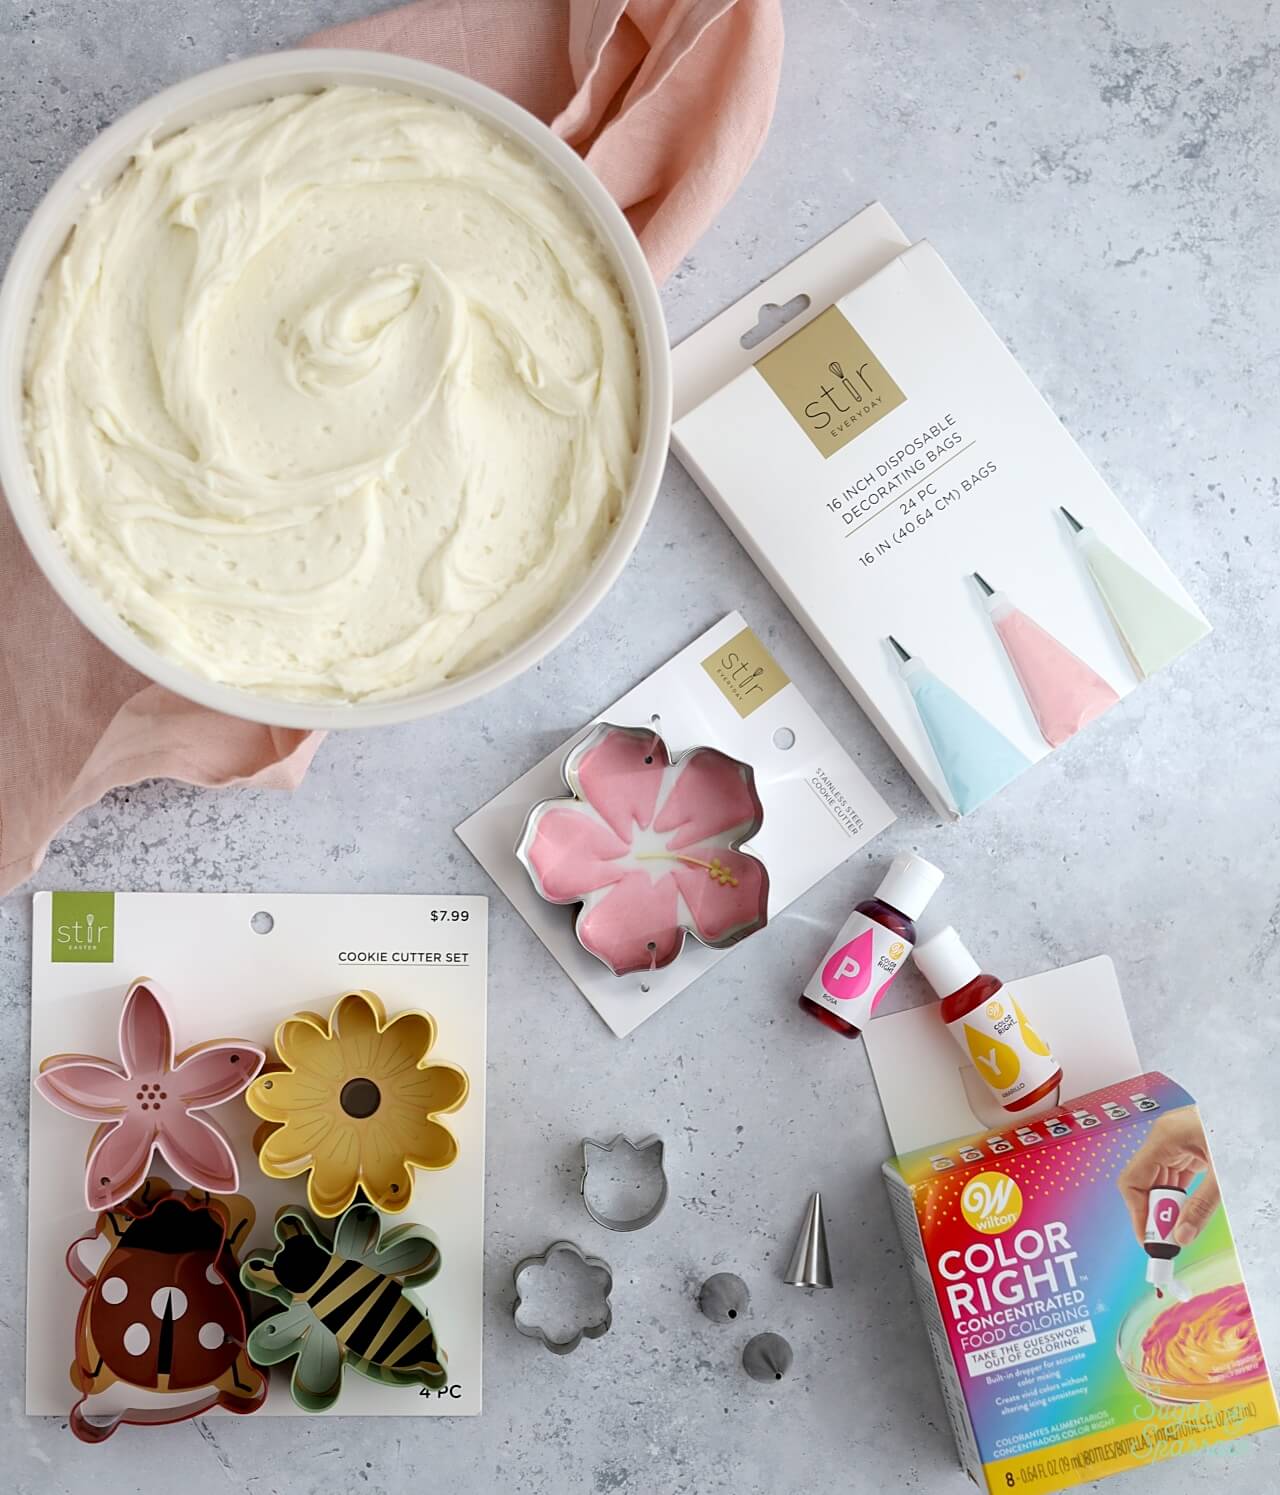
  • A chilled, crumb coated cake (mine is three 6” layers)
  • 4-5 Cups of vanilla buttercream (about 1.5 batches)
  • Cake turntable
  • Icing Smoother
  • Angled Spatula
  • Food color gels of your choice
  • Bowls and spoons for color mixing
  • Large floral cookie cutters
  • Small floral cookie cutters
  • Piping Bags
  • 8x Wilton Tip 2 or 3 
  • Wilton Tip 12
  • Small paint brush (optional)

Step 1: Frost the Cake with Smooth Buttercream

Place your chilled and crumb coated cake on the turntable and frost a smooth buttercream finish onto the cake. Start by frosting a smooth layer on the very top of the cake with your angled icing spatula.

how to frost a smooth buttercream cake

Next, add buttercream to the sides of the cake and glide your icing smoother over them while turning the turntable to create smooth sides.

how to frost a cake with smooth buttercream
how to frost a smooth buttercream cake

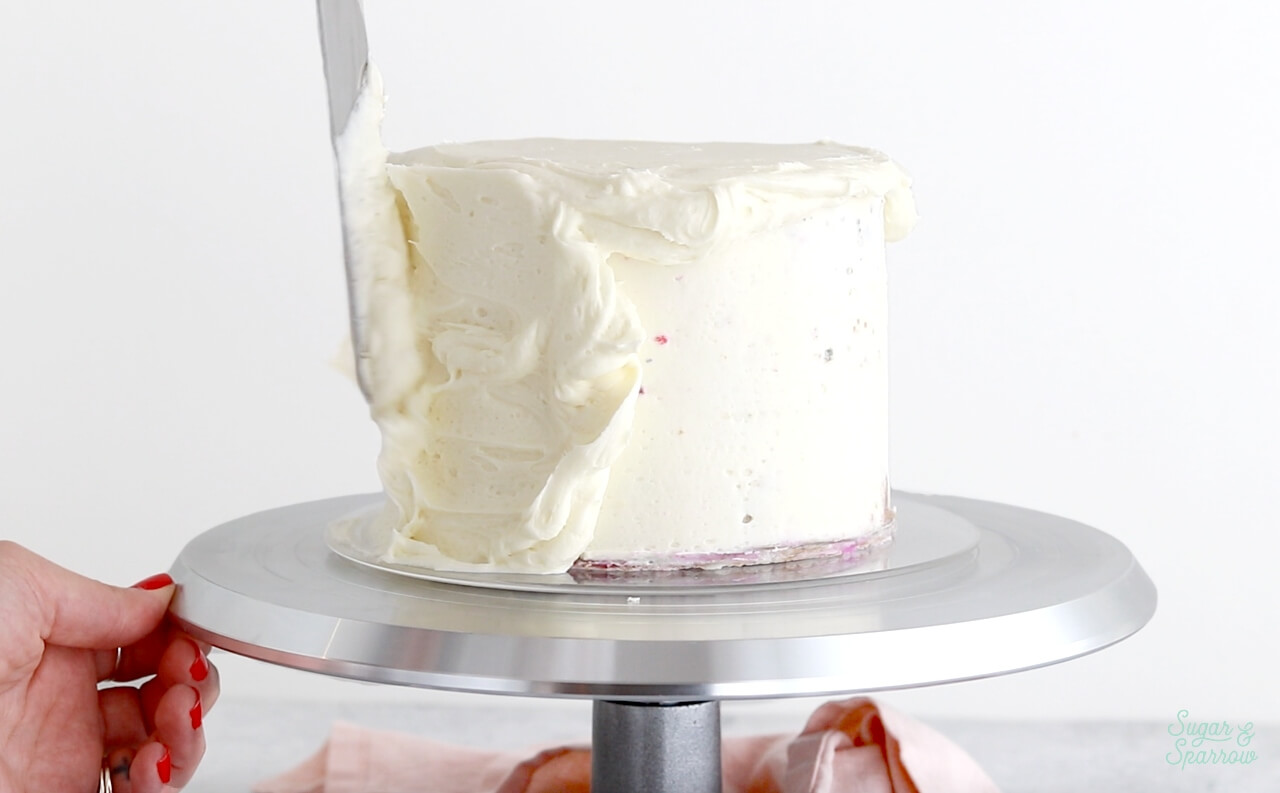
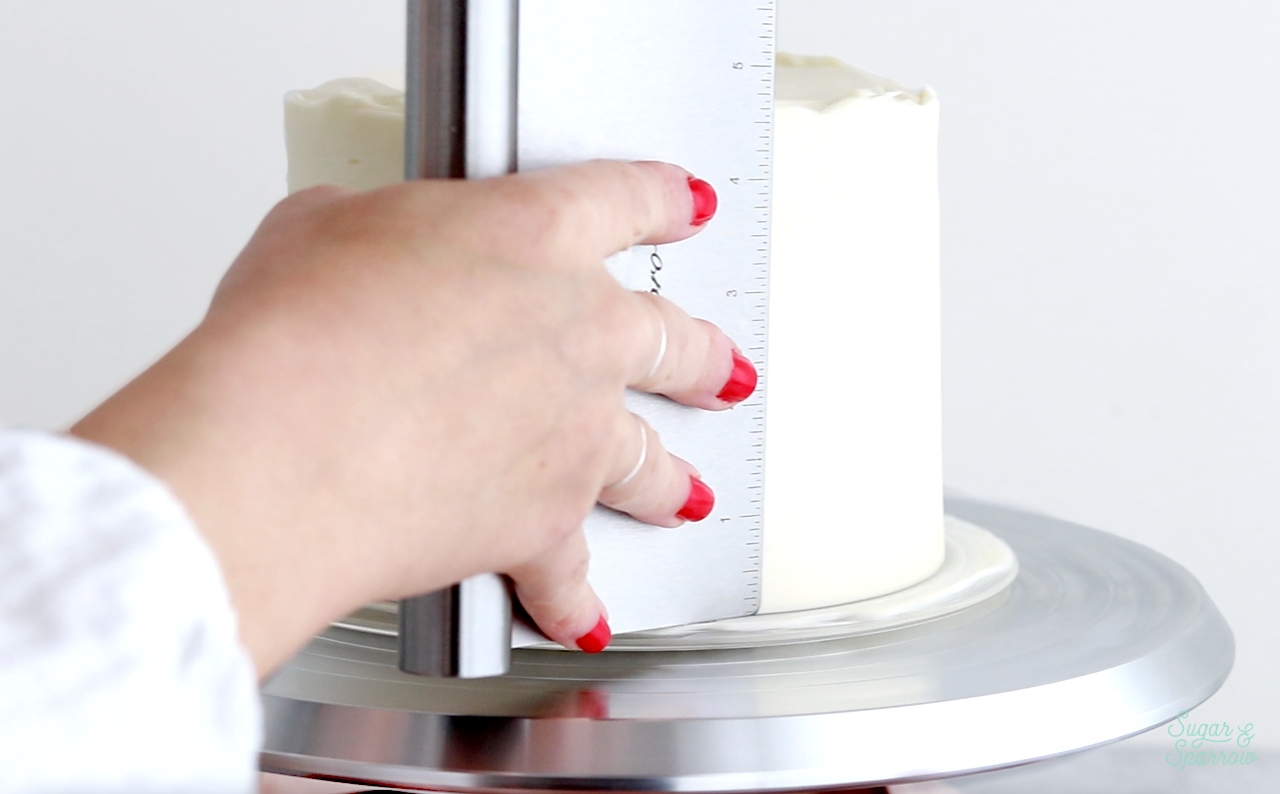
You’ll notice a crown of buttercream forming on the top edges of the cake, which is essential to getting sharp edges on the top. Use your angled icing spatula to swipe the crown inwards (toward the top center of the cake). Repeat until you’ve got nice sharp edges.

smooth buttercream cake tutorial

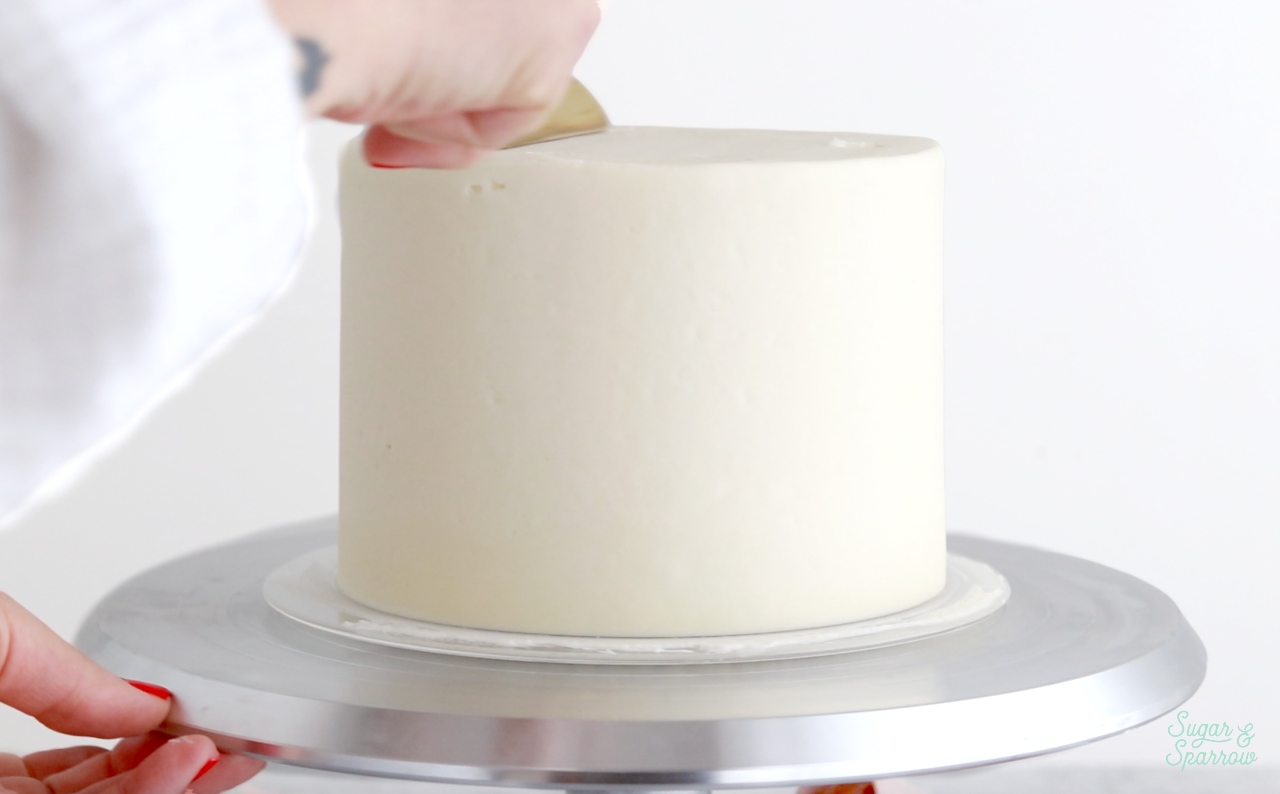
When your cake is looking ultra smooth, pop it into the refrigerator to firm up for at least 30 minutes. If you need more tips on creating a perfectly smooth cake finish, I’ve got a great tutorial for you here. 

Step 2: Mix the Color Palette

Divide the remaining buttercream amongst nine different bowls (or however many colors you plan on mixing, plus one bowl you’ll leave uncolored). Use gel food coloring to create your ideal color palette. I used the Wilton Color Right Food Coloring System, which comes with 8 bottles of ultra concentrated food color gels and a guide to help you mix the colors you’re imagining. If you want to replicate the color palette I created, here’s what I did:

buttercream color palette
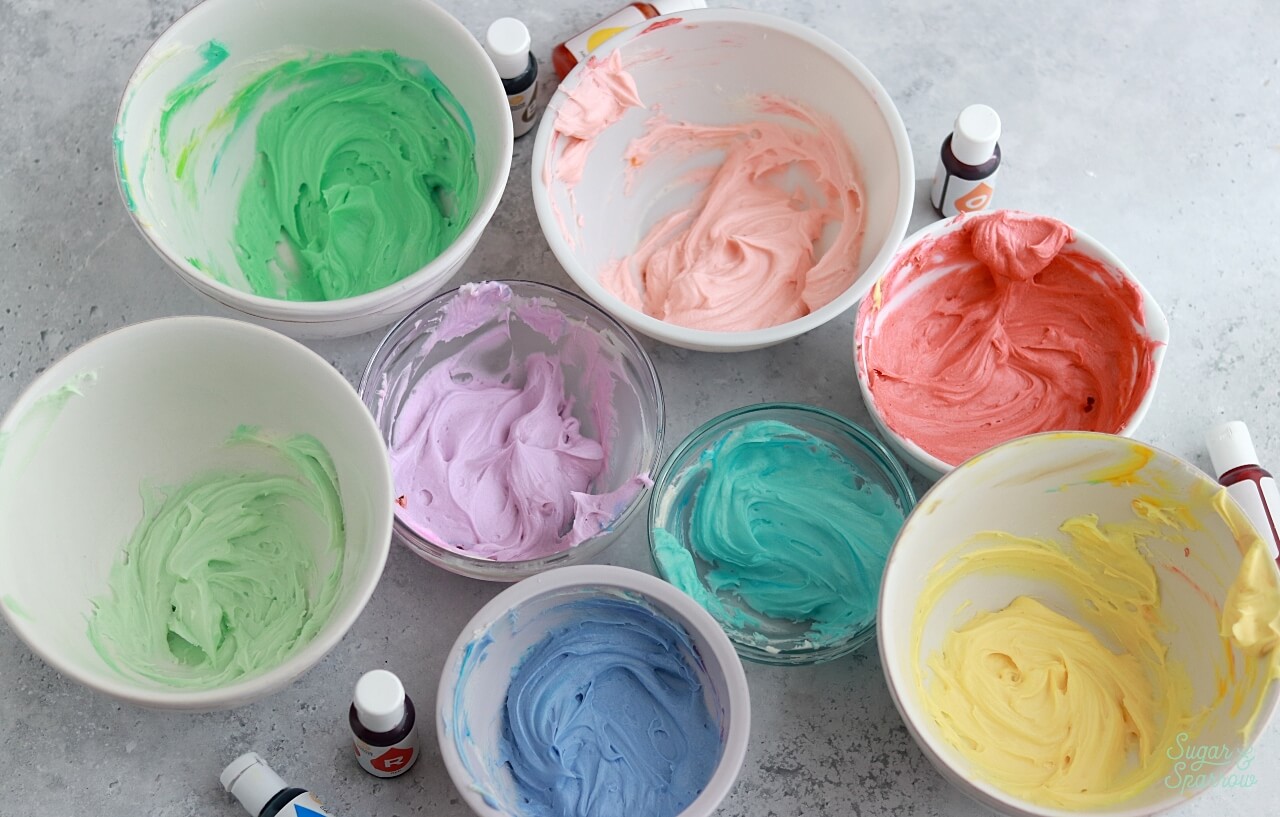
  • Dark Green: 1 drop blue, ½ drop yellow, ¼ drop brown 
  • Light Green: Mix dark green with uncolored buttercream using a 1:1 ratio
  • Light Purple: 1 drop pink, ¼ drop blue 
  • Periwinkle Blue: 1 drop blue, ¼ drop pink
  • Sky Blue: 1 drop blue
  • Coral Red: 1 drop orange, 2 drops red, ½ drop brown 
  • Peach: Mix 1 Tbsp of the coral red buttercream with uncolored buttercream
  • Yellow: 1 drop yellow, ¼ drop brown

It might seem intimidating to custom mix your color palette but I promise it’s worth it! You’ll get more control over your colors (thus a more cohesive color palette), but like I said before – feel free to walk to the beat of your own drum and use whatever colors you’re imagining! 

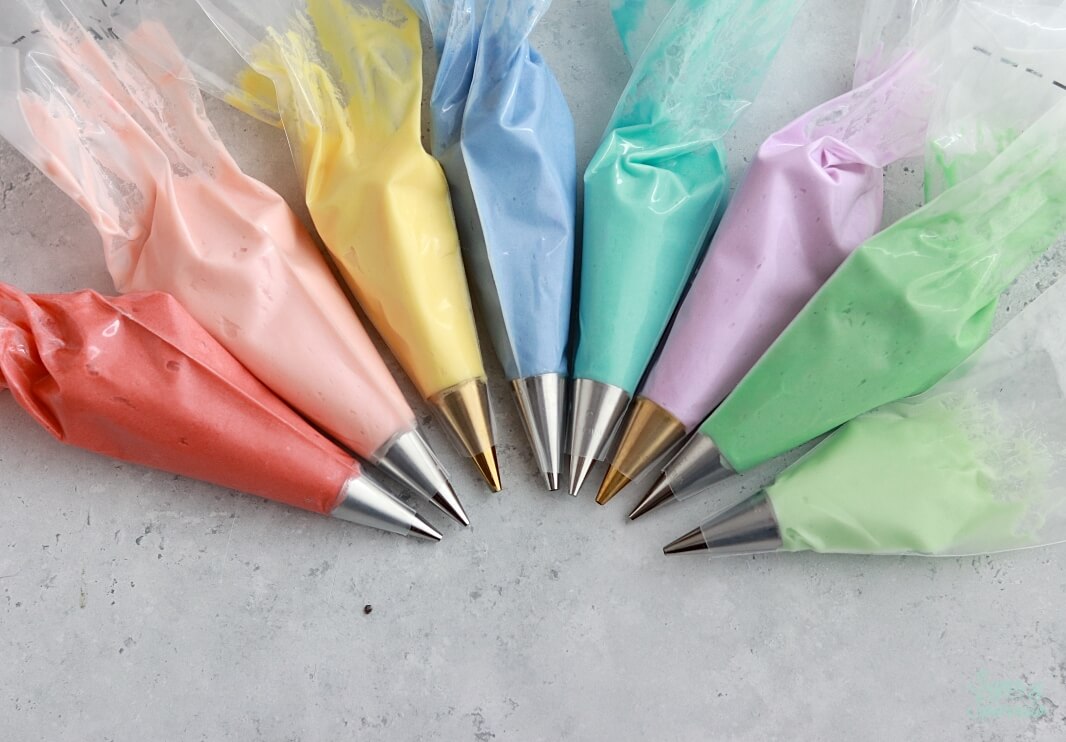
Step 3: Prepare the Piping Bags

Fit eight piping bags with Wilton Tip 2 or 3, then fill each one with each of the colors you mixed up in the previous step. There’s not much of a size difference between Tip 2 and 3, so you could even use a mix of both or fit some of the piping bags with couplers so you can swap the tips between bags mid-decorating.

rainbow piping bags

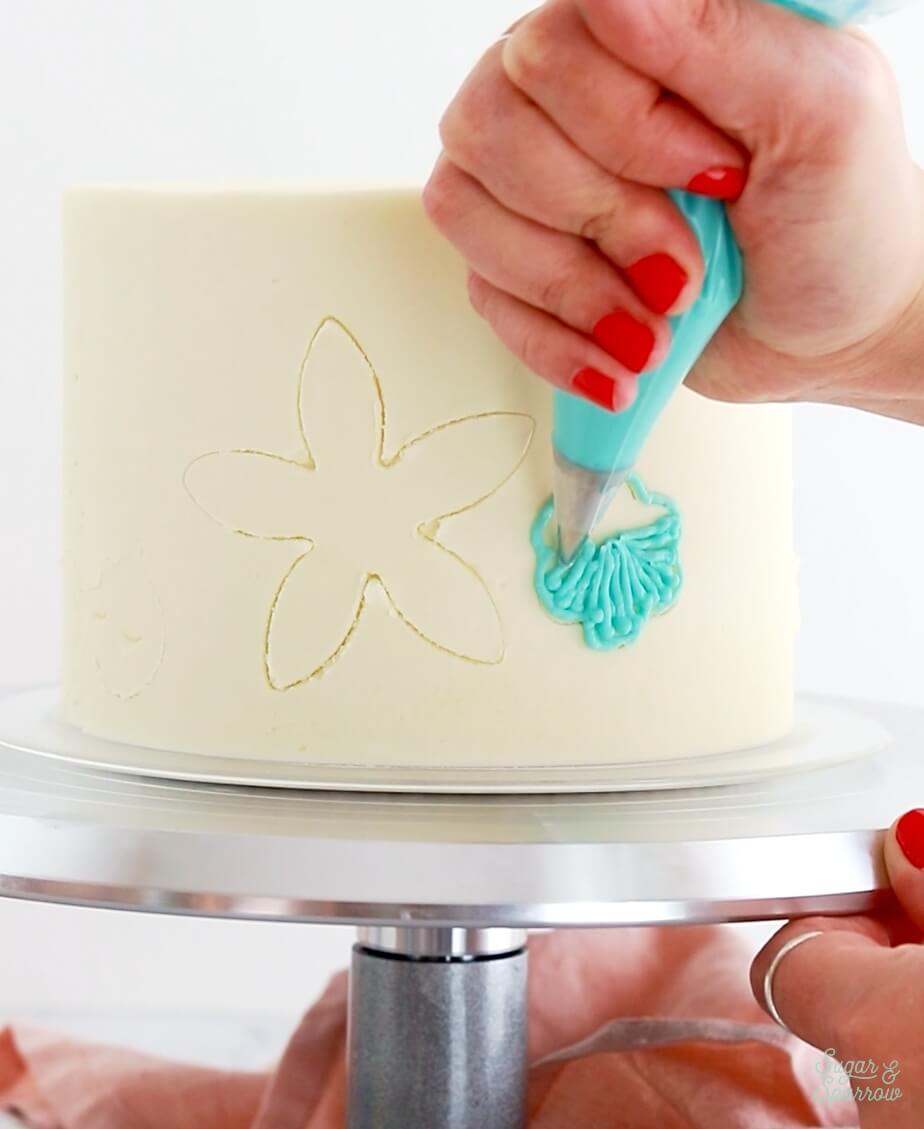
Step 4: Imprint the Cake with Floral Cookie Cutters

Once your frosted buttercream cake is chilled and firm to the touch, use the floral cookie cutters to make imprints where you want your embroidery to be piped.

how to imprint a buttercream cake

Leave a little room to freehand some details in between imprints as well. 

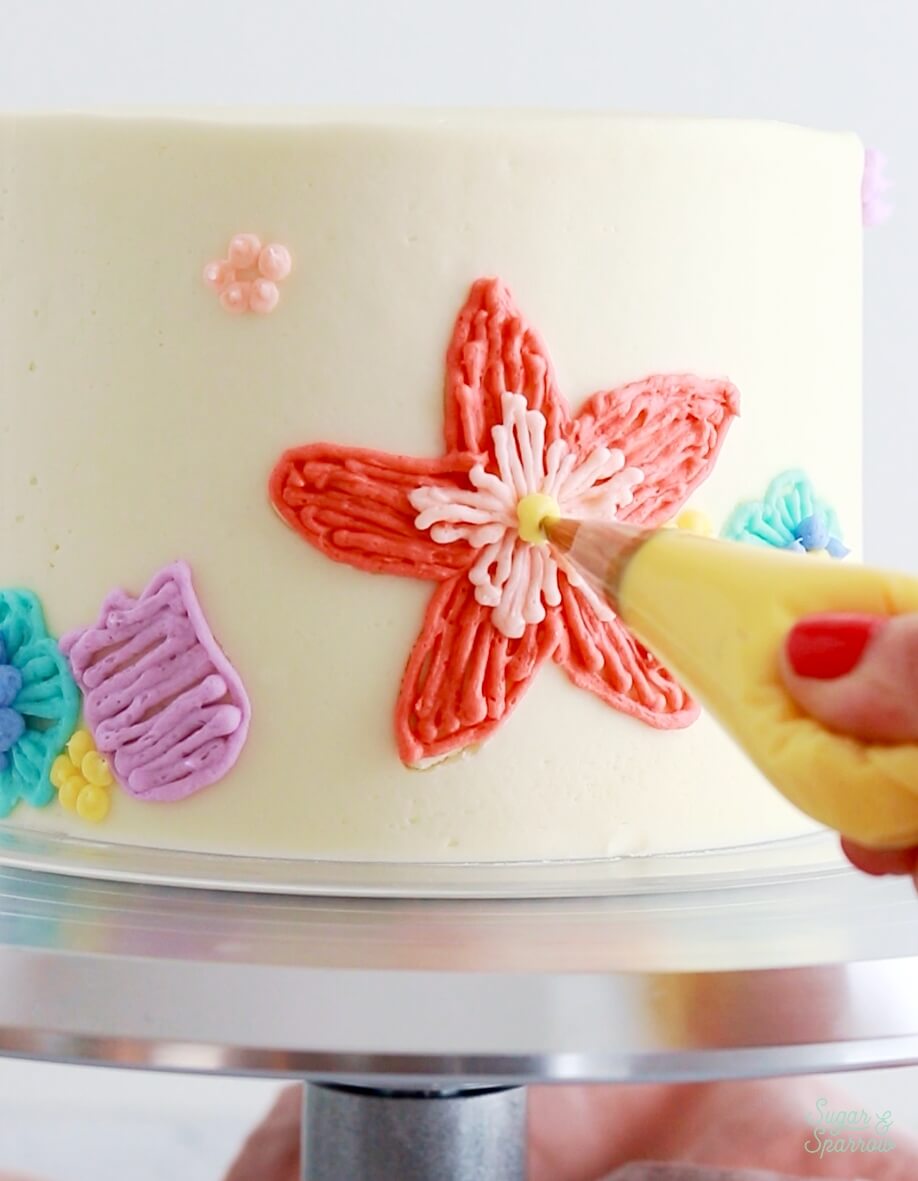
Step 5: Pipe the Embroidery Textures

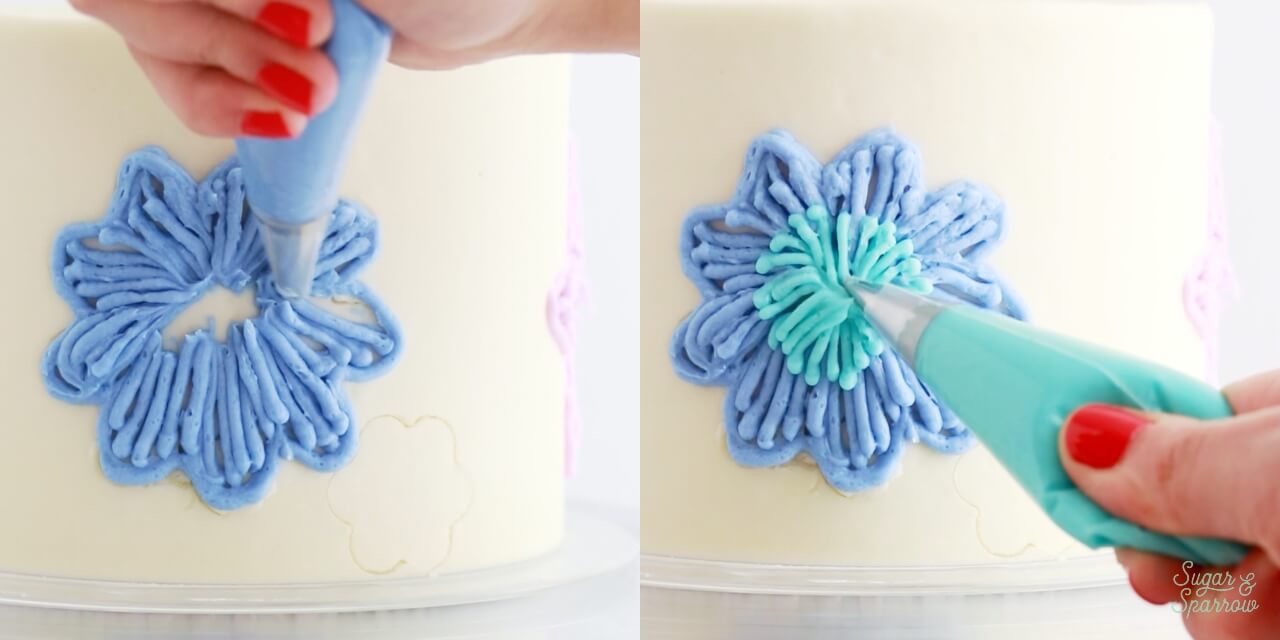
Start by outlining one of the floral imprints with one of the piping bags you prepared. Place a dot in the center of the flower. Squeeze and drag the piping bag from the outlined edge of the shape to the center dot and focus on making a straight line. Continue making straight lines of buttercream from the outlined edge to the center dot all the way around the shape.

how to pipe embroidery texture with buttercream

For some of the flowers, you can pipe two colors on the inside of the imprint. Starting on the outlined edge of the flower, pipe the straight lines of buttercream only part of the way to the center of the shape with one color, then overlap with a different color to reach the center.

how to pipe embroidery with buttercream

For some of the smaller flowers, I outlined the imprint with buttercream and filled in the shape with more of a back-and-forth piping motion. I started at the bottom of the flower outline and piped from one outlined edge to the other and continued piping parallel lines in a back-and-forth motion until I reached the top of the shape.

how to pipe buttercream embroidery

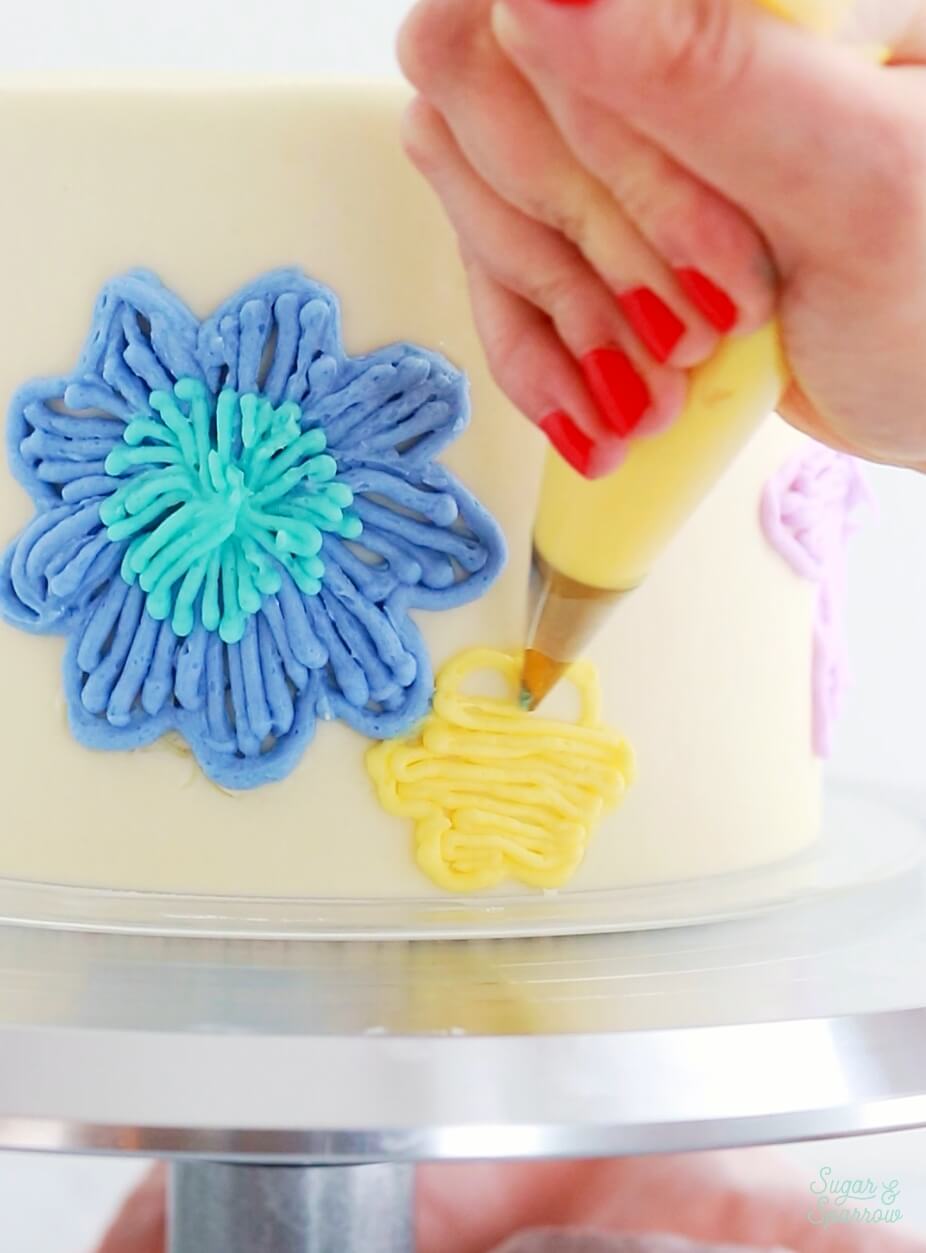
I freehanded the stems and leaves using the same embroidery-inspired piping techniques. Mainly just lines and dots!

buttercream floral embroidery cake tutorial

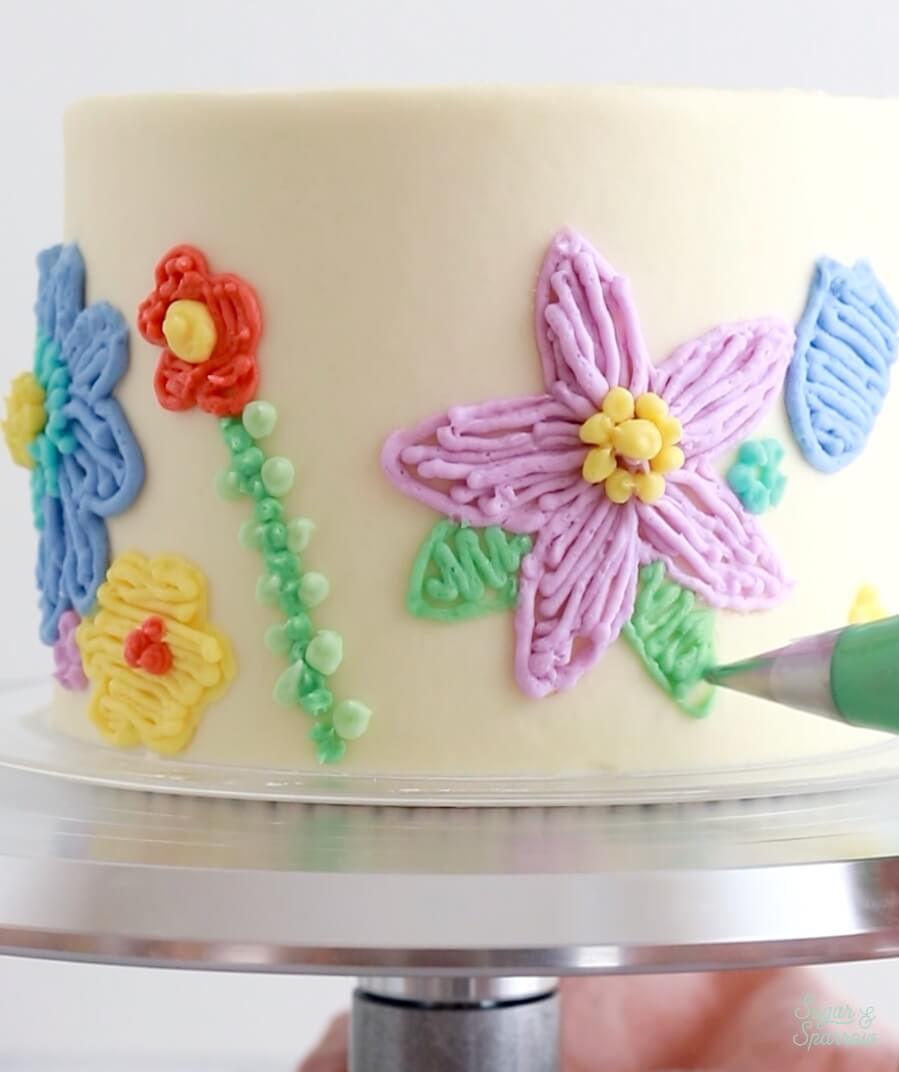
Step 6: Add Some Accents 

I decided to add some super tiny flowers in random places as accents and I love them so much! Each one is just five dots in a circular formation.

piping floral embroidery with buttercream

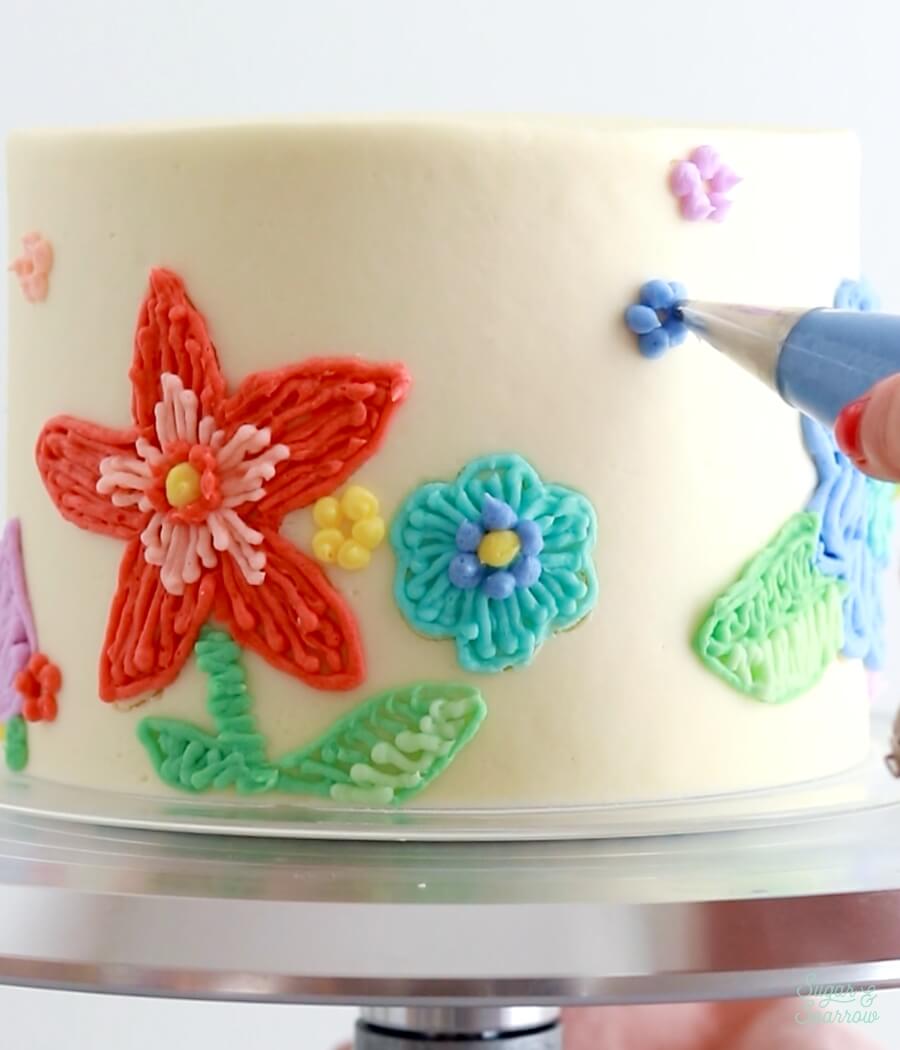
I also placed dots in the center of each flower I created in the previous step. This made the embroidery design look super detailed and multi-layered.

adding details to embroidery cake with buttercream

Finally, I added a border on top of the cake. This is where the ninth color in my palette came in. I mixed the remaining uncolored buttercream with a little of the Coral Red to make a mid-toned coral color. Then I placed it in a bag fitted with Wilton Tip 12 and piped dots along the top edge of the cake.

dot border with buttercream

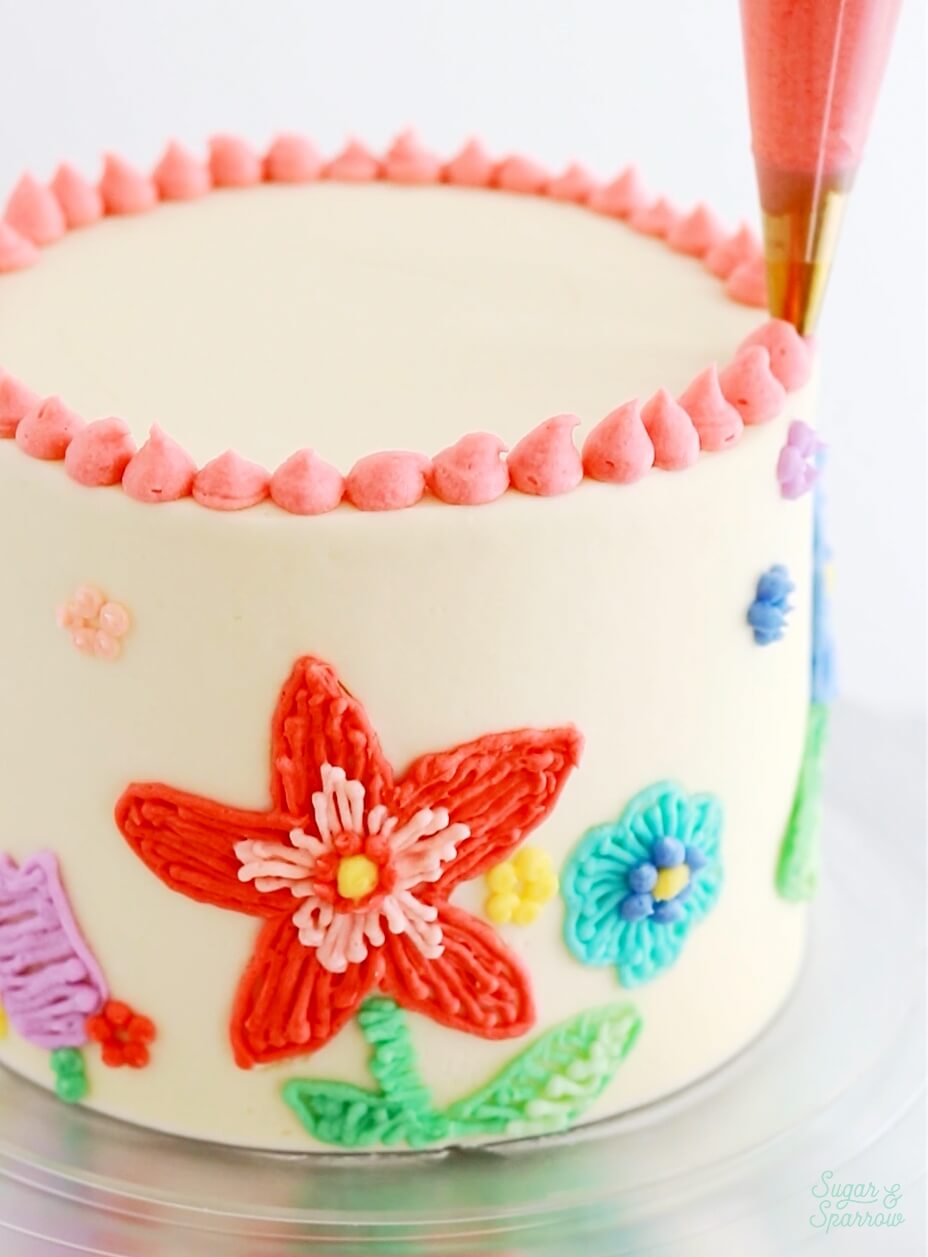
If your dot border looks more like chocolate chips than dots, you can always wet a small paint brush with a little bit of water and gently reshape the peaked top until it looks more round. You can also do this with any of your embroidery piping to get rid of unwanted peaks. 

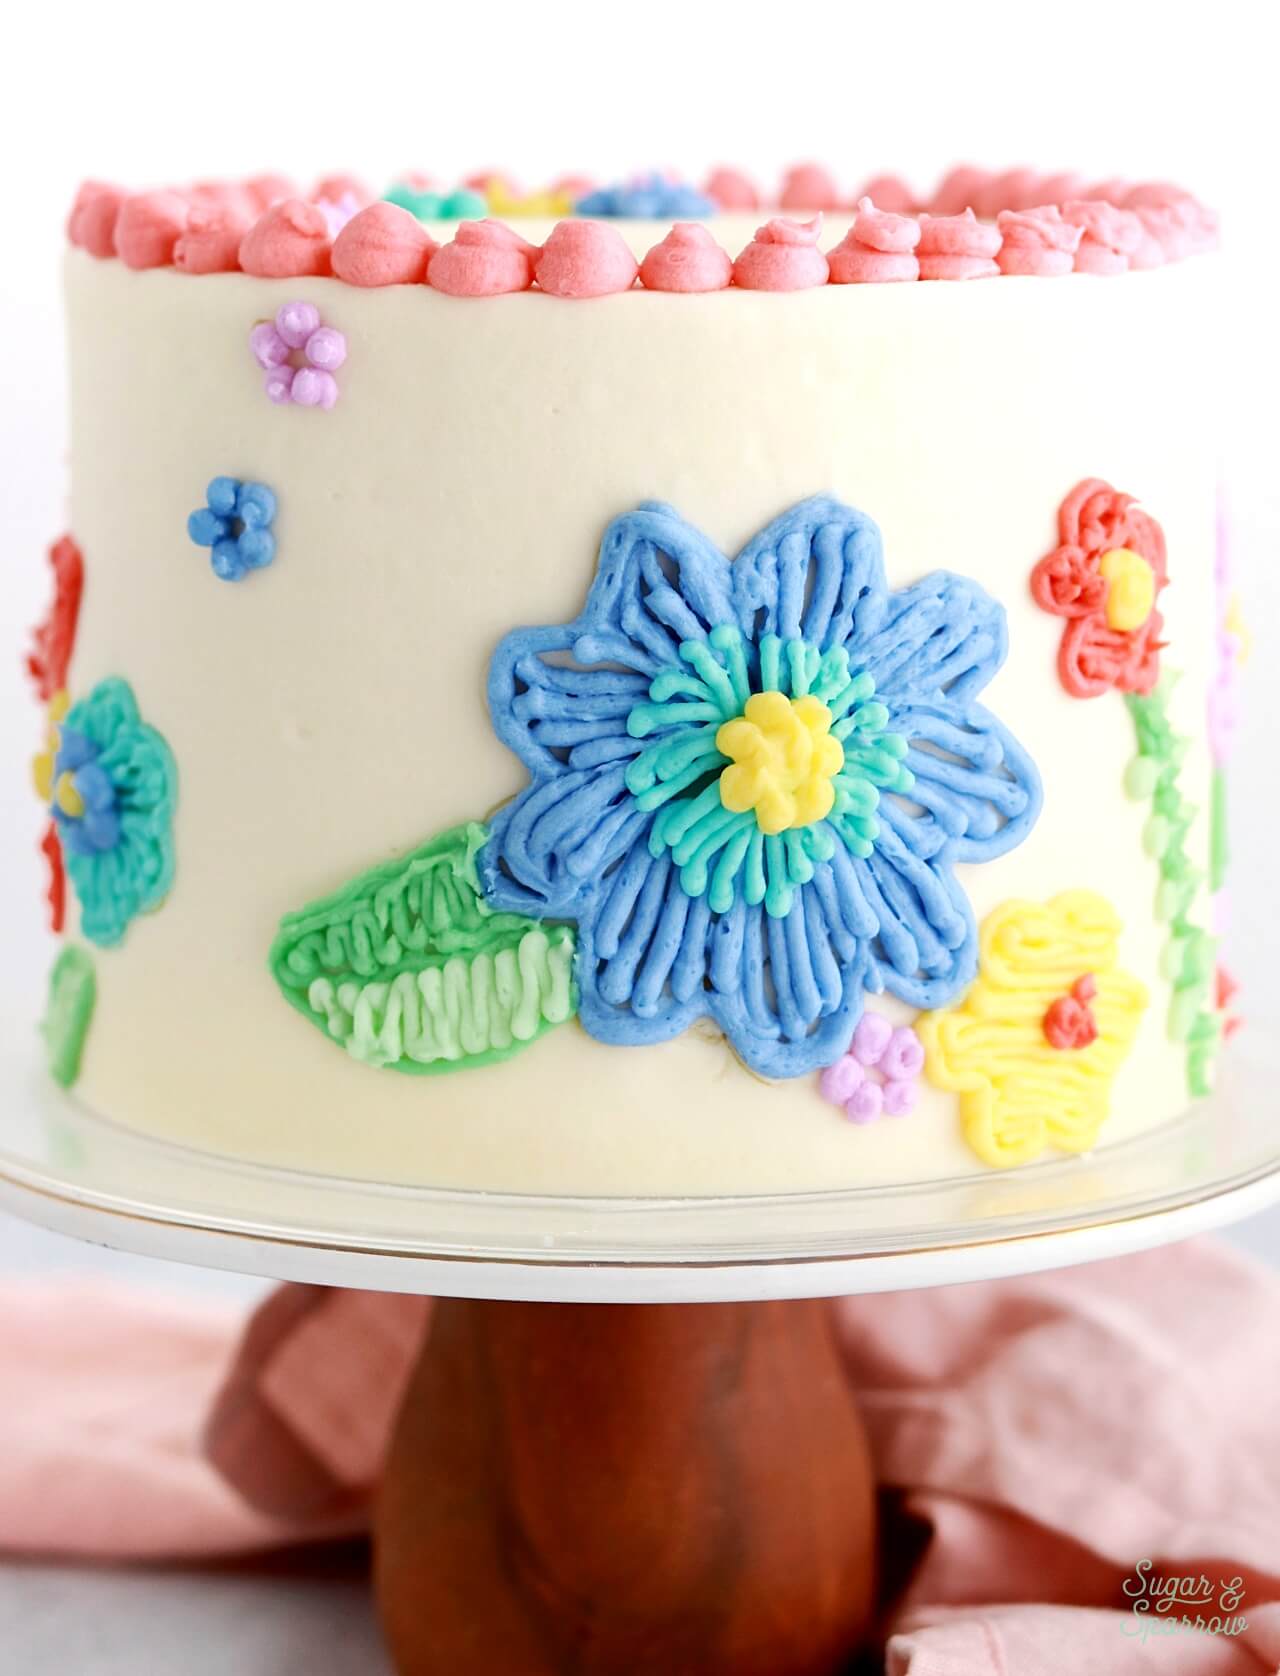
I piped just a few more tiny flowers on the very top of the cake and had to stop myself there because it is so easy to want to keep on piping! Definitely follow your heart when it comes to this design, but also try to leave plenty of white space to let the embroidery elements shine!

piping buttercream embroidery cake

Just look at how adorable this embroidery cake turned out! I am so happy I finally tried these techniques and that my local JOANN had the perfect supplies to make it exactly how I imagined.

embroidery cake by sugar and sparrow

I hope you love making this embroidery cake as much as I did! If you do end up making one, let me know how it went in the comments below + be sure to tag @sugarandsparrowco on Instagram to show us. We’d love to see what you create!   

Disclaimer: I was compensated by JOANN for my work of creating this project, styling, filming, photographing, and writing about their products. As always, all opinions are honest and my own. Thank you for supporting brands that support Sugar & Sparrow.


By: Whitney · In: Featured, Tutorials · Tagged: buttercream embroidery cake, buttercream piping, embroidery cake, floral cake, JOANN, wilton color right, wilton tip 2, wilton tip 3

you’ll also love

vintage halloween lambeth cakeVintage Halloween Lambeth Cake Tutorial
how to mix rainbow buttercream colorsThe Easiest Way to Make Rainbow Buttercream Colors
marble buttercream cake tutorialMarble Buttercream Cake Tutorial Feat. the JOANN Stir Collection

Join the List

Stay up to date & receive the latest posts in your inbox.

Reader Interactions

Leave a Reply Cancel reply

Your email address will not be published. Required fields are marked *

Recipe Rating


Next Post >

The Easiest Way to Make Rainbow Buttercream Colors

Primary Sidebar

Welcome to Sugar & Sparrow

Welcome to Sugar & Sparrow

Helping you whip up pretty desserts with confidence and creativity. And hopefully sharing a few laughs with you along the way!

Learn More

Connect

let’s bake!

Get my very best recipes, baking tips, and decorating tutorials sent to your inbox

Featured Posts

easy Cadbury Mini Egg Cheesecake recipe

No-Bake Cadbury Mini Egg Cheesecake

sugar and sparrow apple spice cake

Apple Spice Cake with Cinnamon-Vanilla Buttercream

sugar and sparrow small batch strawberry cake

Small Batch Strawberry Cake

Search

Archives

Follow Along

@sugarandsparrowco

STRAWBERRY SHORTCAKE ICE CREAM CAKE 🍓if Strawbe STRAWBERRY SHORTCAKE ICE CREAM CAKE 🍓if Strawberry Shortcake Ice Cream Bars make you nostalgic for your childhood ice cream truck days, you’re going to LOVE this easy ice cream cake version - no ice cream maker needed 🙌🏼 

Full recipe on my blog at https://sugarandsparrow.com/strawberry-shortcake-ice-cream-cake/

STRAWBERRY CRUNCH 
24 whole (280g) Golden Oreos, finely ground
3 Oz box strawberry jello
4 Tbsp unsalted butter, melted

ICE CREAM LAYERS
1/2 Cup (15g) freeze-dried strawberries
2 Cups heavy whipping cream, cold
1 Tbsp pure vanilla extract, divided
14 Oz sweetened condensed milk
1 1/2 tsp strawberry jam or preserves

1. Combine the strawberry crunch ingredients and bake on a lined cookie sheet at 350ºF for 4 min.
2. For the crust, combine 1 Cup of the strawberry crunch with 2 Tbsp melted butter. Press into the bottom of a 6-inch springform pan and line with an acetate collar. Place in the freezer while you move on.
3. Using a food processor, grind the freeze-dried strawberries into a fine powder. Set aside.
4. Add the heavy whipping cream and 2 tsp of vanilla extract into a chilled bowl, then whip it with a hand mixer to stiff peaks. Place in the refrigerator.
5. Divide the condensed milk between two medium bowls. To one bowl, add 1 teaspoon of vanilla. To the second bowl, add the finely strawberry powder and the jam/preserves. Whisk the ingredients together within each individual bowl.
6. Divide the whipping cream evenly between each of the two bowls you created in the previous step. Fold each sweetened condensed milk mixture together with the divided whipped cream to create the vanilla ice cream and strawberry ice cream.
7. Layer half of each of the ice creams on top of the strawberry crunch crust, sprinkle a layer of strawberry crunch on top, then repeat. Freeze for 6 hours and serve. 
#icecreamcake #strawberryshortcake #nochurnicecream #icecreamlover #strawberry
LEMON CUPCAKES 🍋 after about a dozen recipe tes LEMON CUPCAKES 🍋 after about a dozen recipe tests, this one is everything I could want in a lemon cupcake! Fluffy-yet-moist, bursting with natural lemon flavor, and absolutely irresistible topped with lemon cream cheese buttercream. 

Full recipe (with frosting) linked in my bio + at https://sugarandsparrow.com/homemade-lemon-cupcakes/

INGREDIENTS:
1 Cup (132g) all-purpose flour
1 tsp baking powder
1/4 tsp salt
1/4 Cup (60ml) whole milk, room temperature
3 Tbsp (45ml) lemon juice from 1 medium lemon
3/4 Cup (150g) granulated sugar
3 Tbsp (42g) unsalted butter, room temperature
2 Tbsp (30ml) vegetable oil
2 large eggs, room temperature
1 tsp pure vanilla extract

INSTRUCTIONS:
1. Preheat the oven to 350ºF (177ºF) and line a standard cupcake pan with 12 paper liners.
2. In a large bowl, whisk together the flour, baking powder, and salt. Set aside. 
3. In the bowl of a stand mixer fitted with the paddle attachment (or with a hand mixer and large bowl), add the lemon zest to the sugar and mix on low speed until fragrant and well combined, about 1 minute. Meanwhile, combine the lemon juice with the milk and set aside. 
4. Add the butter to the lemon-sugar mixture and cream on medium speed until and combined, about 2 minutes. Add the vegetable oil and beat until light and creamy, about 3 minutes. Scrape down the bowl and paddle as needed.
5. Mix in the eggs one at a time on low speed, then add the vanilla and turn the mixer to medium speed for one minute.
6. Turn the mixer off and add the flour mixture all at once. Mix on low speed until just combined, then slowly pour in the lemon-milk mixture. Mix until just combined, about 30 seconds.
7. Divide the batter equally between the liners and bake for 14-18 min. Cool, then top with frosting of your choice (link in bio for lemon cream cheese frosting)�
#lemoncupcakes #creamcheesefrosting #lemon #cupcakes #cupcakedecorating
April in my kitchen 🌸 I published 5 NEW recipes April in my kitchen 🌸 I published 5 NEW recipes on my site, baked my Oreo cupcake recipe for a fundraiser and found it was just as delicious as I remember, and filmed/photographed 3 recipes that will be on my blog in May (Lemon Cupcakes, Lemon Cream Cheese Buttercream, and No-Bake Marbled Strawberry Cheesecake) 🥰 

Comment “APRIL” to get all the available recipes and stay tuned for more! 

#bakersofinstagram #springbaking #cakedecorating #cupcakes #bakinglove
SHEET PAN COOKIE CAKE 🍪 slice it warm for a fud SHEET PAN COOKIE CAKE 🍪 slice it warm for a fudgy chocolate chip cookie OR let it settle into a moist and chewy cookie cake that’s perfect for decorating! My fave vanilla buttercream + sprinkles turn this giant chocolate chip cookie into the perfect birthday cake alternative at the end 🥳
⁣
Full recipe + decorating ideas at https://sugarandsparrow.com/sheet-pan-chocolate-chip-cookie-cake/
⁣
INGREDIENTS⁣
1 Cup (226g) unsalted butter, melted⁣
1 1/3 Cups (267g) packed light or dark brown sugar⁣
1/2 Cup (100g) granulated sugar⁣
3 large eggs⁣
1 Tbsp pure vanilla extract⁣
1 tsp baking soda⁣
1 tsp cornstarch⁣
1/2 tsp salt⁣
3 Cups (398g) all purpose flour⁣
2 Cups (350g) semi-sweet chocolate chips⁣
⁣
INSTRUCTIONS⁣
1. Preheat the oven to 350ºF (177ºC). Grease and line a 13×18 inch sheet pan.⁣
2. In a large bowl, add the brown sugar and granulated sugar. Melt the butter in the microwave and pour it over the top of the sugars. Whisk together until uniform. Add the eggs and vanilla, then continue whisking until uniform. Whisk in the baking soda, cornstarch, and salt.⁣
3. Add the flour and use a silicone spatula to fold it in until smooth cookie dough forms. Reserve 1/2 Cup of the chocolate chips and set them aside, then fold the remaining 1 1/2 Cups of chocolate chips into the cookie dough.⁣
4. Place the chocolate chip cookie dough onto the prepared sheet pan and use an offset spatula to spread it all the way to the edges in an even layer.⁣
5. Bake the cookie cake for 14-16 minutes, until it looks golden brown on the edges and set. 
6. Enjoy warm or let it cool and decorate with vanilla buttercream and sprinkles! ⁣
⁣
#cookiecake #chocolatechipcookies #sheetcake #birthdaycake #cakedecorating
STRAWBERRY CUPCAKES 🍓based on my beloved strawb STRAWBERRY CUPCAKES 🍓based on my beloved strawberry layer cake recipe, this cupcake version is just as moist yet fluffy and bursting with natural strawberry flavor! Between the mix of fresh strawberries in the cupcakes + freeze-dried strawberries in the frosting, the flavor is out of this world 🚀

Full recipe link in my bio (with strawberry buttercream) + at https://sugarandsparrow.com/strawberry-cupcakes/

STRAWBERRY CUPCAKES
Yield: 14 cupcakes

INGREDIENTS:
5 oz (143g) fresh or frozen strawberries
1/3 Cup (80ml) whole milk, room temp
1 1/2 Cups (158g) sifted cake flour
1 tsp baking powder
1/4 tsp baking soda
1/2 tsp salt
6 Tbsp (85g) unsalted butter, room temp
1 Cup (200g) granulated sugar
2 large eggs, room temp
3 Tbsp (45g) sour cream, room temp
1 tsp vanilla extract
1 drop pink food coloring (optional)

INSTRUCTIONS: 
1. Puree the strawberries using a food processor (you’ll have about 1/2 cup of puree), then place into a saucepan over medium-low heat. Bring to a simmer, then cook for 10-15 min, stirring occasionally, until you have 1/4 cup. Refrigerate until room temp.
2. Preheat oven to 350ºF (177ºC) and line a standard cupcake pan with liners.
3. Whisk together the sifted cake flour, baking powder, baking soda, and salt and set aside.
4. In a stand mixer w/ paddle attachment (or hand mixer + large bowl), whip the butter on high for 2 min. Add sugar and beat for 2 min, until light and fluffy. Turn the mixer to low and add the eggs one at a time, then add the vanilla and sour cream, turn the mixer to high and beat for 1 min. Meanwhile, whisk together the strawberry puree, whole milk, and food coloring (if using).
5. Turn the mixer off and add all of the dry ingredients at once. Mix on low until just combined, then add the strawberry milk mixture until just combined, about 30 seconds.
6. Fill the cupcake liners 2/3 full and bake for 14-18 minutes. Cool completely before topping with strawberry buttercream (full recipe linked above). 

#strawberrycupcakes #strawberrycake #pinkcupcakes #strawberry #cupcakes

Footer

On the Blog

  • Cake Basics
  • Recipes
  • Tutorials

Info

  • About
  • Privacy Policy & Disclosure

stay in the know

Copyright © 2026 · Theme by Sugar & Sparrow