• Cake
  • Frosting
  • YouTube
  • My Favorite Tools
  • Nav Social Icons

  • Skip to primary navigation
  • Skip to main content
  • Skip to primary sidebar
  • Skip to footer
  • Recipes
    • Cake
    • Cupcakes
    • Frosting
    • Ice Cream
    • Vegan
  • Cake Basics
  • Tutorials
  • Blog
  • About
  • Mobile Menu Widgets

    Connect

    Search

Sugar & Sparrow logo in script font

Sugar & Sparrow

Lifestyle and Cake from Portland Oregon

  • Cake Basics
  • Recipes
    • Cake
    • Cupcakes
    • Cookies & Bars
    • Filling
    • Frosting
    • Ice Cream
    • No-Bake
    • Small Batch
    • Vegan
  • Tutorials
  • Book
  • Blog
  • About

Christmas Sweater Sheet Cake Tutorial

November 15, 2024 · In: Featured, Holiday, Seasonal, Tutorials

Have you ever lost all sense of time and space while working on a cake? That was me with this Christmas sweater sheet cake. I had the best time piping all of the textures, going with the flow, and surprising myself with the outcome. It turned out even better than I imagined! I can’t wait for you to make this one and lose yourself in the process (in the best way, of course). 

This post may contain affiliate links. For more information, see our disclosure policy.

Christmas sweater sheet cake tutorial
Christmas sweater cake tutorial

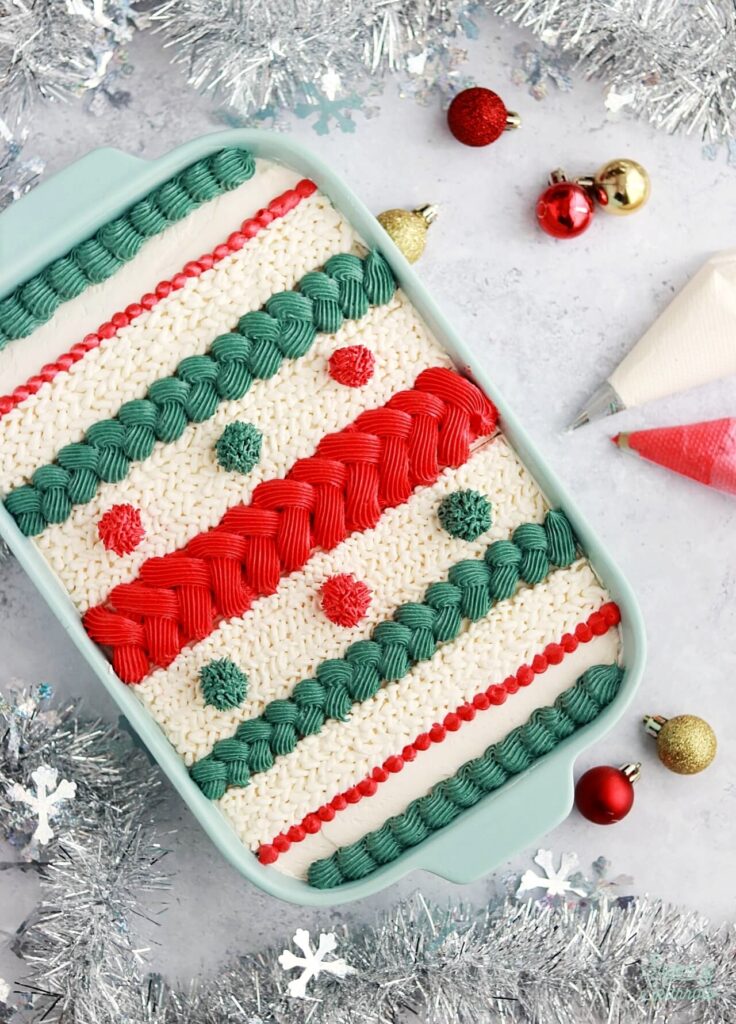
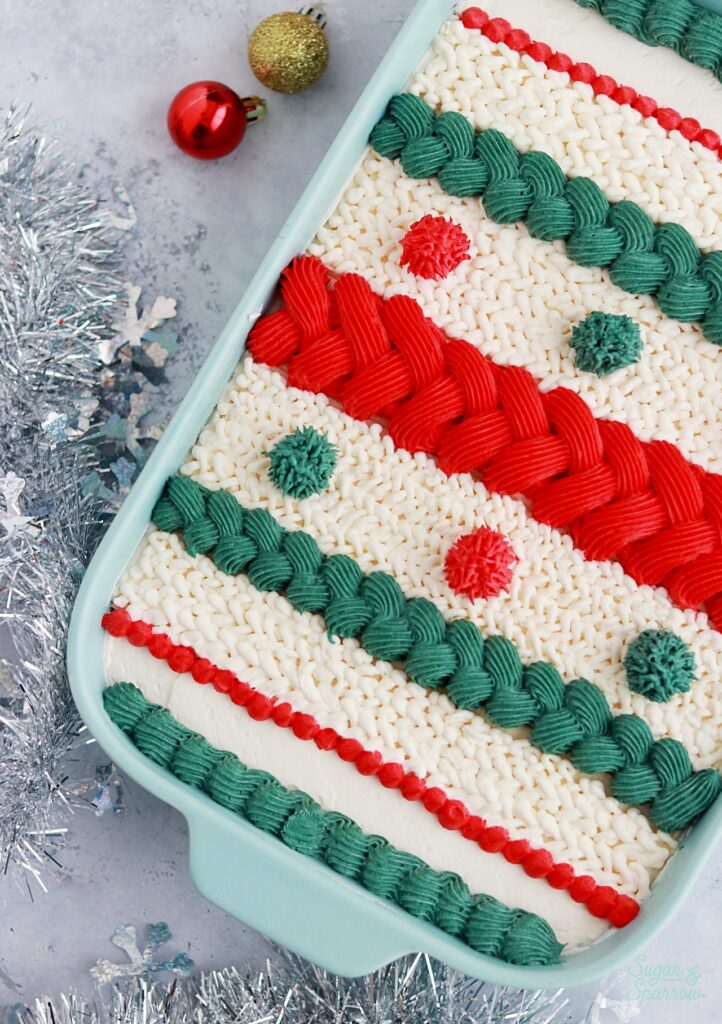
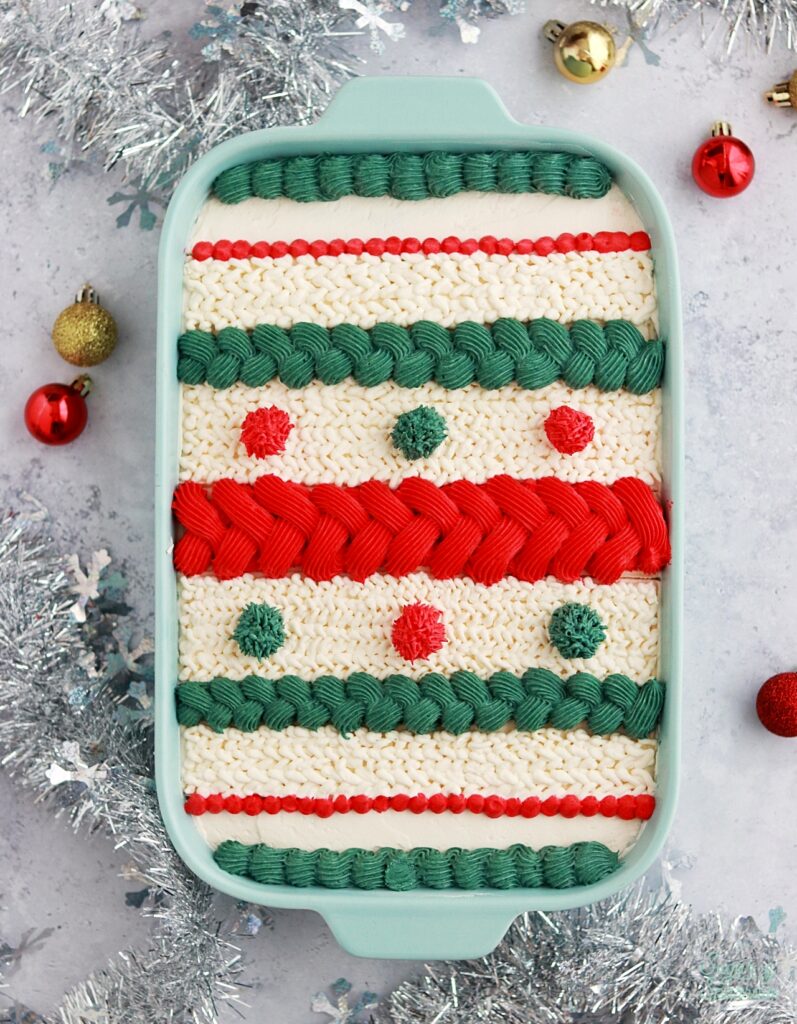
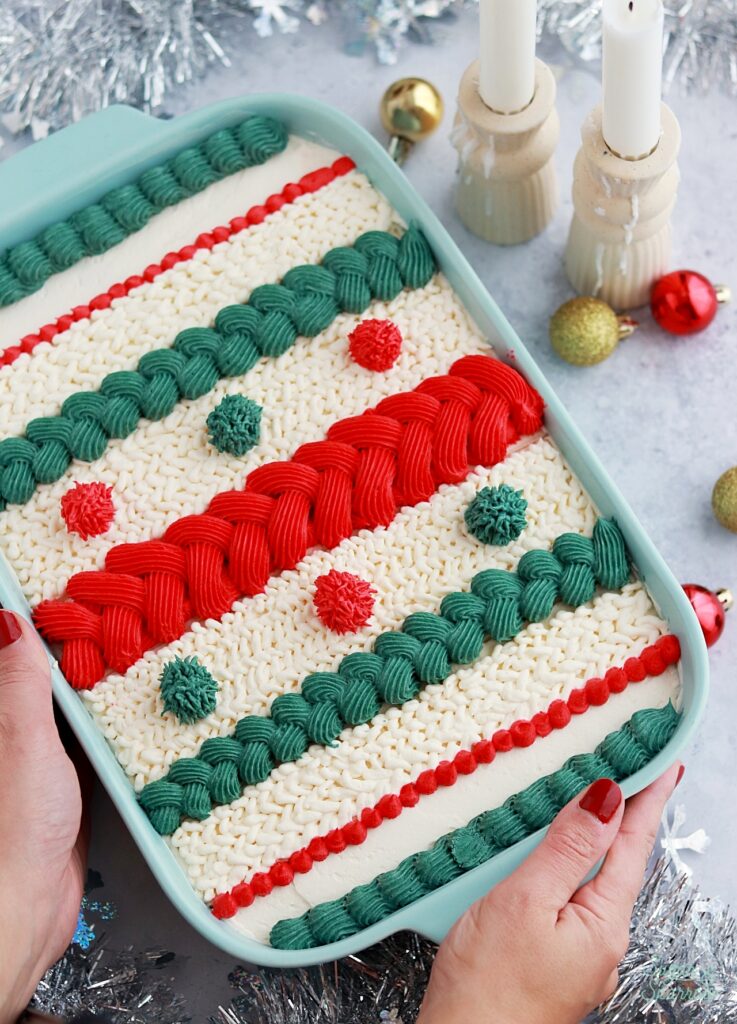
This sweater sheet cake design is so perfect for the holidays, whether you need a dessert table centerpiece for your Christmas party or simply want to impress your loved ones with a beautifully detailed cake. I cannot get over how cute it is between the buttercream pom poms and knit textures. Also, I feel like I need a sweater like this for a real life Holiday party. Comment me a link if you find one! 

Knitted Buttercream Details

At first glance, these sweater cake textures look complicated. I’m happy to report that they’re mostly the same piping technique over and over again, just with different piping tips. The real key to making the knit texture look perfect is to measure out sections on the sheet cake before you start piping. Then, you’ll pipe horizontal lines of overlapping x’s to fill in the spaces. Here’s a quick video that shows you how to pipe the knit details: 

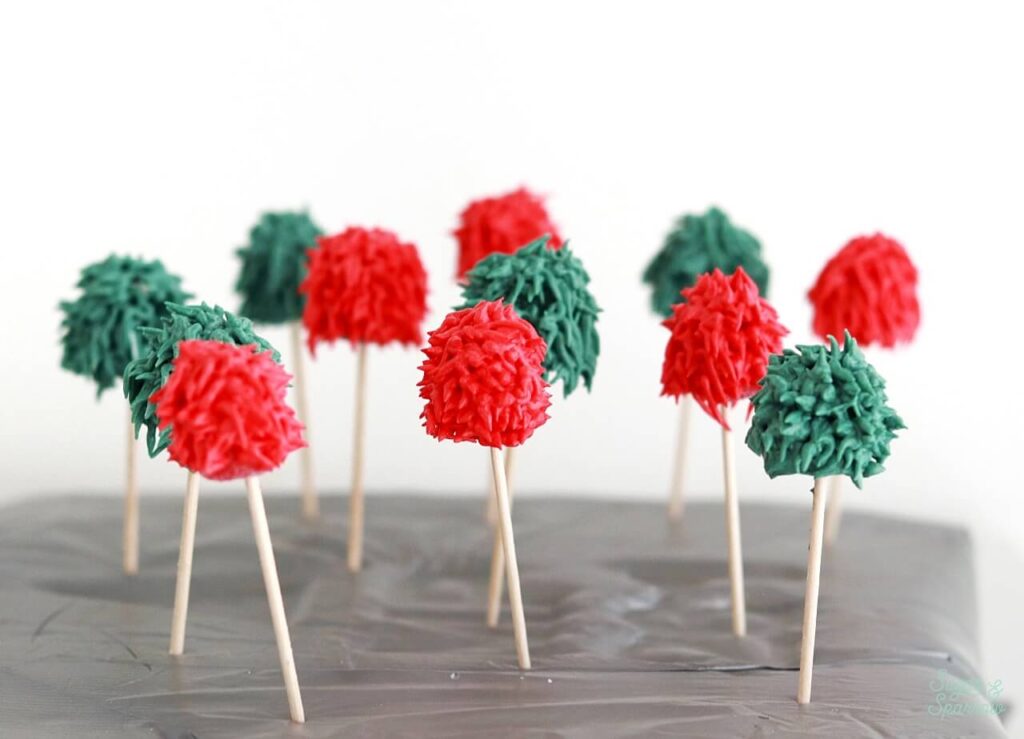
I have always wanted to make buttercream pom poms, so I was thrilled to figure out how to add those as details for this sweater sheet cake. I ended up sticking mini gumdrops onto toothpicks, then using Wilton Cake 233 to pipe the pom pom texture onto them. Here is what they look like before they go on the cake. 

buttercream pom pom tutorial with wilton 233

What Kind of Buttercream Can I Use?

For these knit textures, you can use any kind of buttercream you’re most comfortable making and working with as long as it’s easy to color. I chose American Buttercream simply because it’s a great consistency for piping and so easy to achieve a Christmas color palette.

knitted buttercream sweater cake tutorial

Buttercream Piping Tips for Success

This sweater cake design requires a fair amount of continuous piping. That said, I would still consider it beginner-friendly as long as you’re okay that it’s a little tedious. Here are some things I’d recommend to make it as easy as possible:

  • Make sure your buttercream is the right consistency. It’s important that your buttercream is at least medium-consistency so that it will hold its shape when piped. Here’s a blog post that details how to ensure your buttercream is the perfect consistency for piping. 
  • Practice on a cookie sheet. If you’re not super confident in your ability to pipe directly onto the cake just yet, don’t worry! You can always practice on a cookie sheet or other flat surface to get the technique down before you commit to the actual cake. 
  • Mark out sections. This sweater cake design looks best when the lines are even, so before you do any piping, be sure to mark out sections on the frosted sheet cake to use as a guide for your piping. I found that using a cake comb like the one in the middle in this collection helped me create precise sections so that I could stay inside the lines, even with the smallest knit textures. 
  • Keep the buttercream from getting too warm. If at any point you feel like the buttercream is getting too warm while piping, there are a few things you can do. First, you can place the bag in the refrigerator for about 10 minutes to let the frosting firm back up slightly, then gently massage it back into a uniform consistency for piping. Second, you can run your hands under cold water to keep them nice and cool. Buttercream usually gets too warm from too much handling of the bag. 
knitted buttercream cake tutorial

Christmas Sheet Cake Recipes

Before you can get started with decorating, you’ll need a baked and cooled sheet cake for this tutorial. You can certainly use your go-to sheet cake recipe or enough boxed cake mix for a 9 x 13 inch cake pan, or bake any of my layer cake recipes as a sheet cake! Here are some sheet cake flavors I’d recommend for this cake design: 

  • Vanilla Sheet Cake
  • Gingerbread Latte Sheet Cake
  • Pumpkin Sheet Cake
  • Spiced Apple Sheet Cake
  • Chocolate Sheet Cake
  • Funfetti Sheet Cake (but with Christmas sprinkles)
  • Red Velvet Cake Recipe
  • Peppermint Hot Cocoa Cake
  • Eggnog Cake
  • Peppermint Mocha Cake

If you’re using any of the above layer cake recipes, just make the recipe for the batter as-is, grease and line a 9×13 inch baking dish, fill it with the batter, then bake in a 325ºF (163ºC) oven for 30-35 minutes, or until a toothpick inserted comes out clean.

christmas cake ideas: buttercream sweater sheet cake
sweater cake tutorial with buttercream

You Will Need

  • A baked 9×13 inch sheet cake
  • 5-6 Cups of frosting (I used a double batch of my vanilla buttercream recipe)
  • Red and green food color gel
  • Icing spatula
  • Icing smoother
  • Icing comb with square teeth like this OR a ruler
  • Wilton tips: 4B, 32, 3, 10, and 233 (x2) 
  • Piping bags 
  • 6 mini gumdrops
  • 6 toothpicks

Step 1: Mix the Buttercream Colors

Divide the buttercream into three separate bowls. In the first bowl, add red food color gel until you reach your desired color. I used about 10 drops of AmeriColor Super Red for this. In the second bowl, add green food color gel until you reach your desired color. I used about 6 drops of AmeriColor Forest Green for this deep green color. Keep the last bowl uncolored (white) and keep in mind that the red and green colors will darken over time. 

Step 2: Prepare the Piping Bags

Fit one piping bag with Wilton Tip 3 and add about ⅓ of the white buttercream, then set the rest aside for frosting the cake. Fit one piping bag with Wilton Tip 4B and fill it with ¾ of the red buttercream, then divide the rest of the red buttercream between two other piping bags, one fitted with Wilton Tip 233 and one fitted with Wilton Tip 10. 

christmas buttercream colors

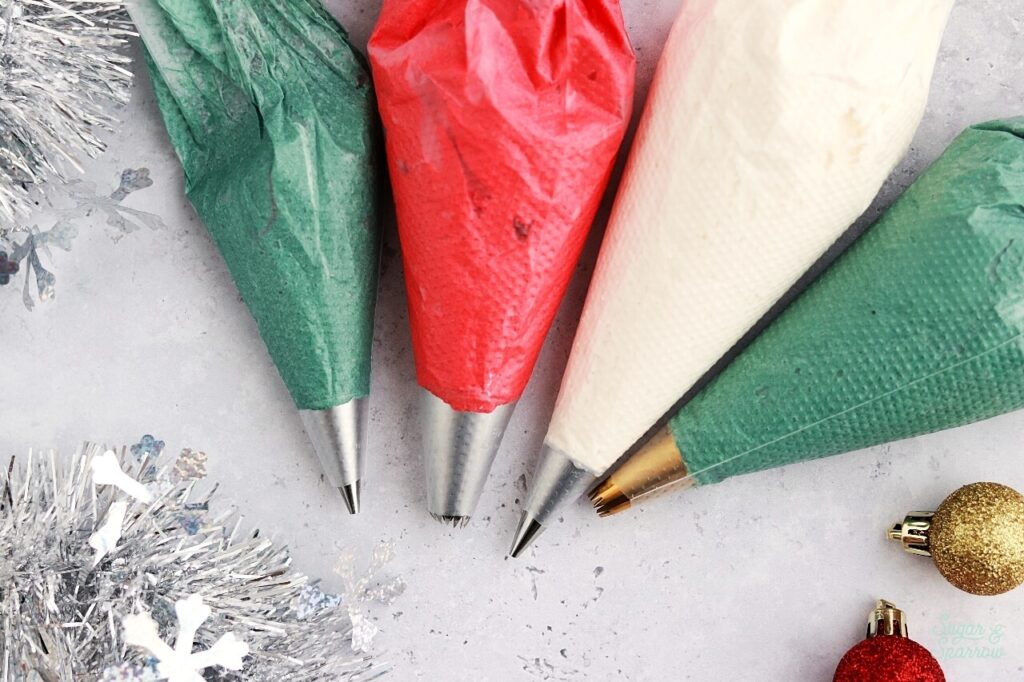
Add ⅓ of the green buttercream into a piping bag fitted with Wilton Tip 233 and add the rest of the green buttercream into a piping bag fitted with Wilton Tip 32. 

Step 3: Make the Buttercream Pom Poms 

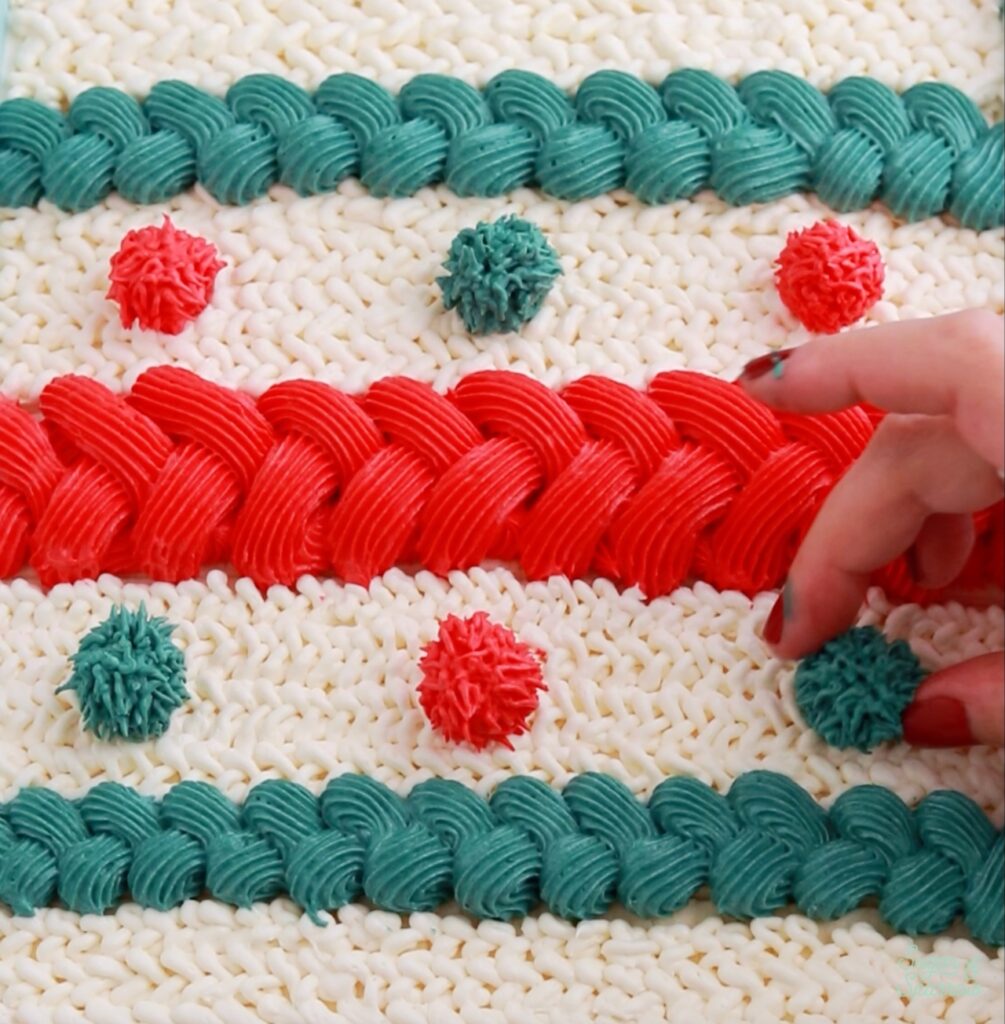
Stick one of the mini gumdrops onto a toothpick, then choose one of the red or green piping bags fitted with Wilton Tip 233 to pipe pom pom texture (aka shag texture) all over the surface of the gumdrop. When you’re finished piping, stick the toothpick into a styrofoam block, cardboard box, or something else that will keep it upright. 

how to make buttercream pom poms
buttercream pom pom tutorial with wilton 233

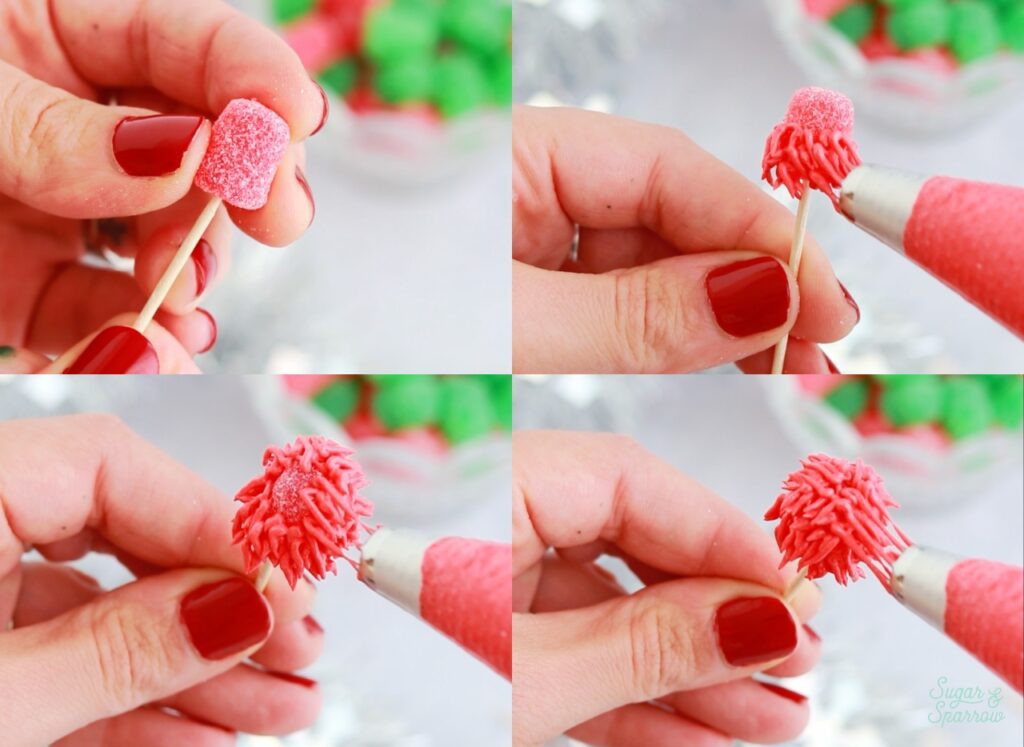
One by one, continue the process of making buttercream pom poms until you have 3 red ones and 3 green ones. Then, refrigerate the pom poms until they’re easy to handle without ruining the piping (about 20-30 minutes).

Step 4: Frost the Sheet Cake 

While the buttercream pom poms are in the refrigerator, use the reserved white buttercream to frost a thin, smooth layer of buttercream onto the cake. I used my icing spatula to spread the buttercream on, then used an icing smoother to level it out. The buttercream will be covered by piping, so don’t worry about being a perfectionist with the finish. 

frosting a sheet cake

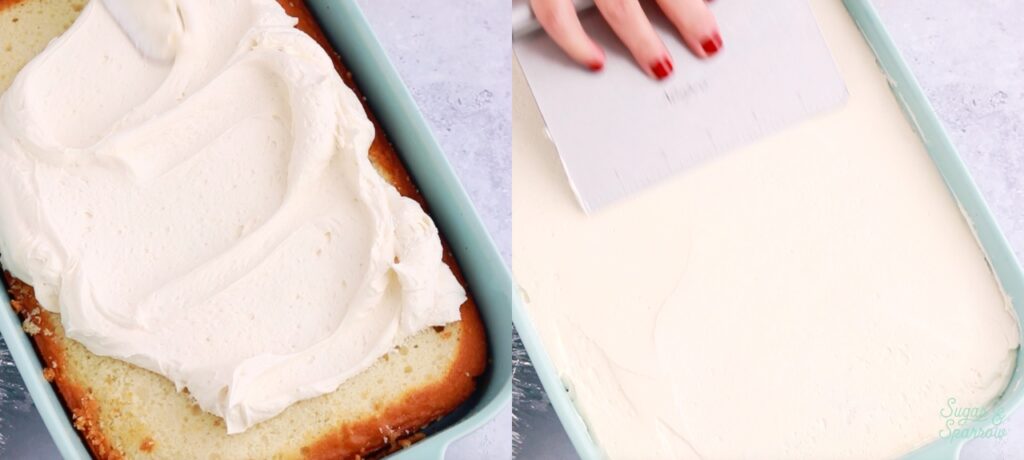
When you’ve got a level layer of buttercream on your cake, refrigerate it for 15-20 minutes to let the frosting firm up before you move on. 

Step 5: Measure the Piping Segments 

In order to pipe perfect horizontal lines, you’ll need to make yourself a piping guide. You can get creative with how you do that, but what works for me is using an icing comb with square teeth. I waited until the frosting on the sheet cake was nice and firm, then dragged my icing comb across the surface to create perfectly spaced horizontal lines. 

measuring sheet cake segments

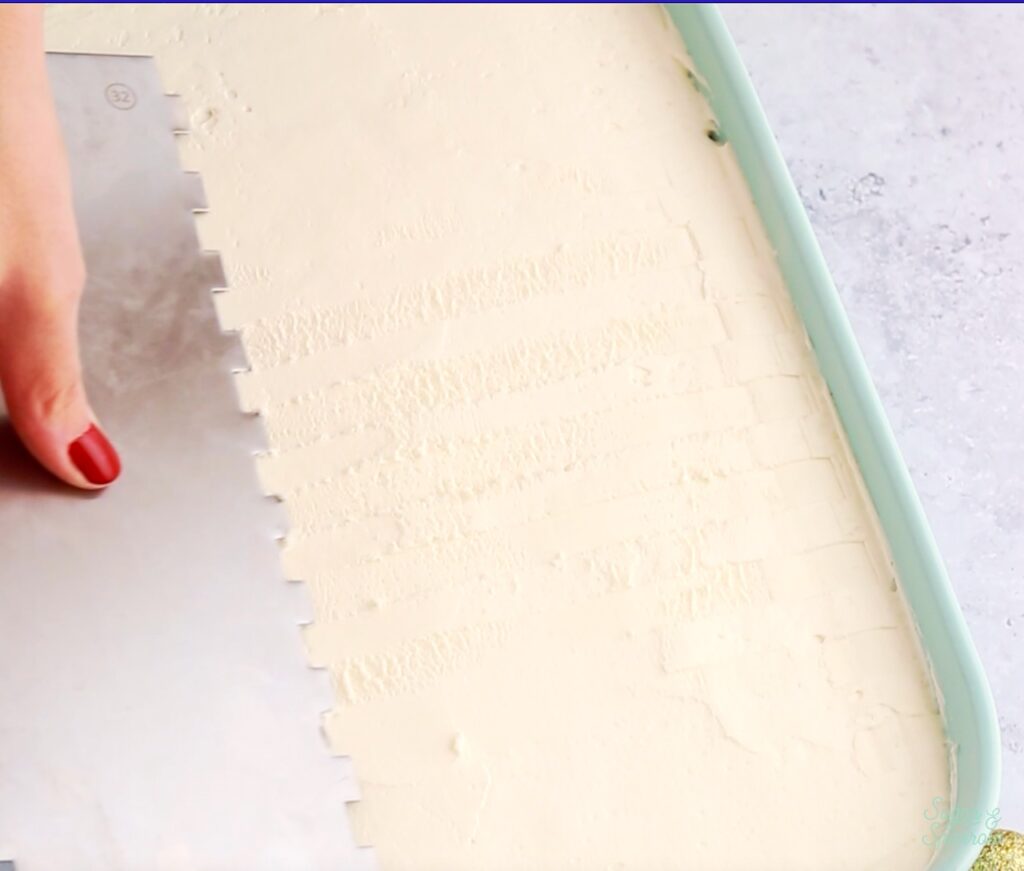
I had already drawn a picture of what I wanted the final cake to look like, so I counted out the horizontal lines and used the blade of my icing smoother to really mark out where each section would begin and end. Here’s what it looked like before I started piping. 

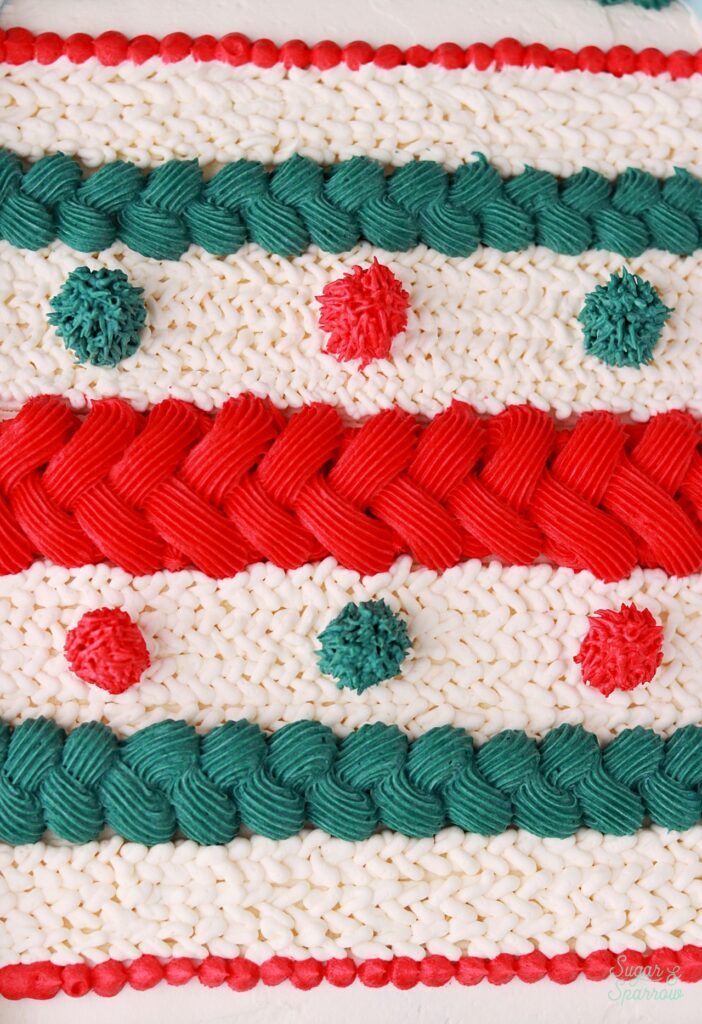
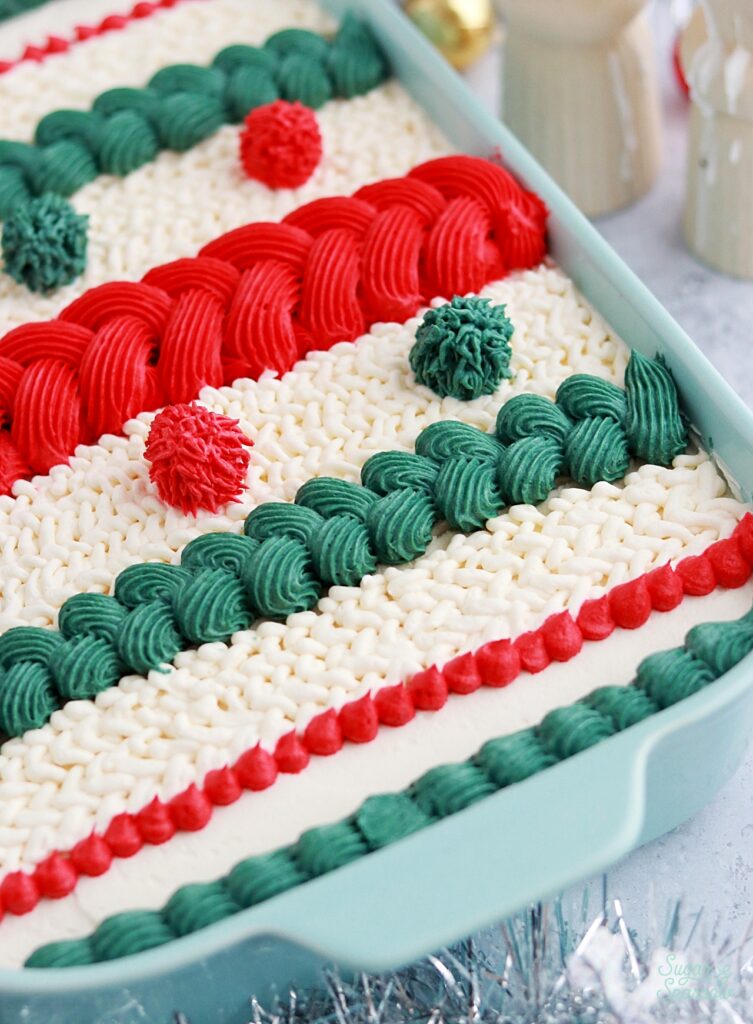
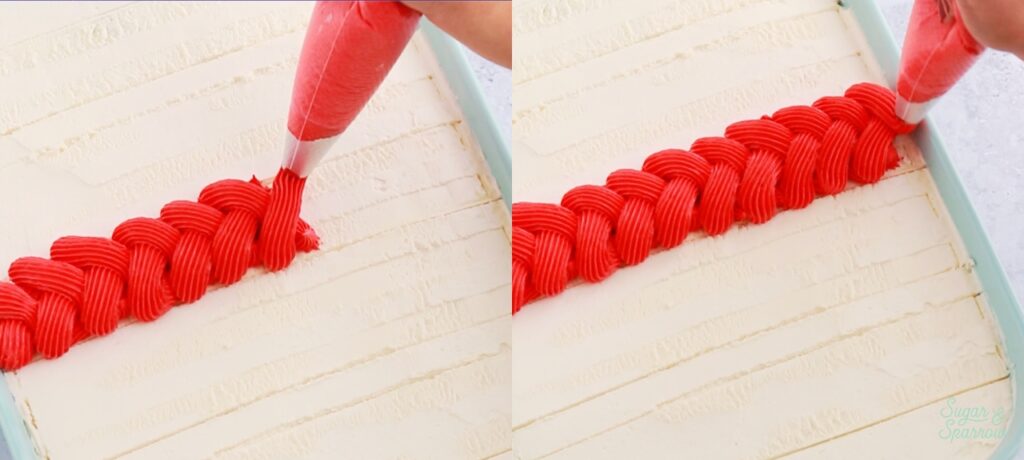
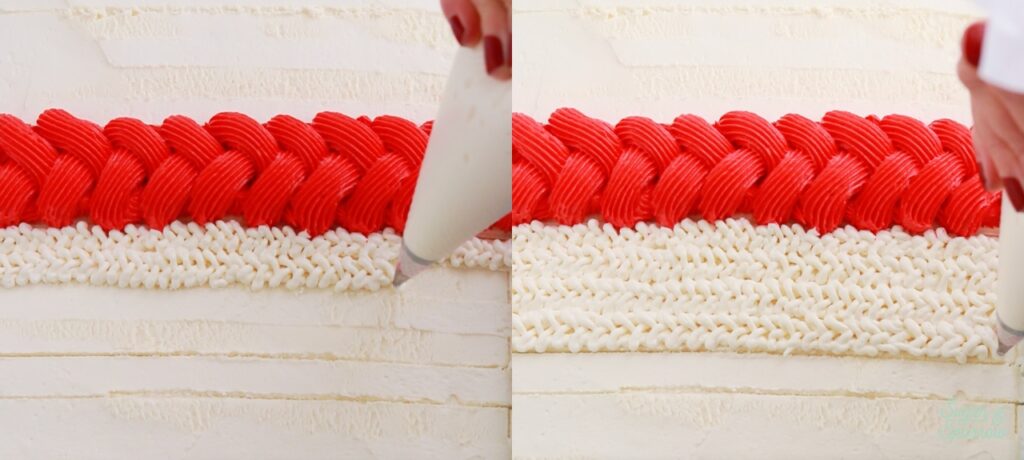
Step 6: Pipe the Knit Textures 

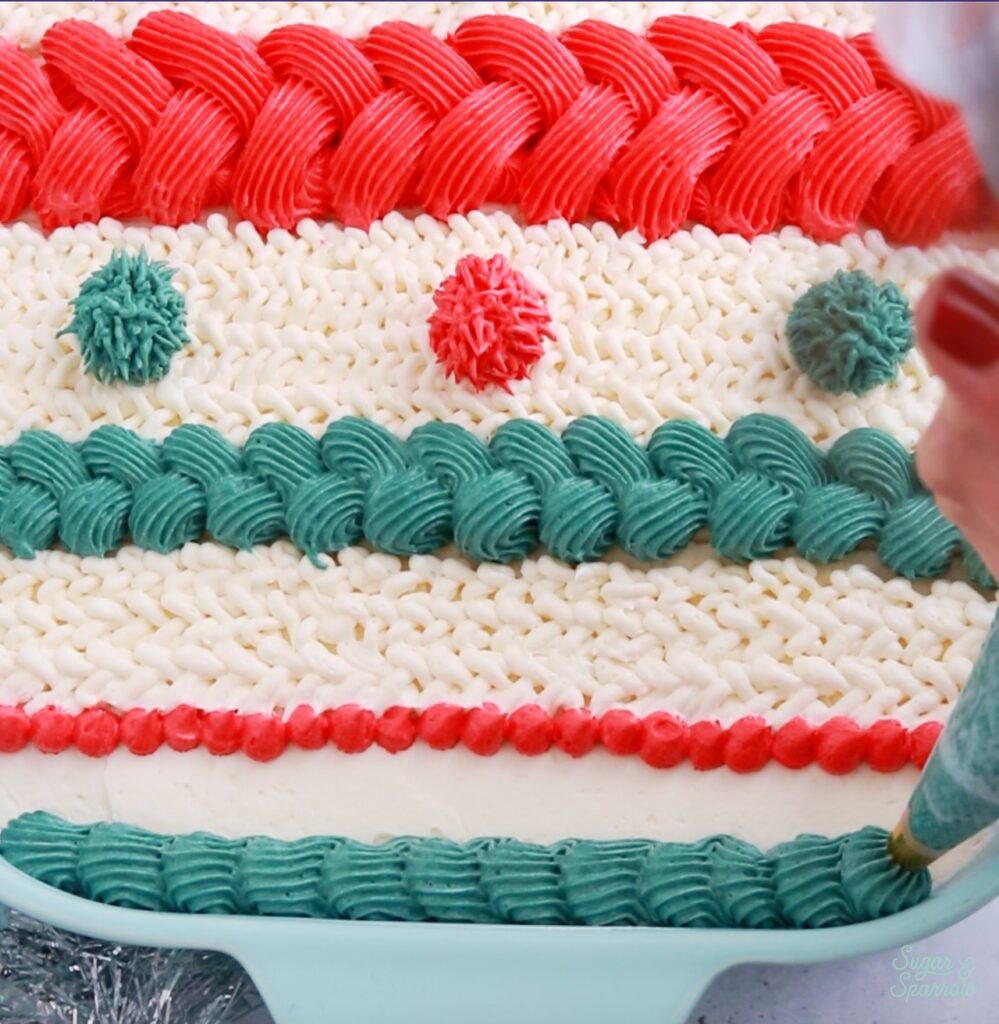
Now comes the fun part – piping! I started in the middle section with my red buttercream and Wilton Tip 4B, essentially piping a series of overlapping x’s to create a braided look for the center section. 

braided buttercream tutorial

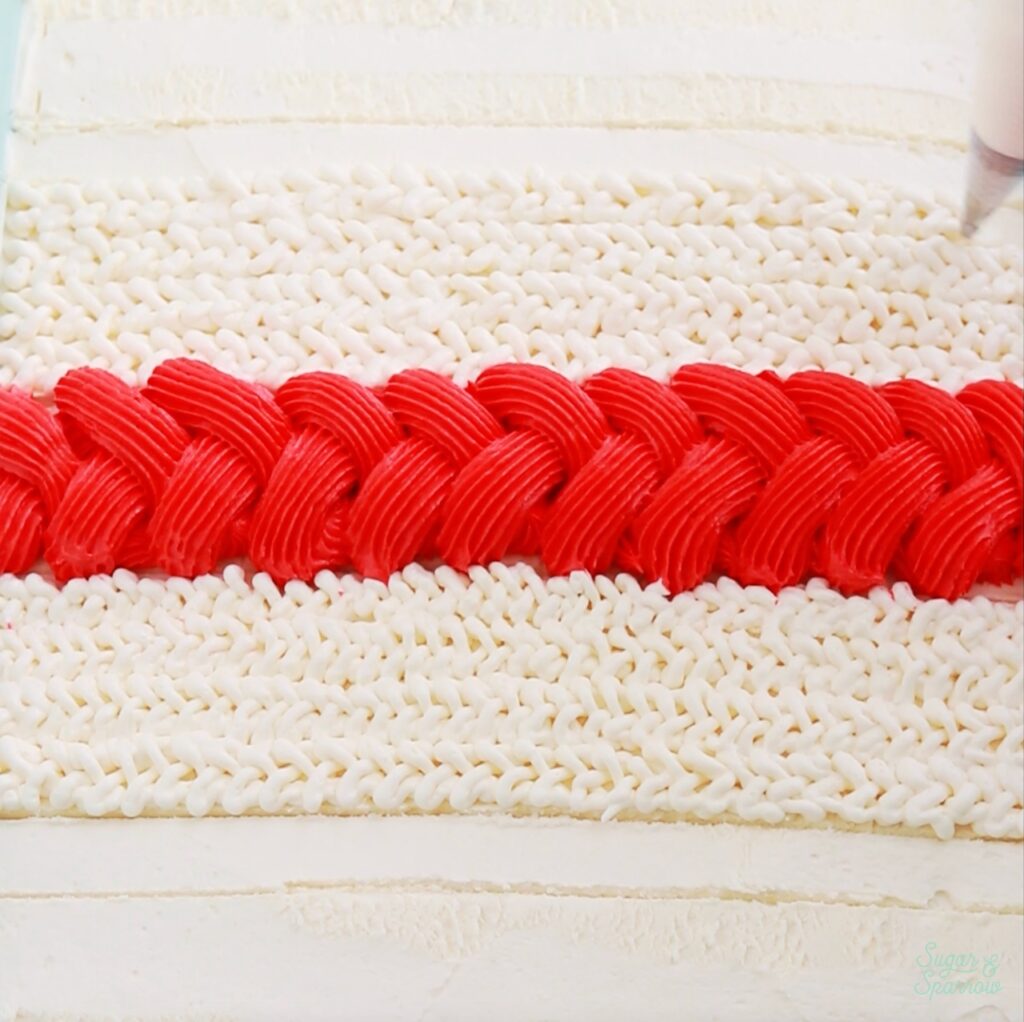
Next, I used the white buttercream with Wilton Tip 3 to pipe four lines of knitted texture beneath the red center section. Since I used the icing comb to mark the horizontal sections, I was able to just pipe within each line that the icing comb created. 

knitted buttercream tutorial

Repeat four lines of that same knitted texture above the red center section.

knitted buttercream sweater tutorial

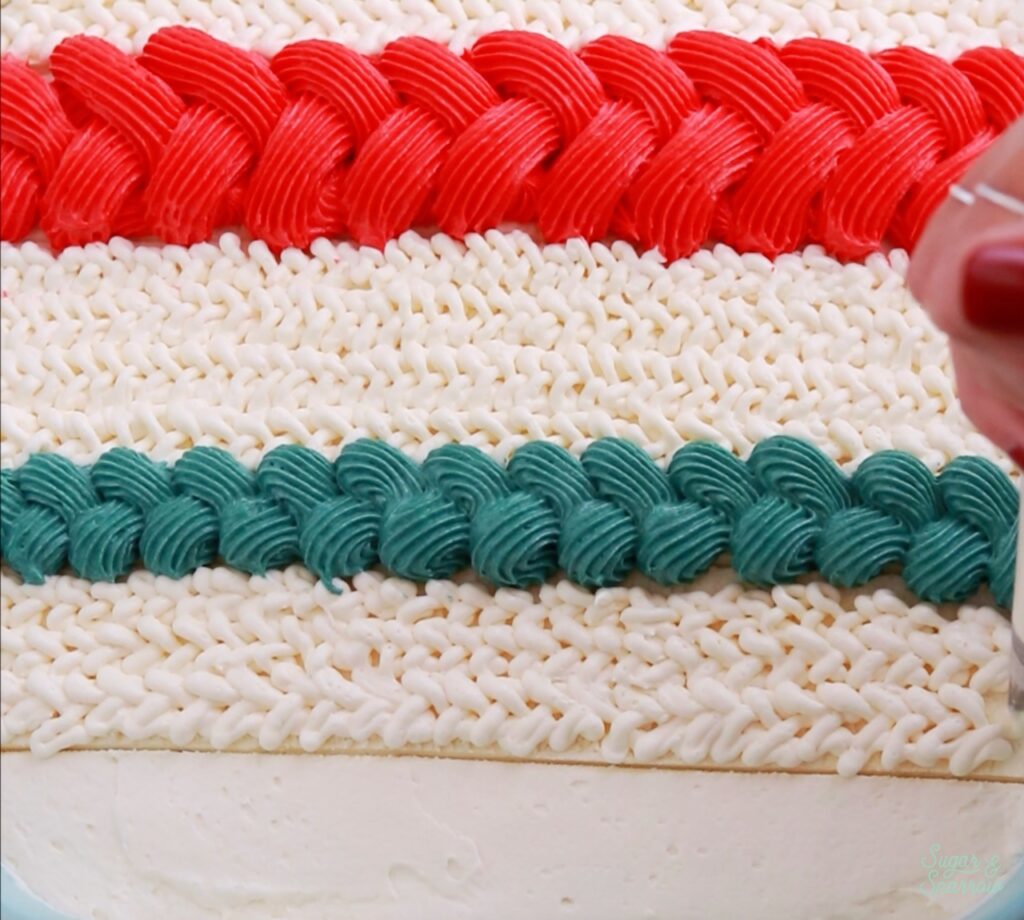
Use the green buttercream with Wilton Tip 32 to pipe a mini version of the braided buttercream beneath (and above) the white knitted sections. 

buttercream sweater texture tutorial

Then, repeat three lines of the white knitted texture beneath and above the green sections.

buttercream knit tutorial

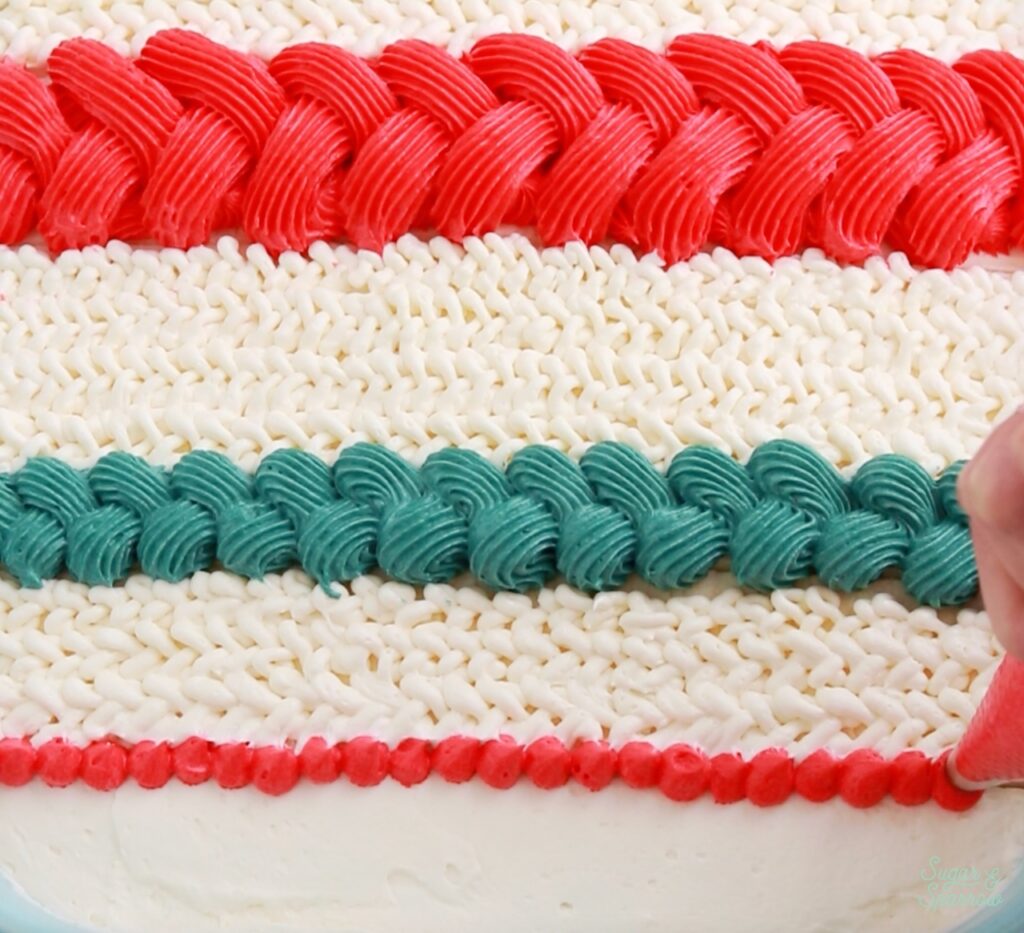
Next to the latest sets of white knitted texture, add a border of dots using the red buttercream and Wilton Tip 10. 

christmas sweater cake tutorial

Step 7: Place the Buttercream Pom Poms

Grab the buttercream pom poms out of the refrigerator and one by one, carefully remove the toothpick and place them onto the sections of white knitted buttercream that have four lines. Since the buttercream is cold, they should be much easier to handle without messing up all your pretty pom pom texture.

buttercream pom poms on sweater cake

Finally, add a simple shell border on the very bottom and top edge of the sheet cake using the green buttercream and Wilton Tip 32. I left a little blank (white) space between the red dot borders. 

Christmas sweater cake tutorial

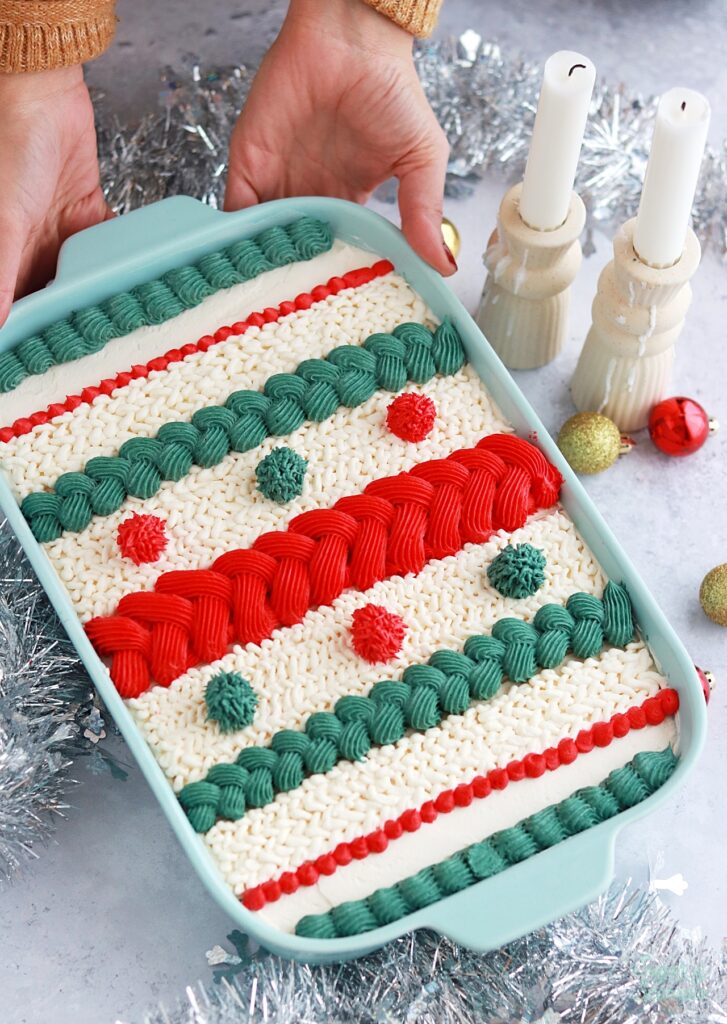
And voila! The cutest Christmas sweater sheet cake ever. I am so happy with how this design turned out and cannot wait for you to try it! 

holiday cake ideas christmas sweater cake

Let me know if you use this tutorial to make something special for the holidays. Feel free to leave a comment below letting me know how it went or tag me on Instagram to show me a photo! I love to see what you create.

By: Whitney · In: Featured, Holiday, Seasonal, Tutorials · Tagged: christmas cake, christmas sweater cake, sheet cake, sweater cake, ugly sweater cake

you’ll also love

apple sheet cake with spiced buttercreamSpiced Apple Sheet Cake
Sugar and sparrow vanilla sheet cakeThe Best Vanilla Sheet Cake Recipe
christmas sugar cookie dough cake recipeChristmas Sugar Cookie Dough Cake

Join the List

Stay up to date & receive the latest posts in your inbox.

Reader Interactions

Comments

  1. Addie says

    November 15, 2024 at 11:23 am

    How cute! Love the colors.

    Reply

Leave a Reply Cancel reply

Your email address will not be published. Required fields are marked *

Recipe Rating


Next Post >

Spiced Chai Pumpkin Cake

Primary Sidebar

Welcome to Sugar & Sparrow

Welcome to Sugar & Sparrow

Helping you whip up pretty desserts with confidence and creativity. And hopefully sharing a few laughs with you along the way!

Learn More

Connect

let’s bake!

Get my very best recipes, baking tips, and decorating tutorials sent to your inbox

Featured Posts

hostess cupcake layer cake recipe

Hostess Cupcake Layer Cake

holiday wreath cupcakes

Festive Christmas Wreath Cupcakes Tutorial

vegan chocolate oreo cake by sugar and sparrow

Vegan Chocolate Cake with Oreo Buttercream

Search

Archives

Follow Along

@sugarandsparrowco

LEMON CUPCAKES 🍋 after about a dozen recipe tes LEMON CUPCAKES 🍋 after about a dozen recipe tests, this one is everything I could want in a lemon cupcake! Fluffy-yet-moist, bursting with natural lemon flavor, and absolutely irresistible topped with lemon cream cheese buttercream. 

Full recipe (with frosting) linked in my bio + at https://sugarandsparrow.com/homemade-lemon-cupcakes/

INGREDIENTS:
1 Cup (132g) all-purpose flour
1 tsp baking powder
1/4 tsp salt
1/4 Cup (60ml) whole milk, room temperature
3 Tbsp (45ml) lemon juice from 1 medium lemon
3/4 Cup (150g) granulated sugar
3 Tbsp (42g) unsalted butter, room temperature
2 Tbsp (30ml) vegetable oil
2 large eggs, room temperature
1 tsp pure vanilla extract

INSTRUCTIONS:
1. Preheat the oven to 350ºF (177ºF) and line a standard cupcake pan with 12 paper liners.
2. In a large bowl, whisk together the flour, baking powder, and salt. Set aside. 
3. In the bowl of a stand mixer fitted with the paddle attachment (or with a hand mixer and large bowl), add the lemon zest to the sugar and mix on low speed until fragrant and well combined, about 1 minute. Meanwhile, combine the lemon juice with the milk and set aside. 
4. Add the butter to the lemon-sugar mixture and cream on medium speed until and combined, about 2 minutes. Add the vegetable oil and beat until light and creamy, about 3 minutes. Scrape down the bowl and paddle as needed.
5. Mix in the eggs one at a time on low speed, then add the vanilla and turn the mixer to medium speed for one minute.
6. Turn the mixer off and add the flour mixture all at once. Mix on low speed until just combined, then slowly pour in the lemon-milk mixture. Mix until just combined, about 30 seconds.
7. Divide the batter equally between the liners and bake for 14-18 min. Cool, then top with frosting of your choice (link in bio for lemon cream cheese frosting)�
#lemoncupcakes #creamcheesefrosting #lemon #cupcakes #cupcakedecorating
April in my kitchen 🌸 I published 5 NEW recipes April in my kitchen 🌸 I published 5 NEW recipes on my site, baked my Oreo cupcake recipe for a fundraiser and found it was just as delicious as I remember, and filmed/photographed 3 recipes that will be on my blog in May (Lemon Cupcakes, Lemon Cream Cheese Buttercream, and No-Bake Marbled Strawberry Cheesecake) 🥰 

Comment “APRIL” to get all the available recipes and stay tuned for more! 

#bakersofinstagram #springbaking #cakedecorating #cupcakes #bakinglove
SHEET PAN COOKIE CAKE 🍪 slice it warm for a fud SHEET PAN COOKIE CAKE 🍪 slice it warm for a fudgy chocolate chip cookie OR let it settle into a moist and chewy cookie cake that’s perfect for decorating! My fave vanilla buttercream + sprinkles turn this giant chocolate chip cookie into the perfect birthday cake alternative at the end 🥳
⁣
Full recipe + decorating ideas at https://sugarandsparrow.com/sheet-pan-chocolate-chip-cookie-cake/
⁣
INGREDIENTS⁣
1 Cup (226g) unsalted butter, melted⁣
1 1/3 Cups (267g) packed light or dark brown sugar⁣
1/2 Cup (100g) granulated sugar⁣
3 large eggs⁣
1 Tbsp pure vanilla extract⁣
1 tsp baking soda⁣
1 tsp cornstarch⁣
1/2 tsp salt⁣
3 Cups (398g) all purpose flour⁣
2 Cups (350g) semi-sweet chocolate chips⁣
⁣
INSTRUCTIONS⁣
1. Preheat the oven to 350ºF (177ºC). Grease and line a 13×18 inch sheet pan.⁣
2. In a large bowl, add the brown sugar and granulated sugar. Melt the butter in the microwave and pour it over the top of the sugars. Whisk together until uniform. Add the eggs and vanilla, then continue whisking until uniform. Whisk in the baking soda, cornstarch, and salt.⁣
3. Add the flour and use a silicone spatula to fold it in until smooth cookie dough forms. Reserve 1/2 Cup of the chocolate chips and set them aside, then fold the remaining 1 1/2 Cups of chocolate chips into the cookie dough.⁣
4. Place the chocolate chip cookie dough onto the prepared sheet pan and use an offset spatula to spread it all the way to the edges in an even layer.⁣
5. Bake the cookie cake for 14-16 minutes, until it looks golden brown on the edges and set. 
6. Enjoy warm or let it cool and decorate with vanilla buttercream and sprinkles! ⁣
⁣
#cookiecake #chocolatechipcookies #sheetcake #birthdaycake #cakedecorating
STRAWBERRY CUPCAKES 🍓based on my beloved strawb STRAWBERRY CUPCAKES 🍓based on my beloved strawberry layer cake recipe, this cupcake version is just as moist yet fluffy and bursting with natural strawberry flavor! Between the mix of fresh strawberries in the cupcakes + freeze-dried strawberries in the frosting, the flavor is out of this world 🚀

Full recipe link in my bio (with strawberry buttercream) + at https://sugarandsparrow.com/strawberry-cupcakes/

STRAWBERRY CUPCAKES
Yield: 14 cupcakes

INGREDIENTS:
5 oz (143g) fresh or frozen strawberries
1/3 Cup (80ml) whole milk, room temp
1 1/2 Cups (158g) sifted cake flour
1 tsp baking powder
1/4 tsp baking soda
1/2 tsp salt
6 Tbsp (85g) unsalted butter, room temp
1 Cup (200g) granulated sugar
2 large eggs, room temp
3 Tbsp (45g) sour cream, room temp
1 tsp vanilla extract
1 drop pink food coloring (optional)

INSTRUCTIONS: 
1. Puree the strawberries using a food processor (you’ll have about 1/2 cup of puree), then place into a saucepan over medium-low heat. Bring to a simmer, then cook for 10-15 min, stirring occasionally, until you have 1/4 cup. Refrigerate until room temp.
2. Preheat oven to 350ºF (177ºC) and line a standard cupcake pan with liners.
3. Whisk together the sifted cake flour, baking powder, baking soda, and salt and set aside.
4. In a stand mixer w/ paddle attachment (or hand mixer + large bowl), whip the butter on high for 2 min. Add sugar and beat for 2 min, until light and fluffy. Turn the mixer to low and add the eggs one at a time, then add the vanilla and sour cream, turn the mixer to high and beat for 1 min. Meanwhile, whisk together the strawberry puree, whole milk, and food coloring (if using).
5. Turn the mixer off and add all of the dry ingredients at once. Mix on low until just combined, then add the strawberry milk mixture until just combined, about 30 seconds.
6. Fill the cupcake liners 2/3 full and bake for 14-18 minutes. Cool completely before topping with strawberry buttercream (full recipe linked above). 

#strawberrycupcakes #strawberrycake #pinkcupcakes #strawberry #cupcakes
COFFEE BUTTERCREAM (recipe below)☕️ this frost COFFEE BUTTERCREAM (recipe below)☕️ this frosting has AMAZING coffee flavor, is so easy to decorate cakes with, and pairs beautifully with so many flavors (chocolate, vanilla, or any cake flavor you’d want to turn into a latte). 

All my cake pairing suggestions are linked in my bio or at https://sugarandsparrow.com/coffee-buttercream-recipe/ 

COFFEE BUTTERCREAM⁣
Yield: 2.5 Cups⁣

INGREDIENTS⁣
1 1/2 tsp instant coffee or espresso powder⁣
1 1/2 Tbsp whole milk, room temperature⁣
1 Cup (226g) unsalted butter, room temperature⁣
3 1/2 Cups (420g) powdered sugar⁣
2 tsp pure vanilla extract⁣
Pinch of salt⁣

INSTRUCTIONS⁣
1. Combine the instant espresso/coffee with the whole milk and set aside. In the bowl of a stand mixer, beat the butter on high until creamy and smooth (about 5 minutes), scraping down the bowl and paddle a few times in between.⁣
2. Turn the mixer to low and add the powdered sugar a few cups at a time, scraping down the bowl and paddle between intervals. Add the vanilla, the coffee/espresso milk mixture, and salt. Mix on low until fully incorporated, about one minute.⁣

#coffeebuttercream #buttercream #frosting #coffeecake

Footer

On the Blog

  • Cake Basics
  • Recipes
  • Tutorials

Info

  • About
  • Privacy Policy & Disclosure

stay in the know

Copyright © 2026 · Theme by Sugar & Sparrow