• Cake
  • Frosting
  • YouTube
  • My Favorite Tools
  • Nav Social Icons

  • Skip to primary navigation
  • Skip to main content
  • Skip to primary sidebar
  • Skip to footer
  • Recipes
    • Cake
    • Cupcakes
    • Frosting
    • Ice Cream
    • Vegan
  • Cake Basics
  • Tutorials
  • Blog
  • About
  • Mobile Menu Widgets

    Connect

    Search

Sugar & Sparrow logo in script font

Sugar & Sparrow

Lifestyle and Cake from Portland Oregon

  • Cake Basics
  • Recipes
    • Cake
    • Cupcakes
    • Cookies & Bars
    • Filling
    • Frosting
    • Ice Cream
    • No-Bake
    • Small Batch
    • Vegan
  • Tutorials
  • Book
  • Blog
  • About

How to Price a Cake (a Guide for Home Bakers)

December 26, 2025 · In: FAQ, Featured

One of the most frequent questions I get from cake business owners is “how should I be pricing my cakes?” I totally get it, because when I ran my custom cake business years ago, determining pricing was one of my biggest challenges, especially in the beginning.

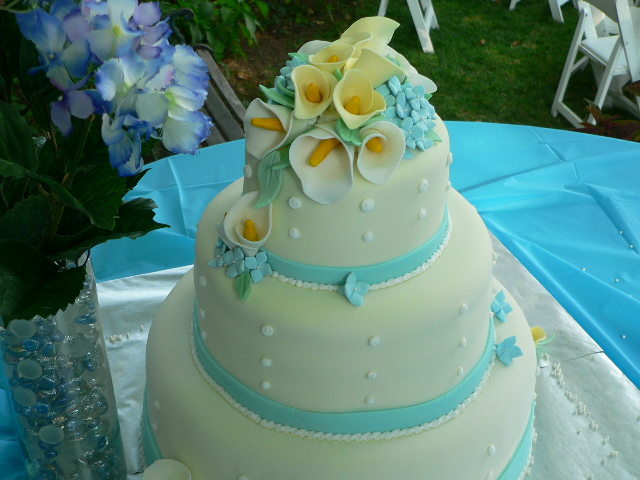
For example, the first wedding cake I ever made was a three-tiered fondant-covered cake with handmade gumpaste flowers. I can’t remember exactly how long it took me from start to finish (spoiler alert: it was days), but I do remember working on the cake the whole day before the wedding and finding myself up at 3am, still decorating and being stressed out of my mind. In the morning, the cake looked great, but there was still the small matter of delivering said cake to the wedding venue – a whole new level of panic. The cake did make it there in one piece and the mother of the bride handed me my check. That’s when it hit me that I had agreed to do several days worth of work for one hundred and twenty five dollars. I swore I’d never do that again.  

my first wedding cake, circa 2009

While it was a deflating experience, it didn’t stop me from making more cakes. I went on to spend nearly a decade selling custom cakes from my certified home kitchen and still, I struggled with pricing. It’s so very easy to undersell yourself when it comes to being a cake maker, especially when you have no idea where to start with your prices. I want to share some helpful tips I’ve gathered for pricing your cakes so that you can continue doing what you love and charge what you’re worth. 

Custom Cakes vs. Grocery Store Cakes

When you’re first starting out, it’s very tempting to compare your pricing to the cakes at your local grocery store or bakery, but here’s the thing: custom cakes take a lot more intention, time, and effort. Your grocery store has the equipment and staff necessary to mass-produce cakes and churn them out at a low cost. Your cake business is likely run from your own home, by one person (you), with limited oven and refrigerator space. That takes more time right there. Add the time and creativity involved in making custom cake decorations and you’ll spend all day on one cake. 

cactus cake tutorial by sugar and sparrow

Because of these differences, do not be tempted to compete with grocery store cake prices! Your cakes should cost more because they take more time, effort, and consideration. Not everyone will be able to afford them, and that’s okay. 

You Should Be Charging More

When I first started out, the average cost of my 6-inch cakes was about $100. I had this constant tension of thinking that was too expensive and simultaneously stressing about underselling myself. But my friends, family, and even clients would tell me, “you should be charging more.” So slowly, I started increasing my prices and was blown away to still have just as much business. 

heart shaped cake tutorial
gold crown cake topper tutorial

If you’re confident in your cake making skills, have clients willing to pay for your cakes, and are serious about running a business, you should be pricing your cakes in such a way that it causes some people to walk away. It will be much more worth your time to take one higher priced cake order than several lower priced cake orders. I’ll show you how to come up with pricing that better reflects your worth in the next sections!

3 Different Ways to Price Cakes

In this section I’ll go over three different ways that you can price cakes, including the pricing strategy I used for my business:

Strategy 1: Per Serving

This is pretty straightforward – choose a price per slice of cake and multiply by the amount of servings. For example, if your price per serving is $7.00 and you’re selling a 3-layer 6-inch cake that serves 20 people, the price should be $140. I think there should be exceptions to this where the price increases, like if you’re adding a custom cake topper that takes more of your time (which I cover next). 

Strategy 2: Base Price + Add-Ons 

This was a strategy I used for my business for a long time. You determine a base price per cake size and then come up with prices for add-ons like custom cake toppers, special ingredients, and so on. The base price includes a cake that is filled and frosted (but not decorated) and then the price goes up based on the cake design. Here’s an example of what I used to charge for my most popular cake sizes (each 3-layer):

Base Price
6-inch Cake$140
8-inch Cake$160
Add-Ons
Vintage Piping$30
Special Message$10
High Cost Ingredients (Nutella, matcha, mascarpone, etc)$10
Handmade Cake Topper$50+

Strategy 3: Cost of Ingredients + Time and Effort + Overhead 

This pricing strategy gets very involved, but accounts for everything. If you’re the analytical type, this might be fun for you! I am not, so I went with the previous strategy for simplicity. 

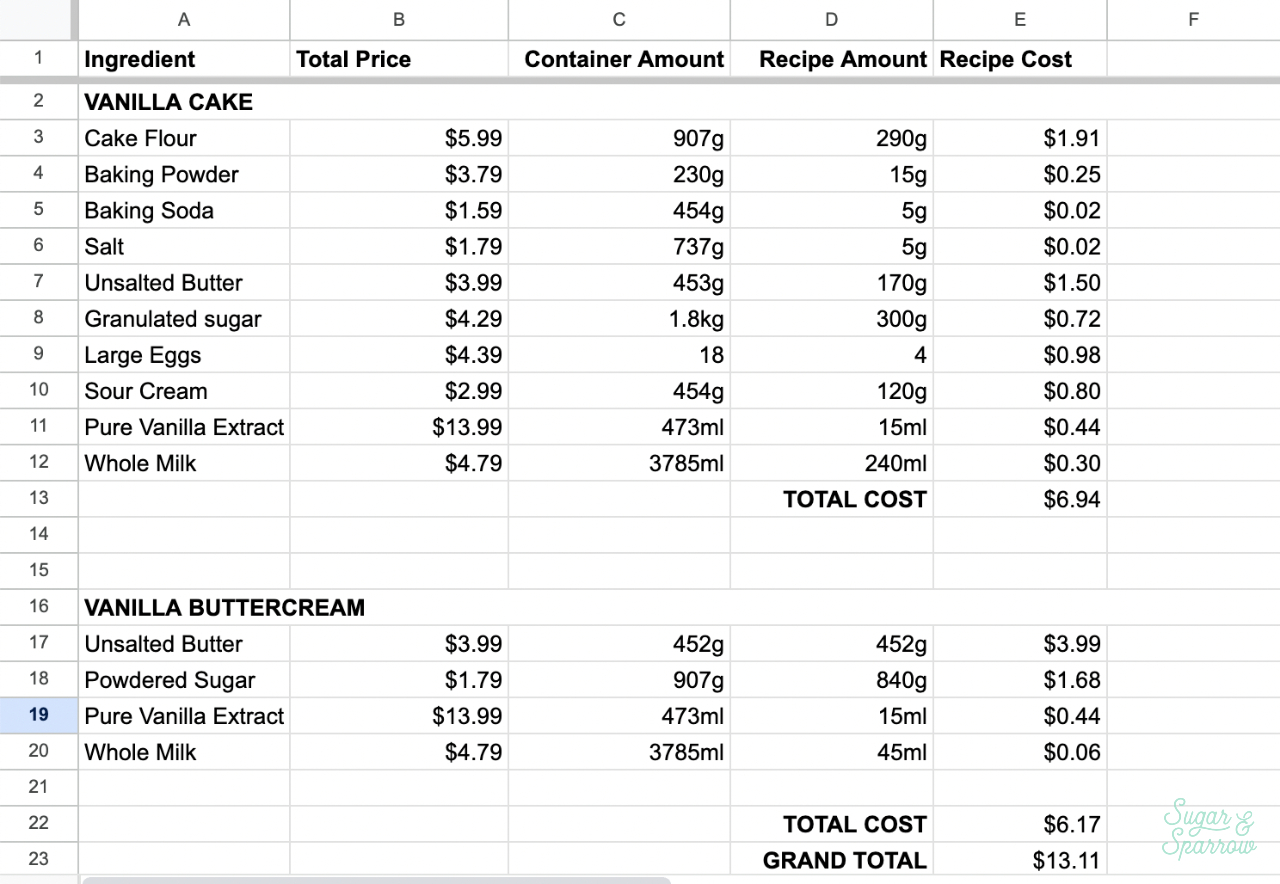
  1. Determine the cost of your ingredients. Like, every ingredient that goes into every one of your cake and frosting recipes. List the ingredients in a spreadsheet, calculate the total container amount (I found this was easiest to do in grams), list the amount used in the recipe, and calculate the cost of that recipe amount. I used this basic formula:

Recipe Cost Per Ingredient = (Total Cost of Ingredient/Container Amount in grams or ml) x Amount Used for the Recipe 

So to give you an example from the spreadsheet below, it would cost $1.91 for the amount of cake flour in the vanilla cake recipe because $5.99/907 grams = 0.0066 per gram. Multiply that by the amount used in the recipe (290g) and you get $1.91. Repeat that process with the rest of the ingredients, add them all up (from column E in the spreadsheet example) and you’ll have the total cost of making the recipe. For my vanilla cake filled and frosted with vanilla buttercream, the total cost of ingredients totals $13.11. 

  1. Add time and effort. For this part, you’ll need to determine how much you want to charge per hour and calculate the amount of hours it takes to make the cake. For example, if you want to be paid $25 per hour and the cake takes 5 hours to prepare, bake, assemble, and decorate, you’ll add $125 to the cost of the ingredients. 
  2. Add overhead. This means all the indirect costs that go into making this cake: cardboard cake circles ($0.75), a cake box ($1.40), and special molds or tools you might need to buy for this specific cake, etc. It also includes the fixed costs like rent/electricity on your space (lets say $20 per cake) and depreciation of your baking equipment ($1 or less per cake). For this example, let’s go with all the amounts in parentheses, so $23.15.

From here, add up the cost of ingredients, time and effort, and overhead: $13.11 + $125.00 + $23.15 = $161.26. Round it to a whole number to keep it tidy and you have your price.

diy sprinkle letter toppers
buttercream daisy cake by sugar and sparrow

Add a Delivery Fee

If you’re delivering the cake, you need to add a delivery fee. Always. You can either set a fixed delivery fee within a certain radius (mine was $20), or you can calculate a special delivery fee based on distance. Either way, your delivery fee should cover gas, wear and tear on your car, and personal stress. 

how to package a cake for transporting

Cake Pricing for Friends and Family

Now that you have a better understanding of how to price your cakes for clients, you can be a little more flexible with friends and family if you want. Here are some strategies that I have used:

  • Set a fixed discount (25% off, 50% off, etc). Determine the price of the cake using one of the methods above and then deduct the discount. 
  • Only charge for ingredients. Calculate your ingredient costs and pass that price on.
  • Make the cake as a gift. In other words, totally free. 

It’s completely up to you whether or not you offer a friends and family discount, or to whom you offer it.  

Build a Community with Your Fellow Bakers

One of my friends and fellow business owners always says, “community, not competition” and I love that so much. You shouldn’t see other cake bakers in your area as competition. In fact, I’m a firm believer in joining together. By knowing your fellow cake makers you can swap stories, support each other on social media, and just generally lift each other up. You might even make some real life friends. And when you’re too busy to take on an extra cake order, you have resources to direct clients to. That always feels good.

sugar and sparrow

More Helpful Resources for Your Cake Business

Hopefully you found this blog post to be a good starting point for your cake pricing! If you’re just starting out with your business, here are some other blog posts that might be helpful:

  • How to Package and Transport Cakes
  • How Many Servings Per Cake Size
  • How Much Buttercream Do I Need?
  • How to Make and Decorate Cakes Ahead of Time
  • My Favorite Cake Tools

Let me know if you’ve found this blog post helpful in the comments below! I’d love to cheer you on.

By: Whitney · In: FAQ, Featured · Tagged: cake business, cake pricing, home cake business

you’ll also love

Peach Crisp Cake with Brown Butter Frosting
unicorn cake tutorialUnicorn Party Cake Tutorial
smores ice cream cake recipe by sugar and sparrowThe Ultimate S’mores Ice Cream Cake

Join the List

Stay up to date & receive the latest posts in your inbox.

Reader Interactions

Leave a Reply Cancel reply

Your email address will not be published. Required fields are marked *

Recipe Rating


Next Post >

Peppermint Mocha Cake Recipe

Primary Sidebar

Welcome to Sugar & Sparrow

Welcome to Sugar & Sparrow

Helping you whip up pretty desserts with confidence and creativity. And hopefully sharing a few laughs with you along the way!

Learn More

Connect

let’s bake!

Get my very best recipes, baking tips, and decorating tutorials sent to your inbox

Featured Posts

gingerbread latte cake recipe

Gingerbread Latte Cake Recipe

brown butter chocolate chip skillet cookie recipe

Brown Butter Chocolate Chip Skillet Cookie with C&H® Sugar

sprinkle rose cupcakes tutorial

Sprinkled Rose Cupcakes Tutorial

Search

Archives

Follow Along

@sugarandsparrowco

LEMON CUPCAKES 🍋 after about a dozen recipe tes LEMON CUPCAKES 🍋 after about a dozen recipe tests, this one is everything I could want in a lemon cupcake! Fluffy-yet-moist, bursting with natural lemon flavor, and absolutely irresistible topped with lemon cream cheese buttercream. 

Full recipe (with frosting) linked in my bio + at https://sugarandsparrow.com/homemade-lemon-cupcakes/

INGREDIENTS:
1 Cup (132g) all-purpose flour
1 tsp baking powder
1/4 tsp salt
1/4 Cup (60ml) whole milk, room temperature
3 Tbsp (45ml) lemon juice from 1 medium lemon
3/4 Cup (150g) granulated sugar
3 Tbsp (42g) unsalted butter, room temperature
2 Tbsp (30ml) vegetable oil
2 large eggs, room temperature
1 tsp pure vanilla extract

INSTRUCTIONS:
1. Preheat the oven to 350ºF (177ºF) and line a standard cupcake pan with 12 paper liners.
2. In a large bowl, whisk together the flour, baking powder, and salt. Set aside. 
3. In the bowl of a stand mixer fitted with the paddle attachment (or with a hand mixer and large bowl), add the lemon zest to the sugar and mix on low speed until fragrant and well combined, about 1 minute. Meanwhile, combine the lemon juice with the milk and set aside. 
4. Add the butter to the lemon-sugar mixture and cream on medium speed until and combined, about 2 minutes. Add the vegetable oil and beat until light and creamy, about 3 minutes. Scrape down the bowl and paddle as needed.
5. Mix in the eggs one at a time on low speed, then add the vanilla and turn the mixer to medium speed for one minute.
6. Turn the mixer off and add the flour mixture all at once. Mix on low speed until just combined, then slowly pour in the lemon-milk mixture. Mix until just combined, about 30 seconds.
7. Divide the batter equally between the liners and bake for 14-18 min. Cool, then top with frosting of your choice (link in bio for lemon cream cheese frosting)�
#lemoncupcakes #creamcheesefrosting #lemon #cupcakes #cupcakedecorating
April in my kitchen 🌸 I published 5 NEW recipes April in my kitchen 🌸 I published 5 NEW recipes on my site, baked my Oreo cupcake recipe for a fundraiser and found it was just as delicious as I remember, and filmed/photographed 3 recipes that will be on my blog in May (Lemon Cupcakes, Lemon Cream Cheese Buttercream, and No-Bake Marbled Strawberry Cheesecake) 🥰 

Comment “APRIL” to get all the available recipes and stay tuned for more! 

#bakersofinstagram #springbaking #cakedecorating #cupcakes #bakinglove
SHEET PAN COOKIE CAKE 🍪 slice it warm for a fud SHEET PAN COOKIE CAKE 🍪 slice it warm for a fudgy chocolate chip cookie OR let it settle into a moist and chewy cookie cake that’s perfect for decorating! My fave vanilla buttercream + sprinkles turn this giant chocolate chip cookie into the perfect birthday cake alternative at the end 🥳
⁣
Full recipe + decorating ideas at https://sugarandsparrow.com/sheet-pan-chocolate-chip-cookie-cake/
⁣
INGREDIENTS⁣
1 Cup (226g) unsalted butter, melted⁣
1 1/3 Cups (267g) packed light or dark brown sugar⁣
1/2 Cup (100g) granulated sugar⁣
3 large eggs⁣
1 Tbsp pure vanilla extract⁣
1 tsp baking soda⁣
1 tsp cornstarch⁣
1/2 tsp salt⁣
3 Cups (398g) all purpose flour⁣
2 Cups (350g) semi-sweet chocolate chips⁣
⁣
INSTRUCTIONS⁣
1. Preheat the oven to 350ºF (177ºC). Grease and line a 13×18 inch sheet pan.⁣
2. In a large bowl, add the brown sugar and granulated sugar. Melt the butter in the microwave and pour it over the top of the sugars. Whisk together until uniform. Add the eggs and vanilla, then continue whisking until uniform. Whisk in the baking soda, cornstarch, and salt.⁣
3. Add the flour and use a silicone spatula to fold it in until smooth cookie dough forms. Reserve 1/2 Cup of the chocolate chips and set them aside, then fold the remaining 1 1/2 Cups of chocolate chips into the cookie dough.⁣
4. Place the chocolate chip cookie dough onto the prepared sheet pan and use an offset spatula to spread it all the way to the edges in an even layer.⁣
5. Bake the cookie cake for 14-16 minutes, until it looks golden brown on the edges and set. 
6. Enjoy warm or let it cool and decorate with vanilla buttercream and sprinkles! ⁣
⁣
#cookiecake #chocolatechipcookies #sheetcake #birthdaycake #cakedecorating
STRAWBERRY CUPCAKES 🍓based on my beloved strawb STRAWBERRY CUPCAKES 🍓based on my beloved strawberry layer cake recipe, this cupcake version is just as moist yet fluffy and bursting with natural strawberry flavor! Between the mix of fresh strawberries in the cupcakes + freeze-dried strawberries in the frosting, the flavor is out of this world 🚀

Full recipe link in my bio (with strawberry buttercream) + at https://sugarandsparrow.com/strawberry-cupcakes/

STRAWBERRY CUPCAKES
Yield: 14 cupcakes

INGREDIENTS:
5 oz (143g) fresh or frozen strawberries
1/3 Cup (80ml) whole milk, room temp
1 1/2 Cups (158g) sifted cake flour
1 tsp baking powder
1/4 tsp baking soda
1/2 tsp salt
6 Tbsp (85g) unsalted butter, room temp
1 Cup (200g) granulated sugar
2 large eggs, room temp
3 Tbsp (45g) sour cream, room temp
1 tsp vanilla extract
1 drop pink food coloring (optional)

INSTRUCTIONS: 
1. Puree the strawberries using a food processor (you’ll have about 1/2 cup of puree), then place into a saucepan over medium-low heat. Bring to a simmer, then cook for 10-15 min, stirring occasionally, until you have 1/4 cup. Refrigerate until room temp.
2. Preheat oven to 350ºF (177ºC) and line a standard cupcake pan with liners.
3. Whisk together the sifted cake flour, baking powder, baking soda, and salt and set aside.
4. In a stand mixer w/ paddle attachment (or hand mixer + large bowl), whip the butter on high for 2 min. Add sugar and beat for 2 min, until light and fluffy. Turn the mixer to low and add the eggs one at a time, then add the vanilla and sour cream, turn the mixer to high and beat for 1 min. Meanwhile, whisk together the strawberry puree, whole milk, and food coloring (if using).
5. Turn the mixer off and add all of the dry ingredients at once. Mix on low until just combined, then add the strawberry milk mixture until just combined, about 30 seconds.
6. Fill the cupcake liners 2/3 full and bake for 14-18 minutes. Cool completely before topping with strawberry buttercream (full recipe linked above). 

#strawberrycupcakes #strawberrycake #pinkcupcakes #strawberry #cupcakes
COFFEE BUTTERCREAM (recipe below)☕️ this frost COFFEE BUTTERCREAM (recipe below)☕️ this frosting has AMAZING coffee flavor, is so easy to decorate cakes with, and pairs beautifully with so many flavors (chocolate, vanilla, or any cake flavor you’d want to turn into a latte). 

All my cake pairing suggestions are linked in my bio or at https://sugarandsparrow.com/coffee-buttercream-recipe/ 

COFFEE BUTTERCREAM⁣
Yield: 2.5 Cups⁣

INGREDIENTS⁣
1 1/2 tsp instant coffee or espresso powder⁣
1 1/2 Tbsp whole milk, room temperature⁣
1 Cup (226g) unsalted butter, room temperature⁣
3 1/2 Cups (420g) powdered sugar⁣
2 tsp pure vanilla extract⁣
Pinch of salt⁣

INSTRUCTIONS⁣
1. Combine the instant espresso/coffee with the whole milk and set aside. In the bowl of a stand mixer, beat the butter on high until creamy and smooth (about 5 minutes), scraping down the bowl and paddle a few times in between.⁣
2. Turn the mixer to low and add the powdered sugar a few cups at a time, scraping down the bowl and paddle between intervals. Add the vanilla, the coffee/espresso milk mixture, and salt. Mix on low until fully incorporated, about one minute.⁣

#coffeebuttercream #buttercream #frosting #coffeecake

Footer

On the Blog

  • Cake Basics
  • Recipes
  • Tutorials

Info

  • About
  • Privacy Policy & Disclosure

stay in the know

Copyright © 2026 · Theme by Sugar & Sparrow