• Cake
  • Frosting
  • YouTube
  • My Favorite Tools
  • Nav Social Icons

  • Skip to primary navigation
  • Skip to main content
  • Skip to primary sidebar
  • Skip to footer
  • Recipes
    • Cake
    • Cupcakes
    • Frosting
    • Ice Cream
    • Vegan
  • Cake Basics
  • Tutorials
  • Blog
  • About
  • Mobile Menu Widgets

    Connect

    Search

Sugar & Sparrow logo in script font

Sugar & Sparrow

Lifestyle and Cake from Portland Oregon

  • Cake Basics
  • Recipes
    • Cake
    • Cupcakes
    • Cookies & Bars
    • Filling
    • Frosting
    • Ice Cream
    • No-Bake
    • Small Batch
    • Vegan
  • Tutorials
  • Book
  • Blog
  • About

DIY Cake Costume Tutorial (with Video!)

October 25, 2025 · In: Featured, Halloween, Lifestyle, Seasonal, Tutorials

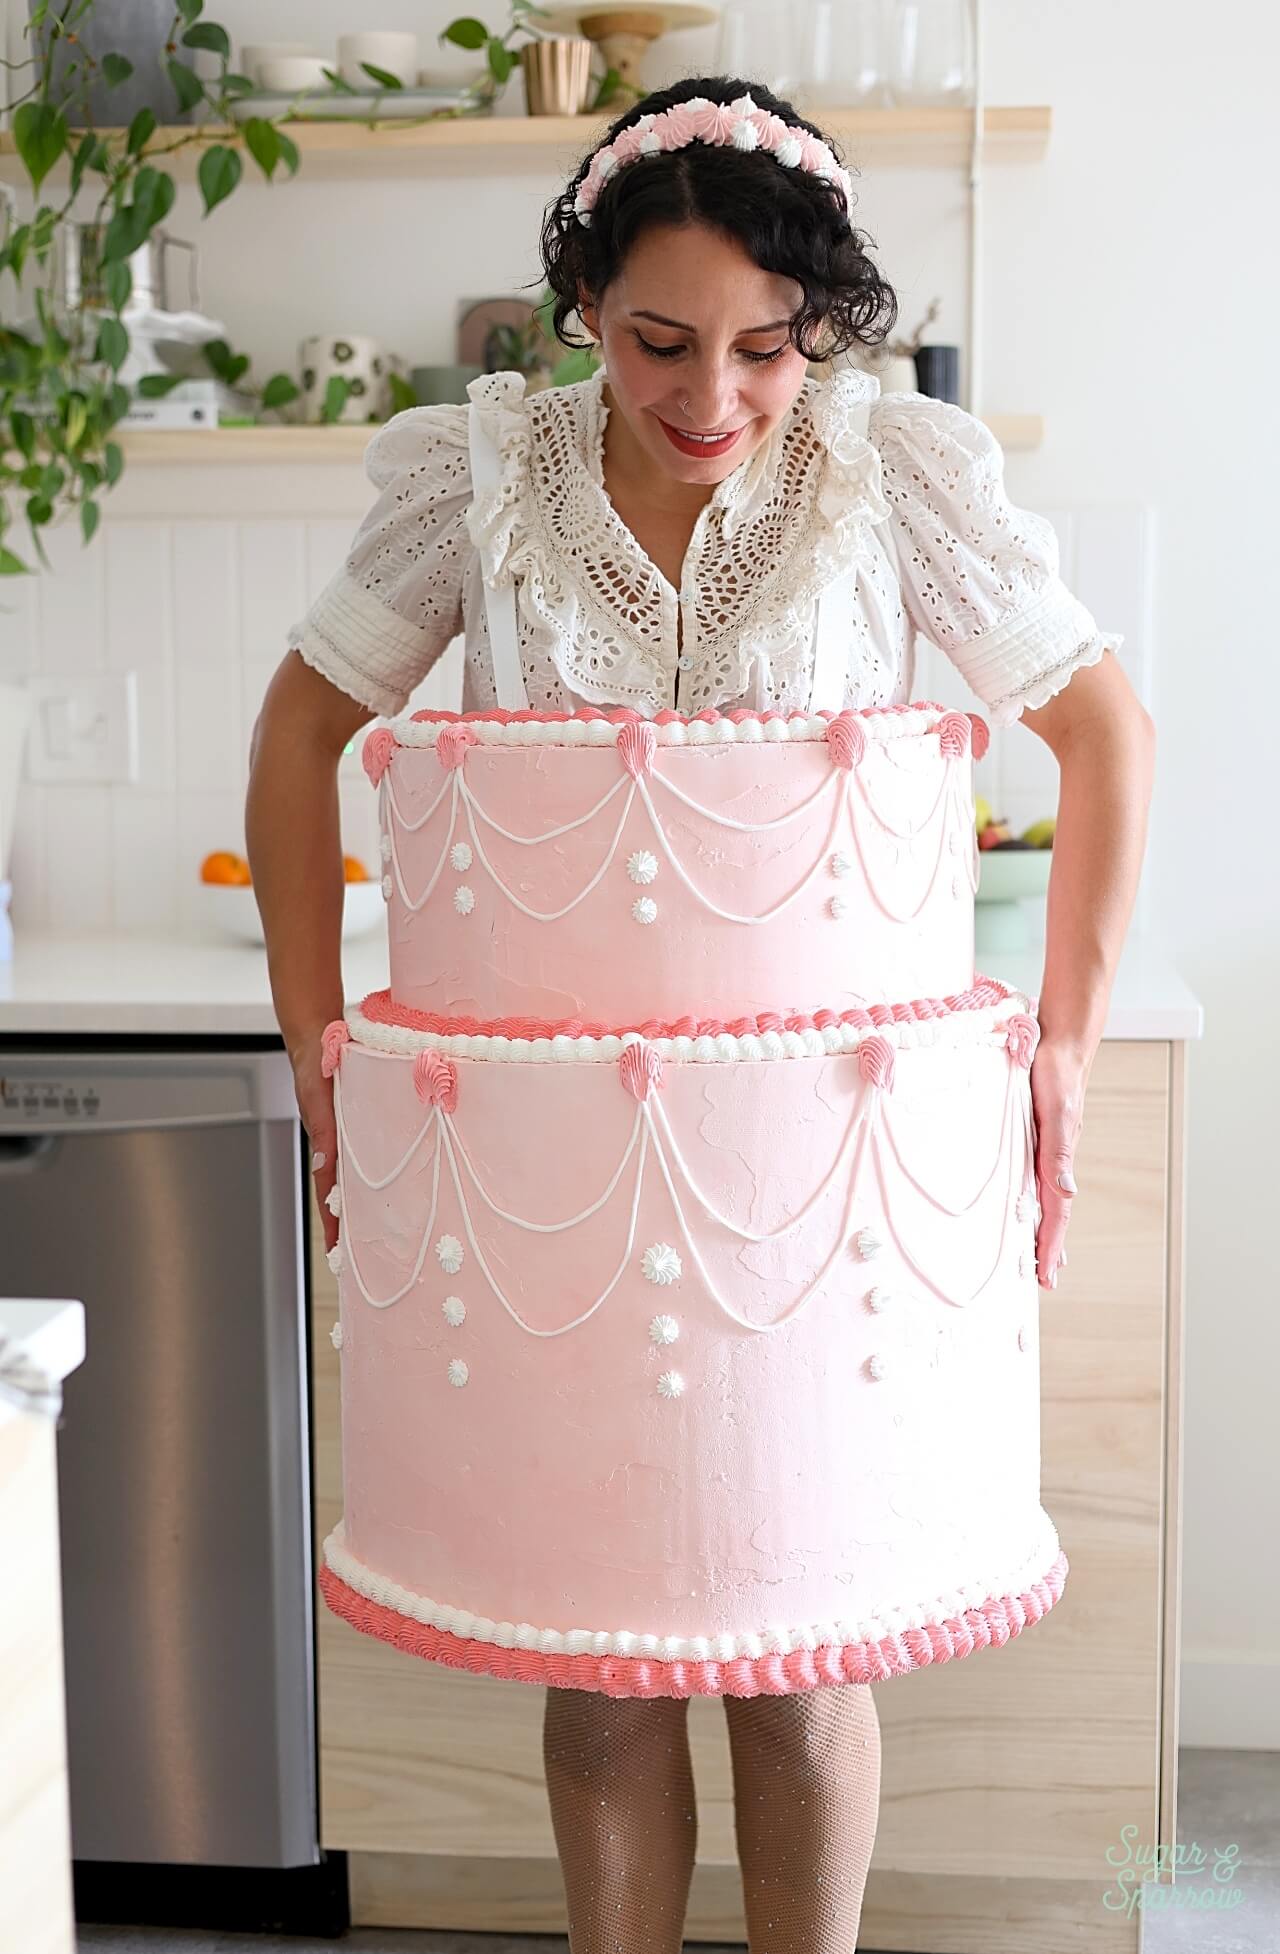
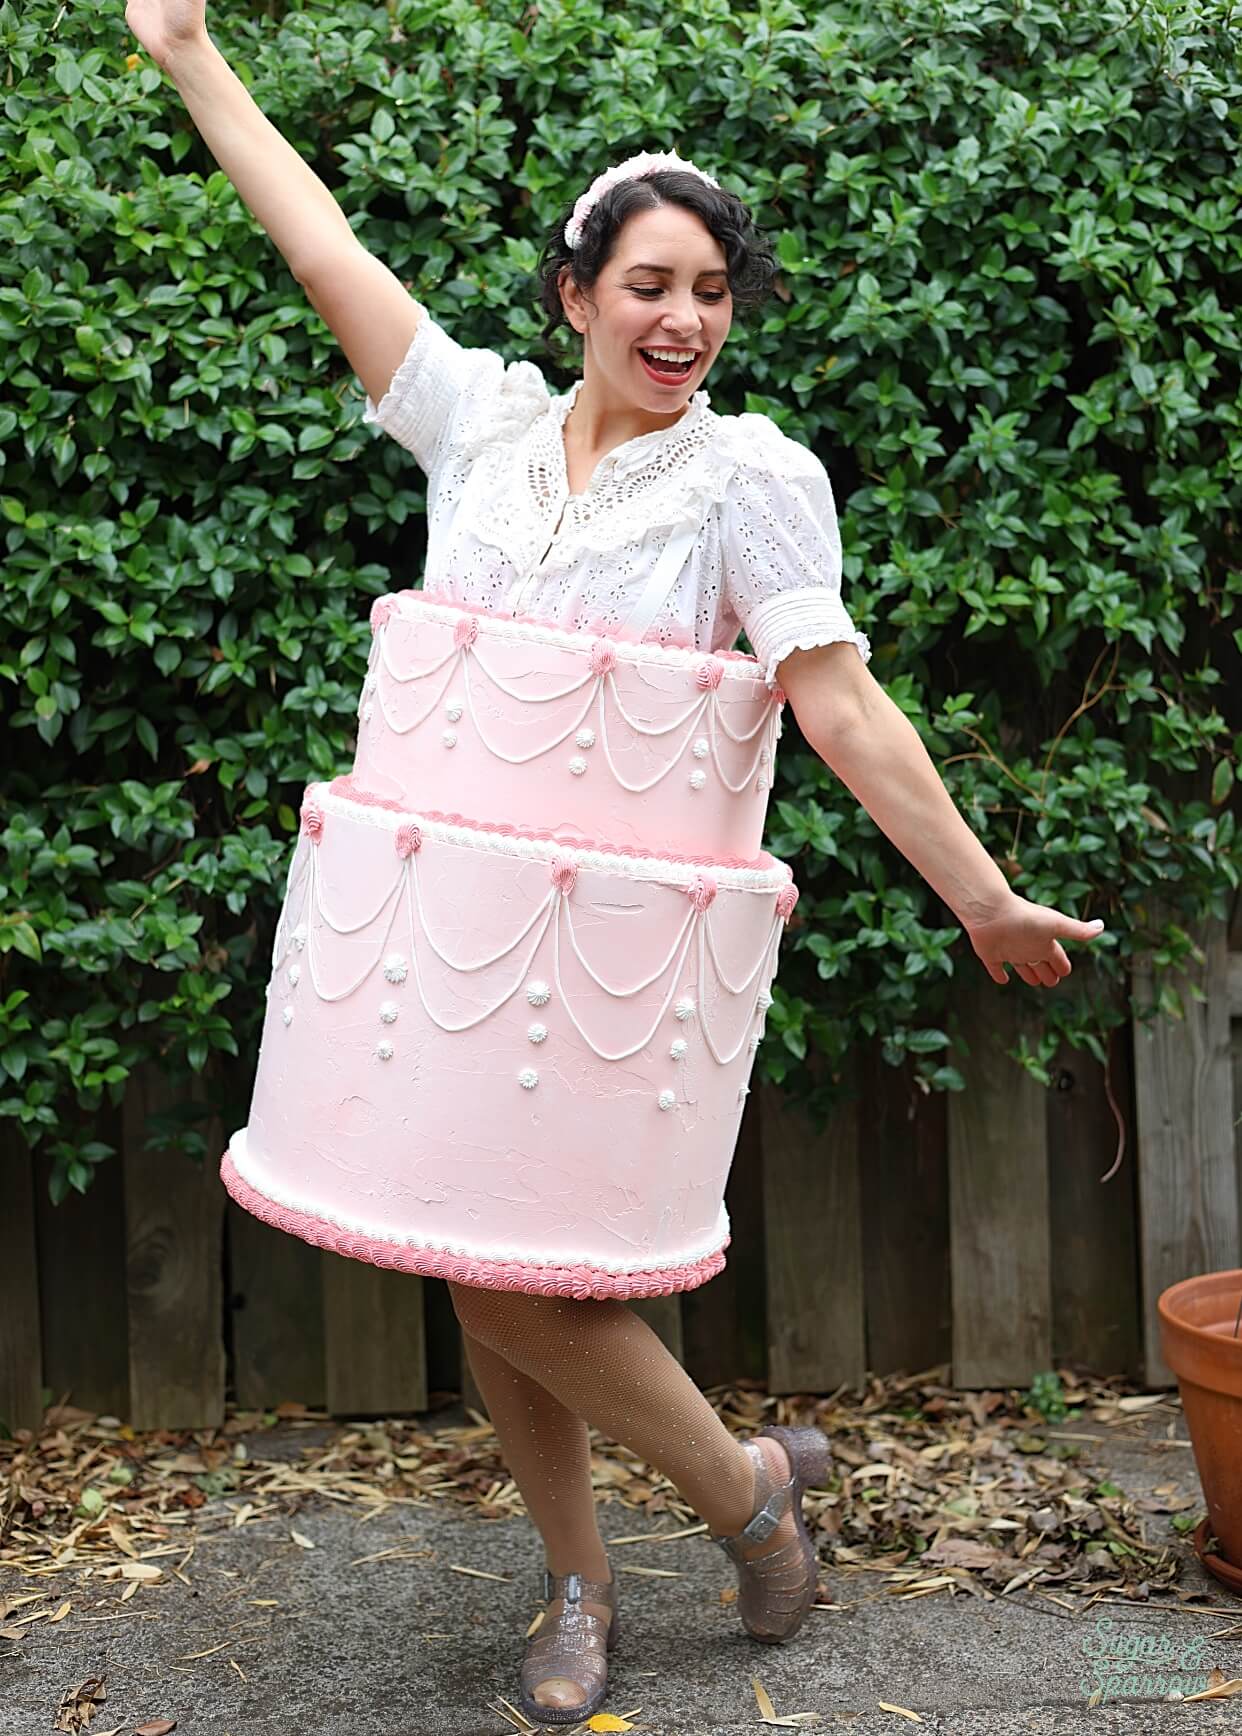
Ever since I saw this cake costume last year, I’ve been dreaming about making my own version for Halloween. Quite frankly, I just thought it would be fun to decorate a giant cake with spackle. Turns out this homemade cake costume was a LOT of work, but it was just as fun as I thought it would be and turned out looking SO CUTE! 

diy cake costume with foam board and spackle
homemade cake halloween costume

Here’s every detail about how to make it, including the things that I would have done differently so if you do make it, you’ll do an even better job. I did find a lot of helpful guidance from this similar blog tutorial, and she even makes a matching hat and shoes, so that one is worth a look too. KEEP IN MIND that if you do want to make this costume, it will take you about a week with drying time, so don’t wait until the last minute. 

Faux cake tutorial halloween costume

Cake Costume Video Tutorial

Before you read all about how to make this costume, here’s a video that shows the whole process:

If you love fun tutorial videos like this one, be sure to check out my YouTube channel! I’ve got a growing collection of recipes, cake decorating tutorials, and Cake Basics over there. Hit the subscribe button on my page so you never miss a new video.

Cake Costume Supplies 

  • Foam Board. You’ll know exactly what sizes you’ll need after making the plan in Step 1, but I used two pieces of 15”x20”, three pieces of 18”x24”, and two pieces of 20”x30”. 
  • Hot glue gun with hot glue sticks
  • X-Acto knife
  • Cardboard cutter (optional, but helpful)
  • Pen or pencil attached to a string (for drawing a circle) 
  • Measuring tape and rulers
  • Book binding tape
  • Lightweight spackle. I used 2 gallons + 1 quart for the design pictured. 
  • Rit dye or acrylic paint (for dying the spackle)
  • Icing spatula
  • Icing smoother
  • Thick white yarn
  • Large piping bags
  • Piping tips. I used Wilton Tip 6B and Tip 4B 
  • Nylon webbing (or any kind of sturdy straps)

Step 1: Plan it Out

Draw out the cake on a piece of paper and then use measuring tape to figure out how wide the opening needs to be. You’ll need to comfortably fit it over your hips, waist, and chest, and I want to emphasize the word comfortably because if I would do this over again, I would have made the opening about an inch bigger. I could technically fit, but I had to wiggle a bit and risk breaking the piping around the top. So measure yourself for the opening but add an inch for wiggle room. 

dimensions of a cake costume
drawing of a pink cake

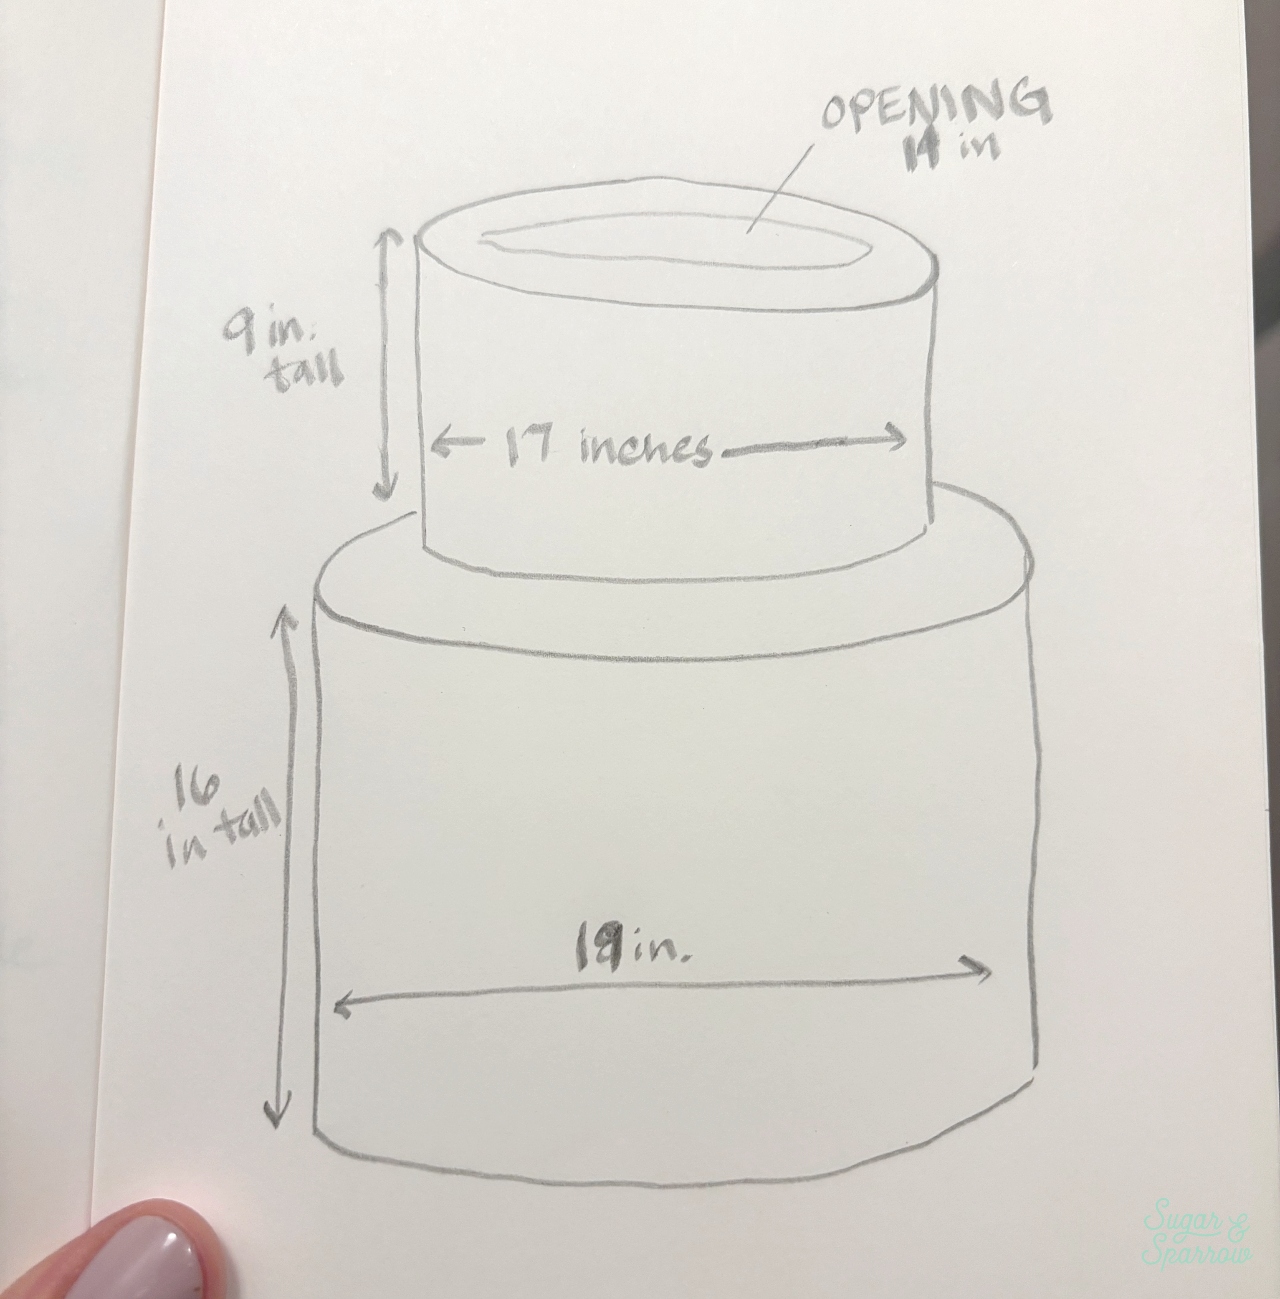
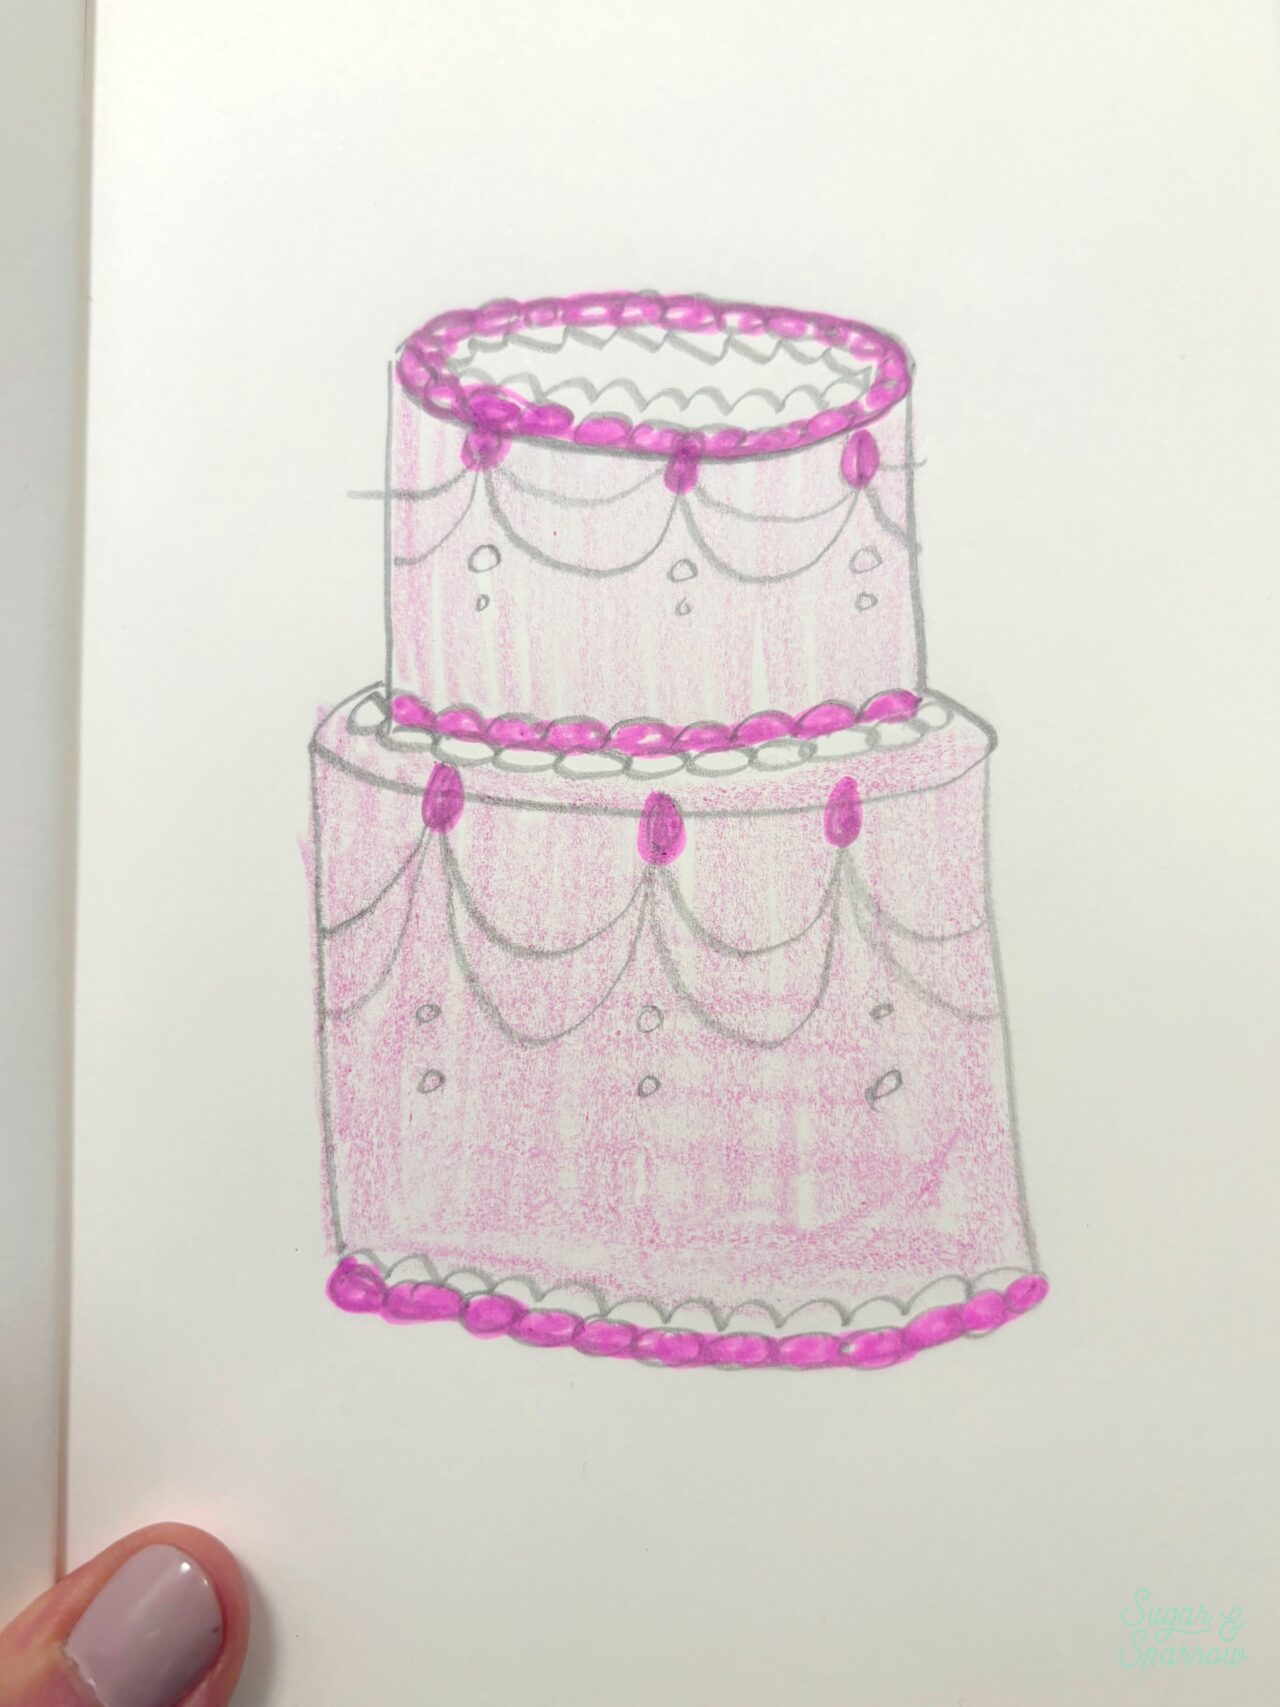
In case you need a math refresher (like I did!), after you figure out the diameter of each cake tier, you can calculate the circumference by using the formula: Circumference = 3.14 x the diameter of your cake. 

Step 2: Cut Out the Cake Frame Pieces

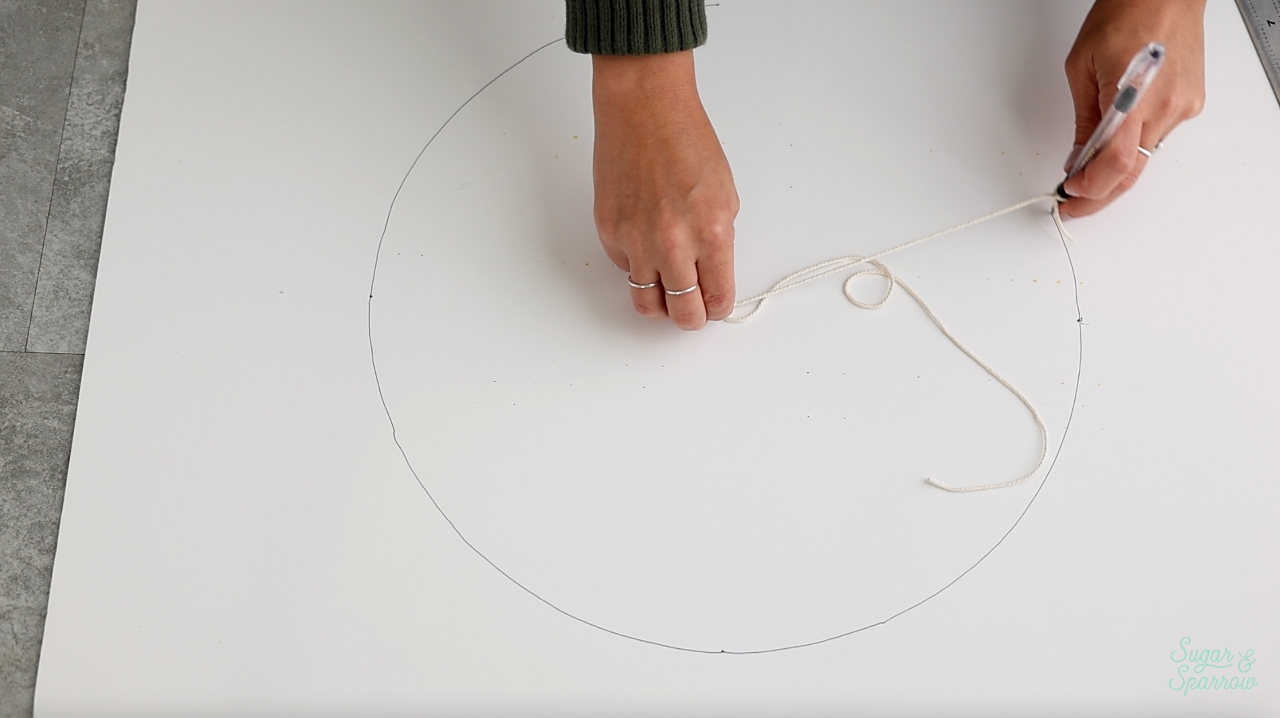
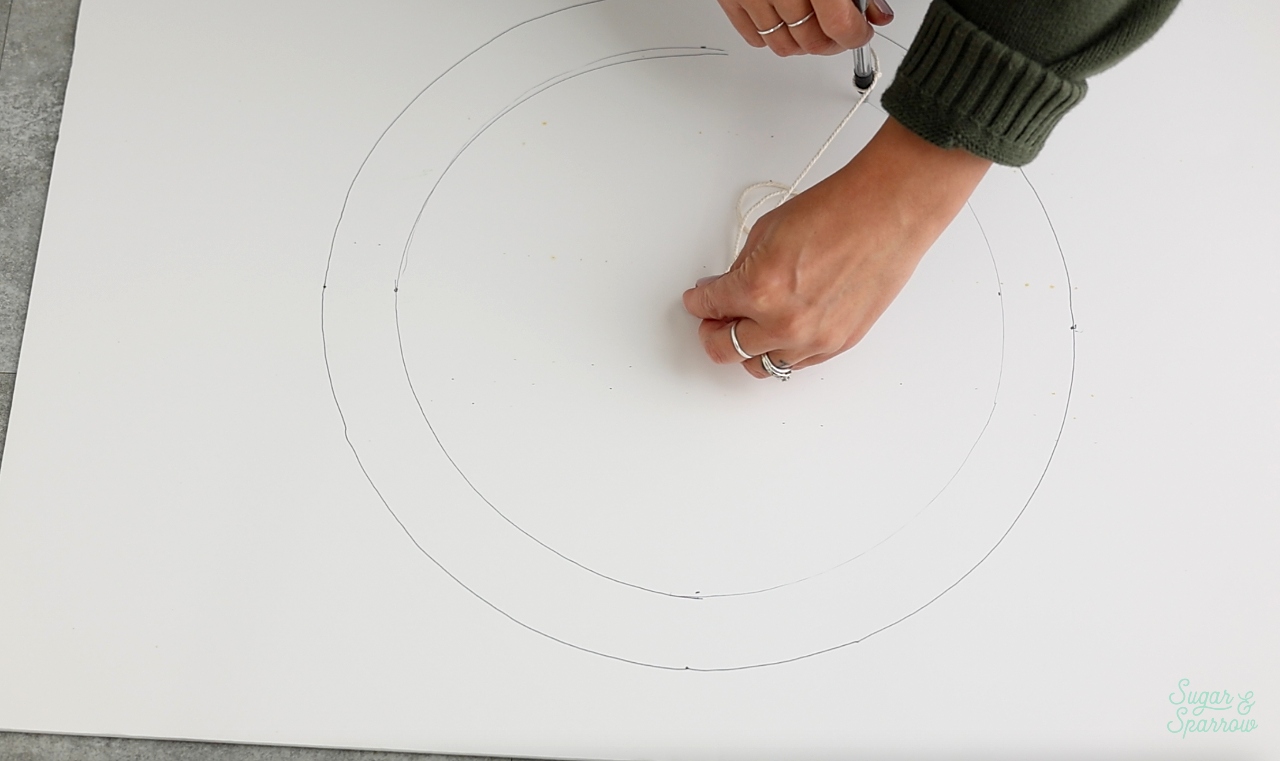
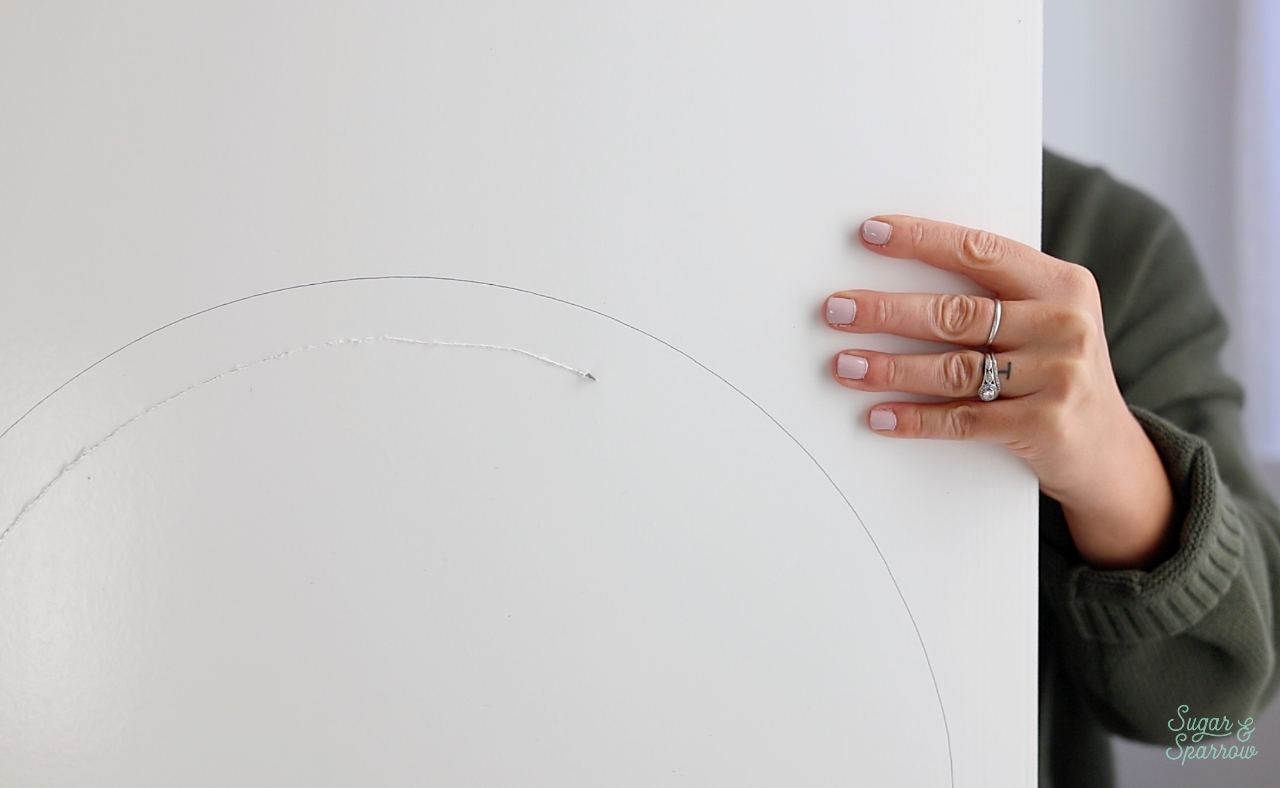
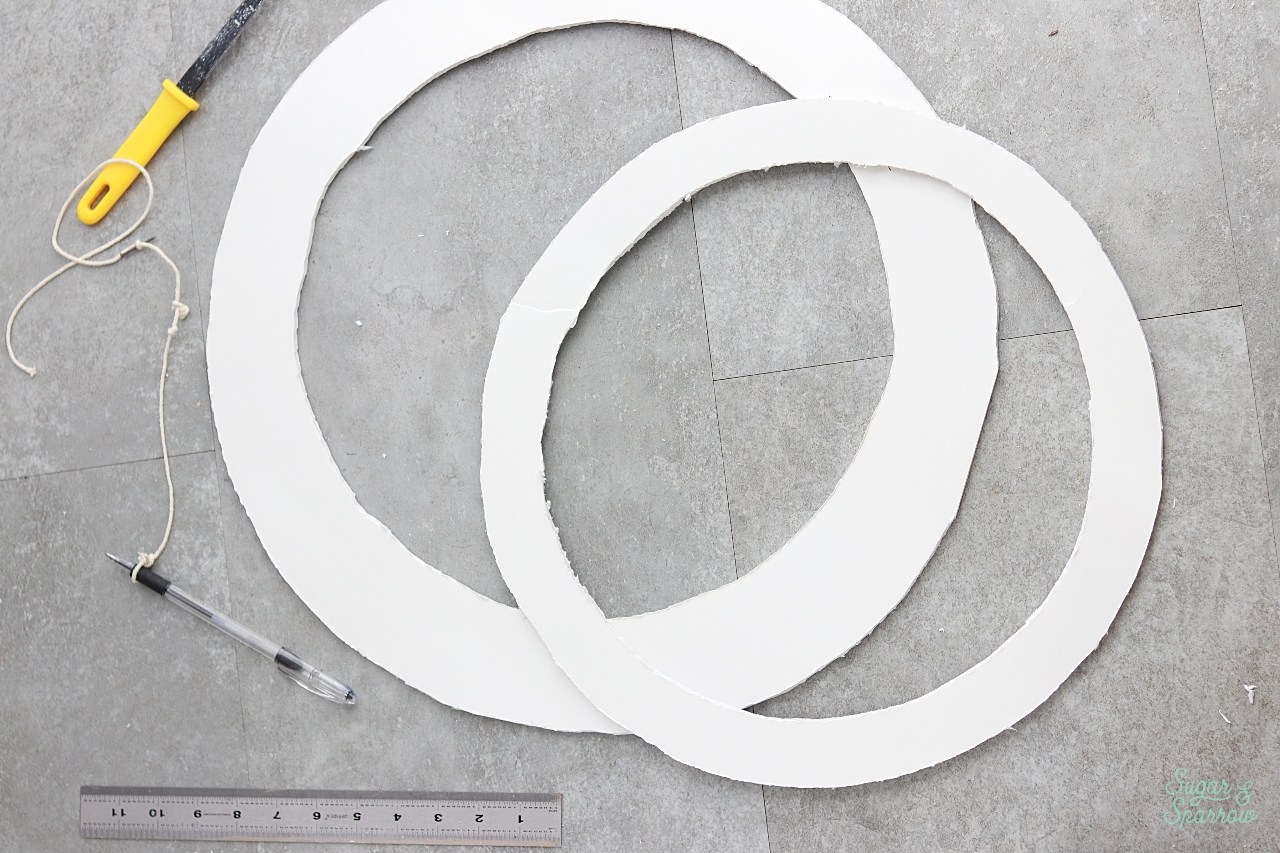
Now that you know the dimensions of your cake, you’ll cut them out of the foam board. I started with the circular pieces that I used for the top of each tier. To create a perfectly round circle, I marked out the diameter with a ruler, then attached a pen to a piece of string, wrapped it around a nail, and inserted the nail into the center. Then, I held the nail as sturdy as I could while I carefully drew the circle. 

how to draw a circle on foam board

I figured that I wanted about 1.5 inches on top of each tier, so I drew another circle 1.5 inches out from the first circle. Then, I cut the piece out using a cardboard cutter. I initially started cutting with an X-acto knife, but the cardboard cutter was much quicker and easier to work with. 

drawing a circle on foam board
how to cut foam board

Repeat this process with the second tier’s diameter. The smallest one is the opening that you’ll have to step into to put the costume on, so now is a good time to double check that you can step into it and pull it up past your hips and waist, all the way to your chest. 

diy cake costume pieces

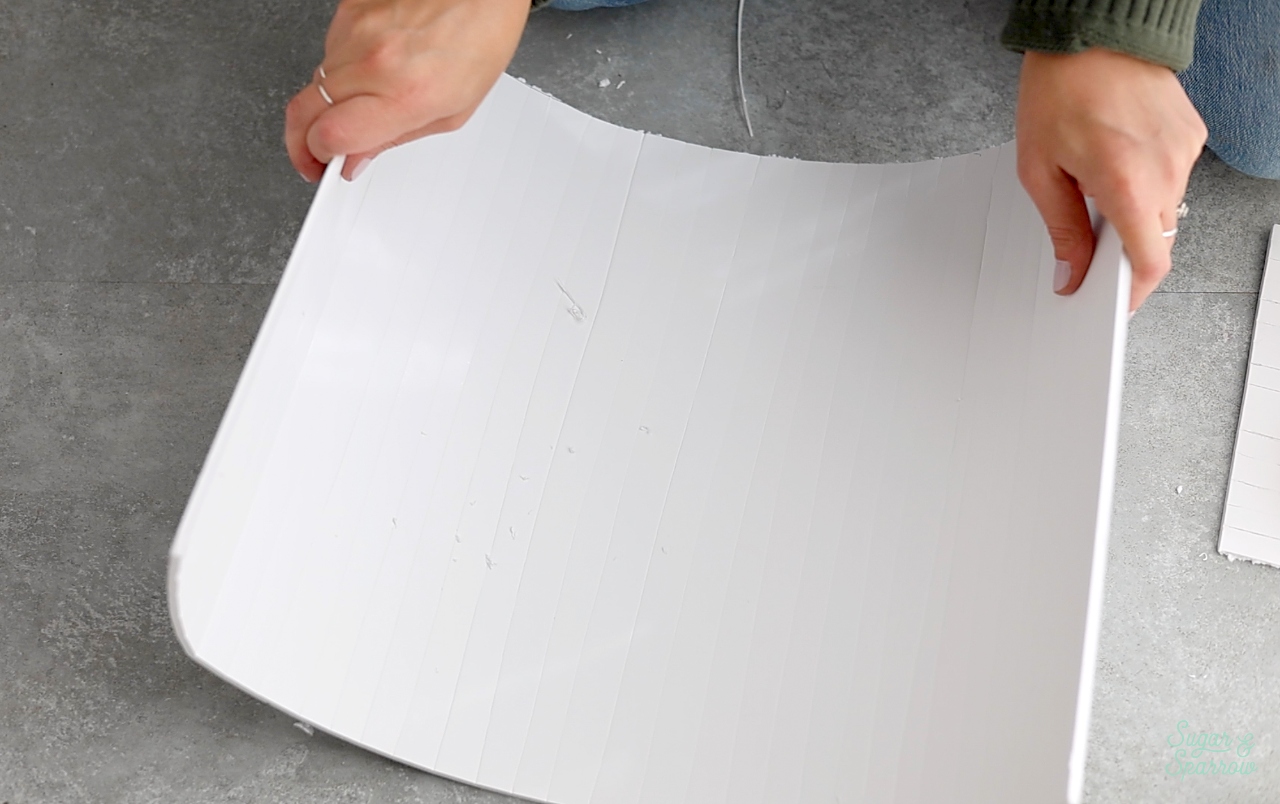
Now, measure out the height of each tier on additional pieces of foam board and cut out the strips until you have the full circumference measurement of each tier (so you have enough to wrap around). Then, using a ruler and an X-acto knife, score each piece of foam board every ¼ inch or so. This means you’ll make slices that don’t go all the way through the board. 

how to score foam board with an x acto knift

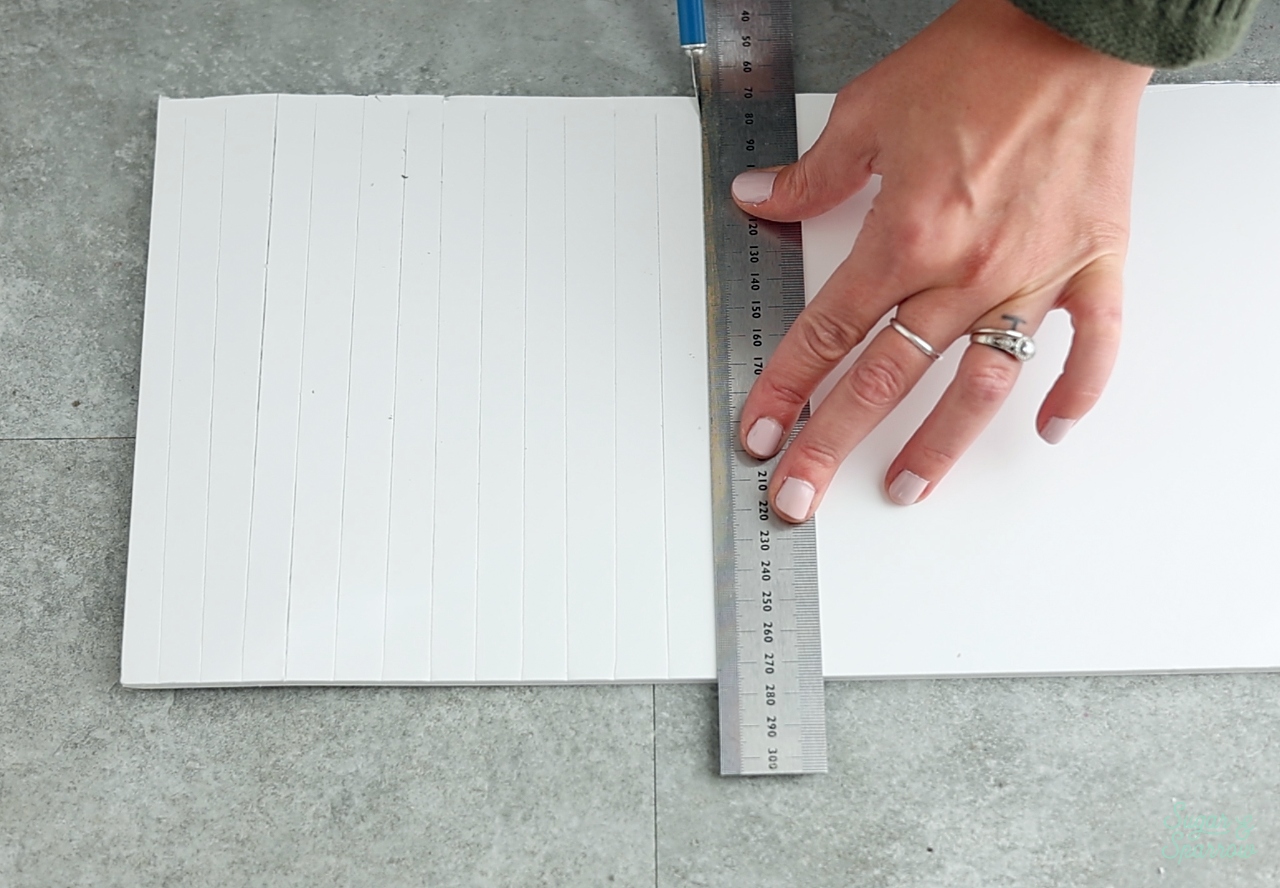
Once you have those straight pieces scored, you’ll be able to bend and wrap them to form cylindrical shapes for each cake tier. 

how to make a cylinder out of foam board

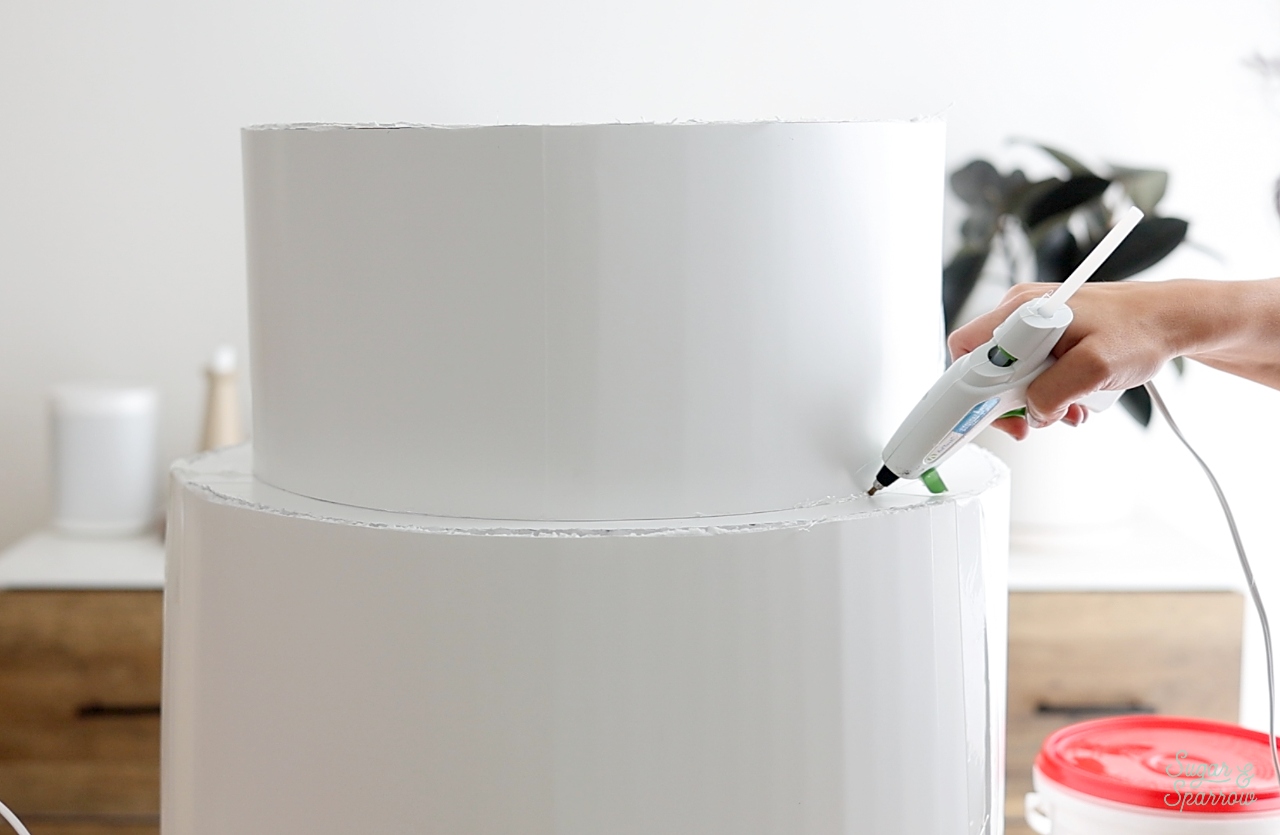
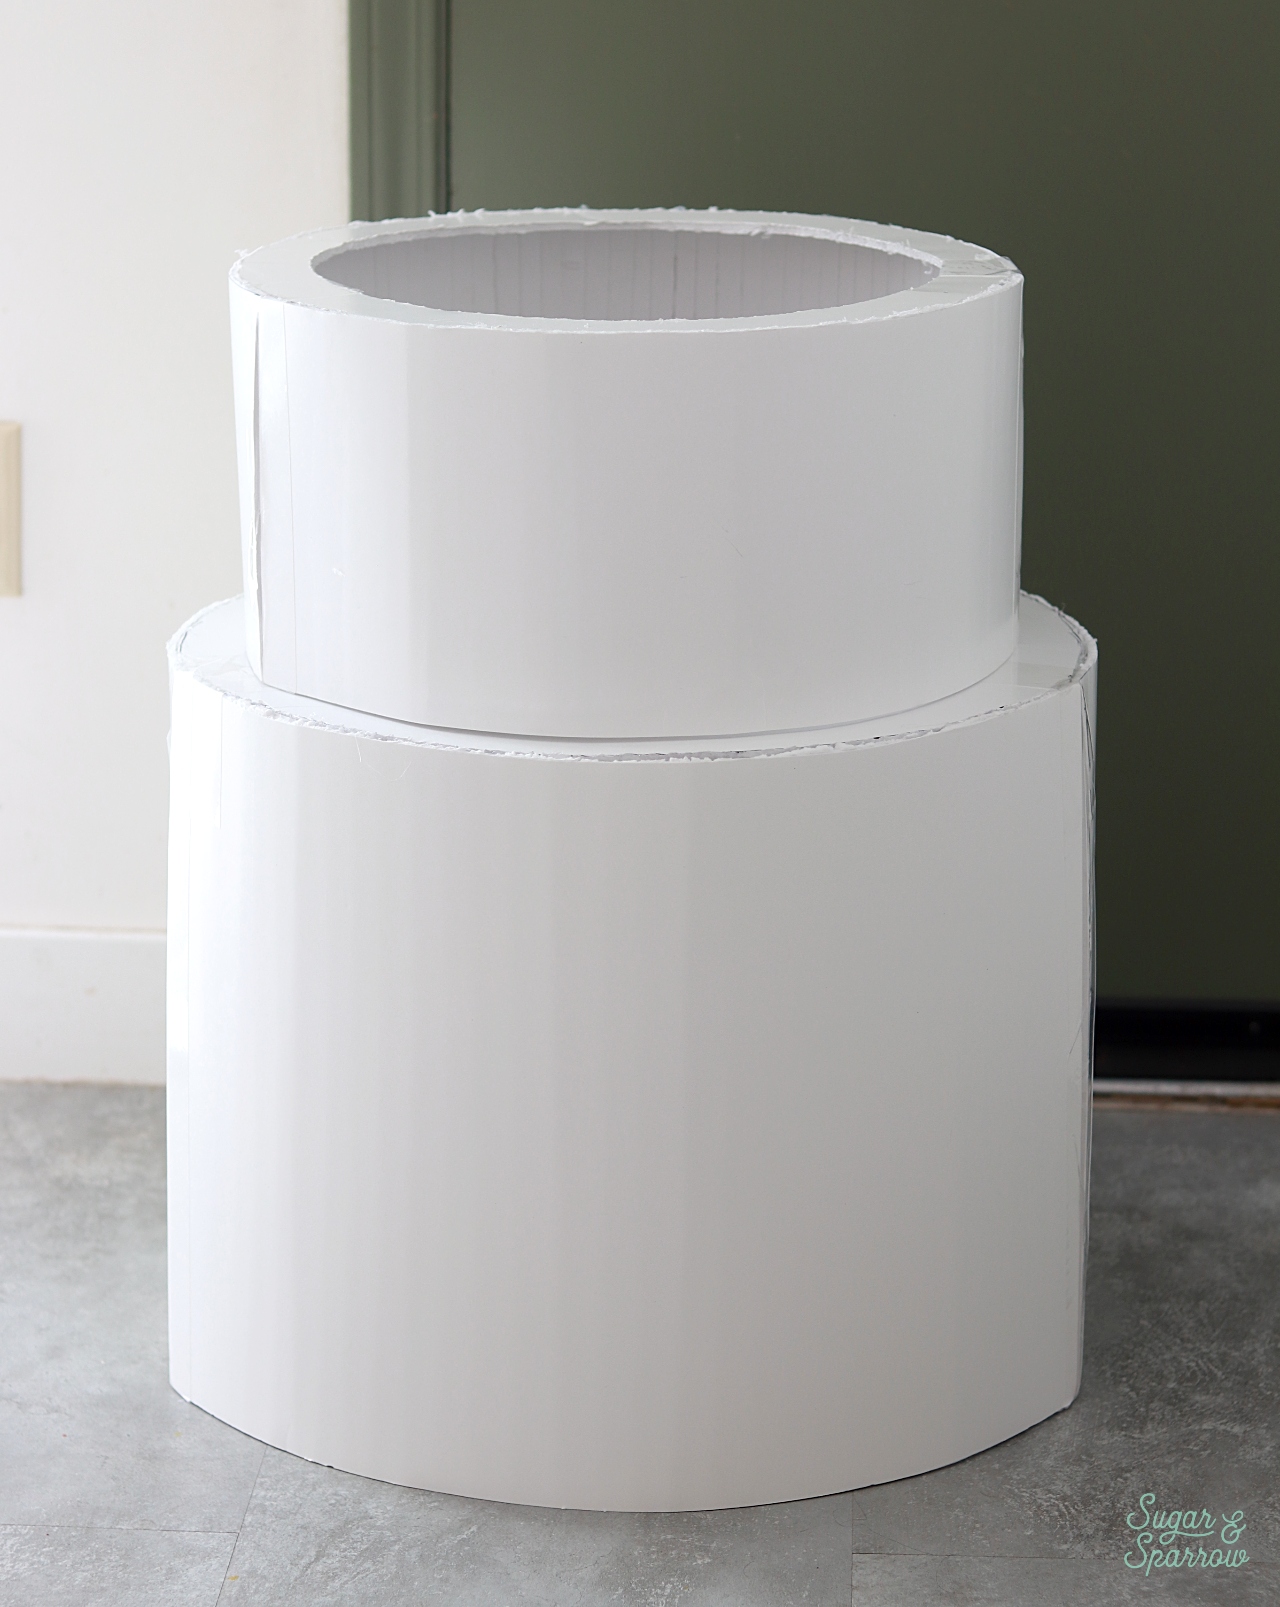
Step 3: Build the Cake Frame

Now that you have all the pieces for the frame, glue them together using the hot glue gun. I started with the smaller tier and glued the edges of the smaller circular piece, then wrapped the corresponding piece of foam board around and held it until it stuck. Seal any seams with book binding tape for extra structure. 

building a cake costume out of foam board

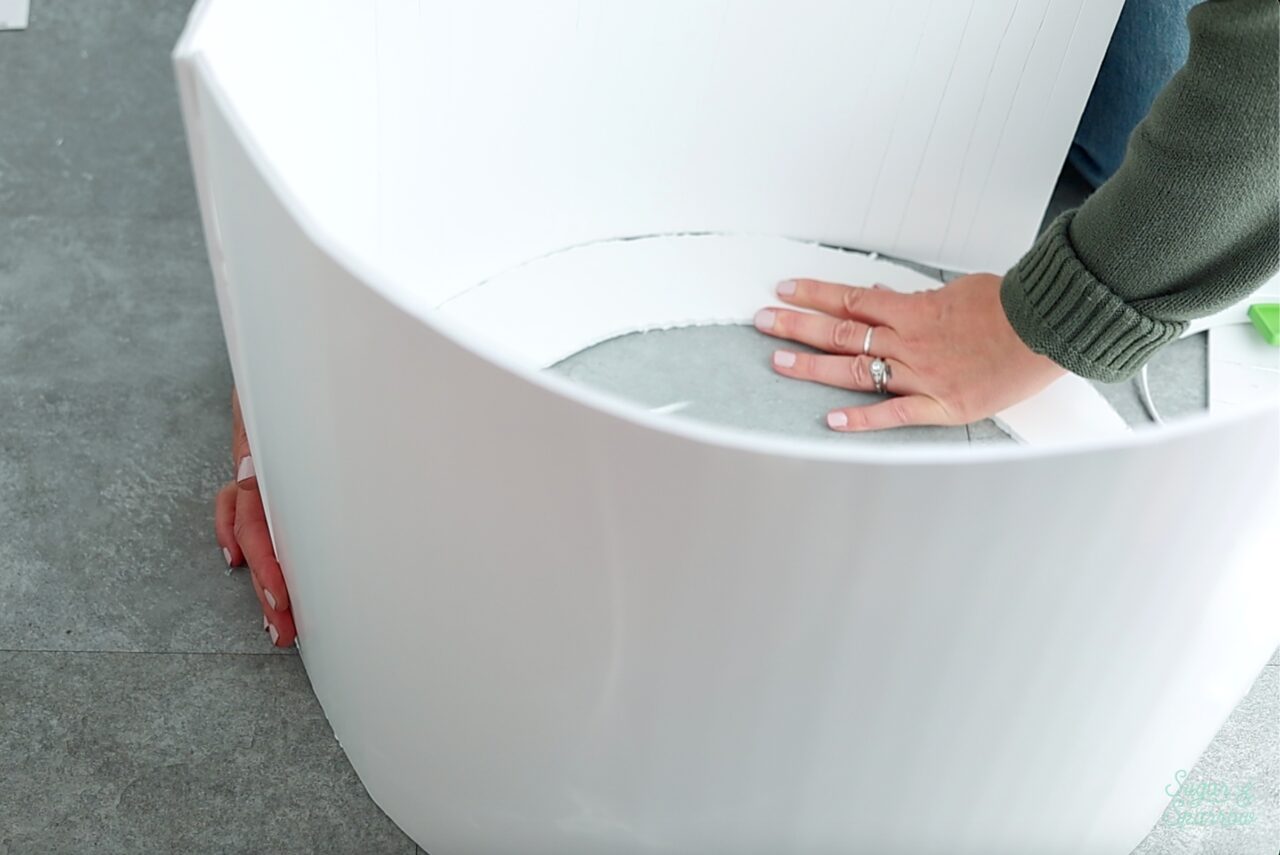
Repeat the process with the second tier. Then, glue those two tiers together with the hot glue gun. Now you have a frame! 

gluing foam board together
how to build a cake costume with foam board or cardboard

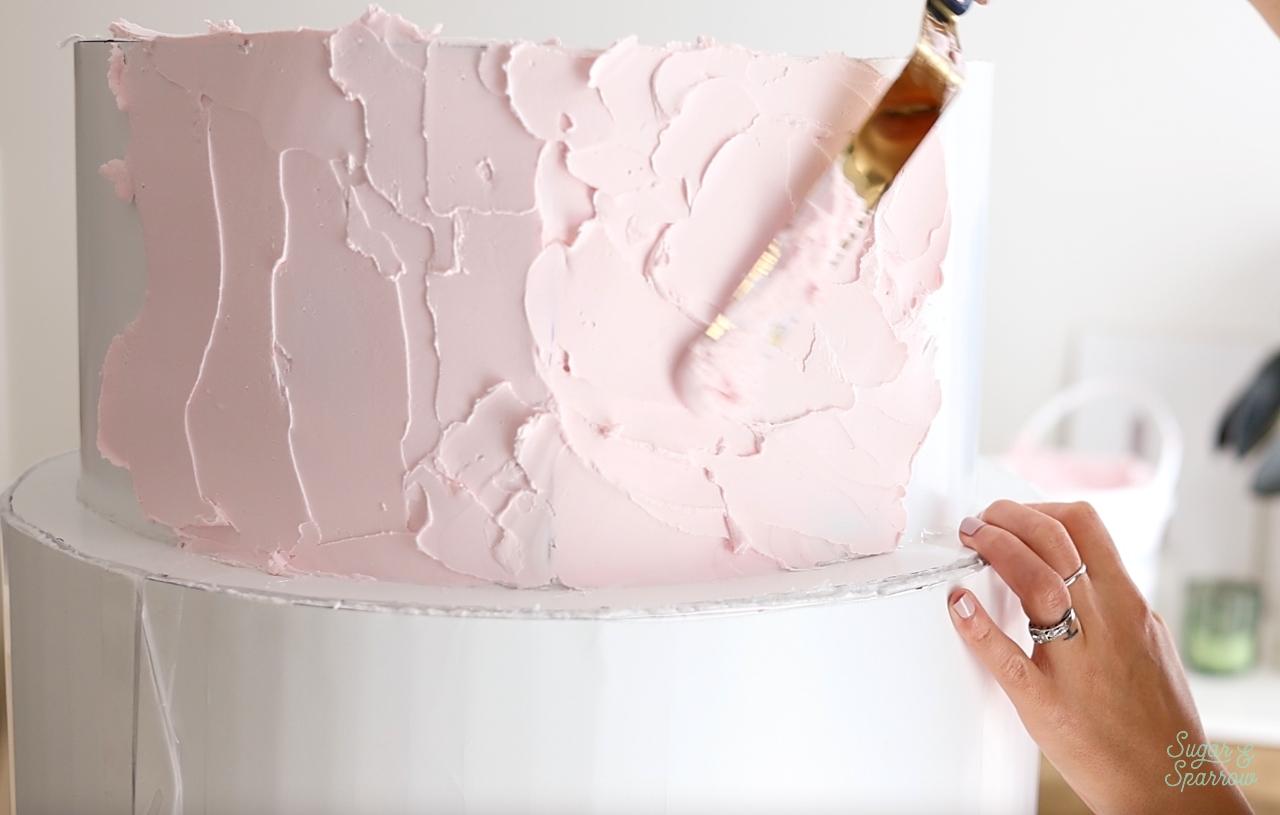
Step 4: Frost the Cake Costume

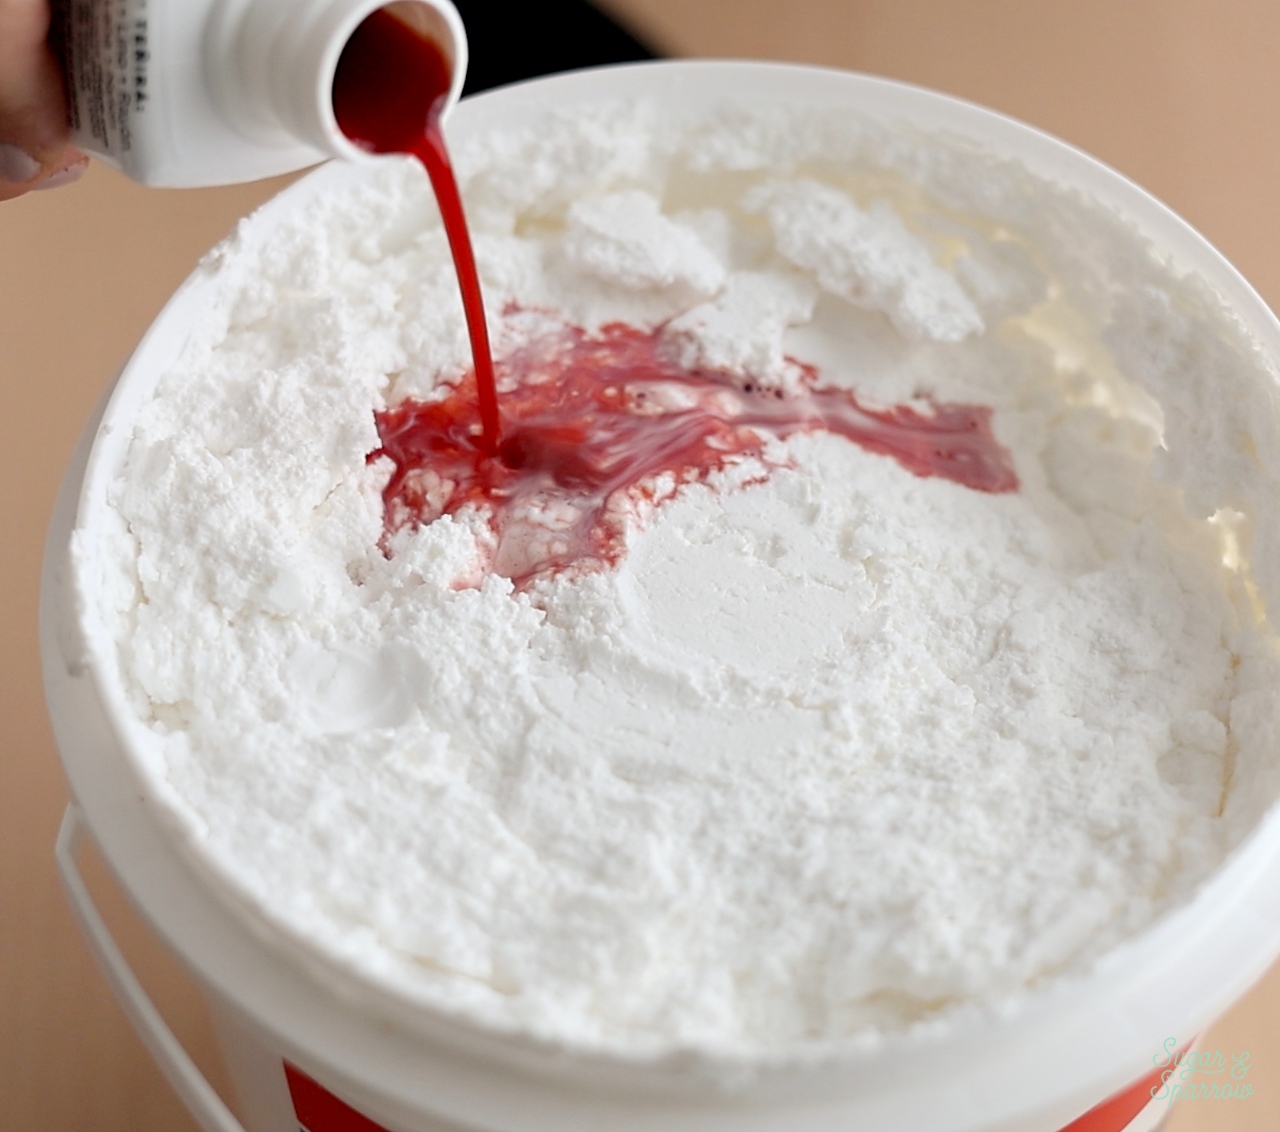
Before frosting the cake, I tinted one gallon of the lightweight spackle by pouring in some Rit Dye. This worked amazingly. 

tinting spackle with rit dye
how to tint spackle

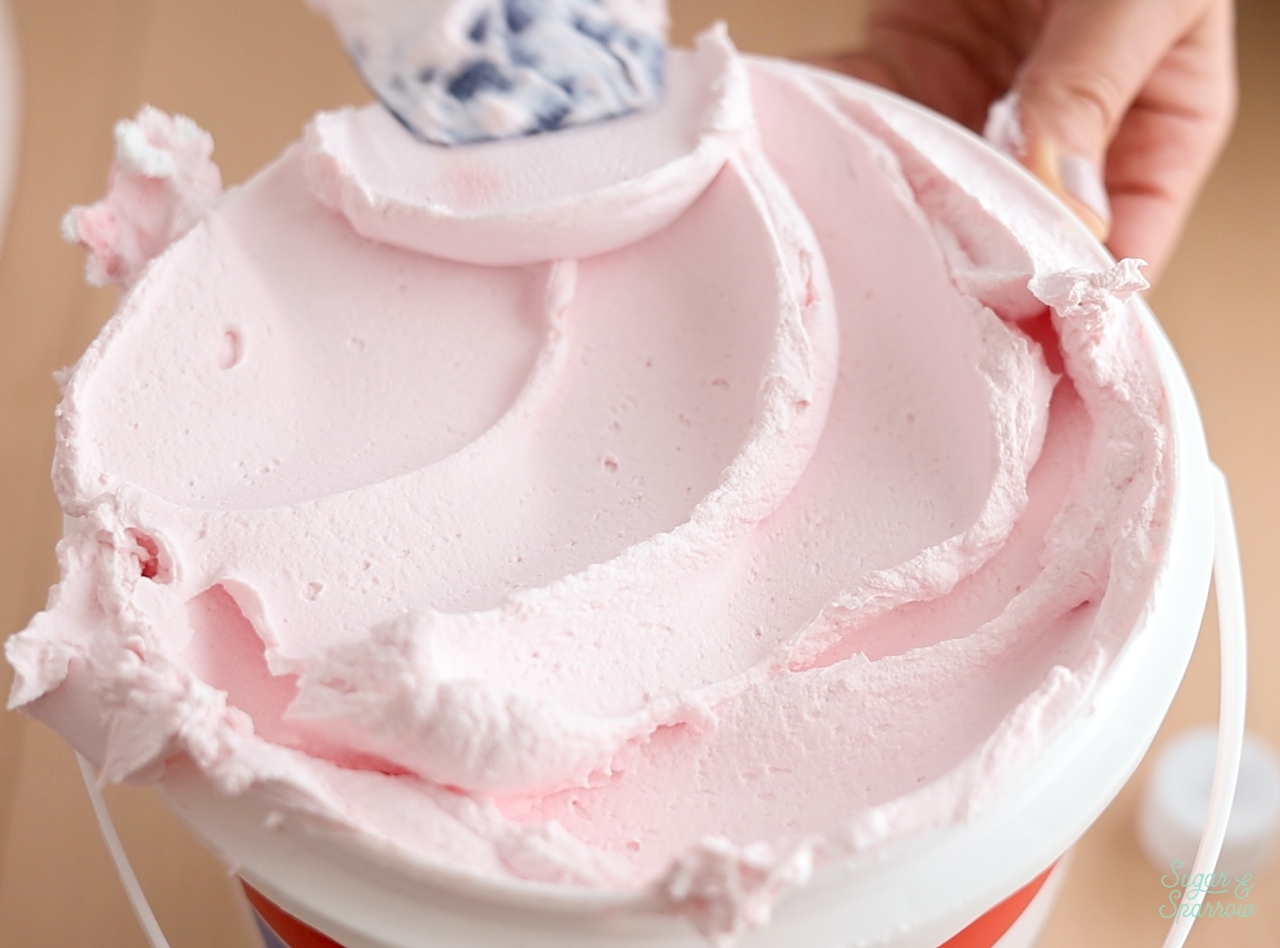
Then, I used my cake decorating tools to frost the cake. I applied the pink spackle with the angled spatula and then used an icing smoother to smooth it out. It wasn’t perfectly smooth in the end, but close enough. If you need a good tutorial on making a smooth finish on a real cake, this tutorial is really helpful for that and for frosting this fake cake.   

how to frost a fake cake with spackle
frosting a fake cake with spackle
what to use for fake cake frosting

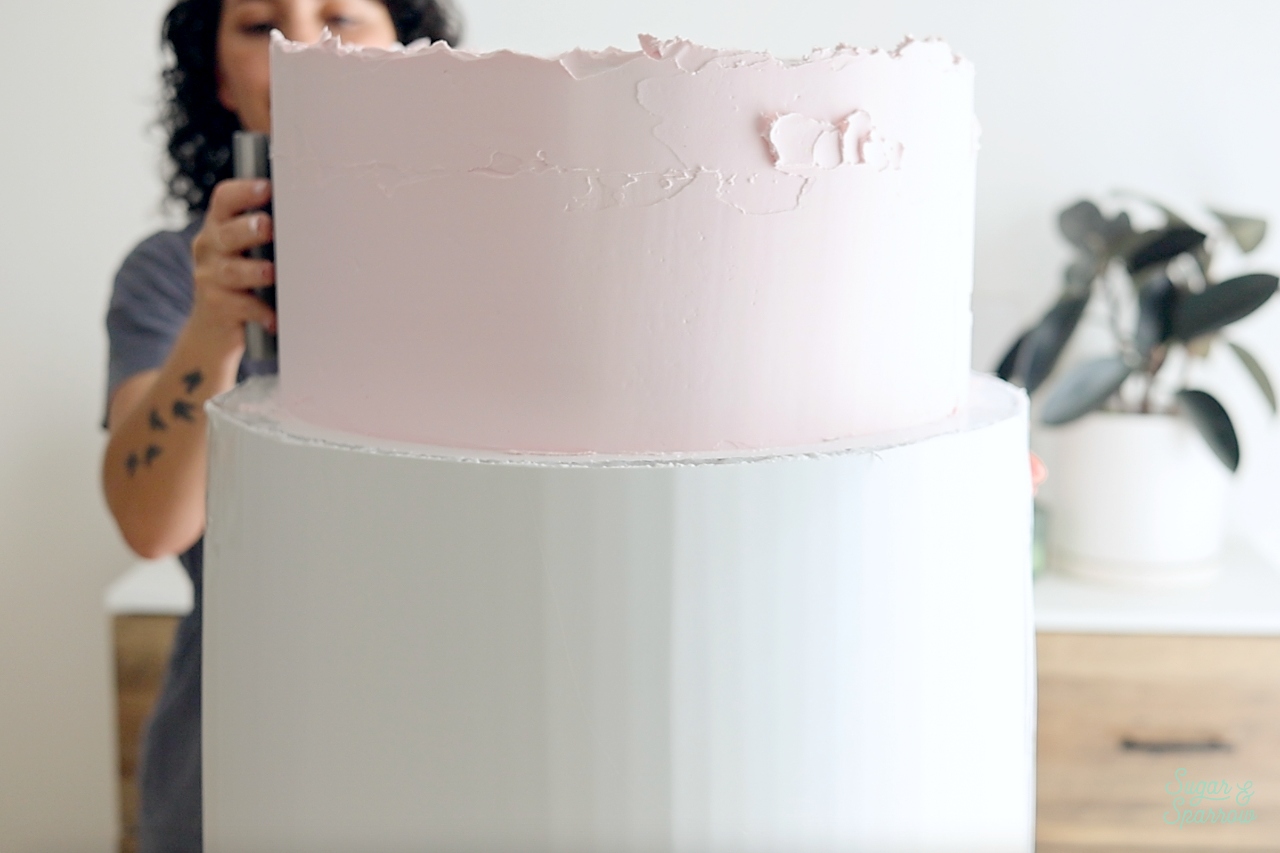
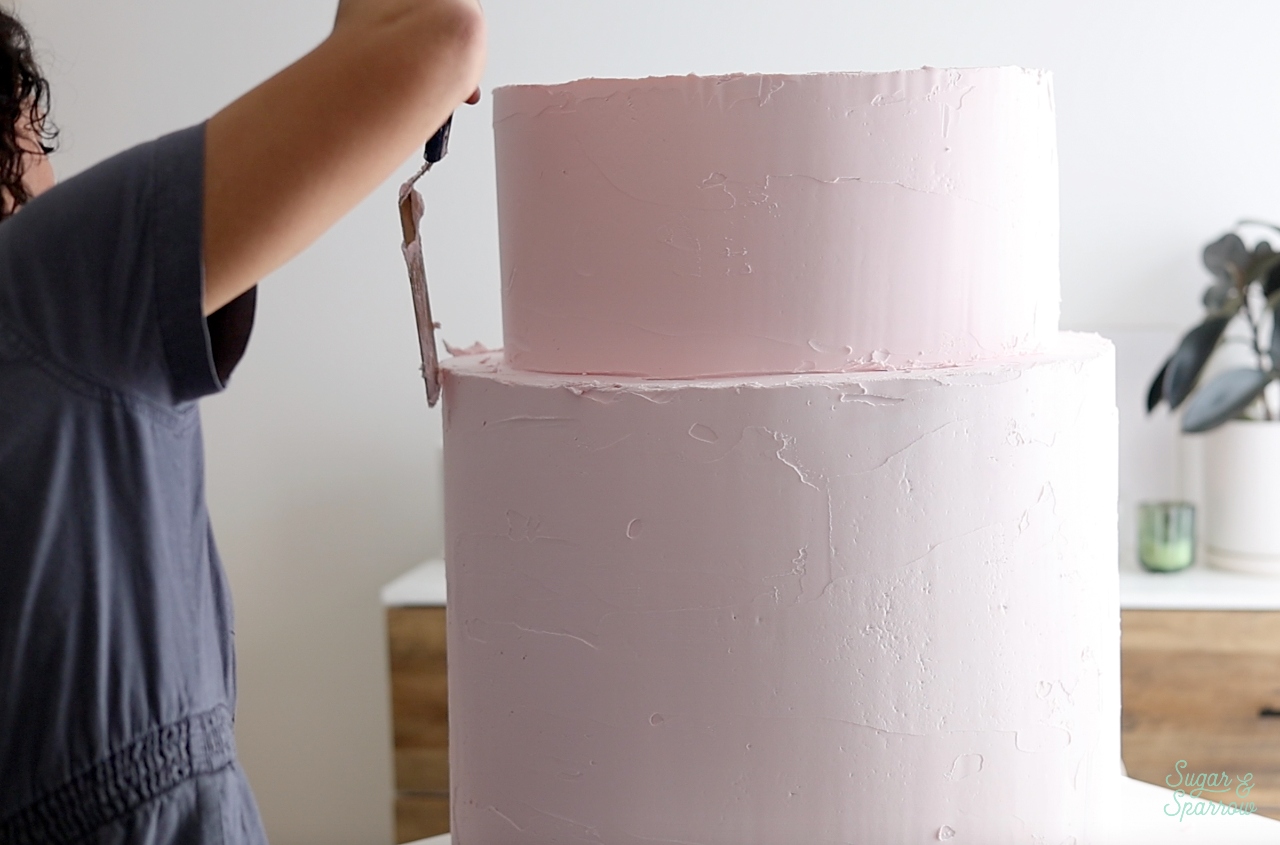
After frosting the cake, allow it to dry for 24-48 hours before moving on to decorating. 

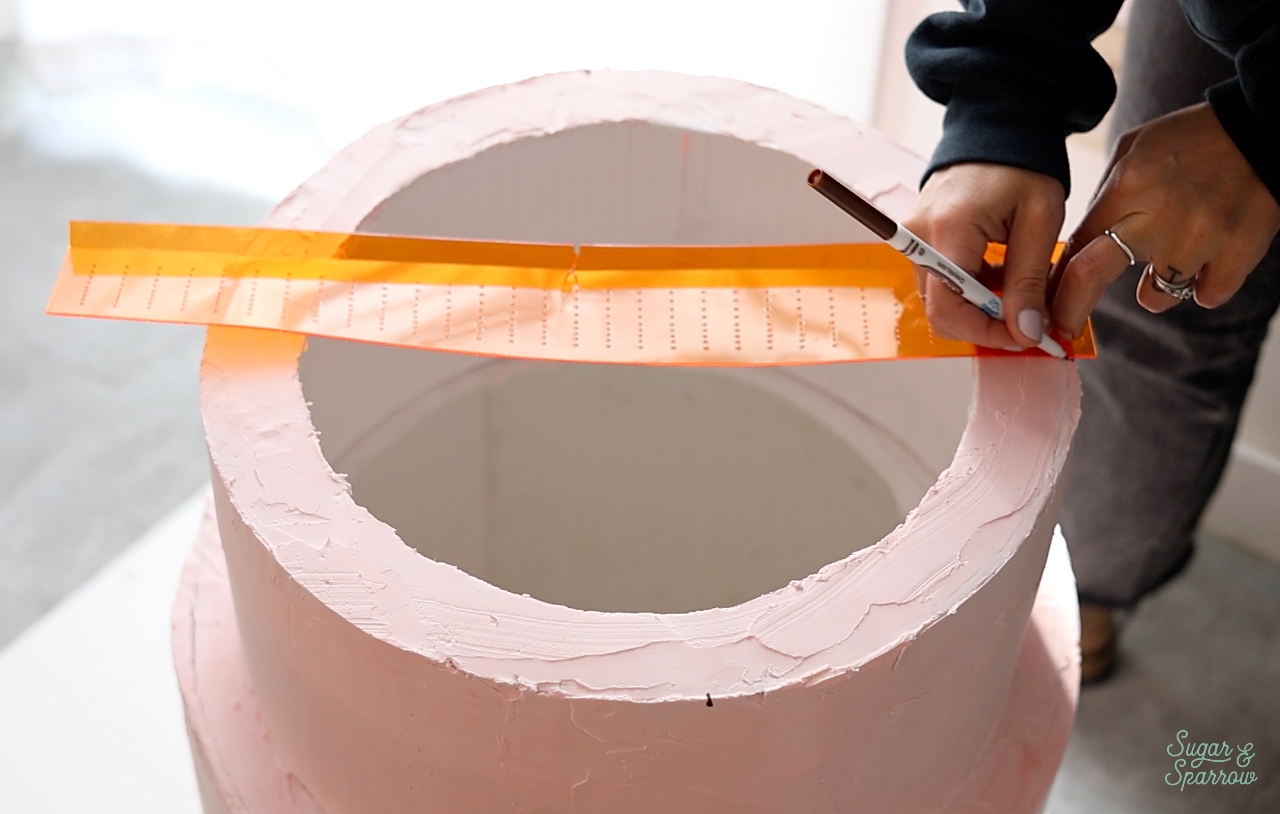
Step 5: Decorate the Cake Costume

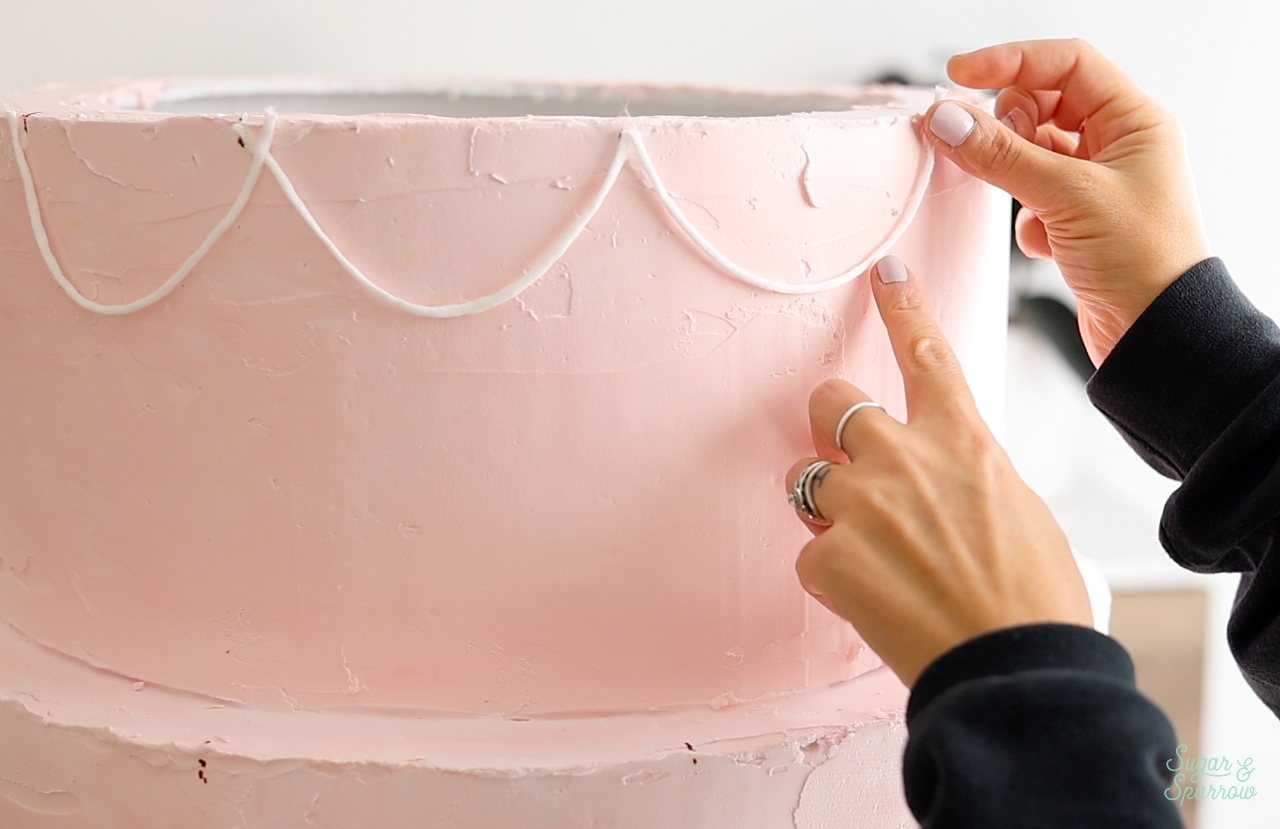
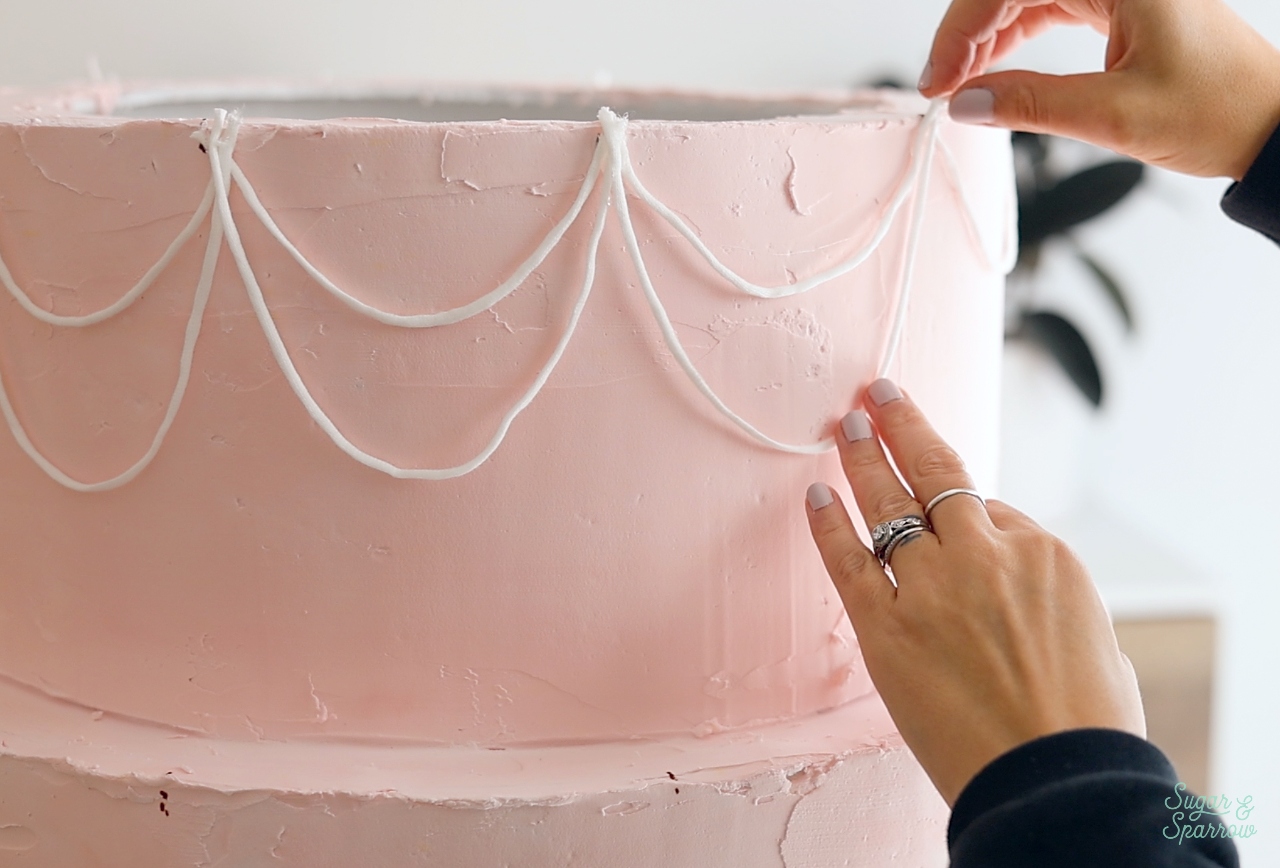
Once the cake costume is totally dry to the touch, decorate it any way you’d like! I measured out some sections on my cake for my design before decorating, and just kindof eyeballed things with a straight edge. In hindsight, I would have used a pencil instead of a kid’s marker because some of the decorations had to be shifted slightly as I decorated.

marking out sections on a cake

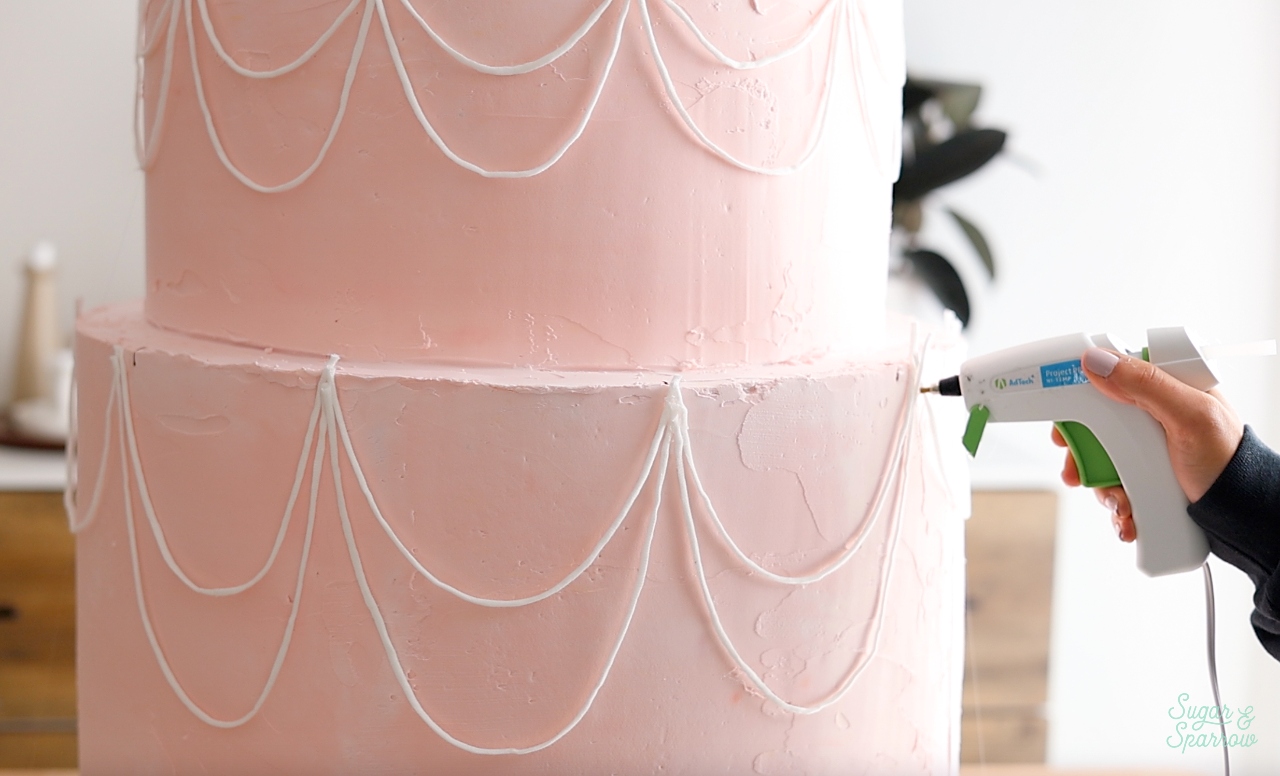
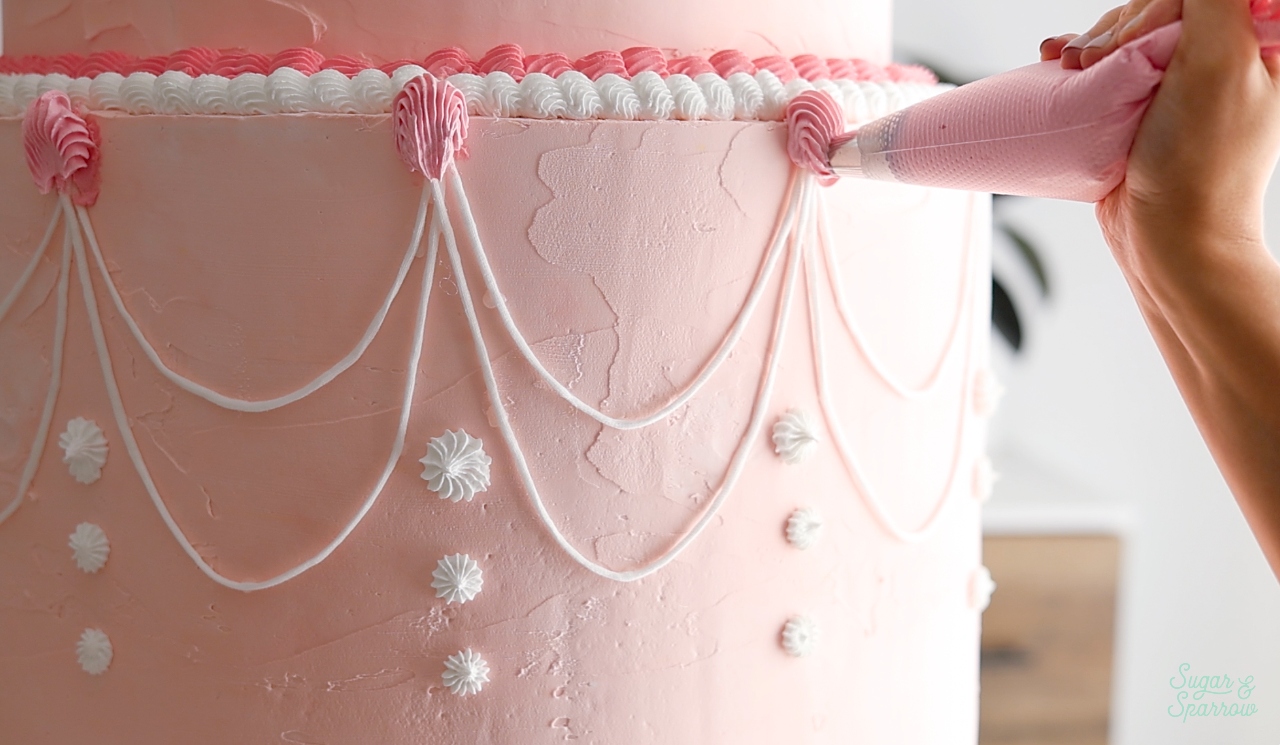
After marking out sections, I glued on some pieces of yarn to make them look like swags and this method ended up being a lot more fail proof than piping the swags on. 

making swags on a fake cake
using yarn for swags ona. fake cake
how to decorate a fake cake costume

Now for the piping. I tinted some of the spackle with a little bit of red acrylic paint to create a darker pink, then added it to a piping bag fitted with Wilton Tip 6B and piped shell borders. You’ll find that the spackle is really thick, almost too thick to pipe. So to combat this issue I added a little water (1-2 teaspoons at a time) until it was a nice pipe-able consistency. I did add too much water at one point and wasn’t able to rescue the spackle, so really be careful!

how to pipe shell border with spackle

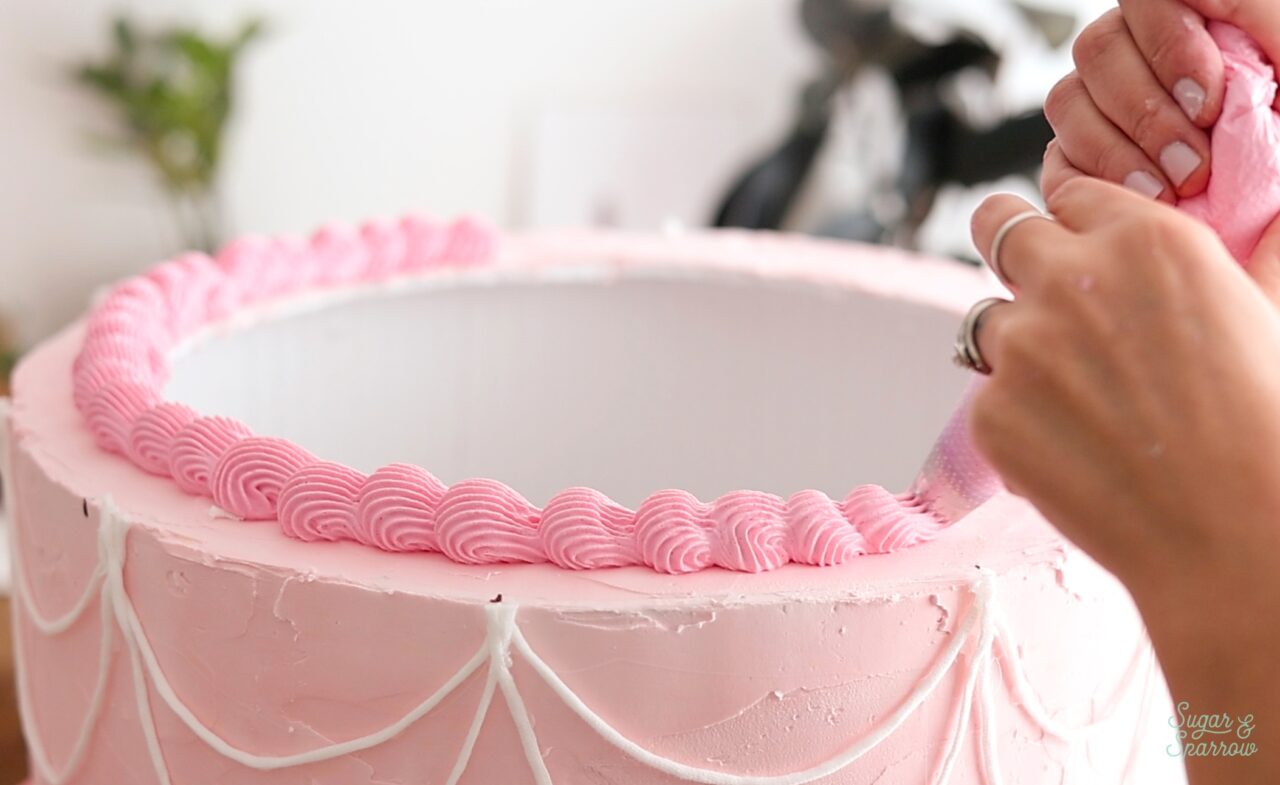
Next, I added some white spackle into a piping bag fitted with Wilton Tip 4B and piped more shell borders next to the pink ones. I also used this to pipe some stars in between the yarn swags.

piping a shell border on a fake cake

Finally, I piped a single shell where each yarn swag connected. I was so giddy when I saw it all finished!

piping with spackle on a fake cake

You’ll want to let these decorations dry for at least 72 hours, up to a week if you have the time. They may feel dry to the touch but won’t be fully dry for about a week. 

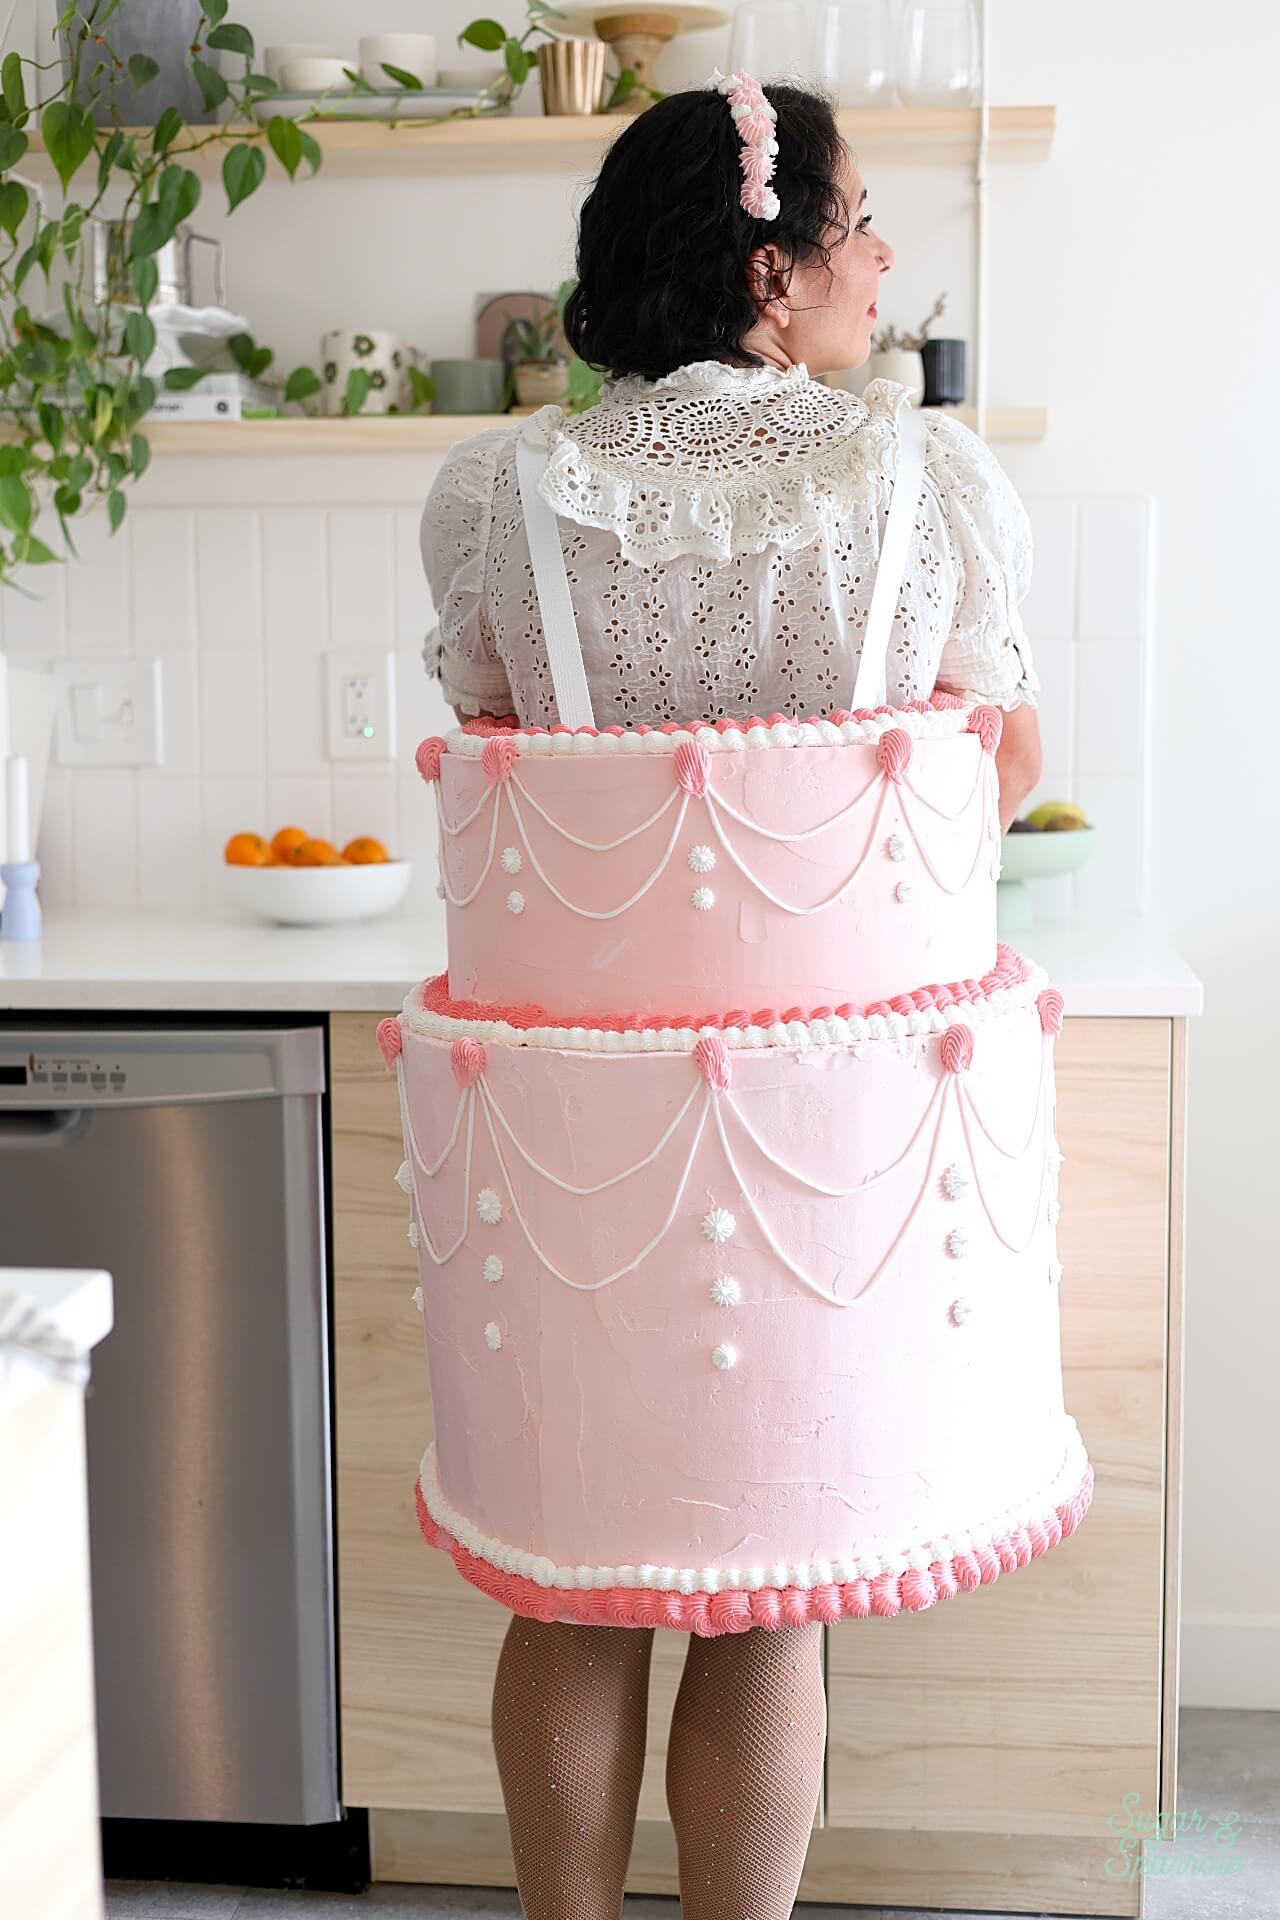
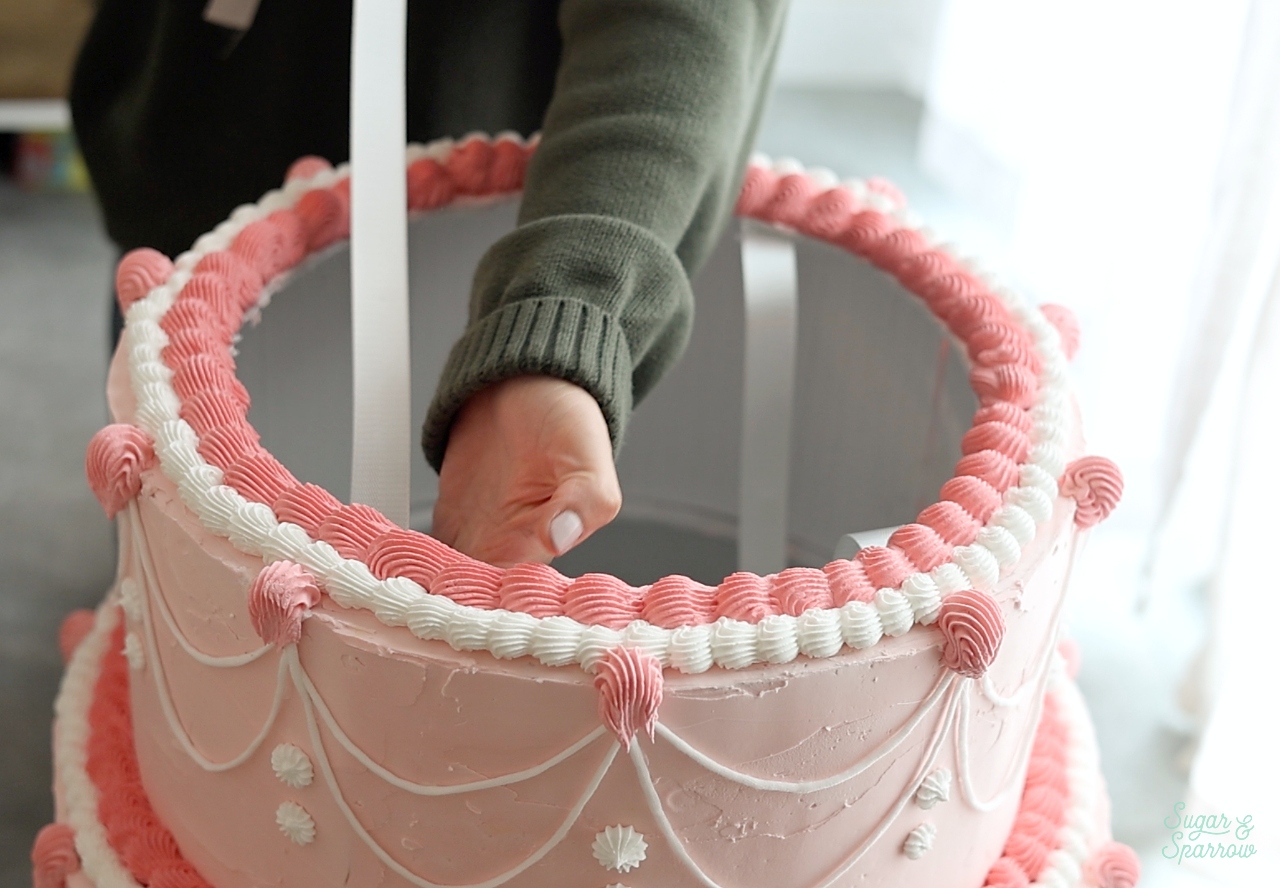
Step 6: Attach the Straps + Wear !

When it came time to try on the costume, I attached some nylon webbing to the inside lip of the top of the cake costume with hot glue, then reinforced it with more book binding tape. I was skeptical that this would hold but it really did work! 

attaching straps to a cake costume
cake costume tutorial for halloween

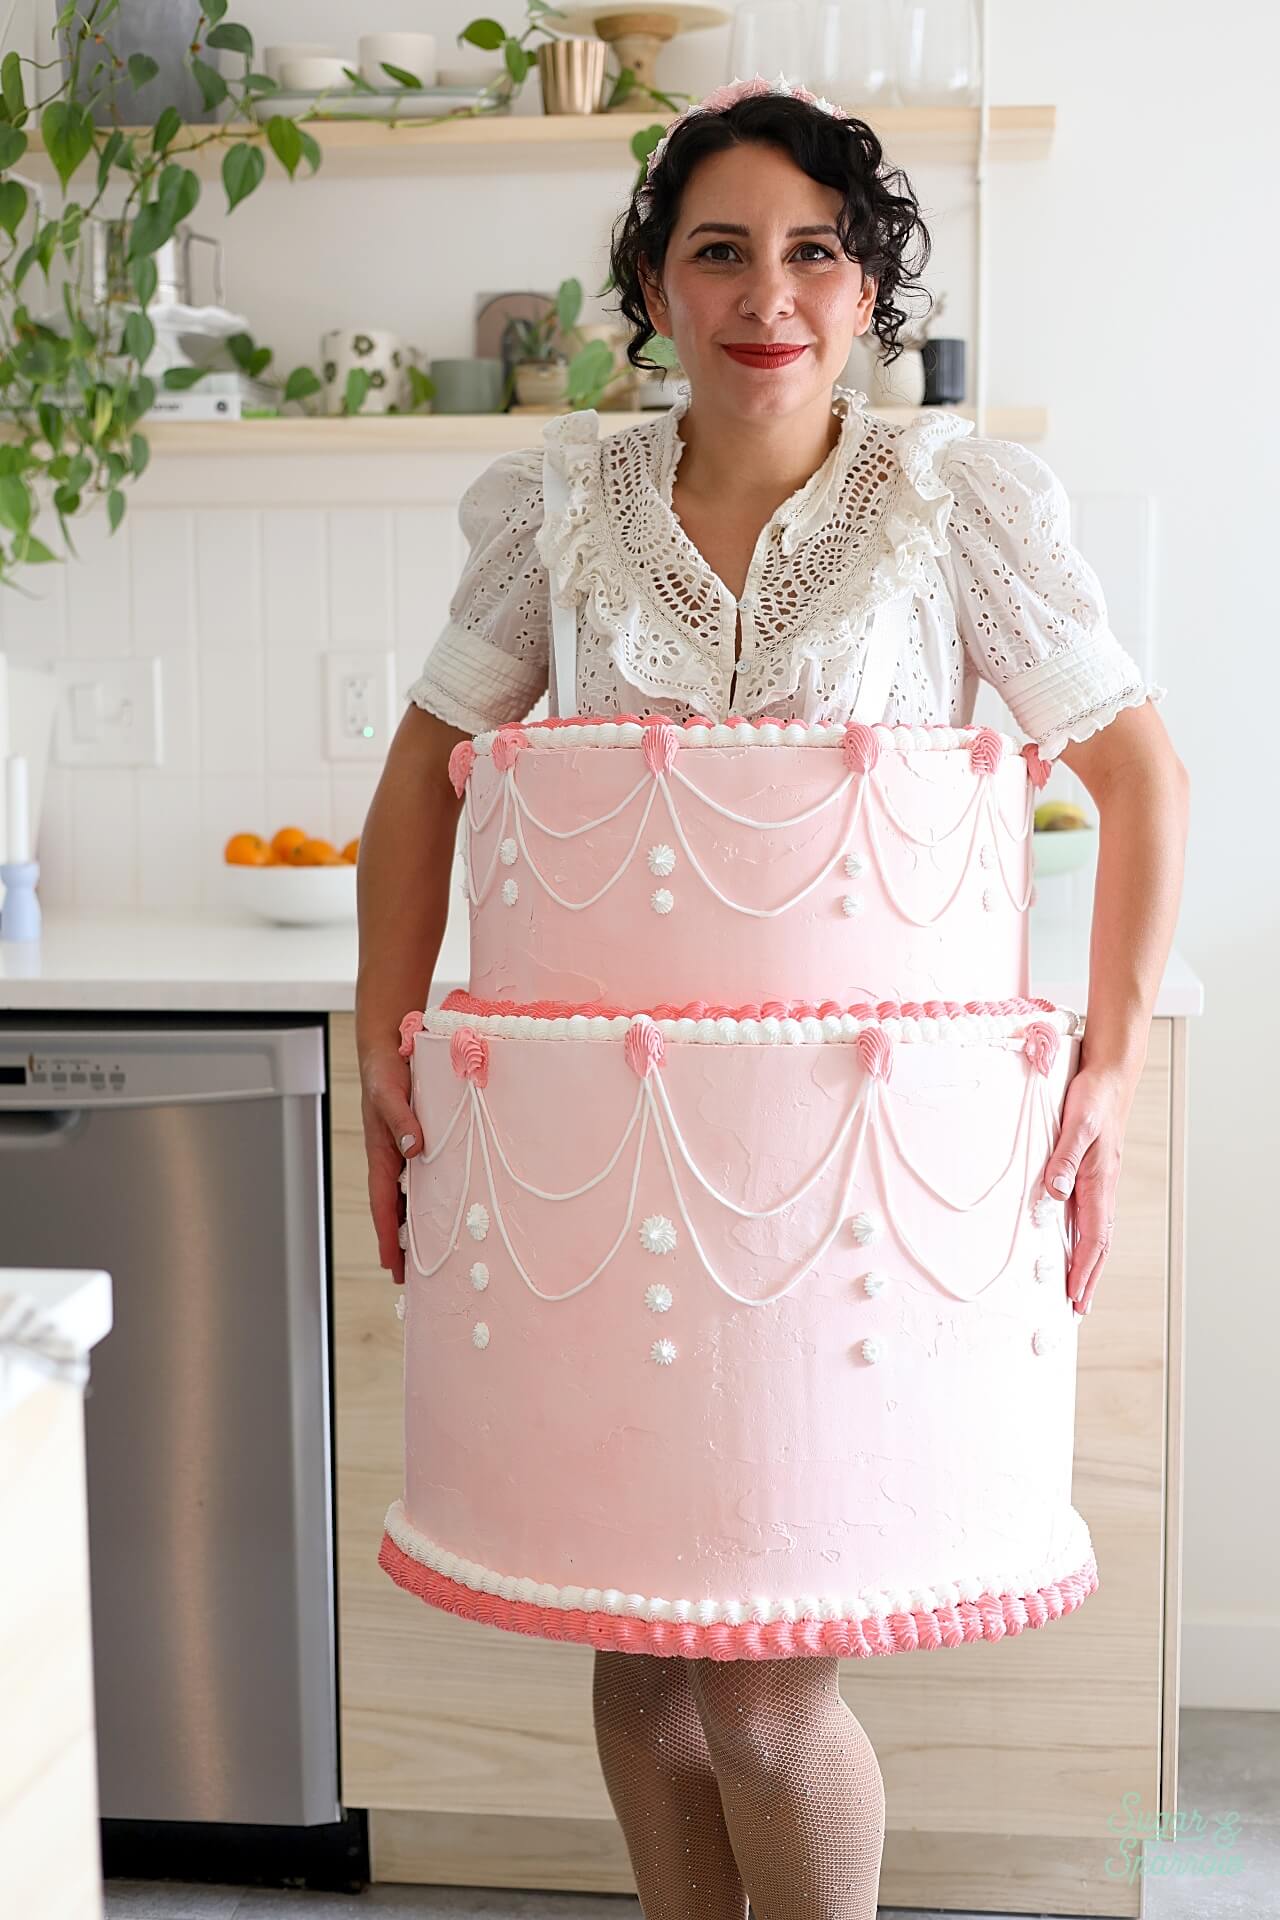
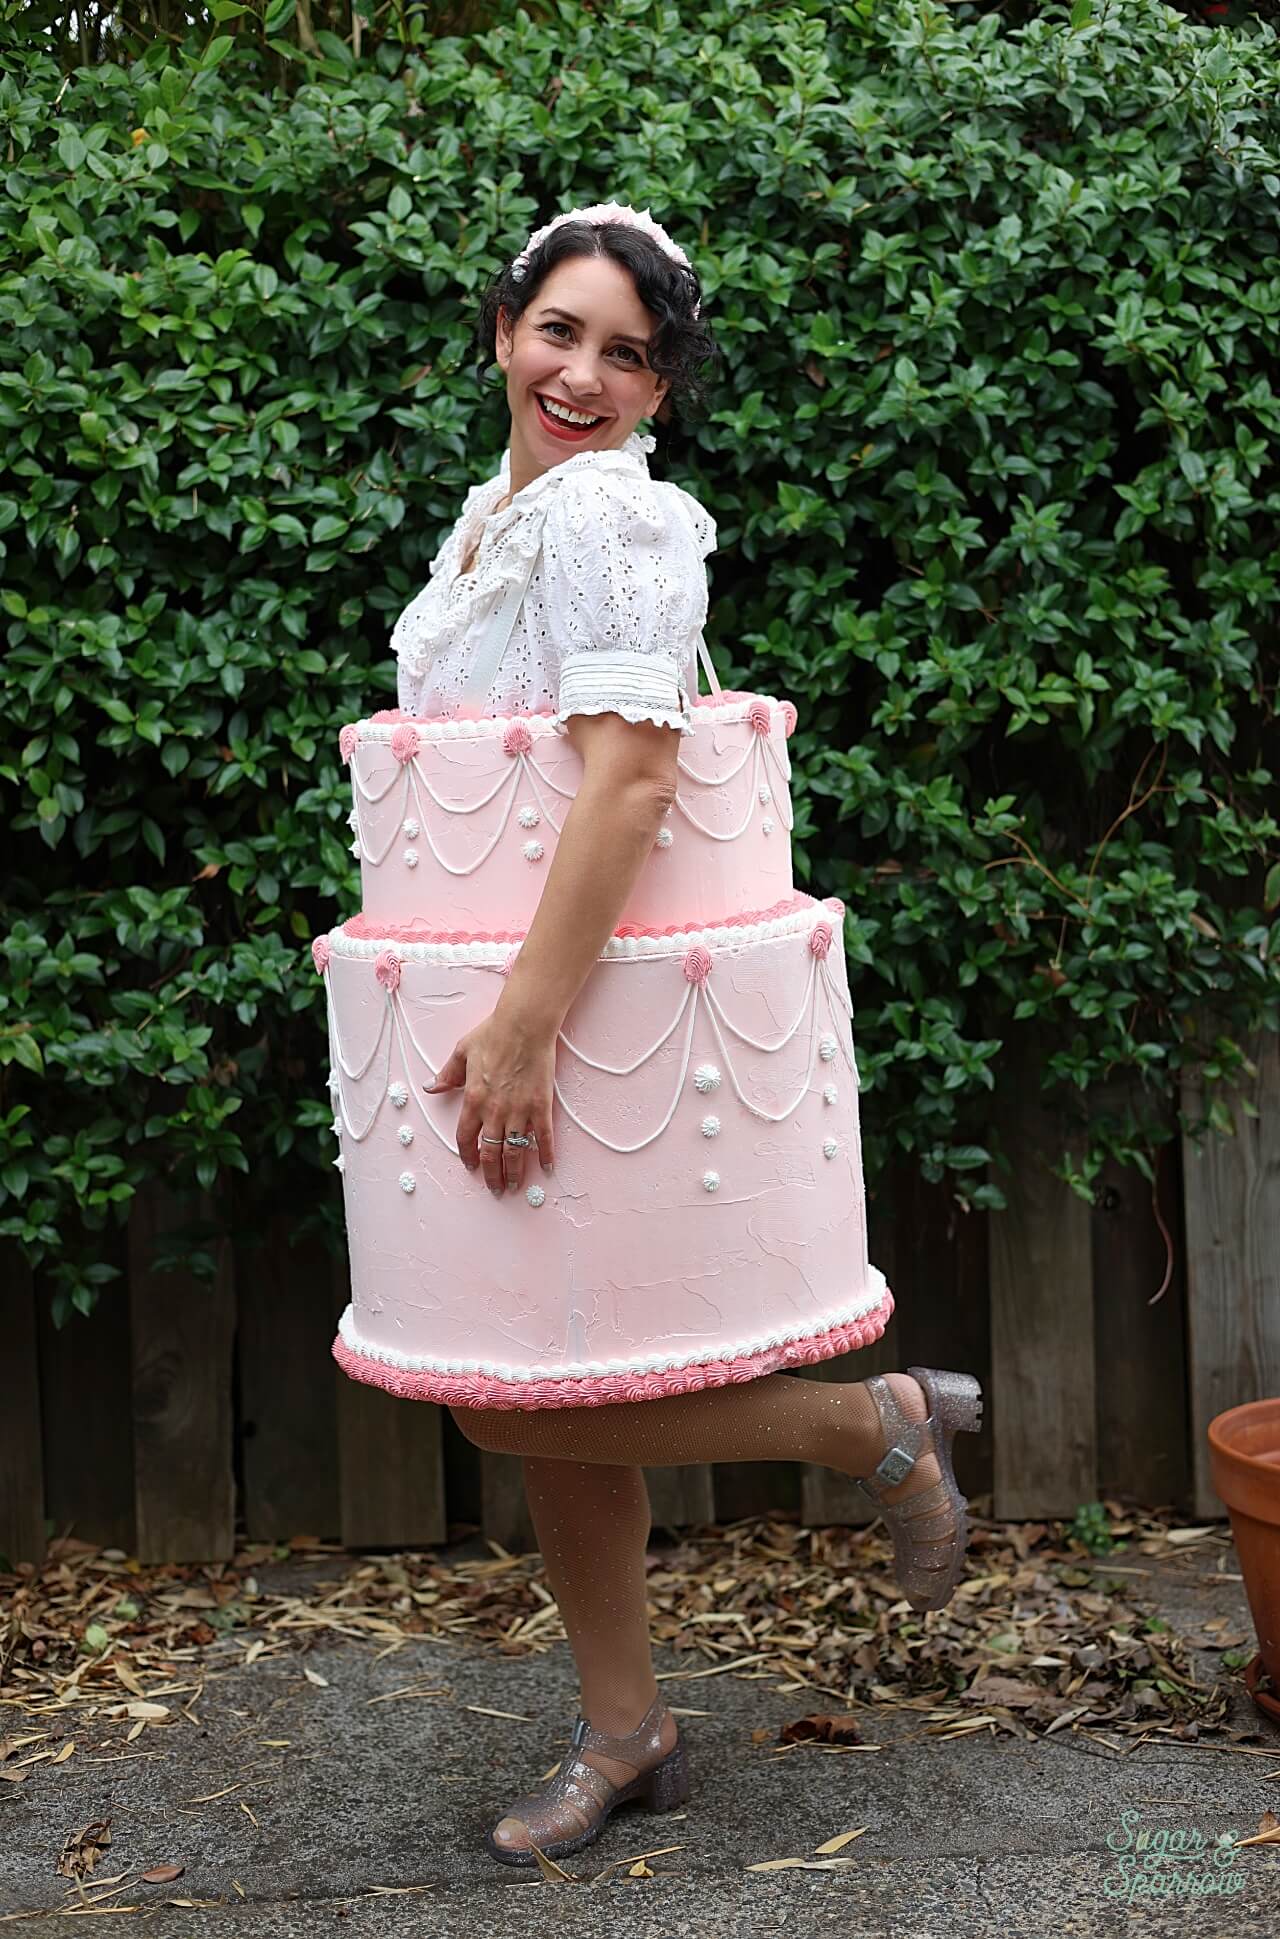
And I was even more giddy once I tried on the whole outfit! I paired the cake costume with a ruffled top and sparkly jelly sandals (both purchased at a vintage store long ago), these sparkly tights, and a headband that I piped with more spackle. Soooo fun!

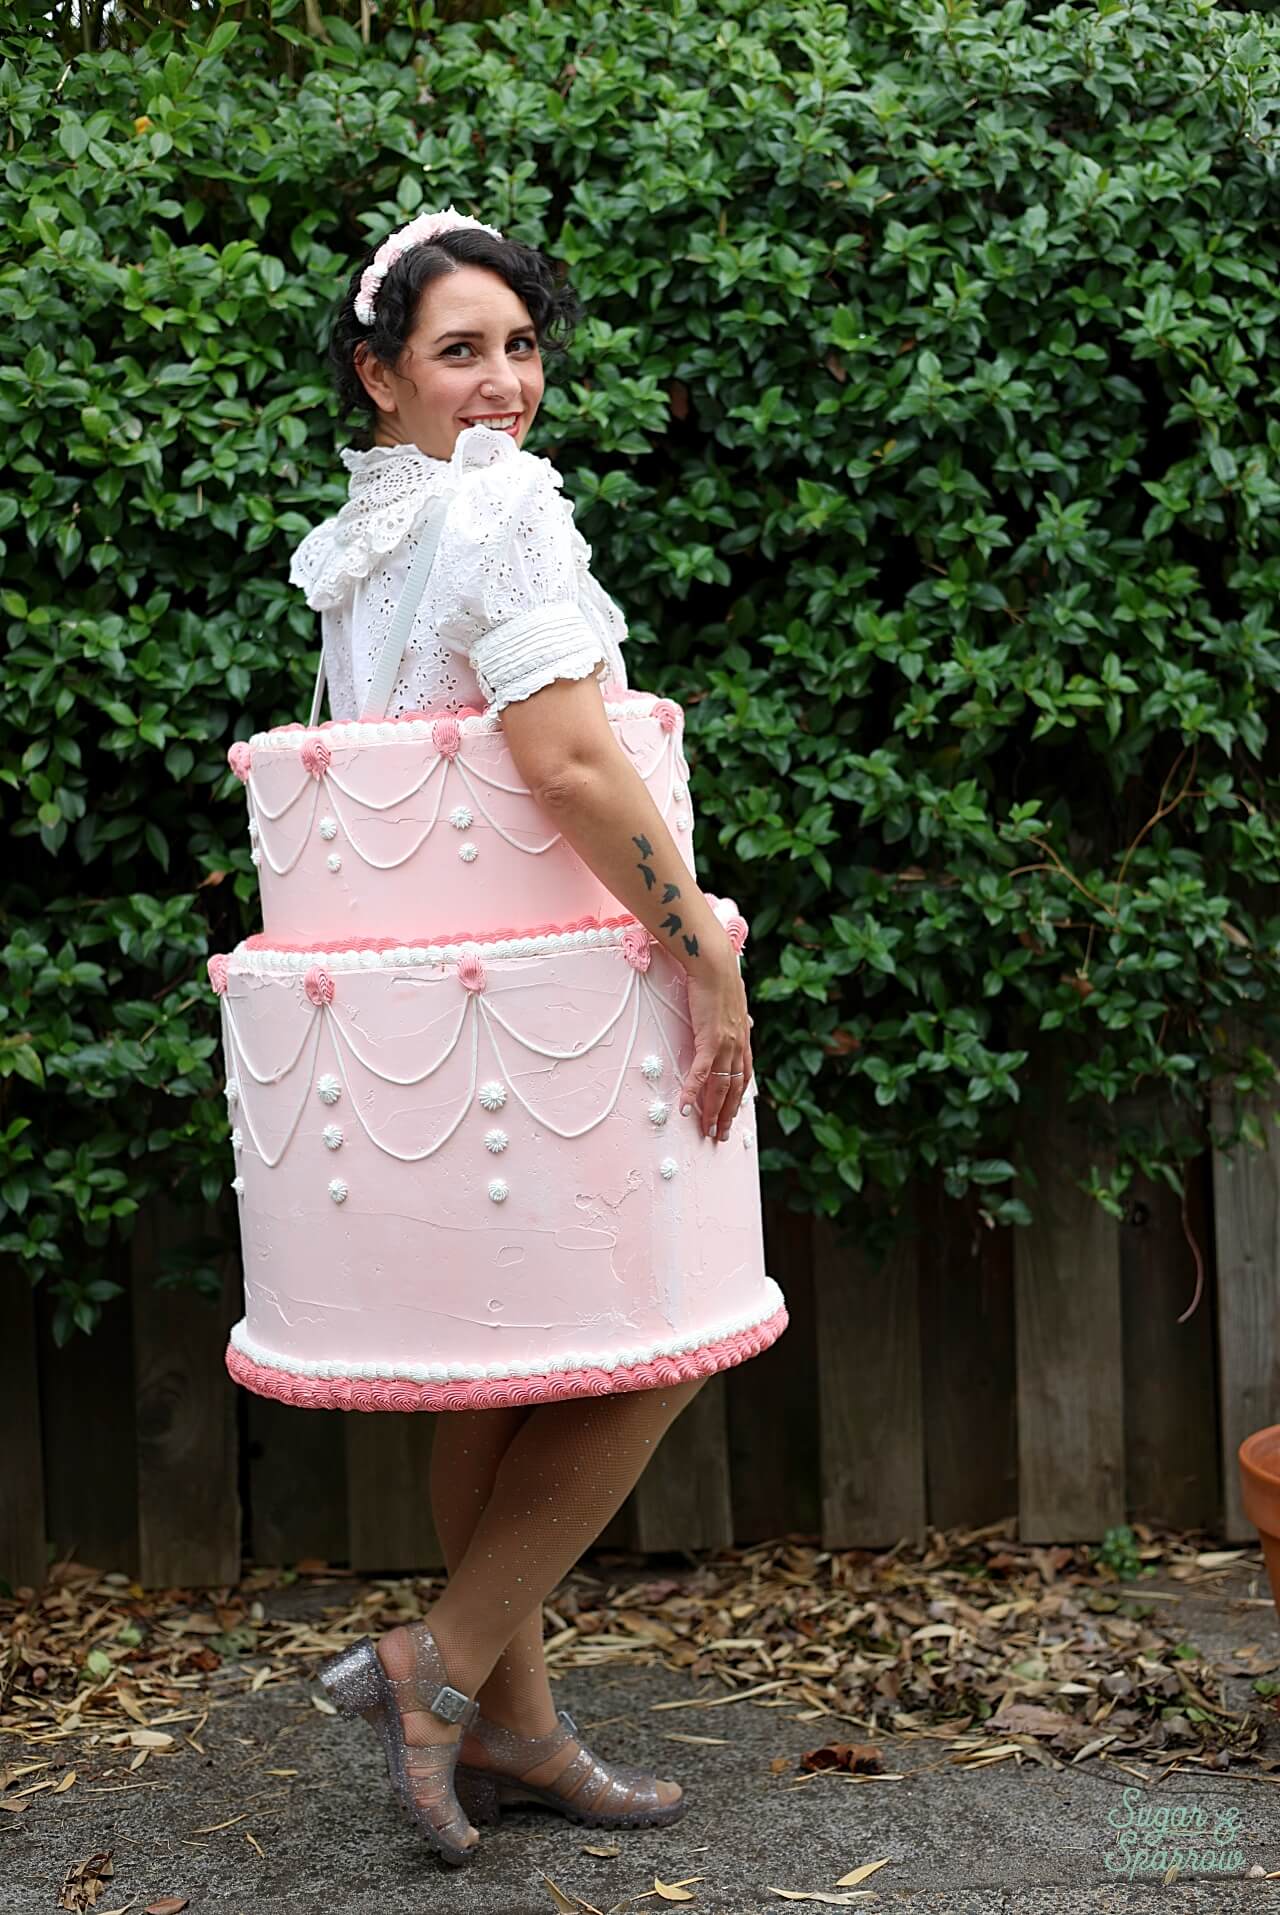
If you’re looking to make your own cake costume, I hope you find this tutorial so helpful. I absolutely loved the process of making this cake and cannot wait to wear it on Halloween! Let me know if you make a cake costume and be sure to tag @sugarandsparrowco on Instagram so I can see a pic!

By: Whitney · In: Featured, Halloween, Lifestyle, Seasonal, Tutorials · Tagged: cake costume, fake cake, halloween costume

you’ll also love

black forest cake recipe with homemade cherry filling and whipped cream frostingBlack Forest Cake Recipe
Sugar and sparrow vanilla sheet cakeThe Best Vanilla Sheet Cake Recipe
heat resistant buttercream for hot weatherStable Vanilla Buttercream Recipe for Hot Weather

Join the List

Stay up to date & receive the latest posts in your inbox.

Reader Interactions

Leave a Reply Cancel reply

Your email address will not be published. Required fields are marked *

Recipe Rating


Next Post >

Vegan Black Velvet Cake (Dye-Free!)

Primary Sidebar

Welcome to Sugar & Sparrow

Welcome to Sugar & Sparrow

Helping you whip up pretty desserts with confidence and creativity. And hopefully sharing a few laughs with you along the way!

Learn More

Connect

let’s bake!

Get my very best recipes, baking tips, and decorating tutorials sent to your inbox

Featured Posts

Our Sweet Baby Boy is Here!

pretzel nutella cake recipe

Sweet & Salty Pretzel Nutella Cake Recipe

homemade gluten free chocolate cake

Perfect Gluten-Free Chocolate Cake (Easy & FUDGY)

Search

Archives

Follow Along

@sugarandsparrowco

STRAWBERRY SHORTCAKE ICE CREAM CAKE 🍓if Strawbe STRAWBERRY SHORTCAKE ICE CREAM CAKE 🍓if Strawberry Shortcake Ice Cream Bars make you nostalgic for your childhood ice cream truck days, you’re going to LOVE this easy ice cream cake version - no ice cream maker needed 🙌🏼 

Full recipe on my blog at https://sugarandsparrow.com/strawberry-shortcake-ice-cream-cake/

STRAWBERRY CRUNCH 
24 whole (280g) Golden Oreos, finely ground
3 Oz box strawberry jello
4 Tbsp unsalted butter, melted

ICE CREAM LAYERS
1/2 Cup (15g) freeze-dried strawberries
2 Cups heavy whipping cream, cold
1 Tbsp pure vanilla extract, divided
14 Oz sweetened condensed milk
1 1/2 tsp strawberry jam or preserves

1. Combine the strawberry crunch ingredients and bake on a lined cookie sheet at 350ºF for 4 min.
2. For the crust, combine 1 Cup of the strawberry crunch with 2 Tbsp melted butter. Press into the bottom of a 6-inch springform pan and line with an acetate collar. Place in the freezer while you move on.
3. Using a food processor, grind the freeze-dried strawberries into a fine powder. Set aside.
4. Add the heavy whipping cream and 2 tsp of vanilla extract into a chilled bowl, then whip it with a hand mixer to stiff peaks. Place in the refrigerator.
5. Divide the condensed milk between two medium bowls. To one bowl, add 1 teaspoon of vanilla. To the second bowl, add the finely strawberry powder and the jam/preserves. Whisk the ingredients together within each individual bowl.
6. Divide the whipping cream evenly between each of the two bowls you created in the previous step. Fold each sweetened condensed milk mixture together with the divided whipped cream to create the vanilla ice cream and strawberry ice cream.
7. Layer half of each of the ice creams on top of the strawberry crunch crust, sprinkle a layer of strawberry crunch on top, then repeat. Freeze for 6 hours and serve. 
#icecreamcake #strawberryshortcake #nochurnicecream #icecreamlover #strawberry
LEMON CUPCAKES 🍋 after about a dozen recipe tes LEMON CUPCAKES 🍋 after about a dozen recipe tests, this one is everything I could want in a lemon cupcake! Fluffy-yet-moist, bursting with natural lemon flavor, and absolutely irresistible topped with lemon cream cheese buttercream. 

Full recipe (with frosting) linked in my bio + at https://sugarandsparrow.com/homemade-lemon-cupcakes/

INGREDIENTS:
1 Cup (132g) all-purpose flour
1 tsp baking powder
1/4 tsp salt
1/4 Cup (60ml) whole milk, room temperature
3 Tbsp (45ml) lemon juice from 1 medium lemon
3/4 Cup (150g) granulated sugar
3 Tbsp (42g) unsalted butter, room temperature
2 Tbsp (30ml) vegetable oil
2 large eggs, room temperature
1 tsp pure vanilla extract

INSTRUCTIONS:
1. Preheat the oven to 350ºF (177ºF) and line a standard cupcake pan with 12 paper liners.
2. In a large bowl, whisk together the flour, baking powder, and salt. Set aside. 
3. In the bowl of a stand mixer fitted with the paddle attachment (or with a hand mixer and large bowl), add the lemon zest to the sugar and mix on low speed until fragrant and well combined, about 1 minute. Meanwhile, combine the lemon juice with the milk and set aside. 
4. Add the butter to the lemon-sugar mixture and cream on medium speed until and combined, about 2 minutes. Add the vegetable oil and beat until light and creamy, about 3 minutes. Scrape down the bowl and paddle as needed.
5. Mix in the eggs one at a time on low speed, then add the vanilla and turn the mixer to medium speed for one minute.
6. Turn the mixer off and add the flour mixture all at once. Mix on low speed until just combined, then slowly pour in the lemon-milk mixture. Mix until just combined, about 30 seconds.
7. Divide the batter equally between the liners and bake for 14-18 min. Cool, then top with frosting of your choice (link in bio for lemon cream cheese frosting)�
#lemoncupcakes #creamcheesefrosting #lemon #cupcakes #cupcakedecorating
April in my kitchen 🌸 I published 5 NEW recipes April in my kitchen 🌸 I published 5 NEW recipes on my site, baked my Oreo cupcake recipe for a fundraiser and found it was just as delicious as I remember, and filmed/photographed 3 recipes that will be on my blog in May (Lemon Cupcakes, Lemon Cream Cheese Buttercream, and No-Bake Marbled Strawberry Cheesecake) 🥰 

Comment “APRIL” to get all the available recipes and stay tuned for more! 

#bakersofinstagram #springbaking #cakedecorating #cupcakes #bakinglove
SHEET PAN COOKIE CAKE 🍪 slice it warm for a fud SHEET PAN COOKIE CAKE 🍪 slice it warm for a fudgy chocolate chip cookie OR let it settle into a moist and chewy cookie cake that’s perfect for decorating! My fave vanilla buttercream + sprinkles turn this giant chocolate chip cookie into the perfect birthday cake alternative at the end 🥳
⁣
Full recipe + decorating ideas at https://sugarandsparrow.com/sheet-pan-chocolate-chip-cookie-cake/
⁣
INGREDIENTS⁣
1 Cup (226g) unsalted butter, melted⁣
1 1/3 Cups (267g) packed light or dark brown sugar⁣
1/2 Cup (100g) granulated sugar⁣
3 large eggs⁣
1 Tbsp pure vanilla extract⁣
1 tsp baking soda⁣
1 tsp cornstarch⁣
1/2 tsp salt⁣
3 Cups (398g) all purpose flour⁣
2 Cups (350g) semi-sweet chocolate chips⁣
⁣
INSTRUCTIONS⁣
1. Preheat the oven to 350ºF (177ºC). Grease and line a 13×18 inch sheet pan.⁣
2. In a large bowl, add the brown sugar and granulated sugar. Melt the butter in the microwave and pour it over the top of the sugars. Whisk together until uniform. Add the eggs and vanilla, then continue whisking until uniform. Whisk in the baking soda, cornstarch, and salt.⁣
3. Add the flour and use a silicone spatula to fold it in until smooth cookie dough forms. Reserve 1/2 Cup of the chocolate chips and set them aside, then fold the remaining 1 1/2 Cups of chocolate chips into the cookie dough.⁣
4. Place the chocolate chip cookie dough onto the prepared sheet pan and use an offset spatula to spread it all the way to the edges in an even layer.⁣
5. Bake the cookie cake for 14-16 minutes, until it looks golden brown on the edges and set. 
6. Enjoy warm or let it cool and decorate with vanilla buttercream and sprinkles! ⁣
⁣
#cookiecake #chocolatechipcookies #sheetcake #birthdaycake #cakedecorating
STRAWBERRY CUPCAKES 🍓based on my beloved strawb STRAWBERRY CUPCAKES 🍓based on my beloved strawberry layer cake recipe, this cupcake version is just as moist yet fluffy and bursting with natural strawberry flavor! Between the mix of fresh strawberries in the cupcakes + freeze-dried strawberries in the frosting, the flavor is out of this world 🚀

Full recipe link in my bio (with strawberry buttercream) + at https://sugarandsparrow.com/strawberry-cupcakes/

STRAWBERRY CUPCAKES
Yield: 14 cupcakes

INGREDIENTS:
5 oz (143g) fresh or frozen strawberries
1/3 Cup (80ml) whole milk, room temp
1 1/2 Cups (158g) sifted cake flour
1 tsp baking powder
1/4 tsp baking soda
1/2 tsp salt
6 Tbsp (85g) unsalted butter, room temp
1 Cup (200g) granulated sugar
2 large eggs, room temp
3 Tbsp (45g) sour cream, room temp
1 tsp vanilla extract
1 drop pink food coloring (optional)

INSTRUCTIONS: 
1. Puree the strawberries using a food processor (you’ll have about 1/2 cup of puree), then place into a saucepan over medium-low heat. Bring to a simmer, then cook for 10-15 min, stirring occasionally, until you have 1/4 cup. Refrigerate until room temp.
2. Preheat oven to 350ºF (177ºC) and line a standard cupcake pan with liners.
3. Whisk together the sifted cake flour, baking powder, baking soda, and salt and set aside.
4. In a stand mixer w/ paddle attachment (or hand mixer + large bowl), whip the butter on high for 2 min. Add sugar and beat for 2 min, until light and fluffy. Turn the mixer to low and add the eggs one at a time, then add the vanilla and sour cream, turn the mixer to high and beat for 1 min. Meanwhile, whisk together the strawberry puree, whole milk, and food coloring (if using).
5. Turn the mixer off and add all of the dry ingredients at once. Mix on low until just combined, then add the strawberry milk mixture until just combined, about 30 seconds.
6. Fill the cupcake liners 2/3 full and bake for 14-18 minutes. Cool completely before topping with strawberry buttercream (full recipe linked above). 

#strawberrycupcakes #strawberrycake #pinkcupcakes #strawberry #cupcakes

Footer

On the Blog

  • Cake Basics
  • Recipes
  • Tutorials

Info

  • About
  • Privacy Policy & Disclosure

stay in the know

Copyright © 2026 · Theme by Sugar & Sparrow