• Cake
  • Frosting
  • YouTube
  • My Favorite Tools
  • Nav Social Icons

  • Skip to primary navigation
  • Skip to main content
  • Skip to primary sidebar
  • Skip to footer
  • Recipes
    • Cake
    • Cupcakes
    • Frosting
    • Ice Cream
    • Vegan
  • Cake Basics
  • Tutorials
  • Blog
  • About
  • Mobile Menu Widgets

    Connect

    Search

Sugar & Sparrow logo in script font

Sugar & Sparrow

Lifestyle and Cake from Portland Oregon

  • Cake Basics
  • Recipes
    • Cake
    • Cupcakes
    • Cookies & Bars
    • Filling
    • Frosting
    • Ice Cream
    • No-Bake
    • Small Batch
    • Vegan
  • Tutorials
  • Book
  • Blog
  • About

Vegan Black Velvet Cake (Dye-Free!)

October 20, 2025 · In: Cake, Featured, Halloween, Recipes, Seasonal, Vegan

Jump to Recipe

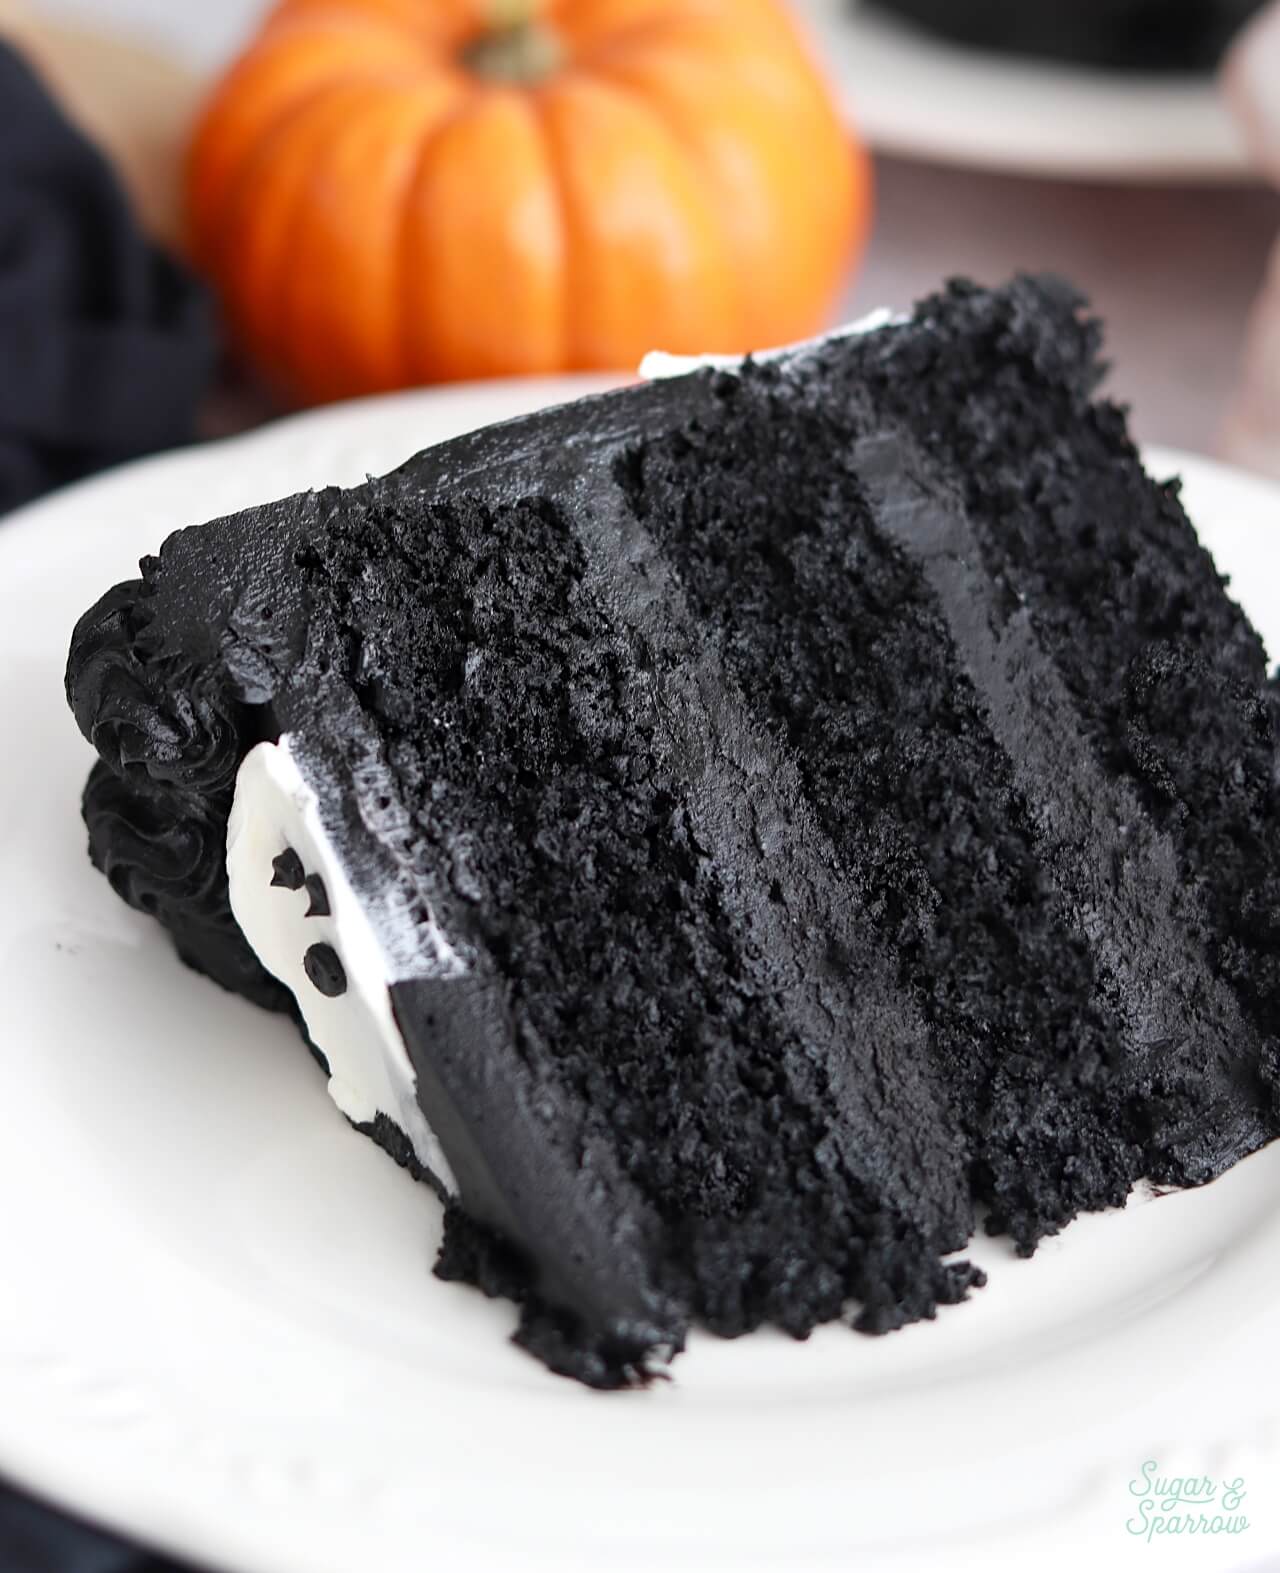
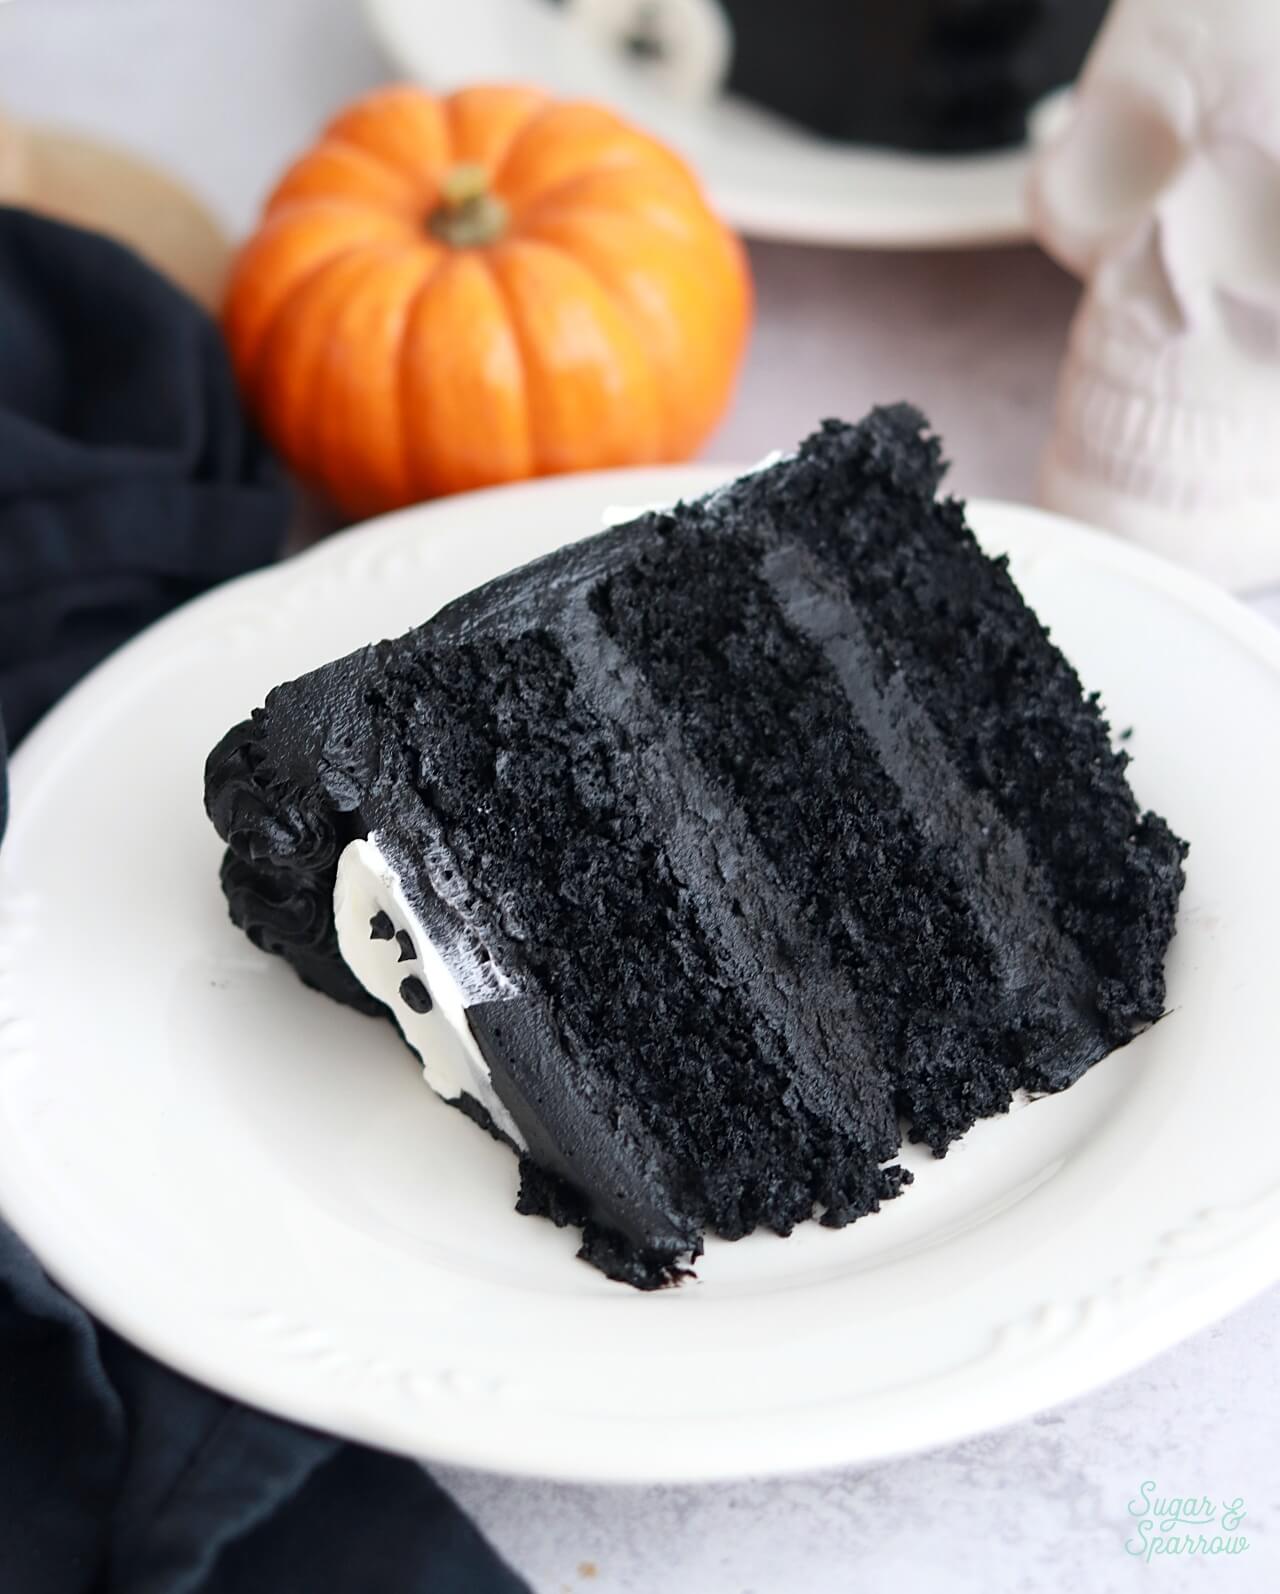
This vegan black velvet cake is so moist and fudgy, tastes like Oreo cookies, and has a deep black color without a single drop of food coloring (so it won’t turn anyone’s mouth black)! The key to achieving the dark black color in the cake and the buttercream without any dye is this extra dark black cocoa powder. It’s the magic ingredient that naturally tints the cake black and since it’s the main ingredient in Oreo cookie shells, the black cocoa powder is also responsible for the amazing Oreo flavor profile in this cake. It’s the perfect plant-based cake for Halloween and so delicious that no one will even guess that it’s vegan! 

vegan black velvet cake dye free
vegan black velvet cake without food color gel

Vegan Black Velvet Cake Ingredients & Substitutions 

Ever since I made this black velvet cake recipe and realized how popular it gets around Halloween, I wanted to offer a vegan version for my plant-based friends. It took many recipe tests to create the perfect fudgy texture with a good amount of rise, but in the end I’m so excited for you to try this finalized version. I’ve listed the most important ingredients below, as well as any substitutions you might need to know:

  • Black cocoa powder. Used in both the cake and the buttercream frosting recipes, this is the key ingredient to creating the rich black color + adding the Oreo cookie flavor. It’s important to use an extra-dark black cocoa powder here to make it completely dye-free (this is my favorite brand). Otherwise, you can use any Dutch-processed cocoa powder as a substitute and add a few drops of black food color gel to tint the cake and buttercream black.  
  • Granulated sugar. This not only sweetens the cake, but yields a soft crumb. 
  • All-purpose flour. Since this cake is so moist, all-purpose flour is my only recommendation for creating the strongest structure. I haven’t yet tried this with gluten-free flour, but I will report back here if I do. 
  • Lots of baking powder + a little baking soda. These are the leavening agents used to make this cake rise. The baking powder is particularly important because black cocoa is non-acidic after the Dutching process (more on that in the next section), so it won’t react as easily with the baking soda and therefore needs more leavening to make this cake rise properly. 
  • Vegetable oil. For added moisture and fudgy texture. I like using plain vegetable oil, but you can use any oil you’re used to baking with (canola, avocado, melted coconut oil, etc). 
  • Unsweetened applesauce. The natural pectin in applesauce makes it the perfect egg replacer in this recipe. It helps bind the crumb while adding moisture. 
  • Pure vanilla extract. A little vanilla enhances the Oreo flavor perfectly. 
  • Unsweetened soy milk. Any non-dairy milk will work in this recipe, but soy milk is my favorite because it has the highest protein content, which helps yield a rich texture. It also has the most mild flavor of the non-dairy milk options in my opinion, so it doesn’t affect the overall flavor of the cake. 
  • Vinegar. Adding a little vinegar creates a rich velvety texture in this cake. I like using white vinegar, but you can also use apple cider vinegar here.
  • Hot coffee. Don’t worry, you won’t taste coffee in the final baked cake, but coffee helps amplify the chocolate flavor big time. The heat also blooms the cocoa powder and incorporates all the ingredients before the baking process. If you’d rather not use hot coffee, you can use hot water instead. 
  • Vegan butter sticks. You’ll want to use your favorite brand of vegan butter sticks for the buttercream portion of the recipe. The sticks help thicken the buttercream and create structure. I like Country Crock or Earth Balance, but any brand of vegan buttery sticks (not the spread) will do.  
dairy free egg free black velvet cake

What is Black Cocoa Powder?

Black cocoa powder is basically an ultra-Dutched cocoa powder, meaning it’s been treated with an alkaline solution to reduce its acidity. It’s very dark in color and while it isn’t as chocolatey as regular cocoa powder, it does have amazing flavor. It’s the main ingredient in Oreo cookie shells, and that’s basically what the cake layers end up tasting like. The best part about black cocoa powder is it gives the cake layers a rich black color without having to add any additional food coloring! That means it won’t turn your mouth crazy colors. 

How to Make Vegan Black Velvet Cake

Step 1: Prep work. Preheat the oven to 350ºF (177ºC) and prepare your cake pans.

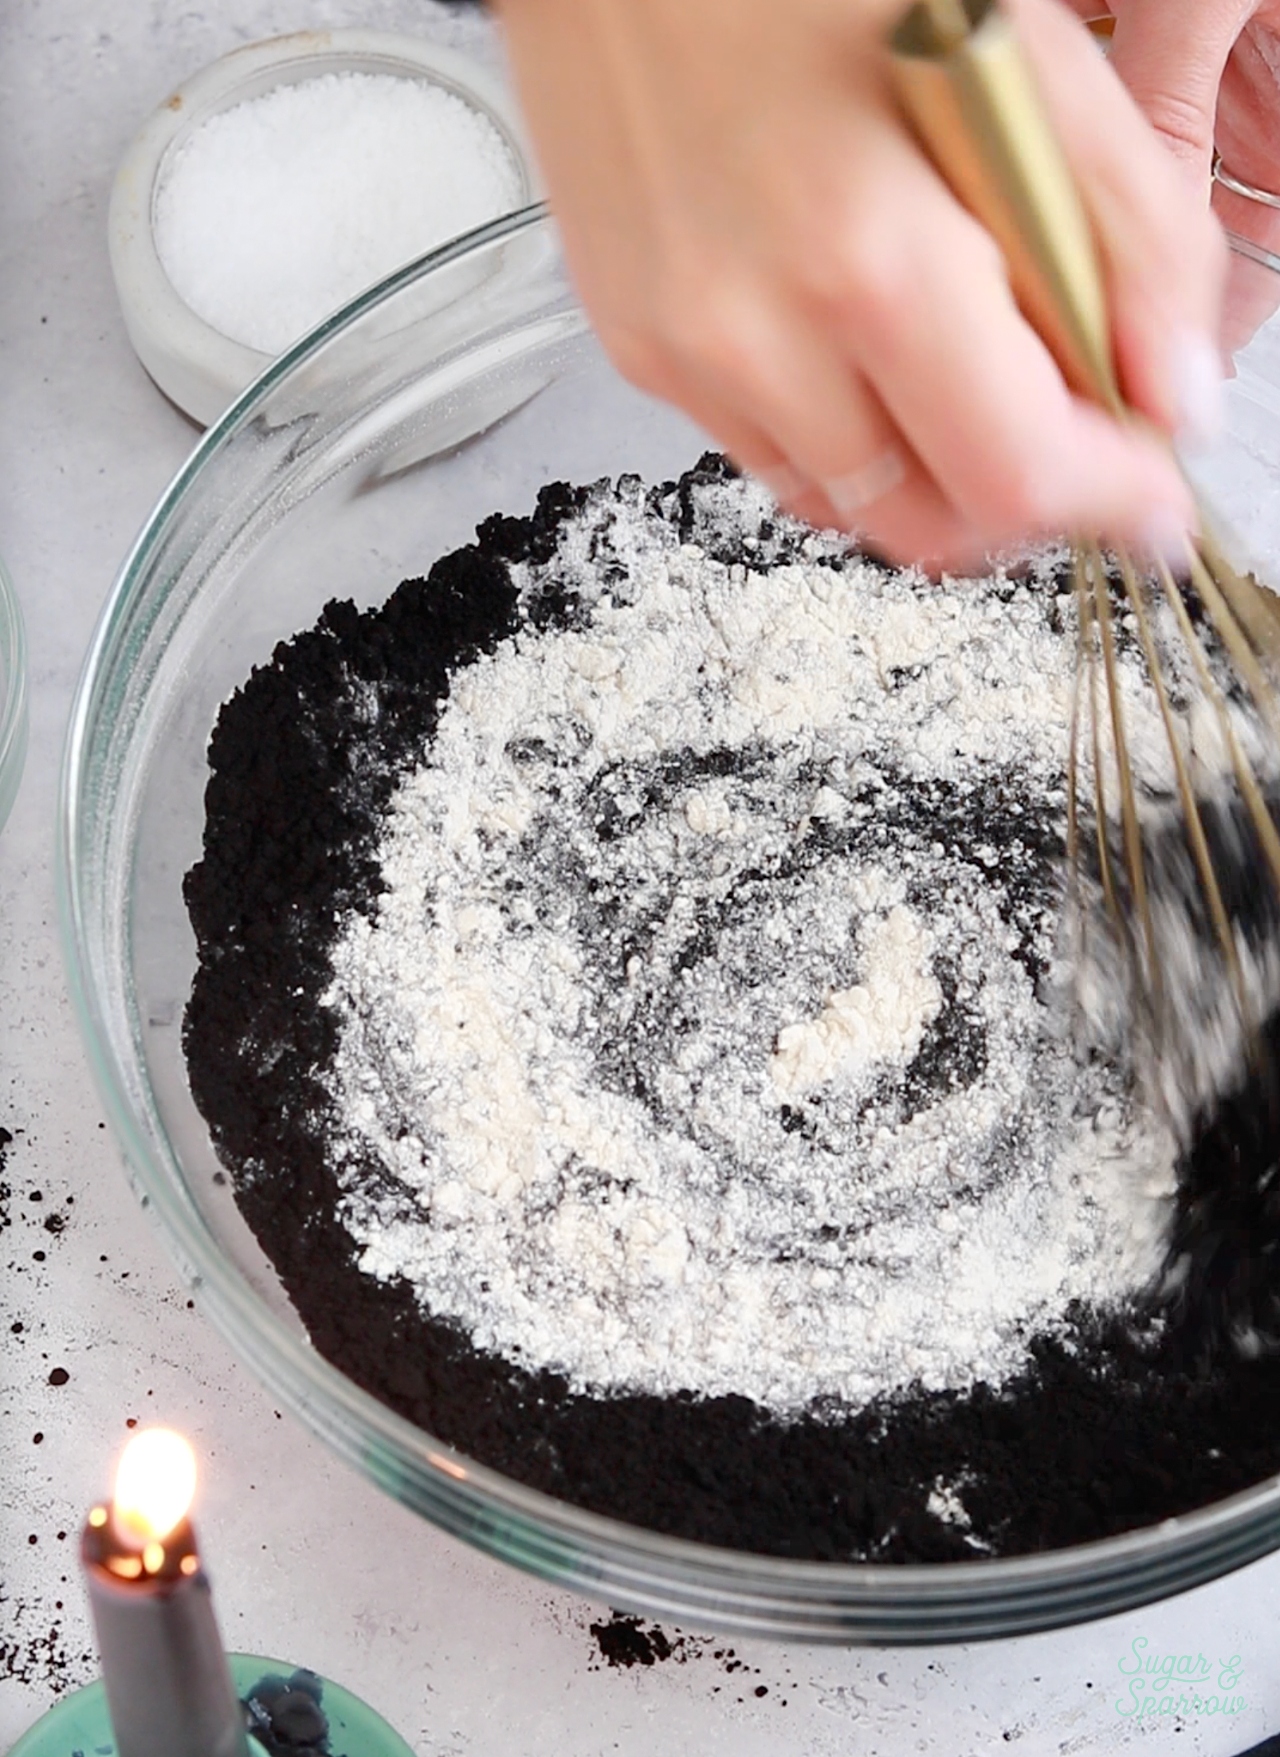
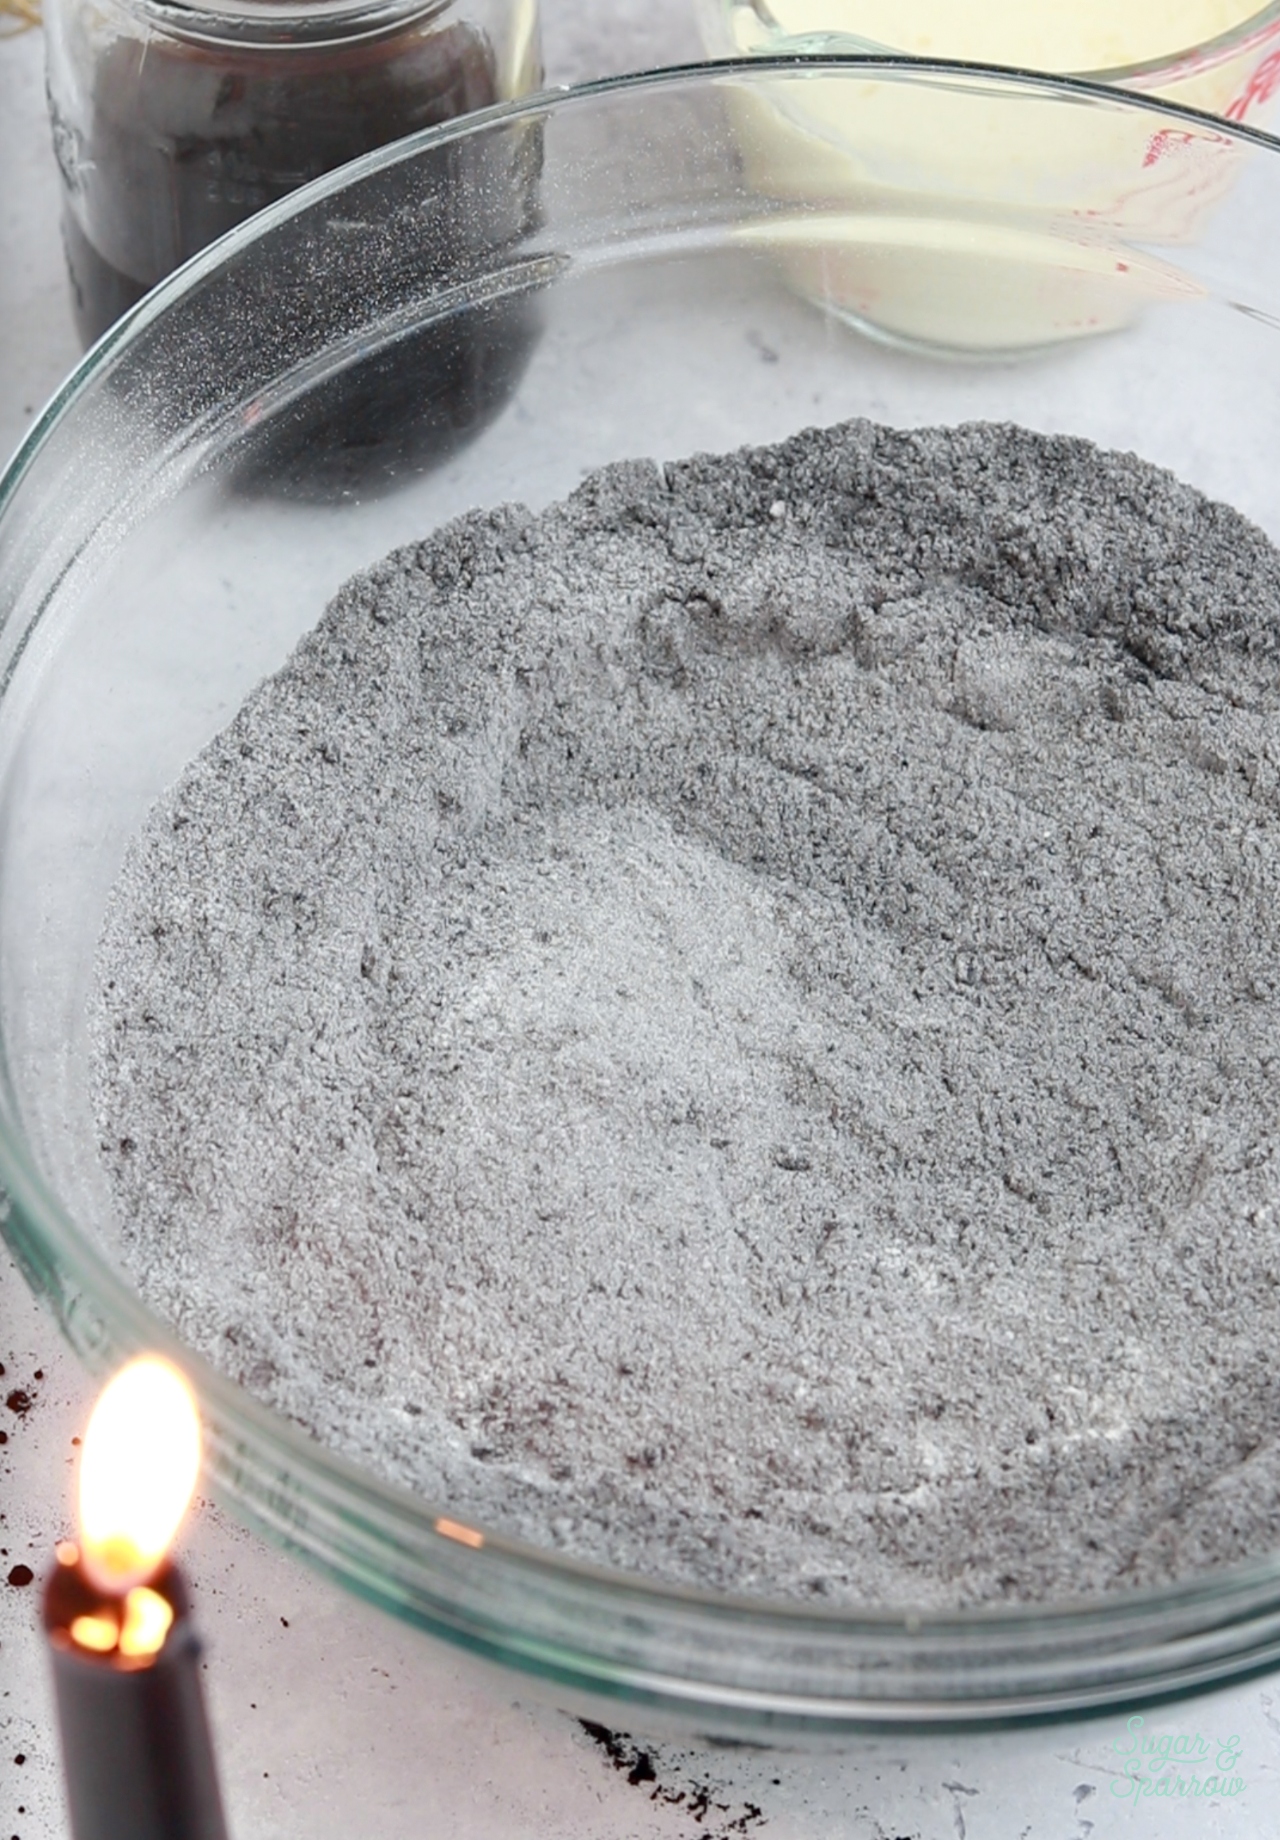
Step 2: Combine the dry ingredients. Add the flour, sugar, black cocoa powder, baking powder, baking soda, and salt into a large bowl and whisk the ingredients together. 

Step 3: Add most of the wet ingredients. To the dry ingredients, add the oil, applesauce, vanilla, and vinegar milk mixture. Whisk it all together.

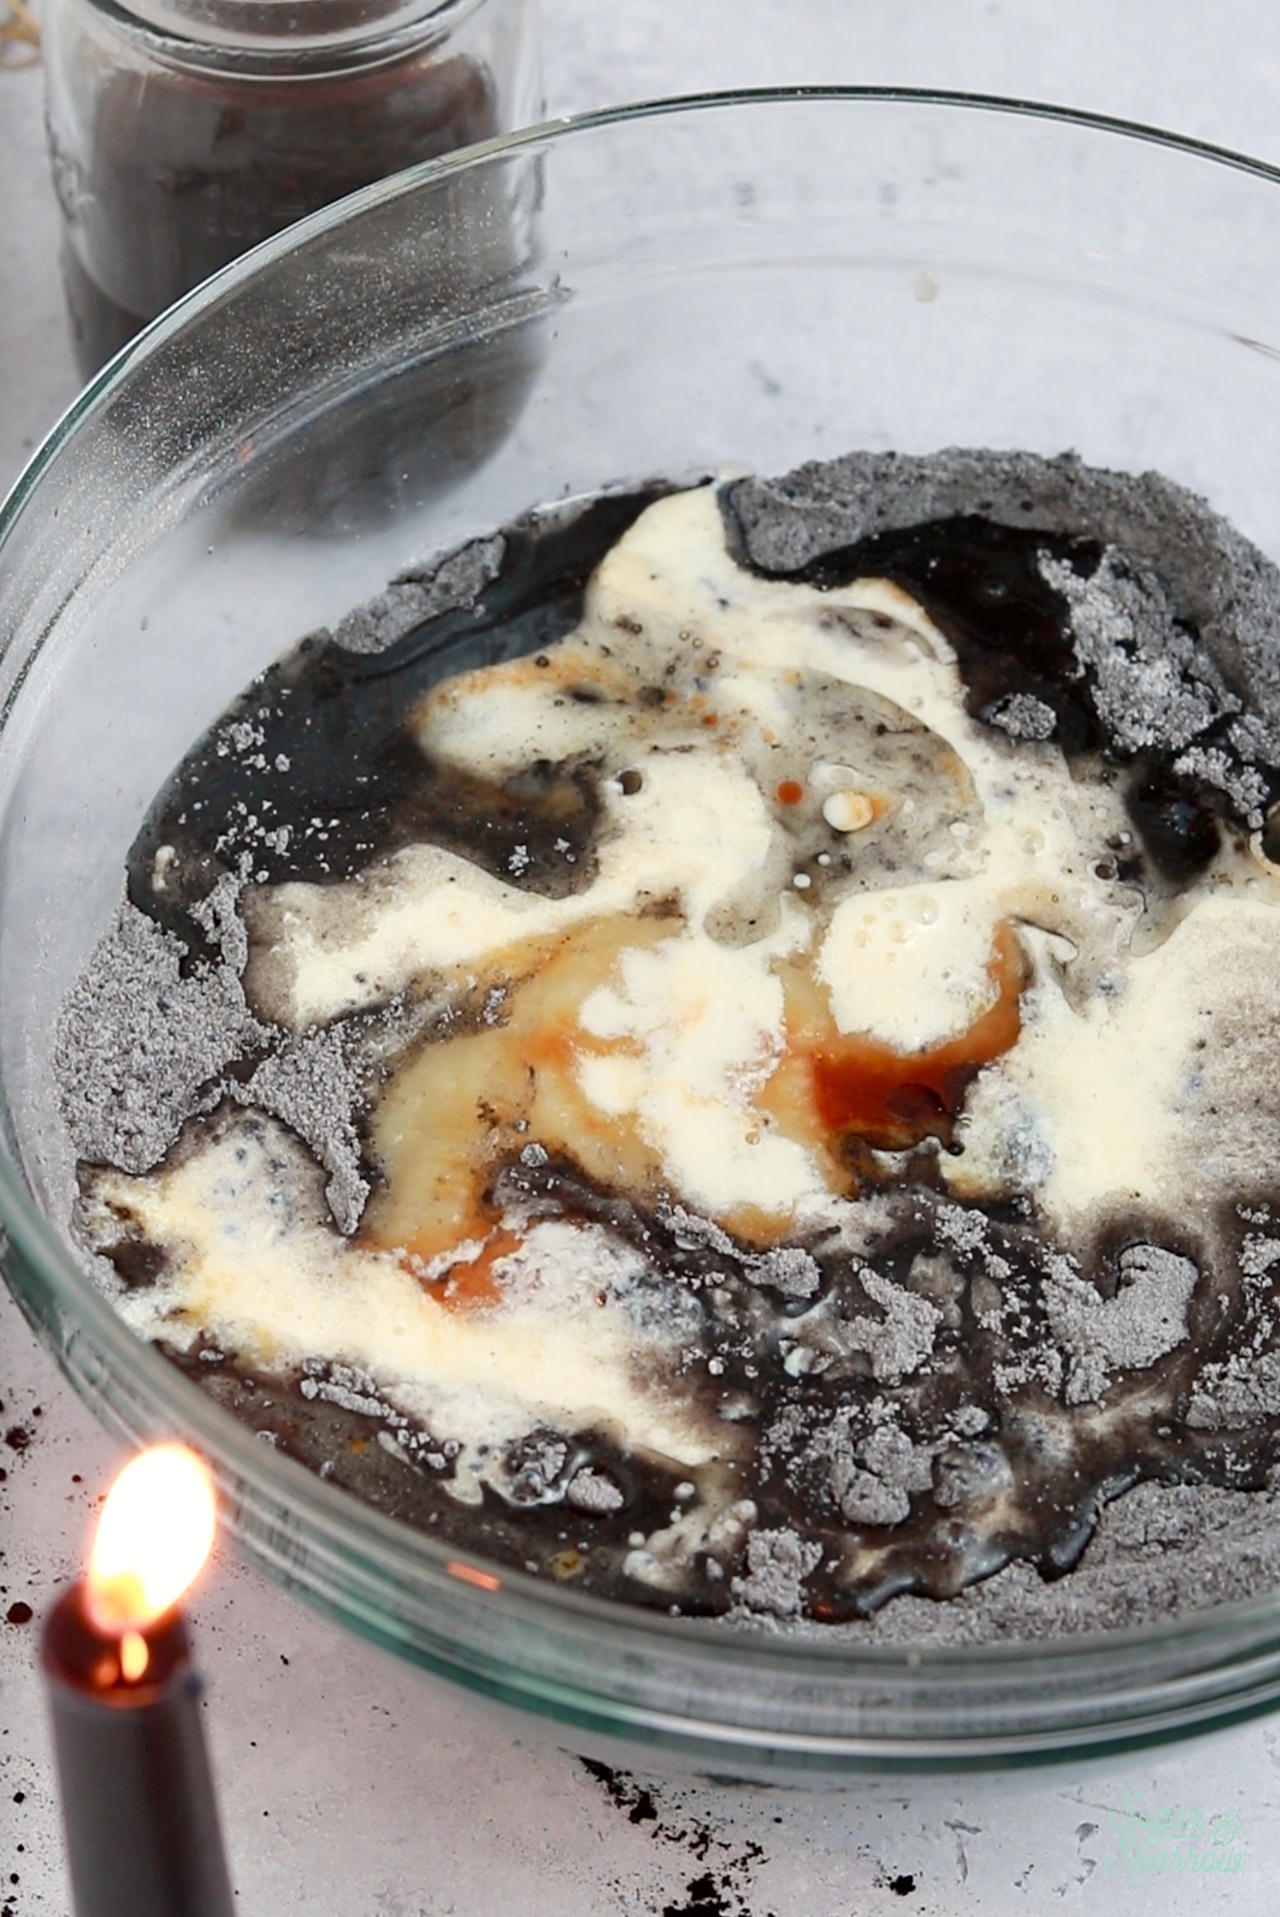
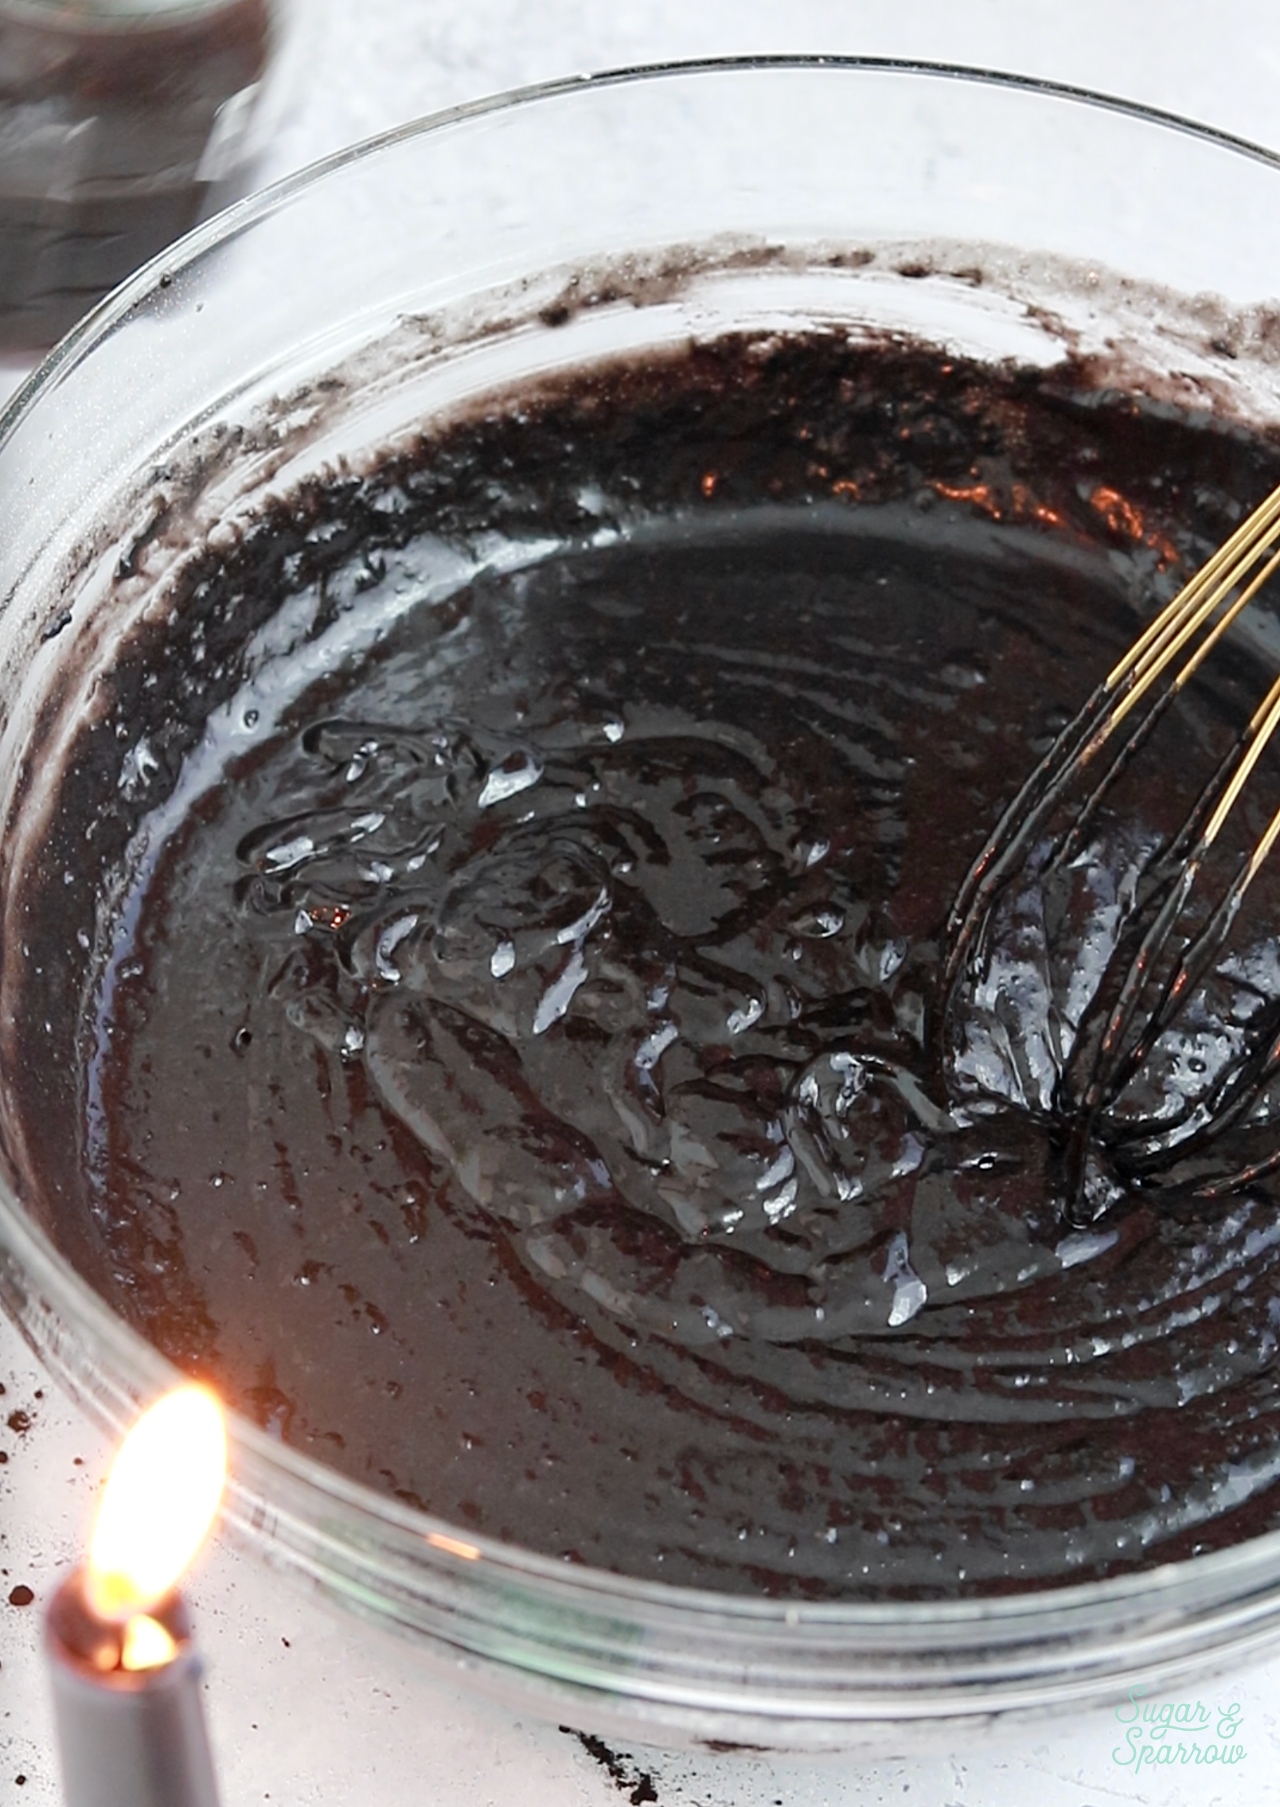
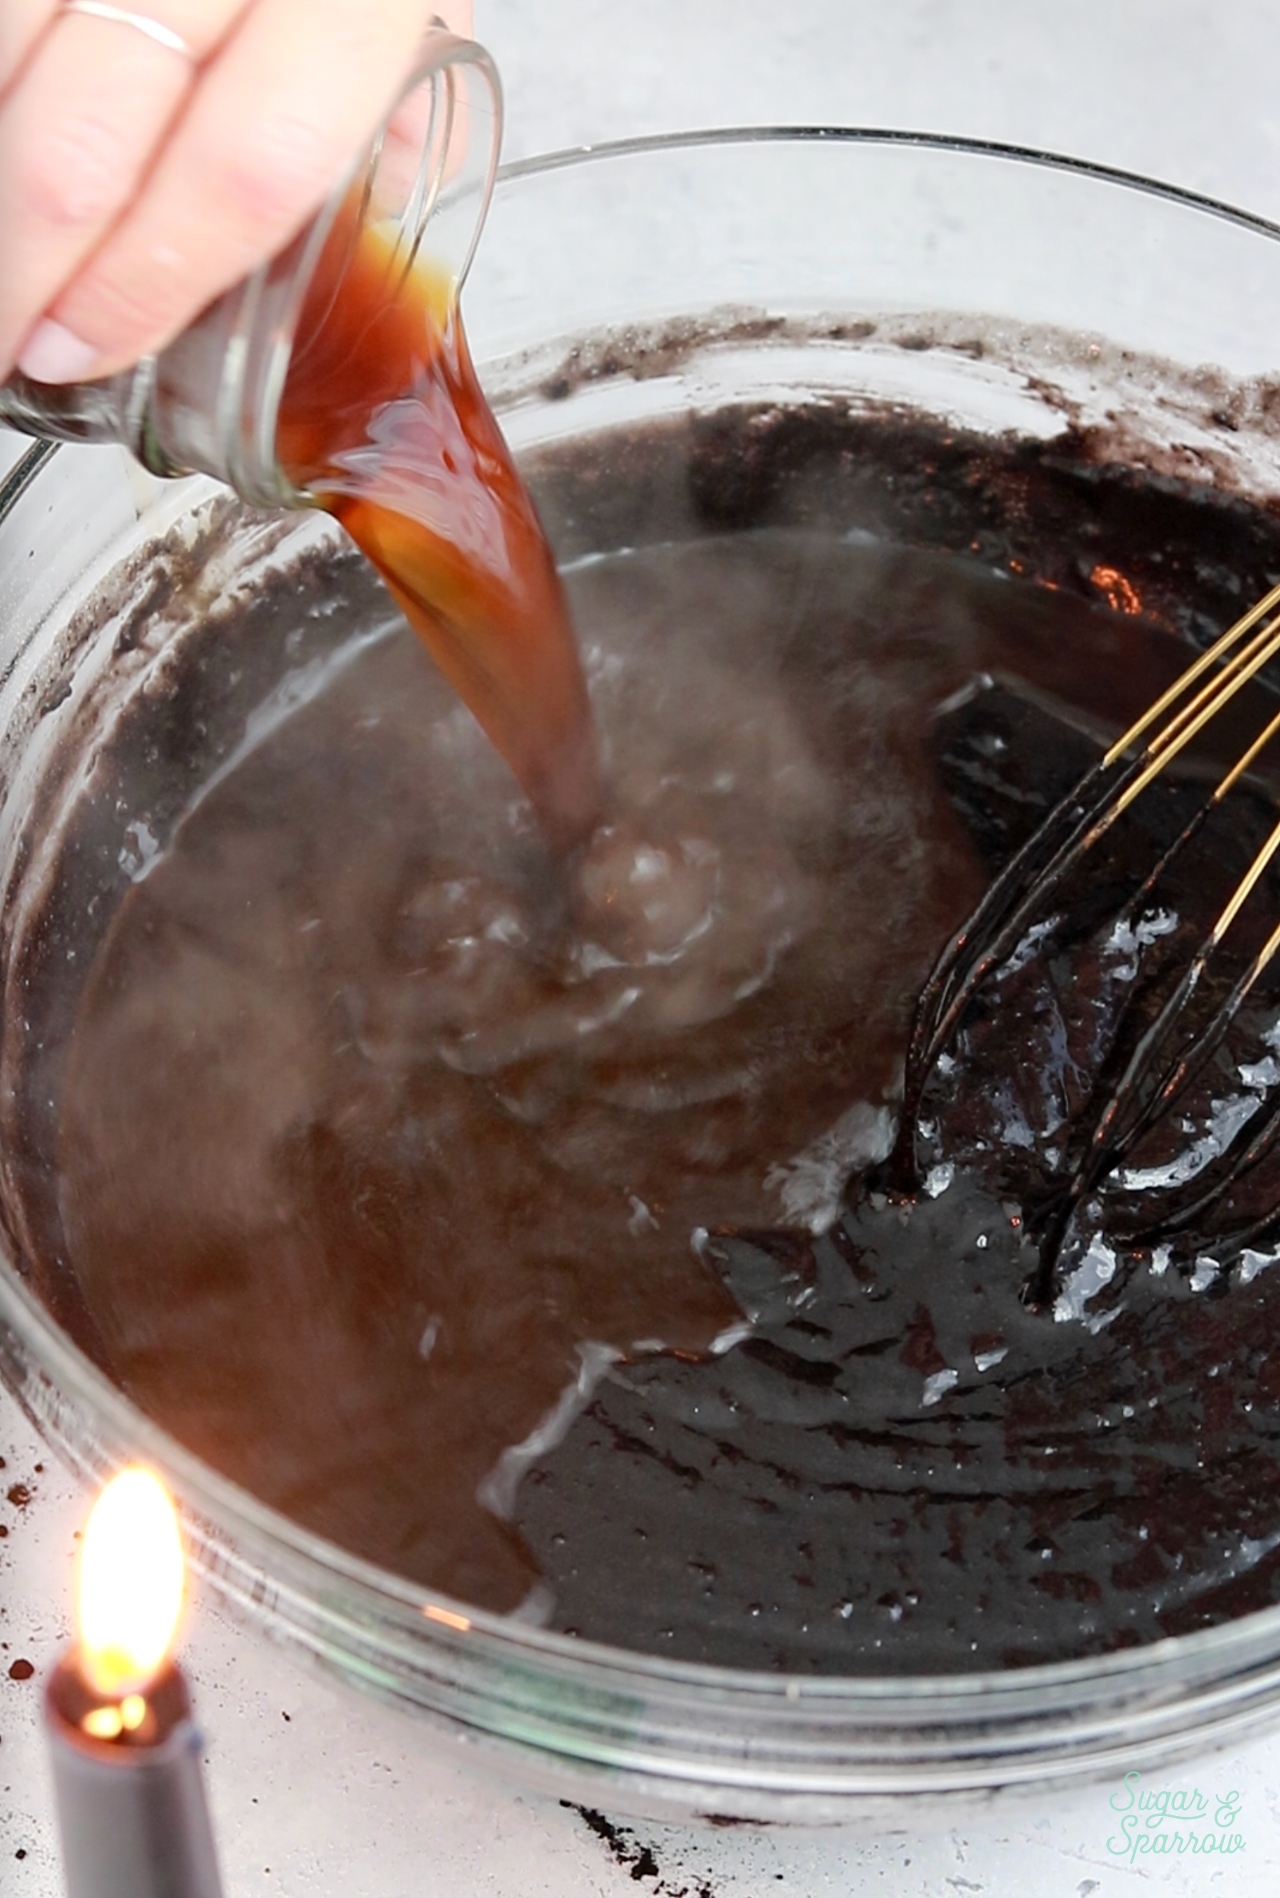
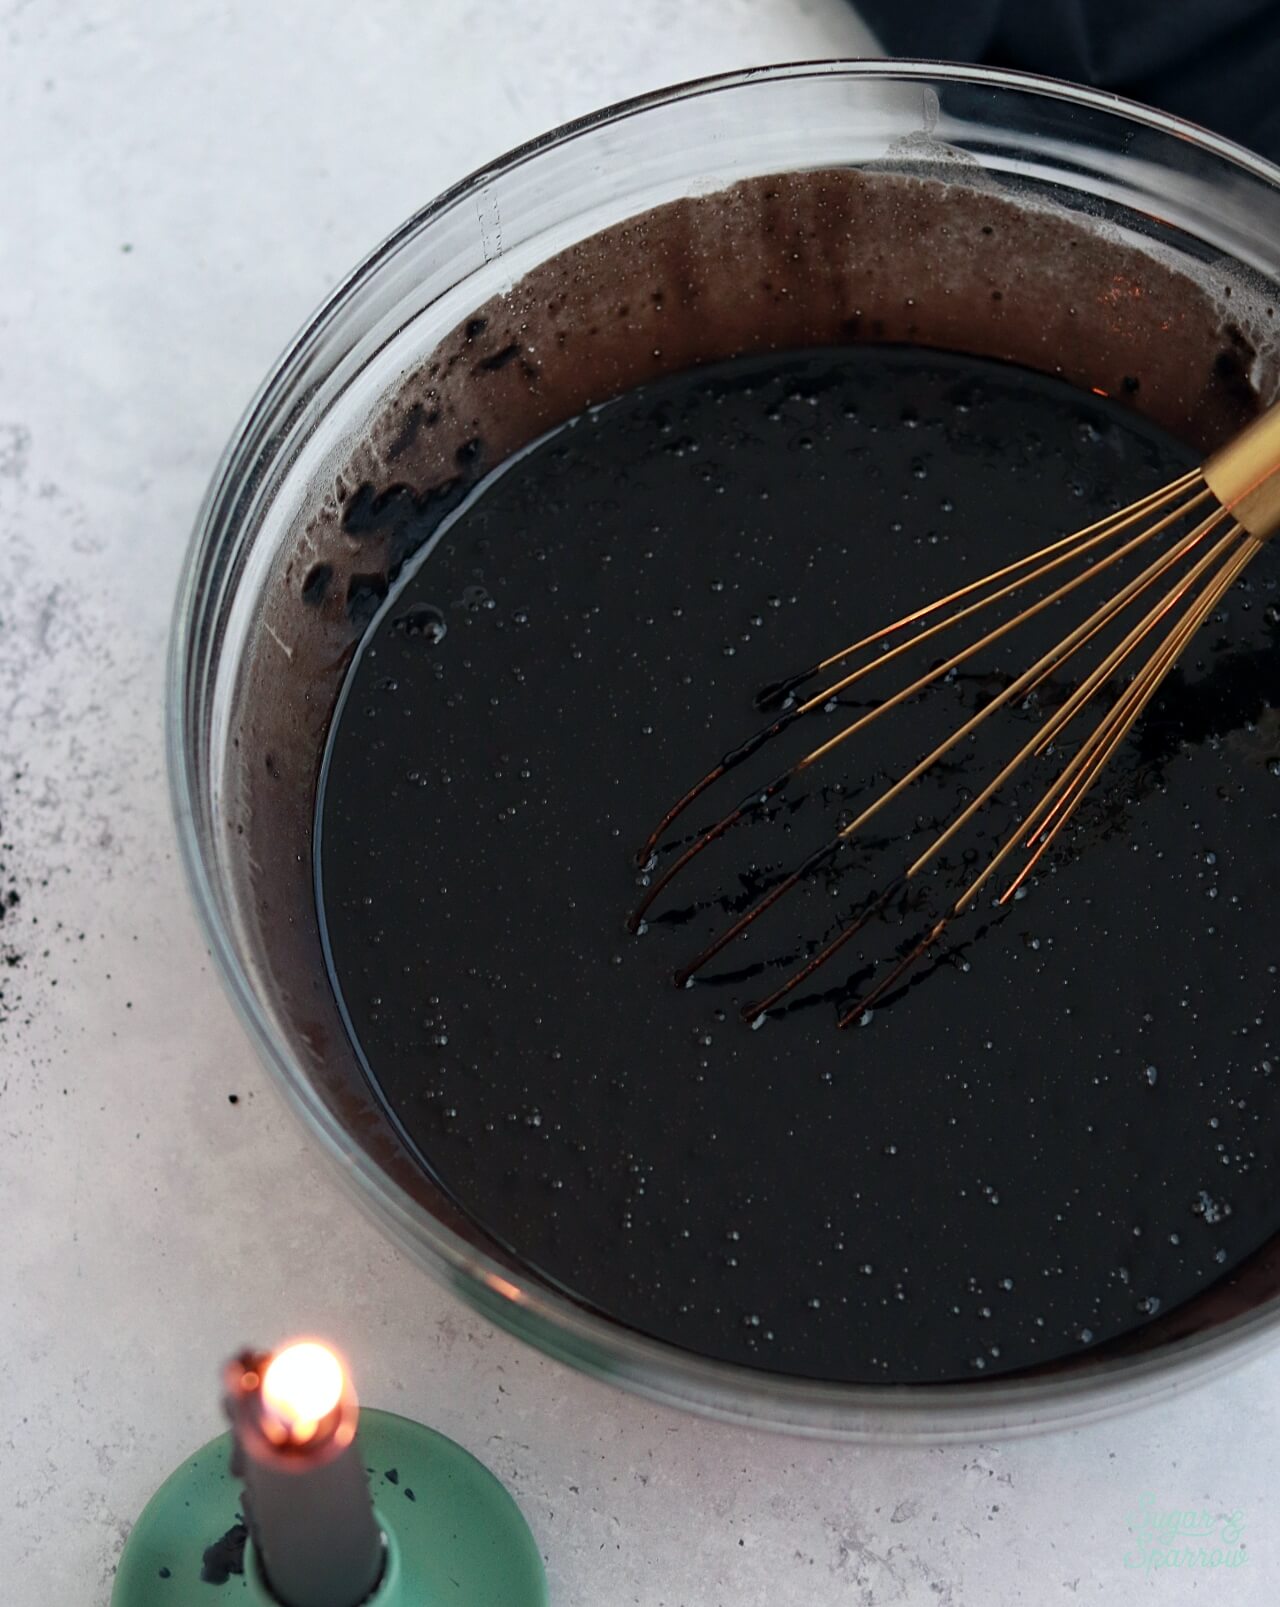
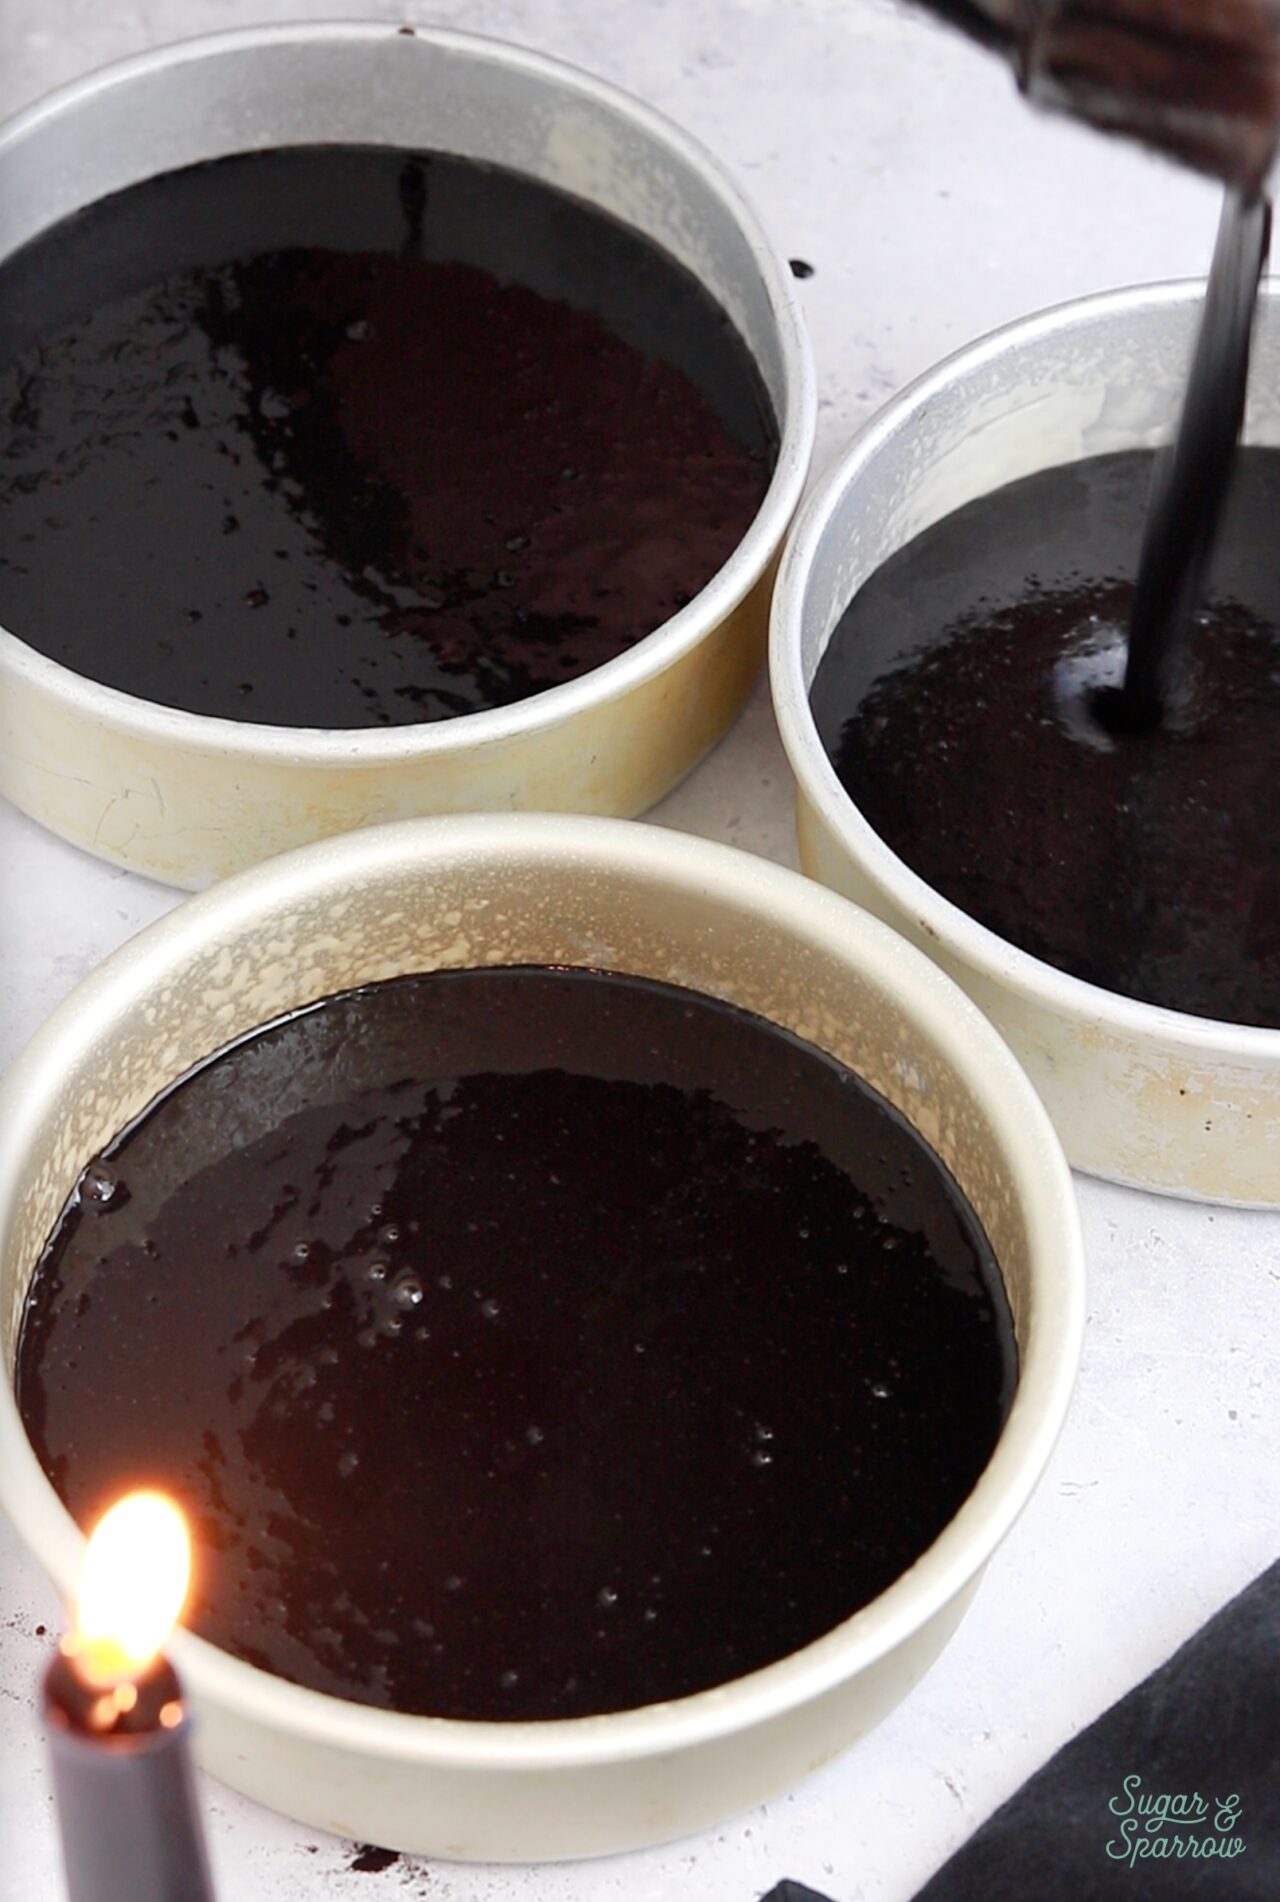
Step 4: Add the hot coffee. Whisk in the hot coffee until the batter is well combined and uniform. It will be very thin. 

adding hot coffee to chocolate cake batter
black velvet cake batter

Step 5: Bake the cakes. Pour the batter evenly between the cake pans and bake for 30-35 minutes, until a toothpick inserted comes out clean or with just a few moist crumbs. Let the cakes cool in the pan for a few minutes before carefully transferring them to a wire rack for an additional few hours of cooling. 

pouring black velvet cake batter into a pan

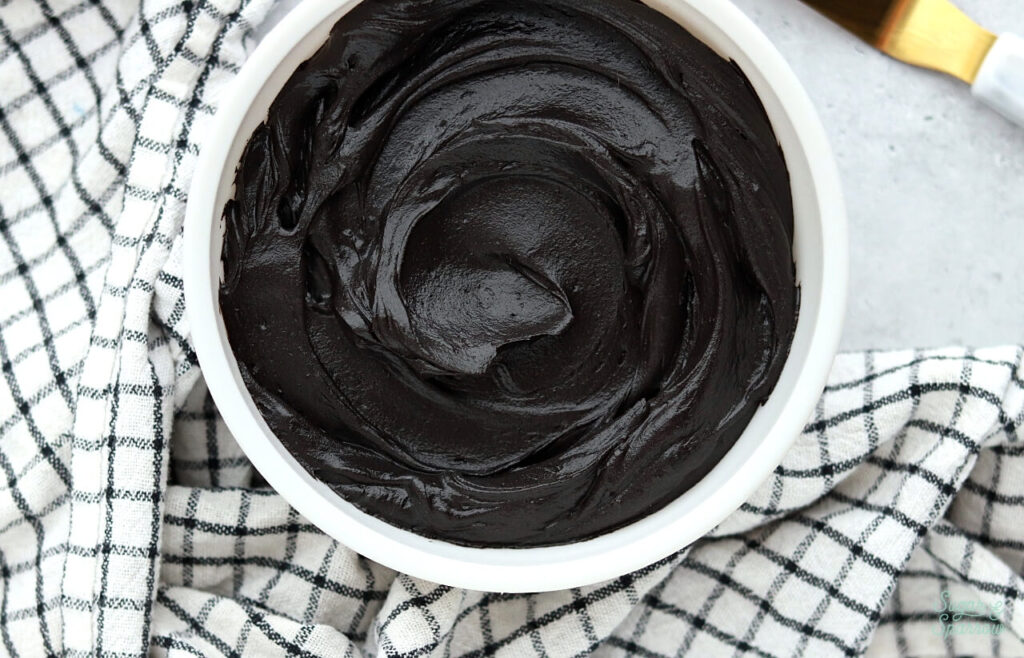
Step 6: Make the buttercream. When the cakes are cool and you’re ready to decorate (or make the buttercream ahead), whip up the buttercream according to the instructions in the recipe card below. 

black buttercream recipe by sugar and sparrow

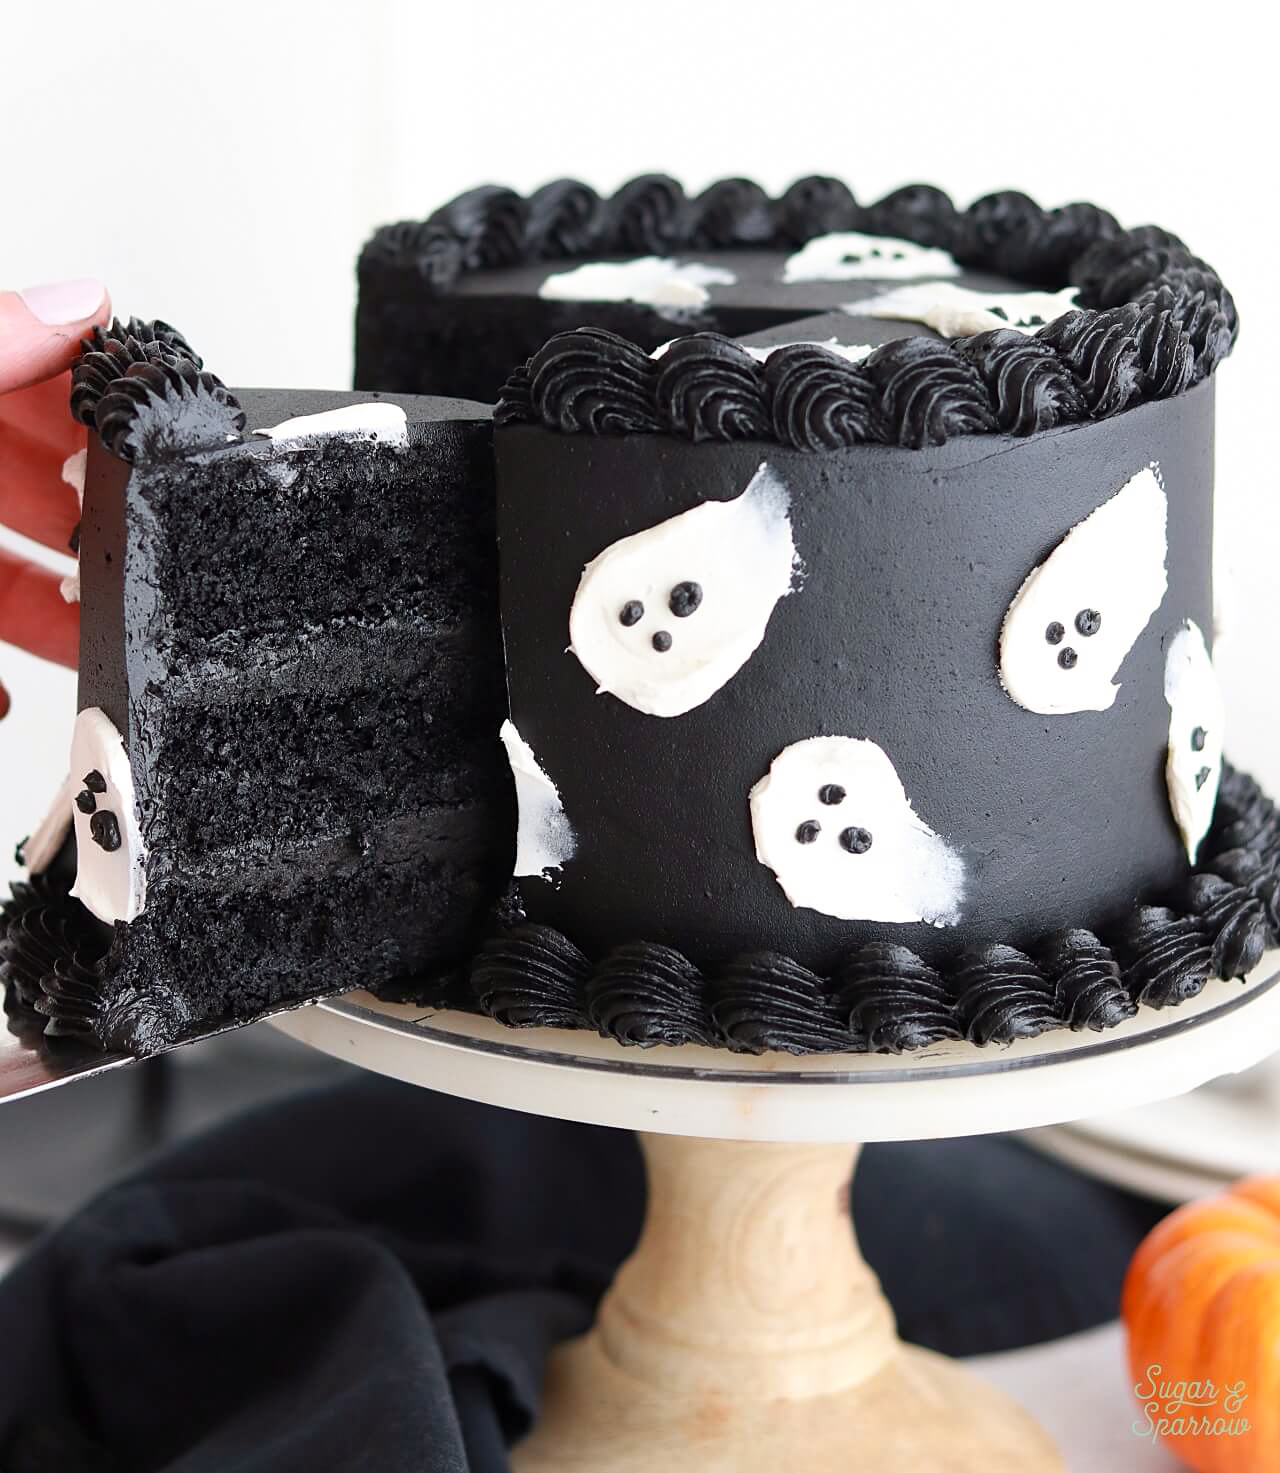
Step 7: Decorate. Fill and stack the vegan black velvet cake layers with the vegan black buttercream, crumb coat it, then frost and decorate the cake to your heart’s desire! I have some ideas in the next section, as well as details about the cake design pictured. 

buttercream ghost decorations for cake
how to decorate a cake with buttercream ghosts
black velvet cake with buttercream ghost decorations

How to Decorate Vegan Black Velvet Cake 

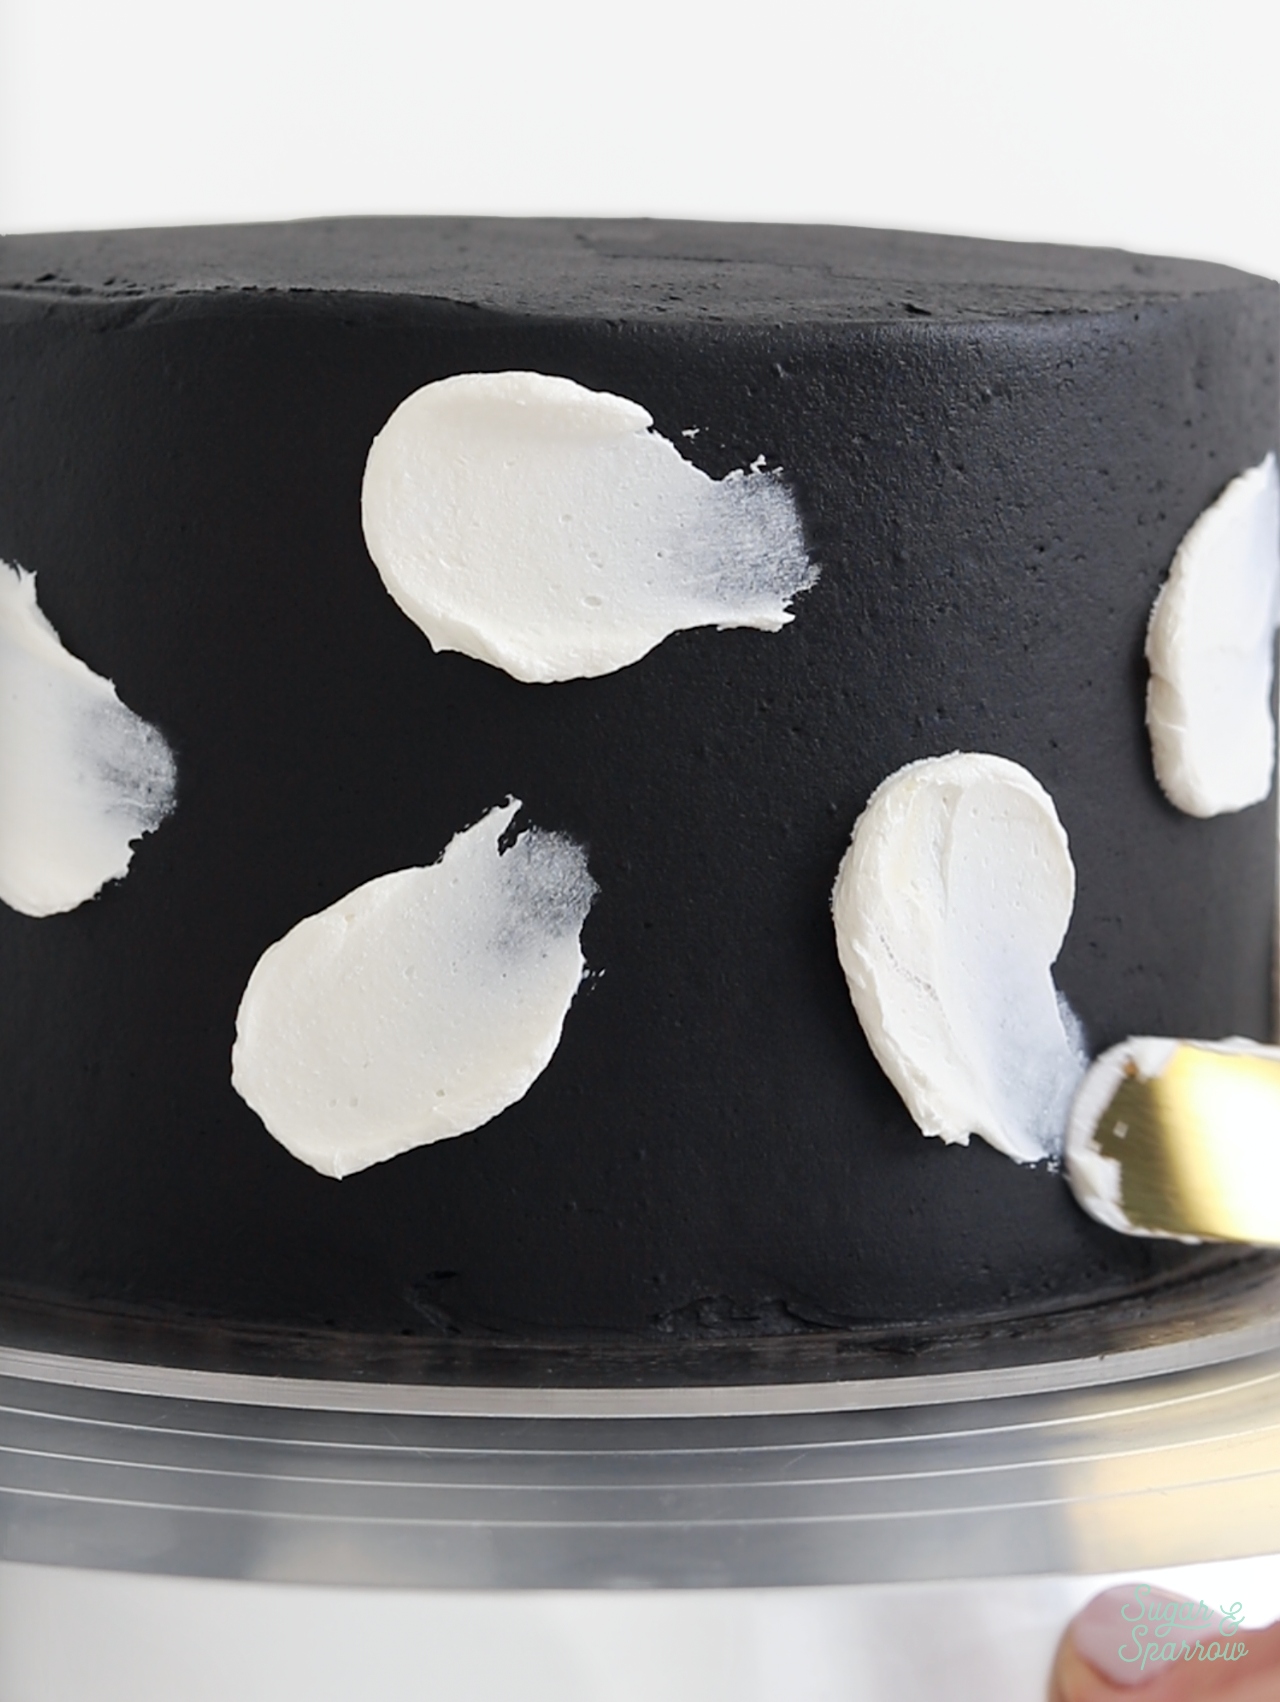
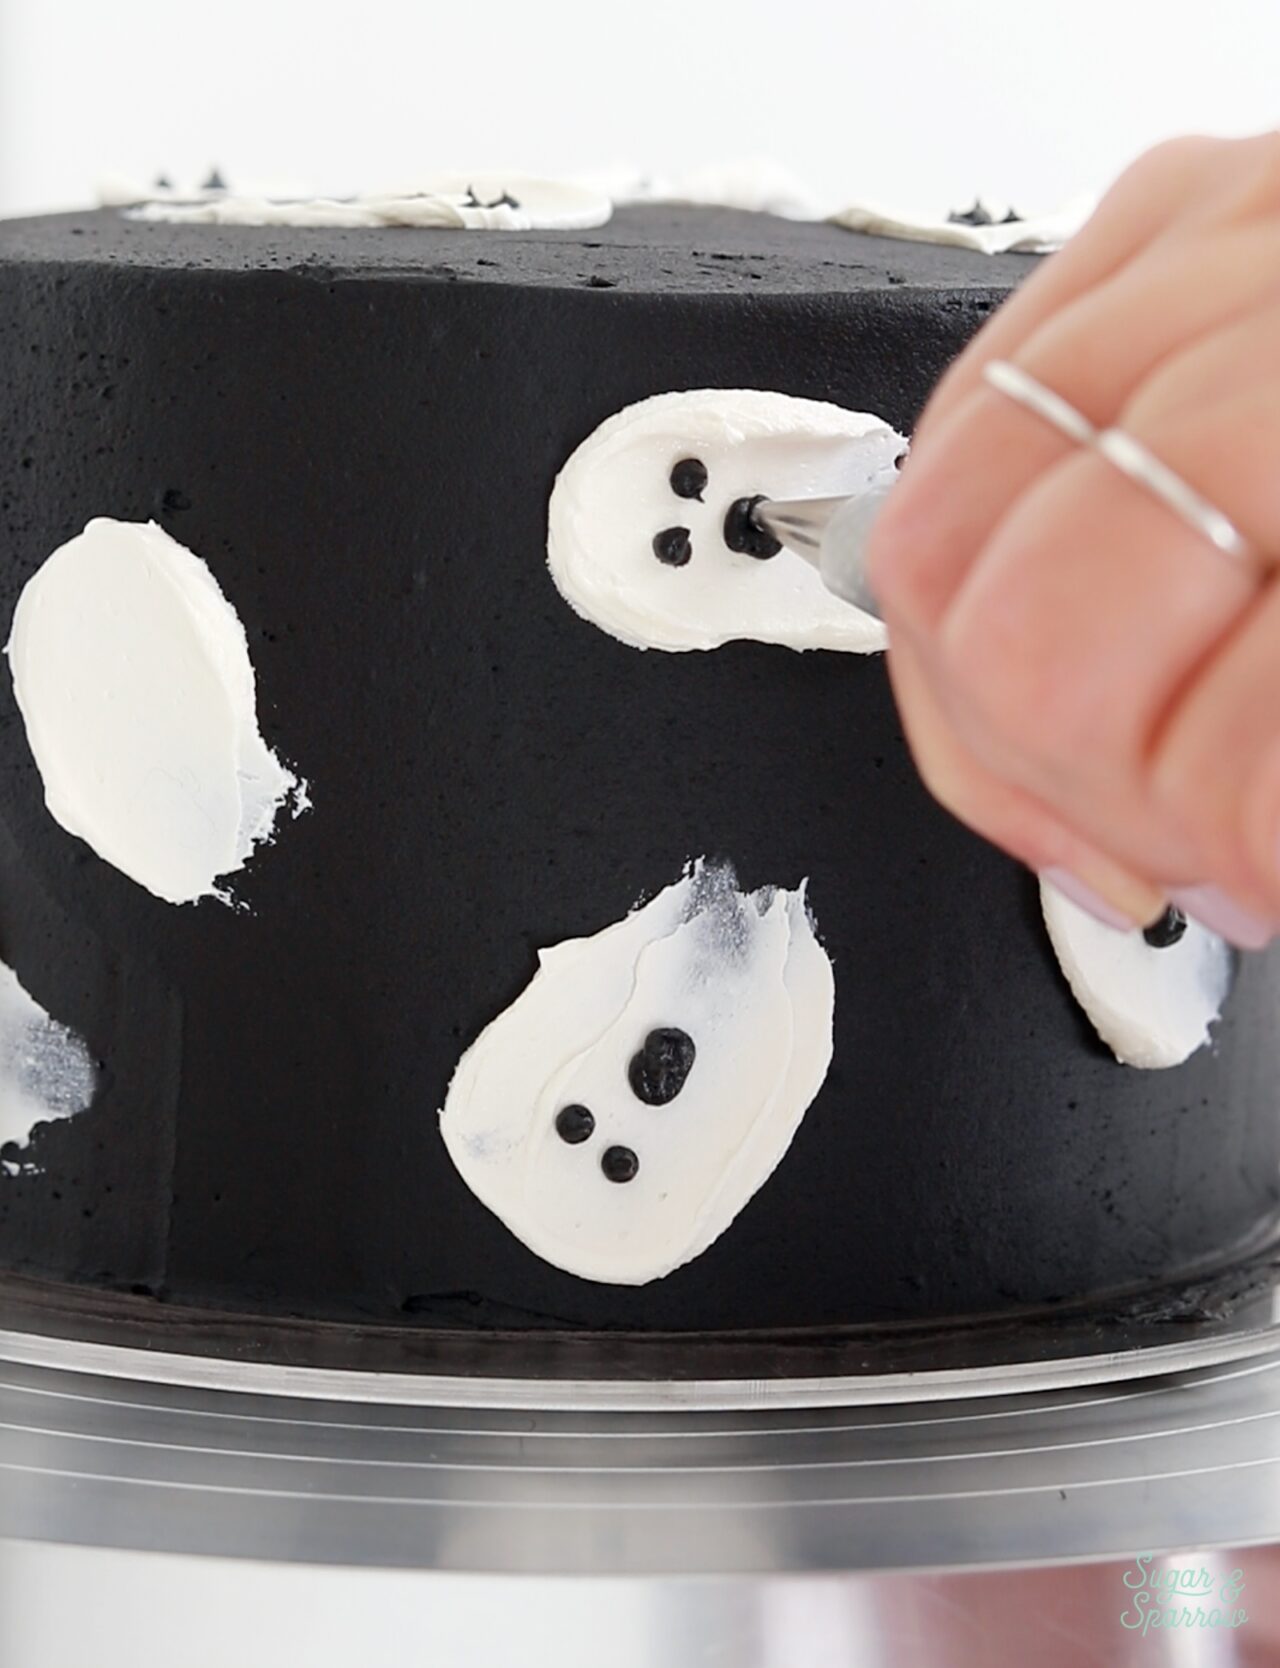
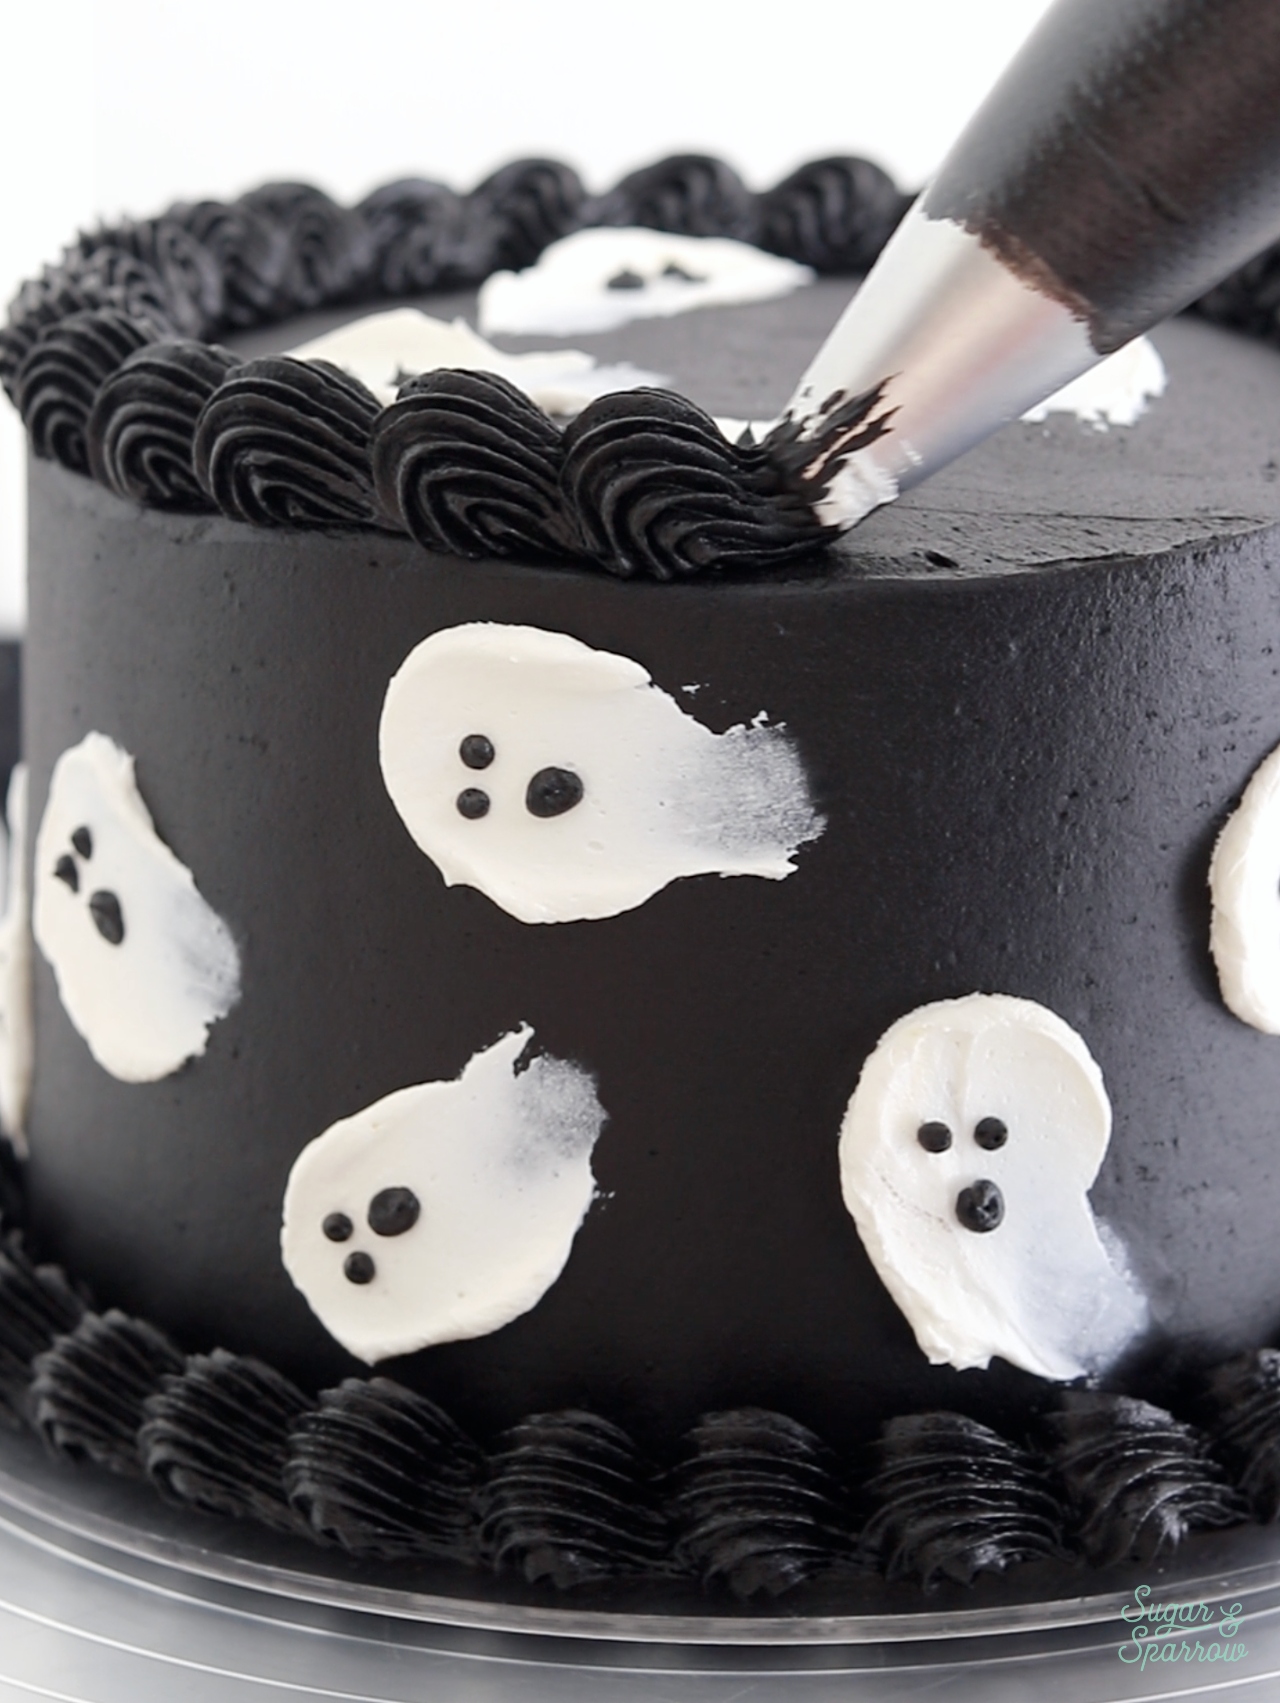
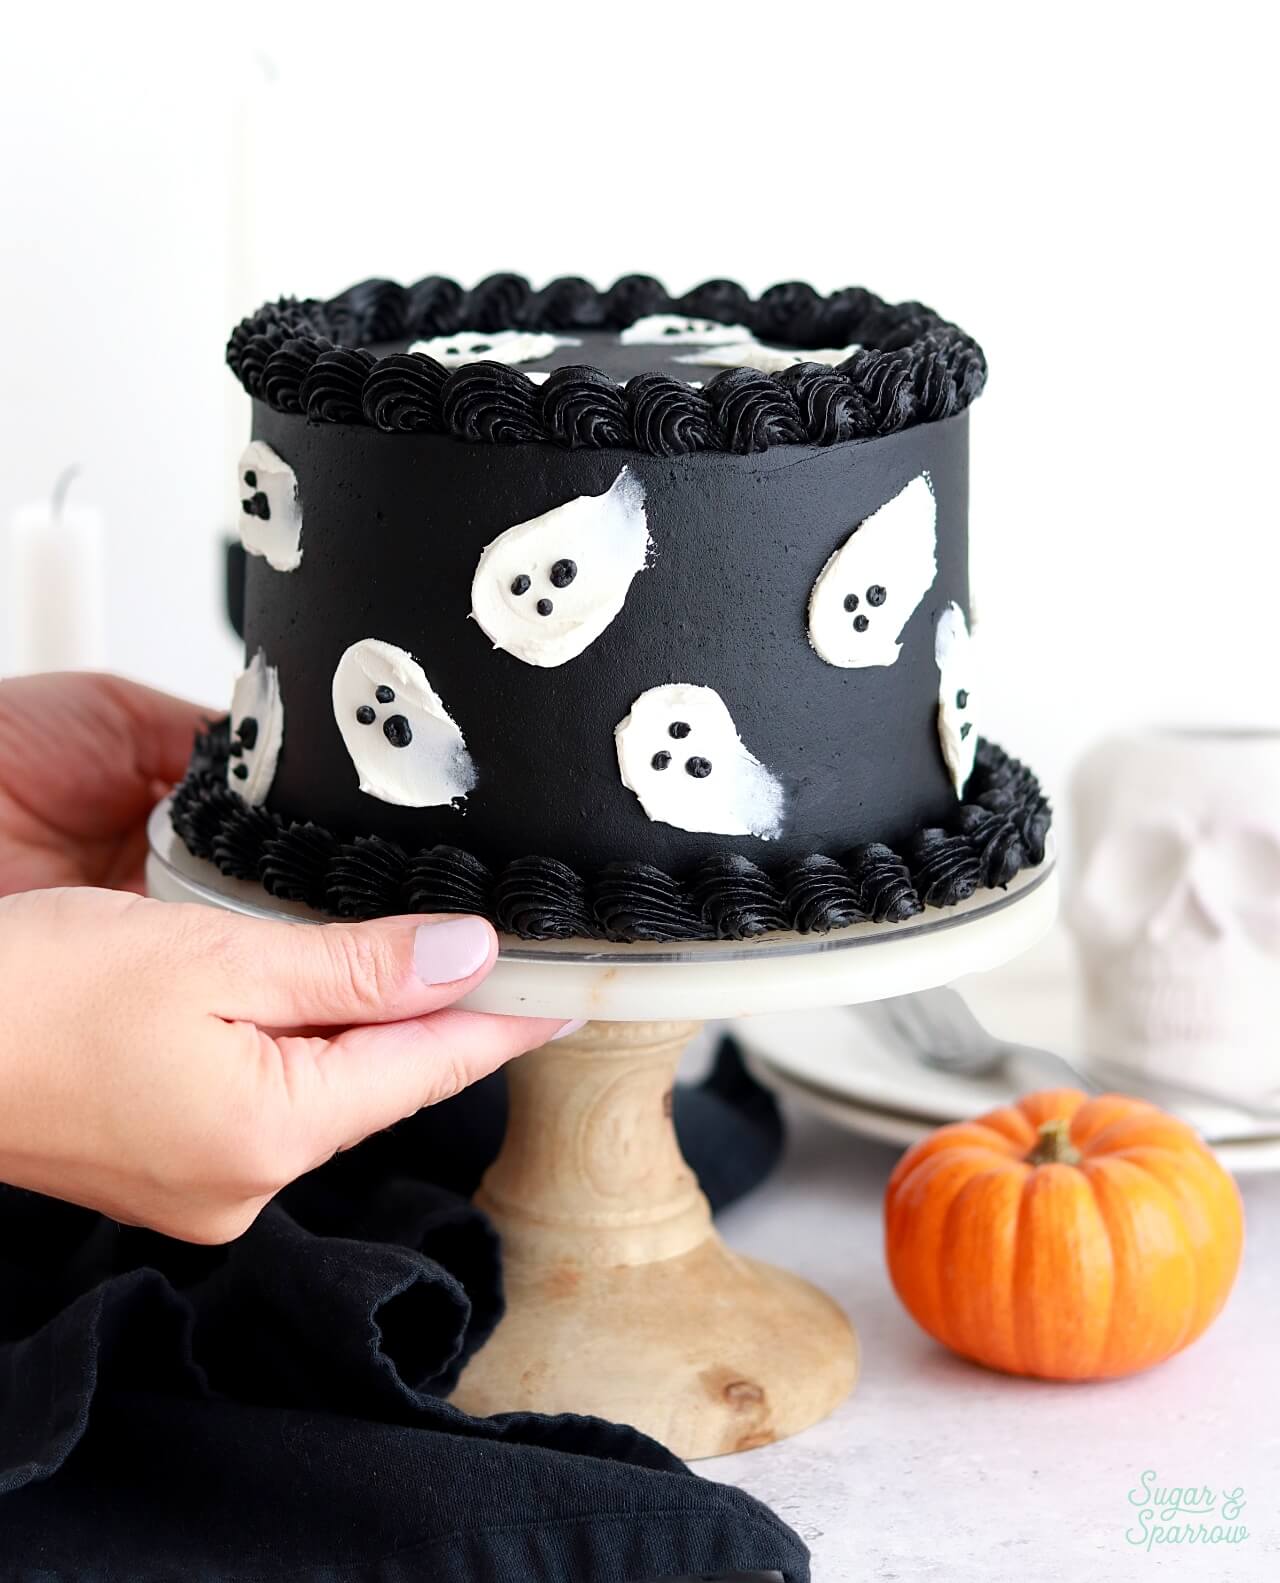
I was ready to add all the sprinkles and googly eyes to this vegan black velvet cake, but after some Google research I realized that most sprinkles are NOT vegan. I did find some good vegan sprinkle options on Sweetapolita’s website but I wouldn’t have been able to order them in time to decorate this cake, so instead I decided to reserve some of my buttercream before adding the black cocoa powder (while it was still white), then used it to make some simple ghost decorations all over the black cake. I love how it turned out! 

black cake with white ghosts

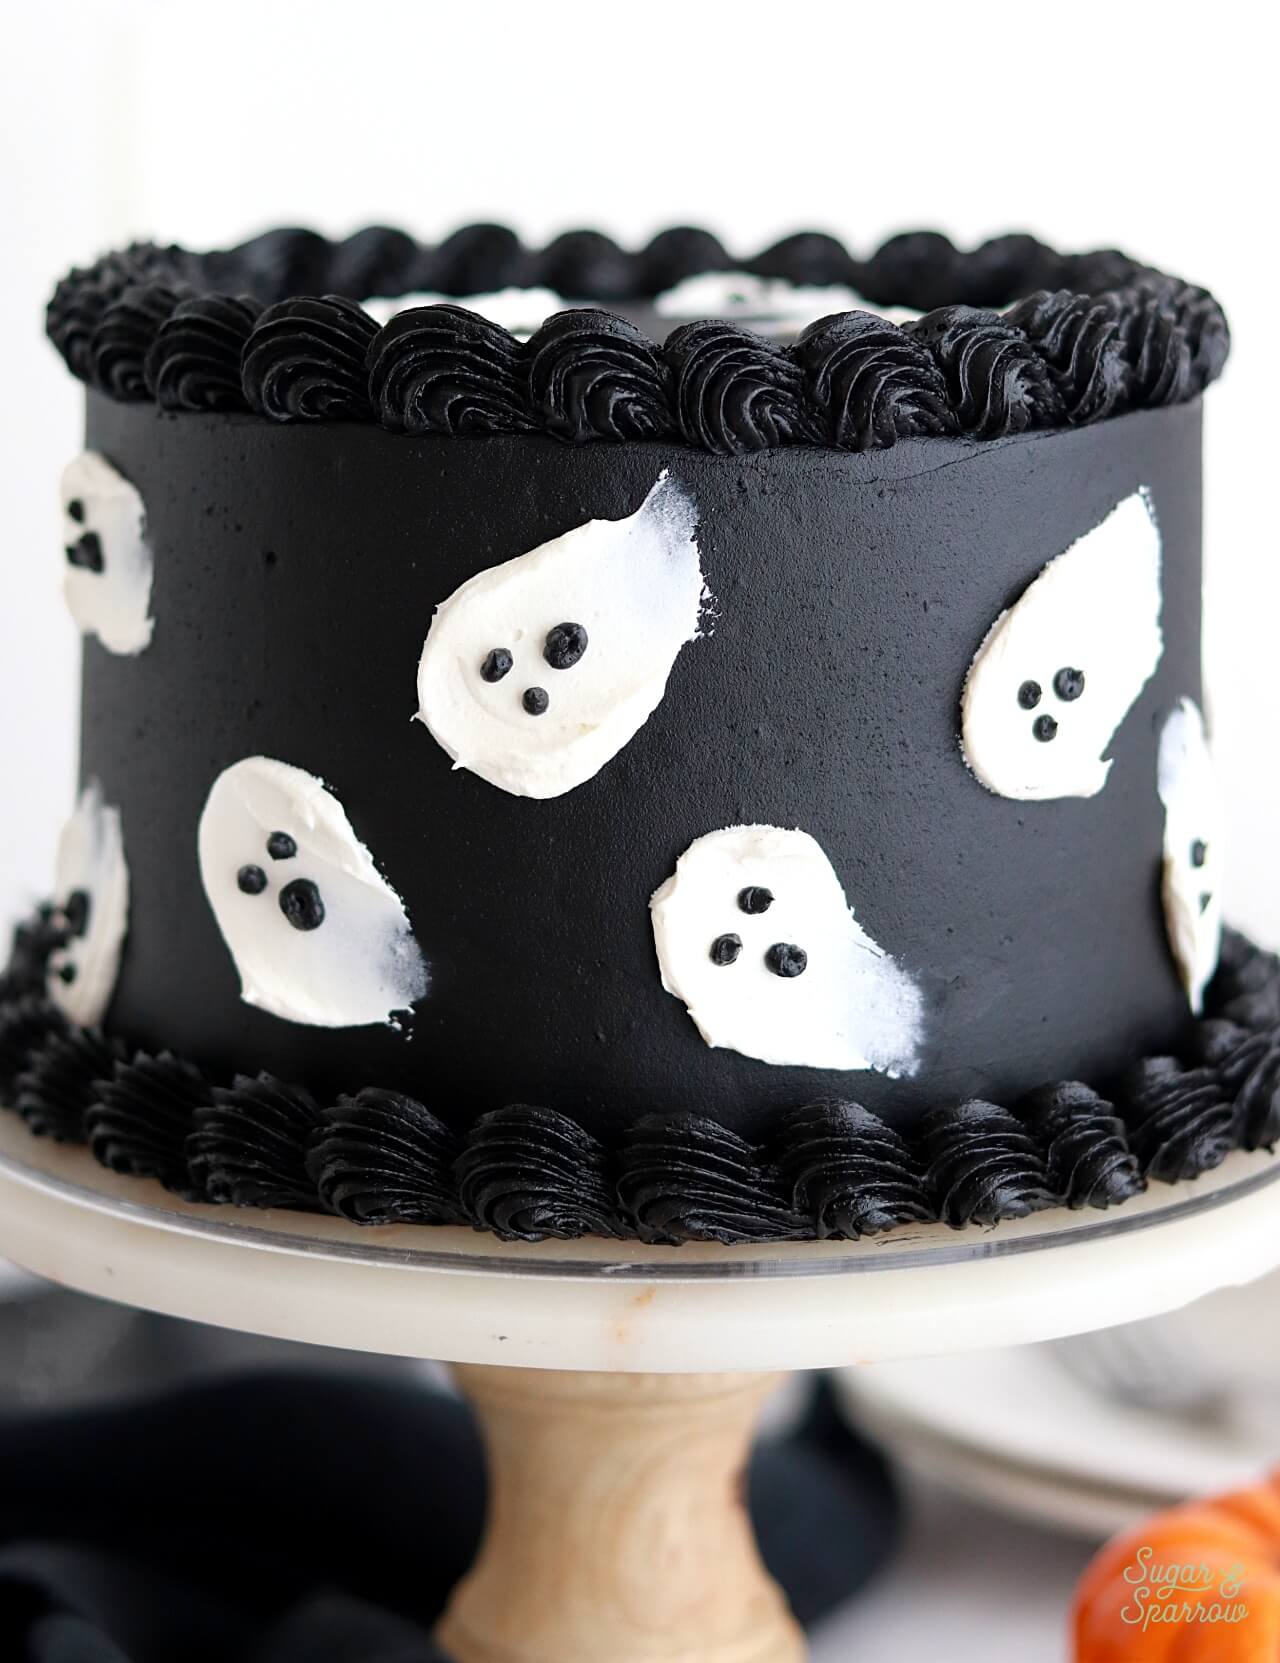
I also added some simple shell borders to the top and bottom of the cake with my black buttercream to add a little more vintage texture. You can feel free to get creative with your cake design though! Make an elaborate lambeth cake like I did with my original black velvet cake, or add a simple rustic buttercream finish and call it a day. 

Vegan Black Velvet Cake FAQs

  • Will this cake turn my mouth black? Since there’s no dye in this recipe, it won’t stain your mouth black or turn your poop weird colors. It’s basically like eating Oreos! 
  • Where can I find black cocoa powder? I haven’t been able to find black cocoa powder at any of my local grocery stores, so I always get it online. This is my favorite brand to use for the darkest color.
  • Can I make it gluten-free? I haven’t yet tried making a gluten-free version, so if you try it let me know! And I’ll report back here if I try it too. 
  • Can I bake this recipe as cupcakes? Yes. Fill your cupcake tins no more than ⅔ full and bake at 350ºF (177ºC) for 15-18 minutes.
slice of black velvet cake on a plate

More Vegan Cake Recipes You’ll Love

If you need more vegan cake recipes in your life, I have a growing collection of them on my blog! Here are a few of my favorites so far:

  • Vegan Chocolate Cake
  • Vegan Vanilla Cake
  • Vegan Chocolate Oreo Cake
vegan black velvet cake recipe

I hope you love this vegan black velvet cake recipe as much as I do! Let me know if you make it in the comments below (don’t forget to rate it!) and feel free to tag @sugarandsparrowco on Instagram to show me! I love to see what you create with my recipes and tutorials.

vegan dye-free black velvet cake

Vegan Black Velvet Cake

5 from 1 vote
The perfect plant-based Halloween cake, made without a single drop of food coloring! This vegan black velvet cake is moist and fudgy, features naturally colored black cake layers and black buttercream, and it tastes like the cake version of Oreo cookies.
Print Recipe Pin Recipe
Prep Time:30 minutes mins
Cook Time:35 minutes mins
Cooling Time:2 hours hrs
Total Time:3 hours hrs 5 minutes mins
Course: Dessert
Cuisine: American
Servings: 15 slices

Ingredients

Vegan Black Velvet Cake

  • 2 Cups (265g) all-purpose flour
  • 1 1/2 Cups (300g) granulated sugar
  • 1/2 Cup (60g) black cocoa powder*
  • 1 Tbsp baking powder
  • 1/2 tsp baking soda
  • 1/2 tsp salt
  • 1/2 Cup (120ml) vegetable oil
  • 1/2 Cup (130g) unsweetened applesauce
  • 2 tsp pure vanilla extract
  • 2 tsp white vinegar or apple cider vinegar
  • 1 Cup (240ml) soy milk, room temperature or any non-dairy milk
  • 3/4 Cups (180ml) hot coffee or hot water

Vegan Black Buttercream

  • 2 Cups (453g) unsalted vegan butter, room temperature any brand of vegan butter sticks (not the spread)
  • 5 Cups (600g) powdered sugar
  • 1 tsp pure vanilla extract
  • 1/4 Cup (60ml) non-dairy milk, room temperature I like soy or coconut
  • 1 Cup (112g) black cocoa powder

Instructions

Make the Vegan Black Velvet Cake

  • Preheat the oven to 350ºF (177ºC) and prepare three 6-inch or two 8-inch cake pans by spraying the sides with baking spray and fitting the bottoms with a parchment cake circle. 
  • In a large bowl, whisk together the flour, sugar, black cocoa powder, baking powder, baking soda, and salt. Add the vegetable oil, applesauce, vanilla, vinegar, and soy milk. Whisk together until combined, then carefully whisk in the hot coffee (or hot water). The batter will be very thin.
  • Pour the batter evenly between the prepared cake pans and bake for 30-35 minutes, until a wooden toothpick inserted comes out clean. Cool completely before filling and frosting.

Make the Buttercream

  • In a stand mixer fitted with a paddle attachment, whip the vegan butter sticks on medium speed until creamy and light in color, about 4 minutes. Scrape down the bowl and paddle, then add half of the powdered sugar. Mix on low speed until just incorporated, then add the rest of the powdered sugar, vanilla, and non-dairy milk. Mix on low speed until incorporated.
  • If you're planning on making the ghost design pictured, reserve about 1/4 Cup of the buttercream at this point and set it aside. Then, with the mixer still in the off position, sift the black cocoa powder into the main batch of buttercream. Mix on low speed until fully combined and smooth, about 2 minutes. Note that the buttercream will darken in color over the next 24 hours.

Assembly

  • Once the cake layers have cooled completely, level them to your desired height. Fill and stack the layers with the black buttercream, then crumb coat the cake with more black buttercream. Refrigerate the crumb coated cake for 20-30 minutes to let the frosting firm up. Then, decorate the cake with the rest of the buttercream.
  • To create the design pictured, use the black buttercream to create a smooth finish on the cake, then refrigerate it for at least 30 minutes. When the frosting finish is firm to the touch, use a small icing spatula to swipe the reserved white buttercream onto the cake to look like ghosts. Place about 2 Tablespoons of the black buttercream into a piping bag fitted with Wilton Tip 2, then use it to pipe eyes and a mouth on each ghost. Add the rest of the black buttercream into a piping bag fitted with Wilton Tip 4B and pipe shell borders on the top and bottom edges of the cake.

Notes

*Black Cocoa Powder: It’s important to use the darkest black cocoa powder possible to achieve a black color. Here’s the brand I used in this recipe. You can technically use any Dutch-process cocoa powder, but the color of the cake and buttercream won’t be black in color unless you add a few drops of black food color gel (which is an option if you don’t mind dye).  
Make Ahead Tips: 
  1. The vegan black velvet cake layers can be made ahead and stored at room temperature, covered tightly in plastic wrap, for up to two days. Alternatively, you can cover with plastic wrap and store in the freezer for up to two months before thawing to room temperature. 
  2. The buttercream can be made ahead and stored in an airtight container at room temperature for up to 1 day. Alternatively, you can store it in an airtight container in the refrigerator for up to two weeks. When you’re ready to use it, bring it back to room temperature and rewhip with your stand mixer to bring back to frosting consistency.  

By: Whitney · In: Cake, Featured, Halloween, Recipes, Seasonal, Vegan · Tagged: black buttercream, vegan black velvet cake

you’ll also love

black velvet cupcake recipe by sugar and sparrowBlack Velvet Cupcakes
dye free black buttercream easy recipeEASY Dye-Free Black Buttercream Recipe
black velvet cake recipe by sugar and sparrowSpooky Black Velvet Cake Recipe (Dye-Free!)

Join the List

Stay up to date & receive the latest posts in your inbox.

Reader Interactions

Comments

  1. Corinne says

    January 22, 2026 at 7:08 am

    Hi! I usually replace applesauce with the forager non dairy greek yogurt (it’s high in protein and I feel like structurally works well as an egg). How do you think that would do in this recipe? I’m not a fan of applesauce and always taste even the smallest amount that’s usually undetectable to others haha.

    Reply
    • Whitney says

      January 22, 2026 at 10:57 am

      Hi Corinne! I haven’t tried it before so it will be an experiment. If you’ve had success using the non-dairy greek yogurt as the applesauce sub or egg replacer in other recipes, it should work!

      Reply
    • Spooky says

      February 20, 2026 at 3:55 pm

      Hi Corinne! I would love to hear did the non dairy greek yogurt work out for the recipe? (:

      I would be making this for a birthday party but there will be people who are allergic to apples so I’d need a replacement :/

      Reply
  2. Novia says

    November 30, 2025 at 12:59 pm

    How many cupcakes does this recipe yield?

    Reply
    • Whitney says

      November 30, 2025 at 7:38 pm

      Hi Novia! This recipe should yield about 30 standard sized cupcakes.

      Reply
      • Novia Wegner says

        December 17, 2025 at 7:07 am

        5 stars
        I 1.5x the recipe and got 40 cupcakes. They were a huge hit at my son’s birthday party!

        Reply

Leave a Reply Cancel reply

Your email address will not be published. Required fields are marked *

Recipe Rating


Next Post >

A Few of My Favorite Things (Fall 2025)

Primary Sidebar

Welcome to Sugar & Sparrow

Welcome to Sugar & Sparrow

Helping you whip up pretty desserts with confidence and creativity. And hopefully sharing a few laughs with you along the way!

Learn More

Connect

let’s bake!

Get my very best recipes, baking tips, and decorating tutorials sent to your inbox

Featured Posts

sugar and sparrow new website

We’ve Got a New Look + New Website Features!

gingerbread latte sheet cake for christmas

Gingerbread Latte Sheet Cake

sugar and sparrow 3 year blog anniversary

Sugar & Sparrow is 3!

Search

Archives

Follow Along

@sugarandsparrowco

STRAWBERRY SHORTCAKE ICE CREAM CAKE 🍓if Strawbe STRAWBERRY SHORTCAKE ICE CREAM CAKE 🍓if Strawberry Shortcake Ice Cream Bars make you nostalgic for your childhood ice cream truck days, you’re going to LOVE this easy ice cream cake version - no ice cream maker needed 🙌🏼 

Full recipe on my blog at https://sugarandsparrow.com/strawberry-shortcake-ice-cream-cake/

STRAWBERRY CRUNCH 
24 whole (280g) Golden Oreos, finely ground
3 Oz box strawberry jello
4 Tbsp unsalted butter, melted

ICE CREAM LAYERS
1/2 Cup (15g) freeze-dried strawberries
2 Cups heavy whipping cream, cold
1 Tbsp pure vanilla extract, divided
14 Oz sweetened condensed milk
1 1/2 tsp strawberry jam or preserves

1. Combine the strawberry crunch ingredients and bake on a lined cookie sheet at 350ºF for 4 min.
2. For the crust, combine 1 Cup of the strawberry crunch with 2 Tbsp melted butter. Press into the bottom of a 6-inch springform pan and line with an acetate collar. Place in the freezer while you move on.
3. Using a food processor, grind the freeze-dried strawberries into a fine powder. Set aside.
4. Add the heavy whipping cream and 2 tsp of vanilla extract into a chilled bowl, then whip it with a hand mixer to stiff peaks. Place in the refrigerator.
5. Divide the condensed milk between two medium bowls. To one bowl, add 1 teaspoon of vanilla. To the second bowl, add the finely strawberry powder and the jam/preserves. Whisk the ingredients together within each individual bowl.
6. Divide the whipping cream evenly between each of the two bowls you created in the previous step. Fold each sweetened condensed milk mixture together with the divided whipped cream to create the vanilla ice cream and strawberry ice cream.
7. Layer half of each of the ice creams on top of the strawberry crunch crust, sprinkle a layer of strawberry crunch on top, then repeat. Freeze for 6 hours and serve. 
#icecreamcake #strawberryshortcake #nochurnicecream #icecreamlover #strawberry
LEMON CUPCAKES 🍋 after about a dozen recipe tes LEMON CUPCAKES 🍋 after about a dozen recipe tests, this one is everything I could want in a lemon cupcake! Fluffy-yet-moist, bursting with natural lemon flavor, and absolutely irresistible topped with lemon cream cheese buttercream. 

Full recipe (with frosting) linked in my bio + at https://sugarandsparrow.com/homemade-lemon-cupcakes/

INGREDIENTS:
1 Cup (132g) all-purpose flour
1 tsp baking powder
1/4 tsp salt
1/4 Cup (60ml) whole milk, room temperature
3 Tbsp (45ml) lemon juice from 1 medium lemon
3/4 Cup (150g) granulated sugar
3 Tbsp (42g) unsalted butter, room temperature
2 Tbsp (30ml) vegetable oil
2 large eggs, room temperature
1 tsp pure vanilla extract

INSTRUCTIONS:
1. Preheat the oven to 350ºF (177ºF) and line a standard cupcake pan with 12 paper liners.
2. In a large bowl, whisk together the flour, baking powder, and salt. Set aside. 
3. In the bowl of a stand mixer fitted with the paddle attachment (or with a hand mixer and large bowl), add the lemon zest to the sugar and mix on low speed until fragrant and well combined, about 1 minute. Meanwhile, combine the lemon juice with the milk and set aside. 
4. Add the butter to the lemon-sugar mixture and cream on medium speed until and combined, about 2 minutes. Add the vegetable oil and beat until light and creamy, about 3 minutes. Scrape down the bowl and paddle as needed.
5. Mix in the eggs one at a time on low speed, then add the vanilla and turn the mixer to medium speed for one minute.
6. Turn the mixer off and add the flour mixture all at once. Mix on low speed until just combined, then slowly pour in the lemon-milk mixture. Mix until just combined, about 30 seconds.
7. Divide the batter equally between the liners and bake for 14-18 min. Cool, then top with frosting of your choice (link in bio for lemon cream cheese frosting)�
#lemoncupcakes #creamcheesefrosting #lemon #cupcakes #cupcakedecorating
April in my kitchen 🌸 I published 5 NEW recipes April in my kitchen 🌸 I published 5 NEW recipes on my site, baked my Oreo cupcake recipe for a fundraiser and found it was just as delicious as I remember, and filmed/photographed 3 recipes that will be on my blog in May (Lemon Cupcakes, Lemon Cream Cheese Buttercream, and No-Bake Marbled Strawberry Cheesecake) 🥰 

Comment “APRIL” to get all the available recipes and stay tuned for more! 

#bakersofinstagram #springbaking #cakedecorating #cupcakes #bakinglove
SHEET PAN COOKIE CAKE 🍪 slice it warm for a fud SHEET PAN COOKIE CAKE 🍪 slice it warm for a fudgy chocolate chip cookie OR let it settle into a moist and chewy cookie cake that’s perfect for decorating! My fave vanilla buttercream + sprinkles turn this giant chocolate chip cookie into the perfect birthday cake alternative at the end 🥳
⁣
Full recipe + decorating ideas at https://sugarandsparrow.com/sheet-pan-chocolate-chip-cookie-cake/
⁣
INGREDIENTS⁣
1 Cup (226g) unsalted butter, melted⁣
1 1/3 Cups (267g) packed light or dark brown sugar⁣
1/2 Cup (100g) granulated sugar⁣
3 large eggs⁣
1 Tbsp pure vanilla extract⁣
1 tsp baking soda⁣
1 tsp cornstarch⁣
1/2 tsp salt⁣
3 Cups (398g) all purpose flour⁣
2 Cups (350g) semi-sweet chocolate chips⁣
⁣
INSTRUCTIONS⁣
1. Preheat the oven to 350ºF (177ºC). Grease and line a 13×18 inch sheet pan.⁣
2. In a large bowl, add the brown sugar and granulated sugar. Melt the butter in the microwave and pour it over the top of the sugars. Whisk together until uniform. Add the eggs and vanilla, then continue whisking until uniform. Whisk in the baking soda, cornstarch, and salt.⁣
3. Add the flour and use a silicone spatula to fold it in until smooth cookie dough forms. Reserve 1/2 Cup of the chocolate chips and set them aside, then fold the remaining 1 1/2 Cups of chocolate chips into the cookie dough.⁣
4. Place the chocolate chip cookie dough onto the prepared sheet pan and use an offset spatula to spread it all the way to the edges in an even layer.⁣
5. Bake the cookie cake for 14-16 minutes, until it looks golden brown on the edges and set. 
6. Enjoy warm or let it cool and decorate with vanilla buttercream and sprinkles! ⁣
⁣
#cookiecake #chocolatechipcookies #sheetcake #birthdaycake #cakedecorating
STRAWBERRY CUPCAKES 🍓based on my beloved strawb STRAWBERRY CUPCAKES 🍓based on my beloved strawberry layer cake recipe, this cupcake version is just as moist yet fluffy and bursting with natural strawberry flavor! Between the mix of fresh strawberries in the cupcakes + freeze-dried strawberries in the frosting, the flavor is out of this world 🚀

Full recipe link in my bio (with strawberry buttercream) + at https://sugarandsparrow.com/strawberry-cupcakes/

STRAWBERRY CUPCAKES
Yield: 14 cupcakes

INGREDIENTS:
5 oz (143g) fresh or frozen strawberries
1/3 Cup (80ml) whole milk, room temp
1 1/2 Cups (158g) sifted cake flour
1 tsp baking powder
1/4 tsp baking soda
1/2 tsp salt
6 Tbsp (85g) unsalted butter, room temp
1 Cup (200g) granulated sugar
2 large eggs, room temp
3 Tbsp (45g) sour cream, room temp
1 tsp vanilla extract
1 drop pink food coloring (optional)

INSTRUCTIONS: 
1. Puree the strawberries using a food processor (you’ll have about 1/2 cup of puree), then place into a saucepan over medium-low heat. Bring to a simmer, then cook for 10-15 min, stirring occasionally, until you have 1/4 cup. Refrigerate until room temp.
2. Preheat oven to 350ºF (177ºC) and line a standard cupcake pan with liners.
3. Whisk together the sifted cake flour, baking powder, baking soda, and salt and set aside.
4. In a stand mixer w/ paddle attachment (or hand mixer + large bowl), whip the butter on high for 2 min. Add sugar and beat for 2 min, until light and fluffy. Turn the mixer to low and add the eggs one at a time, then add the vanilla and sour cream, turn the mixer to high and beat for 1 min. Meanwhile, whisk together the strawberry puree, whole milk, and food coloring (if using).
5. Turn the mixer off and add all of the dry ingredients at once. Mix on low until just combined, then add the strawberry milk mixture until just combined, about 30 seconds.
6. Fill the cupcake liners 2/3 full and bake for 14-18 minutes. Cool completely before topping with strawberry buttercream (full recipe linked above). 

#strawberrycupcakes #strawberrycake #pinkcupcakes #strawberry #cupcakes

Footer

On the Blog

  • Cake Basics
  • Recipes
  • Tutorials

Info

  • About
  • Privacy Policy & Disclosure

stay in the know

Copyright © 2026 · Theme by Sugar & Sparrow