• Cake
  • Frosting
  • YouTube
  • My Favorite Tools
  • Nav Social Icons

  • Skip to primary navigation
  • Skip to main content
  • Skip to primary sidebar
  • Skip to footer
  • Recipes
    • Cake
    • Cupcakes
    • Frosting
    • Ice Cream
    • Vegan
  • Cake Basics
  • Tutorials
  • Blog
  • About
  • Mobile Menu Widgets

    Connect

    Search

Sugar & Sparrow logo in script font

Sugar & Sparrow

Lifestyle and Cake from Portland Oregon

  • Cake Basics
  • Recipes
    • Cake
    • Cupcakes
    • Cookies & Bars
    • Filling
    • Frosting
    • Ice Cream
    • No-Bake
    • Small Batch
    • Vegan
  • Tutorials
  • Book
  • Blog
  • About

Floral Sheet Cake Tutorial

June 13, 2019 · In: Featured, Seasonal, Spring, Tutorials

My momma was the queen of birthday sheet cakes. She baked them in her favorite casserole dish and served them up for every one of my birthdays as a kid, always covered in canned frosting and that grocery store tube gel for writing out Happy Birthday. It’s so nostalgic for me to see those little gel tubes hanging at the grocery store nowadays! I think casserole dish sheet cakes might have been a 90’s thing, but I want to bring them back in a big way. After a trip to my local JOANN store, I found the perfect piping tip set to make it happen!

UPDATE 2025: JOANN has (sadly!!) gone out of business, so I have slightly changed these product links.

sheet cake with flowers

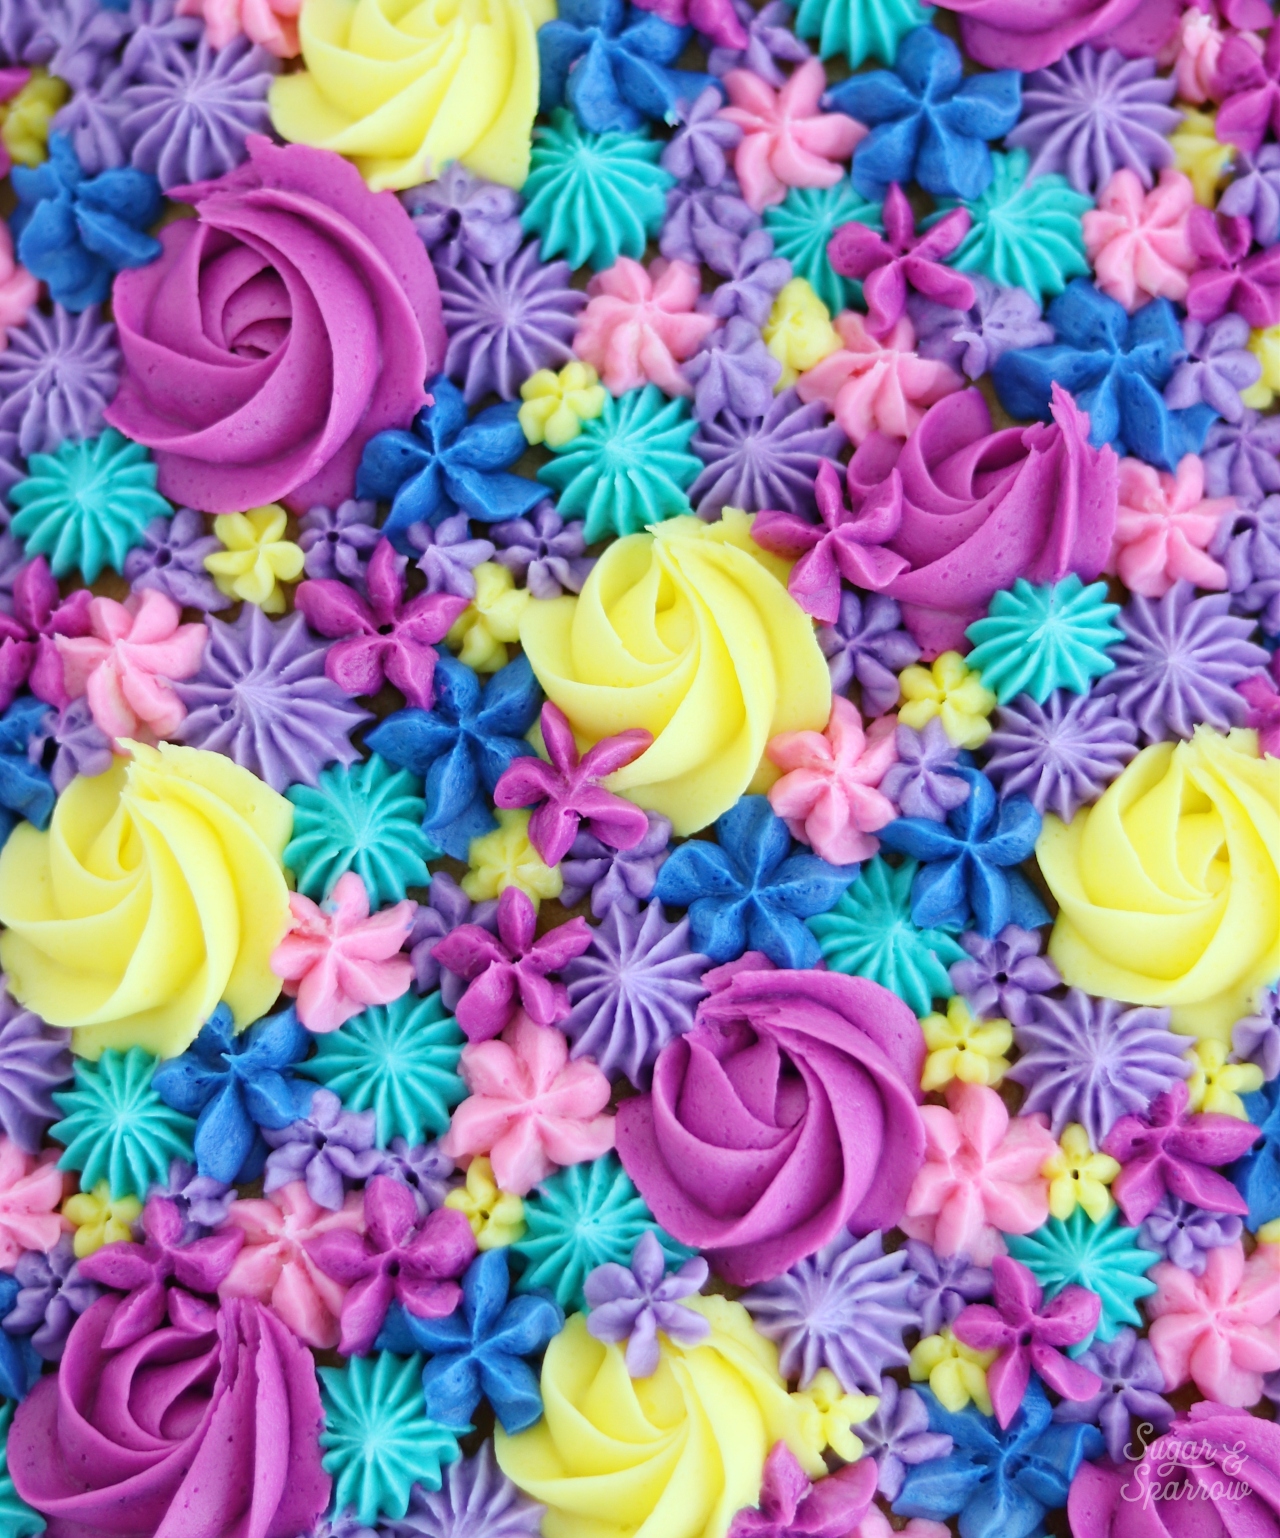
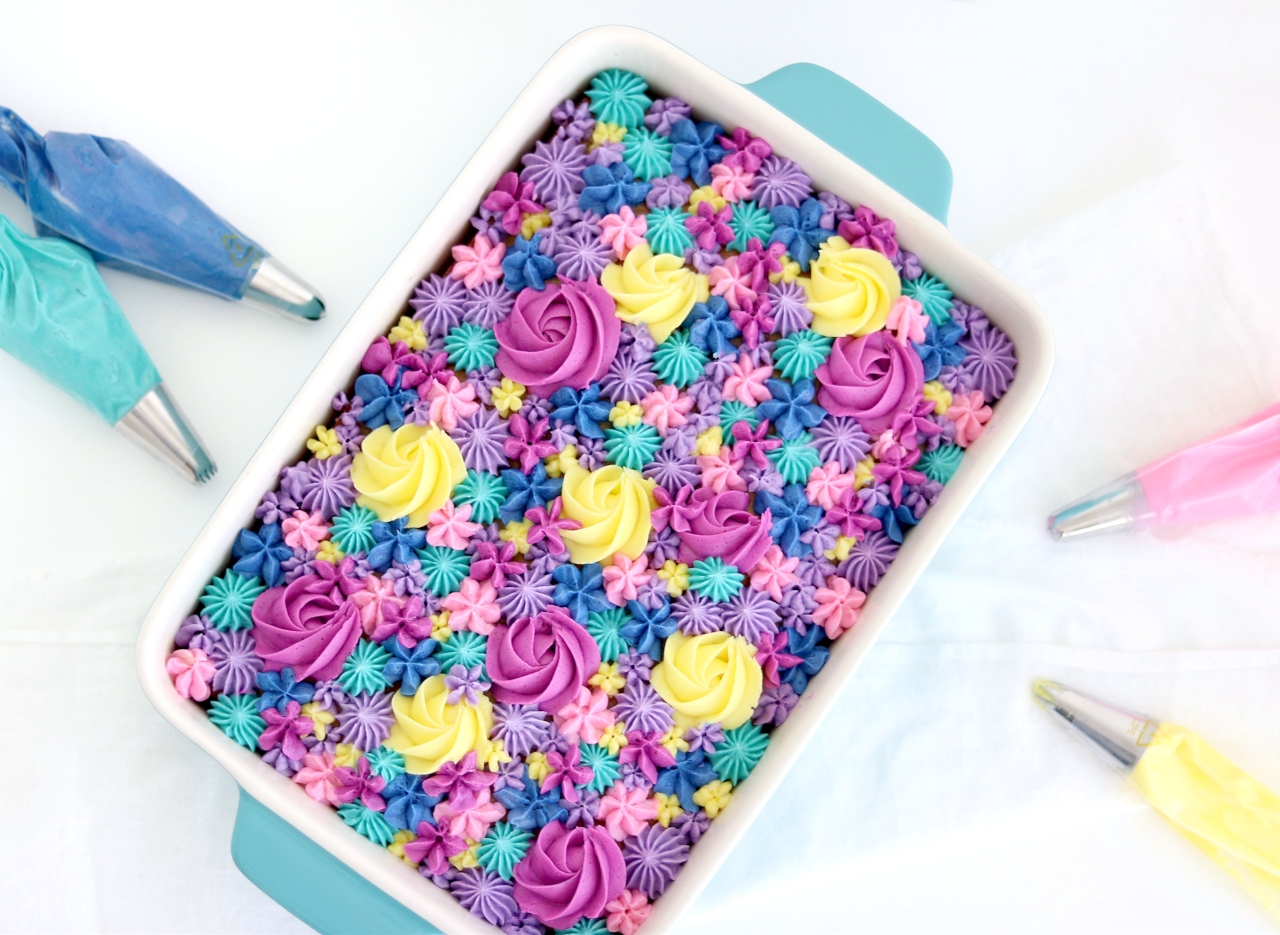
See? All that cake needed was a little revamp! Same sheet cake underneath, but a whole lot of pretty piping to make it eye-catching. All of these pretty buttercream florals were made possible with the Wilton Drop Flower Tip Set + a few additional favorite tips (1M and 4B).

The best thing about baking a sheet cake is it’s easy. You don’t have to worry about leveling, filling, or stacking any layers. Just add some cake batter to your casserole dish and bake it up! The only real thing you need to worry about is giving the cake enough time to cool before you frost it.

buttercream piping
sheet cake with buttercream piping tutorial

The reason I love these drop flower piping tips is that they take care of all the hard work for you. They’re designed to create perfect florals in just a twist of the wrist, creating a beautiful floral look that anyone can achieve.

Here’s a quick video to show you the technique before you read all about it below. This design will work in just about any color palette imaginable, so pick your favorite color scheme and get ready to party!

If you love tutorial videos like this one, be sure to check out my YouTube channel! I’ve got a growing collection of cake recipes, decorating tutorials, and Cake Basics over there. Hit the subscribe button on my page so you never miss a new video.

You Will Need

  • Your favorite casserole dish
  • 1 box of cake mix
  • 1.5 batches of vanilla buttercream
  • Food Color Gels of your choice
  • Bowls and spoons for color mixing
  • Piping bags
  • Wilton Drop Flowers Tip Set
  • Wilton Tip 1M
  • Wilton Tip 4B

Step 1: Bake The Cake

Whip up your favorite cake recipe or a box of cake mix, then pour it into your favorite (prepared) 9 x 13 casserole dish. I always like to spray the dish with Baker’s Joy to ensure that the cake doesn’t stick to the dish after baking.

how to bake a sheet cake

Once your sheet cake is baked to perfection, allow several hours for it to cool at room temperature before you start piping your florals.

Step 2: Color The Buttercream

With your favorite color scheme in mind, divide the vanilla buttercream into separate bowls for color mixing, then use your favorite color gels to tint it. I used the Wilton Color Right System to mix up five different colors for this project.

how to color buttercream with Wilton Color Right System

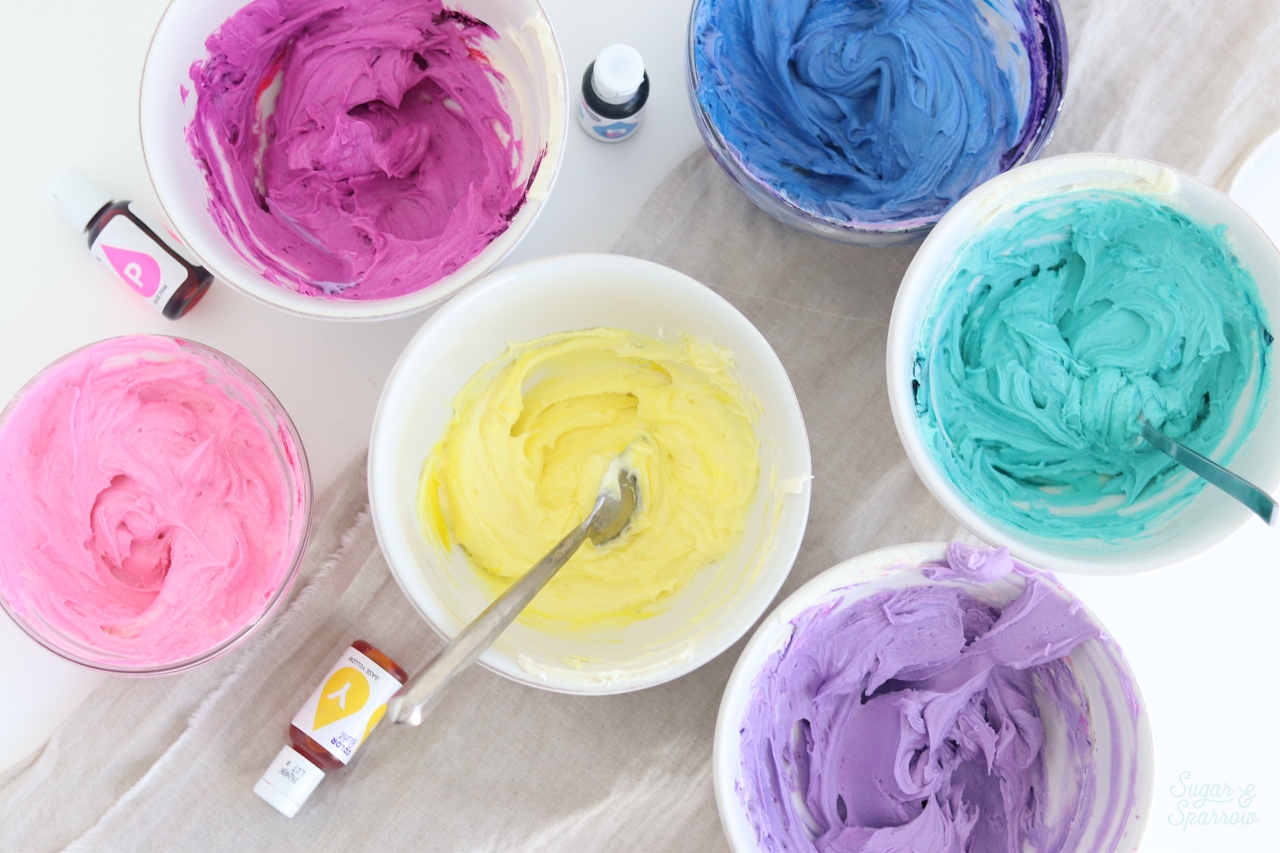
While any color gels will work for this part, the Wilton Color Right System is perfect for getting totally custom shades. It comes with a guide for color mixing, and you can use it to achieve any color imaginable!  

Step 3: Prepare Your Piping Bags

Snip off the end of each piping bag and insert the piping tips one by one. For this design, I prepared two piping bags with Wilton Tip 4B, two with Wilton Tip 1M, and four for each of the piping tips that come with the Wilton Drop Flowers Tip Set.

buttercream piping bags

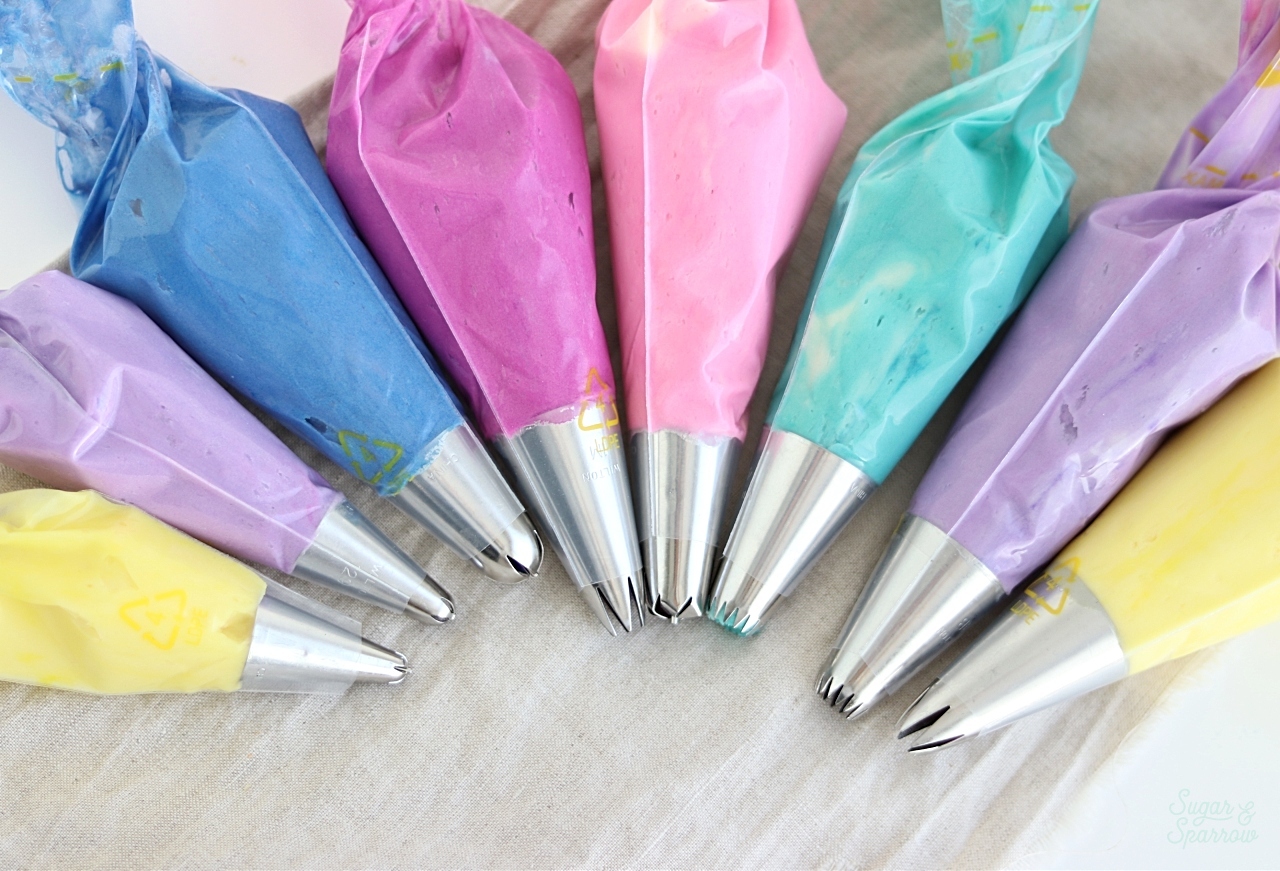
The Wilton Drop Flowers tip set comes with Tips 225, 129, 109, and 190. Each one makes a different floral design, effortlessly!

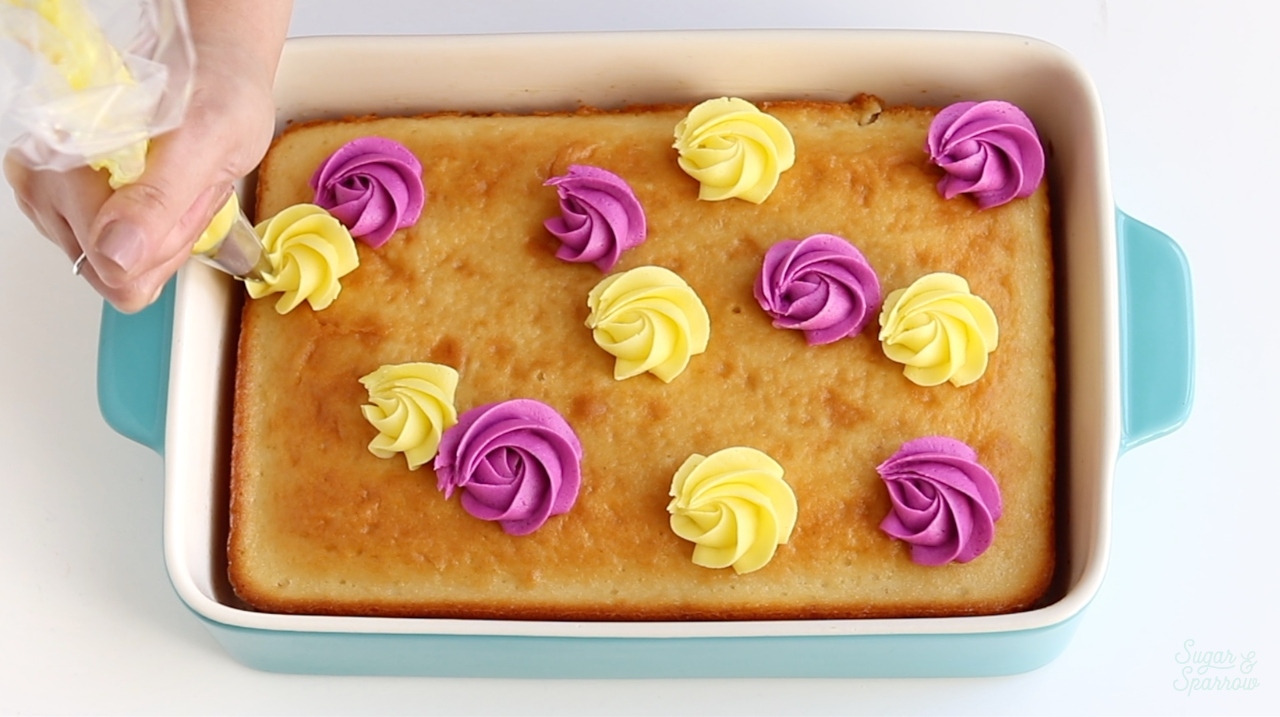
Step 4: Pipe The Floral Designs

With your cooled sheet cake in the casserole dish, first pipe rosettes using the piping bags fitted with Tip 1M. To pipe a rosette, face the piping tip downward and squeeze the piping bag to get the buttercream flowing, then while keeping continuous pressure, make a small swirl around the where you originally squeezed. There’s no rhyme or reason as to where to pipe the rosettes, so just follow your heart here.

how to pipe buttercream rosettes

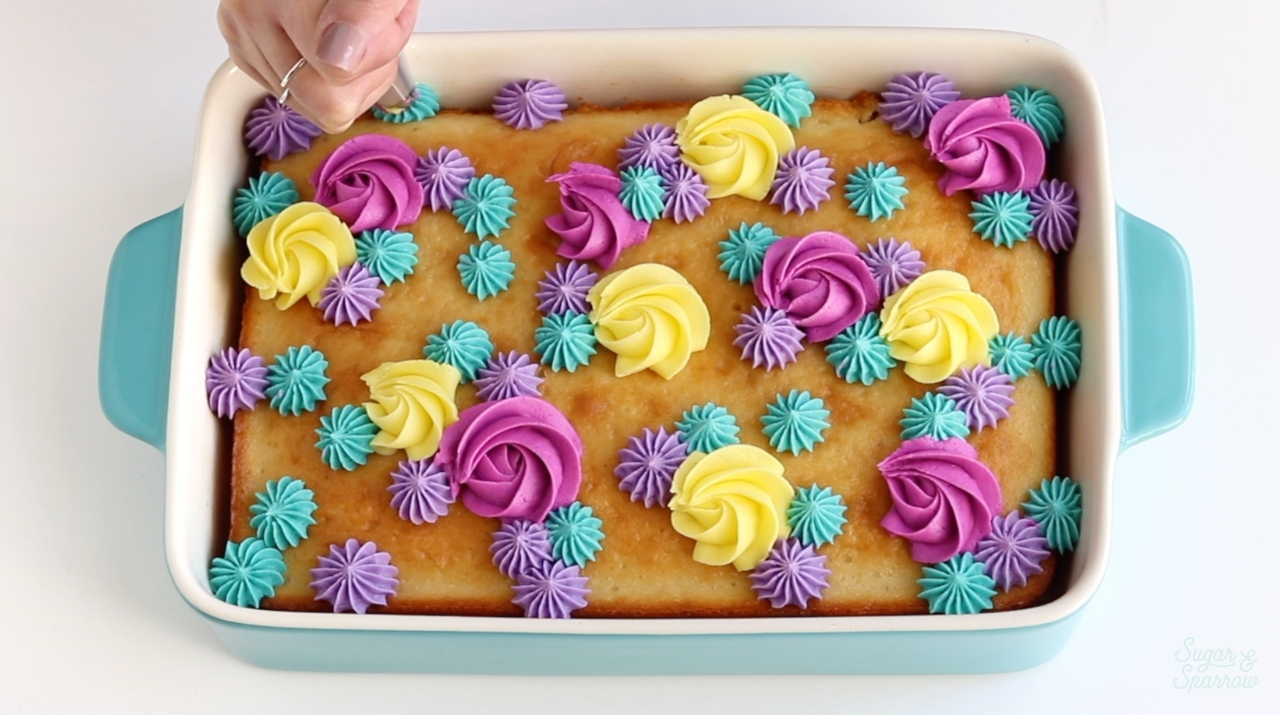
Next, use the piping bags fitted with Tip 4B to pipe star designs wherever you’d like. These stars are quite simple, just face the piping tip downward, squeeze, and release as you lift up.

how to pipe buttercream flowers

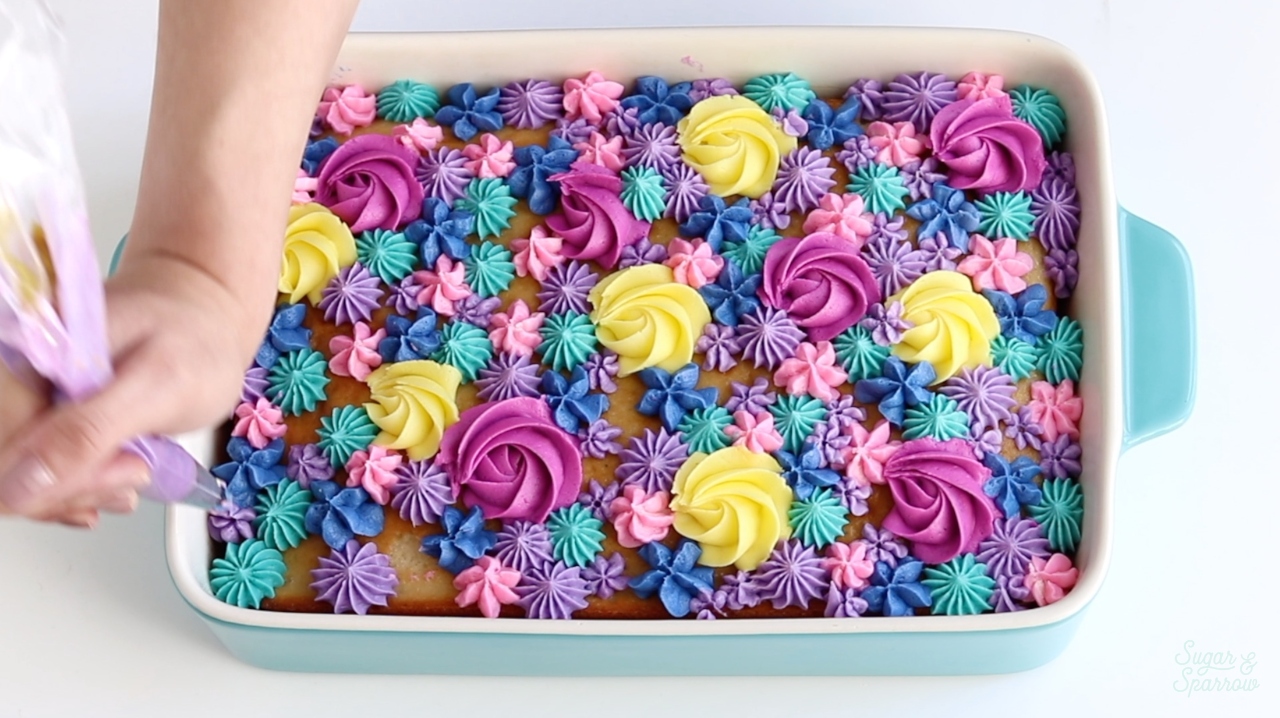
And finally, use the piping bags fitted with the Wilton Drop Flowers Tip Set to fill in all of the empty spaces. You can either pipe them with a squeeze or gently rotate your wrist as you’re piping to get cool swirled floral designs.

buttercream piping tips
how to decorate a sheet cake

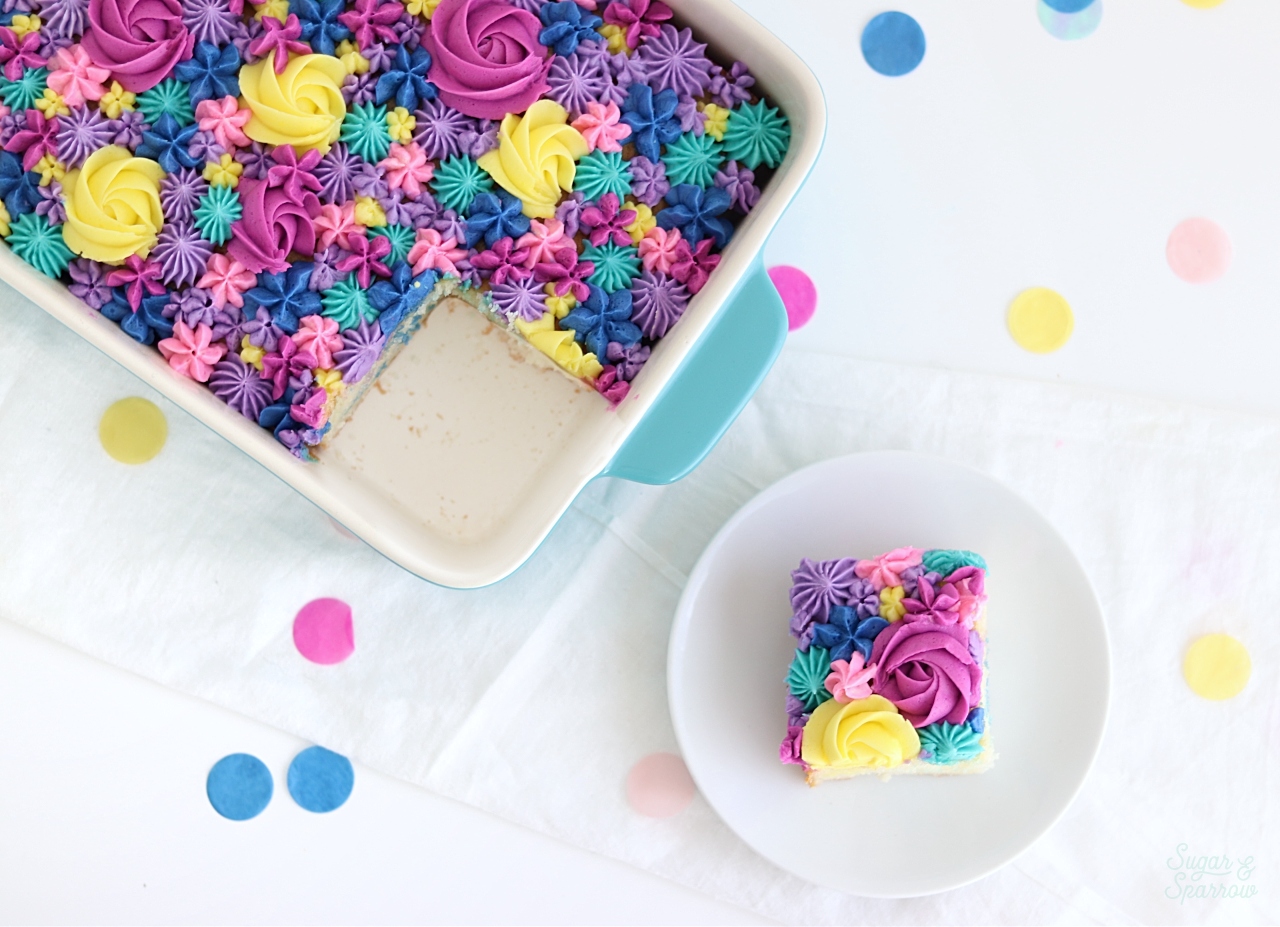
Isn’t this floral sheet cake a hit? It’s a nostalgic concept, made modern with some easy piping! The best part is, it’ll work in all sorts of color schemes and the look can be achieved in minutes. It’s the easiest way to make an eye-catching floral cake!

sheet cake decorating tips

Disclaimer: I was compensated by JOANN for my work of creating this project, styling, filming, photographing, and writing about their products. As always, all opinions are honest and my own. Thank you for supporting brands that support Sugar & Sparrow.

By: Whitney · In: Featured, Seasonal, Spring, Tutorials · Tagged: baking a sheet cake, buttercream flowers, buttercream piping, cake decorating, floral piping, floral sheet cake, JOANN, JOANN cake decorating supplies, sheet cake, sheet cake decorating, sheet cake ideas, spring, wilton, wilton cake decorating tips, wilton piping tips

you’ll also love

apple sheet cake with spiced buttercreamSpiced Apple Sheet Cake
pumpkin layer cake recipe by sugar and sparrowPerfect Pumpkin Layer Cake Recipe
oreo cookies and cream cakeOreo Layer Cake Recipe

Join the List

Stay up to date & receive the latest posts in your inbox.

Reader Interactions

Comments

  1. Alison Solanch says

    May 29, 2025 at 10:40 am

    Hi! The flower tip set that is linked to Michael’s doesn’t look like the same as in your photo of the bags with tips. I could be wrong, I think one is specifically for leaves? Does the leaf tip also make flowers? Thanks!

    Reply
    • Whitney says

      May 30, 2025 at 7:33 pm

      Hi Alison! You’re right, they sadly discontinued the drop flowers tip set in the years since this post was written so a similar set was linked instead. I did a quick search on Amazon and found the original set available (for now): https://amzn.to/3HhKP3D

      Reply
      • Alison says

        May 31, 2025 at 2:05 pm

        Thanks so much! I found a similar set at Michael’s.

        Reply
  2. Katrina says

    April 13, 2023 at 7:46 am

    Hi! I would like to make this beautiful floral design on brownies for a fundraiser. I was wondering, what is the best way to slice it? I don’t want to drag (smear) the buttercream down into the brownie. I would like to have clean cuts for each individual brownie. Any tips, would be amazing! Thank you for sharing all your baking knowledge!

    Reply
    • Whitney says

      April 14, 2023 at 9:07 am

      Hi Katrina! This design would be so stunning on brownies! Here’s what I would do: after baking and cooling the brownies, turn them out of the dish you baked them in and onto a flat surface like a cutting board. Pipe on the floral design, then either wait about an hour before slicing to let the buttercream crust/set up or pop it into the refrigerator for about 20 minutes. Then use a clean knife to slice straight down into the brownies and clean the knife in between cuts.

      Reply
  3. Annie Eckert says

    August 16, 2022 at 9:22 am

    Hi! I love your video and directions! Thank you so much for sharing. I have a question – I always have so much buttercream left for projects like these. How do you avoid over-making buttercream?

    Reply
    • Whitney says

      August 16, 2022 at 8:48 pm

      Hi Annie! I usually have a little buttercream left over after projects as well. It’s hard to make just the right amount and always better to have more than enough than not enough. I usually wrap the extra buttercream in plastic wrap and refrigerate or freeze it until the next project.

      Reply
  4. Melissa says

    February 10, 2020 at 11:42 am

    That is just gorgeous! How much would a peice of that cake be sold for in a bake sale? I would really like to make one!

    Reply
    • Whitney says

      February 11, 2020 at 3:18 pm

      Hi Melissa! I’m not sure how to price one piece of cake for a bake sale, but if you look at your local bakery pricing you can get a sense for how much a slice of cake goes for and figure out your pricing from there 🙂

      Reply
    • Abby says

      July 8, 2021 at 7:48 am

      How much would you charge to sell a cake like this?

      Reply
      • Whitney says

        July 11, 2021 at 9:29 pm

        Hi Abby! I don’t sell my cakes but if you want to figure out how to price your cakes there’s a lot of info out there on the topic. It really depends on where you live, what your local cake makers are charging, how much time goes into your design, etc.

        Reply
  5. Katie says

    January 29, 2020 at 3:33 pm

    Hi Whitney!
    I’m thinking of doing this for a friends birthday this weekend…the problem is, she wants a chocolate sheet cake with chocolate icing. Do you think a monochromatic look would work? Or should Ice with chocolate icing and then do the flowers with tinted white icing? I can’t decide…

    Reply
    • Whitney says

      February 1, 2020 at 3:19 pm

      Hi Katie! I think this would look lovely in monochrome! If you’re concerned about the lack of color you could always add in some more chocolate textures like chocolate covered espresso beans, etc. or use my white chocolate buttercream for some of the piping. I like mixing white chocolate buttercream with chocolate buttercream to get a mid-toned chocolate color (that tastes amazing!) as well. Here’s the white chocolate buttercream recipe, including a photo of a cake where I mixed the two buttercreams together: https://sugarandsparrow.com/white-chocolate-buttercream-recipe/

      Reply
  6. Hanako Narushima says

    November 24, 2019 at 2:28 pm

    Hello 🙂 What cake recipe do you use for your sheet cake?

    Reply
    • Whitney says

      November 25, 2019 at 8:45 am

      Hi Hanako! For this cake I used my vanilla cake recipe in a 9 x 13 pan (filled about 1/2 full): https://sugarandsparrow.com/vanilla-cake-recipe/

      Reply
  7. Lizi says

    October 5, 2019 at 10:19 am

    Thank you for the fantastic idea! I just made this, using fall colors instead, and it turned out amazing — and was also incredibly simple for something so gorgeous.

    Reply
    • Whitney says

      October 6, 2019 at 8:17 pm

      That’s amazing, Lizi! So happy you loved the tutorial and I bet it looked incredible in a fall color palette!

      Reply

Leave a Reply Cancel reply

Your email address will not be published. Required fields are marked *

Recipe Rating


Next Post >

Banana Split Cupcakes Recipe

Primary Sidebar

Welcome to Sugar & Sparrow

Welcome to Sugar & Sparrow

Helping you whip up pretty desserts with confidence and creativity. And hopefully sharing a few laughs with you along the way!

Learn More

Connect

let’s bake!

Get my very best recipes, baking tips, and decorating tutorials sent to your inbox

Featured Posts

dia de los muertos cupcakes

Dia De Los Muertos Spiderweb Cupcakes

mini black velvet layer cake

Mini Black Velvet Cake Recipe

buttercream sweater cake

Buttercream Knitted Sweater Cake Tutorial

Search

Archives

Follow Along

@sugarandsparrowco

THICK CREAM CHEESE FROSTING 🤍 knowing how to th THICK CREAM CHEESE FROSTING 🤍 knowing how to thicken cream cheese buttercream WITHOUT adding tons of extra powdered sugar is a game changer for cake decorating! Adding buttermilk powder is just one way to do it, and I’ve got a few more recommendations in the recipe below + even more ideas/info at https://sugarandsparrow.com/stablized-cream-cheese-frosting/

STABILIZED CREAM CHEESE FROSTING 
Yield: 3 Cups

4 Cups (480g) powdered sugar
1/4 Cup (32g) buttermilk powder*
1/2 Cup (113g) unsalted butter, room temp
8 Oz (226g) full-fat brick-style cream cheese, room temp (NOT the spread)
1 1/2 tsp pure vanilla extract
1/4 tsp salt

INSTRUCTIONS
1. In the bowl of a stand mixer fitted with the paddle attachment, cream the butter and cream cheese on medium-high until light, fluffy, and uniform (no lumps), about 5 minutes. Meanwhile, sift together the powdered sugar and buttermilk powder.
2. Turn the mixer to low speed and add the powdered sugar mixture a few cups at a time, mixing thoroughly after each addition and scraping down the bowl and paddle as needed. Add the vanilla and salt and mix on low for another minute, until fully combined and smooth.

*you can substitute this for 1/4 Cup of cornstarch OR 1 Tbsp meringue powder. Both of those options are flavorless.

#creamcheesefrosting #frosting #buttercream #creamcheese #cakedecorating
Rainbow sheet cake 🌈🥳 such a pretty cake for Rainbow sheet cake 🌈🥳 such a pretty cake for St. Patrick’s Day, but really for any day because rainbow cakes are year round if you ask me 🫶🏽⁣ details: 
⁣ 
👩🏽‍🍳 recipes: funfetti sheet cake + vanilla buttercream (both can be found at sugarandsparrow.com) 
🎨 colors: custom mixed with the @wiltoncakes color right system 
🌈 piping tips: @wiltoncakes 1M for the rosettes, 104 for the ruffles, 32 for the swirls and stars⁣ 
⁣
THIN MINT CHOCOLATE CAKE💚 I cannot resist a Thi THIN MINT CHOCOLATE CAKE💚 I cannot resist a Thin Mint when it comes to Girl Scout cookies, which is where this cake recipe gets its inspiration. It’s layers of decadent mint chocolate cake + mint chocolate chip buttercream + chopped Thin Mint cookies for the perfect crunch (but you can use ANY kind of mint chocolate cookies in this cake or omit them completely and still have a delicious mint chocolate cake!). 
⁣ 
Search “thin mint cake” at sugarandsparrow.com to find the full recipe! 
⁣ 
#mintchocolatechip #chocolatecake #greencake #mintchocolate #cakedecorating
Some of you have been asking for gluten-free cake Some of you have been asking for gluten-free cake recipes for awhile now, which makes me EXTRA excited to finally share this gluten-free chocolate cake!! After tonnns of recipe testing, this cake is so rich and fudgy (yet somehow not too dense!), has an amazing chocolate flavor, is irresistible with chocolate buttercream, and truly doesn’t taste gluten-free. It low key might be my favorite chocolate cake recipe of all (and I’ve had a LOT of them) 🤎 
 
Get the recipe link in my bio + at https://sugarandsparrow.com/gluten-free-chocolate-cake/ 
 
#chocolatecake #glutenfreecake #glutenfree #cakesofig #birthdaycake
VANILLA CUPCAKES 🧁these from-scratch vanilla cu VANILLA CUPCAKES 🧁these from-scratch vanilla cupcakes are super soft and moist, have the perfect vanilla flavor, and are perfect for any celebration with a swirl of vanilla buttercream + pretty rainbow sprinkles! I originally published this recipe in 2018 and it’s become a reader fave ever since 🙌🏼 
�Full recipe (with frosting) is linked in my bio + at https://sugarandsparrow.com/vanilla-cupcake-recipe/ 
 
VANILLA CUPCAKES 
Yield: 32 cupcakes 
 
INGREDIENTS 
2 1/2 cups (265g) sifted cake flour 
2 tsp baking powder 
1/2 tsp baking soda 
1 tsp salt 
3/4 cup (170g) unsalted butter, room temp 
1 3/4 cup (350g) granulated sugar 
3 large eggs, room temp 
1/2 cup (120g) sour cream, room temp 
1 Tbsp pure vanilla extract 
1 cup (240ml) whole milk, room temp 
 
INSTRUCTIONS 
1. Preheat the oven to 350°F (177ºC) and line standard cupcake pan(s) with up to 32 liners. 
2. Add the sifted cake flour, baking powder, baking soda, and salt into a bowl and whisk to combine. Set aside. 
3. In the bowl of your stand mixer with the paddle attachment (or w/ hand mixer and large bowl), beat the butter on high for 2 minutes, then add the sugar and continue to beat on high until light and fluffy, about 2 min. Turn the mixer to low and add the eggs one at a time, mixing thoroughly after each addition. Add the vanilla and sour cream, then turn the mixer to high speed and mix for 1 min. Scrape down the bowl and paddle as needed. 
4. With the mixer on low speed, add the dry ingredients all at once and mix until just combined, then add the milk in a steady stream. Continue mixing for another 20-30 seconds, until just combined. Scrape the sides and bottom of the bowl and gently mix by hand until uniform. 
5. Spoon or pour the batter into the cupcake liners until they’re about ⅔ full, then bake for 14-18 minutes, until they spring back to the touch and a toothpick inserted comes out clean. 
6. Top with your fave frosting (my vanilla buttercream recipe is linked in my bio)! 
 
#vanilla #cupcakes #cupcakesofinstagram #cakedecorating #fromscratch

Footer

On the Blog

  • Cake Basics
  • Recipes
  • Tutorials

Info

  • About
  • Privacy Policy & Disclosure

stay in the know

Copyright © 2026 · Theme by Sugar & Sparrow