• Cake
  • Frosting
  • YouTube
  • My Favorite Tools
  • Nav Social Icons

  • Skip to primary navigation
  • Skip to main content
  • Skip to primary sidebar
  • Skip to footer
  • Recipes
    • Cake
    • Cupcakes
    • Frosting
    • Ice Cream
    • Vegan
  • Cake Basics
  • Tutorials
  • Blog
  • About
  • Mobile Menu Widgets

    Connect

    Search

Sugar & Sparrow logo in script font

Sugar & Sparrow

Lifestyle and Cake from Portland Oregon

  • Cake Basics
  • Recipes
    • Cake
    • Cupcakes
    • Cookies & Bars
    • Filling
    • Frosting
    • Ice Cream
    • No-Bake
    • Small Batch
    • Vegan
  • Tutorials
  • Book
  • Blog
  • About

Holiday Floral Buttercream Cake Tutorial

December 3, 2018 · In: Featured, Holiday, Seasonal, Tutorials

I’ve been in the Holiday spirit since before Thanksgiving, which is about the time all the cute decorations hit the shelves and the Christmas music started flooding the radio stations. I can’t help but have hundreds of ideas for festive cake decorating this time of year, especially because creative prints and fun color schemes are everywhere I look! It really is the most wonderful time of the year.

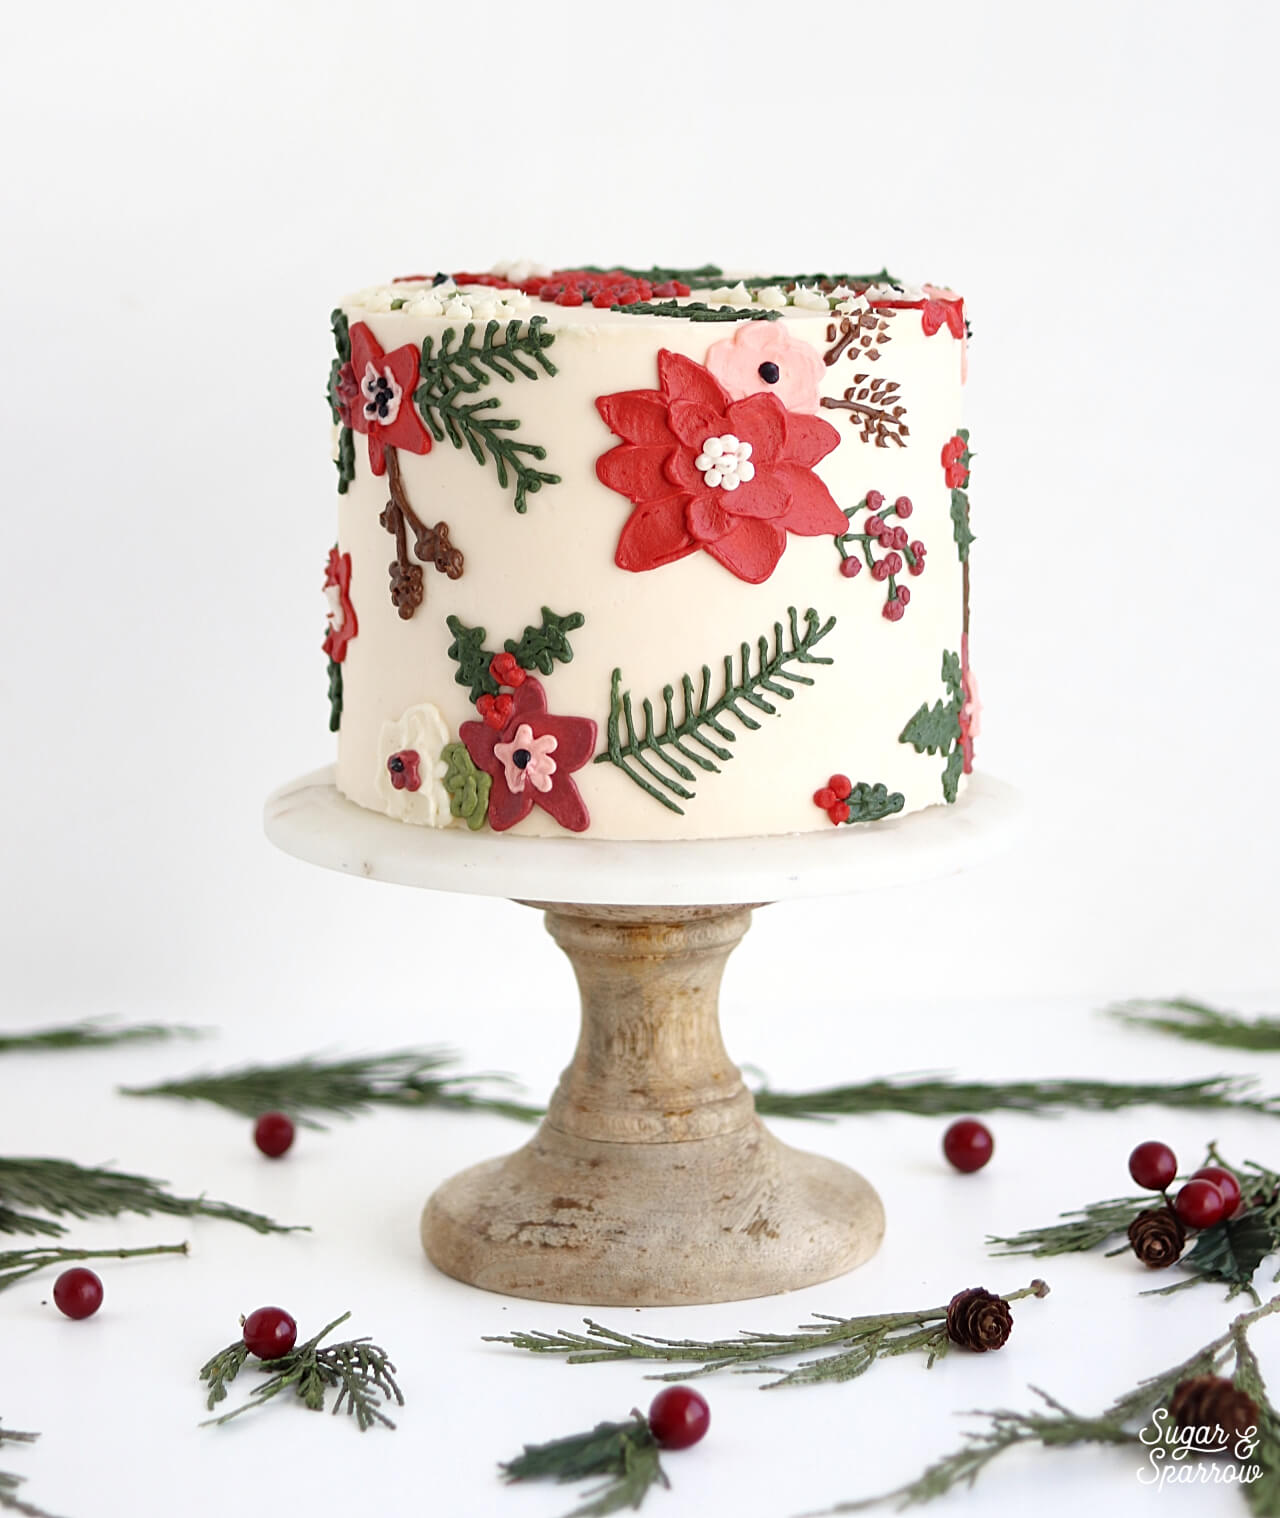
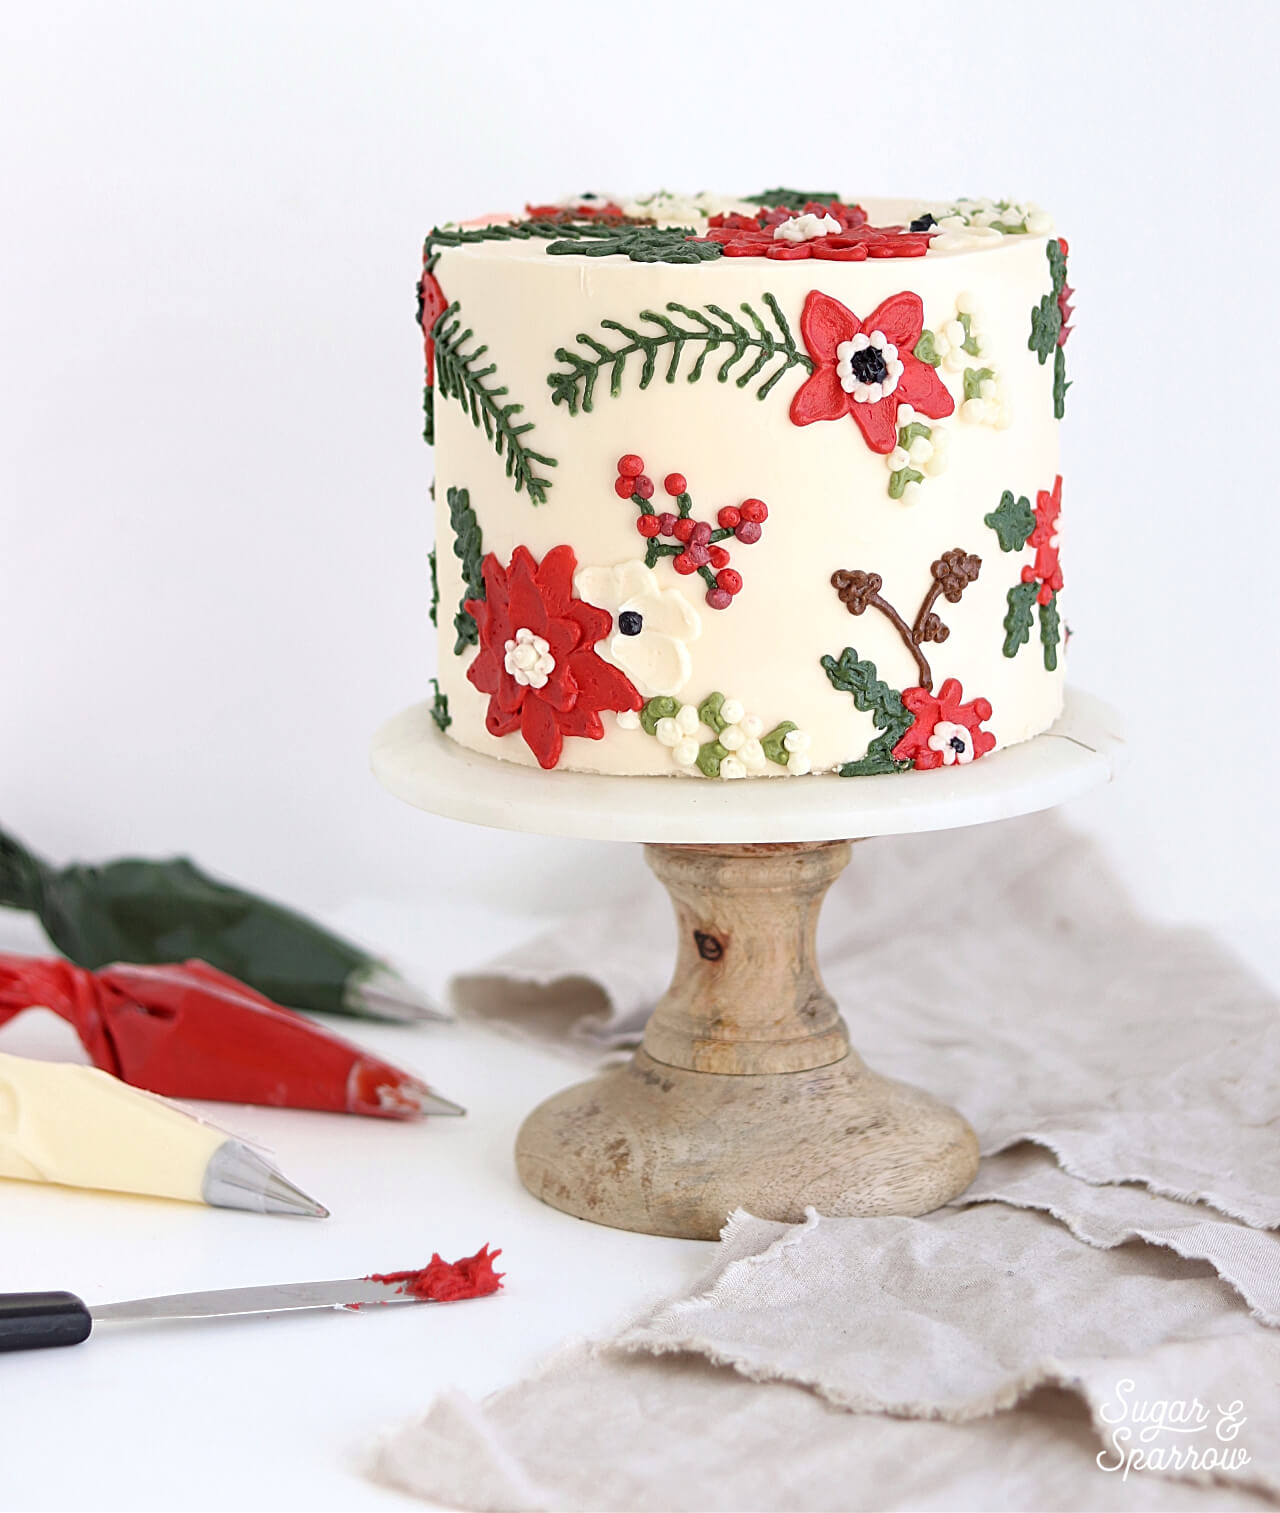
One of my favorite cake decorating techniques I learned over the last year is how to to use icing spatulas and piping tips to create floral print patterns on buttercream cakes. So when my friends over at Wilton asked me to create a cake for their Holiday campaign, (after squealing) I instantly thought of recreating the buttercream floral print look with a Holiday theme! It’s easier than it looks with the right tools, a great color scheme, and some inspiration from your favorite Holiday florals and foliage (think Poinsettias, pine sprigs, snowberries, holly, and all the flowers that make you think of this festive season).

christmas floral cake by sugar and sparrow

buttercream cake with holiday flowers by sugar and sparrow

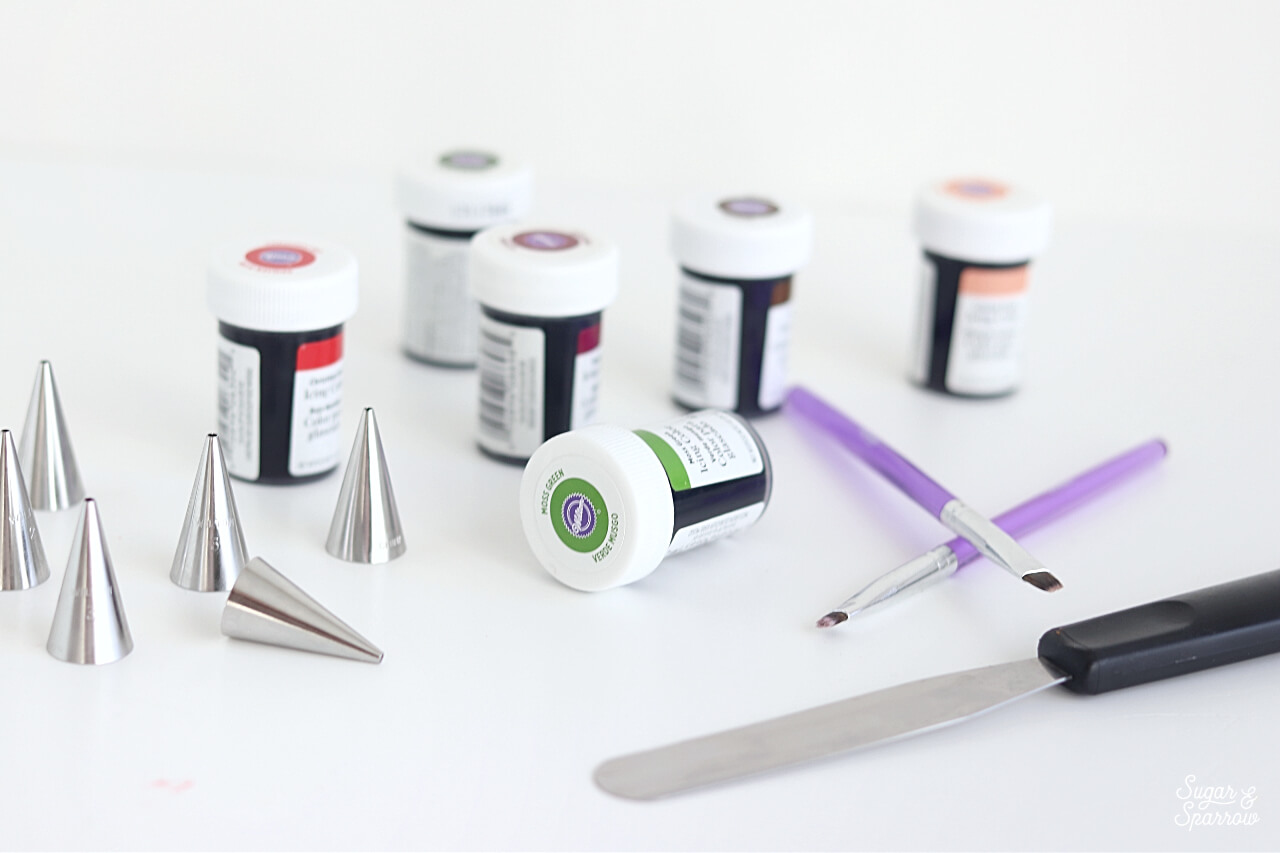
Although I already had the essential Wilton piping tips and icing spatula on hand, Wilton was kind enough to send me the perfect Icing Color Gels and decorating brush set to create the ultimate festive cake!

wilton cake decorating supplies

Here’s a video to see the techniques and step-by-step in action, and I’ll walk you through every detail below:

You Will Need:

  • A cake frosted with smooth buttercream
  • 1 batch of vanilla buttercream (or other light colored buttercream)
  • Wilton Icing Color Gels (or color gels of your choice)
  • Toothpicks
  • Bowls and spoons for color mixing
  • Piping bags
  • Several Wilton Piping Tip 2 (one for each color you’re using)
  • A small icing spatula
  • Floral designs for tracing + wax paper and a pencil (optional)
  • Wilton decorating brushes
  • A small dish of water

Step 1: Chill Your Buttercream Cake  

It’s essential that you begin this technique with a cold buttercream cake as your canvas. That way, you won’t have to worry about accidentally smudging your smooth buttercream as you create the floral patterns.

how to frost smooth buttercream cake

After frosting (I’ve used a tiny amount of Wilton’s Creamy Peach to get this subtle cream shade for my backdrop), chill the cake for at least 30 minutes, or until the buttercream is firm to the touch.

Step 2: Prepare Your Buttercream Color Palette

While your cake is chilling, divide your buttercream into separate bowls (one for each color). Dip a toothpick into the Wilton Icing Color Gel of your choice and apply it to the first bowl of buttercream. Mix with a spoon and continue adding color until it’s the perfect shade, then repeat with the other colors. The color palette for this specific cake is Creamy Peach, Christmas Red, Juniper Green, Moss Green, Brown, Burgundy, White (non-colored vanilla buttercream), and Black.

wilton tip 2 piping on buttercream

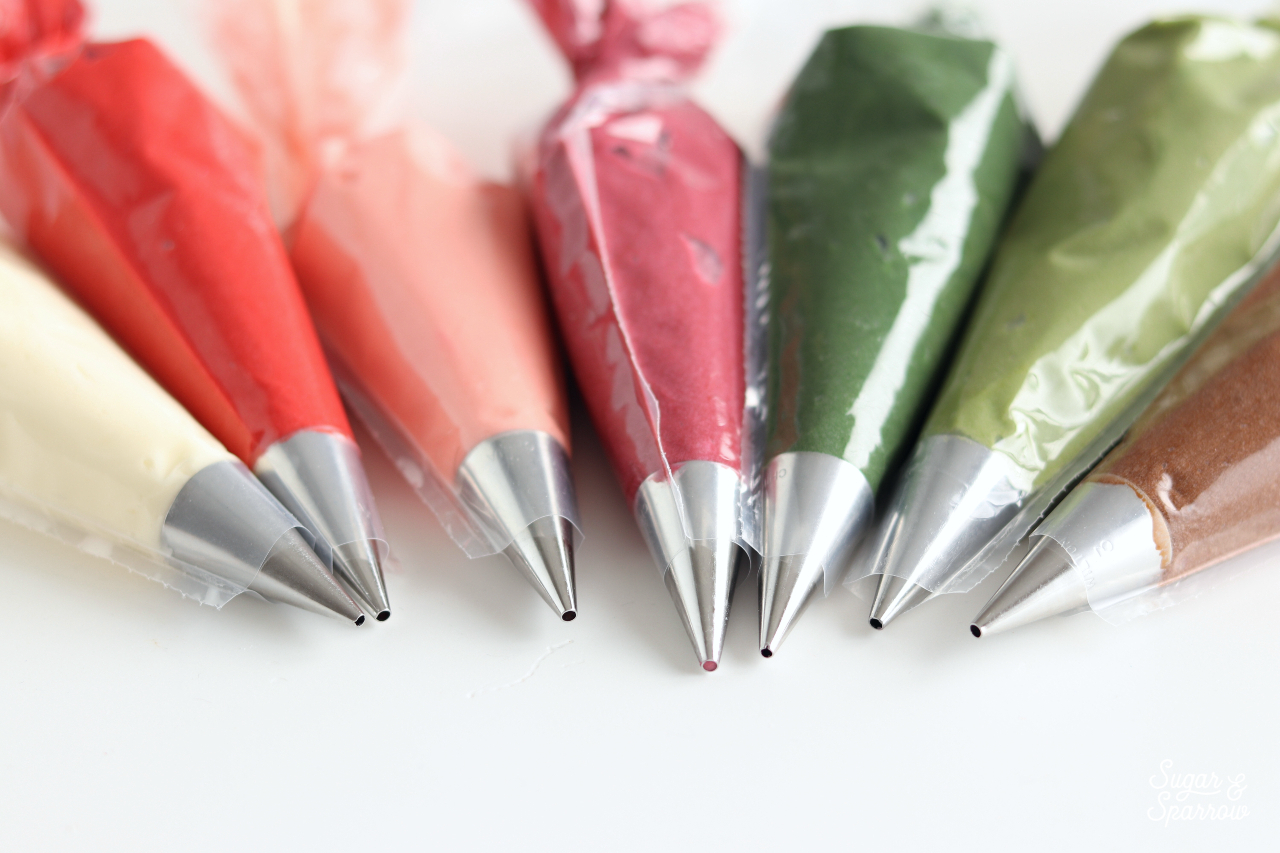
When your icing color palette is looking perfect, prepare your piping bags by snipping off the end and fitting each one with a Wilton Tip 2. This will give you a small, perfectly circular opening for more precise piping. Fill each piping bag with your buttercream colors and marvel at how pretty they look all together!

Step 3: Create Floral Pattern Tracings (optional)

Since I am an ultra-perfectionist, I like to know what my floral patterns are going to look like on the cake and give myself a guide by tracing the patterns on prior to piping. I created and printed out templates of simple floral patterns and traced them onto wax paper, then used the dull end of a wooden skewer to imprint the patterns onto my cold buttercream cake.

how to create floral patterns for cakes

how to trace patterns onto buttercream cakes

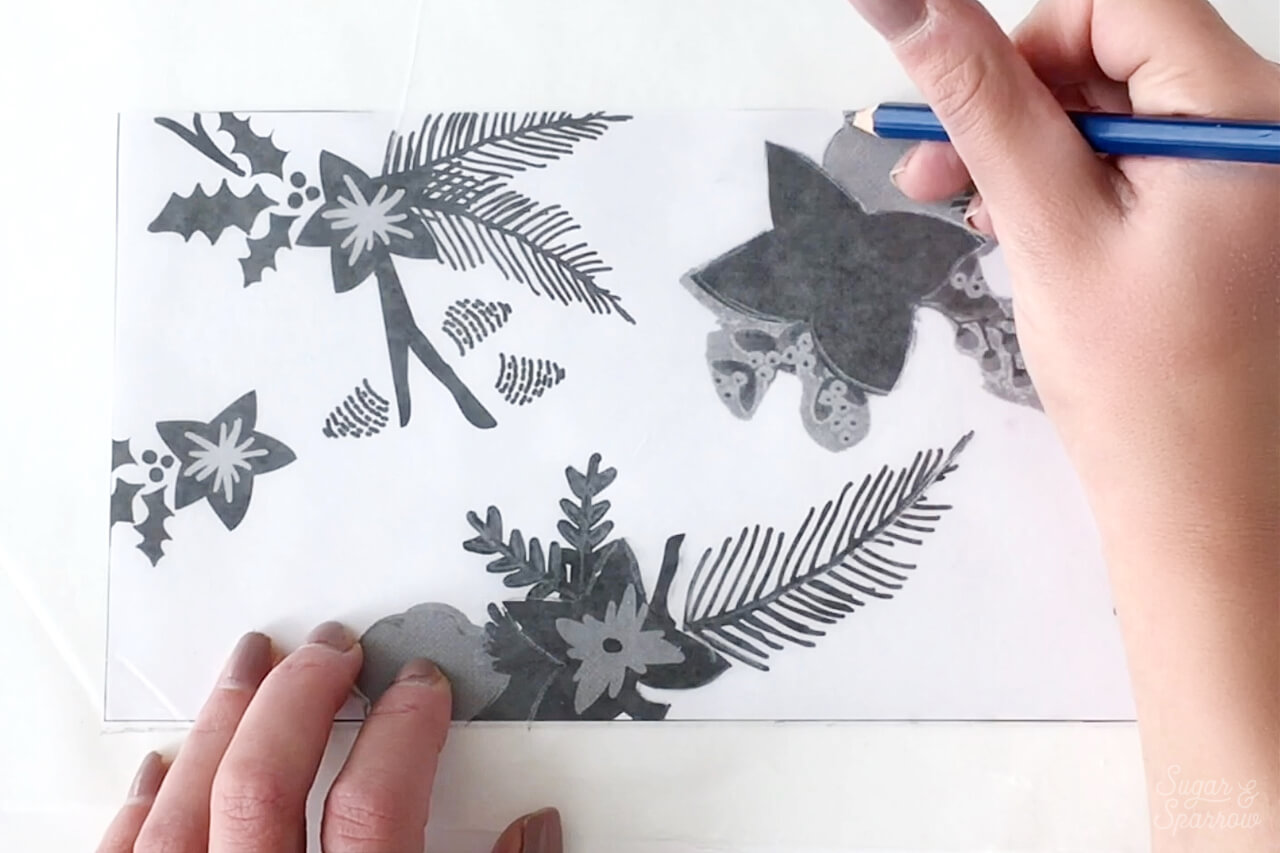
For the tracings, you could also use floral designs from wrapping paper or doing an online search for Holiday floral patterns. If you’re more of a go-with-the-flow type of cake decorator, feel free to improvise the patterns as you go!

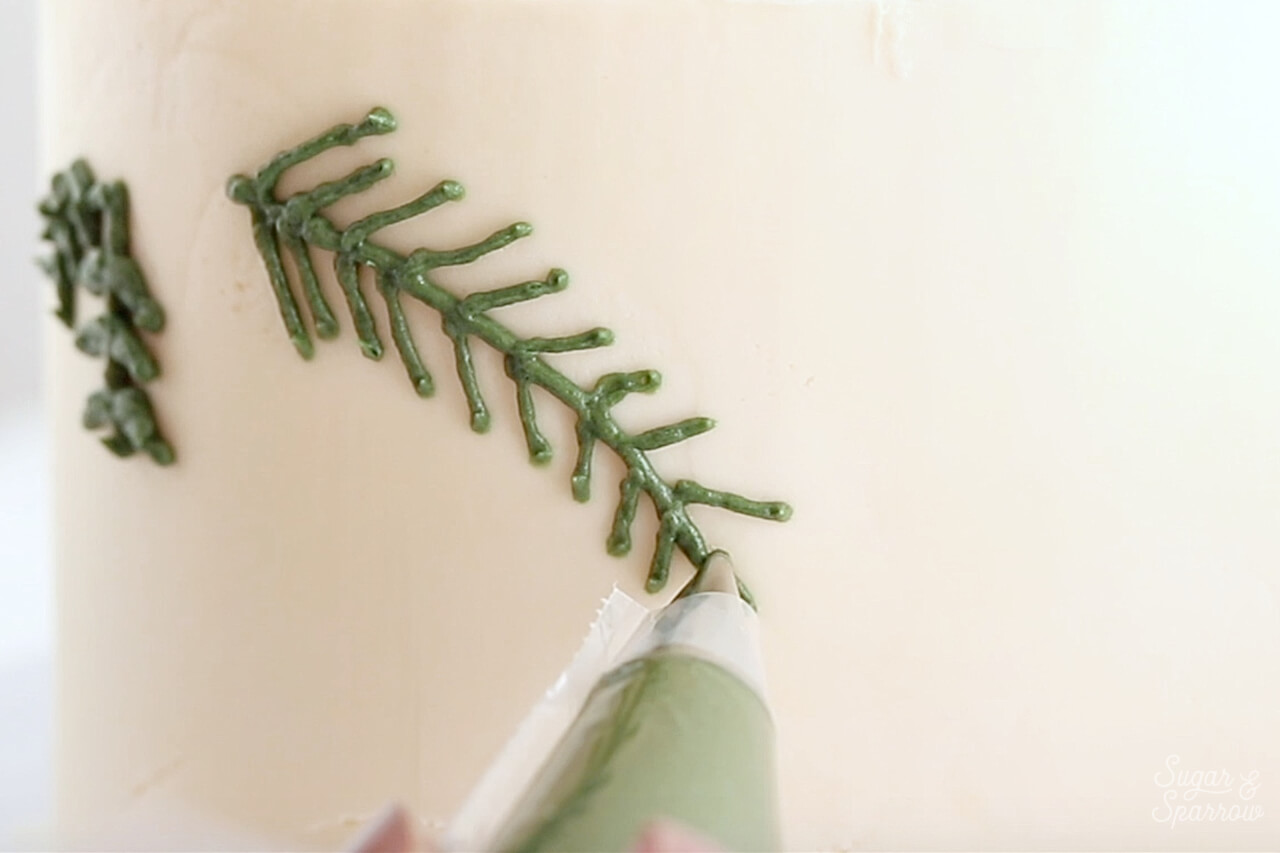
Step 4: Pipe Your Patterns Onto The Cake

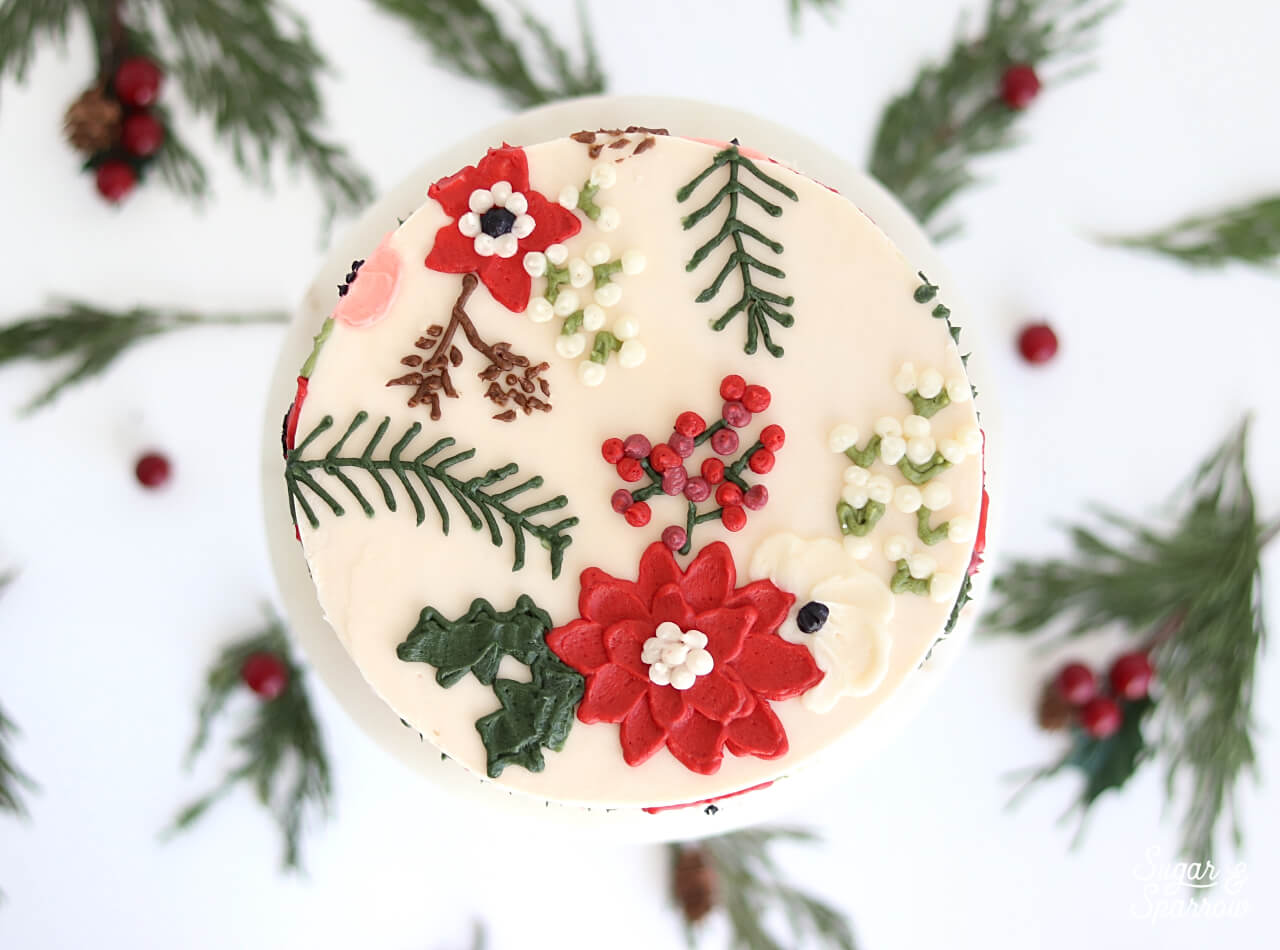
Now for the fun part – piping the designs! Using your piping bags, outline the floral pattern tracings one by one. You’ll find that some designs (like the fir tree branches) will only require outlines, while other designs (like pinecones and snowberries) require dots. The Wilton Tip 2 is perfect for either of these techniques, as it allows you to drag the buttercream in precise lines or dot the buttercream on for circular textures.

how to pipe flowers onto buttercream cakes

For the flower designs, pipe the outline of the flower before filling a little bit of buttercream inside the petals. Use a small icing spatula to swipe the buttercream inward and create the look of petals.

how to make buttercream poinsettia

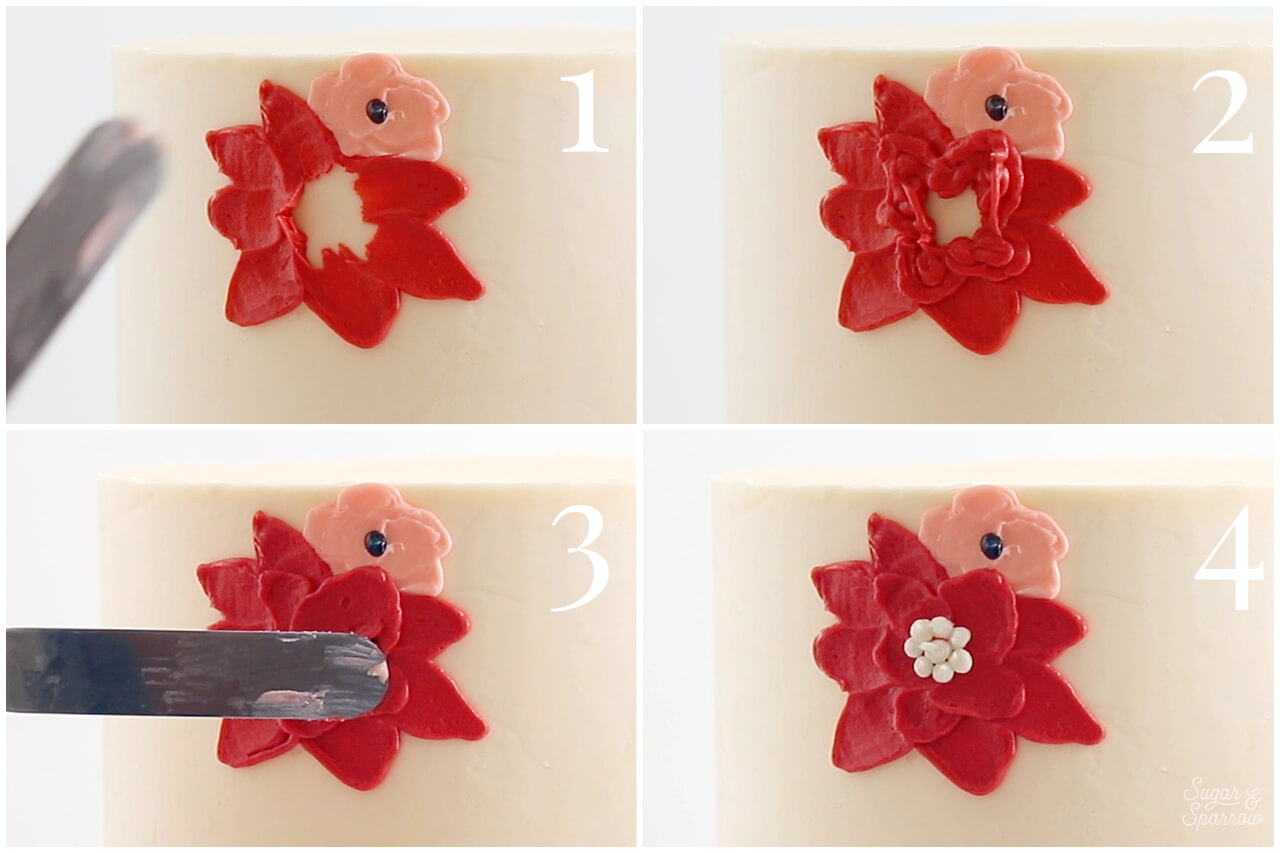
Repeat the process of piping and spatula painting until your entire cake is patterned with holiday florals.

how to paint flowers onto buttercream

Depending on the look you’re going for, you can have as many or as little designs as you’d like!

Step 5: Smooth With Paint Brushes

After all of your piping is complete, it’s time to do a tiny bit of finish work to make everything look smooth and uniform. It’s essential to have a few paintbrushes handy (I’m using Wilton’s 5 Piece Decorating Brush Set) and a small bowl of water for this part. 

how to smooth buttercream piping paintbrush

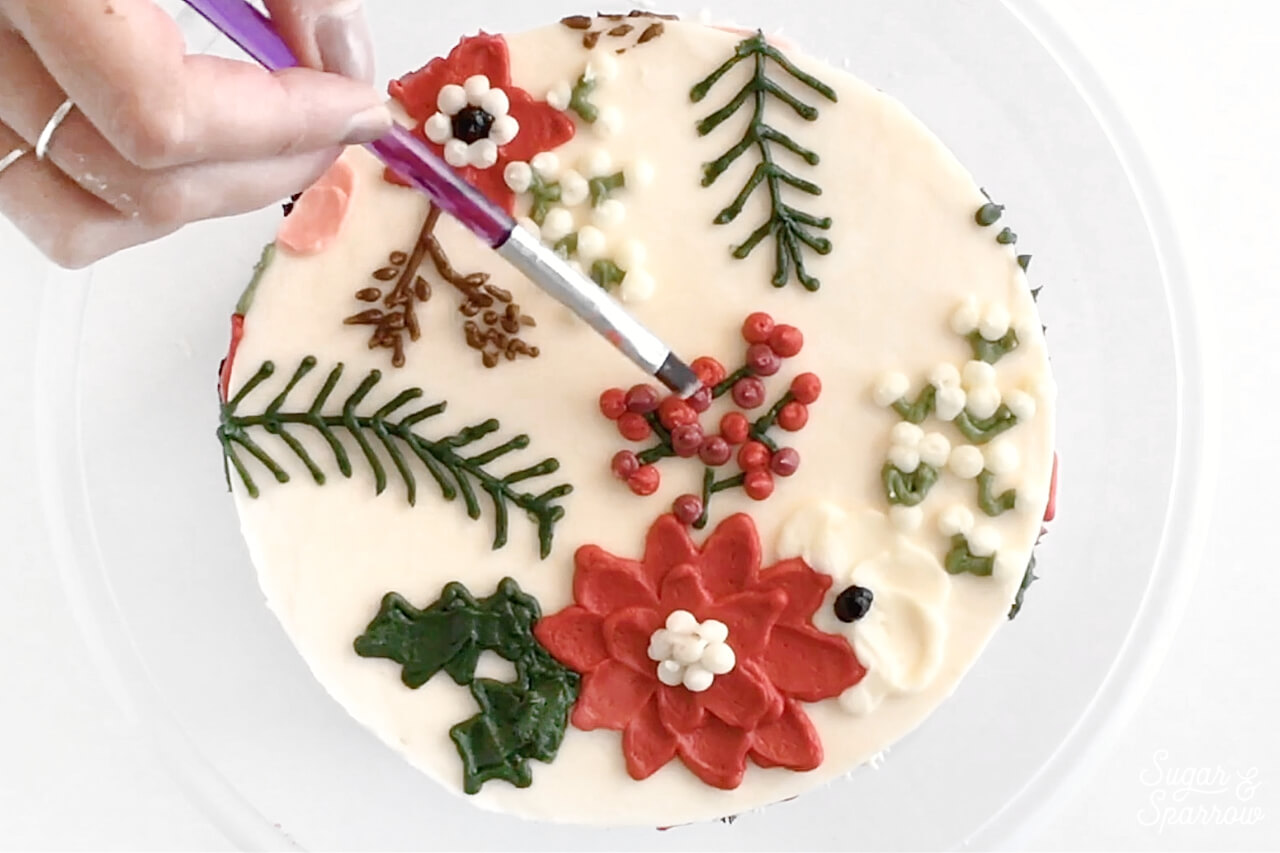
Dip your paintbrush into a tiny bit of water and gently press down on any places on the cake where sharp peaks have formed. This technique helps flatten and smooth designs like branches, berries, and anywhere your piping is peaking.

I couldn’t be happier with how this Holiday Floral Cake turned out! Wilton had the perfect paint brushes and Icing Color Gels for this palette and I am so happy to add them to my already-vast collection of Wilton cake decorating products.

christmas cake by sugar and sparrow

What kind of festive cakes are you planning this season? There are a TON of brilliant Holiday cake ideas like this one over on Wilton’s Christmas Ideas page, so be sure to check it out for some inspiration! And if you try this buttercream floral pattern technique, be sure to tag me on Instagram so I can see your creativity in action. Happy Holiday season to you and yours!

By: Whitney · In: Featured, Holiday, Seasonal, Tutorials · Tagged: buttercream piping, cake decorating, cake decorating tutorial, cake tutorial, christmas cake, holiday cake, poinsettia cake, spatula painted cake, tutorial, vanilla buttercream

you’ll also love

pumpkin layer cake recipe by sugar and sparrowPerfect Pumpkin Layer Cake Recipe
oreo cookies and cream cakeOreo Layer Cake Recipe
yellow cake recipe with chocolate frosting and rainbow sprinklesYellow Cake with Chocolate Frosting (Classic Birthday Cake)

Join the List

Stay up to date & receive the latest posts in your inbox.

Reader Interactions

Comments

  1. Amanda LeJeune says

    December 15, 2020 at 1:14 pm

    What consistenty do you use for the frosting decorations?

    Reply
    • Whitney says

      December 15, 2020 at 9:18 pm

      Hi Amanda! I just use my vanilla buttercream recipe as-is for the frosting decorations: https://sugarandsparrow.com/vanilla-buttercream-recipe/ If you feel that you’d like the buttercream to be thicker you can always add an extra 1/2 cup to stiffen it.

      Reply
  2. Sara Brown says

    July 25, 2020 at 2:47 pm

    I love this so much! You inspired me to be able to tackle a similar cake today wish I could attach a photo. I especially appreciated the tips about 1)actually using a tip (I’m a tip less bag lover, but sometimes you just need a tip!) and 2) pulling “in” with the spatula. Thanks so much!

    Reply
    • Whitney says

      July 25, 2020 at 9:59 pm

      Yay, Sara! So happy to hear you found this tutorial helpful! I’d love to see your cake, if you’ve got Instagram try tagging me in a post or sending a pic to me there!

      Reply
  3. Sash says

    March 31, 2019 at 7:04 am

    Splendid and thank you so much for your precise explanation. I really wish to bake something smilies for my daughter’s 10 th birthday .
    Thank you !!

    Reply
    • Whitney says

      April 1, 2019 at 8:58 am

      Thank you, Sash! I hope you end up making something like this for your daughter’s birthday! This design would make an awesome birthday cake 🙂

      Reply
  4. Annie Maier says

    December 12, 2018 at 3:40 pm

    This is gorgeous, and I love that you didn’t use fondant! Your precise and detailed instructions make me think I could actually pull this off. 😀

    Reply
    • Whitney says

      December 12, 2018 at 3:56 pm

      Thanks so much, Annie! You can totally pull this off!!

      Reply
  5. Gabby says

    December 5, 2018 at 10:07 am

    Where can I find the floral document? Thanks!

    Reply
    • Whitney says

      December 5, 2018 at 12:39 pm

      Hi Gabby! My husband actually whipped up the floral graphics for me inspired by some Rifle Paper Co Holiday designs, found here: https://riflepaperco.com/shop/occasions/

      You can totally print those out and use them as a template, or do a quick search for “holiday floral prints” to see what you like!

      Reply

Trackbacks

  1. Fun Christmas Desserts - Wilton says:
    March 14, 2022 at 9:46 pm

    […] Sugar and Sparrow’s love of baking is evident in this decadent and impressive Christmas cake with a buttercream floral print inspired by seasonal flowers and foliage! Find the Recipe Here. […]

    Reply

Leave a Reply Cancel reply

Your email address will not be published. Required fields are marked *

Recipe Rating


Next Post >

Chocolate Caramel Pecan (Turtle) Cupcakes

Primary Sidebar

Welcome to Sugar & Sparrow

Welcome to Sugar & Sparrow

Helping you whip up pretty desserts with confidence and creativity. And hopefully sharing a few laughs with you along the way!

Learn More

Connect

let’s bake!

Get my very best recipes, baking tips, and decorating tutorials sent to your inbox

Featured Posts

Sugar and Sparrow best cake recipes of 2023

Best of 2023

apple sheet cake with spiced buttercream

Spiced Apple Sheet Cake

Anyone Can Cake giveaway with Wilton

Anyone Can Cake x Wilton GIVEAWAY!

Search

Archives

Follow Along

@sugarandsparrowco

Y’all have been asking for gluten-free cake reci Y’all have been asking for gluten-free cake recipes for awhile now, which makes me EXTRA excited to finally share this gluten-free chocolate cake!! After tonnns of recipe testing, this cake is so rich and fudgy (yet somehow not too dense!), has an amazing chocolate flavor, is irresistible with chocolate buttercream, and truly doesn’t taste gluten-free. It low key might be my favorite chocolate cake recipe of all (and I’ve had a LOT of them) 🤎 
 
Get the recipe link in my bio + at https://sugarandsparrow.com/gluten-free-chocolate-cake/ 
 
#chocolatecake #glutenfreecake #glutenfree #cakesofig #birthdaycake
VANILLA CUPCAKES 🧁these from-scratch vanilla cu VANILLA CUPCAKES 🧁these from-scratch vanilla cupcakes are super soft and moist, have the perfect vanilla flavor, and are perfect for any celebration with a swirl of vanilla buttercream + pretty rainbow sprinkles! I originally published this recipe in 2018 and it’s become a reader fave ever since 🙌🏼 
�Full recipe (with frosting) is linked in my bio + at https://sugarandsparrow.com/vanilla-cupcake-recipe/ 
 
VANILLA CUPCAKES 
Yield: 32 cupcakes 
 
INGREDIENTS 
2 1/2 cups (265g) sifted cake flour 
2 tsp baking powder 
1/2 tsp baking soda 
1 tsp salt 
3/4 cup (170g) unsalted butter, room temp 
1 3/4 cup (350g) granulated sugar 
3 large eggs, room temp 
1/2 cup (120g) sour cream, room temp 
1 Tbsp pure vanilla extract 
1 cup (240ml) whole milk, room temp 
 
INSTRUCTIONS 
1. Preheat the oven to 350°F (177ºC) and line standard cupcake pan(s) with up to 32 liners. 
2. Add the sifted cake flour, baking powder, baking soda, and salt into a bowl and whisk to combine. Set aside. 
3. In the bowl of your stand mixer with the paddle attachment (or w/ hand mixer and large bowl), beat the butter on high for 2 minutes, then add the sugar and continue to beat on high until light and fluffy, about 2 min. Turn the mixer to low and add the eggs one at a time, mixing thoroughly after each addition. Add the vanilla and sour cream, then turn the mixer to high speed and mix for 1 min. Scrape down the bowl and paddle as needed. 
4. With the mixer on low speed, add the dry ingredients all at once and mix until just combined, then add the milk in a steady stream. Continue mixing for another 20-30 seconds, until just combined. Scrape the sides and bottom of the bowl and gently mix by hand until uniform. 
5. Spoon or pour the batter into the cupcake liners until they’re about ⅔ full, then bake for 14-18 minutes, until they spring back to the touch and a toothpick inserted comes out clean. 
6. Top with your fave frosting (my vanilla buttercream recipe is linked in my bio)! 
 
#vanilla #cupcakes #cupcakesofinstagram #cakedecorating #fromscratch
FUDGY CHOCOLATE NUTELLA CAKE 🍫🌰 this is my a FUDGY CHOCOLATE NUTELLA CAKE 🍫🌰 this is my absolute DREAM cake + if you love chocolate and hazelnut it will be yours toothis cake is pure decadence and perfect for any chocolate hazelnut lover: layers of fudgy chocolate cake with the+ creamiest Nutella ganache and Nutella flavored buttercream. 
⁣ 
Comment NUTELLA CAKE to get the recipe sent to you 💌 it’s also linked in my bio + at https://sugarandsparrow.com/chocolate-nutella-cake/ 
⁣ 
#nutellacake #nutella #chocolatecake #cakelover #cakes
FREEZE-DRIED CHERRY BUTTERCREAM 🍒I was so excit FREEZE-DRIED CHERRY BUTTERCREAM 🍒I was so excited to find freeze-dried tart cherries for the very first time at @traderjoes and had to try them in a buttercream recipe! Turns out they are an AMAZING way to flavor a cherry buttercream – you get incredible cherry flavor without adding any liquid, so the consistency of the frosting ends up perfect every time. I found that the KEY to amplifying the cherry flavor here is add a little almond extract ✨ trust! 
 
Full recipe with cake pairing suggestions linked in my bio + at https://sugarandsparrow.com/freeze-dried-cherry-buttercream/ (spoiler alert: it’s incredible on chocolate cupcakes!) 
 
CHERRY BUTTERCREAM 
Yield: 2.5 Cups 
 
INGREDIENTS 
1 Cup (226g) unsalted butter, room temp 
3/4 Cup (34g) freeze-dried cherries 
3 Tbsp (45ml) whole milk, room temp 
1 tsp pure vanilla extract 
1/2 tsp almond extract 
3 Cups (360g) powdered sugar 
pinch of salt, or to taste 
 
INSTRUCTIONS 
1. With a food processor, grind the freeze-dried cherries into a fine powder. You can alternatively place the cherries in a Ziploc bag and crush them into powder with a rolling pin. 
2. Whip the butter using a stand mixer with a paddle attachment on medium-high speed until it’s creamy and light in color, about 5 minutes, scraping down the bowl and paddle as needed. Add the cherry powder, milk, vanilla, and almond extract and continue to mix on medium until fully combined. 
3. Add the powdered sugar one cup at a time and mix on low speed, scraping down the bowl and paddle after each addition. Add a pinch of salt and mix on low speed until fully combined and smooth, 1-2 minutes. 
 
#cherrybuttercream #cherries #cakedecorating #frosting #buttercream
CONVERSATION HEART CAKES 💕 these mini heart cak CONVERSATION HEART CAKES 💕 these mini heart cakes turned out so cute + I love that you can write any message you want on top!! Perfect Valentine’s Day party activity and/or dessert. Details (full recipe + tutorial link is in my bio): 
 
👩🏽‍🍳Recipes: my favorite one-bowl chocolate cake + vanilla buttercream. Both are included in the link below, but you can use any cake recipe with the tutorial. 
💗Heart cake pans: I found these 4-inch heart pans on @amazon but also include instructions on how to make heart-shaped cakes starting with round cake layers in case you don’t want to add any more cake pans to your collection 
🎨Buttercream colors: @americolor electric purple, mint green, and deep pink (and super red for the writing on top) 
🥰Piping tip: @wiltoncakes tip 5 
 
Full tutorial (w/ recipes!) is linked in my bio + at https://sugarandsparrow.com/mini-conversation-heart-cakes/ 
⁣⁣ 
#minicake #heartcake #cakedecorating #chocolatecake #vintagecake

Footer

On the Blog

  • Cake Basics
  • Recipes
  • Tutorials

Info

  • About
  • Privacy Policy & Disclosure

stay in the know

Copyright © 2026 · Theme by Sugar & Sparrow