If there’s one thing that always looks good semi-naked, it’s a cake. The barely-there buttercream is such a versatile look that works well for almost any kind of event. Whether you dress it with fresh flowers, drip it with ganache, or tint the buttercream, you can get pretty creative with this rustic or minimalist look. And the best part is, the semi-naked technique is extremely easy. You just need to know a few key things before attempting it to set yourself up for success.

If you’re more of a video-inclined learner, here’s a quick one I shot of the semi-naked technique. I’ll break everything down in the tutorial in the next section:
You Will Need:
- 3 Cups of buttercream (this Vanilla Buttercream recipe is perfect)
- Baked cake layers
- Angled spatula
- Icing smoother
- Cake turntable
Step 1: Prep Your Cake Layers
If you haven’t already, start by leveling your cake layers to an even height. In my opinion, this step should never be missed, no matter what kind of cake you’re creating. Leveling helps to get rid of any domed cake tops, thus setting your entire cake up for being super level and sharp.

Once your cake layers are perfectly even and level, fill and stack them.
PRO TIP: when you’re stacking your cake layers, it helps to very slightly offset the middle layer so that the edge sticks out a little further in some areas. The top and bottom layers should be completely parallel for evenly straight sides, but slightly offsetting the center layer (and I’m talking a centimeter or two) will help create more varying depth with your semi-naked finish.
Step 2: Frost And Smooth The Top Of The Cake
Start frosting the top of the cake by placing a bit of buttercream on the top and smoothing it with an angled spatula, turning the cake on your turntable as you smooth.
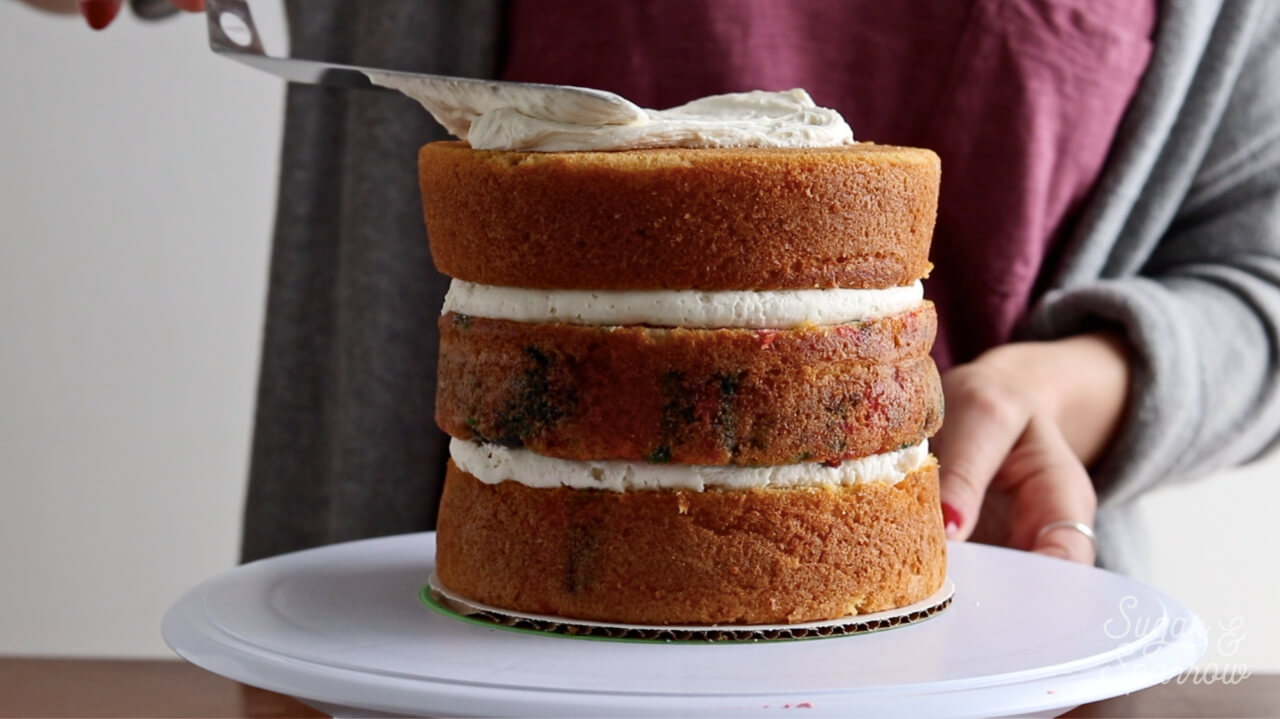
You should have enough frosting on the top of the cake that it extends about ¼ inch beyond the top edges.
Step 3: Frost And Smooth The Sides Of The Cake
Using that same angled spatula, apply buttercream to the sides of the cake, starting at the bottom and working your way up to the top. Since the semi-naked look involves buttercream that looks barely there, try to apply a pretty thin layer.

When you’ve got the sides covered, take your icing smoother and smooth the sides of the cake until they’re straight and you have some nice areas of cake peeking through. If you have areas that need more buttercream, simply apply more buttercream and keep smoothing until you like what you see.
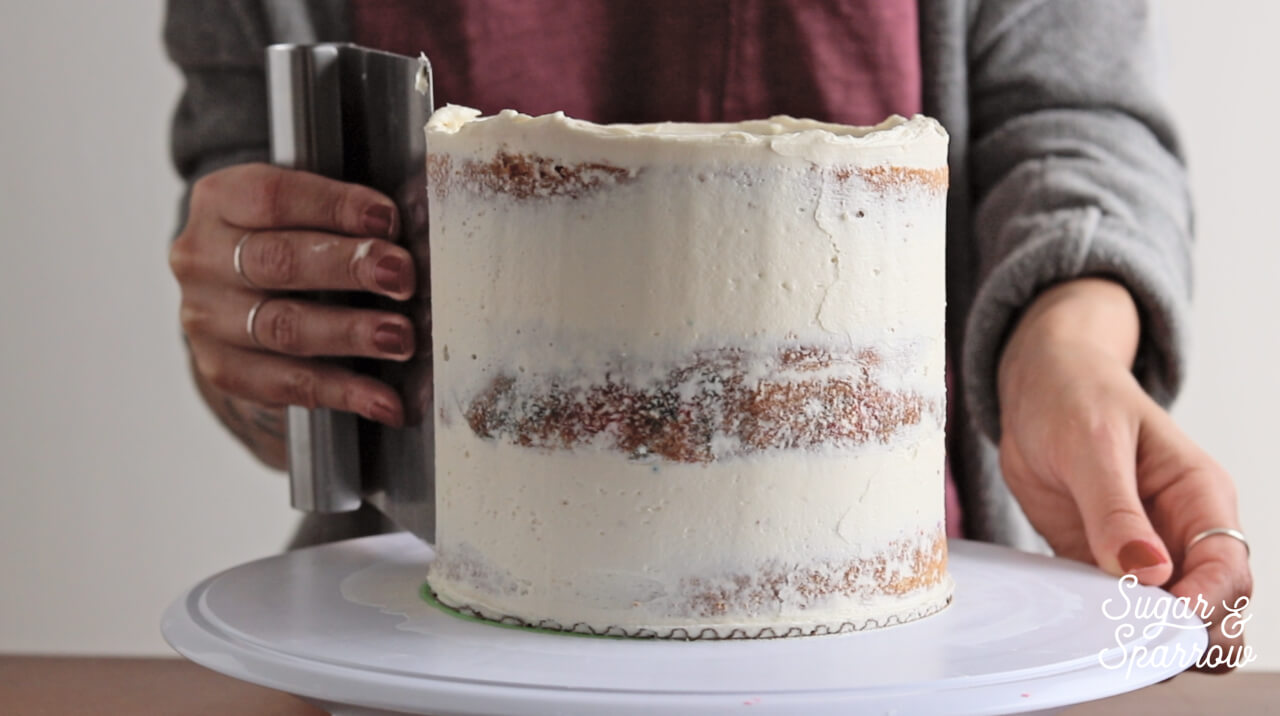
Try not to press too hard when you’re smoothing the more “naked” areas, since you could puncture the cake layers and cause them to crumble. If this happens, just smooth it over with more buttercream.
Step 4: Smooth The Top Edges
Now that your sides are looking so rustic and beautiful, you’ll probably notice a little buttercream crown has formed around the top edge of your cake. This is a really good sign, because it means you’re going to have a nice, sharp top edge when you’re done smoothing it.
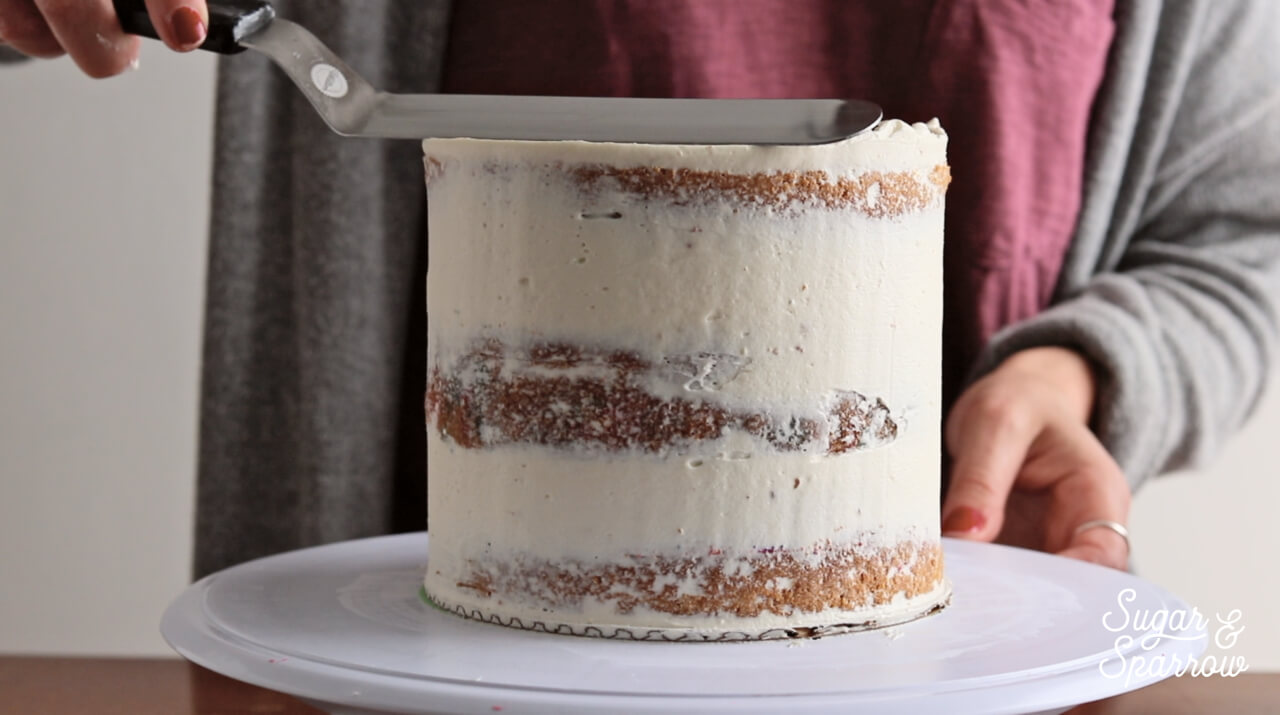
Using your angled spatula, smooth the buttercream crown inward, moving the buttercream toward the middle of the cake. The goal here is to create level, sharp edges by swiping through the buttercream crown and moving the excess buttercream across the top of the cake. Smooth the top of the cake until it’s level and you don’t have a dome in the middle from moving the buttercream crown inward.
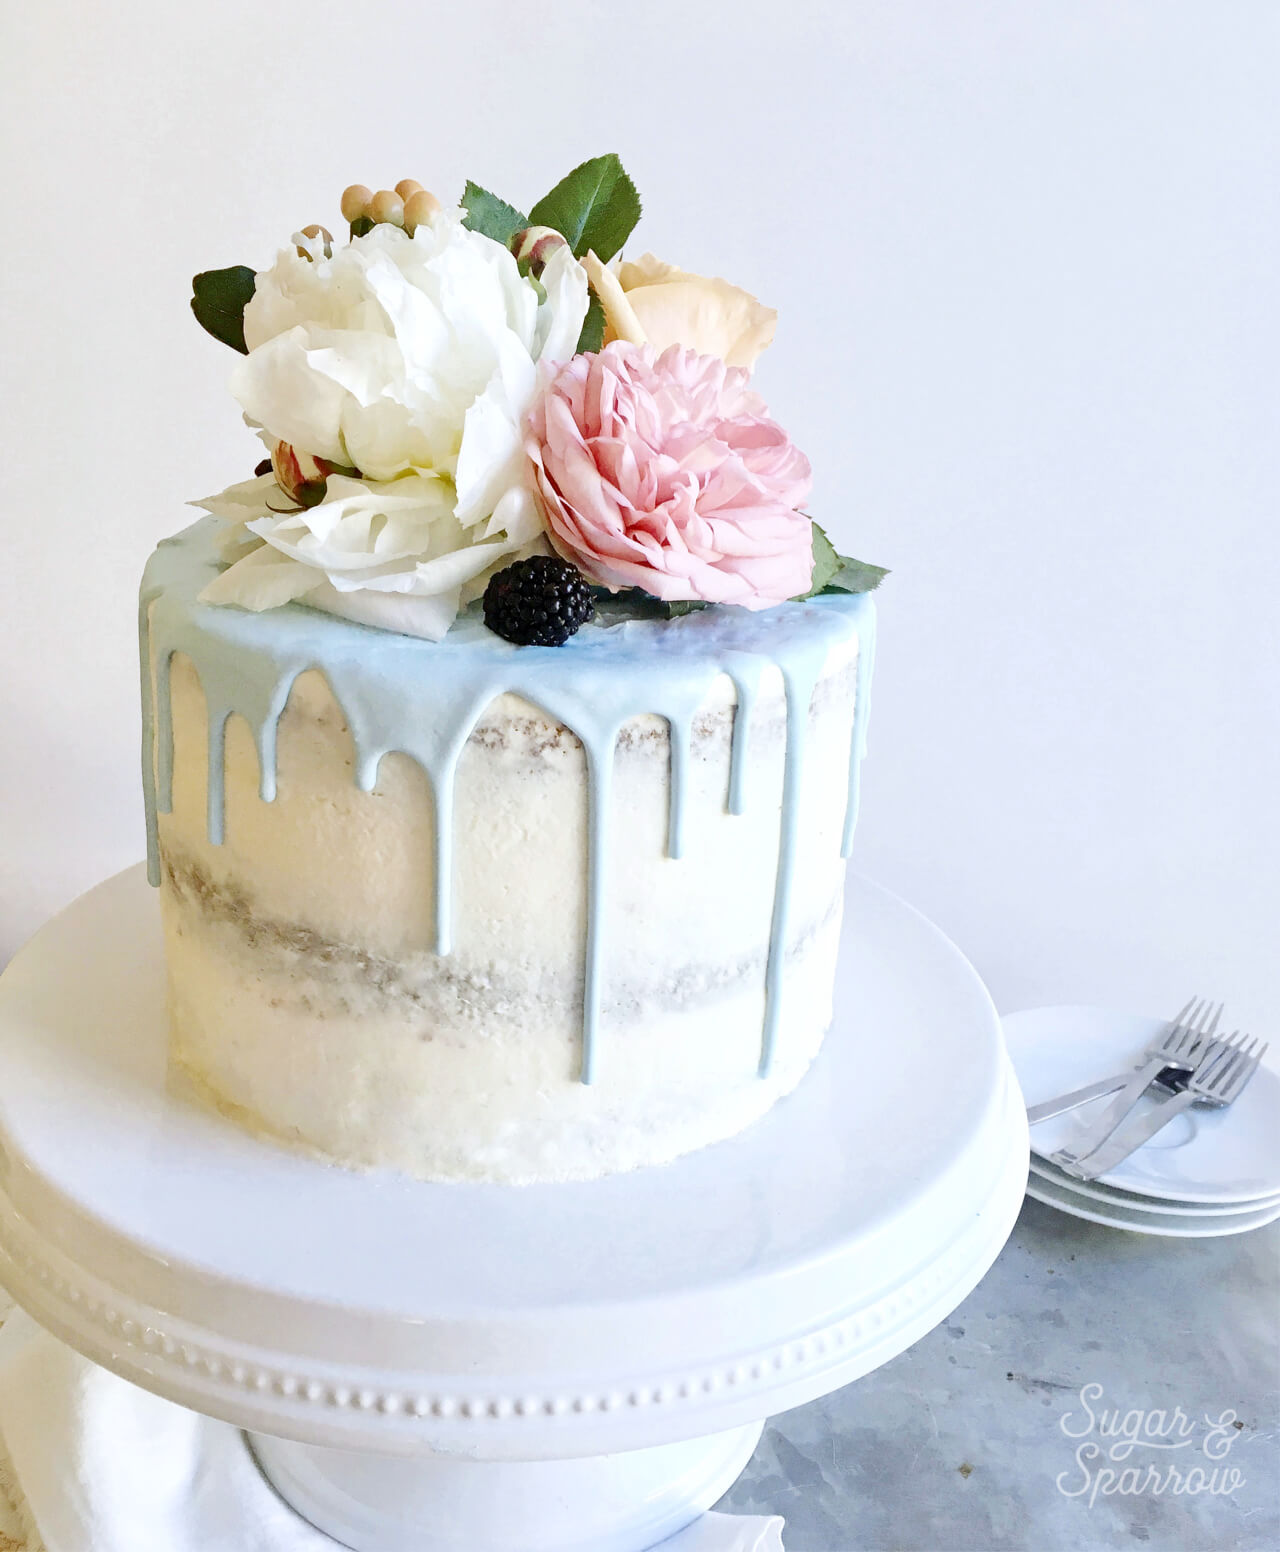
Step 5: Decorate
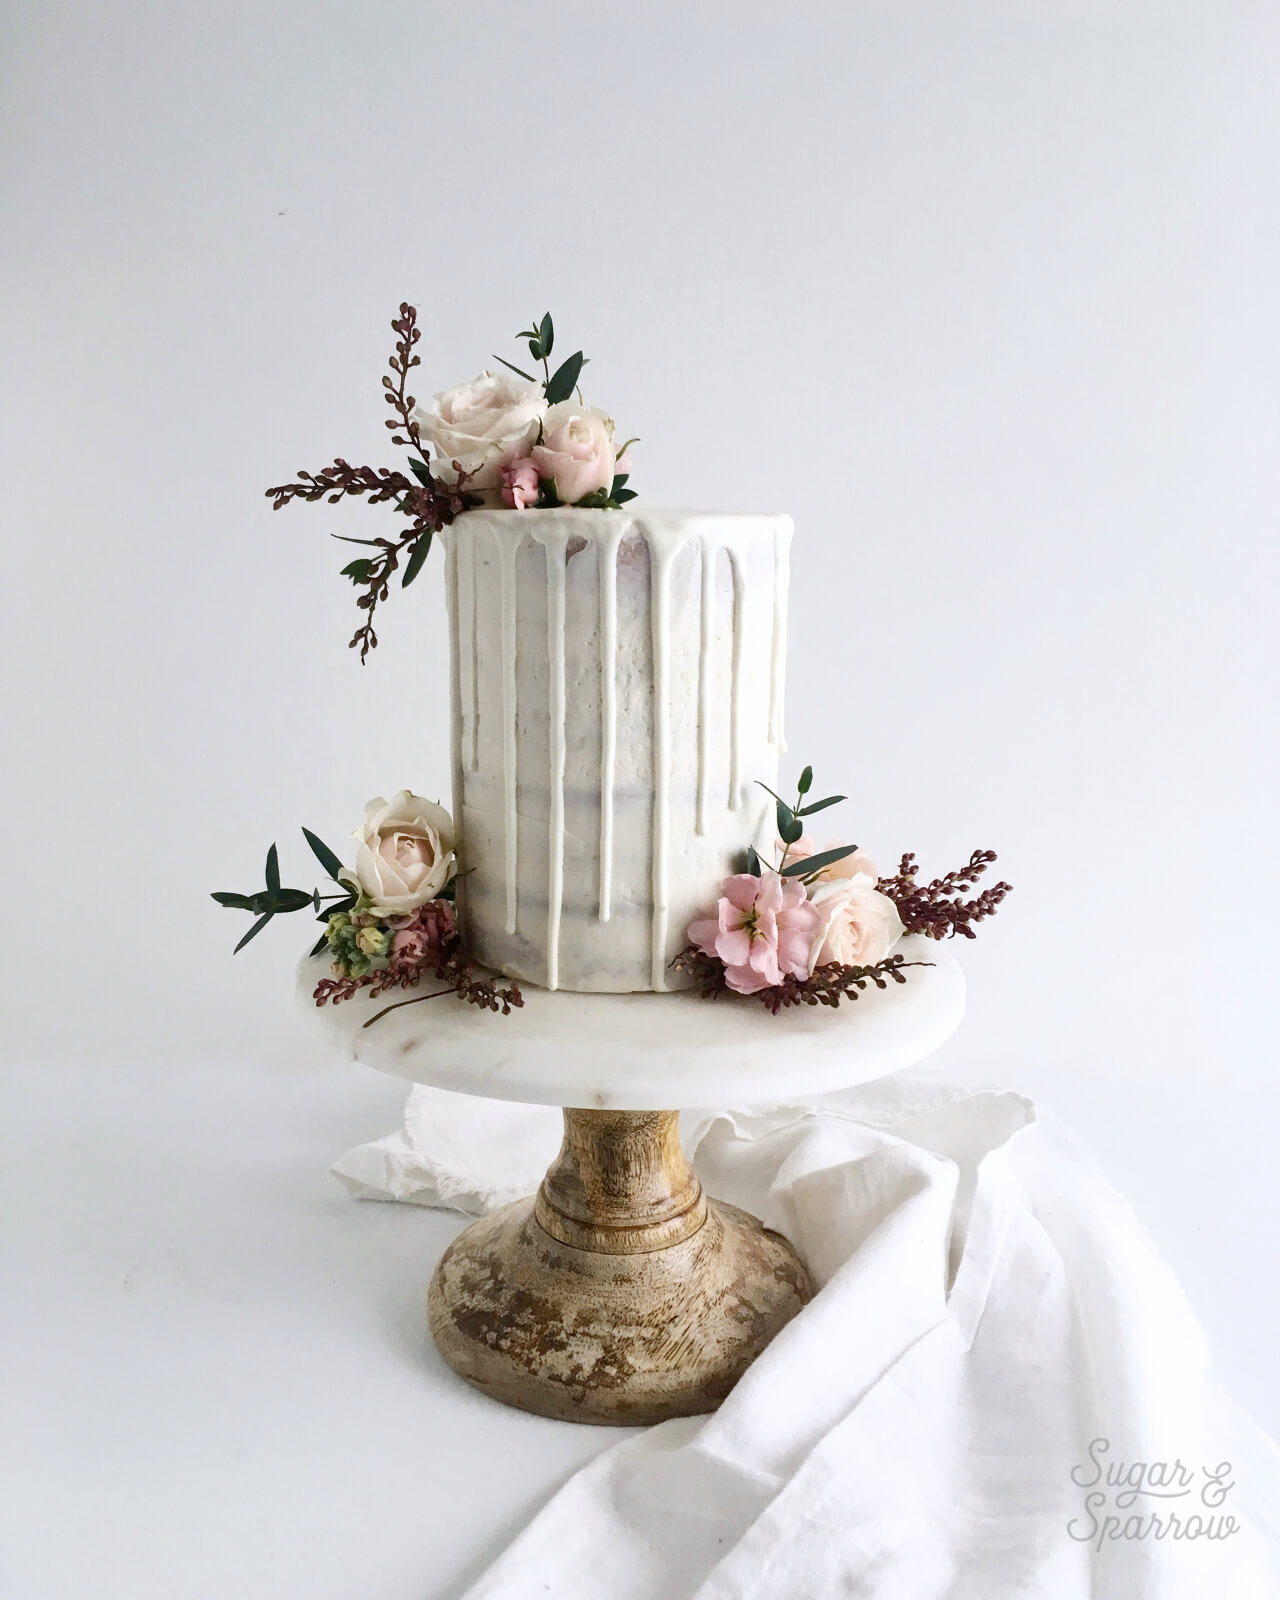
Now that you’ve created your very own semi-naked cake, it’s time to dress it up a little! Some awesome next steps would be incorporating some fresh flowers (made food safe) to decorate, doing a ganache drip, or keeping the design rustic with some greenery like fresh herbs. Here’s what I’ve done in the past:

Whether it’s your first semi-naked cake attempt or not, let me know if this tutorial was helpful and show me what you’ve created by tagging me on Instagram! I’d love to see your creations.


Hi there, this tutorial was amazingly helpful. However I just wanted to know, I’m making a semi naked wedding cake but want my actual sponge to be a white sponge vanilla cake. Is that possible? Thank you
Hi Salimah, this technique will work with any cake or sponge, so a white sponge vanilla cake will be totally fine. The cake and buttercream colors should be different enough to show the semi-naked details.
Hi Whitney! This tutorial is so helpful but I’m curious as to whether I could use white chocolate ganache instead of butter cream for a naked cake? I’ve decorated with both and I just find ganache to be easier to work but I don’t want to try it if it won’t work nicely! Thankyou 🙂
Hi Kiahna, white chocolate ganache frosting will work just fine with this technique! When it’s whipped into frosting consistency, it behaves just like buttercream. You should totally try it if white chocolate ganache is your go-to for frosting cakes.
Hey I am looking to do a wedding cake in July and afraid that american buttercream wont be stable enough. I was considering using white chocolate ganache – if this is whipped, will it still provide stability as it stiffens and sets as it would unwhipped ganache?
Hi Suzie! I would recommend this buttercream recipe for hot weather: https://sugarandsparrow.com/buttercream-recipe-for-hot-weather/
Thank you so much for all your above advice, it has been extremely helpful. I’ve baked a number of cakes, however I have been asked to make a large wedding cake for February. It will be a naked cake, and I understand needs to be dowelled due to its size, however for transportation would you recommend leaving each layer separate on its individual board and then assembling once there? There are 4 layers, 3 being naked. I plan to leave it to refrigerate the night before.
Also what frosting do you use please? I always struggle with this one as I know many use cream, however I was concerned that as a wedding cake it will be sitting out of the fridge. Other recipes I find are normal buttercream that then leaves the frosting yellow?
Any help would be so greatfully received.
Thank you
Hi Chrystal! For a four-tiered cake, I would do the assembly at the venue instead of trying to transport it all built up (much safer that way!). I would dowel the individual tiers and bring extra frosting with you to the venue, then assemble and finish decorating it there. For my semi-naked cakes (and every style of cake I do), I always use this vanilla buttercream recipe: https://sugarandsparrow.com/vanilla-buttercream-recipe/
For an ultra-white buttercream, I always add a little Americolor Bright White at the end of the recipe. It whitens the buttercream without affecting taste/texture and you can find it here: https://amzn.to/39REqH0
Good luck!!
Thank you for for this tutorial! I am hoping to make a decorate a cake for my daughter’s baby shower. How do you safely put flowers on the cake? I will be using roses but I am not sure how to place them. Thank you!
Yay, Karen! So happy for you to try this technique and I think it will be so pretty for a baby shower. Here’s everything you need to know about using fresh flowers on your cake: https://sugarandsparrow.com/fresh-flowers-cake-decorating/
Hi! I’m making a super tall 8 inch layer cake for a birthday and I’d like to do a semi-naked frosting. I have some questions I was hoping you could help with:
If I’m doing a really tall cake, it’s been suggested that I support with a cake round in the middle and support w dowels, etc. Can this be done on a semi naked cake if I trim the board slightly so it doesn’t overhang? I also want to alternate chocolate and vanilla layers and possibly do an ombre icing to avoid this looking too much like a wedding cake with just white. Do you think the ombré look plus chocolate and vanilla layers is too much happening at once? Any tips to make it work? Thank you!!
Hi Olivia! To answer your questions: 1) yes, you can support the taller layers with a cake round and just trim it down so that it’s slightly smaller than the cake layer. 2) If you alternate the chocolate and vanilla layers it might end up looking striped underneath the semi-naked frosting, even if you do an ombre over the top. I think what I would do is have the chocolate cake layers toward the bottom of the cake so the darker color of the ombre could go over the top of those and then ombre into white for the vanilla layers. If a striped look think a semi naked ombre will look really cool!
Hi. I’m doing a 4 tier wedding cake semi naked and want to know if the cakes will hold fresh flowers on the edge of the middle layers or will they end up tearing the cake?
Hi Carolynn! Inserting flowers into the edges of the middle layers will be totally fine. Flowers don’t weigh enough to tear the cake. Be sure to properly prepare the stems before inserting them into the cake, I have a tutorial on that here if you need: https://sugarandsparrow.com/fresh-flowers-cake-decorating/
Hi there, could I still do this naked cakes effect with a cream cheese frosting?
Hi Gigi! You can certainly create a semi-naked design with cream cheese frosting!
hi! just wondering where you got your cake pans from?
Hi Ann! I get my cake pans from Amazon and the ones I used for this cake are these Wilton 6″ cake pans: https://amzn.to/2JjvdvC
This is so helpful! I am going to make the same size cake you made. If you are transporting a cake should you secure the layers? Or you think it will stay put?
Hi Angela! There’s no need to secure the layers when transporting a cake of this size. I always refrigerate the cake for at least an hour (or even overnight) before transporting though. That way the cake is way sturdier.
Hi. Can you cover the cake with cream instead of the buttercream icing?
Hi Shan! I’m not sure what you mean by cream. If you mean whipped cream, I would find a recipe for Stabilized Whipped Cream frosting because that will work, but just plain whipped cream won’t frost well.
Hi there could this work for a gluten free version? Could you substitute for gluten free flour? Thanks heaps
Hi Nikki! I’ve never made a gluten free cake before, but I’m sure there are all sorts of good flour substitution tips online! This cake tutorial will work for any kind of cake and buttercream once you find a good recipe 🙂
Hi – if it helps, I made a gluten and dairy free semi-naked cake, as an extra, at my son’s wedding. I used ‘Freee’ gluten free self-raising flour (available everywhere in the UK but not sure about US) and used the recipe on the back of their pack (victoria sponge) with a splash of vanilla essence added. I used Stork for the buttercream. The coeliac, and vegan guests were delighted 😉 xx
I enjoyed reading all of your comments and your replies. I will be making a tiered semi naked cake for my sons wedding next month . You have some very good tips . I have decorated cakes at my job for many years but those were ice cream cakes , so this will be my first official cake cake . Thank you for all of the great information !
Thanks so much, Sarah! I’m happy the tips are helping and I’m so excited for you to make your first official cake. The semi-naked look is so pretty for weddings 🙂
hello! I want to make a red velvet cake and ice it with this technique. What would be a recommended recipe or strategy to prevent crumbs from getting into the buttercream?
Hi Jennifer! I would do a light crumb coat on the cake, then chill it for at least 30 minutes before continuing with another final coat of buttercream. This way, all of the loose crumbs will be caught in the crumb coat and the final (thin) layer of buttercream will cover them up.
to add one what type of cake recipe would you recommend, a chocolate cake recipe is preferred
I have an excellent chocolate cake recipe here that I’d love to recommend: https://sugarandsparrow.com/chocolate-cake-recipe/
Thank you for the wonder tutorial!☺️
May I ask where you purchased the beautiful cake stand in you pic? I absolutely love it.❤️
Hi Debbie! So happy you found the tutorial helpful. The cake stand pictured was a gift from my sister in law, and unfortunately it’s no longer available from Amazon. Here is a similar one though: https://amzn.to/2RAbU3S
Hi how do you make sure all your layers have the same darkness on the edges? Mine always seem to be different, lighter and darker and I think it looks funny. Is there any additional steps in the prep or baking? Thanks
Hi, Jodi. I’ve never heard of that happening! Here’s how I always bake my cake layers: https://sugarandsparrow.com/how-to-prepare-cake-pans/