If there’s one thing that always looks good semi-naked, it’s a cake. The barely-there buttercream is such a versatile look that works well for almost any kind of event. Whether you dress it with fresh flowers, drip it with ganache, or tint the buttercream, you can get pretty creative with this rustic or minimalist look. And the best part is, the semi-naked technique is extremely easy. You just need to know a few key things before attempting it to set yourself up for success.

If you’re more of a video-inclined learner, here’s a quick one I shot of the semi-naked technique. I’ll break everything down in the tutorial in the next section:
You Will Need:
- 3 Cups of buttercream (this Vanilla Buttercream recipe is perfect)
- Baked cake layers
- Angled spatula
- Icing smoother
- Cake turntable
Step 1: Prep Your Cake Layers
If you haven’t already, start by leveling your cake layers to an even height. In my opinion, this step should never be missed, no matter what kind of cake you’re creating. Leveling helps to get rid of any domed cake tops, thus setting your entire cake up for being super level and sharp.

Once your cake layers are perfectly even and level, fill and stack them.
PRO TIP: when you’re stacking your cake layers, it helps to very slightly offset the middle layer so that the edge sticks out a little further in some areas. The top and bottom layers should be completely parallel for evenly straight sides, but slightly offsetting the center layer (and I’m talking a centimeter or two) will help create more varying depth with your semi-naked finish.
Step 2: Frost And Smooth The Top Of The Cake
Start frosting the top of the cake by placing a bit of buttercream on the top and smoothing it with an angled spatula, turning the cake on your turntable as you smooth.
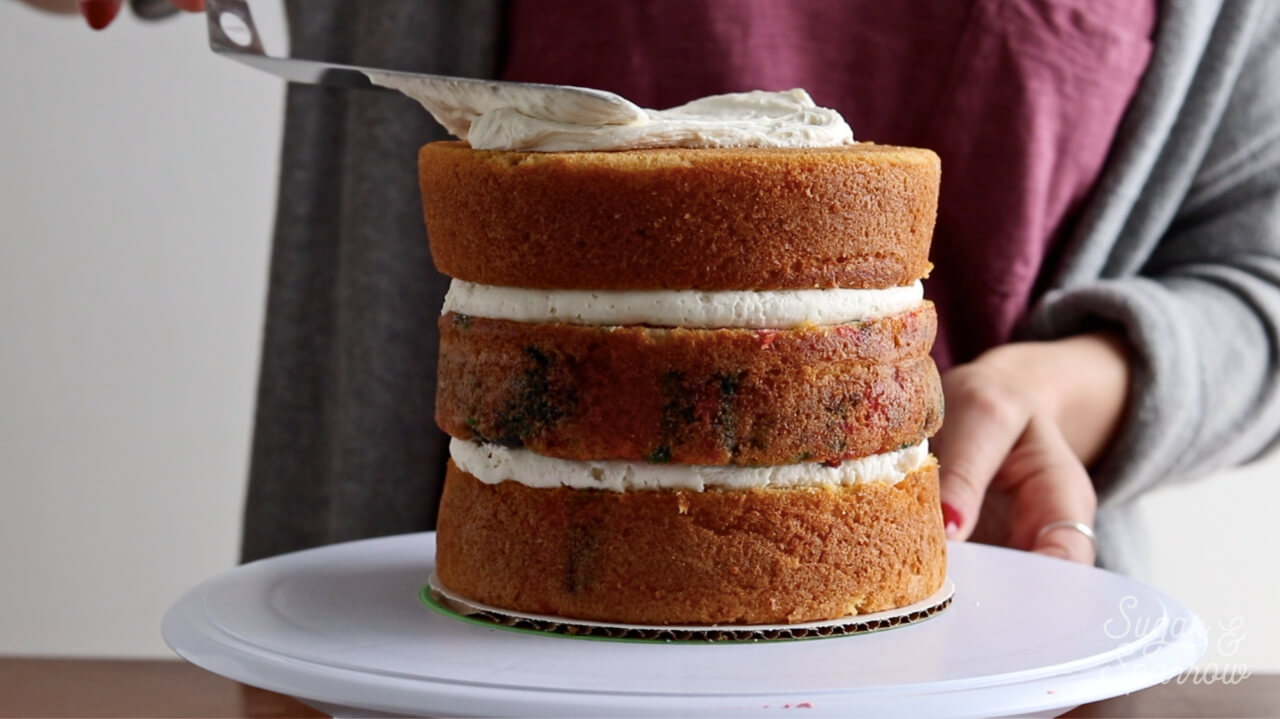
You should have enough frosting on the top of the cake that it extends about ¼ inch beyond the top edges.
Step 3: Frost And Smooth The Sides Of The Cake
Using that same angled spatula, apply buttercream to the sides of the cake, starting at the bottom and working your way up to the top. Since the semi-naked look involves buttercream that looks barely there, try to apply a pretty thin layer.

When you’ve got the sides covered, take your icing smoother and smooth the sides of the cake until they’re straight and you have some nice areas of cake peeking through. If you have areas that need more buttercream, simply apply more buttercream and keep smoothing until you like what you see.
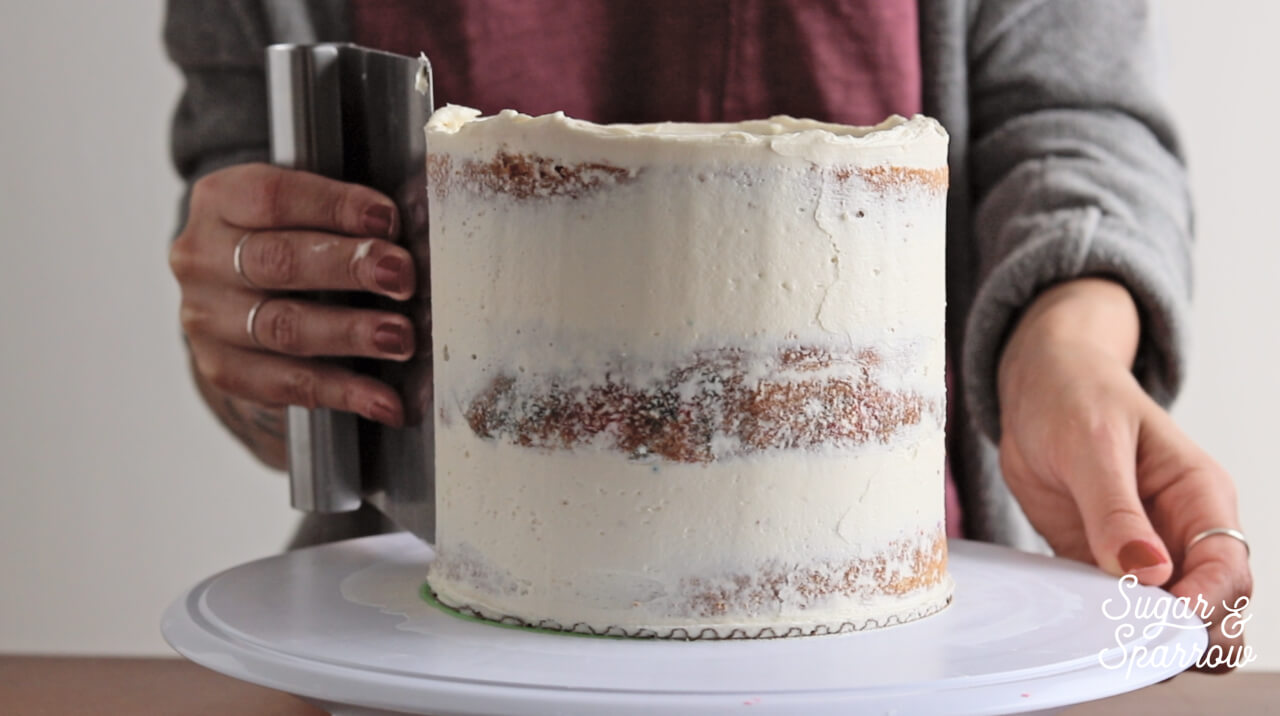
Try not to press too hard when you’re smoothing the more “naked” areas, since you could puncture the cake layers and cause them to crumble. If this happens, just smooth it over with more buttercream.
Step 4: Smooth The Top Edges
Now that your sides are looking so rustic and beautiful, you’ll probably notice a little buttercream crown has formed around the top edge of your cake. This is a really good sign, because it means you’re going to have a nice, sharp top edge when you’re done smoothing it.
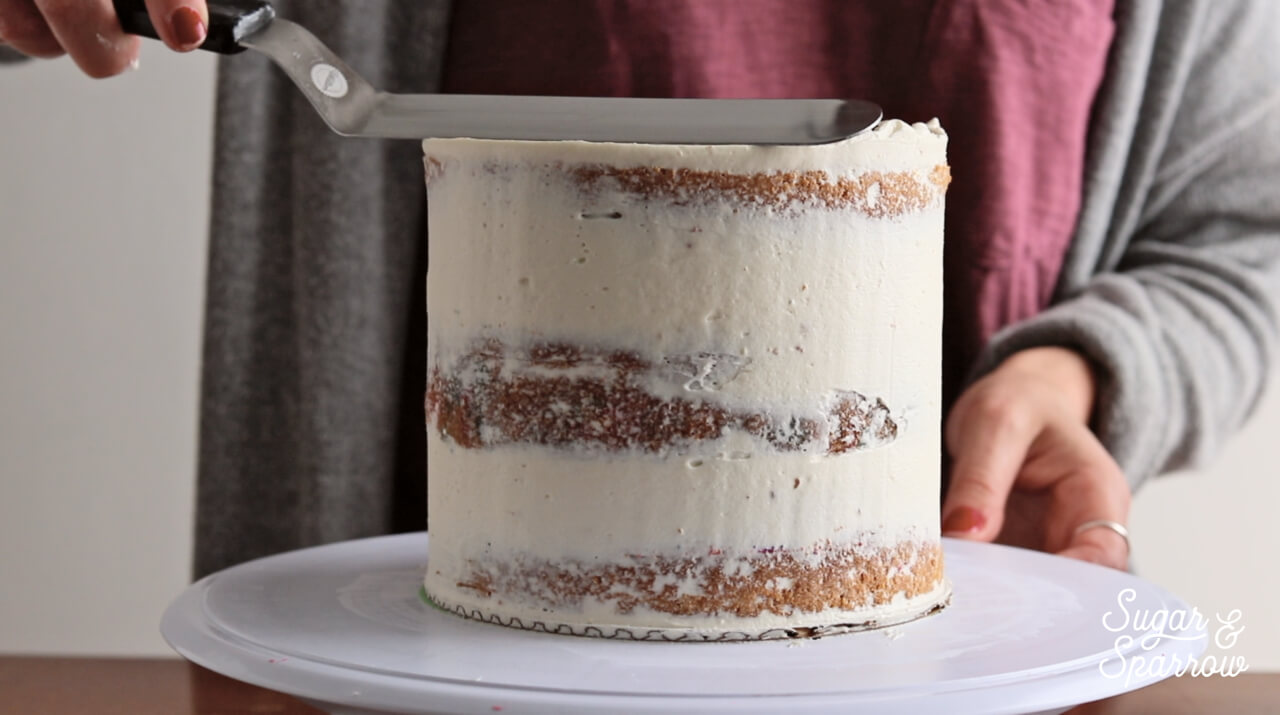
Using your angled spatula, smooth the buttercream crown inward, moving the buttercream toward the middle of the cake. The goal here is to create level, sharp edges by swiping through the buttercream crown and moving the excess buttercream across the top of the cake. Smooth the top of the cake until it’s level and you don’t have a dome in the middle from moving the buttercream crown inward.
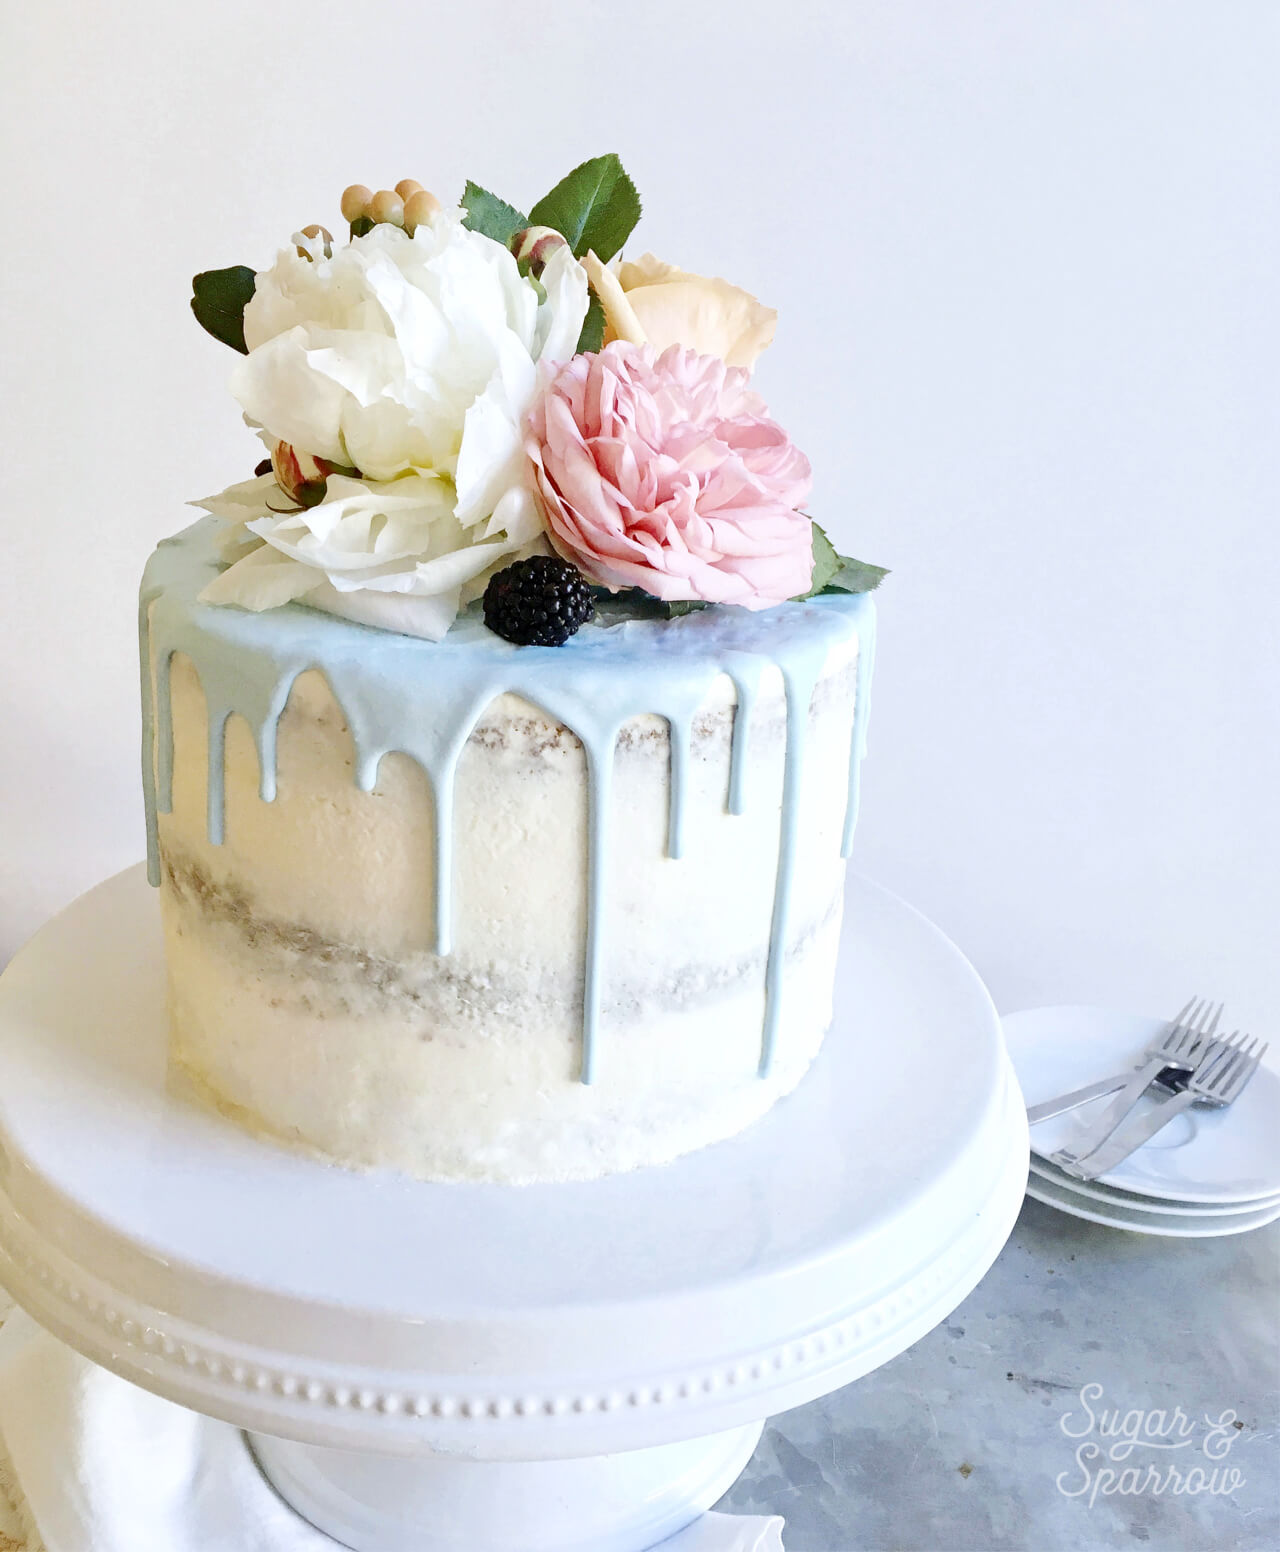
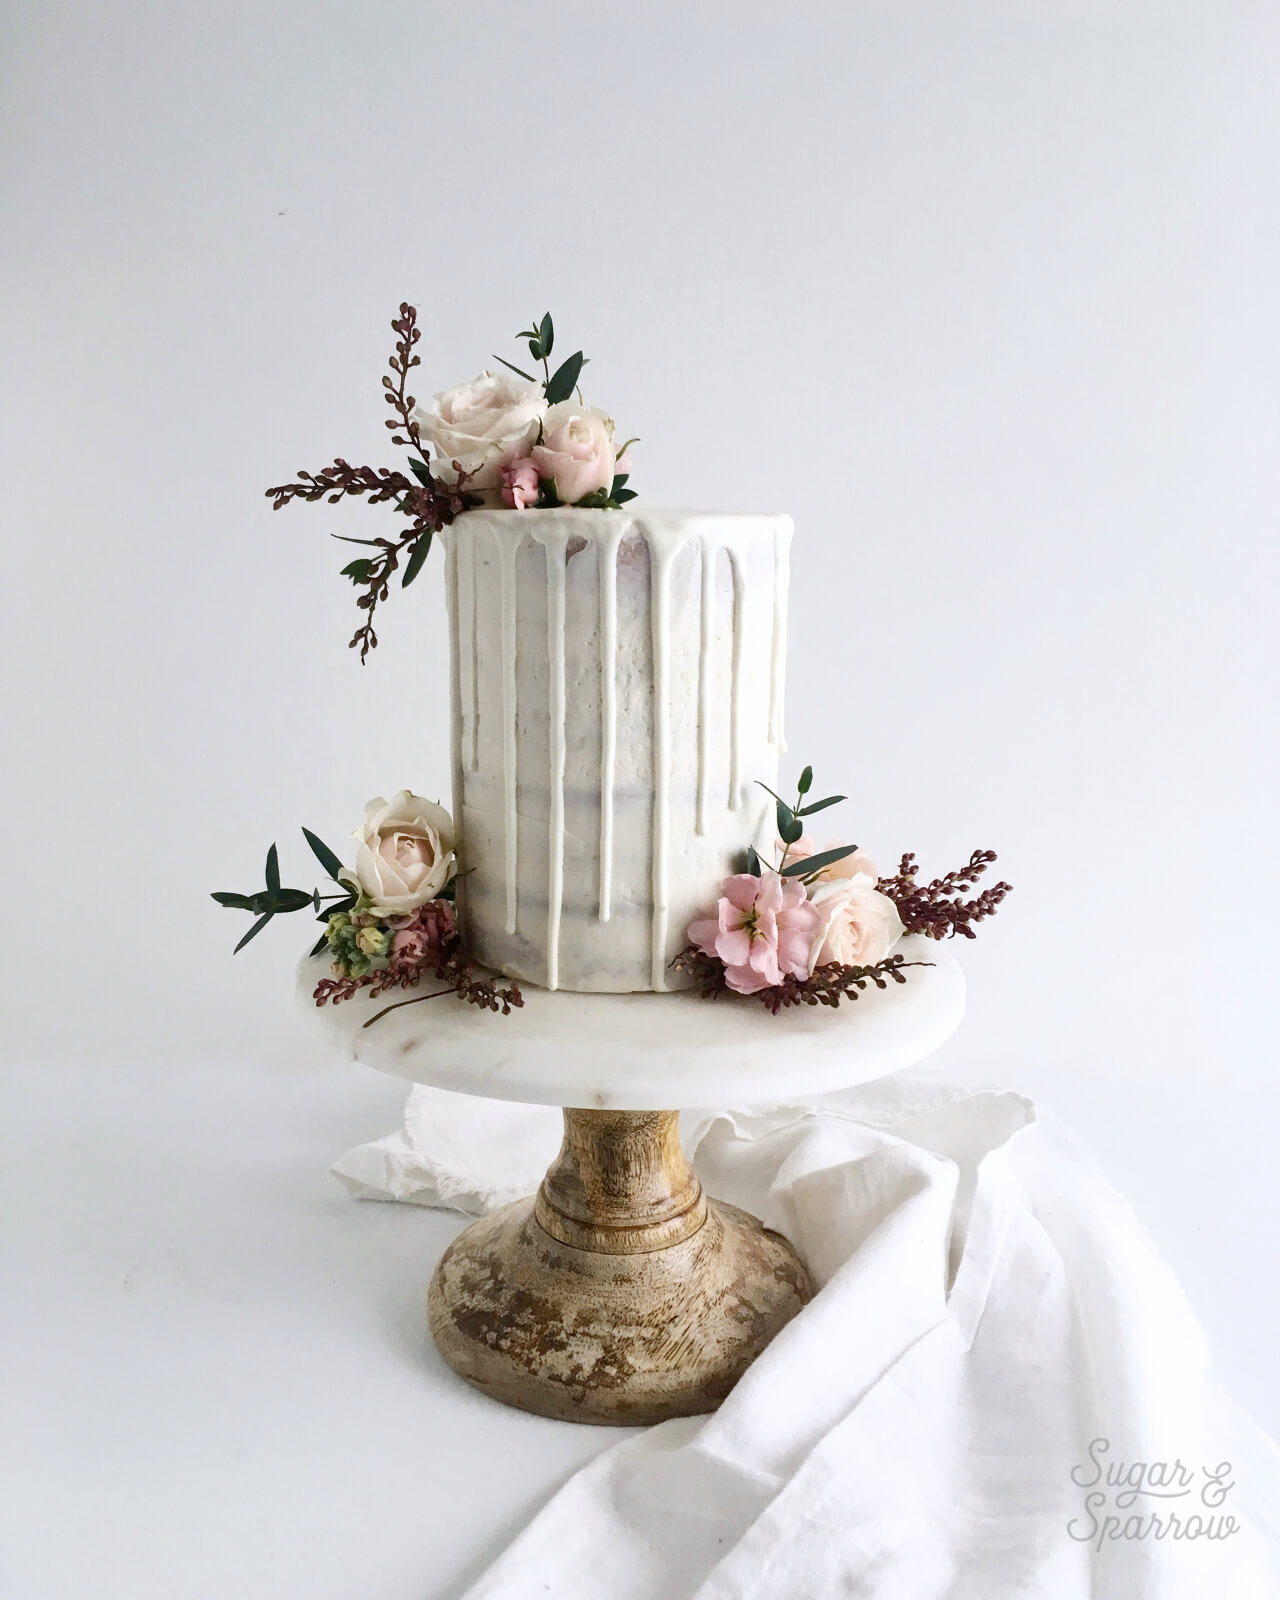
Step 5: Decorate
Now that you’ve created your very own semi-naked cake, it’s time to dress it up a little! Some awesome next steps would be incorporating some fresh flowers (made food safe) to decorate, doing a ganache drip, or keeping the design rustic with some greenery like fresh herbs. Here’s what I’ve done in the past:

Whether it’s your first semi-naked cake attempt or not, let me know if this tutorial was helpful and show me what you’ve created by tagging me on Instagram! I’d love to see your creations.


Hi.
I’m making a two tier cake with for my daughter’s wedding in August. Would carrot cake with cream cheese frosting work? I’m already stressing …. but your tutorial has eased my mind a lot. Thanks
Hi Wendy! A carrot cake with cream cheese frosting should totally work for a semi-naked cake design. As long as you follow these steps it should come out beautiful.
This is great, thankyou! My cakes always seem to bulge which is so frustrating- any tips? 🙂
Hi Claire! That used to happen to me all the time too and I feel your frustration! It usually happens when the filling is too thin to uphold the cake layers. Here’s how I fill my cakes to prevent that: https://sugarandsparrow.com/fill-and-stack-cake-layers/
Hi,
Whenever I try doing sharp corners they end up looking rounded, what do you recommend?
Hi Freda! You’ll need to either 1) build up the buttercream “crown” high enough to create a sharper edge when you swipe or 2) troubleshoot this after the fact by refrigerating the cake with the rounded edges for 20 minutes, then doing another thin frosting layer over the top. It’s much easier to get a smooth/sharp cake when you have multiple frosting layers. Hope that helps!
hello! Would this work with a whipped cream frosting?
Hi Emma! It totally would.
I cant see if anyone else has asked this , but what is your preferred cake for a naked cake. Would a sponge work, or are you better off using a more dense cake??
Hi Keo! Either a sponge or a denser cake would totally work for a semi-naked cake. Any of my cake recipes will work with this technique: https://sugarandsparrow.com/category/recipes/cake/
For two 10-inch layers with two 8-inch layers on top, would you suggest adding dowels? Or do you think I can get by without it? I will be assembling it at the venue. Also, how much icing would you guestimate I would need? Thank you. Your cakes are beautiful, by the way!
Hi Tammy! I would definitely use dowels if you’re making a tiered cake. And as far as amount of buttercream, if you’re using it to fill and frost with a semi-naked finish I would make 2.5-3x the vanilla buttercream recipe. If you’re only using it as a semi-naked finish you should be able to get away with 1.5x the recipe.
Can I chill the cake over night for easier delivery and stacking on sight? 3 tier cake
Hi Ellen! Yes, totally. I refrigerate cakes overnight every single time and keep them in the fridge until the very last minute (like when I’m heading out the door for a delivery). Way easier to work with a cold cake when you’re delivering and stacking on site!!
Hi have you ever decorated a semi-naked cake with stabilized whipping cream instead of buttercream and if so how did it turn out?
Hi Roseann! Yes, I have used stabilized whipped cream as a cake finish for a semi-naked design, only once. It turned out great though!
Hi! Could you please tell me what the names of the flowers are you used? Many thanks 🙂
Hi Elli! Which cake are you wondering about the flowers? There are three different cakes with flowers in this post – some with roses and fuschia and carnations.. let me know which one you were wondering about and I can try to figure out what I used.
Excellent tutorial- genius suggestion to stagger the layers! Thank you for sharing, made a cake for my MIL’s birthday and it looked fab.
Yay, Natasha! So happy this tutorial was helpful!
Should this cake be refrigerated? I’m always so worried with anything that has milk in it. I wouldn’t want anyone to get sick from something so pretty!
Hi Jennifer! Because of the amount of sugar in the buttercream, the small amount of dairy ends up being preserved at room temp and can last for 4-5 days outside of the refrigerator. I usually refrigerate my cakes after decorating (mainly to preserve the decorating details) until about 2 hours before serving the cake. It always tastes best at room temp 🙂
Hi Whitney,
I was wondering how, with semi naked cakes, you avoid the bulging in between the layers of the cake into the exterior frosting. I keep my jam or filling an inch inwards to avoid spillage but the buttercream in the middle seems to bulge inbetween my layers..
Any tips would help
Hi Shanice! To make sure the filling doesn’t bulge in between cake layers, you’ll need to either:
1) use a stiffer consistency buttercream to make a ring around the edge of each cake layer, then place the filling inside of that ring, then place the next cake layer on top. Since the buttercream ring will be more stable, it is less likely for the layers above to smoosh the filling down and make bulges. To make the buttercream more stiff, you’ll just need to add a little more powdered sugar to the mixture that you’ll be creating the rings with.
2) Or if you don’t want to add extra powdered sugar to the buttercream, you can still use the buttercream ring method for filling the cake, but allow the cake to settle before you frost it. This means let it sit at room temp for about 20 min to see what gravity does. You can swipe away any buttercream bulges at that point. After that, I like to place the cake in the refrigerator to let the buttercream firm up before adding the semi-naked buttercream frosting.
Does that make sense? A tutorial and video on this very topic is coming soon!
Your cake is beautiful! I plan on making it for my sisters baby shower. You made 3 layers? How many people would you say it feeds? Thanks!
Thank you, Rachel! Excited for you to make this! The cake pictured is a three layer 6-inch cake, which serves about 12-15 people depending on how big the slices are.
Hmmm, we might need a bigger cake (9″). How would the recipe change to make a 9″ cake? Or maybe you already have one…I’ll look around. Thanks!
Which recipe are you looking to make – one of my cake recipes or the vanilla buttercream recipe that’s linked to this tutorial? If it’s the buttercream recipe, I would double the recipe linked in this tutorial for filling and frosting three 9 inch layers. If you’re looking for a cake recipe to make three 9 inch layers, each of my recipes make different amounts and adjusting them will depend on the recipe. Feel free to comment on one of my cake recipes for suggestions on how to adjust.
Yes, I want to make the buttercream recipe in this link! I’ll double the recipe – thanks so much!
Hi everything looks fabulous,,, How exactly do I make the light blue ganache dripping??
Hi Lori-Ann! To make the light blue ganache, you’ll need to make white chocolate ganache and first tint it with white food color gel (all the details for that are in this post: https://sugarandsparrow.com/white-chocolate-ganache-drip-recipe/) then add the tiniest amount of blue food color gel