• Cake
  • Frosting
  • YouTube
  • My Favorite Tools
  • Nav Social Icons

  • Skip to primary navigation
  • Skip to main content
  • Skip to primary sidebar
  • Skip to footer
  • Recipes
    • Cake
    • Cupcakes
    • Frosting
    • Ice Cream
    • Vegan
  • Cake Basics
  • Tutorials
  • Blog
  • About
  • Mobile Menu Widgets

    Connect

    Search

Sugar & Sparrow logo in script font

Sugar & Sparrow

Lifestyle and Cake from Portland Oregon

  • Cake Basics
  • Recipes
    • Cake
    • Cupcakes
    • Sheet Cakes
    • Cookies & Bars
    • Filling
    • Frosting
    • Ice Cream
    • No-Bake
    • Small Batch
    • Vegan
  • Tutorials
  • Book
  • Blog
  • About

How To Frost A Flawless Semi-Naked Cake

May 23, 2018 · In: Featured, Tutorials

If there’s one thing that always looks good semi-naked, it’s a cake. The barely-there buttercream is such a versatile look that works well for almost any kind of event. Whether you dress it with fresh flowers, drip it with ganache, or tint the buttercream, you can get pretty creative with this rustic or minimalist look. And the best part is, the semi-naked technique is extremely easy. You just need to know a few key things before attempting it to set yourself up for success.

stable cream cheese buttercream recipe for piping

If you’re more of a video-inclined learner, here’s a quick one I shot of the semi-naked technique. I’ll break everything down in the tutorial in the next section:

You Will Need:

  • 3 Cups of buttercream (this Vanilla Buttercream recipe is perfect)
  • Baked cake layers
  • Angled spatula
  • Icing smoother
  • Cake turntable

Step 1: Prep Your Cake Layers

If you haven’t already, start by leveling your cake layers to an even height. In my opinion, this step should never be missed, no matter what kind of cake you’re creating. Leveling helps to get rid of any domed cake tops, thus setting your entire cake up for being super level and sharp.

how to make cakes level

Once your cake layers are perfectly even and level, fill and stack them. 

PRO TIP: when you’re stacking your cake layers, it helps to very slightly offset the middle layer so that the edge sticks out a little further in some areas. The top and bottom layers should be completely parallel for evenly straight sides, but slightly offsetting the center layer (and I’m talking a centimeter or two) will help create more varying depth with your semi-naked finish.

Step 2: Frost And Smooth The Top Of The Cake

Start frosting the top of the cake by placing a bit of buttercream on the top and smoothing it with an angled spatula, turning the cake on your turntable as you smooth.
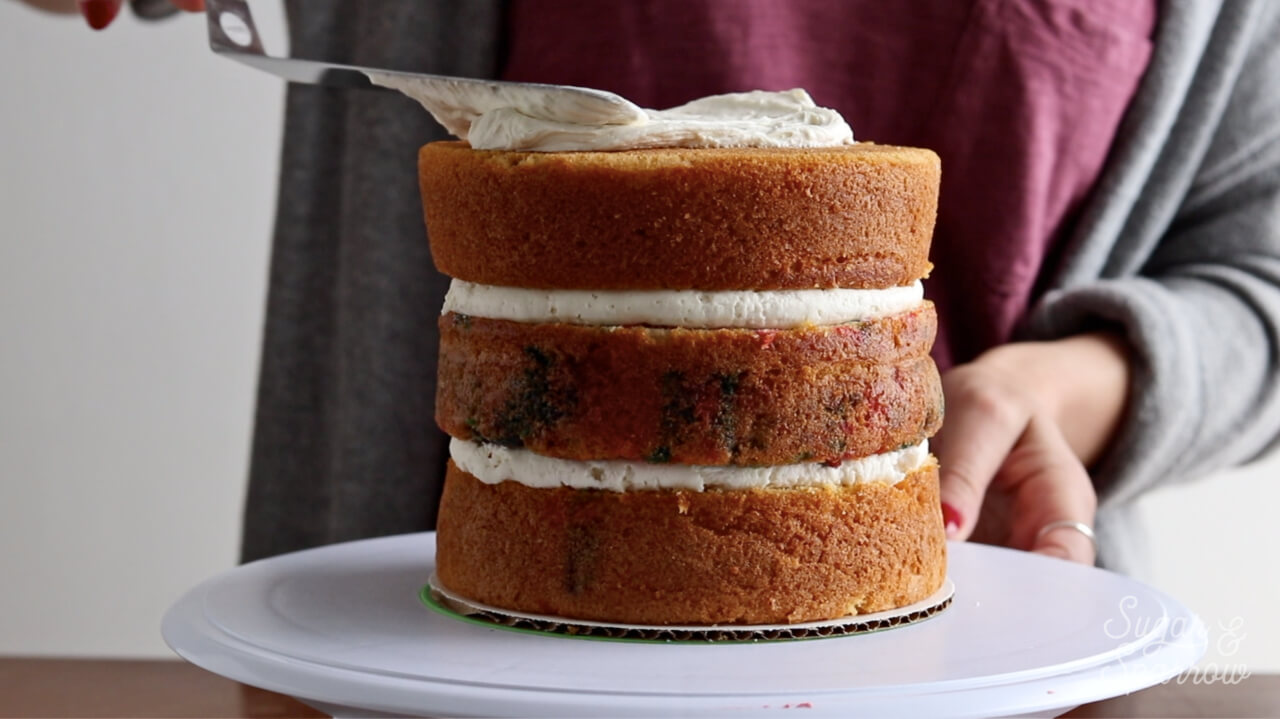
how to frost a semi naked cake

You should have enough frosting on the top of the cake that it extends about ¼ inch beyond the top edges.   

Step 3: Frost And Smooth The Sides Of The Cake

Using that same angled spatula, apply buttercream to the sides of the cake, starting at the bottom and working your way up to the top. Since the semi-naked look involves buttercream that looks barely there, try to apply a pretty thin layer.

tips for the perfect semi naked cake

When you’ve got the sides covered, take your icing smoother and smooth the sides of the cake until they’re straight and you have some nice areas of cake peeking through. If you have areas that need more buttercream, simply apply more buttercream and keep smoothing until you like what you see.
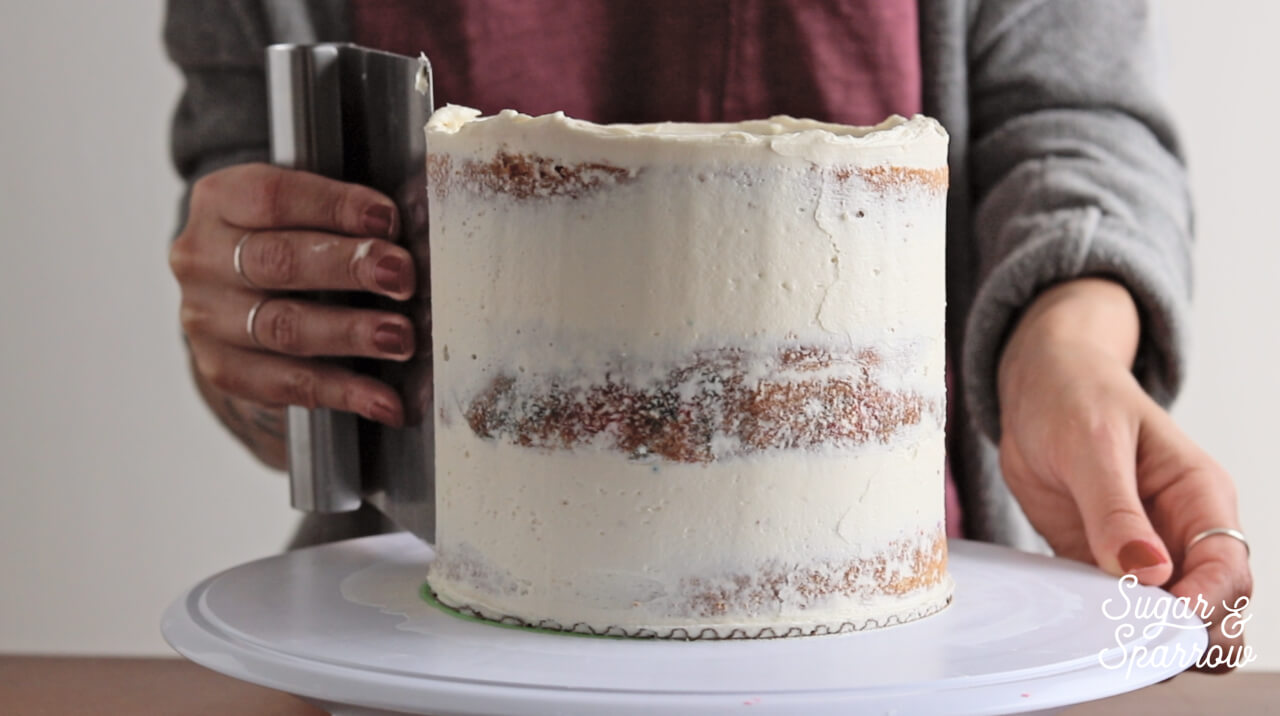
how to create a semi naked buttercream finish

Try not to press too hard when you’re smoothing the more “naked” areas, since you could puncture the cake layers and cause them to crumble. If this happens, just smooth it over with more buttercream.

Step 4: Smooth The Top Edges

Now that your sides are looking so rustic and beautiful, you’ll probably notice a little buttercream crown has formed around the top edge of your cake. This is a really good sign, because it means you’re going to have a nice, sharp top edge when you’re done smoothing it.
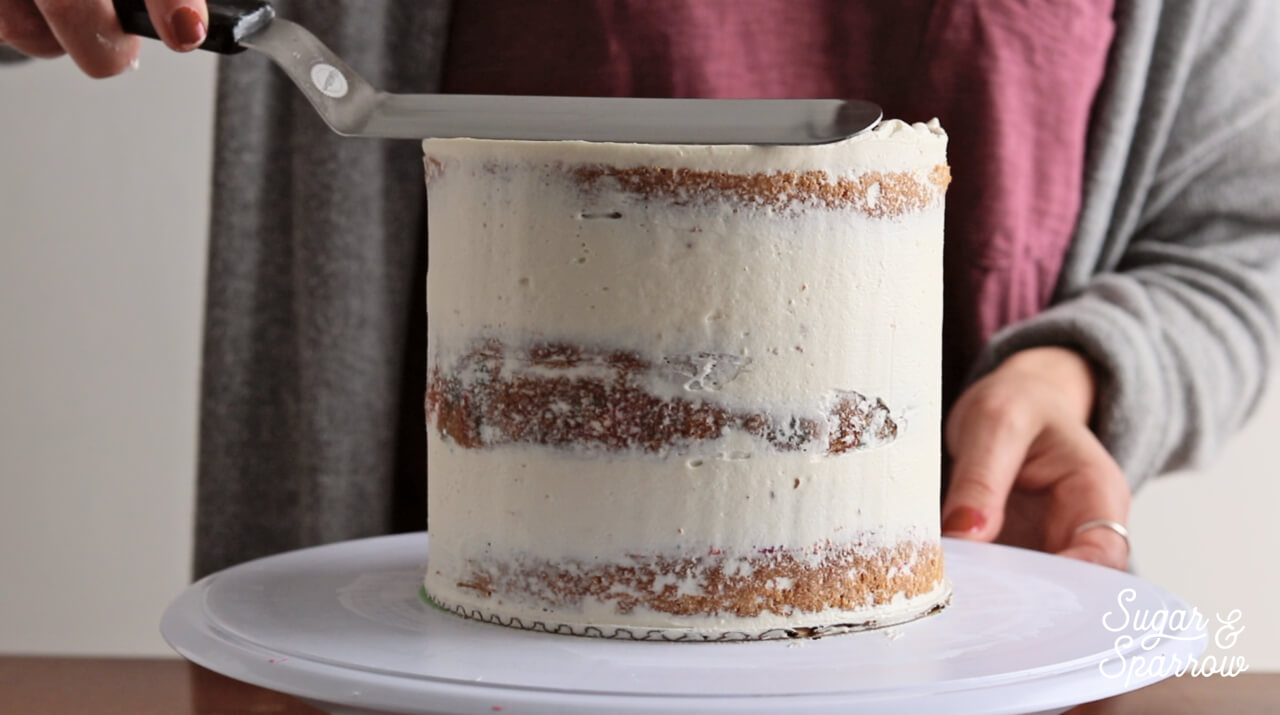
tips for smooth buttercream cake

Using your angled spatula, smooth the buttercream crown inward, moving the buttercream toward the middle of the cake. The goal here is to create level, sharp edges by swiping through the buttercream crown and moving the excess buttercream across the top of the cake. Smooth the top of the cake until it’s level and you don’t have a dome in the middle from moving the buttercream crown inward.

Step 5: Decorate

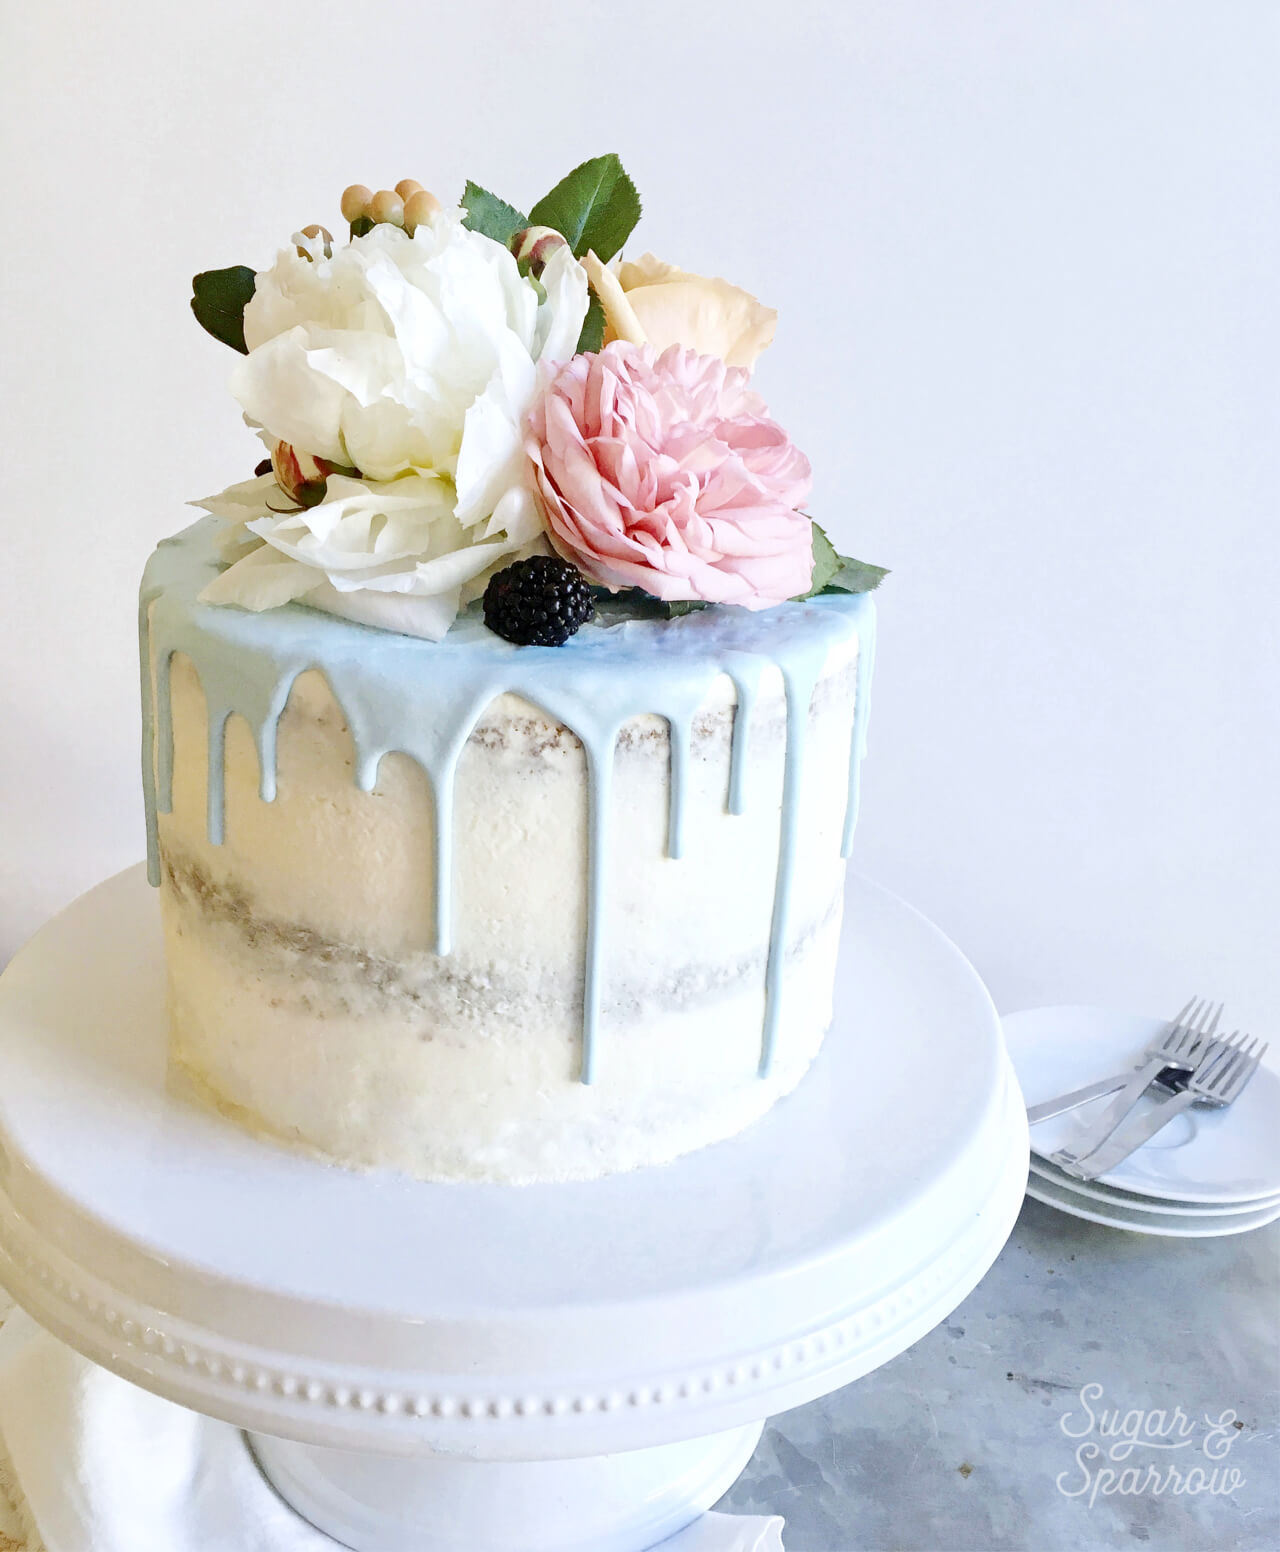
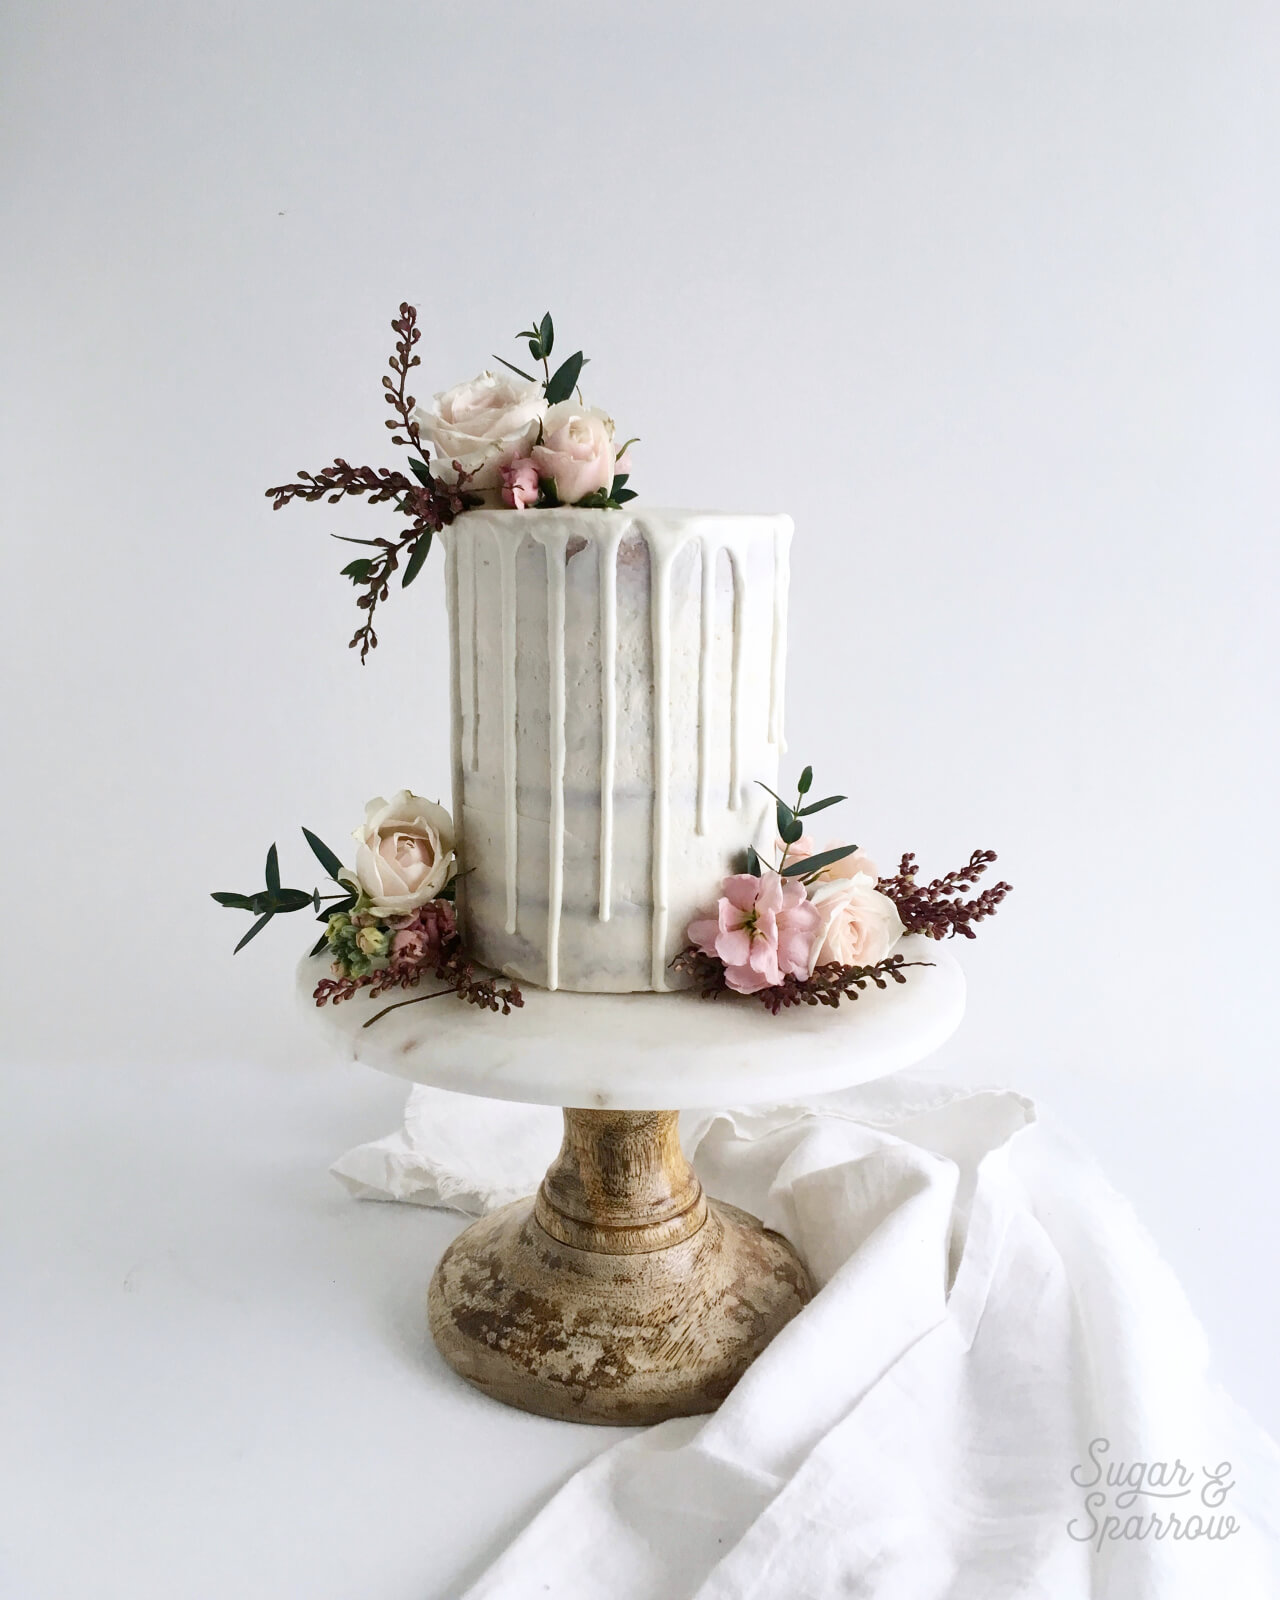
Now that you’ve created your very own semi-naked cake, it’s time to dress it up a little! Some awesome next steps would be incorporating some fresh flowers (made food safe) to decorate, doing a ganache drip, or keeping the design rustic with some greenery like fresh herbs. Here’s what I’ve done in the past: 

semi naked cake tutorial

how to decorate a semi naked cake

semi naked drip cake by sugar and sparrow

Whether it’s your first semi-naked cake attempt or not, let me know if this tutorial was helpful and show me what you’ve created by tagging me on Instagram! I’d love to see your creations.
By: Whitney · In: Featured, Tutorials · Tagged: buttercream, buttercream recipe, cake ideas, cake tips, cake tutorial, frosting, how to frost a cake, naked cake, semi naked cake, semi naked cake tutorial, smooth buttercream

you’ll also love

Almond Joy Cake
baymax birthday cake tutorialBaymax Birthday Cake
strawberry buttercream frosting recipeFresh Strawberry Buttercream Recipe

Join the List

Stay up to date & receive the latest posts in your inbox.

Reader Interactions

Comments

  1. Inga says

    January 4, 2024 at 7:29 am

    Hi Whitney, the cake looks amazing – exactly what I am looking for for my ‘cake smashes’. Thanks for posting!

    Reply
  2. Jean says

    September 28, 2022 at 10:06 pm

    Hi! Beautiful cakes! I want to use your tips to decorate a cake for my kid’s birthday, but I won’t have time to make home made frosting. Is it possible to make a store bought buttercream frosting into the right thin consistency by adding something to it? Thank you!

    Reply
    • Whitney says

      October 1, 2022 at 9:58 pm

      Hi Jean! I’ve never tried using store bought frosting so I’m not sure! But I did find this article from Wilton on how to decorate cakes with it: https://blog.wilton.com/store-bought-icing-hacks/

      Reply
  3. Martha Veenendaal says

    August 13, 2022 at 9:40 am

    I’m making a semi naked cake for my son’s wedding in September. Because of the timeline, I must ice it the day before the wedding. Should I use a simple syrup on it to prevent drying, or do you feel that it would be okay for that period of time?

    Reply
    • Whitney says

      August 14, 2022 at 8:14 pm

      Hi Martha! Simple syrup can’t hurt, but as long as the cake is frosted even with a thin layer of buttercream it should be protected against drying out, especially if you frost it the day before. Hope that helps!

      Reply
  4. Elisavet says

    June 11, 2022 at 11:21 pm

    Hello!!
    I like to make a naked cake but i always use cake stripes so the edge is not caramelised at all and it doesn’t looks that good as I crumb coat it.
    I m afraid not to use the stripes. Any ideas?? Thanks!!

    Reply
    • Whitney says

      June 14, 2022 at 7:10 pm

      Hi there! I never use cake strips and don’t end up with over-caramelized edges. Even so, this semi-naked cake tutorial should work just fine with a cake that doesn’t have caramelized edges (like the ones you’re describing where you use cake strips). Whether you use your favorite recipe or try one of mine without cake strips, this tutorial for a semi-naked finish should work great!

      Reply
    • Rona says

      October 15, 2025 at 8:41 am

      what sort of cake is best for this semi naked look? Can you link me to one you recommend please?

      Reply
      • Whitney says

        October 15, 2025 at 10:04 am

        Hi Rona! Truly any cake recipe looks good semi-naked, but I particularly love these ones:
        -carrot cake: https://sugarandsparrow.com/carrot-cake-recipe/
        -chocolate cake: https://sugarandsparrow.com/chocolate-cake-recipe/
        -vanilla cake: https://sugarandsparrow.com/vanilla-cake-recipe/
        -pumpkin cake: https://sugarandsparrow.com/pumpkin-layer-cake-recipe/

        Reply
  5. Desirae says

    May 24, 2022 at 3:57 pm

    Hello, for the ganache drip, can you tell me exactly what you used and how this look was achieved?

    Reply
    • Whitney says

      May 31, 2022 at 7:39 pm

      Hi Desirae! Here’s my post and recipe for chocolate ganache drip cakes: https://sugarandsparrow.com/ganache-drip-cake-tips/ you should find everything you need to know there!

      Reply
« Older Comments

Leave a Reply Cancel reply

Your email address will not be published. Required fields are marked *

Recipe Rating


Next Post >

DIY Gumpaste Letter Cupcake Toppers

Primary Sidebar

Welcome to Sugar & Sparrow

Welcome to Sugar & Sparrow

Helping you whip up pretty desserts with confidence and creativity. And hopefully sharing a few laughs with you along the way!

Learn More

Connect

let’s bake!

Get my very best recipes, baking tips, and decorating tutorials sent to your inbox

Featured Posts

christmas floral cake tutorial

Holiday Floral Buttercream Cake Tutorial

oreo cookies and cream cake

Oreo Layer Cake Recipe

how to crumb coat a cake

How to Crumb Coat Cakes (and Why it’s Important)

Search

Archives

Follow Along

@sugarandsparrowco

ALMOND JOY CAKE 🤎🥥 this tastes just like an Almond ALMOND JOY CAKE 🤎🥥 this tastes just like an Almond Joy candy bar in cake form: layers of soft, fluffy coconut cake with silky chocolate ganache, sliced almonds, and the dreamiest coconut-almond buttercream! 

Comment RECIPE and I’ll send it on over! Or find it linked in my bio + at https://sugarandsparrow.com/almond-joy-cake-recipe/

#almondjoy #coconutcake #almondcake #cakedecorating #candycake
You butter believe I made myself the Halloween cos You butter believe I made myself the Halloween costume of my dreams!! 🧈 

#diyhalloweencostume
#foodcostume #halloweencostume #handmadecostume #bakerlife
MELTED CANDLE CUPCAKES 🖤🕯give me a few cupcakes, s MELTED CANDLE CUPCAKES 🖤🕯give me a few cupcakes, some dye-free black buttercream, and black chocolate ganache and watch me transform them into the spookiest edible centerpiece! 

Full tutorial is linked in my bio + at https://sugarandsparrow.com/melting-candle-cupcakes/ but I have a condensed version below: 
 
SUPPLIES: ⁣ 
-9 cupcakes⁣  (made these with my small batch black velvet cake recipe!) 
-1 batch of dye-free black buttercream 
-boba straws or skewers (for stabilizing the taller candles) ⁣ 
-icing smoother + turntable ⁣ 
-black ganache for dripping⁣ 
-3 birthday cake candles⁣ 
-matches ⁣ to light them
⁣ 
INSTRUCTIONS: ⁣ 
1. Fill and stack the cupcakes: one stack of 2 cupcakes, one stack of 3 cupcakes, and one stack of 4 cupcakes. For the two taller cupcakes I inserted a boba straw through the middle to stabilize the stack for frosting. ⁣ 
2. Frost the stacked cupcakes with smooth buttercream and keep the top edge raw. Refrigerate for 20 minutes to let the frosting firm up. ⁣ 
3. Transfer the frosted cupcake candles  onto a small plate and pipe ganache around the edges and tops to look like melted wax. ⁣ 
4. Insert a birthday cake candle into each cake candle (keep the wick about 1/4 inch from the cake surface) and light! ⁣ 
⁣ 
#candlecake #halloweencake #cupcakes #blackvelvetcake #blackbuttercream
BISCOFF COOKIE BUTTERCREAM 🤎 this delicious frosti BISCOFF COOKIE BUTTERCREAM 🤎 this delicious frosting is flavored with Biscoff cookie butter and goes with literally ANY Fall cake recipe 🙌🏼 So far my favorite cake flavors to pair it with are pumpkin cake, banana cake, chocolate cake, coffee cake, and spice cake, but I am also testing a full-on Biscoff cake this week!! 

Full recipe + my favorite cake pairing suggestions are at https://sugarandsparrow.com/biscoff-buttercream/ 
⁣⁣ 
INGREDIENTS⁣⁣ 
1 Cups (226g) unsalted butter, room temperature⁣⁣ 
1/2 Cup (94g) Biscoff cookie butter⁣⁣ or spread
3 Cups (360g) powdered sugar⁣⁣ 
1 tsp pure vanilla extract⁣⁣ 
2 Tbsp whole milk, room temperature⁣⁣ 
1/4 tsp salt, or to taste⁣⁣ 
⁣⁣ 
INSTRUCTIONS⁣⁣ 
1. Cream the butter and Biscoff cookie butter together in the bowl of a stand mixer fitted with the paddle attachment (or you can use a hand mixer and large bowl). Mix on medium-high until creamy and well combined, about 5 minutes, scraping down the bowl and paddle as needed.⁣⁣ 
2. Turn the mixer to low speed and add the powdered sugar a few cups at a time, scraping down the bowl and paddle after mixing in each addition. Add the vanilla, milk, and salt and continue mixing on low speed until smooth and combined, 1-2 minutes.⁣ 
⁣⁣ 
#biscoffcake #biscoff #buttercream #frosting #cakedecorating
DYE-FREE BLACK VELVET CUPCAKES 🖤 These all black c DYE-FREE BLACK VELVET CUPCAKES 🖤 These all black cupcakes use black cocoa powder (and NO food coloring!) to achieve that rich black color for the cupcakes + black buttercream. That means they won’t turn anyone’s mouth black AND they taste like Oreo cookies in deliciously moist cupcake form 👻

✨Full recipe (with dye-free black buttercream) is linked in my bio + at https://sugarandsparrow.com/black-velvet-cupcakes/ 

BLACK VELVET CUPCAKES
Yield: 14 cupcakes

1 Cup (132g) all purpose flour
3/4 Cup (150g) granulated sugar
1/3 Cup (38g) black cocoa powder
1 tsp baking soda
1/2 tsp baking powder
1/4 tsp salt
1/4 Cup (60ml) vegetable oil
1 large egg, room temperature
1/2 tsp pure vanilla extract
1/2 Cup (120ml) full-fat buttermilk*
1/2 Cup (120ml) hot coffee or hot water

INSTRUCTIONS:
1. Preheat the oven to 350°F (177°C). Line a muffin pan with cupcake liners and set aside.
2. Place all of the dry ingredients into a large bowl and whisk together to combine. Add the vegetable oil, eggs, vanilla, and buttermilk and whisk until combined. With the mixer still on low, add the hot coffee (or hot water) and whisk until smooth, about 2 minutes. The batter will be very thin. 
3. Pour the batter into the prepared cupcake liners (no more than ⅔ full) and bake for 15-18 minutes, until a toothpick inserted comes out with just a few moist crumbs on it. Cool completely before frosting with dye-free black buttercream (full recipe linked in my bio).

*If you don’t have buttermilk on hand (I rarely do!), use 1/2 Cup whole milk mixed with 1 1/2 tsp vinegar or lemon juice. 

#blackcupcakes #blackbuttercream #blackcocoapowder #halloweencupcakes #halloweenbaking

Footer

On the Blog

  • Cake Basics
  • Recipes
  • Tutorials

Info

  • About
  • Privacy Policy & Disclosure

stay in the know

Copyright © 2026 · Theme by Sugar & Sparrow