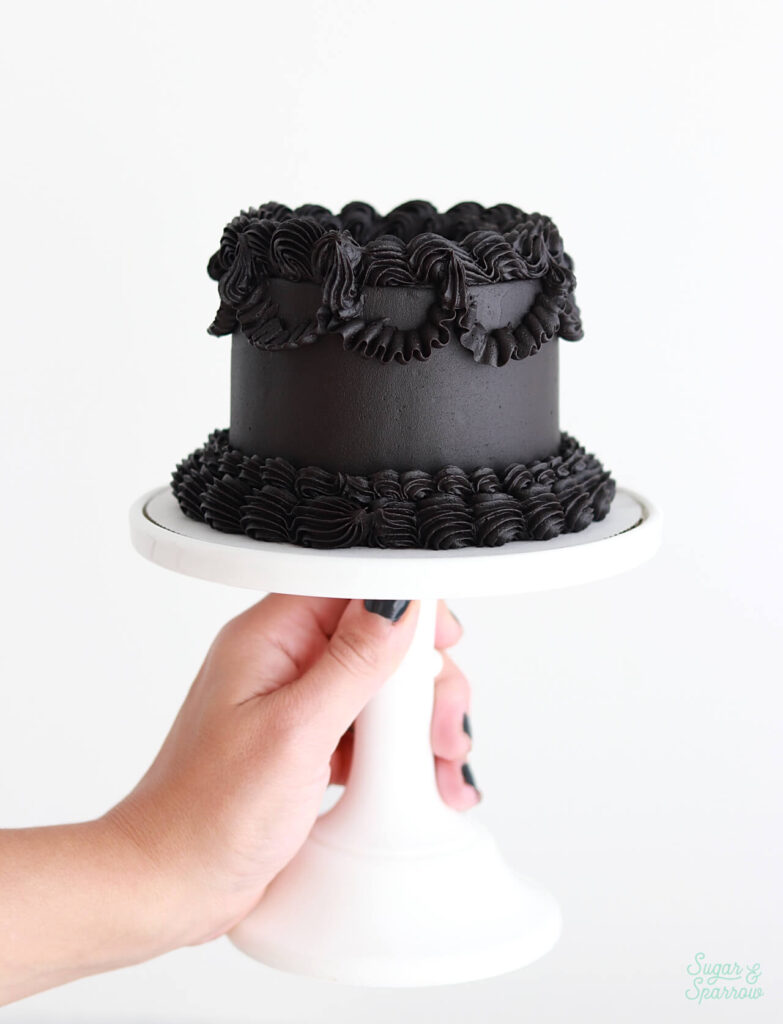
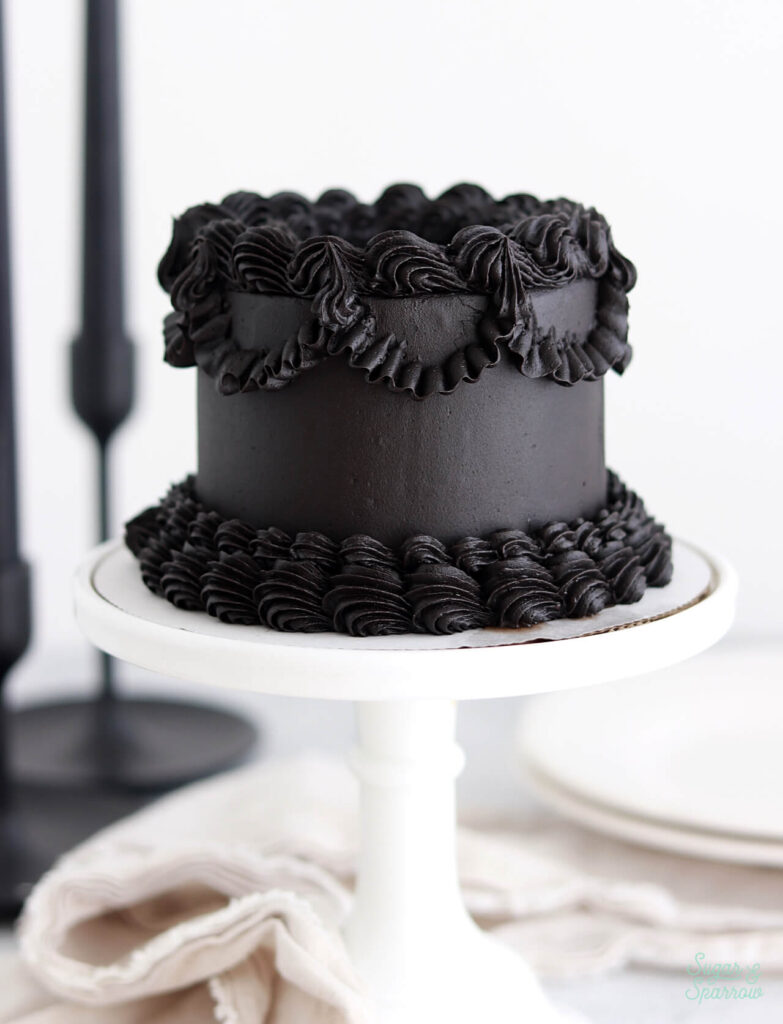
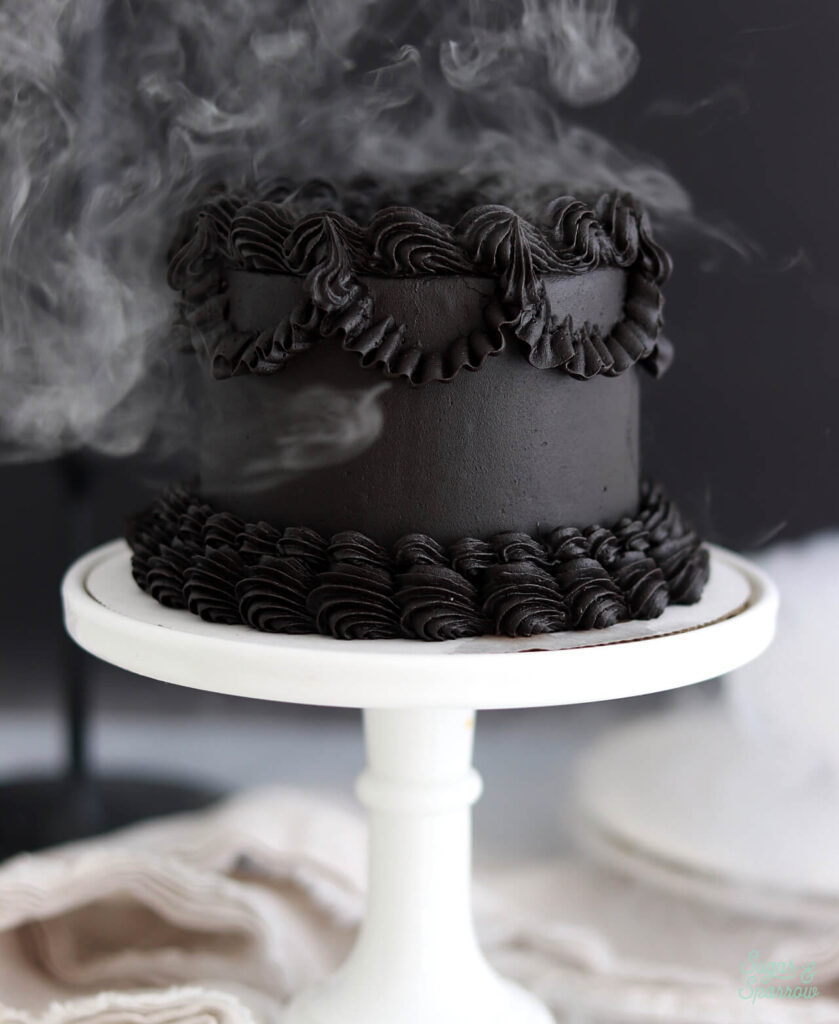
For two Halloweens now, I have enjoyed seeing my black velvet cake recipe in the wild (via Instagram) and hearing about how loved it is. I decided it’s about time I offer this spooky cake recipe in MINI form, because you never know when you’re going to need a tiny version to serve just 2-4 people. And also, I couldn’t stop thinking about how cute the Lambeth piping would be on a mini cake. It’s just as cute as I imagined!
This post may contain affiliate links. For more information, see our disclosure policy.
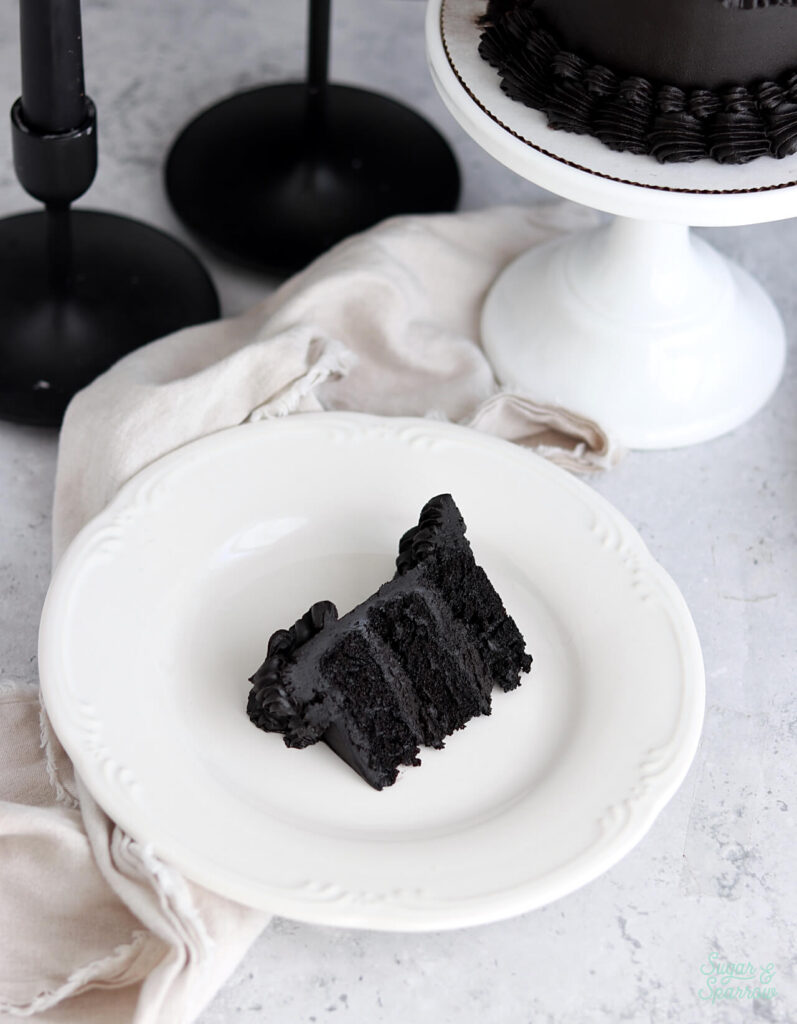
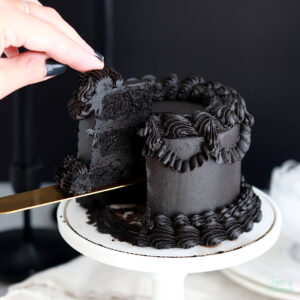
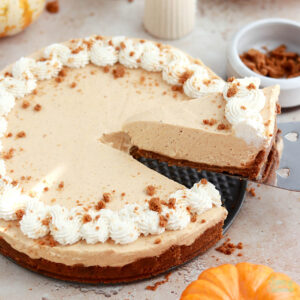
This spooky little cake recipe yields just the right amount for a triple layer 4-inch cake or one 6-inch cake layer. It’s the perfect size to share with your Halloween-obsessed best friend. And if you’re wondering how many cupcakes it makes, the answer is 9! The instructions for those are in the notes section of this recipe below.
Tip: for my 4-inch cake layers, I love using these mini cake pans.
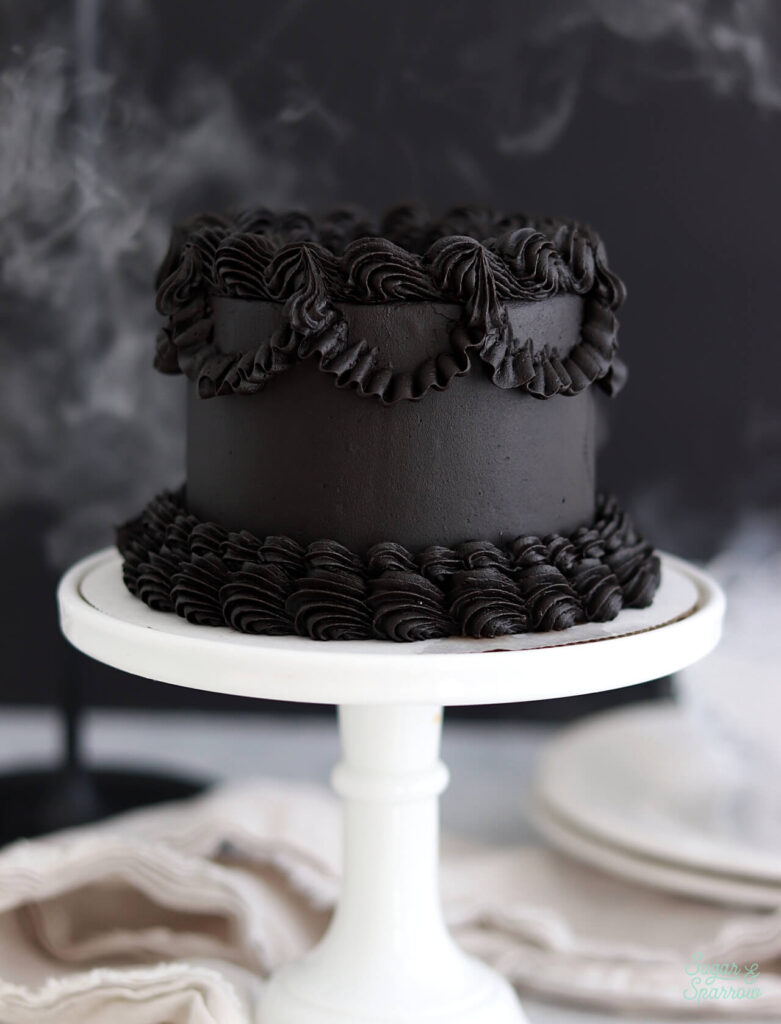
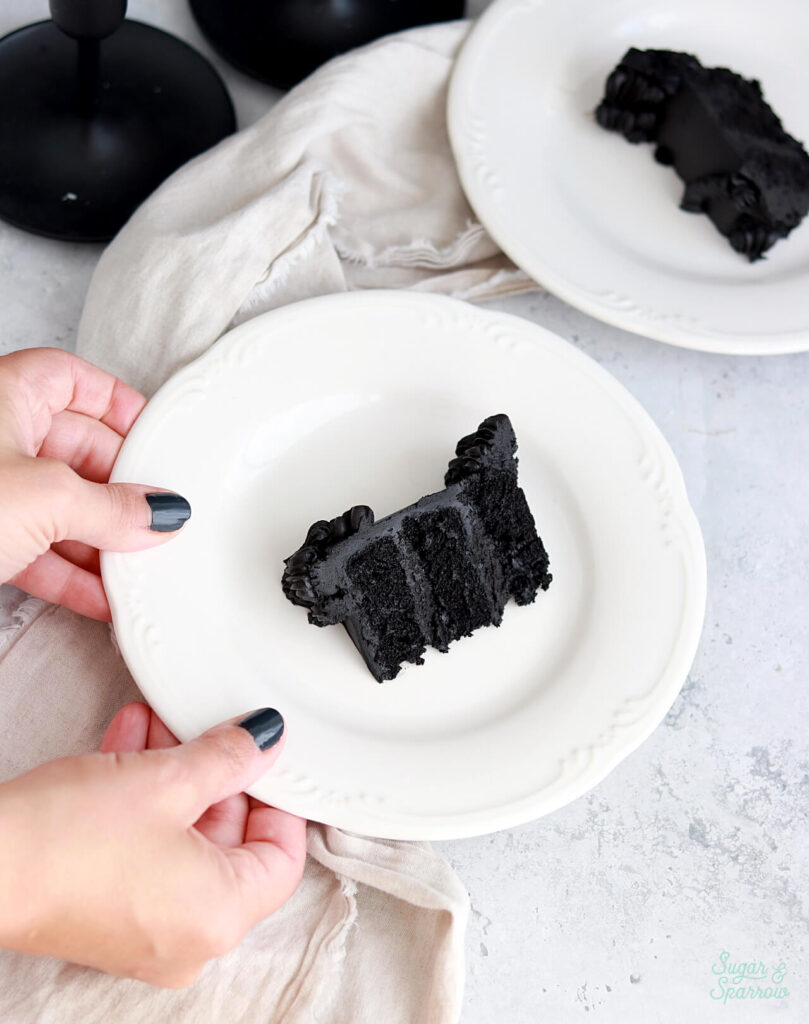
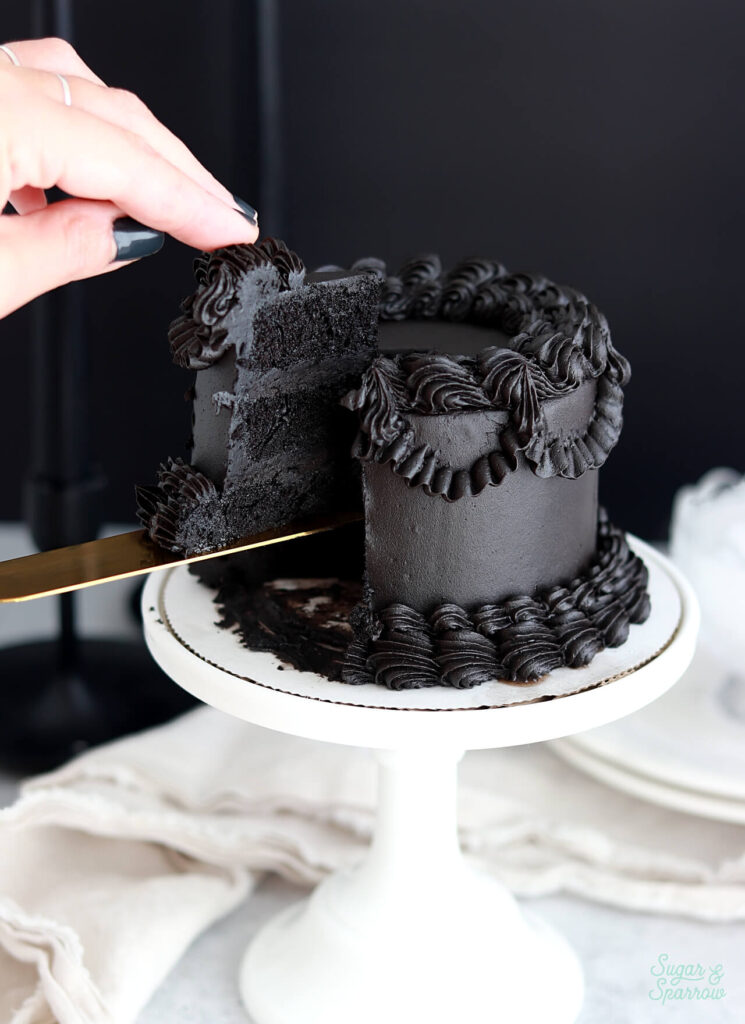
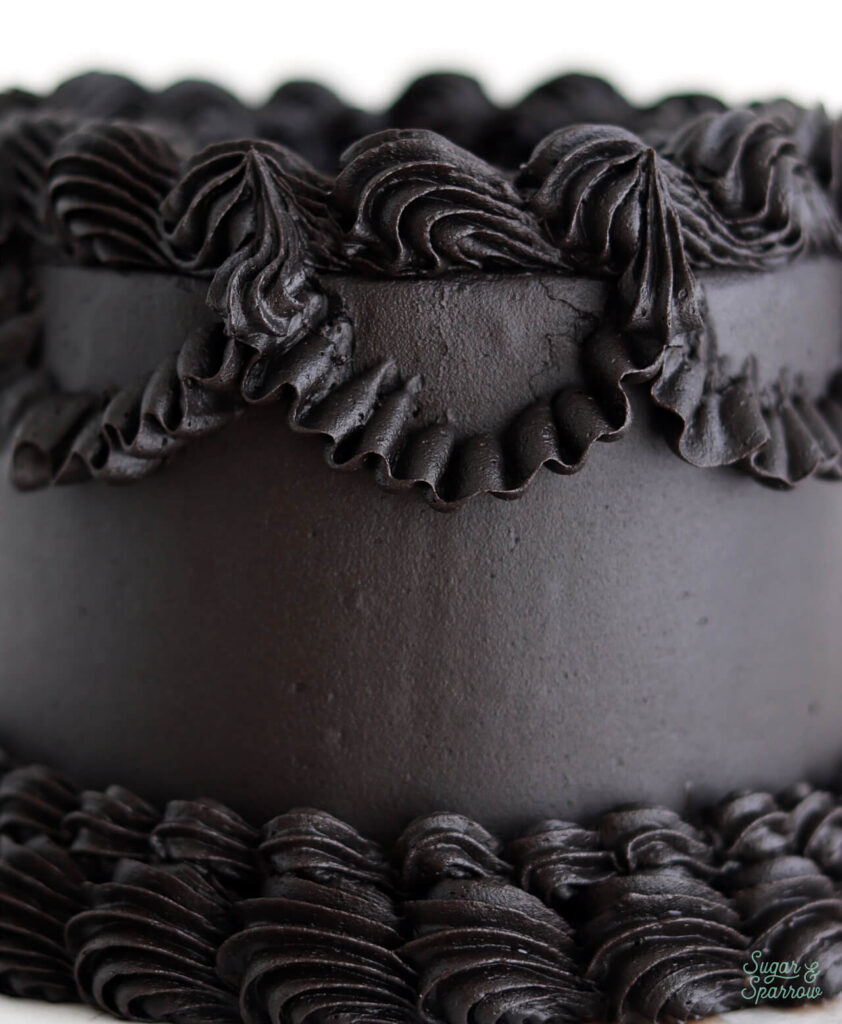
This mini black velvet cake is so striking with the pitch black cake layers and buttercream. But can you believe there is ZERO food color gel involved? It’s true. The cake and the frosting both get their dark black color from black cocoa powder (more on that below). One wonderful advantage to not having any dye in this recipe: it won’t turn your mouth black! Or anything else for that matter (iykyk)!
What Does Black Velvet Cake Taste Like?
If you’ve never had a black velvet cake before you might be wondering what it tastes like. Great news for you: it has the flavor profile of an Oreo cookie! After all, black cocoa powder is the main ingredient in Oreo cookie shells. It does make sense. The cake layers are just as described: velvety. There’s something about adding vinegar to a chocolate cake recipe that ups the softness factor.
And the buttercream. I can’t make it without absentmindedly eating spoonful after spoonful because it basically tastes like Oreo cookie butter. I cannot help myself!
What is Black Cocoa Powder?
Black cocoa powder is basically an ultra Dutched cocoa powder, meaning it’s been treated with an alkaline solution to reduce its acidity. It’s very dark in color and flavor, having more of a dark chocolate profile in contrast to regular cocoa powder. And fun fact: dark cocoa is the main ingredient in Oreo cookie shells, which is essentially what this black velvet cake ends up tasting like. The best part about black cocoa powder is it gives the cake layers and frosting a rich black color without having to add any additional food coloring! That means it won’t turn your mouth (or anything else) crazy colors.
Where to Find Black Cocoa Powder
My favorite brand of black cocoa powder is The Cocoa Trader, which I usually buy on Amazon. If the link is sold out (happens this time of year!) I’ve had luck finding this brand on eBay, although they tend to hike up the price. It’s the darkest black cocoa powder I’ve ever used, which makes it possible to make this whole recipe (cake and buttercream) dye-free.
You could alternatively use a different brand of black cocoa powder or even Hershey’s Special Dark Cocoa Powder, which can be found in most grocery stores. Neither of those options will get quite as dark as The Cocoa Trader brand, but you can always add a few drops of black food color gel to the cake batter and the buttercream to make it perfectly black.
How to Decorate a Black Velvet Cake
Now that you know everything you need to know about making your black velvet cake elements, here’s a quick rundown on how I decorated it. I used the black buttercream to fill and stack the cake, crumb coat it, and frost it with a smooth buttercream finish. Then, I used the following piping tips to decorate:
- Wilton Tip 4B for the shell border around the bottom and top edges of the cake.
- Wilton Tip 102 for the ruffle garlands.
- Wilton Tip 16 for the mini shell borders next to the ones piped with Tip 4B, plus the shell that connects each ruffle garland.
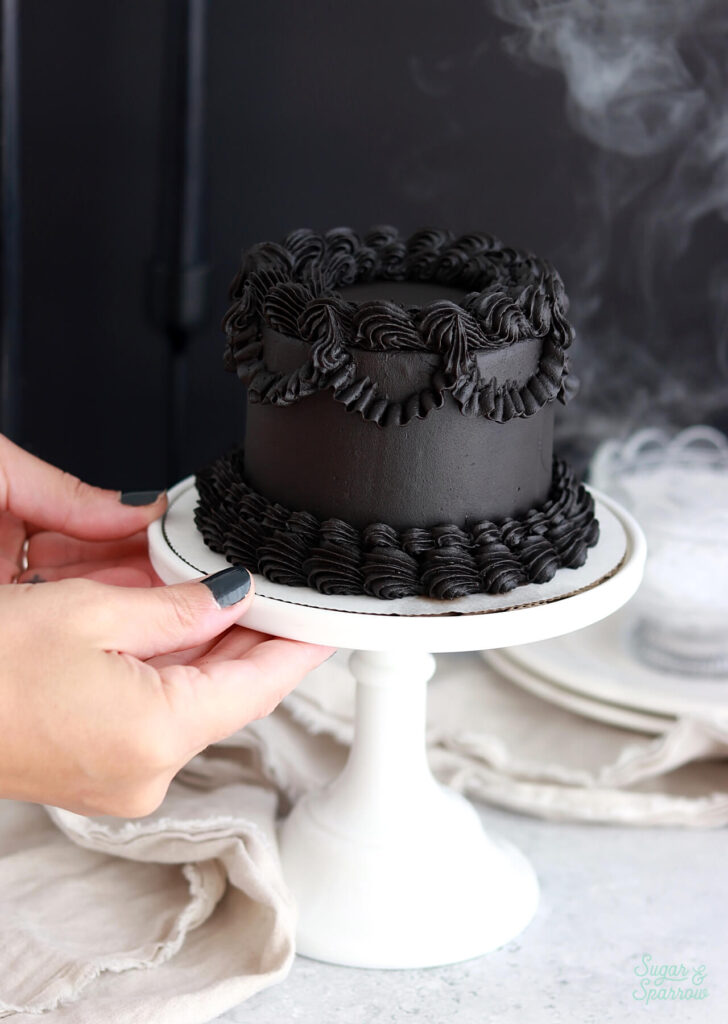
I didn’t use a template for this Lambeth cake like I’ve done previously, but if you want more of a tutorial on how to pipe this Lambeth style, check out this blog post. However you choose to decorate, this mini black velvet cake is sure to make anyone’s day!
Mini Black Velvet Cake
Ingredients
Small Batch Black Velvet Cake
- 1/4 Cup (60ml) whole milk, room temperature
- 1 tsp white vinegar
- 1/2 Cup (65g) all purpose flour
- 1/2 Cup (100g) granulated sugar
- 1/4 Cup (30g) black cocoa powder
- 1/4 tsp baking soda
- 1/4 tsp baking powder
- 1/8 tsp salt
- 1 large egg, room temperature
- 2 Tbsp vegetable oil
- 1/2 tsp pure vanilla extract
- 1/4 Cup hot coffee or hot water
Dye-Free Black Buttercream
- 1/2 Cup (113g) unsalted butter, room temperature
- 1 1/2 Cups (180g) powdered sugar
- 1/4 Cup (30g) black cocoa powder* for best results, use The Cocoa Trader brand (see notes)
- 1 1/2 Tbsp whole milk, room temperature
- 1 tsp pure vanilla extract
- pinch of salt, or to taste
Instructions
Make the Small Batch Black Velvet Cake
- Preheat the oven to 350ºF and prepare three 4-inch or one 6-inch cake pan by spraying the sides with cooking spray and fitting the bottom(s) with a wax paper or parchment paper cake circle.
- Mix together the whole milk and vinegar. Set aside for 10-15 minutes, after which the mixture will look slightly curdled (this is the chemical reaction we're looking for!).
- Place all of the dry ingredients into the bowl of a stand mixer and stir on low for 30 seconds to fully combine them. Add the vegetable oil, egg, vanilla, and milk mixture and mix on low until just combined. With the mixer still on low, add the hot coffee (or hot water) in a slow stream, then turn the mixer to medium and beat until smooth, about 2 minutes. The batter will be very thin.
- Pour the batter into the prepared cake pan(s). If using 4-inch cake pans, bake for 18-22 minutes. If using a 6-inch cake pan bake for 24-28 minutes. The cake is done when it springs back to the touch and a toothpick inserted comes out clean. Cool completely before assembling and decorating.
Make the Black Buttercream
- In a stand mixer fitted with a paddle attachment, whip the butter on medium speed until creamy and light, about 3 minutes. Scrape down the bowl and paddle, then the powdered sugar. Mix on low speed until incorporated. With the mixer in the off position, sift in the black cocoa powder and add the vanilla, milk, and salt. Mix on low until all ingredients are thoroughly combined, about 2 minutes, scraping down the bowl and paddle as needed.
- The buttercream will look dark brown at this point, but the color will darken significantly over the next several hours. See the recipe notes for storage instructions if you're not planning on frosting the cake the same day.
- If you're in a hurry, you can add about 1 Tbsp of black buttercream into a microwave safe bowl and microwave for 5-10 seconds, until melted but not hot. Add this into the rest of your buttercream and mix it together with your stand mixer on low speed. This will help darken the color faster.
Assembly
- To create the design pictured: once the cake layers have cooled completely, level them to your desired height. Fill and stack the layers with black buttercream, then crumb coat the cake with more black buttercream. Refrigerate the crumb coated cake for 20 minutes to let the frosting firm up.
- Use the black buttercream to create a smooth finish on the cake, then refrigerate it for about 20 minutes. Use the rest of the black buttercream to create lambeth piping using Wilton Tip 4B for the large shell borders, Tip 16 for the small shell borders, and Tip 102 for the ruffle garlands. Feel free to use this tutorial as guidance.
Notes
- The black velvet cake layer(s) can be made ahead and stored at room temperature, covered tightly in plastic wrap, for up to two days. Alternatively, you can cover with plastic wrap and store in the freezer for up to two months before thawing to room temperature.
- The black buttercream can be made ahead and stored in an airtight container at room temperature for up to 1 day. Alternatively, you can store it in an airtight container in the refrigerator for up to two weeks. When you’re ready to use it, bring it back to room temperature and rewhip with your stand mixer to bring back to frosting consistency.

Hi. I was wondering if Dutch Process cocoa power would work? The color isn’t important to me for this.
Thanks so much for this recipe. I can’t wait to try it.
Hi Sally! Yes, Dutch-process cocoa works great in this recipe.
Hi Faheema! Sorry you weren’t a fan of this recipe. The cake with frosting should taste like Oreos. Did you try it with the frosting? Or make any substitutions to the ingredients?
I used normal cocoa instead of black.. and I don’t complain abt the colour. I don’t like frosting and it’s too much sugar. Hence the frosting part was skipped..
Hi, i was wondering if buttermilk can be substituted for whole milk/vinegar? I dont have whole milk, only 2% milk at the moment. I appreciate any advice on this, thanks!
Hi Sarah! Yes, you can make the homemade buttermilk with an equal amount of 2% milk + vinegar. Enjoy!
Hi Whitney,
I have a cake that needs to be done by Saturday, how far advance can I make the cake and make the buttercream?
Thank you
Gina L.
Hi Gina! The make ahead instructions are in the notes section of this recipe.
Thank you ☺️
Im interested in making this as a 2 layer 6-inch cake. I read somewhere that cupcake recipes can be adapted to this size of cake, so I was comparing this recipe to your Halloween cupcake recipe and I noticed that the cupcakes have a lower ratio of sugar and cocoa powder to the other ingredients. Any reason why?
Hi Elizabeth! This recipe is basically scaled down to 1/3 of my original black velvet cake recipe (but with some amounts rounding up or down) and the cupcake version is scaled down to 1/2 of the original recipe (again, with some amounts rounding up or down). The rounding is probably why there is a slightly lower ratio of sugar to cocoa powder in the cupcake version, but this recipe is so versatile that it doesn’t seem to matter. Here’s the original for reference: https://sugarandsparrow.com/black-velvet-cake-recipe/#wprm-recipe-container-34744
Got it! Do you have a recommendation for which to use for a 6” 2-layer? Double this or use the cupcake recipe? Maybe it doesn’t matter
If you use the cupcake recipe, you’ll only have enough for two short 6-inch layers. And since I had to tweak different ingredient amounts in this mini version of the cake I’m not sure if they’ll scale up well. I would recommend scaling down the original black velvet cake recipe (https://sugarandsparrow.com/black-velvet-cake-recipe/) by 2/3 so you have exactly enough for two 6-inch layers. I like this recipe scale calculator (select the 2/3 option) but it doesn’t scale the gram measurements very well. It’s good if you’re using standard cup measurements though: https://www.inchcalculator.com/recipe-scale-conversion-calculator/