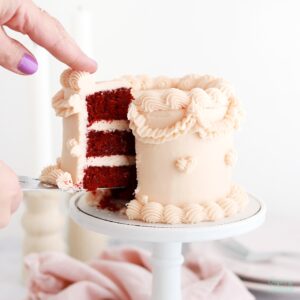
This small batch red velvet cake recipe is so soft and moist, with the perfect hint of cocoa flavor, and the perfect size for 2-4 people. You can make it as a mini 4-inch layer cake or a single layer 6-inch cake, but the tiny layer cake version has my heart for sure. It’s just so cute! I love to pair this with my favorite cream cheese buttercream recipe to make it extra irresistible.
Soft & Moist Red Velvet Cake in Mini Form
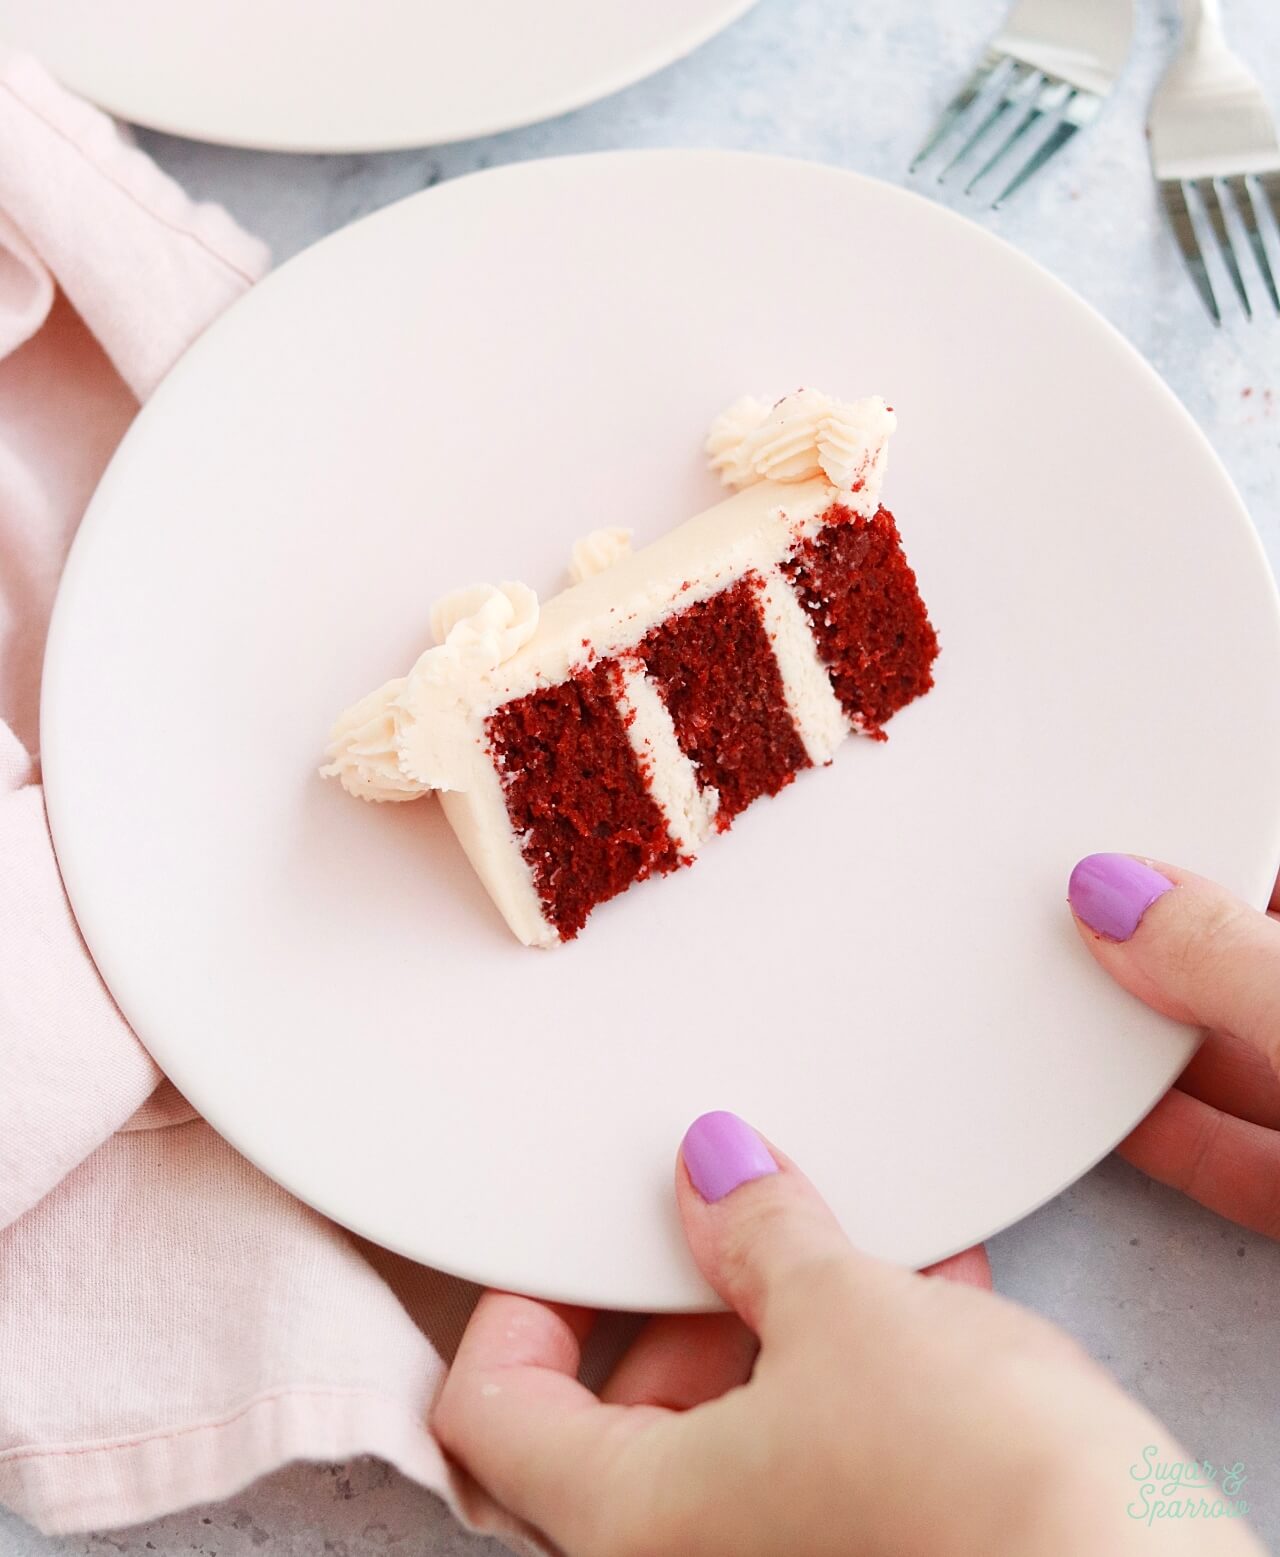
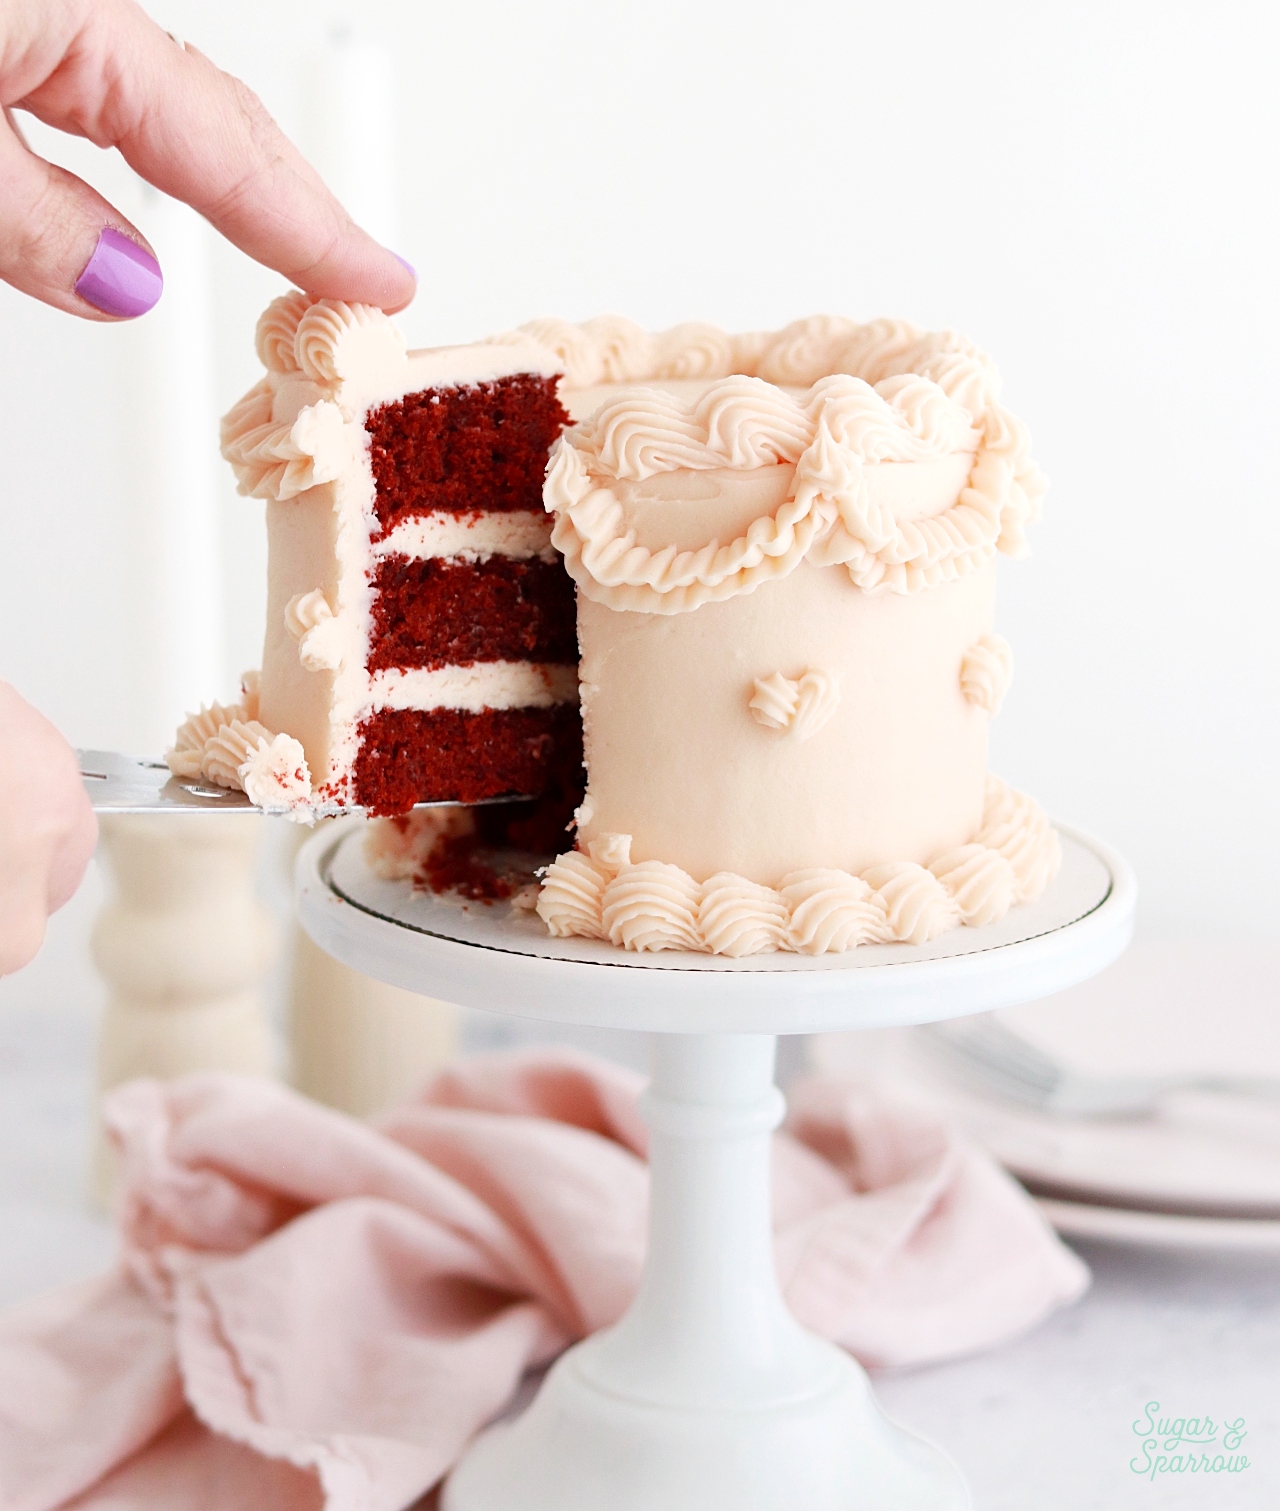
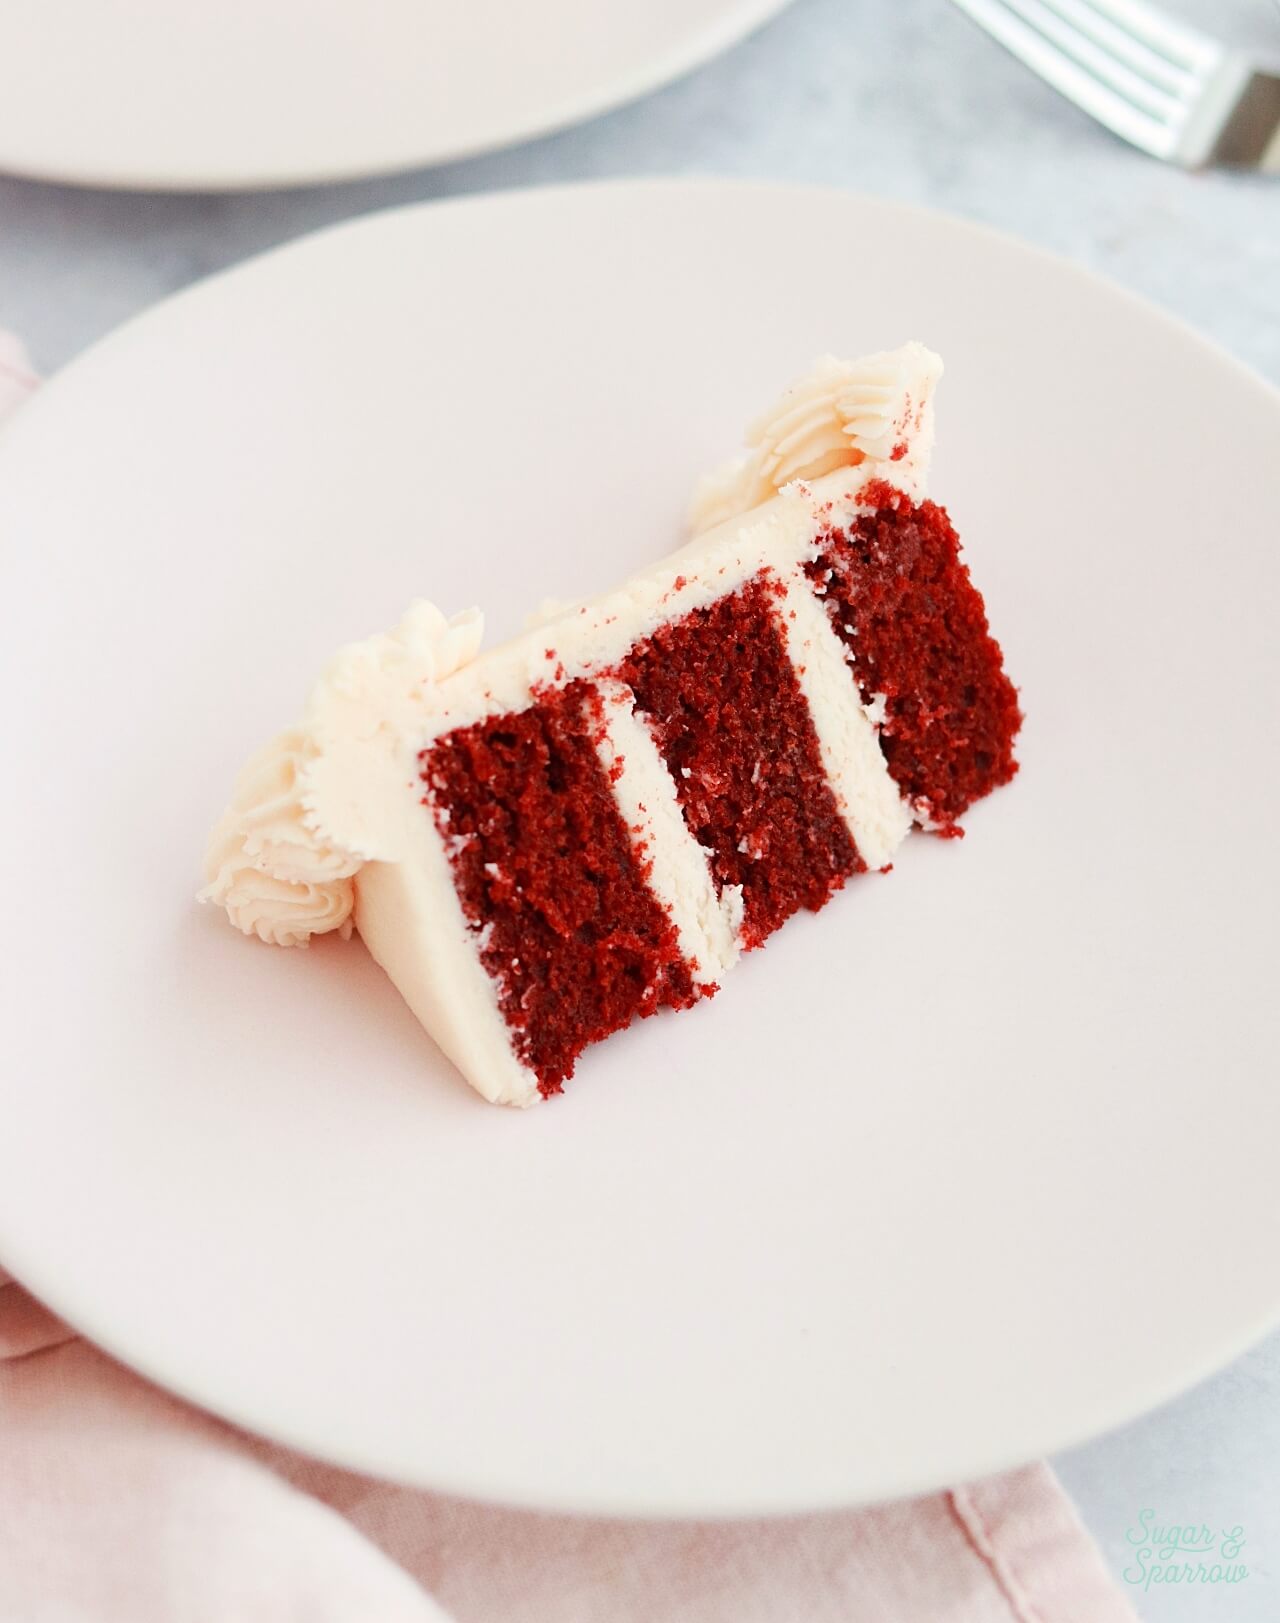
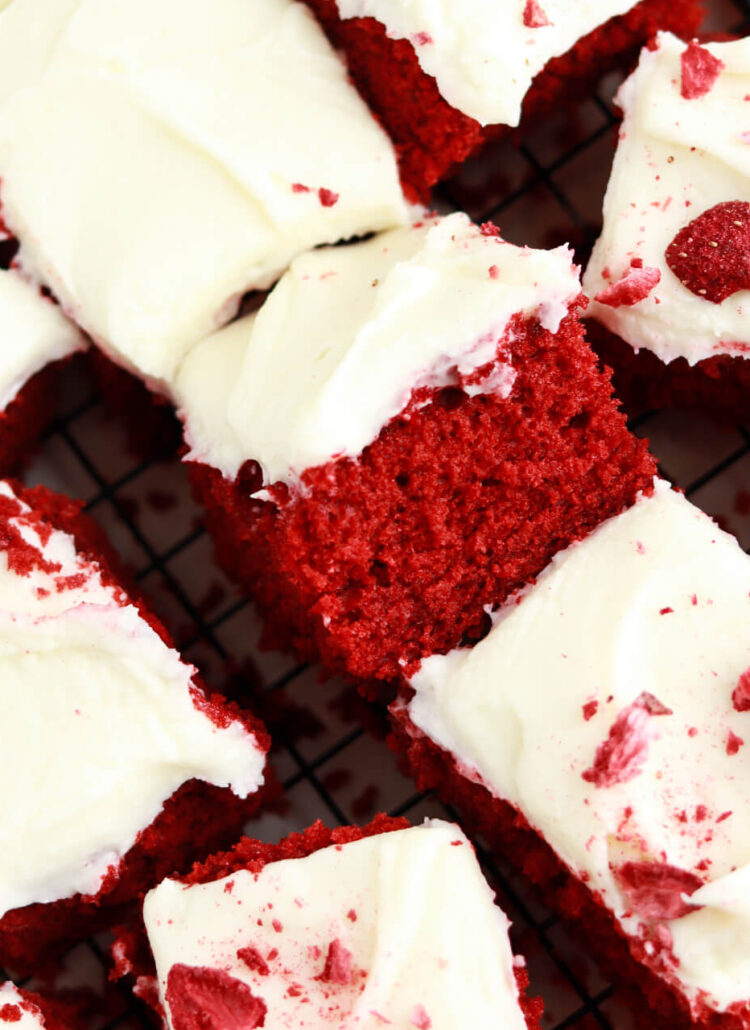
For this cake, I started with my favorite red velvet cake recipe and scaled it down to fit perfectly in three 4-inch cake pans or one 6-inch cake pan. It’s perfectly soft, extra moist from the addition of vegetable oil and buttermilk, and has a subtle chocolate flavor due to the cocoa powder in the recipe. The distilled vinegar is one of the magic ingredients here, as it reacts with the cocoa powder and baking soda in the recipe to create the signature velvety crumb.
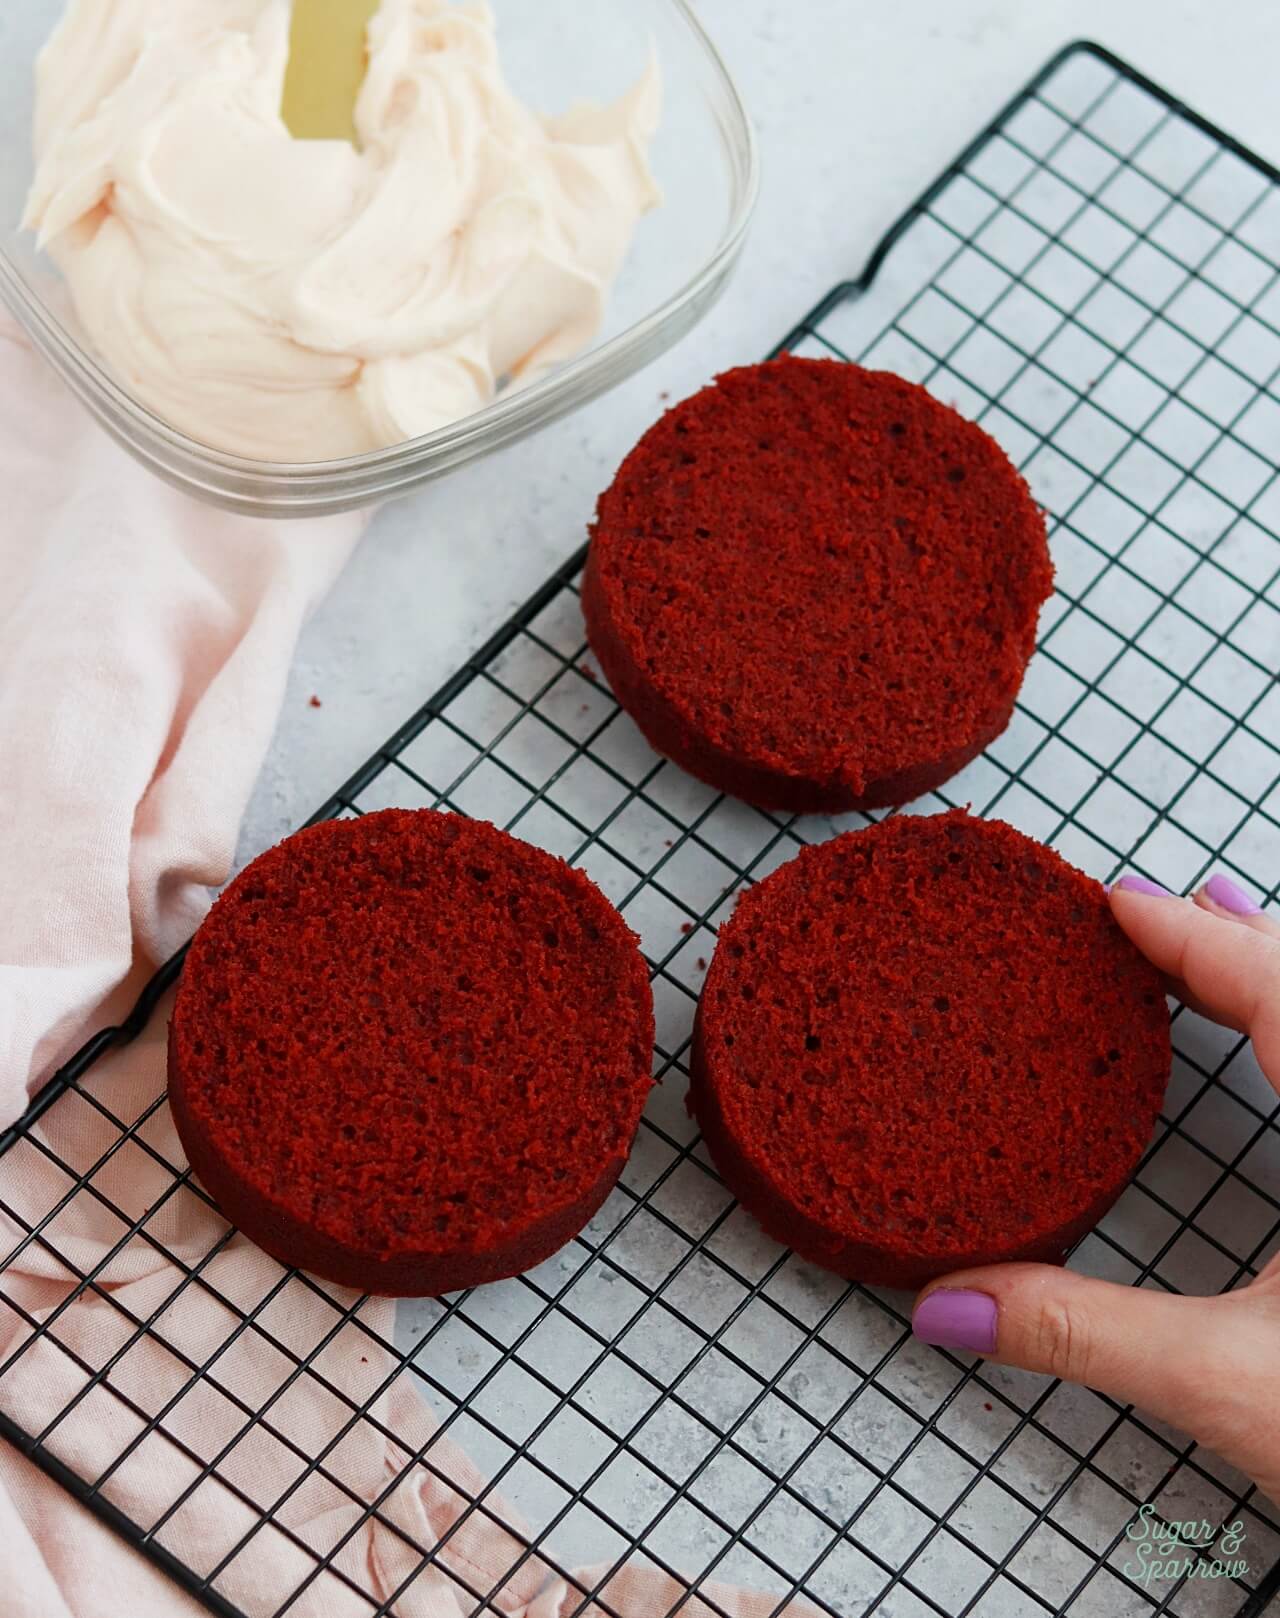
You’ll notice if you’re comparing the two recipes that I use all purpose flour in this one and cake flour in the other. That’s because when this recipe is scaled down to a smaller pan size or cupcake size, all purpose flour gives the cake more structure. In other words, this recipe ends up a little too fluffy if you use cake flour with the smaller pans, but works well with larger pans.
All-Natural Red Velvet Cake Color
To get the red color in a red velvet cake, you have to add a little food coloring. In the past I’ve used AmeriColor Super Red for this task, but with the ban on RED 3 taking effect in the United States, I thought I’d look for a more natural alternative. I did find this red food color gel that’s made with all-natural ingredients and gave it a try in this recipe. I was a little worried that it would add unwanted flavor to the cake (it’s made with beetroot) but it worked wonderfully and didn’t affect the overall flavor at all!
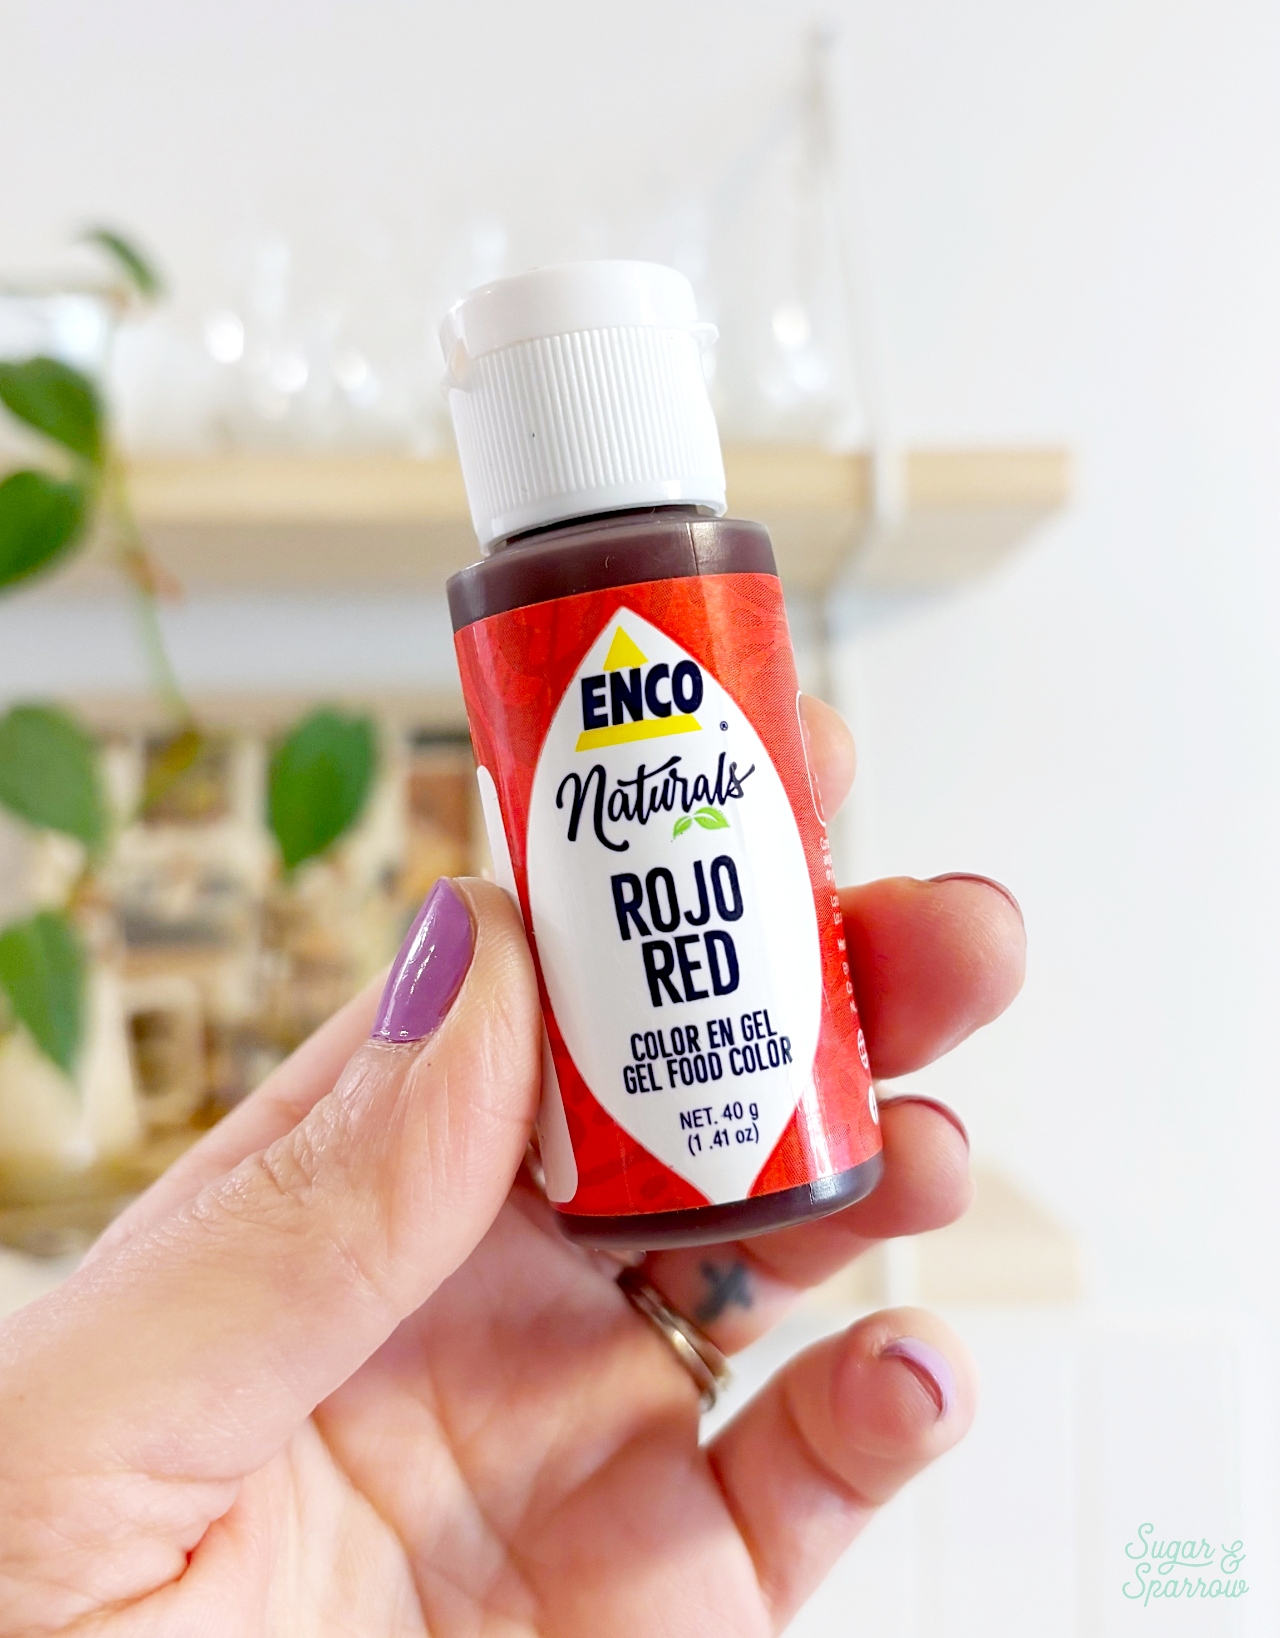
I used a few drops of the Enco food color gel in the buttercream as well and the color was beautiful. I still have yet to try making a true red buttercream with this color gel, but once I do I’ll report back on how well it works.
How Many Servings Does This Small Batch Cake Make?
This small batch red velvet cake makes enough for 2-4 people, or up to 6 people if you’re cutting the slices really small. It’s the ideal size for a small gathering, date night (especially with Valentine’s Day coming up!), satisfying a cake craving, or making someone’s day special.
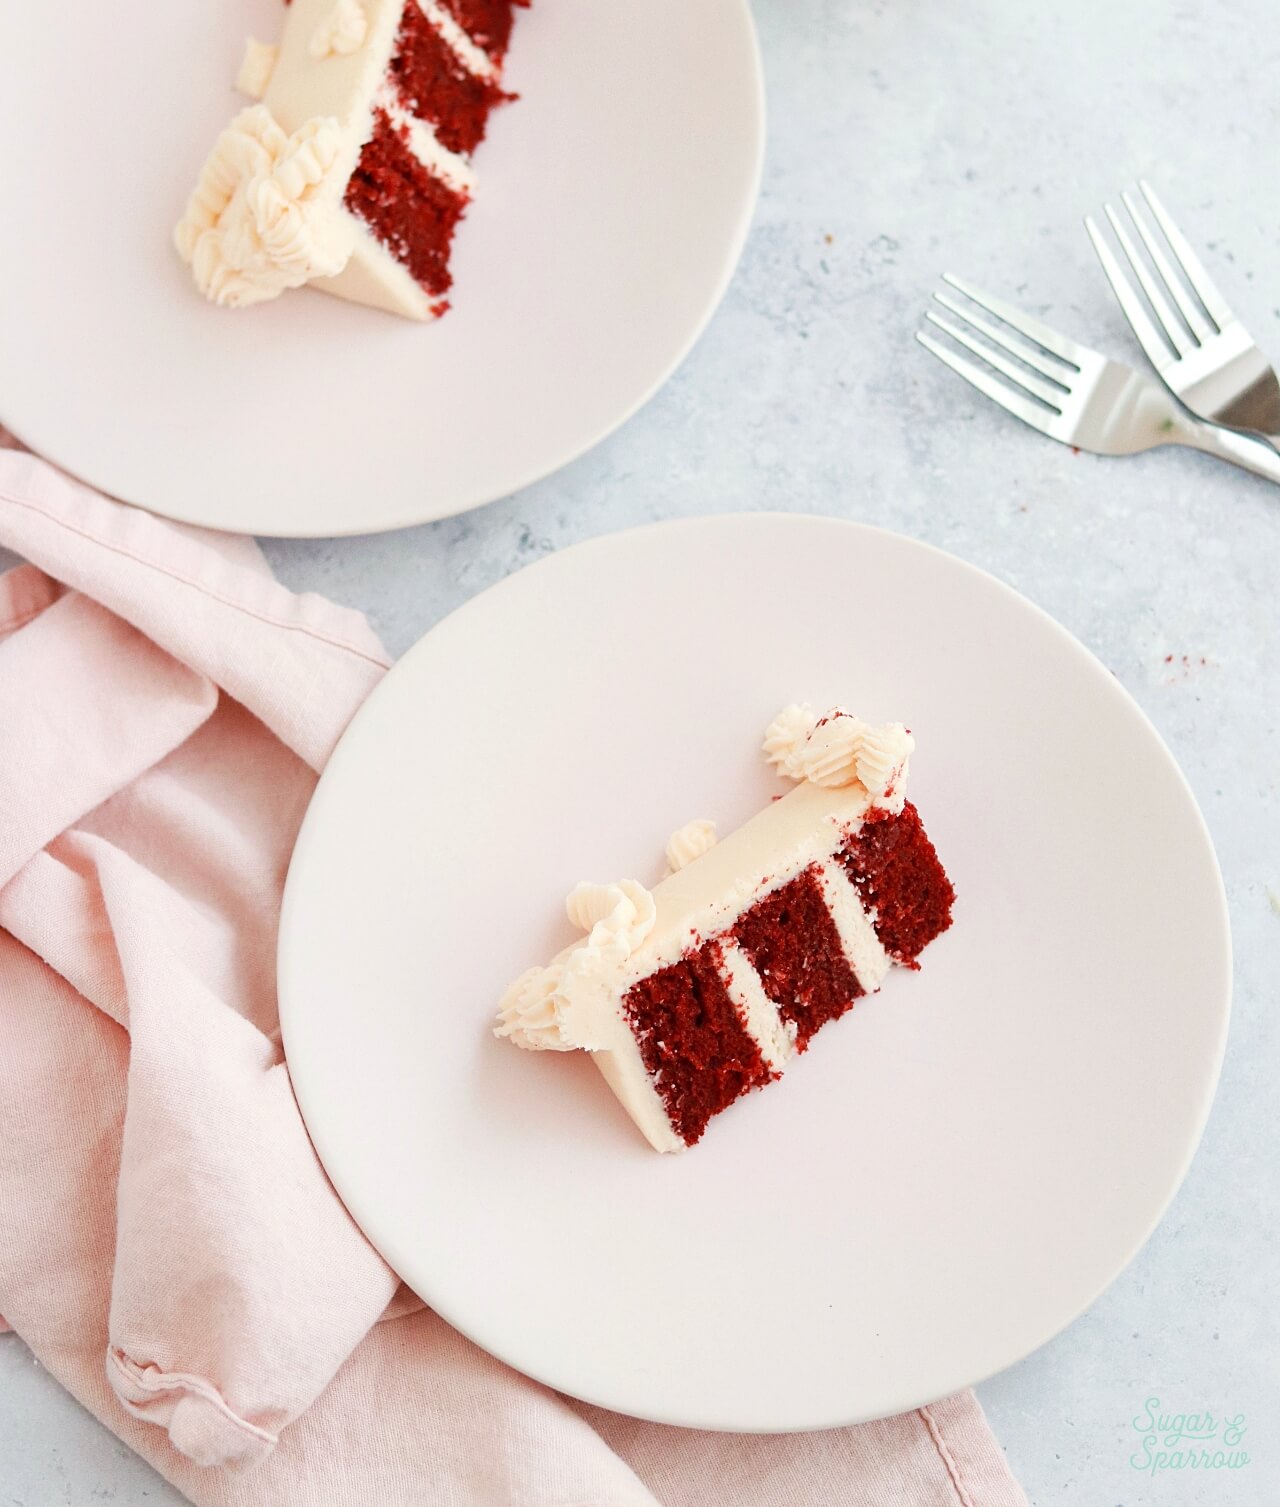
I’m partial to the layer cake version just because it’s so cute! I use these 4-inch cake pans for all of my small batch cake recipes.
Irresistible Cream Cheese Frosting
For filling and frosting this cake, I used my favorite cream cheese frosting recipe and it pairs so well with this red velvet cake flavor. Cream cheese frosting is notoriously finicky, but my recipe is the perfect consistency for cake decorating as long as you use full-fat brick style cream cheese. This is important because the spreadable cream cheese (the kind in tubs) and the low fat versions both contain so much water content that it will make the frosting too thin and borderline soupy.
If you can’t find brick-style cream cheese in your area, I recommend making an alternative frosting for this cake. Any of these recipes would be delicious:
- Vanilla Buttercream
- Chocolate Buttercream
- Nutella Buttercream
- Ruby Chocolate Buttercream
- White Chocolate Buttercream
I made a full batch of the cream cheese frosting so that I’d have enough for filling, frosting, and piping the cake with the Lambeth details. If you don’t plan on recreating the vintage piping, you could get away with halving the frosting portion of the recipe or any of the above frosting recipes.
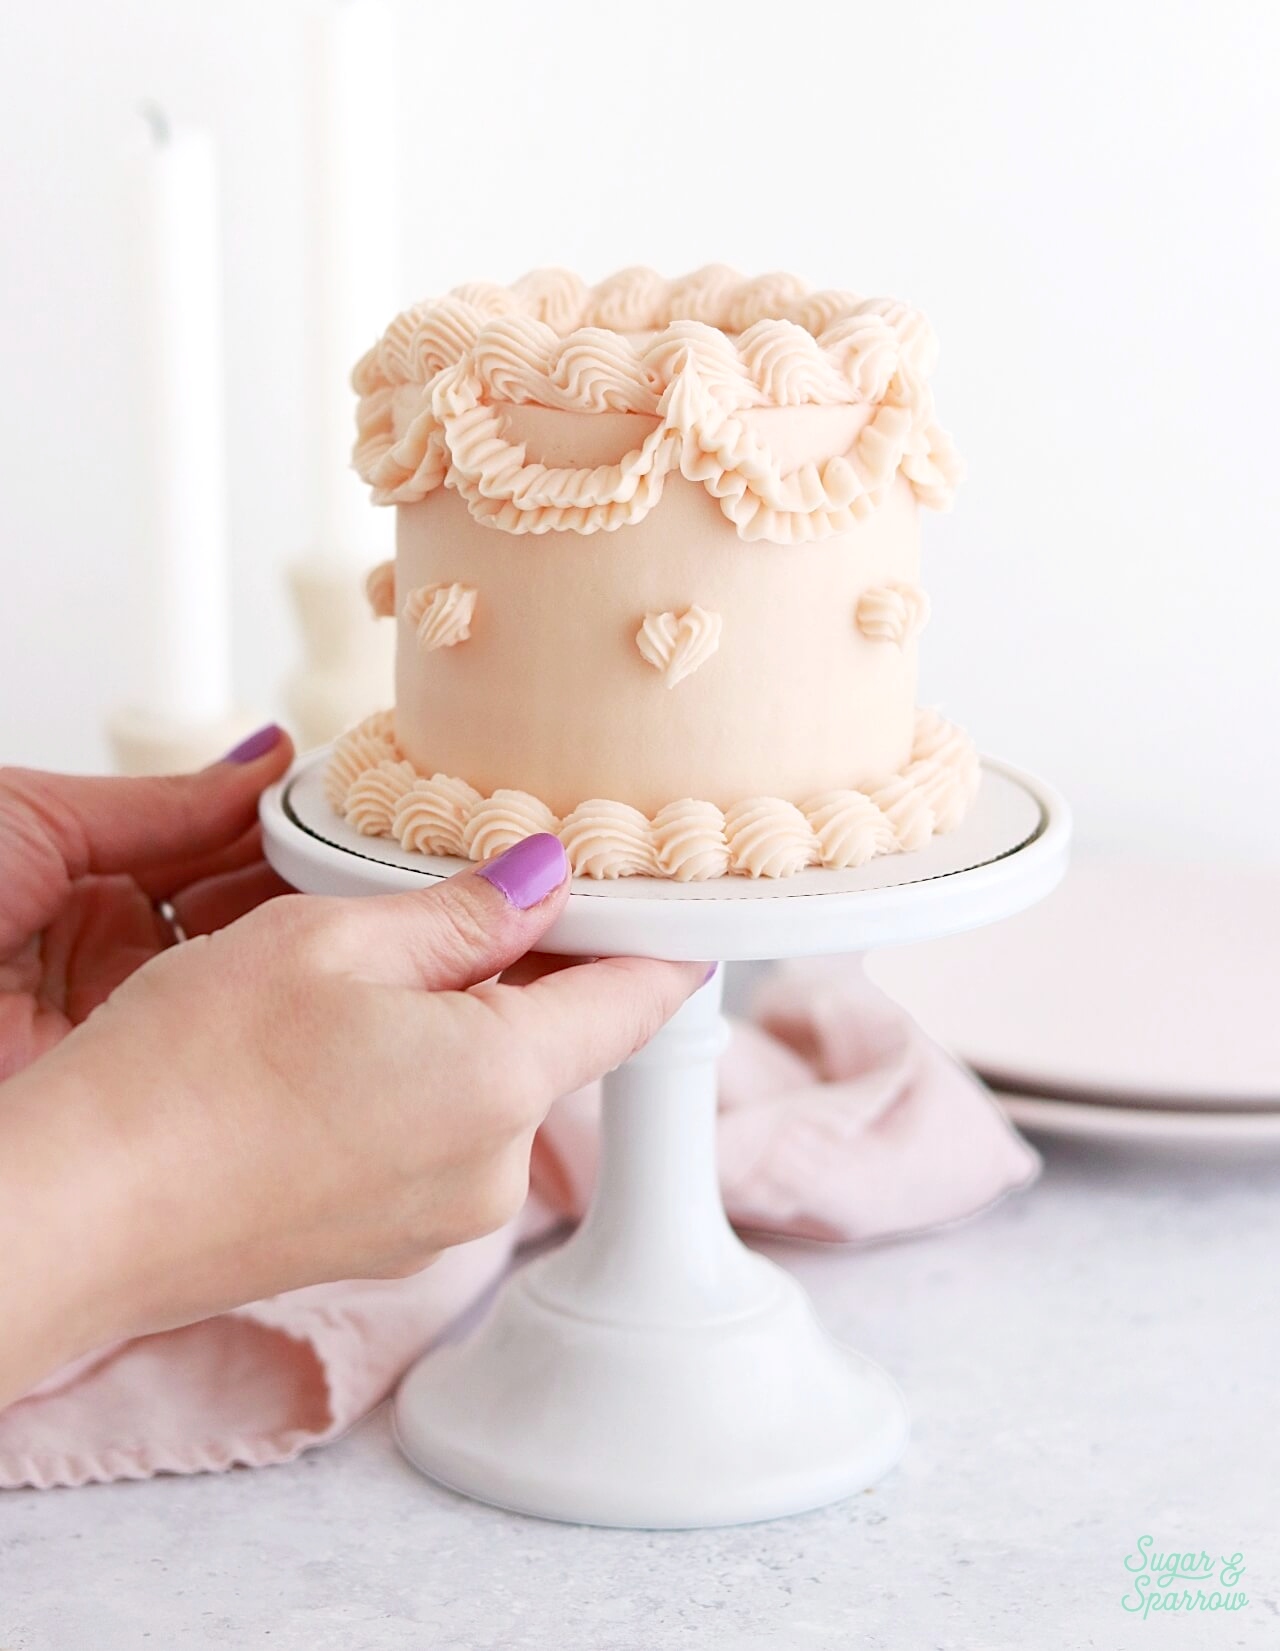
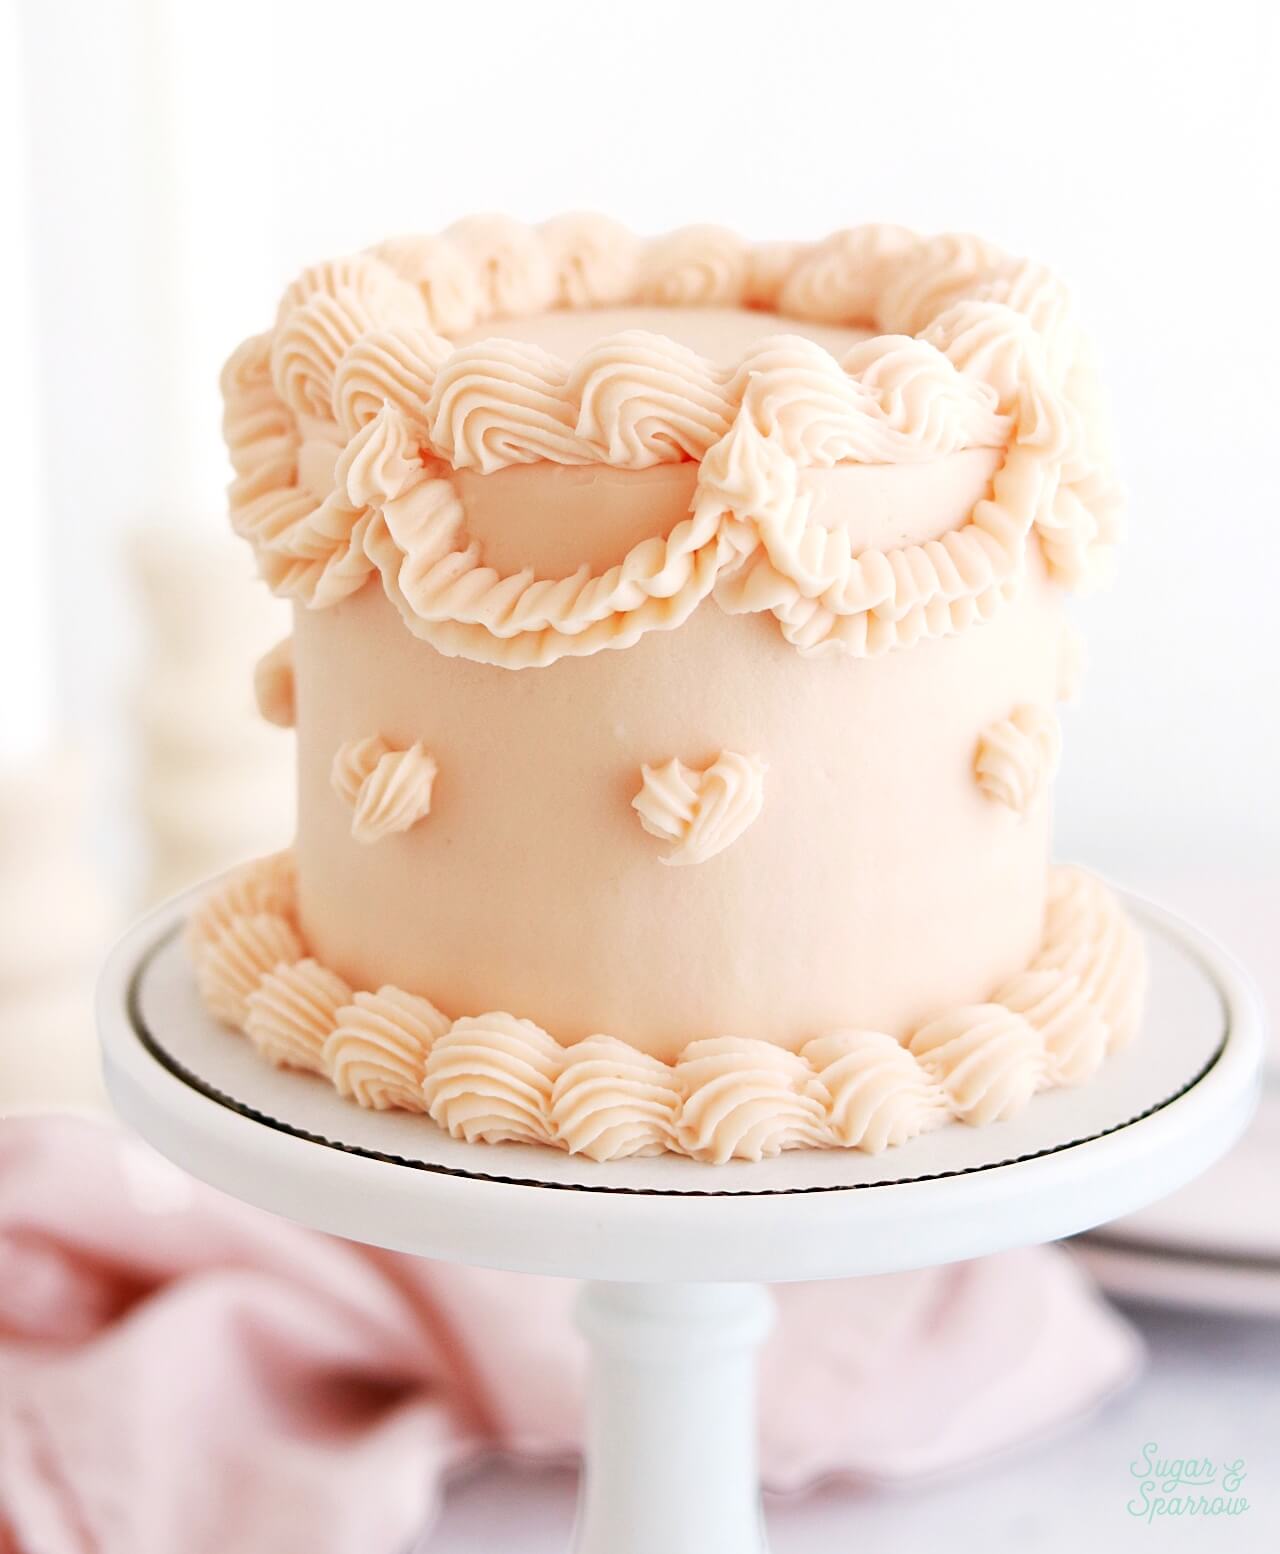
How to Decorate a Mini Red Velvet Cake
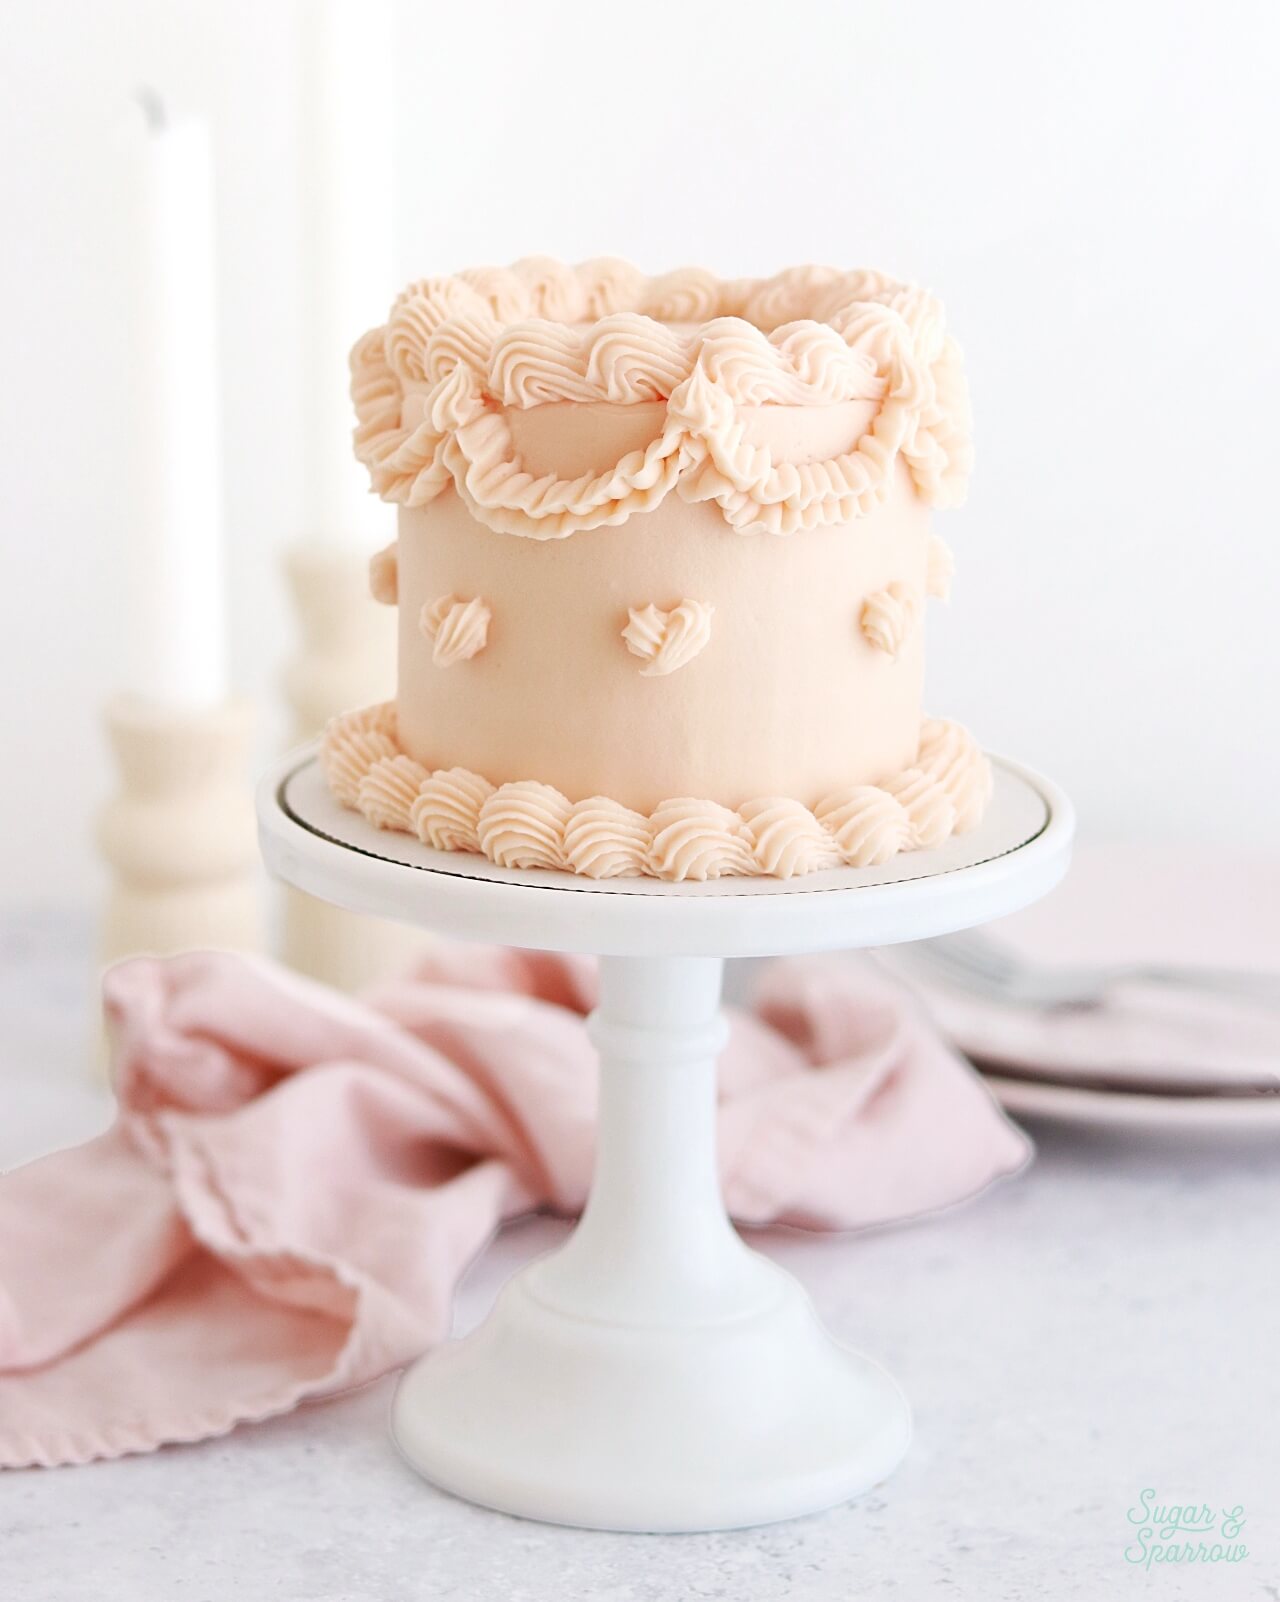
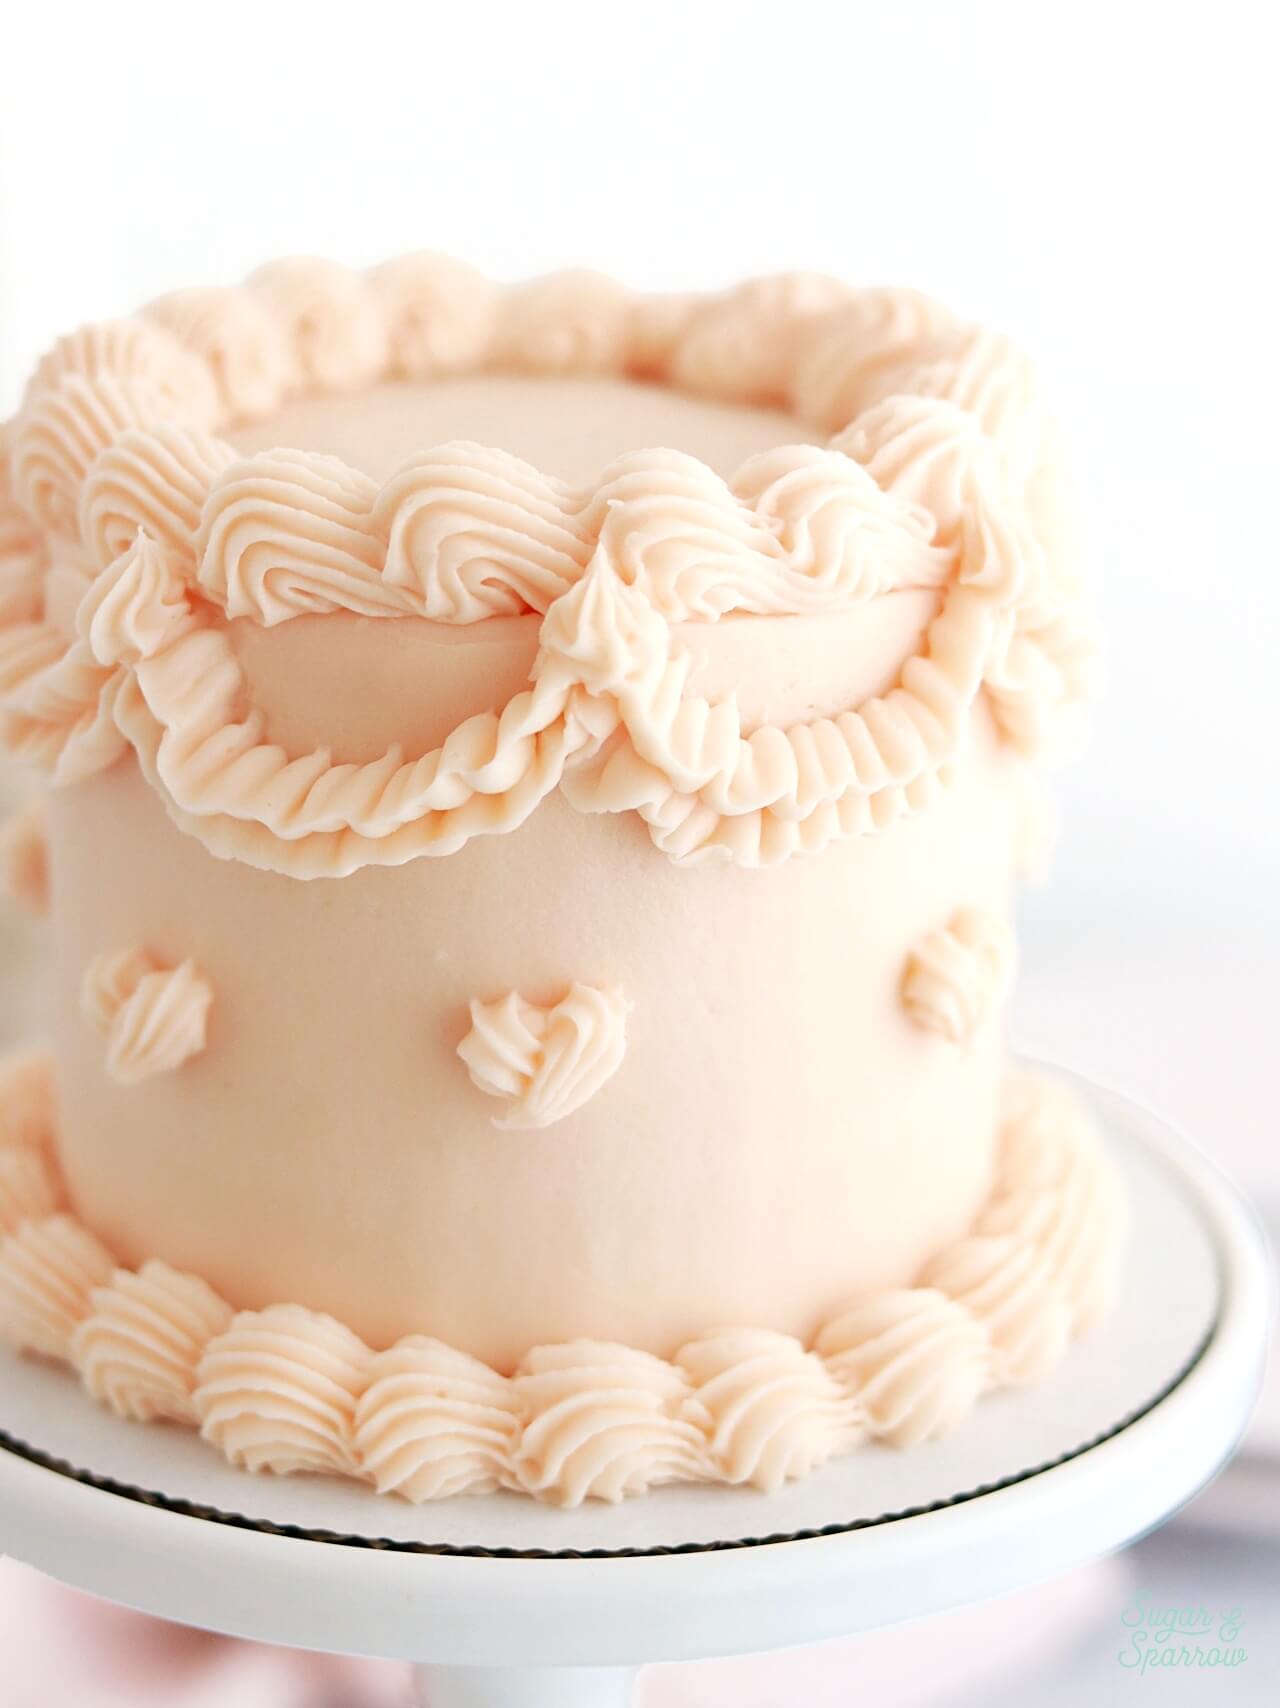
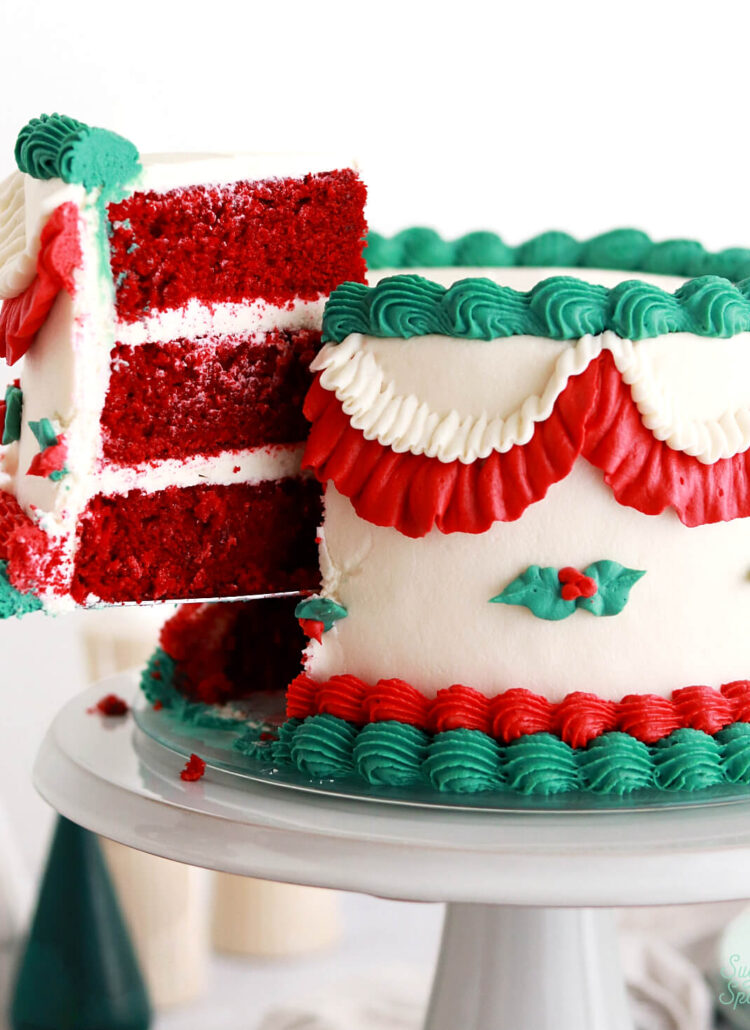
To decorate, I decided to make a tiny version of the vintage piped red velvet cake recipe that’s in my book Anyone Can Cake. It turned out so cute in mini form! I used a drop of this all-natural food color gel to tint the cream cheese frosting a light pink before filling, frosting, and decorating.
I approach decorating a small layer cake essentially the same way I decorate a full-sized cake, with a few exceptions. First, I had to custom cut a 4-inch cardboard cake circle to build the layer cake on. Second, it took a little more patience frosting a smooth buttercream finish because the cake is so lightweight that it can slide easier than a larger cake. And lastly, I used slightly smaller piping tips to get the vintage piped look on a smaller scale.
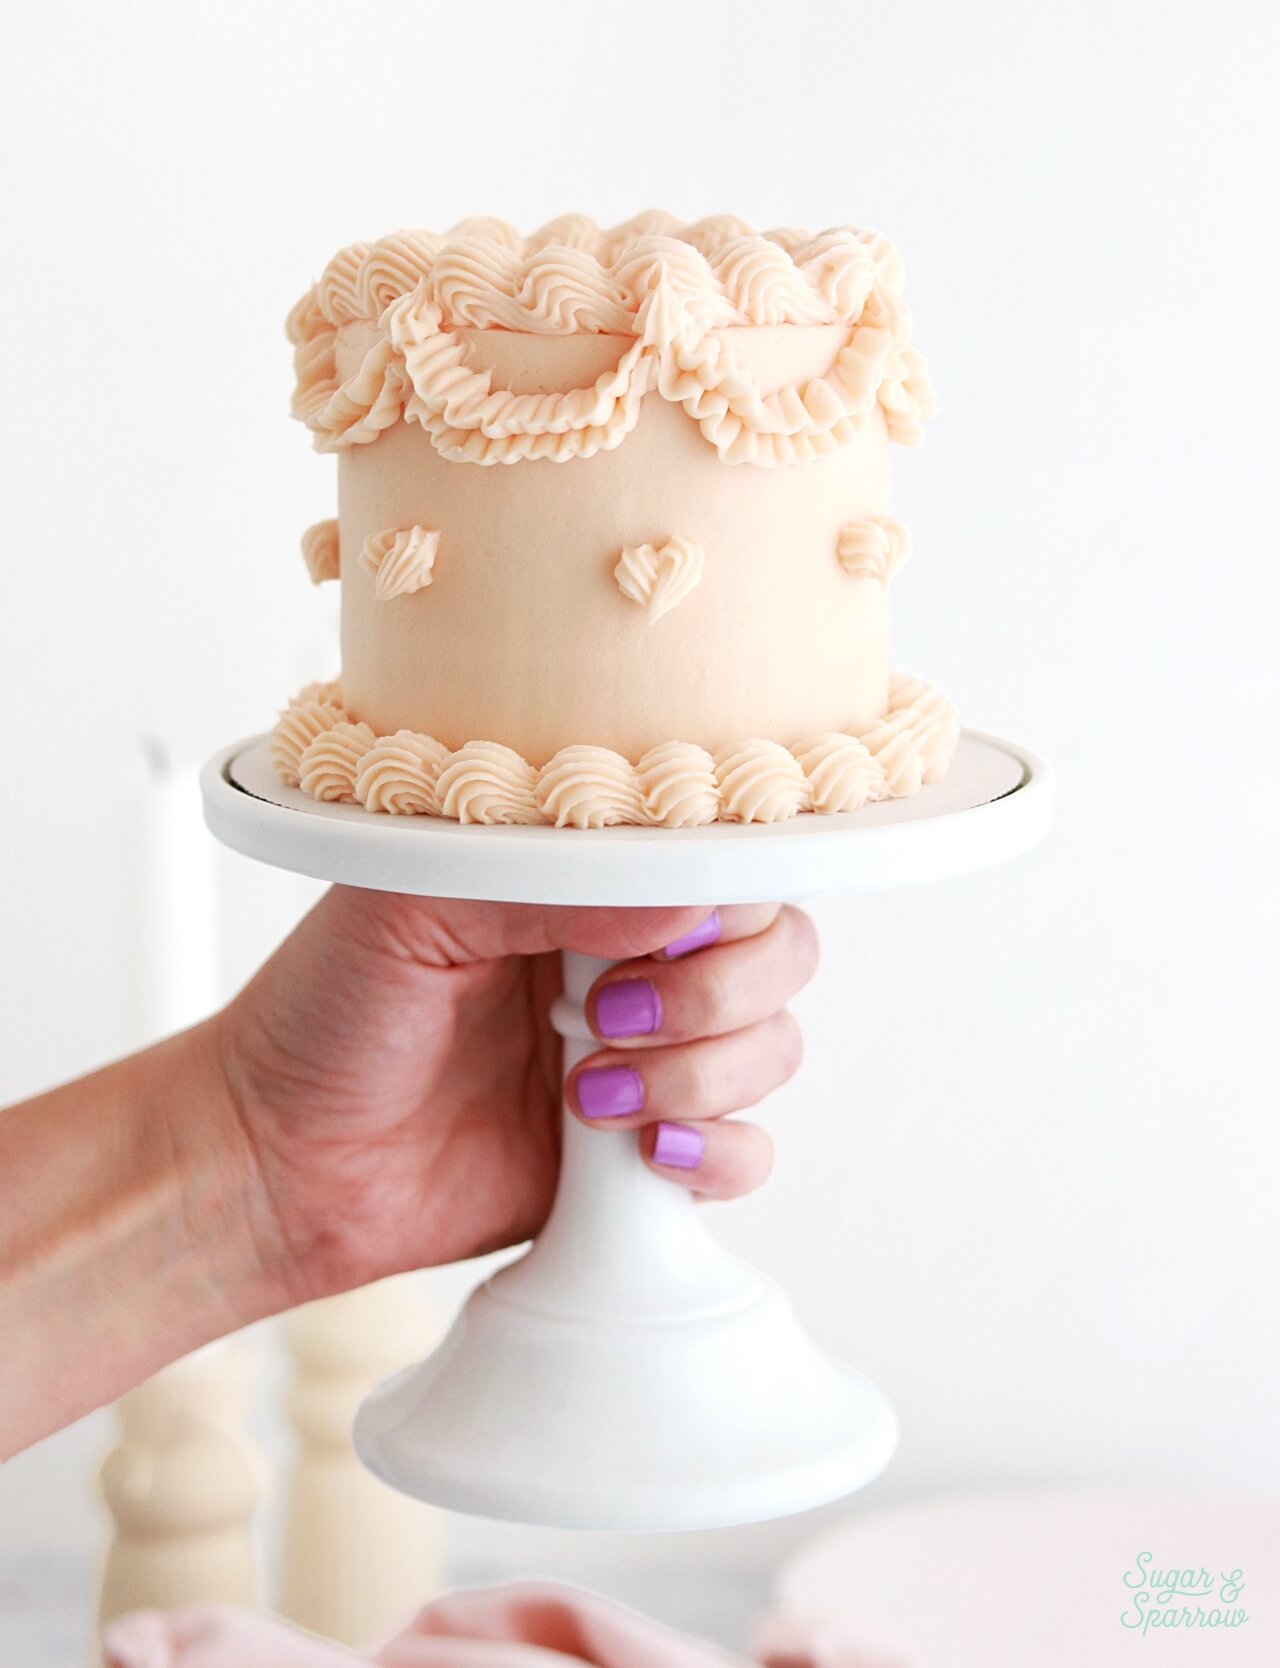
After frosting the cake with a smooth layer of cream cheese buttercream, I refrigerated the cake to let the frosting firm up and create a solid surface for the Lambeth piping. Then, I used Wilton Tip 4B for the shell borders on the top and bottom of the cake. I piped the ruffle garlands using Wilton Tip 102 and connected them with a small shell using Wilton Tip 16. And finally, I used Wilton Tip 16 to pipe two overlapping shells in the shape of a heart underneath where each ruffle garland connects. For a version of this decorating technique on a larger scale, see this cherry chip cake blog post.
If you’re wondering how to decorate a single 6-inch layer, you can get creative with the piping on top or simply use an icing spatula to frost the cake with more of a rustic finish. However you decorate, this small batch red velvet cake is sure to be a hit whether you’re hosting a small gathering or sharing it with a friend. I’m so excited for you to make this one!
Small Batch Red Velvet Cake with Cream Cheese Frosting
Equipment
- 3 4-inch cake pans OR
Ingredients
Small Batch Red Velvet Cake
- 2/3 Cups (89g) all purpose flour
- 1 Tbsp natural unsweetened cocoa powder
- 1/2 tsp baking soda
- 1/4 tsp salt
- 1/3 Cup (80ml) buttermilk*, room temperature DIY recipe in notes
- 1/2 tsp red food color gel**
- 2 Tbsp (29g) unsalted butter, room temperature
- 1/2 Cup (100g) granulated sugar
- 2 Tbsp (30ml) vegetable oil
- 1 large egg, room temperature
- 1 tsp pure vanilla extract
- 1 tsp distilled white vinegar
Cream Cheese Buttercream
- 1/2 Cup (113g) unsalted butter, room temperature
- 8 Oz (226g) full-fat brick-style cream cheese***, room temperature NOT the spread
- 4 Cups (480g) powdered sugar
- 1 1/2 tsp pure vanilla extract
- pinch of salt, or to taste
- 1 small drop red food color gel (optional)
Instructions
Make the Small Batch Red Velvet Cake
- Preheat the oven to 350ºF and prepare three 4-inch or one 6-inch cake pan by spraying the sides with cooking spray and fitting the bottom(s) with a wax paper or parchment paper circle.
- In a medium bowl, add the flour, cocoa powder, baking soda, and salt. Whisk together and set aside. Mix the red food color gel into the buttermilk and set aside.
- In the bowl of your stand mixer (or with a large bowl and hand mixer), add the butter, sugar, and vegetable oil. Beat together on high speed until light and fluffy, 2-3 minutes. Scrape down the bowl and paddle. Turn the mixer to low speed and add the egg. Mix until incorporated, then add the vanilla and white vinegar and mix on low for another 30 seconds. Scrape down the bowl and paddle once more.
- Add the flour mixture all at once and mix on low speed until just incorporated, then add the red buttermilk mixture and continue mixing on low speed until uniform.
- Pour the batter evenly between the prepared cake 4-inch pans (or all into one 6-inch cake pan). If using 4-inch cake pans, bake for 20-25 minutes. If using a 6-inch cake pan bake for 24-28 minutes. The cake is done when it springs back to the touch and a toothpick inserted comes out clean. Cool completely before assembling and decorating.
Make the Cream Cheese Buttercream
- In the bowl of a stand mixer fitted with the paddle attachment, cream the butter and cream cheese on medium-high until light, fluffy, and uniform (no lumps), about 5 minutes.
- Turn the mixer to low speed and add the powdered sugar a few cups at a time, mixing thoroughly after each addition and scraping down the bowl and paddle as needed. Add the vanilla and salt and mix on low for another minute, until fully combined and smooth. Add a small drop of red food color gel (or a few drops of pink) to create a light pink buttercream, if desired.
Assembly
- Once the red velvet cake layers are completely cooled, frost and decorate with the cream cheese buttercream. To create the mini layer cake pictured, level the cake layers to your desired height. Add a swipe of cream cheese buttercream onto a cardboard cake circle and place the first cake layer on top. Fill and stack the cake with cream cheese buttercream, then crumb coat the cake with cream cheese buttercream. Place the crumb coated cake in the refrigerator for at least 30 minutes to let the buttercream set firm.
- To create the look pictured, use the cream cheese buttercream to create a smooth finish on the cake, then refrigerate it for about 20 minutes. Use the rest of the cream cheese buttercream to create lambeth piping using Wilton Tip 4B for the large shell borders, Tip 102 for the ruffle garlands, and Tip 16 for the small shells that connect each ruffle garland + the shell hearts underneath each garland. Feel free to use this tutorial for some guidance.
Notes
- The red velvet cake layer(s) can be made ahead and stored at room temperature, covered tightly in plastic wrap, for up to two days. Alternatively, you can cover with plastic wrap and store in the freezer for up to two months before thawing to room temperature.
- The cream cheese buttercream can be made ahead and stored in an airtight container at room temperature for up to 1 day. Alternatively, you can store it in an airtight container in the refrigerator for up to two weeks. When you’re ready to use it, bring it back to room temperature and rewhip with your stand mixer to bring back to frosting consistency.
Did you make this cake? I want to know how it went. Let me know in the comments section below or tag @sugarandsparrowco on Instagram to show me a photo. I love to see what you make!

Hi! I’m wondering, could i use two 5 inch cake pans to make this?
Hi Roxy! Yes, this recipe should work for two 5-inch cake pans. The layers might be slightly shorter than they would be in three 4-inch cake pans or one 6-inch cake pan, so I would check for doneness a few minutes before the specified bake time (around the 18 minute mark). Enjoy!
Looks like a great recipe! Can I substitute the vegetable oil for something else like butter or ghee? I’m trying to avoid oils. Thanks
Hi Meliha! You can try subbing the oil for an equal amount of softened butter and just use all of the butter in the beginning of the recipe (cream together with the sugar). Hope that helps!
Another great recipe for a small batch cake! As an empty nester I absolutely love your 4 inch and 6 inch recipes. This cake was delicious! Now I need to keep practicing the icing techniques!
This is the perfect recipe for a birthday cake for 2 people. Thank you for making my small celebration perfect by enjoying a mini version of my favourite cake❤️
Yay, Hannah! I’m so happy to hear this was a hit. Happy birthday!
Hi, i am try this small cake today. But i need the mesurment for a big cake for Nov 8. Do you can help me??
Hi Agnes! Here’s the full-sized red velvet cake recipe: https://sugarandsparrow.com/red-velvet-cake-recipe/
Hi I’m trying to make this cake…is there a substitute for egg? Thankyou
Hi Anuja! I haven’t tested this recipe with an egg replacer, so unfortunately I don’t have a recommendation. I’ll let you know if I make an eggless version in the future!