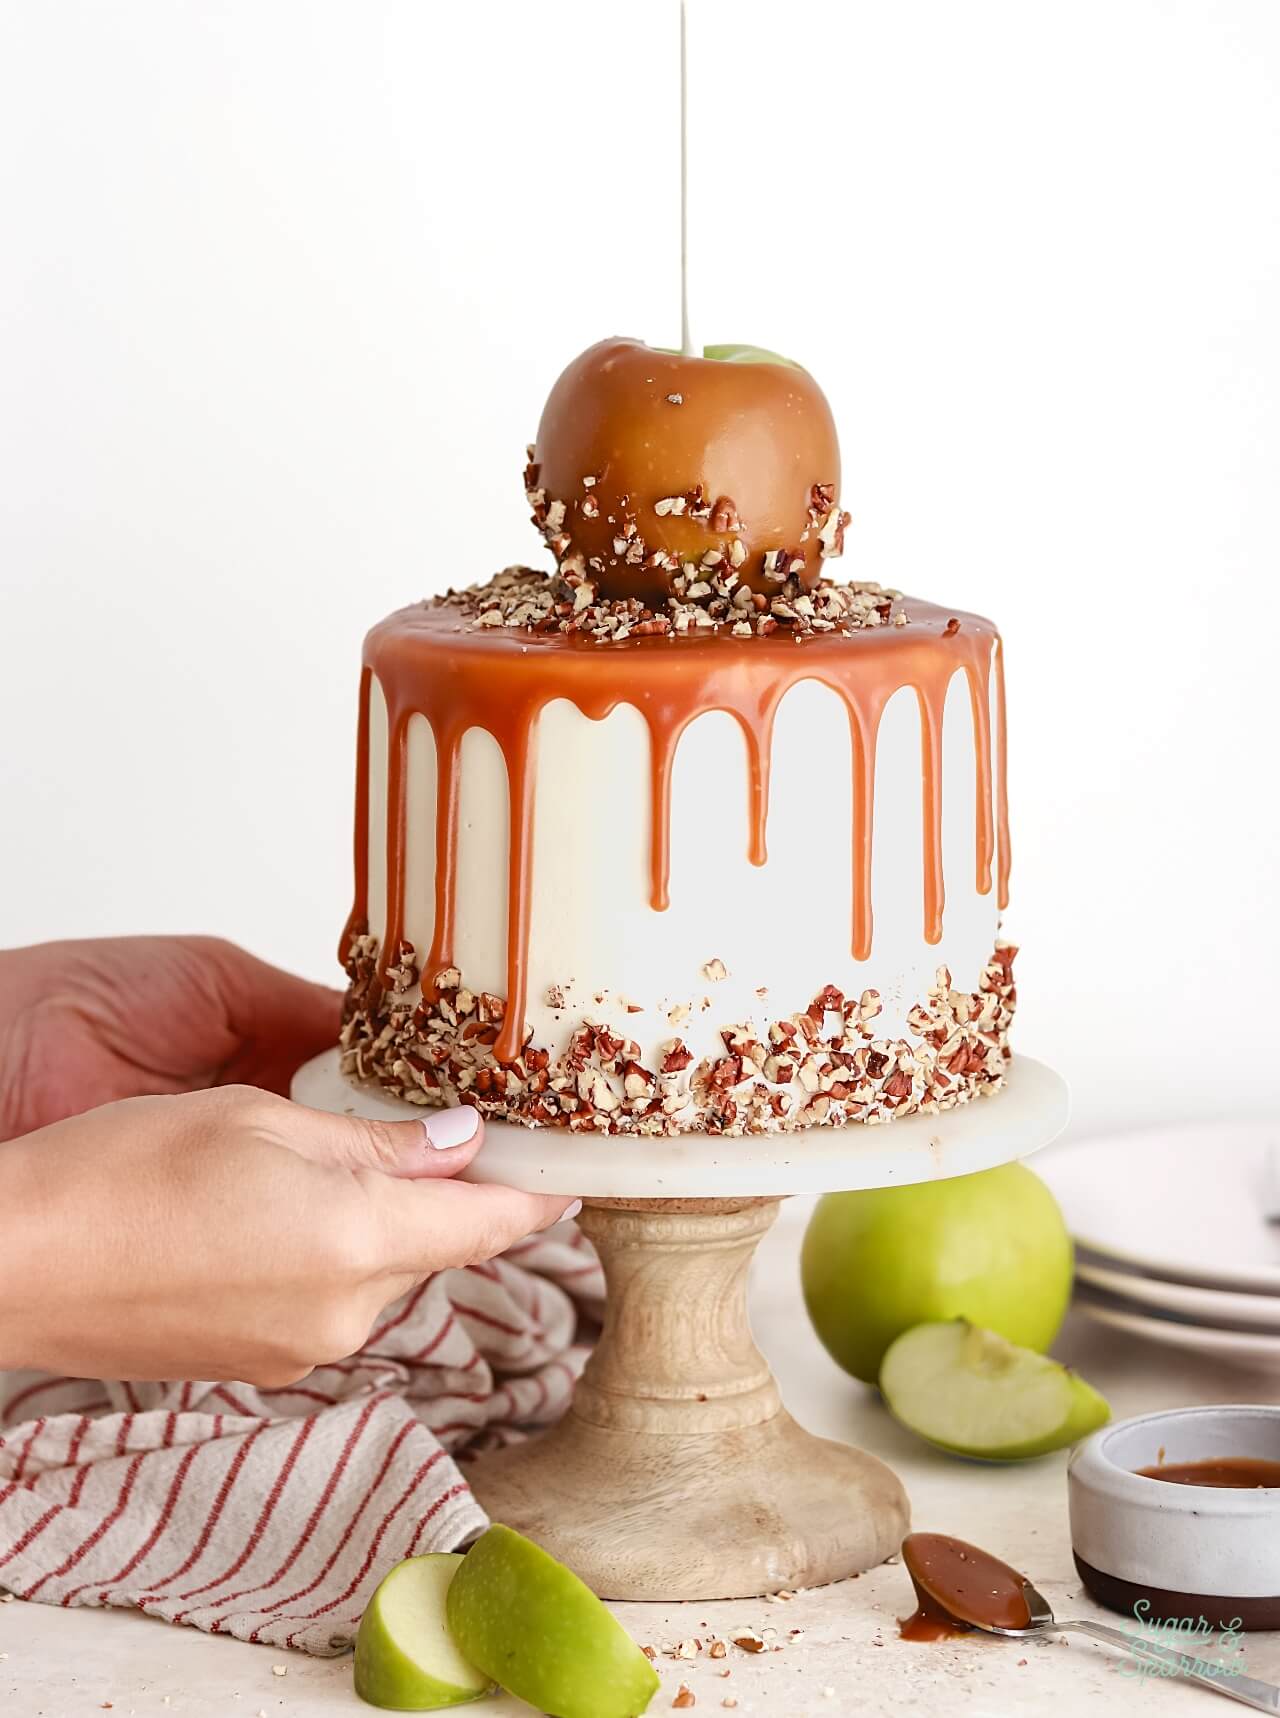
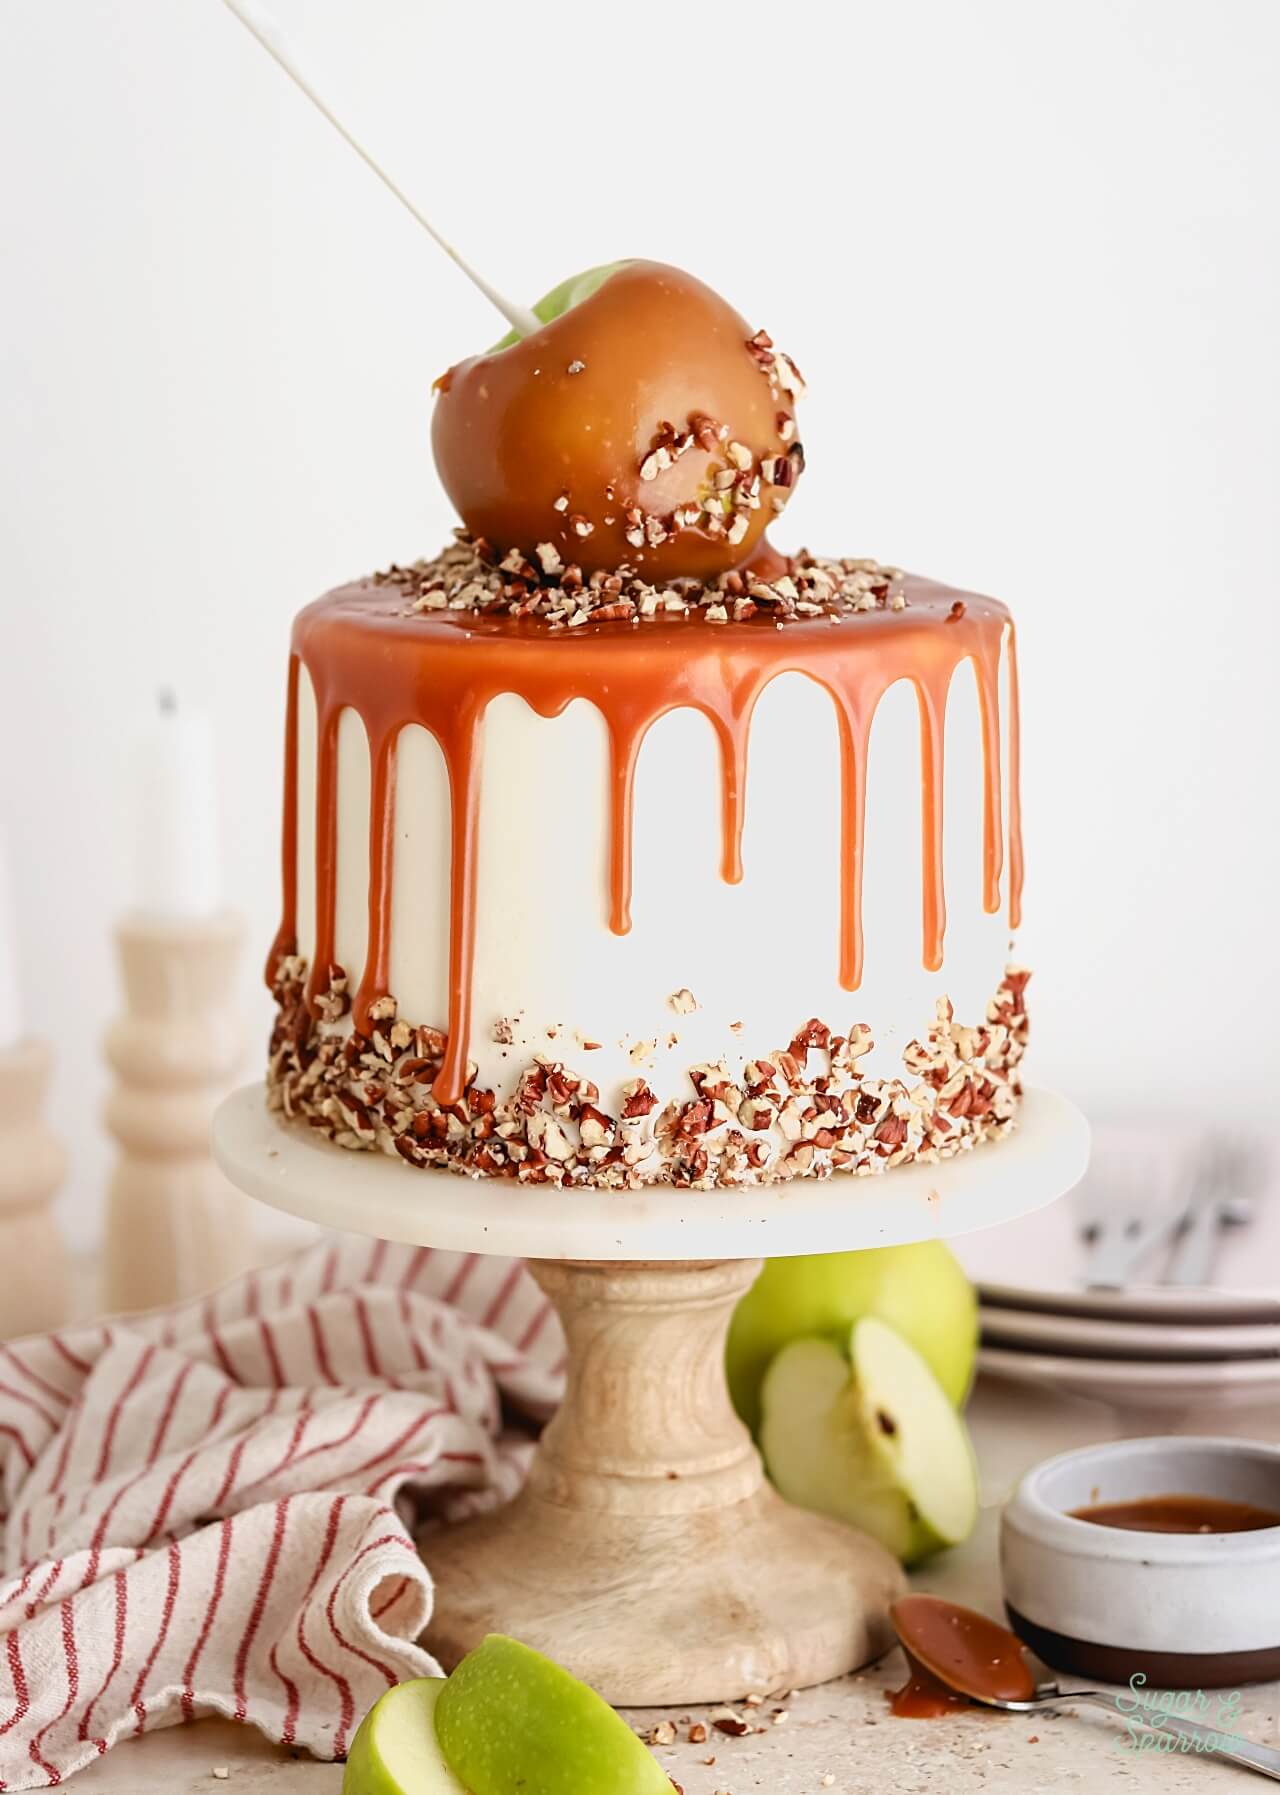
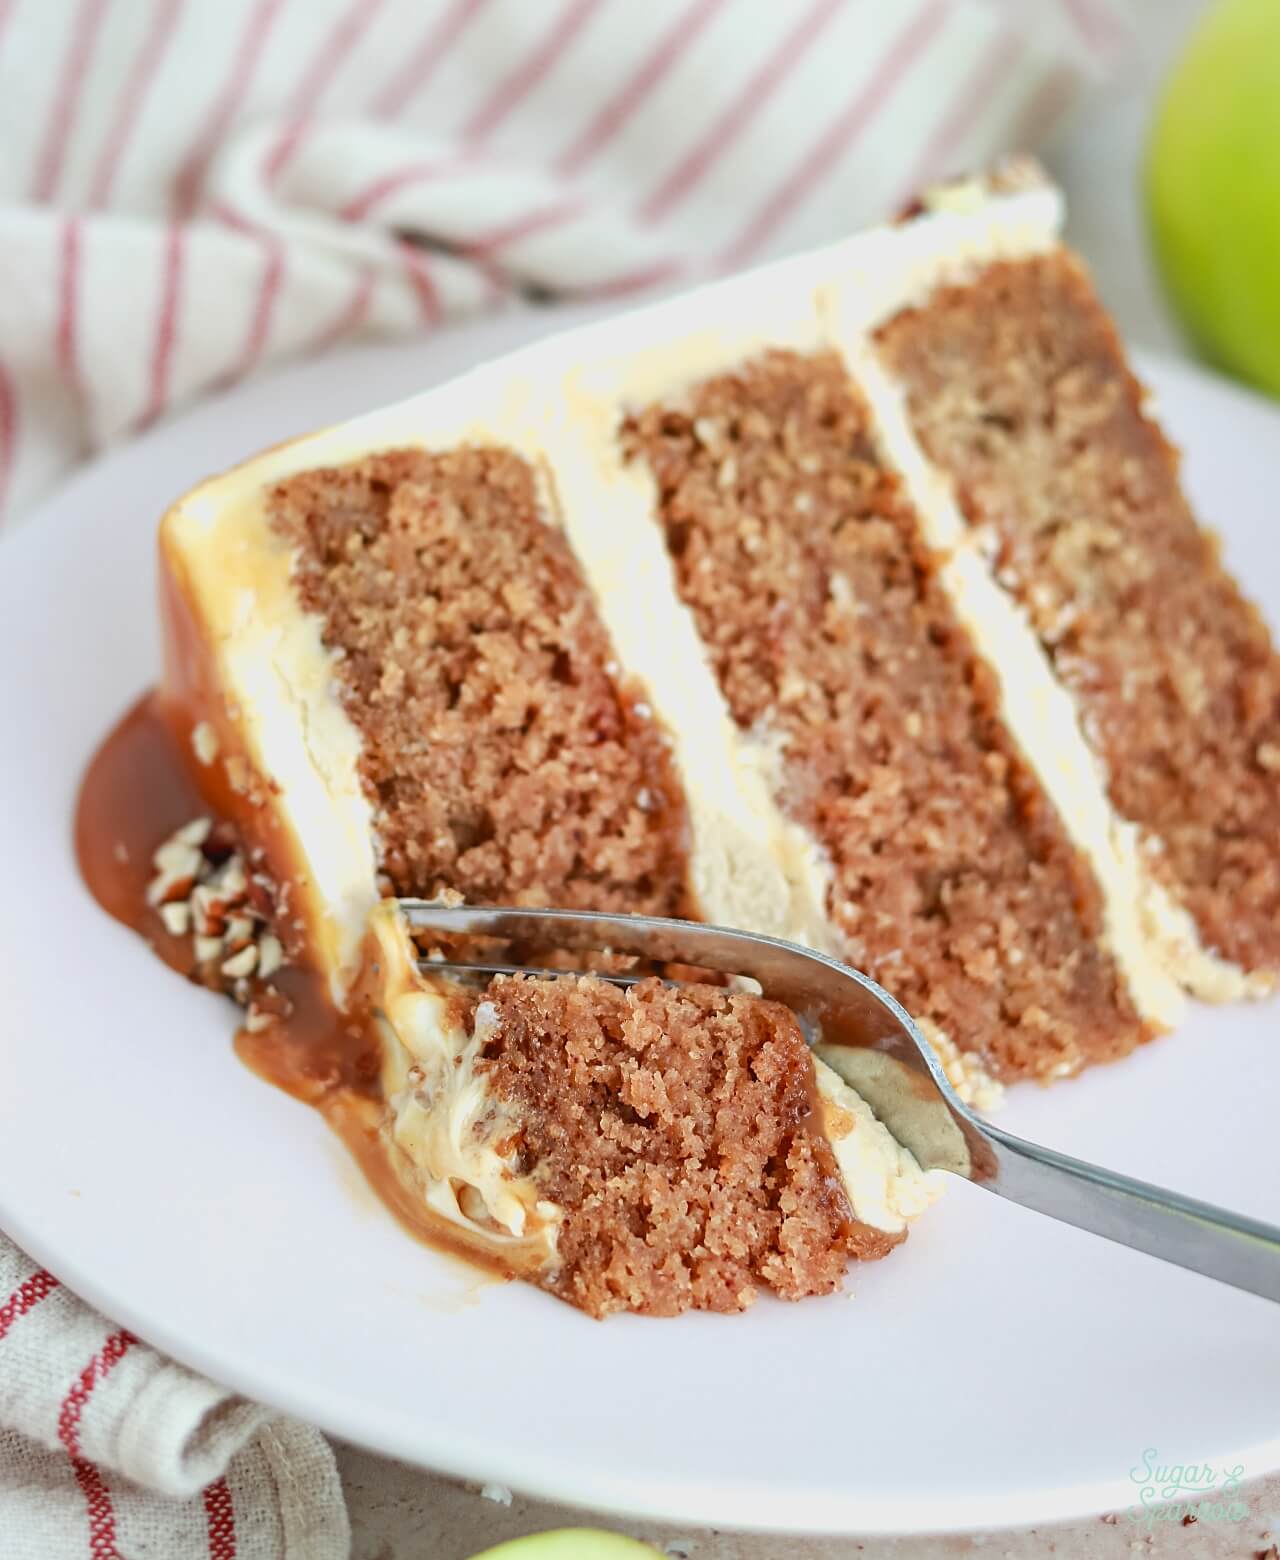
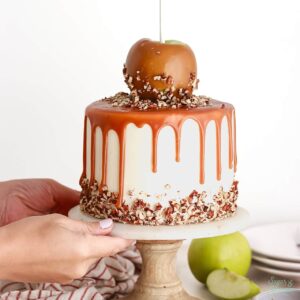
Fall is officially here and this salted caramel apple cake is the perfect way to celebrate! It features layers of super moist, perfectly spiced apple cake with an easy homemade salted caramel that you’ll use to flavor the buttercream filling, drizzle in between the layers, use as a cake drip, and coat the apple cake topper. This dripping apple cake design makes it a showstopper at any gathering and it’s so fun to assemble! If you love the sweet and salty complexity that caramel adds to apple flavored things, this cake is going to be right up your alley.
UPDATE 2025: I remade this recipe with new photos and slightly changed the recipe card to include more salted caramel between the cake layers.
My Favorite Spiced Apple Cake
First, let’s talk about this apple spice cake, because it’s the starting point of this recipe and the foundation of all this flavor. It’s made with unsweetened applesauce to give it a nice apple flavor and make it ultra-moist. I tested this recipe with shredded apples and chopped apples, and at the end of the day the applesauce won out for both flavor and texture. Amplifying the apple flavor with the cinnamon, allspice, and nutmeg not only gives this cake the perfect spice, it also makes your kitchen smell amazing as it’s baking! There’s nothing more cozy than the aroma of this cake in the oven, especially on a picturesque Fall day.
Easy Salted Caramel That’s So Versatile
The next step in this caramel apple cake is making homemade caramel. If you’ve never made caramel before, fear not! This from-scratch salted caramel recipe couldn’t be easier. There are only four ingredients involved, no candy thermometer necessary, and only takes about 15 minutes from start to finish. Once you make it and cool it to room temperature, you’ll be using this caramel to:
- Make salted caramel buttercream that you’ll use as the filling and crumb coat.
- Drizzle it in between the cake layers for extra caramel flavor
- Drip the cake
- Coat an apple that you’ll use as the cake topper
So versatile! It’s one of my favorite Fall staples.
Two Flavors from One Vanilla Buttercream Recipe
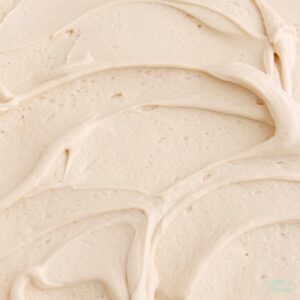
The original salted caramel apple cake recipe I wrote in 2018 had you making the salted caramel buttercream and vanilla buttercream separately, but after revisiting this recipe in 2025 I had some new thoughts about efficiency. Since the salted caramel buttercream is essentially vanilla buttercream with the homemade salted caramel added at the end, I thought it would be easier to just make the vanilla buttercream and divide it in half, then add the salted caramel to one half of the recipe. It’s much more efficient this way!
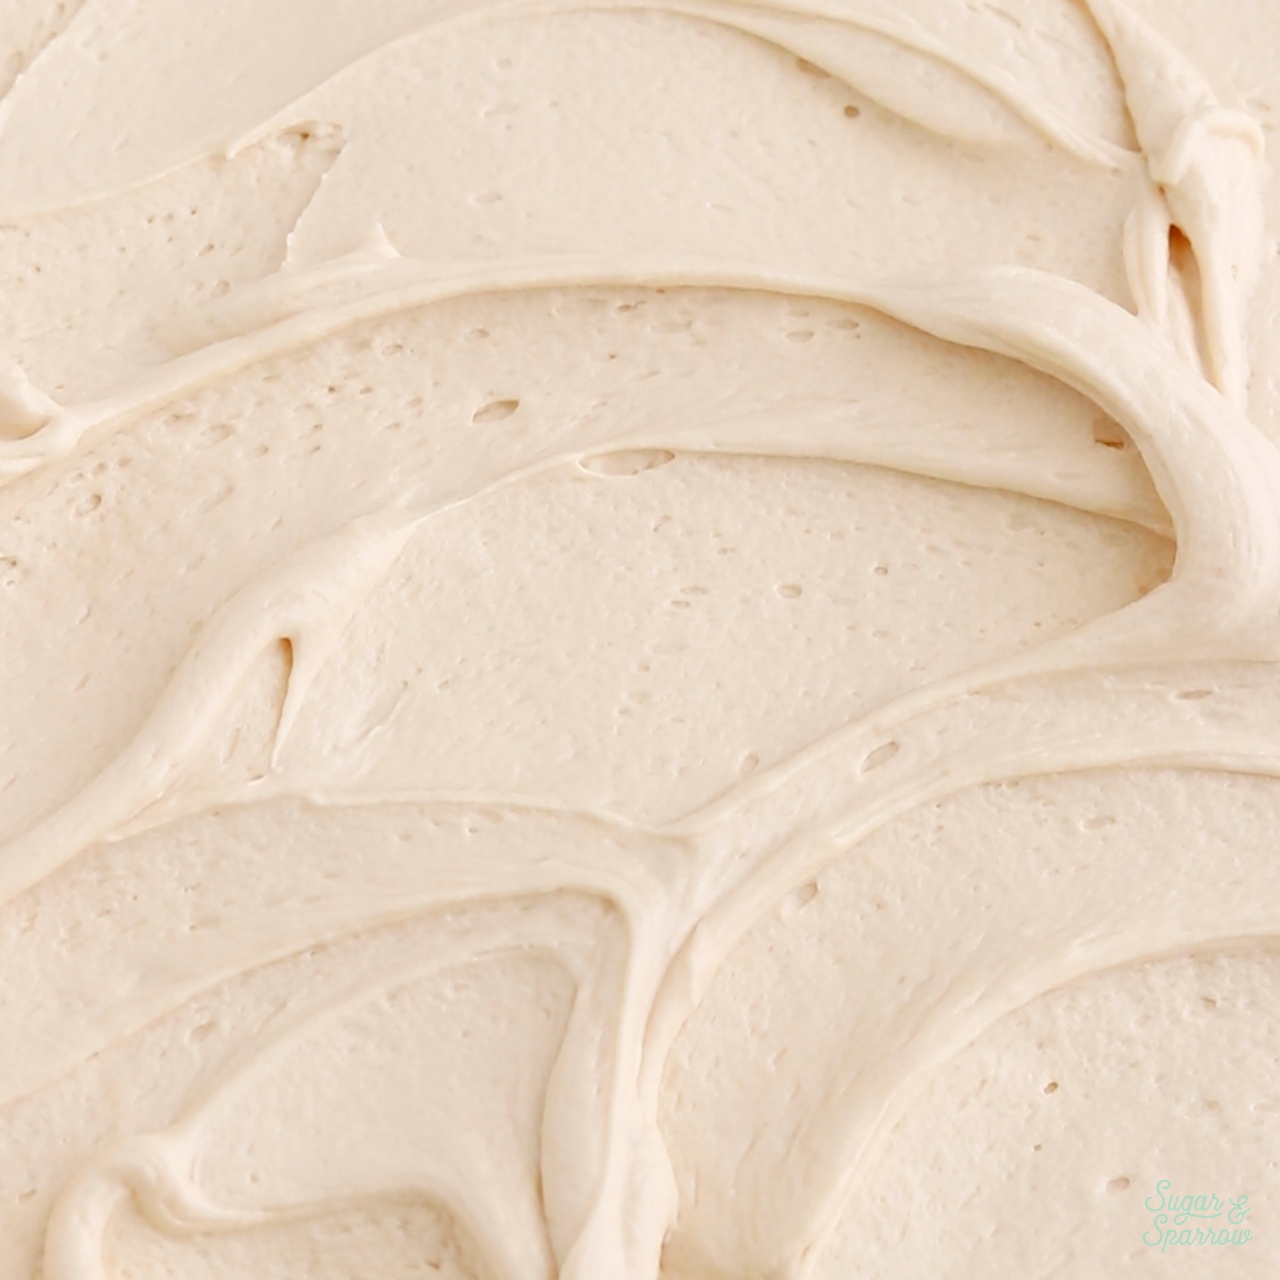
You’ll use the salted caramel buttercream as cake filling (along with some drizzled salted caramel) and also use it to crumb coat the cake. Then, you’ll use the rest of the vanilla buttercream to frost the cake with a smooth finish.
How to Decorate a Caramel Apple Cake
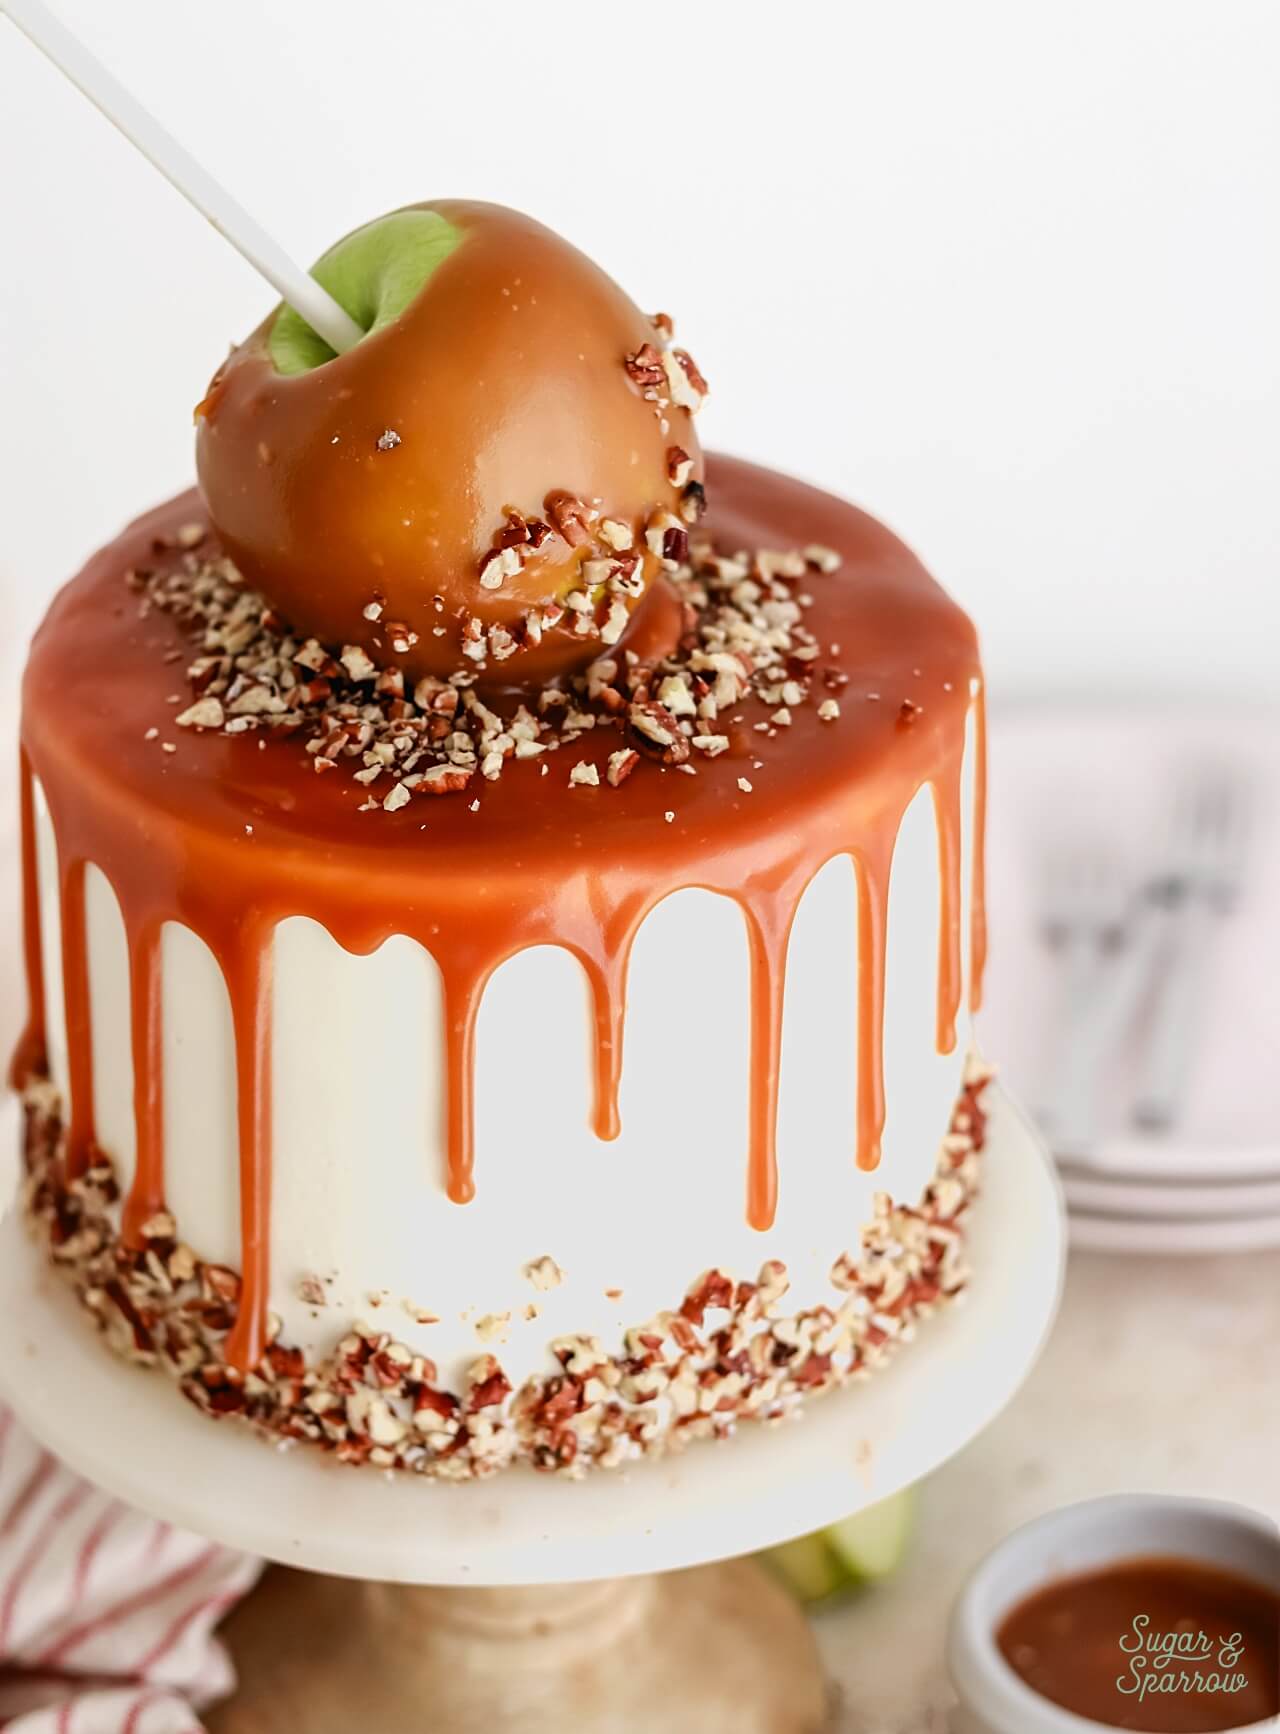
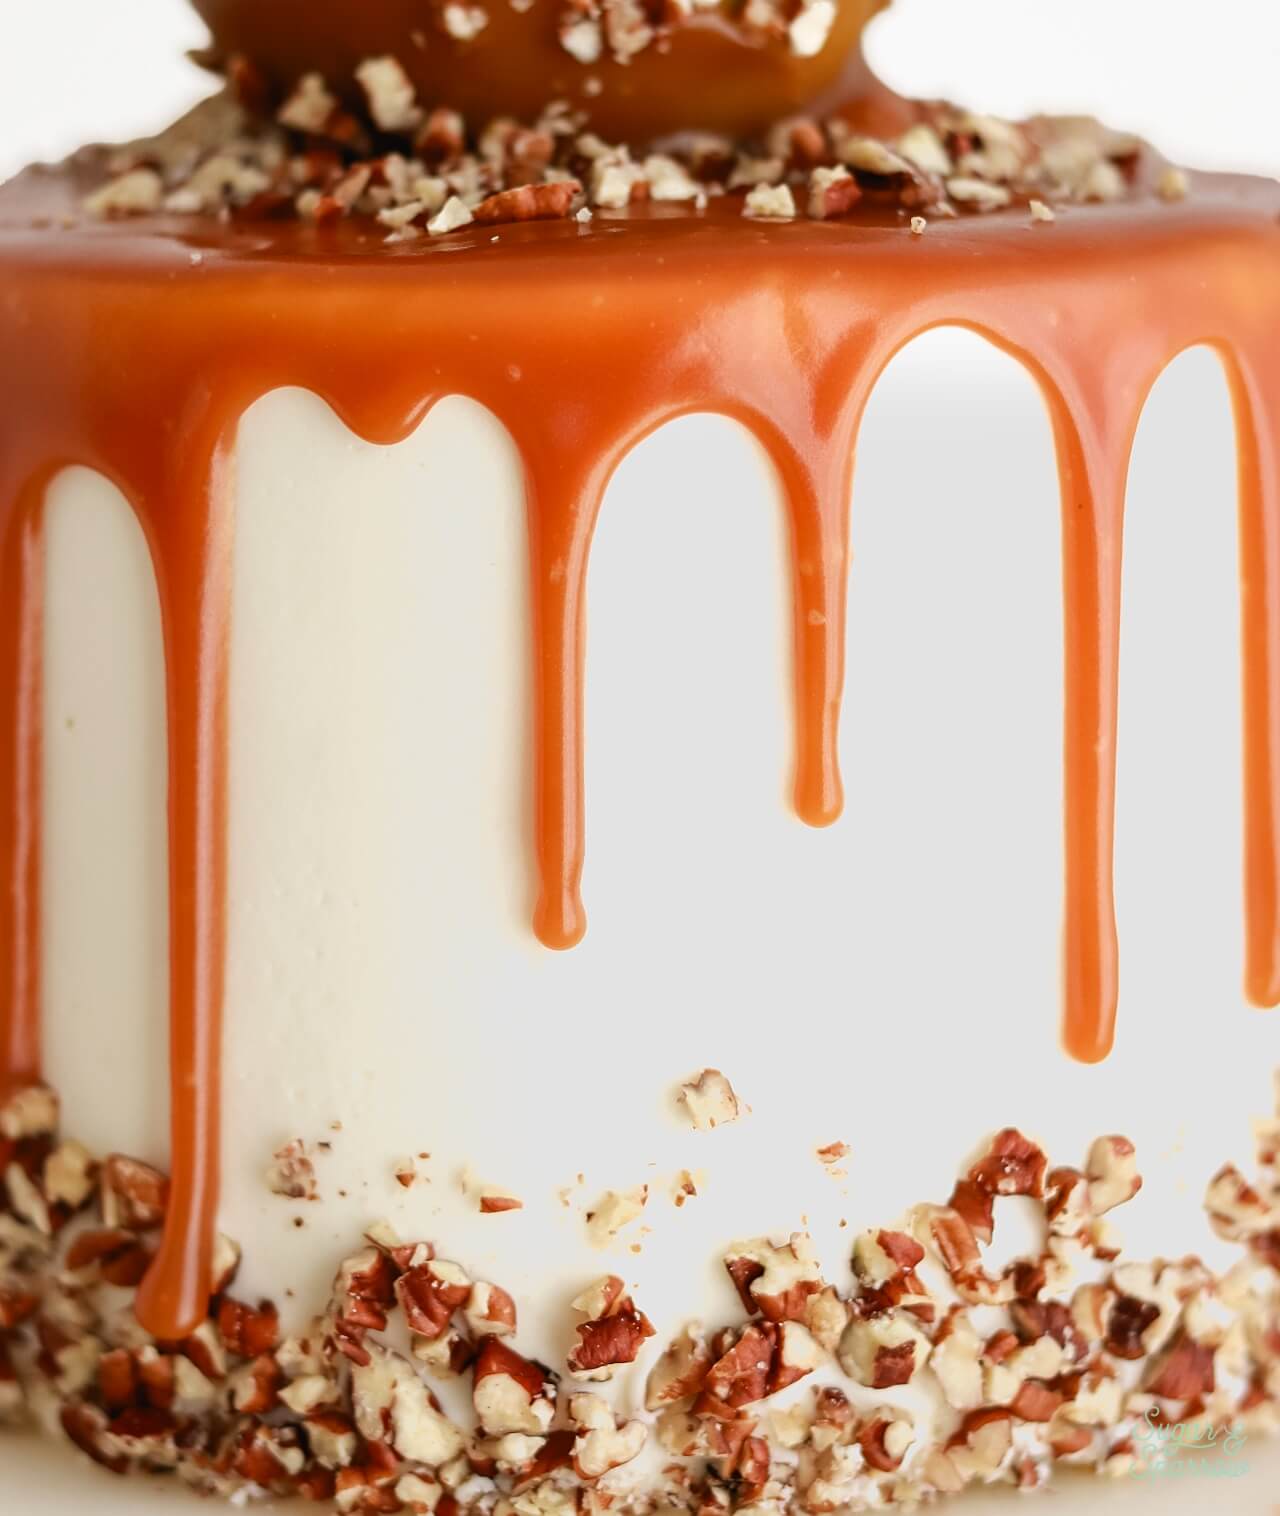
Decorating this cake is my favorite part! For my final cake presentation, I garnished the bottom edges with chopped pecans, then dripped the cake with salted caramel before placing a caramel apple on top. The goal here was to make it look like the caramel apple was dripping down the sides of the cake. Here’s a video I made (in 2019) to show you the process:
Note that I’ve updated the recipe slightly since that video was made! If you like watching videos like this, I have a ton of decorating tutorials and recipe videos on my YouTube channel. Don’t forget to hit the subscribe button while you’re there so you never miss a new video from me!
More Fall Cake Recipes You’ll Love
If you’re looking for more cake recipes to make this Fall, try these recipes from my blog:
- Apple Spice Cake
- Apple Crisp Cake
- Spice Cake with Brown Butter Cream Cheese Frosting
- Perfect Pumpkin Layer Cake
- Spiced Pumpkin Biscoff Cake
I hope you love this caramel apple cake as much as I do! Let me know if you make it in the comments below and feel free to tag @sugarandsparrowco on Instagram if you post a photo. I love to see what you create with my recipes!
Salted Caramel Apple Cake
Ingredients
Apple Spice Cake
- 2 1/2 Cups (332g) all-purpose flour
- 1 1/2 tsp baking soda
- 1/2 tsp baking powder
- 1/2 tsp salt
- 2 tsp cinnamon
- 1 tsp nutmeg
- 1/2 tsp allspice
- 1 Cup (226g) unsalted butter, room temperature
- 1 1/4 Cups (250g) granulated sugar
- 3/4 Cup (150g) packed brown sugar light or dark
- 1 tsp pure vanilla extract
- 1 large egg, room temperature
- 2 Cups (500) unsweetened applesauce
Homemade Salted Caramel
- 1 1/2 Cups (300g) granulated white sugar
- 9 Tbsp (128g) unsalted butter, room temperature cut into Tbsp sized slices
- 3/4 cup (180ml) heavy whipping cream, room temperature
- 1 1/2 tsp salt
Vanilla Buttercream
- 1 1/2 Cups (339g) unsalted butter, room temperature
- 5 Cups (600g) powdered sugar
- 1 1/2 tsp pure vanilla extract
- 2 Tbsp whole milk, room temperature
- 1/4 tsp salt, or to taste
Salted Caramel Buttercream
- 2 Cups (432g) vanilla buttercream (recipe above)
- 1/2 Cup (120ml) salted caramel, room temperature (recipe above)
- pinch of salt, or to taste
Additional Garnish
- 1 medium apple
- 1/2 Cup chopped pecans
Instructions
Make The Apple Spice Cake
- Preheat the oven to 350ºF (177ºC) and prepare three 6-inch or two 8-inch cake pans by spraying the sides with cooking spray and fitting the bottoms with a parchment paper circle.
- In a medium bowl, add the flour, baking soda, baking powder, salt, cinnamon, nutmeg, and allspice. Whisk together and set aside.
- In the bowl of a stand mixer fitted with the paddle attachment (or with a hand mixer and a large bowl), beat the butter on high speed until light and creamy, about 2 minutes. Add the brown and white sugars and continue to beat on medium-high until light and fluffy, 2-3 minutes. Scrape down the bowl and paddle as needed.
- Turn the mixer to low speed and add the vanilla and the eggs. Turn the mixer to medium and beat for one full minute.
- Turn the mixer back to low speed and add the flour mixture in three parts, alternating with the applesauce, beginning and ending with the flour mixture. When it begins to come together after the last flour addition, turn off the mixer and give it a few stirs by hand to make sure everything is incorporated. The batter will be very thick.
- Divide the batter between your prepared cake pans (fill no more than 2/3 full) and smooth the tops, then bake for 36-42 minutes, or until a toothpick inserted comes out clean. Let the cakes cool completely before filling and frosting.
Make The Homemade Salted Caramel
- Have everything pre-measured and ready to go (you’ll be constantly stirring). Place the sugar in a medium saucepan over medium-high heat and stir constantly with a wooden spoon, until it melts into an amber-colored liquid and no sugar clumps remain, 6-8 minutes.
- Reduce the heat to medium. Carefully add the butter (it will bubble up when you do) and use a whisk to combine it with the sugar mixture until the butter is fully melted and incorporated, 1-2 minutes.
- Add the heavy whipping cream in a steady stream while whisking. As soon as the cream is incorporated, let the caramel boil for a full minute before removing it from the heat and stirring in the salt.
- Let the caramel cool completely to room temperature before using it in a buttercream recipe, dipping a caramel apple, or dripping the cake. It will thicken as it cools.
Make The Vanilla Buttercream
- With a hand mixer or paddle attachment on your stand mixer, cream the butter on medium-high until it’s creamy and light (almost white) in color, about 7 minutes.
- Add the powdered sugar a few cups at a time, mixing on low speed and scraping down the bowl and paddle after each addition is mixed in. Keep the mixer on low speed while you add the vanilla, milk, and salt. Continue mixing until fully incorporated and smooth, about two minutes.
- Set about 3 Cups (648g) of the vanilla buttercream aside in an airtight container, keeping about 2 Cups (432g) of the vanilla buttercream in the mixing bowl for making the salted caramel buttercream.
Make the Salted Caramel Buttercream
- Once the salted caramel is room temperature and thick, add 1/2 Cup (120ml) to the 2 Cups of vanilla buttercream in your stand mixer from the previous step. Mix on low speed until incorporated and smooth, adding a pinch of salt to balance the sweetness.
Assembly
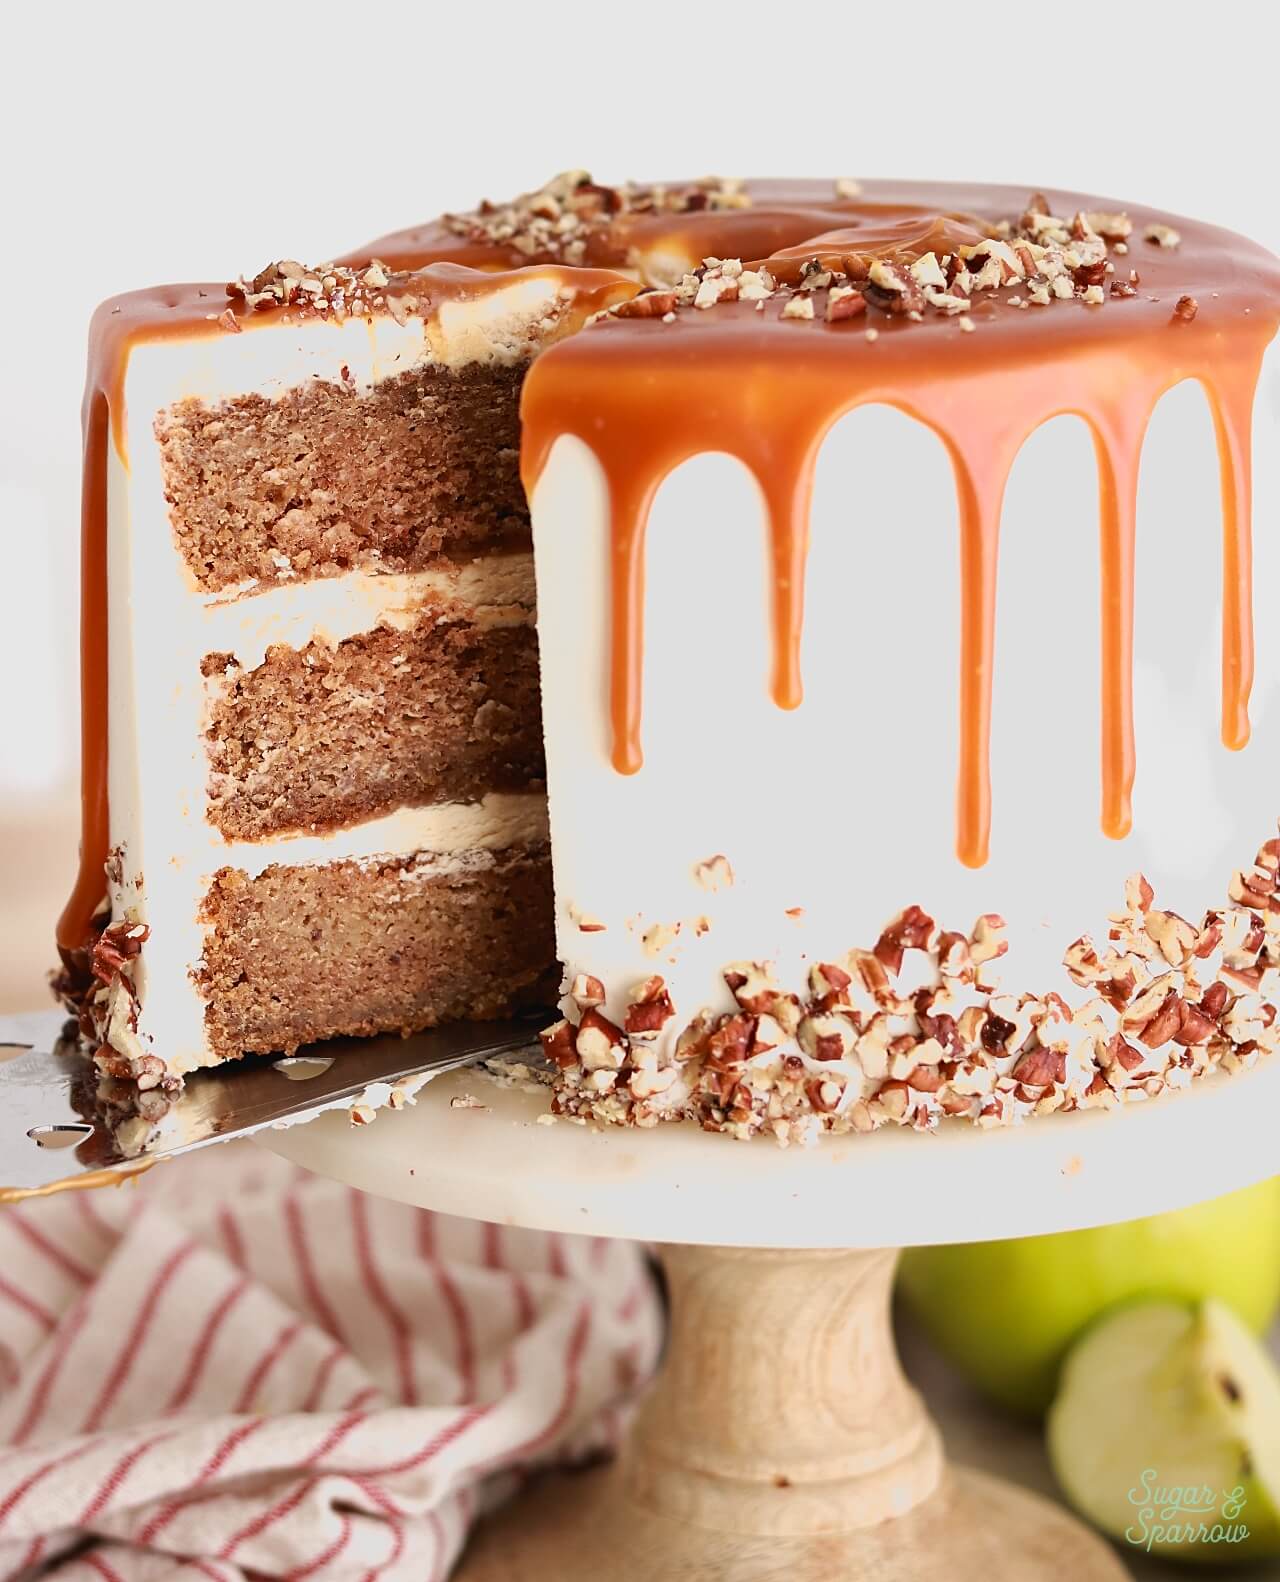
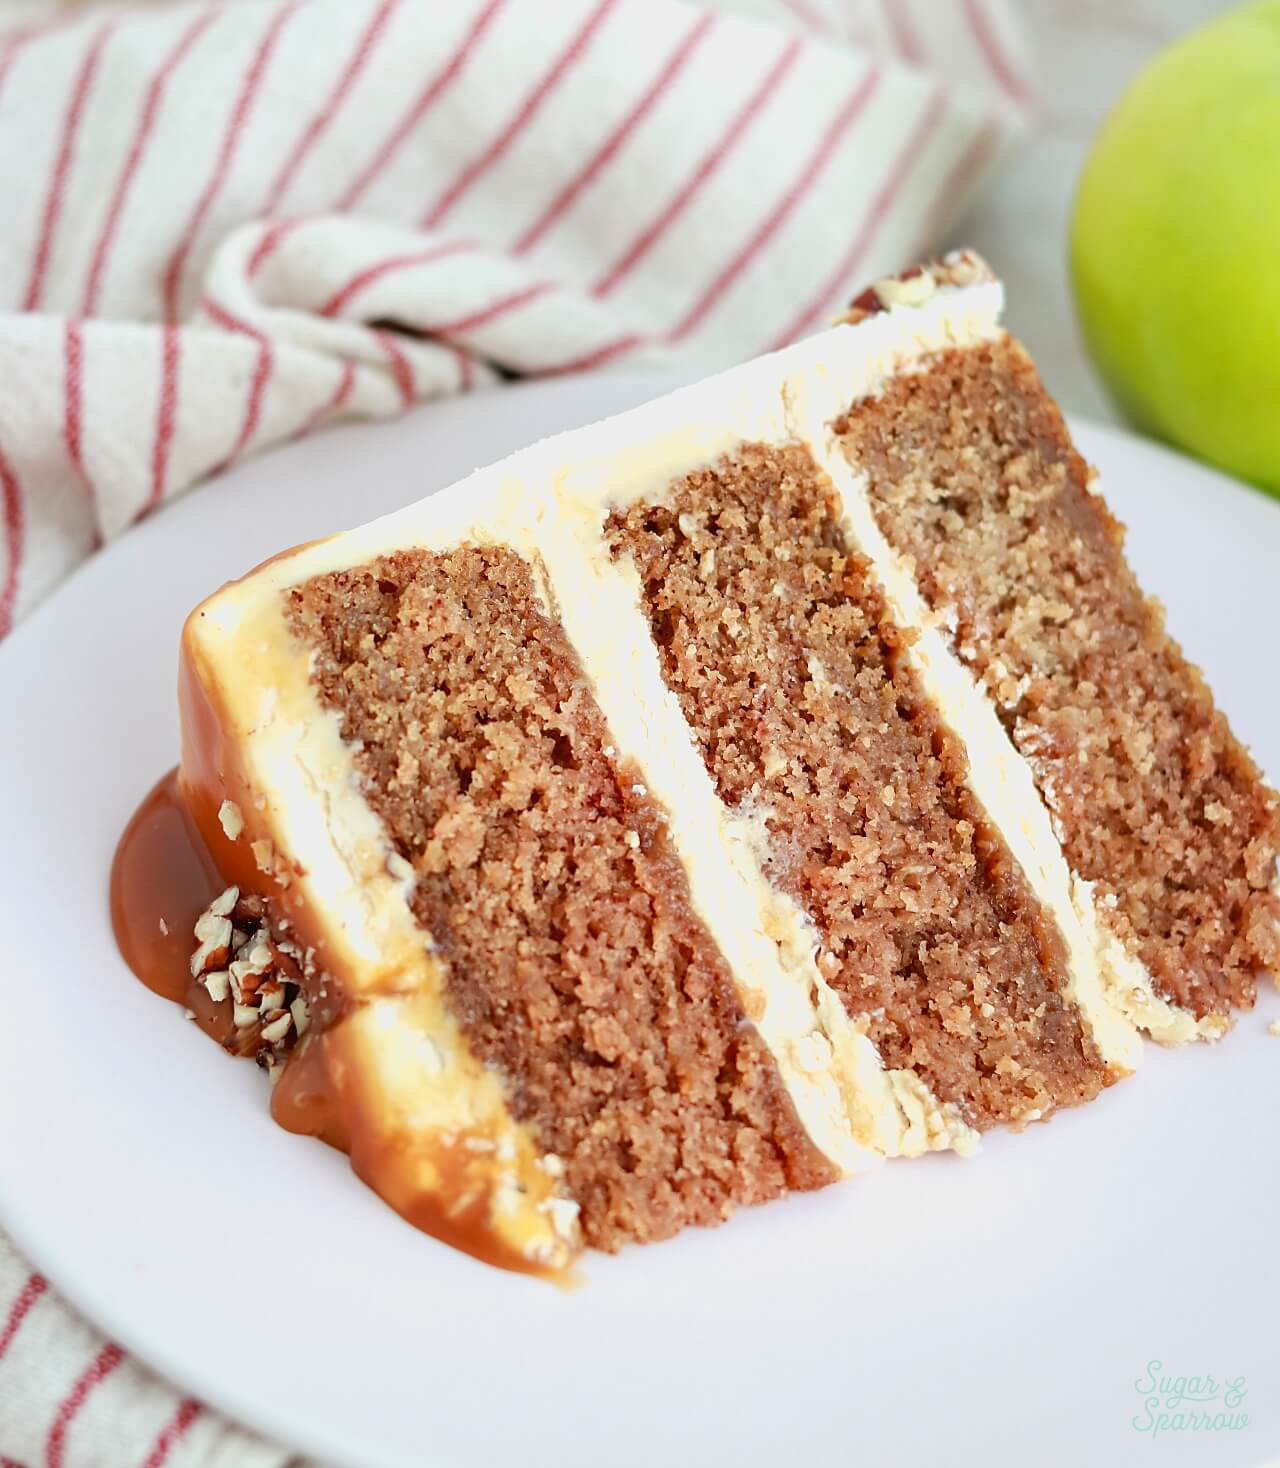
- When the apple spice cake layers are cooled completely, level them to your desired height. Place the first cake layer on your turntable and add a layer of salted caramel buttercream as filling. Drizzle with cooled salted caramel before placing the next cake layer on top and repeating the process of filling and stacking. Place the final apple spice cake layer on top, upside down so that the bottom of the cake becomes the top. Crumb coat the cake with the remaining salted caramel buttercream and refrigerate until firm to the touch, about 30 minutes.
- To create the look pictured, frost the cake with a smooth buttercream finish using the vanilla buttercream and garnish the bottom edge with chopped pecans. Refrigerate the cake once more to let the frosting firm up, about 15 minutes this time.
- While the cake is chilling, pour the remaining Homemade Salted Caramel into a small bowl. Insert a popsicle or cookie stick into the apple and dip it into the caramel, coating it thoroughly. Let the excess caramel drip off of the apple and then set it onto a sheet of wax paper, then place it into the refrigerator with the cake to let the caramel set slightly.
- To create the caramel drip effect, first do a test drip on the chilled cake with room temperature salted caramel. If it’s too thick, microwave it in 15 second bursts to bring it to perfect drip consistency without heating it too much. Drip the sides of the cake with salted caramel and partially fill in the top before topping with the caramel apple. Garnish with more chopped almonds on top of the cake and apple.
Notes
- The spiced apple cake layers can be made ahead and stored, wrapped in plastic wrap, at room temperature for up to two days. Alternatively, you can store the wrapped cake layers in the freezer for up to 2 months before thawing and frosting.
- The homemade salted caramel can be made ahead and stored in an airtight container in the refrigerator for up to two weeks. When you’re ready to use it, reheat it in the microwave in 15 second intervals until it reaches room temperature.
- Both of the buttercream flavors can be made ahead and stored in airtight containers in the refrigerator for up to two weeks. When you’re ready to use them, bring them back to room temperature and re-whip each in your stand mixer to bring back to smooth buttercream consistency.
What are some of your favorite Fall flavors? Besides caramel apple, I love a good Chai Latte and am hoping to incorporate those tasty flavors into a cake and/or cupcakes SOON! In the meantime, if you make this caramel apple cake, I’d love to know how you like it. Tag me on Instagram or let me know in the comments below!


It is possible to use real apples instead of using applesauce?
That’s a great question! The only way to use real apples would be to make DIY unsweetened applesauce from them, then use them in the cake recipe. The finely pureed applesauce is what gives this cake both moisture and great texture.
Can I reduce the sugar and use Sweetened applesauce?
Hi Jenna! You can certainly give it a try, but since I’ve never tried it myself I am not sure the exact sugar amount to use or how it will turn out. Let me know if you do try it and if so, how much sugar you ended up using!
I made this for Thanksgiving and wow! Everyone wants me to make it at Christmas too! Even my husband, who doesn’t usually like sweets had two pieces and said I nailed it. It was a big hit with my family. Mine didn’t look as pretty though because I think I overheated the caramel when I tried to make the drippings and it all ran together. One thing though. I am going to re type the recipe because I want each section to have the ingredients and instructions together, not on separate pages. This is a five star cake!
I am SO happy to hear that, Laura!! Sounds like it was a mega hit with your family! Can’t wait for you to make it again for Christmas 🙂
I simply do not have the interest in baking, nor the time to devote, as I am busy raising goats. I would , however, love to know how much it would cost me, to have this cake made and shipped, to seabrook island South Carolina in mid December? There is a wonderful couple whom I love, that would enjoy, and deserves to have a surprise, they are not expecting from me. She is always giving me small gifts of wonderful soaps and lotions from goats milk to silk from expensive specialty places, along with expensive chocolates, I have gained 15 pounds and told her to stop, but she doesn’t. This cake would blow her mind and her husband is going to sit and grin because she can’t tell him NO. Hehehe.
Hi, Bernita! Thanks so much for your kind words about my cake! Unfortunately, I don’t sell my cakes or ship them so I won’t be able to send you this cake. Perhaps you can try a local baker and see if they can replicate the design and flavors?
Precise & easy to follow instructions. Our cake came out perfectly. Thank you very much
I’m so happy you love this recipe! It’s one of my favorites 🙂
Can i make the full cake with decor a day before and leave in fridge?
Hi Naila! You totally can make and decorate this cake ahead of time and store it in the fridge the day before serving. Just make sure you bring it back to room temp before serving it by taking it out of the fridge 1-2 hours beforehand.
Could I substitute the all purpose flour for cake flour? Would I use the same amount?
Hi Olivia! You can certainly substitute cake flour in this recipe and use the same amount (in cups, not grams). I think all purpose flour weighs more than cake flour, so be sure to go with the Cups measurement.
I have some apples I need to use up. Can I substitute fresh apples for the applesauce? If so how many?
Hi Lynn! I’ve never made this recipe with fresh apples before but I bet you could find a from-scratch applesauce recipe and use that in this cake recipe! Just make sure it’s unsweetened when you make it fresh (aka don’t add sugar) and you should be good.
Hi! I was wondering how you store any leftover cake? Can it sit at room temperature or does it need to be in the refridgerator? Thanks!
Hi Michal! Leftover cake can be stored in an airtight container at room temp for up to two days, or you can wrap it up in plastic wrap and store it in the refrigerator for about five days.
Thats perfect thanks!
Hi I’m wanting to make this into 3 8 inch cake layers, any suggestions? I think doubling the recipe would be too much. How many cups of batter does this recipe make?
Hi Olivia! Fortunately, although this specifies to use 6-inch cake pans (because that’s my preference) this cake will make exactly enough for three 8 inch pans as-is. It makes extra batter if you use 6-inch pans. Hope you love it!
Have you made these cupcakes before?
I presume 16-18 minutes at 350?
Hi Diana! Yes, you can totally make these as cupcakes. Just be sure to fill the tins no more than 2/3 full and bake at 350 for (you guessed it!) 16-18 min!
How many cupcakes would 1 recipe make?
Hi Staci! This recipe will make quite a lot of cupcakes. I’d guess about 35-40 of them.
Made this cake a few weeks back and it tasted soooooo good!
I’m wanting to make a couple of 10 inch cakes with this recipe using professional baking tins at 4inches high. I was just wondering if you could advise on converting ingredients and bake time?
Hi Alannah! I’m so happy you love this cake recipe! I’ve never baked these cakes with that deep of a pan before, but I would advise to double the recipe and from what I’ve read on the internet in regards to baking a 4 inch deep cake, they say to bake it at a lower oven temp (300 degrees). As far as the time it will take for these layers to bake, I would check them at 70-80 minutes and see how much more time you need. Since the oven temp needs to be lower they’re gonna take awhile. Let me know how it goes!
Thank you so much Whitney! I will do, here’s hoping all goes well! 🙂
One more question sorry, do you think doubling the recipe will do two 10inch pans to give a relatively tall 4 layer cake? And do you recommend filling the batter half way or 2/3 🙂
I definitely think doubling the recipe will be enough batter. I would fill the pans 2/3 of the way full, as this recipe doesn’t rise a ton in the oven. Here’s an article about baking 4 inch deep cakes that might help: https://fatdaddios.com/inspiration/reach-incredible-heights
I followed the recipe exactly and turned out great. Very moist and flavorful, I actually got it to look very professional. I left the caramel apple off the top though, it’s a nice decoration but not needed for what I wanted it for. The caramel was a little thick once it cooled and I had to warm it up to get the drip effect. Definitely one of the better cakes I made. Thank you for the great recipe.
Yay, Chad!! That makes me so happy to hear that you loved the recipe and were able to decorate it so beautifully! Thanks so much for your feedback, it really makes my day 🙂
I did this great recipe again and everything was perfect except the caramel was a little thick to do a good drip, even while it was still warm. I’ve never done caramel this way and without a thermometer. I must be at too high of a temperature, or maybe browning the sugar too long at the beginning? My wife is begging for me to do a red velvet any suggestions?
So happy you loved the recipe the second time around! Not sure why the caramel ended up too thick. That’s happened to me once before and I ended up whisking about a tsp of water into the caramel to thin it out and it worked like a charm. I’ve never done a red velvet cake before but I hear it’s just a chocolate cake recipe with red food coloring added. I do have a chocolate cake recipe here that you could try adding a few drops of red food color gel to: https://sugarandsparrow.com/chocolate-cake-recipe/ but in the future I’ll definitely add red velvet cake to my test list.
No! No! No! …a red velvet cake is NOT a chocolate cake with red food coloring. It should not taste like a chocolate cake. Ive been making old fashion Red Velvet cakes for 50 years.
Feel free to share your recipe here! I’ve never made a red velvet cake before so I truly don’t know what it entails.
Not that anyone cares but I calculated 16,035 total calories for this cake. Totally worth it!!!
Hello! I’m just wondering how much of the caramel you actually add to the buttercream mixture?
Hi Alannah! I add 1/2 cup of salted caramel per batch of the salted caramel buttercream. The rest is preserved for dripping the cake and dripping the apple. If you’re not making the whole cake and just making the salted caramel buttercream, I’ve got the recipe details here: https://sugarandsparrow.com/salted-caramel-buttercream-recipe/
Should I double the recipe if I’m usinf 8in pans?
Hi Nikki! If you want a tall 8 inch cake (3 or more layers), I would double the recipe. If it’s just going to be two layers the above recipe should work just fine!
I made this tonight, because it’s stunning!!! But my 3 six inch pans runneth over and made a big mess! I measured with a baking scale, what happened?
Oh no, Erin! It sounds like the cake pans were too full. Did you fill them over 2/3 full? I hope you were able to torte the tops off and salvage the cake layers. This recipe does make a little more batter than you need, so be sure to fill the pans 2/3 full (or less) to ensure that they don’t overflow next time.
I was able to save them and the cake was a big hit!! Thanks so much for the reply.
Oh YAY! That’s so awesome to hear!! I’m so happy they turned out and thanks for letting me know 🙂