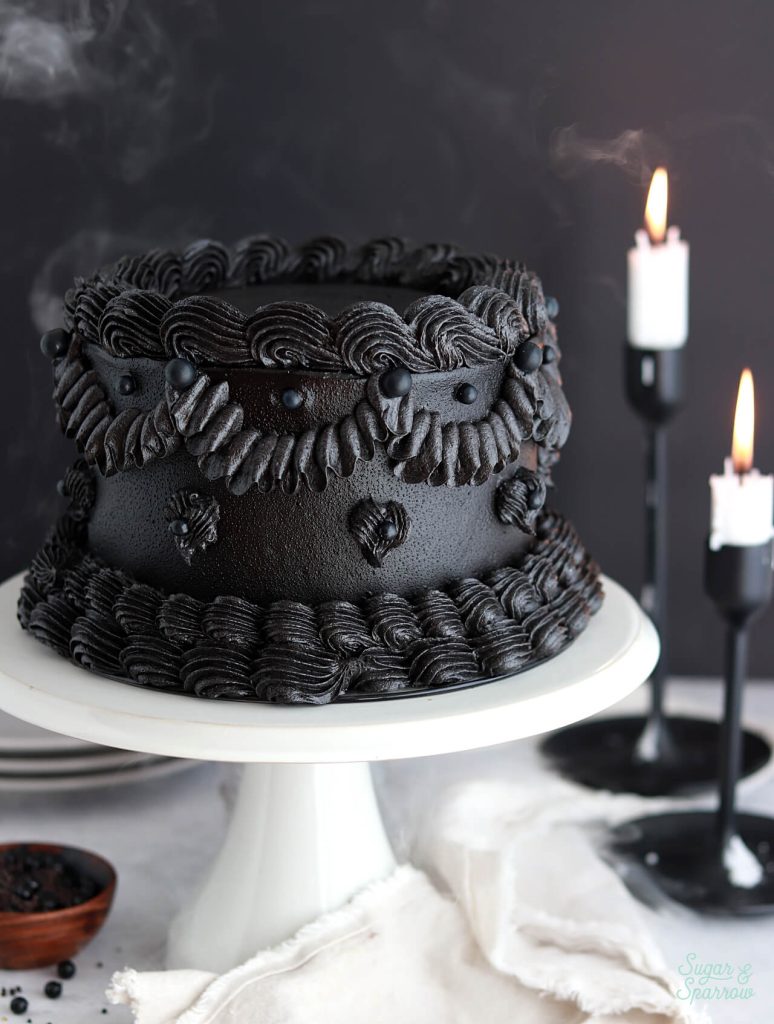
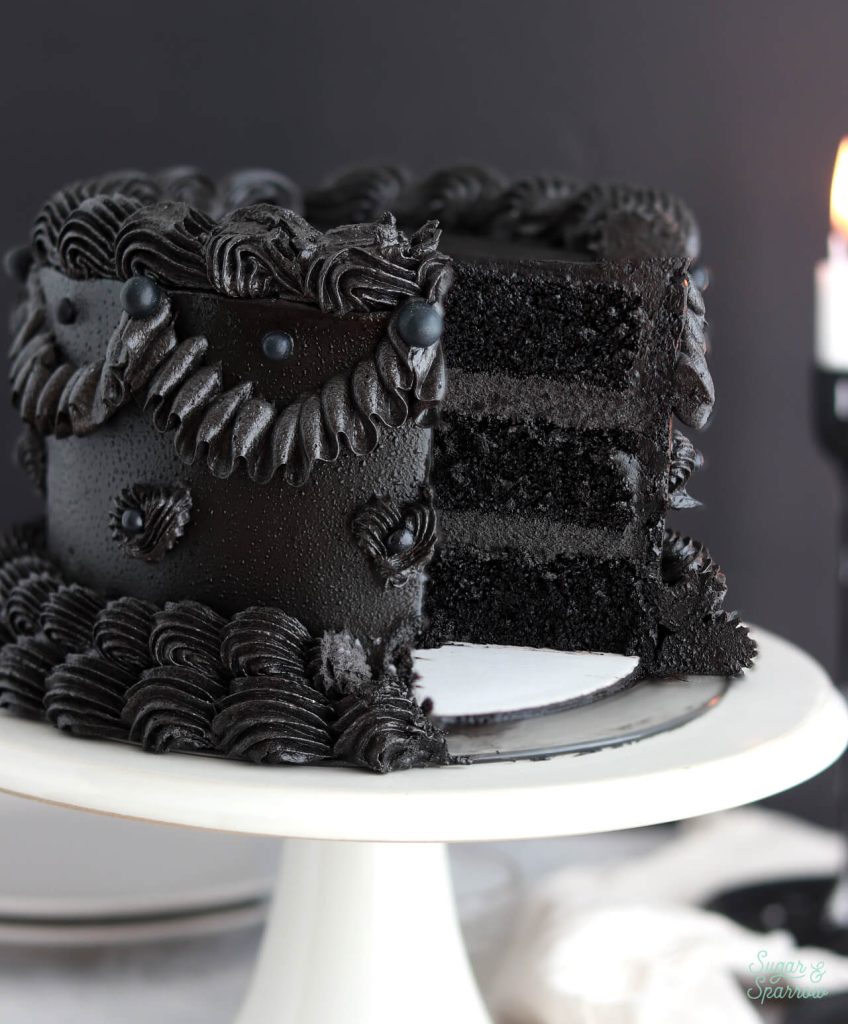
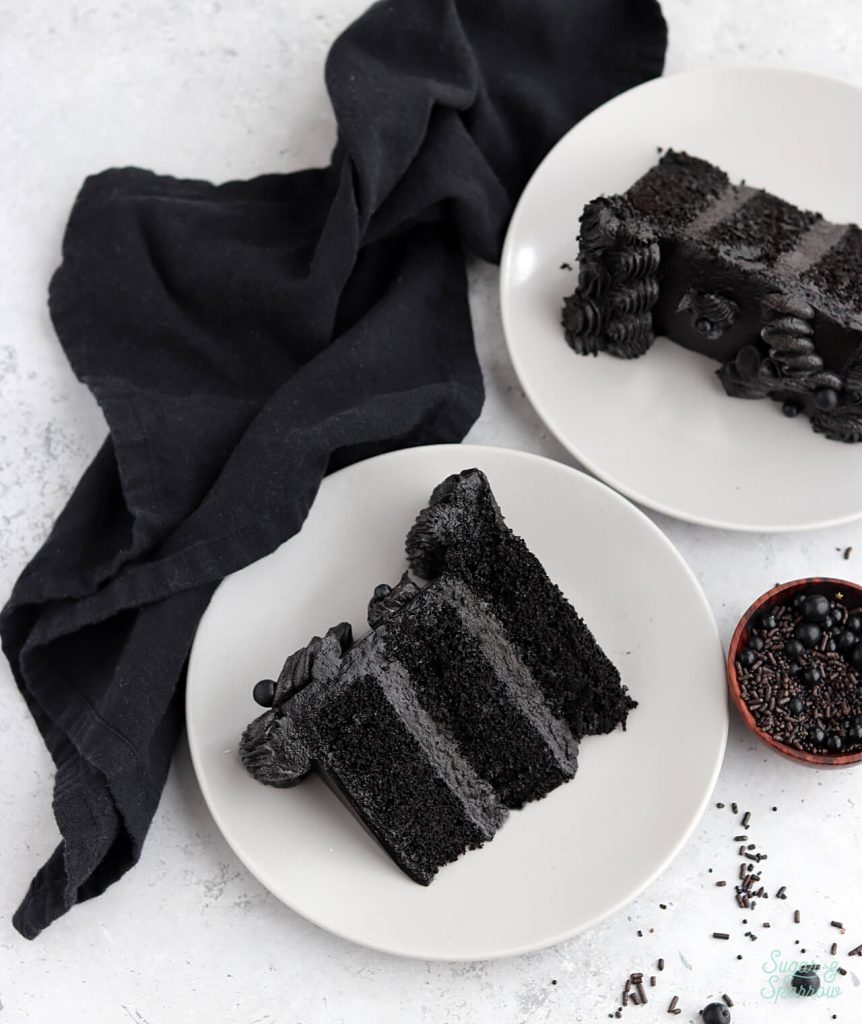
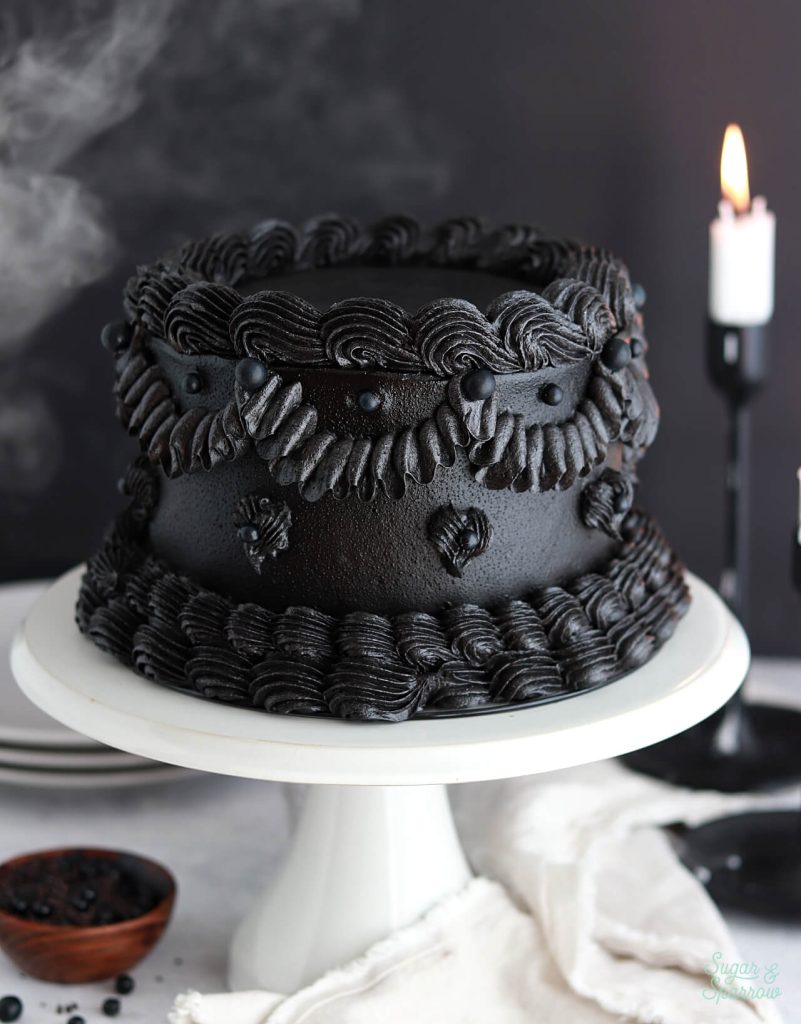
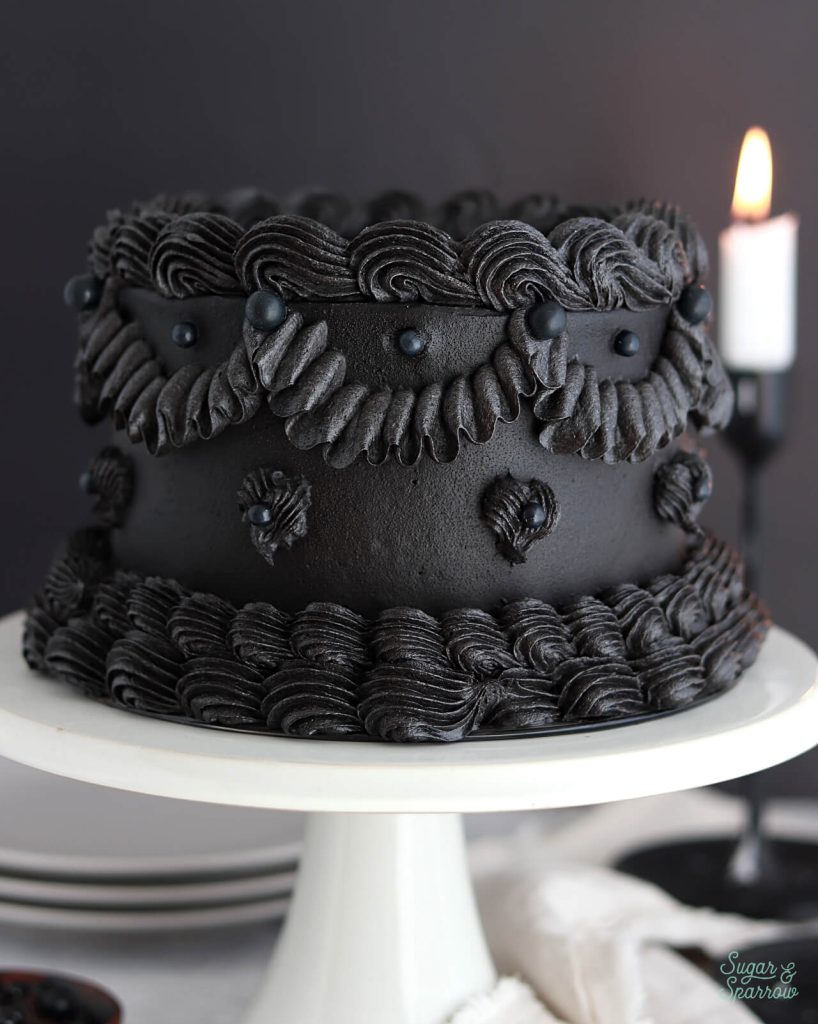
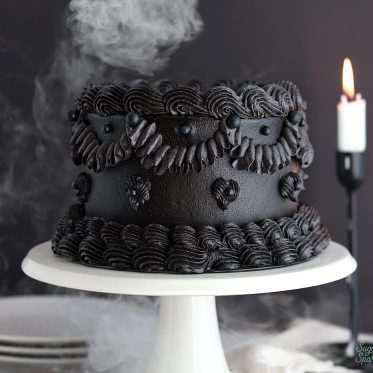
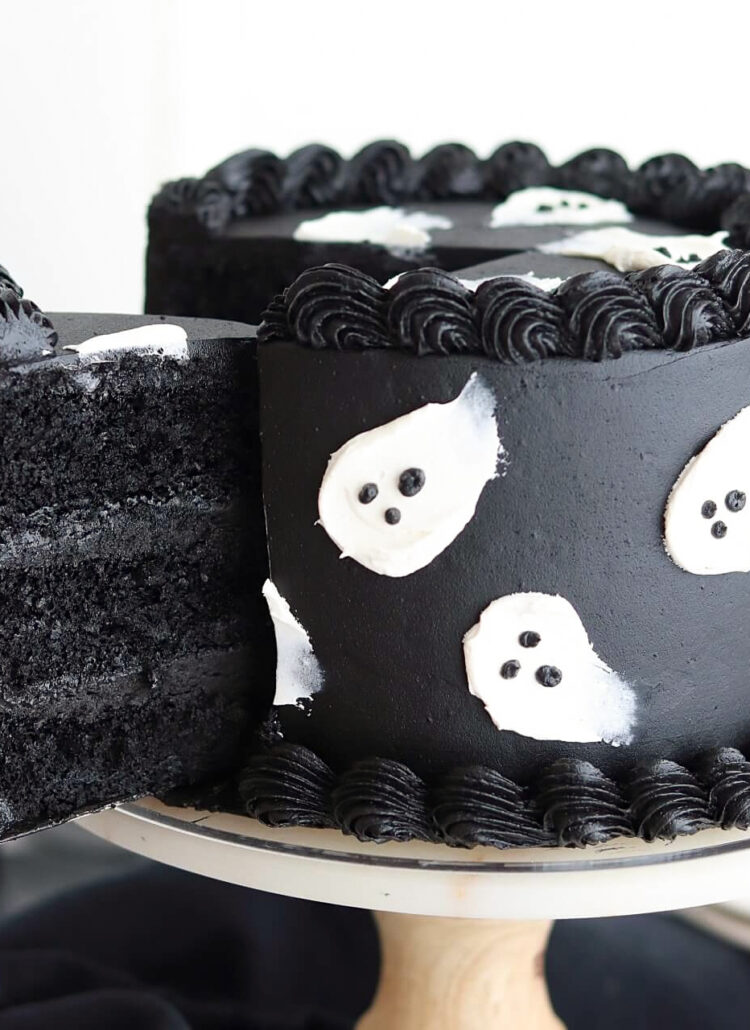
In honor of the spookiest season of all, I’ve whipped up a cake recipe that’s sure to satisfy all the Halloween lovers: black velvet. The cake layers are pitch black, super moist and decadent, naturally colored, and taste just like the delicious shell of an Oreo cookie! Paired with my favorite dye-free black buttercream recipe and lambeth piping, this black velvet cake is a real stunner. It’s elegant and a little eerie all at the same time, which makes it the perfect Halloween party cake!
You’ve probably heard of red velvet cake (which could also be a very cool Halloween-themed cake depending on how you decorate it!), but you don’t really see black velvet cake any other time of year. It’s so delicious that I would totally eat this cake year round. I’m actually planning on using it in an Oreo-inspired cake recipe since it tastes so much like the cookie part! The color and the flavor both come from black cocoa powder, which I’ll explain more about below.
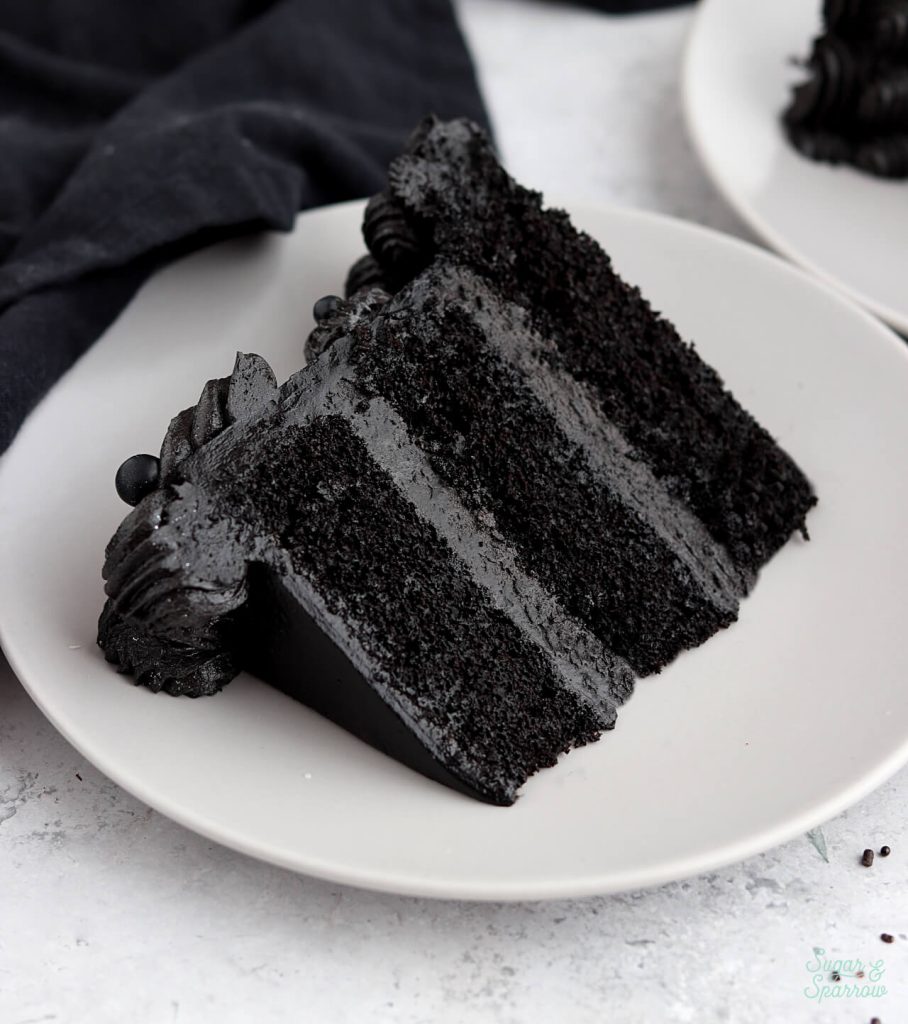
First, look at how stunning these cake layers are with this black buttercream. The whole thing together tastes like if you sandwiched chocolate buttercream between Oreo cookie shells instead of creme filling. If you’re a chocolate lover like I am, you are going to love this black velvet cake.
What is Black Cocoa Powder?
Black cocoa powder is basically an ultra Dutched cocoa powder, meaning it’s been treated with an alkaline solution to reduce its acidity. It’s very dark in color and while it isn’t as chocolatey as regular cocoa powder, it does have amazing flavor. It’s the main ingredient in Oreo cookie shells, and that’s basically what the cake layers end up tasting like. The best part about black cocoa powder is it gives the cake layers a rich black color without having to add any additional food coloring! That means it won’t turn your mouth crazy colors.
I use this extra dark black cocoa powder in the frosting portion of this recipe, which makes it possible to create black buttercream without adding food color gel. The frosting ends up being a super dark brown color after you mix it up, but after 24 hours it darkens to a rich black color like magic! It won’t stain your mouth or kick off any startling bathroom experiences, plus it tastes like Oreo cookie butter so I’m in love.
Where to Find Black Cocoa Powder
You probably won’t be able to buy black cocoa powder at your local grocery store, but you might have some luck at a dedicated cake decorating supply shop. There aren’t many of those around me, so I get my black cocoa powder on Amazon. If you don’t want to get it online, you can substitute it with an equal amount of Hershey’s Special Dark Cocoa Powder, which can be found at most grocery stores. It’ll make the cake batter dark brown, so if you’re going for a black colored cake you’ll need to add a squirt of black food color gel to take it all the way.
What Makes it a Velvet Cake?
The term “velvet cake” dates back to the 1800’s. The term was used to describe the soft, delicate texture of the cakes served at fancy dessert parties. Today, there are recipes for virtually every color of velvet cake – red velvet and white velvet being the most popular. The common denominator between all of the velvet cake recipes of today is the use of buttermilk. This ingredient helps give the cakes their velvety texture.
How to Make a Lambeth Cake
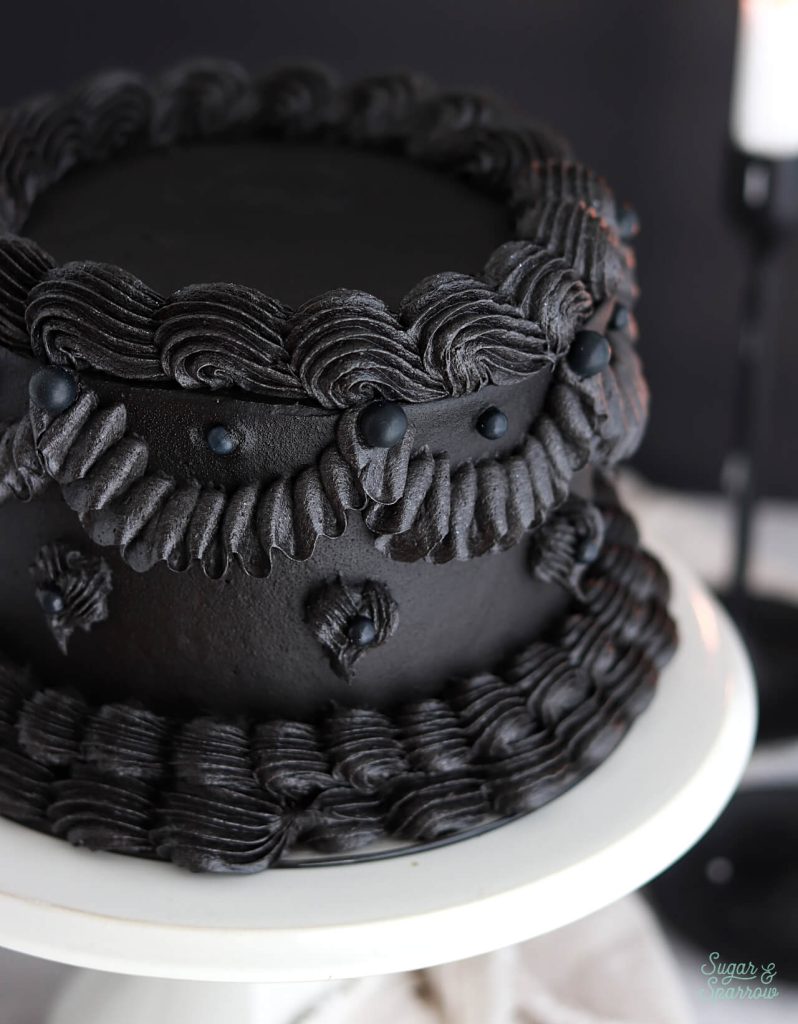
After making these cake layers, I couldn’t stop imagining black lambeth piping as the final decoration. Turns out that lambeth was the perfect choice to turn this black velvet cake into a spooky showstopper. The thing about lambeth is you can add as many layers of piping as you want, so feel free to go overboard. Here’s how I decorated mine:
I used the black buttercream to fill and stack the cake, crumb coat it, and frost it with a smooth buttercream finish. After chilling the cake until the frosting was firm, I made a template for the garlands using this same parchment paper technique from my cherry chip cake recipe. Then, I used the following piping tips to decorate:
- Wilton Tip 6B for the shell border around the bottom + top edges
- Wilton Tip 4B for the shell border above the bottom 6B shell
- Wilton Tip 104 for the ruffle garlands
- Wilton Tip 32 for the overlapping shells below the garlands
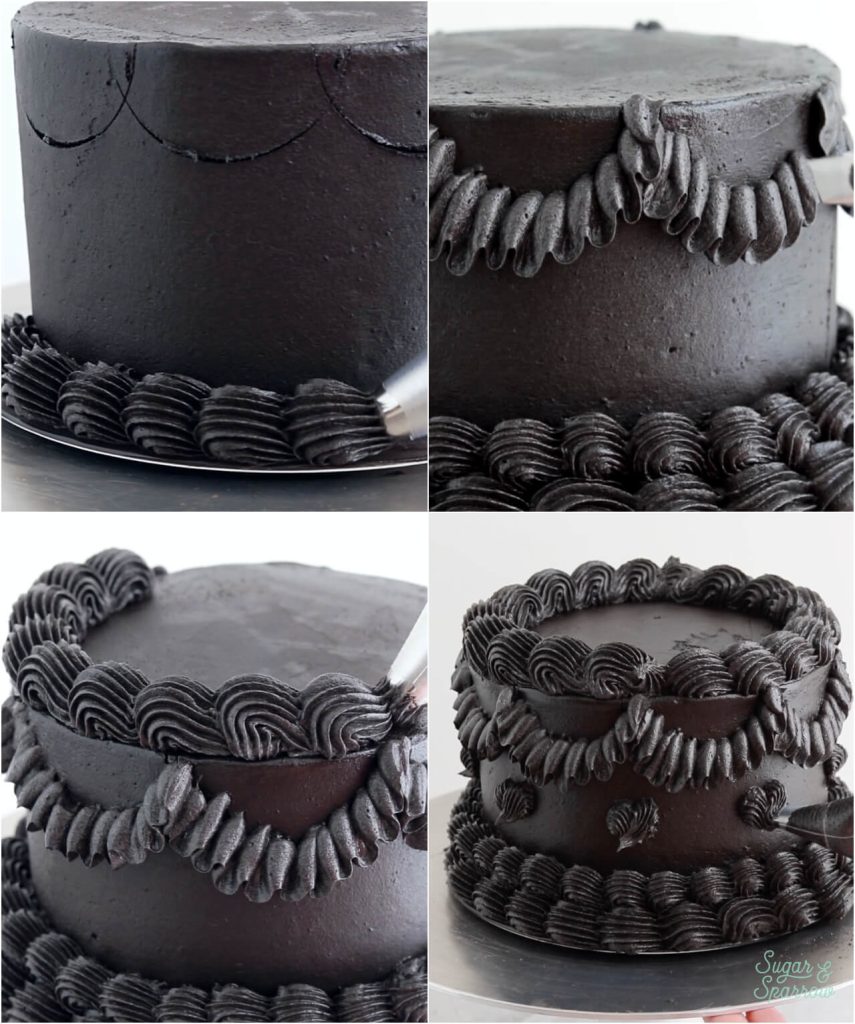
My cherry chip cake recipe shows these piping techniques in more detail. I finished the look by placing a few round black sprinkles to accent the ruffle garlands and overlapping shells.
I whipped up a quick video to walk you through this cake recipe and decorating from start to finish:
If you love recipe videos like this one, be sure to check out my YouTube channel! I’ve got a growing collection of cake recipes, decorating tutorials, and Cake Basics over there. Hit the subscribe button on my page so you never miss a new video.
Black Velvet Cake
Ingredients
Black Velvet Cake
- 2 Cups (265g) all purpose flour
- 1 2/3 Cups (340g) granulated sugar
- 2/3 Cup (80g) black cocoa powder
- 2 tsp baking soda
- 1 tsp baking powder
- 1/2 tsp salt
- 1/2 Cup (120ml) vegetable oil
- 2 large eggs, room temperature
- 1 1/2 tsp pure vanilla extract
- 1 Cup (240ml) full-fat buttermilk*, room temperature DIY recipe in notes
- 1 Cup (240ml) hot coffee or hot water
Dye-Free Black Buttercream
- 2 Cups (452g) unsalted butter, room temperature
- 5 Cups (600g) powdered sugar
- 1 Cup (112g) black cocoa powder**
- 4 Tbsp whole milk, room temperature
- 2 tsp pure vanilla extract
- 1/4 tsp salt, or to taste
Instructions
Make the Black Velvet Cake
- Preheat the oven to 350ºF and prepare three 6-inch or two 8-inch cake pans by spraying the sides with cooking spray and fitting the bottoms with a wax paper or parchment cake circle.
- Place all of the dry ingredients into the bowl of a stand mixer and stir on low for 30 seconds to fully combine them. Add the vegetable oil, eggs, vanilla, and buttermilk and mix on low until just combined. With the mixer still on low, add the hot water in a slow stream, then turn the mixer to medium and beat until smooth, about 2 minutes. The batter will be very thin.
- Pour into prepared cake pans no more than 2/3 full and bake for 32-36 minutes, until a toothpick inserted comes out clean. Cool completely before frosting.
Make the Black Buttercream
- In a stand mixer fitted with a paddle attachment, whip the butter on medium speed until creamy and light in color, about 4 minutes. Scrape down the bowl and paddle, then add half of the powdered sugar. Mix on low speed until just incorporated, then add the rest of the powdered sugar. With the mixer still in the off position, sift in the black cocoa powder and add the vanilla, milk, and salt. Mix on low until all ingredients are thoroughly combined, about 2 minutes, scraping down the bowl and paddle as needed.
- The buttercream will look dark brown at this point, but the color will darken significantly over the next several hours. See the recipe notes for storage instructions if you're not planning on frosting the cake the same day.
Assembly
- Once the cake layers have cooled completely, level them to your desired height. Fill and stack the layers with black buttercream, then crumb coat the cake with more black buttercream. Refrigerate the crumb coated cake for 20-30 minutes to let the frosting firm up.
- To create the design pictured, use the black buttercream to create a smooth finish on the cake, then refrigerate it for at least 30 minutes. Use the rest of the black buttercream to create lambeth piping (feel free to use this tutorial as guidance). Accent the lambeth piping with round black sprinkles where desired.
Notes
- The Black Velvet Cake layers can be made ahead and stored at room temperature, covered tightly in plastic wrap, for up to two days. Alternatively, you can cover with plastic wrap and store in the freezer for up to two months before thawing to room temperature.
- The Black Buttercream can be made ahead and stored in an airtight container at room temperature for up to 1 day. Alternatively, you can store it in an airtight container in the refrigerator for up to two weeks. When you’re ready to use it, bring it back to room temperature and rewhip with your stand mixer to bring back to frosting consistency.
This black velvet cake recipe is so perfect for any Halloween gathering! I hope you love it as much as I do. Let me know what you think in the comments below and feel free to tag @sugarandsparrowco on Instagram if you post a pic! I love to see what you create.

Wow this is hands down the most delicious cake I’ve made! So easy to make and still perfectly moist two days later! Can’t wait to make it again around Halloween time.
That’s so amazing, Maggie! I’m so happy to hear it was a hit!
If I wanted to make a two layer 9×13 cake, how much would I need to alter this recipe?
Hi Erika! You’ll want to either make 2/3 of the recipe, or make the recipe as-is and fill the pan no more than 1/2 full. Bake at 350F for an additional 5-10 minutes from what the recipe states, or until a toothpick inserted comes out clean. Hope that helps!
Hi. I will be trying this recipe on Saturday for my daughters birthday. I was just wondering what the measurements will be for a 13×9 sheet cake.
Hi Nancy! You’ll want to either make 2/3 of the recipe, or make the recipe as-is and fill the pan no more than 1/2 full. Bake at 350F for an additional 5-10 minutes from what the recipe states, or until a toothpick inserted comes out clean. Hope that helps!
Wow absolutely moist and delicious made the cake with vanilla buttercream turned out to be a crowd pleaser. Great recipe excited to try your other recipes as well
Yay, Hanna! I’m so happy this was a hit!
do you sift your powdered sugar and cocoa powder into the butter for the frosting or just add as is?
Hi Nicole! I usually only sift the powdered sugar and cocoa powder if there are visible lumps, otherwise I just add them in as-is. You can never go wrong with sifting – I just get a little lazy sometimes 🙂
Is the cake supposed to be dense? Mine seems a little dense. The toothpick came out clean. It’s still going to be fabulous.Thank you for any help.
Hi Sheila! This cake should be moist but not overly dense. Did you taste it yet?
Is the indicated portion of buttercream enough for only one cake? or for how many?
Hi Akira! The specified buttercream amount is enough to fill, frost, and decorate one 3-layer 6-inch cake or one 2-layer 8-inch cake in the style pictured.
Hi, I have a question, in my country I can’t get the full-fat buttermilk, do you have a recipe or what can I exchange it with?
Hi Akira! The best substitute will be the DIY buttermilk in the notes of the recipe: add 1 Tbsp of white vinegar (lemon juice works too) into a jar and top it with 1 Cup of whole milk. Stir and let sit for 15 minutes before using in the recipe.
So excited to try this! Can you suggest any alternative to Vegetable oil? Thank you!
Hi Amanda! Any flavorless cooking oil should do. Canola, safflower, grapeseed, etc.
What adjustments could I make to turn this recipe into cupcakes? So excited to try it out
I’m so excited for you to try this recipe, Kelsey! To make it as cupcakes, fill the tins no more than 2/3 full and bake at 350F/177C for 15-18 min. They’re done when a toothpick inserted comes out clean. This recipe should make about 35-40 cupcakes as-is. Enjoy!
I was just going to ask the same question as Sravanthy! It doesn’t seem much flour even though there is quite a lot of black cocoa. This looks delicious and I would like to make it next week but need to know about the flour first please! Thanks a lot.
That was a typo! It’s 265g of all purpose flour. Thanks for catching that!
Hi Whitney!
Did you mean 265 g all purpose flour or is it supposed to be 165 g?
Yes I did! Thanks so much for catching that typo. I corrected it on the recipe 🙂
My husband is a type 1 diabetic, how much would I have to adjust the recipe to be safe for him?
Hi Lily! I’m not sure – I’ve never made a cake diabetic friendly before. My hunch is to swap the flour for GF flour and use a sugar substitute that’s meant for baking in place of the sugar. The frosting might be harder to tweak since I’m not sure what a diabetic friendly alternative to powdered sugar would be. Hope some of those suggestions help though!
Type 1s need to eat in moderation not sugar free, but they also want to celebrate like everyone else. They use insulin based on carbs. Learn to really read labels. If you compare the label of SF candy to its counterpart you will see they both contain almost the same number of carbs due to sweeteners containing sugar alcohols, often SF contains more carbs & the side effects are unhealthy. Extra fat, in pizza & frosting, can slow the metabolic rate in digestion, but sometimes there is too much sugar in cake for that to come into play. I would bolus ahead of eating & recheck my numbers in an hour+. Enjoying my cake the way it’s supposed to be. Adding fake sugar stimulates your cravings & you only end up overeating. I’m a mom of TD1 twins & a chef w/ degree in culinary nutrition so I understand how challenging eating for life can be.
For diabetic frendly cake you can use jaggery (natural product ) by replacing powder sugar or you can also use sugar free capsules in form of powder (industrial product). Hope so this info will help you.
Monk fruit is what I use. Im T2 diabetic. It comes in granulated and powdered. Ratio is 1:1.
That’s awesome to know, Angela! Thanks!
When using Monk fruit in place of sugar do use the same measurement?
Hi Dana! I’ve never tried this recipe with monk fruit, so I’m not sure what the results would be. A quick Google search suggested to sub 1/4 of the amount of sugar in the recipe with monk fruit, which works out to be somewhere between 1/3 to 1/2 Cup of monk fruit. That’s where I’d start if you want to experiment. Hope that helps!
A friend requested a gothic cake for her baby shower and I used this recipe. It came out amazing both in taste and look! It didn’t turn anyone’s mouth black, either. It doesn’t look as dark as first but gets more black as it sits I think, which dye does as well. Anyway, thank you for this!
Where’s the vinegar? Where’s the chemical reaction you said it was a black velvet cake though the cakes have a chemical reaction from the vinegar in the cocoa.
Hi Cynthia! I’m not sure where you read that there needs to be vinegar in this cake recipe. The buttermilk is very acidic (the DIY version in the notes does call for vinegar) and aids in that chemical reaction that takes place in the oven.
Hi,
This looks awesome! My son is having a goth themed wedding and this would be perfect I want to make this for the bottom tier of a 3 tiered cake. How could I convert this recipe to make a 10″ cake, my tins are 3″ high. Also, is this buttercream suitable or stable enough to use under fondant icing? Great recipe can’t wait to try it!!!
Hi Jessica! That’s such a fun wedding theme! One batch of this cake recipe makes enough for one 10 inch cake layer (6 Cups of batter). You’ll need to multiply the cake portion of this recipe by the number of layers you’re making to get the right amount. Here’s a more detailed blog post I wrote about scaling recipes to fit different pan sizes: https://sugarandsparrow.com/cake-serving-guide/. And yes, the buttercream is stable enough for under fondant. Enjoy!
Hello! I need a little clarification. So the cake (i already made) uses black cocoa, but I now see the buttercream needs extra dark black coco. Can I use the black cocoa I used in the cake for the buttercream? I didn’t realize I needed black and extra dark black cocoa.
My exact same question lol
Hi Teresa-Ann! Yes, you can use the same black cocoa for the cake and buttercream. And if you don’t have extra black cocoa powder then you can use this recipe for the buttercream and double it: https://sugarandsparrow.com/black-buttercream-recipe/
Does this cake turn your tongue & teeth black when eating?
Hi Alyce! This recipe doesn’t use any food color gel, so it won’t tint your mouth black!