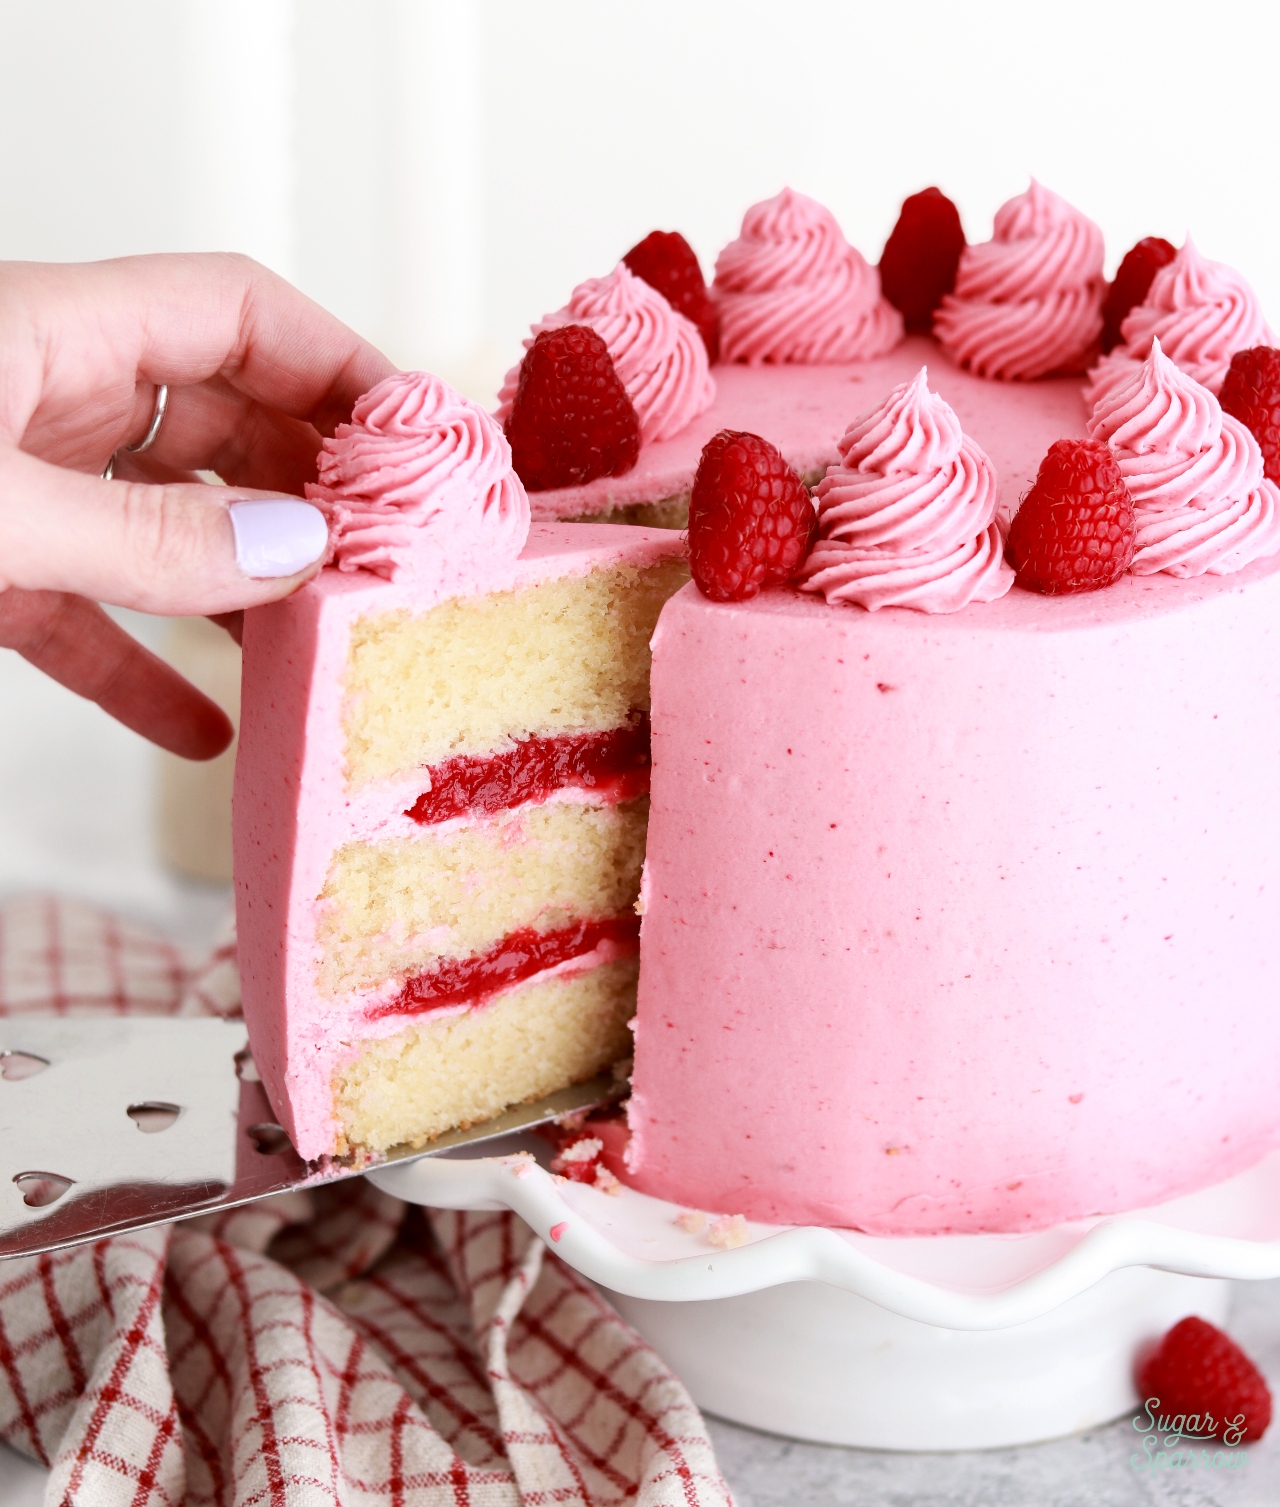
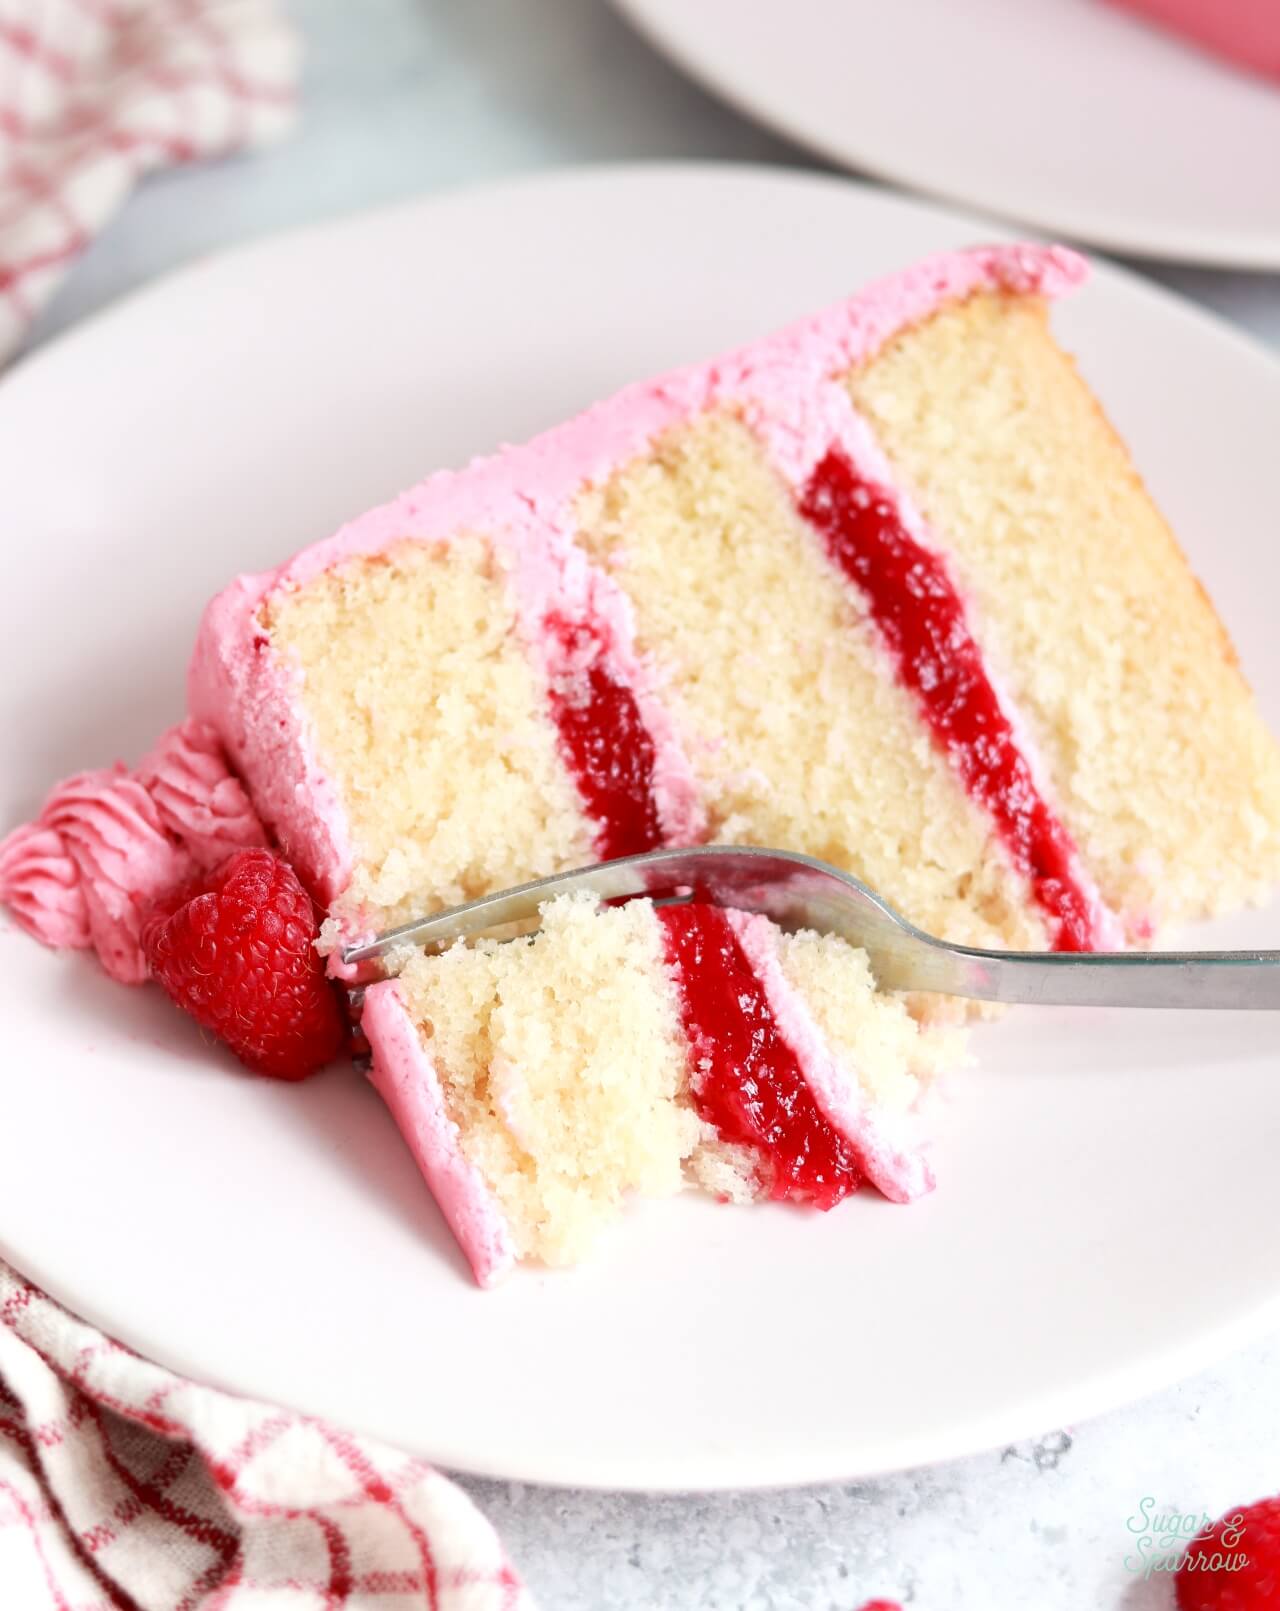
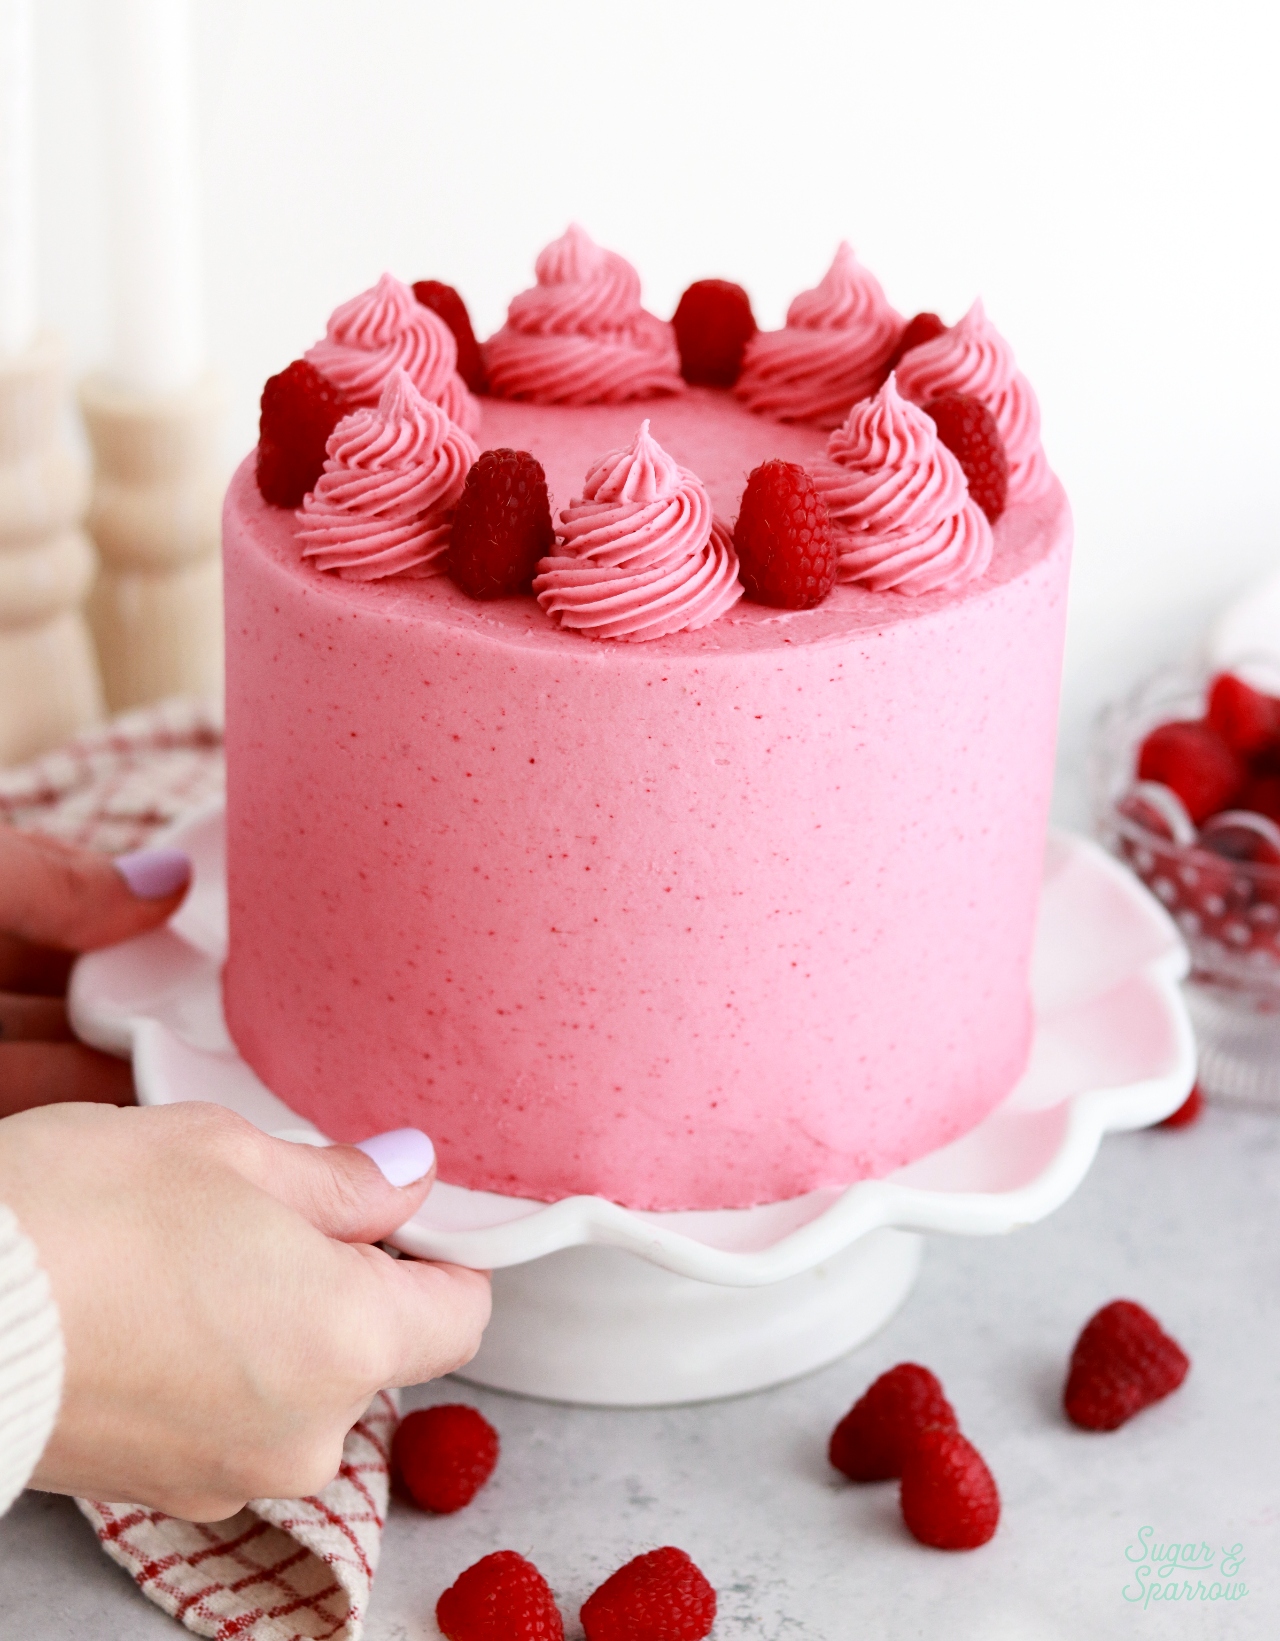
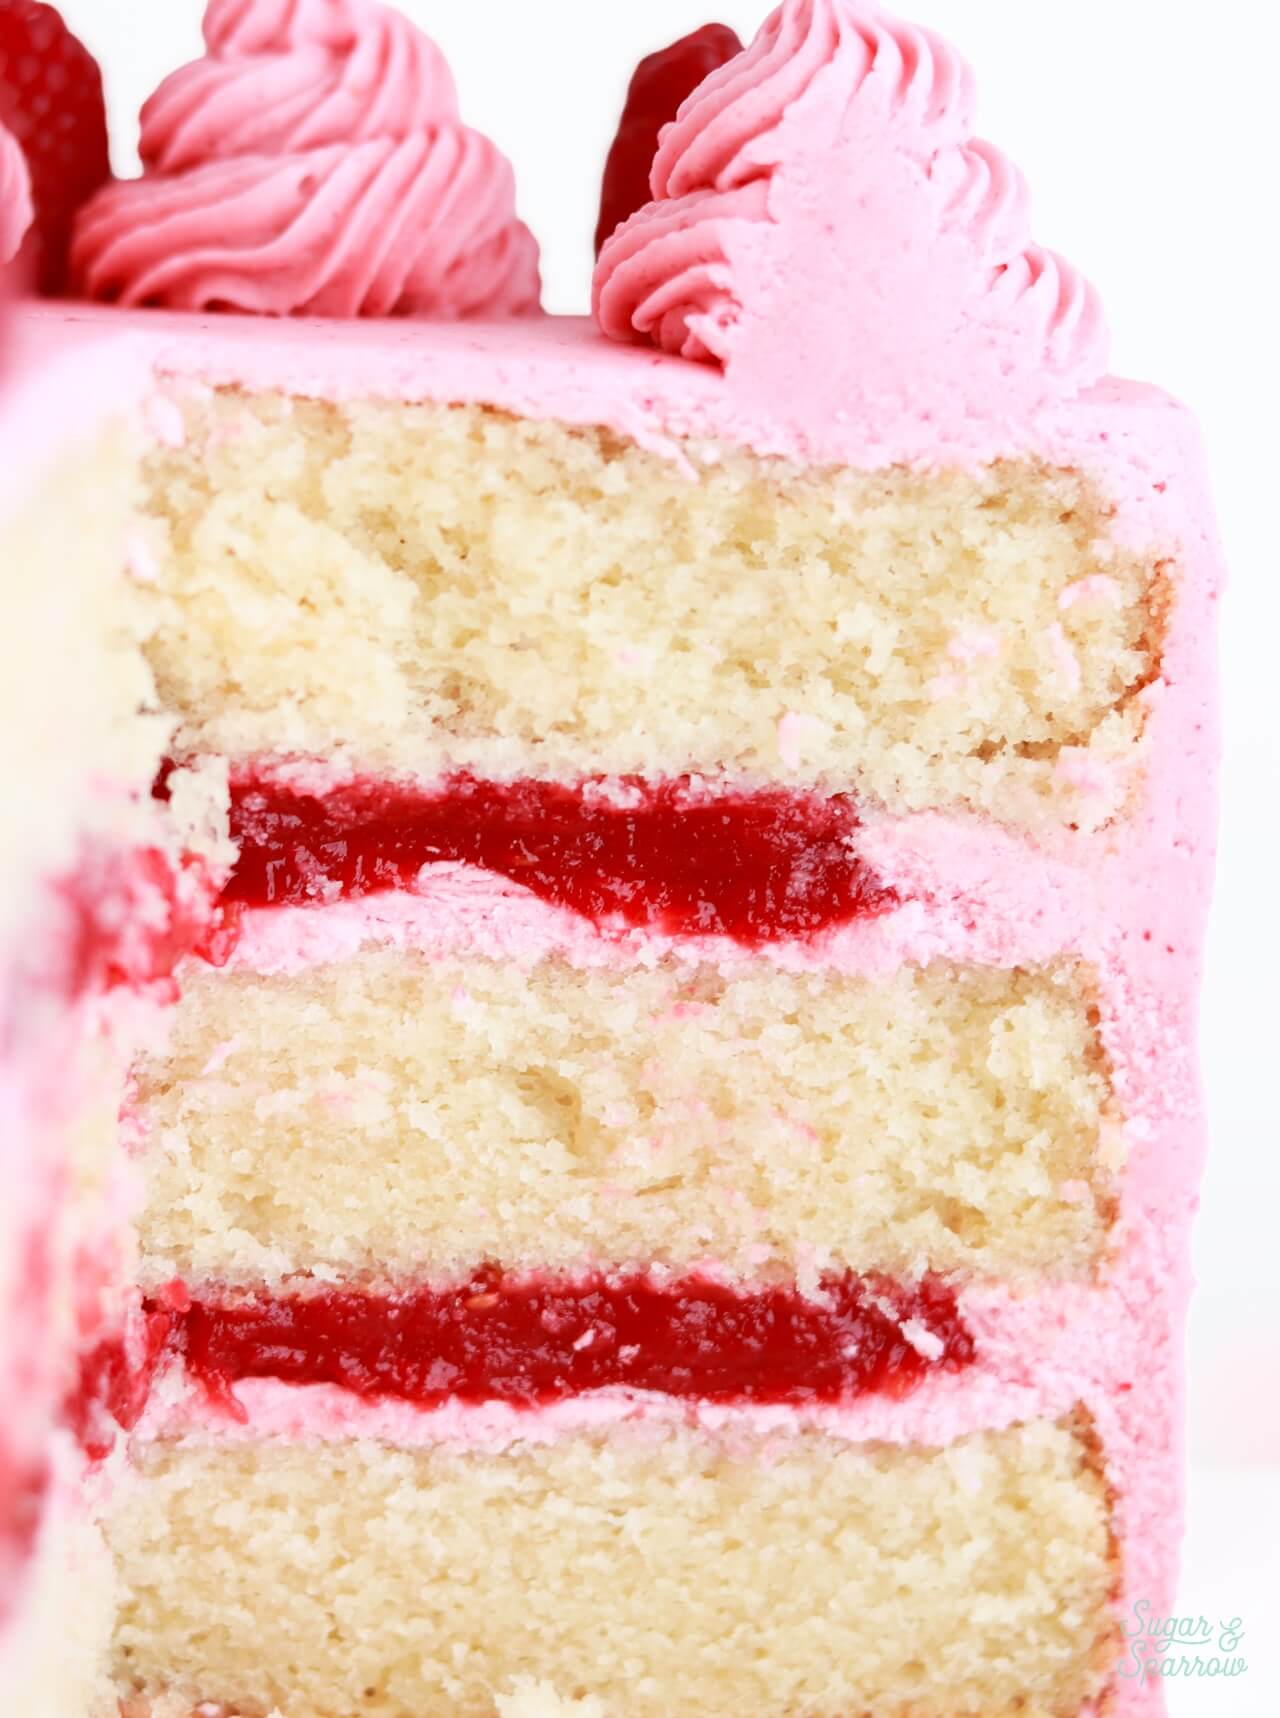
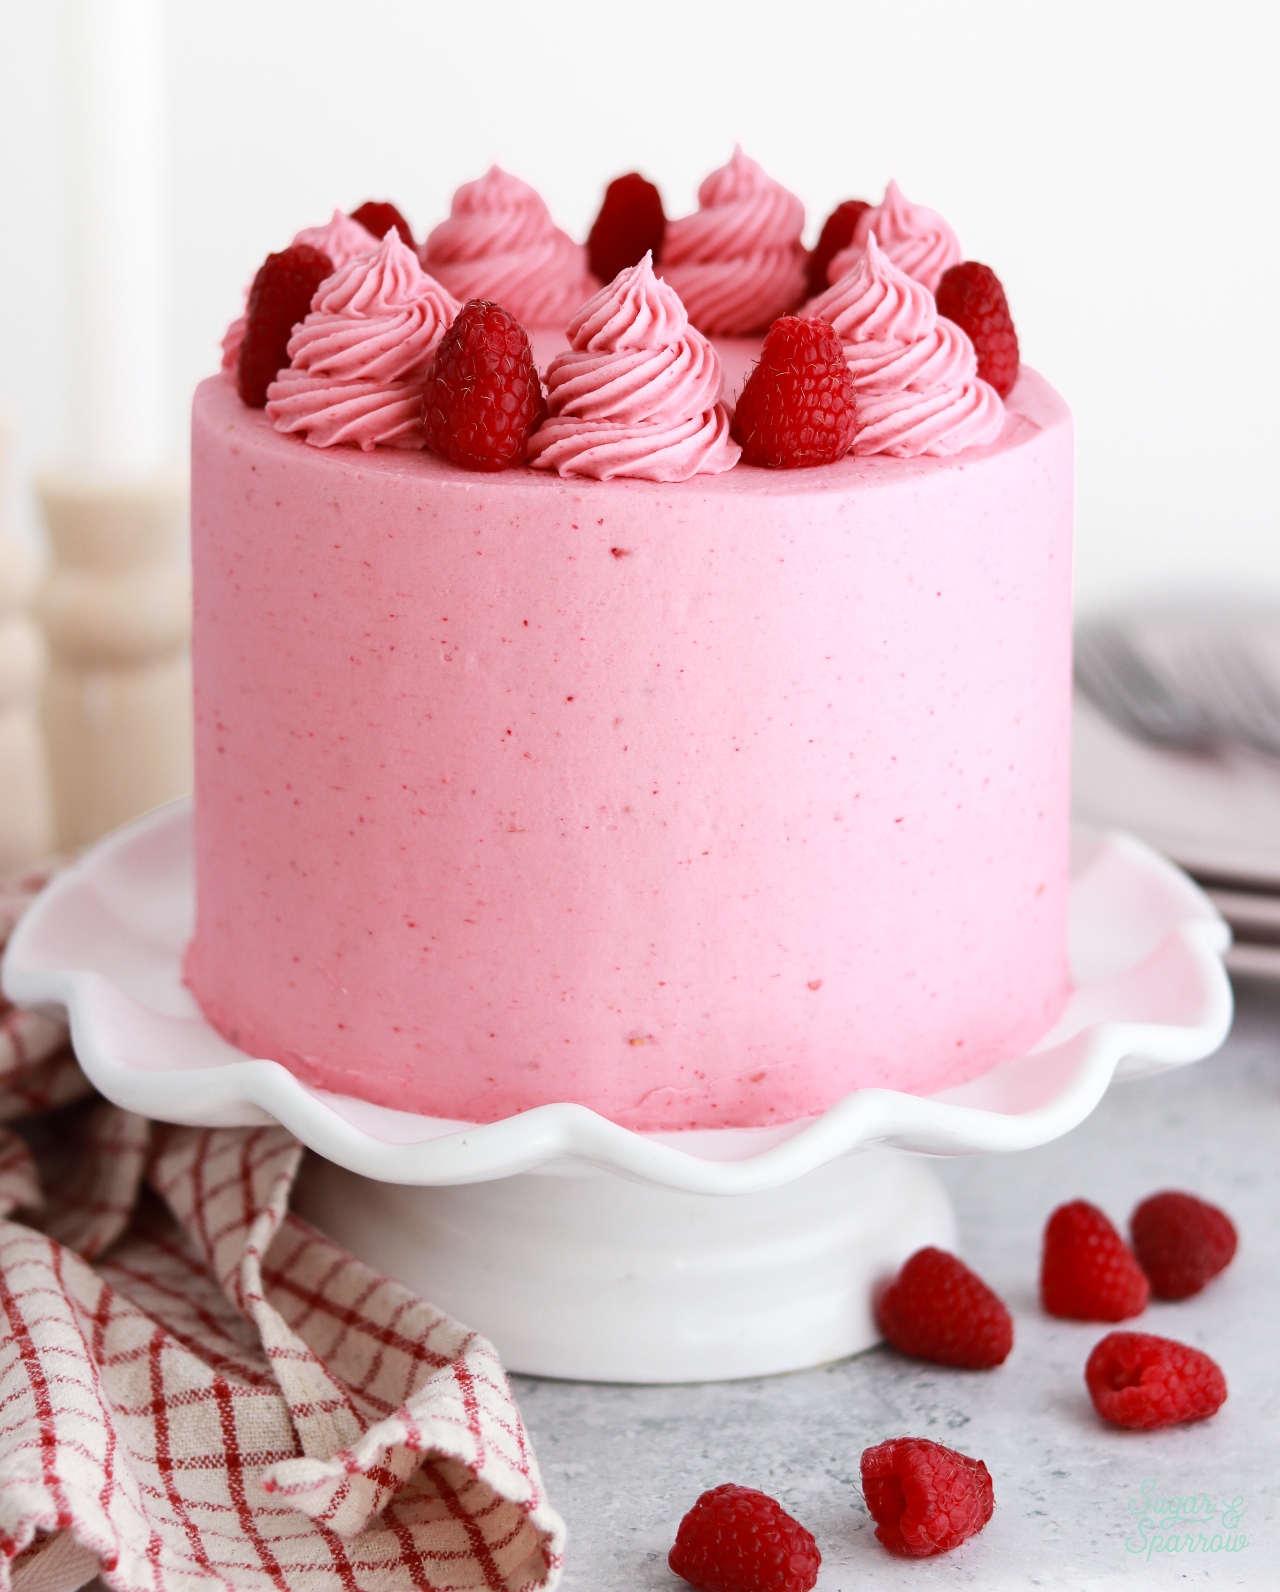
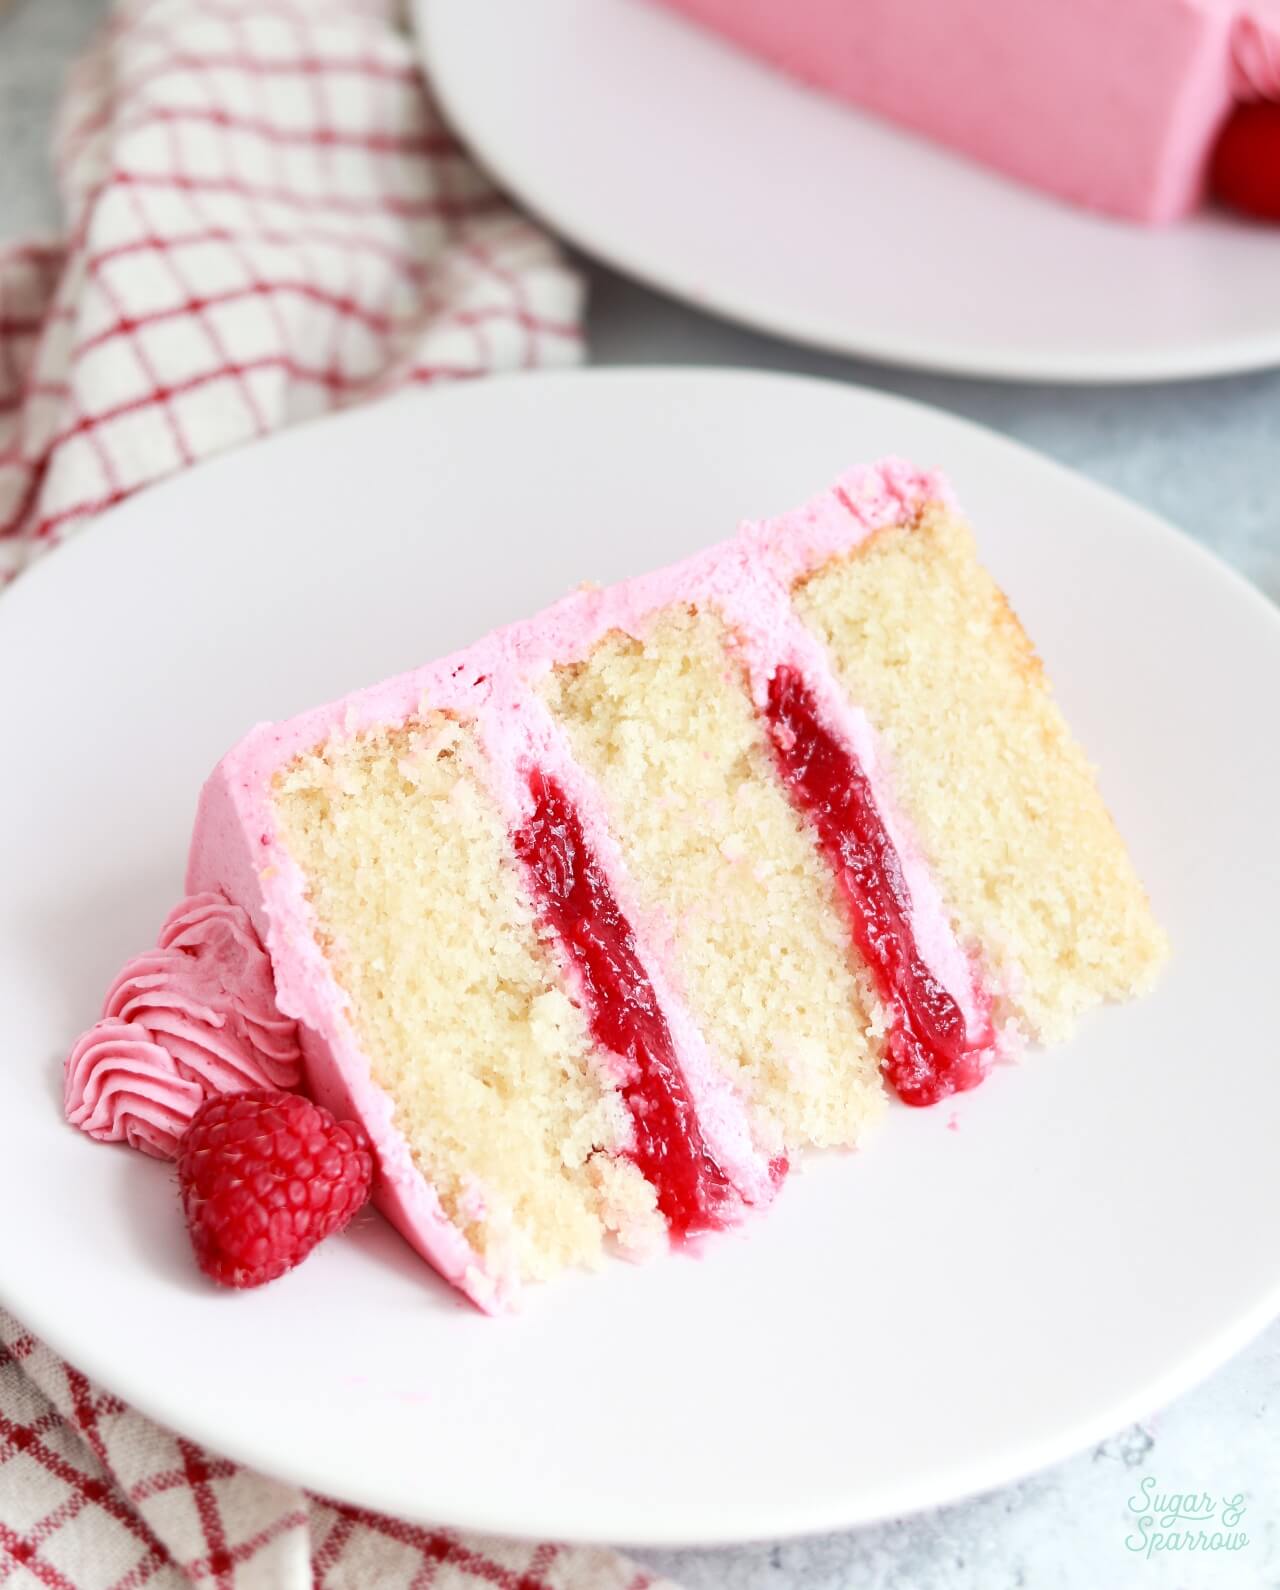
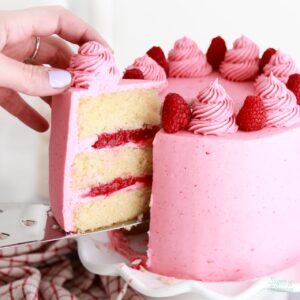
This vanilla raspberry layer cake is a complete showstopper with its naturally pink raspberry buttercream, and it tastes just as dreamy as it looks! Inside are layers of soft bakery-style vanilla cake with bright, jammy bursts of homemade raspberry filling that add just the right amount of tartness. The seedless raspberry filling can be made with either fresh or frozen raspberries, and I find that using freeze-dried raspberries for the frosting is the KEY to creating the most beautiful natural color and powerful flavor. Altogether, this cake has amazing raspberry flavor in every bite while the fluffy vanilla cake compliments it all perfectly.
Why You’ll Love this Vanilla Raspberry Layer Cake
- All-natural colors and flavors. The raspberry elements in this cake are made from fresh (or frozen) and freeze-dried raspberries. That makes the flavor really authentic and the natural colors of the filling and frosting are out of this world! No pink or red food coloring here, folks.
- Fun to make. This recipe is a little next-level, as you’ll be cooking homemade raspberry filling, grinding freeze-dried strawberries into powder for the frosting, and baking the cake layers. All of the components are easy to make with detailed instructions, but the variety of tasks makes the recipe fun!
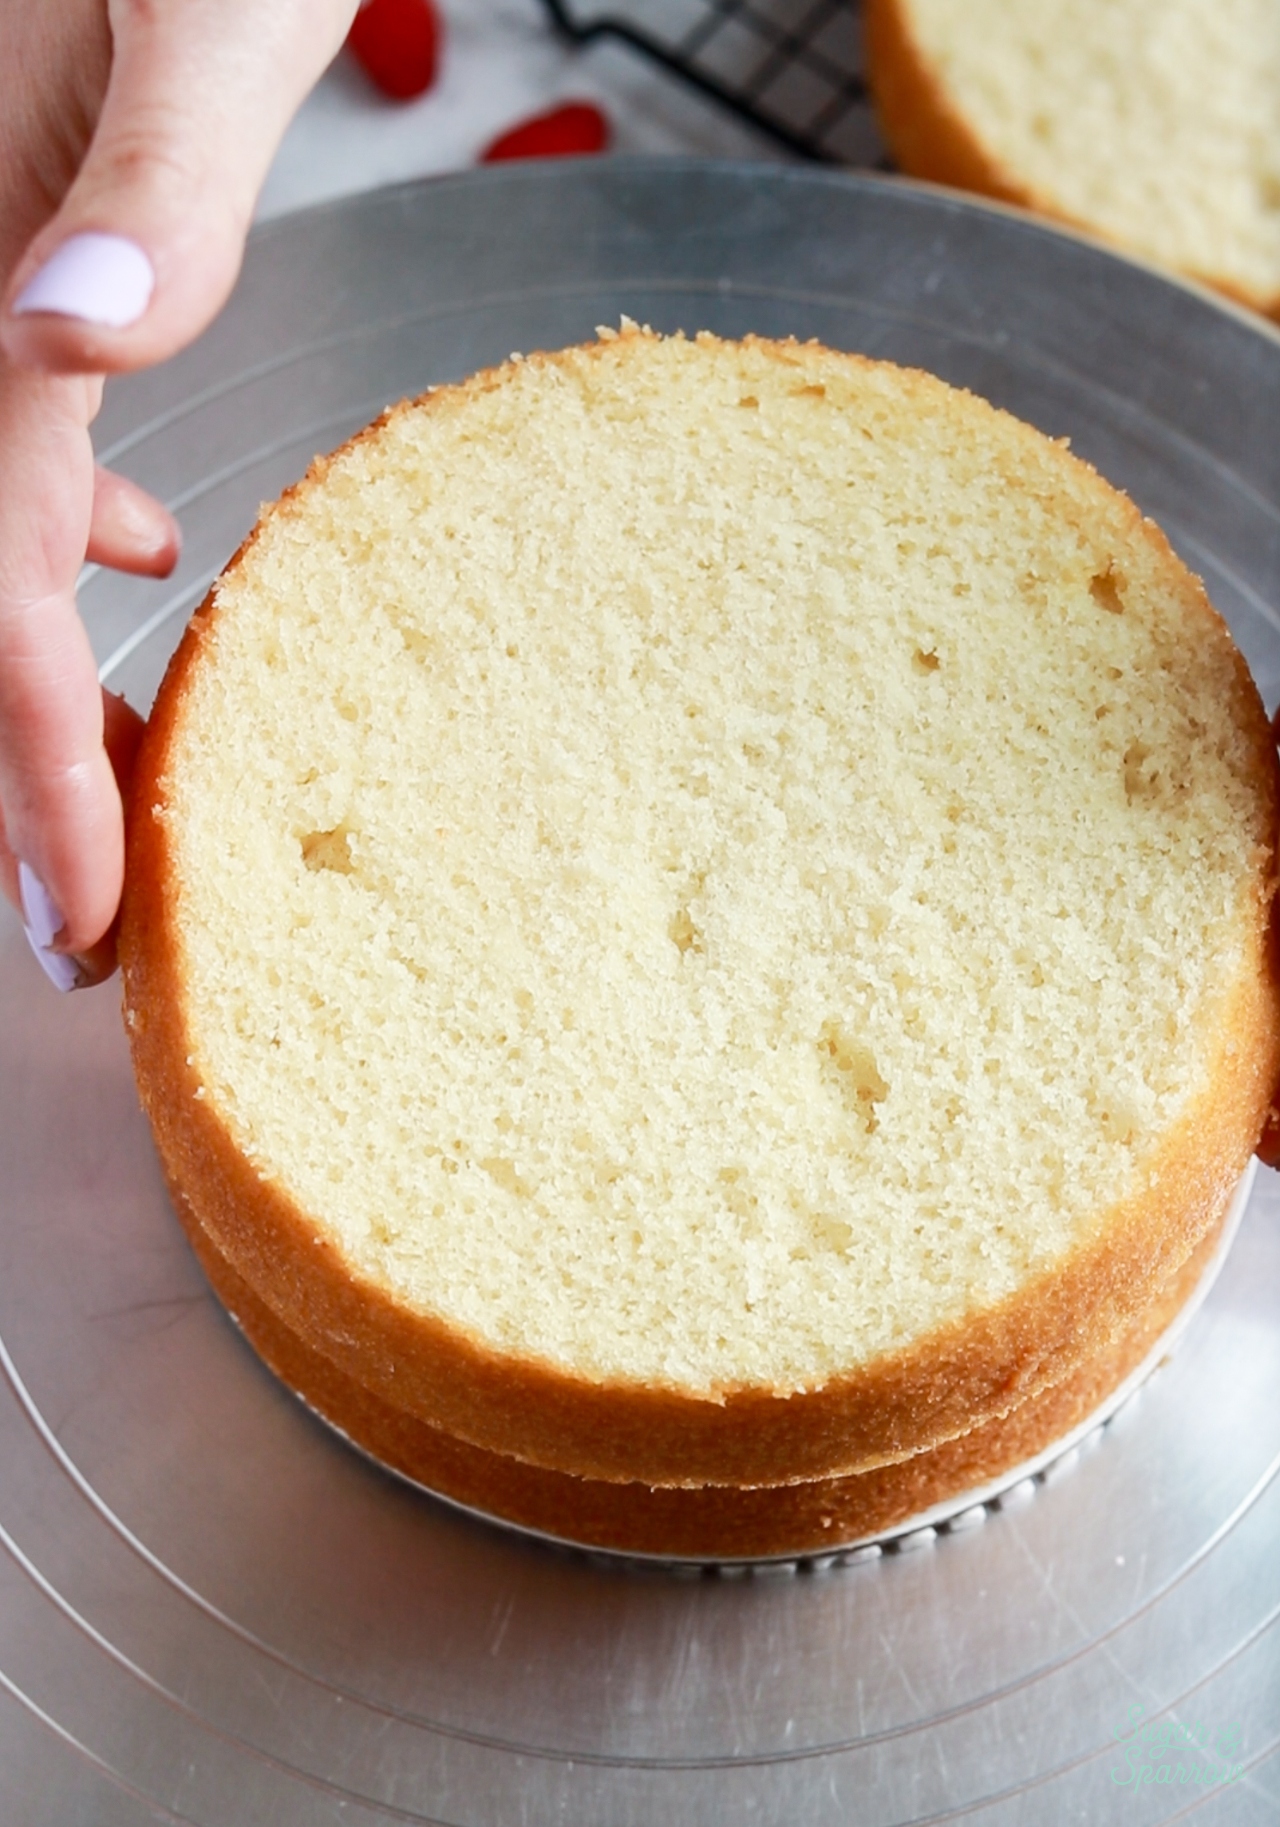
- The softest vanilla cake layers. I used my bakery-style white cake recipe to create the vanilla cake layers, and they keep this cake really light while complimenting the raspberry elements beautifully. The layers are so soft and moist, and they stay that way for days!
- Perfect Cake for Spring or Summer. This delightfully bright flavor palette is ideal for Spring or Summer gatherings, although you could make it year round and no one would complain!
Perfectly Thick Raspberry Filling
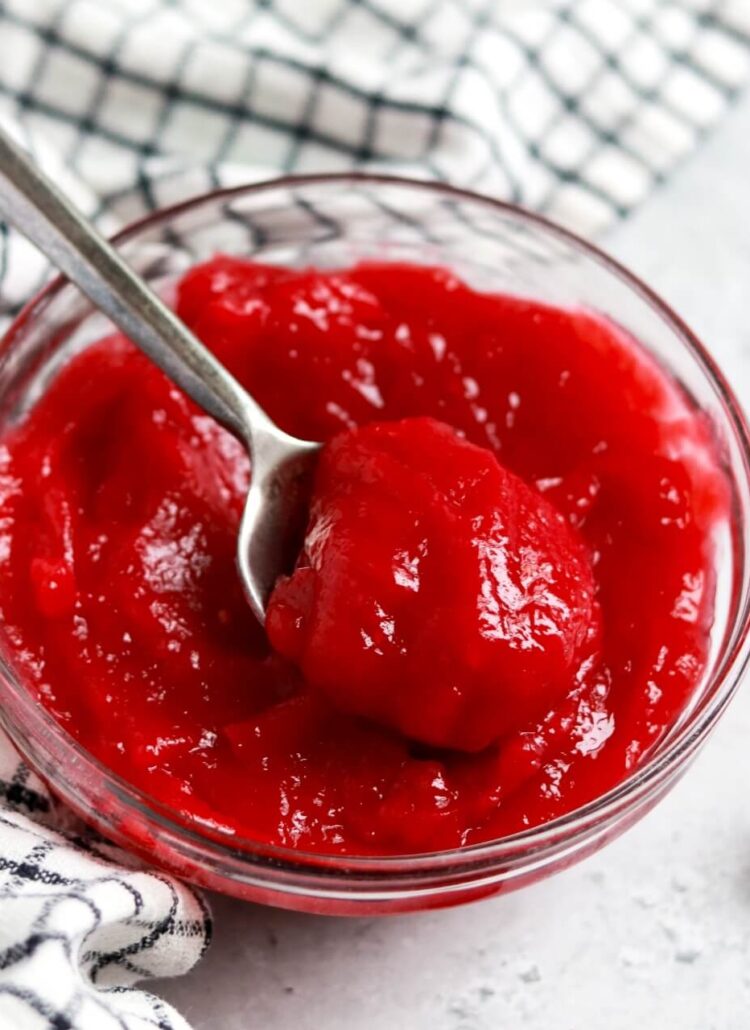
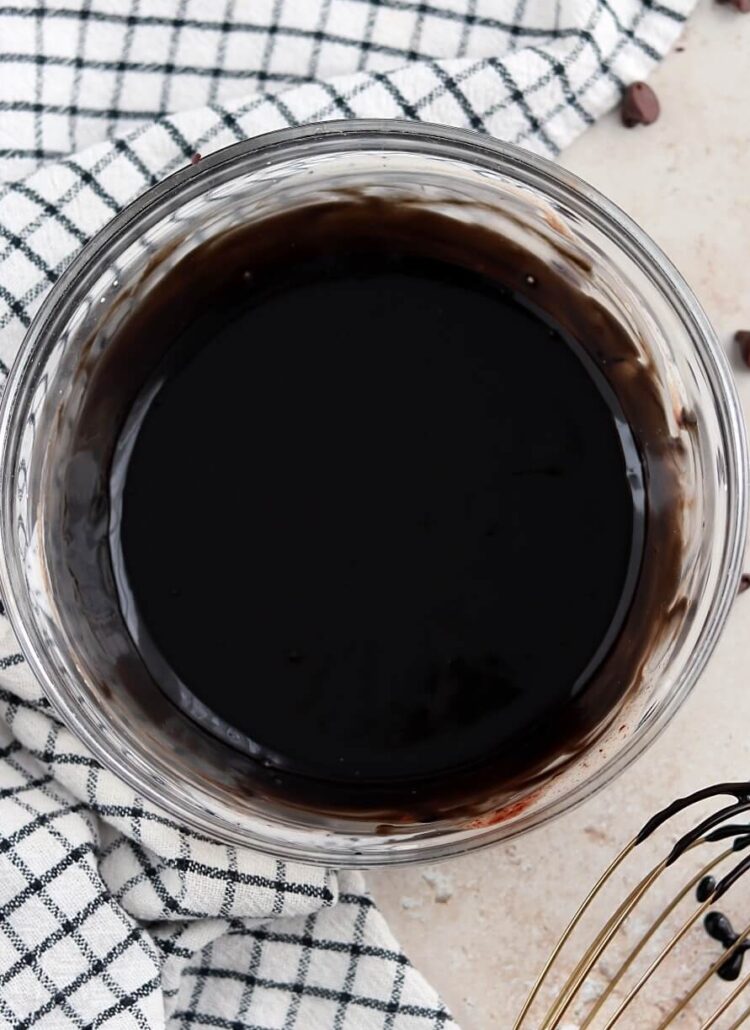
While I already have a jammy raspberry filling recipe that contains seeds, I wanted to try a seedless version and the results were amazing! It is essentially the same easy recipe that comes together with fresh or frozen raspberries and 5 other simple ingredients, but with the added step of straining out the raspberry seeds. I love using frozen raspberries for this recipe because they’re available year round.

The filling recipe also contains a little bit of sugar, cornstarch for thickening, and lemon juice and zest which beautifully enhances the raspberry flavor. One essential tool you’ll need for the recipe is a fine mesh sieve for straining out the seeds, but if you don’t have one readily available, this raspberry filling recipe is just as delicious. The seeds just make it a little more rustic and natural.
The Absolute BEST Raspberry Buttercream
To amplify the raspberry flavor in this cake, I used my favorite raspberry buttercream as part of the filling and all of the frosting. It has incredible flavor from freeze-dried raspberries! By grinding the freeze-dried raspberries into powder, you’ll have the perfect flavor agent for the buttercream that doesn’t add any extra liquid to it. That means it stays the perfect consistency for a frosting sturdy enough to fill and stack cakes, frost a smooth buttercream finish, and pipe details on top.
If you’ve never heard of freeze-dried raspberries before, they’re a bit different from frozen raspberries. The process of freeze-drying involves first freezing the berries, then evaporating all the liquid out until you’re left with a dry raspberry that has all its flavor but no juice at all. This way they’re easy to grind into powder. You can find freeze-dried raspberries in the snack aisle of most grocery stores these days, and also on Amazon.
Tip: If you can’t find freeze-dried raspberries easily, use a double batch of this fresh raspberry buttercream instead. You can use fresh or frozen berries in that recipe!
How to Assemble a Vanilla Raspberry Layer Cake
Once you have all the elements for this vanilla raspberry layer cake ready to go, here’s how to build and decorate it as pictured:
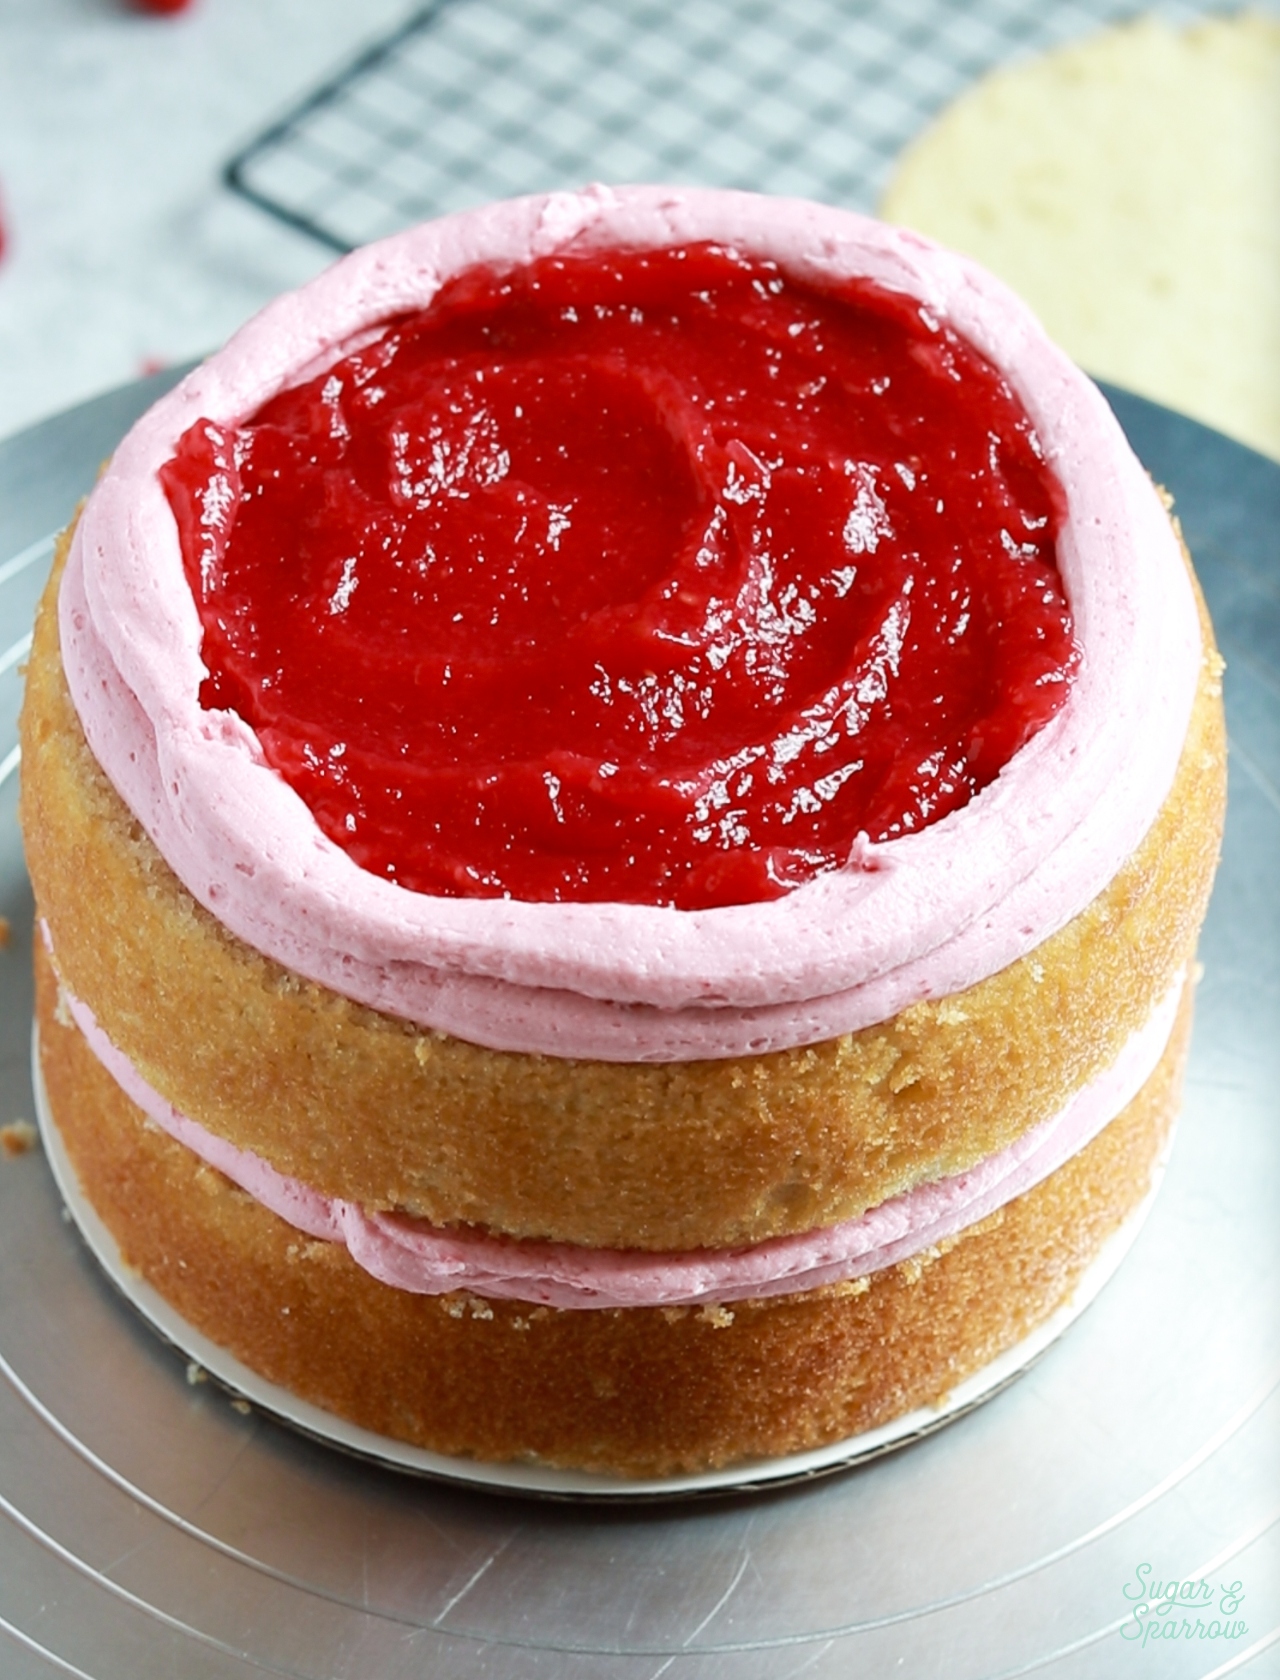
Step 1: Pipe a buttercream dam. Fill a piping bag with raspberry buttercream and snip off about ½ inch opening on the end. Place the first cake layer on your turntable and pipe a ring around the edge about ¼ inch inward from the edge of the layer.
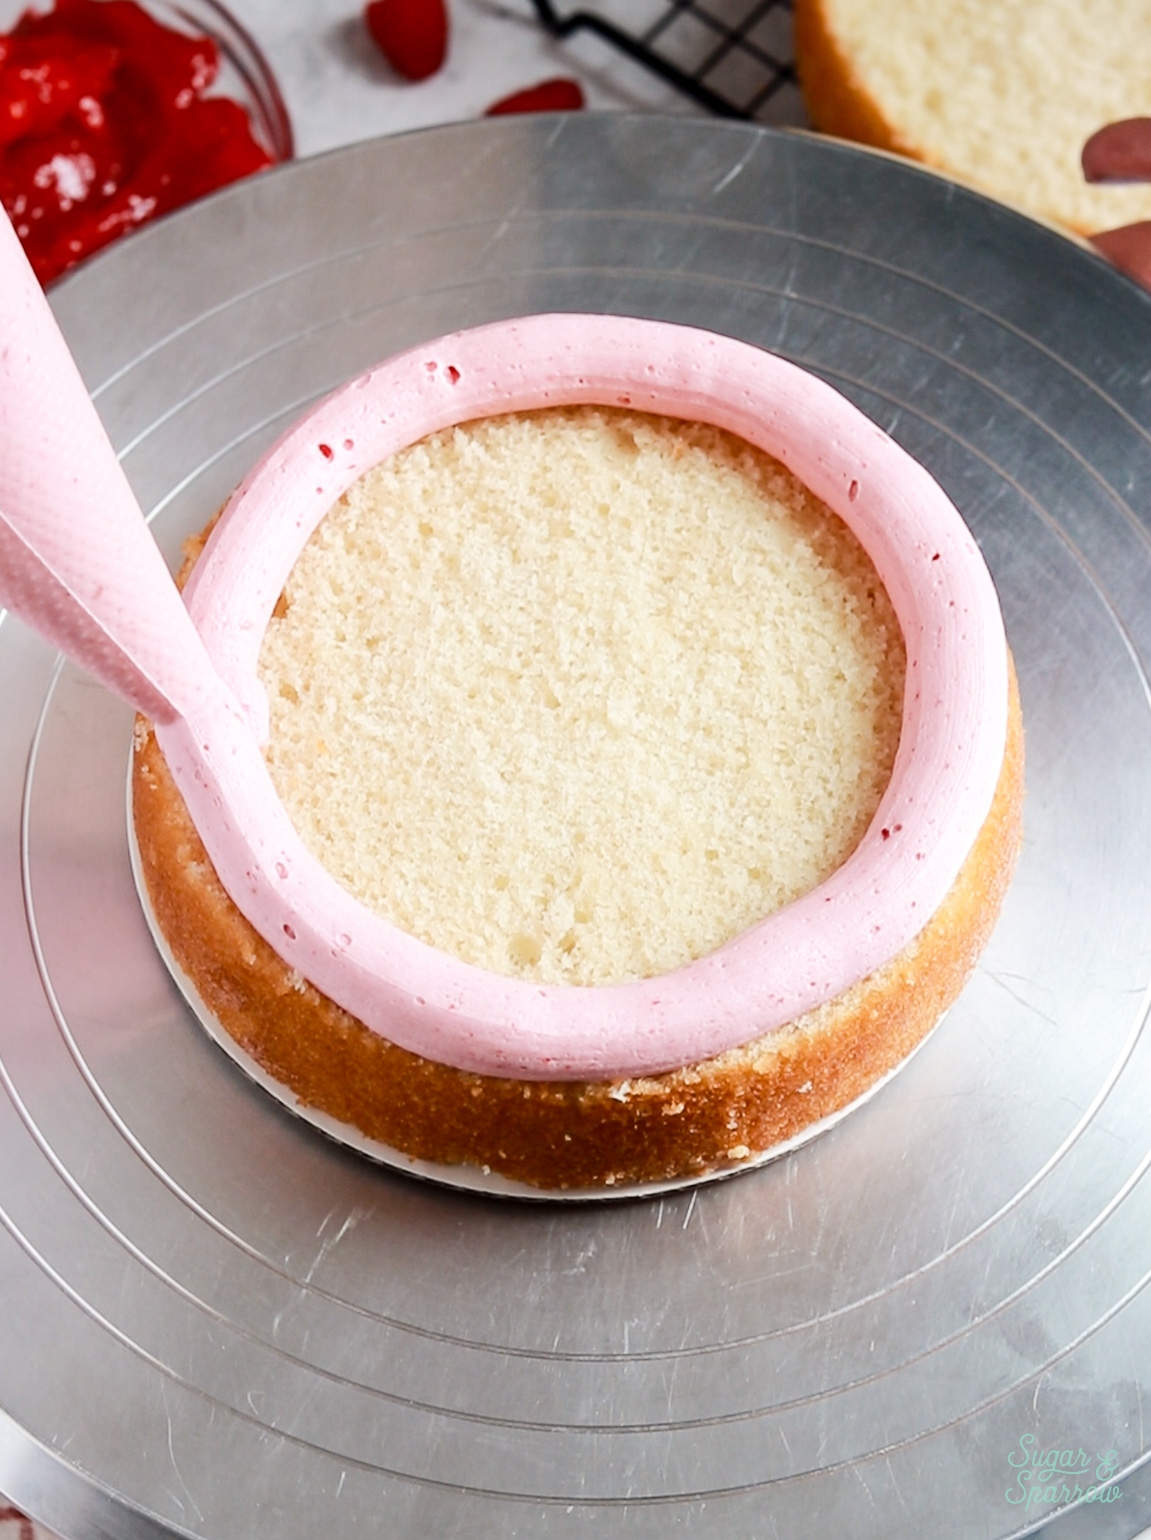
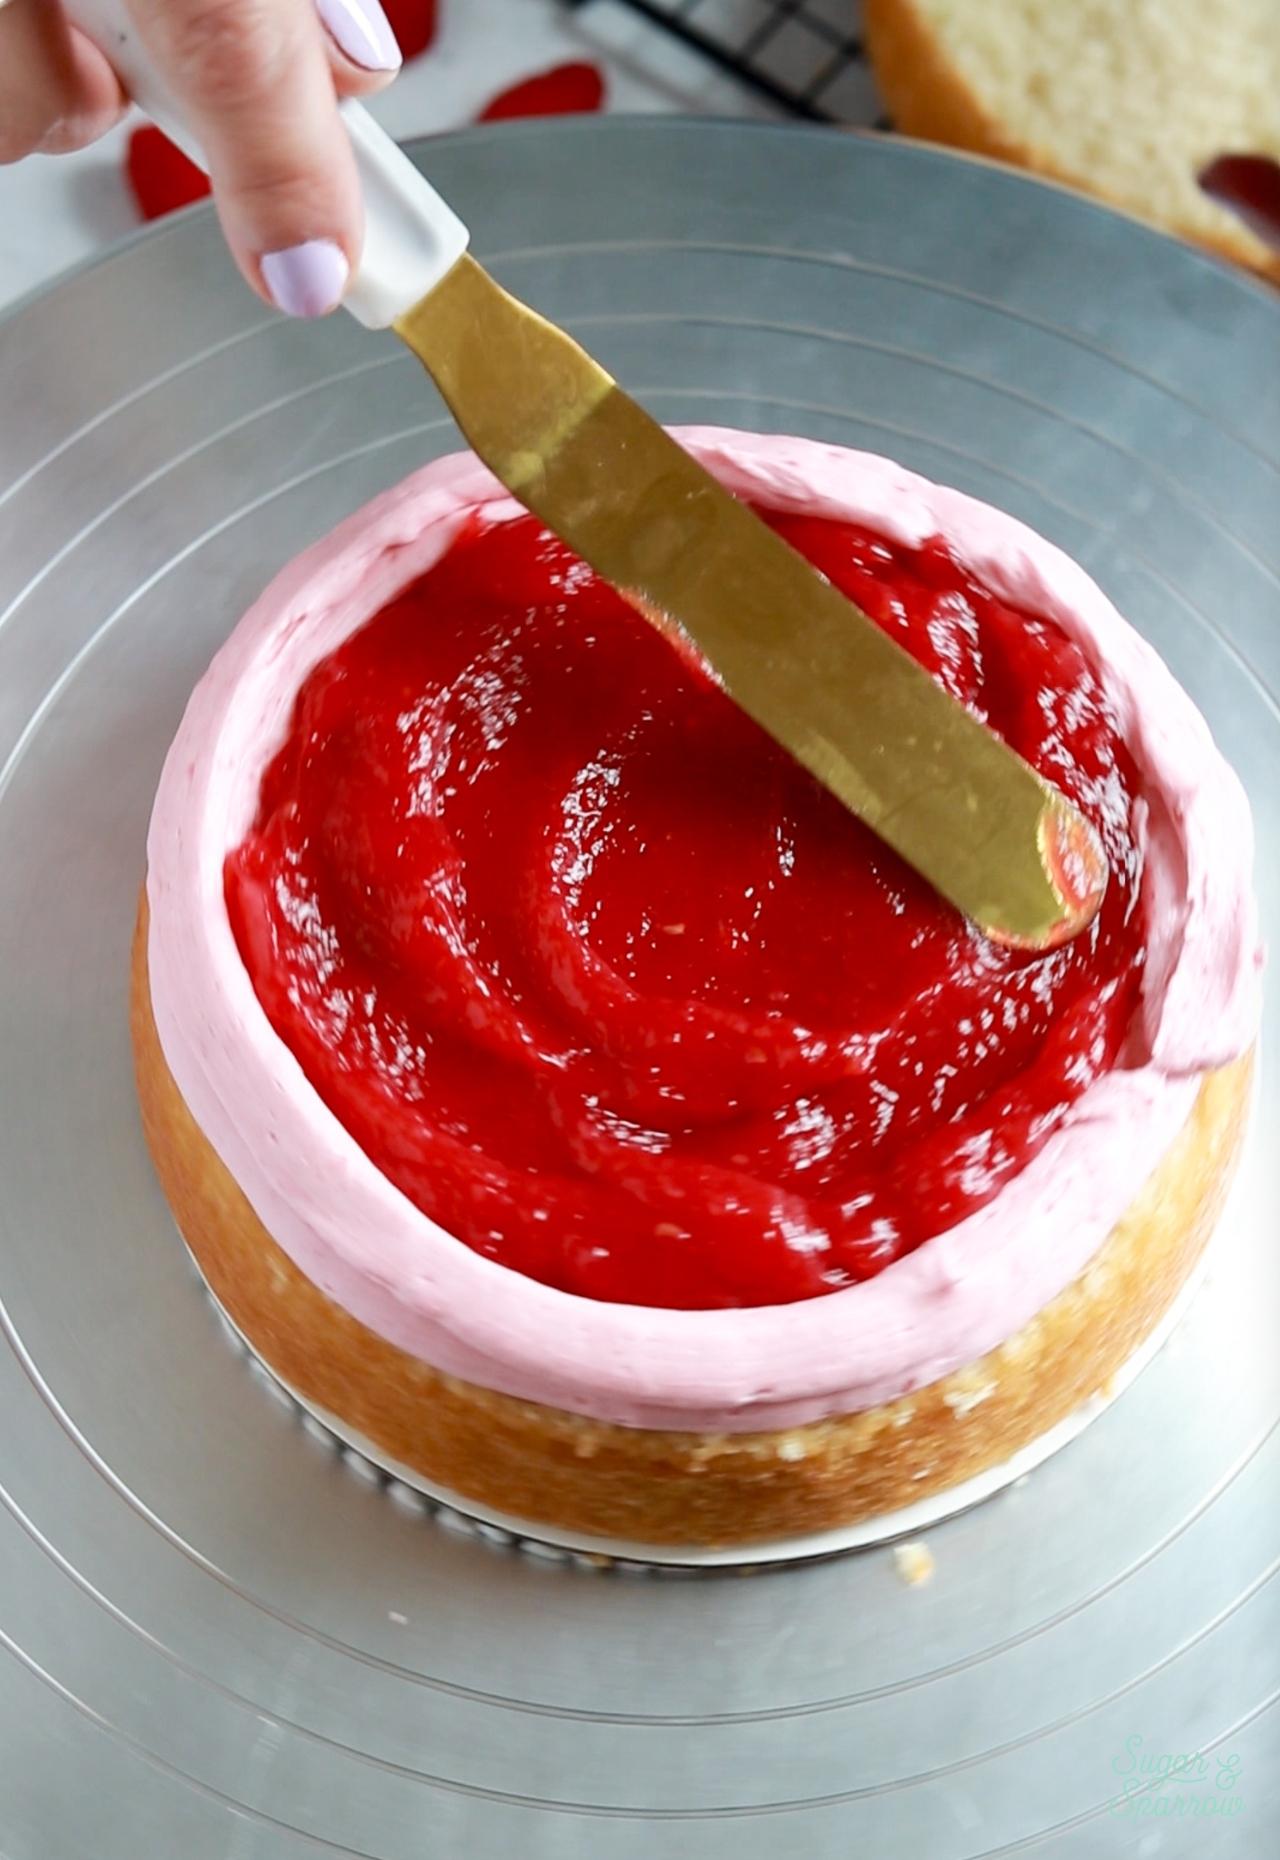
Step 2: Add the raspberry filling. Add about half of the raspberry filling and smooth it down until it’s just slightly below the top of the dam.
Step 3: Add the next cake layer and repeat. Add the next cake layer on top and repeat the process of piping the dam and filling in the center. Place the last layer on top, upside down so that the bottom of the cake becomes the top.
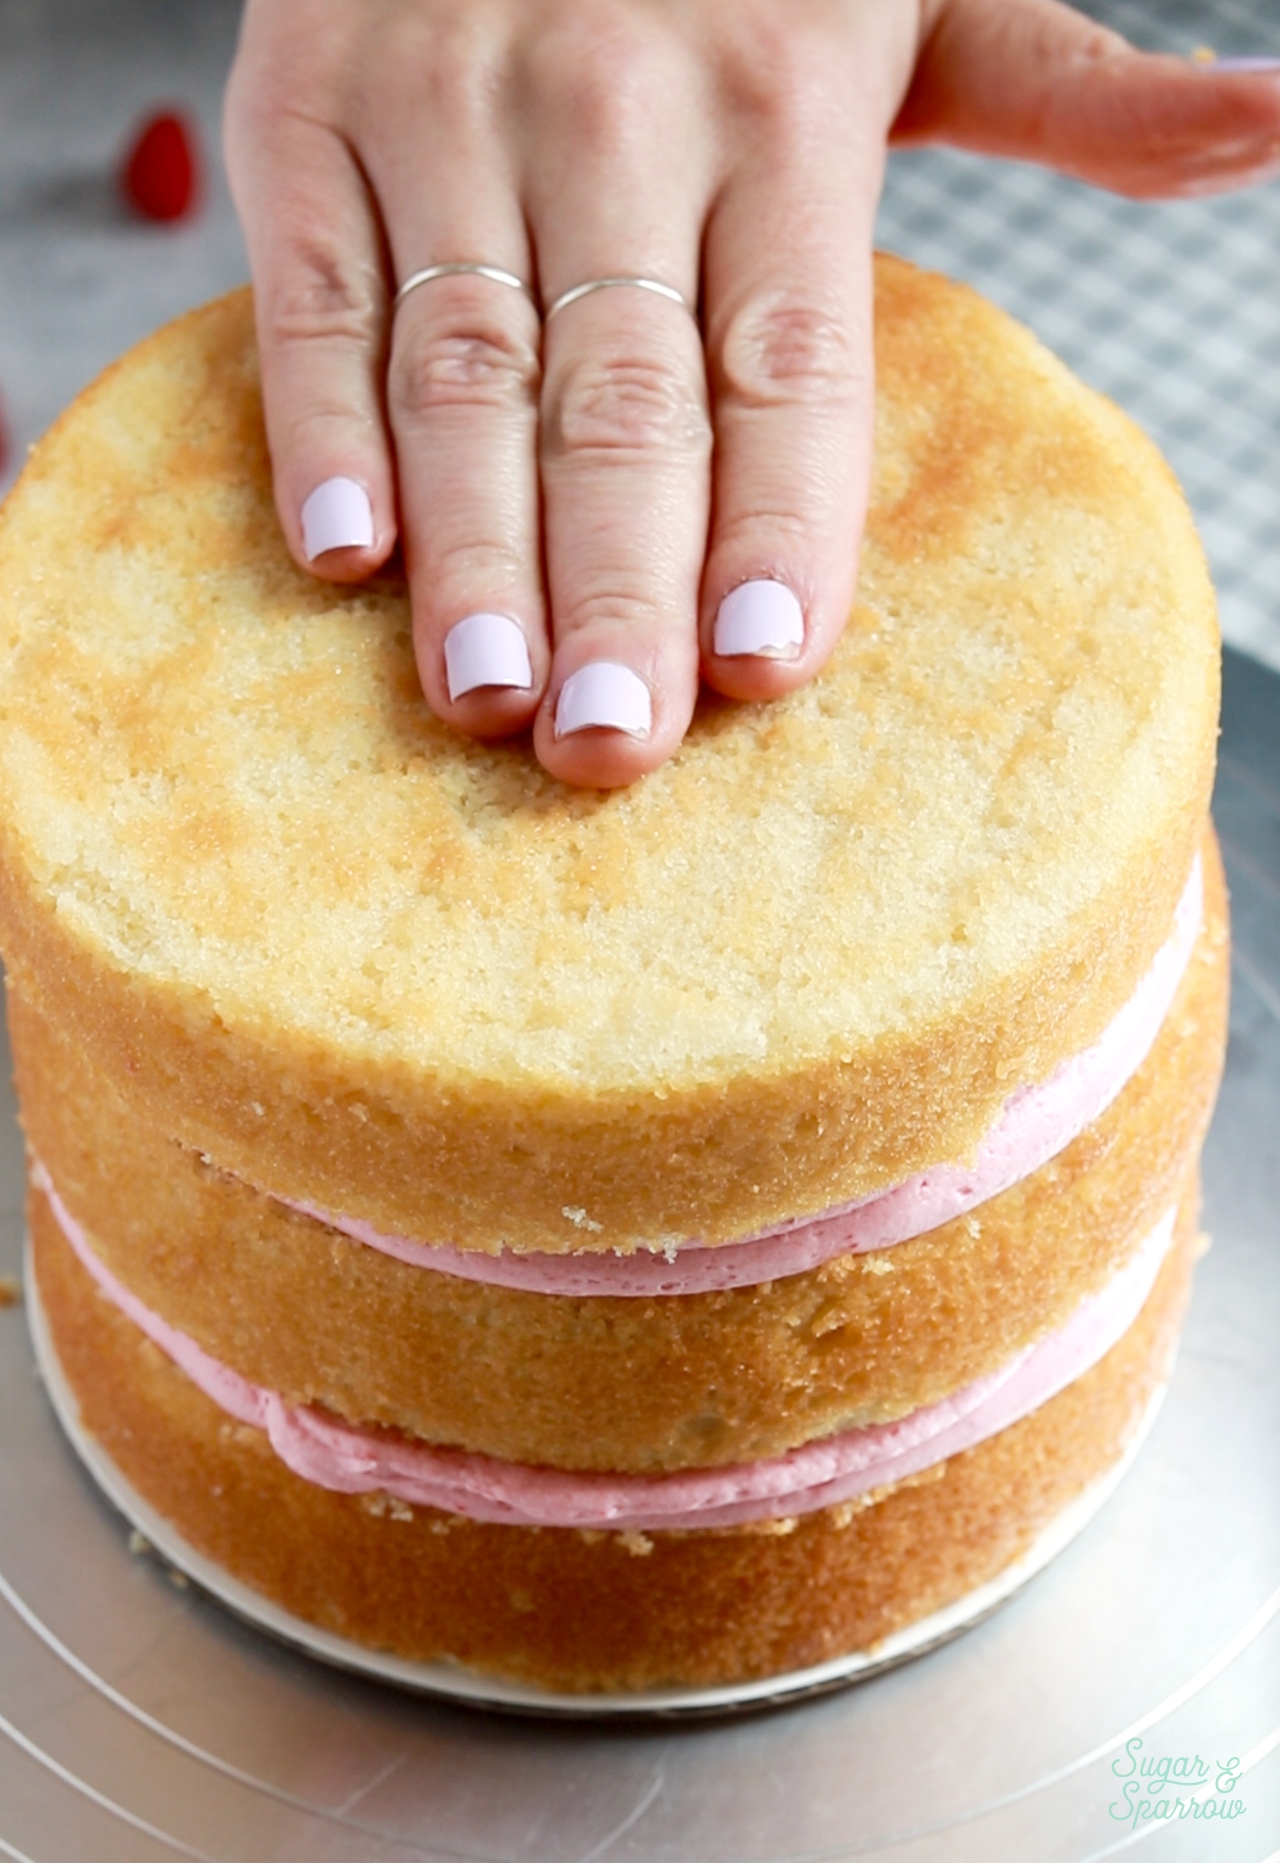
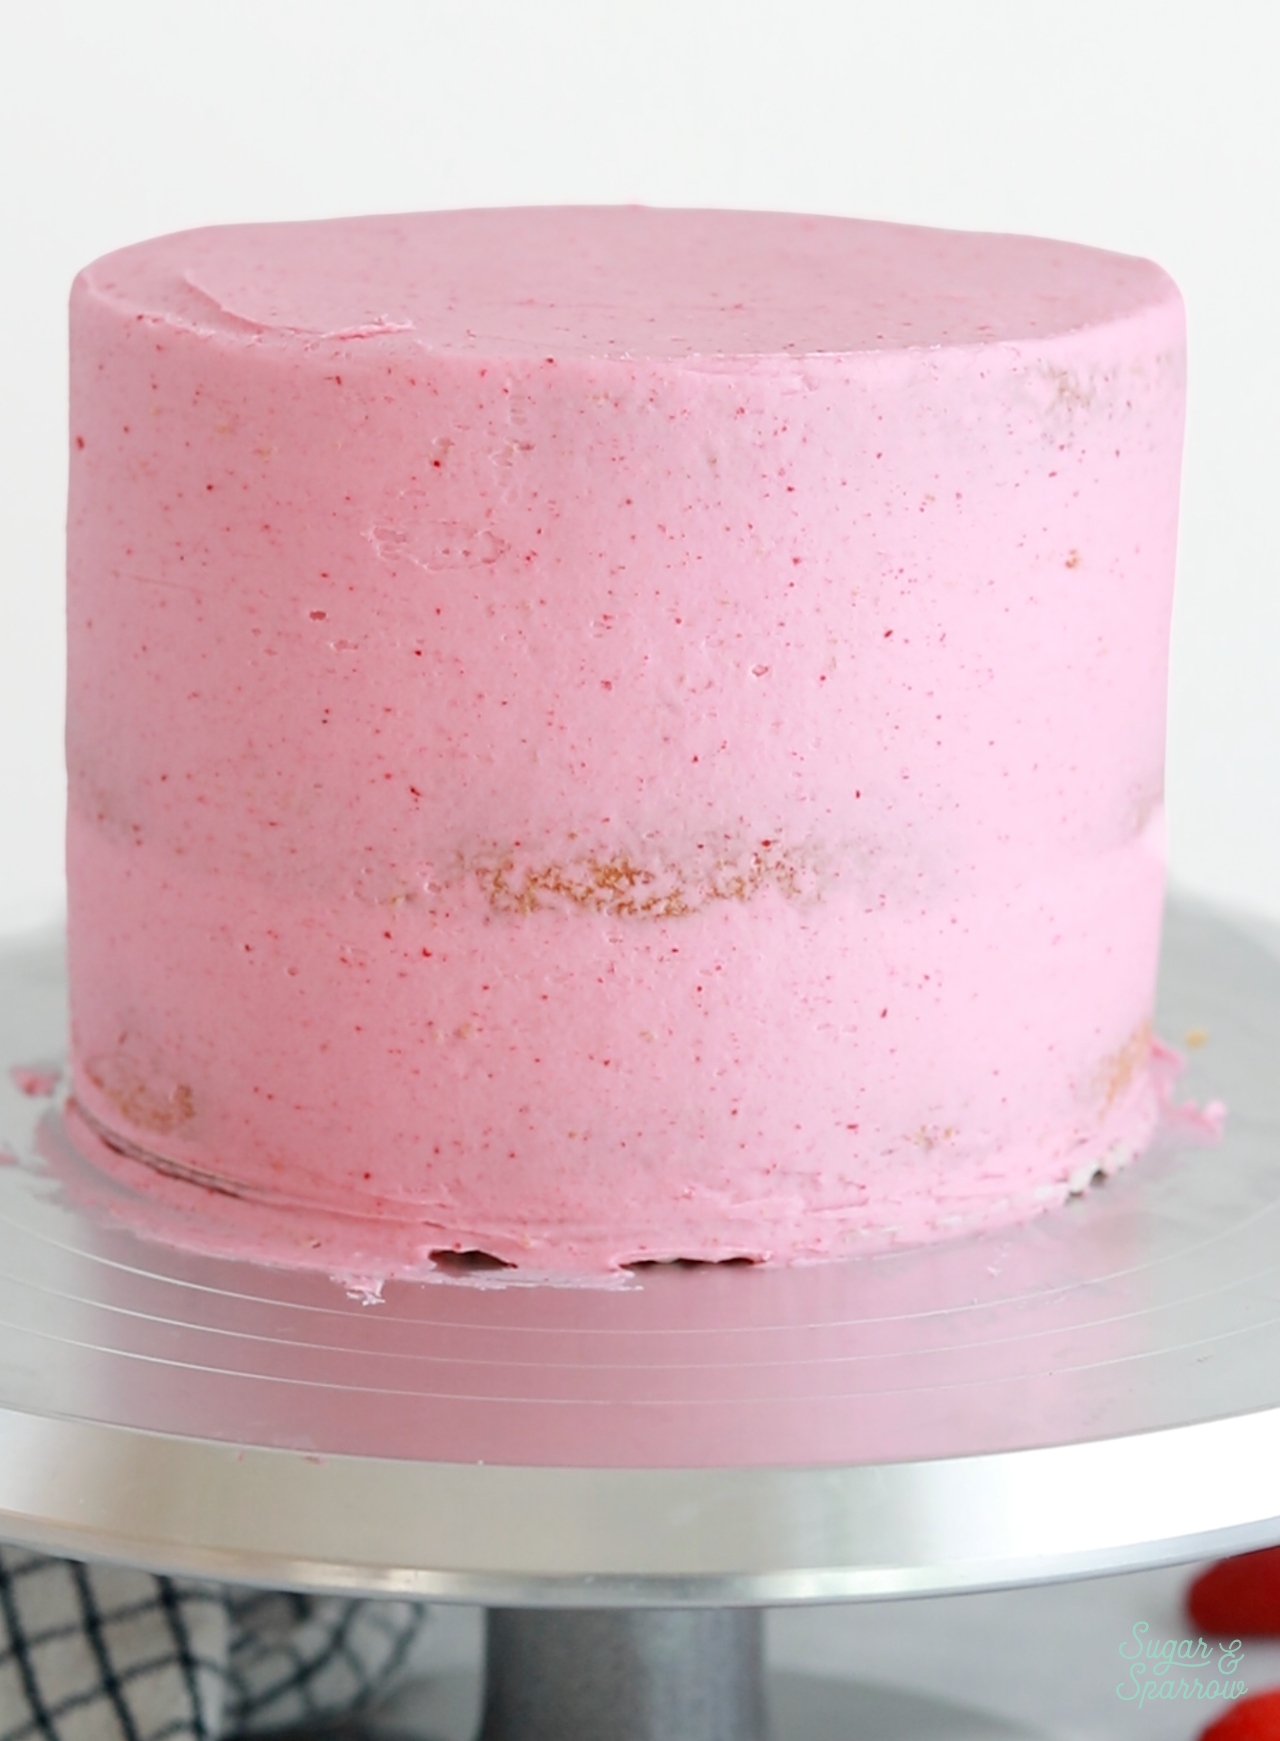
Step 4: Crumb coat the cake. Add a thin layer of raspberry buttercream all around the cake, smooth it down, and refrigerate for about 20-30 minutes (until the frosting is firm). In addition to locking in the crumbs, the process of crumb coating will lock in the shape of the cake and make it so that the layers won’t shift around while you’re frosting it.
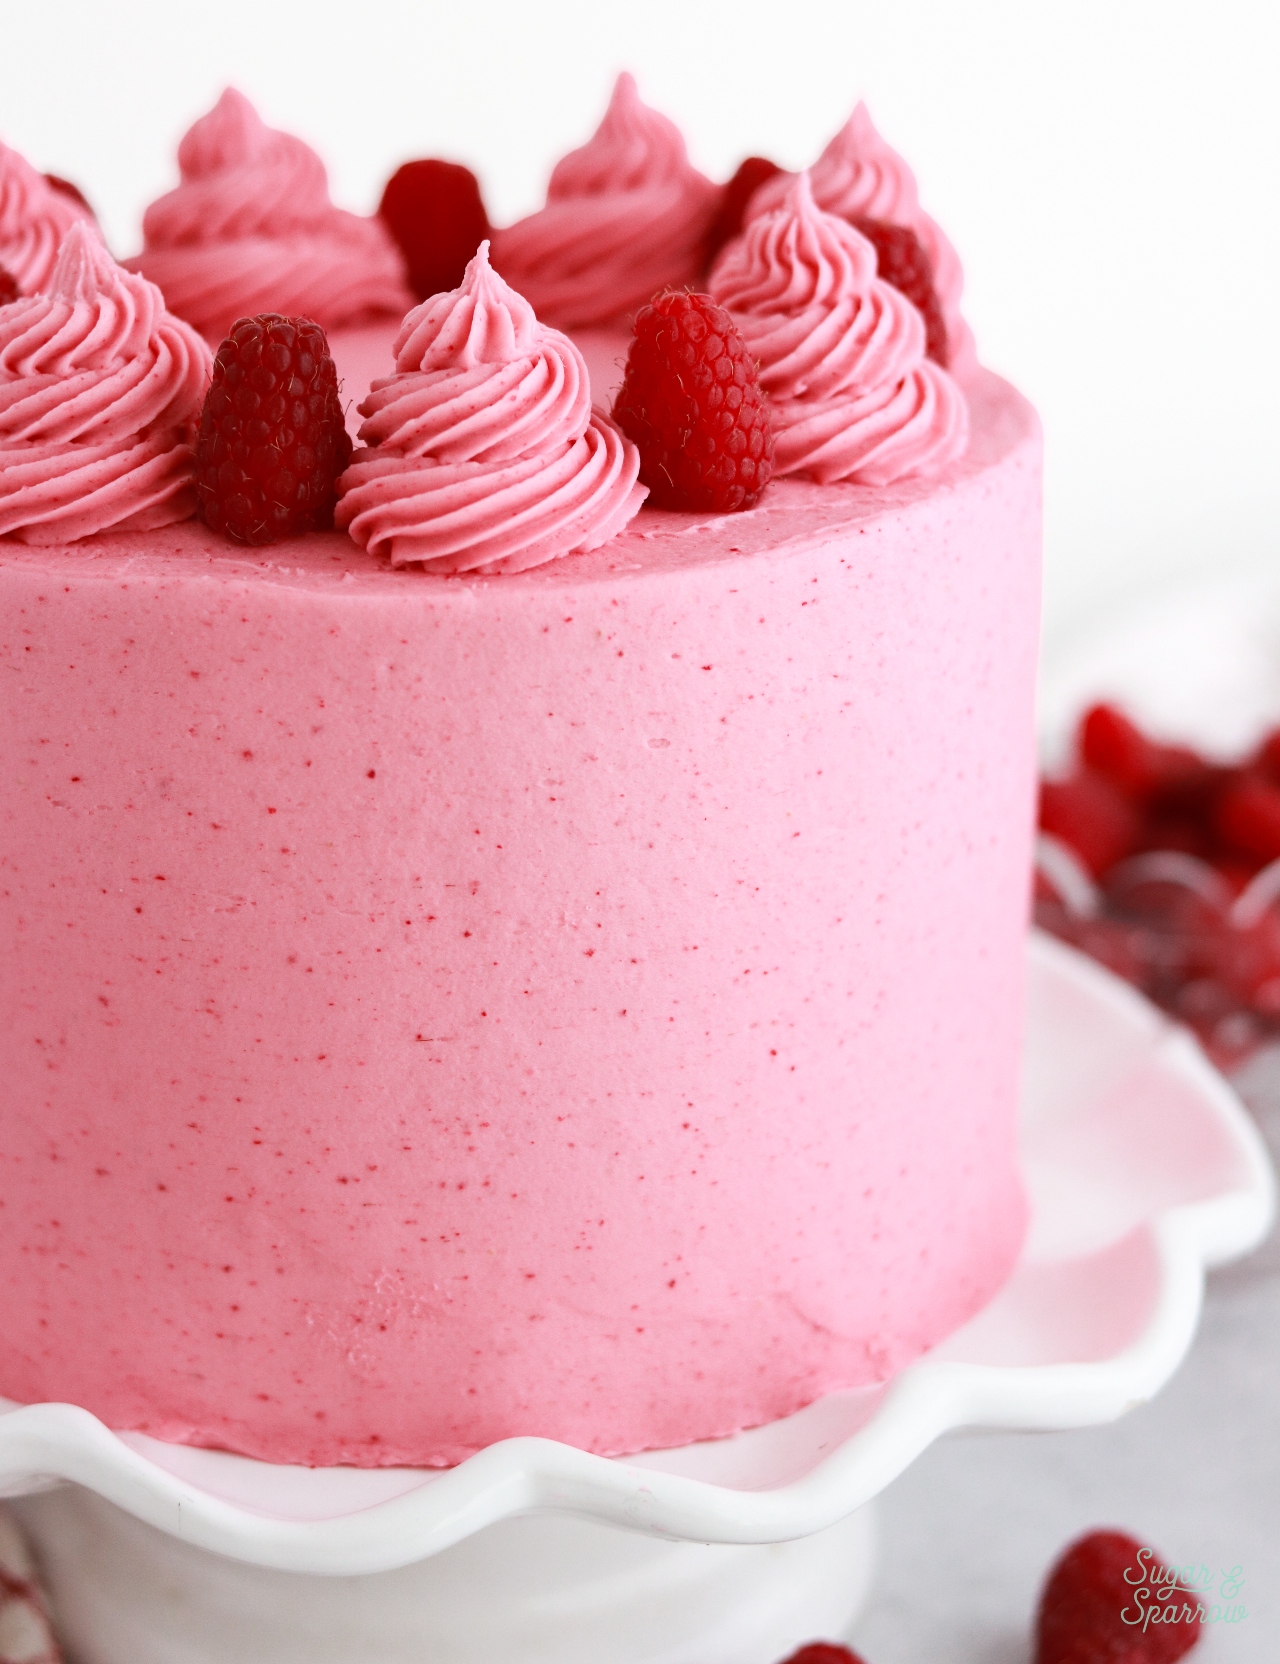
Step 5: Frost the cake and decorate. I used more of the raspberry buttercream to frost a smooth buttercream finish on the cake, then added the rest of the buttercream into a piping bag fitted with Wilton Tip 4B and piped swirls on top. I spaced the swirls about ½ inch apart and placed a fresh raspberry in between each one.
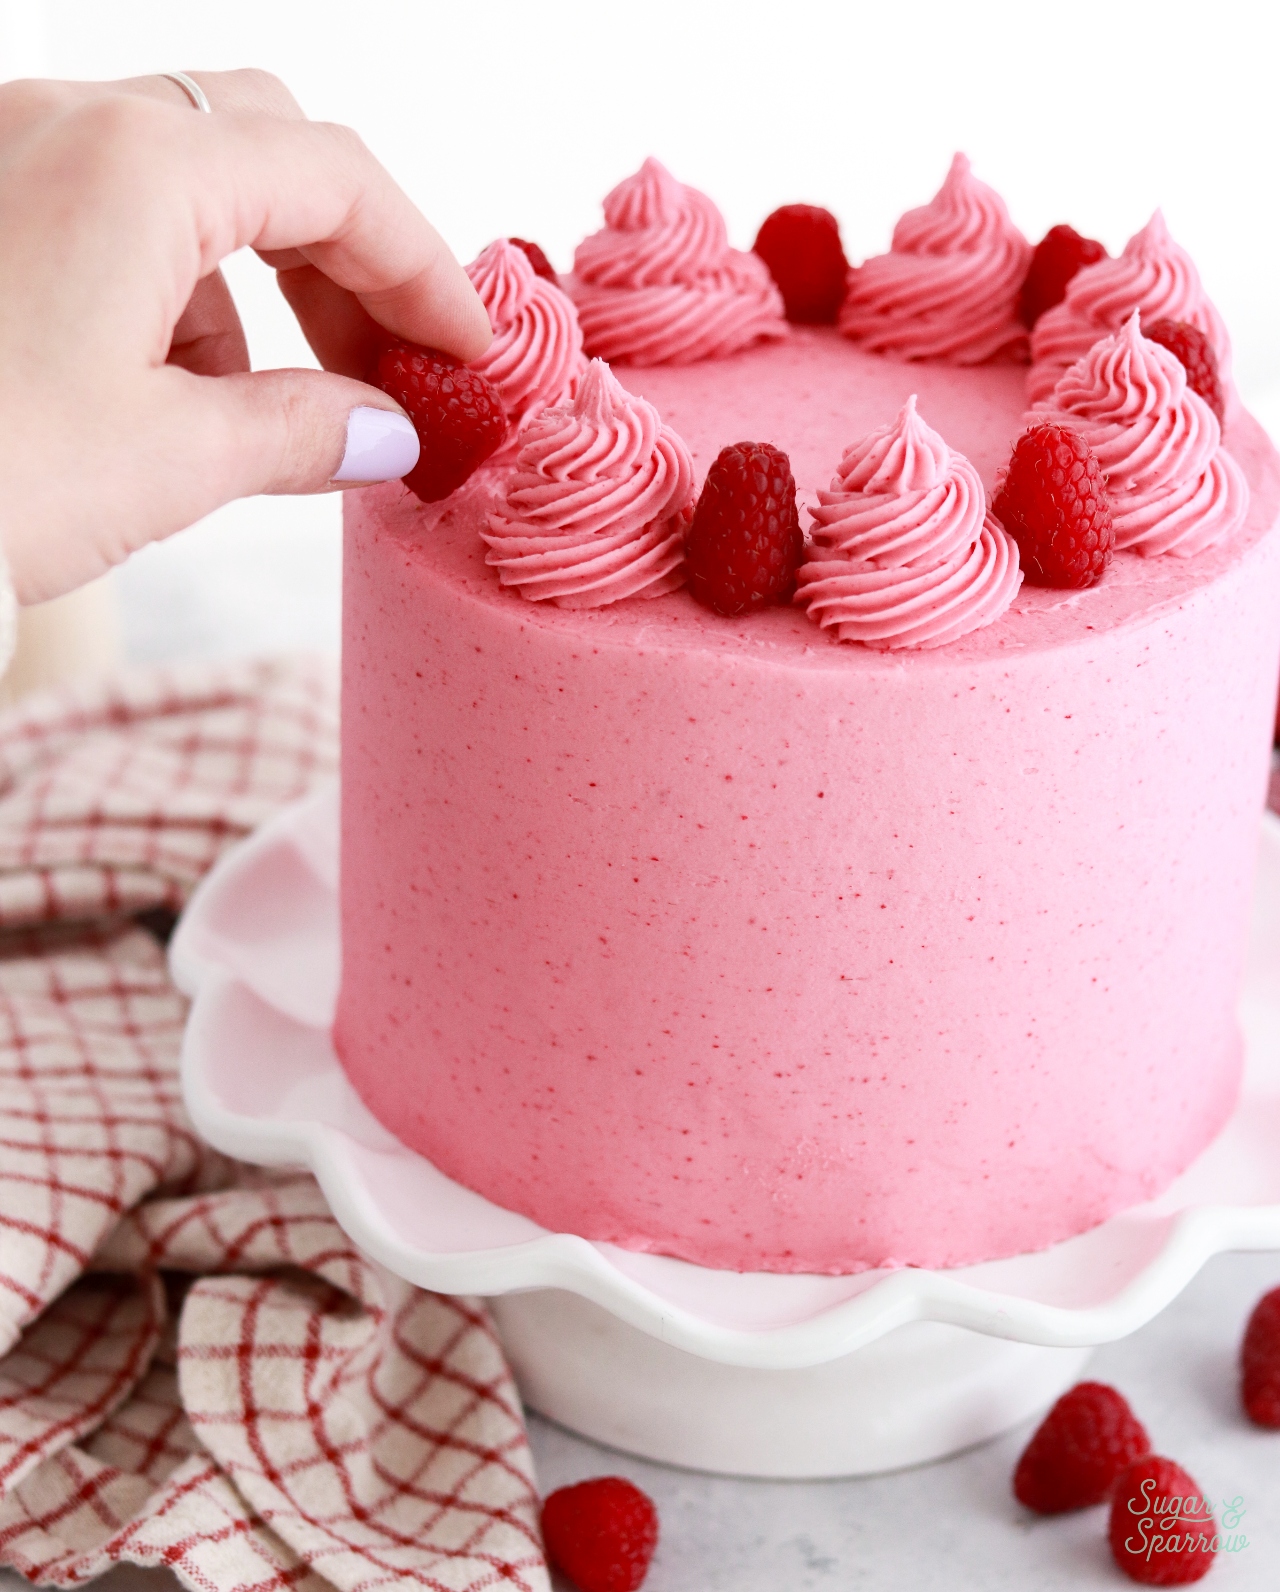
I absolutely love how simple yet effective this cake design is, but however you want to decorate, it’s easy to make it a showstopper! I especially swoon over the little flecks of raspberry in the frosting.
Similar Cake Recipes You’ll Love
If you love this vanilla raspberry layer cake recipe, here are some others from my blog that you’ll love too:
- Lemon Raspberry Layer Cake
- Raspberry Chocolate Cake
- Raspberry Pistachio cake with Mascarpone Buttercream
- Strawberry Layer Cake
- Chocolate Covered Strawberry Cake
I hope you love this vanilla raspberry layer cake as much as I do! Let me know if you make it in the comments below (and who you shared it with!) and don’t forget to tag @sugarandsparrowco on Instagram to show me a photo. I love to see what you create!
Vanilla Raspberry Layer Cake
Ingredients
Seedless Raspberry Filling
- 2 1/2 Cups (10oz, 315g) fresh or frozen raspberries
- 1/2 Cup (100g) granulated sugar
- 1 Tbsp lemon juice
- 1 tsp lemon zest
- 1 1/2 Tbsp (12g) cornstarch
- 1 1/2 Tbsp (22ml) water
Bakery-Style Vanilla Cake
- 2 1/2 Cups (265g) sifted cake flour* DIY recipe in notes
- 2 tsp baking powder
- 1/2 tsp baking soda
- 1/2 tsp salt
- 1 1/2 Cups (300g) granulated sugar
- 1/2 Cup (113g) unsalted butter, room temperature
- 4 large egg whites, room temperature
- 1/2 Cup (120ml) vegetable oil
- 1 Tbsp pure vanilla extract
- 1 1/4 Cups (300ml) buttermilk*, room temperature DIY recipe in notes
Freeze-Dried Raspberry Buttercream
- 1 Cup (24g) freeze-dried raspberries*
- 1 1/2 Cups (339g) unsalted butter, room temperature
- 1/4 Cup (60ml) whole milk, room temperature
- 5 Cups (600g) powdered sugar
- pinch of salt, or to taste
Garnish (Optional)
- fresh raspberries
Instructions
Make the Seedless Raspberry Filling
- In a medium saucepan, add the raspberries, granulated sugar, lemon juice, and lemon zest. Set the saucepan over medium heat and stir with a silicone spatula to combine. Cook until the mixture begins to boil, mashing down the raspberries as they soften.
- Once the mixture starts to boil, lower the heat and simmer for 10-15 minutes while you continue stirring occasionally. Then, remove from heat and use a fine mesh sieve to strain out the seeds over a medium bowl. Use the silicone spatula to press the raspberry mixture into the sieve, scraping the other side of the sieve often to capture the strained raspberry mixture. After straining, you’ll be left with about 1/4 Cup of seedy pulp.
- In a small separate bowl, combine the cornstarch and water until uniform. Return the strained raspberry filling to the saucepan (wipe it free of any remaining seeds if needed) and add the cornstarch/water mixture. Set the saucepan over medium heat and bring the mixture back to a boil, stirring constantly. Once it's boiling, reduce the heat to a simmer and let it cook for 1-3 minutes, until the filling has thickened slightly, is no longer cloudy, and coats the back of the spatula.
- Pour the raspberry filling into an airtight container and refrigerate for at least 4 hours and up to 1 week. It will be jello-like once it sets but after stirring it will be more of a thick, jammy consistency.
Make the Bakery-Style Vanilla Cake
- Preheat the oven to 350°F (177°C) and prepare three 6-inch or two 8-inch cake pans by spraying the sides with baking spray and fitting a parchment paper circle to the bottom of each pan.
- In a medium bowl, add the flour, baking powder, baking soda and salt. Whisk together and set aside.
- In the bowl of a stand mixer fitted with the paddle attachment, beat the butter at high speed until creamy, about 2 minutes. Add the sugar and cream it together with the butter at medium-high speed until light and fluffy, about 2 minutes, scraping the bowl and paddle at the halfway point. Turn the mixer to low and add the egg whites one at a time, mixing until they are just combined and scraping down the bowl and paddle as needed. Add the vegetable oil and vanilla, increase the mixer speed to high and beat for 1 minute.
- Turn the mixer off and add the flour mixture all at once. Mix the ingredients on low speed until just combined, then slowly pour in the buttermilk. Continue mixing at low speed for about 30 seconds, until the batter is uniform and combined. The batter will be slightly thin.
- Divide the batter evenly between the prepared cake pans and bake for 28 to 32 minutes. They’re done when they spring back to the touch and a toothpick inserted into the centers comes out clean or with just a few moist crumbs on it. Let the cakes cool in their pans for 5 minutes, then remove them from the pans and allow them to cool completely on a wire rack.
Make the Freeze-Dried Raspberry Buttercream
- With a food processor, grind the raspberries into a fine powder. Sift out the seeds (if a few seeds end up in the powder that is totally ok) and set the powder aside.
- In the bowl of a stand mixer fitted with the paddle attachment (or with a hand mixer and large bowl), beat the butter on medium-high speed until pale and creamy, about 5 minutes. Add the raspberry powder and milk and continue to mix on medium until fully combined.
- Turn the mixer to low speed and add the powdered sugar a few cups at a time, scraping down the bowl and paddle after each addition. Add a pinch of salt and continue mixing on low speed until fully combined and smooth, 1-2 minutes.
Assembly
- Once the vanilla cake layers are completely cooled, level them to your desired height. Add a swipe of raspberry buttercream onto a cardboard cake circle and place the first cake layer on top. Add about 1 Cup of the raspberry buttercream into a piping bag and snip off about 1/2 inch opening on the end. Use it to pipe a dam around the edge of the cake layer and frost a thin layer of the raspberry buttercream in the center, then fill the rest with raspberry filling until it reaches slightly below the top edge of the buttercream dam. Place the next vanilla cake layer on top and repeat the process of filling and stacking before placing the final cake layer on top, upside down so that the bottom of the layer becomes the top of the cake. Crumb coat the cake with raspberry buttercream, then refrigerate the cake for 15-20 minutes to let the crumb coat firm up.
- To create the design pictured, reserve about 2/3 Cup of raspberry buttercream for the swirls on top and use the rest of the buttercream to frost a smooth buttercream finish. Place the reserved buttercream into a piping bag fitted with Wilton Tip 4B and pipe swirls on top, spaced about 1/2 inch apart. Place a fresh raspberry in between each swirl.
Notes
- The raspberry filling can be made ahead and stored in an airtight container in the refrigerator for up to one week.
- The vanilla cake layers can be made ahead and stored at room temperature, covered tightly in plastic wrap, for up to two days. Alternatively, you can cover with plastic wrap and store in the freezer for up to two months before thawing to room temperature.
- The raspberry buttercream can be made ahead and stored in an airtight container at room temperature for up to 2 days. You can also refrigerate the buttercream for up to 2 weeks or freeze for up to 3 months. When you’re ready to use it, bring back to room temperature before mixing on medium speed until creamy and smooth.


If I were to make the raspberry filling for a 13×9 sheet cake would I double the recipe?
Hi Laura! Yes, I would double the filling recipe to have enough for a 13×9 sheet cake. Enjoy!