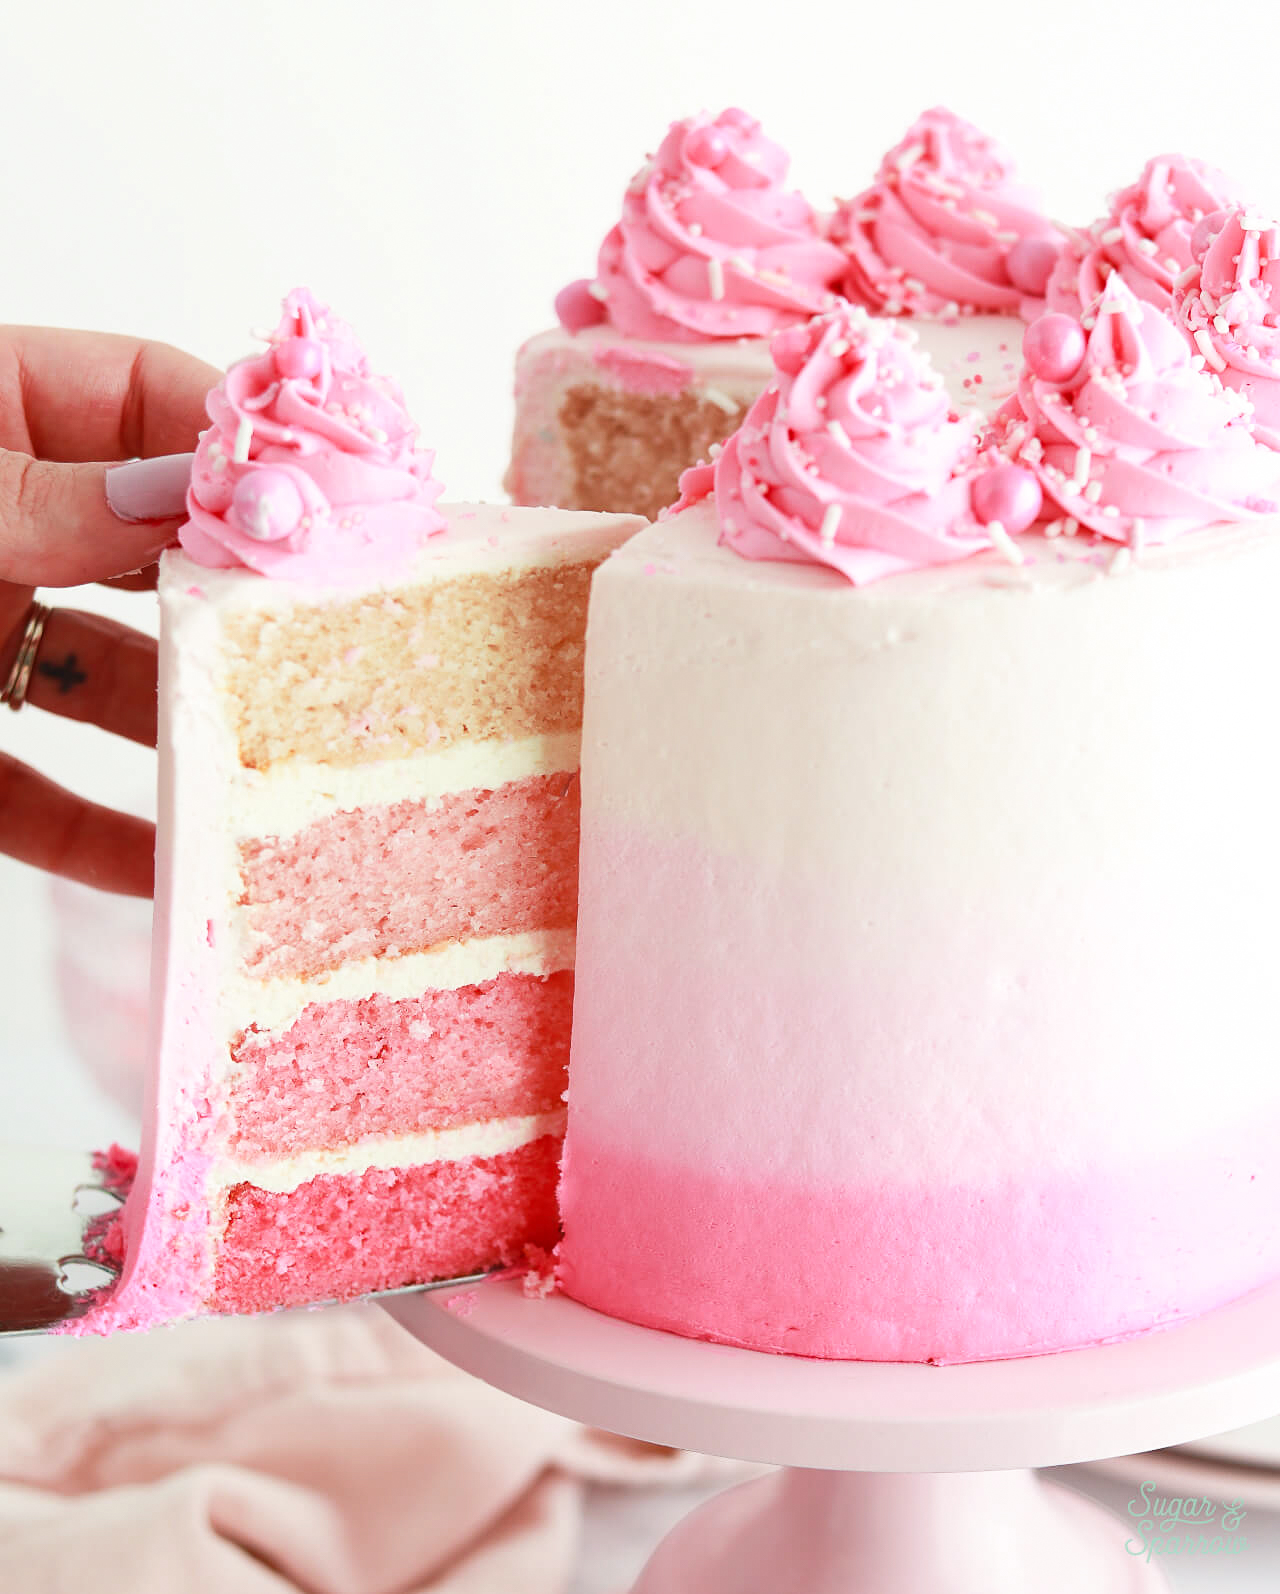
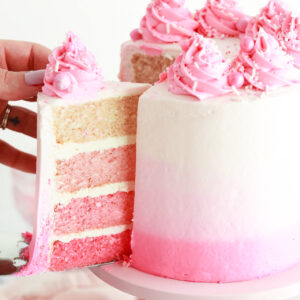
With pink ombre buttercream on the outside and pink ombre cake layers on the inside, this is the ultimate pink cake! I used my bakery-style white cake as the base recipe for tinting the batter in different shades of pink and my vanilla buttercream recipe for the ombre finish on the outside. It’s such a fun cake project and the perfect cake design for Valentine’s Day, Galentine’s Day, a girl baby shower, or celebrating someone who loves the color pink!
What Pink Food Color Should I Use?
Any pink food color gel or liquid will work with this recipe, so if you have a favorite already you can absolutely stick with that. I used AmeriColor Deep Pink for both the cake layers and buttercream pictured here, but I also love these other options (there’s even an all-natural option in this list!):
- AmeriColor Electric Pink
- Wilton Color Right Pink
- Colour Mill Candy
- Chefmaster Rose Pink Liqua-gel
- Enco Nautrals Rosa Pink (no Red 3 or Red 40!)
Pink Ombre Cake Layers
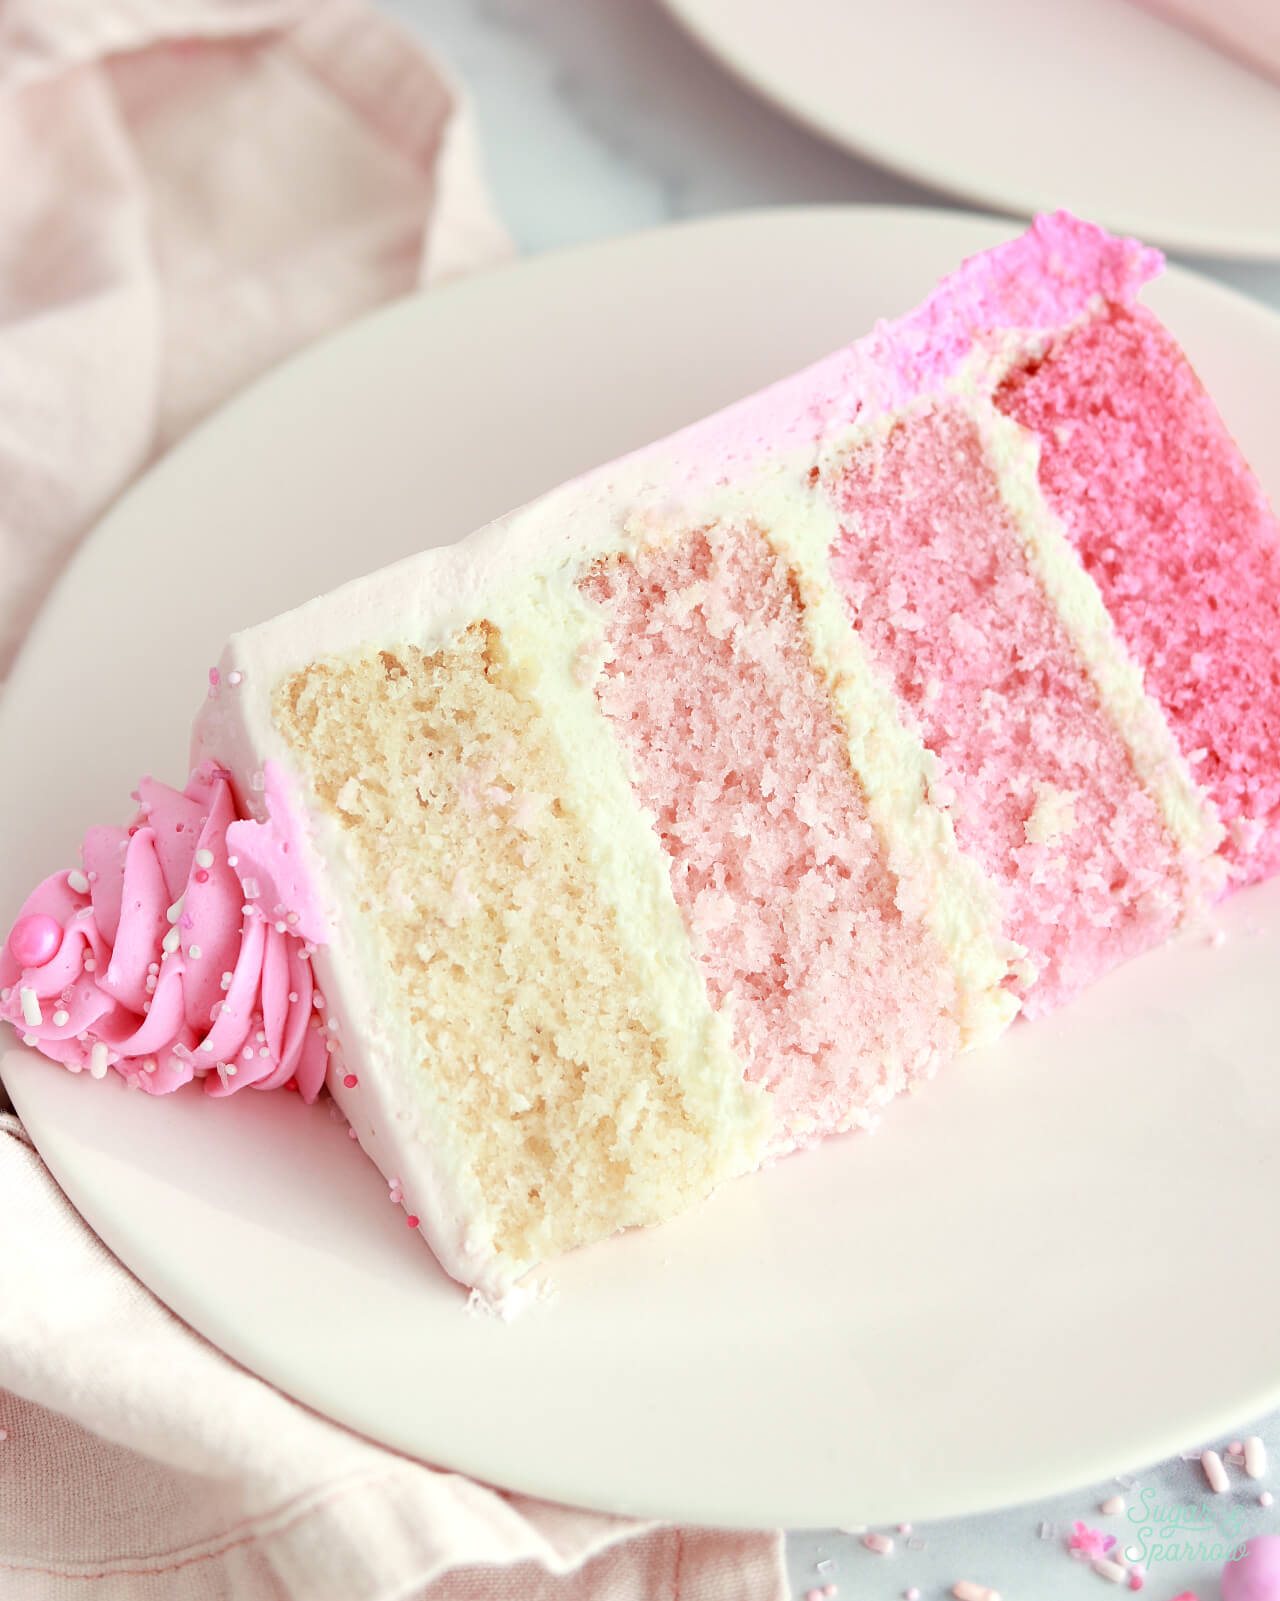
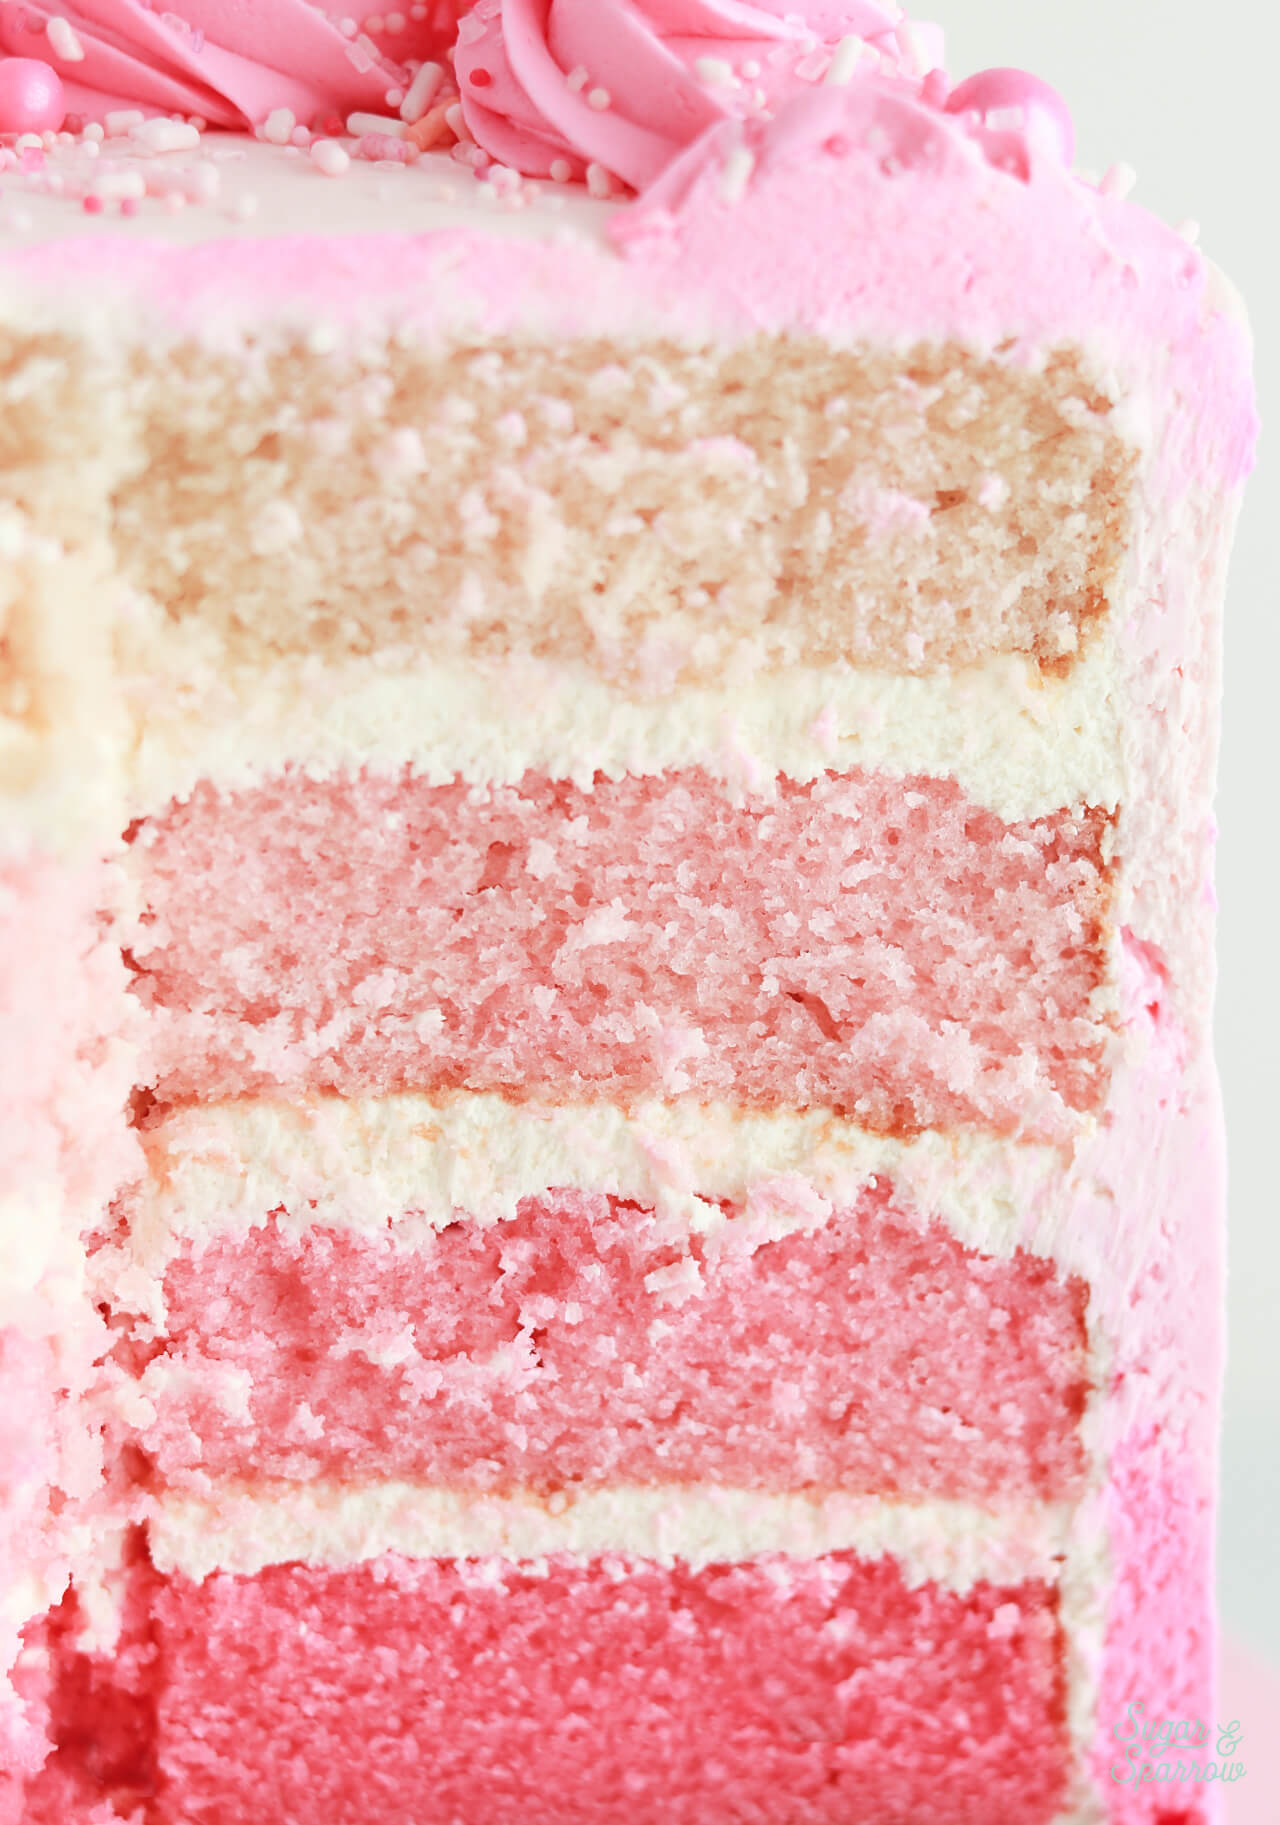
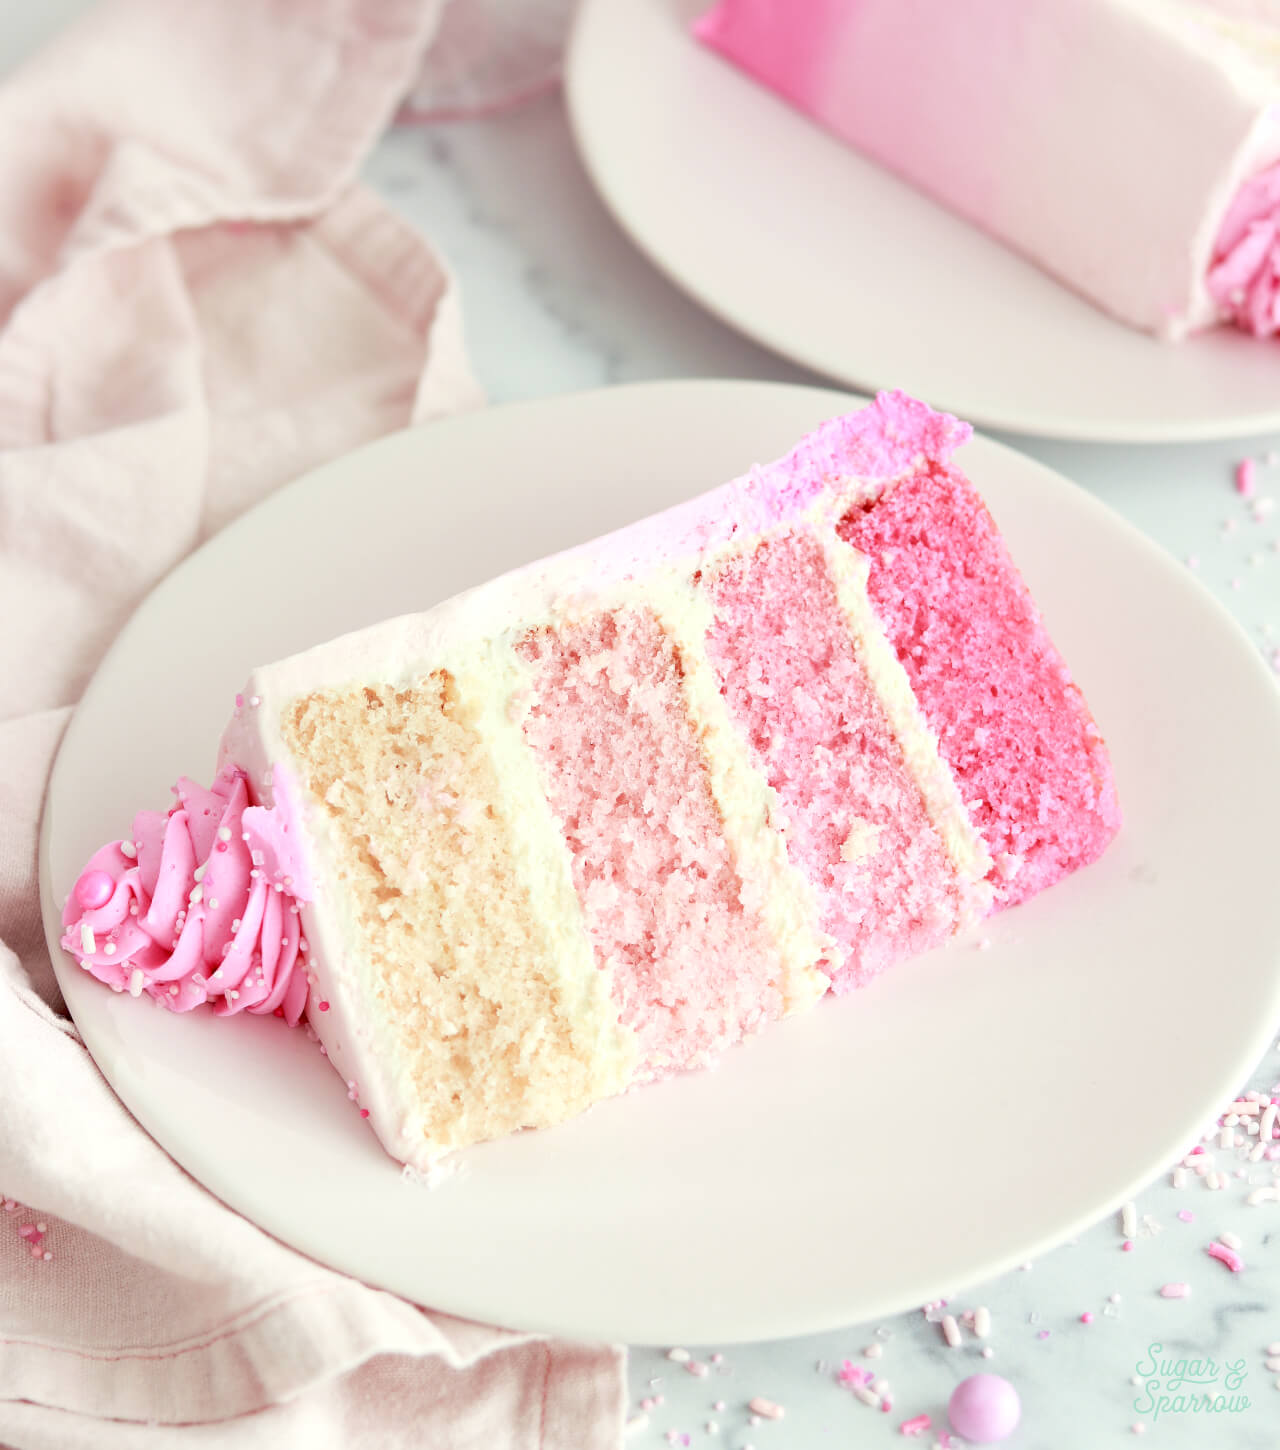
This recipe starts with whipping up my bakery-style white cake recipe. The cake layers bake up so soft and tender (yet still sturdy enough for a layer cake) and the batter is the perfect white color for adding the pink food color gel. After making the batter, I divided it equally between four different small mixing bowls, one for each cake layer. I found it really helpful to use my kitchen scale to weigh the batter so that my bowls were exact. My total batter weight was 1240g, so I divided that by four to get 310g per bowl.
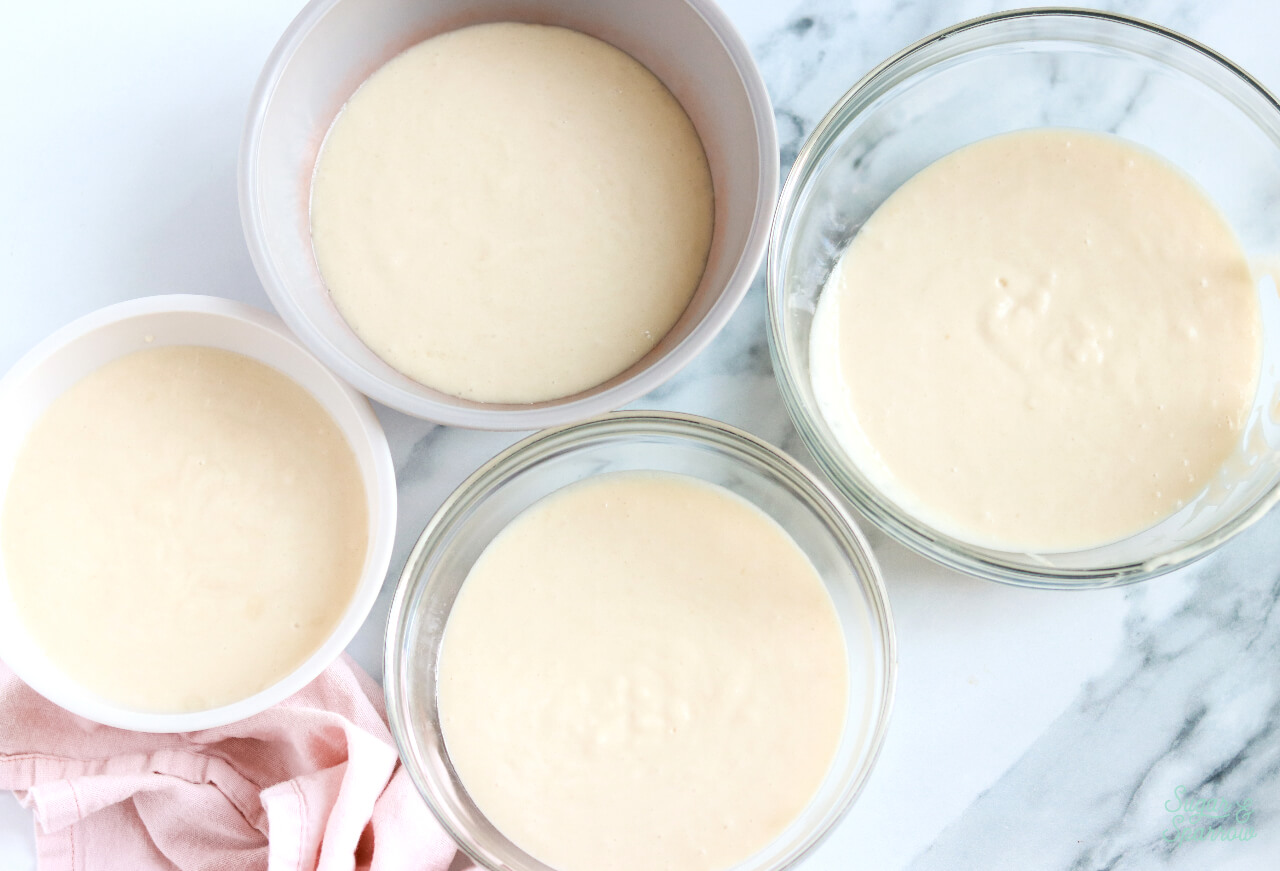
After measuring out the batter amongst the four bowls, I added the pink food color gel. I always start with the darkest color, so I added about 6 drops of AmeriColor Deep Pink to one of the bowls and mixed it in to see what color I got. It was a nice deep pink color, so I added 4 small drops to the second bowl, two small drops to the third bowl, and 1 small drop to the fourth bowl.
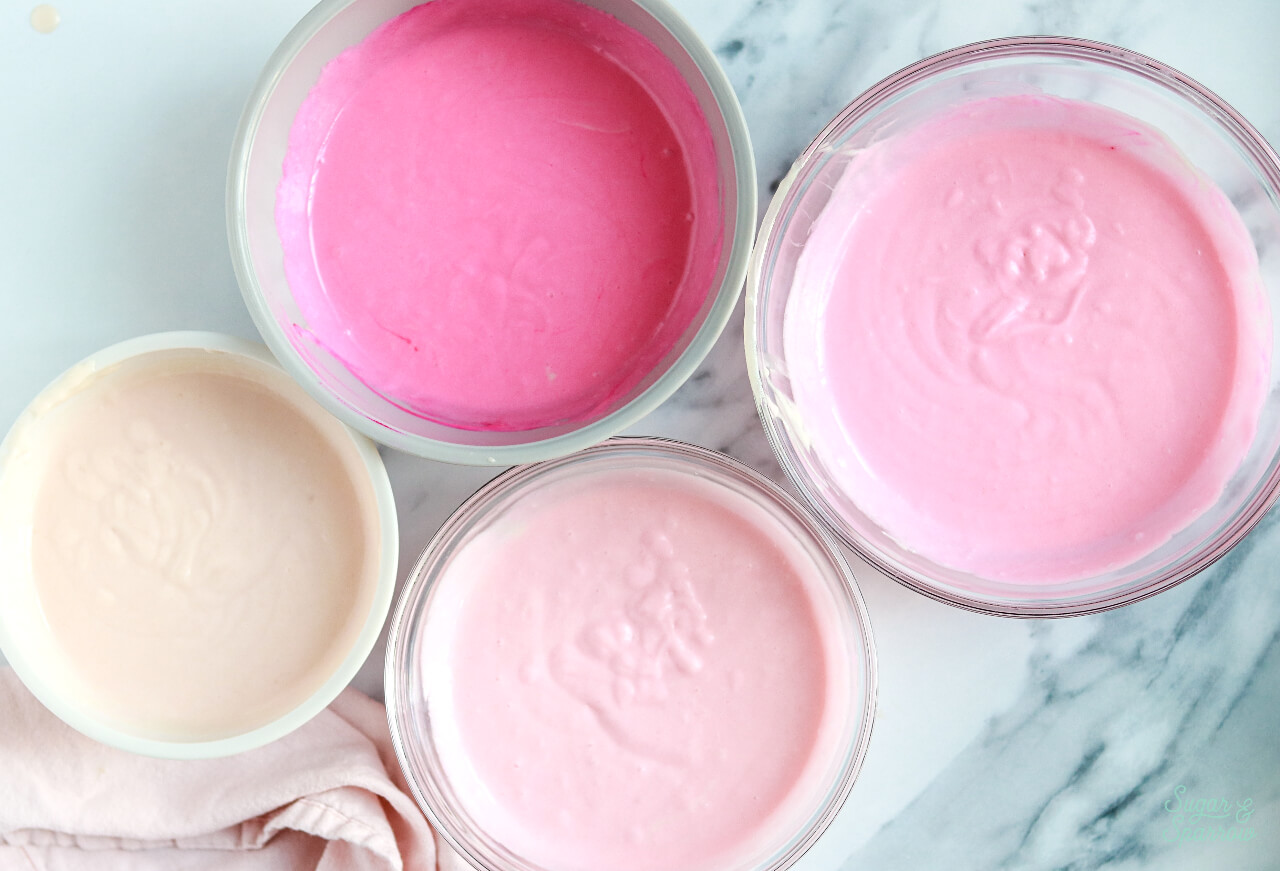
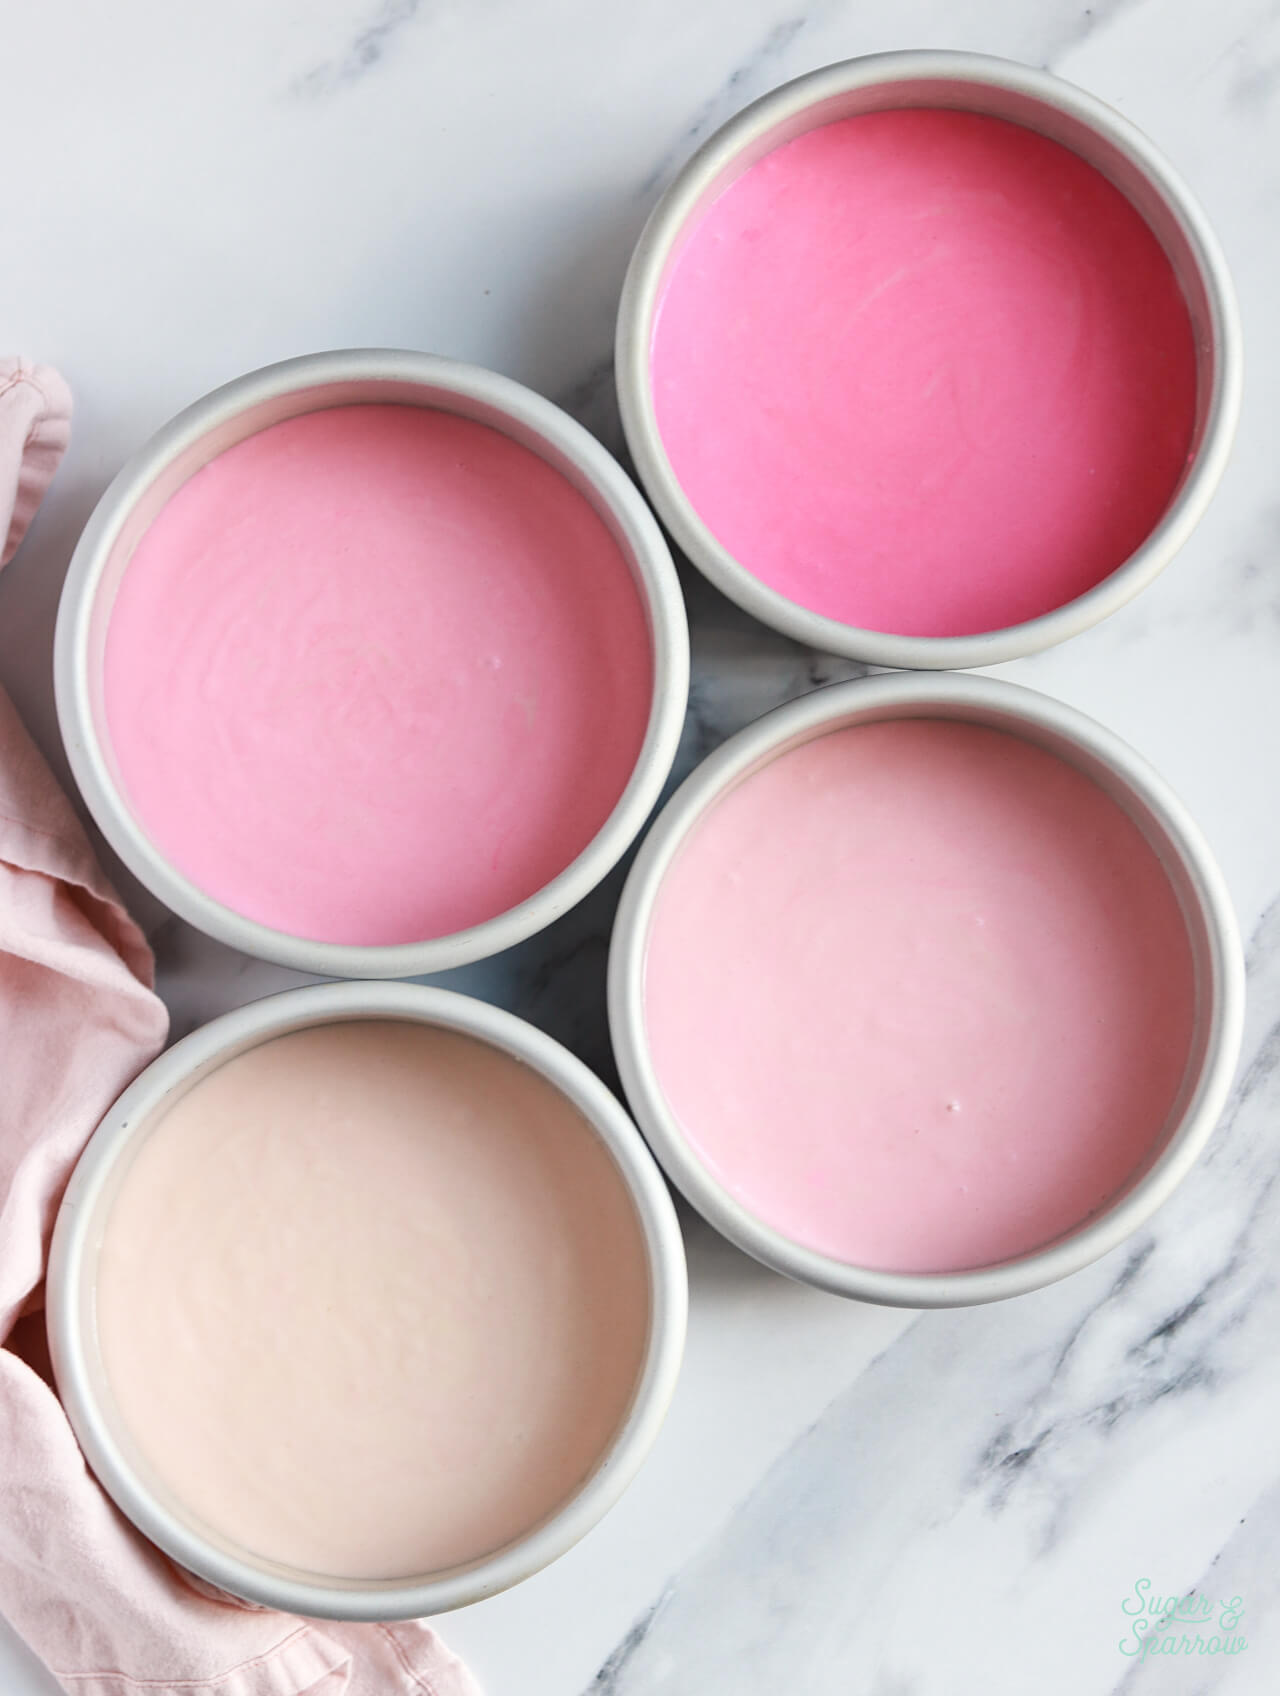
It’s important to go slow with adding the food color gel so you end up with a satisfying ombre color scheme and don’t have too many dark colored layers. After adding the food color gel, I poured each bowl of batter into its own 6-inch round cake pan that had been previously greased and lined with parchment paper. Then, I baked them in a 350ºF (177ºC) oven for 25-30 minutes.
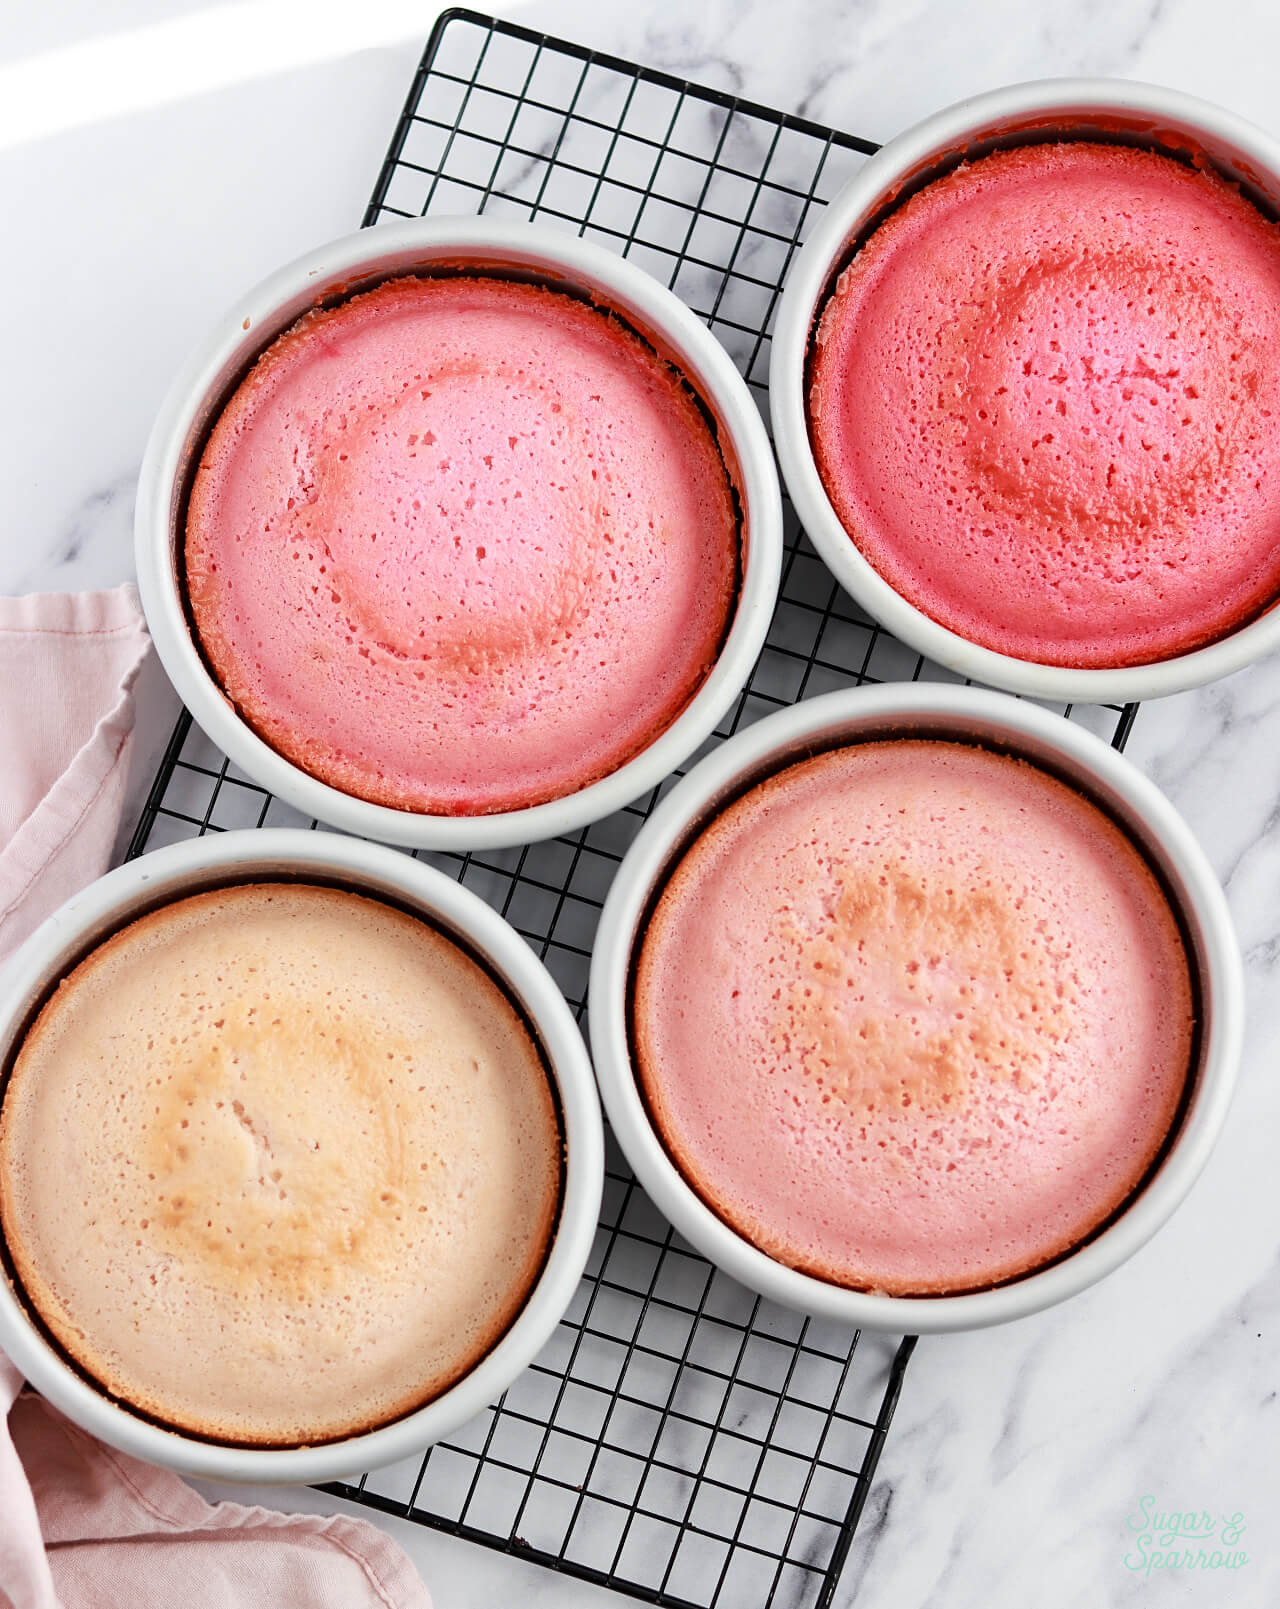
The ombre turned out so pretty!
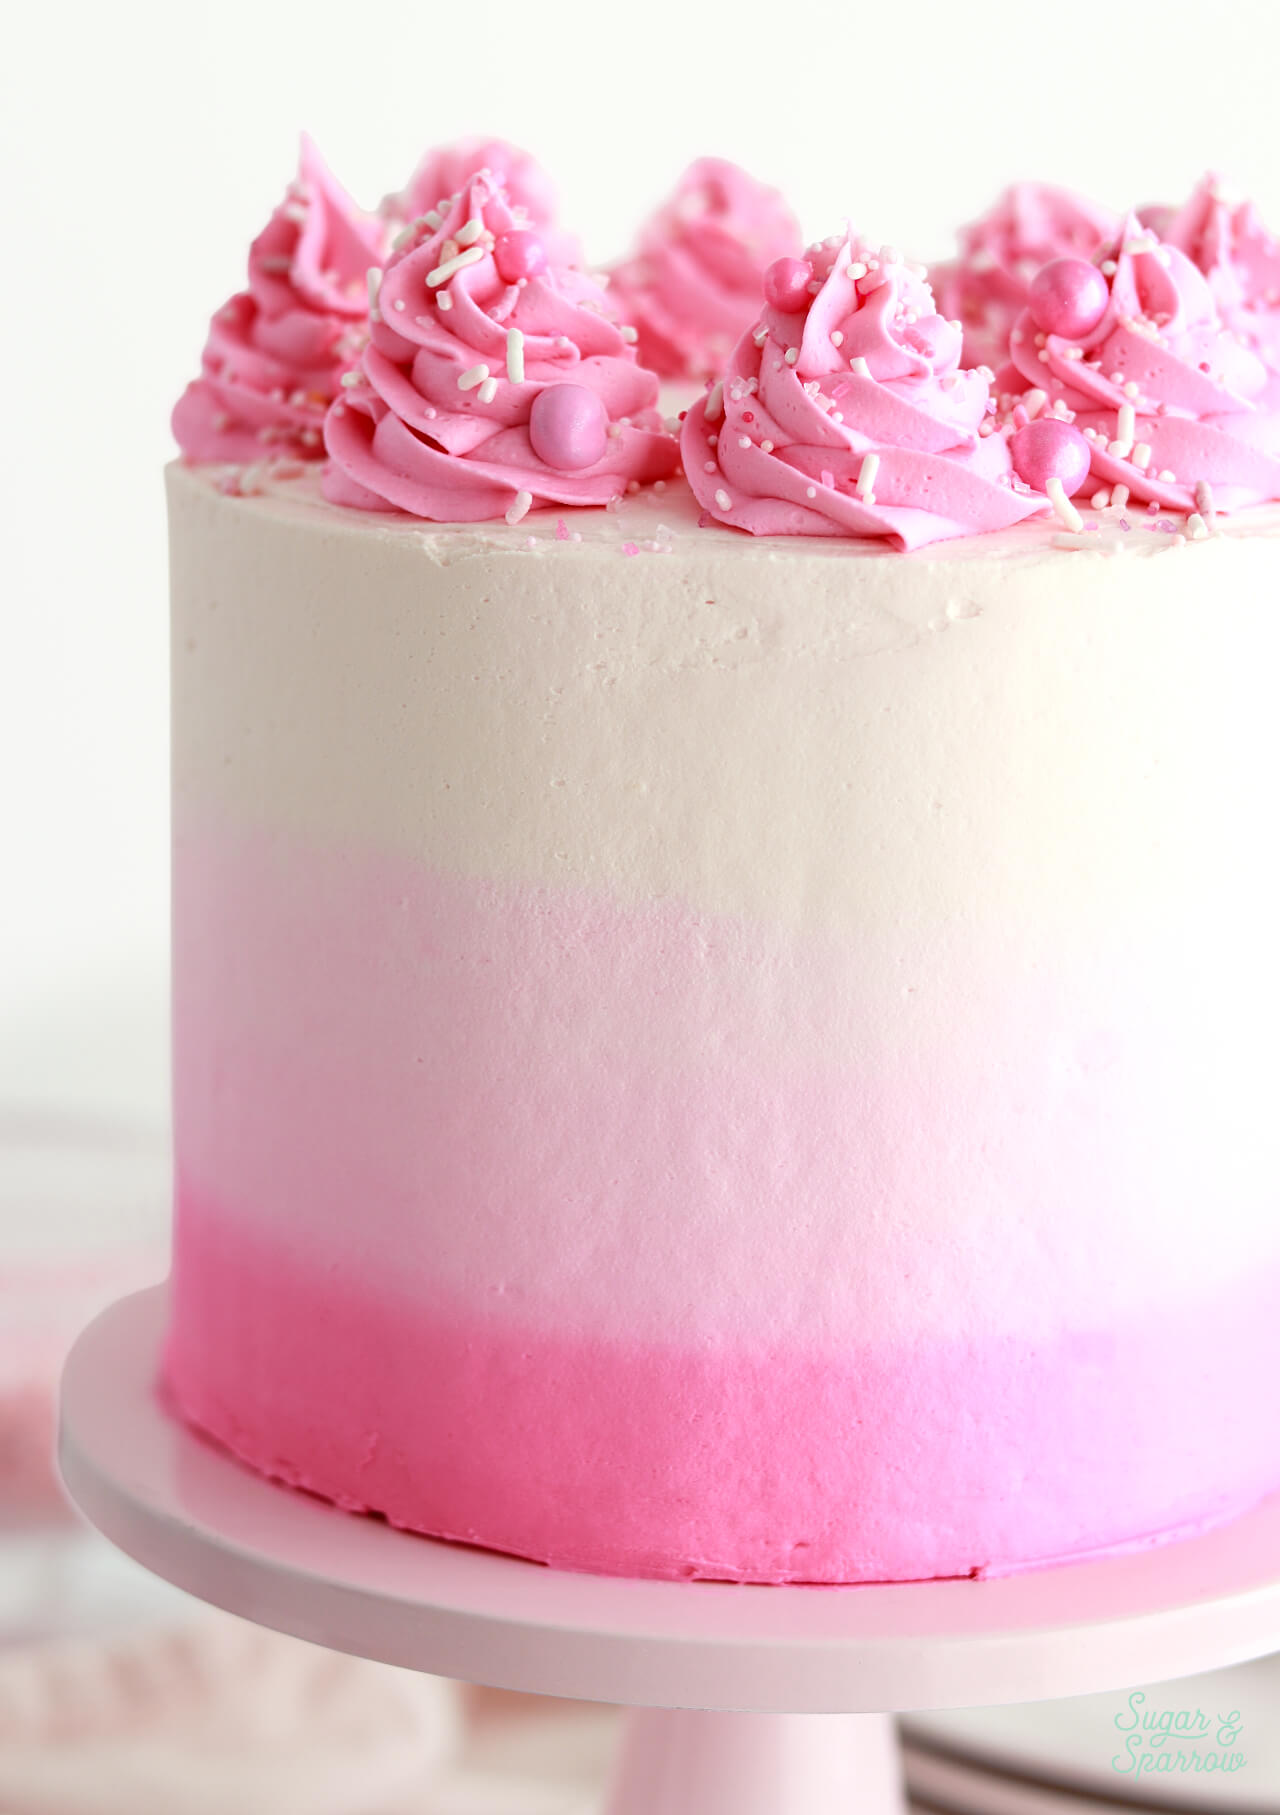
Pink Ombre Buttercream Tutorial
Once the cake layers were cooled, I leveled them before filling and stacking with uncolored (white) vanilla buttercream. I crumb coated the stacked cake and placed it in the refrigerator while I created the ombre color palette with the rest of the buttercream and frosted the finish. Here’s how:
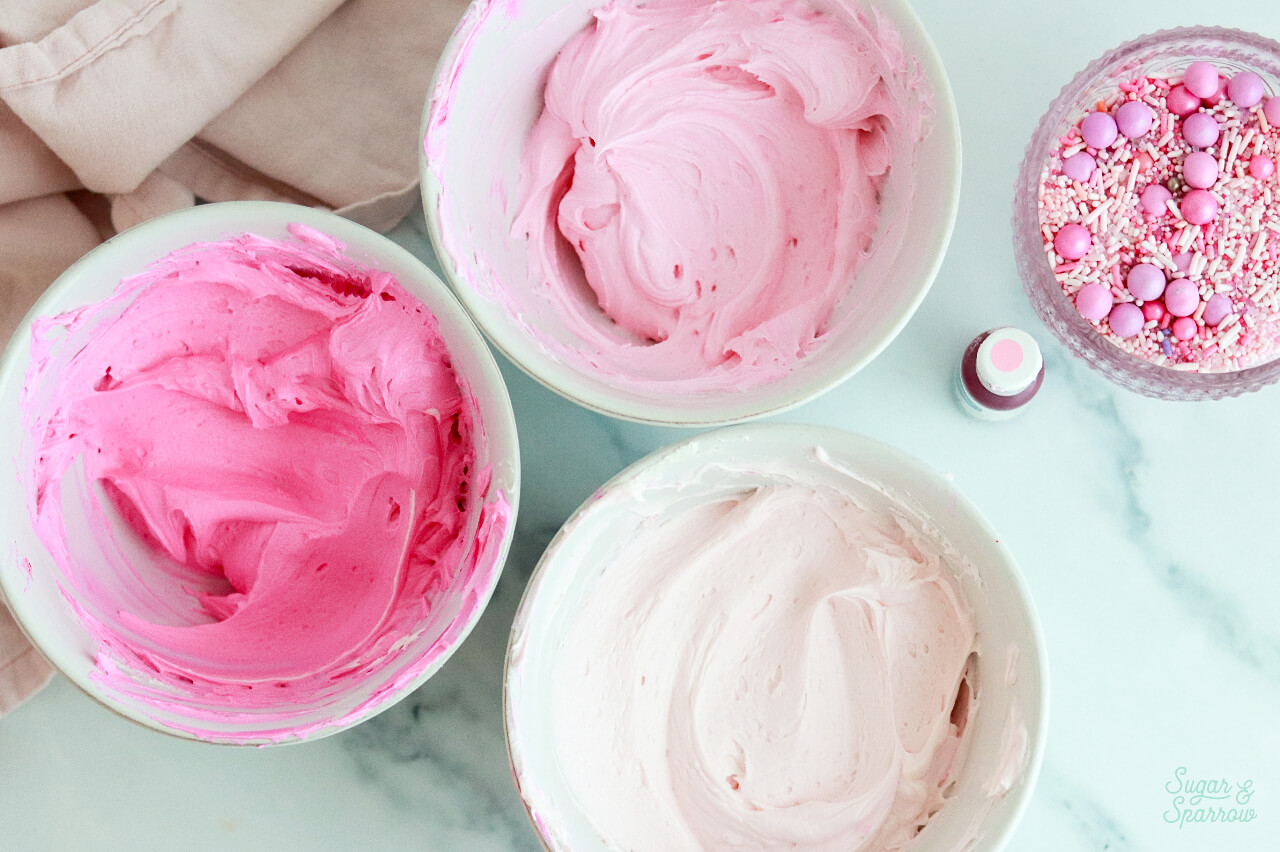
Step 1: Divide the buttercream. I will admit, I wasn’t as meticulous about the buttercream amounts as I was about the cake batter (as in, I didn’t weigh the buttercream). Instead, I divided all the remaining buttercream into three different bowls in such a way that almost half went into one bowl and the rest into the other two bowls equally. You basically want to make sure that more goes into one of the bowls because it will be used to frost the top and upper third of the cake.
Step 2: Create the ombre colors. After dividing up the buttercream, I again created the darkest color first by adding about 4 drops of AmeriColor Deep Pink into one of the bowls with the least amount of buttercream. Once that was mixed in and I was happy with the color, I added about 2 small drops to the other bowl with the lesser amount of buttercream and mixed it in. The bowl with the most buttercream will be the lightest color. I made a super light pink (which almost looks white in these photos!) by mixing just a little of the darkest pink buttercream in.
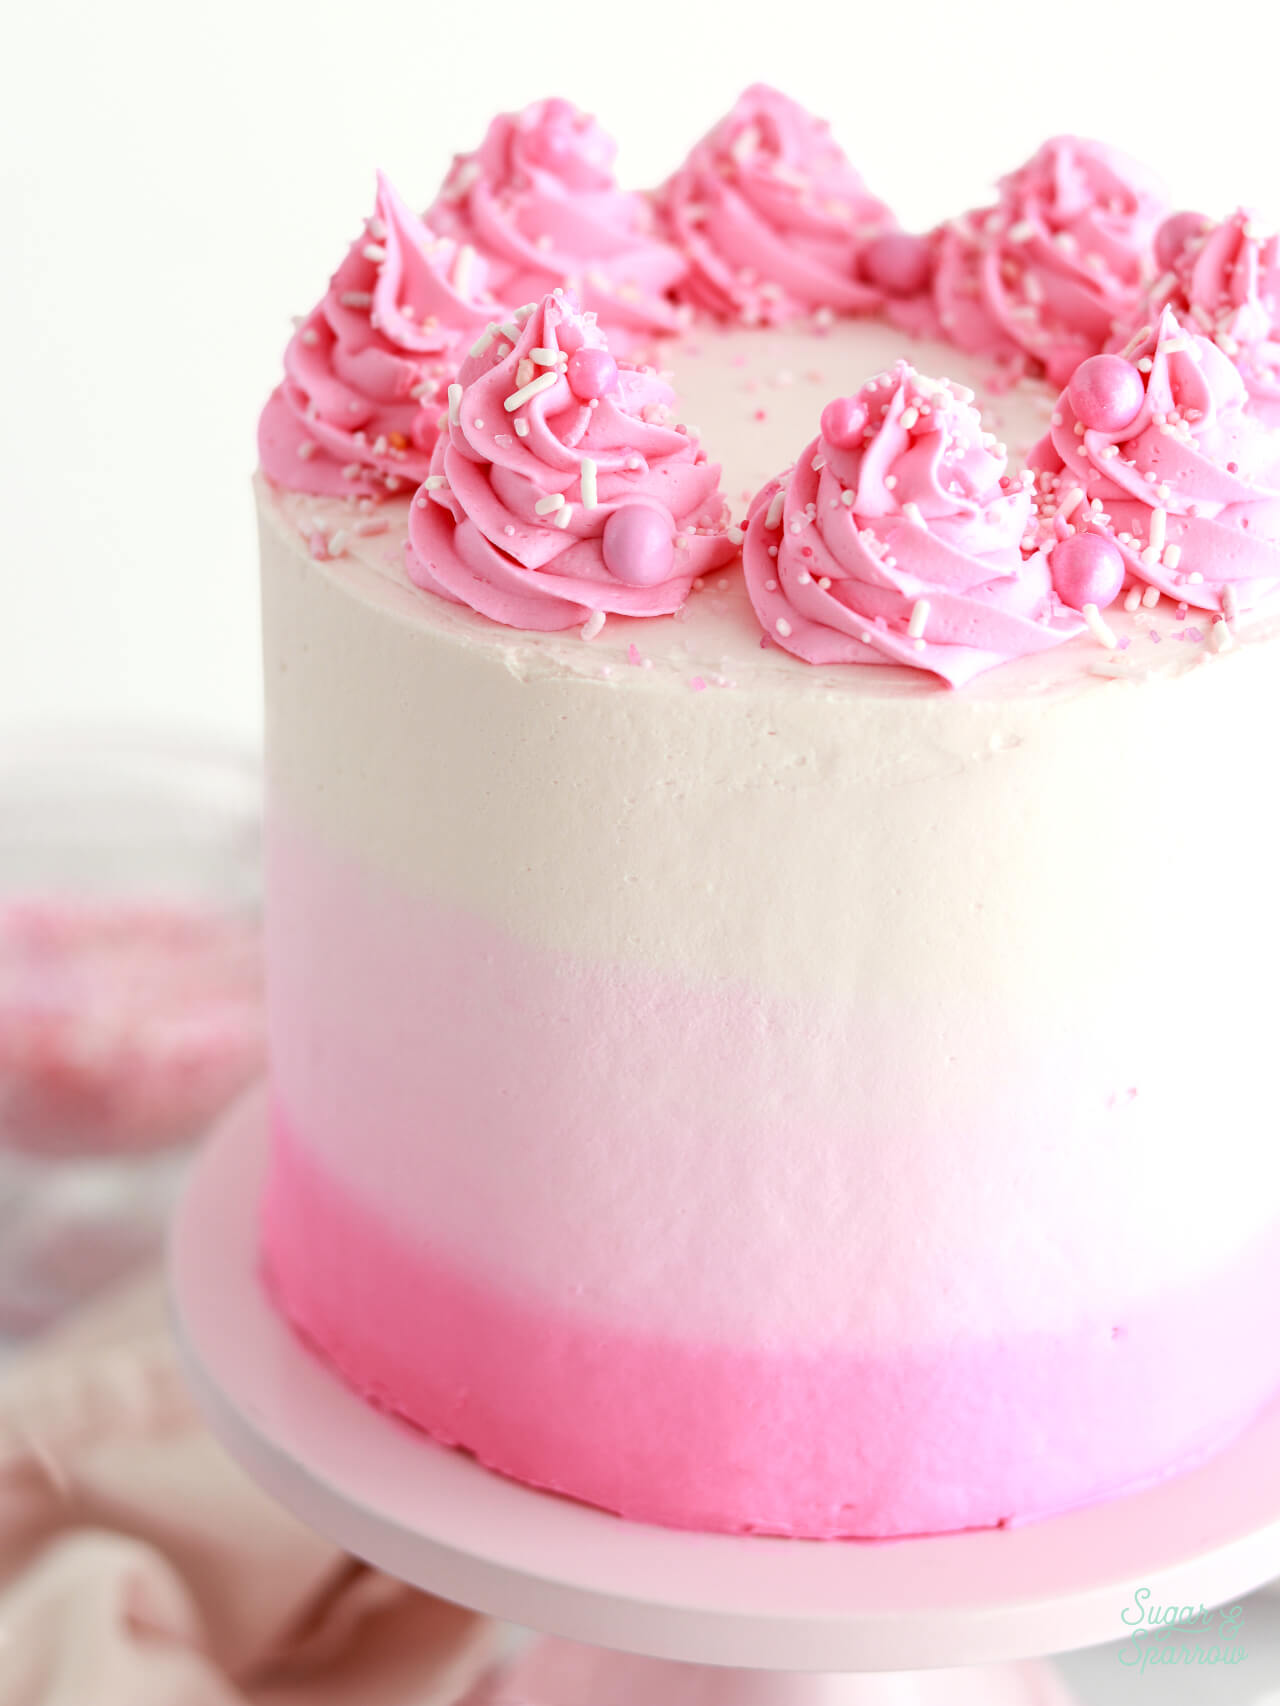
Step 3: Apply the buttercream to the cake. When you’re ready to frost the cake, place your chilled and crumb coated cake on a turntable. Use an angled spatula to apply the lightest color to the very top of the cake and smooth it down until it reaches just over the top edges. Clean your spatula and apply the darkest pink buttercream to the bottom third of the cake. Repeat cleaning the spatula and then apply the mid-toned pink buttercream to the middle third of the cake. Clean the spatula one more time and apply the lightest color to the top third of the cake.
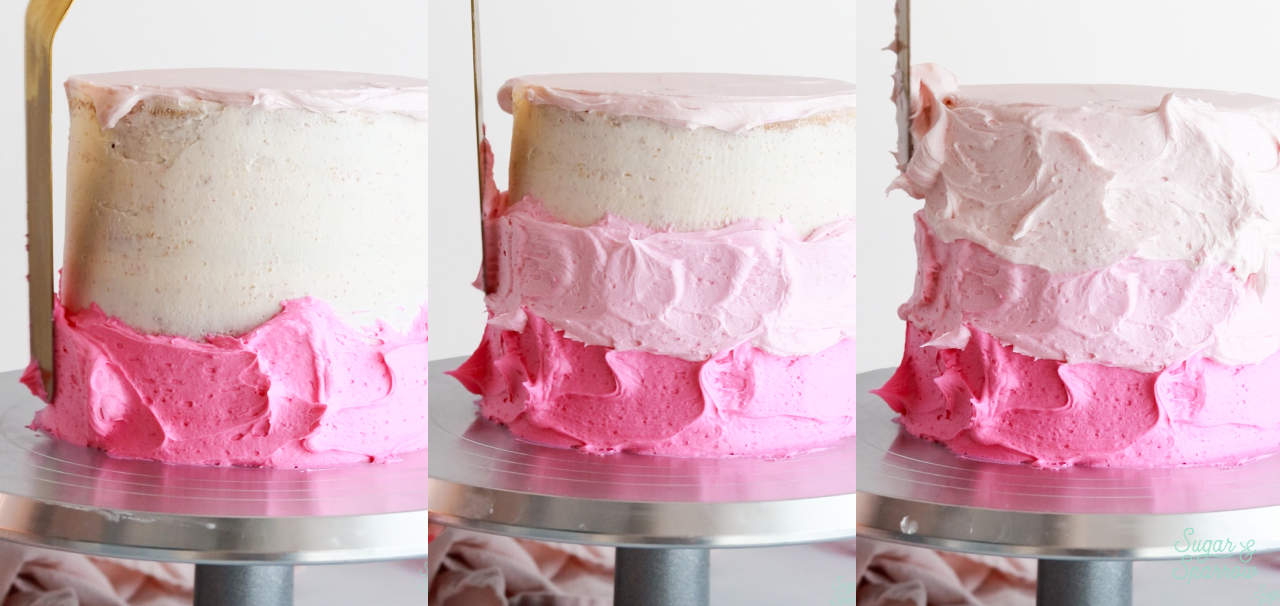
Step 4: Blend the transitions. Once all the buttercream colors are on, I like to spin the turntable while moving my angled spatula in an up and down squiggly motion over the areas where the colors meet. This helps blend the colors and create smoother transitions for the ombre for the next step.
Step 5: Smooth the buttercream. Finally, use an icing smoother to smooth the sides of the cake. If this is your first time creating a smooth buttercream finish or you don’t feel confident, this blog post will help tremendously with creating a smooth buttercream finish.
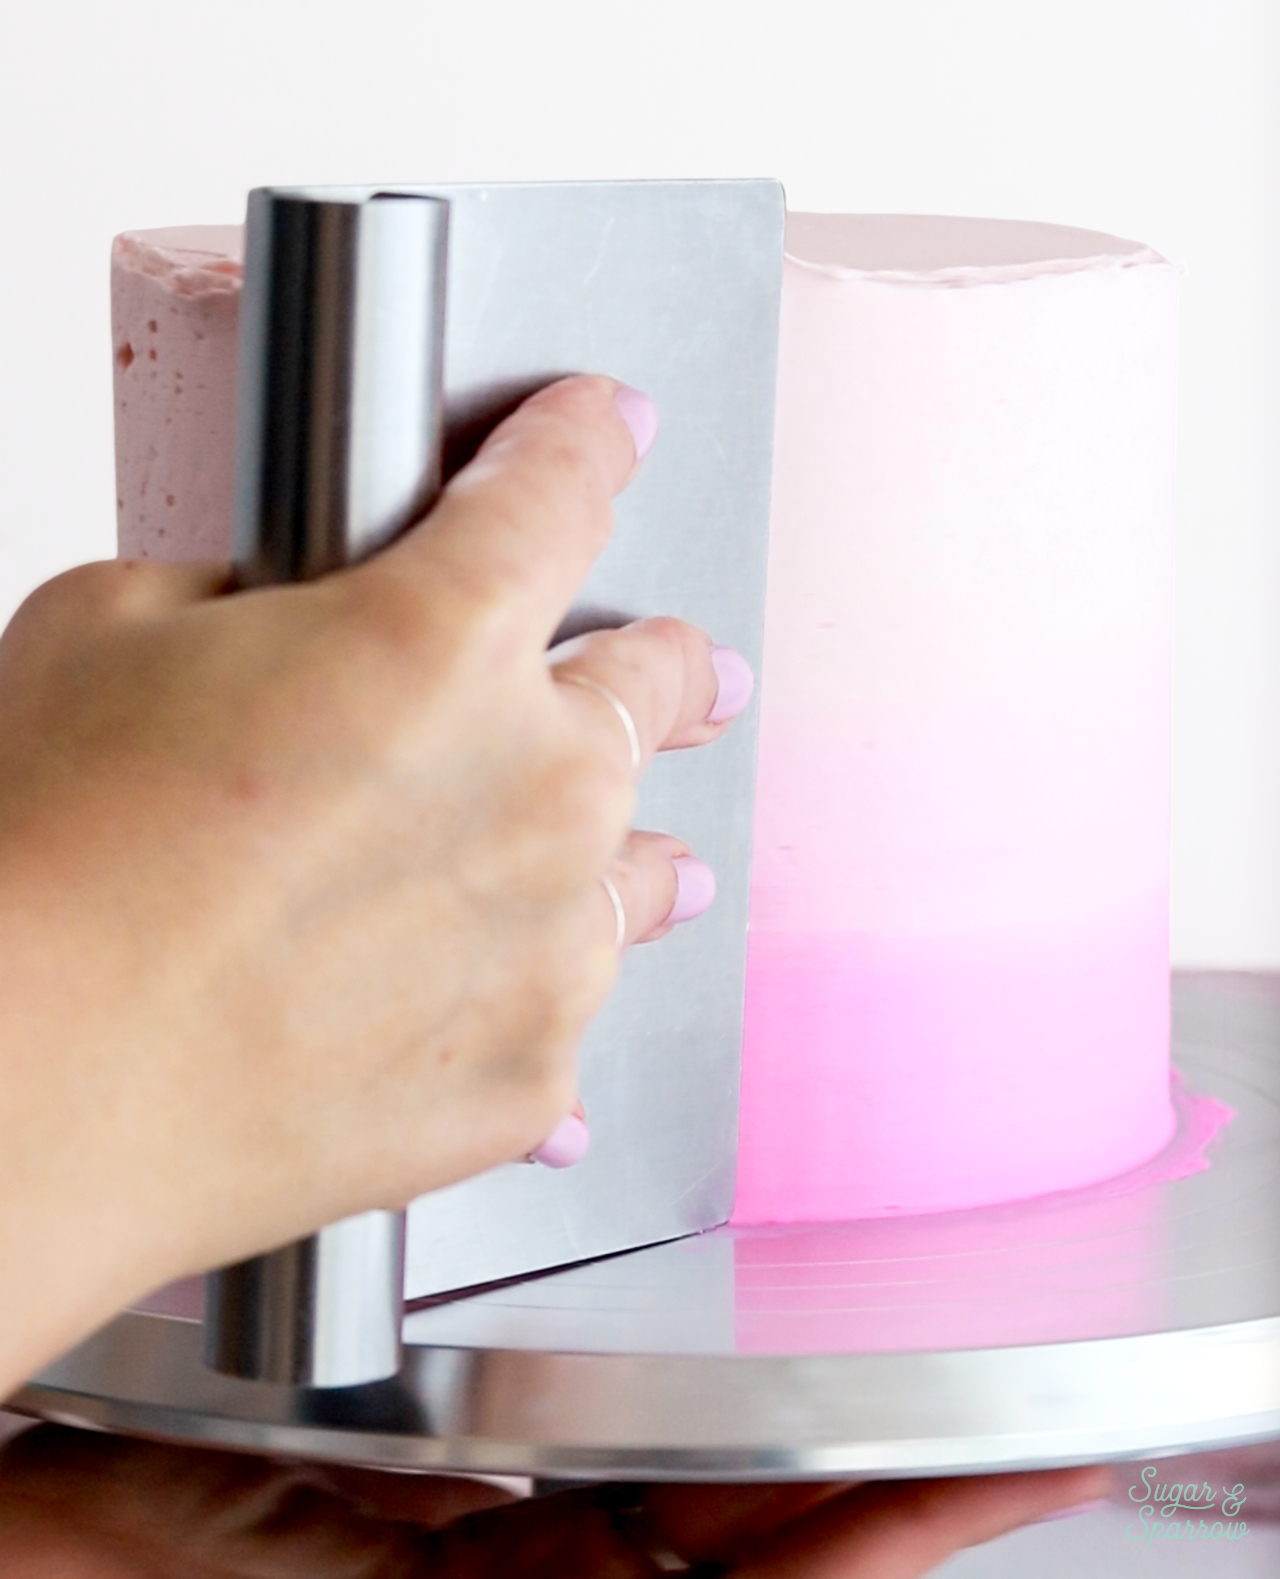
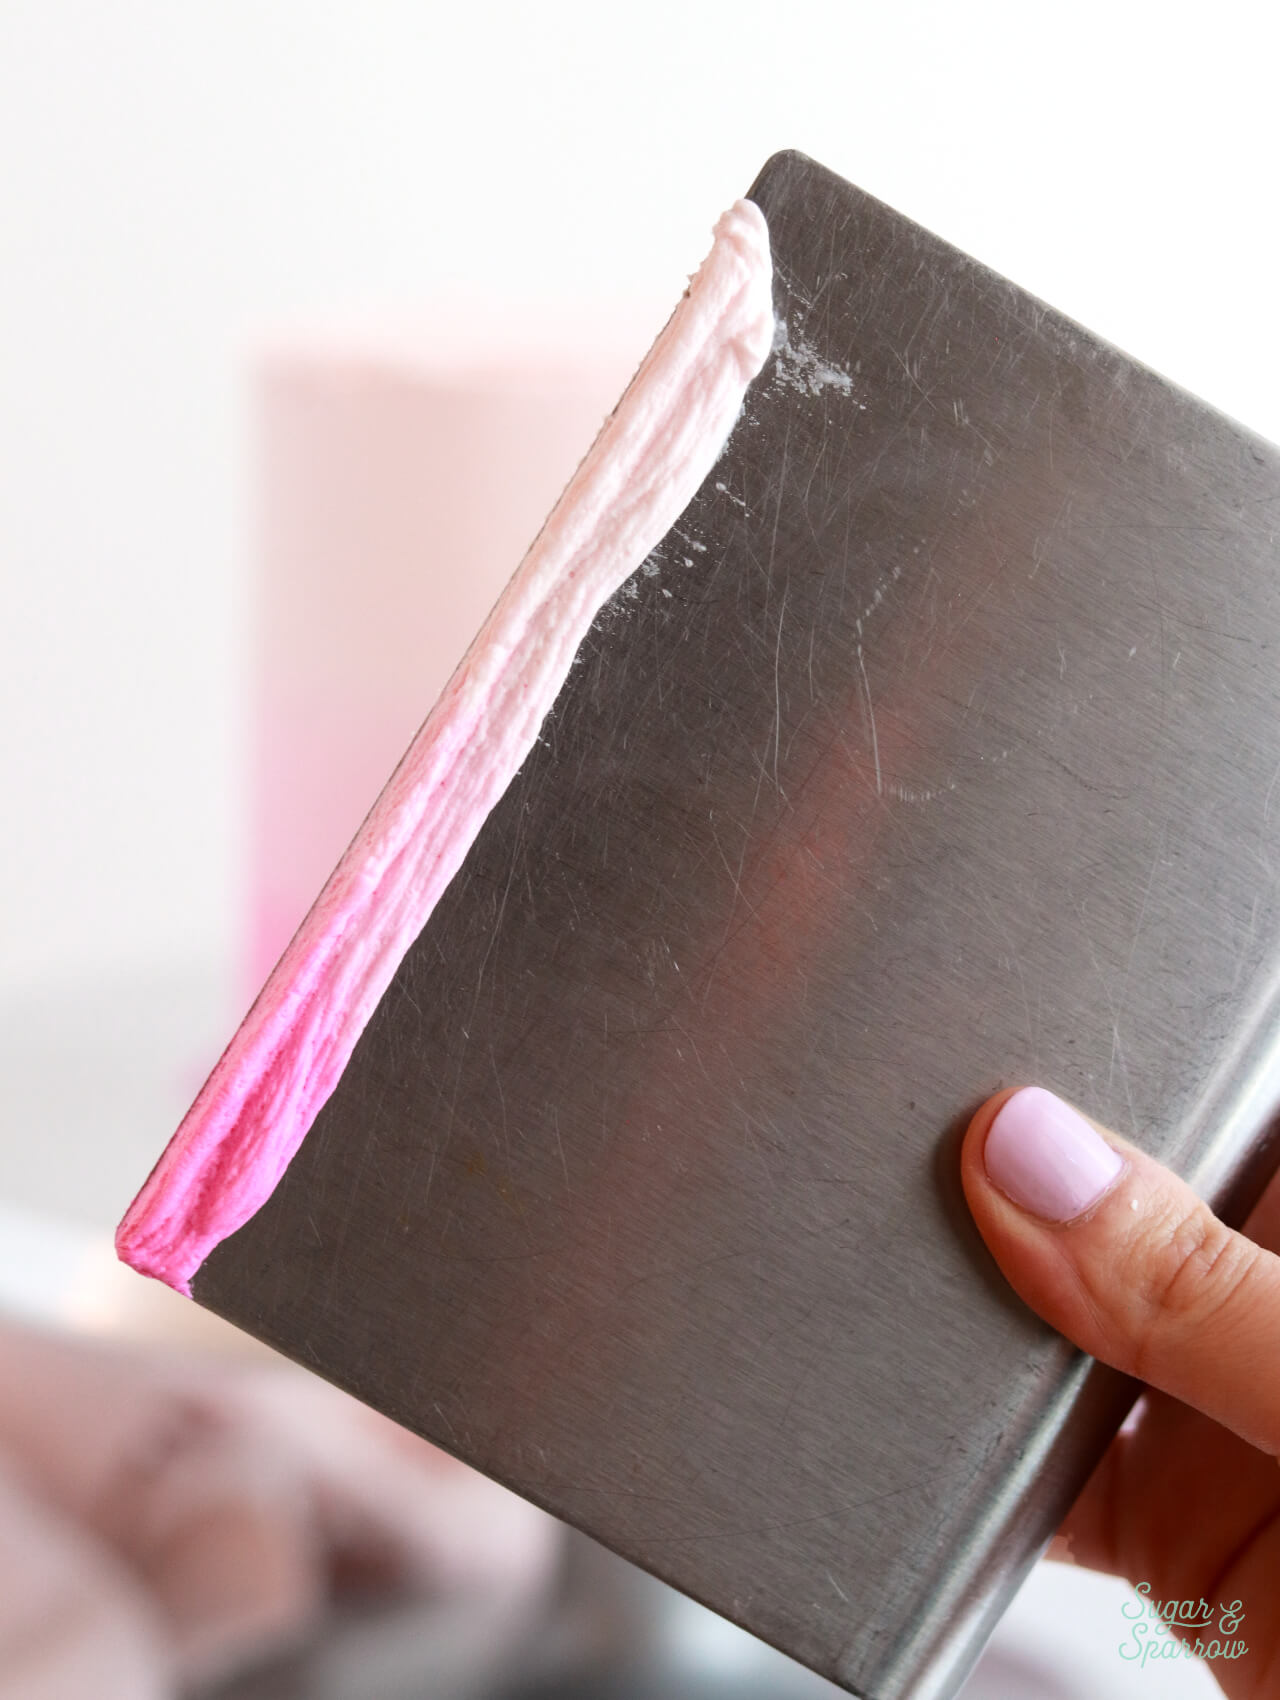
It’s really important to scrape the colors off your icing smoother in such a way that you keep the colors intact in case you need more buttercream for filling in areas on your cake. Try to scrape them onto the edge of a bowl in such a way that you keep the colors separate like they are on the icing smoother.
Feel free to repeat step 4 and do the wiggly technique to further blend the color transitions if need be, and fill in any holes in the buttercream finish with the corresponding buttercream color before smoothing. It also helps to keep paper towels handy to clean off any excess buttercream from your smoother after scraping.
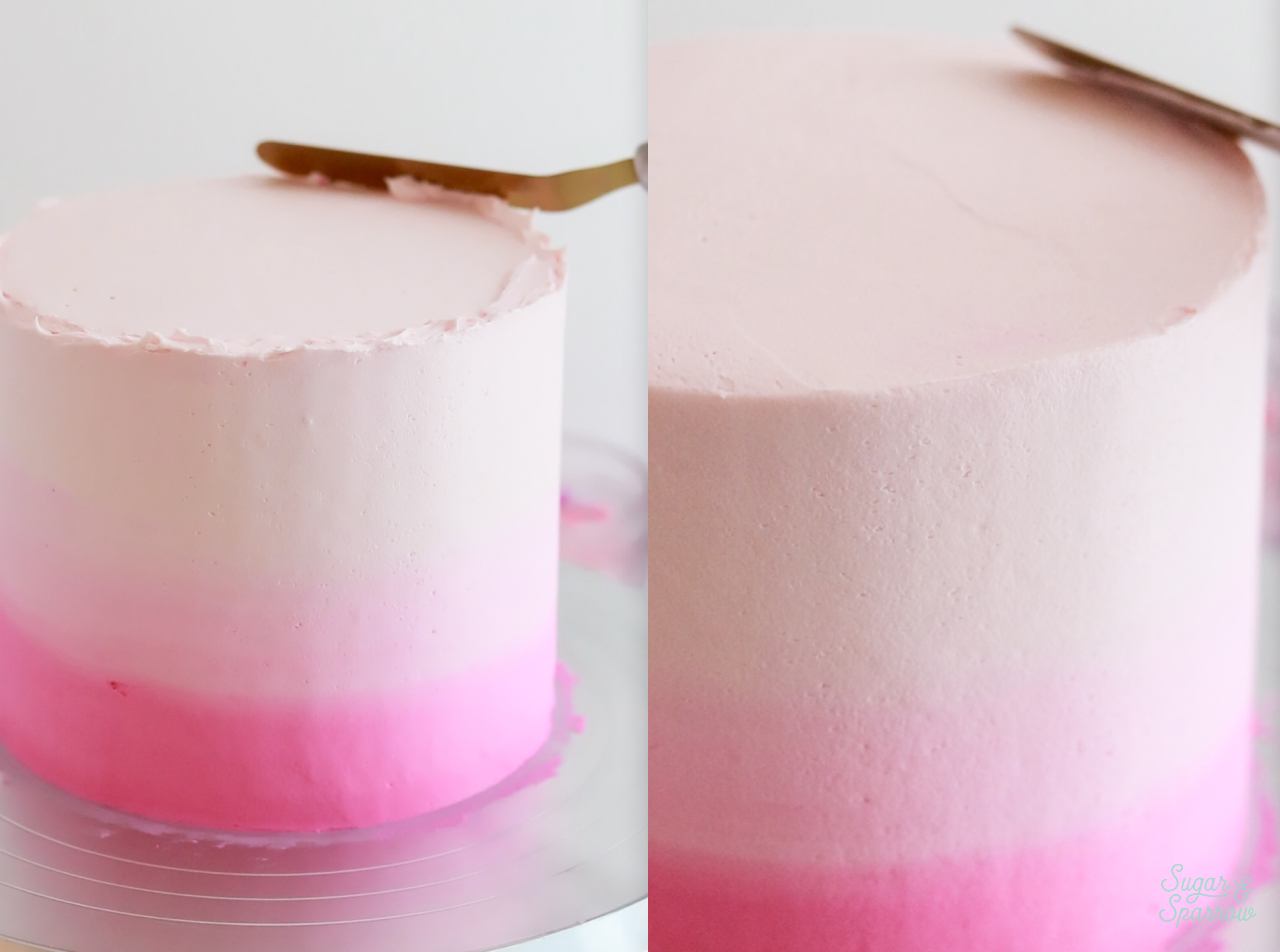
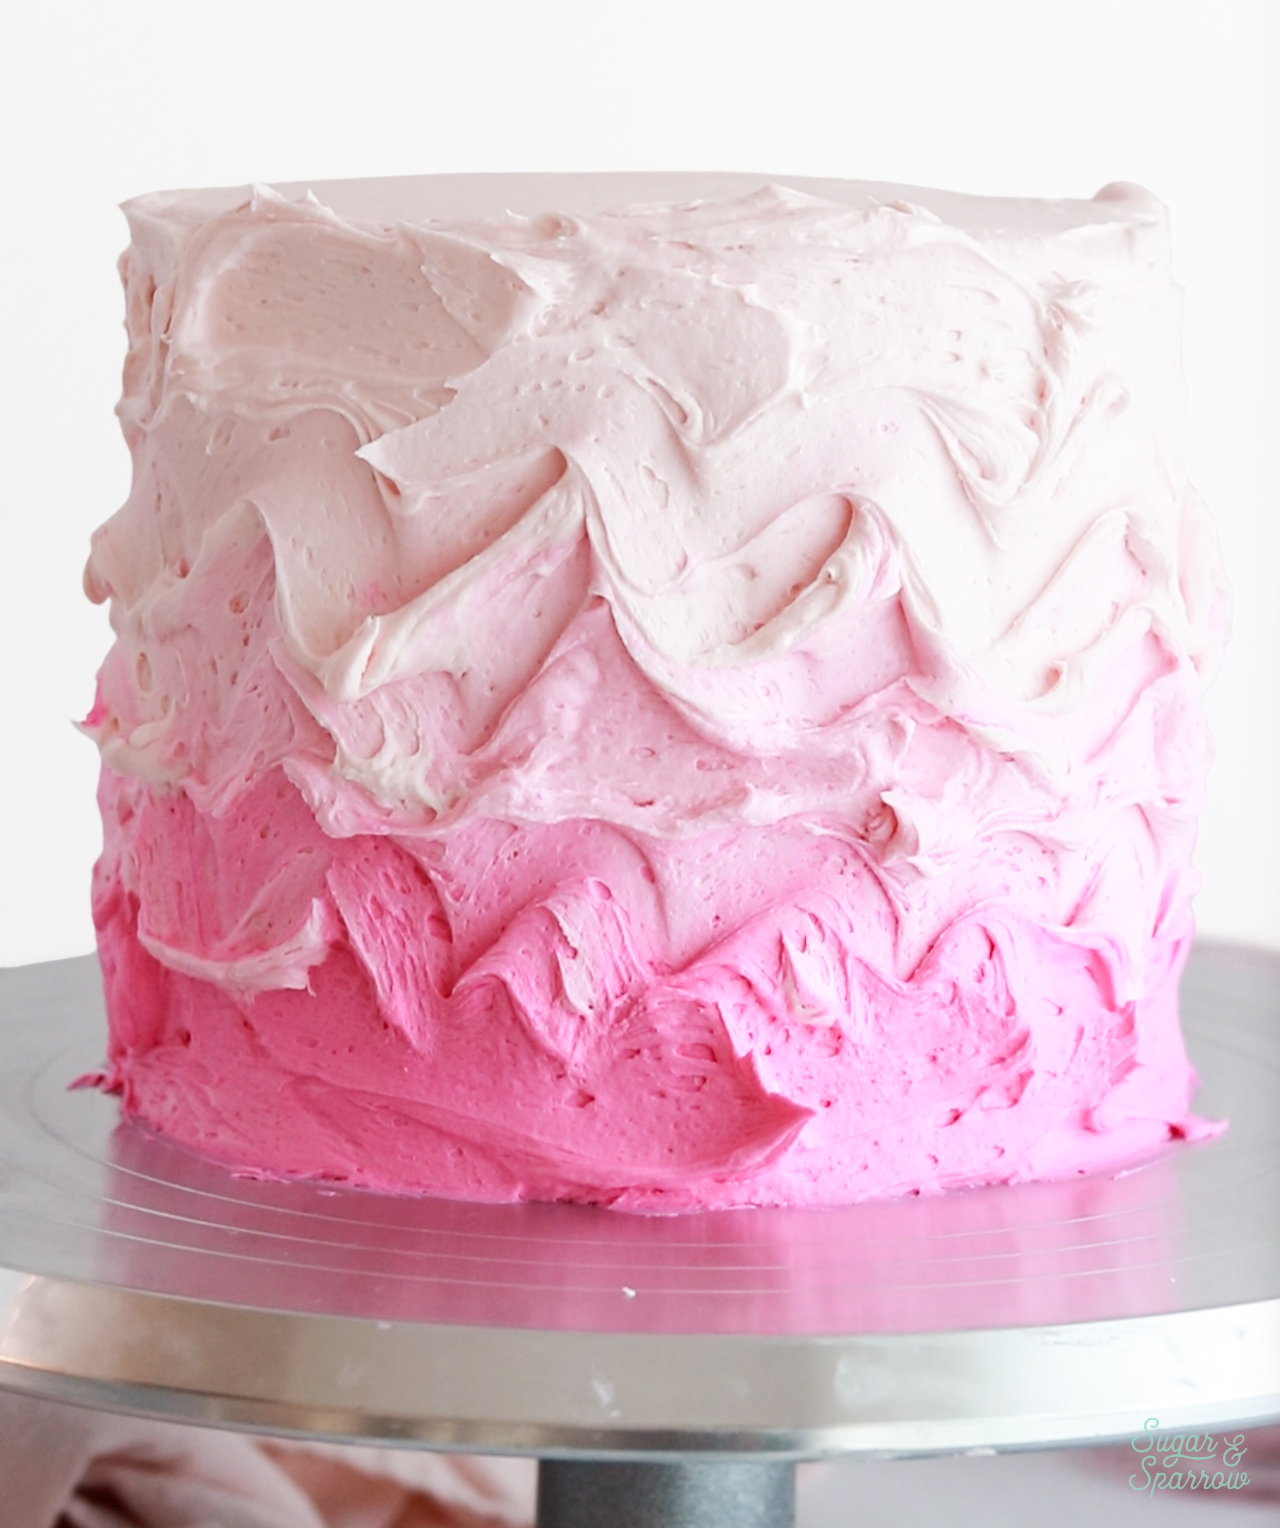
Once the sides of the cake are looking smooth and you love the ombre finish, swipe the top edges of the cake inward to create sharp edges.
Finishing Touches for a Pink Ombre Cake
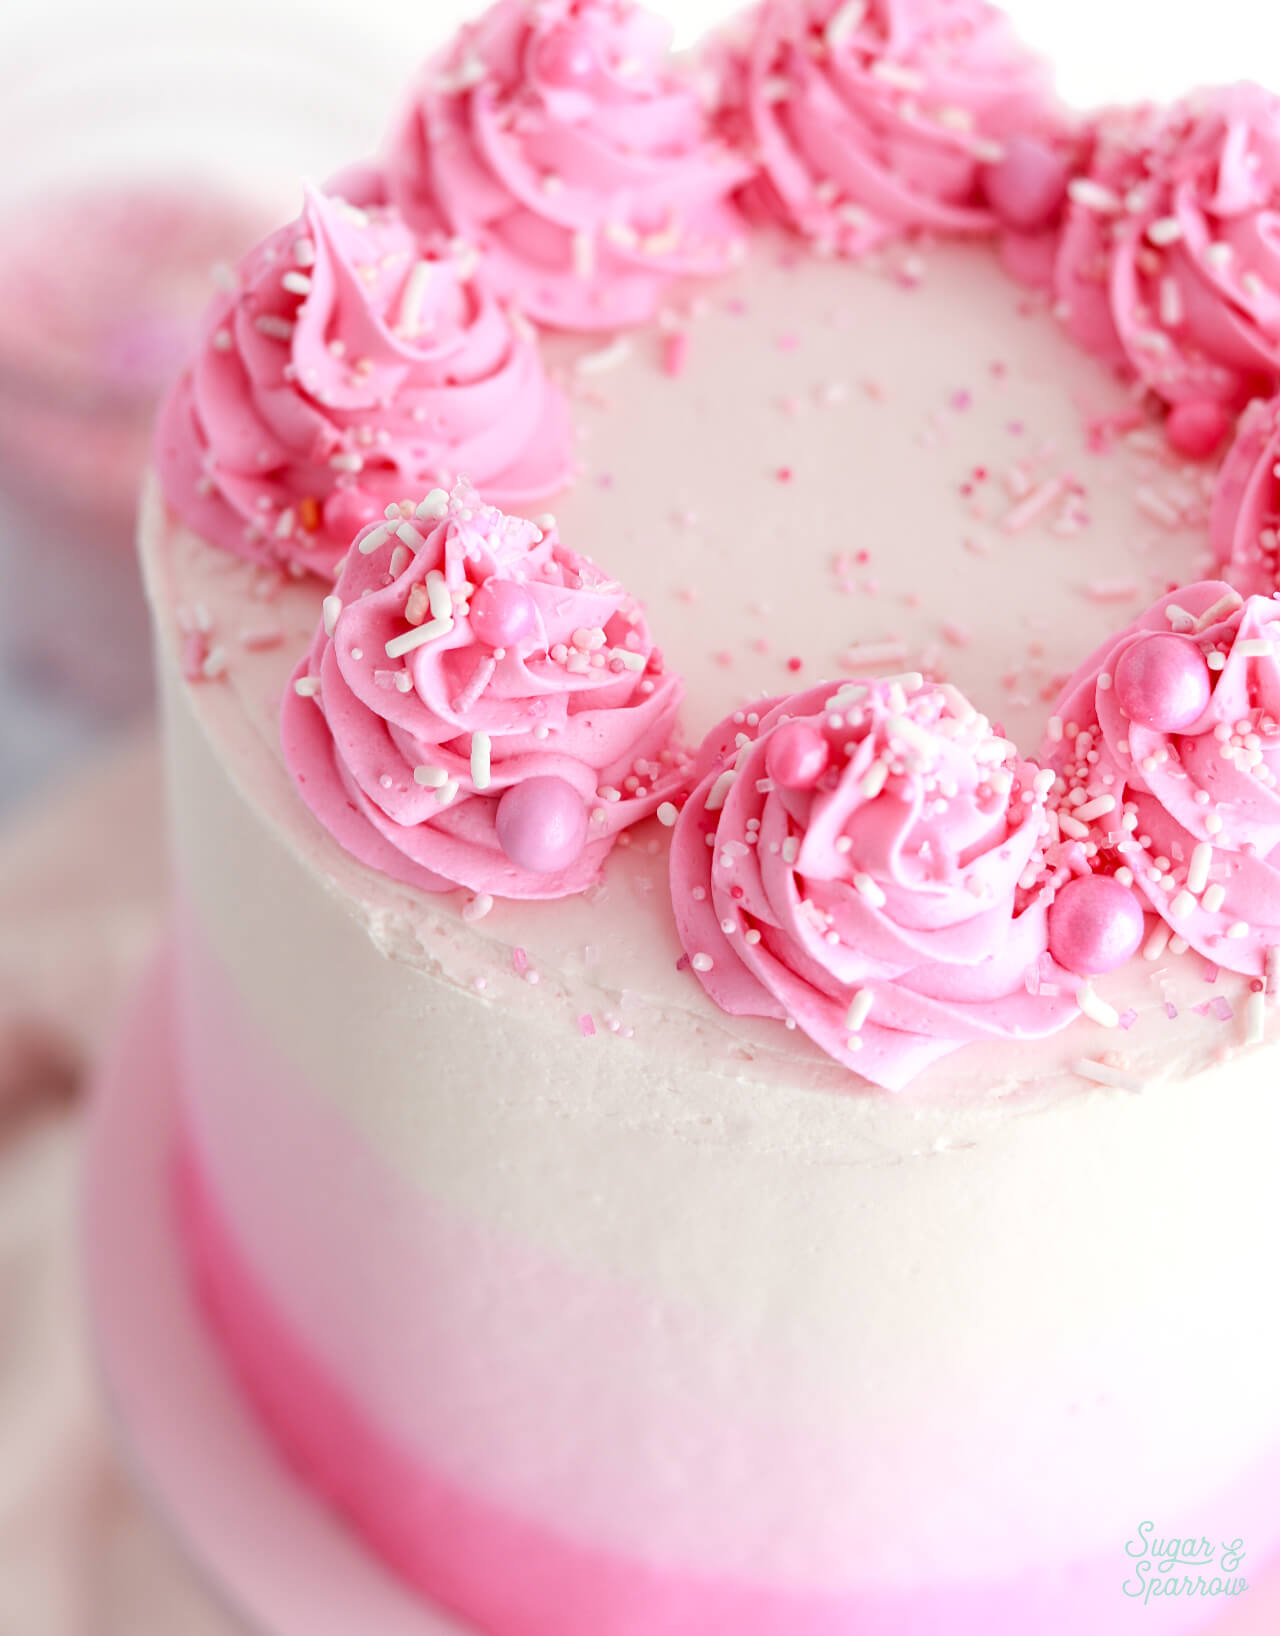
To finish the cake design pictured, I added all the excess buttercream into one bowl and mixed it all together to get a new pink color. I added this buttercream into a piping bag fitted with Wilton Tip 1M and piped swirls along the top edge of the cake before garnishing with pretty pink sprinkles which fittingly are called “Pink Ombre” by Sprinkle Pop.
I had just enough buttercream for that swirl border! Feel free to get creative with your finishing touches like:
- A white chocolate ganache drip (tinted pink of course)
- A sprinkle letter or number topper using a pink sprinkle mix
- A candy melt sail in a pink color scheme
- A sprinkle ombre on the sides
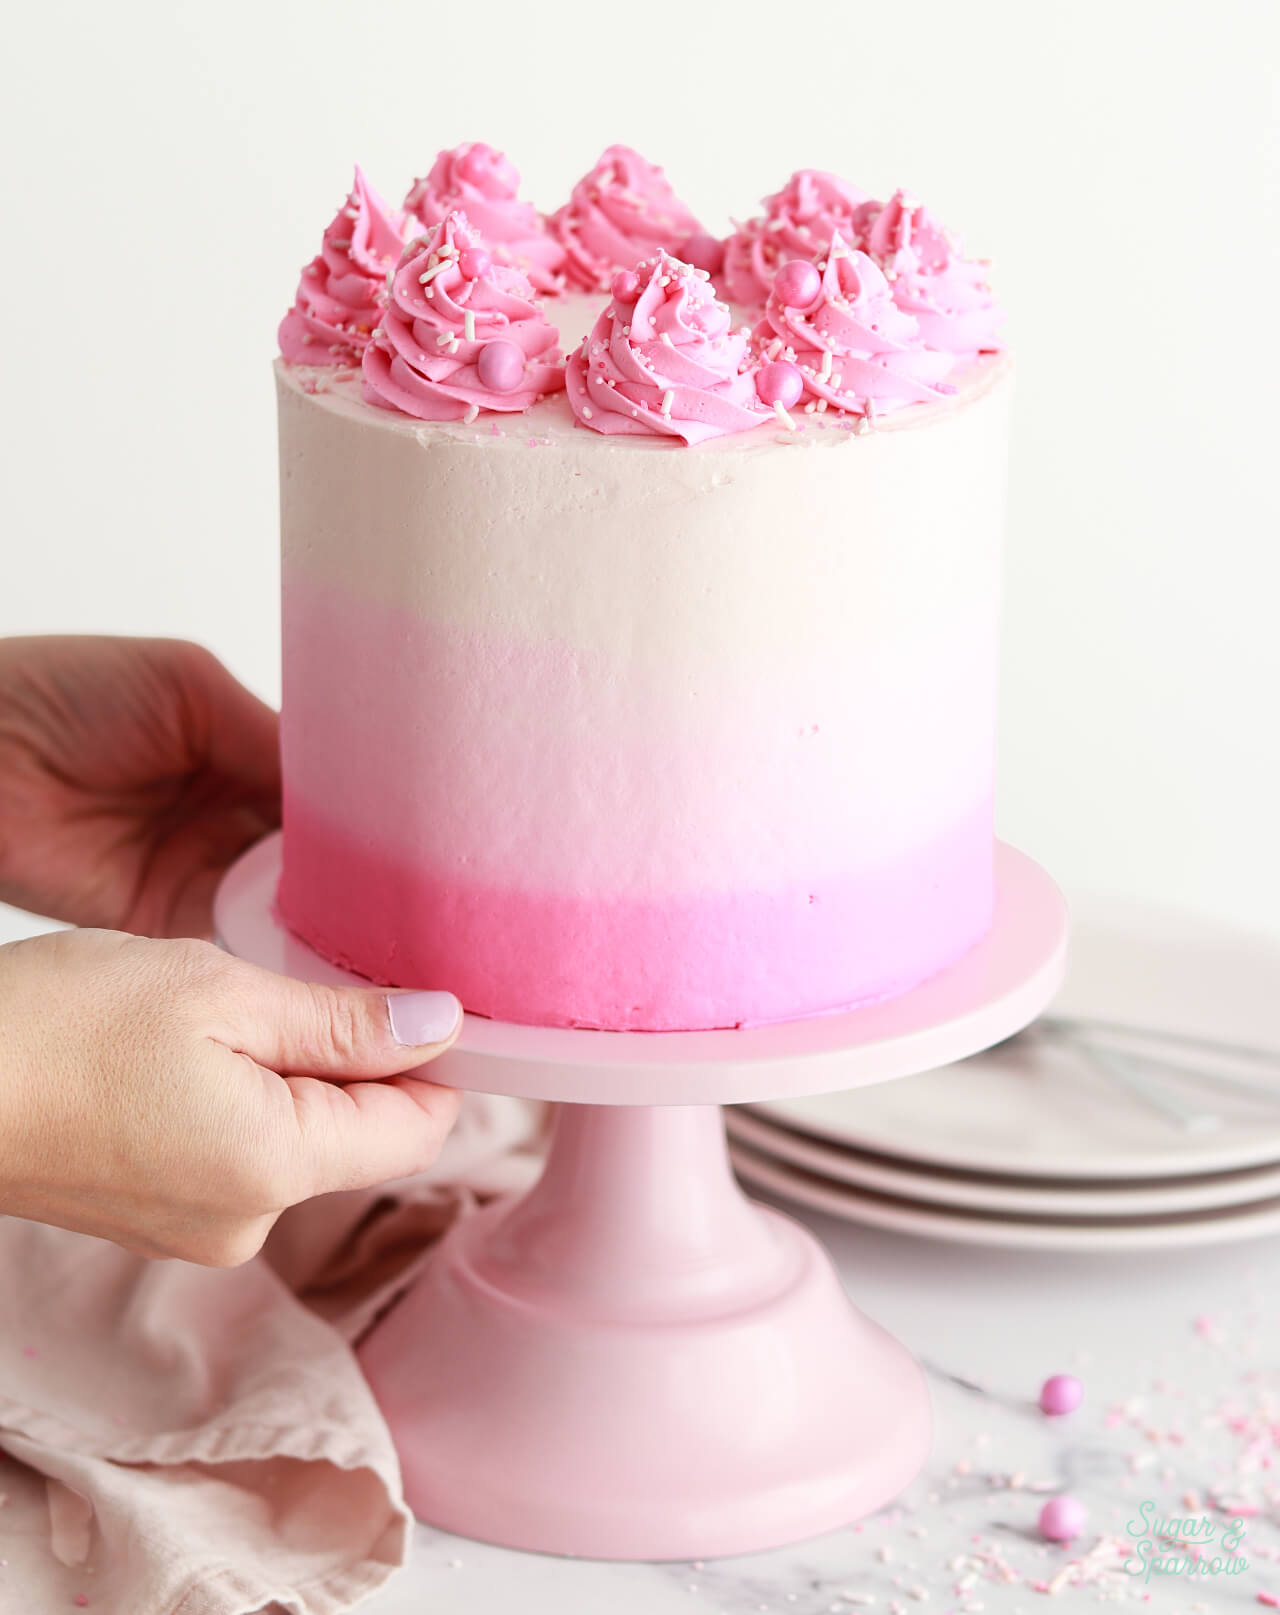
However you finish decorating, this cake is such a showstopper inside and out! The slice reveal is everything.
More Pink Cakes You’ll Love
If you love this pink ombre cake, here are some other pink cake recipes and designs from my blog:
- Strawberry Layer Cake
- Vintage Heart Cake
- Striped Buttercream Circus Animals Cake
- Cascading Heart Cake
- Lemon Raspberry Cake
I hope you love this pink ombre cake as much as I do! Let me know if you make it in the comments below and feel free to tag @sugarandsparrowco on Instagram. I love to see what you create with my recipes and tutorials!
Pink Ombre Cake
Equipment
- Four 6-inch cake pans
Ingredients
Pink Ombre Cake Layers
- 2 1/2 Cups (265g) sifted cake flour* DIY recipe in notes
- 2 tsp baking powder
- 1/2 tsp baking soda
- 1/2 tsp salt
- 1 1/2 Cups (300g) granulated sugar
- 1/2 Cup (113g) unsalted butter, room temperature
- 4 large egg whites, room temperature
- 1/2 Cup (120ml) vegetable oil
- 1 Tbsp pure vanilla extract
- 1 1/4 Cups (300ml) full-fat buttermilk*, room temperature DIY recipe in notes
- pink food coloring see notes for natural options
Vanilla Buttercream
- 2 Cups (452g) unsalted butter, room temperature
- 7 Cups (840g) powdered sugar
- 4 tsp pure vanilla extract
- 1/4 Cup whole milk, room temperature
- pinch of salt, or to taste
- pink food coloring see notes for natural options
Garnish (Optional)
- 2 Tbsp pink ombre sprinkles
Instructions
Make the Pink Ombre Cake Layers
- Preheat the oven to 350°F (177°C) and prepare four 6-inch cake pans by spraying the sides with baking spray and fitting a parchment paper circle to the bottom of each pan.
- In a medium bowl, add the flour, baking powder, baking soda and salt. Whisk together and set aside.
- In the bowl of a stand mixer fitted with the paddle attachment, beat the butter at high speed until creamy, about 2 minutes. Add the sugar and cream it together with the butter at medium-high speed until light and fluffy, about 2 minutes, scraping the bowl and paddle at the halfway point. Turn the mixer to low and add the egg whites one at a time, mixing until they are just combined and scraping down the bowl and paddle as needed. Add the vegetable oil and vanilla, increase the mixer speed to high and beat for 1 minute.
- Turn the mixer off and add the flour mixture all at once. Mix the ingredients on low speed until just combined, then slowly pour in the buttermilk. Continue mixing at low speed for about 30 seconds, until the batter is uniform and combined. The batter will be slightly thin.
- Divide the batter evenly between four bowls. You should have about 310g of batter per bowl. Add 4-6 drops of pink food coloring to one bowl and mix it in to create the darkest pink color. Add a little less (2-3 drops) to the next bowl, a little less to the third bowl (1-2 small drops), and the smallest amount to the last bowl (1 small drop).
- Pour each bowl of tinted batter into its own prepared cake pan. Bake for 30-35 minutes or until they spring back to the touch and a toothpick inserted comes out clean. Let the cakes cool in their pans for 5 minutes, then remove them from the pans and allow them to cool completely on a wire rack.
Make the Vanilla Buttercream
- With a hand mixer or paddle attachment on your stand mixer, cream the butter on medium-high until it’s creamy and light (almost white) in color. About 7 minutes.
- With the mixer on low, add the powdered sugar one cup at a time, scraping down after each addition and making sure each cup is fully incorporated before adding the next one. Add the vanilla, milk, and salt and mix on low for another minute until fully incorporated. Don't add the pink food color gel until step 2 of the assembly instructions.
Assembly
- Once the cake layers are completely cooled, level them to get rid of any domed tops and create even layers. Add a swipe of vanilla buttercream onto a cardboard cake circle and place the first cake layer on top. Fill and stack the cake layers with the vanilla buttercream, starting with the darkest pink cake layer on the bottom and ending with the lightest pink cake layer on top. When you get to the final cake layer, place it upside down on top of the stack, then crumb coat the cake with vanilla buttercream. Refrigerate the cake for 15-20 minutes to let the crumb coat firm up while you prepare the rest of the buttercream.
- To create the pink ombre buttercream finish: divide the remaining buttercream between three separate bowls with a little less than half of the buttercream in one bowl, then the remaining buttercream divided equally between the second and third bowl. To the first bowl, mix in 4-5 drops of pink food coloring until you achieve a deep pink color. To the second bowl, add 1-2 drops of pink food coloring to create a nice mid toned pink. For the third bowl, dip your spatula into the darkest color pink buttercream and mix it in until you achieve a really light pink color.
- Add some of the lightest pink buttercream color to the top of the cake and smooth it down with an angles spatula until it reaches over the edges. Then, starting at the bottom of the cake, add the darkest pink buttercream to the bottom third of the cake. Add the mid toned pink to the middle third of the cake, followed by the light pink buttercream on the top third of the cake. Use your angled spatula to blend the colors together where they meet as described in the tutorial above. Smooth the buttercream with an icing smoother to create a smooth finish.
- Mix the rest of the buttercream together to create a new pink color and add it to a piping bag fitted with Wilton Tip 1M. Use it to pipe a swirl border on top of the cake, then sprinkle with pink ombre sprinkles, if using.
Notes
- The cake layers can be made ahead and stored at room temperature, covered tightly in plastic wrap, for up to two days. Alternatively, you can cover with plastic wrap and store in the freezer for up to two months before thawing to room temperature.
- The vanilla buttercream can be made ahead and stored in an airtight container in the refrigerator for up to two weeks. When you’re ready to use it, bring it back to room temperature and re-whip in your stand mixer to bring back to smooth buttercream consistency.


Leave a Reply